PVD 6331 N - Cooker CANDY - Free user manual and instructions
Find the device manual for free PVD 6331 N CANDY in PDF.
User questions about PVD 6331 N CANDY
0 question about this device. Answer the ones you know or ask your own.
Ask a new question about this device
Download the instructions for your Cooker in PDF format for free! Find your manual PVD 6331 N - CANDY and take your electronic device back in hand. On this page are published all the documents necessary for the use of your device. PVD 6331 N by CANDY.
USER MANUAL PVD 6331 N CANDY
TABLE SANS COMMANDES MODELE "PVS"
Children must not play with the appliance.
- This appliance can be used by children aged from 8 years and above and persons with reduced physical, sensory or mental capabilities or lack of experience and knowledge if they have been given supervision or instruction concerning use of the appliance in a safe way and understand the hazards involved.
- Cleaning and user maintenance shall not be made by children without supervision. If the supply cord is damaged, it must be replaced by the manufacturer, its service agent or similarly qualified persons in order to avoid a hazard.
- CAUTION: In order to avoid a hazard due to inadvertent resetting of the thermal cutout, this appliance must not be supplied through an external switching device, such as a timer, or connected to a circuit that is regularly switched on and off by the utility.
Children under 8 Year of age must be kept away from the appliance unless they are continuously supervised.
- This appliance is not intended to be operated by means of an external timer or separate remote-control system.
- The means for disconnection must be incorporated in the fixed wiring in accordance with the wiring rules.
- The instructions state the type of cord to be used, taking into account the temperature of the rear surface of the appliance.
- WARNING: The appliance and its accessible parts become hot during use. Care should be taken to avoid touching heating elements.
- WARNING: Unattended cooking on a hob with fat or oil can be dangerous and may result in fire. NEVER try to extinguish a fire with water, but switch off the appliance and then cover flame e.g. with a lid or a fire blanket.
- Do not use a steam cleaner for cleaning operations. Any spillage should be removed from the lid before opening.
- The hob surface must be allowed to cool down before closing the lid.
Aluminium foil and plastic pans must not be placed on heating zones.
- After every use, some cleaning of the hob is necessary to prevent the build up of dirt and grease. If left, this is recooked when the hob is used and burns giving off smoke and unpleasant smells, not to mention the risks of fire propagation.
- It is advisable not to stare directly at the halogen elements.
- Do not touch the heat zones during operation or for a while after use.
- Never cook food directly on the glass ceramic hob. Always use the appropriate cookware.
- Always place the pan in the centre of the unit that you are cooking on.
- Do not use the surface as a cutting board.
- Do not slide cookware across the hob.
- Do not store heavy items above the hob. If they drop onto the hob, they may cause damage.
- Do not use the hob as a working surface.
- Do not use the hob for storage of any items. In the unlikely event of a surface crack appearing, do not use the hob. Immediately disconnect the hob from the electrical power supply and call the After Sales Service
- Children should be supervised to ensure that they do not play with the appliance.
GENERALWARNINGS
READ THE INSTRUCTIONS BOOKLET CAREFULLY TO MAKE THE MOST OF YOUR HOB.
We recommend you keep the instructions for installation and use for later reference, and before installing the hob, note its serial number below in case you need to get help from the after sales service.
Identification plate
(located under the hob's bottom casing)

We are constantly striving to improve product quality and as such may modify appliances to incorporate the latest technical improvements.

CE Appliance complies with European Directives 73/23/EEC and 89/336/EEC, replaced by 2006/95/EC and 2004/108/EC, and subsequent amendments.
INSTALLATION
Instalng a domestic apian can be a compled operation which if not carried out correctly, can seriously affect consumer safety. It is for this reason that the task should be undertaken by a professionaly qualitied person who will carry it out in accordance with the technical regulations in force. In the event that this advice is ignored and the installation is carried out by an unqualified person, the manufacturer declines all responsibility for any technical failure of the product whether or not it results in damage to goods or injury to individuals.
BUILT-IN
The furniture in which your hob will be installed and all adjacent furniture, should be made from materials that can withstand high temperatures. In addition, all decorative laminates should be fixed with heat-resistant glue.
Installation:
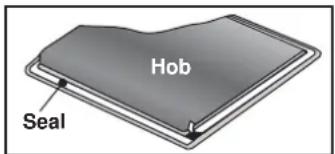
- A watertight seal is supplied with the hob.
Before fitting:
- turn the hob upside down, with the glass surface facing downwards.
Make sure the glass is protected.
fit the seal round the hob. - make sure that it is correctly fitted to avoid any leakage into the supporting cabinet.
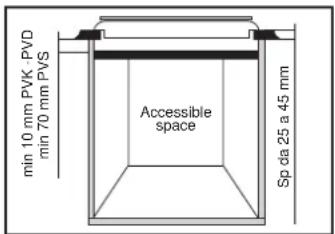
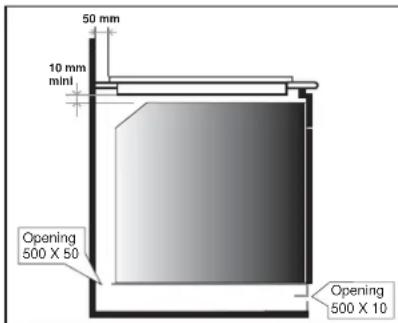
- Leave a gap of at least 5cm between the appliance and the vertical sides of the adjacent furniture.
- If, when installing the hob, the lower hob face is adjacent to an area normally accessible when handling or cleaning, fit a partition 1cm (7 cm for PVS) below the base of the hob to avoid any risk of scorching or damage.
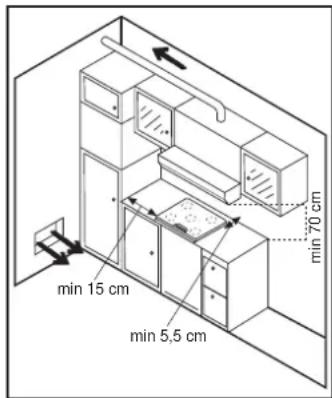
It is forbidden to fit the hob above a nonventilated oven
ELECTRICAL CONNECTION
"The installation must conform to the standard directive
The manufacturer declines all responsibility for any damage that may be caused by unsuitable or unreasonable use.
Warning: we cannot be held responsible for any incident or its consequences that may arise during the use of an appliance not linked to the earth, or linked to an earth whose continuity is defective.
- Always check before any electrical operation, the supply tension shown on the electricity meter, the adjustment of the circuit breaker, the continuity of the connection to earth to the installation and that the fuse is suitable.
- The electrical connection to the installation should be made via a socket with a plug with earth, or via an omnipole cut-out switch.
If the appliance has a socket outlet, it must be installed so that the socket outlet is accessible.
- The yellow/green wire of the power supply cable must be connected to the earth of both power supply and appliance terminals.
- Any queries regarding the power supply cord should be referred to After Sales Service or a qualified technician.
ATTENTION:
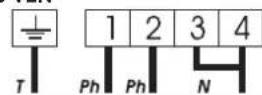
should it be necessary to replace the supply cord, connect the wire in accordance with the following colours/codes:
BLUE -NEUTRAL (N)
BROWN -LIVE (L)
A power cord is not supplied with the appliance, but the hob is equipped with a terminal block which enables you to choose the correct connection for the particular power supply.
CONNECTION TO THE TERMINALS ON THE TERMINAL BLOCK:
To proceed with the connection, you must adhere to the following instructions.
- Before making the connection, make sure that the installation is protected by a suitable fuse, see table, and that it is fitted with wires of a large enough section to supply the appliance normally.
- Choose the supply cord in accordance with the recommendations in the table.
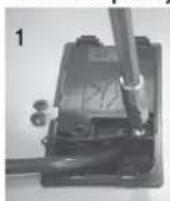
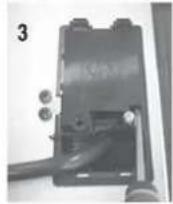
- Turn the hob, with the glass side against the worktop, providing you have protected the glass!
- Remove the cover located under the control
knobs, fitted by 2 screws at the front.
Pass the supply cord into the cover hole.
Pass the supply cord into the clamp. - Strip the end of each conductor of the supply
cord on a 10mm length, by taking account of the requested length of the cord for the connection on the terminal block.
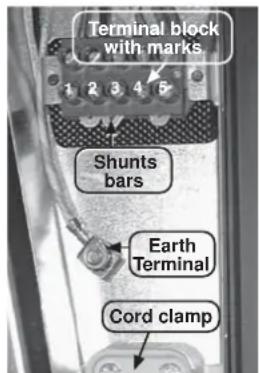
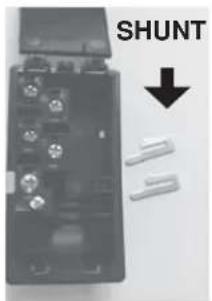
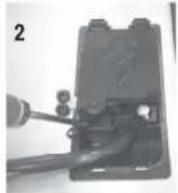
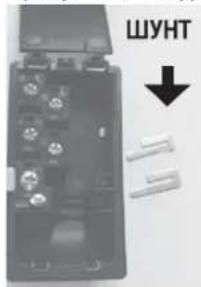
- The terminal block offers different types of connection.
So, in accordance with installation instructions and with the help of shunt bars*, fix the conductors as shown on the chart. - The shunt bars, placed on the Earth Terminal,
allow to make a bridge between two phases. Screw the screw fully home.
Note: Please take care to ensure that the shunt bars do not fall through the hole.
- Screw the cable clamp back.
- Screw the cover hole back do not forget the fan-lock washers.
ELECTRICAL CONNECTION
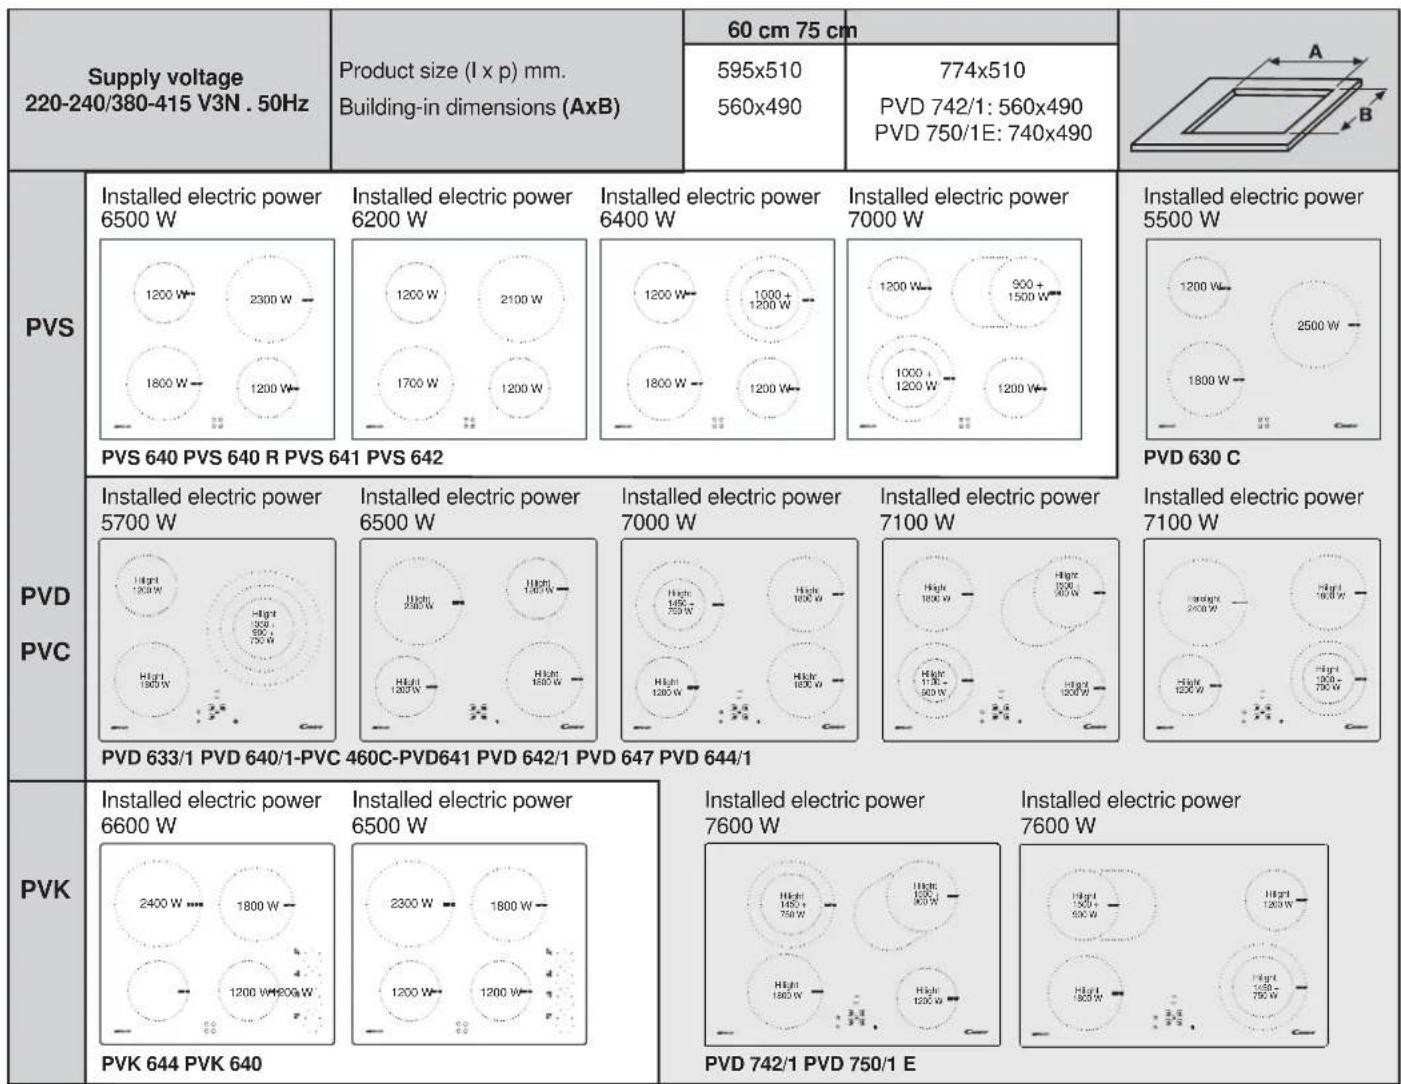
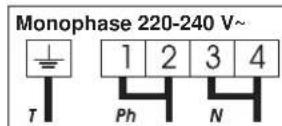
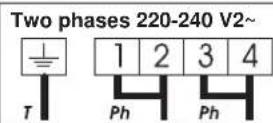
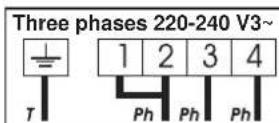
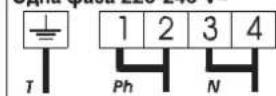
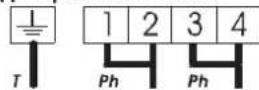
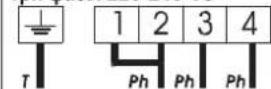
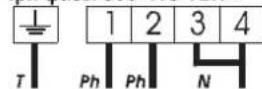
| Monophase 220-240V~ | Two phases 220-240V2~ | Two phases 380-415V2N~ | Three phases 220-240V3~ | Three phases 380-415V3N~ | |
| FUSE | 20 A | 20 A | 20 A | 20 A | 16 A |
| CABLE AREA TYPE | 3 G 2,5 mm2H05RR-F,H05VV-F,H05V2V2-F | 3 G 2,5 mm2H05RR-F,H05VV-F,H05V2V2-F | 4 G 2,5 mm2H05RR-F,H05VV-F,H05V2V2-F | 4 G 2,5 mm2H05RR-F,H05VV-F,H05V2V2-F | 5 G 1,5 mm2H05RR-F,H05VV-F,H05V2V2-F |
| CONNECTION TO THE TERMINAL BLOCK | 12345 TPH N T | 12345 TPH PH T | 12345 TPH PH N T | 12345 TPH PH PHT | 12345 TPH PH N T |
| PH Phase shunt 1-2 shunt 2-3 N Neutral shunt 4-5 T Earth E | PH Phase shunt 1-2 shunt 2-3 PH Phase shunt 4-5 T Earth E | PH Phase shunt 1-2 PH Phase shunt 2-3 N Neutral shunt 4-5 T Earth E | PH Phase shunt 1-2 PH Phase shunt 3-4 PH Phase T Earth E | PH Phase PH Phase PH Phase N Neutral shunt 4-5 T Earth E |
- Models PVD
The hob is fitted with a power supply cord which allows it to be connected only to a power supply of 220-240 V between phases or between phase and neutral.
- Connect to a socket, to choose the correct fuse, you must refer on the table.
It is however possible to connect the hob to :
- Three phase 220-240 V3~
- Three phase 380-415 V2N~
To proceed to the new connection, you must adhere the following instructions.
- Before making the connection, make sure that the installation is protected by a suitable fuse, see table, and that it is fitted with wires of a large enough section to supply the appliance normally.
-
Turn over the hob, glass side against the work top, taking care to protect the glass.
-
Open the cover in the following sequence:
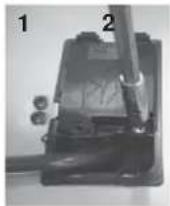
- unscrew the cable clamp "1",
- find the two tabs located on the sides,
- put the blade of a flat screw-driver in front of each tab "2" e "3", push in and press,
remove the cover.
To release the power supplying cord.
-
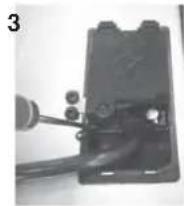
remove the screws retaining the terminal block which contains the shunt bars and the conductors of the supply cord,
Pull out the supply cord. -
Operations to be carried out to make a new connection :
- Choose the power supply cable in accordance with the recommendations in the table.
- Pass the power supply cable into the clamp.
- Strip the end of each conductor of the supply cord on a 10mm length, by taking in account the requested length of the cord for the connection to the terminal block.
- According to the installation and with the help of shunt bars which you should have recovered in the first operation, fix the conductor as shown on the chart.
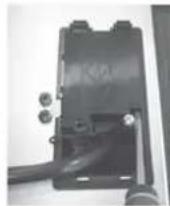
Fix the cover
- Screw the cable clamp.
Note: make sure the terminal board screws are tight.
Connection to the terminals on the terminal block
| PVD 633/1 PVD 630 C | PVD 642/1 PV PVD 644/1 PVD 647 | PVD 742/1 PV D PVD750/1E PVD 750 P | PVC 460 C PVD 641 | |
| MONOPHASE or TWO PHASES 220-240 V~ | ||||
| Fuse 25 A 25 A 25 A 20 A | ||||
| Cable HO5V2V2F | 3x2,5 mm² | 3x2,5 8x2.5 | 3x2,5 mm² | mm² |
| THREE PHASES 220-240 V3~ | ||||
| Fuse 25 A 20 A 25 A 20 A | ||||
| Cable HO5V2V2F | 4x2,5 mm² | 4x2,5 4x2.5 | 4x2,5 mm² | mm² |
| THREE PHASES 380-415 V2N~ | ||||
| Fuse 16 A 20 A 20 A 16 A | ||||
| Cable HO5V2V2F | 4x1,5 mm² | 4x2,5 4x2.5 | 4x1,5 mm² | mm² |
VITROCERAMIC HOB WITHOUT CONTROL KNOBS "PVS"
Connection to the electrical circuit, on the oven or glass ceramic hob, should be made via the oven. For this reason, it is important that the instructions given in the oven instructions booklet are followed carefully.
The ceramic hob without controls "PVS", has been developed to be used only in conjunction with specific separate control units or built in ovens with integral hob controls.
A detailed table (supplied with ovens with integral hob control or with independent control units) shows clearly how the hobs are to be connected to the specified units.
Under no circumstances must the hob be connected with any other control or oven not specified in the list.
To proceed with the connection, it is necessary to joint male connectors 1 and 2 of the hob with the "female" connectors 3 of the oven or of the control panel.

Built-in oven "apertures": Refer to the instruction booklet concerned.
This connection can be made before or after the oven is screwed into place.
PRESENTATION
- hilight zone : a metallic conductor strip is spread uniformly over the whole surface unit. It is effective within 3 seconds and is suitable for steady, homogeneous and also sustained cooking.
The glass-ceramic hob benefits from greater heat output which is generated by the hilight cooking zones thereby accelerating the cooking process. Modifications to the design of the hob have not affected the capacity of the glass to withstand high temperatures, but they have improved controllability.
With the "Sprinter" facility, reduced cooking times of up to 15% can be achieved, depending upon the method of cooking and the type of saucepans being used. - halolight zone : it is a combination of halogen (1/3) and hilight (2/3). The temperature rise of this surface unit is extremely rapid. It is suitable for frying meat, rapid boiling and intensive cooking where a hight temperature is required for a very short period of time.
- Radiant zone : it offers either rapid or slow rises in temperature and great stability in maintaining the required temperature. It is extremely precise and offers very good heat diffusion.
HOB COOKWARE ADVICE
Using good quality cookware is critical for setting the best performance from your hob.

- Always use good quality cookware with perfectly flat and thick bases : using this type of cookware will prevent hot spots that cause food to stick. Thick metal pots and pans will provide an even distribution of heat.
- Ensure that the base of the pot or pan is dry : when filling pans with liquid or using one that has been stored in the refrigerator, ensure that the base of the pan is completely dry before placing it on the hob. This will help to avoid staining the hob.
- Use pans whose diameter is wide enough to completely cover the surface unit: the size of the pan should be no smaller than the heating area. If it is slightly wider the energy will be used at its maximum efficiency.
THE CHOICE OF COOKWARE - The following information will help you to choose cookware which will give good performance.
Stainless Steel : highly recommended. Especially good with a sandwich clad base. The sandwich base combines the benefits of stainless steel (appearance, durability and stability) with the advantages of aluminium or copper (heat conduction, even heat distribution).
Aluminium : heavy weight recommended. Good conductivity. Aluminium residues sometimes appear as scratches on the hob, but can be removed if cleaned immediately.
Because of its low melting point, thin aluminium should not be used.
Cast Iron : usable, but not recommended. Poor performance. May scratch the surface.
Copper Bottom / stoneware: heavy weight recommended. Good performance, but copper may leave residues which can appear as scratches. The residues can be removed, as long as the hob is cleaned immediately. However, do not let these pots boil dry. Overheated metal can bond to glass hobs. An overheated copper pot will leave a residue that will permanently stain the hob.
Porcelain/enamel : Good performance only with a thiny smooth, flat base.
Glass-ceramic : not recommended. Poor performance. May scratch the surface.
HOW TO OPERATE THE GLASS CERAMIC HOB
VITROCERAMIC HOB WITH CONTROL KNOBS "PVK"
- Locate the sign corresponding to the cooking zone that you need: Each surface unit is regulated by a control knob which provides access to any power levels.
- It is recommended that heat setting is at its highest until it has properly warmed up and then lower to the desired cooking setting.
- The residual heat indicator lights up when the heat zone temperature reaches 60^ and above. It will stay on, even if the unit is switched off, until the surface has cooled down. It will switch off when the temperature of the heat zone falls below 60^ .
- To switch off an heat zone, turn the corresponding knob back on the "0" setting.
- Positions : the examples below are intended as a guide. When you become familiar with using your hob you will be able to work out the settings which suit you best.
| Positions Some tips... | |
| 1 Very low To keep a dish hot, melt butter and chocolate... | |
| 2 L o w Slow coocking, sauces, stews, rice pudding, poached eggs... | |
| 3 Moderately Beans, frozen foods, fruit, boiling water... | |
| 4 Medium Steamed apples, fresh vegetables, pasta, crepes, fish... | |
| 5 Higt More intense coocking, omelettes, steaks... | |
| 6 Very higt Steaks, chops, frying... |
VITROCERAMIC HOB WITHOUT CONTROL KNOBS "PVS"
- Locate the sign corresponding to the cooking zone that you need.
- Turn the control knob to the required cooking setting. Initially we recommend that the heat zone be set at the highest position until such times as the contents of the saucepan have reached the required temperature, the heat can then be reduced to the required cooking setting.
- The residual heat indicator light is illuminated when the hob surface temperature reaches 60 degrees or above. It will remain on even if the hob is switched off and will only go out when the hob surface has cooled down.
- To switch off the hob, turn the knob to "0".
Warning : The extra large highlight zone, will depending upon the dimensions of the cookware and/or the quantity of food being cooked provide even higher levels of performance.
-
The oval heating zone consists of two heating areas, a circular area with a complementary oval shaped section. Turn the control knob from 1 to 12 to regulate the circular area. To operate the oval section, simply turn the control knob to position 12 and then select a position from 1 to 12.
-
The heating area consists of two concentric zones. The inner circle is activated when the knob is turned to any of the positions from 1 to 12.
The outer ring will only be activated when the control is turned beyond 12 up to a power of 2200W
| Positions Some | Tips | ||
| 1 | 1-2 | Very Low | To keep a dish hot, melt butter and chocolate... |
| 2 | 3-4 | Low | Slow cooking, sauces, stews, rice pudding poached eggs... |
| 3 | 5-6 | Moderate | Beans,frozen foods,fruit,boiling water... |
| 4 | 7-8 | Medium | Steamed apples,fresh vegetables,pasta, crepes, fish... |
| 5 | 9-10 | High | More intense cooking, omelettes, steaks... |
| 6 | 11-12 | Very High | Steaks,chops,frying... |
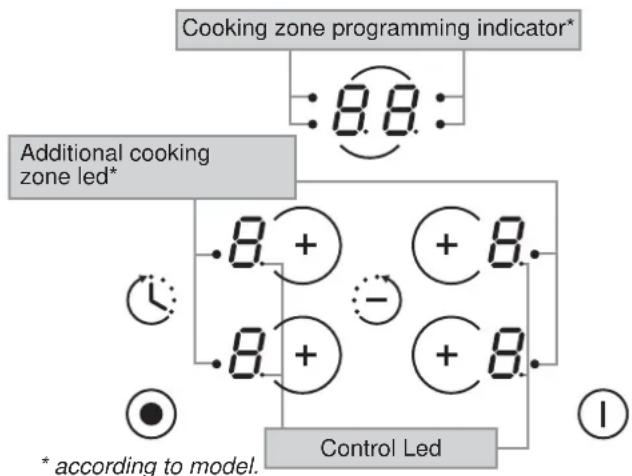
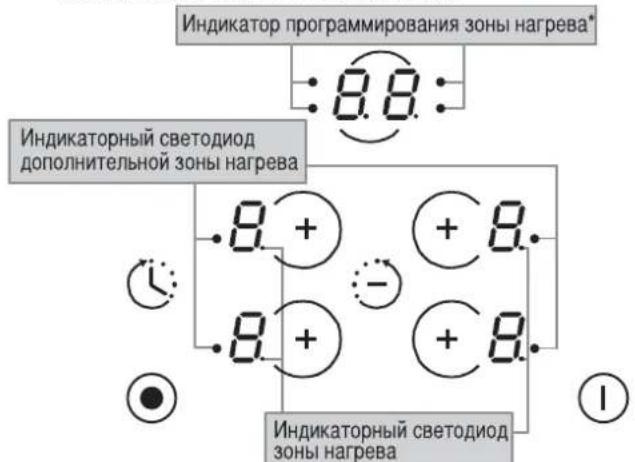
VITROCERAMIC HOB WITH SENSITIVES CONTROLS "PVD"
- PRESENTATION TOUCH SENSITIVES CONTROLS
-
After powering up the hob, wait some seconds to activate the electronic controls.
-
Press the button ①.
Electronic control of the hob is activated. In each display zone the heat level is displayed and the control LED blinks. - After 20 seconds without use, the electronic control goes off and the starting operation has to be repeated.
- STARTING A COOKING ZONE
- Press the selection button of the required cooking zone. In the display zone, the control LED is on steady. It shows that the zone is live.

- Press the - or + button to select a heat level between 1 and 9. Hold down the + or - button and the heat level increases or decreases gradually.
The following examples are for information only. Personal experience should then let you adapt these settings to your taste and habits.
0 1
2: ) .... Melting heat
3:Keeping hot
4: Heating up
5: Thawing, stewing, full cooking, low temperature cooking
6: Cooking without lid
7: Frying, meat browning and roasting
8: High temperature cooking and roasting, seizing
9: Frying, boiling large quantities of water.
- STOPPING A COOKING ZONE
- Press the selection button of the required cooking zone.
- Press the - button to display heat level . Now the zone goes off, the indicator goes off after 10 seconds.
- To stop rapidly, press the - and + buttons at the same time. The heat level automatically goes down to 0. The cooking zone goes off.
GENERAL STOP
The cooking zones and the timer can be stopped at any moment by pressing the On-Off button.

- RESIDUAL HEAT INDICATOR
The control panel tells the user when the surface temperature of the cooking zones exceeds about 60^ , by the following displaying: H. When the temperature goes back below 60^ , the H display goes off.
For ending the cooking, we advise switching off the cooking zone and using the residual heat of the zone to finish cooking gently. N.B. After a cut in the current, the residual heat indicator disappears completely, even if the surface temperature exceeds 60^ .
The cooking zone with two zones is fitted certain models. It can be either concentric or extendable.
It is active in totality when the cooking zone is in function; the control led of the additional cooking is displayed.
To desactivate the additional cooking zone :
- Press on the additional cooking zone button The corresponding control led for the additional cooking zone goes off when it is deactivated.
To re-activate the additional cooking zone :
- Press on the additional cooking zone button The corresponding control led for the additional cooking zone is active.
The additional cooking zone is fitted only one model. It is active in totality when the cooking zone is in function; the two control led of the additional cooking are displayed.
To desactivate the additional cooking zones :
- Press one time the additional cooking zone button. The corresponding control led for the external additional cooking zone goes off when it is deactivated.
- Press two times the additional cooking zone button. The corresponding control led for the central additional cooking zone goes off when it is deactivated.
To re-activate the additional cooking zones :
- Press on the additional cooking zone button, one or two times on the additional cooking zone button, according to the need.
- PROGRAMMING A COOKING ZONE (according to the model)
Every cooking zone can be programmed for a maximum time of 99 minutes.
- Start the required zone by following the previous instructions. The control LED near the heat level must be displayed, it shows that the zone is live.
- Press the Timer button.
The zone mark around the timer display shows the controlled zone.
- Press again on the timer button to select a time in minutes between 0 and 99 minutes or press on the "-" button to decrease the time between 60 minutes and 0.
the programmed time can be modified at any moment reactivating the cooking zone and then the timer button.
When the time is run, the cooking zone goes off automatically and an audible beep sounds for 1 minute, press the timer button to stop it.
the time can be used alone as reminder, it will ring at the end of the programmed time.
The locking function prevents the children from starting the hob. It is also used for cleaning the control strip as the controls can be locked without the hob being on.
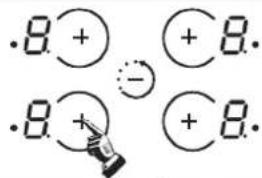
To lock the hob :
- Press the on/off button ①.
- Press simultaneously " - " button and " + " button of the front right zone (PVD 633/1 front left zone), and then press again on the "+" button of this zone. The hob is locked, the locking indicator " L " is displayed on all zones for 20 seconds.
To unlock the hob :
- Press the on/off button ①. The locking indicator "L" is displayed on all zones.
- Press simultaneously the " - " button and the " + " button of the front right zone (PVD 633/1 front left zone), and then press again on the " - " button of this zone.
The hob is unlocked.
Starting the fast heater
-
Press the on/off button (1).
-
Start the required zone, press the "+" button to obtain position "9", release the button briefly and press again the "+" button; the display alternates showing "A" "fast heater" and "9" heat level.
-
If necessary reduce to the required heat position, the display alternates showing "A" "fast heater" and the new heat position.
E.g. 1800 W zone at position 6 = 32% of 1800 W power released When the "Fast heater" is on, the zone supplies 1800 W power for 2.5 minutes, and adjusts to 576 W after this time. For increased safety, the cooking zones cut off automatically if they are left on too long. The cut off depends on the heat level used.
To desactivate the fast heater
- Switch on the cooking zone, press the " - " button to come back to a normal heat level, decrease to the heat level required or to " 0 " to stop the cooking zone.
CLEANING AND MAINTENANCE
- Before carrying out any maintenance work on the hob, allow it to cool down.
- Only products, (creams and scrapers) specifically designed for glass ceramic surfaces should be used. They are obtainable from hardware stores.
- Avoid spillages, as anything which falls on to the hob surface will quickly burn and will make cleaning more difficult.
- It is advisable to keep away from the hob all substances which are liable to melt, such as plastic items, sugar, or sugar-based products.
MAINTENANCE:
- Place a few drops of the specialised cleaning product on the hob surface.
- Rub any stubborn stains with a soft cloth or with slightly damp kitchen paper.
- Wipe with a soft cloth or dry kitchen paper until the surface is clean.
5 If there are still some stubborn stains:
- Place a few more drops of specialised cleaning fluid on the surface.
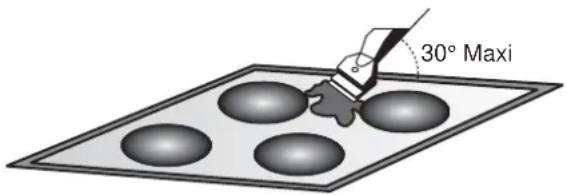
- Scrape with a scraper, holding it at an angle of 30^ to the hob, until the stains disappear.
- Wipe with a soft cloth or dry kitchen paper until the surface is clean.
- Repeat the operation if necessary.
A FEW HINTS:
Frequent cleaning leaves a protective layer which is essential to prevent scratches and wear. Make sure that the surface is clean before using the hob again. To remove marks left by water, use a few drops of white vinegar or lemon juice. Then wipe with absorbent paper and a few drops of specialised cleaning fluid. The control knobs can be removed for a complete cleaning.
However, you must care not to let any liquid go into the open zones, and then to push the knobs fully on fitting back.
The glass ceramic surface will withstand scraping from flat-bottomed cooking vessels, however, it is always better to lift them when moving them from one zone to another.
NB:
Do not use a sponge which is too wet.
Never use a knife or a screwdriver.
A scraper with a razor blade will not damage the surface, as long as it is kept at an angle of 30^ .
Never leave a scraper with a razor blade within the reach of children.
Never use abrasive products or scouring powders.
- The metal surround : to safely clean the metal surround wash with soap and water, rinse, then dry with a soft cloth.
AFTERCARE
Before calling out a Service Engineer please check the following:
that the plug is correctly inserted and fused;
If the fault cannot be identified switch off the appliance — do not tamper with it — call the Aftercare Service Centre. The appliance is supplied with a guarantee certificate that ensures that it will be repaired free of charge at the Service Centre.
PROBLEM SOLVING
The cooking zones do not simmer or only fry gently. Only use flat-bottomed pans. If light is visible between the pan and the hob, the zone is not transmitting heat correctly. The pan bottom should fully cover the diameter of the selected zone.
The cooking is too slow
- Unsuitable pans are being used. Only use flatbottomed utensils, that are heavy and have a diameter at least the same as the cooking zone.
Small scratches or abrasions on the hob's glass surface
- Incorrect cleaning or rough-bottomed pans are used; particles like grains of sand or salt get between the hob and the bottom of the pan. Refer to the "CLEANING" section; make sure that pan bottoms are clean before use and only use smooth bottomed pans. Scratches can be lessened only the cleaning is done correctly.
Metal marks
- Do not slide aluminium pans on the hob. Refer to the cleaning recommendations.
- You use the correct materials, but the stains persist. Use a razor blade and follow the "CLEANING" section.
Dark stains
Light surfaces on the hob
- Use a razor blade and follow the "CLEANING" section.
- Marks from an aluminium or copper pan, but also mineral, water or food deposits; they can be removed using the cream cleaner.
Caramelisation or melted plastic on the hob. Refer to the "CLEANING" section.
The hob does not operate or certain zones don't work
- The shunts are not positioned correctly on the terminal board. Have a check made that the connection is done in compliance with the recommendations.
- Hobs with sensitive controls: a big spill or object covers at least two buttons, for at least 10 seconds. Clean up the spill or remove the object.
The control panel is locked. Unlock the hob.
The hob does not cut off.
- The control panel is locked. Unlock the hob.
The hob stops automatically
- A spill covers at least two buttons for more than 10 seconds; the hob switches to safety, and an audible beep sounds. Clean up the spill or remove the object.
- The cooking zones stop automatically if they are left on for too long. Refer to the section, "operating time".
Frequency of on/off operations for cooking zones
- The on-off cycles vary according to the required heat level:
- low level: short operating time,
- high level: long operating time.
"H display, residual heat indicator, blinking.
- The electronic temperature is too high. A technician should verify the fitting in compliance with the recommendations.
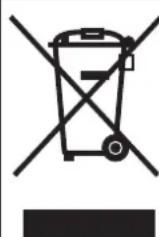
This appliance is marked according to the European directive 2002/96/EC on Waste Electrical and Electronic Equipment (WEEE). By ensuring this product is disposed of correctly, you will help prevent potential negative consequences for the environment and human health, which could otherwise be caused by inappropriate waste handling of this product. The symbol on the product indicates that this product may not be treated as household waste.
Instead it shall be handed over to the applicable collection point for the recycling of electrical and electronic equipment Disposal must be carried out in accordance with local environmental regulations for waste disposal.
For more detailed information about treatment, recovery and recycling of this product, please contact your local city office, your household waste disposal service or the shop where you purchased the product.
Ph = Fas N = Nollan T = Jord
- GLASKERAMIKHÄLL UTAN KONTROLLVRED "PVS"
TILKOBLING TIL POLENE I KOBLINGSBOKSEN:
Starte hurtigoppvarming
Deaktivere hurtigoppvarming
RENGJØRING OG VEDLIKEHOLD
La platetoppen avkjoles for du begyinner med vedlikehold.
- Bruk kunprodukter (kremer og skraper) som er spesielt designet for glasskeramikkoverflater. Disse fár du kjopt i jernvarebutikker.
- Unngå søl. Det som faler ned på plateoverflaten, vil raskt bli brent, og rengjöringen blir vanskeligere.
- Alt som kan smelte, bør holds unna platetoppen, f.eks. plast, sukker eller sukkerbaserteprodukter.
VEDLIKEHOLD:
- Pafor et par draper med renjorghingsmiddel pa platetoppen.
- Skrubb vanskelige flekker med en myk klut eller med lett fuktet kjokkenpapir.
- Tørk av med en myk klut ell er tort kjokkenpapir til overflaten blir ren.
WAARSCHUWINGICOON VOOR RESTHITTE
WERKING VAN DE VERGRENDELTOETS
MEPbI INPEIOCTOPOXHOCTN
YTO6bI DO6NTbC HANJUYUHX PE3yJIbTATOB IPN 3KCTNJYATALIM BAPOCHOH NOBEPXHOCTN, BHIMATEJIbHO PPOHTNTE 3TY INHCTPYKUNO
PekomehnyeTcOxpaHnTB3TyMHCTpyKUIO NO yCTaHOKBN 3KcIpyatauNNnOBpaatbcKHeNo MEpe HEO6xoDMOCtN INpeed YCTaHOBKO BapocHOHNOBepxHOCTN.BcNyae ObaPaeHn3a NOMoBuBO CepBNCbYceHTpYkAXHTecepHnHOHomePapOHNOBepxHOCTN,yKa3aHHbB Ee NaCnpTOHTabnkyke,KAK NOKa3AHOHNKe.
Nacnpthaa Ta6nHka
(pacnoJIOKeHb HnKHeuactn Kopnyca)

| Наряжende петаши 220-240/380-415 V3N·50 Φ | Размеры Истелем (I x p) ММ Размеры OTьерсту B рабочи новерхости (AxB) | 60 cm | 75 cm | A B | |
| 595x510 560x490 | 774x510 PVD 742/1: 560x490 PVD 750/1E: 740x490 | ||||
| PVS | Ystановленьая мошноctь 6500 (Вт) | Ystановленьая мошноctь 6200 (Вт) | Ystановленьая мошноctь 6400 (Вт) | Ystановленьая мошноctь 7000 (Вт) | |
| 1200 W 2300 W 1800 W ... | 1200 W 2100 W 1700 W ... | 1200 W 1800 W 1200 W ... | 1200 W 1800 W 1200 W ... | ||
| PVS 640 | PVS 640 R | PVS 641 | PVS 642 | ||
| PVD PVC | Ystановленьая мошноctь 5700 (Вt) | Ystановленьая мошноctь 6500 (Вt) | Ystановленьая мошноctь 7000 (Вt) | Ystановленьая мошноctь 7100 (Вt) | Ystановленьая мошноctь 7100 (Вt) |
| Height 1200 W Height 1000 W Height 800 W Height 600 W ... | Height 1200 W Height 1200 W Height 1800 W ... | Height 1800 W Height 1800 W Height 1800 W ... | Height 1800 W Height 1800 W Height 1800 W ... | ||
| PVD 633/1 | PVD 640/1-PVC 460C-PVD641 | PVD 642/1 | PVD 647 | PVD 644/1 | |
| PVK | Ystановленьая мошноctь 6600 (Вt) | Ystановленьая мошноctь 6500 (Вt) | Ystановленьая мошноctь 7600 (Вt) | Ystановленьая мошноctь 7600 (Вt) | |
| 2400 W 1800 W 1200 W ... | 2300 W 1800 W 1200 W ... | Height 1800 W 1200 W ... | Height 1800 W 1200 W ... | ||
| PVK 644 | PVK 640 | PVD 742/1 | PVD 750/1 E | ||
Haama KOMnHnnoCToRnHO CTpeMNTc NOBbICntb KaecTBO Bblnyckaemoe npOyKm, NoTOMy B KOHCTpyKIO HOblnyckaeMbIX HAMN 3dEIN MOY TBHCtBCa HOBeIe TExHueckne YCOBepHcHcBOBaHn.

3TOT 3NEKTPONPN60p COOTBETCTBYET Tpe6oBaHnM DnpeKTHB EBponeNCKORO 3KOHOUMHeCKORO COo6ueCTBa 73/23/EEC n 89/336/EEC, KOtOpbIe 6blnn 3aMeHeHb InpEeTNBaMn 2006/95/EC n 2004/108/EC n noCneDyUOHMn NOnpaKBAMn K Hm.
YCTAHOBKA
YcTaHOBKa 6bIToBOI TexHKn RaJIeTcra CLOKHO pa6OToH, HENpaBnIbHoe BbINONHeHne KOTopoM MoKxET OTPuAteNbHO cKa3aTbcHr Ha 6e3OnachocTHn Pnbl30BaTeLa. No 3TO npUHNHE YcTAHOBA K6b10BOI TexHKN DoJNkHa BbINONHbCBy BCIOKOKBAMHnpOBaHHIM CNEuaNIMCTAm, KOtOpBle BbINOHNrYT yCTAHOBky C cO6IIIOHeHem BceX DeIcTByIOUxN pPABn H Hopm. B Tom Cnyuay, ecnn 3TO npDEoCTpeKeHHe 6yET npOnHropOBaHO, n YcTAHOBA 6yET BbINONHeH NIOOM He IMMeHOUMDcTOAtoHKBANFKAun, pON3BOImTeNb E 6yET npInHMATb NHKAKNX npTeH3NI OTHOCHTeBHO BbIXOda 06OpdyOBaHHN H3 CTPOR HAHeceHHOro PpN 3Tom Uyep6a HMyueCTBy HNN 3DOPOBbHo IIOJeN.
BCTPANBAEMARbITOBARTEXHnKA
Kyxohna Me6enb, B KOTopyIO 6yET BCTpaNbaTc BAwa BapOHaH naOBepxHOCTb, INBcPacnONoXeHHaN ONoM3OCTn OT Hee Me6enb DOJXHa 6bITb N3rTOBnEHa N3 MaTePNaNOB, KOtOpble MOrY BblpepXuBaTb BblCOKne TemnepaTypb. Kpome 3TOrO BCE deKopatNBhIe PNeHKn DOJXHb 6bITb PNkneeHb TENNOCTOKHM KNEEM.
YcTaHOBKa:
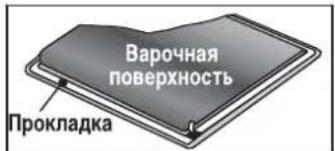
B KOMIIeKTe C BapOHHIOBepxHOCTbIO NOCTabJIReTc REpMeTH3NpyIOUaI npoklaJaKa.
Ipepe yCTaHOBkoN:
-10IOXHTe BApOHyIO NOBepxHOCTb TAK, YTO6bl CTekNOKepaMueckar NOBepxHOCTb 6bIa HAnpAbJIeHa BHN3.
PnOBePte TcTcEKeIKePamCckAe NOBExPOCTb 3aunieHa. YctAHOBtne PnOKnADky No nepmETpy BadoyOHNOBEXHOCTn.
- Y6eintecb TOM, YTO IPOKJIaKaI npABINbHO yCTAHOBHe HJTO TOToYTO6bI K36exKaTb IPOTEeK B WkaD, HA KOToBm ONIPAeTc BAOpHAr NOBepxHOctb.
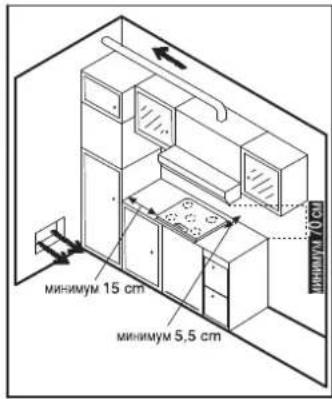
PacctoHHe MeKdy BapOCHNoBepXHOCTbIO N BepTKaJIbHbIMN CTEHkAMn pacnoJooKeHHoI pAOM C HEn KyyxOHHO Me6JIbHO DoJIIXeH 6bITb HE MeHbUe 5 CM.
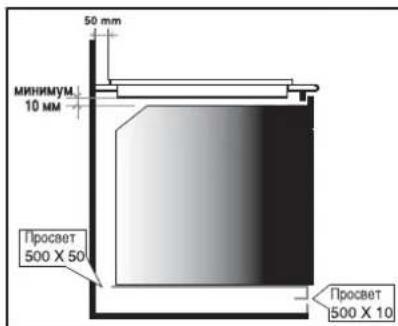
EcnHnKnHCTOPOHa yctAHOBHeHHo BAPOHHO NOBepxHOCTn paCNOaraeTcB 0bNactn, K KOtOPOOCyUeCTBnRETC DOCTyn BO BPEMa BblONHHeH YA6pKn HnDpyrHX ONEpauM,TO yCTaHOBnTE HNXe BAPOHHO NOBepxHOCTn NpeperopOky. NpeperopOKda DOnXkHa 6bIb YCTaHOBHeHa pAcToTHnn 1 cm (7cm dJe moDEnn PVS) OT BAPOHHO NOBepxHOCTn IJRA TORO, YTO6bl n36exKaTB OXKOrB INN NOBpeXKeHn.
3anpeaaetcyaTahabnBaBbBapOHyoNOBepxHocTb HADHEBEHTINmpyEmOdyXOBKoN
ПОДКЛIOUЧЕНКЗJEKTPOCETN
YCTAHOBKa DOnXHa 6BtB BbINOJIHeBA COOTBETCTBn C DeIeCTBYOUIMN npabuJAMn HOpMaMn 3JIeKTPo6E3ONACHOCTn. PpOIN3BOJNTeJIb HE pINHMmaet HNKAKNX PpeTeH3N OTHOCITeJIbHO NOBPEXJDEHn, RBJLIOUxXCr CNeCTBnEM HENpaBUNbHOrO pPmMeHHeNrN 3dEJIa.
PpeynpexdHHe: PpOn3BoDnteH He Hecet OTBcTBeHHocTh 3a HeCuaCThIe Cnyan, RbIraHouneCnEcdTBnEMTOr, YTO 3JIeKTPoPnp6Op He 6bl 3a3emHe, Hn npOn30We 6pbIB B IHHN 3a3EmHeHn.
Ipeed BblnoHHeHnem NoKJIOUeHnraNkTponpnbopa K3NeKTPoceTN 63083aTeBNo IPOBepbTe HnapJeHnneB M 3NeKTPoceTN,peytnpoBky ABtOMATNECKORO BbIKHOuAteTn,OTcYCTBnM 06pbBaB B JINHH 3a3EMHeHnJIeKTPoPb6opba,INOMHHAN NlABKOrO PnpdoXpAHntEJa.
3JIeKTPoPnIP6Op DIONJHcNIOKIIHOHaTcR K3JIeKTPuYeCKO pO3ETKe C NOMOuB BuNK, ChA6KeHHo WbtpbKOM 3aUHTHOrO 3aEmNeHn, Hnuepe3 dByxNIOHCHb pa3beHNHTeB.
Ecnn anekTponpHOp Ch6KeH wTeNCbHbO p03eTKo, TO OH dONKeH 6bIb yCTaHOBHeN TaK, YTObI K TcENcBHO p03eTKe OcyuEcTBnCn yO6HbN DOCTyN.
XeTo-3eneHn npoBOnHK uHypa nTaNHeonKHeNoCoEHNbC KOKrAky 3a3emEnHn 3neKtpueckO p03eKn n 3NeKtppon60pa.
-Пи BO3HнКНОВЕМК KAKIM-XIIN60 BONPOCOB,CB83aHHbIX C INCNOb3OBAHnEM шура пNTаня, cNeDyET O6paTbCB B cIyX6by NOcENpOdaXHOrO obcIyXuBaHnY nII K KBaIINΦIuNpOBaHnOMy 3JIeKTPnky.
BHIMAHHE:
Ecnn Bo3NHKHe Heo6XoDMNOCtB BbIIOHNHT 3aMeHy Whpy NiTAHn, NOcOeHInTe IPOOBHnK WHpya NITAHy B COOTBTCTBm C yKa3AHbIMN HIXe BUETOBMbIM KOdAM.
CINHIN
KOPNUHEBbI
XEJTO-3EJIENbI
*UHTbl,yCTAHOBNEHbIE Ha KJIEMME 3a3eMNEHn,NO3BOJIOHT 3aMKHYb DBe pa3bl. IINTHO 3aTRHHe BNTbl.
PnmeaHne: PpOBepeTe, YTO WHTbI He BblanuYepe3 OTBepCTne.
-3aTHTBEHbTI 3axmua hypa nHTAHn.
- YctaHOBHTe Ha MecTO KDbIUKy KJEMMHON
KoIOnKn, n 3aKePnTe ee c NOMOuBIO BnHTOB (He 3a6yDbTe yCTaHOBt b CTOnOpHbIe Wai6bI).
3JIeKTPnueCKNE COEINHEHNA
| Одna Фаза 220-240 B ~ | Дae Фазы 220-240 B 2~ | Трн Фазы ~380-415 B N~ | Трн Фазы ~220-240 B 3~ | Трн Фазы ~380-415 B 3N~ | |
| ПЕДОХРАНТЕЛБ | 20 A | 20 A | 20 A | 20 A | 16 A |
| SUHYP ПИТАНИСЕЧЕНИМЕТП | 3 G 2,5mm H05RR-F, H05VV-F, H05V2V2-F | 3 G 2,5mm H05RR-F, H05VV-F, H05V2V2-F | 4 G 2,5mm H05RR-F, H05VV-F, H05V2V2-F | 4 G 2,5mm H05RR-F, H05VV-F, H05V2V2-F | 5 G 1,5mm H05RR-F, H05VV-F, H05V2V2-F |
| COЕДИЗЕНИМАКЛЕMMHONKOЛОДKE | T12345 T PH N T | T12345 T PH PH T | T12345 T PH PH N T | T12345 T PHPHP T | T12345 T PHPHN T |
| PH ФазашуHT 1-2шуHT 2-3N НейтальшуHT 4-5T 3eMLЯ E | PH ФазашуHT 1-2шуHT 2-3PH ФазашуHT 4-5T 3eMLЯ E | PH ФазашуHT 1-2PH ФазашуHT 2-3N НейтальшуHT 4-5T 3eMLЯ E | PH ФазашуHT 1-2PH ФазашуHT 3-4PH ФазашуHT 4-5T 3eMLЯ E | PH ФазаPH ФазаPH ФазаN НейтальшуHT 4-5T 3eMLЯ E |
- Modell PVD
B KOMNNEKT NOCTABKN BAPOHN NOBEPXHOCTN BXOHT WHP NTANH.3TO N03BOJRE TNOKINHOATb 3OT 3NEKTPONP6OP TOIbKO K 3NEKTPOCETN C HnPAKHeHem 220-240 B MEXyDyMpaAMnIMMejdy pa3oN HeHPTBIO.
IopKnIOHTe3NEKTPoPnH6pO K 3NEKTPnueckO po3eTKe, 3aunuEHHoII nAOKMnpeDOxpaHNTeMeH (HomHaI npdeOxpaHNTeJI BbIbPaTeC nOMOsbTO Tabmbl).
OdaKo TaKke HMeetc BO3MOXHOCTb NOKIOHTb BapOHyIO NobepxHOCTb K CnedyUOUM NHHM 3NeKTPOCETN:
Tpnfza3bl
220-240 B 3~
Tpnf0a3b1
380-415B3N~
Ia nepexoHa HoBOe noKnIOueHHe BbINOJIHnTe CneDyOuNe HNCTpyKU:
IpeBbIIOHHeHMeIOKIIIOeHnIPOBepbTe,TO3NEKToPnpBop3aUuHcN CNOMOUBOIOXDOJIUEFO NIAKBORO INEOxOPAHNTER (CM.TaONLIy),NTO IIOUaIbCeHNeHOIOBdoHnIOPOBHNIOBKnOBHnEOTCIOCTAOHHo,TO6bI oecneueHBaoCb HOpMaINbHOe NTtAHne 3NEKToPnpBopOpa.
- PINOJXHTE BAPOCHY NOBEPXHOCTb HA NOBEPXHOCTb CTOna CTKIOKEPAMUHECKTOPOHOH BHIN. (CTKIOKEPAMUHECKA NOBEPXHOCTb DOJXHA 6bITb 3auuueHaI).
- CHIMNTE KpbIiKU KJIeMMHoi KOJIOKn, BbINoIHNB CNeDyIOuHe Opeaun:
OTBepHnTe3axmMhhypaNITAHNA"1
HaHnTe DBe IaNKn, paCNOIOKeHHbIe c6Oky,
HaxMNTe Ha IaNky JIe3BnEM NIOCKO OTBepTKN (BbIINHHTe 3TO DNIA KAKDOI NaKN "2" "3").
- CHIMITE KpbilUKy.
Tc06bI ChrB WHyp NtAnHn
OTBEPHNTe BHTb, KOtOpbIMK KpeNITcR KJIeMMHaR KOLOKa, B KOTopoHaxoJrTcR WHTbI NPOBOHNKu WHypa NITAHn,
- BbITAHHTe UHyp nHTaHn.
- NopraDOK BbInonHeHnHO HOBO NOKJIIOUeHNr:
- BbIbepe Te UHyp NTaHnB CCOBTBeTCTBnC peKOMeHaunm, npedctabJIeHHbIMN B Ta6nue.
- Pnpocnte whyp
3aYnCTNTe KOHbCEXPnOBdHKnOB WHypa nITAHHa DnHe 10 MM, pINHMAB B paCET dNHy WHypa NTAHHa, HeoBXOdMMyIO JnBblONHeHH CoeHNHeHH Ha KJEMMHOH KONOKe.
BbINOHNTe NOKJIOHEnI npBODHNKOB uHyTOB (6blnn CHrTaB npebdIyuee onepaunn) B COOTBETCTBmC TINOM NIMHN 3NEKTPOINTAHNA KAK NOKa3aHO B npeCDtABNeHHOH HNKe Ta5nue. YctahOBnTE KpbIbky.
-3aTnHTe BnHTb3axkma Whypa NtAHm.
PpmeaHHe: PpOBepbTe, YTO BnHTbHa KJIeMMHO KOJIOKe HAdEJKHO 3aTAYtbl.
CoeINHeHn, BbINONHReMbIe Ha KJIeMMHOJ KOJOnKe
| PVD 633/1 | PVD 642/1 PVD 644/1 PVD 647 | PVD 742/1 PVD750/1E PVD 750 | PVD 640/1 PVC 460 C PVD 641 | |
| ОДHA ΦАЗИЙДBE ΦАЗы 220-240 B~ | ||||
| Прешихсантуль 25 A | 25 A | 25 A | 20 A | |
| Шур пitaимя HO5V2V2F | 3x2,5 mm² | 3x2,5 mm² | 3x2,5 mm² | 3x2,5 mm² |
| ТРИ ΦАЗы ~220-240 B 3~ | ||||
| Прешихсантуль 25 A | 20 A | 25 A | 20 A | |
| Шур пitaимя HO5V2V2F | 4x2,5 mm² | 4x2,5 mm² | 4x2,5 mm² | 4x2,5 mm² |
| ТРИ ΦАЗы ~380-415 B 2N~ | ||||
| Прешихсантуль 16 A | 20 A | 20 A | 16 A | |
| Шур пitaимя HO5V2V2F | 4x1,5 mm² | 4x2,5 mm² | 4x2,5 mm² | 4x1,5 mm² |
Onda 220-240 V~
DBeΦa3bl 220-240 V2~
Tp n 0a3bl 220-240 V3~
TpΦa3b1 380-415 V2N~
Ph = Φa3a N = Heɪtpaɪb T = 3eMla
CTEKJIOKEPAMNUECKA BAPOHAR NOBEPXHOCTb BE3 PEGYJATOPOB (PVS)
IIOKJIIOUHHe BAPOHOI NOBEPXHOCTN K 3JEKTKPOCETN DOJNXHO BByIOINHrTBcR
Yepe3 DxyOBky. IIO3OTMy 3JEKTKPUECKNE COEHNHEHn DOJNXHbI BByIOINHrTBcR
B COOTBETCTBM C NHTCPYKUNM DN JyOXBN.
CTeKnOkepAmueckA BapouHn A nobExHocb 6e3 perynrTopoB (PVS) npedHa3HaueHa nncNoIb30BaHHn TOnbKO BmecTe Co CneunAhbIMn OTeJIbHbIMn 6NOKAMn peYrnapTOPOB NnDOnKHByCytAHABINBaTcRa HdyoxBKn CO BCTpoEHbIMn B Hx perynTOpAMn BapoyHn NOBepXHOCTn. B Tabniue (NoCTabJIreTCBmecTe C DxyOBKaMn CO BCTpoEHbIMn B Hx perynrTopAMn BapoyHn NOBepXHOCTn. YTeKoNoka3Ho, KAK perynrTopbI BapovHn NOBepXHOCTn DOJKNHbN oNDKIOVAChB K BApOHOH NOBepXHOCTn. BapoyHn NOBepXHOCTb H N B KOEM CInyae He NDJKAHO NODKNHOATCBs K peYrnapTOpAMn Nn K DxyOBKaM, TNNb KotopbIX He Yka3aHb I Tabniue.
YTO6b BYIIOJINHTb NOKIOHOUHHe Heo6XODIMO COeHNHTb OXBaTBiBAeMbIE coeHHNTEN (1) 2 BapOCHOH NOBepxHOCTCN OXBaTBiBAOUMM coeHHNTENAMN (3) DyXOBKn Nn NaHEnn peRyIaTOpOB.
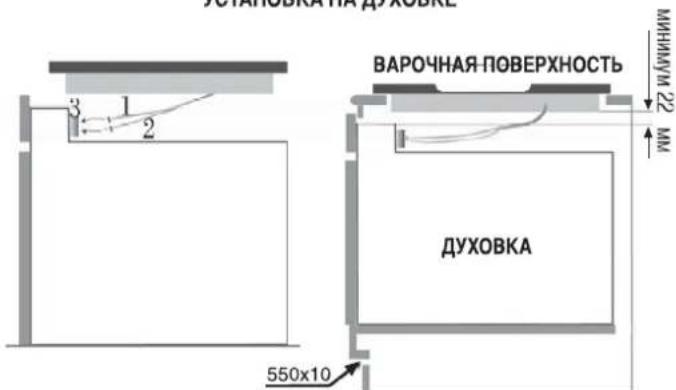
YCTAHOBKA HAДУXOBKE
"PpocBtI DnB BCTpaHbAeMoN dyXOBKn. Cm. cooTBeTcTByOuO HcTpyKuIO no 3KcnnyataunnyDxOBKn.
3TN COeMHHeH NMOY 6bITb BbINONHeHb IO HNN NocNe KpeNHeH NdyXOBKn C NOMOuBIO 6oTTOB.
ONICAHNE
30HaHarpBa"xaJnaiT":MetaJIInueckA TOKOpBOJaIaIaI nonOka pacnPpeJeHa OndHpOAnHO NO BceB BapOHyNIOBepxHocTNI. OHa pa3OrpBeaeTcB TeChHe 3 C MOnKet NcNoIb3oBaTcBcN PAbHOmeHoro, OndHpOAnHO IIOCTaTOHNO pOOnJXITeHoro PPOCeCCA pNIROTBoHnI HNIu
SPRINTERCTeKNOKEpAMUeCKaBapOuHAR NOBepxHOCTb 06nadaet 60nbwoTENNBOM MoUHOCTbIO, REhepepyemOH3oHnHarpeBa"XaIaNIT",YTO OeCENEyBaET 6bCTpoe npiroTOBHeHne Nn.3MeHneHn, BHeCHeHbE B KOHCTpykUHO BApOHOH NOBepxHOCTn, HcH3nHn CnOCo6HOCT CTeKNOKePAmKn BblDePckNAbTB BbcOKHe TEMRepaTpybI, HO OHN NobICnN T6KOCTb perynpoBaHn HarpeBa. nCnoJIb3OBAHne yctPoJCTBa "CnpHTEP" No3BOJNET Chn3INT BpEM npiroTOBHeHn NnHa 15% B 3aBMCMOCTn OT CnOCo6a npiroTOBHeHn NnN INCIOJIb3YeMoN KxOHHO Nocdybl
30HaHarpBa"xaonaiT":3TOKOMBnHaIraIraIoreHOBOI 30HbHarpeBa (1/3) n30hI HarpeBa"xaJnAIaT"(2/3).3Ta 30Ha pa3OrpeBaetcOeyH b6ItcPo. OHa npIOHa IJXkapmMa, 6bICTPO KINRAEHN BOI INHTEHCBHORo pnpOTOBHeNIMU, KOrJa Tpe6yTeC BICOKAR TemepaTyba TteHecNKeKOPOTKOrnpomexyTKBpEmeHn.
30HaHarpBa"paHHT":3a30HaHarpeBaOeCneuHbAet6bIcTpoNIM MeDnEHHO NOBbUeHHe TEMepaTybl,aTakKe BbICOKyIOCTaINbHOCTb NODepKAnHryHKHOI TEMepaTybl.3Ta30HaHarpeBaRbIeTCrOeHb TOOHNOEcneuHBAETOeyHbXopoWee paccErHHe TENla.
COBETbI OTHOCNTeJIbHO BbIbOPA KXYOHHOIOCYdI JINCIOJIb3OBAHnC BAPOHON IOBEPXHOCTbIO
Ja 06ecneHnB BicOKo3ΦeKTHBHOCTBaOpHNO NobepxHOCTN DOnXHa HcNoB3OBaTbCBy BicOKoKaYeCTBeHHAkyOHHa Nocyda.

I0nb3yTecb ToIbKO BbICOKOkaeCTBeHHoK KyxOHHO NocyDo C cOBepHeHNOIOCKHM IOToCTbIM OCHOBAHmE:NCIONb3OBAHne TAKOINocyblnpedOTBpaaetO6Ba3OBAHme RopnHex TOeK, B KOTOpbIX 6dyTe NOrpoPbA Tb mua. KAcTpHn NCKOBOPObc TOnTbIM OCHOBAHmE 6dyT o6ecneHbTaB pabHomePbOe paCnpdeJeHHe TenJa.
- OchOBaHHe KAcTPOHn HnCKOBOpObdoJOnKHO 6bItb cyxHM: nocne TOrO, KaK B Nocdy 6yed3aJIHTa JNkIOcTb, Hn npn NCNoIb3OBaHN KAcTPOHn, KOtopar do 3TO RHO HAXoINNaCb B XOLOINbHmKe, nepeD TEM KAK NOCTaBnTb KAcTPOHn Ha BapOCHyNO NobepxHOCTb PObEbpTe, YTO OCHOBaHHe KAcTPOHn ABETe CObEPueHEO cyxHM. 3To npdeTbpatNT Obp3OBaHHe Ha BapOHn NOBepxHOCTn PAnrH.
- P0nb3yIeCb ToBko BblcOKoKaeeCTBeHHo KyxOHHO NoCydo C cObepeHNO NIOCKM NTOCTbIM OCHOBAHm: DnAMETP NocSydi OJIKEN 6b1b He MeHbSe DnAMETp 3ObHI HarpeBa. Ecn DnAMETp NocSydi HEMHO 60nbIe DnAMETp 3ObHI HarpeBa, TO 3HEPRN6 Byet NCINb3OBA Tbsc MAKCMaJIbHO 3ΦΦEKTHBHOCTbO.
BbIOP IOxOJUeK KXOHHO NOCybl -PpeCTabHeHHa HnKe HΦopMaHn NOMoKET Bam Bb6paTb Nocdy dny pnproTOBHeHHa nC MAkCMaJIbHO 3ΦΦeKTHBHOCTbIO.
Nocya n3 HepXabeOe CTaHn: HAcToTEnbHo peKoMeHdyETcHcNoIb30BaTb. Oc6eHNO XPOoIO NOxOIN T KxyOHHa Nocya c TpexCNoHoiCTpykTyPO OCHOBaHn. OChOBaHne C TpExCNoHoi CtPykTyPO ObEHNReB CSepe IpenMUsEcTa HepXabeOe CTaHn (PpNBLeKaTeNbBi BHeuHNBVD, DIOLOBeeHOCbI INpOvHOctB) INpeMUsEcBAIOMNHIN MeDN (BbICOKA TENlONPoBODHOCTb, paBHOMepHOe PaCnpdeJeHne TemnPepaTpybl).
AnomnneBa nocya: peKOMeHyteTc HcNtB3OaTb TKeIyHO nocny. BbcOKaTeHIOpOBoHObCTb.AnOMHHneBa nocya HNOgTa OCTABnReT Ha bAPOHn NOBepXHOCTn CNEbl, NOXKHe HA capanHb. Ho 3TN CNEbl NERKO ydaNHTCt, ECNI NCTKa BAPoHn NOBepXHOCTn BbINOJIHReTc HEMdNEHHO nocne o6pa3oBAHn 3TNx CNEob.
H3a Hn3Ko TEmnepaTpybI NpABeHeHH aIOMMHN, TOHKa aIOMMHNEBa Iocya He DoJnxHa NCNoB30BaTbcR.
UryHHa nocya:MOxHO NcNoJIb30BaTb,HO He peKoMeHdyetc. IIOxHe 3KcNpyatauOHhIe xapakTePnCTnKn.Moxet JapanaTb nobepxHOctb.
Nocya c MeHbIM dHOM / KameHHaepaMnka: peKoMeHdyETcR
NCIOJIb30BaT bTKeJyHO NocyDy. XopoJiue 3KcIpyataUHbIe XapaKTePncTHKn, HO MeB MoKet OCTabJIrTa H NaOBepxHOCTn CneDbI, NOXOKHe Ha UapAINHBi. 3TN CNEy MORYt 6bITb ydaNEbI, eCNN YcCTKa BApOHO JOBepxHOCTn BInONHReTC HeMeJeHNO OcNe Obpa3OBAHN 3NX CNEoB. OdHAKO He CTaBte Ha BApOHyIOBepxHOCTb Takyo NocyDu 63 HAnITOn B Hee KIKKOCTn. Ipeperpetb MTaJI MoxeT npriPoPeTb K cTeKIOKePAmVcECKoN OBOeXHOCTn. Ipeperpeta Nocya c MeHbIM dHOM MoKet OCTabITb Ha cTeKIOKePAmVcECKoN OBOeXHOCTn CneDbI, KOtpbe He Bo3MOXHO 6yDeT ydaINbTb.
Φapopobar /3maHnpoBaHHa nocya:XopoWne 3KcnIyatauHOHHbExapaKTepeNCTNK TOBko TIOPOcYbIC TOHKIM, FIAKIM, NIOCKM OCHOBAHHeM.
CTeKIOkepAMueckar nocya: He peKoMeHdyETcNcNoJb30BaTb. IIOxne 3KcIpyaTuOHHbte XapakTePmCTnK. MoKet capanaTb CTeKIOkepAMueckyIO BapOHyNOOBepXHOCTb.
3KCNLYATAUCA TCEKJIOKEPAMNUECKOBAPOCHNOBEPXHOCTN
CTEKJIOKEPAMUUECKA BAPOUHAR IOBEPXHOCTb C PEYJITOPAMN (PVK)
HaiHNTe3Hak,cooTBetCTbHOuHHyXHOBAM30HeHarpeBa.JaKaKdo30hblHarpeBa HMeETcpyka perynipOBKn, c NOMOuBo KOTopoB BbIOHnRETCyCTaHOBKA HyxHOrOpOBHr MOUHOCTn HarpeBa.
- PekomeHdyetc Chayana yctahOBNTb MakcmaIbHyO MOuHocTb HArpeBa, TTo6bl HarpeTb Nocydy Do HyXHO TeMnepaTypb, a 3aTeM yMeHbWntb YCTAHOBky peryJrTopa Do HyXHO 3HaueHnI dI nprirotobHeHH nIi.
Korda TemnepaTpa 30hHaRpeBa octraet 60^ 3aropaetca HnHkaTOp octatoHoro HarpeBa.3OT nHnKaTOp 6yET npoJOnKaTb ropeTB noCle BbIKHOeHHa 30hHaRpeBa DO tex nop, noka TemnepaTpa 30hHaRpeBa He onyCTNTc HnKe 60°C.
YTO6bI BbIKIOHTb 30Hy HArpeBa, yCTaHOBnTe COOTBeTcTByHoupyuKy peRyINPOBKn B nIoXKeHne "O".
- P03nucn peyraTopa: npdctabHeHbIe HNKe npmepbl cneDyET nCOnb30BaTb TONkoTcnpABKn. KOrDa Bbl npno6peTe DCtatoHHb OnbIt paObToB C apoHNOBepxHOCTbBo, Bbl CMoxeTe camocToTeBbHO BbInpTa ONTMaNbHBe yCTAHOBKn peYrTopa.
CTEKJIOKEPAMUHECKA BAPOUHAR IOBEPXHOCTb C CEHCOPHBIM YIPABJIENEM (PVD)
ONICAHNE CEHCOPHOYYPABJIEHNA
B 3aBbCmOcTN OT MOdJIIN
- Pocne BKIOUeHn NITAHN BAPOCHN NOBepxHOCT N ODOXdnte HeckoBko CekyHd IIN TORO, YTObI DaTb nporpeTBc 3NEKTPOHOMY 6LOKY ynpabHeHH.
-HaKmTe KhONkY ①
BkIIOaTeTc 3JKeKToPONHbI 6NOK ynpaBHeHH. B KaXdoI 3Oe IINCIIeR OTO6paXaeTcYpOBeHb HarpBa , INMraet INHdkaTOpHb CBeToNDoD.
-ECINB TEEHHe 20 C He BbIIOJIHReTcH NkAkaXN DeIcTBn,3NEKTOHHbI 6bnOK YnpaBHeHH BbIKIOHaTeCn, HneOxOdmo NOBtOpntb OepaUIO 3anycka.
BKJIOUeyHNE3OHbI HAPPEBA
-HaKMTe KHOKNky Bb6opa HyKHOI BAM 30hbl HArpeBa.B COOTBcTCTByOuEe 30He DCNJIeER CBETNOH DAHAHIE T OPeTb POBHIM CBETOM, NOKA3bBAe TEM CAMbl, YTO 30Ha HArpeBa BKIOUHeHa.
-Bb6epnte HxhHb ypOBeHb HarpeBa Dnana3ohe 0T 1 Do 9 C nOMouBHO KhoKn"-"mN"+.Pnp HaxKaTH N KhoKn"+"mN"-ypoBeHb HarpeBa6ydet NOCTeNEHNO YBEINHbATbCRA NmYMeHbWAtbCra.
OnncaHbIe Hxke npmepbI npBBeHebI TOBko dNcPpABKn. C TeueHem BpeMeHN bbl HayHTecb npaBnIbHO bblnpaTb yCTaHOBKn HarpeBa B COOTBTCTBNN CO CBOOMN NOTpe6HOCTrM
HnKOrda He octabnIte cKepe6OK C ne3BnEM 6pntbbl B DOCTynhbx IaIeTei Mectax.
Hikorda He NoIb3yItecb a6pa3NBbIMN YnCTaUMn CpeCTBaMn HnH a6pa3NBbIMN NopoWKamn.
MetannueckampaKa: BbIMoTe MeTaNnueckyIO paMKyMbIbHOBBOIO, 3aTEM NCTO BDOH, IN POTPNT HAcYXoTKaHBHO.
TOCJIENPODAJXHOE OBCNJXKUBAHNE
Ipeep Tem KAK Bb3BaTb CneuaHncta No TexHnueckOMy 06cnyKbaHIO, BbINONHTe CnedyUOuNe npOBepKn:
PpOBepeTe, YTO BUNKa UHpya NHTAHy npABINbHO BCTAbleHa B 3NEKTPnueeckyo PO3ETky, uYTO He nepeorepe IINABKNI ppeOxAHTENb. EcN Bbl He MOKeTe CAMOCToTEnbHO ONpeDEInb NpHHy HcncPABHOCTM, BIKIOHHTe 3NEKTPponPi6Op H He NItaNTecb OTpeMOHTnpOBaTB erO CAMOCToTEnbHO. P03BOHTE B CEHTP NOcENpOdaXHORO O6CnyXBAHNA. 3NEKTPponPi6Op IMeet rapaTHIO, N 6yETOTpeMOHTPOBaH B CEPBCHOM 9HTpe 6ecnnaTHO.
PELJEHNEIPO6JIEM
HedocTaOuHbI HArpeB
Pb3ytebTobKkoXHOHNOcYIO C NIOCKHM HOM.EcNMeJyDHom NOcYdbI M BApOHHIOBepxHOCTn IMeETCPOCBET,TeNIO6yETnNOxo nepeBADatcb.
-Дно Кхонню nocybldONxHNO NnHOCbIO NOKpbBaTb 3OHy HarpeBa.
Tnua roTOBNTcCNIWKOM MeDHeHHO
IcnoIb3yETcHenoIxOJaA KxOHnA NOyDa.IoNb3yIeTcB TOnbKO TJeON KxOHHO NocyDn, DnAMTp DHa KOtOpO He MeHbUe DnAmETpa 30HbI HappeBa.
He6bIe qapHnHbI nIe NOtepTOCTHa CTeKNOKepaMueckoB aPoCHNoBepxHOCTN
IcnoIb3yIOCTcHHeOxOJaIe NcTcTaIe CpeCDBa IIN HeoXoJgAa JkyOHAA NOcydCA WepoxOBaBIM dHOM. MeKdy BapOCHN NOBepXHOCTn INOM NOcybl IONANI 3epHA INI cactNk CONM. CM. pa3den "HCTKA IN OCJIYKUBAHNE". Nepe IcNoIb3OBAHmE KxyOHHO NocSybl, IpOBepbTe, YTO HA INe KxyOHNOcSybl HE Tpr3N, IN ONb3yITecb ToIbKO KxyOHHO NocydoC rIaNKHM INOM. LiapanHHb MOXHO yMeHBWHTb ToIbKO npn npabINbHM BbIOnHHeHm YcTKn.
Cnebl Metannla
He nepeTackBaIte aIOMHnHReyIO nocdy no BapOHH NOBepxHOCTN, CM. peKOMeHdaUN OTHOCHTeJIbHO BblONHEHINY NCTKN.
BbI NpIb3yetebcNpIXoJrAunmMATEepnAnamn,HO IaHTHa OCTaHOTcR. HcNOb3yIte dnnCTKn ne3Bne 6pntBbl, KaK 3TO ONCaHO Bpa3deJe "NCTKA N OCJIYXINBAHVE."
Temhhe pTHa Ha noBepxHoctn
Icnonb3yIteIaYCTKJIe3BHe6pntbI,KaK3TOONCAHO Bpa3deJe "HCTKAIOBCJLYKINBAHIE".
CBeTlbIe oBlaCTH HIOBepxHocTH
Cnebl ot anomnnoebo m MeHNO nocdyb, a taKxe MHepaBhbe OTIOXKeHNA, PTHA OT BOdb H NINU. 3TN PTHA MOXHO ydaINTb C NOMOuHO YNCTRAIero KpeMa.
06yrrnBwaaerHnn paacnnaBneHHa nlaactMacca Ha nobepxhoctn Cm. paoen "IcCTKA IN OBCJNYKUBAHIE".
BapOuHaI NOBepxHocTb He pa6oTaET, HnH He pa6oTaOT HeKOTOpbIE 30hI HArpeBa BapOuHoi NOBepxHocTn
Hennapnblho yctahOBHeIyHTbl (3akopauBaHOJIne nepembUKN) H KlemmHO KOJIOKe. POpBeBte, YTO noKlnOHeHne BInONHeBO COOTBTCTBM C yka3AHMM.
BapouhIbe NOBepxHocTn C cehCOPbHM ynpaBHeHEm: npOHTa Ha 6oJbWOM YauCTKe KINKOCTb NIN 6oJIbWOI O6BeKT, NOKPBIAOUMe, NO KPAHMepe, IBE KHONB TteHHe He MeHee 10c. YdaJIte PpOHTyO XNkOCTb NIN O6bEKT.
- Panahe lynpaBneHn BapOHn NOBepxHocTn 3a6NOKpOBAHa. Pa36NOKpyIte ee.
Bapouha noBepxHocTb He BBKJIIOuaeTcA
-3a6nokupoBaHa naHEnb ynpaBneHna. Pa36nokpyte ee.
Bapouha noBepxHoctb camonpon3BOJbHO BbIKIOaetc
- PpOJIITaHa 60JbWOM yAcTe XnKIOcTb HnN 60JbWoI OSeKT, NOKpbIbAOuHne, NO KpAHMepe, DBe KHONK B TeHeHNe Me HeMeE 10 C; B cIeNx 63oIaCHOCTBaOpOHn IOBepXHOCTb ATOmatHEeCKn BkIKHOaETcR, B NKIOUaEOCTe3ByKOBOuCnHnA. YdAnitePpOJIITy XnKIOcTb HnN OSeKT.
30HbHarpeBaABTomATMeCKN BbIKIOaIOTc,eCnO OH pa6oTAOT CmUKOM Dnro.CM.NyHKT"Bpempa6oTbI".
Yactota uKKNOB BKNIOueHHe/BbIKIOueHne 3OH HarpeBa
YACTOTAUKNIOBBKNIOHNE/BbIKIOHNE3ABNCNTOTyCTAHOBNYPOBHARpeBa:
Hn3KnyoBeHbHarpeBa:KopoTkoeBpeMa pa60TbI
BbICOKIN yPOBeHb HaPeBa:ДЛNTeJIbHoe BpeM pa60TbI.
Mnraet HndkaTop "H", HndkaTop octatouHoro HarpeBa
CINUKOM BbICOKa Tempepatya 6Ioka 3NEKTOHNI. CneuaJIcT no TexHHeCKOMy 06CnyXBAHIO DOJKeH NPOBepNTb, YTO YCTAHOBKa BblIOJIHeHa B COOTBTCTBNC PekOMeHN DaunmN.
DaHHb 3NeKtpPn6Op HmEeT MapKnpoBky COOTBETCTBnE EBpOneNcKO INpeKTNBte 2002/96/EC no yTNIN3aUN 3NeKtpnueCKoRIO n 3NeKtpoHnro O6OpyDobAHn (WEEE).
PpabnBhaYttnaunMaunHbI NOMOXET npedTbpaTntb HeratBnHO B03eJCTBHe Ha OKyXaOuYIO CpeHy 3DIOOBBe IIOEi.
MapKIMPOBKA Ha n3dennn yka3bIbaeT HA TO, YTO daHHoe 3N3dne HeJIb3B bIb6paBcIbA, KaK 0bHIIbe 6bITObIE 0TXoDbI. MaunHa DoJnxHa 6bITb OCTaBnHe Ha MeCTo C6pOaT6a0TaBwero CBOI cPOK eNkTpMeCKORIO
3NEKPTPOHORO 6OBOPDOBAHIN BIIPOJNHEHNI ee yTINN3aUN. YTNIN3AUHO MAMNH CNEyET PON3BONDTB COOTBETCTBN CMECTHBIMnpaBnAMn OTHCIOENTbHO YTNIN3AUHNOTOXODB
3a 60nee Inpo6bHn HnOpmaueHn OTHOCHTBnHO yTINN3aUN MauHHbI NOBTOPHO nCnlo3bOBAHn HaxoJAAxnc B HeN MaTePnaNoB CJeNyET o6paatb6B a OrpahI MeCTHO rYnpabHeNIA, B MeCTHYO cIyKbOy TYN3aUN
6bIbOBx OTOXoOBNB MAra3nH, rIe BbI npNo6peN DaHHoe N3dEne.
FR
The manufacturer will not be responsible for any inaccuracy resulting from printing or transcript errors contained in this brochure. We reserve the right to carry out modifications to products as required, including the interests of consumption, without prejudice to the characteristics relating to safety or function.
DE
PpOu3BODHTeH He 6epet Ha ce6r OTBETCTBEHOCTb 3a OWH6Kn B DAHHo HNCTpyKun, BO3NHKNue B npoucece neaTH. PpOu3BOHTeB NMeet npabo BHCOTB CBOU N3dEINN KOTOpBc OH COyTe N0NE3bIMn DnR CBOUX N3dEINM, COxPAHRA pN TOM OCHOBHbE XAPAKTEPHCTMNK.