
KA93GAI30N - Fridge SIEMENS - Free user manual and instructions
Find the device manual for free KA93GAI30N SIEMENS in PDF.

User questions about KA93GAI30N SIEMENS
0 question about this device. Answer the ones you know or ask your own.
Ask a new question about this device
Download the instructions for your Fridge in PDF format for free! Find your manual KA93GAI30N - SIEMENS and take your electronic device back in hand. On this page are published all the documents necessary for the use of your device. KA93GAI30N by SIEMENS.
USER MANUAL KA93GAI30N SIEMENS
4.2 CmHa Ha npbkkata Ha BpaTaTa 10
4.2.1 ⅢBaXdaHe Ha npBxKata Ha BpaTata 10
4.2.2 MoHTnpaHe Ha IpBkKaTa Ha BpaTaTa 10
4.3 CmHa Ha paTaa 11
4.3.1 ⅢBaJdaHe Ha paΦTa 11
4.3.2 MoHTnpaHe Ha paΦTa 11
4.4 CmHa Ha Ta6nKata 3a 6yTnKn.. 12
4.4.1 CbajHe Ha Ta6JnUkata 3a 6yTNIK 12
4.4.2 MoHTnpaHe Ha Ta6mKata 3a 6yTnIKn 12
4.5 CmHa Ha cTeIaxa Ha BpaTata 13
4.5.1 ⅢBaXdaHe Ha cTeNaXHa BpaTaTa 13
4.5.2 MoHTpaHe Ha CTenaja Ha BpaTaTa 13
4.6 CmHa Ha KOHTeHepTe 14
4.6.1 ⅢBaKaDaHe Ha KOHTeHepuTe 14
4.6.2 MoHTnpaHe Ha KOHTeHepTe 14
4.7 CMHa Ha LED lamnata 15
4.7.1 CbajHe Ha LED lamnata 15
4.7.2 Noctabare Ha LED lamnata 16
OTHOCHO To3n DokyMeHT
1.1 Baxha nHΦopMaζη
1.1.1 Uen
TeHc cBbETn 3a pEmOH T NOMarat Ha Ntpe6nTEnla da pEmOHtnpa Cam ypeiB n BcOTBeTCTBnC pernameHTa 3a ekONOrOcb6p3No npoeKtnpaHe Ha ypeiNe (OT03.2021 r.).
Te cbIbpxkT INHΦOpMaJN KAK Da CMeHrTe ONpeDeneHn pe3epBn YactN, BKIOH-TEINHO pnpynpeKdEHN n PNCKOB.
Ako IMATE HRAKAKINBbIPOCS,MOJIa CbIpXeTe Ce hAUNIOTEN3a 06CNYBAHe Ha KIMENTH. Hne HOCIM OTTOBOPHOCT 3a IETNI, CAMO AKO CbBEITNe 3a peMOHT ca cna3EH npabInHO.
1.2 06aCHeHne Ha cHMBOJInTe
1.2.1 HbHa onaCHOCT
IpeynpeintenHnBaCe cBcTOrT OT CmB0J nCnHaHa Dyma.CnrHaHaTa yMa noka3Ba cepno3HOCTTA Ha onaCHOCTTA.
| Ниво на п dedурждени 3начени | |
| ОПАСHОCT | Еспаразы新股у на п dedурждени.TО сбоб Shedени по Смьт ини сернони наразяваим. |
| ПРEDУПЕЖДЕНЕ | Еспаразы新股у на п dedурждени.TOTСбob Shedени по Смьт ини сернони наразяваим. |
| ВИМATEЛНО | Еспаразы新股у на п dedурждени.TOTСбob Shedени по Смьт ини наразяваим. |
| ВИМАМЕЛ | Еспаразы新股у на п dedурждени.TOTСбob Shedени по Смьт ини смьз. БЕСТВЕНI.YE.TN. |
Tabuua 1: Hua Ha onachocm
1.2.2 Cnmbon3a onachoct
CIMBOHTE3aONACHOCTCa CIMBOHNUH N3o6paXeHNA, KOHTO DaBaT INDINKAUHA 3a BnDa ONACHOCT.
BTo3n DOKyMeHCTe H3N013BaT CNEdHInTe CMBOIN 3a OnaCHOCT:
MoHTnpaTBeBobpaTeHpeI.

PemOH
4.3 CmHa Ha paΦTa
N3nCKBaHe:
BpaTaTa e oTbopeHa.
4.3.1 N3BaXdAne Ha paΦTa
H3dpnaiTepaTa.
PaftbtecbaneH.
4.3.2 MoThnpaHe Ha paΦTa
MOHTnpaTeB06paTeHpeI.

PemOH
4.4 CmHa Ha Ta6nKaTa 3a 6yTnKn
M3nCKBaHe:
BpaTaTa e OTBopeHa.
4.4.1 CbAHe Ha Ta6nukata 3a 6yTmKn
H3dbpnaTe Ta5nHkata 3a 6ytnkn.
Ta5nukata3a6ytnknecbaneHa.
4.4.2 MoThiPaHe Ha Ta6JnUkata 3a 6yTnIkn
MoHTnpaIteB06paTeHpeI.

PemOH
4.5 CmHa Ha cTeJaXa Ha BpaTaTa
M3nCKBaHe:
Bpatae oTbopeha.
4.5.1 N3Baxdahe Ha CTenaxa Ha BpaTata
NobHHeTcTeJaxHaBaPaTaHarope.
CTenakbT Ha BpaTaTa e CbaNeH.
4.5.2 MoNTupaHc HcTeNaKa Ha BpaTaTa
MOHTnpaTBeBobpaTeHpeI.

PemOH
4.6 CMHa Ha KOHTeHepnTe
M3nCKBaHe:
BpaTaTa e oTbopeHa.
4.6.1 N3BaXdAne Ha KOHTeHepTe
H3IbpaTe KOHTeHepa DOKpa, NOBnHETe ro, 3a da ro OTdEnITE OT dbpkaHa, Hro H3BaTe.

KoHTeHHePbTe n3BaDeH.
4.6.2 MoHTnpaHe Ha KOHTeHepnte
MoHTnpaIteB06paTeHpeI.

PemOH
4.7CMaHa Ha LED JAmnata

BaWnATypeDcHabCHeLCEOHTeH3NCKBnOaDpBbKk. TObaOCBeTneHMeMOKe Da6BepeMoHTnpaHO CaMOOT CNeuHaNCT OTcynb6ataa06cnyKaBeHNa KIneHTn NmOT KbannPunpaHnTe Hmni!


ONACHOCT
Pnck ot TokOB yap nopadn qactn noHanpeXeHne!
Onachoc3a JKBOTA OT TOKOB ydap B cnyaHa HnpaBnneH peMOHT
EneKtpmcknTpeAaTn Tp8Ba da ce pemOHnpat OT kBaanHnHnpan H eneKtpoTeXnHn.
CnepemOnTA Tp6BaJa ce N3BbPmI npOBepKa 3a 6E30NaCHOCTcBJIaHcO VDE 0701 mN B cTbETCTBME Cbc nEuHHTMe 3actPAnahata pAnopeD6M

BHIMATEIHO
Octpn pb6oBe!
HapaHaBaHmO Tnpa3BaHe
HocTe npedna3n pbKaBn.
M3NCKBaHe:
YpeBt E n3KIOueHOT 3aXpaHbHeTo.
BpaTaTa e oTbopeHa.
TogHnT paFte cBaneH.
4.7.1 CbajHe Ha LED JAMnata
- XbaheTe kanaka Ha LED lamnata c DBe pBue n dpbnHete HADONY

KanakbHaLEDJamnataeCBaneH
2.ИЗырnaиTeи n3BaTeLE LEDЯmnaTа

PemOH
- NsbaTe KneMaTa
LED namnata e 3BaedeHa.
4.7.2 NocTaBHe Ha LED lamnata
MOnTnpaIteB06paTeHpeI.
Apparaat is losgekoppeld is van de stroomvoorziening. Deur is open.
Repair hints - Fridge-freezer
1 Concerning this document. 78
1.1 Important information 78
1.1.1 Purpose 78
1.2 Explanation of symbols 78
1.2.1 Danger levels.. 78
1.2.2 Hazard symbols 78
1.2.3 Structure of the warnings 79
1.2.4 General symbols 79
Safety 80
2.1 General Safety instructions 80
2.1.1 All domestic appliances 80
Tools and aids. 81
Repair 82
4.4 Replacing bottle tray. 87
4.4.1 Removing bottle tray 87
4.4.2 Installing bottle tray 87
4.5 Replacing door rack 88
4.6 Replacing containers 89
4.6.1 Removing containers 89
4.6.2 Installing containers 89
4.7 Replacing LED lamp 90
4.7.1 Removing LED lamp 90
4.7.2 Installing LED lamp 91
Concerning this document
1.1 Important information
1.1.1 Purpose
These repair hints support consumer to repair appliances by himself according to the applicable eco-design regulation (as of 03/2021).
They contain information how to exchange defined spare parts including warnings and risks.
In case of questions, please contact our customer service. We will only be liable for damages if the repair hints have been followed properly.
1.2 Explanation of symbols
1.2.1 Danger levels
The warning levels consist of a symbol and a signal word. The signal word indicates the severity of the danger.
Table 1: Danger levels
| Warning level Meaning | |
| Danger | Non-observation of the warning message will result in death or serious injuries. |
| Warning | Non-observation of the warning message could result in death or serious injuries. |
| Caution | Non-observation of the warning message could result in minor injuries. |
| Notice | Non-observation of the warning message could result in damage to property. |
1.2.2 Hazard symbols
Hazard symbols are symbolic representations which give an indication of the kind of danger.
The following hazard symbols are used in this document:
| Hazard symbol Meaning | |
| ! | General warning message |
| Danger from electrical voltage | |
| Risk of explosion | |
| Danger of cuts | |
| Danger of crushing |
Concerning this document
| Hazard symbol Meaning | |
| Danger from hot surfaces | |
| Danger from strong magnetic field | |
| Danger from non-ionizing radiation |
Table 2: Hazard symbols
1.2.3 Structure of the warnings
Warnings in this document have a standardised appearance and a standardised structure.
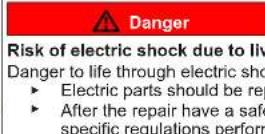
Danger
Type and source of danger!
Possible consequences of ignoring the danger / warning.
Measures and prohibitions for preventing the danger.
The following example shows a warning that warns against electric shock due to live parts. The measure for avoiding the danger is mentioned.
Danger
Risk of electric shock due to live parts!
Death by electrocution
- Disconnect appliances from electrical supply at least 60 seconds before starting repairs.
1.2.4 General symbols
The following general symbols are used in this document:
| Gen. symbol Meaning | |
| 1 | Identification of a special tip (text and/or graphic) |
| i | Identification of a simple tip (only text) |
| Identification of a link to a video tutorial |
| Gen. symbol Meaning | |
| Identification of required tools | |
| Identification of required preconditions | |
| Identification of a condition (if ..., then ...) | |
| Identification of a result | |
| [Start]Identification of a key or button | |
| [00123456] Identification of a material number | |
| Status Identification of displayed text / window(in the appliance's display) | |
Table 3: General symbols
Safety
2.1 General Safety instructions
2.1.1 All domestic appliances
Risk of electric shock due to live parts!
Errors by repairs involving electrical components can lead to electrical shock!
- Disconnect the appliance from the mains for at least 60 seconds before starting work.
After the repair have a safety test according VDE 0701 or country-specific regulations performed.
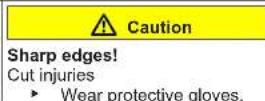
Risk of injury from sharp edges!
Wear protective gloves.
Risk of crushing during repair, maintenance, troubleshooting and service due to heavy and moving components
Wear protective shoes.
- Secure heavy components from falling down.
- Do not stick body parts into moving components.
Risk to the appliance's safety / function!
Only use original spare parts.
Risk of damage to electrostatically sensitive components (ESDs)!
- Do not touch the modules, including connections and conductor paths.

Tools and aids
| Designation Details Images | ||
| Protection cloth [00342013] | 60 cm x 50 cm | |
| Hexagon socket wrenches [00340819] | 2 mm, 2.5 mm, 3 mm, 4 mm, 5 mm, 6 mm, 8 mm | |
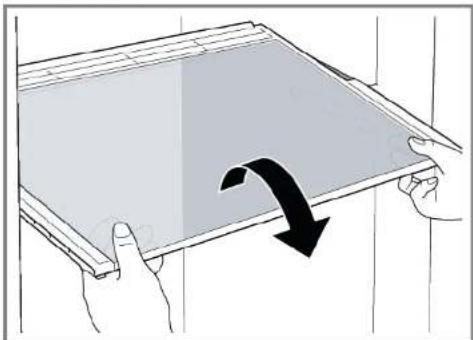
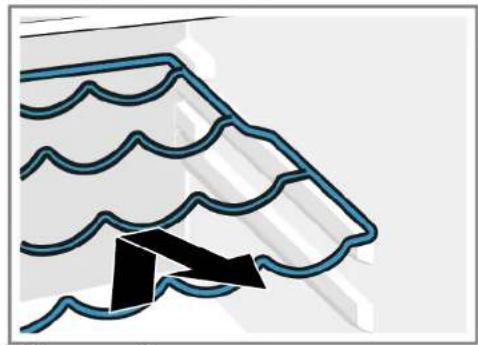
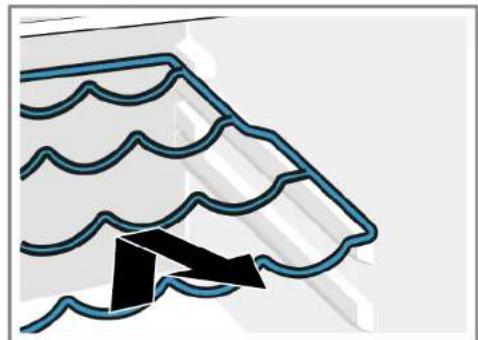
Prerequisite:
Door is open.
- Release door gasket from the groove on right and left corner.
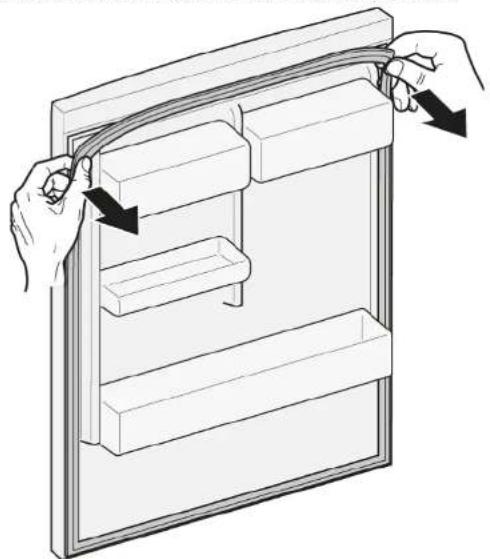
- Pull out door gasket from groove.

Door gasket is removed.
| Thickness of new door gasket may deviate slightly from thickness of old door gasket. This will not affect closing behavior and long-term function. | |
| If your appliance has adjustable hinges or hinge attachments, you can optimize the closing behavior subsequently. | |
| Small side holes in door gasket are functional (required for ventilation). These are not production faults. |

Repair
- Check groove for gasket for damage.
- If groove for gasket is it is damaged.
- Contact customer service.
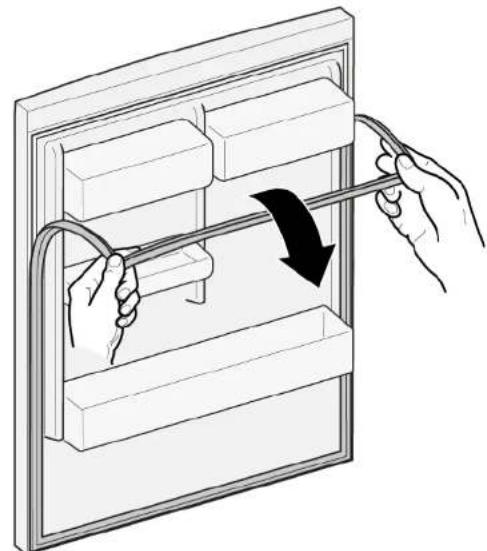
- Slight deformation of door gasket is normal and does not affect its function. It is recommended to straighten door gasket before inserting it into appliance.
Heat door gasket with a hair dryer or hot water and manually reshape it.
- Push corners of gasket at the top and bottom to the groove.


Repair
- Press whole gasket step by step into the groove.

Door gasket is installed.
Hexagon socket wrenches 2 mm, 2.5 mm, 3 mm, 4 mm, 5 mm, 6 mm, 8 mm [00340819]
Prerequisite:
Appliance is disconnected from power supply.
Door is open.
4.2.1 Removing door handle
-
- Unscrew two screws (1).
-
Remove door handle (2).
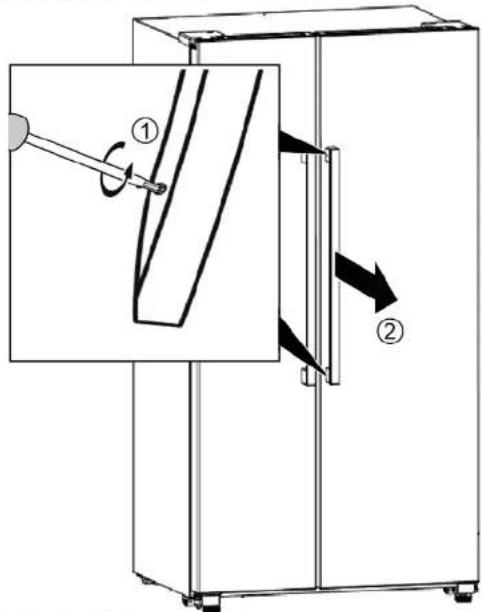

Door handle is removed.
- Remove the second door handle in the same manner.
Install in reverse order.

Repair
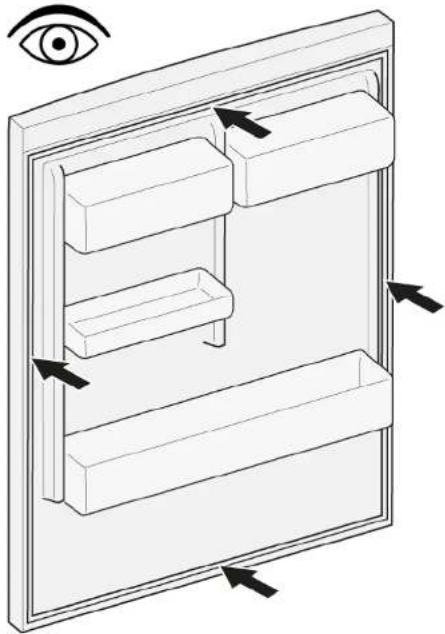
4.3 Replacing shelf
Prerequisite:
Door is open.
4.3.1 Removing shelf
Pull out shelf.

Shelf is removed.
4.3.2 Installing shelf
Install in reverse order.

Repair
4.4 Replacing bottle tray
Prerequisite:
Door is open.
4.4.1 Removing bottle tray
Pull out bottle tray.
Bottle tray is removed.
4.4.2 Installing bottle tray
Install in reverse order.

Repair
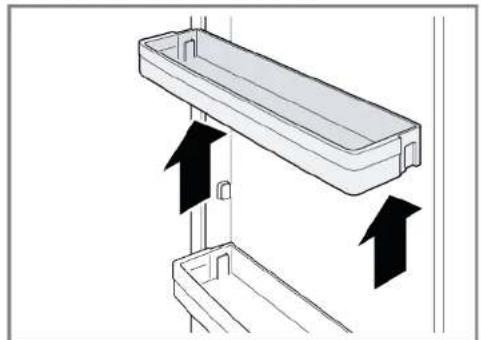
4.5 Replacing door rack
Prerequisite:
Door is open.
- Lift door rack upwards.

Door rack is removed.
Install in reverse order.

Repair
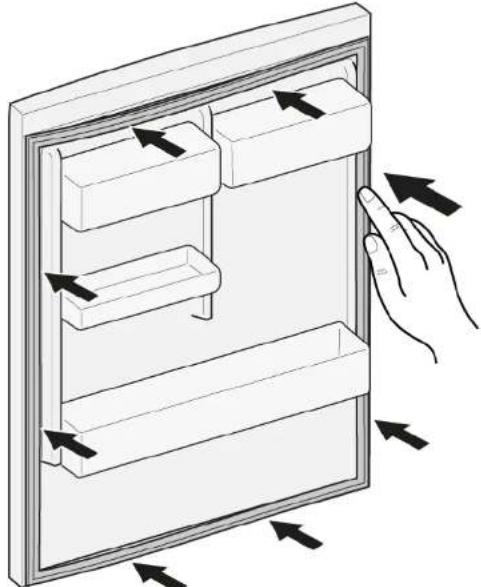
4.6 Replacing containers
Prerequisite:
Door is open.
4.6.1 Removing containers
Pull out container all the way, lift to detach it from the holder and take out.

Container is removed.
4.6.2 Installing containers
Install in reverse order.

Repair
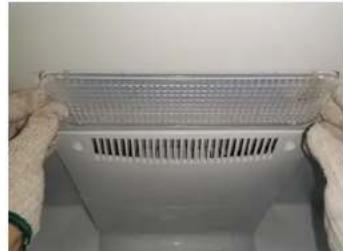
4.7 Replacing LED lamp

Your appliance features a maintenance-free LED light. These lights may be repaired by customer service or authorised technicians only!
Prerequisite:
Appliance is disconnected from power supply.
Door is open.
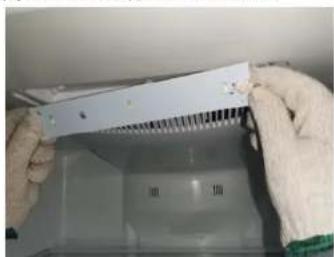
Upper shelf is removed.
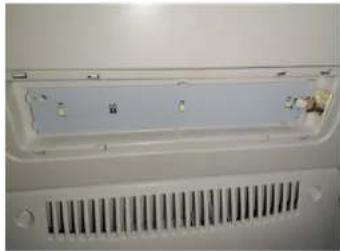
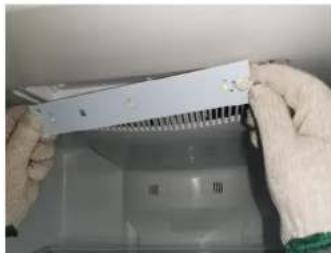
4.7.1 Removing LED lamp
- Catch the LED lamp cover with two hands and pull down
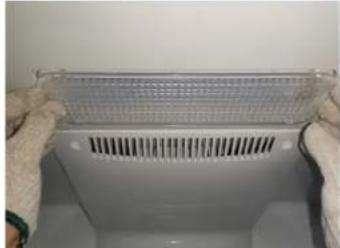

LED lamp cover is removed.
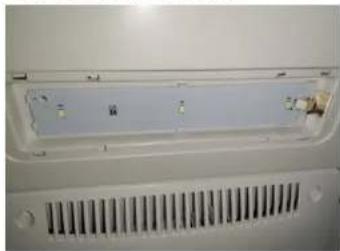
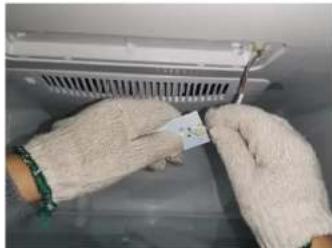
- Pull and take the LED lamp out
- Unplug the terminal
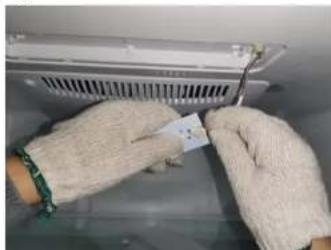
LED lamp is removed.

Repair
4.7.2 Installing LED lamp
Install in reverse order.
Remonditeave - Kombikülmik
1 Selle dokumendiga seoses 93
1.1 Tahtis teave 93
1.1.1 Eesmark 93
1.2 Sumbolite selgitus 93
1.2.1 Ohutaseemed 93
1.2.2 Ohusumbolid 93
1.2.3 Hoiatuste struktuur.. 94
1.2.4 Üldised sumbolid 94
Ohutus. 95
2.1 Üldised ohutusjuhised 95
2.1.1 Koki kodumasinad 95
Tabel 1: Ohutasedmed
1.2.2 Ohusumbolid
Innensechskantschlüssel 2 mm, 2.5 mm, 3 mm, 4 mm, 5 mm, 6 mm, 8 mm
Voraussetzung:
Eayovaa kaiid 2mm,2.5mm,3mm,4mm,5mm 6mm,8mm
[00340819]
Pouot68e0n:
Houkeunivaaonovdeevnanto nV npoxnpoobocia
H Tóptα eivai avoixTH.
4.2.1 Aqapieoan Aaicns npotras
4.7.2 TOnroBcTnON λaμπαc LED
Eykaotnoe nTv aVtiTeo eipa.
4.7 Vymena LED ziarovsky 300
4.7.1 Odobratie LED ziarovsky 300
4.7.2 Montáž LED Žiarovky 301
O tomto dokunte
4.7 Vymena LED ziarovsky

Vo vybave vasho spotrebica je bezudrbove LED svetlo.
Tieto svetla mozeogravovat len zakaznicky servis aleboogravenny technik!

NEBEZPECENSTVO
Nebepezencstvo urazu elektrickym prudom pri dotyku scastami pod napatim!
Ohrozenie ziivota sposobene elektrickym zasaohom v tripade nespravnje spravy
- Tryck in hela packningen i sparet bit for bit.


