
SFW 350 C2 - Meat Grinder SILVERCREST - Free user manual and instructions
Find the device manual for free SFW 350 C2 SILVERCREST in PDF.
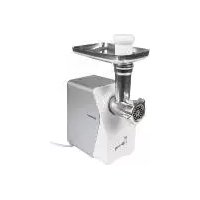
| Product Type | Electric Meat Grinder |
| Brand | SilverCrest |
| Model | SFW 350 C2 |
| Rated Voltage | 220-240 V ~ 50 Hz |
| Power Consumption | 250-350 W |
| Protection Class | II |
| Intermittent Operation Time | 15 minutes, then 30 minutes stop |
| Material of food contact parts | Stainless steel and food-grade plastic |
| Main Functions | Chopping fresh meat, making sausages, preparing kebbe, shortbread cookies, tomato press |
| Included Accessories | Filling tray, stopper, screw conveyor, spring, cross blade, medium grinding plate, fine grinding plate, coarse grinding plate, locking ring, sausage stuffing tube, kebbe attachment, shortbread cookie attachment with pattern disk, tomato press attachment (plastic screw, sieve, tomato ejector, locking collar) |
| Cleaning the motor unit | Damp cloth only, do not immerse |
| Cleaning metal accessories | Hand wash in hot water with dish soap, dry immediately, oil after cleaning |
| Cleaning plastic accessories | Dishwasher (top rack) or hand wash |
| Safety | Cross blade is very sharp, use pusher, unplug before disassembly/cleaning, do not use metal utensils |
| Warranty | 3 years, customer service France: 0800 919270 |
| Usage | Household use only, for domestic quantities |
Frequently Asked Questions - SFW 350 C2 SILVERCREST
User questions about SFW 350 C2 SILVERCREST
0 question about this device. Answer the ones you know or ask your own.
Ask a new question about this device
Download the instructions for your Meat Grinder in PDF format for free! Find your manual SFW 350 C2 - SILVERCREST and take your electronic device back in hand. On this page are published all the documents necessary for the use of your device. SFW 350 C2 by SILVERCREST.
USER MANUAL SFW 350 C2 SILVERCREST
Operating instructions
NL BE
VLEESMOLEN
Gebruiksaanwijizing
ES
PICADORA DE CARNE
Before reading, unfold the page containing the illustrations and familiarise yourself with all functions of the device.
FR BE
KOMPERNASS HANDELS GMBH
BURGSTRASSE 21
DE-44867 BOCHUM
DEUTSCHLAND
www.kompernass.com
Rezepte
Kebbe
Limited liability 24
Intended use 24
Items supplied/Component description. 25
Technical data 26
Safety instructions 26
Assembly/Disassembly. 28
Assembling the meat grinder 28
Assembling the sausage stuffer attachment 29
Assembling the kibbeh attachment 30
Assembling the biscuit attachments 30
Fitting the strainer attachment 31
Operation 32
Operating the appliance 32
Processing meat 33
Processing sausage meat 34
Using the kibbeh attachment 34
Making biscuits 35
Straining tomatoes 35
Non-functionality 36
Cleaning 36
Cleaning the motor block 37
Cleaning the accessories 37
Storage 38
Disposal 38
Fresh Grill Sausages 43
Biscuits 43
Introduction
Congratulations on the purchase of your new appliance.
You have clearly decided in favour of a quality product. These operating instructions are a part of this product. They contain important information in regard to safety, use and disposal. Before using the product, familiarise yourself with all of these operating and safety instructions. Use the product only as described and only for the specified areas of application. Retain these instructions for future reference. In addition, pass these documents on, together with the product, to any future owner.
Copyright
This documentation is copyright protected.
Any copying or reproduction of it, including as extracts, as well as the reproduction of images, also in an altered state, is only permitted with the written authorisation of the manufacturer.
Limited liability
All technical information, data and instructions for the installation, connection and operation contained in these operating instructions correspond to the latest available at the time of printing and, to the best of our knowledge, take into account our previous experience and know-how.
No claims can be derived from the details, illustrations and descriptions in these instructions.
The manufacturer assumes no responsibility for damage caused by failure to observe these instructions, improper use, incompetent repairs, making unauthorised modifications or for using unapproved replacement parts.
Intended use
This appliance is intended only for the preparation of food in quantities expected in domestic households:
Mincing fresh meat.
- Making sausages with natural or artificial sausage skin,
Making biscuits.
Straining tomatoes.
This appliance is not intended for the processing of frozen foods or other hard foodstuffs, e.g. bones or nuts, or for use in commercial or industrial environments.
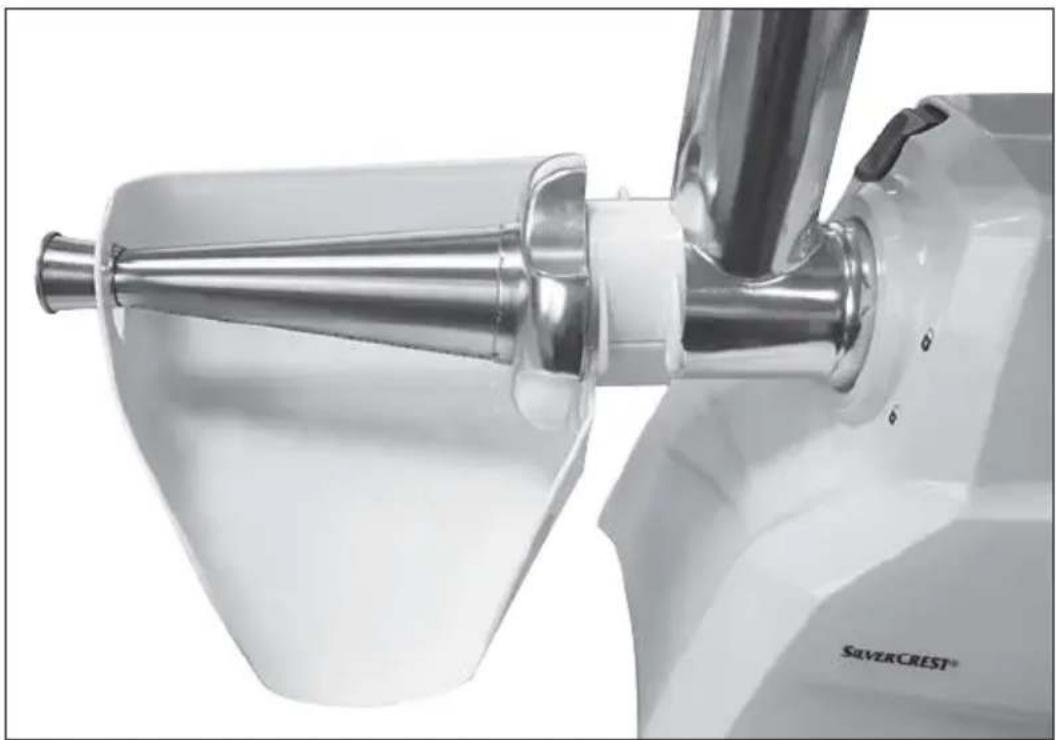
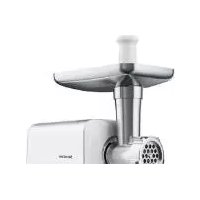
Items supplied / Component description
Figure A:
1 Biscuit attachment with pattern strips
Stodger
Feeding tray
4 Motor unit
5 Meat grinder casing made of metal
Locking clamp
Tomato outlet
8 Plastic screw
Strainer sieve
Transport screw
Spring
12 Cross blade
Medium-sized, fine perforated disc
14 Ring clamp
15 Sausage stuffer attachment
16 Coarse perforated disc
17 Kibbeh attachment
Figure B:
18 Locking button
Figure C:
19 "I" button (on)
20 "O" button (off)
21 n = n button (reverse mode)
Technical data
| Voltage 220 - 240 V ~, 50 Hz | |
| Power consumption 250 - 350 W | |
| Protection class | II / ☐ |
| All of the parts of this appliance that come into contact with food are food-safe. | |
| C.O. Time 15 minutes |
C.O. Time
The C.O. Time (Continuous Operation) details how long an appliance may be used without the motor overheating and being damaged. After the appliance has run for this period it must be switched off until the motor has cooled itself down.
Safety instructions

RISK OF ELECTRIC SHOCK
- Ensure that the power cable does not become damaged. Protect the cable from heat and ensure that it cannot be trapped or clamped.
- Arrange for damaged power cables and/or plugs to be replaced as soon as possible by a qualified specialist or by Customer Services.
- Use the appliance only in dry indoor areas, not outdoors.

Never immerse the motor block in water or any other liquid! If you do, then you could receive a potentially fatal electric shock.

WARNING!
Never use the appliance for purposes other than those listed here. There will be a major risk of serious accidents should you try to neutralise the safety fitments on the appliance!
WARNING! RISK OF INJURY!
- Never put your hand into the openings of the appliance. Do not insert any objects of any kind into the openings - except for the appropriate stodger and the foodstuff to be processed. If you do, there will be a serious risk of accidents!
- Unplug the appliance from the power source before attaching or removing accessories.
- Do not leave the appliance unsupervised when it is ready for use. To avoid it being switched on accidentally, always unplug the appliance after use or during breaks.
- Only use the original accessory parts for this appliance. Other accessories may not meet the safety requirements.
- Never operate the appliance in a no-load condition. This could irreparably damage the appliance.
Before changing accessories or additional parts that are in motion during operation, the appliance must be switched off and disconnected from mains power. - Never use the appliance for purposes other than those described in these instructions.
- Warning: the cross blade is very sharp! Always take care when handling and cleaning the appliance.
The appliance should always be disconnected from the mains when unattended and before assembly, disassembly or cleaning.
This appliance may not be used by children.
The appliance and its connecting cable must be kept away from children.
WARNING! RISK OF INJURY!
- This appliance may be used by persons with limited physical, sensory or mental capabilities or lack of experience and knowledge, provided that they are under supervision or have been told how to use the appliance safely and are aware of the potential risks.
The appliance must not be used as a plaything by children.
Assembly/Disassembly
CAUTION - PROPERTY DAMAGE!
- All accessories are coated with a thin film of oil to protect them from corrosion. Therefore, carefully clean all of the parts before using the appliance for the first time, as described in detail in the chapter "Cleaning". After subsequent usage, always apply a light coating of cooking oil to the metallic components.
NOTICE
Before using for the first time, remove the protective foil from the control panel.
Assembling the meat grinder
Unfold the fold-out side. There you will find the step-by-step illustrations for assembling the appliance.
1) Place the transport screw in the meat grinder casing.
2) Place the spring 1 onto the transport screw 10.
3) Then fit the cross blade 12 on so that the sharp side points away from the spring 1. Ensure that the square opening in the cross blade 12 is placed correctly on the square axle.


WARNING! RISK OF INJURY!
The cross blade is very sharp! Risk of injury!
CAUTION - PROPERTY DAMAGE!
The appliance will be damaged if the cross blade 12 is inserted the other way around!
4) Select the required perforated disc 18/16.
5) Place your selected cutting disc 13/16 into the meat grinder casing 5 so that the fixings on the cutting disc 13/16 are located in the openings in the meat grinder casing 5.
6) After everything has been correctly assembled, screw the ring clamp 14 back on hand-tight.
7) The ready-assembled meat grinder casing 5 is connected by a bayonet connector to the motor unit 4:
- Insert the meat grinder casing 5 into the motor unit 4 such that the arrow on the meat grinder casing 5 lies against the symbol 6 on the motor unit 4. The locking button 18 presses itself in (Fig. B).
- Lightly press the meat grinder casing 5 in and at the same time turn the feeding shaft on the meat grinder casing 5 into the middle position (Fig. B) so that the arrow on the feeding shaft points to the symbol ⑦. When the meat grinder casing 5 engages, the locking button 18 springs out.
- Finally, place the feeding tray 3 on top of the feeding funnel.
- To dismantle it, press the locking button 13 and turn the feeding funnel to the right (Fig. B). You can now pull the meat grinder casing 5 out.
Assembling the sausage stuffer attachment
Unfold the fold-out side - there you will find the step-by-step illustrations for assembling the appliance.
1) Remove the meat grinder casing 5 as described under "Assembling the meat grinder".
2) Dismantle all parts which are fitted to/in the meat grinder casing 5 and clean them.
3) Coat all metal parts with cooking oil.
4) Put the transport screw 10, the spring 11 and the cross blade 12 back into the meat grinder casing 5.
5) Insert the coarse perforated disc 16 so that the fixings on the disc 16 are inside the recesses on the mincer attachment 5.
6) Then place the sausage filling attachment 15 in front of the coarse perforated disc 16.
7) Screw the ring clamp 14 on hand-tight.
8) Assemble the meat grinder casing 5 as described under "Assembling the meat grinder".
Assembling the kibbeh attachment
Unfold the fold-out side. There you will find the step-by-step illustrations for assembling the appliance.
1) Remove the meat grinder casing 5 as described under "Assembling the meat grinder".
2) Disassemble any attachments that might be fitted and clean the meat grinder casing.
NOTICE
For the kibbeh attachment 17, the cross blade 12 with the spring 11 is not required! If need be, remove them both from the meat grinder casing 5. The transport screw 10 remains inside the mincer attachment 5.
3) Coat all metal parts with cooking oil.
4) If not already done, place the transport screw inside the mincer attachment.
5) Insert the two plastic parts of the kibbeh attachment 17 so that the fixings on the bottom kibbeh attachment 17 ring are located in the openings in the meat grinder casing 5.
6) When everything has been attached correctly, screw the ring clamp 14 back on hand-tight.
7) Assemble the meat grinder casing 5 as described under "Assembling the meat grinder".
Assembling the biscuit attachments
Unfold the fold-out side. There you will find the step-by-step illustrations for assembling the appliance.
1) Remove the meat grinder casing 5 as described under "Assembling the meat grinder".
2) Disassemble any attachments that might be fitted and clean the meat grinder casing.
NOTICE
For the biscuit attachment 1, the cross blade 2 with the spring 1 is not required! If need be, remove them both from the meat grinder casing 5. The transport screw 10 remains inside the mincer attachment 5.
3) Coat all metal parts with cooking oil.
4) If not already done, place the transport screw inside the mincer attachment.
5) Pull the pattern strips 1 away from the front of the biscuit attachment 1.
6) First place the plastic disc and then the metal disc of the biscuit attachment 1 into the meat grinder casing 5 (see fold-out side). Insert the biscuit attachment 1. so that the fixings on the biscuit attachment 1. are located in the openings in the meat grinder casing 5.
7) After everything has been correctly assembled, screw the ring clamp 14 back on hand-tight.
8) Replace the pattern strips ① back in to the front of the biscuit attachment ①. Ensure that the grip on the pattern strips ① points away from the appliance. If it does not, you will not be able to adjust the pattern, which is located directly on the grip.
9) Assemble the meat grinder casing 5 as described under "Assembling the meat grinder".
10) To dismantle it, you must first remove the pattern strips ① before you can screw the ring clamp ⑫ open and take the biscuit attachment ① back out.
Fitting the strainer attachment
Unfold the fold-out page - it contains the step-by-step illustrations for assembling the appliance. The figure displayed under point 8) will help you assemble the appliance.
1) Remove the meat grinder casing 5 as described in "Assembling the meat grinder".
2) Remove any attachments that might be fitted and clean the meat grinder casing 5.
NOTICE
The transport screw 10 and the cross blade 12 with the spring 11 are not required for the strainer attachment! Remove these from the meat grinder casing 5 if necessary.
3) Push the plastic screw 8 into the meat grinder casing 5.
4) Push the strainer sieve over the plastic screw so that the tabs on the strainer sieve fit into the recesses in the meat grinder casing. The holes of the strainer sieve should be facing downwards.
5) Once everything has been correctly attached, roll the ring clamp 14 over the strainer sieve 9 and screw it on hand-tight.
6) Fit the meat grinder casing 5 as described in "Assembling the meat grinder".
7) Undo the locking clamp 6 on the tomato outlet 7.
8) Place the tomato outlet ⑦ under the strainer sieve by pushing the tip of the strainer sieve ⑨ through the small hole in the tomato outlet ⑦:
9) Fasten the locking clamp ⑥ so that it grips the meat grinder casing ⑤ .
Operation

RISK OF ELECTRIC SHOCK
- NEVER open the housing of the motor unit 4 - it does not contain any user-serviceable elements. If the housing is opened, the warranty becomes void. If the housing is opened, there is a risk of receiving a potentially fatal electric shock.
CAUTION - PROPERTY DAMAGE!
Do not use the appliance for longer than 15 minutes continuously. To avoid an overheating of the appliance, after such a period switch it off and allow it to cool down for ca. 30 minutes.
NEVER activate the buttons "1" or "<" 2, during a change of rotation direction, if the appliance motor has not come to a complete stop. This could damage the motor.
Operating the appliance
Once the appropriate attachments have been fixed:
1) Place the appliance where it will at all times be absolutely stable and under no circumstances could it fall off of the work surface or in any way come into contact with water (due to vibrations or becoming snagged in the power cable). Vibration is unavoidable when it is working.
RISK OF ELECTRIC SHOCK
- Never touch an appliance, which is plugged in or is operational when it happens, that falls or lands in water - or in the case of other emergencies! First disconnect the appliance from the mains power source in all emergency situations! Otherwise you run the risk of serious injury or loss of life!
2) Put the food which is to be processed in the feeding tray 3 and place a catchment container at the front under the exit opening.
3) First press the button "0" to check that the appliance is still switched off. Otherwise there is a risk that the appliance could unintentionally start when the plug is inserted into the power socket.
4) Then insert the plug into a mains power socket.
5) Press the button "I" to start the appliance.
WARNING! RISK OF INJURY!
- Push the foodstuff into the feeding shaft ONLY with the round stodger 2 - NEVER with one's fingers, forks, spoons or similar objects. That could lead to physical injury and also damage the appliance.
CAUTION - PROPERTY DAMAGE!
- Do not ever press so hard that the motor gets audibly slower. This could overburden the machine and damage it.
Processing meat
1) Use pieces of meat that fit easily into the feeding funnel. If necessary, cut the meat to size beforehand. Check that the meat does not have any bones and or tendons.
WARNING!
- Minced meat is very prone to bacterial contamination. Therefore take care to maintain good hygiene when processing meat. If you do not, it may cause serious health problems.
2) When you have read and understood all of the instructions on the topic "Meat", you can now use the appliance as described in the chapter "Operating the appliance".
Processing sausage meat
1) Pass meat through the meat grinder twice before using it as sausage stuffing.
2) To make sausage stuffing, add some chopped onions, spices and other ingredients to the minced meat, as per your recipe, and knead the mixture well. Refrigerate this for 30 minutes before processing it further.
3) Pull one end of the sausage skin (natural or artificial sausage skin) onto the sausage stuffer attachment 15 and tie a knot in the other end. For 1kg of the filling, you will need approximately 1.60m of sausage skin.
TIP!
Soak the natural sausage skin in lukewarm water for about 3 hours before using it and wring it out before attaching it. This will make the natural sausage skin more elastic. Natural sausage skins are available from butcher suppliers close to slaughter houses or from your family butcher.
4) The sausage mixture will be pressed into the sausage skin by the sausage stuffer attachment ⑤. When it is long enough switch the appliance off, press the sausage together at the ends and rotate it a couple of times along its longitudinal axis.
TIP!
Sausage meat tends to expand when cooked or frozen. Therefore, to prevent it from bursting it is best not to overstuff the sausage.
5) When you have read and understood all of the instructions on the topic "Sausage", you can now use the appliance as described in the chapter "Operating the appliance".
Using the kibbeh attachment
With the kibbeh attachment ⑦ foodstuffs can be processed to form hollow rolls of meat or vegetables, which can then be stuffed as desired.
1) First put the meat through the meat grinder twice before pressing it through the kimbeh attachment
2) When you have read and understood all of the instructions on the topic "kibbeh-attachment", you can now use the appliance as described in the chapter "Operating the appliance".
Making biscuits
After you have made the biscuit pastry according to your recipe, and after having fixed the biscuit attachment 1:
1) Line a small baking tray with greaseproof paper and place or hold it directly under the exit opening at the front of the appliance.
2) Press pastry evenly into the meat grinder casing 5 - the transport screw 10 then pushes it through the selected design on the design motif strip of the biscuit attachment 1.
3) When the biscuit is the required length, stop the appliance and break the pastry off at the exit opening. Lay the biscuits on the baking tray.
4) When you have read and understood all of the instructions on the topic "Biscuits", you can now use the appliance as described in the chapter "Operating the appliance".
Straining tomatoes
- Place a container under the tomato outlet 7.
2) Place a container at the front under the strainer sieve 9.
3) Quarter the tomatoes and push them slowly and evenly into the meat grinder casing 5.
The plastic screw 8 pushes the tomatoes through the strainer attachment. The strained tomatoes fall in the tomato outlet 7. The tomato skin is ejected at the front from the strainer sieve 9.
NOTICE
If tomato juice starts leaking from the screw joints of the strainer attachment, this can have the following causes:
-You are working too fast.
- You are using too much pressure to press the tomato pieces into the appliance.
The tomato pieces are too large.
Try working more slowly; press the tomato pieces gently into the appliance and cut the tomatoes into smaller pieces.
4) Once you have read and understood all of the instructions in the section "Straining tomatoes", you can use the appliance as described in the section "Operating the appliance".
Non-functionality
If the drive is blocked by accumulated food:
Press the button "0" to stop the meat grinder.
Press and hold the button << ②. The appliance will now run in the reverse direction. This enables you to transport the food which has become stuck a short way backwards, and the motor to run freely again.
When the drive runs smoothly again, release the << button.
Press the button "I" to re-start the meat grinder.
If you do not succeed in getting the drive free with this, clean the appliance as described in the chapter "Cleaning".
Should the motor suddenly stop, it could be due to automatic activation of the internal overload fuse. This is intended to protect the motor.
- Switch the appliance off and allow it cool down for approximately 30 minutes before continuing to use it.
Should this not work, wait for a further 15 minutes.
If it still does not function at the end of this period, this indicates a technical problem. In this case, contact the Customer Service Centre.
If the power cable is damaged or the accessories are visibly damaged:
Immediately switch the appliance off by pressing the "0" button!
If this is not possible without risk to personal safety, disconnect the plug from the mains power socket.
- Arrange for the defective parts to be repaired by Customer Services before re-using the appliance.
Cleaning

RISK OF ELECTRIC SHOCK
- Disconnect the plug from the mains power socket before cleaning the appliance. In this way accidents caused by the inadvertent switching on of the appliance and electric shocks can be avoided.
Cleaning the motor block
Clean the exterior surfaces and the power cable with a slightly damp cloth. Dry the appliance well before re-using it.

RISK OF ELECTRIC SHOCK
- Never immerse the motor block in water or any other liquid! Should this occur, you are at risk of a potentially fatal electric shock if permeating moisture makes contact with the electrical wiring.
CAUTION - PROPERTY DAMAGE!
- Never use detergents, abrasive cleaners or solvents. These could damage the appliance and leave residues on the foodstuffs.
Cleaning the accessories
NOTICE
- Do not clean any metal components in the dishwasher! This can damage the components!
Metal components in contact with food should be cleaned ...
- by hand only, the accessories are not dishwasher safe.
- with hot water and a household detergent suitable for use with foods.

WARNING! RISK OF INJURY!
The cross blade is very sharp! Risk of injury!
Dry all parts thoroughly, before re-using the appliance.
NOTICE
Apply a light coating of cooking oil to all metallic components after each cleaning! Otherwise, metal parts can discolour!
You can clean plastic components in the dishwasher. Place the parts in the upper basket only and ensure that none of the parts can get stuck. This may cause them to become deformed. If this is not possible, clean the plastic components in warm water and mild washing-up liquid. Rinse all the parts off using clean water. Dry all parts well.
Storage
Push the power cable (but not the plug) into the cable storage shaft under the appliance base. There it is protected from damage.
Store the appliance at a dry location.
■ After drying the metal attachments coat them lightly with a little cooking oil - if you are not going to use the appliance immediately. This will protect them from corrosion.
Store the appliance where it will be out of reach of children and people requiring supervision. They are not always able to correctly assess the potential risks involved with using electrical appliances.
Disposal
Do not dispose of the appliance in your normal domestic waste. This product is subject to the provisions of European Directive 2012/19/EU (Waste Electrical and Electronic Equipment).
Dispose of the appliance through an approved disposal centre or at your community waste facility. Observe the currently applicable regulations. In case of doubt, please contact your waste disposal centre.

Dispose of all packaging materials in an environmentally friendly manner.
This appliance has a 3-year warranty valid from the date of purchase. If this product has any faults, you, the buyer, have certain statutory rights. Your statutory rights are not restricted in any way by the warranty described below.
Warranty conditions
The validity period of the warranty starts from the date of purchase. Please keep your original receipt in a safe place. This document will be required as proof of purchase.
If any material or production fault occurs within three years of the date of purchase of the product, we will either repair or replace the product for you at our discretion. This warranty service is dependent on you presenting the defective appliance and the proof of purchase (receipt) and a short written description of the fault and its time of occurrence.
If the defect is covered by the warranty, your product will either be repaired or replaced by us. The repair or replacement of a product does not signify the beginning of a new warranty period.
Warranty period and statutory claims for defects
The warranty period is not prolonged by repairs effected under the warranty. This also applies to replaced and repaired components. Any damage and defects present at the time of purchase must be reported immediately after unpacking. Repairs carried out after expiry of the warranty period shall be subject to a fee.
Scope of the warranty
This appliance has been manufactured in accordance with strict quality guidelines and inspected meticulously prior to delivery.
The warranty covers material faults or production faults. The warranty does not extend to product parts subject to normal wear and tear or fragile parts such as switches, batteries, baking moulds or parts made of glass.
The warranty does not apply if the product has been damaged, improperly used or improperly maintained. The directions in the operating instructions for the product regarding proper use of the product are to be strictly followed. Uses and actions that are discouraged in the operating instructions or which are warned against must be avoided.
This product is intended solely for private use and not for commercial purposes. The warranty shall be deemed void in cases of misuse or improper handling, use of force and modifications / repairs which have not been carried out by one of our authorised Service centres.
Warranty claim procedure
To ensure quick processing of your case, please observe the following instructions:
Please have the till receipt and the item number (e.g. IAN 12345) available as proof of purchase.
- You will find the item number on the type plate, an engraving on the front page of the instructions (bottom left), or as a sticker on the rear or bottom of the appliance.
If functional or other defects occur, please contact the service department listed either by telephone or by e-mail.
■ You can return a defective product to us free of charge to the service address that will be provided to you. Ensure that you enclose the proof of purchase (till receipt) and information about what the defect is and when it occurred.

You can download these instructions along with many other manuals, product videos and software on www.lidl-service.com.
Service
GB Service Great Britain
Tel.: 0871 5000 720 (£ 0.10/Min.)
E-Mail: kompernass@lidl.co.uk
IE Service Ireland
Tel.: 1890 930 034
(0,08 EUR/Min., (peak))
(0,06 EUR/Min., (off peak))
E-Mail: kompernass@lidl.ie
IAN 285532
Importer
Please note that the following address is not the service address.
Please use the service address provided in the operating instructions.
KOMPERNASS HANDELS GMBH
BURGSTRASSE 21
DE-44867 BOCHUM
GERMANY
www.kompernass.com
Recipes
Kibbeh
Ingredients for the mince filling
400 g lean beef or lamb
2 onions
10gflour
25g coarsely chopped pine nuts
1/2 tsp. each of ground allspice, cinnamon, cumin, caraway, cloves, nutmeg
Salt and pepper
Ingredients for the shell
500g bulgur wheat (soaked)
500 g lean beef or lamb
1 onion
1 pinch of black pepper, 1 pinch of chilli
Mince filling
Prepare the mince filling first and leave it to cool while you prepare the shell.
Chop the meat twice with the mincer (using first the coarse, then the fine perforated disc 13). Mix the meat, flour, pine nuts and spices well. Chop and sear the onions. Add the mince and mix it with the onions. Thoroughly fry the mixture, then let it cool.
Shell
Chop the meat for the shell twice with the mincer (using first the coarse, then the fine perforated disc 13) and mix it with the bulgur wheat, chopped onion and spices. Process the mass twice more using the mincer. Replace the perforated disc 13 with the kibbeh attachment 17 (see chapter "Installing the kibbeh attachment") and make kibbeh shells of approx. 7 cm length.
Preparation
Fill each kibbeh shell with the mince as soon as it is made, pinching the ends together to create small pouches. Deep-fry the finished kibbeh in hot oil (190 °C) for approximately 3 minutes. They should have a golden brown colour.
Meat rolls
Ingredients for the mince shell
450 g of lean Lamb, Veal or Beef
150 g Flour
1 Tsp Pimento (type of pepper)
1 Tsp Nutmeg
1 Pinch Chili powder
1 Pinch Pepper
Ingredients for the meat filling
700 g Mutton
1 1/2 Tbsp Olive oil
1 1/2 Tbsp Onions, finely chopped
1/2 Tsp Pimento (type of pepper)
1/2 Tsp Salt
1 1/2 Tbsp Flour
Pass the meat for the wrapping through the meat grinder twice (using first the medium-sized, then the fine perforated disc 3) and then combine it with the ingredients. Then pass this mixture through the meat grinder twice. Exchange the cutting disc 15 for the kibbeh attachment 17 (see chapter "Using the kibbeh attachment").
Shape the kibbeh wrappers with the kibbeh attachment 17 and then freeze them.
Filling:
Pass the meat through the meat grinder twice (using first the medium-sized, then the fine perforated disc 3). Saute the onions and then mix them well with the meat and other ingredients. Fill the kibbeh wrappers and fry until done.
Alternative Fillings:
250 g steamed Broccoli
or 250g steamed Zucchini
or 250g cooked Rice
Fresh Grill Sausages
Ingredients:
300 g lean Beef
500 g lean Pork
200 g Shoulder bacon
20 g Salt
1/2 Tsp ground white Pepper
1 Tsp Caraway
1/2 Tsp Nutmeg
Pass the beef, pork and bacon through the meat grinder twice.
Add the mixed spices and salt and thoroughly knead for 5 minutes.
Place the sausage filling in the refrigerator for ca. 30 minutes. Fill the skins with sausage meat as detailed (see chapter "Processing sausage meat") and make sausages of ca. 25cm in length.
Grill the sausages well and eat them on the same day.
Biscuits
Ingredients:
500 g butter
500 g sugar
2-3 packets of vanilla sugar
1 packet of vanilla custard
1/4 tsp salt
1 egg
4 egg yolks
800 g plain flour
2 tbsp baking powder
200g ground (blanched) almonds
Zest of a lemon
Beat the butter until fluffy. Add the remaining ingredients one after another and knead well into the dough. Cover the finished dough and allow to stand for around 12 hours in the fridge (e.g. overnight). Then pass it through the meat grinder with the biscuit attachment ① . Place the biscuits on a baking tray lined with baking paper. Bake the biscuits in a pre-heated oven at 180^ for approx. 10 - 15 minutes until golden brown.
Sommaire
Introduction 46
Droits d'auteur 46
Chere cliente, cher client,
KOMPERNASS HANDELS GMBH
BURGSTRASSE 21
DE-44867 BOCHUM
ALLEMAGNE
www.kompernass.com
Recettes
Kebbe
WAARSCHUWING! LETSELGEVAAR!
WAARSCHUWING! LETSELGEVAAR!
WAARSCHUWING! LETSELGEVAAR!
WAARSCHUWING! LETSELGEVAAR!
WAARSCHUWING! LETSELGEVAAR!
KOMPERNASS HANDELS GMBH
BURGSTRASSE 21
DE-44867 BOCHUM
DUITSLAND
www.kompernass.com
Recepten
Kebbe
KOMPERNASS HANDELS GMBH
BURGSTRASSE 21
DE-44867 BOCHUM
NEMECKO
www.kompernass.com
Recepty
Kebbe
Characteristicas techniques
KOMPERNASS HANDELS GMBH
BURGSTRASSE 21
DE-44867 BOCHUM
ALEMANIA
www.kompernass.com
Recetas
Kibbeh
KOMPERNASS HANDELS GMBH
BURGSTRASSE 21
DE-44867 BOCHUM
ALEMANHA
www.kompernass.com
Receitas
Quibe
KOMPERNASS HANDELS GMBH
BURGSTRASSE 21
DE-44867 BOCHUM
GERMANY
www.kompernass.com


- VLEESMOLEN
- PICADORA DE CARNE
- FR BE
- Rezepte
- Kebbe
- Intended use 24
- Items supplied/Component description. 25
- Technical data 26
- Safety instructions 26
- Assembly/Disassembly. 28
- Operation 32
- Non-functionality 36
- Cleaning 36
- Storage 38
- Disposal 38
- Introduction
- Copyright
- Limited liability
- Intended use
- Items supplied / Component description
- Figure A:
- Figure B:
- Figure C:
- Technical data
- C.O. Time
- Safety instructions
- RISK OF ELECTRIC SHOCK
- WARNING!
- WARNING! RISK OF INJURY!
- Assembly/Disassembly
- CAUTION - PROPERTY DAMAGE!
- NOTICE
- Assembling the meat grinder
- WARNING! RISK OF INJURY!
- Assembling the sausage stuffer attachment
- Assembling the kibbeh attachment
- Assembling the biscuit attachments
- Fitting the strainer attachment
- Operation
- Operating the appliance
- Processing meat
- WARNING!
- Processing sausage meat
- TIP!
- Using the kibbeh attachment
- Making biscuits
- Straining tomatoes
- Non-functionality
- If the drive is blocked by accumulated food:
- Should the motor suddenly stop, it could be due to automatic activation of the internal overload fuse. This is intended to protect the motor.
- If the power cable is damaged or the accessories are visibly damaged:
- Cleaning
- Cleaning the motor block
- Cleaning the accessories
- Storage
- Disposal
- Warranty conditions
- Warranty period and statutory claims for defects
- Scope of the warranty
- Warranty claim procedure
- Service
- Importer
- Recipes
- Kibbeh
- Mince filling
- Shell
- Preparation
- Meat rolls
- Filling:
- Fresh Grill Sausages
- Biscuits
- Sommaire
- Introduction 46
- Recettes
- WAARSCHUWING! LETSELGEVAAR!
- Recepten
- Recepty
- Characteristicas techniques
- Recetas
- Receitas
- Quibe
Brand : SILVERCREST
Model : SFW 350 C2
Category : Meat Grinder