Easy Protect Plus - Baby monitors TIGEX - Free user manual and instructions
Find the device manual for free Easy Protect Plus TIGEX in PDF.
User questions about Easy Protect Plus TIGEX
0 question about this device. Answer the ones you know or ask your own.
Ask a new question about this device
Download the instructions for your Baby monitors in PDF format for free! Find your manual Easy Protect Plus - TIGEX and take your electronic device back in hand. On this page are published all the documents necessary for the use of your device. Easy Protect Plus by TIGEX.
USER MANUAL Easy Protect Plus TIGEX
ECOUTE-BÉBÉ Easy Protect Plus
Article n°: 80890843
Operating instructions
Francais 2
Please note inner coverage

Sommaire
5.3 Full-Eco-Control
5.3 Full-Eco-Control
5.Eco-Mode e Full-Eco-Control 23
5. Eco-Mode e Full-Eco-Control
5.3 Full-Eco-Control
5.Eco-Mode e Full-Eco-Control 33
5. Eco-Mode e Full-Eco-Control
5.3 Full-Eco-Control
- Introduction 52
2.Box contents 52 - Components of the baby monitor 52
4.Description of device. 53
4.1 Proper use. 53
4.2 Description of function 53
5.Eco-Mode and Full-Eco-Control 53
5.1 Eco-Mode 53
5.2 Special Features during activated Eco-Mode . . . 53
5.3 Full-Eco-Control 54 - Safety information 54
6.1 General information. 54
6.2 Protection against electric shock 54
6.3 For your child's safety. 54
6.4 Protection from injury 54
6.5 Damage to the product. 54
6.6 Using NiMH rechargeable batteries 55 -
Starting and connecting the devices. 55
7.1 Parent unit. 55
7.2 Baby unit. 55
7.3 Connecting baby unit and parent unit. 56 -
Alerts, warnings and indicators.. 56
-
Activation of features 56
9.1 Volume adjustment 56
9.2 Using the VOX function to adjust the transmission sensitivity. 57
9.3 Talk to your baby 57
9.4 Lullabies 57
9.5 Nightlight. 58
9.6 Lullabies, Nightlight, Talk-Back and VOX Setting in Eco-Mode 58
9.7 Temperature tracking 58
10.Cleaning and care 59
10.1 Cleaning 59
10.2 Changing the battery 59
- Technical data 59
11.1 FHSS Technology 59
12.Disposal 60
12.1 Equipment 60
12.2 Packaging 60
12.3 Disposable/rechargeable batteries. 60
13.Warranty. 60
1. Introduction
Thank you for choosing the Tigex baby monitor Easy Protect Plus. This device allows you to monitor your baby or small children in the nursery. This device is only
attended to assist you; it is not a substitute and can never replace the supervision of an adult, a baby-sitter or a care professional.
2. Box contents
1 baby unit
1 parent unit
1 rechargeable battery
2 mains adapters, one for each unit
1 operating instructions
3. Components of the baby monitor
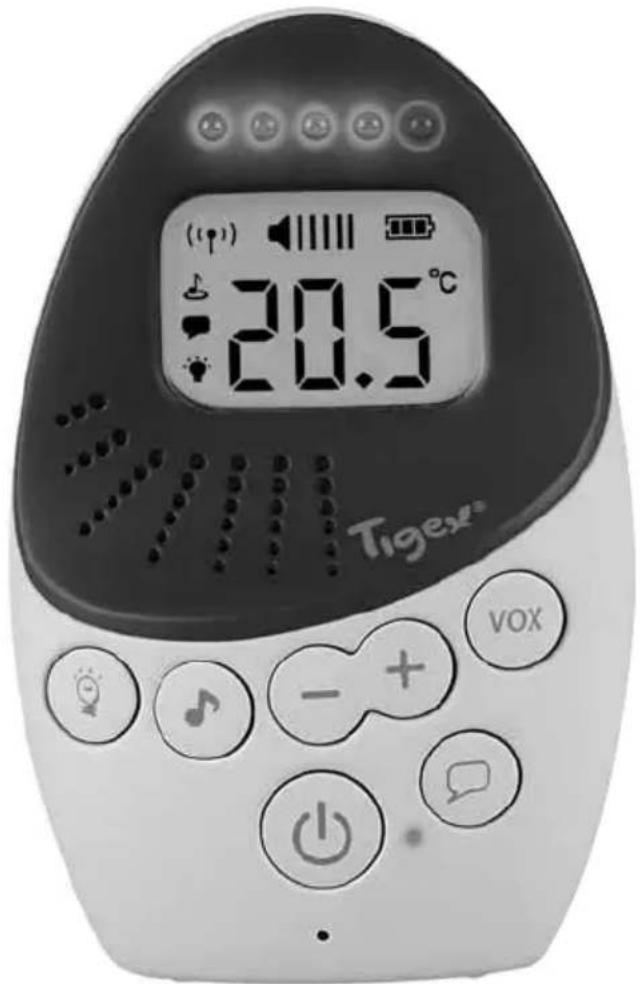
Parent Unit
1 Parent unit
2 LED indicators for: Noise, Volume and VOX-Level as well as lost link
3 Display
4 VOX button: setting of microphone sensitivity
5 Volume and VOx level adjustment buttons
6 Talk Back button
7 Power, Eco-Mode as well as low battery indicator
8 Microphone
9 Power ON/OFF button
10 Lullabies on/off button
11 Nightlight on/off button
12 Speaker
13 Battery cover
14 Mains adapter socket
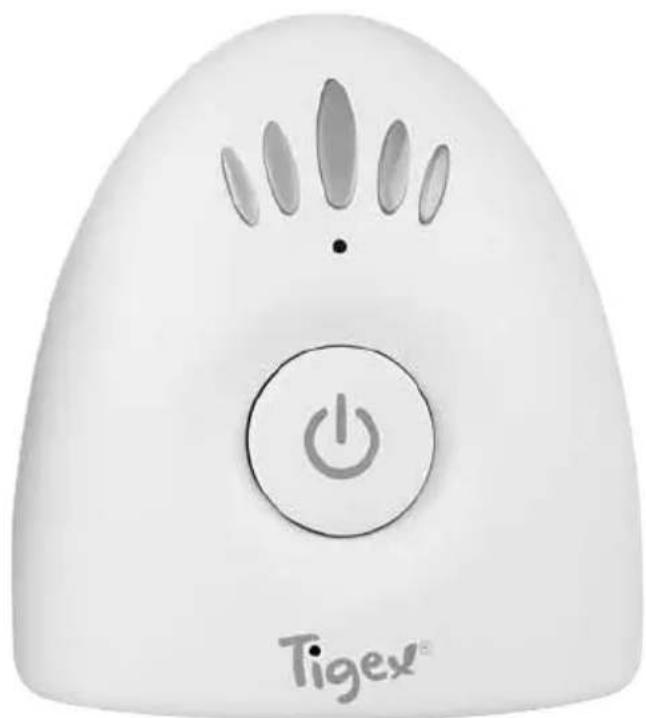
Baby Unit
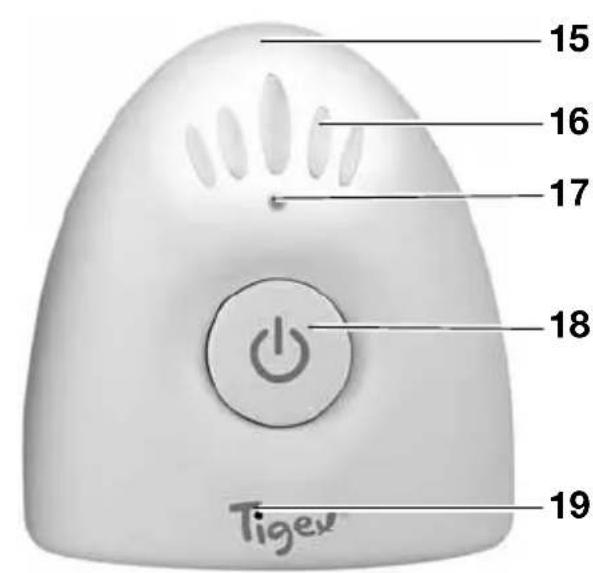
15 Baby unit
16 Nightlight
17 Power, Eco-Mode and Link indication
18 Power ON/OFF button
19 Microphone
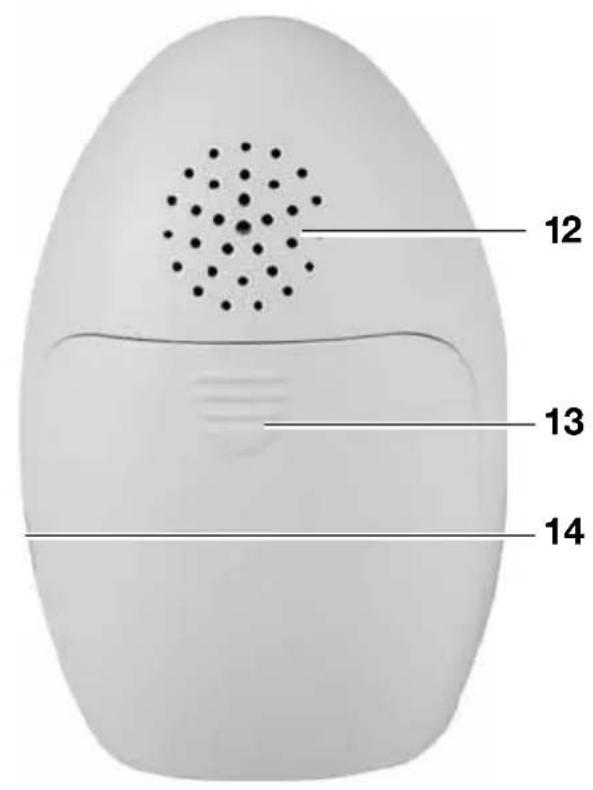
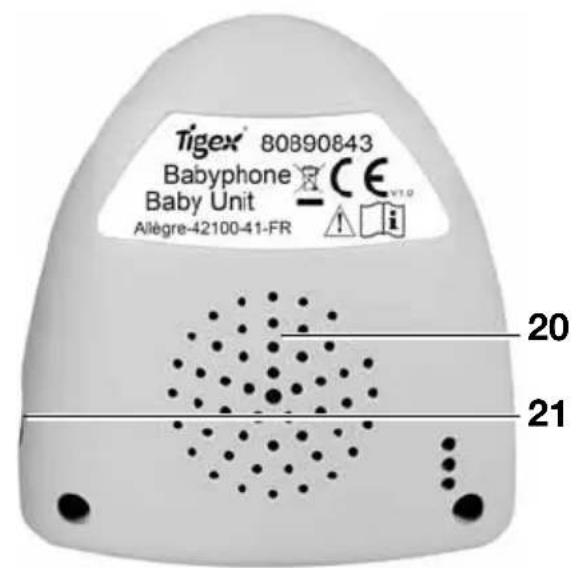
20 Speaker
21 Mains adapter socket
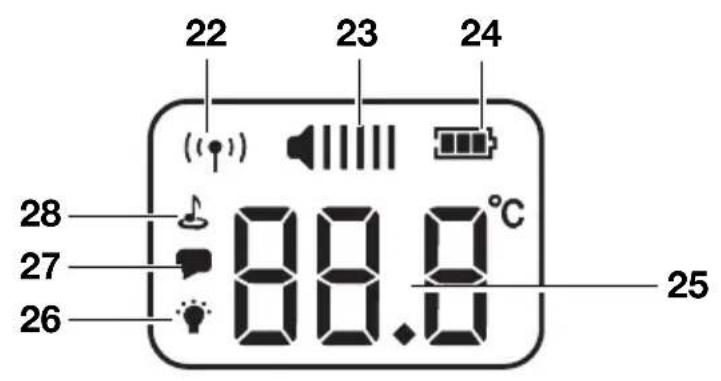
Display
22 Link icon
23 Volume level indication
24 Battery level indication
25 Nursery temperature
26 Nightlight icon
27 Talk Back icon
28 Lullabies icon
4. Description of device
4.1 Proper use
This baby monitor Easy Protect Plus allows you to listen in to your baby or small children in the nursery. It can also be used for sound-only monitoring of the elderly.
This device is intended only for dry environments. It is not suitable for use in wetrooms or outdoors in wet weather.
This device is intended for use in private households. It is not intended for commercial use.
This device is intended as a supplementary aid. It is in no way a substitute for the physical presence and attention of parents, babysitters or caregivers.
4.2 Description of function
The baby unit 15 is set up in the room that monitored. It registers the sounds in the room and sends it wirelessly to the parent unit 1.
The parent unit 1 has a built-in rechargeable battery so that you can always set it up where you can see it. The battery is recharged using the supplied mains adapter.
The limiting distance between baby and parent unit is about 50m indoors and up to 300m outdoors (in open country). The babyphone's reception will vary depending on its surroundings. Thick walls or metal can reduce the range.
The baby monitor has an Eco-Mode, in which the transmitter (baby unit) automatically switches to standby as soon as your baby is sleeping peacefully. Depending on the sensitivity setting, it will not switch back on until your baby begins making a noise or starts to cry.
If you want to be sure of hearing every single sound from the nursery you can use the VOX button 4 to set the transmission sensitivity to its maximum (=level 5). On this setting the baby unit is continually switched on (see "9.2 Using the VOX function to adjust the transmission sensitivity" on page 57).
If you do not want to hear any sounds at all you can use the Vol - button 5 to set the volume to mute. In this case only the LED for sound indication 2 will show you if your baby is making noise.
Activating Eco-Mode minimises the high-frequency radiation in the children's room. In this mode the baby unit merely sends a brief signal to the parent unit every 30 seconds to test the connection. If the parent unit is out of range, the parents will be alerted by a beep.
You will find more information about Eco-Mode in "5. Eco-Mode and Full-Eco-Control" on page 53.
5. Eco-Mode and Full-Eco-Control
This baby monitor has an integrated Eco-Mode function that not only saves energy, but also minimizes the high-frequency radiation in the nursery to zero while the baby is sleeping. This means that your baby is not continually exposed to radiation that is unnecessary during quiet sleep. It furthermore has a Full-Eco-Control System that always ensures and permanently checks that parent unit and baby unit are linked. In case of a lost connection parents will be alarmed immediately.
5.1 Eco-Mode
The Eco-Mode is automatically activated in VOX Level 1-4 (see "9.2 Using the VOX function to adjust the transmission sensitivity" on page 57). Is the mode activated, the transmissions between the parent unit and baby unit are limited. The device automatically switches back to transmission mode as soon as your baby makes a noise that exceeds your selected sound threshold (VOX levels 1 - 4).
You can see when the Eco-Mode has been activated because the LED indicator 7 on the parent unit as well as the LED 17 on the baby unit start flashing green. You can see when Eco-Mode has been deactivated because both LED indicators show a steady green light. VOX Level 5
indicates a constant link between parent unit and baby unit without an Eco-Mode option.
5.2 Special Features during activated Eco-Mode
While the Eco-Mode is activated and your baby is peacefully asleep, the special features such as the lullabies, the nightlight or the talk-back function are deactivated and can not be changed. This is a safety setting to avoid that you may wake your baby by accident.
However, the special functions can be changed with a 30 sec delay during the link check of the Full-Eco Control. This way you can turn off the nightlight even when the EcoMode is activated.
-
Activate or deactivate the nightlight or lullabies by pressing the according button:
-
The function will not start immediately and the icon on the display starts flashing. This is the indication that the Eco-Mode is activated.
-
If you do want to use one of the features even though your baby is sleeping, simply wait for the next link-check and it will be activated.
Note: The Talk-Back function is also deactivated during the Eco-Mode which will be indicated with a double beep.
5.3 Full-Eco-Control
The function FULL-ECO-CONTROL guarantees that you are always connected to your baby. Even when the EcoMode is activated a link check is performed to ensure that both units are connected. If at any time the parent unit is out of range or for some other reason the connection is
interrupted, the LED 7 on the parent unit will light up red and an alarm signal can be heard. Furthermore, the link indication 22 on the display starts flashing.
Note: Check the range of your baby monitor before using Eco-Mode. Make sure that the two units are always within range, so that you can hear your baby.
6. Safety information
6.1 General information
- Please read these operating instructions carefully before using the device. These instructions form part of the device and must be kept to hand at all times.
- The device should only be used for the intended purpose, as described (see "4.1 Proper use" on page 53).
- Use only accessories supplied with the device or expressly permitted in these instructions.
Each time you use the device, first check that it is working properly. As well as checking the range and the connection, we recommend always checking that the device is audible when in use.
These devices may be used only for the transmission of sound within your personal environment. Everybody in a room that could be overheard must be informed that you are using the device. - Please note that transmission will always depend on the surroundings. Electronic devices, insulation, walls, moisture or trees can seriously interfere with reception.
6.2 Protection against electric shock

Warning! The following safety instructions are intended to protect you from electric shock.
- Do not attempt to repair the device yourself. The device may be opened only by qualified technicians.
- The device must not be used if it is damaged.
- If you are travelling, please always make sure that the available voltage matches that given in the technical data.
6.3 For your child's safety
Warning! Children cannot recognise the dangers associated with using such devices. They should therefore be kept away from them.
- Make sure that the unit and its accessories are always kept out of baby's reach. The unit and its accessories should always be at least 1 m away.
Children are often poor judges of hazard and are liable to injure themselves. You should therefore note: - This device is not designed to be used by people (including children) with physical, sensory or mental
disabilities or with insufficient experience and/or knowledge, unless a person responsible for their safety is supervising them or instructing them on how to use the device.
- Children should be supervised to ensure that they cannot play with the device.
- Make sure that the plastic packaging does not become a lethal trap for children. There is a risk of suffocation. Plastic packaging is not a toy.
-
To avoid the possibility of strangulation, the power cable must always be out of baby's reach.
-
Use the unit only to give you additional safety. It can never serve as a substitute for a human carer.
6.4 Protection from injury
Waming! Follow the instructions below to prevent injuries.
- Make sure the power supply cable is tucked away neatly to prevent anyone from tripping over it.
6.5 Damage to the product
Caution! To prevent damaging the product, follow the instructions below.
- Do not expose the device to direct sunlight or extreme heat as UV rays and overheating may make the plastic brittle and the electronics could be damaged.
- The baby monitor should not be placed near to a source of heat and the device should also not be covered, to prevent it overheating.
- Never use the baby monitor in damp or wet surroundings.
- Never use the baby monitor in dusty surroundings. This could shorten the life of the device.
- Never use sharp or abrasive cleaning agents as these could damage your device.
- While the devices are not in use, always switch them off with the On/Off button 18 on the baby unit 15 and the On/Off button 9 on the parent unit 1.
6.6 Using NiMH rechargeable batteries
Warning!
To avoid potential hazards that could cause injuries or damage the equipment, always note the following:
- Avoid short circuits.
The battery poles should never be allowed to come into contact with any metal objects, as this could cause a short circuit. A short circuit can cause the battery to overheat, in which case it could leak electrolyte and possibly cause an explosion or fire.
If electrolyte does leak out, avoid any contact with skin, eyes and mucous membranes in order to prevent injuries. In the event of any contact with the electrolyte, rinse the affected areas with plenty of clean fresh water and immediately seek medical attention.
-
The built-in battery may be replaced only by a genuine replacement battery. If the battery is defective, please contact the after sales service (see "13. Warranty" on page 60). Do not use any other battery than the original Tigex.
-
Never try to open the battery, bend the contacts or pull them off. Do not throw the battery onto the floor or knock nails into it.
Damaging the battery could cause an internal short circuit, in which case it could leak electrolyte and possibly cause an explosion or fire.
- Use only the supplied mains adapter to charge the battery.
Using the wrong mains adapter could overcharge it, causing it to overheat and explode.
- NiMH batteries must be charged or stored only on heatproof, non-combustible surfaces.
- NiMH batteries must be charged only under supervision so that you can intervene in good time in the event of a failure.
- NiMH batteries contains toxic substances. For this reason, always observe the regulations for its disposal given in "12.3 Disposable/rechargeable batteries" on page 60.
7. Starting and connecting the devices
7.1 Parent unit
The parent unit can be used wireless or by mains adapter. If you prefer to use the mains adapter we recommend to remove the battery only to maintain the capacity.
Attention!
- To prevent malfunctions, first insert the battery into the parent unit and then connect the mains adapter to the parent unit.
-
Before first use make sure the battery is charged fully for at least 14 hours to activate the full battery capacity. Every following full charge only needs 8 hours.
-
Remove the battery cover 13 on the back of the parent unit 1, by sliding it downwards.
- Put the battery in its compartment and connect the cable.
There is only one way to connect.
- Slide the battery cover 13 back onto the parent unit 1.
- Insert the small plug of the mains adapter into the mains adapter socket 14 of the parent unit.
- Insert the plug into a power socket standard that matches the rating given in the technical data (see "11. Technical data" on page 59).
- To turn on the parent unit 1 simply press the power ON/OFF button 9.
Is the battery level low the LED indicator 7 will flashing red. The parent unit needs to be connected with the mains
adapter to charge the battery before the unit turns itself off automatically. In addition a signal will also inform you about a low battery status.
7.2 Baby unit
The baby unit only works with the included mains adapter.

Warning! Ensure that the baby is not able to touch the power cable. Also ensure that the unit cannot fall into the cot.
Attention!
Note for first use: Don't install the baby unit 15 until the battery of the parent unit1 is fully charged.
- Put the baby unit somewhere in the nursery where your baby will not be able to reach it. An optimal distance between baby and the baby unit is from 1 to 2m
Note: Since the temperature sensor is inside the baby unit it is important that you do not cover it or place it near any heat source or on any cold surface. Direct sunlight may also affect the reading. - Insert the mains adapter plug into the socket 21 of the baby unit 15.
- Insert the plug into a power socket standard that matches the rating given in the technical data (see "11. Technical data" on page 59).
The baby unit is unlike the parent unit ready to be used once it is plugged in for the first time.
This function is a safety programming which ensures that baby unit will start automatically again after a power outage. However, if you turn the baby unit off manually by pressing the power ON/OFF button 18 the unit will stay off during a power outage.
7.3 Connecting baby unit and parent unit
Once both units are supplied with electricity and are turned on, they start connecting automatically. During the pairing process the red of the five LED indicators 2 on the parent unit 1 and the link indicator 17 on the baby unit15 light up
red. When the link is established both indicators will turn green.
Always ensure that the parent unit remains within the range for the pairing process.
In the event that the connection between the parent unit and the baby unit breaks down, the devices will automatically attempt to establish a new one. If a new connection is not established within 30 seconds, the parent unit 1 will emit a regular beep and the link indicator 7 will light up red. You may need to move the parent unit to a different location before a new connection can be established.
8. Alerts, warnings and indicators
This baby monitor has several ways to warn or alert you.
If you hear an alert pay close attention to the parent unit and its display. Usually a sound indication is combined with a special icon shown on the display.
Note: blinking Icons and red LEDs need your attention and reaction immediately.
| Sound alert Indicator/Icon Meaning What to do | |||
| Alarm every 30 s Link in indicators 2 and 17 are red Link icon 22 is flashing | Parent unit is either out of range or you lost the link to the baby unit for another reason | Move the parent unit to a different location so a new connection can be established | |
| Alarm every 60 s LED in indicator 7 is flashing red Battery icon 24 is flashing | Battery is low Connect the mains adapter | ||
| Nursery temperature shows LO, HI or is flashing | The temperature is outside the correct range | Action is required (see "9.7 Temperature tracking" on page 58) | |
Above the display 3 on the parent unit 1 are 5 LEDs 2 (4 green, 1 red). These LEDs have multiple purposes.
| Activated function Meaning | |
| No function is activated (frequently illuminated LEDs) | Indicating the noise level in the nursery. The more LEDs are lit, the louder are the noises. |
| Adjusting volume (steady illuminated LEDs) | The more LEDs are lit, the higher the volume level on the parent unit. |
| Adjusting VOX sensitivity (flashing LEDs) | The more flashing LEDs the higher is the VOX Level and the more the microfon on the baby unit is reacting to small noises. Level 5 will continuously transmit all noises without activating the Eco-Mode |
| Eco-Mode / Lullabies (no illuminated LEDs) | Indication that maybe the Eco-Mode is activated and your baby is sleeping. The LEDs are also deactivated while the Lullabys are playing. |
| Only the red LED lights up Lost link/no | connection between parent unit and baby unit or indication for low battery status. |
9. Activation of features
9.1 Volume adjustment
To adjust the volume of the parent unit you can use the volume adjustment buttons 5. All together there are 5 levels
of volume and the option to mute the parent unit (see "Mute Setting" on page 57).
Each time you press one of the buttons you will hear a beep at the volume that is currently set and the corresponding volume indicators 2 will be illuminated. The louder your chosen setting, the louder will be any beeps and the more volume indicators 2 will light up. In the display 3 the level is also shown by numbers of bars. The louder your chosen setting, the more bars will appear.
Note: When the VOX function is set to low sensitivity (see "9.2 Using the VOX function to adjust the transmission sensitivity" on page 57), then quiet sounds will not be transmitted regardless of the volume setting. This means that turning up the volume will not enable you to hear anything more. If you want to hear more of the sounds from the nursery you will need to increase the transmission sensitivity by selecting a higher VOX level.
Mute Setting
The parent unit 1 can be "MUTED". Sounds nursery will be transmitted but no longer heard. The noise level indicators 2 will continue to indicate the noise level in the nursery. The more LEDs are lit the louder are the noises in the nursery.
When reducing the volume to mute at the end you will hear a double beep and the volume icon 23 on the display 3 shows no bar.
Note: If the parent unit is muted and you activate the talkback function, the volume will automatically return to the first level. Also, if the parent unit is muted and you want to activate the lullabies the volume automatically returns to volume level 1. This is a safety setting to ensure that you always stay connected to your baby and see or hear if your baby is in need (see "9.4 Lullabies" on page 57).
9.2 Using the VOX function to adjust the transmission sensitivity
Babies make a lot of different noises. These can range from loud breathing through babbling to calling or loud crying. The VOX function can be set up in such a way that only loud sounds such as crying or calling are transmitted while quieter sounds are not registered.
The VOX function sets up the transmission sensitivity of the microphone. The higher the VOX level the more sensitive the device is to noises.
Activate the VOX function by briefly pressing the VOX button 4.
The VOX level indicators 2 start flashing and are indicating the current set level.
By pressing the VOX adjustment buttons 5 the sensitivity can be increased (+) or decreased (-) .
VOX level 1 = extremely low sensitivity, reacts only if baby screams very loudly;
VOX level 2 = low sensitivity, reacts if baby screams loudly; VOX level 3 = normal sensitivity, reacts if baby cries normally;
VOX level 4 = high sensitivity, reacts even to slight sounds; VOX level 5 = Eco-Mode is switched off. The unit is set to transmit continuously.
Note: After activating the VOX function, you have about two seconds to alter the transmission sensitivity. The device will then automatically switch back to transmitting sounds. You can see this has happened because the level indicators 2 will no longer be flashing, and the volume and VOX adjustment buttons 5 now only modify the volume.
9.3 Talk to your baby
You can use the "Talk back" function to speak to your baby. Hold down the Talk Back button 6 on the parent unit 1.
Theodisplay 4 shows the Talk Back icon 27 and a single beep indicates that function is activated and that you can start talking.
Keep the button pressed while you talk and release the button to hear your baby's response.
Notes:
-
If the baby unit 15 is in Eco-Mode, the function is deactivated so that you do not accidentally wake up your baby while it is sleeping. If in this case you press the button during Eco-Mode, a double beep signal will inform you that the talk-back function is currently not available and the display 4 shows a flashing Talk Back icon27.
-
If the volume of the parent unit is set to "MUTE" (see "Mute Setting" on page 57), the volume will automatically be increased to level 1 as soon as you press the Talk Back button 6. So you can hear the reaction of your baby.
9.4 Lullabies
To soothe your baby and put it to sleep, you can play lullabies on the speaker 20 of the baby unit 15. A choice of four different lullabies and one track of natural sounds are available.
- Activate the function by briefly pressing the Lullabies on/off button 10.
The first song will be played and at the same time the lullabies icon 28 will appear on the display 3 of the parent unit 1.
- Switch to the next song by holding down the Lullabies on/off button 10.
The lullabies icon 28 on the display 3 will flash briefly and then the next song will be played.
- Switch the function off by briefly pressing the Lullabies on/off button 10.
The lullabies icon 28 disappears and the lullabies will stop playing.
Caution!
-
The five noise levels are switched off while lullabies are playing, because the device cannot distinguish between a baby crying and a lullaby being played, but you will still be able to hear if your baby is crying in the background. Therefor in case the parent unit was muted previously an activation of the lullabies will automatically turn back to volume level 1.
-
We always recommend that you do not use the mute setting on the parent unit while lullabies are being played, because this would leave you with no monitoring functions at all and quite unable to hear if your baby cries.
9.5 Nightlight
The nightlight function provides for a soft dim light in the nursery and helps the baby with a little orientation in the dark.
- Activate the function by briefly pressing the Nightlight on/off button 11.
The nightlight 16 switches on. The display 4 shows the nightlight icon 26.
- Switch the nightlight off by briefly pressing the Nightlight on/off button 11 again.
The nightlight 16 switches off. The nightlight icon 26 disappears.
Note: The Nightlight will stay on until you switch it off manually.
9.6 Lullabies, Nightlight, Talk-Back and VOX Setting in Eco-Mode
While you baby is sleeping the baby unit is also "sleeping" and the Eco-Mode is activated. During the activated Eco-Mode the special features such as the lullabies, the nightlight or the talk-back function are deactivated and can not be changed.
This is a safety setting to avoid that you may wake your baby by accident.
In case you want to change the setting of the special functions follow the stepps explained above. The adequate icon will start blinking on the display to indicate that the Eco-Mode is still active. The setting change will be transmitted with the next link check, which can take up to 30 sec (see "5.2 Special Features during activated Eco-Mode" on page 53).
Note: If you activate the lullabies or use the Talk-Back function you may not only wake up your baby, you also deactivate the Eco-Mode.
9.7 Temperature tracking
The correct nursery temperature is particularly important for baby's healthful sleep. The baby unit of this baby monitor has an integrated temperature sensor. The temperature in the nursery is always shown on the display 4 and is updated automatically.
The baby unit checks the nursery temperature and sends warnings to the parent unit (see "8. Alerts, warnings and indicators" on page 56). The following signals are displayed on the display 4 of the parent unit 1:
LO (flashing):
The temperature has fallen below the lower threshold of 10^ .
The nursery temperature has reached an extremely critical level and urgent action is required to increase the temperature in the nursery.
10°C to 15°C (flashing):
This temperature is too low for baby to sleep properly.
Check the heating and adjust it if necessary.
15^ C to 30^ C :
This temperature is suitable for baby to sleep properly.
30 °C to 35 °C (flashing):
This temperature is too high for baby to sleep properly.
Check the ventilation or air conditioning and adjust it if necessary.
HI (flashing):
The temperature has risen above the upper threshold of 35^
The nursery temperature has reached an extremely critical level and urgent action is required to reduce the temperature in the nursery.
Note: Since the temperature sensor is inside the baby unit it is important that you do not cover it or place it near any heat source or on any cold surface. Direct sunlight may also affect the reading.
10. Cleaning and care
10.1 Cleaning
Warning! To avoid the risk of electric shocks, injuries and damage:
- Always disconnect the mains adapter from the power socket before cleaning the device.
- Never immerse the individual parts in water.
Caution! Under no circumstances use abrasive, corrosive or scratching cleaning agents, as these could damage the device.
- If necessary, wipe the individual parts with a damp cloth.
- Only use the baby monitor again when all the parts have fully dried out.
10.2 Changing the battery
The installed 2.4 V 850 mAh Nickel metal hydride battery (NiMH) may be replaced only by a genuine replacement battery as used by us. If necessary please contact our After sales service (see "13. Warranty" on page 60).
- Remove the battery cover 13 on the back of the parent unit 1, by sliding it downwards.
- Remove the defective battery.
- Put the new battery in its compartment as indicated on the unit. There is only one way to attach the plug.
- Slide the battery cover 13 back onto the parent unit 1.
- Initially, charge the parent unit continuously for 14 hours to activate the full battery capacity (see "7.1 Parent unit" on page 55).
11. Technical data
| Wireless connection 2.4 GHz FHSS | |
| Transmission frequency 2400-2483.5 | MHz, < 20 dBm |
| Number of channels 36 / automatic o channel selection | |
| Outdoor range app. 300 m (free field | without interferences) |
| Indoor range app. 50 m | Successful transmission depends on the environment. Walls or trees can seriously interfere with reception. |
| Baby unit | |
| Operating temperature 0 °C to 40 °C | ambient temperature |
| Parent unit | |
| Operating temperature 0 °C to 40 °C | ambient temperature |
| Battery | Nickel metal hydride (NiMH) 2.4 V 850 mAh |
| Period of operation in normal transmission mode: at least 6 hours | |
| Period of operation in Eco-Mode: > 9 hours | |
| Charging time when battery is charged for the first time: at least 14 hours, on subsequent occasions, charging takes about 8 hours | |
| Mains adapters (Model No. TGE050P055) | |
| Input | 100-240 V AC; 50/60 Hz; 100 mA |
| Output | 5 V ——; 2.75 W; —←+ |
11.1 FHSS Technology
Frequency Hopping Spread Spectrum (FHSS) is a digital frequency spreading method for wireless data transmissions.
This method has several advantages over conventional radio transmission:
-
difficult to intercept the radio signal, because the listener does not know how the signal is distributed among the different frequencies and how to correctly reassemble it.
-
less susceptible to interference because a given carrier frequency is always used only very briefly before switching to another.
12. Disposal
12.1 Equipment

The symbol of the crossed-through wheelie bin means, within the European Union, that the product is subject to a separate waste collection. This applies to the product and all accessories marked with this symbol. Products labelled as such must not be disposed of with the
normal household waste collections; they must be taken to a recycling bank for electrical and electronic equipment. Recycling helps to reduce the use of raw materials and is eco-friendly.
12.2 Packaging
When you wish to dispose of the packaging, please observe the relevant environmental regulations for your country.
12.3 Disposable/rechargeable batteries

Batteries must not be disposed of with domestic waste. Flat batteries must be disposed of properly. Special containers for battery disposal are provided for this purpose at shops selling
batteries or at municipal collection points. Batteries and rechargeable batteries on which the following letters are printed contain, among other things, the following harmful substances: Cd (cadmium), Hg (mercury), Pb (lead).
13. Warranty
In addition to the seller's warranty obligations arising from the contract to purchase, we as the manufacturers provide a warranty of 10 Years from purchase of the appliance as long as the appliance is used properly and the operating instructions are followed. Evidence of the date of purchase and the type of appliance should be provided by means of a receipt. Without a receipt, we will not be able to take your request into account.
The purchaser's statutory rights are unaffected by this manufacturer warranty. During the warranty period, we undertake to remedy any defects attributable to poor materials or workmanship. Wear parts are excluded from the warranty. Minor deviations from specified quality which do not affect the value or usability of the appliance are not covered by the warranty. We are likewise unable to accept the warranty if the defects on the appliance are due to transport damage for which we are not responsible, if they are attributable to misuse or lack of care or if the appliance has been interfered with by persons not authorized by us to do so.
The warranty service will involve replacement of the plug adaptors or replacement of the appliance at our discretion by the same model or a model of a similar range.
The warranty period will be neither extended nor restarted by the performance of warranty services. The warranty for any spare parts fitted will expire with the warranty for the appliance as a whole. Extended or different claims, especially those relating to the making good of damage sustained outside the appliance, are excluded unless liability is compulsory in law. We will not accept the costs or risks of transport.
Please do contact our after sales service by phone, email or regular Postmail to expose the issues faced on your product before returning any good to our adrasse. A return
form will be sent to you to activate the 10 Year guarantee & the replacement of the product as per above conditions. The original of the Purchase Receipt will need to be sent at the same time.
Please keep this address and article number in case of any queries.