Harmony Premium - Baby monitors TIGEX - Free user manual and instructions
Find the device manual for free Harmony Premium TIGEX in PDF.
Frequently Asked Questions - Harmony Premium TIGEX
User questions about Harmony Premium TIGEX
0 question about this device. Answer the ones you know or ask your own.
Ask a new question about this device
Download the instructions for your Baby monitors in PDF format for free! Find your manual Harmony Premium - TIGEX and take your electronic device back in hand. On this page are published all the documents necessary for the use of your device. Harmony Premium by TIGEX.
USER MANUAL Harmony Premium TIGEX
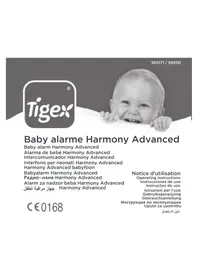
Baby alarmé Harmony Premium
Baby alarm Harmony Premium Alarma de bebé Harmony Premium Intercomunicador Harmony Premium Interfono per neonati Harmony Premium Harmony Premium babyfoon
Notice d'utilisation Operating instructions Instrucciones de uso Instruções de uso Istruzioni per l'uzo Gebruiksaanwijzing
C∈0168
Thank you for choosing the Tigex baby alarm. This appliance is an electronic wireless communication system that allows you to keep an eye on baby while he is asleep.
IMPORTANT ADVICE
- This baby alarm CANNOT IN ANY CIRCUMSTANCES REPLACE the supervision of the baby by an adult.
- The transmitter is designed to detect sounds at a normal level within a radius of approximately 1 to 1.5 metres. It cannot detect soundless activities such as the baby's movements.
- Before using the devices, make sure that no products or their components are worn or damaged. If in doubt, do not use the appliance and contact your local retailer or qualified experts.
- Always place the baby unit and parents unit on a flat, stable surface, out of baby's reach.
- Always make sure that electrical appliances and their wires are kept out of children's reach.
-
Remove all the batteries from the battery compartment when the unit is not going to be used for long periods.
-
To enjoy maximum range, we suggest that you plug the transmitter into the mains supply. The transmitter's range is reduced (less than 300 metres on open ground) when it runs on batteries.
-
If there is too short a distance between the receiver and the transmitter, you may obtain a Larsen effect (very shrill sound). To avoid this, simply increase the distance between the receiver and the transmitter or lower the volume on the receiver.
-
If there is too great a distance between the receiver and the transmitter, you may hear interference. This shows that you have reached the maximum range for your appliance. To solve this problem, simply reduce the distance between the receiver and the transmitter.
-
The maximum range is approximately 300m in an open space with no obstacles. The appliance's range varies according to the obstacles it meets (lie of the land, number of partition walls between the transmitter and the receiver, the presence of metal structures, level of charge of the batteries, etc.).
-
Never use this product near neon lights or other electrical/electronic devices such as TVs, motors, PCs, cordless DECT phones etc. These could interfere with its functions.
-
It is vital to regularly check that the baby unit and the parents unit are both working properly ; in particular check that the signal is receiving clearly and that you have not exceeded the maximum foreseen distance.
-
The system should not be used to eavesdrop on private conversations. This type of use is strictly illegal.
- Please read all the instructions carefully before you use this baby alarm. Keep this booklet as it acts as a permanent proof of purchase and may be used for identification purposes in the event of theft.
- Never try to take your baby alarm apart yourself.
- Keep the appliances well away for all sources of heat (maximum 40^ ) and humidity.
- Clean the appliance with a soft, dry cloth. Do not immerse it in water or expose it to water drops or splashes.
- The adapters may become warm when the appliance is in use; when you use them, make sure that the heat can disperse and do not cover them.
- The appliance should not be dropped or subjected to violent impacts.
- Use this product only with the electrical connection included or supplied as an accessory.
- Do not place sources of naked flames, such as lit candles, on the appliance.
-
Please care for the environment: do not throw used batteries out with the household rubbish, dispose of them in the collection points provided.
-
N.B. to avoid all risk of electrocution; do not expose the appliance to rain or damp conditions.
- Batteries should not be exposed to excessive heat (sun, fire, etc.)
- The power supply adapter acts as an insulation device and should be easily accessible.
- Always disconnect the mains adaptors from the power sockets when not in use.
- The electricity supply switch should be easily accessible.
PACK CONTENTS
1 baby unit (transmitter)
1 parents unit (receiver)
1 charging base for the parents unit (receiver)
2 mains supply adapters
2 rechargeable NiMH, 2 x1.2V, 550mAh type AAA batteries (for the receiver)
1 set of instructions for use
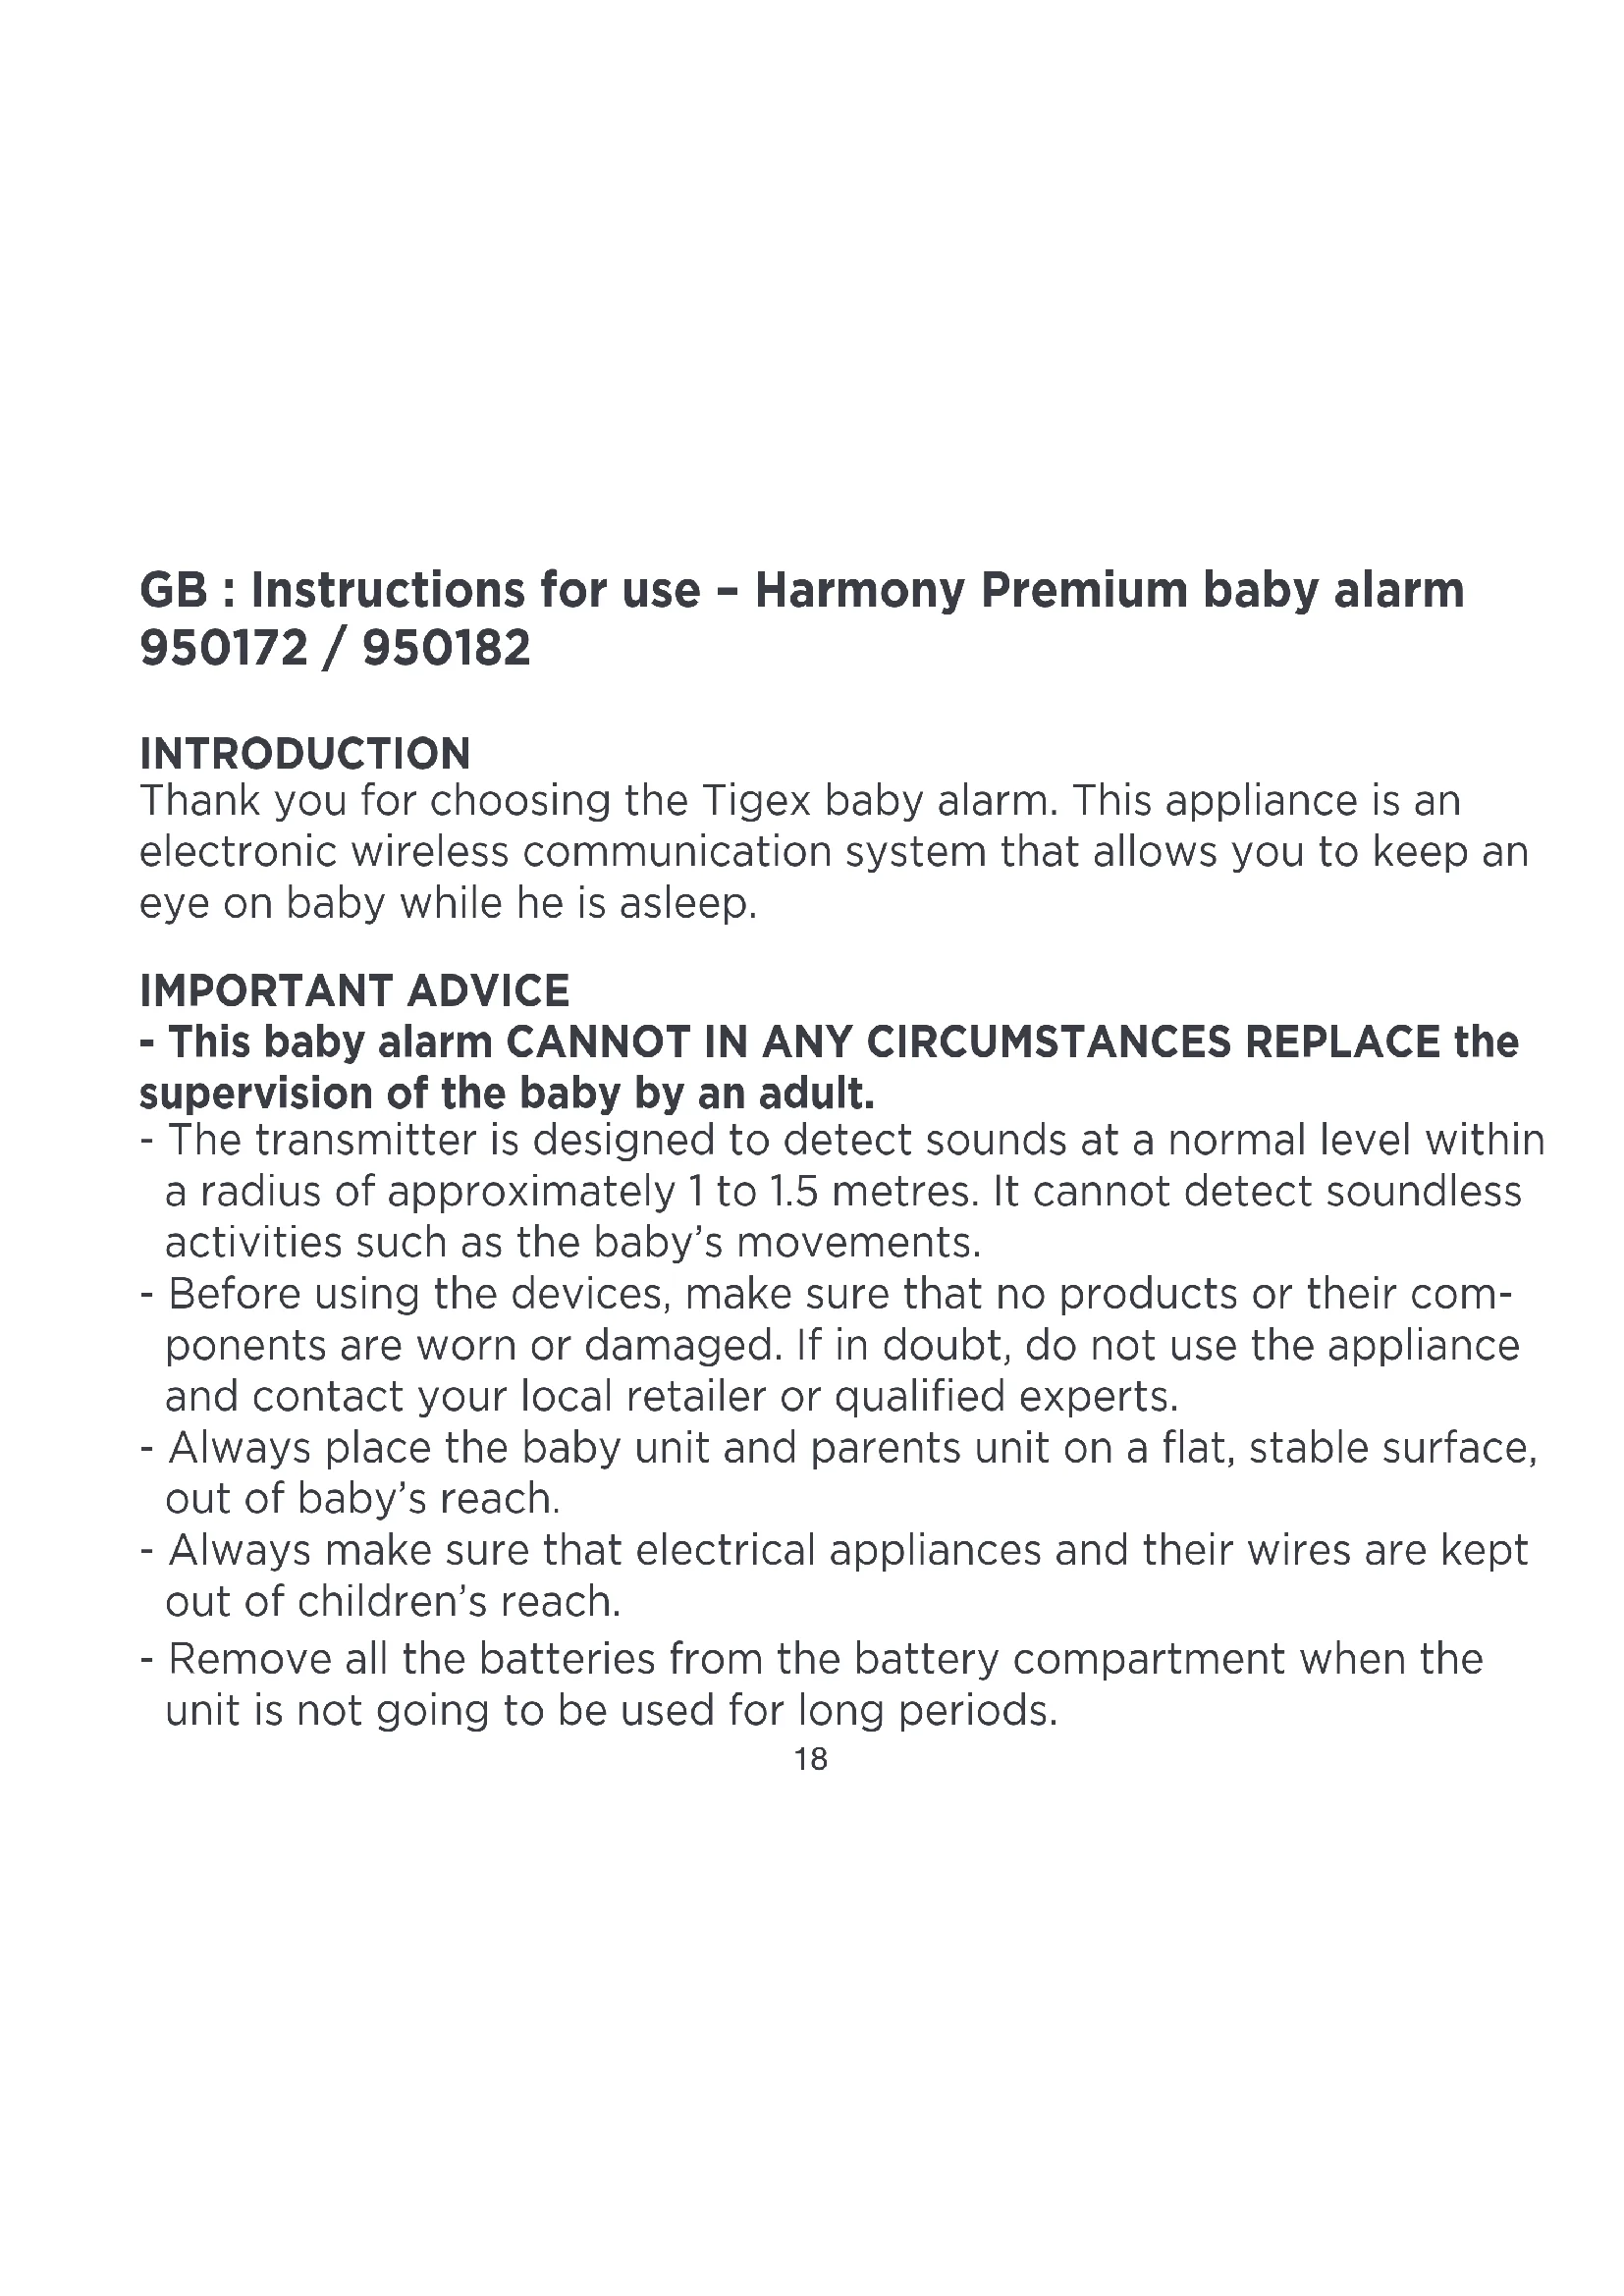
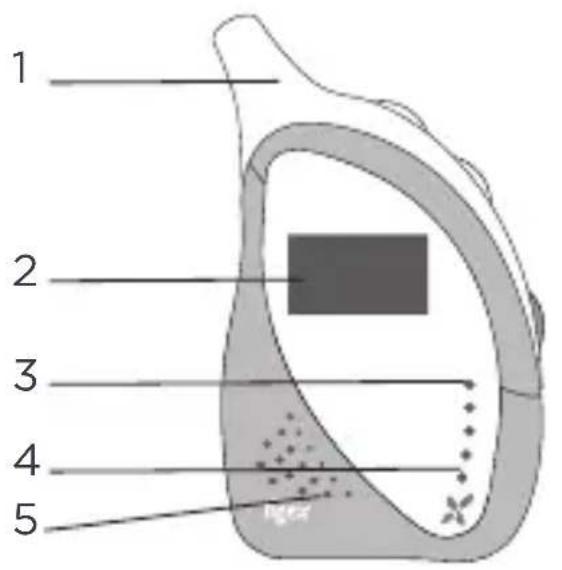
FRONT VIEW BACK VIEW
BABY UNIT DESCRIPTION
- Soft aerial
- LED (green / red): power, and battery status indicator
- LCD screen
- Night light
- Integrate speaker
- Integrate microphone
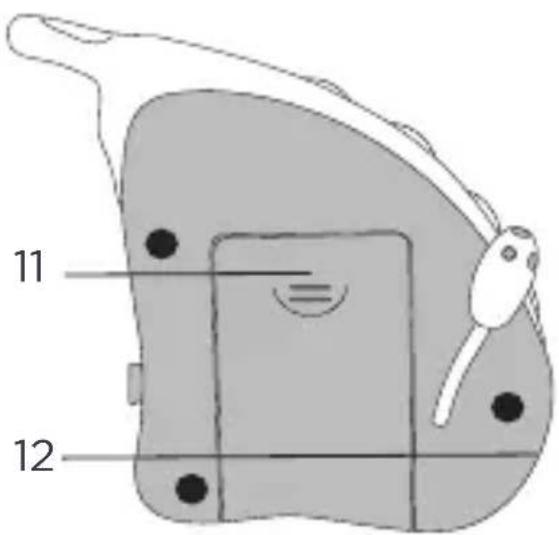
- Volume switches
- Transmission switch
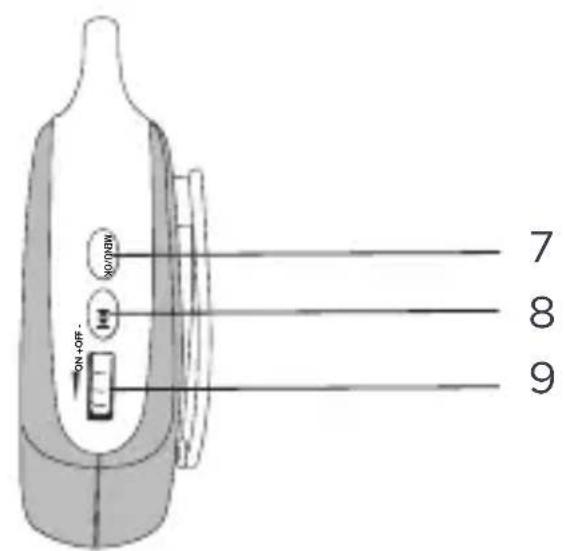
Press to make the parents unit send an alarm beep. This helps in finding an appliance that has been mislaid
9. ON / OFF switch
Press and hold down for 2 seconds to switch the appliance ON or OFF
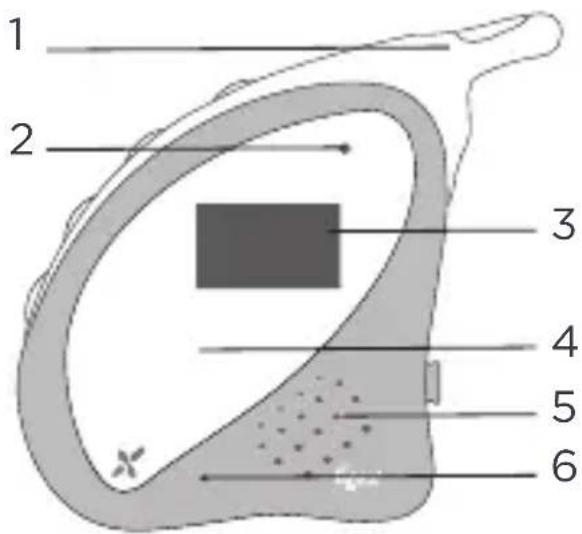
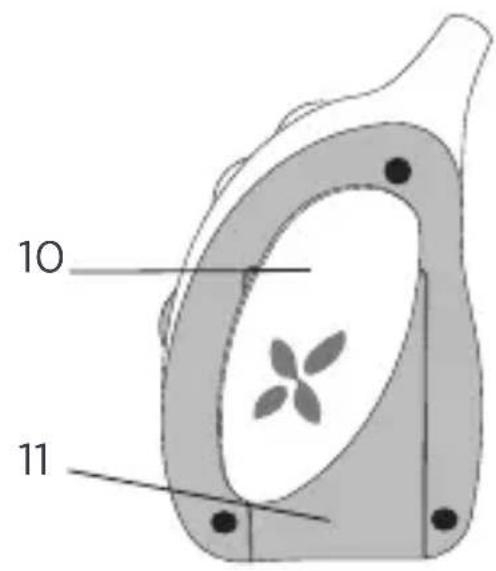
10. Temperature sensor
11. Battery flap (2 rechargeable type AAA batteries)
12. Mains supply
ONLY TO BE USED WITH THE ADAPTOR SUPPLIED
FRONT VIEW BACK VIEW
SIDE VIEW
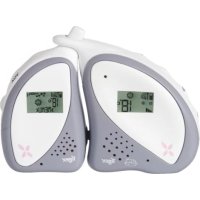
PARENTS UNIT DESCRIPTION
- Soft aerial
- LCD screen
- 4 LED (2 green and 2 red): baby cries indicator
4.1 LED (green / red): power, link and battery status indicator - Integrate speaker
- Charging base with mains supply
ONLY TO BE USED WITH THE ADAPTOR SUPPLIED
- Menu / OK button
Press to enter into the Menu, press once again to select an option - Browse button
- Power and Volume wheel
- Rotative belt clip
- Battery flap (2 rechargeable type AAA batteries supplied)
1- Power sources
Baby unit
The transmitter can operate either with two AAA batteries (not supplied) or with a mains adapter (supplied).
To operate on the batteries, open the battery compartment, insert the 2 AAA batteries taking care about the polarities and then close the compartment. Close the compartment properly to ensure that the children do not swallow the batteries.
Warning: Non-rechargeable batteries should not be recharged. Use batteries of the same type. Never mix used batteries and new batteries. To use with the adapter, insert the output jack from the mains adapter into the DC socket on the baby unit. Plug the adapter into a standard wall socket.
Parents unit
The receiver can either work with two rechargeable AAA batteries (2 x 550mAh AAA NiMH batteries supplied) or with a mains adapter (supplied).
To operate on the batteries, open the battery compartment, insert the 2 AAA batteries taking care about the polarities and then close the compartment. Close the compartment properly to ensure that the children do not swallow the batteries.
Warning: Non-rechargeable batteries should not be recharged. Use batteries of the same type. Never mix used batteries and new batteries.
NB: THERE IS A RISK OF EXPLOSION IF THE BATTERIES ARE REPLACED BY THE
WRONG TYPE. DISPOSE OF BATTERIES ACCORDING TO THE INSTRUCTIONS.
To use with the adapter, insert the output jack from the mains adapter into the DC socket on the charging base, place the parents unit on the charging base. Plug the adapter into a standard wall socket.
2- Switching on and connection between the 2 units
Baby unit
Press the button for two seconds to switch on the appliance. The LED indicator will become green and then flash every 0.5 seconds during connection. The indicator light stops flashing once the connection is established.
Parents unit
Turn the wheel up on the parents unit. The LED indicator will become green and then flash every 0.5 seconds during connection. The indicator light stops flashing once the connection is established.
3- Adjusting the volume
Baby unit
Press the button +to increase the volume and the button -to decrease the volume.
Parents unit
Turn the wheel up to increase the volume and down to decrease the volume.
4- Baby unit functionalities
4.1 Description of the display
| Batteries low Batteries | half charged | Batteries charged |
| Cold temperature <16°C | Recommended temperature 16°C - 20°C | Hot temperature >20°C |
| Minimal volume Maximal | volume Aerial |
4.2 Night light
Night light is activated from the parents units. See part 5.5 Night light.
4.3 Lullabies
Lullabies are activated from the parents unit. See part 5.6 Lullabies.
4.4 Search function between the parents unit and the baby unit
Press the button on the baby unit. The parents unit will beep until you press any button on the parents unit or the button on the baby unit to stop it. This allows you to locate the parents unit quickly and easily if you misplace it.
5- Parents unit functionalities
5.1 Description of the display
| Batteries low Batteries | half charged | Batteries charged |
| Aerial Vibrate Sound | +DO | |
| Night Lullabies Vox | VOX | |
| Cold temperature <16°C | Recommended 16°C - 20°C | Hot temperature >20°C |
5.2 Browsing in the menu and return
Press the buttonMENDispoxy the menu, then use the button to browse the menu. You will see the icons appear in turn. Once positioned on the right icon press the button tMENDuFOK and thus adjust the option as you wish with button to see the different options and with buttonMENLeKoKan option. For the adjustment of options, refer to the following parts. Once an option is selected, an asterisk will be displayed next to the selected option.
If you don't press any button for 5 seconds, the main display mode will be displayed and nothing will be saved.
5.3 Vox
Press the buttonMEntOKsub-menu, next press the button to browse the menu. Once you are placed on VOx, press the button MENU/OK to adjust the option as you wish. You have 5 options:
VOX OFF: this option allows you to hear your baby all the time, irrespective of the sound level in the bedroom.
VOX 1 to VOX 4: these options allow you to hear your baby only when your baby cries or makes a loud noise. This means that you do not have to be listening constantly and prevents any permanent background noise from interfering on the parents unit when baby is sleeping peacefully. 4 levels are available: with VOX 1, the parents unit will be activated with a low noise; with VOX 4, the parents unit will be activated with a loud noise.
5.4 Vibrate
Press the button MEntuteokub-menu, next press the button

to browse the menu. Once you are placed on II, press the button MENU / OK to adjust the option as you wish. You have 3 options:
VIBR.OFF: vibrate alarm is inactivated.
VIBR.ON: vibrate alarm will be triggered when the baby will cry or make a noise.
VIBR+SOUN: vibrate and sound alarms will be triggered when the baby will cry or make a noise.
5.5 Night light
Press the button MENU/OK sub-menu, next press the button to browse the menu. Once you are placed on**press the button MENU / OK to adjust the option as you wish. You have 2 options:
LIGHT OFF: night light is inactivated.
LIGHT ON: night is activated on the baby unit.
5.6 Lullabies
Press the button MENUteOK sub-menu, next press the button to browse the menu. Once you are placed on, press the button MENU/OK to adjust the option as you wish. You have 7 options:
TUNES OFF: lullabies are inactivated.
SONG 1 to SONG 5: one lullaby is selected and is playing on the baby unit.
SONG ALL: lullabies are activated, and the lullabies are playing in turn on the baby unit.
To modify the volume of the lullabies, press the buttons +and -on the baby unit.
5.7 Languages
Press the button MENHTeDkSub-menu, next press the button to browse the menu. Once you are placed on LANGUAGE, press the button MenduJusthe option as you wish. 6 languages are availa-ble: FRANCAIS, ENGLISH, ESPANOL, ITALIANO, PORTUGUES and DUTCH.
5.8 Temperature
Press the button MENU/OK sub-menu, next press the button to browse the menu. Once you are placed on TEMP.set, press the button MENU / OK to adjust the option as you wish. 2 options are available: Celsius C^ or Fahrenheit F^ . The temperature will be displayed on each unit.
5.9 ECO mode
When the parents unit comes closer to the baby unit, transmission strength is dynamically reduced to save energy. This has no effect on sound quality or the effectiveness of the connection.
6 Sound and visual alerts
6.1 Battery low alert
Baby unit
When the batteries are low: the LED switches to red, the empty battery icon flashes and the LCD backlight turns on during 20s.
Parents unit
-
When the batteries are low: the LED switches to red, the beep alert triggers, the empty battery icon flashes and the LCD backlight turns on during 20s.
-
When the batteries are on charge: the red LED flashes, the battery icon flashes continuously to show that charging is in progress and the LCD backlight switches on 20s.
-
When the batteries are almost or fully charged: the LED switches to green, the full battery icon lights and the LCD backlight switches on 20s.
6.2 Out of range alert
Baby unit
-
When the units are out of range: the green LED flashes, the empty antenna signal flashes and the LCD backlight turns on during 20s.
-
When the units are well connected, the LED switched to green and the full antenna signal icon is displayed.
Parents units
-
When the units are out of range: the green LED flashes, the bip alert triggers, the empty antenna signal is displayed and the LCD backlight turns on during 20s.
-
When the units are well connected, the LED switched to green and the full antenna signal icon is displayed.
CEDECLARATIONOFCONFORMITY
| Name: M. Patrick Fleurentdier |
| Head office: ALLEGRE PUERICULTURE SAS Adress: 41. Rue Edouard Martel, BP 197 42013 SANT ETIENNE Cedex 2 - FRANCE Identification of the product: Designation: Baby Alarm Harmony Premium Brand: TI0EX Item reference: 950172/1650182 Model: EN1033 Declare under his responsibility that this product complies with the essential requirements of Directives: R&TE 1999/5EC (article 3.1.a/3.1.b/3.2), Directive TRP 2008/125/EC - Directive ROHS 2002/98/EC and WEEE 2002/98/EC Directive R&TE 1999/5EC: |
| Article 3.1a (Electrical safety): Standard EN 60956-1:2008 + A1:2010 + A11:2009 + A12:2011 |
| Article 3.1a (health): Standard EN 62476:2010 e EN 62311:2008 Standard EN 62471:2008 |
| Article 3.1b (EMC): Standard EN 301 400-1 V1.0.2 (2011-00) Standard EN 301 400-6 V1.3.1 (2008-08) EN61000-3-2:2006 + A2:2009 + A1:2009 & EN61000-3-3:2006 EN61000-3-3:1995 + A1:2001+A2:2005 |
| Article 3.2 (RADIC): Standard EN 301 406 V2.1.1 (2009-07) Directive ErP 2009/125/EC Reglement ErP 278/2009 Reglement 1275/2008 |
| Date: 24/08/2012 Patrick Fleurantdider General manager Signature: |


WEEE marking - Consumer information. Disposal of products at the end of their life. You should comply with current legislation and not dispose of your products with household waste.