SJ21 - Juicer TELEFUNKEN - Free user manual and instructions
Find the device manual for free SJ21 TELEFUNKEN in PDF.
| Product Type | Slow Juicer |
| Brand | TELEFUNKEN |
| Model | SJ21 |
| Rated Power | 200 W |
| Supply Voltage | 220-240 V ~ 50-60 Hz |
| Maximum Continuous Operation Time | 20 minutes |
| Recommended Cooling Time | 10 minutes |
| Number of Automatic Programs | 9 (hard fruits, firm fruits, soft fruits, mixed, vegetables, jams, leafy vegetables, plant milks, cleaning) |
| Reverse Function (unblock) | Yes, R button (reverse for 10 seconds) |
| Large Chute Diameter | 85 mm (accepts whole fruits up to 75 mm) |
| Small Chute | For cut ingredients (2 cm) |
| Included Collection Containers | 2 containers: one for pulp, one for juice |
| Included Pusher | Yes |
| Included Cleaning Brush | Yes |
| Automatic Cleaning | Yes, dedicated program (requires closing caps and adding water) |
| Safety | Automatic shut-off in case of overheating; lid lock; blockage protection |
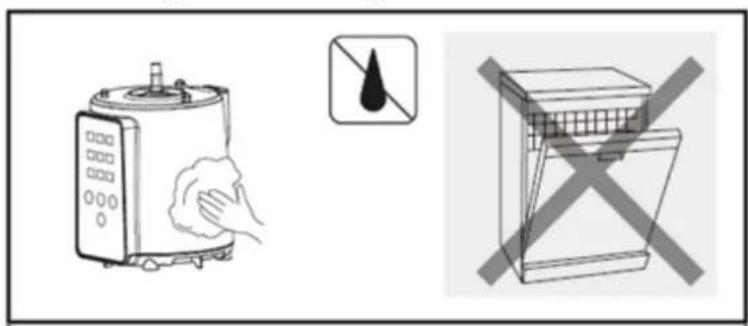
| Body Maintenance | Clean with a soft dry cloth; do not immerse |
| Accessories Maintenance | Wash with a sponge and hot water; do not put in dishwasher |
| Prohibited Ingredients | Frozen foods, pits, sugar cane, hot foods, dry grains without soaking, high-starch foods (rice, almonds) |
| Warranty | Not specified in the manual |
Frequently Asked Questions - SJ21 TELEFUNKEN
User questions about SJ21 TELEFUNKEN
0 question about this device. Answer the ones you know or ask your own.
Ask a new question about this device
Download the instructions for your Juicer in PDF format for free! Find your manual SJ21 - TELEFUNKEN and take your electronic device back in hand. On this page are published all the documents necessary for the use of your device. SJ21 by TELEFUNKEN.
USER MANUAL SJ21 TELEFUNKEN
- READ CAREFULLY THE INSTRUCTIONS BEFORE INSTALLING AND USING THIS APPLIANCE. IT CONTAINS IMPORTANT INFORMATION. IN THE CASE YOU RESELL THIS APPLIANCE, PLEASE MAKE SURE TO PROVIDE THIS INSTRUCTION MANUAL TO YOUR BUYER.
- THIS APPLIANCE IS INTENDED TO BE USED IN HOUSEHOLD AND SIMILAR APPLICATIONS SUCH AS:
STAFF KITCHEN AREAS IN SHOPS, OFFICES AND OTHER WORKING ENVIRONMENTS;
FARM HOUSES;
O BY CLIENTS IN HOTELS, MOTELS AND OTHER RESIDENTIAL TYPE ENVIRONMENTS;
BED AND BREAKFAST TYPE ENVIRONMENTS.
- THIS APPLIANCE SHALL NOT BE USED BY CHILDREN. KEEP THE APPLIANCE AND ITS CORD OUT OF REACH OF CHILDREN.
- THIS APPLIANCE CAN BE USED BY PERSONS WITH REDUCED PHYSICAL, SENSORY OR MENTAL CAPABILITIES OR LACK OF EXPERIENCE AND KNOWLEDGE IF THEY HAVE BEEN GIVEN SUPERVISION OR INSTRUCTION CONCERNING USE OF THE APPLIANCE IN A SAFE WAY AND IF THEY UNDERSTAND THE HAZARDS INVOLVED. CHILDREN SHALL NOT PLAY WITH THE APPLIANCE. CLEANING AND MAINTENANCE SHALL NOT BE MADE BY CHILDREN.
- ALWAYS DISCONNECT THE APPLIANCE FROM THE SUPPLY IF IT IS LEFT UNATTENDED AND BEFORE ASSEMBLING, DISASSEMBLING OR CLEANING.
- WARNING: POTENTIAL INJURY FROM MISUSE.
- EXTRA CARE SHALL BE TAKEN WHEN HANDLING THE SHARP CUTTING BLADES, EMPTYING THE BOWL AND DURING
CLEANING.
- BE CAREFUL IF HOT LIQUID IS POURED INTO THE FOOD PROCESSOR OR BLENDER AS IT CAN BE EJECTED OUT OF THE APPLIANCE DUE TO A SUDDEN STEAMING.
- SWITCH OFF THE APPLIANCE AND DISCONNECT FROM SUPPLY BEFORE CHANGING ACCESSORIES OR APPROACHING PARTS THAT MOVE IN USE.
- THE APPLIANCE MUST NO BE USED IF THE ROTATIVE FILTER OR THE COVER LID HAS ANY VISIBLE DAMAGE, IF IT LEAKS OR IF IT FUNCTIONS ABNORMALLY IN ANY WAY.
- THIS APPLIANCE CAN ONLY BE USED WITH ITS PROVIDED STAND.
- IF THE SUPPLY CORD IS DAMAGED, IT MUST BE REPLACED BY THE MANUFACTURER, ITS SERVICE AGENT OR SIMILARLY QUALIFIED PERSONS IN ORDER TO AVOID A HAZARD.
- REGARDING THE INFORMATION FOR OPERATING TIMES AND ACCESSORIES SETTING, THANKS TO REFER TO THE BELOW PARAGRAPH OF THE MANUAL.
SAFETY INSTRUCTIONS FOR CLEANING AND MAINTENANCE
- ALWAYS UNPLUG THE APPLIANCE AND LET IT COOL DOWN COMPLETELY BEFORE ANY CLEANING OPERATION.
- NEVER IMMERSE IN WATER OR ANY OTHER LIQUID THIS APPLIANCE, ITS ELECTRIC PLUG AND CORD.
- THE SUPPLY CORD SHOULD BE REGULARLY EXAMINED FOR SIGNS OF DAMAGE AND THE APPLIANCE IS NOT TO BE USED IF THE CORD IS DAMAGED.
FOR THE DETAILS ON HOW TO CLEAN SURFACES IN CONTACT WITH FOOD, PLEASE SEE SECTION "CLEANING AND MAINTENANCE".
SAFETY CAUTIONS
- AFTER UNPACKING THE APPLIANCE, MAKE SURE IT IS NOT DAMAGED. IN CASE OF DOUBT, DO NOT USE THE APPLIANCE AND CONTACT YOUR SUPPLIER OR A QUALIFIED TECHNICIAN.
- THE USE OF ACCESSORY AND ATTACHMENTS NOT RECOMMENDED BY THE MANUFACTURER MAY CAUSE INJURIES.
- THE APPLIANCE MUST NOT BE USED IF IT HAS BEEN DROPPED, IF IT HAS ANY VISIBLE DAMAGE, IF IT LEAKS OR IF IT FUNCTIONS ABNORMALLY IN ANY WAY.
- ALWAYS UNPLUG THE APPLIANCE IF NOT USING IT FOR A PERIOD OF TIME.
- REMOVE ALL PACKAGING AND DO NOT LEAVE THE PACKAGING MATERIAL SUCH AS PLASTIC BAGS, POLYSTYRENE AND ELASTIC BANDS IN EASY REACH OF CHILDREN AS THEY MAY CAUSE SERIOUS INJURIES.
- AFTER UNPACKING YOUR APPLIANCE, MAKE SURE YOU HAVE PUT IT ON A FLAT, STABLE AND HEAT-RESISTANT SURFACE. CHECK YOU HAD LEAVE ENOUGH SPACE BETWEEN YOUR APPLIANCE AND SURROUNDING WALL TO LET THE AIR CIRCULATE AROUND. THERE SHOULD BE AT LEAST 50CM ON THE TOP AND 20CM ON SIDES APART FROM THE APPLIANCE.
- THIS APPLIANCE MUST BE EARTHED.
- CHECK THAT YOUR ELECTRICAL INSTALLATION IS SUFFICIENT FOR SUPPLYING THIS APPLIANCE.
- TAKE ALL NECESSARY MEASURE WITH CORDS AND EXTENSIONS TO AVOID ANY INJURIES WHILE IN USE.
-
FOR YOUR OWN SAFETY, WE RECOMMEND YOU NEVER LEAVE THE APPLIANCE IN A PLACE THAT IS EXPOSED TO HUMIDITY OR INCLEMENT WEATHER CONDITION.
-
DO NOT PUT THIS APPLIANCE ON TOP OF OTHERS.
- NEVER LEAVE APPLIANCE PLUGGED IN WHEN NOT IN USE.
- NEVER MOVE THE APPLIANCE WHEN IN USE.
- NEVER PLUG THE APPLIANCE AND TOUCH THE THERMOSTAT WITH WET HANDS. NEVER USE THE APPLIANCE WITH BARE OR WET FEET.
- NEVER UNPLUG THE APPLIANCE BY PULLING THE POWER CABLE. ALWAYS UNPLUG THE APPLIANCE FROM THE MAIN SOCKET.
STANDARDS
THIS APPLIANCE IS CONFORMED TO CURRENT DIRECTIVES AND STANDARDS.
SAFETY INSTRUCTIONS ON RECYCLING
The European Directive on Waste Electrical and Electronic Equipment (WEEE) requires that old household electrical appliances must not be disposed of in the normal
unsorted municipal waste stream. Old appliances must be collected separately in order to optimize the recovery and recycling of the materials they contain, and reduce the impact on human health and the environment.
The crossed out "wheeled bin" symbol on the product reminds you of your obligaon, that when you dispose of the appliance, it must be separately collected.
Consumers should contact their local authority or retailer for informaon concerning the correct disposal of their old appliance.
TABLE OF CONTENTS
DESCRIPTION 1
SET UP AND USE 2
Before rst use. 2
Assembling the appliance 3
Descripon of the control panel and the automac program .. 5
Prepare the ingredients for juicing 7
Using your appliance. 7
Disassembling aer use 10
TROUBLESHOOTING. 10
CLEANING AND MAINTENANCE 11
TECHNICAL INFORMATION 12
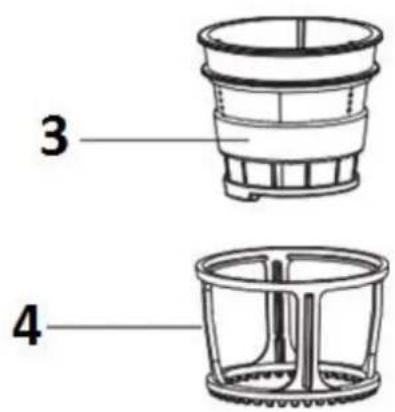
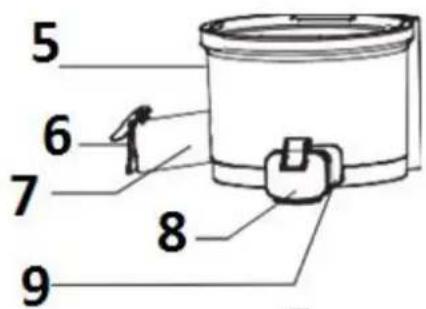
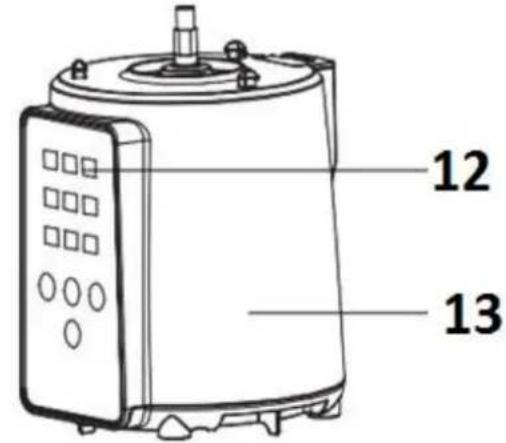
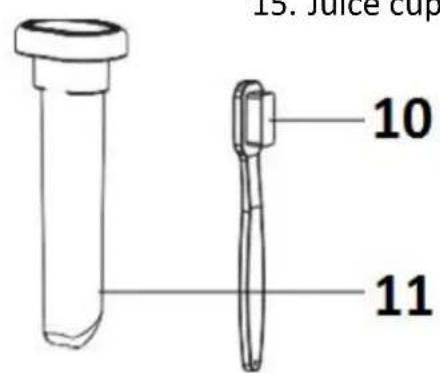
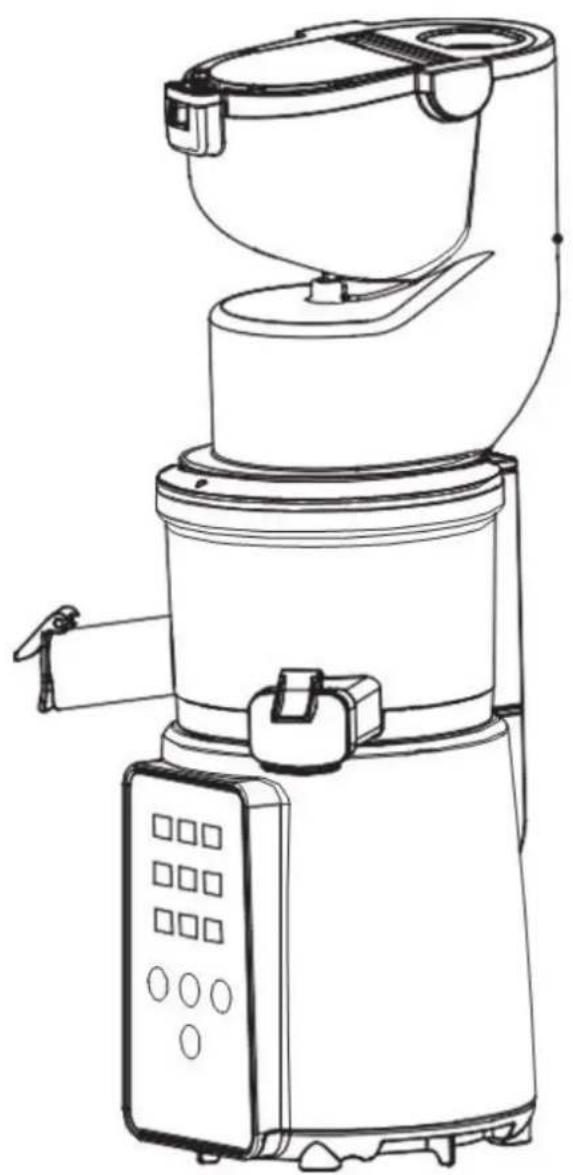
DESCRIPTION
- Cover with feeding tube
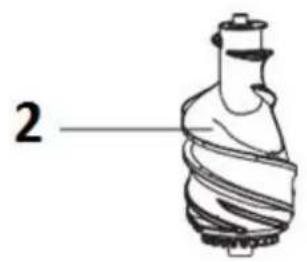
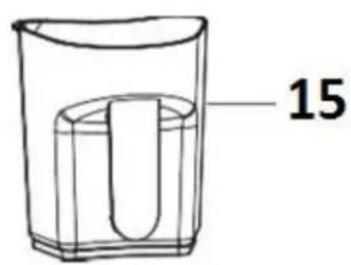
- Auger
- Filter
- Rotave brush
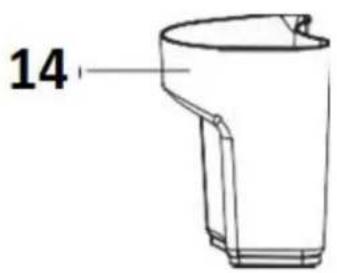
- Juicing bowl
- Juice spout cap
- Juice spout
- Pulp spout cap
- Pulp spout
- Cleaning brush
- Food pusher
- Electronic control panel
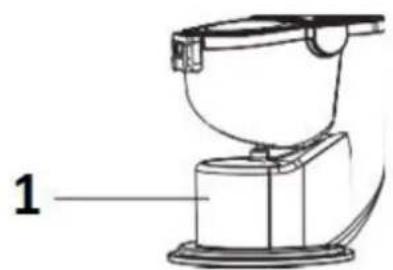
- Main body
- Pulp cup
- Juice cup
SET UP AND USE
Before rst use
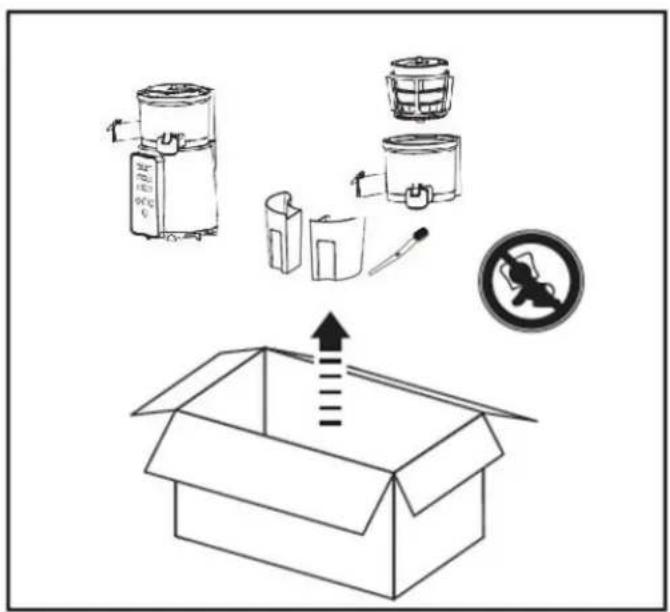
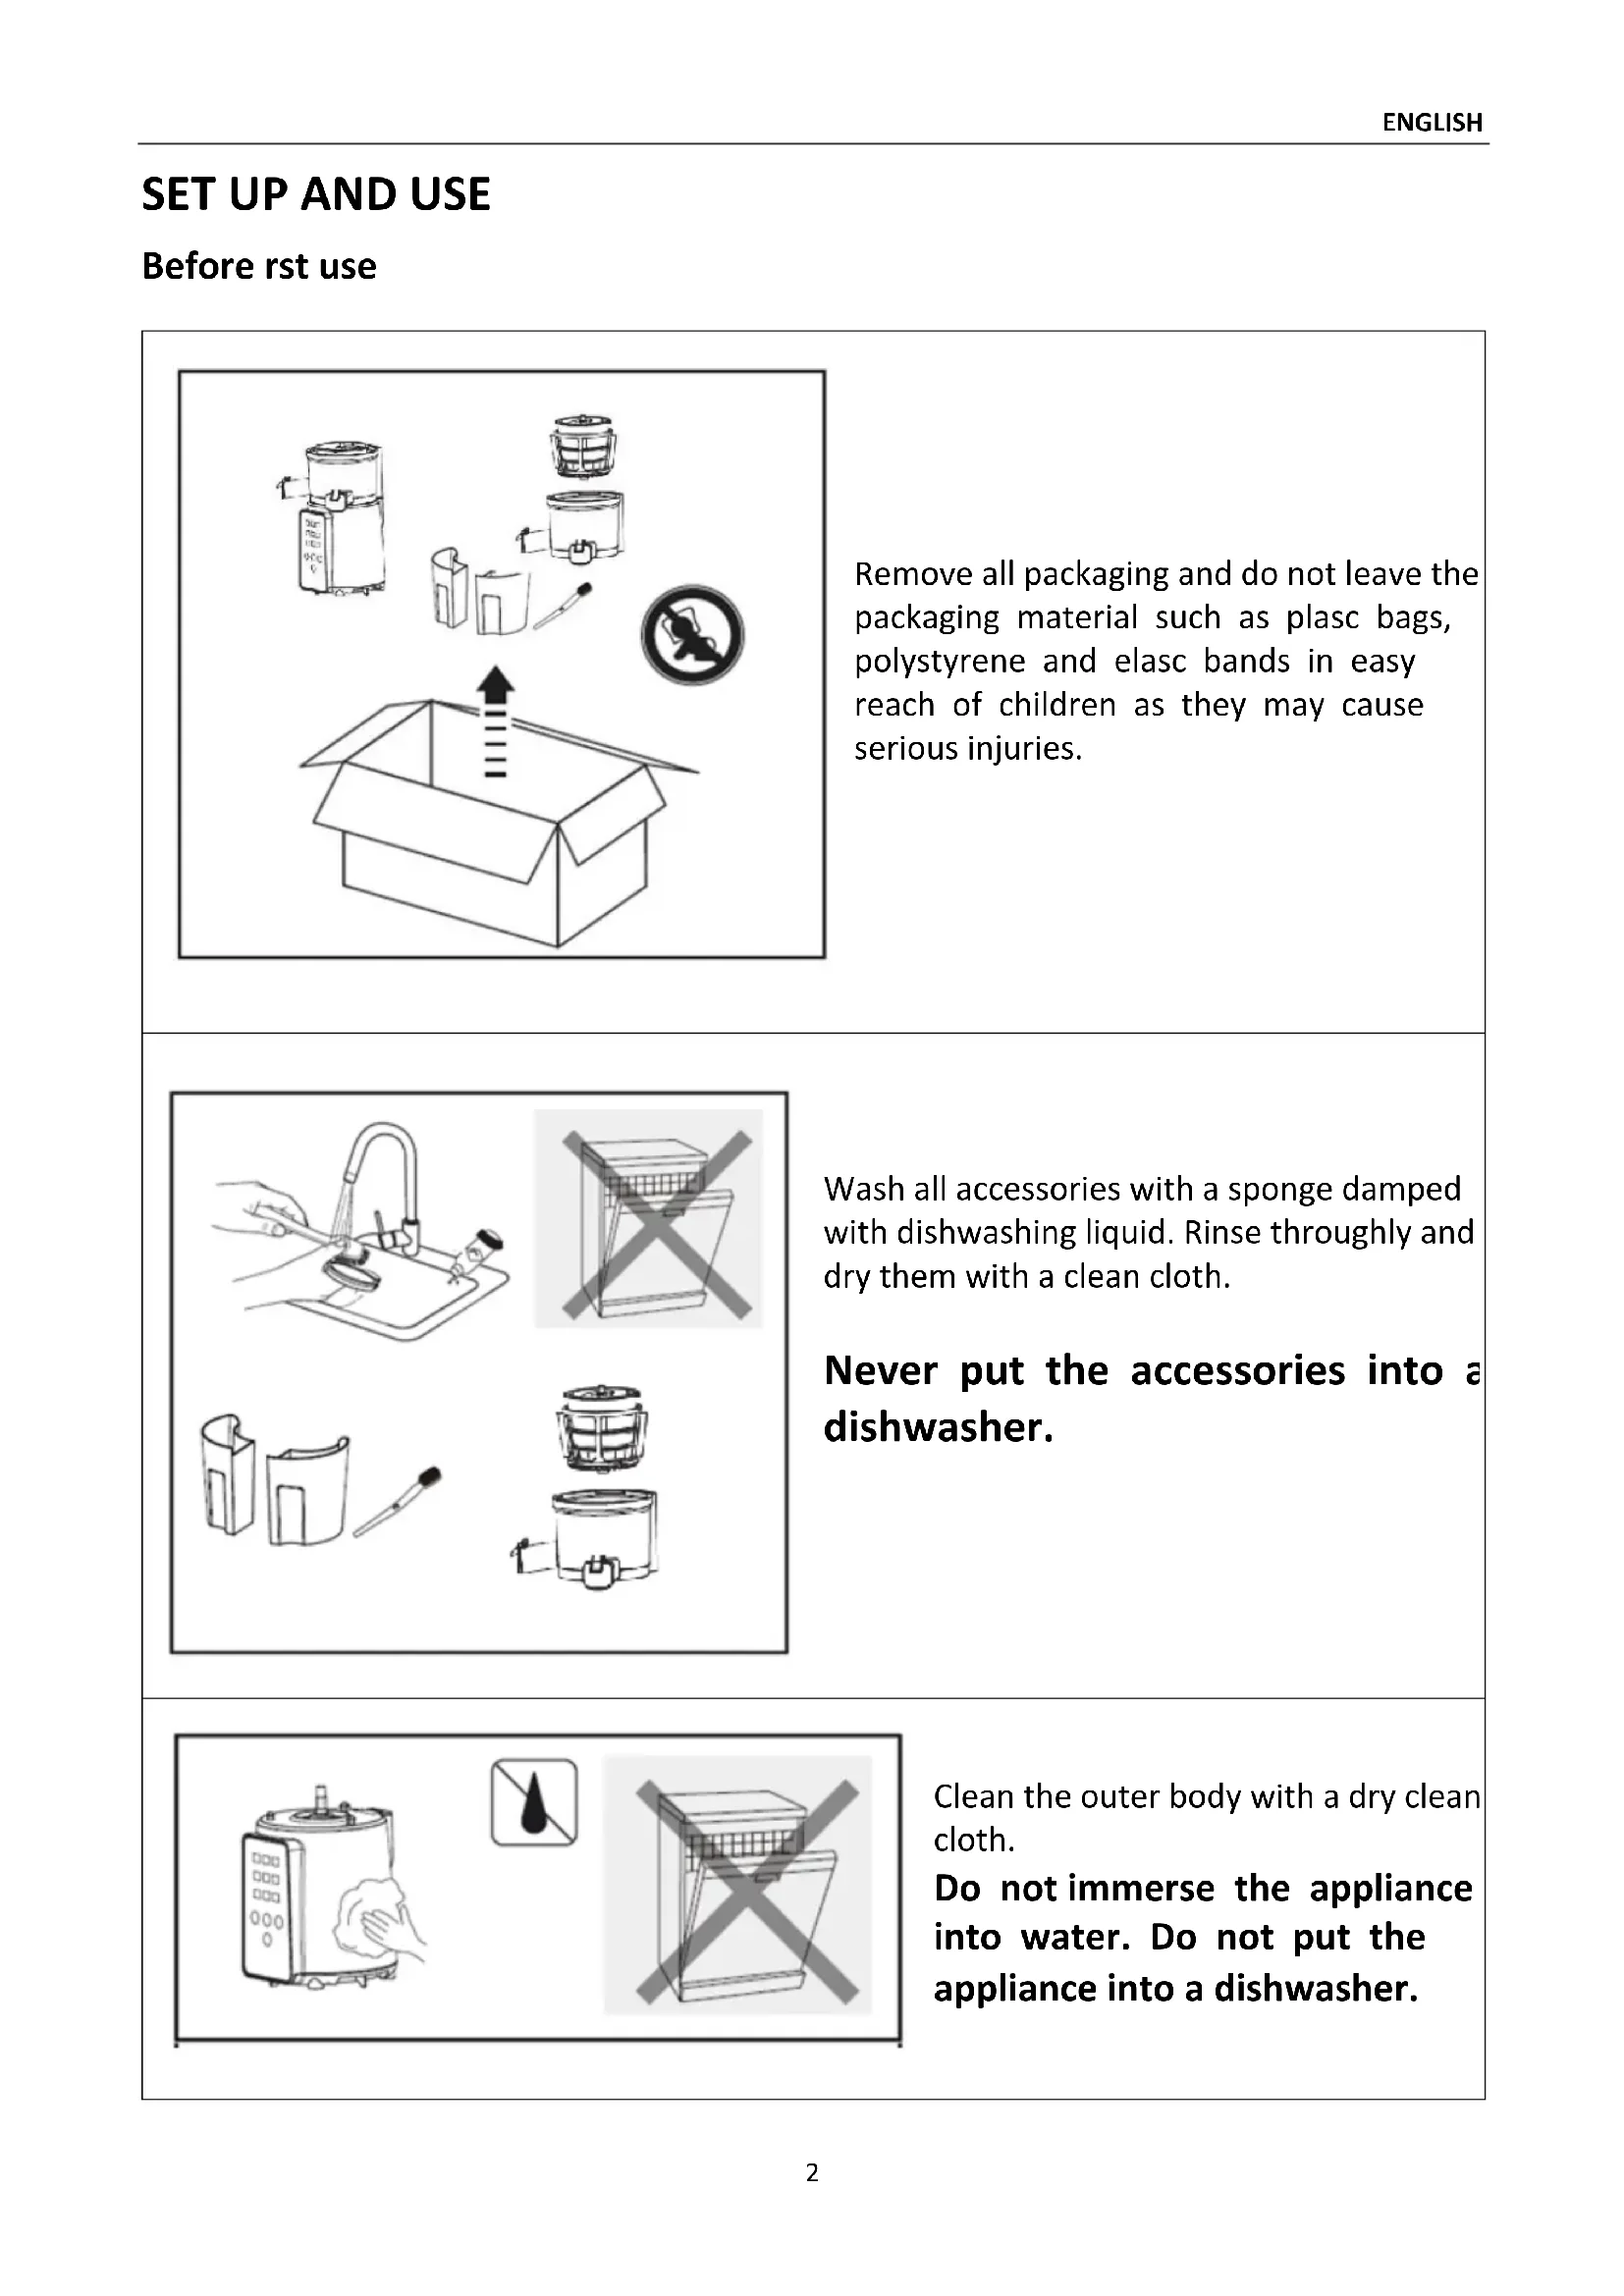
Remove all packaging and do not leave the packaging material such as plasc bags, polystyrene and elasc bands in easy reach of children as they may cause serious injuries.
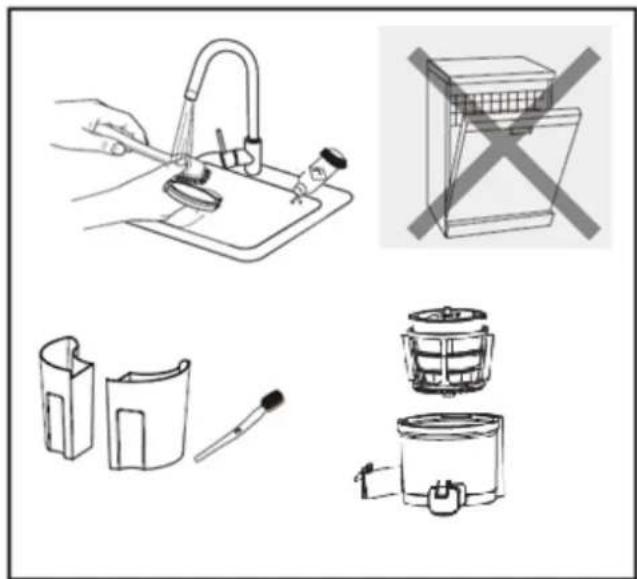
Wash all accessories with a sponge damped with dishwashing liquid. Rinse thoroughly and dry them with a clean cloth.
Never put the accessories into a dishwasher.
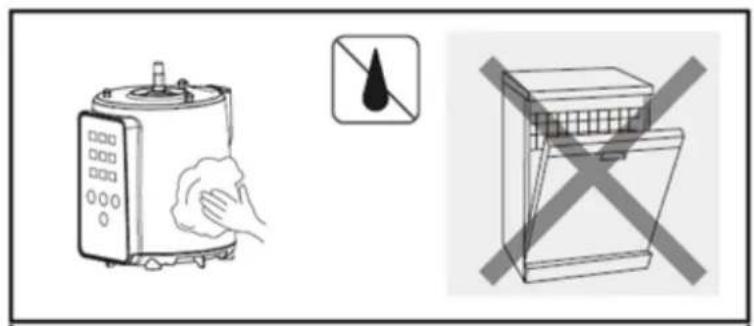
Clean the outer body with a dry clean cloth.
Do not immerse the appliance into water. Do not put the appliance into a dishwasher.
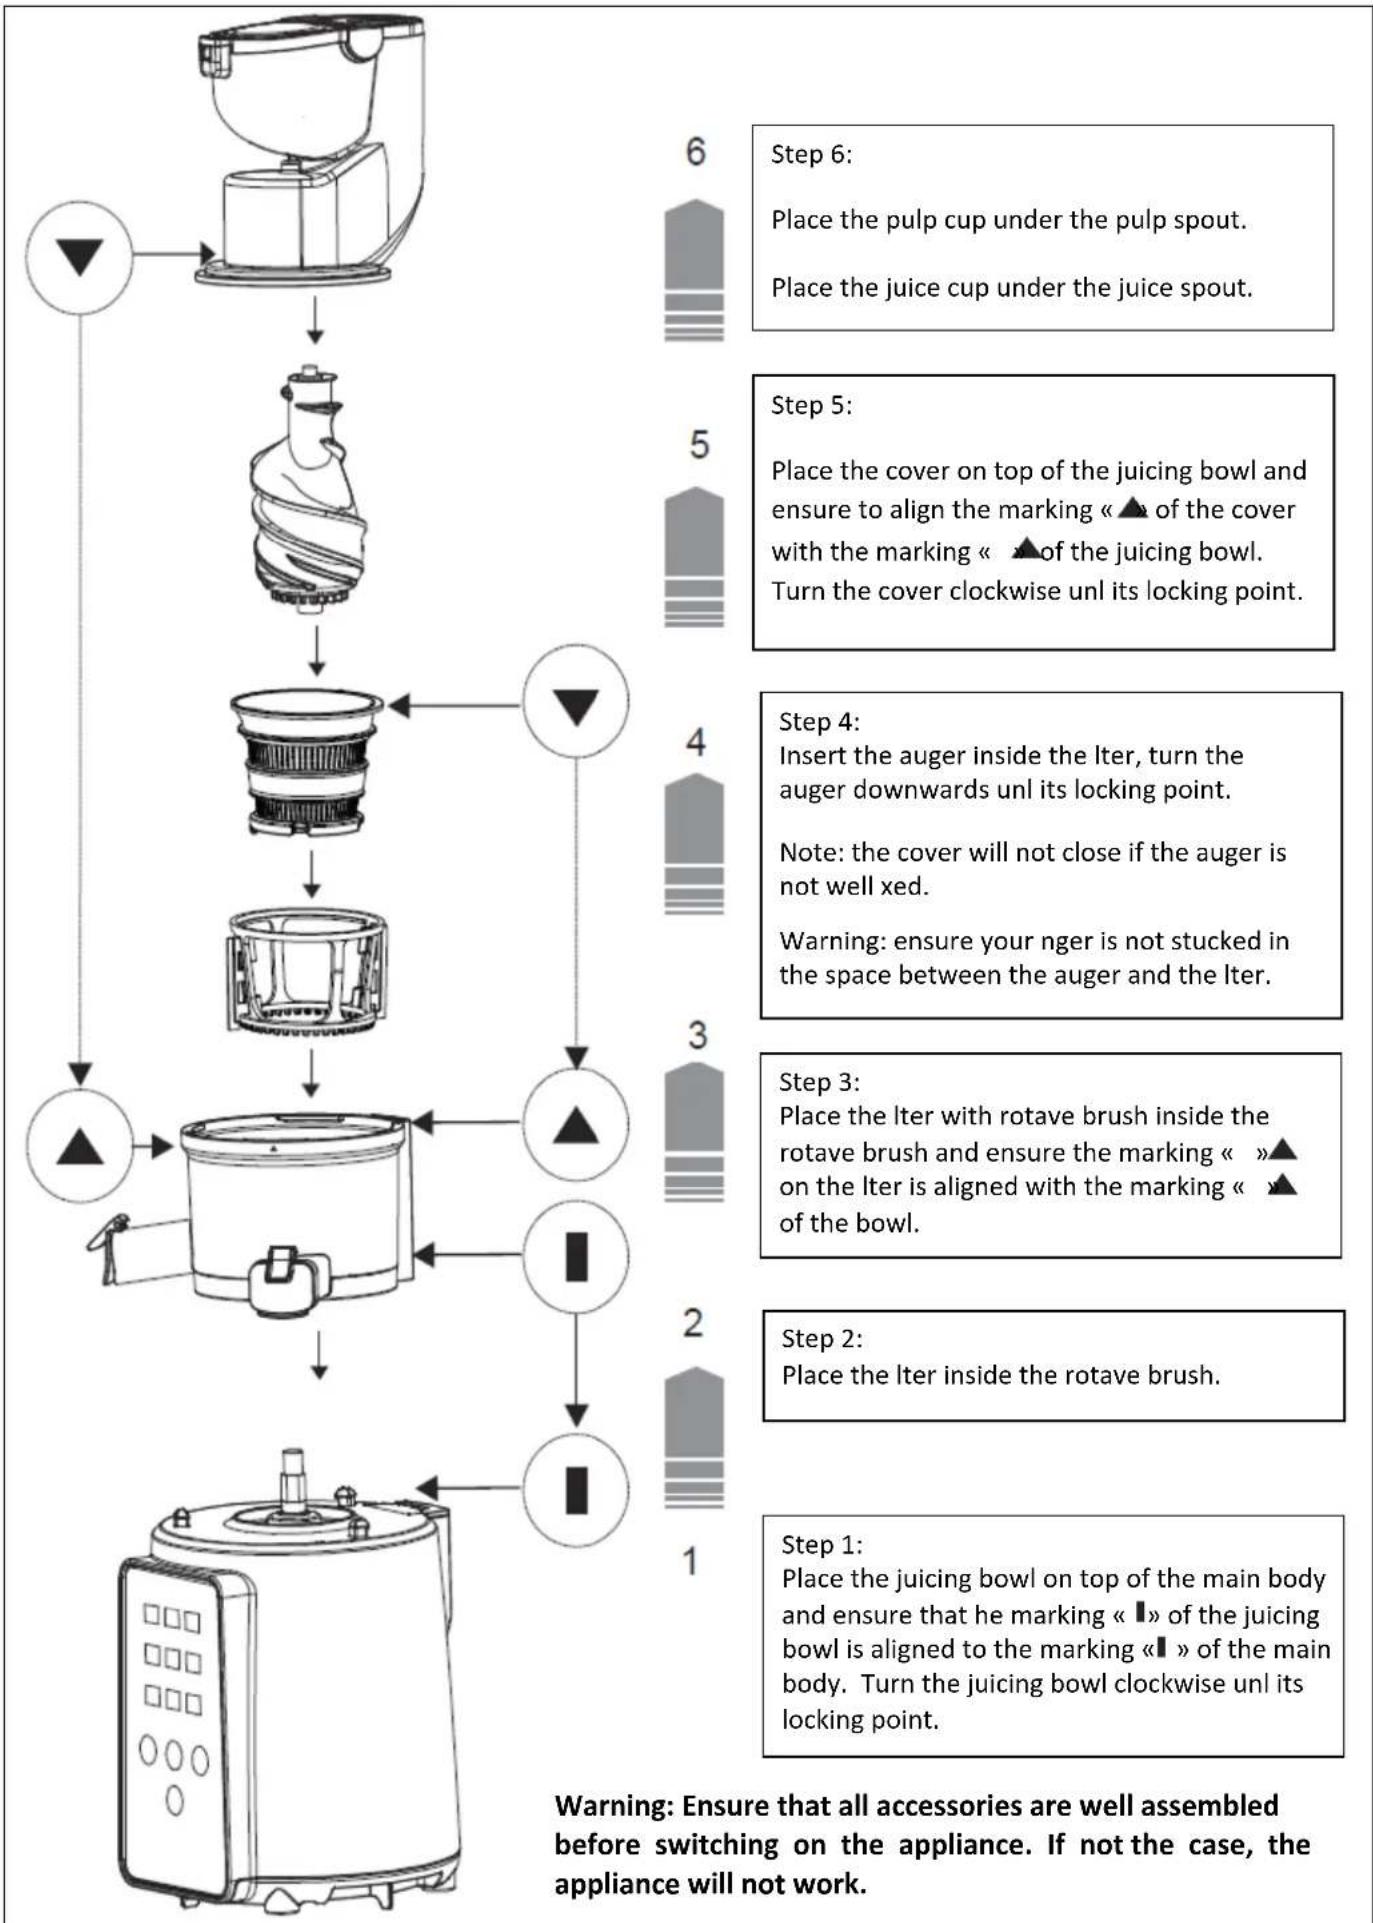
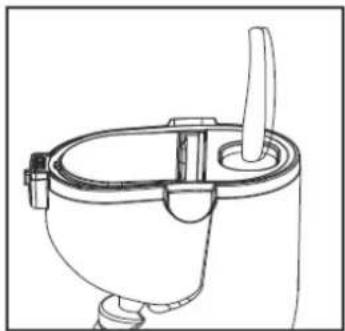
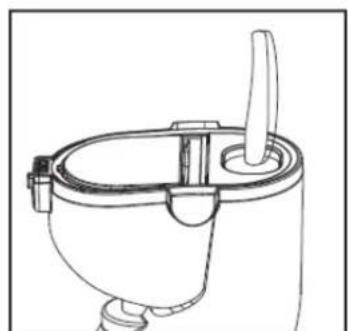
Assembling the appliance
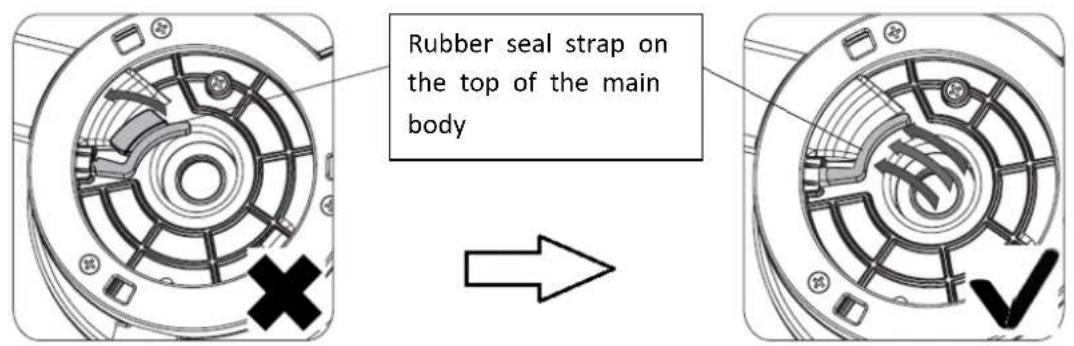
Warning: Never plug in the appliance before assembling the accessories. Always plug out when disassembling the appliance.
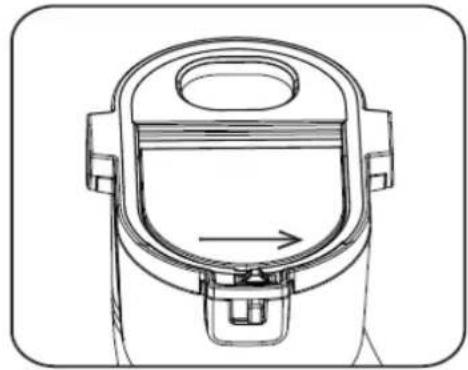
Check on the rubber seal strap on the main body : ensure that the rubber seal strap located on the top of the main body is well xed following below diagram .
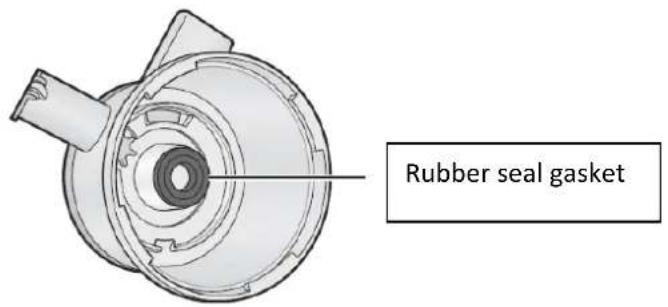
Check on the rubber seal gasket located inside the juicing bowl: Ensure the rubber seal gasket is well xed inside the juicing bowl without gap. If any gap push down the seal gasket unl no gap.
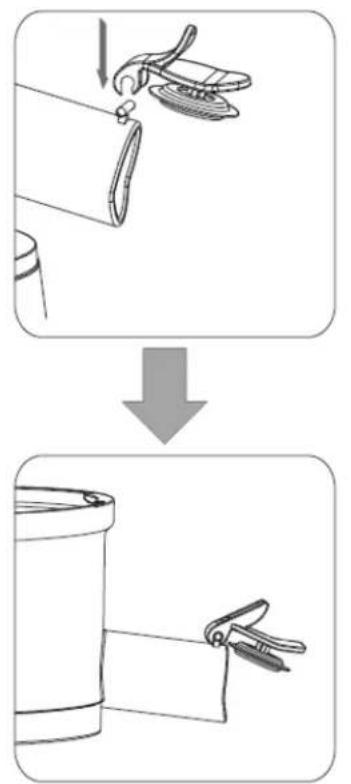
Juice spout cap seng:
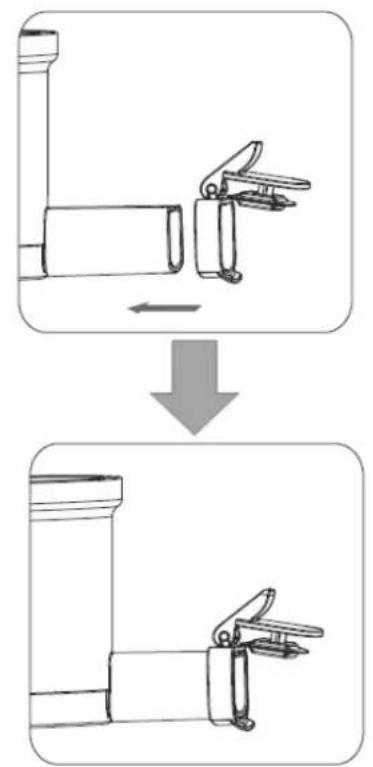
Pulp spout cap seng:
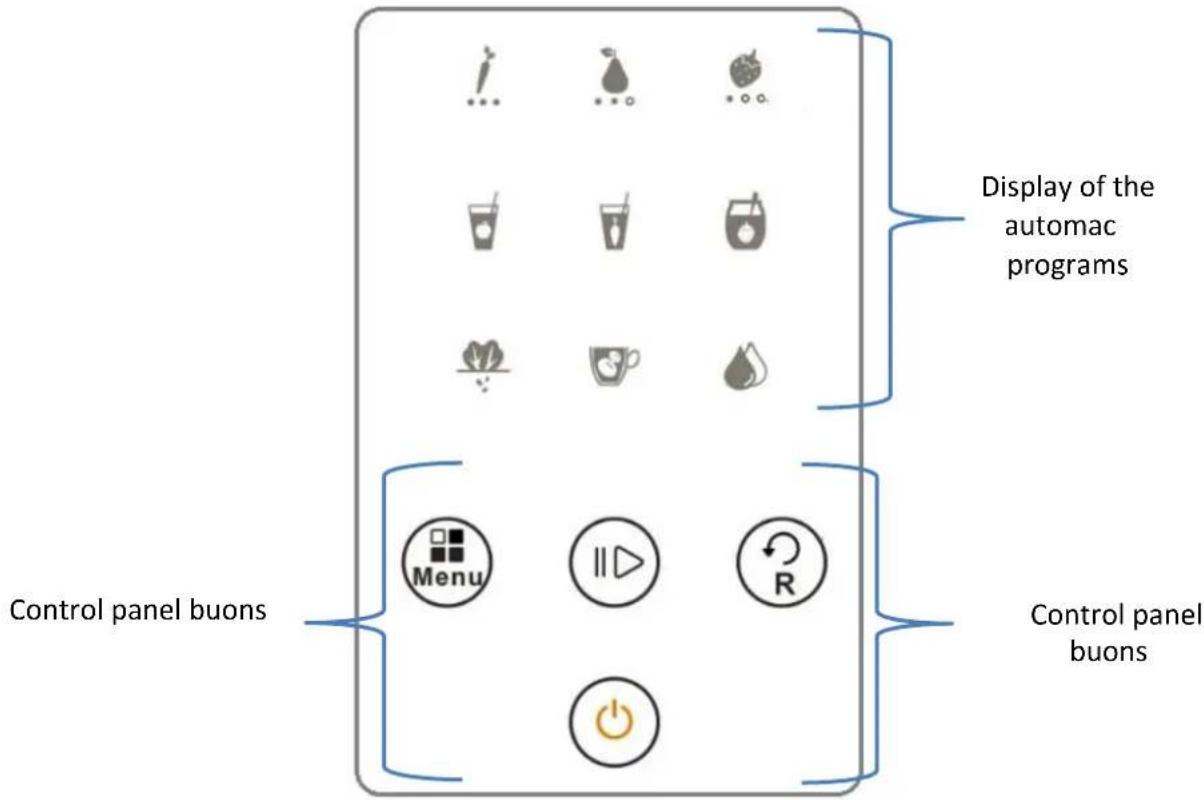
Descripon of the control panel and the automac program
Control panel buons descripon
| R | « Reverse » buon: When foods are blocked inside the appliance, press one me buon « R » (reverse) posion. The slow juicer will turn an-clockwise for 10 seconds then automatically stop. Push again this buon if foods are sll blocked inside. |
| « ON/OFF » buon : aer the appliance is plugged in and the cover of juice cup is set, the buzzer will beep and the power lamp will ash to enter into standby status; press the ON/OFF buon to switch on the appliance, it will light on to indicate is switched on.At the end of your preparaon, press one me on the buon to switch o the appliance. The slow juicer will rotate an-clockwise for 5 seconds and switch o. | |
| Menu | « Menu » buon: this buon allow you to select one of the 9 automac program. Press this buon unl you have selected your program.Note: the program selected will light on the display. |
| ID | « Start » buon: aer selecng your automac funcon, press one me on the « Start » buon to start the program. Press again this buon to pause the extracon or to stop the automac funcon. |
Important :
- You can change the selected auto funcon during use by pressing on the « ON/OFF » buon one me, then press the "Menu" buon to select another program.
- The working me for each auto program is 20 minutes. Stop the appliance for 10 minutes ater 20 minutes to allow the machine to cool down. Do not force the slow juicer to work.
Automac programs descripon
| 1. For fruits and vegetables with hard esh such as caros, goyava etc. 2. Cut the vegetables and fruits in cubes of 2cm before inseng them into the feeding tube. 3. Press the « R » buon if food are blocked or machine slow down. | 1. For fruits and vegetables with medium hard esh such as apples, pears, etc. 2. Cut the vegetables and fruits in cubes of 2cm before inseng them into the feeding tube. 3. Press the « R » buon if food are blocked or machine slow down. You can insert a whole apple or pear; but ensure the diameter of the fruit is less than 75mm. |
| 1. For fruits and vegetables with so esh such as strawberries, grapes, peaches etc. 2. Insert the whole fruit if diameter less than 75cm or cut in 2cm cubes before inseng them into the feeding tube. 3. Press the « R » buon if food are blocked or machine slow down. | 1. For fruits and vegetables with so esh such as strawberries, grapes, peaches etc. 2. Insert the whole fruit if diameter less than 75cm or cut in 2cm cubes before inseng them into the feeding tube. 3. Press the « R » buon if food are blocked or machine slow down. |
| 1. Program for extracng so and hard fruits at the same me. 2. Insert the whole fruit if diameter less than 75cm or cut in 2cm cubes before inseng them into the feeding tube. 3. Press the « R » buon if food are blocked or machine slow down. | 1. Program for extracng so and hard fruits at the same me. 2. Insert the whole fruit if diameter less than 75cm or cut in 2cm cubes before inseng them into the feeding tube. 3. Press the « R » buon if food are blocked or machine slow down. |
| 1. For vegetables such as beets, celery etc. 2. Insert the vegetables cut in 2cm cubes before inseng them into the feeding tube. 3. Press the « R » buon if food are blocked or machine slow down. | 1. Program for making jam with so fruits or vegetables such as strawberries, tomatoes etc. 2. Ensure the 2 spouts caps are closed before starng the program. 3. Insert the whole fruit if diameter less than 75cm or cut in 2cm cubes before inseng them into the feeding tube. 4. Extract for 3 minutes; ensure to respect the max level of the juicing bowl. 5. Press the « R » buon if food are blocked or machine slow down. |
| 1. For vegetables leaves such as kales, sweet potatoes leaves etc. 2. Cut leaves into 2cm long before inseng them into the feeding tube. 3. Press the « R » buon if food are blocked or machine slow down. | 1. For vegetables leaves such as kales, sweet potatoes leaves etc. 2. Cut leaves into 2cm long before inseng them into the feeding tube. 3. Press the « R » buon if food are blocked or machine slow down. |
| 1. Program to extract grains milks such as soya milk, nuts milks etc. 2. Soak nuts or grains into water for 12 hours then put the nuts or grains with the soaked water into the feeding tube. 3. Press the « R » buon if food are blocked or machine slow down. Important: it's imperave you cook the extract milk before drinking it. It is forbidden to extract grains with high starch composition to avoid damaging the appliance. | 1. Program to extract grains milks such as soya milk, nuts milks etc. 2. Soak nuts or grains into water for 12 hours then put the nuts or grains with the soaked water into the feeding tube. 3. Press the « R » buon if food are blocked or machine slow down. Important: it's imperave you cook the extract milk before drinking it. It is forbidden to extract grains with high starch composition to avoid damaging the appliance. |
| 1. Automac cleaning program for below case: 1. When you have decided to make a dierent second juice. 2. As a pre-cleaning step to facilitate you cleaning of the appliance at the end of use. It's mandatory to close the 2 spout caps before pouring water into the feeding tube et starng the program. At the end of the program, open the 2 spout caps to empty the water. | 1. Automac cleaning program for below case: 1. When you have decided to make a dierent second juice. 2. As a pre-cleaning step to facilitate you cleaning of the appliance at the end of use. It's mandatory to close the 2 spout caps before pouring water into the feeding tube et starng the program. At the end of the program, open the 2 spout caps to empty the water. |
Prepare the ingredients for juicing
1. Forbidden ingredients
| Ingrédients pouvant endommager les accessoires | Ingrédients collants ou huileux |
| 1. Ice and frozen ingredients,2. Fruits seeds (peach, manguo, avocado etc.),3. Raw or cooked pumpkins/potatoes,4. Sugar canes,5. Hot ingredients,6. Dried grains who were not soaked (cereals, nuts,soya etc),7. Ingredients with high starch composition such as rice, almonds etc. | 1. Okra,2. Oils,3. Peanuts,4. Lotus roots. |
2. Ingredients preparaon
| Fruits | Légumes |
| 1. Peel the thick skins of fruits. 2. Remove the seeds from the fruits. 3. Cut fruits with diameter larger than 75mm. 4. Unfreeze frozen fruits and vegetables for at least 30 minutes prior to extracng. | 1. Remove stems and seeds. 2. Cut vegetables leaves into 2 cm cubes or strips for an easier juice extracon. 3. Unfreeze for at least 30 minutes the frozen vegetables prior to extracng. 4. Cut the high ber vegetables into 2 cm cubes or strips. |
3. Tips
- Use fresh and seasonal fruits and vegetables.
- Use fruits with high esh and water composition.
- Add liquids for ingredients with low water composition.
- Cut fruits or vegetables with diameter more than 75mm
- Never use the pulps to extract the juice to avoid damaging the appliance.
- Add liquids (coconut water, water, milk) when extracng vegetables leaves.
Using your appliance
| 1. Aer assembling your appliance, place it on a at and stable surface. 2. Place the pulp cup under the pulp spout. 3. Place the juice cup under the juice spout. 4. Plug the appliance to a power socket. 5. Press on the “ON/OFF” buon. |
Your appliance comes with two feeding tubes located on top of the cover:
- Large feeding tube 85mm allowing to feed a whole fruit or vegetable with diameter up to 75mm
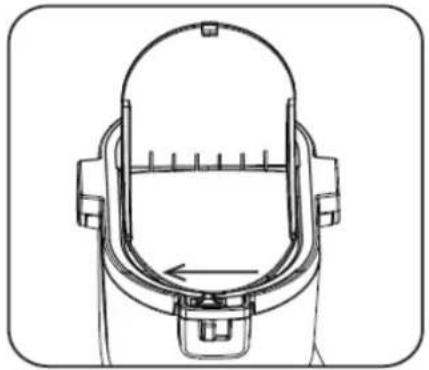
To open the feeding tube cover, push the lock pin to the le side.
To close the feeding tube cover, push the lock pin to the right side.
- Small feeding for cut ingredients with width less than 2cm:
- Recommended for vegetables with high ber composition.
- Recommended for fruits and vegetables with hard esh.
- Ensure to close the cover of the large feeding tube prior to this feeding tube use.
Juice extracon:
1.


2.


3.


- Press one me on the buon «
to switch on the appliance. Press the menu buon «
select one of the nine auto programs and press on the start buon « » to start the selected juice extracng program.
- Insert your ingredients whole or cut in cubes per small quanes every 5 seconds into the feeding tube (large or small). Use the food pusher to push ingredients downwards.
- At the end of your juice extracon, press one me on the start buon «
to start the auto
program and close the juice spout cap. Then press on the buon « » to switch o the appliance.

When foods are blocked inside the appliance, press one me buoy « R » (reverse) posion. The slow juicer will turn an-clockwise for 10 seconds then automatically stop.
Push again this buon if foods are sll blocked inside.
Warning:
- Never insert your hands or any objects into the feeding tube. When foods are blocked, use the food pusher.
- Do not let the appliance work for more than 30 seconds without any food.
- Always ensure all the accessories are well assembled.
- Never use the appliance with wet hands.
- Do not block the pulp and the juice spout during use.
- Do not open the cover or retrieve the juicing bowl during use.
- Do not move the appliance when in use.
Recipes:
| Recipe | Ingredients | Preparaon |
| Energy juice | 2 grapefruit2 oranges1 lemon5 fresh mint leaves5 gr of ginger | Cut all the fruits then insert them inside the feeding tube. |
| Tropical juice | 1 mango1/2 pineapple | Cut all the fruits then insert them inside the feeding tube. |
| Detox juice | 1 carrot1 celery1 apple50 gr spinach | Cut all the fruits/vegetables then insert them inside the feeding tube. |
Note: It is advised to drink your juice within 15 minutes aer the end of your preparaon to preserve all the vitamins and minerals.
Disassembling aer use
Warning: Always unplug the appliance before retrieving the accessories.
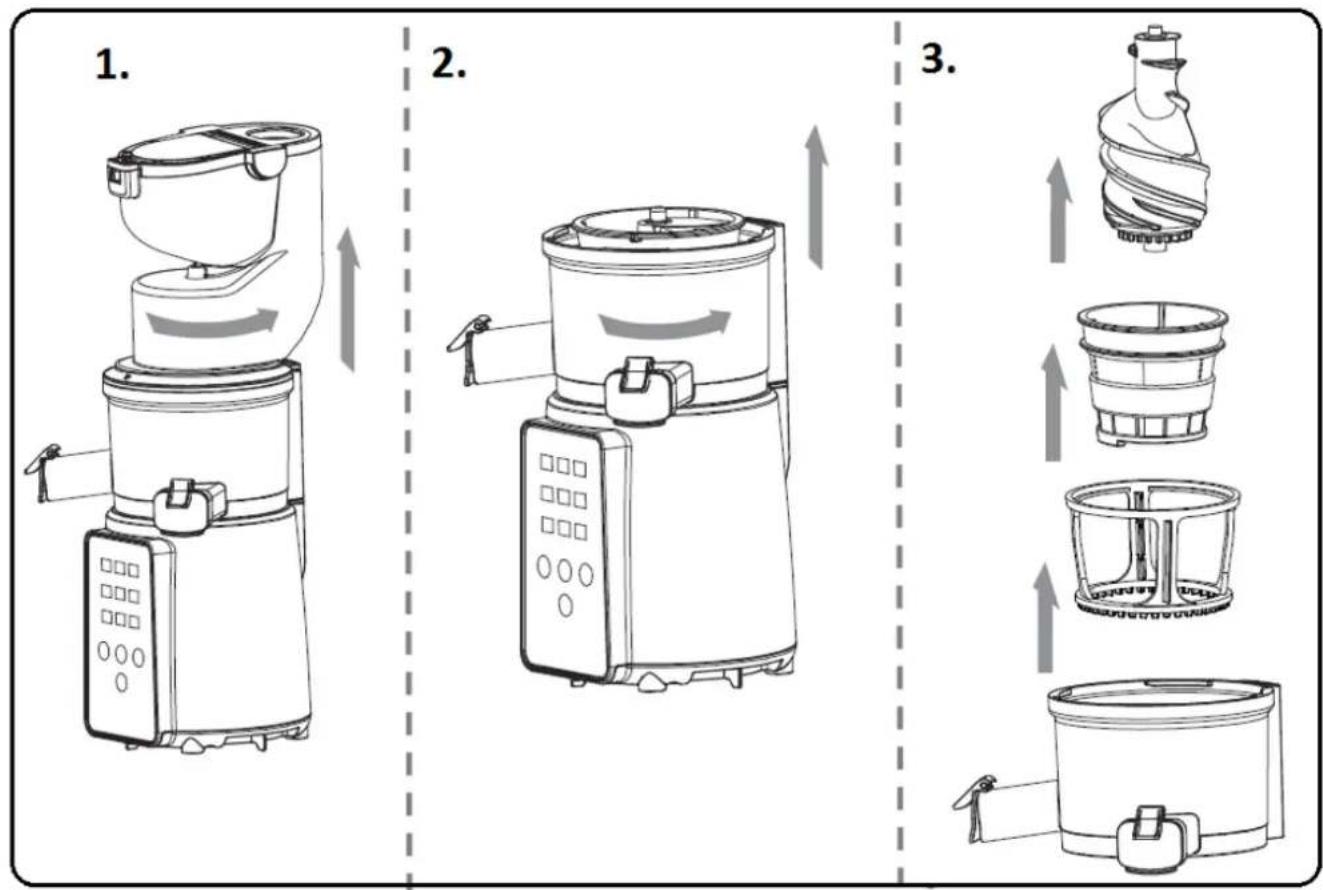
- Turn the cover an-clockwise to retrieve it.
- Retrieve the juicing bowl by pulling it from the main body.
- Retrieve the Iter by pulling it from the juicing bowl. Then retrieve the auger by pulling it from the Iter.
TROUBLESHOOTING
| Problems | Causes | Soluons |
| The appliance is not working aer plugged in. | 1. Wrong assembling of accessories. 2. Use of forbidden ingredients or overloading of ingredients. 3. The cover is not well assembled. 4. The pulp spout is clogged. 5. You have overworked the nominal working me of the machine (20 minutes), which is now into the motor protected mode. | 1. Disassemble and assemble again all accessories. 2. Switch o the appliance and remove the forbidden or overloaded ingredients. 3. Switch o the appliance and replace correctly the cover. 4. Switch o the appliance and remove the clogged pulps. 5. Wait for the motor to cool down for 10 minutes before using again the appliance. |
| Noise during operaoon. | 1. Squeaking/cracking noises. 2. Vibraon of motor/accessories. | This is normal: these noises indicate your machine is extracng the juice. |
| Low volume of juice. | Frozen ingredients not being unfreeze enough.Fruits or vegetables with low water composition. | Add liquids to your preparaon. |
| Juice leakage. | Seals or accessories are wrongly assembled. | Switch o the appliance, disassemble and assemble again the seals and accessories. |
| Abnormal noises or vibraons. | 1. Accessories are not well assembled.2. The appliance is not placed on a at and stable surface.3. The pulp spout is clogged. | 1. Switch o the appliance, disassemble and assemble again the accessories2. Switch o the appliance and place the appliance on a at and stable surface.3. Switch o the appliance and remove the clogged pulps. |
CLEANING AND MAINTENANCE
Your slow juicer has an automac cleaning program « » for below case:
- When you have decided to make a dierent second juice.
- As a pre-cleaning step to facilitate you cleaning of the appliance at the end of use.
It's mandatory to close the 2 spout caps before pouring water into the feeding tube et starng the program.
At the end of the program, open the 2 spout caps to empty the water.
- At the end of the pre-cleaning program, switch o your appliance by pressing the buon “ON/OFF”.
- Unplug your appliance from the power socket.
- Ensure to always unplug your appliance before any cleaning operaon. Never put the motor unit into the dishwashing or under the water.
Cleaning the body motor unit:
Clean the outer surface with a so cloth (or sponge) on the surfaces of the appliance.
Cleaning the accessories:
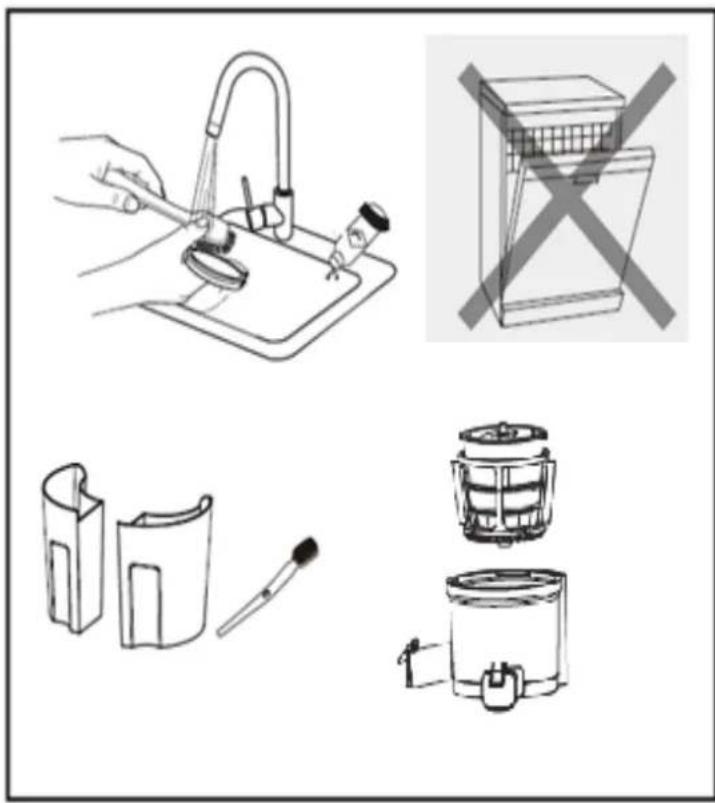
Wash the accessories with a sponge and dishwashing liquid and rinse them.
To take out the heavy stains, put all the accessories into hot water with dishwashing liquid and let it rest for 30 min. then use a brush to clean it.
Do not use a hard brush or any others cleaners to avoid scratching or damaging the appliance.
Do not use a hard brush or any others cleaners to avoid scratching or damaging the appliance. Never immerse the appliance.
TECHNICAL INFORMATION
| Model | SJ21 |
| Voltage | 220-240V ~ 50-60Hz |
| Power | 200W |
| Nominal working me | 20 minutes max. |
TELEFUNKEN
EXTRACTOR DE ZUMO
SJ21
This manual instrucon is also available on the following website: http://pieces-detachees.sogedis.fr/