
Style Series R4 - Shaver REMINGTON - Free user manual and instructions
Find the device manual for free Style Series R4 REMINGTON in PDF.
| Brand | Remington |
| Model | Style Series R4 |
| Product type | Rotary shaver |
| Number of heads | 3 rotary heads |
| Integrated trimmer | Yes, retractable precision trimmer |
| 3-day stubble accessory | Yes (adjustable comb) |
| Power supply | Rechargeable via mains (adapter SW-047010EU) |
| Adapter input voltage | 100-240 V~, 50/60 Hz |
| Adapter output voltage | 4.7 V ----, 0.1 A |
| Charging time | 16 hours (full charge recommended for first use) |
| Battery life | Up to 40 minutes |
| Charging indicator | Yes, below the switch |
| Pivoting / flexible head | Yes, pivoting and flexible head |
| Cleaning | Washable under running water (shaver head only) |
| Trimmer maintenance | Lubricate every 6 months with a drop of oil |
| Protective cap | Included |
| Cleaning brush | Included |
| Removable hair chamber | Yes |
| Safety | Waterproof device (keep dry); do not use if damaged |
| Battery recycling | Rechargeable battery removable by a professional |
| Dimensions (approx.) | 15 x 5 x 5 cm |
| Weight (approx.) | 200 g |
Frequently Asked Questions - Style Series R4 REMINGTON
User questions about Style Series R4 REMINGTON
0 question about this device. Answer the ones you know or ask your own.
Ask a new question about this device
Download the instructions for your Shaver in PDF format for free! Find your manual Style Series R4 - REMINGTON and take your electronic device back in hand. On this page are published all the documents necessary for the use of your device. Style Series R4 by REMINGTON.
USER MANUAL Style Series R4 REMINGTON
Style Series Rotary Shaver R4


Thank you for buying your new Remington® product. Please read these instructions carefully and keep them safe. Remove all packaging before use.
IMPORTANT SAFEGUARDS
- This appliance can be used by children aged from 8 years and above and persons with reduced physical, sensory or mental capabilities or lack of experience and knowledge if they have been supervised/instructed and understand the hazards involved. Children shall not play with the appliance. Cleaning and user maintenance shall not be done by children unless they are older than 8 and supervised. Keep the appliance and cable out of reach of children under 8 years.
- Always check the appliance before you use it. Do not use the appliance if it is damaged, as this may cause injury.
- The adaptor contains a transformer. Do not cut off the adaptor to replace it with another plug, as this causes a hazardous situation.
WARNING: Keep the appliance dry. - Do not use the product with a damaged cord. A replacement can be obtained via our International Service Centres.
- WARNING: For recharging the battery, only use the charger supplied with the appliance - type reference SW-047010UK.
- Always replace a damaged adaptor with one of the original type.
- Do not use the shaver, charging adaptor, charging stand or any other part if it is damaged, as this may cause injury.
- This appliance should never be left unattended when plugged into a power outlet, except when charging.
- Keep the power plug and cord away from heated surfaces.
- Do not plug or unplug the appliance with wet hands.
- Do not twist or kink the cable, or wrap it round the appliance.
- This appliance is not intended for commercial or salon use.
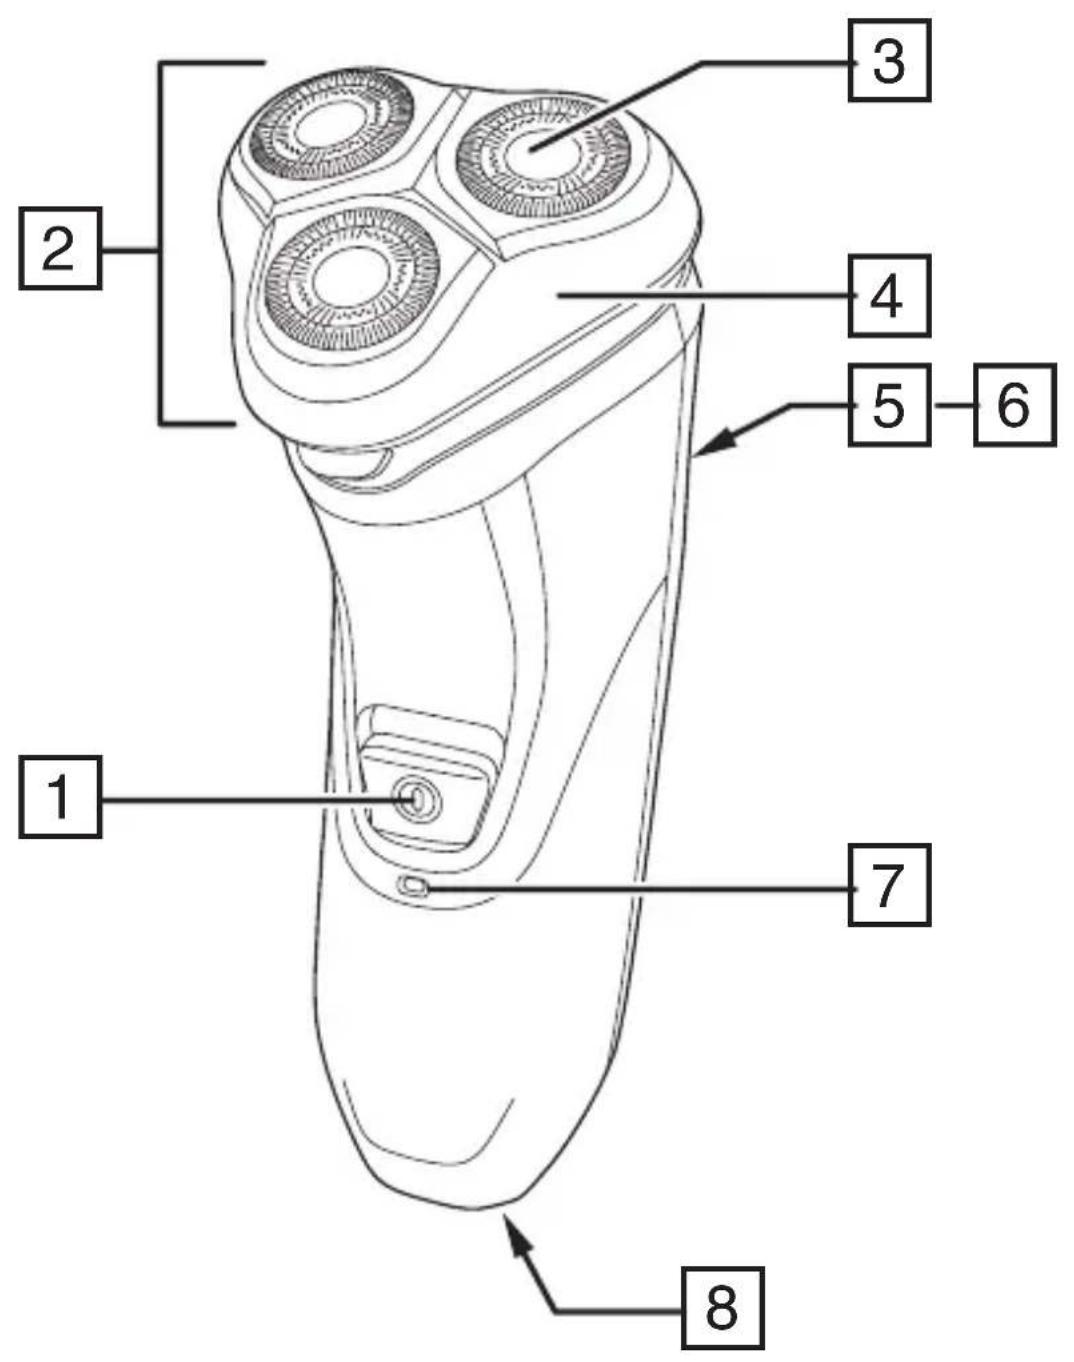
PARTS
- On/off switch
- Pivoting head and cutter assembly
- Flexing heads
- Hairpocket
- Detail trimmer
-
Trimmer release button
-
Charging indicator light
- Charger connector
Not shown - Adaptor
- Cleaning brush
- Stubble head guard
GETTING STARTED
CHARGING YOUR SHAVER
- It is recommended to fully charge your appliance before using it for the first time.
- Ensure the product is switched off.
- The adaptor automatically adjusts to a main voltage between 100V and 240V.
- Connect the shaver to the adaptor and then to the mains.
- The indicator light below the power switch will light up to indicate the shaver is charging.
- Charge time for the battery from empty to full charge is 16 hours. Remove from charging after 16 hours and the charging indicator will turn off.
- Run time from fully charged is up to 40 mins.
- Note: To preserve the life of your batteries, let them run out completely every 6 months and then fully charge.
- Do not recharge your shaver after each use as this will shorten the life of the battery.
INSTRUCTIONS FOR USE
SHAVING
- Switch the shaver on.
- Stretch the skin with your free hand so the hairs stand upright.
- Only apply light pressure on the shaving head while shaving (pressing too hard can damage the heads and make them vulnerable to breakage).
- Use short, circular strokes.
TRIMMING
- Slide the trimmer button to release the detail trimmer.
- Hold the trimmer at a right angle to your skin.
- Place the trimmer at desired trim line for a quick, easy, professional trim.
- To retract the trimmer, push down until it locks into position.
STUBBLE LOOK
- Fit the stubble head guard to your shaver for a 3-day stubble look.
B
TIPS FOR BEST RESULTS
- Always hold the shaver at right angles to the skin so that all three heads are touching the skin with equal pressure.
- Use moderate to slow stroking movements. The use of short circular motions in stubborn areas may obtain a closer shave, especially along the neck and chin line.
DO NOT press hard against the skin in order to avoid damage to the rotary heads.
- Care for your appliance to ensure a long lasting performance. We recommend you clean your appliance after each use.
-
Ensure the appliance is switched off and unplugged from the mains before cleaning.
-
Open the shaver head by pressing the release button (Fig. A).
- Empty out any hair clippings.
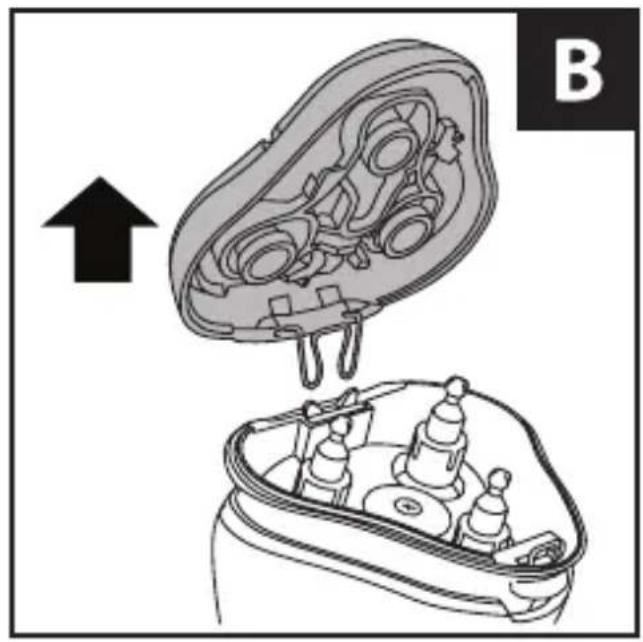
- Pull the shaver head upwards to remove it from the body (Fiq. B).
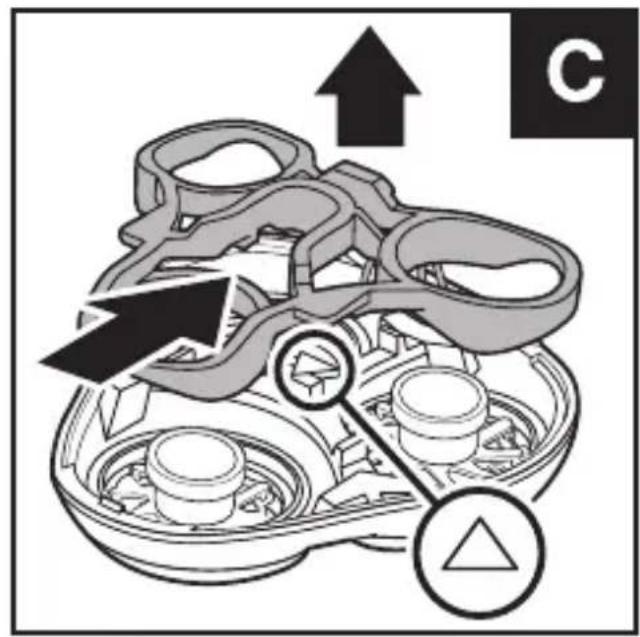
- Locate the centre arrow and slide the retainer in the opposite direction to release it. Once released, lift it out of the shaver head (Fig. C). Make a note of the correct orientation of the retainer to make refitting easier.
- Carefully brush away any hairs from the cutters.
- For a more thorough cleaning, lift out the three cutters (Fig. D).
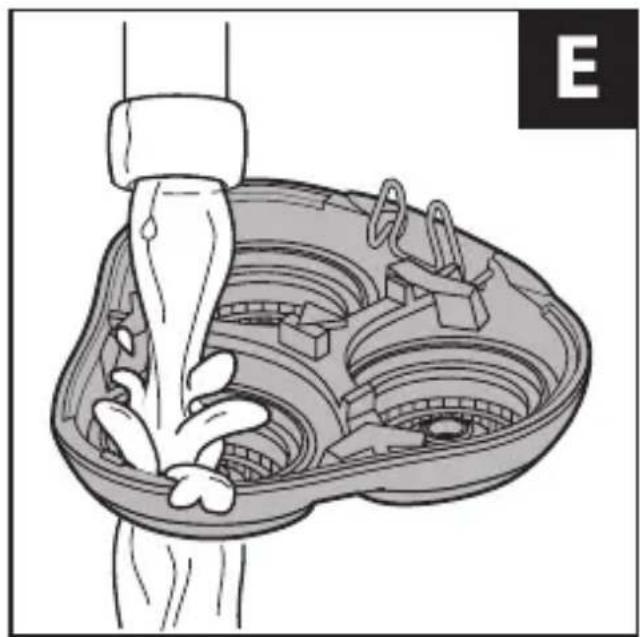
- Wash the shaving head under running water (Fig. E). Allow to dry thoroughly.
- Carefully refit the three cutters.
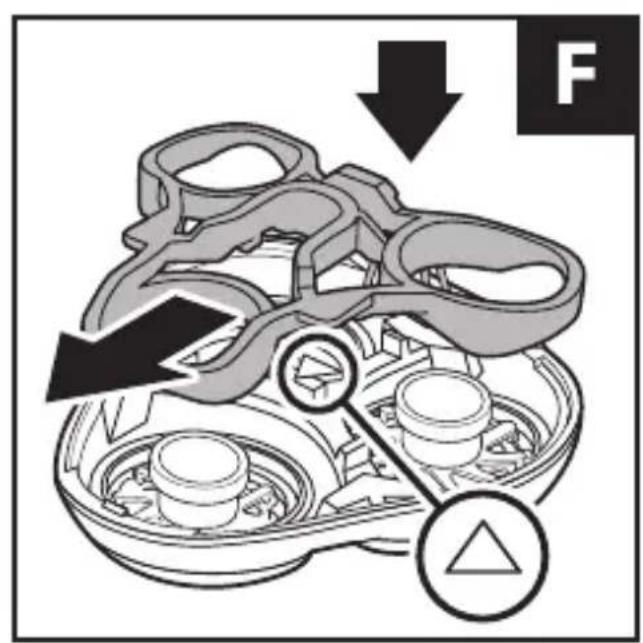
- Refit the retainer. Locate the centre arrow and slide the retainer in the same direction as the arrow until it clicks into place (Fig. F).
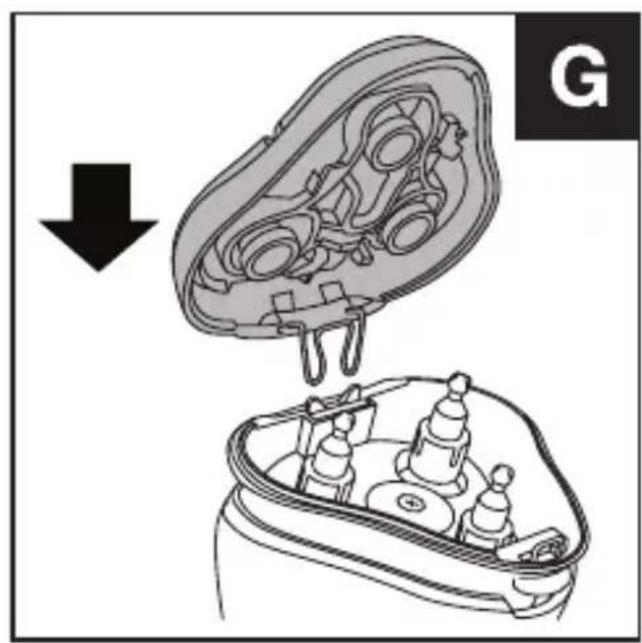
- Once the shaver head is assembled, align the spring hinge with the slot at the back of the hair pocket and press into place (Fiq. G). Snap the head assembly closed.
TRIMMER
Lubricate the teeth of the trimmer every six months with a drop of sewing machine oil.
REMOVING THE RECHARGEABLE BATTERY
We strongly recommend that a professional removes the rechargeable battery. Parts of the shaver case, and tools have sharp edges and may cause injury if not handled correctly.
- The rechargeable battery must be removed from the appliance before it is scrapped.
-
Disconnect the charging adapter before removing the battery.
-
Run the shaver until the motor stops.
- Unplug the shaver.
-
Open the hair pocket and remove 1 screw from the top.
-
Remove the three drive shafts and the shaver head
- Unscrew the 2 screws on the top housing.
- Carefully pry off the front housing.
- Unscrew the 6 screws on the inner housing.
- Carefully pry off the back housing.
- Lift the battery carrier and circuit board out of the shaver body then cut the tabs holding the batteries to the circuit board.
- Used batteries must be removed from the appliance and disposed of at an appropriate official recycling/collection point.
- Do not attempt to operate the shaver once you have opened it.
ADAPTER SPECIFICATIONS
| Manufacturer address and registration number | Spectrum Brands (UK) Limited, Regent Mill, Fir Street, Failsworth, Manchester M35 0HS Company number: 02394603 |
| Adapter model number SW-04701 | UK |
| Input voltage 100 - 240 V~ | |
| Input AC Frequency 50/60Hz | |
| Output voltage | 4.7 V --- |
| Output current 0.1 A | |
| Output power 0.47 W | |
| Average active efficiency ≥40.4% | |
| Efficiency at 10% - | |
| No load power consumption ≤0.1 W |
RECYCLING
To avoid environmental and health problems due to hazardous substances, appliances and rechargeable and non-rechargeable batteries marked with one of these symbols must not be disposed of with unsorted municipal waste. Always dispose of electrical and electronic products and, where applicable, rechargeable and non-rechargeable batteries, at an appropriate official recycling/ collection point.
B
UW APPARAAT VERZORGEN
NAGRA GODA RÄD FÖR BÄSTA RESULTAT
RADY, JAK OSIAGNAC NAJLEPSZY WYNIK
Ha pncyHke He noka3aHbI:
-Перекхднк
- UeTkaIyIuNCTKn
3aunTHaHacaKa C rpe6eHkoIyKOpOueHnIeTINHbI
HauJIO PABOTbI
3APRAKA BPUTBbl
-пекпервимиспльзованемидения pekomehуетс понocью зардntб ero.
- y6eIntecb, yTO n3dJIne BblKJIIOueHo.
- Переконь abTomatnieckи постразиBaetся пон наразженье сети в преелax 100—240В.
-ПоДКЛЮЧИТЕбрNTБУкпелегхODнИКу,аЗATEм -Кpo3ETKE.
- CBetOBO IHINKATOP HNXe BbIKIOUaTeJHaUHET CBeNTbCRA, yKa3bIBa, YTO IN3dJIne 3apjkaetc.
Bpem3ap4n6aTapeoOTnoHOnpa3p4nDIO noHOrO 3ap4aCoCTaBnaTe 16 yacob.Ype3 16 yacob npekpatnte 3ap4ky yctpoiCTBa.Ipn 3tOM INnKaTop 3ap4da BbIKIouHTcra.
Bpempa60tbI np6opa npn noHOn 3apJKe -do 40 MNHT
- Примechан. Дд пордени срoka слжбbl 6atapeи поноctbpo pa3ржайтпплноctbIO 3apЯкайт ИХ кждьe 6 MecaueB.
He nepe3apjkaTe yctpoiCTBO nocIe KaJIOrO nCnOJIb3OBaHnA, TaK KaK 3TO COKpaTNT cPOK cnJX6bl 6aTapeN.
HCTPyKUINIPO3KcJIyATAUIN
BPUITbE
- y6eIntecb, cyo aKKymyIaTOp 6pNTbbl NOnHOCTbIO 3apJxHeBl.
BkIouHTe 6pntBy.
Cbo6oHoi pyKoI HataRnBaIte Koxy, yTO6bI BOLOCKn paCNOJINcB nepneHdNkUyraPHO KOKe.

BoBpem 6pntbHe cneIyET CnIbHO daBVt b Ha 6pITBy (CnIbHoe daBHeHne MoKet npNBecTn K NOBpeXdEHIO TOnOBOK N CdelaTb NX OC06O yra3BmblIMN K IONOMKe).
- BbInonHnTe KOpOTKne KpyROBbIe DnIXKeHHa.
NCIOJIb3OBAHNETPUMMEPA
ДягOTКрытmaMeJkoTOrMeJIMMepaCdBnHbTe KHOKNy TpIMMepa.
- TpnmMep CneDyeT DepeXaTb NOI npaBnIbHbIM yrIOM K KOxE.
-Дя Выноленя 6бICTpoi,лergки npoфeccnoHaNbHOCTpIXKn paCNoLOXHTe TpIMMep Ha XeJaemyIO IINHIO CTpIXKn.
- UTo6bI y6paTb TpIMMep, HaxMMTe Ha Hero, Noka OH He 3aUeJIKNHeTc.
CTINb CO UETNHOI
- PpNkpeHnTe HacaKy dny 9eTnHb K BaSei 6pntBe dny nOlyueHnCTpnXkN TpexdHeBHa 9eTnHa.
ДЯ HANЛУЧЕРО PE3YJBbTATA
- Depxnte 6pntby nO npaBnIbHbIM yrIOM K KOx, YTO6bl BCE TprI rONOBKn KaCaJIncbKOxN POn OOnHaKOBbIM DaBJIeHNEM.
-ДвиженяdoлжныбытьумepeHHbIMNЛИМeДнEHbIMN,NOrlaЖиBaOuIMN. KopotknE KpyroBbIe DBnJxHnBcX MeCTax MOry cNoC06CTBOBaTb lyuWeMy c6pnbAHIO,OCo6eHHo B O6naTn шen n noD6opOka.
HE haxmaite ype3meho Ha koxy, yTO6bI He nobpeintb Bpaaiounecra JONOBKn.
YXOD 3A BPUTBOI:
Cma3bIbaIte 3y6cbl TpIMMepa KaXdbie NOnroda, KaHHyB KaNIIo MaCna dIra IWBeyHbIX MaunH.
N3BJIeUHHe BATAPEI
HaCToTeNbHO peKOMeHdyetcayTO6bI n3BLeueHne nepe3apXaEMoB 6aTapeN BblOnHnJI cNeuaJIncr. Ha qactx Kopnyca 6pntbI n npucnocO6leHnx ectb OCTpbie KpaJ.
HenpaBnIbHoe 6paueHne MoKeT npUBeCTn K TpaBMe.
-
Pered ytnn3auee 6atapeo cneyuT n3Bleuy n3 yc troiCTBa.
-ПииИЗВеун Ибатер устюctBO следуET OTКЛIOЧТь OT ЛЕКТрocETN. -
BkIouHTe 6pntby,doXdITecb OCTaHOBKn DBrTaTeJr.
- OTKIIOUHTe 6pntBy OT cETN.
- OTKpoIte OTceK dIa C6opa BOLOC N BBBepHIne OIN H BNHT C BepXHeu qACTn.
4.ИЗВЕКИТЕТРИВАЛпрИВОДАИгOLOBКБбПТВБI - BbIbepHnte 2 BnHTa Ha BepXHeJ qactN KOpnyCa.
- AkkypaTHo nOdIeHbTe nepeDHIIO uAcTb KOpnyca.
- BbIeBpHnTe 6 BNHTOB Ha BHyTpEHHe YacTn KOpnyca.
- AkkypaTHO NOIDeHbTe 3aHIOU qAcTb KOpnyca.
9.ИЗВLEКиTe DepeKaTeIb 6aTapeN I neaTHyO ПaTy N3 KOpnyCa 6pNTBbl,пocne Yero obpeKbTe BbICTynbl,сnomoCbIO KOTOpbIX 6aTapeN KpeЯTcR K neaTHOIN PlaTe. - IcnoIb3OBAHhBie 6aTapeH Heo6xOJMo n3BLey b n3 np6opa n yTuIN3npoBaTb B COOTBeTCTByIOUeM OfNuaJIbHOM nyHKTe nepepa6OTKn/c6opa.
He nItaTeCb 3aNyckaTb 6pTuBBy nOcNe BCKpbITna ee KOpnyca.
IOBTOPHA INEPEPABOTKA
Bo n36eXaHHe BO3dEiCTBnB BpeDhblx BeIeCTB Ha OKpyKaIOUyO cpeDu n 3IOPOBBe np6Opbl n 6bTapeu OndHopa3OBoro nII MHOrOPa3OBOro IcNoJIb3OBaHnra, NOMEueHHbIe ODNHM I3 3TNIX CIMBOJOB, Heo6XoDIMO yTuINl3NpOBaTB OTJeNbHOOT HecOPTIpOBaHHbIX 6bITOBbIX OTXoIDOB. O6aTeJIbHO yTuINl3NpyIte 3JIeKTPnueCKne n 3JIeKTPoHNbIe n3DeJIIna, a TAKKe (ecNI 3TO npImeHMo) 6aTapeu OndHopa3OBoro nII MHOrOPa3OBoro IcNoJIb3OBaHnra B COOTBeTCTByIOUx OfNUaJIbHbIX PYNKTax NOBTopHO nepepa60TK / c6opa OTXoIDOB.

TEXHUNYCKNE XAPAKTEPUCTUKN BLOKA NITAHNA
| Адес и регистрацнонный Homep празьковые | Russell Hobbs Deutschland GmbH, Am Unisyspark 1, 65843 Sulzbach, Germany |
| Homep Рodeл 6лoka пitaши Sw-047010EU | |
| Вхонhoe наревке 100 - 240 B~ | |
| Частota переменого тoka на вхODE 50/60Гц | |
| Вухонhoe наревке | 4.7 B --- |
| Вухонов ТOK 0.1 A | |
| Вухоная мошость 0.47 Вт | |
| Сре.dяя зф ek independently ak independently可靠可靠可靠可靠可靠可靠可靠可靠可靠可靠可靠可靠可靠可靠可靠可靠可靠可靠可靠可靠可靠可靠可靠可靠可靠可靠可靠可靠可靠可靠可靠可靠可靠可靠可靠可靠可靠可靠可靠可靠可靠可靠可靠可靠可靠可靠可靠可靠可靠可靠可靠可靠可靠可靠可靠可靠可靠可靠可靠可靠可靠可靠可靠可靠可靠可靠可靠可靠可靠可靠可靠可靠可靠可靠可靠可靠可靠可靠可靠可靠可靠可靠可靠可靠可靠可靠可靠可靠可靠可靠可靠可靠可靠可靠可靠可靠可靠可靠可靠可靠可爱可靠可靠可靠可靠可靠可靠可靠可靠可靠可靠可靠可靠可靠可靠可靠可靠可靠可靠可靠可靠可靠可靠可靠可靠可靠可靠可靠可靠可靠可靠可靠可靠可靠可靠可靠可靠可靠可靠可靠可靠可靠可靠可靠可靠可靠可靠可靠可靠可靠可靠可靠可靠可靠可靠可靠可靠可靠可靠可靠可靠可靠可靠可靠可靠可靠可靠可靠可靠可靠可靠可靠可靠可靠可靠可靠可靠可靠可靠可靠可靠可靠可靠可靠可靠可靠可靠可靠可靠可靠可靠可靠可靠可靠可靠可靠可靠可靠可靠可靠可靠的可靠可靠可靠可靠可靠可靠可靠可靠可靠可靠可靠可靠可靠可靠可靠可靠可靠可靠可靠可靠可靠可靠可靠可靠可靠可靠可靠可靠可靠可靠可靠可靠可靠可靠可靠可靠可靠可靠可靠可靠可靠可靠可靠可靠可靠可靠可靠可靠可靠可靠可靠可靠可靠可靠可靠可靠可靠可靠可靠可靠可靠可靠可靠可靠可靠可靠可靠可靠可靠可靠可靠可靠可靠可靠可靠可靠可靠可靠可靠可靠可靠可靠可靠可靠可靠可靠可靠可靠可靠可靠可靠可靠可靠可靠可靠可靠可靠可靠可靠可可可可可可可可可可可可可可可可可可可可可可可可可可可可可可可可可可可可可可可可可可可可可可可可可可可可可可可可可可可可可可可可可可可可可可可可可可可可可可可可可可可可可可可可可可可可可可可可可可可可 Бухонhoe наревке 100 - 240 B~ | |
| Вухонhoe наревке | 4.7 B --- |
| Вухонов ТOK 0.1 A | |
| Вухоная мошость 0.47 Вт | |
| Сре.dяя зф ek independently ak independently可靠可靠可靠可靠可靠可靠可靠可靠可靠可靠可靠可靠可靠可靠可靠可靠可靠可靠可靠可靠可靠可靠可靠可靠可靠可靠可靠可靠可靠可靠可靠可可可可可可可可可可可可可可可可可可可可可可可可可可可可可可可可可可可可可可可可可可可可可可可可可可可可可可可可可可可可可可可可可可可可 Зф ek independently ak independently可靠可靠可靠可靠可靠可靠可靠可靠可靠可靠可靠可靠可靠可靠可靠可靠可靠可靠可靠可靠可靠可靠可靠可靠可靠可靠可靠可靠可靠可靠可靠可靠可靠可靠可靠可靠可靠可靠可靠可靠可靠可靠可靠可靠可靠可靠可靠可靠可靠可靠可靠可靠可靠可靠可靠可靠可靠可靠可靠可靠可靠可靠可靠可靠可靠可靠可靠可靠可靠可靠可靠可靠可靠可靠可靠可靠可靠可靠可靠可靠可靠可靠可靠可靠可靠可靠可靠可靠可靠可靠可靠可靠可可可可可可可 Знegrопотравлие等相关内容可参见附录。 | |
EN IYI SONUÇLAR IÇIN IPUÇLARI
JIERKA HEBPUTICTb  
3aKpinitb 3axnchy hacaKy Ha 6pntbi IJna DoCgHHeHHBnIy 3-DeHHOi He6pntocti.
IOPAДNДЯ ДОСЯгHEHЯ ONTUMALbHOrO PE3yIbTATY
CπiTpmaTn 6pntBy πi npaMM KytOM Do shkpN TaKIM YHOM, yO6 yci Tpr rOlIBKm TopKaINcA shkpN 3 pIBHomipHM HaTNCHeHHM.
HamaraTeCpa6nTu nomipHi HeuBnki pyxu 6e3 pNBkIB. HebeNki o6epTaIbHi pyxu B Micqax, De BOLOccBaKko NiJaTbcra RoJIHHIO, DOnomarae 3a6e3neuyBatn UcHtIwe roJHHr.Oco6nBO ue CTocyTbcra Nii Ta liHII ni6Opidra.
HE IPNITNCKAITE 3aHaTTo rOJIbKn Do Wkipn, 0o6 He dOnyCTnTn NOKoJxHn o6eptalbHnx roIbOK.
Доглад 3A БРТBOIO
PeteNbHO dOrrJaTe 3a BaIIM npucTroE M, Oo6 rapaHTyBaTn Ioro cTany npOdyKTHBHiCTb Ta TpNBaII N TePMIn CnyX6N. PekOMeHdYcTBcA YnCTNTn 6pNTBy NiCIA KOxHOrO BnKOpNCtAHJ.
IpekehaiTeca, 0xKINBHeHH npncTpoIO BUMKHeHO, a cam npncTpiB iDKnUoyeHO BiMepexi KINBHeHH.
1. Biikpnite 6pntBeHy rOIOBky, HATNCHbUn KHOk Ky iKcaTopa (pnc.A).
2. NobHicTbBndaJIb yci 3piaHI BOJOCKN.
3. NotarHItb6pntBcHy roNoBky Bropy, 0o6 Bi'edHaTu II BiKopnucy (Pnc.B).
- 3haɪdɪt b ceɪtpaɪbHy no3Haʊky 3i ctrpiɪkoɪ Ta nocyHbTe Tpɪməu y HaɪpərMky, npOTnIeJxHOMy ciɪ ctrpiɪzü, Ⅲo6 po36lOKyBaTn IORO. 3HIMITb po36lOKOBaHn Tpɪməu i3 6pɪtBeHoI rɒlOBkN (pɪnc. C). 3aɪam'Ятæ Te npabɪnbHn HaɪpərMok Tpɪməu a, Ⅲo6 MoːKHa 6byNo npocTiSe BCTaHOBuTn IORO Ha Mɪcæ.
- PeTeNbHO ouNCTbTe ne3a BiD BONOCsR.
6.ДЯбишpeTeIbHOrO OuNueHHBnIMtB TprNe3a (pnc.D). - ПомиTe 6pntBey roOBky npoToHOIO BOIOU (pnc.E).ДaIe iIN NOBHCIO BnCOxHyTN.
- O6epexkHO BCTaHOBiTb Ha MicCe Tpr Ne3a.
- YctaHObITb Ha Micce TpIMauch. 3HaJdITb ceHtpaIbHy nO3HaUky 3i cTpIKoIO Ta nocyhbTe TpIMauch y II HanpArykMy do xapaKtephoro KlaaunHHa (Pnc.F).
- Пися збигань брптBEHOI rolOBКИ BCTaHOBiTB shapHipHe 3'EDHaHHЯ 3 npyJINHOI B na3 Ha 3aHHiЧASTHI BiDcIKY ДЯ 36ИрANHЯ BOLOCCЯ Ta HATNCHTb Ha HbOro, lo6 ChTUNH 3'EDHaIIncs (pnc.G). 3akpnTe 6nOK rolOBKn.
YUHHEHH TPNMEPA
3Ma7yIe 3y6uKn TpImepa KoxHi icb MicaicB OndHcIO KpaJIeIO MaCTnla dJa MaunH dJa WNTTJ.
BILUyEHHBAATAPEIKN
HanoerIINBO peKomeHdyETbcra, 6o6 6aTaapeIO 3 MoXJIbICTIO 3apJxKaHHBnIMaB CneuaIicr. YactHn KOpNcY 6pNTBn Ta npUaDJa MaOTb roCTpi KpaT Ta MoKytb npu3BeCTn Do TpaBMyBaHHB B pa3i HeHaJeKHO NOBQKeHHa.
Ipeytni3aui npnctpoio i3 hborocidictatn 6atapeio.
Ipeed TmJk dictaBatn 6atapeo i3 npucptpo, noTo Tpe6a Bi'EDHaTn BID Mepeki XINBLeHn.
- Eknyatye 6pntby do nobhoi 3ynnkn dBnryha.
- Biikniouitb 6pntBy Biid Mepeksi KINBneHHa.
- BiKpnTe BiCik DnIy 36npaHH BOnocn BnKpyTiB OINH TBnHT i3 BepxHbOi YaCTuHN.
- BnIMtB Tpr npuBoDi BaJI Ta 6pntBeHy rONOBky
- BnKpyiTb 2 rBnHTn Ha BepxHn qactnHi Kopnycy.
- 06epexho niiueiitb nepeHNo yacTHHy Kopnycy.
- BnKpytItb 6 rBnHTiB Ha BHyTpIiHHi YaCTNHi KOpnyCy.
- 06epexHo niiueiNb 3aHIO qactHy Kopnycy.
- BnmiTb Tpmau 6aapei Ta eNeKtpoHny Pnatay 3 Kopnucy 6pntBn, nicra yoro nepepiXte r3nUKN, 0o 3'EnHyOToB 6aapei 3 eNeKtpoHHOI PnatoIO.
Bukopnctani 6atapei Heo6xidno 3Hrtn 3 npunctpoTu yTnI3yBaTu y BiNobiHi ophiuihni Touci nepepo6Kn/36opy.
He hamaratea 3anyckatn 6pntby nicra po3kpuTTa II Kopnycy.
U A
YTNJI3AUJIA
Ioo6 He 3aBdaTn IkoJIN DOBkJIIO Ta 3IOpOB'IO IIOJeYpeE3 DIO He6e3neuHnx peOBNH, He cIiD yTuJI3yBaTn npIcTpoi N6bataei OndopazOBoro a6o 6araTopa3OBoro BnKOpNCtAHN, 0o I03NaueHi OHNm i3 Ux CNMBOJIIB, pa3OM i3 HeBIDcOPTOBAHm N6bTOBM CMITaM. O6OB'a3KOBO yTuJI3yIte eJekTpUHni J eJekTpOHNI BnpO6n, a TAKoJ, De MoXJIbO, 6atapei OndopazOBoro a6o 6araTopa3OBoro BnKOpNCtAHNry BvIINOBiDNHomy ophiinHomy nyHKTI nepepo6Kn/36Opy.
TEXHIYHIXAPAKTEPNUCTUKNIAANTPEPA
- .
.
·jai
a + b = 3
.
j_L = 21
.
1
a|b|1
四四四
J
a
aai 1
(On/off) 1
ai a ai 分母最小值为 k .
3
m = 311
Jalil j5
1 6
S OBC = S COD + S BOC - S BOC
| ### |
| ### |
| ### |
| ### |
| ### |
| ### |
| ### |
| ### |
| ### |
| ### |
| ### |
| ### |
| ### |
| ### |
| ### |
| ### |
| ### |
| ### |
| ### |
| ### |
| ### |
| ### |
| ### |
| ### |
| ### |
| ### |
aaiia iisla il
a
.
.(A)
2
.(B)
J 4
Jcuiiie 1 Jcuiiie iuee aie gai (C k) dA
5
.(D)
alai jil 5jil .(E. Jk) yjll oilll lll
8
Remington® is a Registered Trade Mark of Spectrum Brands, Inc.,
or one of its subsidiaries