USER MANUAL IAN 296289 AURIOL
Operation and Safety Notes
FR BE
STATION MÉTEO RADIOGUIDEE
DRAADLOOS WEERSTATION
Included items . Page 10
Safety
General safety information.. Page 11
Safety instructions for batteries / rechargeable batteries Page 12
Before use
Setting up the devices.. Page 13
Preparing to use the outdoor sensor.. Page 14
Preparing the weather station for use.. Page 15
Operation
Receiving the DCF radio time signal.. Page 17
Setting the 12/24 hour mode/°C/°F/hPa/inHg/time zone/time/date/language manually. Page 18
Setting the alarm time.. Page 21
Activating/deactivating the alarm function.. Page 22
Switching off the alarm signal.. Page 22
SNOOZE function . Page 22
Preparing to use the weather forecasting function.. Page 23
Selecting the location.. Page 25
Selecting the location manually.. Page 25
Lunar phases.. Page 29
Reading the barometric pressure for the last 12 hours . Page 29
Adjusting the air pressure indication.. Page 30
Setting the channel.. Page 31
Displaying temperature and temperature trend.. Page 32
Displaying the humidity and humidity trend.. Page 32
Displaying the maximum/ minimum temperature/humidity.. Page 33
Temperature and frost alarm.. Page 34
Activating/deactivating the the temperature and frost alarm.. Page 34
Background lighting.. Page 35
Battery state display.. Page 35
Changing the batteries . Page 35
Troubleshooting
Cleaning and care.. Page 37
Disposal
Warranty
Information
Simplified EU declaration of conformity. Page 40
Radio-controlled weather station
Introduction
We congratulate you on the purchase of your new product. You have chosen a high quality product. The instructions for use are part of the product. They contain important information concerning safety, use and disposal. Before using the product, please familiarise yourself with all of the safety information and instructions for use. Only use the product as described and for the specified applications. If you pass the product on to anyone else, please ensure that you also pass on all the documentation with it.
Intendeduse
The weather station displays the indoor and outdoor temperatures in Celsius ( ^ C) or Fahrenheit ( ^ F) and their maximum and minimum values. It also displays the indoor and outdoor humidity (\% RH) as well as their maximum and minimum values. Additional display values of weather station include the weather forecast, the time in 12/24-hour clock modes and the date. The weather station displays the sunrise and sunset times for that day and the lunar phase as well. In addition, the weather station has two different alarm functions. The product is only suitable for use in private households and is not intended for commercial use.
Partsdescription
Weather station:
1 Datedisplay
2 Monthdisplay
3 |Alarm|
4 SNOOZEdisplay
5 Radio tower symbol
6 DST display (summer time)
7 Timedisplay
8 |Alarm2
Day of week display
Sunrise/time of sunrise
11 Tidal range display
12 Location
13Lunarphase
14 Sundown/time of sundown
15 Temperature trend (indoor)
Humidity trend (indoor)
Humidity(indoor)
18 Comfort indicator (maximum / minimum)
19 Inside temperature (^ / ^)
20 Battery state display
21 Humidity trend (outdoor)
22 Humidity(outdoor)
23 Temperature and frost alarm (maximum / minimum)
24 Temperature trend (outdoor)
25 Outdoor temperature (^ / ^)
26 Battery state display (outdoor sensor)
27 Selectedchannel
28 Barometric pressure bar display
29 Barometric pressure display of the last hour
30 Absolute/ relative barometric pressure
31 Barometric pressure trend
32Weatherforecast
33 SNOOZE/LIGHT button
34MODEbutton
35+button
36)-button
37 Channel button (CH)
38 HISTORY ABS/REL button
39CITYbutton
40 Batterycompartment
Outdoor sensor:
41ControlLED
42|Mount
43RESETbutton
44 Channel selector switch
45 Batterycompartment
-Technicaldata
Weather station:
Temperature measurement range: 0 to +50^
$$
+ 3 2 \text {t o} + 1 2 2 ^ {\circ} F
$$
Temperatureresolution:0.1°C
Humidity measurement range: 20% - 95%
Humidityresolution: 1 %
Radiosignal: DCF
Batteries: 3 × AA, 1.5 ~V = - (direct current)
Air pressure range: 850 - 1050 hPa
Frequency Band: 433.050 to 434.790 MHz
Outdoor sensor:
Temperature measurement range: -20 to +65 °C -4 to +149 °F
Humidity measurement range: 20% -95% Humidityresolution: 1 % HF transmission signal: 433 MHz
HF transmission range: max. 30 metres (in open area)
Batteries: 2× AA 1.5V = direct current)
Degree of protection: IPX4 (splash-proof)
Frequency Band: 433.050 to 434.790 MHz
Max. Transmitted power: 433.999 MHz, < 10 dBm
- Included items
1 Weather station
1 Outdoor sensor
3 Batteries AA, 1.5 V (pre-installed)
2 Batteries AA, 1.5 V (pre-installed)
1 Operating instructions

Safety
Please read all safety information and instructions. Failure to comply with the safety information and instructions may result in an electric shock, fire and / or severe injuries.
KEEP ALL THE SAFETY ADVICE AND INSTRUCTIONS IN A SAFE PLACE FOR FUTURE REFERENCE!

Children are at risk of being infected with COVID-19, and the COVID-19 pandemic is a major public health problem in many countries. The COVID-19 pandemic has been characterized by a number of serious consequences for people's health and well-being.
Children should be kept away from the product at all times.
This product can be used by children aged from 8 years and above and persons with reduced physical, sensory or mental capabilities or lack of experience and knowledge if they have been given supervision or instruction concerning use of the product in a safe way and understand the hazards involved. Children shall not play with the product. Cleaning and user maintenance shall not be made by children without supervision.
Do not use the product if it is damaged.

Safety instructions for batteries / rechargeable batteries
DANGER TO LIFE! Keep batteries / rechargeable batteries out of reach of children. If accidentally swallowed seek immediate medical attention.
DANGER OF EXPLOSION! Never recharge non-rechargeable
batteries. Do not short-circuit batteries / rechargeable batteries and / or open them. Overheating, fire or bursting can be the result.
Never throw batteries / rechargeable batteries into fire or water.
Do not exert mechanical loads to batteries / rechargeable batteries.
Risk of leakage of batteries / rechargeable batteries
Avoid extreme environmental conditions and temperatures, which could affect batteries / rechargeable batteries, e.g. radiators / direct sunlight.
If batteries / rechargeable batteries have leaked, avoid contact with skin, eyes and mucous membranes with the chemicals! Flush immediately the affected areas with fresh water and seek medical attention!

WEAR PROTECTIVE GLOVES! Leaked or damaged batteries /
rechargeable batteries can cause burns on contact with the skin.
Wear suitable protective gloves at all times if such an event occurs.
In the event of a leakage of batteries / rechargeable batteries, immediately remove them from the product to prevent damage.
Only use the same type of batteries / rechargeable batteries. Do not mix used and new batteries / rechargeable batteries.
Remove batteries / rechargeable batteries if the product will not be used for a longer period.
Risk of damage of the product
Only use the specified type of battery / rechargeable battery!
Insert batteries / rechargeable batteries according to polarity marks (+) and (-) on the battery / rechargeable battery and the product.
Clean the contacts on the battery / rechargeable battery and in the battery compartment before inserting!
Remove exhausted batteries / rechargeable batteries from the product immediately.
- Beforeuse
- Setting up the devices
Put the batteries first into the outdoor sensor.
CAUTION! When choosing where to position the weather station, make sure that it is not exposed to direct sunlight, vibrations, dust, heat, cold or moisture. Do not place the devices close to sources of heat, e.g. radiators. Otherwise they may be damaged.
Do not place the devices on valuable or sensitive surfaces unless these are appropriately protected. Otherwise they may be damaged.
Please ensure that neighbouring devices are not operated at the same frequency of 433MHz . Such devices may cause interference to the radio connection.
Do not place the devices next to or on metal plates. Otherwise the quality of radio wave transmission may be reduced.
Do not install the devices in buildings made of reinforced concrete, e.g. airports, high-rise buildings, factories or cellars. Otherwise the transmission of the radio waves between the devices may be severely impaired.
Preparing to use the outdoor sensor
Remove the battery compartment cover from the back of the outdoor sensor.
- Remove the battery safety strip. The outdoor sensor is now ready for operation and the control LED 41 lights up briefly.
- Close the battery compartment cover.
Installing the Outdoor Sensor:
Note: You will need an electric drill for this step.
Find an appropriate place for the outdoor sensor.
Note: Please ensure that you install the outdoor sensor within a radius of 30m from the weather station. Check that there are no obstacles between the outdoor
sensor and the weather station. Otherwise there may be interference of the transmission of data.
For wall mounting:
Hang the outdoor sensor with the mount 42 on one screw.
Preparing the weather station for use
Removing the battery safety strip:
Open the battery compartment 40 on the back of the weather station.
Pull out the battery safety strip.
Then close the battery compartment.
As soon as the battery safety strip has been removed, the weather station starts to receive the radio signal.
Note: Do not move the weather station while it is receiving the signal. This may disrupt reception.
Connecting the weather station with the outdoor sensor and the DCF radio signal:
After removal of the battery safety strip the weather station attempts to establish a connection with the outdoor sensor. This process can take a few minutes. The symbol will keep flashing for few minutes. On successful connection with the outdoor sensor, the selected channel symbol appears in the LC display with the channel of the outdoor sensor (if necessary you can change the channel of the outdoor sensor as shown in the section "Setting the channel"). If the connection with the outdoor sensor is not established automatically, this can be done manually as follows:
- Press the channel button (CH)37. The icon of the selected channel 27 will flash in the LC-display. Outdoor temperature 25 and Humility (Outdoor) 22 will display (-____________________________________________________________________________________
- -
- -
- -
- -
- -
- -
- -
- -
- -
- -
- -
- -
- -
- -
- -
- -
- -
- -
- -
- -
- -
- -
- -
- -
- -
- -
- -
- -
- -
- -
- -
- -
- -
- -
- -
- -
- -
- -
- -
- -
- -
- -
- -
- -
- -
- -
- -
- -
- -
- -
.
- (\boxed{37}). The icon of the selected channel 27 will flash in the LC-display. Outdoor temperature 25 and Humility (Outdoor) 22 will display (-________)
(\boxed{37}). The icon of the selected channel 27 will flash in the LC-display. Outdoor temperature 25 and Humility (Outdoor) 22 will
(\boxed{37}). The icon of the selected channel 27 will flash in the LC-display. Outdoor temperature 25 and Humility (Outdoor) 22 will
(\boxed{37}). The icon of the selected channel 27 will flash in the LC-display. Outdoor temperature 25 and Humility (Outdoor) 22 will
(\boxed{37}). The icon of the selected Channel 27 will flash in the LC-display. Outdoor temperature 25 and Humility (Outdoor) 22 will
(\boxed{37}). The icon of the selected Channel 27 will flash in the LC-display. Outdoor temperature 25 and Humility (Outdoor) 22 will
(\boxed{37}). The icon of the selected Channel 27 will flash in the LC-display. Outdoor temperature 25
(\boxed{37}). The icon of the selected Channel 27 will flash in the LC-display. Outdoor temperature 25
(\boxed{37}). The icon of the selected Channel 27 will flash in the LC-display. Outdoor temperature 25
(\boxed{37}). The icon of the selected Channel 27 will flash in the LC-display. Outdoor temperature 25
//
- Then press the RESET button 43 of the sensor. Weather station outdoor temperature 25 and Humility (Outdoor) 22 will display exiting value.
As soon as the weather station has established a connection with the outdoor sensor it automatically begins to receive the DCF radio signal. This process takes several minutes and is indicated in the LC display by a flashing radio tower symbol 5.
When the DCF radio signal is being successfully received, the radio tower symbol is shown permanently in the display. If at the time of putting the device into operation it is not possible to synchronise with the atomic clock, you can also carry out
the clock adjustments manually ("Setting the 12/24 hour mode/°C/°F/hPa/inHg/time zone/time/date/language manually").
Radio signal (DCF):
The DCF signal (time signal transmitter) consists of time pulses emitted by one of the most accurate clocks in the world close to Frankfurt / Main, Germany.
In ideal conditions, your weather station can pick up this signal over a distance of up to approx. 2000 km around Frankfurt / Main. Reception of the radio signal generally takes approx. 3-10 minutes.
Reception can be considerably impaired by obstacles (e.g. concrete walls) or sources of interference (e.g. other electrical devices). In the event of reception problems, change the position of the weather station (e.g. to somewhere near a window).
Operation
Receiving the DCF radio time signal
After a connection with the outdoor sensor is established or 3 minutes after the battery safety strip is removed, the weather station automatically begins to search for the DCF radio signal. The search is shown in the LC display by the radio tower symbol flashing.
Note: In buildings made of reinforced concrete the reception of the radio signal may be severely impaired (see "Setting up the devices"). In order to correct any deviations from the exact time, the clock is automatically synchronised with the DCF radio signal every day at 1:00, 2:00 and 3:00. Reception of the DCF radio signal can also be started manually on the weather station.
Press the + and - button 35, 36 at the same time. The weather station attempts to receive the DCF radio signal. This process takes several minutes and is indicated in the LC display by a flashing radio tower symbol.
If the connection with the DCF radio signal cannot be established, the search is stopped.
Note: If the clock of the weather station cannot receive the DCF radio signal due to errors, too great a distance from the transmitter or similar reasons, it is possible to set the time manually. If reception of the DCF signal is successful, the manual settings are overwritten.
- Setting the 12/24 hour mode/°C/°F/hPa/inHg/time zone/time/date/language manually
The reception of DCF radio signal where the weather station has been positioned may become degraded or interrupted. If this happens you can set the device manually.
Follow these steps:
- Press and hold down the MODE button34 for about 3 seconds. "12 Hr" or "24 Hr" blinks in the display. Press the + or - button35, 36 to choose the desired hour format.
Note: The AM symbol in the time display 7 stands for before noon in the 12 hour mode. The PM symbol in the time display stands for after noon in 12 hour mode.
- Confirm your setting by pressing the MODE button. The temperature unit "°C" or "°F" flashes in the display. Press the + or - button to choose the desired temperature unit.
- Confirm your setting by pressing the MODE button. The barometric pressure's unit flashes in the display. Press the + or - button to set the desired unit (hPa / inHg).
- Confirm your setting by pressing the MODE button. The time zone indicator flashes in the display. Press the + or - button to set the desired value (-2 to +2). Note: Should you be in a country in which the DCF signal can be received but the time is different to your current local time, you can use the time zone setting to have the product display your current local time. If you find yourself in a country in which, for example, the local time is an hour ahead of Central European Time (CET), you set the time zone to +01. The product is now still controlled by DCF but shows the time as one hour ahead of CET.
- Confirm your setting by pressing the MODE button. The hour value of the time display flashes. Press the + or - button to set the desired value.
Note: The time and date settings will be done automatically if the weather station receives the DCF signal. You should manually adjust the time and date if you have no reception of DCF.
Tip: Hold the + or - button pressed down. This will speed up the process of setting the values. You can also use this fast setting option for subsequent settings. If you do not press any button for 20 seconds, the LCD automatically reverts to the standard display.
- Confirm your setting by pressing the MODE button. The minute indicator of the time display blinks. Press the + or - button to set the desired value.
- Confirm your setting by pressing the MODE button. The year indicator flashes in the time display. Press the + or - button to set the desired value.
- Confirm your setting by pressing the MODE button. The month indicator flashes in the date display 1. Press the + or - button to set the desired value.
- Confirm your setting by pressing the MODE button. The day indicator flashes in the date display. Press the + or - button to set the desired value.
- Confirm your setting by pressing the MODE button. At the place of the day of the week display 9 , the language indicator of this display flashes. Press the + or - button to choose the desired language.
Note: You have the choice of German (GE), English (EN), Italian (IT), French (FR) and Spanish (SP) (German is set as the standard language).
- Confirm your setting by pressing the MODE button.
- Setting the alarm time
- Press the MODE button 34 briefly in order to get to alarm mode. The currently set waking time appears in the LC display.
- Press and hold down the MODE button for about 2 seconds. The hours display flashes.
- Press the + or - button 35, 36 to set the desired value.
- Confirm your setting by pressing the MODE button. The minutes display flashes. Repeat step 3 to set the minutes.
- Confirm your setting by pressing the MODE button.
Tip: Hold the + or - button pressed down. This will speed up the process of setting the values. You can also use this fast setting option for subsequent settings. If you do not press any button for 20 seconds, the LCD automatically reverts to the standard display.
Note: You can set two different alarms separately.
- Press the MODE button twice briefly if the weather station is in time display mode. Press the MODE button once briefly if the weather station is in ALARM 1 mode. This brings you now to ALARM 2 mode.
- Repeat steps 2-5 to set the value for ALARM 2.
- Activating / deactivating the alarm function
- Briefly press the MODE button 34 briefly once or twice to reach ALARM 1 or ALARM 2 mode.
- Press the + button 35. The ALARM 1 symbol 3 or ALARM 2 symbol 8 appears in the LC display. The alarm has been activated.
- Press the button + again. The ALARM 1 or ALARM 2 symbol in the LC display goes out. The alarm has been deactivated.
- Switching off the alarm signal
Press any button except the SNOOZE- / LIGHT button 33 to stop the alarm signal. It is not necessary to reactivate the alarm. It switches itself automatically to the alarm time which has already been set.
Note: The alarm signal sounds for approx. 2 minutes.
SNOOZefunction
Press the SNOOZE- / LIGHT button 33 as the alarm signal sounds to get to SNOOZE mode. The alarm signal sounds again after approx. 5 minutes.
22 GB/IE/NI
Preparing to use the weather forecasting function
Note: Please take the weather forecast from your local weather forecasting service into account as well as the forecast from your weather station. If there are discrepancies between the information from your product and from the local weather forecasting service, please take the advice of the latter as authoritative.
The weather forecast is calculated from evaluation of fluctuations in the barometric pressure and may deviate from the actual weather conditions.
The weather station displays the following weather symbols:
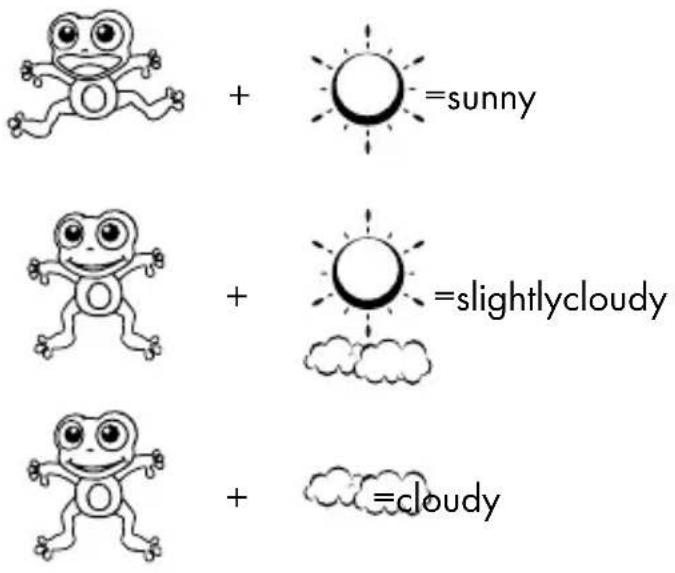

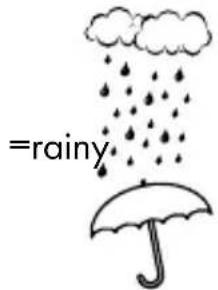

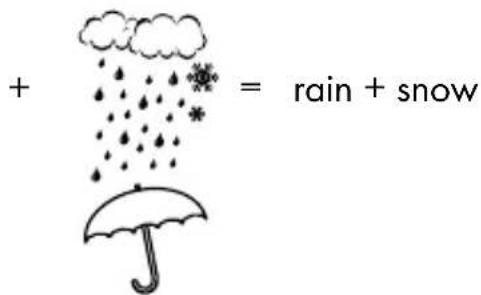
The weather symbols indicate the weather fluctuation over the next eight hours and not the current weather.
The weather station can display the barometric pressure trend 31.
You may see the following displays:

The barometric pressure will rise.
The barometric pressure will remain constant.

The barometric pressure will fall.
24 GB/IE/NI
- Selecting the location
Press the CITY button 39. The location display 12 blinks and the longitude and latitude are displayed.
Press the + or - button 35, 36 to select your location.
Press the CITY button to confirm your entry. If the abbreviation for your location does not appear in the display, you may enter a user-defined location (see "Selecting the location manually").
After a brief moment, the weather station displays the times for sunrise and sundown, the lunar phases as well as the tidal range - low (TIDE LO), medium (TIDE MID) and high (TIDE TH).
- Selecting the location manually
Press the CITY button 39 down for approx. 2 seconds and keep it pressed. Press the + or - button 35, 36 to select the beginning letters of your location.
Press the CITY button to confirm your entry. Enter the 2nd and 3rd letters in the same fashion.
GMT appears in the LC display and the time zone indicator blinks.
Press the + or - button to set the difference from your time zone to GMT.
Press the CITY button to confirm your entry. Set the longitude and latitude of your location in the same fashion.
After a brief moment, the weather station displays the times for sunrise and sundown, the lunar phases as well as the tidal range - low (TIDE LO), medium (TIDE MID) and high (TIDE TH).
You can choose from the following countries and cities:
| Germany (DE) | Berlin BER | |
| Bremen BRE | |
| Köln KOE | |
| Dortmund DOR | |
| Dresden DRE | |
| Düsseldorf DUS | |
| Erfurt ERF | |
| Frankfurt FRA | |
| Freiburg FRE | |
| Hamburg HAM | |
| Hannover HAN | |
| Hof HOF | |
| Kaiserslautern KAI | |
| Kassel | KAS |
| Kiel KIE | |
| Leipzig | LEI |
| Magdeburg | MAG |
| München MUN | |
| Nürnberg NUR | |
| Osnabrück | OSN |
| Passau | PAS |
| Regensburg | REG |
| Rostock ROS | |
| Saarbrücken | SAA |
| Stuttgart STU | |
| Ulm | ULM |
| Würzburg | WUR |
| Australia (AU) | Canberra | CBR |
| Melbourne | MEL |
| Sydney SYD | |
| Austria (AT) | Bregenz BRE | |
| Graz GRZ | |
| Innsbruck INN | |
| Linz | LNZ |
| Salzburg | SLZ |
| Vienna | WIE |
| Villach | VIL |
| Wels | WEL |
| Belgium (BE) | Antwerp | ANT |
| Bruges | BRG |
| Brussels | BRU |
| Libramont LIB | |
| Liege LIE | |
| Bosnia & Herzegovina (BA) | Sarajevo | SAR |
| Croatia (HR) | Split | SPL |
| Zagreb | ZAG |
| Czech (CZ) | Brno | BRN |
| Prague | PRG |
| Denmark (DK) | Aalborg ALB | |
| Copenhagen | KOB |
| Odense | ODE |
| Finland (FI) | Helsinki | HEL |
| France (FR) | Ajaccio AJA | |
| Biarritz BIA | |
| Bordeaux BOR | |
| Brest BRE | |
| Cherbourg-Octeville | CHE |
| Clermont-Ferrand | CMF |
| Dijon DJ | |
| Lille LIL | |
| Lyon LYO | |
| Marseille MRS | |
| Metz MET | |
| Nantes NAN | |
| Nice NCE | |
| Orleans ORL | |
| Paris PAR | |
| Perpignan PER | |
| Rouen ROU | |
| Strasbourg STR | |
| Toulouse | TOU |
| Greece (GR) | Athens | AHN |
| Hungary (HU) | Budapest BUD | |
| Ireland (IE) | Dublin | DUB |
| Italy (IT) | Ancona | ANC |
| Bari | BAR |
| Bolzano | BOZ |
| Cagliari CAG | |
| Florence | FIR |
| Foggia FOG | |
| Genoa GEN | |
| Lecce | LEC |
| Messina | MES |
| Milan | MIL |
| Naples NAP | |
| Palermo PAL | |
| Parma | PAR |
| Perugia PER | |
| Rome | ROM |
| San Remo SRE | |
| Triest | TRI |
| Turin TOR | |
| Venice | VEN |
| Verona VER | |
| Liechtenstein (LI) | Vaduz | VDZ |
| Luxemburg (LU) | Luxembourg | LUX |
| Monaco (MC) | Monte Carlo | MCM |
| Netherlands (NL) | Amsterdam | AMS |
| Arnhem | ARN |
| Eindhoven | EIN |
| Groningen | GRO |
| Rotterdam ROT | |
| The Hague | DHA |
| New Zealand (NZ) | Wellington WLG | |
| Norway (NO) | Bergen | BGN |
| Lillehammer | LIL |
| Oslo OSL | |
| Poland (PL) | Cracow KRA | |
| Gdansk | GDA |
| Poznan POZ | |
| Warsaw | WAR |
| Portugal (PT) | Faro FAR | |
| Lisbon LIS | |
| Porto POR | |
| Russian Federation (RU) | St. Petersburg PET | |
| Serbia (RS) | Belgrade BEO | |
| Slovakia (SK) | Bratislava BRV | |
| Kosice KOS | |
| Slovenia (SI) | Ljubljana LUB | |
| Spain (ES) | Alicante ALI | |
| Andorra AND | |
| Badajoz BAD | |
| Barcelona BAR | |
| Bilbao BIL | |
| Cordova COR | |
| Eivissa Ibiza IBZ | |
| La Coruña LCO | |
| Las Palmas LPA | |
| Leon | LEO |
| Madrid | MAD |
| Malaga MAL | |
| Palma de Mal- lorca | PAL |
| Salamanca | SAL |
| Sevilla SEV | |
| Valencia | VAL |
| Zaragoza | ZAR |
| Sweden (SE) | Gothenburg GOT | |
| Karlstad KAR | |
| Stockholm STO | |
| Switzer-land (CH) | Basel | BAS |
| Berne | BRN |
| Chur | CHU |
| Geneva GEN | |
| Lucerne | LUC |
| Lugano | LUG |
| Sion | SIO |
| St. Gallen | SGL |
| Zurich | ZUR |
| United Kingdom (GB) | Aberdeen | ABD |
| Belfast BEL | |
| Birmingham | BIR |
| Cardiff | CAR |
| Glasgow GLW | |
| London | LON |
| Manchester | MAN |
| Newcastle upon Tyne | NEC |
| Plymouth PLY | |
| United States (US) | Los Angeles | LAX |
| New York | NYC |
| Washington | WAS |
| Lithuania (LT) | Vilnius | VNO |
| Bulgaria (BG) | Sofia | SOF |
| Romania (RO) | Bucharest BUH | |
| Cyprus (CY) | Nicosia | NIC |
| Northern Ireland (NI) | Belfast BFS | |
Lunarphases
The weather station has a display which automatically displays the current lunar phase 13.
| | | |
| New moon Waxing half- moon | Half-moon Waxing full moon |
| | | |
| Full moon Waning full moon | Half-moon Waning half- moon |
- Reading the barometric pressure for the last 12 hours
Press the HISTORY ABS / REL button 38 repeatedly to read the barometric pressure values for the last 12 hours.
OHR = present barometric pressure
-1HR = barometric pressure an hour earlier
- 2HR = barometric pressure two hours earlier, etc.
Adjusting the air pressure indication
The forecast of this weather station is basing on an analysis of the change of the air pressure.
The barometric pressure 30 is factory provided adjusted to the absolute air pressure. As the air pressure generally decreases with the height beyond sea level, the public weather service always announces the so-called relative air pressure. This relative air pressure is adjusted to the topography of the country in order to get comparable values.
You can adjust the air-pressure of your weather station to the proportion of its place. For that you have to adjust your weather station uniquely the current air pressure. Ask your local weather forecast service for the barometric pressure at sea level or get the current value from the Internet.
You can adjust the weather station like this:
Press and hold the HISTORY ABS / REL button 38 for approx. 3 seconds. After that press the + or - button 35, 36, to interchange between the absolute or relative air pressure.
- Chose „Rel" and press the HISTORY ABS/REL button for confirmation. The air pressure indication blinks. Now you can chose the correct value by pressing the + or - button.
- Confirm your choice by pressing the HISTORY ABS / REL button. Your weather station now shows the relative air pressure.
If you want your weather station to announce the absolute air pressure, proceed like this:
Press and hold the HISTORY ABS / REL button for approx. 3 seconds. Afterwards press the + or - button, to change to the absolute air pressure. Confirm by pressing the HISTORY ABS / REL button.
- Setting the channel
The weather station receives the outdoor sensor signal automatically after you have made all the settings.
Note: In the event of interference from nearby equipment transmitting radio signals, the symbol for humidity (outdoor) 22 and outdoor temperature 25 flashes during this time. Please select a different channel for the outdoor sensor by pressing the CH button 37 on the weather station or the channel selector switch 44 on the outdoor sensor. The relevant data is shown in the LC display.
- 1: Outdoor sensor channel 1
-2: Outdoor sensor channel 2
-3: Outdoor sensor channel 3
- c: automatic channel change
- Displaying temperature and temperature trend
The current indoor temperature 19 and the temperature trend (indoors) 15 are shown in the LC display.
After successfully connecting with the outdoor sensor, the weather station can display the outdoor temperature [25] and the temperature trend (outdoor) [24]. You may see the following displays:

The temperature is rising.

The temperature is remaining constant.
The temperature is falling.
- Displaying the humidity and humidity trend
The current humidity trend (indoors) 16 and the current humidity (indoors) 17 are shown in the LC display.
The COMFORT indicator 18 displays the humidity in three categories.
The following categories are available:
$$
\begin{array}{l} \mathrm {DRY} = \text {Humidity} < 40 \% \ \text {COMFORT} = \text {Humidity} 40 - 70 \%, \text {indoor temperature} 20 ^ {\circ} \mathrm{C} - 28 ^ {\circ} \mathrm{C} \ \mathrm{WET} = \text{Humidity} >70\% \ \end{array}
$$
After a successful connection has been made with the outdoor sensor, the weather station shows the humidity trend (outdoors) 21 and the humidity (outdoors) 22 in the LC display.
- Displaying the maximum/minimum temperature/humidity
The minimum / maximum temperature / humidity is measured for the first time after the batteries have been inserted and stored in the weather station.
The maximum and minimum values for temperature, hygrometer and barometric pressure are automatically saved.
□ If the weather station is in time display 7, press the + button 35 to display the maximum values.
Press the ^+ button twice to display the minimum values.
Hold the + button down for approx. 3 seconds to erase the stored maximum and minimum values.
- Temperature and frost alarm
The temperature alarm is a short beep, which sounds as soon as the outdoor temperature exceeds or falls below the preset temperature range. Follow the below procedures to set the desired temperature range.
Press the - button 36 to get top the temperature alarm mode.
Hold the - button down for 3 seconds. The maximum temperature display blinks. Press the + or - button to set the values.
Press the MODE button 34 to confirm your setting. The minimum temperature display blinks. Press the + or - button to set the values.
Press the MODE button to confirm your setting.
- Activating / deactivating the the temperature and frost alarm
□ If more than one outdoor sensor is activated, press the channel button 37 to select one.
Press the - button 36 repeatedly to activate the temperature and frost alarms.
If the frost alarm alarm is activated, the corresponding symbol 23 appears next to the outdoor temperature. The alarm signal sounds at -1^ to +3^ .
If the temperature alarm is activated, the corresponding symbol appears next to the outdoor temperature. The alarm signal sounds at the set values.
If the temperature and frost alarm are activated, both symbols appear in the display.
- Backgroundlighting
Press the SNOOZE / LIGHT button 33. The backlight illuminates for 5 seconds.
Battery state display
The battery state display 20, 26 appears in the weather station's LC display if the batteries are weak. Make sure you replace the batteries at the earliest opportunity (see "Changing the batteries").
- Changing the batteries
Weather station:
Replace the batteries if the LC display becomes illegible or if the battery display [20] is shown.
Remove the battery compartment cover on the back of the weather station.
Remove the used batteries.
Insert 3 new batteries type AA, 1.5V
Note: Make sure that the polarity is correct when you insert the battery. The correct polarity is shown inside the battery compartment [40].
Close the battery compartment.
Outdoor sensor:
Replace the batteries if battery display 26 is shown.
Remove the battery compartment cover from the back of the outdoor sensor.
Remove the used batteries.
Insert 2 new batteries type AA, 1.5V
Note: Make sure you insert the batteries with the correct polarity. The correct polarity is shown inside the battery compartment [45].
Close the battery compartment.
- Troubleshooting
Note: This product has delicate electronic components. This means that if it is placed near an object that transmits radio signals, it could cause interference.
If the display indicates a problem, move such objects away from the weather station or outdoor sensor or remove the batteries from the weather station or outdoor sensor for a short while and then replace them.
Obstacles such as concrete walls can also cause that the reception is disturbed. In this case, change the location (eg near a window). Please take note that the external sensor should always be set up within max. 30 meters (open space) from the base station. The specified range is the free-field range and means that no obstacle should be between the remote sensor and the base station. A "visual contact" between remote sensor and base station often improves the transmission.
Cold (outdoor temperatures below 0^ C) can reduce the battery power of the outdoor sensor and thereby negatively impair the radio transmission. Another factor that may cause harmful interference, are dead or weak batteries in the outdoor sensor. Replace them by new ones.
- Cleaning and care
Under no circumstances should you use liquids or detergents, as these will damage the product.
Clean only the outside of the product with a soft, dry cloth.
Under no circumstances should you spray the outdoor sensor, e.g. with a garden hose. The outdoor sensor is only protected against rain from above.
Disposal
The packaging is made entirely of recyclable materials, which you may dispose of at local recycling facilities.
Observe the marking of the packaging materials for waste separation, which are marked with abbreviations (a) and numbers (b) with following meaning: 1-7: plastics / 20-22: paper and fibreboard / 80-98: composite materials.

The product and packaging materials are recyclable, dispose of it separately for better waste treatment. The Triman logo is valid in France only.

Contact your local refuse disposal authority for more details of how to dispose of your worn-out product.
To help protect the environment, please dispose of the product properly when it has reached the end of its useful life and not in the household waste. Information on collection points and their opening hours can be obtained from your local authority.
Faulty or used batteries / rechargeable batteries must be recycled in accordance with Directive 2006/66/EC and its amendments. Please return the batteries / rechargeable batteries and / or the product to the available collection points.
Environmental damage through incorrect disposal of the batteries / rechargeable batteries!
Batteries / rechargeable batteries may not be disposed of with the usual domestic waste. They may contain toxic heavy metals and are subject to hazardous waste treatment rules and regulations. The chemical symbols for heavy metals are as follows: Cd = cadmium, Hg = mercury, Pb = lead. That is why you should dispose of used batteries / rechargeable batteries at a local collection point.
Warranty
The product has been manufactured to strict quality guidelines and meticulously examined before delivery. In the event of product defects you have legal rights against the retailer of this product. Your legal rights are not limited in any way by our warranty detailed below.
The warranty for this product is 3 years from the date of purchase. Should this product show any fault in materials or manufacture within 3 years from the date of purchase, we will repair or replace it - at our choice - free of charge to you.
The warranty period begins on the date of purchase. Please keep the original sales receipt in a safe location. This document is required as your proof of purchase. This
warranty becomes void if the product has been damaged, or used or maintained improperly.
The warranty applies to defects in material or manufacture. This warranty does not cover product parts subject to normal wear, thus possibly considered consumables (e.g. batteries) or for damage to fragile parts, e.g. switches, rechargeable batteries or glass parts.
Hereby, OWIM GmbH & Co. KG, Stiftsbergstraße 1, DE-74167 Neckarsulm, GERMANY, declares that the product (Radio-Controlled Weather Station Z31915), is in compliance with Directives 2014/53/EU and 2011/65/EU. The full text of the EU declaration of conformity is available at the following internet address: www. owim.com

Indledning
Shift of battery. Side 71
Afhjaelpning af feil Side 72
Signal radio (DCF) :
replaces the piles whilst the symbol does not.
40 Batterijcompartment
Buitensorson:
41 Controle-LED
42 Ophanginrichting
43 RESET-toets
44Kanaal-keuzeschakelaar
45Batterijcompartment
-Technischegegevens
Weerstation:
Last Information Update
Tilstand of information · Version