
VPLDX11 - Projector SONY - Free user manual and instructions
Find the device manual for free VPLDX11 SONY in PDF.
| Product type | LCD projector |
| Brand | Sony |
| Model | VPL-DX11 |
| Projection technology | 3 LCD panels, 1 lens |
| LCD panel | 0.63 inch (16.0 mm), 2,360,000 pixels (786,432 × 3) |
| Native resolution | XGA (1024 × 768) |
| Lens | 1.2× zoom, f = 18.63 – 22.36 mm, F1.65 – 1.8 |
| Lamp | Ultra-high pressure mercury lamp 200 W (replacement model LMP-D200) |
| Typical brightness | 3000 lumens (High mode) |
| Projected image size (diagonal) | 40 to 300 inches (1,016 to 7,620 mm) |
| Power consumption | 320 W max; standard standby 5.5 W; low standby < 1.0 W |
| Power supply | Mains (power cord supplied) |
| Keystone correction | Automatic (vertical) via adjustable feet; manual via remote control |
| Main functions | Optical zoom, manual focus, image masking, APA, multiple input (computer, video) |
| Maintenance | Regular cleaning of air filter (every 500 h approx.), lens and cabinet; lamp replacement |
| Safety | Mandatory grounding; automatic shutdown in case of overheating; do not look into the lit lamp |
| Supplied accessories | Remote control, CR2025 battery, HD D-sub 15-pin cable (2 m), carrying case, power cord, instruction manual CD-ROM, quick reference guide, safety label |
| Options | Replacement lamp LMP-D200, presentation tool RM-PJPK1 |
| Operating temperature | 0 °C to 35 °C |
| High altitude mode | Yes (setting in menu) |
| Signal compatibility | Computer: up to SXGA+ (1400 × 1050); video: PAL, SECAM, NTSC, NTSC4.43, PAL-M, PAL-N, PAL60 |
| Frequency range | fH: 19 – 80 kHz; fV: 48 – 92 Hz |
Frequently Asked Questions - VPLDX11 SONY
User questions about VPLDX11 SONY
0 question about this device. Answer the ones you know or ask your own.
Ask a new question about this device
Download the instructions for your Projector in PDF format for free! Find your manual VPLDX11 - SONY and take your electronic device back in hand. On this page are published all the documents necessary for the use of your device. VPLDX11 by SONY.
USER MANUAL VPLDX11 SONY
VPL-DX11/DX15:3000lm
(兰蒙一卜高のと)
To reduce the risk of fire or electric shock, do not expose this apparatus to rain or moisture.
To avoid electrical shock, do not open the cabinet. Refer servicing to qualified personnel only.
WARNING THIS APPARATUS MUST BE EARTHED.
WARNING
When installing the unit, incorporate a readily accessible disconnect device in the fixed wiring, or connect the power plug to an easily accessible socket-outlet near the unit. If a fault should occur during operation of the unit, operate the disconnect device to switch the power supply off, or disconnect the power plug.
Notice for customers
The statements for each country/area are only applicable to equipment sold in that country/area.
IMPORTANT
The nameplate is located on the bottom.
WARNING: THIS WARNING IS
APPLICABLE FOR USA ONLY.
If used in USA, use the UL LISTED power cord specified below.
DO NOT USE ANY OTHER POWER CORD.
Plug Cap Parallel blade with ground pin (NEMA 5-15P Configuration)
Cord Type SVT, three 18 AWG wires
Length Minimum 1.5m (4 ft. 11 in.), Less than 2.4m (7 ft. 9 in.)
Rating Minimum 7 A, 125 V
Using this unit at a voltage other than 120V may require the use of a different line cord or attachment plug, or both.
To reduce the risk of fire or electric shock, refer servicing to qualified service personnel.
WARNING: THIS WARNING IS APPLICABLE FOR OTHER COUNTRIES.
1 Use the approved Power Cord (3-core mains lead) / Appliance Connector / Plug with earthing-contacts that conforms to the safety regulations of each country if applicable.
2 Use the Power Cord (3-core mains lead) / Appliance Connector / Plug conforming to the proper ratings (Voltage, Ampere).
If you have questions on the use of the above Power Cord / Appliance Connector / Plug, please consult a qualified service personnel.
For kundene i Norge
For the customers in the U.S.A.
This equipment has been tested and found to comply with the limits for a Class B digital device, pursuant to Part 15 of the FCC Rules. These limits are designed to provide reasonable protection against harmful interference in a residential installation. This equipment generates, uses, and can radiate radio frequency energy and, if not installed and used in accordance with the instructions, may cause harmful interference to radio communications. However, there is no guarantee that interference will not occur in a particular installation. If this equipment does cause harmful interference to radio or television reception, which can be determined by turning the equipment off and on, the user is encouraged to try to correct the interference by one or more of the following measures:
-Reorient or relocate the receiving antenna.
-Increase the separation between the equipment and receiver.
-Connect the equipment into an outlet on a circuit different from that to which the receiver is connected.
-Consult the dealer or an experienced radio/ TV technician for help.
You are cautioned that any changes or modifications not expressly approved in this manual could void your authority to operate this equipment.
All interface cables used to connect peripherals must be shielded in order to comply with the limits for a digital device pursuant to Subpart B of Part 15 of FCC Rules.
This device complies with Part 15 of the FCC Rules. Operation is subject to the following two conditions: (1) this device may not cause harmful interference, and (2) this device must accept any interference received, including interference that may cause undesired operation.
If you have any questions about this product, you may call;
Sony Customer Information Service Center 1-800-222-7669 or http://www.sony.com/
Declaration of Conformity
Trade Name: SONY
Model: VPL-DX10
VPL-DX11
VPL-DX15
Responsible party:
Sony Electronics Inc.
Address: 16530 Via Esprillo, San
Diego, CA 92127U.S.A.
Telephone Number:
858-942-2230
This device complies with part 15 of the FCC Rules. Operation is subject to the following two conditions: (1) this device may not cause harmful interference, and (2) this device must accept any interference received, including interference that may cause undesired operation.
For the customers in Canada
This Class B digital apparatus complies with Canadian ICES-003.
For the customers in Europe
The manufacturer of this product is Sony Corporation, 1-7-1 Konan, Minato-ku, Tokyo, 108-0075 Japan.
The Authorized Representative for EMC and product safety is Sony Deutschland GmbH, Hedelfinger Strasse 61, 70327
Stuttgart, Germany. For any service or guarantee matters please refer to the addresses given in separate service or guarantee documents.
For the State of California, USA only
Perchlorate Material - special handling may apply, See
www.dtsc.ca.gov/hazardouswaste/ perchlorate
Perchlorate Material: Lithium battery contains perchlorate.
For the customers in Taiwan only

廢電池請回收
CAUTION
Danger of explosion if battery is incorrectly replaced.
Replace only with the same or equivalent type recommended by the manufacturer.
When you dispose of the battery, you must obey the law in the relative area or country.
For the Customers in Brazil only
DESCARTE DE PILHAS E BATERIAS
For the customers in the U.S.A. and Canada
This device complies with Part 15 of FCC Rules and RSS-Gen of IC Rules. Operation is subject to the following two conditions: (1) this device may not cause interference, and (2) this device must accept any interference, including interference that may cause undesired operation of this device.
This equipment complies with FCC/IC radiation exposure limits set forth for uncontrolled equipment and meets the FCC radio frequency (RF) Exposure Guidelines in Supplement C to OET65 and RSS-102 of
the IC radio frequency (RF) Exposure rules. This equipment should be installed and operated with at least 20cm and more between the radiator and person's body (excluding extremities: hands, wrists, feet and ankles).
For the customers in the U.S.A.
In according with 47 CFR Part15.407 (e) U-NII devices operating in 5.15-5.25GHz frequency bands are restricted to indoor operations only.
This transmitter must not be co-located or operated in conjunction with any other antenna or transmitter.
For the customers in Europe
Notice for customers: the following information is only applicable to equipment sold in Countries applying EU directives.

This product is intended to be used in the following countries:
| AT | BE | BG | CY | CZ | DK | KE | E | FI | FR | DE | GR | |
| HUI | ET | LVT | LUMTN | PL | PTRO | |||||||
| SK | S | ES | SE | GB | IS | LI | NO | CH |
| Bulgarian | С Isaac_STояшто Сони Корпораша Deкларира, чу Този VPL-DX15/Data Projector OTROваря на оснOBнITE ИЗСКВанья и ДугптесьOTBEТСВаПИ Клайзни Директува 1999/5/EC. Побrosостп моче за hamерпente на Иntерспсстравицата : http://www.compliance.sony.de/. |
| Czech | Sony Corporation tímto prohlašuje,Že tento VPL-DX15/Data Projector je ve shodě se základními požadavky a dalími príslužnými ustanoveními směrnice 1999/5/ES. Podrobnosti lze získat na následujíci URL: http://www.compliance.sony.de/ |
| Danish | Undertegnede Sony Corporation erklærer herved, at følgende udstyr VPL-DX15/Data Projector overholder de væsentlige krav og øvridge relevante krav i direktiv 1999/5/EF. For yderligere information gå ind på følgende hjemmeside: http://www.compliance.sony.de/ |
| Dutch | Hierbij verklaart Sony Corporation dat het toestel VPL-DX15/Data Projector in overeenstemming is met de essentiële eisen en de andere relevante bepalingen van richtlijn 1999/5/EG. Nadere informatie kurz u vinden op: http://www.compliance.sony.de/ |
| English | Hereby, Sony Corporation, declares that this VPL-DX15/Data Projector is in compliance with the essential requirements and other relevant provisions of Directive 1999/5/EC. For details, please access the following URL: http://www.compliance.sony.de/ |
| Estonian | Sony Corporation kinnitab kiesolevaga seadme VPL-DX15/Data Projector vastavust 1999/5/EÜ direktiivi põhinõuetele ja nimetatud direktiivistulenevatele teistele asjakohastele sätetele. Üksikasjalikum info: http://www.compliance.ory.de/. |
| Finnish | Sony Corporation vakuuttaa täten että VPL-DX15/Data Projector typpinenlaite on direktiivin 1999/5/EY olellisten vaatimusten ja sitä koskeviendirektiivin muiden ehtojen mukainen. Halutessasi lisätietaja, käy osoitteessa:http://www.compliance.ory.de/ |
| French | Par laprésente Sony Corporation déclare que l'appareil VPL-DX15/DataProjector est conforme aux exigences essentielles et aux autres dispositionspertinentes de la directive 1999/5/CE. Pour toute information complémentaire,veuilles consulter l'URL suivante: http://www.compliance.ory.de/ |
| German | Hiermit erklart Sony Corporation, dass sich das Gerät VPL-DX15/DataProjector in Übereinstimmung mit den grundlegenden Anforderungen und denübrigen einschlögigen Bestimmungen der Richtlinie 1999/5/EG befindet.Weitere Informationen erhältlich unter: http://www.compliance.ory.de/ |
| Greek | Me ην πησγακρογίας Corporation δηλώνει πι VPL-DX15/DataProjector συμμο φόνεται ποσις της υουώδεις απατήσεις και τις λούπεςσχετιες διατάξεις της ἀπαβαίδεις Φιαταμερείεςπαραλαύνμε δόπως ελένεξετε την αχόλουθη σελίδα τουδιαδιατίου:http://www.compliance.ory.de/ |
| Hungarian | Alulírott, Sony Corporation nyilatkozom, hogy a(z) VPL-DX15/DataProjector megfelel a vonatkozó alapvető követelményeknek és az1999/5/EC irányelv egyéb előirásainak. További információkat akövetkező webboldalon találhat: http://www.compliance.ory.de/ |
| Italian | Con la presente Sony Corporation dichiarare che questo VPL-DX15/DataProjector è conforme ai requisiti essenziali ed alle altre disposizioni pertinenti stabilite dalla direttiva 1999/5/CE. Per ulteriori dettagli, si prega di consultare ilseguente URL: http://www.compliance.ory.de/ |
| Latvian | Ar šo Sony Corporation deklare, ka VPL-DX15/Data Projector atbilstDirektīvas 1999/5/EK butiskajām prasibām un citiem ar to saistītajiemnoteikūmiem. Plasāka inform ācija ir pieejama: http://www.compliance.ory.de/ |
| Lithuanian | Šiuo Sony Corporation deklaruoja, kad šis VPL-DX15/Data Projector atitinka esminius reikalavimus ir kitas 1999/5/EB Direktyvos nuostatas.Susipazinti su visu atitikties deklaracijos turiniu Jus galite internototinklalapyje: http://www.compliance.ory.de/ |
| Norwegian | Sony Corporation erklærer herved at utstyretVPL-DX15/Data Projector er i samsvar med de grunnleggende krav og øvrige relevante krav i direktiv 1999/5/EF. For flere detailjer, vennligst se: http://www.compliance.ory.de/ |
| Polish | Niniejszym Sony Corporation oswiadczа, ze VPL-DX15/Data Projector jest zgodne z zasadniczymi wymaganiami oraz innymi stosownymi postanowieniami Dyrektywy 1999/5/WE. Szczechówne informacjaznaleźć można pod nastepujacym adresem URL:http://www.compliance.ory.de/ |
| Portuguese | Sony Corporation declara que este VPL-DX15/Data Projector está conforme osrequisitos essentials e'autres disposções da Direcita 1999/5/CE. Para maisinformacoes, por favor consulte a segunte URL:http://www.compliance.ory.de/ |
| Romanian | Prin prezenta, Sony Corporation declară că acest VPL-DX15/Data Projector respectă cerințele esentțialeșioste în conformitate cu prevederile Directivei 1999/5/EC. Pentru detalii,țărugăm accesați următoarea adresă: http://www.compliance.SONy.de/ |
| Slovak | Sony Corporation týmto vyhlasuje,Že VPL-DX15/Data Projector splná základné požiadavky a všetky príslušné ustanovenia Smernice 1999/5/ES. Podrobnosti získate na nasledovnej webovej adresc: http://www.compliance.SONy.de/ |
| Slovenian | Sony Corporation izjavlja,da je ta VPL-DX15/Data Projector v skladu z bistvenimi zahétvami in ostalimi relevantnimi dolovi direktive 1999/5/ES. Za podrobnosti vas naprošamo,Že pogledate na URL: http://www.compliance.SONy.de/ |
| Spanish | Por medio de la presente Sony Corporation declara que el VPL-DX15/Data Projector cumple con los requisitos esenciales y cualesquiera除外as dispositions aplicables o exigibles de la Directiva 1999/5/CE. Para mayor información,por favor consulte elCEE. http://www.compliance.SONy.de/ |
| Swedish | Härmed intygår Sony Corporation attenna VPL-DX15/Data Projector står I överensstämmlse med deväsentliga egenskapskrav och övriga relevanta beställmelser som framgår av direktiv 1999/5/EG. Förytterligare information gå in på fällande hemsida:http://www.compliance.SONy.de/ |
For the customers in France
The WLAN feature of this Data Projector shall exclusively be used inside buildings.
For the customers in Italy
Use of the RLAN network is governed:
with respect to private use, by the Legislative Decree of 1.8.2003, no. 259 ("Code of Electronic Communications"). In particular Article 104 indicates when the prior obtainment of a general authorization is required and Art. 105 indicates when free use is permitted;
with respect to the supply to the public of the LAN access to telecom networks and services, by the Ministerial Decree 28.5.2003, as amended, and Art. 25 (general authorization for electronic communications networks and services) of the Code of electronic communications
- with respect to private use, by the Ministerial Decree 12.07.2007
For the customers in Cyprus
The end user must register the RLAN devices in the Department of Electronic Communications (P.I. 6/2006 and P.I. 6A/2006).
P.I. 6/2006 is the Radiocommunications (Categories of Stations Subject to General Authorization and Registration) Order of 2006.
P.I. 6A/2006 is the General Authorization for the use of Radiofrequencies by Radio Local area Networks and by Wireless Access Systems, including Radio Local Area Networks (WAS/RLAN).
Tn Touc nEaTeC oNv KUnpo
O ts ovoxevee s RLAN oTo Tmu HExtgoovxov EAnoxovov (KdI. 6/2006 xai KdI. 6A/2006).
To KAI. 6/2006 eivai to aataayma negi
Padoeixovwov tv 2006
(Katnyogiec Padooovyotntow
Ytoxeivee oEevixn Egoovodotnon
xai Eyyqan).
To KAI. 6A/2006 anotel tN Evixn
Esoovodotnon yia tn xgnon
gadooxyottwv ao touxa
aougata dixva xai aougata
ovotna poobaons,
ovuagauabavouevw tv tonixov
deltaov enoxovwov (WAS/RLAN).
For the customers in Norway
Use of this radio equipment is not allowed in the geographical area within a radius of 20 km from the centre of Ny-Alesund, Svalbard.
For kundene i Norge
For the customers in Taiwan
注意
- Check that the operating voltage of your unit is identical with the voltage of your local power supply. If voltage adaptation is required, consult with qualified Sony personnel.
- Should any liquid or solid object fall into the cabinet, unplug the unit and have it checked by qualified Sony personnel before operating it further.
- Unplug the unit from the wall outlet if it is not to be used for several days.
- To disconnect the cord, pull it out by the plug. Never pull the cord itself.
- The wall outlet should be near the unit and easily accessible.
- The unit is not disconnected from the AC power source (mains) as long as it is connected to the wall outlet, even if the unit itself has been turned off.
- Do not look into the lens while the lamp is on.
- Do not place your hand or objects near the ventilation holes (exhaust) — the air coming out is hot.
- Be careful not to catch your fingers by the adjuster when you adjust the height of the unit. Do not push hard on the top of the unit with the adjuster out.
- Be sure to grasp both sides of the unit with both hands when carrying the unit.
On illumination
- To obtain the best picture, the front of the screen should not be exposed to direct lighting or sunlight.
- Cover any windows that face the screen with opaque draperies.
- It is desirable to install the unit in a room where floor and walls are not of light-reflecting material. If the floor and walls are of reflecting material, it is recommended that the carpet and wall paper be changed to a dark color.
On preventing internal heat build-up
The unit is equipped with ventilation holes (intake) at the bottom and ventilation holes (exhaust) at the side. Do not block or place anything near these holes, or internal heat build-up may occur, causing picture degradation or damage to the unit.
On cleaning
Before cleaning
Be sure to disconnect the AC power cord from the AC outlet.
On cleaning the air filter
- Clean the air filter whenever you replace the lamp.
Refer to the "Cleaning the Air Filter" for the air filter cleaning.
On cleaning the lens
The lens surface is especially treated to reduce reflection of light.
As incorrect maintenance may impair the performance of the projector, take care with respect to the following:
- Avoid touching the lens. To remove dust on the lens, use a soft dry cloth. Do not use a damp cloth, detergent solution, or thinner.
- Wipe the lens gently with a soft cloth such as a cleaning cloth or glass cleaning cloth.
- Stubborn stains may be removed with a soft cloth such as a cleaning cloth or glass cleaning cloth lightly dampened with water.
- Never use solvent such as alcohol, benzene or thinner, or acid, alkaline or abrasive detergent, or chemical cleaning cloth, as they will damage the lens surface.
On cleaning the cabinet
- Clean the cabinet gently with a soft dry cloth. Stubborn stains may be removed with a cloth lightly dampened with mild detergent solution, followed by wiping with a soft dry cloth.
-
Use of alcohol, benzene, thinner or insecticide may damage the finish of the cabinet or remove the indications on the cabinet. Do not use these chemicals.
-
If you rub on the cabinet with a stained cloth, the cabinet may be scratched.
- If the cabinet is in contact with a rubber or vinyl resin product for a long period of time, the finish of the cabinet may deteriorate or the coating may come off.
On LCD projector
The LCD projector is manufactured using high-precision technology. You may, however, see tiny black points and/or bright points (red, blue, or green) that continuously appear on the LCD projector. This is a normal result of the manufacturing process and does not indicate a malfunction. Also, when you use multiple LCD projectors to project onto a screen, even if they are of the same model, the color reproduction among projectors may vary, since color balance may be set differently from one projector to the next.
Notes on Installation and Usage
Unsuitable Installation
Do not install the unit in the following situations. These installations may cause malfunction or damage to the unit.
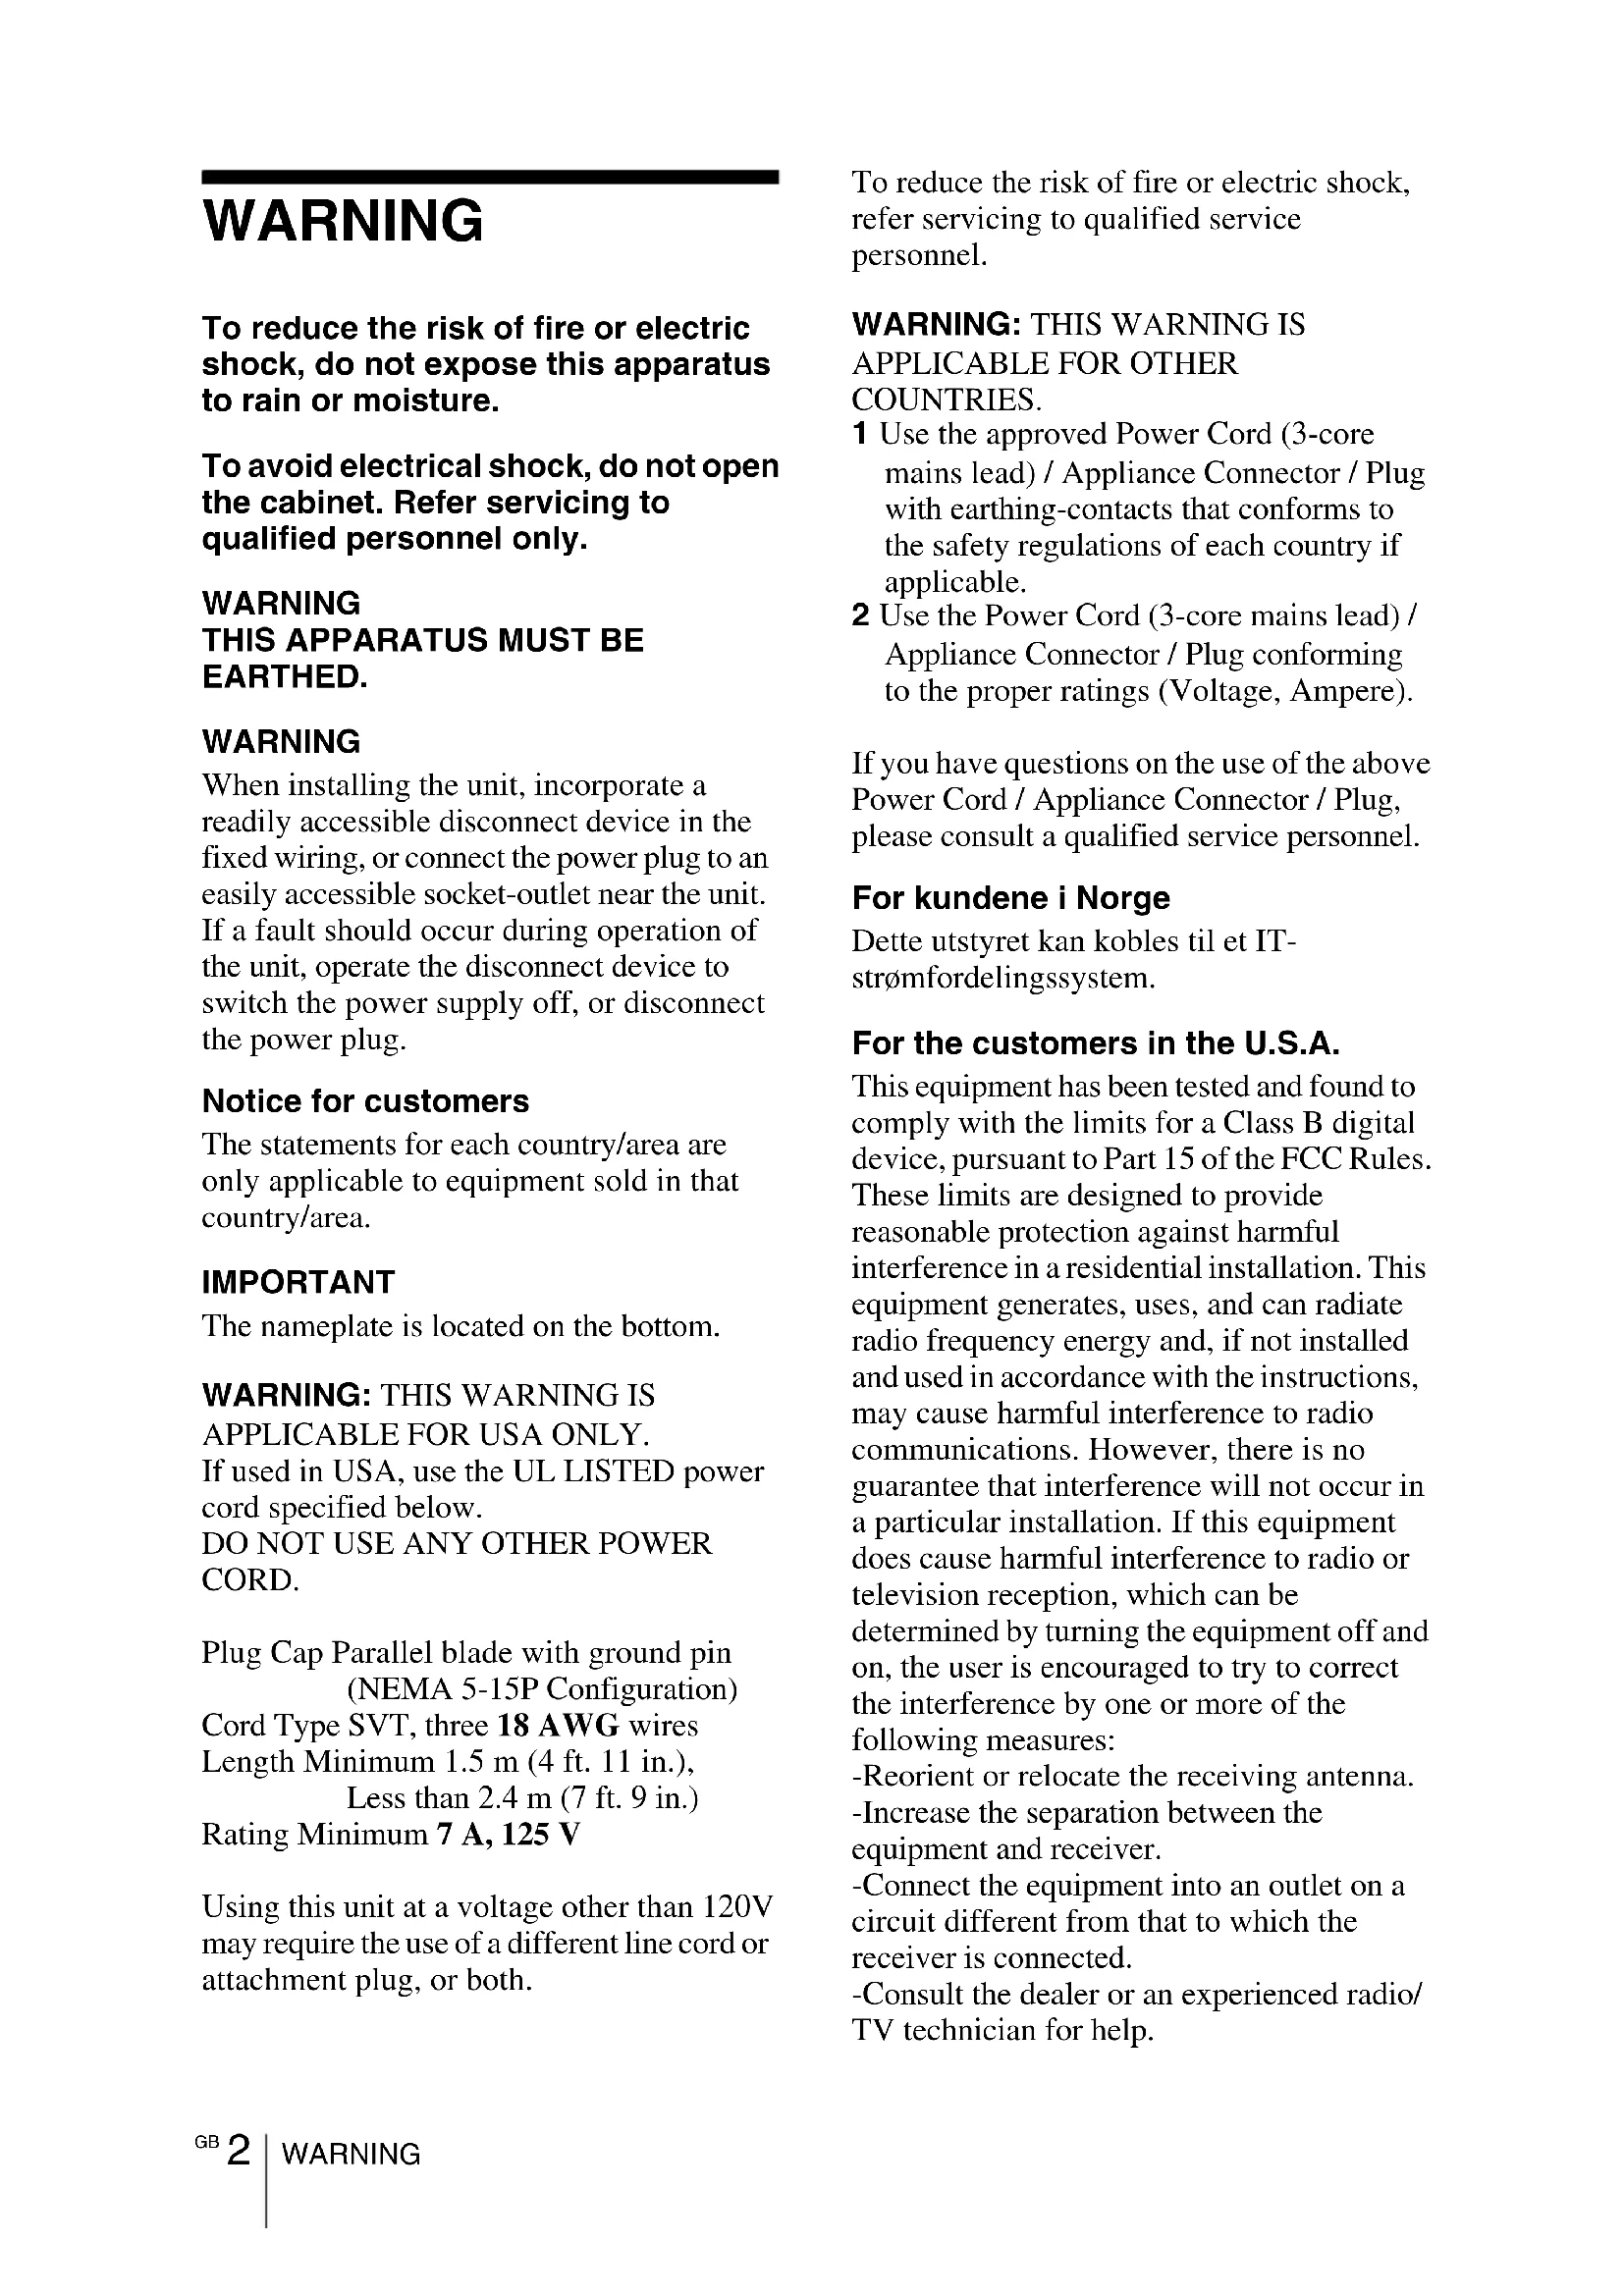
Poorly ventilated
- Allow adequate air circulation to prevent internal heat build-up. Do not place the unit on surfaces (rugs, blankets, etc.) or near materials (curtains, draperies) that may block the ventilation holes.
- When the internal heat builds up due to the block-up, the temperature sensor will function with the message "High temp! Lamp off in 1 min." The power will be turned off automatically after one minute.
- Leave space of more than 30~cm (11 7/8 inches) around the unit.
- Be careful that the ventilation holes may inhale tininess such as a piece of paper.
Highly heated and humid
- Avoid installing the unit in a location where the temperature or humidity is very high, or temperature is very low.
- To avoid moisture condensation, do not install the unit in a location where the temperature may rise rapidly.
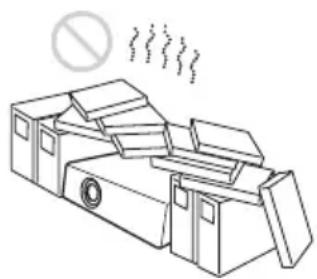
Subject to direct cool or warm air from an air-conditioner
Installing in such a location may cause malfunction of the unit due to moisture condensation or rise in temperature.
Near a heat or smoke sensor
Malfunction of the sensor may be caused.
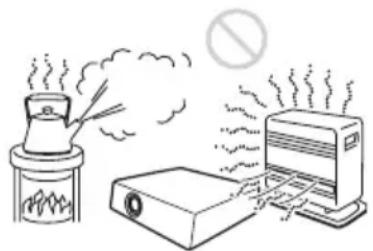
Very dusty, extremely smoky
Avoid installing the unit in a very dusty or extremely smoky environment. Otherwise, the air filter will become obstructed, and this may cause a malfunction of the unit or damage it. Dust preventing the air passing through the filter may cause a rise in the internal temperature of the unit. Clean the air filter whenever you replace the lamp.
Usage in High Altitude
When using the unit at an altitude of 1,500m or higher, set the "High Altitude Mode" to "On" in the Setup menu. Failing to set this mode when using the unit at high altitudes could have adverse effects, such as reducing the reliability of certain components.
Note on the screen
When using a screen with an uneven surface, stripes pattern may rarely appear on the screen depending on the distance between the screen and the unit or the zooming magnifications. This is not a malfunction of the unit.
Unsuitable Conditions
Do not use the unit under the following conditions.
Do not topple the unit
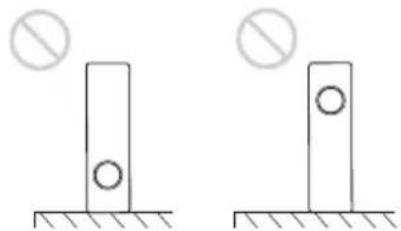
Avoid using as the unit topples over on its side. It may cause malfunction.
Do not tilt right/left

Avoid using as the unit tilts right or left more than 20 degrees. These installations may cause malfunction.
Do not block the ventilation holes
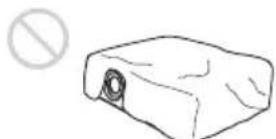
Avoid using something to cover over the ventilation holes (exhaust/intake); otherwise, the internal heat may build up.
Do not place a blocking object just in front of the lens
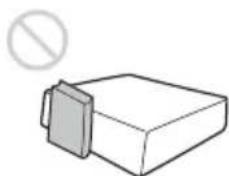
Do not place any object just in front of the lens that may block the light during projection. Heat from the light may damage the object. Use the picture muting function key to cut off the picture.
Using the CD-ROM Manuals
The supplied CD-ROM contains Operating Instructions and ReadMe file in Japanese, English, French, German, Italian, Spanish, Chinese and Russian. First, refer to the ReadMe file.
Preparations
To read the Operating Instructions in the CD-ROM, Adobe Acrobat Reader 5.0 or later is required. If the Adobe Acrobat Reader is not installed in your computer, you can download free Acrobat Reader software from URL of Adobe Systems.
To read the Operating Instructions
The Operating Instructions are contained in the supplied CD-ROM. Insert the supplied CD-ROM into the CD-ROM drive of your computer, and the CD-ROM will start automatically after a while. Select the Operating Instructions you want to read. The CD-ROM may not start automatically depending on the computer. In this case, open the Operating Instructions file as follows:
(In case of Windows)
① Open "My Computer."
② Right-click the CD-ROM icon and select "Explorer."
③ Double-click "index.htm" file and select the Operating Instructions you want to read.
(In case of Macintosh)
① Double-click the CD-ROM icon on the desk top.
Double-click "index.htm" file and select the Operating Instructions you want to read.
Note
If you cannot open "index.htm" file, double-click on the Operating Instructions you want to read from among those in "Operating_Instructions" folder.
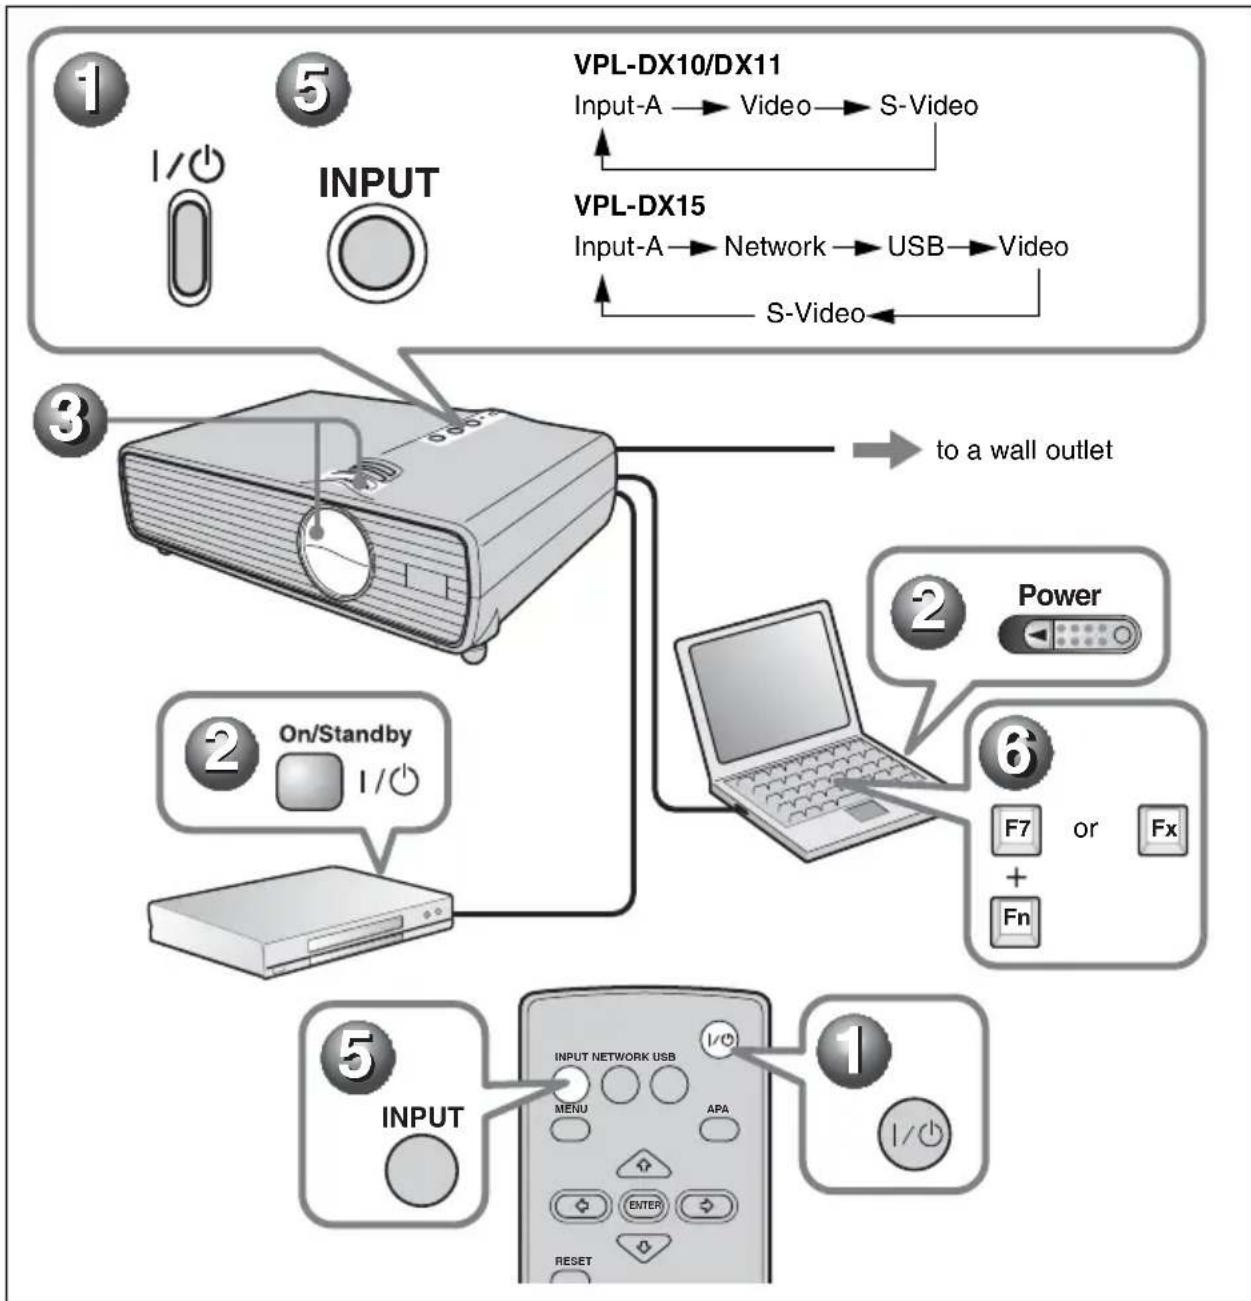
Projecting
Projecting
Press the I/ key.
Turn on the equipment connected to the projector.
Move the lens shutter lever to open the lens shutter.
Adjust the picture position, size, and focus.
See "Adjusting the Projector" on page 14.
Press the INPUT key on the Remote Commander or the control panel to select the input source.
When the computer is connected, set it to output the signal to only the external monitor.
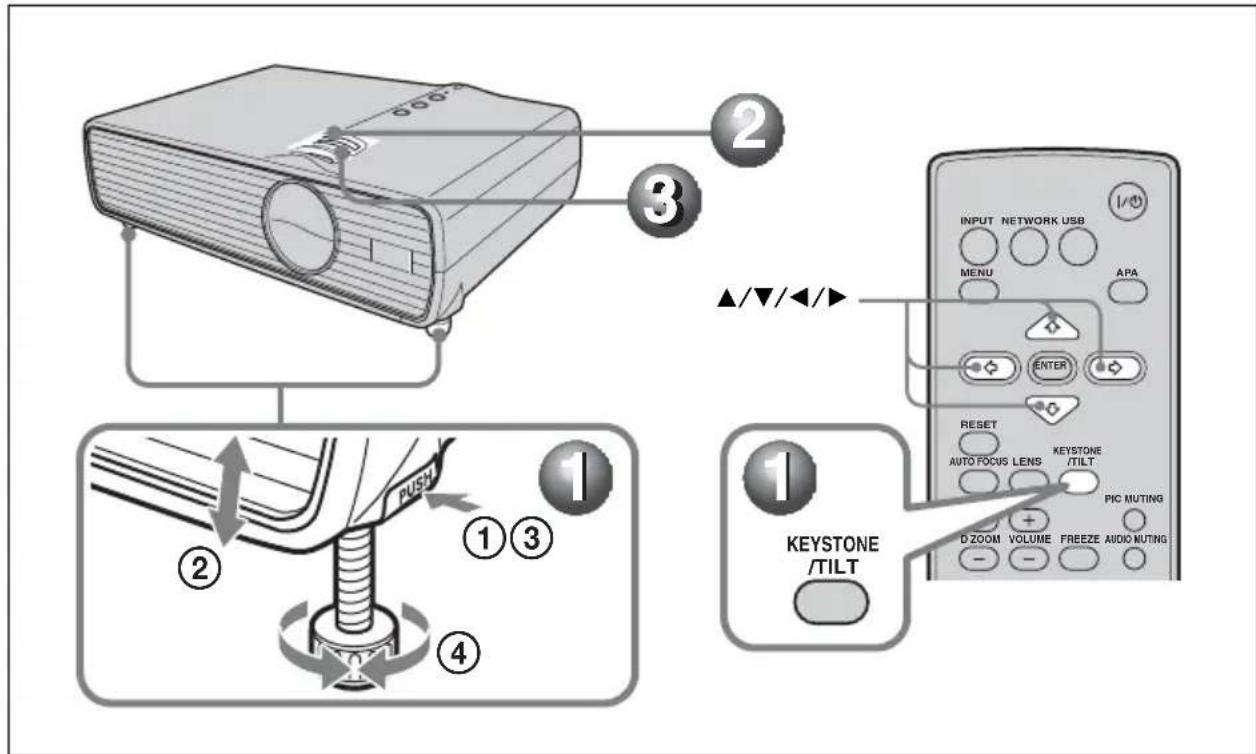
Adjusting the Projector
Adjust the tilt (upper or lower position of the picture) of the projector with the adjusters.
When you adjust the tilt with the adjusters, the V keystone adjustment is performed automatically.
① Lift the projector while holding the Adjuster button pressed.
②Adjust the tilt of the projector.
③Release the Adjuster button.
④ When fine-tuning is necessary, turn the Adjuster right and left.
To adjust the tilt manually
Press the KEYSTONE/TILT key on the Remote Commander to display the TILT menu and adjust the tilt using the / / keys.
Adjust the size of the picture with the Zoom ring.
Adjust the focus with the Focus ring.
Turning off the Power
1 Press the I/O key.
2 When a message appears, press the I/ key again.
3 Unplug the AC power cord from the wall outlet after the fan has stopped running and the I/ key has lit in red.
Replacing the Lamp
The lamp used as a light source is a consumable product. Thus, replace the lamp with a new one in the following cases.
- When the lamp has burnt out or dims
- "Please replace the Lamp." appears on the screen
The LAMP/COVER indicator flashes in orange (Repetition rate of 3 flashes) (Refer to page 19 for another possible cause.)
The lamp life varies depending on conditions of use.
Use an LMP-D200 Projector Lamp as the replacement lamp.
Use of any other lamps than the LMP-D200 may cause damage to the projector.
Caution
The lamp remains not after the projector is turned off with the 1 / 0 key. If you touch the lamp, you may burn your finger. When you replace the lamp, wait for at least an hour for the lamp to cool.
Notes
- If the lamp breaks, contact qualified Sony personnel.
- Pull out the lamp by holding the handle. If you touch the lamp, you may be burned or injured.
- When removing the lamp, make sure it remains horizontal, then pull straight up. Do not tilt the lamp. If you pull out the lamp while it is tilted and if the lamp breaks, the pieces may scatter, causing injury.
1 Turn off the projector, and disconnect the AC power cord from the AC outlet.
Note
When replacing the lamp after using the projector, wait for at least an hour for the lamp to cool.
2 Place a protective sheet (cloth) beneath the projector. Turn the projector over so you can see its underside.
Note
Be sure that the projector is stable after turning it over.
3 Open the lamp cover by loosening the screw with a Phillips screwdriver.
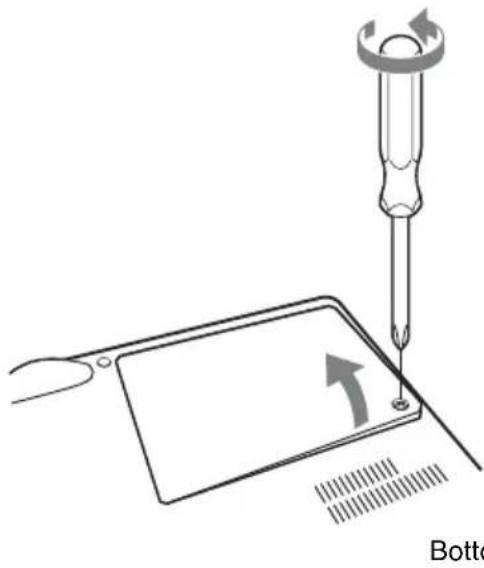
Note
For safety reasons, do not loosen any other screws.
4 Loosen the two screws on the lamp unit with the Phillips screwdriver (1). Fold out the handle (2), then pull out the lamp unit by the handle (3).
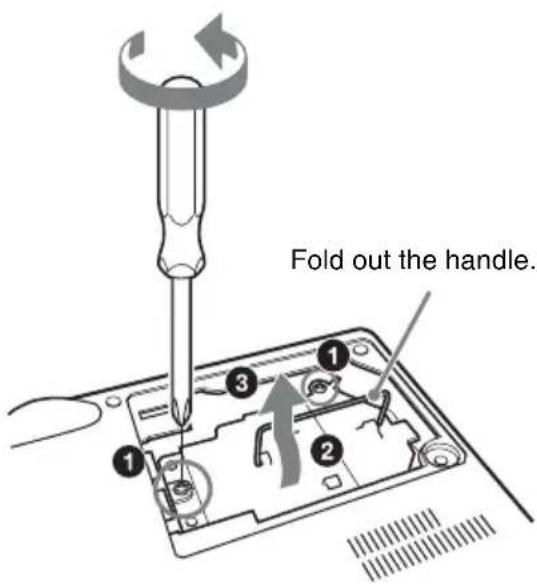
Caution
Do not put your hands into the lamp replacement slot, and do not allow any liquid or other objects into the slot to avoid electrical shock or fire.
5 Insert the new lamp all the way in until it is securely in place (1). Tighten the two screws (2). Fold down the handle to replace it (3).
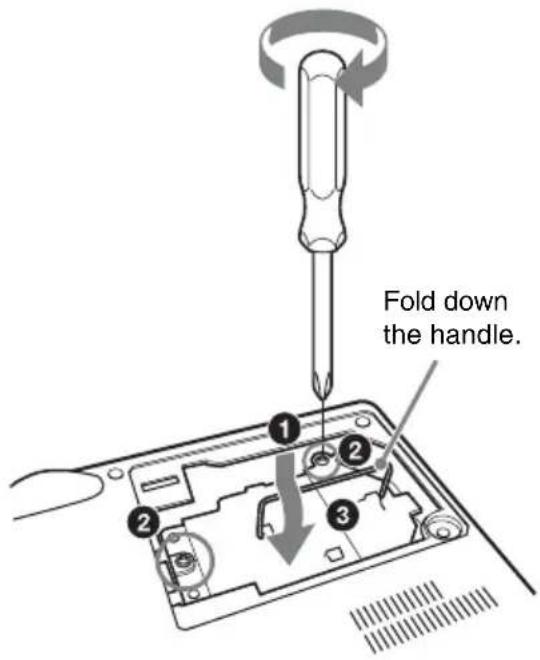
Notes
- Be careful not to touch the glass surface of the lamp and a inside conductor.
- Insert the handle firmly to attach it securely.
The power will not turn on if the lamp is not secured properly.
6 Close the lamp cover and tighten the screw.
Note
Be sure to attach the lamp cover securely as it was. If not, the projector cannot be turned on.
7 Turn the projector back over.
8 Connect the power cord. The I/ key lights in red.
9 Press the I/ key to turn the projector on.
10 Press the MENU key, and then select the Setup menu.
11 Select "Lamp Timer Reset", and then press the ENTER key.
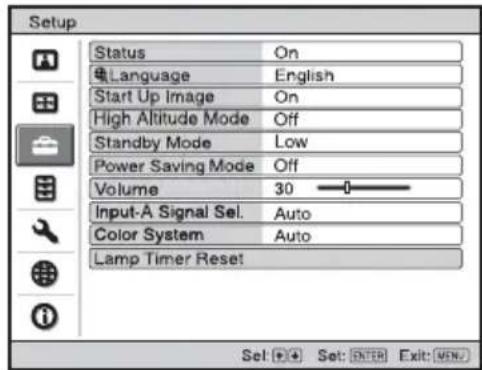
"Settings for Lamp replacement. Has the projection Lamp been replaced?" is displayed in the menu screen.
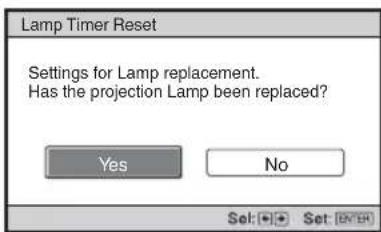
12Select "Yes" with the key, and then press the ENTER key.
The Lamp Timer is initialized to 0, "Lamp Timer Reset Complete!" is displayed in the menu screen.
Disposal of the used lamp For the customers in the USA
Lamp in this product contains mercury. Disposal of these materials may be regulated due to environmental considerations. For disposal or recycling information, please contact your local authorities or the Telecommunications Industry Association (www.eiae.org).
Cleaning the Air Filter
The air filter should be cleaned after approximately 500 hours use. Remove the air filter cover then remove the dust with a cloth lightly dampened with mild detergent solution.
The time needed to clean the air filter will vary depending on the environment or how the projector is used.
1 Turn the power off and unplug the AC power cord.
2 Place a protective sheet (cloth) beneath the projector and turn the projector over.
3 Remove the air filter cover.
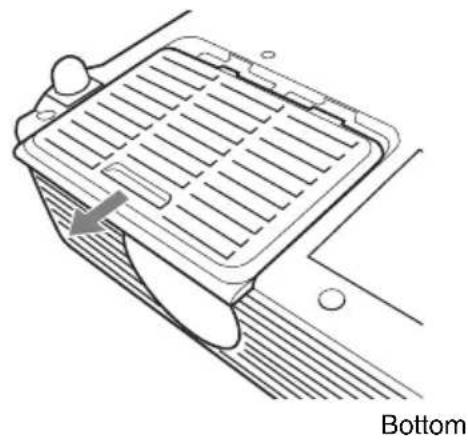
4 Remove the filter inside, and then wipe its dust with mild detergent.
5 Return the filter to the air filter cover.
6 Return the air filter cover.
Notes
- If the dust cannot be removed from the air filter, replace the air filter with a new one.
- For details on new air filter, consult with qualified Sony personnel.
- Be sure to attach the air filter cover firmly; it may cause a problem if the air filter cover is not installed properly.
Troubleshooting
If the projector appears to be operating erratically, try to diagnose and correct the problem using the following instructions. If the problem persists, consult with qualified Sony personnel. For details on the symptoms, see the Operating Instructions contained in the CD-ROM.
Power
| Symptom Cause and Remedy | |
| The power is not turned on. | ·The AC power cable is not connected. →Connect the AC power cable firmly. ·The lamp or lamp cover is not secured. →Close the lamp or lamp cover securely. |
Picture
| Symptom Cause and Remedy | |
| No picture. • The power is not turned on. →Turn on the power. ·A cable is disconnected or the connections are wrong. →Check that the proper connections have been made. ·The Lens shutter is closed. →Open the Lens shutter. ·Input selection is incorrect. →Select the input source correctly. ·The picture is muted. →Press the PIC MUTING key to release the picture muted. ·The computer signal is not set to output to an external monitor or set to output both to an external monitor and a LCD monitor of a computer. →Set the computer signal to output only to an external monitor. | |
| The picture is noisy. The connecting cable may not be connected properly. →Check if the connecting cable is connected properly. | |
| On-screen display does not appear. | “Status” in the Setup menu has been set to “Off.” →Set “Status” in the Setup menu to “On”. |
| Color balance is incorrect. • | The image quality setting is not proper. →Set the image quality on the Picture menu. →You can reset all values to default. ·The setting of “Input-A Signal Sel.” in the Setup menu is incorrect. →Select “Computer,” “Video GBR” or “Component” correctly according to the input signal. ·The projector is set to the wrong color system. →Set “Color System” in the Setup menu to match the color system being input. |
| The picture is too dark. • Contrast or brightness has not been adjusted properly. →Adjust the Contrast or Brightness in the Picture menu properly. →You can reset all values to default. ·The lamp has burnt out or is dim. →Check “Lamp Timer” on the Information menu. | |
| Symptom Cause and Remedy | |
| The picture is not clear. • The picture is out of focus. →Adjust the focus. • Condensation has accumulated on the lens. →Leave the projector for about two hours with the power on. | |
| The image extends beyond the screen. | • The APA key has been pressed even though there are black edges around the image. →Display the full image on the screen and press the APA key. • The screen setting is not proper. →Adjust “Shift” on the Screen setting menu. →You can reset all values to default. |
| The picture flickers. • The screen setting is not proper. →Adjust “Phase” on Screen setting menu. →You can reset all values to default. | |
| The aspect ratio of the display is not right. | • The screen setting is not proper. →Adjust “Aspect” on the Screen setting menu. →You can reset all values to default. |
Sound
| Symptom Cause and Remedy | |
| No sound. • A cable is disconnected or the connections are wrong. →Check that the proper connections have been made. · The audio connecting cable used is incorrect. →Use a no-resistance stereo audio cable. · The sound is muted. →Press the AUDIO MUTING key to release audio muted. · The sound is not adjusted properly. →Adjust the sound with the VOLUME +/- key on the Remote Commander. |
Indicators
| Symptom Cause and Remedy | |
| The LAMP/COVER indicator flashes in orange. (Repetition rate of 2 flashes) | The lamp cover is detached. →Attach the cover securely. |
| The LAMP/COVER indicator flashes in orange. (Repetition rate of 3 flashes) | ·The interior of the unit reached a high temperature, and the temperature sensor has been activated. →Check to see that nothing is blocking the fresh-air inlet and exhaust outlet. ·The lamp has reached a high temperature. →Wait for 90 seconds for the lamp to cool then turn on the power again. After you have checked the items above, if any of the troubles recur, the following causes are possible: ·The lamp must be replaced, because it has reached the end of its service life. ·The interior of the unit reached a high temperature, and the temperature fuse burned out. →Consult with qualified Sony personnel. |
| Symptom Cause and Remedy | |
| I/O key flashes in red. (Repetition rate of 2 flashes) | ·The internal temperature is unusually high. →Check to see that nothing is blocking the ventilation holes. ·The projector is being used at a high altitude. →Ensure that “High Altitude Mode” in the Setup menu is set to “On.” |
| I/O key flashes in red. (Repetition rate of 4 flashes) | The fan is broken. →Consult with qualified Sony personnel. |
| I/O key flashes in red. (Repetition rate of 6 flashes) | Unplug the AC power cord from the wall outlet after the I/O key goes out, plug the power cord to the wall outlet, and then turn the projector on again. If the I/O key flashes in red and the problem persists, the electrical system has failed. Or the interior of the unit reached a high temperature, and the temperature fuse has burned out. →Consult with qualified Sony personnel. |
Specifications
Projection system
3 LCD panels, 1 lens, projection system
LCD panel 0.63-inch (16.0 mm) XGA panel, approximately 2,360,000 pixels (786,432 pixels × 3
Lens 1.2 times zoom lens
f 18.63mm to 22.36mm/ F1.65 to 1.8
Lamp 200 W Ultra High Pressure mercury lamp
Projected picture size (measured diagonally) 40 inches to 300 inches (1,016mm to 7,620~mm)
Light output VPL-DX10: 2500 lumen
VPL-DX11/DX15: 3000 lumen
(When the Lamp Mode is set to "High.")
Throwing distance
Refer to "Installing the Projector and Installation Diagram" in "Operating Instructions" included on the supplied CD-ROM.
Color system NTSC 3.58/PAL/SECAM/ NTSC4.43/PAL-M/PAL-N/ PAL60 system, switched automatically/manually (NTSC4.43 is the color system us when playing back a video recorded in NTSC on a NTSC4.43 system VCR.)
Resolution 750 horizontal TV lines (Video input) 1,024× 768 dots RGB input
Acceptable computer signals 1)
fH: 19kHz to 80kHz
fV: 48 Hz to 92 Hz
(Maximum input signal resolution: SXGA + 1400× 1050 fV:60 Hz)
1) Set the resolution and the frequency of the signal of the connected computer within the range of acceptable preset signals of the projector.
Applicable video signals
15 k RGB, Component 50/60 Hz, Progressive component 50/60 Hz, DTV (480/60i, 575/50i, 480/60p, 575/50p, 720/60p, 720/50p, 1080/60i, 1080/50i), Composite video, Y/C
Dimensions Approx. 295× 74× 204mm (11^5 / 8× 2^29 / 32× 8^1 / 32 inches) (w/h/d) (without projecting parts)
Mass VPL-DX10/DX11: Approx. 2.1kg (4 lb 11 oz)
VPL-DX15: Approx. 2.2kg (4 lb 14 oz)
Power requirements AC 100V to 240V,3.6A to 1.6A - 50 / 60Hz
Power consumption
VPL-DX15: Max. 320 W in standby (Standard): 10.5 W in standby (Low): less than 1.0 W
VPL-DX10/DX11: Max. 320 W in standby (Standard): 5.5 W in standby (Low): less than 1.0 W
Operating temperature 0^ to 35^ (32^ to 95^)
Supplied accessories
Remote Commander (1)
Lithium battery CR2025 (1)
HD D-sub 15 pin cable (2m) (1) (1-791-992-51/Sony) or (1-791-992-61/Sony)
Carrying case (1)
AC power cord (1)
Operating Instructions (CD-ROM) (1)
Quick Reference Manual (1)
Security Label (1)
Design and specifications of the unit, including the optional accessories, are subject to change without notice.
Note
Always verify that the unit is operating properly before use. SONY WILL NOT BE LIABLE FOR DAMAGES OF ANY KIND INCLUDING, BUT NOT LIMITED TO, COMPENSATION OR REIMBURSEMENT ON ACCOUNT OF THE LOSS OF PRESENT OR PROSPECTIVE PROFITS DUE TO FAILURE OF THIS UNIT, EITHER DURING THE WARRANTY PERIOD OR AFTER EXPIRATION OF THE WARRANTY, OR FOR ANY OTHER REASON WHATSOEVER.
Optional accessories
Projector Lamp LMP-D200 (for replacement) Presentation Tool RM-PJPK1
Not all optional accessories are available in all countries and area.
Please check with your local Sony Authorized Dealer.
AVENTISSEMENT
Installation inadequate
Hz, DTV (480/60i, 575/50i,
480/60p, 575/50p, 720/60p,
720/50p, 1080/60i, 1080/50i),
video composite, Y/C
Dimensions environ 295× 74× 204mm
(11^3 / 8 × 2^29 / 32 × 8^1 / 32 pouces)
(1 / h / p) (sans parties externes)
Poids VPL-DX10/DX11:2,1 kg (4 lb 11
oz) environ
VPL-DX15:2,2kg (4lb 14 oz)
environ
Alimentation 100V a 240VCA 3,6Aa1,6A, 50 / 60Hz
NTSC4.43/PAL-M/PAL-N/
Hz, DTV (480/60i, 575/50i,
480/60p, 575/50p, 720/60p,
720/50p, 1080/60i, 1080/50i),
LCD-Panel 0,63-Zoll (16,0 mm)-XGA-Panel, ca. 2.360.000 Pixel (786.432 Pixel × 3
NTSC4.43/PAL-M/PAL-N/
VPL-DX10/DX11:Max.320W
NTSC4.43/PAL-M/PAL-N/
PAL60, commutato
automaticamente/manualmente
50i,480/60p,575/50p,720/60p
720/50p, 1080/60i, 1080/50j),
videocomposito, Y/C
Dimensioni circa 295× 74× 204mm (l/a/p)
(escluse le parti sporgenti)
Massa VPL-DX10/DX11: Circa 2,1 kg
PL-DX15: circa 2,2 kg
VPL-DX10/DX11:Max.320W
in attesa (Standard): 5,5 W
60p、575/50p、720/60p、
Printed on recycled paper using VOC (Volatile Organic Compound)-free vegetable oil based ink.
01 木一入一念为活用<