FP38547 - Subwoofer BOWERS & WILKINS - Free user manual and instructions
Find the device manual for free FP38547 BOWERS & WILKINS in PDF.
| Product type | Subwoofer |
| Brand | Bowers & Wilkins |
| Model | FP38547 |
| Series | DB Series |
| Connectivity | Bluetooth (DB Subwoofer app) |
| Audio inputs | RCA Phono stereo, XLR balanced stereo |
| Control | iOS/Android mobile app, Trigger 12V, RS-232 |
| Room equalization | Automatic via mobile microphone |
| Settings | Level, trim, low-pass filter, input equalization (presets + 5 bands) |
| Feet options | Spiked (carpet), decoupling (wood floor), rubber (hard floor) |
| Grille | Magnetic removable (included) |
| Power supply | Mains, cable included |
| Auto standby | After 20 minutes of inactivity |
| Status light | Green (on), Red (standby), Flashing red (overload) |
| Reset | Hold the standby button for 5 seconds |
| Cleaning | Soft lint-free cloth, mild detergent if needed |
Frequently Asked Questions - FP38547 BOWERS & WILKINS
User questions about FP38547 BOWERS & WILKINS
0 question about this device. Answer the ones you know or ask your own.
Ask a new question about this device
Download the instructions for your Subwoofer in PDF format for free! Find your manual FP38547 - BOWERS & WILKINS and take your electronic device back in hand. On this page are published all the documents necessary for the use of your device. FP38547 by BOWERS & WILKINS.
USER MANUAL FP38547 BOWERS & WILKINS
DB Series Subwooofers
Welcome to Bowers & Wilkins and the DB Series subwoofoers.
Thank you for choosing Bowers & Wilkins. When John Bowers first established our company he did so in the belief that imaginative design, innovative engineering and advanced technology were keys that could unlock the enjoyment of audio in the home. His belief is one that we continue to share and it inspires every product we design.
Before connecting and operating this mains powered apparatus, please read carefully and observe the Important Safety Instructions in the accompanying leaflet.
This manual covers all DB Series subwoofoers.


bowers-wilkins.com
1. Carton Contents
- DB Series subwoofer
- Power cable(s)
- Speaker grilles
- Spike, decoupling and rubber feet
- Literature pack
2. Introduction
Your DB Series subwoofer is an extremely high performance product that will reward thoughtful installation. We suggest that you take some time to read this manual before you begin.
DB Series subwoofoers can be used for low frequency applications in both conventional stereo and home theatre systems. They incorporate a compressive set of features that enhance versatility and enable performance to be finely tuned to the listening room, listening position and programme material. These features are briefly described in the following paragraphs:
Set Up and Control
DB Series subwoofoers can be set up and controlled only via the Bluetooth connected Bowers & Wilkins DB Subwoofoers app for iOS and Android devices.
Before you begin installing your subwoofer, please download and install the DB Subwoofer's app on your iOS or Android device. It is not possible to set up or use a DB Series subwoofer without the app.
Note: The DB Subwoofer's app requires iOS version 10 and Android version 7 or later. Bluetooth must be switched on in the iOS or Android settings.
Room Equalisation
DB Series subwoofoers can automatically optimise their performance to match the acoustic characteristics of the listening environment.
Multiple Inputs
DB Series subwoofoers provide RCA Phono and balanced XLR stereo analogue inputs. The inputs can be connected simultaneously and configured independently for different system applications.
Level Adjustment
DB Series subwoofoers incorporate both level adjustment and trim adjustment. The trim adjustment enables optimum matching of different source output levels so that the subwoofer volume level matches that of the main speakers for all inputs.
Low Pass Filter Set up
DB Series subwooers provide low pass filter options for stereo configurations for both RCA and XLR connections. When using mono (LFE) connections the bass management functions of the source equipment should be employed. For stereo installations the low pass filter characteristics can be matched to either specific Bowers & Wilkins main speakers or to alternative manufacturer's main speaker specifications.
Input EQ
DB Series subwoofoers provide optional equalisation presets designed to suit music and movie programme material. Custom equalisation via a five band equaliser is also provided.
3. Installing your Subwoofer
3.1 Before You Begin
Please follow the unpacking instructions printed on the outer carton.
Your DB Series subwoofer is heavy and should be unpacked by two people working together close to its final installed position.
Note: DB Series subwoofoers are intended for free-standing use and we do not recommend that they are suitable for installation within custom built furniture. If furniture installation is necessary however, you must ensure that the furniture is structurally adequate to support the weight of the subwoofer and provides at least 20cm clearance around the sides, back, and top of the subwoofer.
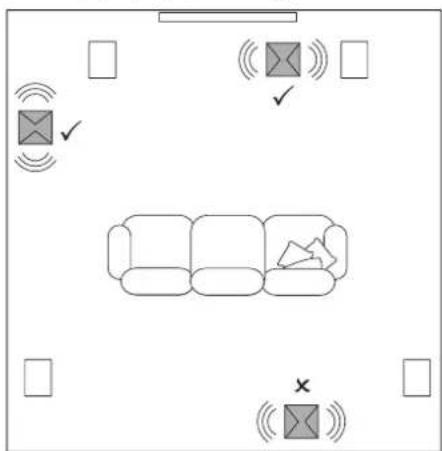
3.2 Positioning
DB Series subwoofoers are more versatile than most subwoofoers in terms of positioning thanks to their Room EQ optimisation system that can compensate for less than ideal positioning.
Best results however will be obtained if your DB Series subwoofer is placed between the left and right speakers or in the vicinity of one of them. Placing a subwoofer to the side, but still to the front of the listeners is an acceptable compromise if domestic considerations dictate, however the
subwoofer should not be located behind the listening position.
If two subwoofoers are to be used it is best to position one near the left speaker and one near the right speaker. Diagrams 1a and 1b illustrates subwoofer positioning.
Your subwoofer should be oriented with its drivers facing sideways. Incorrect orientation of the drivers may result in compromised performance.
Note: Using two subwoofoers in a single installation can improve performance by maintaining stereo separation to the lowest frequencies, averaging the effects of low frequency room resonances and enabling a higher maximum volume level. In the case of two subwoofoers used in a conventional stereo system, stereo separation will only be improved if each subwoofer is located close to the appropriate main speaker.
Note: Like all speakers, the proximity of room boundaries affects the sound of a subwoofer. Bass volume increases as more boundaries come into proximity. The more boost gained from the room, the lower the volume can be set and the less hard the subwoofer has to work.
Once you have positioned your subwoofer, its performance can be optimised using the Room EQ function. This is described in Section 4.
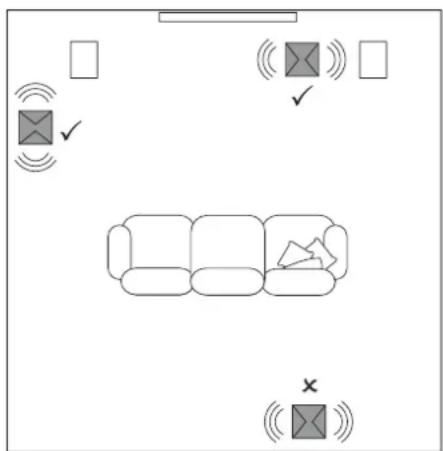
Diagram 1a
Subwoofer positioning in stereo systems
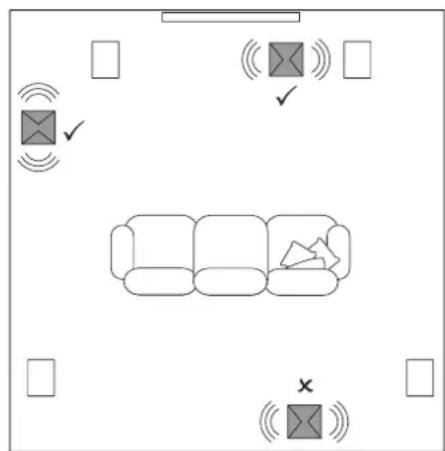
Diagram 1b
Subwoofer positioning in home theatre systems
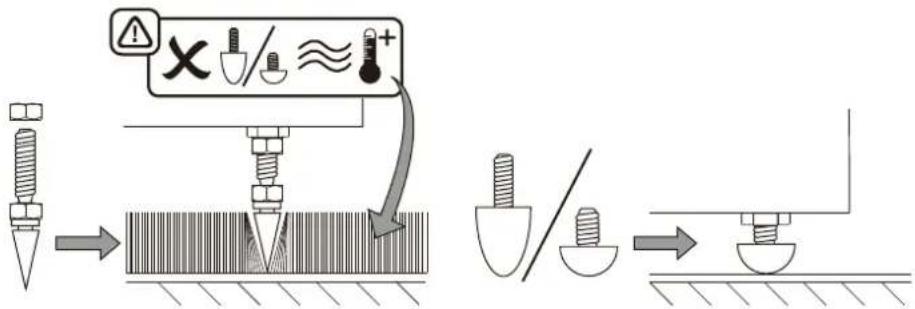
3.3 Subwoofer Foot Options

DB Series subwoofoers must not be without one of the foot options fitted.
DB Series subwoofoers can be fitted with either decoupling, rubber or spike feet. Use of the different foot types is described in the following paragraphs:
- The spike feet are intended for use on carpeted floors. The spikes pierce the carpet and rest on the floor beneath both to protect the carpet from indentation and to provide the subwoofer with a solid foundation.
- The decoupling feet are intended to be used on suspended wooden floors. The rubber material of the foot provides a degree of de-coupling between the floor and subwoofer.
- The rubber feet are intended for use on noncarpeted solid floors where spike feet might cause damage the surface.

to the underside location of subwoofer heat-sink, rubber or coupling feet should not be used on heated floors.
In order for feet to be fitted to the subwoofer it must first be turned upside-down. Take care not to damage the drive units when handling the subwoofer, and ensure when upside-down that the subwoofer rests on a surface that will not damage its finish.
Fit the feet by screwing one into each of the four screw holes in the subwoofer underside. In the case of spike feet, initially screw the lock nuts fully onto the thread before screwing the feet into the subwoofer. The lock nut should then be used to raise the subwoofer above the carpet pile and to enable adjustment to minimise rocking.
Note: It is important to raise the subwoofer above the carpet pile to ensure that cooling air can flow around the subwoofer amplifier heatsink panel.
Diagrams 2a and 2b illustrate the use of each foot type.
Once the feet are fitted, the subwoofer can be turned back on to its feet. Take care not to allow the entire weight of the subwoofer to rest at an angle on one or two feet.

Never slide the subwoofer across the skin on its feet. It must be lifted if it is moved.
If the subwoofer rocks when placed on the floor in its final position on spike feet, or the thickness of carpet means that the spike points do not reach the floor beneath, adjust the foot until the subwoofer is supported firmly without rocking and is well clear of the carpet pile. When adjustment is complete, tighten all the lock nuts against the underside of the subwoofer using a 10mm spanner.
3.4 Subwoofer Grilles
Your DB Series subwoofer is supplied with optional fabric covered grilles. The subwoofer can be used with or without grilles fitted. The grilles are attached magnetically.
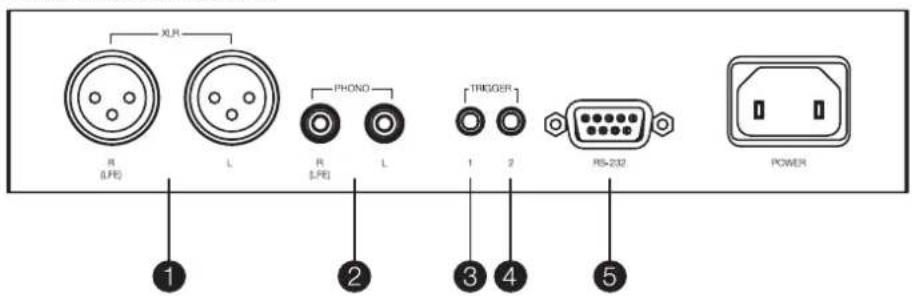
3.5 Connections
DB Series subwoofer requires connection to a mains power supply and an input signal. Connectors for optional 12V trigger and RS232 control are also provided. Diagram 3 illustrates the DB Series subwoofer connection panel.
Mains Power
A variety of different power cables may be packed with your subwoofer. Use the cable appropriate for the mains socket in your territory. The subwoofer will switch on in operational mode, with its front panel standby button indicator illuminated green, as soon as it is connected to mains power. If the subwoofer remains unused for more than 20 minutes it will automatically switch to standby mode with the indicator illuminated red.
Signal Connections
DB Series subwoofoers provide stereo RCA Phono and stereo balanced XLR inputs. It is possible to use the Phono and XLR sockets as independently selectable inputs. This enables your subwoofer to be integrated with two different audio systems: a home theatre system and a conventional stereo system for example. Input selection is managed via the DB Subwoofoers app.
1-XLR inputs
The balanced XLR inputs are intended for use with preamplifiers or audio-visual processors that provide balanced stereo outputs.
Note: Balanced connection, where negative, positive and ground signals are carried on separate wires, is common in professional and some high-end domestic audio equipment. Balanced connection is inherently more resistant to interference and noise than unbalanced connection.
Diagram 2a
Using spike feet
2 - RCA Phono inputs
The unbalanced RCA Phono inputs are intended for use with preamplifiers or audio-visual processors that provide unbalanced balanced stereo outputs.
Note: If your preamplifier or audio-visual processor provides only a mono subwoofer output, it can be connected to just one of the subwoofer input sockets.
Control Connections
In addition to mains and signal input sockets the DB Series subwoofer connection panel carries the following optional control interface sockets:
3-12V Trigger 1:3.5mm jack socket
The Trigger 1 socket enables wired remote control of the subwoofer switch on and standby functions.
4-12V Trigger:3.5mm jack socket
The Trigger 2 socket enables wired remote control of subwoofer input selection.
5-RS-232:9-pin D connector
The RS232 interface enables subwoofoers to be incorporated in remote control home automation systems. Your Bowers & Wilkins retailer will be able to provide more information on RS232 based home automation systems.
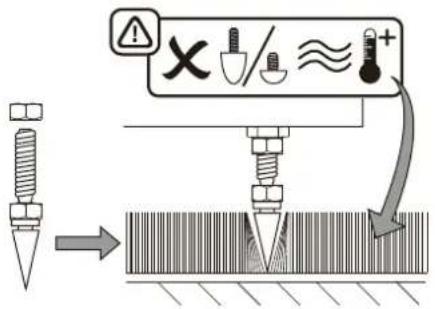
Diagram 2b
Using decoupling and rubber feet
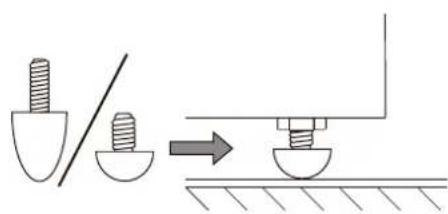
Diagram 3
DB subwoofer connection panel

4. Set Up and Control
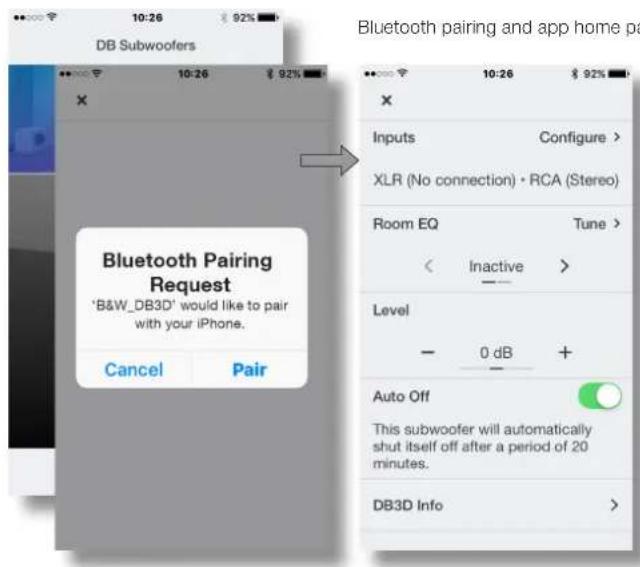
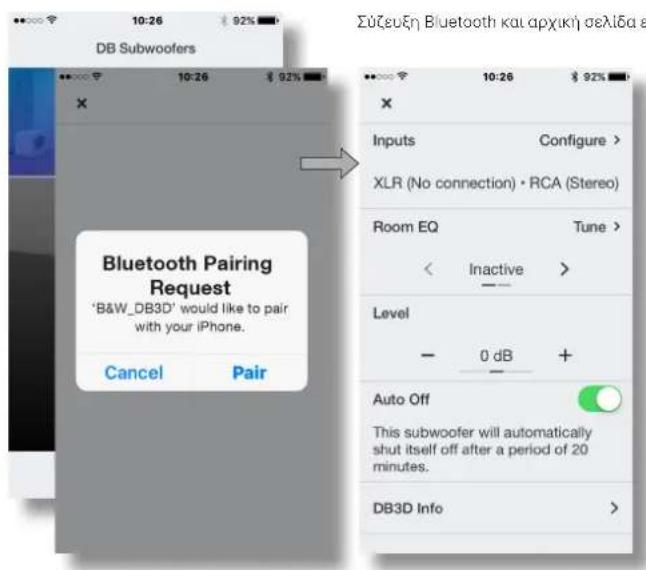
Your DB Series subwoofer can only be set up and controlled using the DB Subwoofer app. If you have not already downloaded and installed the app on your iOS or Android device please do so now. Bluetooth must be enabled on the device in order for it to connect to the subwoofer.
Note: The DB Subwoofoers app requires iOS version 10 and Android version 7 or later. Bluetooth must be switched on in the iOS or Android settings.
When your DB subwoofer is connected to signal cables and mains power it will switch on in operational mode with its front panel standby indicator illuminating green. To begin the set up procedure follow the steps below:
- Launch the DB Subwoofoers app and confirm Bluetooth pairing. When pairing is complete the app will display the app home page.
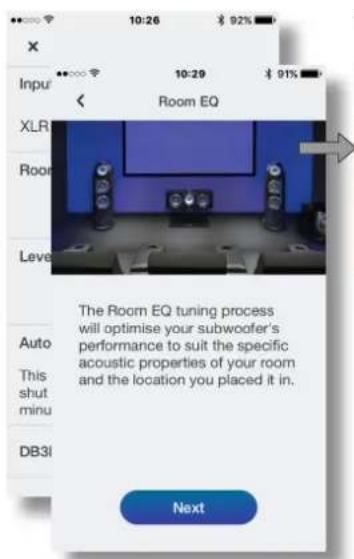
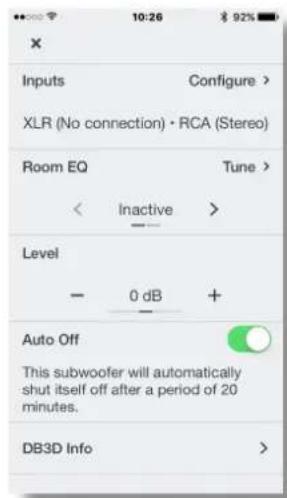
The home page provides subwoofer level adjustment, product information, auto-standby options and access to the Room EQ optimisation procedure. There is no necessity to use Room EQ, however doing so will ensure that your subwoofer performs optimally in your room.
Note: If two subwoofoers are to be set up, the Room EQ procedure must be carried out separately for each one.
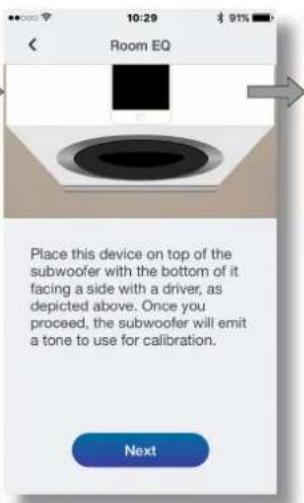
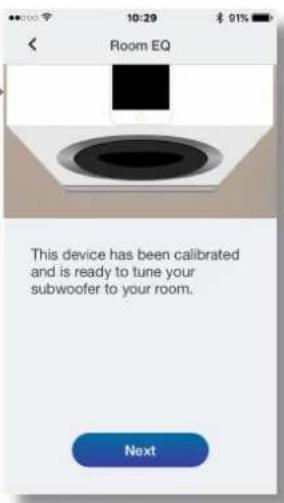
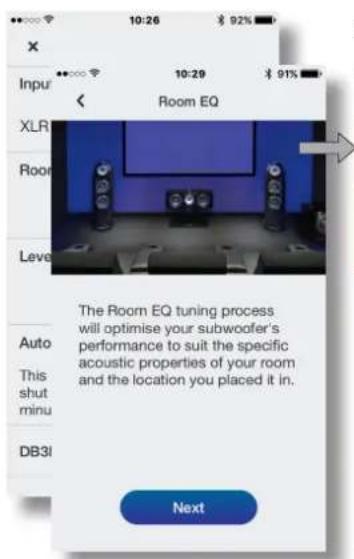
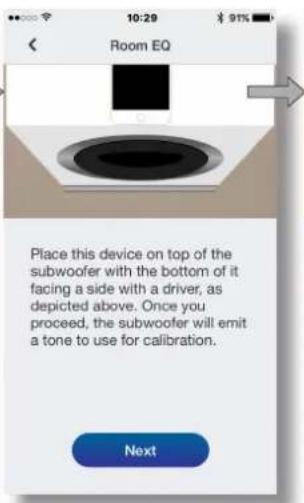
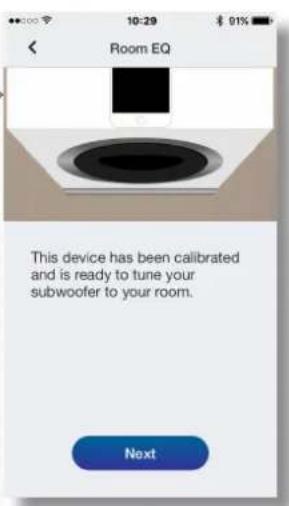
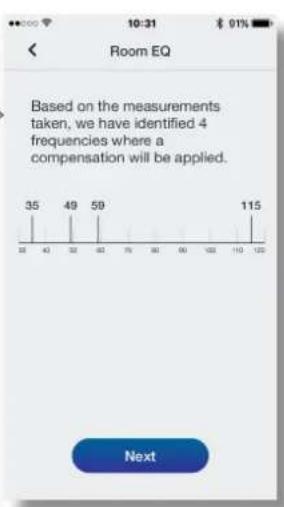
To begin the Room EQ procedure select Tune on home page. Room EQ employs the microphone in your mobile device to analyse the performance of the subwoofer in your room, and the initial requirement is for the mobile device microphone to be calibrated. This is done by placing the mobile device in close proximity to one of the subwoofer drive units while the subwoofer generates a test signal.
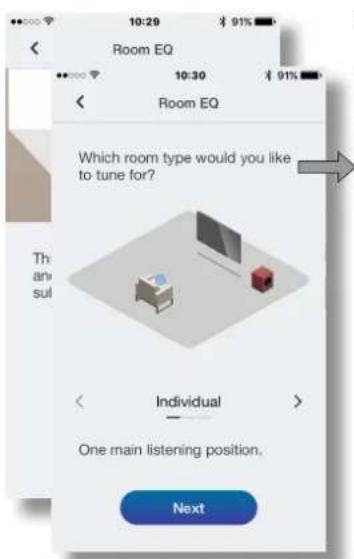
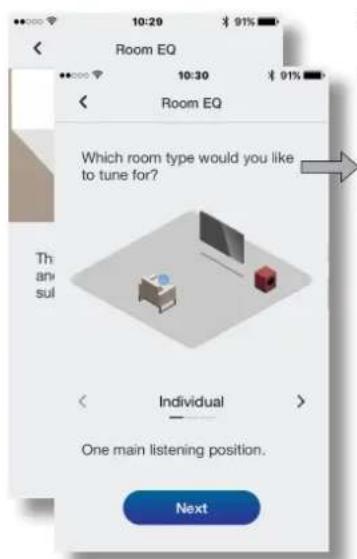
- With the mobile device microphone calibrated, the Room EQ procedure provides options for the subwoofer optimisation to be targeted at a single listening position, a listening area appropriate to two or three listeners, or targeted generally throughout the room. Choose your preferred option and select Next.
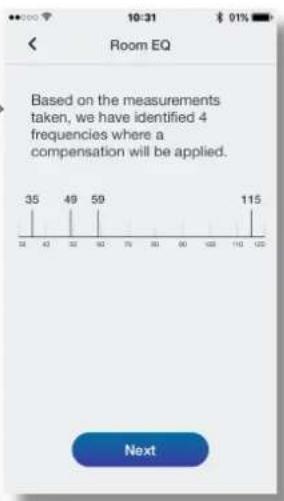
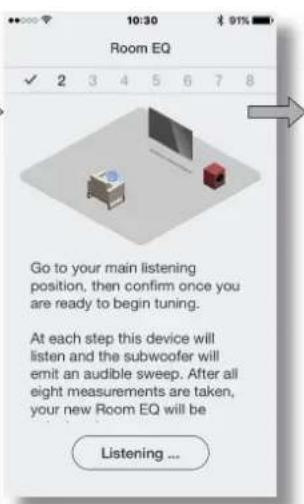
The subwoofer will generate a series of eight separate measurements and use the mobile device microphone to measure the sound in the room and automatically apply an optimal EQ curve. If the Group or Room listening options were selected the app will ask you to move to different positions as the eight measurements are taken.
- When the measurements are complete the results will be displayed. Room EQ will then be complete. On selecting Next the app will return to the home page.
If your DB subwoofer is moved within the listening room or if large items of furniture are introduced, the Room EO procedure should be repeated.
Room EQ: mobile device microphone calibration.
Room EQ: Measurement and analysis.

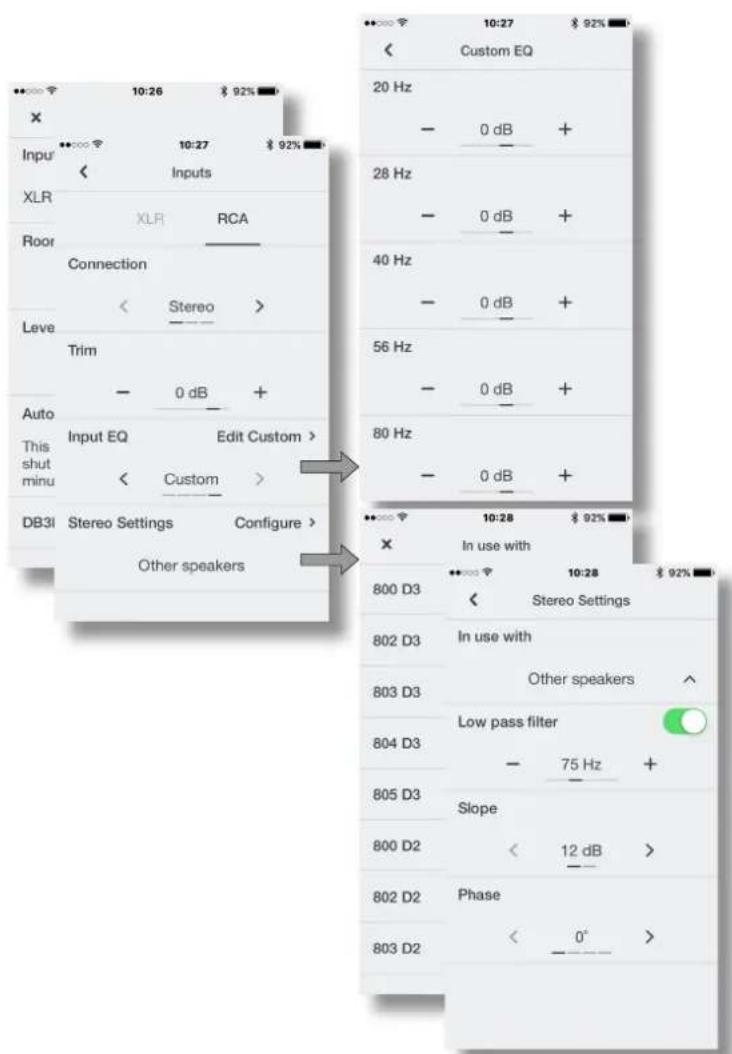
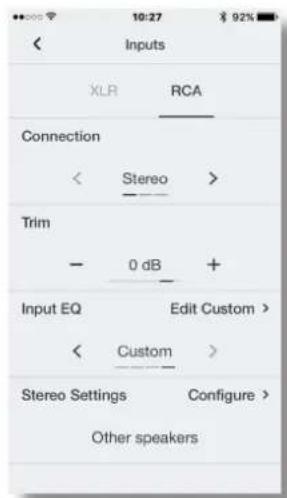
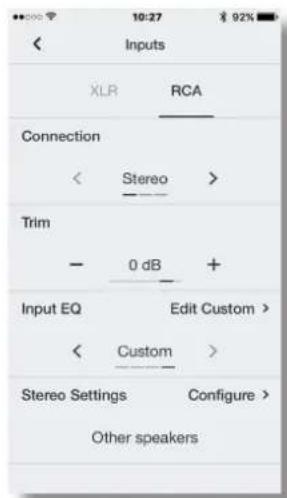
4.2 Input Set up
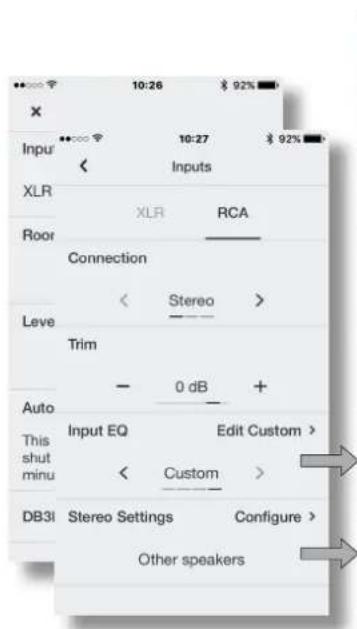
- Selecting the Input option from the app home page will open a configuration page that enables the Phono and XLR inputs to be independently set up. Selecting one of the inputs also makes it active.
Note: The set up options available for the XLR and Phono inputs are the same.
Note: Settings are input specific. Different settings can be selected for each input.
Note: If two subwoofores are used in one system the input settings should be the same for both.
The input set up options are described in the following paragraphs:
- Connection: None, Stereo, LFE. If your subwoofer is to be used for the low frequency effects channel in a home theatre system select LFE. If your subwoofer is to be used for low frequency enhancement of stereo speakers select Stereo. If the input is not connected select None.
- Trim: Input sensitivity. Begin with the input sensitivity set to 0dB. If, in use, the subwoofer level adjustment on the app home page doesn't provide a suitable range the level trim can be adjusted.
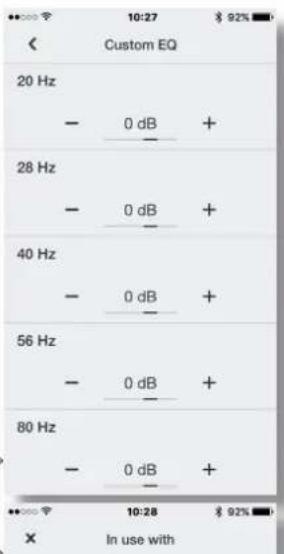
- Input EQ: Flat (no EQ), Music, Movie, Custom. Select Flat to apply no input EQ. Select Music to apply an input EQ character appropriate for music programme. Select Movie to apply an input EQ character appropriate for movie programme. If the Custom input EQ option is selected the app will display a five band EQ page that enables a custom equalisation curve to be applied to the input signal.
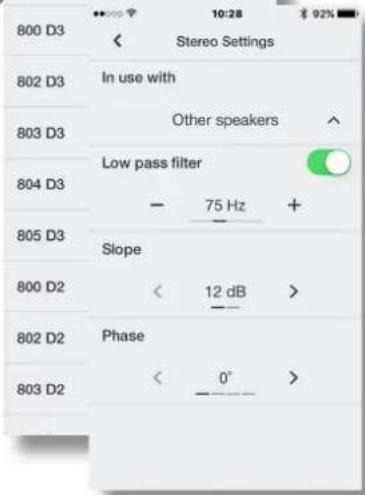
- StereoSettings: Configure. The Stereo Settings option is available only if the Stereo input connection option is selected. In this case, selecting Configure will open a page that enables either the subwoofer's low pass input filter to be set appropriately for specific Bowers & Wilkins main speaker models, or enables a custom low-pass input filter to be specified.
- Use of a custom low pass filter is appropriate when either the main speakers are unlisted Bowers & Wilkins models, or are from an alternative manufacturer. In either case, the low pass filter should be configured to match the main speaker's published low frequency characteristics. Bowers & Wilkins or the alternative speaker manufacturer will be able to assist with the appropriate information if necessary.
Input Options.Custom input EQ.
Stereo Settings: low pass filter selection or configuration.
5. Subwoofoers In Use
Once your subwoofer has been set up it is ready for use. In normal daily use little adjustment should be necessary, however you may wish to adjust the subwoofer volume level, use an alternative input EQ, or select the other input.
To adjust subwoofer volume use the level control on the app home page.
To select an alternative Input EQ select from the input set up page.
To select the alternative input select the alternative tab on the input set up page.
To switch your subwoofer to standby mode press the front panel standby button. The button indicator will illuminate red.
Please remember that your DB Series subwoofer is capable of volume levels that have the potential to cause nuisance. If in any doubt, reduce the volume.
Note: If a DB subwoofer is overloaded its standby indicator will flash red.
The performance of your subwoofer may change subtly during the initial listening period. If it has been stored in a cold environment, the damping compounds and suspension materials of the drive units will take some time to recover their correct mechanical properties. The drive unit suspension will also loosen up during the first hours of use. The time taken for the speaker to achieve its intended performance will vary depending on previous storage conditions and how it is used. As a guide, allow up to a week for the temperature effects to stabilise and 15 hours of average use for the mechanical parts to attain their intended design characteristics.
6. Default Reset
To return your subwoofer to its default settings, press and hold the front panel standby button for 5 seconds. When the default reset is complete the subwoofer will switch off. Press the standby button or launch the app to switch on.
7. Cleaning
Wipe surfaces with a clean lint-free cloth. If you wish to use a cleaning agent, apply it onto the cleaning cloth, not directly onto the subwoofer. Test a small area first, as some cleaning products may damage some of the surfaces. Avoid products that are abrasive, or contain acid, alkali or antibacterial agents.
8. Support
Should you require further help or advice for DB Series subwoofoers please visit the support site here.
Home page
Input set up page
Aaypaμa1b
Toroetnon uoyouep aqa quthma home theatre
3.3 Etuoyc noiw uroyoue

Ta unoyoupeptnc oepac DB dev npenei va xpanoayouovai xuplc va exy totoBteel kartao etioyn toouw.
Ta unoyoepn aead DC DB mappov va tonotetouvt aite me anouovm, ette le tonotetan noiw an Kaoutouk n akidw.H xpon Tsvi diapowu wunnoiv npypdpctat otic akouoepn papaypaooc
Ta nobia akibc npoipovtai yia xonon oe daneda okeaoueva ma xai. O ai kibc npouu to xai kalakoumuov oTo danbeto ankataou To, 000 yia va pootateu To xai an Tn dnupuyia oxoy, 000 Kya va otpeuee To uoyoupep.
Ta nobia aonovwnpnoapiovra yxaonn ce npoeteta Euivna datt6a.To uko an kaoutouk npexei eva bafo anovwnc tou utoyoep ap to To dato.
Ta nia a Kaoutouk npoipovai xa pion ce otepa daneda nou dev kauvtovai anto xai, onote ta nia-akide, mopoel va npokaleouv Cnua stny enipdveia.

TTOOeTnnc Kktpac Tou UooyopeoKtWpeoc,Ta Nobia an Kaoutouok n Ta nobia anouovong secnv npenei va xnpoiotooovvtae bateba kaumuve aan XaI
Ppokéivou va tonoBtnoov ta nobia ato unoyoudep,
Ppemr npwta va to yupiaete avdnoTa. PpooeTva
unpv npokalaeste cna ouovadocbghynong kata
tov xepiaio Tou unoyoudep kai, cvow bival yupiaev
avatdoa, BeBaowtei otu unoyoudep akoumt aetawu
oe ia enphiaviaou dev 0a npokalaeoi Cnua sto
Phiipoujou.
TOnoBTeHrTa nObia BldwovrTa ta KaBeva mea
aeia Ta Tc aoeepn oBbIgauo otKaTu wpeoc
tou anouuopep. Te pinnwnon ou npjpuonoiuvai
nObia-akisec, axika bldwote ta naufuaia aopalaunc
meo oTo amplua npotou bldwete Ta nObia mea 0To
unoyoudep. Tm unvexieia, to naufia opaoianc npetra
va xonuaanonlEi yia va avamknuei to unoyoudep
psiAepea ano terao, Tou yaalou kai va umopoel va
puHoi, oWte va mykouvetai.
Enelwn: Eiva onuavikov a vaaonkwdei to uayoupep nntepa anr to neao tou yaiou, pokoeevou vlaiaoalotet an npoei va pei o aepac yawop anmTv uynooqn kNkTpaou evxun Tou uyoupep.
Ta diayapmuata 2a Ka 2b anekoviciouv m xpon Tou kdo tumouo.
ApoToTOnoTeomOouTaIOa,To unoyoupeMpnpoe vaetavAeBcTmVpOteBn. PooeeTcVa mny akoumuTe OAOkAnPo To apoc TcU OuyoupePun yuvia n eTvAv oEv h duo Modia.

Tneu npotep to unoyoupe oTo Sdnte,
entw a tna niaou. Eav npoket va
muikvthe, kao elva to onkovide.
Edu to uoyoupek couviata otav tonoemn oto
daneto ony taikn tou 0eon ma ta noida-akoe n eev
to npoxy taXaiOe bve tntepetra va koumtnouov
oiakoe oto daneto aot kato,puqutate ta noida
wootou to uoyoupek va unnopticat at terpca xupic
va kouviata ka va npuakoupiia kaoDau o ta naooc tau
xaIou. Apou oAokpanoiein puuaon, ophi te oA ta
taiaia daaiaane endv anb taonuouyepk,
xnpououvua eva KaeiTv 10 mm.
3.4P0AeC uOyoouΦεp
To uoyouoepn cspdc DB diahe Tpoaetke
yaiie kauuuevee ieuaoao. To uoyouoe aiooei va
xpanoiotnoi h xupic yipie tonoetnevec. O
ypiae npoaaptuvai ayvntk.
3.5Uvδεσειc
Ta unoyoupep trc aipdc DB arattov ouvboon o ma npoxy peuatoc dktuao kai o ma mny onpatoc. Napexovtai enion oovcuoi o kavdaiao 12 V ka eayou RS232,Te diaypaum a anekovicta o nivakac ouveeowuyunoyoupep trc opd DC
Tpofoosia dukou
To unoyoupeac mnpel va uovobetat ano diapopa kaiuaia. Xpnaonotote to kaiusio nu evai kataaIyia Tn npaoec diktuoc nepoxnc aac Apou ouvubeei otny npaox nepuatoc, To unoyoupe 0e evepytonogei o leitoupykni kataotaan kai n Evektiuk Lxvy ia avovnc o tov nivaka n pooounc 0a vadoe ipeadovo xmuva.Eav to unoyoupe npaueilev aneveyponu mei nepicaotea ano 20lambda, 0ne npaeoi autuata de aeitoupyia avovnu c kai n evektuuk Lxvy 0a npauelev avapuvm je kokkvo xpduia.
UvEaeic mmuatoc
Ta unoyouppe Tc oepaDCBdeltaouv atepoovuk iiooRCA Phono Kai otepooovki EIOO XLRmu eiaooopm. Exete nduvatotntva xpanauoitie tuc uiooxe;Phono kALXRL wicioouc me duvatotnta aveaptnncnIoayoc.Fei ta uoyoupeopac mopti va evuaatwbeae duiaipopetika npouotjata: yia npadoeyva evuouma home theatre ka eva ouBAtiko otepeoovko auotnja.H diaxipion tnc enoiyic 106owiyivetalpeowtnc aepoynic DB Subwooers.
1-Eiio8oXLR
Oi eiooXLR me EIOOPOMn npocipovtai yxphom me npoeoxuyute n tEEepeyote cOTKooakouotkou OIaOC, Nau dAeouv aTepeoawvke eEobouc me EIOOPOMn.
Enjueiwn: Ouvdeaeic me eiaopponn eniva ouynie cTov etayveaataKai Tov oikakoeonuouvnuNc noiomtac otic nepirtwocn oavtnko, to beiko ngka to onja trveolnc meafeepovrta ano exwpiaata kawdbia. H ouvdeae me eiaopponn eniva eyevucnpopoepoepoepoepoepoepoepoepoepoepoepoepoepoepoepoepoepoepoepoepoepoepoepoepoepoepoepoepoepoepoepoepoepoepoepoepoepoepoepoepoepoepoepoepoepoepoepoepoepoepoep0eip
△aypua2a
Xpion no8aw-akiaw
2 - Eloobc RCA Phono
OiooRCA Phono xupic EIooppOtnn Tpoopcovta yia xipn Jne pTnovioyute n tteEepyaoTe COTIKIOAKOU OAnuoc, Tou diaOeTuO Notepeoawke cEodoux uipic EoioppOtnn
Enueiwn: Eav npoeivxuicn oan n eepyaottn ONTIKAKOAVOTIKOU anatoc nov diadetete diadetie Edo mvo ia mavoDPwVKo unayoupep,muopei va uovdeoi moe pia aTIC urodoxc eioodou unoyoupep.
Uvdoic 4you
Etoa nio udooc bdou tropooboaiaac kai
nuao, o nivaac ouwdeowu wu uyooep TIO
eipae DB diabetet emiag ic kdoovc e u dooxoeg
npoadetkdiemaphc Ekyoo
3-12V Trigger 1:Ynboxj yia opa3,5mm
H uioooy Trigger 1 dive n suvarottna evoupatou nAeipouou tou biaokn tou unoyoudep, otic kataotdooei Ateuoydai avovipoi.
4-12V Trigger 2:Ytofoxniya oua3,5mm
Hunooyn Trigger 2 dive mduvatoteta evupaatou nExepiaou mc enooyic oooou tou nooyopep.
5-RS-232:BoumaD9akδwv
H Suaapn RS232 sivtn duatnta evaupatwnc twuoyoupe o taoka ouotjata autoatao u pe Taeeipio. To katoanjia Aaiwncu npAnong Bowers & Wilkins mape va aac duii nepoote pAnpopiec oxekka me ta ouotjata oikakou autoataoou Tou baoovat rs232.
Adypqua 3
Iyakac ouv6eewu npoyoep DB
4.PoOmuon kal eEyxoc
Ta unoyoupe npiepac DB mnpov va puouotov kai va eayxouv moe tn xpno nTc epapouyocnDB Subwooers.Eav ev exet enk kaviynkayekataoan tnc epapouyocn OTuokueonac me aeitoupyko ouotmaios Android, kaveteto. Ipokeevouva uovsebi noukeun oTo unoyoupe npentv evai evpyonuveo to Bluetooth.
JnneiwiH eapuoy DB Subwooers xpedctai
Aetoupyk oovua iOS ekocc 10 kai Android
ekoo5 n metayevotepo.2t pueoiic tou IOS
Tou Android npertv aivai evpyoioevo to Bluetooth.
Oav to unoyoupep DB Toun diaetere duvegel ae Kauiobia ouatoc kai any npaox npodooiaac
diktu, 8a everyonotel 8e katataan 9e toupylaq,
teynvduekun Auyvia auayovn Oto nivkata nnpaaucnva avabE i npaivo xpuia. Fia va apxiaet
Tt daikkaia puuog, aokouyote ta napakTu
Buuga:
Eevnote nV epapayn DB Subwoers ka emiepaiwote n oukeun Bluetooth. Apo ookanpae n ouceun n epapoyn 0e npavciy npayk eAeAa Tc epapoync.
- 21nv apxik caleiba npexetai nduvatoTn pueuicnnc
tno atounpocountuoyoupep,anpoepocie oxetika
me to npoiov, anpoepocipc oxetika me tv autopatn
eveyponiaynaneavpuovne knpoaeonn
diabukaa belaiootoinoneq EQ xupou. Eevxiecta
vaqnuaonoeinlaouypaEQ xupou, wtooo
etra Bda aiaopaiotei tnuoyoupeacBxaen
btaiontofoobao mceotxwooc
4.1 Eeooopomn xwpou
Enueiwn:EvapoketraVa puouiaTeD duo ouuoyep, n diabkaia EQxupou npereva ktealeitaevipia ta va kaBvA.
Tua va apxioete Ta dbikaia EQ xipou, euiieTe Tune (Euvovuoc) otnayxipki OeAHa. H Aetupuyia EQXwou afoiou to kipofovo tnc pointsc oac oukeuny ia va avauoyn tv anooan Tou Uto uovapoe oovapoo, oioe apxkn npouoBean elvain bboovoun Tou kipoovnuon tnc pointnc oukeunc. Autovivetae Tu NTOgON TNC pointc ouakeunk Kovta oe ia anic movdec obinyonc Tou utoyoupe, evowu to utoyoupe denuoyev eva ona boknuc.
Aoo Baovouoie To kpoovn Tc poinoc oukeun, n diakkaio EA X wou npexi enuoye yia m stoxo0eaia n tbeaiotoinon Tou oyooupe e Kantoiaemuovvveen thek akoaoene, eva xpo akpoaoic katalna yia duo h peic kopoatec nevka de 6oav toxwpo. EuaTe Tnpoipoeynnayn kai otuvexei enuEte Next (Emuvo).
To Utooyouppe Oa 8nouipuyoeia oepia aotoxu Exwpiotee eptneie kai xpnnoiouto to mikoDpovo Tc poinnc uockey iua t nponou TouxovtovxpoKaTIV autouatnpdpayoh nte batiottnc kauvtwnc EApEivnExooov on Etoxyec akpoao Group (Opa) h Room (Xupoc) n epapoyoAo aacntnovaetakvOnTeOE diaopopetikeo cbeic, kaow Laabavovraoi oxu TpePheae.
AogOaokAnpOoUoUeTpeOe,BoEpaVIOuOy Ta anoteAeOgata. 1n ouvexia, Bo eXaioknpWBei n EQxupou.Me Tnv etiooyou kouqayou Next (Etioievo), ne epaooyi Te tntopoei otiv npxik oAldia.
Ev to uoyou@p DB metakvntel meo stov xpc akpaocn hcv totoeonuoyu yuea,na 8ia6kaia EQ xupu Ta nepi va vtaAolqE.
EQxapou:baBovomui kipooovou opntic oukeurc.
EQxupou:Metpnonkai avaxuon.
4.2 P00muon 1608ou
Me nIe IIOAoy Input (Eioooc) any aayn eOlaia troepaoyng Ba aoieE noia oiaou pueuonnpapaeTow, vno otioa uopoe va yivel exwpoutp ouun Tuv iooov Phono kXL R Hmouyn pao ano tiooouc enion ng neevpyoaiol.
Znueiuyu:O emooye ooiou nov iiva siobieyue yia ci ooiou XL R Ka Phono ivai oisic.
ZnEiuyo; O puiueic elvai eikec yia tvy iioo.o. Ia tvkde iaoo mnpov va eneoyiv diaopoeitke cuiuieae.
Eniuiy: Eav xanmaiaovvai dvo unayouepae eva ovojna, opuuieic iiooou npenei vivaloi idic kai yai ta do.
Oi enaioyespu8muongn 6068w npypapoviaot aokouo8e npaypapouc;
Connection (Sivdsan): None (Kajia), Stereo, LFE. Eae To tvouyouep aacipkeiatva xpanmuotoine iya To kavau ephi xunlnc ouvvtntac evoc ouotjatcno home theatre, emuEeLFE.EAE To tvouyouep aac uptoei va xpanmuotoine iya t n BeAtwnxumlc ouvvtntac opeodawikw nyxiwv, emuEse Stereo. Eaeyn elaooc devivai ouvdeMeyn, emuEeEne None (Kajia).
Trim(Poepnnpoepoync:EvaoaetaTc n6oo Apxotemu npuonnc Eauaenioac 6ooaa0dEdu, kato xpnno, npuupian Tc 6ooancou uovouoeopntv apxueaeiaTc 6ooaney6ev anodk katoAAnAoEpuoc, npuupion Tc 6ooancpooannpoapoyncmupevi va puoaiotel.
Input EQ (EQ iiooou); Flat (no EQ) [Ou@eTcnn (xupic EQ)], Music (Moukoik), Movie (Taivia), Custom (Ipoopaoqouevn), EmLeTe Flat (Ou@eTcn), yua va mnu epapaoatei kaBoiou EQ iiooou, EtnaEte Music (Moukoik) ia epapayy jxapakthpa EQ iiooou, katoAAnou yia to oukai npoypaa. EnuEte Movie (Taivia) ia eapayoyh xapakthpa EQ iiooou, katoAAnou yia to kivnpatopypia npoypaa. Ev eniayexei n tniayn EQ iiooou Custom (Ipoopaoqouevn), n eapayoyh ta eupaviia ma oAlda EQ me nveve cueve, no aoc divei tr duvatotnta va eapoyote sto onjia iiooou mia npocpaoqovn kajunl Edoopopomng.
Stereo Settings (Tepeoovkocpuoiic)
Tiaopopwn. Htuaoyi) Stereo Settings
(Tepeoovkvcpouoiic) elva dia0aunnovaev
Exe annayey n enuoy ioooOoStere. Ecvexyivaleuto,pe tnyentaoy rou toxieou Configure
(Puonnpn aeptpw) 0a avoljia na oaiia np ta oai
Sivei tduatnla etie va puoiueka kdaanla to
Aippoiaoofoxaunf ciaeaounc Tou onooupep
yauyekquvauovtea kupw nyelw Bowers
&Wilkins nac sivntuvatrtna Katoepioou
Aipropauoaoofoxaunf
Hxynn evnc npaaapauouov fipatou boudou xunhnc dieaeuong elai katalan nite oray ta kappa nyela elva ovo tca Bowers & Wilkins nou deu maovtai ata site oray tan yeta elvatiptou katakeuaot. Te dae npittwn, to fipato xunhnc dyaeuong npetra va daopowetne pokoeiou v aviatoxel ata dnawiva xapakntpiota kaxunhnc ouyvtantacou kupoiu nyetou.H Bowers & Wilkins n o kataakeuaontou evaalakctkou nyetou 0eextnduvatotna va bononoei me tic kalalnec nnpoepocie, av elviat aaptapaitto.
Emoyc siooou Pooaaopaoevn EQ siodou.
TepeoovkcepuOuiic;eUIOy
n diaopofwnfAipouxamnHc
Baeuovn
5. Ta unroyouΦeρ Ε έxρησ
Aoi ooknpiuoi npuoan tou, to unayouepoc aelv atou yx npoh. Kata tvkavovk kanebpov xpan 0xpeiaetl eaxon puoi, wtoao evexeta va Bteiote vpuBlaote tvvtaon Tou hou Tou unoyuepoe, v xnpaonipate evaalaktik EQ xpwou ny taieaepe ty dann eldo
Tnva pubiaeTe Tnv evtaou ty ouuouyep, xonpaonotote To xepioaio evtaocou utapxue. onv apxik caiia TcE apapoyic.
Tva vmaalete ma evaalakukit eiooEO, emaEe arto n oalda poumuon 1008ou.
Tia va emalaeetny evaalakntk sioo,emaleteyn evaalakntk kaptela otn ola pOuO
Tia va puOuioTe To UTOOyOoep Oa ot AneIOUpyia avouovn, naiote to koumt avouovic oot IVvaka Tnpoounc. H evekukxauVla oTo koumt 0a avapel uKKKVOXpua.
Na 0uOaTe 6T to uoyoupe Tc oelpc DB exet n
duvatoTtva aotolbei otBuec evtanctn xou Tou
unopov v evoxAonov. Eav exete qufBoiae, eiwot
tvv evtan tou xou.
Jnneiwn:Evvaunoyovdp DB unepphiotw0e, n evdeukri kluviuov 8a avaiaoaive pekkivoo
H ano0oan Tou uoyouep aac evbexetai va alaae 1aapkata Tn diakkaia nac apxiknc npio6ou akpaoanv. Av exa otoenkeut oe xupxo nepiabauov, ouuocce aonoean twy kpaadqauay ta uai avaptnanc twu vovadwov obnyancc Ta xpeaotuv Ayo xpovo yia va avokthouw tig oawtec xnuavke Tou, idtonctc. To eaptnna avaptnnc nuc vovadoc obnyanco xa aapuaee enionc kata tm diakkneau tvu ptpauw apowxphoc. O xpvocou xpeiaetai to xieia va va entuyxnv tn ano0oan yia tvn onoi npopicetai 0a kaiaea, avaoya me tc auovhnc enou ixte atnoekutipanyouevw kai tvpotoxphone.tou. Qe kavava, va aphiyvet va napelae ec ma 850aaba ya va ataoepoantouov ai embpdsnc 36epkpapaoa kai 15 wpcxpyang kata meo opnpokeevou ta unxavkaedm va atoknmoov ta yapakntpiutuk axegbiemoue Tn
6. Enyafoo oio noosuayvsc ouuusc
Tia va emavaepete to unoyoupeac otic Tpoeraayevecpuuieae, natahe npatetaaeva To kouni avauovnc stovivakane pooovnc, 56eepemA. Aao oakpuehne h enavapopa ot poeuaeyee ouBuaic, to unoyoupe B aatevepyoanBn. Nathote to kouni avauovnc n SKVHTOE TY epquoyv, y ia va eeypvnoetae.
7. Kaθαριαμος
Kaouniote Tc enphiaveic me eva kaqpo nvi nou dev apyivyeoue. Eav Beleve va xonjoutonoe kato Kaqaoitokv, uypavete me auto navi kaqapoukai npu to anlaotie aneubiacnava oto unoyouep. Anipota oe jia jukpr npoxrKauc opoiuep npovakabapqiuoyevta Vadpauopoupueve erpaivec.Anepuyetye Taiauviknpovta na npovotnu npovotnu npovotnu npovotnu npovotnu npovotnu npovotnu npovotnu npovotnu npovotnu npovotnu npovotnu npovotnu npovotnu npovotnu npovotnu npovotnu npovotnu npovotnu npovotnu npovotnu npovotnu npovotnu npovotnu npovotnu npovotvu npovotnu npovotnu npovotnu npovotnu npovotnu npovotnu npovotnu npovotnu npovotnu npovotnu npovotnu npovotnu npovotnu npovotnu npovotnu npovotnu npovotnu npovotnu npovotnu npovotnu npovotnu npovotnu npovotnu npovotnu npovot\n
8.YnootpiE
Exxpeiaate npaoep Bonoei anouBouae iaTuoyouep Tcnpac DB,emokoeetmy tortoepiaotnepc
Apxikn oAla

ελiδαρθμσηειδδου