
WL 36 AHA - Wine cellar HOTPOINT - Free user manual and instructions
Find the device manual for free WL 36 AHA HOTPOINT in PDF.
| Product type | Wine cellar |
| Brand | Hotpoint |
| Model | WL 36 AHA |
| Standard storage capacity | 36 bottles (Bordeaux type) |
| Maximum capacity | 46 bottles |
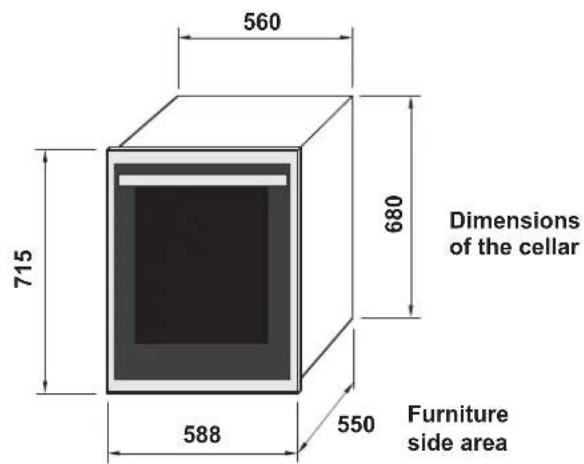
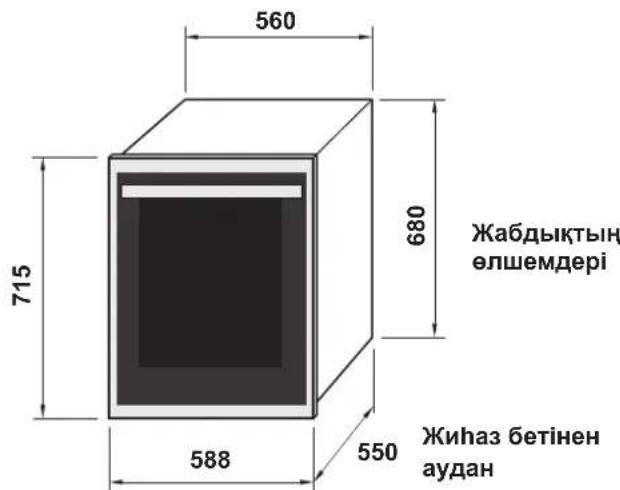
| Dimensions (W x H x D) | 56 x 68 x 55 cm |
| Net weight | 76 kg |
| Power supply | 220-240 V, 50 Hz |
| Electrical power | 65 W |
| Energy consumption | 0.39 kWh/24h |
| Rated current | 0.3 A |
| Number of temperature zones | 1 |
| Preset storage temperature | 15 °C |
| Lighting type | 3 W bulb |
| Shelf material | Wood |
| Number of shelves | 5 (plus bottom) |
| Main functions | Manual temperature adjustment, interior lighting, optimized storage |
| Safety | Mandatory grounding, do not obstruct ventilation |
| Maintenance and cleaning | Unplug before cleaning; use a soft cloth |
| Repairability | Original spare parts, authorized technical assistance |
| Standards | Complies with EC directives (73/23/EEC, 89/336/EEC, 2002/96/EC) |
Frequently Asked Questions - WL 36 AHA HOTPOINT
User questions about WL 36 AHA HOTPOINT
0 question about this device. Answer the ones you know or ask your own.
Ask a new question about this device
Download the instructions for your Wine cellar in PDF format for free! Find your manual WL 36 AHA - HOTPOINT and take your electronic device back in hand. On this page are published all the documents necessary for the use of your device. WL 36 AHA by HOTPOINT.
USER MANUAL WL 36 AHA HOTPOINT
Location and power connection
Technical information
Product Description, 14
Interior Parts
Control Panel
Using the Wine Cellar 15-16
Bottle ageing compartment
Manual temperature control
Taking out the wooden shelves
Table of ideal wine temperatures
Stocking the wine bottles, 17-18
How to stock the bottles
Maintenance and troubleshooting, 19
Care and Maintenance
Troubleshooting
Assistance, 20
EN
Notices
! Remember to keep this booklet so you can refer to it at any time. In case of sale, transfer or should you move, remember to keep it together with the device.
! Read the instructions carefully: there is important information about installation, use and safety.
! To prevent danger stemming from instability of the device, you must fasten it in place, following the assembly instructions strictly.
! Whenever moving or transporting the device, keep it in a vertical position.
! The beverage centre must not be used by children or invalids, without supervision by an adult or a tutor, in order to prevent the cellar from being used improperly.
! Children may use the beverage centre only if supervised by an adult, in order to prevent them from playing with the cellar.
! After installing the device, the power cable and socket must be easy to reach.
! Keep the ventilation openings on the casing of the device free.
! Do not use mechanical devices, or any means not suggested by the manufacturer, to speed up defrosting.
! Do not damage the coolant circuit.
! Contact the after sales service to replace the neon.
! The cable must not be bent or crushed.
! The cable must be checked on a routine basis and replaced only by authorised technicians.
! The power supply cable is of a Y type. Contact the after sales service to replace it.
! Do not use electrical equipment inside the food compartments, unless they are of a kind suggested by the manufacturer.
! The Manufacturer shall not be liable if any of the above rules are not complied with.
| DATA SHEET | |
| Model | WL 36 A/HA |
| Temperatures | 1 Zone |
| Dimensions | width cm 56 length cm 68 depth cm 55 |
| Weight** Weight | 76 Kg 97 Kg |
| Power | 65 W |
| Current | 0,3 A |
| Lamp | 3 W |
| Consumption | 0,39 kWh / 24h |
| Voltage* | 220-240 V |
| Frequency Hz* | 50 |
| * These values may change in different countries. In order to find the specific features of your device, check the product features plate. ** When the device is empty. | |
This appliance is intended to be used exclusively for the storage of wine.
Positioning and connection
Unpacking
1 Unpack the device immediately and make sure it has not been damaged during transport. Should it be damaged, do not connect, and get in touch with the Dealer.
2 Carefully remove the protections and the adhesives, open the door and make sure all the components are present.
3 Take out the power supply cable.
Positioning
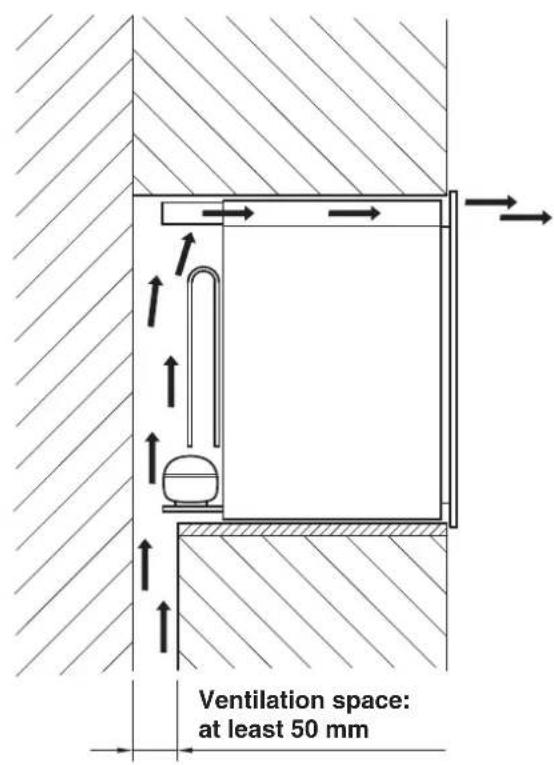
1 Position the device in a well ventilated area, not damp and free (avoid cabinets with closed walls).
2 Keep the device away from heat sources.
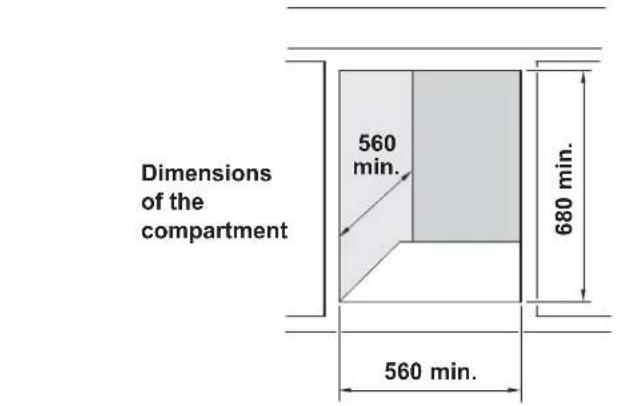
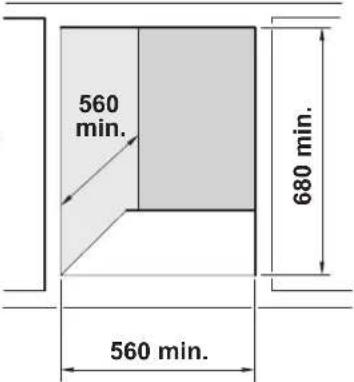
3 Make sure the minimum distances between the device and the walls of the room where it is placed are kept, in order to ensure perfect ventilation of the device.
See figure.
Wiring connection
After transport, stand the device vertically, and wait for at least 3 hours before connecting it to the wiring system. Before putting the plug into the power socket, make sure that:
the socket is earthed and according to legal regulations;
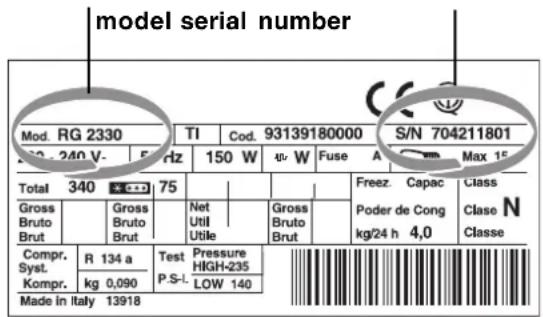
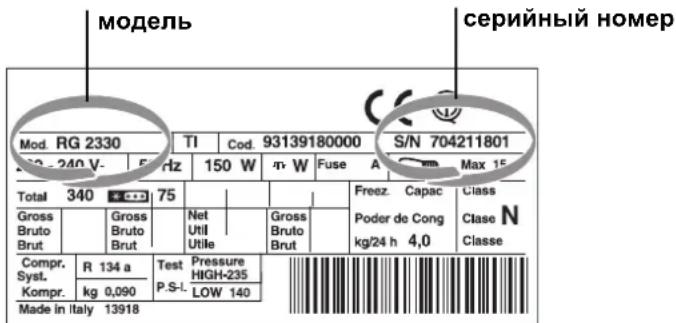
the socket is able to hold up to the maximum power load of the machine, indicated on the Data Sheet table or on the feature plate to the bottom right (see Description of the device);
the power supply voltage falls within the range indicated on the Data Sheet table or on the feature plate to the bottom right (see Description of the device);
the power socket is compatible with the plug of the device. Otherwise, replace the socket or the plug; do not use extensions or multiple sockets.
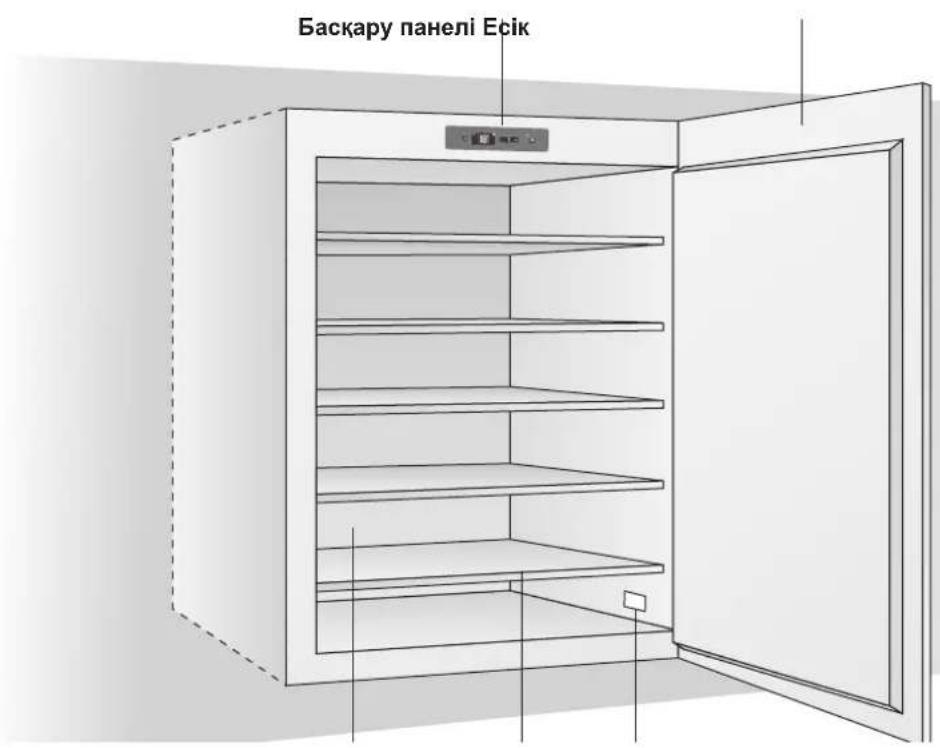
Product Description

Interior Parts
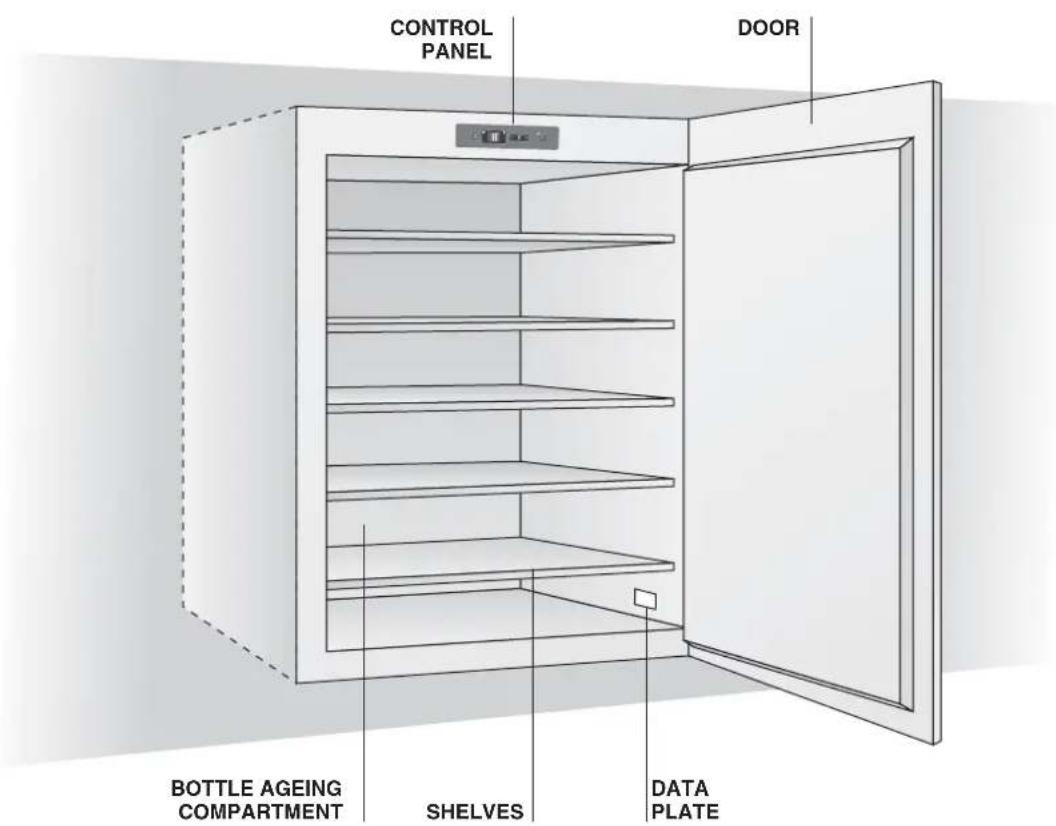
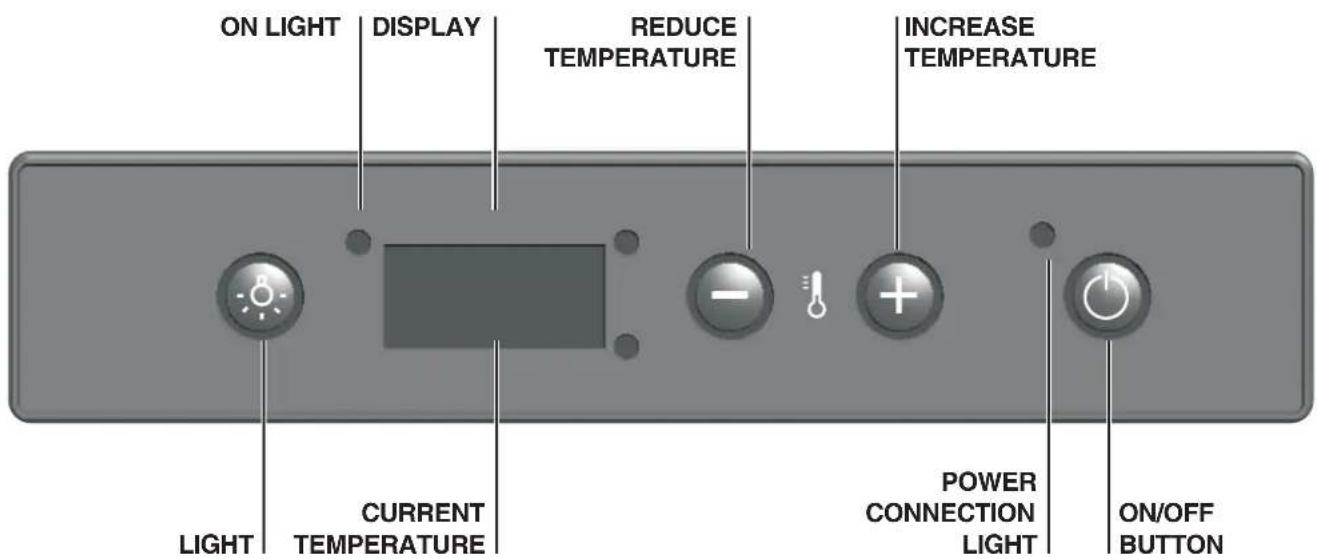
Control Panel
Bottle ageing compartment
The ageing compartment's main function is that of guaranteeing that your wines are preserved in optimal conditions.
The temperature has been set in the factory at a temperature held to be excellent in most cases and is 15^ in the upper compartment.
Wine has a complex nature and it derives from a long and slow process. In order to best express its attributes, very specific conditions are necessary. All wines are preserved at the same temperature, but, depending on their different characteristics, wines are served and tasted at very different temperatures (see the Table of ideal wine temperatures).
Therefore, just as for manufacturers' wine cellars, for your new appliance, the absolute temperature value is not important for preserving your wine. Rather, the constant temperature through time is important. Wine preservation is ideal at any temperature, as long as that temperature does not vary.
Manual temperature control
When you plug in your wine cellar, the display shows the temperature inside the cellar: it has been set to reach 15^ and become steady on it. Should you need to adjust it, follow the instructions below:
- When you plug in your wine cellar, the display shows the temperature that has been set
- Press the button for one second (see the Control Panel). The temperature will begin to blink.
- Press the + or - buttons until you reach the desired temperature.
- Wait 5 seconds for the temperature to stop blinking.
- Wait until the wine cellar reaches its temperature before you place the wine bottles inside.
The inside light does not go on (or it goes off temporarily) when the inside temperature goes over 24^ . This allows you to reach the pre-set temperature more quickly.

Table of ideal wine temperatures
This table indicates the approximate temperatures at which wine should be served. Should one of your wines need to be served at a temperature that is greater than the temperature inside your wine cellar, we suggest that you leave it wine out for the time that is necessary before you serve it.
| Amarone | 17°C |
| Barbaresco | 17°C |
| Barolo | 17°C |
| Beaujolais | 13°C |
| White liquered Bordeaux | 6°C |
| Dry White Bordeaux | 8°C |
| Red Bordeaux | 17°C |
| White Bourgogne | 11°C |
| Red Bourgogne | 18°C |
| Brunello | 17°C |
| Champagne | 6°C |
| Chianti Classico | 16°C |
| Languedoc-Roussillon | 13°C |
| Passito di Pantelleria | 6°C |
| Rosé Provence | 12°C |
| Dry and Sweet Sparkling Wines | |
| Verdicchio di Matelica e dei Castelli di Jesi | 8°C |
| White wines from Trentino Alto Adige | 11°C |
| Franciacorta White Wines | 11°C |
| Dry aromatic white wines | 10°C |
| Dry, young, and fruity white wines | 8°C |
| White wines from Friuli Venezia Giulia | 11°C |
| Rodano wines | 15°C |
| Dry white wines from the Loire | 10°C |
| Liquered wines from the Loire | 7°C |
| Red wines from the Loire | 14°C |
| Liquered Passito wines | 8-18°C |
| Rosè Wines, New Wines | 12°C |
| Light red wines with mild tannic | 14°C |
| Red, rather tannic wines with medium structure | 16°C |
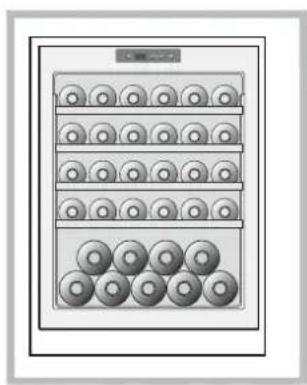
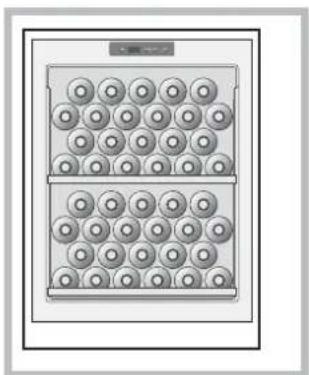
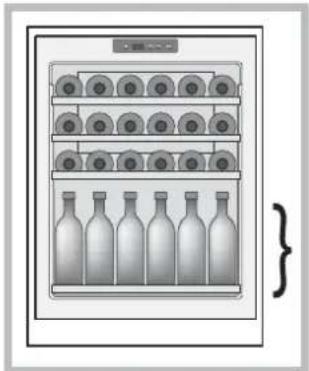
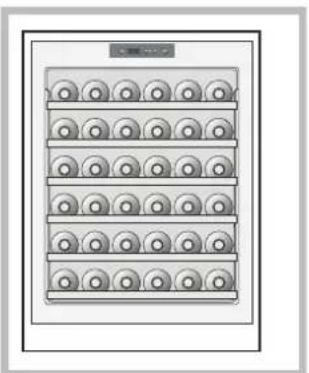
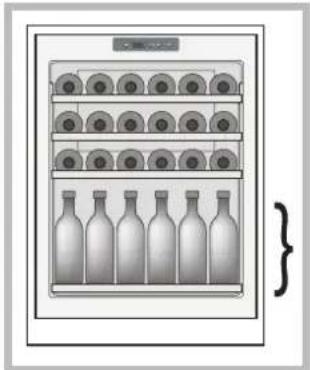
Standard 36-bottle stock
The 36-bottle stock (for standard, mixed, and renana bottles) is recommended for wines that need to be visible and easily removed.
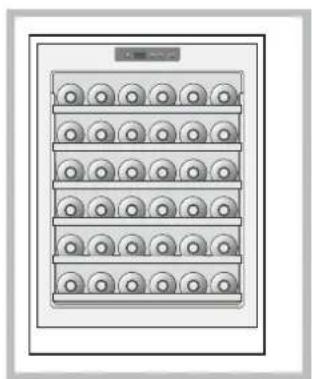
STANDARD
36 Bottles
(100% lying down)
5 shelves
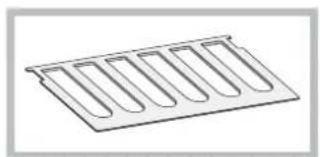
Position each bottle into the slots on the 5 wooden shelves. 6 bottles can be placed on the bottom of the wine cellar.
! The wooden shelves have a special blocking system so that your bottles do not accidentally fall and break.
We suggest you place the Renana bottles onto the lower shelf and the bottom of the wine cellar because they have been specially designed to hold larger bottles.
! The wooden shelf can safely hold up to 22 bottles.
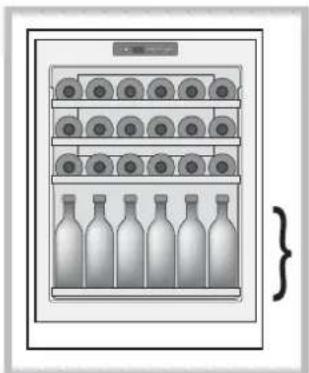
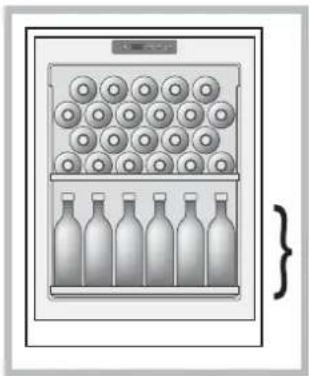
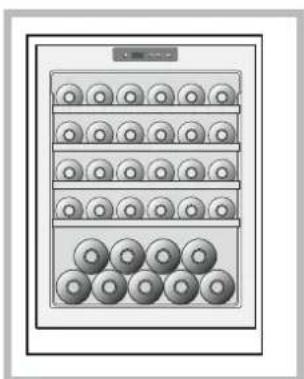
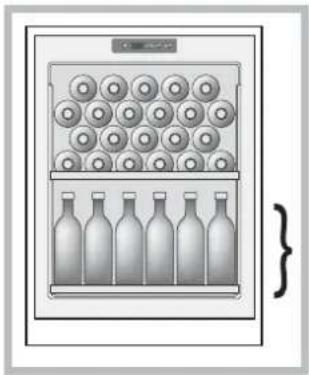
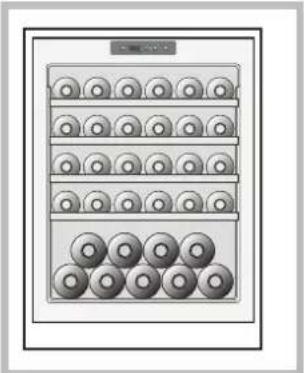
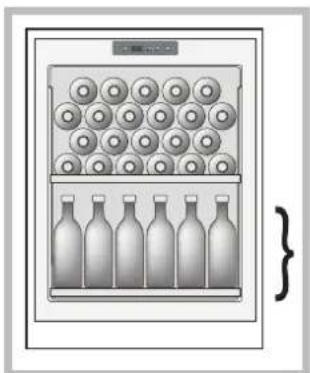
Champagne bottle stock
Champagne bottles are larger than standard bottles. They must be placed onto the base of the wine cellar, which can hold up to 5.
If you want to stock more than 5 Champagne bottles in your wine cellar, remove the 5th shelf and stock the bottles in two rows (placing the bottles in the second row between those on the bottom row). This will hold up to 9 bottles.
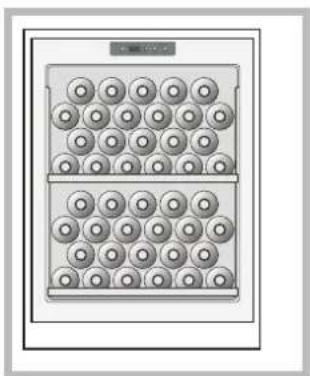
Some stocking configurations
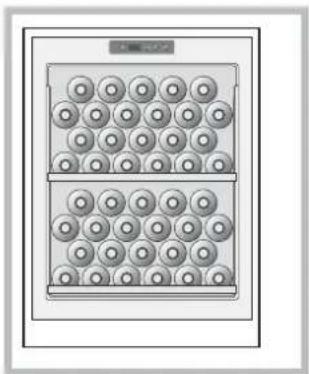
PRESERVATION 44 Bottles (100% lying down) 1 shelf
SERVICE 42 Bottles (50% lying down, 50% standing) 3 shelves
4 rows
MAXIMUM STOCK 46 Bottles (48% lying down, 52% standing) 1 shelf
4 rows

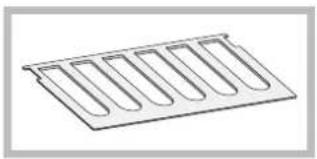
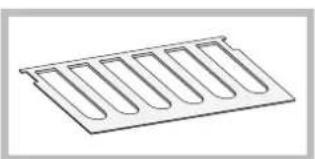
Removing the wooden shelves
Follow the instructions below to remove the wooden shelves:
- Hold the front part of the shelf with one hand.
- Slowly remove the shelf by pulling it toward you. Pull out the shelf by 1/3 of the way if you need to remove or replace bottles.
- Remove or replace the bottles you need and push the shelf back, making sure it locks into place.
- Make sure the shelf is in place by trying to pull it out once again. If it moves, push it back in again until it is securely in place.
To completely remove the shelf, follow step 1 and 2 and remove all bottles that on the shelf. Slowly pull the shelf toward you until you remove it from its slots.
! Do not, under any circumstances, remove more than one shelf at a time.
For a small number of bottles
If you do not need to store enough bottles to fill the entire wine cellar, we suggest that you divide them up between the available shelves and that you do not place them all on top or on the bottom.
Place the bottles in the centre of the shelves to see them better from the outside.
Care and maintenance
Disconnecting the wine cellar
During cleaning and maintenance, it is imperative that you unplug the wine cellar
Troubleshooting
If you notice that your wine cellar is not working properly, check with the following list before you call your Service Centre.
Problem
The compressor does not work
Possible causes/solutions
The plug is not plugged into the wall-outlet or not enough to make contact. Or, there could be a power failure in your home.
- The wall-outlet is not in working order. Plug the wine cellar into another wall-outlet to check.
The compressor never stops
- Contact the Service Centre
! Any work that is done to the wine cellar should be performed by your authorized local Service Centre.
! Short term faults, such as power failure, will not compromise the wines. It is only when working faults are left unsettled for a long time that the wine may suffer.
The appliance was designed and manufactured in compliance with international safety standards. The following warnings are provided for safety reasons and must be read carefully.
This appliance complies with the following Community Directives:

- 73/23/EEC of 19/02/73 (Low Voltage) and subsequent amendments;
- 89/336/EEC of 03.05.89 (Electromagnetic Compatibility) and subsequent amendments;
-2002/96/CE.
Disposal

- Observe local environmental standards when disposing packaging material for recycling purposes.
- The European Directive 2002/96/EC on Waste Electrical and Electronic Equipment (WEEE), requires that old household electrical appliances must not be disposed of in the normal unsorted municipal waste stream. Old appliances must be collected separately in order to optimise the recovery and recycling of the materials they contain and reduce the impact on human health and the environment. The crossed out "wheeled bin" symbol on the product reminds you of your obligation, that when you dispose of the appliance it must be separately collected.
Consumers should contact their local authority or retailer for information concerning the correct disposal of their old appliance.
EN
EN
Before calling for Assistance:
- Check if the malfunction can be solved on your own (see Troubleshooting).
- If after all the checks, the appliance still does not operate or the problem persists, call the nearest Service Centre
Communicating:
- type of malfunction
- appliance model (Mod.)
- serial number (S/N)
This information can be found on the data plate located on the bottom left side of the refrigerator compartment.
Never call on unauthorized technicians and always refuse spare parts which are not originals.

Italiano, 1

English, 11

Français, 21

Espanol, 31

Deutsch, 41

Portugués, 51

Pycckn,

61 Ka3aKa7a, 73
WL 36 A/HA
Sommaire
FR
Compartment vieillissement
Guardar as garrafas, 57-58
Modos de armazenamento
Se as garrafas forem poucas
KaK pa3MeCTNb 6yTbJIKN
OcbnyxmbHne n yctpaHeHne HncnpaBHOCTe, 70-71
06cnyKbAHnE uXoD YcTpaHHe HcnpaBHOCTe
Texnueckoe 6cnyxnbHne,72

AIO 77
PpeynpeKdHn
I CoxpaHnTe pyKoBOcTBo KaK nCTOuHnK cnpaBOUHOH nHΦopMaqun No o6OpyDobAHnIO. OHO dONJXHO 6bITb B KOMnJIeKTe C xOnOuNtBnHkOM B cNyuae ero npOdaXn / nepeDaun nnnepee3da.
!BnMaTeIbHOpOnpOHTaIteHaHNoEpyKOBoDCTBO:BHE mcoepjXaTcBaXhIeCBeHeHnaIOyCTaHOBKe, 6e30NaC-HoN 3KcPnyatauNN N O6cJyKnBaHNO 6obpyOboAHNA.
I Bo n36ekaHne HeycToUHBOcTn 60bpyOBAHn 3aKpeNITe ero HameCTe, B TOUHOCTn CneDy INHCTpyKcIyM NO yCTaHOBKe.
!Pn npemepemeueHnn nI npaHcnpTnpOBKe 6opdyo-BaHna depknte erO BeptkaJIbHO.
!TObbI NCKHIOUHTb HeHaJNEXKaUe IcNoJIb3OBAHne,
DeTNIIINIODNICOrpaHnueHHbIMNΦn3NuEcKIMN
BO3-MOXHOCTaMHeIDONKHBIOINb3OBAtbcraObOpyIDoBAHnEM
6e3 KOHTPOJIaB3PocNbIX INI HAcTabHNKOB.
!HeonyckaTe,HTo6bIeTnIpaJncO6OpyObaHneM.
!Iocne yctahOBKn O6OpyIOBaHn DaJKeH 6bITb o6ec-NeueH CBO6OHyI DOCTyn K NITaHOUeMy Ka6eJIIO n po3eTke.
!HeneperopaxnBaIteBeHTNIAUHOHbIEOTBepCTnHa Kopnyce obopydOBAH.
I He nCnoB3yUte InyckopeHnpa3MopaxNbaHn mExAHueeCKNeuINIO6bIeDpyTnePncOcOBeHn, HpeKOMeHDoBaHHbIe N3rTOBtTeJIeM.
I He noBpeKdaiTe oxnaKaDaIoUm KoHTyp.
!Ia3ameHbHeoHaO6paTntecbABTOpN30BaHHbI cepBnchbI ueHTp.
!Ka6eIbHeDolJKeH6blbnepeKpyeuHnnnepeXkaT.
! Ka6eIb cIeIyET peryIyIrpHo npOBeprTb, ero 3aMeHa IOnJHb Ipon3BOIITbcra TOJIbKO aBTOpI3OBAHHbIM nep-coHaIOM.
!IHTAOUKKa6eNBUMeETTNY.DnEero3aMeHbO6-paNTecBABTOPUN3OBaHHbCEPBNCbHcUEHTp.
I PpOn3BODnTeJIb He Hecet OTBeTCTBeHHOCtN B Cny-ye HecO6JIIODeHn yKa3aHHbIX Mep 6e3oNaChOCTn.
6yTbIIOK pa3MeueHOn Jexa)
5 nonkn
PomeCTe KaKdyu 6yTBInky B BbIeMkn Ha 3-x DepeBnH- hix nonkax, 6 6yTBIOK MOXET 6bITb nOmeEHO Ha dHe «BHHoro norpe6a».
!IepBraHHbIe noIKn IMeOT CneuaJIbHyO KOHcTpkyKUIO,KOTOPa IpeOxpaHReT 6yTBInKo OT cnuyauHoro naDeHHN pa3bBaHHa.
MbpneIanaemomeaTb《peHckne》6ytbIKnHa HnKHOIO nonky nDHO BHHoro norpe6a》,Tak kak OHn CneuaJIbHO cKOHCTpyuPObaHbI noD 6oJbUne 6ytblKn.
!Ha dapeBraHHo noke MoXHO 6e30nacHO dePkaTb Do 22 6yTbIOK.
Pa3meueHne 6yTbIOK wamnaHCKoro
Бутблкп дяшампанckою 60ьше сандapтхьх.Их cneует pacnonaratb на.dHe «ВинHoro norpe6a》, Kya можно nomecnttdo 5 bytlnok.
EcnBbXOTNExpaHntb
60nbIe 5 6ytbIOK
WAMnHcKO B
BvHHOM nOrpe6e》,
CHIMITE 3-IO NOnKy I
pacnoIOXnTe 6ytbIKN B
INBa PraJa (pa3MeaJ
6ytblKn BO BTOpom Pny
Mexkdy 6ytblkamn
HnKHeRo pRda).Takm
O6pa3OM MOxHo
pacnoIOXnTBdo9
6ytblNOK.
HeckoIbko npImepob pa3MeueHn8 6yTbIIOK
XPAHEHNE
44 6yTbIJIKN
(100% 6ytbInok pa3MeueHo Jeka)
1 nonka
ДЯ ПОДАЧИ
42 6yTbIKN
(50% 6yTbIOK pa3Me-
LcHNo IeKa, 50% -CTO)
3 nonkn
4 pya
MAKCMMAJIbHbI 3APAC
46 6yTbIIOK
(48% 6yTbINOK
pa3meueH noJeka, 52% - cT0)
1 nonka
4 pya
Kak cHrTb DepeBHHbIe NOLKn
YTo6bI CHaTb DepeBraHHbIe nonKn, BblOnHnTe cNeDyUouee:
1.ДеркnteпернючacьpoJknOndHoypykoI.
2. pyroynpkoN NOIToJIKNHe BBepx 3aADHIOU qactb NOLKIN.
3. MeIeHNo nBnKeNtpe NoKy, noTaNyB ee Ha ce6a. BbIaBnHbTe NoKy Ha 1/3, ecn Heo6xOJIMo ydaJIInTb nn 3aMeHnTb 6TyblKn.
4. YdaJIInTe IIN 3aMeHInTe HxKHbIe 6yTbJIKN INoDTOJKNHTe NOJky Ha3aI, yDIOCTOBepnBUnCb, YTO OHa 3aΦNKcnpObaHa Ha MecTe.
5. Y6eHITecb, YTO NOKa npOuHO CTOnT Ha MeCTe, NONbITaBUnCb ee BbIDBHyTb eUe pa3. EcNn NOKa DBnraETcA, NOToKHNTe ee CHOBa H3aI Do ynpa.
YTo6bl nonHocb ChrTb nonky, BblnonHnhte warn 1 n
2, npedBapntelbHO cHcB c noKn Bce 6ytbJIKN.
MeIeHNO TAHNTe nonky Ha ce6y, noka He n3BneueTe ee n3 na3OB.
!HnBkoemCnyae He CHImaIte OndHOBpeMeHHO
6oJee OdHoi noJIkn.
Pa3MeueHne He6oJbIwOro KOJIuYeCTBa 6yTbIIOK
Ecnn KOJIueCTBO 6yTbIIOK HeIOCTaTOUHO IIN NOJHOrO 3anONHeHnra "BHHORo norgpe6a",MbI peKOMeHNyem paBHOMepHO pa3MeCTnTB 6yTbIKn Ha IMeOuNXCn POJkax, a He NOMEuaTb BCE 6yTbIKn HabePxy INBHN3y.
Ytob6ytbkn6bIIO NyUWe BnHO C BHeuHcTOpOHb, pa3MeCTNTe INB U CEHTpe NOnK.
RU
DAHHbI BKNAdbIISH OJIXEH bItb BIOXEH BYKOBOCTBO NO 3KcNpyATAUH N YBJIETCRA ERO YACTbIO
Komnpeccop He pa6oTaET
Komnpeccop pa6oTaet HenpepbIBHo
Bo3MoKhbIe npuHbI / PeueHne
-ObopyoBaHne He noKluOHe K 3NeKtpocetn NIn BnIka nIOxo BCTaBJIeHa B po3ETky, He oBeCneuNba KaTakTa, nIN c60J 3NeKtpoNTaHnB DOME.
- Po3eTka HeuCnpaBHa, IINI npOBepKn IOnKnHouHte o6OpyIOBaHne B dpyrHyo po3eTky.
-ObpatntecbBaTOPn3OBaHHbIcepBnCHbIeHTp Ppi 3BOHKe COO6uNTe:
- DAty NOKyIKN; HOMep rapaHTnHOrO DoKymeHTa (cepBnCHoN KHNKKN, cepBnCHORO cepTnΦnKaTa n T.n.);
TIN HENCnpaBHOCTN;
MoJeIb (Mod.) n cepuHbH HOpem (S/N) 6OpyoBaHnY, yka3aHHbE B Ta6NHyKe TExHNeCKHX daHHbIX o6opyoBaHnR (CM. Onucahue), nIN B rapaHTnHOM DOKyMeHTe.
!Ib6oB peMOHT nTexHnueckoe 06cJnyKnbAHne 06OpydoBaHn DaJXKnBb BblOnHrTbcra TOnbKO CneuaNCTaMn ABTOP3OBaHHoro cepBnCHoro ueHpa.
I KpaTkoBpeMeHHbE c6oBn B noDaue 3JKeKtpOnHTaHn He BInyOT Ha coXpAHocb bHnA. Iopca BnHa MoKet npOn3OHT TOJIbKO, KOrda np6bnMbl B pa6ote o6OpuyIOBaHHn octaOTc H peWHeHbIMn B TeUeHne DInTeJbHorO BpeMeHN.
Cpok cnyic6bl 10 Jer

ARISTON
Hotpoint ARISTON
(i) INDESIT
STINOL
PpOIN3BOIDNTB OCTaBnEeT 3a co6oI npaBO
6e3 npdynpexkdeHn BHOCHTb 3MeHeHn B KOHCTpyKUIO N KOMNNEKTAQUIO,
He yxyduaioune 3oepekTnBHOCTb paobtlo obopydoBaHn.
HeKOTOpBie npaMeTpbl, pNBeDeHHbIe B 3ToHnHCTpykUHN
YBJIIOCTCA pN6IIN3NTeJIbHbIMn POn3BOIDTeJIb He HecET OTBETCTBeHHOCTN
e3HaHTeJIbHbIe OTKNOHeHnO T yKa3aHHbIX BeJIuHn.
Pou38odumenb:
Indesit Company S.p.A.
Ipuuduecku apec:
Bnane A. MeploHn, 47
60044Фабпано(AH),Итайя
Ten. (0732) 6611
Ummopem:
OOO "HnDe3nT Pyc"
IOpduuecku adepoc:
Pocn 127018,r. MockBa,yI. DInHueB,
12, Kopn. 1, Bm3HeC-ueHtp «BbHcE»
(Здан不动产《В》)
Aopec u menebohbl dna KOHmakmoe:
Pocna 127018, r. MockBa, yI. DInHueB,
12, Kopn. 1, Bn3HeC-ueHtp DmHnueB
(Зданны «В»)
Ten.: (495) 961-29-00
ΦaKc (495) 961-29-19
http://www.Hotpoint-Ariston.ru
!N3dJIe NcPoeKTHIPOBaHO N3rTOBNeHOB COOTBeTCTBm C MEJyHApOJDhIMn HOpMaTINBaMn 6e3OnaCHOCTn. Heo6xOIMO BHMaTeNbHO pOuHTaTB NaCTOIAE npeDynpexKDeHnA, CoCTaBnEHHbIe B cIeJAX BaWei 6e3OnaCHOCTn.
AnHHOe 3nEJIne COOTBETCTByET CNEyIOUIM DnpeKTHiBAM EBpOeNcKOco6ueCTBa:

-73/23/CEE ot 19/02/73 (Hn3koe HanpiaeHe) c nocJeDyUOuMn N3MeHeHnM;
-89/336/CEE ot 03/05/89 (Злес各项工作 COBMECTIMOCt b) C NOCEdYUOuMm N3MeHHeHnMaN; -2002/96/CE.
YtJn3aun

- YHNUTOKHeHne yNaKOBOHybIX MaTePnaJIOB: coJIHOaIte MeCTHbIe HOpMaTINbBi I NO yTNJIIN3aCIN yNaKOBOHybIX MaTePnaJIOB.
- Ebponecka dnpekTna 2002/96/EC o6 ytniHa3aunn 3neKtpueeCKoro n 3neKtpoHOrO o6OpyDoBaHnA (WEEE) yctanabInbaet npabnla ytniHa3aunn BblweDxnx n3 cTpor 6bITOBbIX 3neKtpoPn6opOB.
B cIeJx MmHmM3aun OtpuataTeIbHOBO3deCTBn yTnIN3OBaHHbIX np6obopBa H aOkpyKaUoUcpeDy, CHNKeHn pNCKOB dnn 3DopOBbHaCaeJeHnA, a TaKke ONTNIM3aun npOceca nepepaotkn n nobTOpHoro NCNoTB0BAHn MaTePnaNob, C6Op n3HoWSeHHORO o6OpyIDOBAHn DOJHXeH ocUeCTBnTbCn BHe paMOK o6Ueropodcknx cnCTem c6opa n yTnIN3aun Mycopa.
CnMBOI «nepeepKHyTOrO MycOpHoro BeDpa», HaHeceHHbI Ha npOdykuHIO, HAnOMnHaet 6bO83aHHoCTN CoBLOeHn CNEuaJIbHOI npOeDpybl yTNIIu3aUH 6bITOB0I TEXHKn.
Iotppe6nteMb MoKTe CdaTb N3HOWeHHoe
obopyoBaHne B CneuHaNbHbIX NyHKtax npnema HIN, ecNI 3TO pa3peWeHO HaUHOHaJIbHbIMN 3aKOHoDaTeBCTBaMn, BO3BpaTHTb KOMnAHm Npni NOKyNke HOBOrO, aHaJOrnHORo PPOdyKTa.
Ha cerodnHn DeneB BCE Bedyu npoN3bOHTeN 6bITOBOI TEXHNIaKTHNBHO pa6oTAOT HAD CO3daHHeM CNCTem C6opa N yTINN3aunn N3HOUeHHoB 6bITOBOI TEXHNI.
Ipeed Tem kak o6paTntbca B LcHtp TexHnueckoro 0cbnyxmbHHaHa:
- npoBepbTe, MoKHO JIy yCTpaHHTb HeucnpaBHOCTb cAmocToTJeLbHO (cM. HeucnpaBHOcmu u Memodbl ux ycmpaHeHua).
- Ecni nocIe npOBepKn XoJIoUJIbHnK He pa6OtaE, IIIN np6JIembl OCTaHO7CRAcKInTECb C cepBnCHbIM LcEHpOM.
Pn o6paueHHB UeHTp TexHueckoro
O6cnykBaHnHa Heo6xoDnMo CoooBntb:
TIN HENCPaBHOCTN
MoIeNb n3dJIeNnR (MoI.)
HOMepTex.nacnopTa(cepHbNg)
Bce 3TN daHbIe Bbl HaJeTe Ha Ta6nueKe c TexHnueCKMn XapakTepncTnKaMn, pacnoJIOxKeHHoB B JEBOM HxKHeM yrny XOIOJNBHO KAMepbl.
He noIb3yItecb yCnyramn Iu, He yNONHOMOeHHbIX npOn3BOUTeJIem. PnppeMOHTe Tpe6yIte nCNoIb3OBAHnOpunHaJIbHbIX 3anaChbIX qAcTei.
KZ
IT
ENFR
Italiano, 1
English, 11

Français, 21
ES DE

Espanol, 31 Deutsch, 41
PT
Portugués, 51
RU
Pycckn,61

Ka3aKa7a, 73
Ma3MyHbI
EpekwenikTepi,74
Andbn any
TexHnKaIbIK CInaTtMaCbl
Ophaty, 75
KaHfactbipy KHeKocy
Xa6dbikTbIH cnaTTamacbl, 76
Iwki 3nementTep
Bacapy nahei
Ka6dbiktbi naDanahy, 77-78
Uapan 6eTeKepeipn caKayra apHaJfah 6eJIM
TemnepaTpaHbIKonmeh pettey
Araa cepenepin any
Uapan yuih yineetih Temnepatypa kecteci
Japan 6eTeKeIepin OphaIacTbipy, 79-80
BeTeIkepepi Kaai opHaanactbipyfa 6oana
KbI3MeT KepCety XeHe aKaynapbH KOHO, 81
Kb3MeT KepceTy XHe KYtin yctay
AkaayapbH KHO
WL 36 A/HA

KZ.O.02.0361
Andbinany
! Byn HycKaynbkTb caKaTbI3. On ToHa3bITkbIHTbI catbn anfah, 6epreh HeMece XaHa nTepre KeUkeH XaFaanapda Xa6Dbkneh 6ipre 6onybl KaKeT, FHN XaHa neci OHbIH XyMbIC ICTey XeHe OFaH KbI3MET Kepcety epexenepeIme TaHbica aIaNbH 6onybl KepeK.
!HcyayIbIKTbMyKnATOKbnWBfblHb3:OHda TOHa3bITKbIbTbOpHaTy MeH naJaIaNaHy Kayinci3diR TypalbMaHb3DbMmImeTTep 6epinre.
!Ka6bIKbIHwaKaIybiH 60nDbipMac yuH OHbOpHbHa opHAty 6oBbIHwA HcKayblkTbCaKTaOnbipIn 6ekitopHaTBHb3.
!Ka6bIKbIH opHbIH aybICTbIPfAH Hemece TaBIMAnDaFAH XaFda OHbT KYiHNe YCTaHbI3.
!KypandbiΦn3nkabik,ceimTandbikHemeceakbn-eci TeMeH Hemece onapdbH 6yn Kypandbi naaandahyfa empiik Taxipnbeci Meh bHraib JOK Tyfnapfa, erep onap bakbnaHbaca Hemece onapdbH Kayincidiri yuiH kayantbl tyfadaHyckay anmaHan Kaardaa naaandahyfa 6oImmaDbI.
!Bananap KypaIMeH OiHaMaybI yuIH 6aKbIaNbIN oTbipyKepeK.
!Ka6dbKbIbOpHaTkKaHHaKeIH Kopek Ka6enihe KeHe po3eTKaRa epKiH KOJIkeTIMiK KamTamacbi 3 etiYi Kepek. !Ka6dbKbTbIH KopnycbIHdaFb XeJTeKII TeciriH anDbH KAYbIN KaMaHbI3.
!My3daTbIybiH XbiIaMdatyuWIn daBihdayuBiYcbiHaHHa6acka,MexAHnKaJIbIK XHe 6acka DaKentereH KypanapdbI naDanahyra 6onMaIdbI.
!CanKbHdaTaTbH XnEKeTpdi 3aKbIMdAn aIMaHb3Iap.
!HeoHbI aybcIby yuiH ABTOpHaH cepBnC optaibfibaXa6apnacbiHb3.
!Ka6enb opanbln Hemece KbcibJbnK KaImaybKepeK.
I Kopek: KaebbdiH Tnii Y. Ohbl aybictby yuhi aBTOpnaHaH cepBnC opTaNbIfbHa xa6apNaCbHb3.
!Ehnpywi KepcetinreH Kayincsik wapaanapbih caKaTaMaFaH XaFdaIa, XayanKepeuINIK KeTepeMeNi.
| TEXHÍKÁLbÍK CYNATTAMACbI | |
| Moděni | WL 36 A/HA |
| TempepatypacbI | 1 aɪmák |
| eʌlsemī | EHI -56 cm; Биіktīrì - 68 cm; Tepeşdīrì - 55 cm. |
| Çaʌmáfþi** Çaʌmáfþi | 76 kr 97 kr |
| KyaTbI | 65 AT |
| ToK | 0,3 A |
| Πamna | 3 Bt |
| Энegrпяны ТутblHybI | 0,39 kBt*c/24 c |
| Kephey* | 220-240 B |
| ToK xhiinirì* | 50 Γι |
*BymMaBHaHapepEnyiwH ePTypnI 60nybIMyMKiH.
EybIMdApDHHaKTbICNAtTAMacBH Xa6DbIKTBH
TEXHKnAblcCnATTAMacBHIN KecTeciHeKepe
anacB3nap.
**BocXaOdbIKTBHcAlMaFbl.
Бул КабдыкTekшалпсakтay yushi faHa apHaIraH
KZ
KaInfactbipy XHe Kocy
Opambiny
- OpambIH Wein, Ka6dbIK TacbImaIay 6apbcihda 3aKbIMdAmmaHaHbHa Ke3 KeTki3in anbHb3. Erep Ka6dbIK 3aKbIMdaIraH 6oNca 6ipdeH JeTeKi3yWIRE 6ipdeH xa6apnacblb3.
- OpambIH xe3diHHe HxancbipbInaTbIH Xa6dbIKTBIOKpIaTpaBH MaTePnAnDapBH MyKnT Wein aBbHb3.EcirH aBbHb3XeHE Xa6dbIKTBIOKOMNoHEHTepi 3akbIMdaJMaHa Ha Ke3 XeTKi3in aBbHb3.
- Kopeek Ka6eJIH aJIbIbIbI3.
Xaɪfætɪpɪy
- Ka6dbik Kypfak XeHe XaKcbi KeJenTeiTetIH KaJaOpHaTbIybi Kepek (Xa6dbIKbI CyJnaHFa XeHe,Kepe Teneepre OPHnactbIPMaHbI3).
- Ka6bIKbXbIy bIpy bIpaTbIH Ke3 KeIreH Kpypan Ke3epiHeH anbcIpaK opHaNActbIpbHbI3.
3.ToHa3bIKbIbTbIHKeIeTeKlI dypbic Kymblc icTeyi yuiH Ka6dbIK opHaIackaH Jep KHe Y-kaIbIH Ka6bIpacbi apacBHa DA MNHMmaIbI apakaUbIKbIK caKTanFaHDbIbHa Ke3 KeTki3in aJIbIbI3.
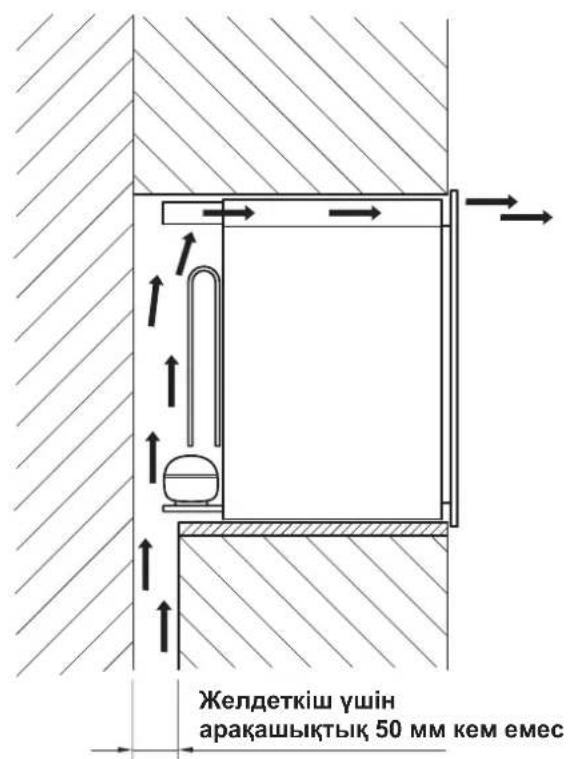
Cypetikapa
3neKtp XeNicHe Kocy
KabdktbTacbimdan anbin KeireHHen KeiH XabkTBITiriHeH KObln KOblb3XeHe OHbI 3neKtp KcnicHe Kocnac 6ypbH KEM DereHde Yw caFat yaBt KYTIH3. Ka6dbk BNkacbiH po3etkaFa Kocnac 6ypbH TeKcepin aBlHB3:
- Ka6bipraadafbi po3eTka Jepre TynbiktaIraH KHe cTaHdapTTapra cAnkec KeNetiHdirih;
- po3eTka JxabkTBH OH XaftbHbIH TEmehri 6enirHde opHaIacKaH OHbIH TexnKakbIK MAnimETtepi TypaJI KeTeDe KepceTinreH Xa6bIKbIH MaKcImanDbIK TybHaTBH KyaTBHa WbdaNtBdIBfBH (Ka6dbkTBH CnnaTTamAcbl Kapa);
- Jei Kepehyi TexHkAnbik Cnattamanap KecTecHde (2 c.Kapa) Hemece Ka6dbKtBih TexHkAnbik MnnimetTepin TypaBik KeCTeKepcetIirre H MaBHaIanapra CcNkec KeJei (Ka6dbKtBih CnataTAMacbl Kapa);
- po3eTka Jka6dbkTbIH BnIkaCbHa cEiKec KeIeTIHirin. Kepi XaIaIda, BnIkaHbI HEmece po3eTKaHbI aybIcTbIpy KepeK. Y3apTkbiHTapDbI HEmece KEN Ke3di po3eTKaIapDbI NaIdaNaHbI3Iap.
Koca opHaTy enwemepi
Iwki 3JemeHTTepi
KZ
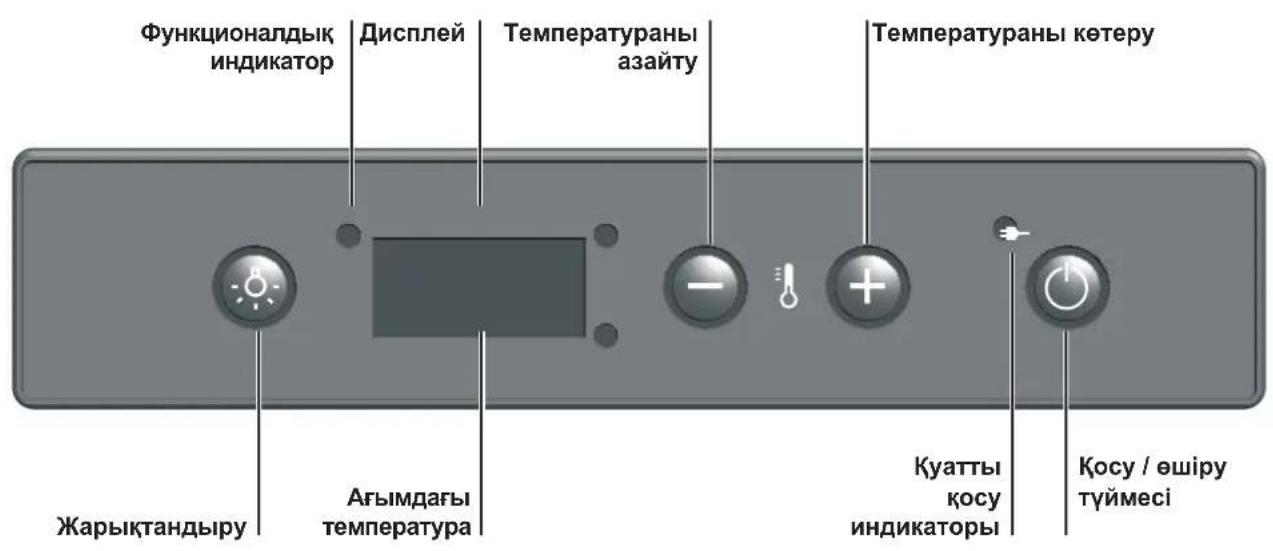
Backapy naHeni
KZ
Uapan 6eTeJKeJepiH caKtayFa apHaJIraH 6eJIM
BemHH Heri3ri Kb3MeTI - WapantbH cKaTaNbH OHaIIbI wapTTapda KaTAmacb3 ety. ToHa3bIKbIITabf3aybIT opHaTKaH Temnepatypa 150C. ByI Temnepatypa KeNTerH wapantapbI cKaTAY uWIn OHaIIbI 6oIbIN caHaJaDbI. WapantbH JaNNbI TaBnfABy KypDeni, Obbl y3ak api 6aY npoueecc HTeNKeCiHde anaDbI. WapantbH canacbIH epeKweey uWIn aPhaBl wapTTapdbH cKaTanybIMinDeTT. BapNbIK wapanTAP bip Temnepatypada cKaTanaDbI, aNaJaOnapdbH apkaNcbIsbHIn epeKweiKTEpiHe kapan onap eptpyni Temnepatypa 6oBbHwa 6aKAnaDbI (UpaNka naBbK Temnepatypa keCTeciH kappa). CoNbIKTaH da, eHdipictik Jka6DbkKa cekinDi ciDIn JkaHa «Upaan KoMaHbI3DaFbI abCoJHTti Temnepatypa MaBHaCsbI wapantbI cKaTAY uWIn MaBb3DbI 6oBbIN TaBbMmaDbI. Eh MaBb3DbcBb 6apNbIK yaKbITarFBTypaKbTI Temnepatypa 6oBbIn Ta6bIaDbI. WapantbI Ke3 KeJIreH Temnepatypada on e3repHne KaBbITbX KaFdaJaDa cKaTayra 6oNAbbl.
TemnepaTypaHbI KOJMeH petTey
KabibkBIOCKaHHaHKeiIN DnCnneJe ToHa3bIKbIbTbIH iwiHderi TemnepaTypa KeipHei:On 150C Ketyi KepeK XeHe coJ KaBInbCaKtayFa Tnic. Erep ci3 TemnepaTypaHb peTteriH3 KeIce,MbHa epeKeTTepDi XacaHbI3:
- Ka6bIKbI KockaHHaH KeiH dncnneOpHaTbIraH TempePaTypa KepiHc Ta6abI.
- Bip ckyHtai yMecin 6acbHb3 (Bacapy naHeiH kapa). DcnpneDi er TemnepaTypa MarbHaCbi e3repe 6actaIbI.
- KaKETTI TemnepaTypara KeTKeHre DeiH Temece -TemnepaTypapbIH 6acbHbI3.
4.ToHa3bITKbIwka 7apan6TeNKeNepiH opHaIacTbIPmac 6ypbIH DncnneJderi TemnepaTypa MaftbIHaCbI XbIbIbIKTaybiH TOKTaTKaHfa deiH 5 ckyHd KYTe TypbIHbI3.
Ka6dbkTbH iwiHderi TemnepaTypa 240C acca, iWiKxapbIKTaHdbIpynapb KocblImaDb (HeMece yaKbITwA eWipineDi). By andbH aIa TancbipbnFaH TemnepaTypaFa Teisipek XeTyre MymKinhik 6epei.
Araw cepenepin any
CAKTAHDbIPY:
Araa cepenep cbiprahanak 60mamdbi. Cepenepi erep onapda 6eTeKepe Typca, onapdbi cbHdbipn anmac ywiin cybpbn anmaHbI3nap.Ci3 cepenepi onapda 6eTeKeep TypmaHan yaKbTTa rHa xyy ywiH ana anacbl3.
Uapan yuin yunecetih TemnepaTypa kecteci
Byn KecTepe Wapan cakTanyra Tnicti Mbican TemnepaTypapdbI waaameH KepceTinreH. Erep ci3dn Keibip WapanTapbIbI 3 ToHa3bITKbIw TemnepaTypacbIHah KorapbI TemnepaTypa 6epiy i Kepek 6oNa, ctonra 6epy aNbIHda ToHa3bITKbIwTaH IbFapbl KaKeTTi yaKbITKa KoBbIbI3.
| Amarone della Valpolicella | 17°C |
| Barbaresco | 17°C |
| Barolo | 17°C |
| Божке | 13°C |
| Борido пиker ak | 6°C |
| БорIDO курак ak | 8°C |
| Борido Кызлы | 17°C |
| Бургундък ak | 11°C |
| Бургундък Кызлы | 18°C |
| Brunello | 17°C |
| Шamпанскoe | 6°C |
| КъяNTи Клашкальik | 16°C |
| Languedoc-Roussillon | 13°C |
| Passito di Panteleria | 6°C |
| Пробданък Кызлы | 12°C |
| Куррак жени тетті кебіktі shapan 6°C | |
| Verdicchio di Matelica e dei Castelli di Jesi | 8°C |
| Trentino Alto Adige ak shapabbl | 11°C |
| Fraciacorta ak shapabbl | 11°C |
| КурракхочиICTIak shapanTap | 10°C |
| Куррак,балгынжөнжөmictiak shapanTap | 8°C |
| Friuli Venezia Giulia ak shapabbl | 11°C |
| Rodano shapabbl | 15°C |
| Луара Курракak shapabbl | 10°C |
| Луара лникшарabbl | 7°C |
| Луара кызbl shapabbl | 14°C |
| Passito лникшарabbl | 8-18°C |
| КызblтшарanTap,ЖаншарanTap | 12°C |
| Орташасктallanakшыл-ksblshapanTap | 14°C |
| Кызbl,жeteкпіkti tугde сактallanrashoptaшаMbiktsbl shapan | 16°C |
UAPAN BOTENKEJIEPIN
OPHAJIACTbIPY
KZ
CtahdapTbI opHaJnactbipy - 36 6eTeJIke
36 6eTEnKeHi opHanaCTbIpy (ctaHdpTTbI, eptypni Tnnteri Xane «peH» [yNKeH]) KepiHin Typyra Tnicti Xane OHai anyra 6oNaTbIH wapan 6eTeNKeJIepiHe apHaHraH.
CTAHДAPT
36 6eTeJIke (100%)
6eTeKkeKaTkbI3bIbIN
opHaJaacKaH)
5 cope
Op 6TeIkeHi 3 aRaaw cepeIepre, e3Ihe apHaJIraH opHbHa opHApAactbIpbHbI3, 6TeIeKne «Uapan K0iMaCbHbIH» Ty6IHe opHaIacByMymKiH.
!Araaw cepenep apnaib KoHCTpyKunFa ne, on 6eTeJIkepePiH Ke3deIcOK KyNaybHaH XHe CbHybHaH KopraaBbl.
B3 «peH» 6TeKeNepin TEmHi cepere KeHe «Uapan KoMaCbIHbH» Ty6iHe canynapbHb3dbI ycbHaMb3, eHTkeHi on opbH apHaH bKeNemDi
6eTeKenepe apHaBIn kacanFaH.
! Arau cepere 22
6eTeJIkeIeH Kayinc3 Tpyde caKtayra 6oNaIbI.
Uamnah 6eTeKeJepi opHaJacTbIpy
Uamnah 6TeKenepi cTAnapt 6TeKepepre KapaFaHda yIkeHipek. Onapb5 6TeJKepepre deiH opHaJactbpyfa 6OaTbIH «Uapan KoIMacbIHbH» Ty6iHe opHaJactbpy Kepek.
Erep ci3 «Uapan KOnMaCbHa» WAmNaHHbIH 5 6eTeJIkeciHeH apTbIK CaTafBbHb3 KeNce, 3 cepeciH
anbihbi3XHe
6eTeKepdi eki KaTapFa opHaJnactbipHb3
(6eTeKeJepdi
ekihui KaTapra
TEmeHderi KaTapdbIH
6eTeKepeHin apacbHa opHaJactbpa Otbpbn).
OcbIaH 96TeJIkere deIH opHaJAcTbIpyra 6oJaBl.
BTeKeIepi opHaIacTbIpydbH 6ipHeWeMbicaJI
CAKTAY
44 BETENKE (100%
6ETENKE KaTbI3bINbIN opHaJaackaH)
1 cope
CTOJFAYCbIHYUJIH
426eTeIke (50%
6eTeIke KaTbI3blBn
50% Typrbl3blBn
opHaJaackaH)
3 cpe 4katap
MAKCMAMJIbIK
APTBIK CAKTAY
466eTeIke (48%
6eTeIke KAtKbI3blBn
52% TyPbI3blBn
opHaJaackaH)
1 cepe 4 kaTap
AFAU COpEJIePDI ANY MYMKIHIDI
Arau cepeepa any yuiH MbHaJapbOpbHaBb3:
- cpehi andbihfb 6eirinH 6ip konme HcTaHb3.
- Ekinui konmeh cepenih apTKbi 6enirih xorapb kapa nTepiH3.
- Ka rana cepehi e3iH3re TaTbpin aBbHb13.Erep 6TeIKeHi any HeMece aybictipy Kepe 60JFaH KaFdaJa capehi 1/3 KblKbItbHb13.
4.KepeK 6eTeKEnepi anbIn TaTcAhb3 HeMece aybCTbpbHb3 XHe cepeni aptka nTepin opHbHa opHaNaCTbPbHB3. - Ohki KaTadaH apKa NTepin oPbIHda HbIK TyphaHbHa Ke3 KETK3IN anbIHbI3. Erep cepe KIMblap Typca, OHbl apTKa TureHwe KaNTa NTepiH3.
CepHI ToJIbIbIMeH anBIn Tactay yuH anDbH ana 6TeJIkepeHH 6apNbIbH CepeH eAnBn,1 XaHe 2 KaamblOpbIHdaHb3. CepHi KaI Fana Na3anapbHaH anFaHwa e3iH3re TapTbHb3.
! Eswkaan 6ip yaKbTTa 6ip cpeJeH apTbIK aImHaB13.
A3 MJIUIEPDEI BOTENKEJIEPDI OPHAJACTbIPY
Erep6eTeKepenpaH «Wapan KOnMaCbH TOJIbIK TOnTbIpy yuIN XeTKiNkci 6oNfAH XaFdaNda, 6i3 6TeKepepi 6apenepre 6ipKeNki etin opHaIacTbIpydu YcbIHAmbl3, 6TeKepepdi TyreIeJ actbHa Hemece TEK yCTHe opHaIacTbIpyra 6oMaIdbI. BTeKepenep cbIpBHaH Jxakcbi KeiHy yuIN , OnapblcpeHH optacbHa opHaIacTbIpbHbI3.
KZ
KbI3MeT Kepcety XaHe KyTin yctay
Ka6dbiktbI eipy
Ka6dbiktb Ta3anay XeHe Kbi3MeT KepceTeP anDbHda 3neKtp JeicHe aXbipaTbn anBHB3.
AkaaynapbHxOIO
ToHa3bIKbIiXyMbICbIHda aay 6onraH kafdaIa cepBnC optanbIFbHa xa6aplacnac 6ypbIH ocbl 6enimMe H TaHbICbIHbI3dAp, MyMKIn ci3 ocblHa npo6IeMaIapbIHb3dbH weuimH Ta6acbl3:
Akaynap
Komnpceccop kymbc icteMeendi
Komnpeccop y3dkci3 kymbc ic tcei
MymkiHikTeri ce6entep /Uewimdepi
Ka6bik 3neKtp XeJicHe KocblImaHaH Hemece BnIka 6aIIaHaBcKa Tycne Po3eTKaFa DpybIC KocblMaHaH Hemece yIeI 3neKtp XeJicInHe icTeH sbHy 6ap.
- P03eTka DpybIC JxMBC icTeMeiDi, TeKcepy yuHJ Kaa6DbIbTbI 6aca po3eTKaFA KocbiHbI3.
- ABTopnHaFan cepBnC opTaIbIFbHa xa6apNaCbIHb3 KoHbIpay wJFaHda xa6apNaHbI3:
- catbn any kynih; kenindik kyxkat hemipin (cepBnctik KITanwa, cepBnctik ceptnpknat kehe T.6.);
- akay TnTepi;
- Xa6dbkTBiH TexnKanbIK MmIImeTep KecTeciHde Hemece Keninik KykaTTa (Cnnattamacbi Kapa) KepcetinreH Xa6dbkTBiH Moeni (Mod.) Xhe cepnabik Hemipi (S/N).
JKa6bIKbIH Ke3 KeIReH KeHDey KMyMbICTapbl XHe TexHNKaIbIK KbI3MeT KepCteY aBTopnHaH cepBnC opTaIbIFbIH MaMaHapbl apKbIbI faHa Kypri3inyi KepeK.
!3neKtp keniHderi kbicka yaKbTTbIK icTeH sbIy wapantbIH caTaNbyHa acep etneDi. WapanTBH 6y3bIybl Ka6dbkTBH Kymbcihdafl npo6nemanap y3ak yaKbTKa dein HweuimH tannaraH ka4dnaFaHa MymkiH 60JMaK.
Kb3Mem Kepcemy Mep3imi 10 xbin
ARISTON
Hotpoint
ARISTON
(i) INDESIT STINOL
EHdipyKoHCTpyKUraFa anbHa ana eckepTne, OHbIXyMbcbHbH TImdiirHe 3aan KeTTipMeiTH e3repTepe Hri3y Kkblbl.
OcbHyckayIbIKTa KeTIpiJIreH Kei6ip npaMeTpIep KybiKtBi 6oJIbIn KeJeDi.
Ehnpuyi Kepcetinre HKelemHea a3 rHa aybtkynap yuH kayankepwnik KeTepeMei.
Ehdpywi:
Indesit Company S.p.A
3aHdbiMeKeHkaaibI:
Bnane A.MepnoHn,47
60044Фабразано(AH),Итани.
Ten.: (0732) 6611
Caryu:
IndesitCompanyInternational
BusinessS.A.
3aHdbMeKeHHkaaBb:
TannepnopTaBbIb,2,BnaKaHToHaJe
6928, MaHNO, WBeMauPnA
Baihaicy yuih MeKeHkaib MeTeneoHbI:
Pecen 129233 Mackey
Mnp daHbbl, BBU (6yp.BDHX)
NaBnIbOH,46
Ten.: (495) 974-6280
ΦaKc (495) 961-2919
974-6279
KZ
KZ
KZ
