
HA WC5120 - Wine cellar HOTPOINT - Free user manual and instructions
Find the device manual for free HA WC5120 HOTPOINT in PDF.


| Product type | Wine cellar |
| Brand | Hotpoint |
| Model | HA WC5120 |
| Bottle capacity | 12 bottles (standard size) |
| Dimensions (H x W x D) | 70 x 50 x 50 cm |
| Net weight | 25 kg |
| Energy class | F |
| Annual energy consumption | 180 kWh |
| Noise level | 40 dB |
| Temperature range | 5 °C to 18 °C |
| Control type | Electronic (digital display) |
| Power supply | 220-240 V, 50 Hz |
| Main functions | Adjustable thermostat, LED interior lighting, silent ventilation |
| Care and cleaning | Clean with a damp cloth and mild detergent; avoid water in electrical components |
| Safety | Door lock (key included), anti-tip system |
| Spare parts and repairability | Available via Hotpoint customer service; repairability index not provided |
| General information | 2-year warranty, made in Italy |
Frequently Asked Questions - HA WC5120 HOTPOINT
User questions about HA WC5120 HOTPOINT
0 question about this device. Answer the ones you know or ask your own.
Ask a new question about this device
Download the instructions for your Wine cellar in PDF format for free! Find your manual HA WC5120 - HOTPOINT and take your electronic device back in hand. On this page are published all the documents necessary for the use of your device. HA WC5120 by HOTPOINT.
USER MANUAL HA WC5120 HOTPOINT


natural_image
Grid of 16 identical circular components arranged in two rows within a frame (no text or symbols visible)STANDARD
natural_image
Simple line drawing of a rectangular tray with six U-shaped cutouts (no text or symbols)natural_image
Diagram of a rack with multiple circular washers, no text or symbols presentnatural_image
Grid of circular washers or washers arranged in a square pattern (no text or symbols visible)CONSERVAZIONE
Location and power connection
Technical information
Product Description, 24
Interior Parts
Control Panel
Using the Wine Cellar, 25-26
Bottle ageing compartment
Manual temperature control
Taking out the wooden shelves
Table of ideal wine temperatures
Stocking the wine bottles, 27
How to stock the bottles
Maintenance and troubleshooting, 28
Care and Maintenance
Troubleshooting
Assistance, 29
SAFETY INSTRUCTIONS
IMPORTANT TO BE READ AND OBSERVED
Before using the appliance, read these safety instructions. Keep them nearby for future reference.
These instructions and the appliance itself provide important safety warnings, to be observed at all times. The manufacturer declines any liability for failure to observe these safety instructions, for inappropriate use of the appliance or incorrect setting of controls.
⚠️ Very young children (0-3 years) should be kept away from the appliance. Young children (3-8 years) should be kept away from the appliance unless continuously supervised. Children from 8 years old and above and persons with reduced physical, sensory or mental capabilities or lack of experience and knowledge can use this appliance only if they are supervised or have been given instructions on safe use and understand the hazards involved. Children must not play with the appliance. Cleaning and user maintenance must not be carried out by children without supervision.
Children aged from 3 to 8 years are allowed to load and unload refrigerating appliances.
PERMITTED USE
⚠️ CAUTION: The appliance is not intended to be operated by means of an external switching device, such as a timer, or separate remote controlled system.
⚠ This appliance is intended to be used in household and similar applications such as: staff kitchen areas in shops, offices and other working environments; farm houses; by clients in hotels, motels, bed & breakfast and other residential environments.
⚠ This appliance is not for professional use. Do not use the appliance outdoors.
⚠ This appliance is intended to be used exclusively for the storage of wine. Always store bottles without their packaging and not inside crates or boxes. The capacity is indicated in the chapter "Stocking the wine bottles".
⚠ The bulb used inside the appliance is specifically designed for domestic appliances and is not suitable for general room lighting within the home (EC Regulation 244/2009).
⚠ The appliance is designed for operation in places where the ambient temperature comes within the following ranges, according to the climatic class given on the rating plate.
The appliance may not work properly if it is left for a long time at a temperature outside the specified range.
Climatic class ambient temperatures:
SN: From 10°C to 32°C;
N: From 16°C to 32°C
ST: From 16°C to 38°C ;
T: From 16°C to 43°C

This appliance does not contain CFCs. The refrigerant circuit contains R600a (HC).
Appliances with Isobutane (R600a):
isobutane is a natural gas without environmental impact, but is flammable.
Therefore, make sure the refrigerant circuit pipes are not damaged, especially when emptying the refrigerant circuit.
⚠ WARNING: Do not damage the appliance refrigerant circuit pipes.
WARNING: Keep ventilatio openings, in the appliance enclosure or in the built-in structure, clear of obstruction.
WARNING: Do not use mechanical, electric or chemical means other than those recommended by the Manufacturer to speed up the defrost process.
⚠ WARNING: Do not use or place electrical devices inside the appliance compartments if they are not of the type expressly authorised by the Manufacturer.
Do not store explosive electrical shock.
substances such as aerosol cans and do not place or use gasoline or other flammable materials in or near the appliance.
⚠️ Damaged gaskets must be replaced as soon as possible.
⚠️ The wine cellar must only be
used for storing bottles of wine, do not place any type of food inside it.

Pentafluorobutane is used as blowing agent in the insulation foam and it is a flammable gas.
INSTALLATION
⚠ The appliance must be handled and installed by two or more persons - risk of injury. Use protective gloves to unpack and install - risk of cuts.
⚠️ Installation, including water supply (if any), electrical connections and repairs must be carried out by a qualified technician. Do not repair or replace any part of the appliance unless specifically stated in the user manual. Keep children away from the installation site. After unpacking the appliance, make sure that it has not been damaged during transport. In the event of problems, contact the dealer or your nearest After-sales Service. Once installed, packaging waste (plastic, styrofoam parts etc.) must be stored out of reach of children - risk of suffocation. The appliance must be disconnected from the power supply before any installation operation - risk of
electrical shock.
During installation, make sure the appliance does not damage the power cable - risk of fire or electrical shock. Only activate the appliance when the installation has been completed.
⚠️ Be careful not to damage the
floors (e.g. parquet) when moving the appliance. Install the appliance on a floor or support strong enough to take its weight and in a place suitable for its size and use. Make sure the appliance is not near a heat source and that the four feet are stable and resting on the floor, adjusting them as required, and check that the appliance is perfectly level using a spirit level. Wait at least two hours before switching the appliance on, to ensure that the refrigerant circuit is fully efficient.
To guarantee adequate ventilation, leave a space on both sides and above the appliance. The distance between the rear of the appliance and the wall behind the appliance should be 50mm, to avoid access to hot surfaces. A reduction of this space will increase the Energy consumption of product.
⚠ WARNING: When positioning the appliance, ensure the supply cord is not trapped or damaged.
⚠ WARNING: To avoid a hazard due to instability, positioning or fixing of the appliance must be done in accordance with the manufacturer instructions.
It's forbidden to place the wine cellar in such way that the metal hose of gas stove, metal gas or water pipes, or electrical wires are in contact with the refrigerator back wall (condenser coil).
There is not foreseen door reversibility. Do not try to reverse the door.
ELECTRICAL WARNINGS
⚠ It must be possible to disconnect the appliance from the power supply by unplugging it if plug is accessible, or by a multi-pole switch installed upstream of the socket in accordance with the wiring rules and the appliance must be earthed in conformity with national electrical safety standards.
⚠ Do not use extension leads, multiple sockets or adapters. The electrical components must not be accessible to the user after installation. Do not use the appliance when you are wet or barefoot.
Do not operate this appliance if it has a damaged power cable or plug, if it is not working properly, or if it has been damaged or dropped.
⚠️ If the supply cord is damaged, it must be replaced with an identical one by the manufacturer, its service agent or similarly qualified persons in order to avoid a hazard - risk of electrical shock.
⚠ WARNING: Do not locate multiple portable socket-outlets or portable power supplies at the rear of the appliance.
CLEANING AND MAINTENANCE
⚠ WARNING: Ensure that the appliance is switched off and disconnected from the power supply before performing any maintenance operation. To avoid risk of personal injury use protective gloves (risk of laceration) and safety shoes (risk of contusion); be sure to handle by two persons (reduce load); never use steam cleaning equipment (risk of electric shock).
Non-professional repairs not authorised by the manufacturer could result in a risk to health and safety, for which the manufacturer cannot be held liable. Any defect or damage caused from non-professional repairs or maintenance will not be covered by the guarantee, the terms of which are outlined in the document delivered with the unit. ⚠️ Do not use abrasive or harsh cleaners such as window sprays, scouring cleansers, flammable fluids, cleaning waxes, concentrated detergents, bleaches or cleansers containing petroleum products on plastic parts, interior and door liners or gaskets. Do not use paper towels, scouring pads, or other harsh cleaning tools.
DISPOSAL OF PACKAGING MATERIALS
The packaging material is 100% recyclable and is marked with the recycle symbol 🌐. The various parts of the packaging must therefore be disposed of responsibly and in full compliance with local authority regulations governing waste disposal.
DISPOSAL OF HOUSEHOLD APPLIANCES
This appliance is manufactured with recyclable or reusable materials.
Dispose of it in accordance with local waste disposal regulations.
For further information on the treatment, recovery and recycling of household electrical appliances, contact your local authority, the collection service for household waste or the store where you purchased the appliance. This appliance is marked in compliance with European Directive 2012/19/EU, Waste Electrical and Electronic Equipment (WEEE) and with the Waste Electrical and Electronic Equipment regulations 2013 (as amended). By ensuring this product is disposed of correctly, you will help prevent negative consequences for the environment and human health.
The symbol on the product or on the accompanying documentation indicates that it should not be treated as domestic waste but must be taken to an appropriate collection center for the recycling of electrical and electronic equipment.
ENERGY SAVING TIPS
Install the appliance in a dry, well ventilated room far away from any heat source (eg. radiator, cooker, etc.) and in a place not exposed directly to the sun. If required, use an insulating plate.
To guarantee adequate ventilation follow installation instructions.
Insufficient ventilation at the back of the product increases energy consumption and decreases cooling efficiency.
Frequent door opening might cause an increase in Energy consumption.
The internal temperature of the appliance and the Energy Consumption may be affected also by the ambient temperature, as well as location of the appliance. Temperature setting should take into consideration these factors. Reduce door opening to minimum.
Do not worry about noises coming from the compressor which are normal operation noises.
Installation
Positioning and connection
Unpacking
- Carefully remove the protections and the adhesives, open the door and make sure all the components are present.
- Take out the power supply cable.
Positioning
- Position the device in a well ventilated area, not damp and free (avoid cabinets with closed walls).
- Keep the device away from heat sources.
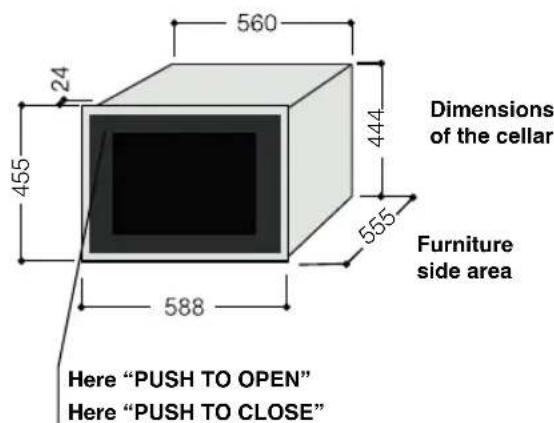
- Make sure the minimum distances between the device and the walls of the room where it is placed are kept, in order to ensure perfect ventilation of the device.
See figure.

Wiring connection
After transport, stand the device vertically, and wait for at least 3 hours before connecting it to the wiring system. Before putting the plug into the power socket, make sure that:
• the socket is earthed and according to legal
- regulations;
- the socket is able to hold up to the maximum power load of the machine, indicated on the Data Sheet table or on the feature plate to the bottom right (see Description of the device);
- the power supply voltage falls within the range indicated on the Data Sheet table or on the feature plate to the bottom right (see Description of the device);
- the power socket is compatible with the plug of the device. Otherwise, replace the socket or the plug; do not use extensions or multiple sockets.


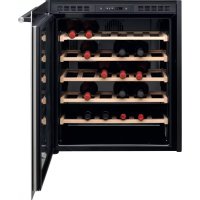
Product Description
Interior Parts

Control Panel

Using the wine cellar
Bottle ageing compartment
The ageing compartment's main function is that of guaranteeing that your wines are preserved in optimal conditions.
The temperature has been set in the factory at a temperature held to be excellent in most cases and is 15irc C in the upper compartment.
Wine has a complex nature and it derives from a long and slow process. In order to best express its attributes, very specific conditions are necessary. All wines are preserved at the same temperature, but, depending on their different characteristics, wines are served and tasted at very different temperatures (see the Table of ideal wine temperatures).
Therefore, just as for manufacturers' wine cellars, for your new appliance, the absolute temperature value is not important for preserving your wine.
Rather, the constant temperature through time is important. Wine preservation is ideal at any temperature, as long as that temperature does not vary.
Manual temperature control
When you plug in your wine cellar, the display shows the temperature inside the cellar: it has been set to reach 15irc C and become steady on it. Should you need to adjust it, follow the instructions below:
I. When you plug in your wine cellar, the display shows the temperature that has been set
2. Press the + button for one second (see the Control Panel). The temperature will begin to blink.
3. Press the + or - buttons until you reach the desired temperature
4. Wait 5 seconds for the temperature to stop blinking.
5. Wait until the wine cellar reaches its temperature before you place the wine bottles inside.
The inside light does not go on (or it goes off temporarily) when the inside temperature goes over 24irc C. This allows you to reach the pre-set temperature more quickly.
Taking out the wooden shelves
WARNING: The wooden shelves are not sliding. Do not take them out when loaded with bottles, to prevent the risk of the bottles breaking.
You can take the shelves out for cleaning only when they are not loaded with any bottles.
Table of ideal wine temperatures
This table indicates the approximate temperatures at which wine should be served. Should one of your wines need to be served at a temperature that is greater than the temperature inside your wine cellar, we suggest that you leave it wine out for the time that is necessary before you serve it.
| Amarone 17°C Dry and Sweet Sparkling Wines | 6°C | ||
| Barbaresco 17°C | Verdicchio di Matelica e dei Castelli di Jesi | 8°C | |
| Barolo 17°C | White wines from Trentino Alto Adige | 11°C | |
| Beaujolais 13°C Franciacorta White Wines | |||
| White liquered Bordeaux 6°C Dry aromatic white wines 10°C | |||
| Dry White Bordeaux 8°C | Dry, young, and fruity white wines | 8°C | |
| Red Bordeaux 17°C | White wines from Friuli Venezia Giulia | 11°C | |
| White Bourgogne 11°C Rodano wines 15°C | |||
| Red Bourgogne 18°C Dry white wines from the Loire 10°C | |||
| Brunello | 17°C Lique red wines from the Loire 7°C | ||
| Champagne | 6°C Red wines from the Loire 14°C | ||
| Chianti Classico | 16°C | Liquered Passito wines | 8-18°C |
| Languedoc-Roussillon | 13°C Rosè | Wines, New Wines 12°C | |
| Passito di Pantelleria | 6°C | Light red wines with mild tannic | 14°C |
| Rosé Provence | 12°C | Red, rather tannic wines with medium structure | 16°C |
Stocking the wine bottles
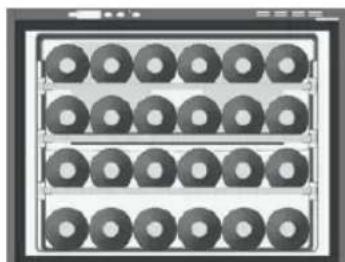
Standard 24-bottle stock
The 24-bottle stock (for standard, mixed, and renana bottles) is recommended for wines that need to be visible and easily removed.
natural_image
Grid of 16 circular components arranged in two rows, no text or symbols visibleSTANDARD
24 Bottles (100% lying down)
3 shelves
Position each bottle into the slots on the 3 wooden shelves. 6 bottles can be placed on the bottom of the wine cellar.
We suggest you place the Renana bottles onto the lower shelf and the bottom of the wine cellar because they have been specially designed to hold larger bottles.
! The wooden shelf can safely hold up to 22 bottles

natural_image
Simple line drawing of a rectangular tray with six rounded cutouts (no text or symbols)Champagne bottle stock
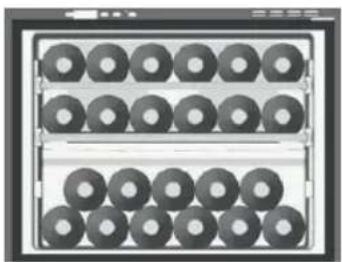
Champagne bottles are larger than standard bottles. They must be placed onto the base of the wine cellar, which can hold up to 5.
natural_image
Grid of circular holes arranged in two rows within a rectangular frame (no text or symbols)If you want to stock more than 5 Champagne bottles in your wine cellar, remove the 3th shelf and stock the bottles in two rows (placing the bottles in the second row between those on the bottom row). This will hold up to 9 bottles.
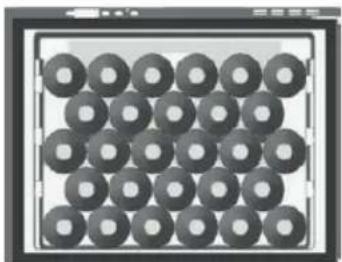
Some stocking configurations
natural_image
Grid of circular washers or washers arranged in rows, no text or symbols visiblePRESERVATION
28 Bottles (100% lying down)
Maintenance and troubleshooting
Care and maintenance
Disconnecting the wine cellar
During cleaning and maintenance, it is imperative that you unplug the wine cellar.
Troubleshooting
If you notice that your wine cellar is not working properly, check with the following list before you call your Service Centre.
| Problem Possible causes/solutions | |
| The compressor does not work • The plug is not pl | plugged into the wall-outlet or not enough to make contact. Or, there could be a power failure in your home.• The wall-outlet is not in working order. Plug the wine cellar into another wall-outlet to check. |
| The compressor never stops • Contact the Service | Centre |
! Any work that is done to the wine cellar should be performed by your authorized local Service Centre.
! Short term faults, such as power failure, will not compromise the wines. It is only when working faults are left unsettled for a long time that the wine may suffer.
! The appliance was designed and manufactured in compliance with international safety standards. The following warnings are provided for safety reasons and must be read carefully.
This appliance complies with the following Community Directives:
CE
- Low Voltage Directive (LVD) 2014/35/EU
- The Electromagnetic compatibility (EMC) Directive 2014/30/EU
- RAEE Directive 2012/30/EU
Disposal

- Observe local environmental standards when disposing packaging material for recycling purposes.
- Directive 2012/19/EUon Wwaste Electrical and Electronic Equipment (WEEE 2 Directive), requires that old household electrical appliances must not be disposed of in the normal unsorted municipal waste stream. Old appliances must be collected separately in order to optimise the recovery and recycling of the materials they contain and reduce the impact on human health and the environment. The crossed out “wheeled bin” symbol on the product reminds you of your obligation, that when you dispose of the appliance it must be separately collected.
Consumers should contact their local authority or retailer for information concerning the correct disposal of their old appliance.
Assistance
Before calling for Assistance:
- Check if the malfunction can be solved on your own (see Troubleshooting).
- If after all the checks, the appliance still does not operate or the problem persists, call the nearest Service Centre
Communicating:
• type of malfunction
• appliance model (Mod.)
- serial number (S/N)
This information can be found on the data plate located on the bottom left side of the refrigerator compartment.
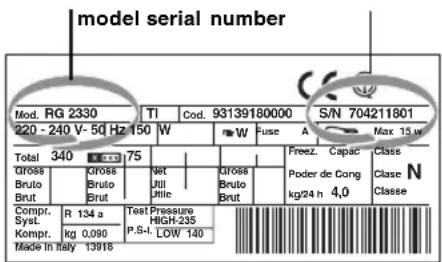
EXAMPLE OF LABEL
Never call on unauthorized technicians and always refuse spare parts which are not originals.
GUIDE D'UTILISATION
IT Italiano, 4
EN English, 17
FR Français, 30
ES Español, 43
DE Deutsch, 56
RU Русский, 69
KZ Казакша, 82
NL Nederlands, 95
PT Português, 108
Table des matières
natural_image
Grid of circular components arranged in two rows within a rectangular frame (no text or symbols visible)STANDARD
natural_image
Simple line drawing of a rectangular tray with six U-shaped cutouts (no text or symbols)natural_image
Close-up of a grid of circular washers or washers in a rack, no visible text or symbolsnatural_image
Grid of circular washers or washers arranged in a 2x2 grid within a square frame (no text or symbols visible)CONSERVATION
natural_image
Grid of 24 identical circular components arranged in two rows within a square frame (no text or symbols visible)ESTÁNDAR
natural_image
Simple line drawing of a rectangular tray with six vertical slots (no text or symbols)natural_image
Grid of circular holes arranged in two rows within a rectangular frame (no text or symbols)natural_image
Grid of circular washers or washers arranged in a square pattern (no text or symbols visible)CONSERVACIÓN
Stromanschluss
Produktbeschreibung
Innenteile

Bedientafel

natural_image
Grid of circular components arranged in two rows, no text or symbols visibleSTANDARD
natural_image
Simple 3D diagram of a rectangular tray with six U-shaped cutouts (no text or symbols)natural_image
Close-up of a grid of circular washers or washers in a rack, no visible text or symbolsnatural_image
Grid of circular washers or washers arranged in a square pattern (no text or symbols visible)KONSERVIERUNG
Описание прибора
natural_image
Grid of circular components arranged in three rows within a frame (no text or symbols visible)СТАНДАРТНАЯ СХЕМА
natural_image
Simple line drawing of a rectangular tray with six U-shaped cutouts (no text or symbols)natural_image
Grid of circular washers or washers arranged in two rows within a rectangular frame (no text or symbols visible)natural_image
Grid of circular washers or washers arranged in a square pattern (no text or symbols visible)КОНСЕРВИРОВАНИЕ
Сымдарды косу
Өнім сипаттамасы
Ішкі бөліктер

Баскару панелі

Шарап коймасын пайдалану
natural_image
Grid of circular components arranged in three rows within a rectangular frame (no text or symbols)СТАНДАРТТЫ
natural_image
Simple line drawing of a rectangular tray with six empty rounded slots (no text or symbols)natural_image
Grid of circular components arranged in two rows within a rectangular frame (no text or symbols visible)natural_image
Grid of circular washers or washers arranged in a square pattern (no text or symbols visible)КОНСЕРВ ЖАСАУ
Aansluiting
Productbeschrijving
Interne delen

Bedieningspaneel

Retirar as prateleiras de madeira
Como armazenar as garrafas

Retirar as prateleiras de madeira
natural_image
Grid of circular components arranged in two rows, no text or symbols visibleSTANDARD
24 garrafas (deitadas a 100%)
3 prateleiras
Posicione cada garrafa nas ranhuras das 3 prateleiras de madeira. Podem ser colocadas 6 garrafas na parte inferior da cave de vinho.
natural_image
Simple line drawing of a rectangular tray with six vertical slots (no text or symbols)Stock de garrafa de Champanhe
natural_image
Grid of circular components arranged in two rows, no visible text or symbolsnatural_image
Grid of circular washers or washers arranged in rows, no text or symbols visiblePRESERVAÇÃO
28 garrafas (deitadas a 100%)
- STANDARD
- CONSERVAZIONE
- Product Description, 24
- Using the Wine Cellar, 25-26
- Stocking the wine bottles, 27
- Maintenance and troubleshooting, 28
- SAFETY INSTRUCTIONS
- IMPORTANT TO BE READ AND OBSERVED
- PERMITTED USE
- INSTALLATION
- ELECTRICAL WARNINGS
- CLEANING AND MAINTENANCE
- DISPOSAL OF PACKAGING MATERIALS
- DISPOSAL OF HOUSEHOLD APPLIANCES
- ENERGY SAVING TIPS
- Positioning and connection
- Unpacking
- Positioning
- Wiring connection
- Product Description
- Using the wine cellar
- Bottle ageing compartment
- Manual temperature control
- Taking out the wooden shelves
- Table of ideal wine temperatures
- Stocking the wine bottles
- Standard 24-bottle stock
- Champagne bottle stock
- Some stocking configurations
- Maintenance and troubleshooting
- Care and maintenance
- Disconnecting the wine cellar
- Troubleshooting
- CE
- Disposal
- Assistance
- Before calling for Assistance:
- Communicating:
- GUIDE D'UTILISATION
- Table des matières
- CONSERVATION
- ESTÁNDAR
- Stromanschluss
- Produktbeschreibung
- Описание прибора
- СТАНДАРТНАЯ СХЕМА
- Сымдарды косу
- Өнім сипаттамасы
- Шарап коймасын пайдалану
- СТАНДАРТТЫ
- Aansluiting
- Productbeschrijving
- Retirar as prateleiras de madeira
- Stock de garrafa de Champanhe
Brand : HOTPOINT
Model : HA WC5120
Category : Wine cellar