HM400 - Lawn mower MURRAY - Free user manual and instructions
Find the device manual for free HM400 MURRAY in PDF.
User questions about HM400 MURRAY
0 question about this device. Answer the ones you know or ask your own.
Ask a new question about this device
Download the instructions for your Lawn mower in PDF format for free! Find your manual HM400 - MURRAY and take your electronic device back in hand. On this page are published all the documents necessary for the use of your device. HM400 by MURRAY.
USER MANUAL HM400 MURRAY
natural_image
Technical line drawing of a mechanical assembly with multiple pipes and connectors (no text or symbols)
natural_image
Technical line drawing of a mechanical assembly with no visible text or symbols
natural_image
Technical line drawing of a mechanical excavator assembly with motion arrows and component details (no text or symbols)
natural_image
Mechanical assembly diagram showing gear and cam mechanism with no visible text or symbols
text_image
2 5
text_image
E 6 A B C DTable of Contents
| Safety | 8 |
| Assembly | 9 |
| Operating | 10 |
| Maintenance | 10 |
REFER TO THE WARRANTY LEAFLET THAT IS SUPPLIED WITH THIS MACHINE FOR PRODUCT WARRANTY DETAILS.

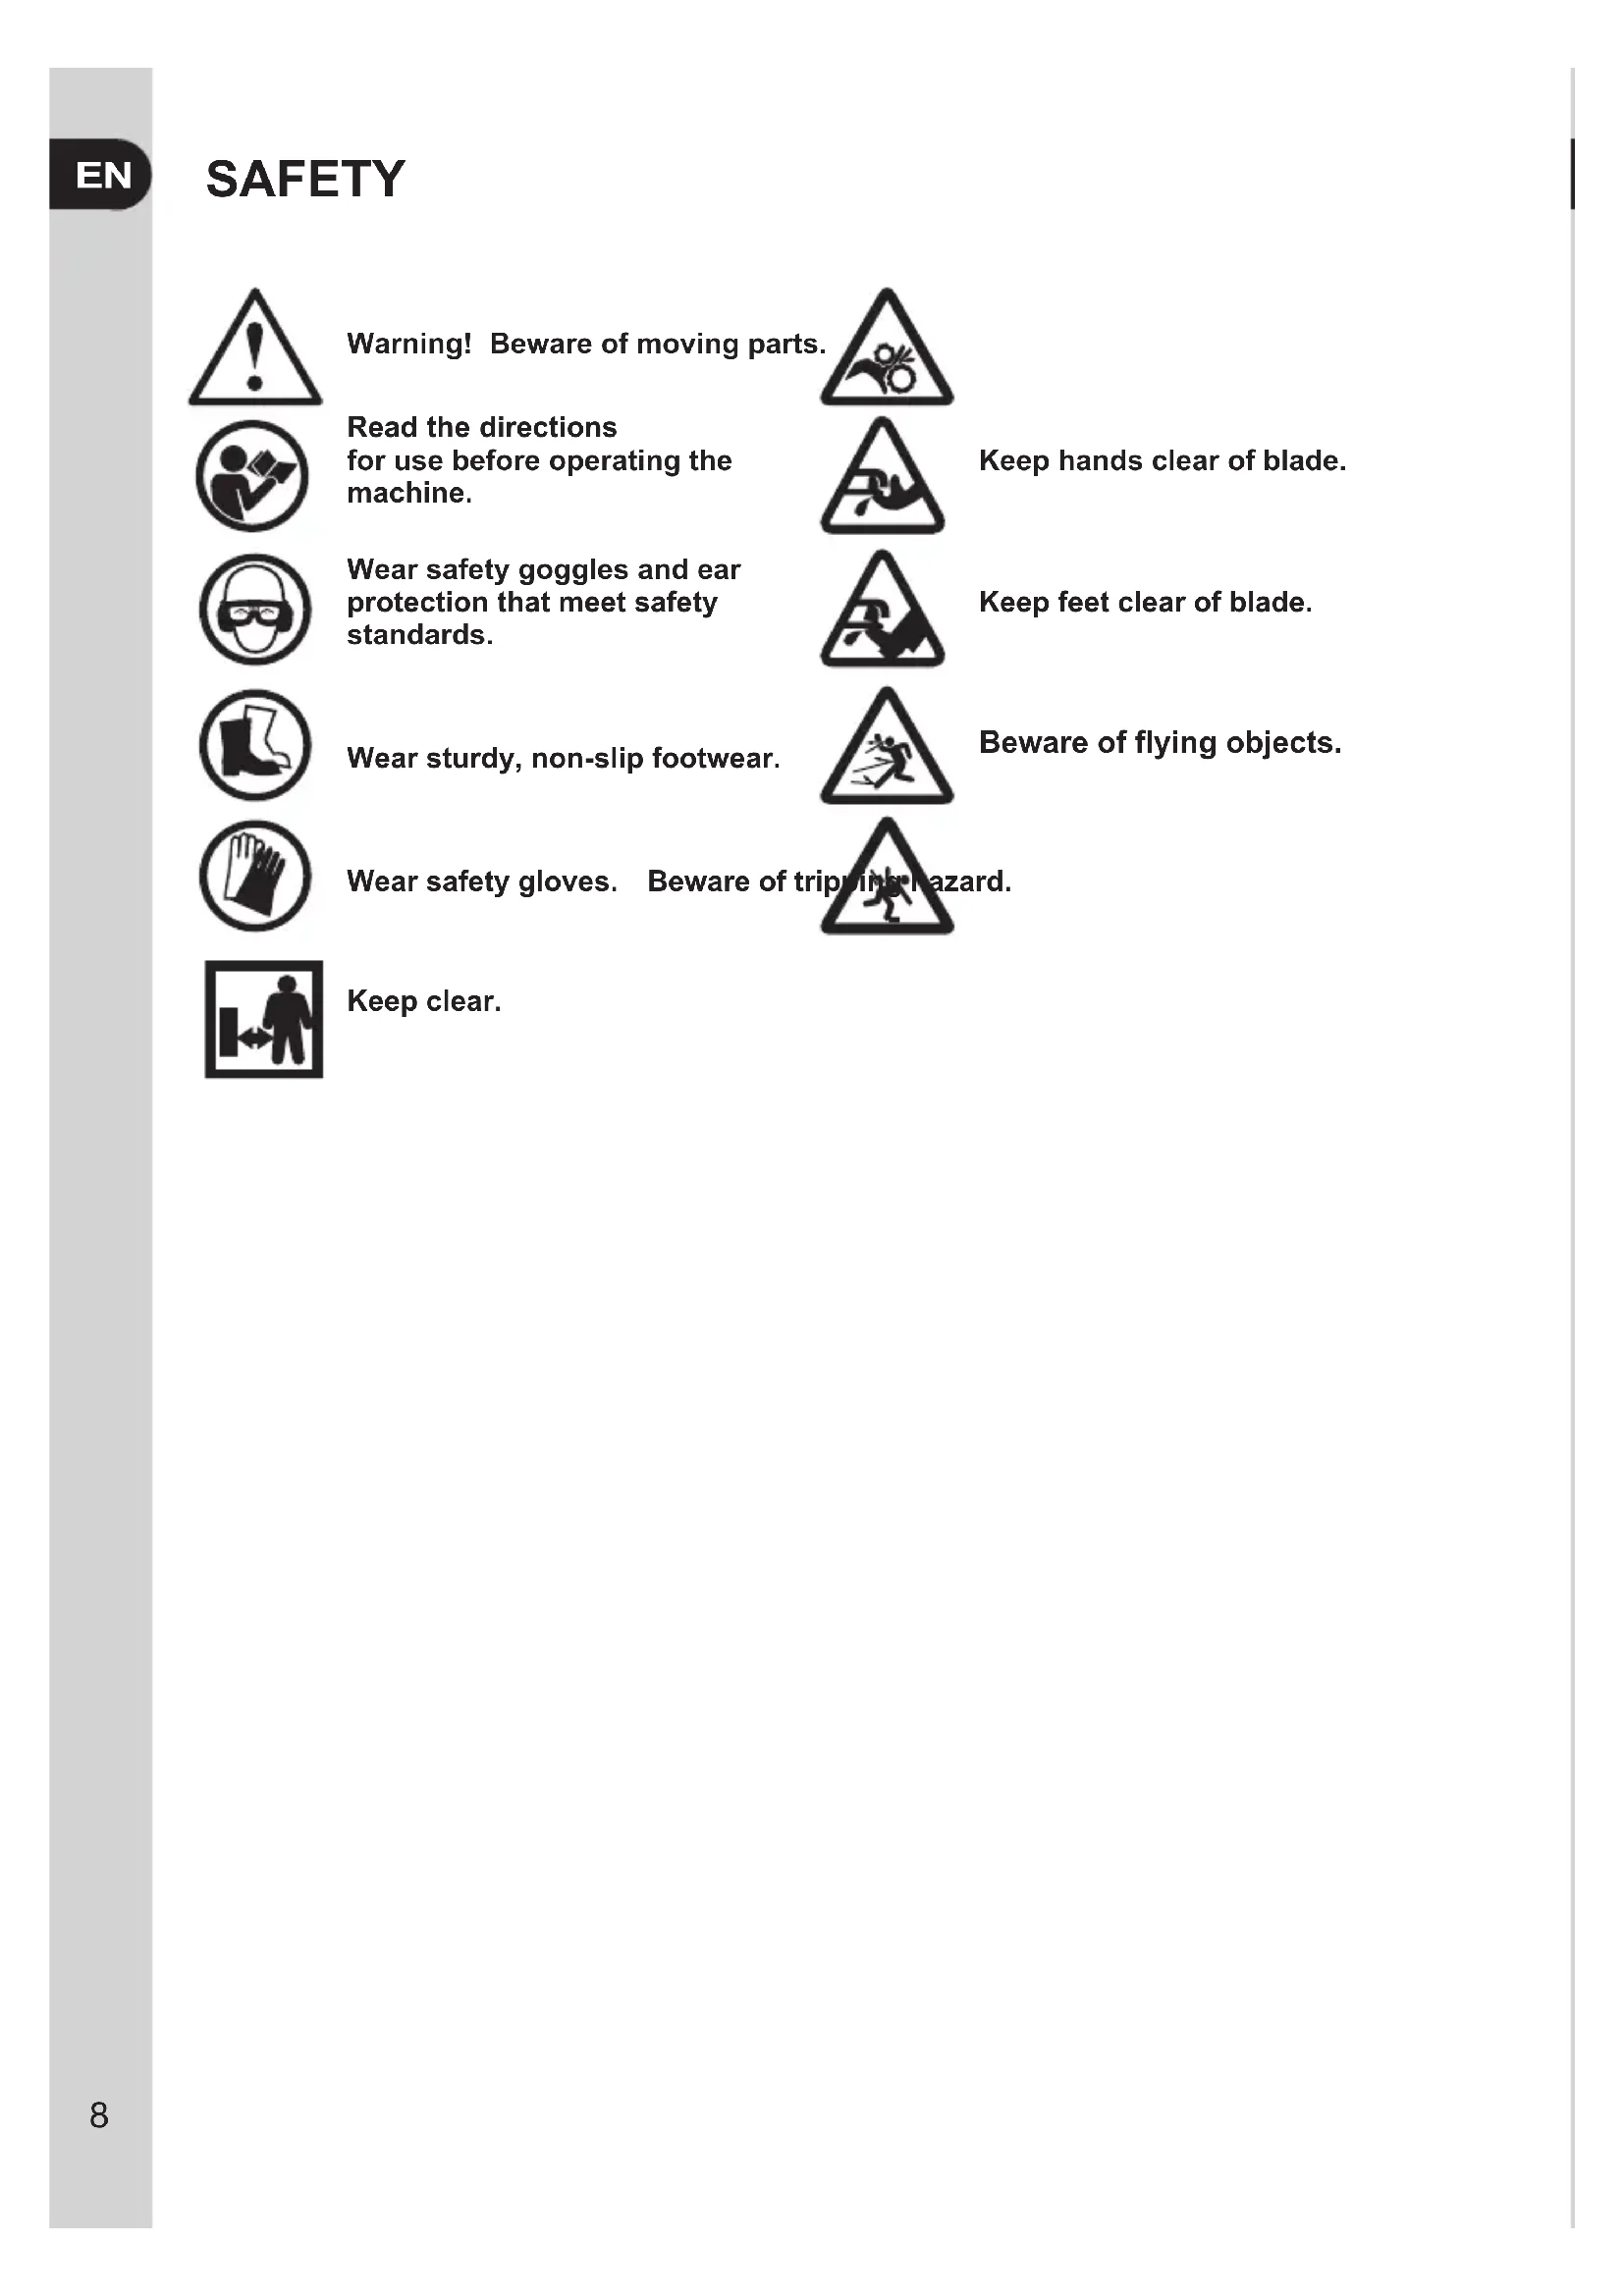
Warning! Beware of moving parts.

Read the directions for use before operating the machine.

Wear safety goggles and ear protection that meet safety standards.

Wear sturdy, non-slip footwear.

Wear safety gloves. Beware of tripping hazard.

Keep clear.

Keep hands clear of blade.


Keep feet clear of blade.

Beware of flying objects.

INTENDED USE
- This product is intended for domestic lawn mowing only.
- The reel blades should rotate when the wheels turn. Both wheels should touch the ground while mowing.
NOTE:
- The mower should never be operated with the wheels off the ground. It should only be used by pushing in a forward direction at ground level and must not be ridden on.
- It should not be used to cut anything other than domestic grass lawns.
- Do not use the product for any task, except for that which it is intended.
Precautions
- The following safety precautions must be strictly observed to avoid the risk of damage or personal injury.
- Do not allow children or people unfamiliar with these instructions to use the mower.
- Do not operate the mower when fatigued, ill or under influence of alcohol, drugs or medication.
- Before using the mower, check and ensure that the blade assembly is not worn or damaged. Damaged or worn blades are major hazards.
- Check all fasteners regularly. Always ensure the mower is in a safe operating condition.
- Make sure the lawn is clear of sticks, stones, bones, wire and debris before mowing. These could be thrown by the blades and cause injury or damage.
- Mow only in good daylight.
- Stop mowing before adjusting the cutting height and when emptying the grasscatcher.
- Mow across the face of a slope, never up or down. Use extreme caution when changing direction on a slope. Do not mow on excessively steep slopes.
- Walk with the mower, never run.
Precautions
- Never lift, carry or tilt the mower when the blade is rotating.
- Never intentionally strike an obstacle such as trees or mow tall weeds, tall and heavy grass, and hidden objects such as sticks. Slips and trips resulting from sudden stoppages, uneven ground and unbalanced movements may result in serious injury.
ASSEMBLY
See images 1 to 3.
OPERATING
Mowing Tips.
- Worn or damaged blades will reduce lawn finish and will not cut properly. Check and inspect them regularly.
- To maintain cutting performance, keep the mower clean and the area to be mowed free from any debris.
- Cut the grass regularly to avoid it becoming too long and making it difficult to push.
- The cutting pattern should be varied from week to week (eg. North-South to East-West).
- As a general rule, only cut the top one third of the grass length (approximately). More than this may leave an untidy appearance and finish.
- Walk at a good, steady pace. Avoid walk at a slow, unsteady pace as the reel mower tends to bind up and skid.
Adjusting the Cutting Height.
See images 4 and 5.
MAINTENANCE
Checking/Adjusting the Blade:

Never attempt maintenance that is not outlined in this manual. All repair work must be carried out by Briggs & Stratton Authorised Service Centre.
Please visit our website:
www.sprintpower.eu
www.murray.com


A pair of safety boots. A pair of prote
Maintaining the mower
- If the mower begins to operate abnormally or if it strikes a foreign object - STOP mowing. Inspect the mower and blades for any damage.
- Regularly inspect and check for any worn or damaged components. Replace if required.
- Regularly check all accessible fasteners. Retighten or replace if required.
- The cutting mechanism on your lawnmower is already preset to the factory setting.
- The blades should be adjusted if the grass is not cut cleanly and evenly or if the mower is difficult to push. Always check the cutting performance before use and adjust if needed.
Image 6 - Mower upside down view

- Keep the mower on a stable and flat surface.
-
Keep hands and feet away from rotating blades. These blades are sharp and can cause serious injury. When handling the blades for adjustment or maintenance tasks, always wear protective gloves.
-
Turn the mower upside down as shown in figure 6. Detach the grasscatcher and the handle assembly (if required).
-
Feed a strip of paper (80gsm) (A) about 1" to 2" wide between the reel blades (B) and the fixed blade (C).
-
Turn the reel blades slowly by hand in the direction shown by the arrow in figure 6 and check if the paper is cut as the first reel blade passes. Repeat this process for the entire length of the fixed blade and the paper should cut cleanly and evenly. The blades act like a scissor.
- If the paper is not cut cleanly and evenly, use a 4mm Hex Allen key (D) and turn it clockwise approximately 1/8th of a turn to tighten the adjustment bolt (E) on both side until the reel blades lightly brushes the fixed blade.
- If the reel blades and fixed blade make in contact and it becomes difficult to turn the reel blades by hand, use hexagon allen key and turn it anticlockwise to loosen the adjustment bolt on both sides. Repeat step 2 & 3 for checking.
NOTE:
- The adjustment bolts should be equally adjusted to avoid misalignment between the reel blades and the fixed blade.
- Do not overtighten the adjustments bolts as this could damage the fixed blade.
Cleaning and Storage
- Clean the mower thoroughly after each use using a soft brush.
- Do not use water, solvents, polishes or any aggressive cleaning agents.
- Do not immerse the mower or any part of it in water.
- Store the mower in a dry place.
- Do not place other objects on top of the mower during storage.

The mower is not freestanding and care should be taken to ensure the mower does not tip, fall or roll during storage.
Troubleshooting
| Problem Possible cause Correction | ||
| Poor cutting Worn or damaged bladesIrregular walking pace.Blunt bladesClearance between the reel blades and the fixed blade is too wide | Contact Service CentreWalk at a good, steady paceContact Service CentreRefer to 'Adjusting the Blade' | |
| Abnormal noises Worn or damaged bladesLoose fastenersInterference between the reel blades and the fixed blade is too much | Contact Service CentreRetighten or replaceRefer to 'Adjusting the Blade' | |
| Difficult to push Worm or damaged bladesCutting height adjustment is too lowInterference between the reel blades and the fixed blade is too muchBlades restricted by grass and dirt accumulated around the cutting area | Contact Service CentreRaise cutting height adjustmentRefer to 'Adjusting the Blade'Clean the cutting area | |
Índice
Veja as imagens 1 a 3.
OPERAÇÃO
Dicas de corte.
Veja as imagens 4 e 5.
MANUTENÇÃO
SJEKK GARANTIBLAD SOM F∅LGER MED MASKINEN FOR INFORMASJON OM PRODUKTGARANTI.

Advarsel!

Les bruksanvisningen før maskinen betjenes.

©2019 Briggs & Stratton
All rights reserved. No part of this booklet may be reproduced by any means without prior written permission. All information herein is subject to change without notice.
| 2302 A | PL BH | RELEASED FOR PRODUCTION 11/12/18 | |
| ECN ISS DRN CKD DESCRIPTION DATE | |||