Tomahawk - Barbecue Klarstein - Free user manual and instructions
Find the device manual for free Tomahawk Klarstein in PDF.
User questions about Tomahawk Klarstein
0 question about this device. Answer the ones you know or ask your own.
Ask a new question about this device
Download the instructions for your Barbecue in PDF format for free! Find your manual Tomahawk - Klarstein and take your electronic device back in hand. On this page are published all the documents necessary for the use of your device. Tomahawk by Klarstein.
USER MANUAL Tomahawk Klarstein
Berlin Brands Group UK Limited
PO Box 42
272 Kensington High Street
Londyn, W8 6ND
United Kingdom
Dear customer,
Congratulations on purchasing this device. Please read the following instructions carefully and follow them to prevent possible damages. We assume no liability for damage caused by disregard of the instructions and improper use. Scan the QR code to get access to the latest user manual and more product information.

CONTENTS
Safety Instructions 23
Gas Connection 25
Leak Test 26
Getting Started 27
Operation 29
Cleaning and Care 31
Troubleshooting 33
Disposal Considerations 37
Manufacturer & Importer (UK) 37
Assembly Instructions 99
TECHNICAL DATA
| Article number 10045157 | ||
| Total heat output (Hs) | 20.7 kW (1506 g/h) | |
| Main burner / side burner (number) | 5 main burners + 1 side burner | |
| Gas category I3B/P(30) I3+(28~30/37) | ||
| Countries LU, NL, DK, FI, SE, CY, CZ, EE, LT, MT, SK, SI, BG, IS, NO, TR, HR, RO, IT, HU, LV | BE, FR, IT, LU, IE, GB, GR, PT, ES, CY, CZ, LT, SK, CH, SI, LV | |
| Gas Propane, butane | and mixtures | Butane/propane |
| Gas pressure 28~30 mbar 28~30 | 0/37 mbar | |

KLARSTEIN
Product name: Tomahawk
Gas smoker grill with glass door
Article number: 10045157
PIN code: 2531CS-0069
Chal-Tec GmbH, Wallstr. 16, 10179 Berlin, Germany
WWW.KLARSTEIN.CO.UK
| Country ofdestination | Equipment class Gas type | and gaspressure | Nozzle size Ø Total h | heatoutput (Hs) | |
| Mainburner | Sideburner | ||||
| BE, CH, CY,CZ, ES, FR,GB, GR, IE, IT,LT, LU, LV, PT,SK, SI | 13+(28~30/37) | Butane (G30)(28-30) mbar | 0.91 mm | 0.76 mm 20 | 7 kW1506 g/h |
| Propane (G31)37 mbar | 0.91 mm | 0.76 mm | |||
| BE, CY, CZ,DK, EE, FI, HU,LT, NL, NO, SE,SI, SK, RO, HR,TR, BG, LU, MT,IT, IS | 13B/P(30) | Butane (G30)/Propane (G31)and their mixtures(28-30) mbar | 0.91 mm | 0.76 mm | |
| AT, CH, DE,SK, LU | 13B/P(50) | Butane (G30)/propane (G31)and their mixtures50 mbar | 0.80 mm | 0.66 mm | |
| PL 13B/P(37) | □ | Butane (G30)/Propane (G31)and their mixtures37 mbar | 0.91 mm | 0.76 mm 23 | kW1674 g/h |
| · For outdoor use only.· Read the instruction manual before use.· The gas bottle must not be placed in the grill.· Warning: Accessible parts can get very hot.Keep small children away.CE2531-20 | |||||
SAFETY INSTRUCTIONS
- Read the operating instructions carefully before installing and commissioning the unit and keep them for future use.
- When installing and setting up, follow the order of steps given in the user manual and never allow children to operate the device.
- The device may only be used in outdoor areas.
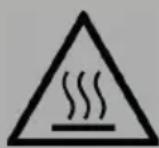
- The easily accessible parts of the device can become very hot during use. Keep small children away from the device. Use protective gloves when working with hot components.
- Do not move the unit to another location while it is in use.
- Turn off the gas valve of the gas bottle after using the device.
- Any modification of the device can be dangerous, so do not modify the device.
Unauthorised modifications to the device will void the warranty. - Do not modify the main control units of the gas grill, such as gas fittings, injectors, valves, etc.
- Parts sealed by the manufacturer or the after-sales service must not be modified by the user of the device.
- Do not store or use gasoline or methanol fuels or other flammable liquids and vapours near this device.
- Never ignite a gas barbecue with petrol or comparable liquids.
- Some LPG dealers will fill cylinders beyond their actual capacity, which can create a dangerous condition by causing high pressure to build up inside the cylinder.
- As a safety device, the gas pressure valve will automatically release gas to normalise the pressure inside the gas cylinder and equalise the excess pressure. Caution: The vented gas is highly flammable and could therefore ignite. To reduce this danger, you should take the following safety precautions:
- Tell the gas dealer to fill the gas bottle to a maximum of 80% of the total capacity.
- If you have an extra gas bottle, you should never store it near or below a grill, heater box or other source of heat or ignition.
- The device is safe and easy to use. Make sure the gas bottle has the right pressure for the grill.
- Food can be grilled on the grill grate with the cover open or closed.
- After the cover has been closed for 5 minutes, it must remain open for at least 1 minute to allow the accumulated heat to escape.
- Only use the grill in combination with a drip tray for fat and oil.
- Adequate ventilation is essential to the combustion and effectiveness of the device. This ensures the safety of the user and those around the grill.
- Never use the device in closed rooms or similar environments.
- Do not place the device directly in the direction of the wind when the wind speed is over 2m / s .
- The grill is suitable for outdoor use only.
- Never install the gas bottle under the grill on the base plate as this could cause serious injury to the user and those in the immediate vicinity of the grill.
- There must not be any gas bottles above the device. Therefore, do not place it under trees, bushes or roofs.
-
Ensure that there is a minimum distance of one metre between the device and other objects.
-
The device must not be used in the vicinity of flammable materials (e.g. petroleum-based products, thinners or other solid objects bearing a "flammable" warning label).
After each use, close the gas valve or the gas pressure valve of the gas cylinder.
Before each use, inspect the hose for tears, cuts, or other signs of wear. - Never use the grill if the hose is not properly intact.
- When changing the gas bottles, make sure that there is no ignition source such as cigarettes, open flames, etc. nearby and that the device is switched off.
- If there is a gas leak, immediately turn off the gas supply, extinguish any open flame and open the cover. If the leak persists, check the device and device components for damage and bad connections. Contact customer service or your local gas supplier immediately if the problem cannot be solved.
- Never use an open flame to check for gas leaks.
- Use caution when using the gas grill and do not leave the grill unattended while in use. Close the gas bottle after each use.
- Clean the grill after each use.
- Do not block the grill's burner openings. Should these become blocked, use a 1.6 mm diameter rod to dislodge the blockage. Be careful not to accidentally widen the burner orifices or nozzle openings.
- It is recommended that the gas grill be serviced at least once a year by a qualified person. Do not attempt to service the device yourself.
- Carry out a gas leakage test with soapy water before putting the device into operation.
- When lighting the burner, the cover must be open.
- Use oven gloves and long grill utensils when using the grill.
- Be prepared in case of fire or accident. Know the location of the first aid kit and fire extinguisher and familiarise yourself with their use.
- Use extreme caution when grilling.
- Do not heat sealed glass or metal containers on the grill. Pressure could build up inside the containers, causing an explosion and resulting in property damage and/or personal injury or damage to the grill.
- This grill meets high quality standards. Use and installation must comply with local regulations.
- This grill may only be operated with gas.
- Do not use the grill until it has been properly installed and all device components have been tightened and secured.
- Do not use the grill near unprotected flammable equipment and keep a minimum distance of 100cm from flammable objects and surfaces.
- To avoid burns, do not touch the metal parts of the grill until it has completely cooled (approximately 45 minutes) unless you are using protective equipment (grill gloves, oven mitts, etc.).
- Consumption of alcohol, prescription and non-prescription medications, or drugs may adversely affect the operator's ability to properly assemble or safely operate the grill.
- Always open the grill cover carefully and slowly as the heat and steam trapped under the cover can cause severe burns if released too quickly.
-
Always place the grill on a hard and level surface. A tarmac or black surface might not be suitable for this purpose.
-
Keep small children and pets away from the grill at all times.
- Never place the grill on tables or similar.
- Do not use the grill in very strong winds.
GAS CONNECTION
The gas connection line between the gas pressure regulator and the grill can be made using metal bellows or a gas-approved rubber hose with a maximum length of 1.5m . Gas grills that run on liquefied petroleum gas (LPG) should be connected with a gas approved rubber hose.
- If a rubber hose is used, a universal air inlet fitting is required.
- The two ends of the gas hose are connected to the grill and the gas valve respectively. Please install the rubber hose adapter directly on the main gas pipe without any adapters in between. The diameter of the gas hose is 8 - 10mm and varies depending on the adapter used. If in doubt, ask your local gas dealer which adapter and gas hose is compatible with the gas bottles available in your country. Never operate the device if you have any doubts about compatibility or if you are unsure whether the connection is properly insulated.
- Only approved gas hoses and regulators may be connected to a (refillable) gas cylinder. All components should comply with local regulations.
- Make sure that the gas hose is not twisted, kinked or bent by other objects. After installation is complete, a gas leak detection (leak test) should be performed.
- Do not expose the gas hose to high temperatures.
It is recommended that an annual air tightness test be carried out on the gas grill. - Before each use, make sure the rubber hose is in good condition. Replace it if it shows signs of wear or cracks.
| Gas connection with Type E adapter | Gas connection (France) |
| If a rubber hose is being used, please install the appropriate adapter (see image above) directly on the main gas pipe without any adapters in between. | When using the gas grill in France, please ensure that the appropriate adapter (see image above) is connected to the main gas line. |
LEAK TEST
- Perform the leak test each time the gas cylinder is connected or reconnected.
- Never use an open flame to check for gas leaks.
- Never smoke while performing the leak test.
- Always perform the leak test outdoors, in a well-ventilated area, and away from sources of ignition such as gasoline, open flames, sparks, or electrical equipment.
- The device must be checked regularly for gas leaks. If a smell of gas is noticeable, the leak test must be carried out immediately.
Carrying out the leak test
- Make a soapy solution of soap and water in a 1:3 ratio. The soap solution can be applied with a bottle, brush, dish soap bottle or cloth to the areas to be tested: gas cylinder valve, pressure regulator, all gas connections, hose connections and along the entire length of the connection hose.
- The gas valve must be turned to the "OFF" position when applying the soap solution. Once the soapy solution has been applied all over, turn on the gas valve to the "ON" position.
- If there is a leak at one point, soap bubbles will appear at the corresponding point.
- If there is a leak, close the gas valve immediately. Tighten the leaking connectors, open the gas valve and recheck all points.
- If the leak does not stop after several attempts, contact your local gas dealer or similarly qualified person. Never use the grill if there is a leak!
GETTING STARTED
- Select the correct regulator by appliance category and gas pressure in the table in the Specifications section, e.g. 37 mbar regulator with appliance category 13+ for propane gas.
- The marking on the injector, e.g. 0.82, means that the size of the injector is 0.82mm .
Note:
- "SB" means "side burner"; allows you to put a pan on the side burner (the diameter of the pan can be max. 24 cm and the mixture 8 cm ).
BB means back burner
Make sure that the grill has been assembled correctly. Detailed assembly instructions with specific information are available for each model (see appendix). Follow these instructions carefully to ensure correct and safe assembly of the grill.
CAUTION: While we make every effort to make the assembly process as simple as possible, with steel components, it is natural that rough edges can result in cuts if improperly handled during assembly. Be careful when handling parts of the device during assembly. It is strongly recommended to protect the hands with gloves.
Preparation
- To use the grill, you need a liquid gas bottle and suitable gas pressure regulators.
- The gas pressure regulators should comply with the current version of the EN12864 standard and national specifications (see further instructions).
After purchasing the gas bottle, you can install it in your barbecue. - Changing gas cylinders should be done at a safe distance from all sources of ignition.
- Position the gas bottle on the left side or inside the grill, in a safe position away from heat.
- When you want to use the grill, insert the gas pressure regulator into the gas bottle and tighten it.

WARNING
Fire hazard
Before lighting the grill, you must read the entire manual. Make sure the hose is not twisted as this could affect gas flow. The hose must not be under tension or touch the hot parts of the device.
- Only use hoses that are heat-resistant at over 80^ .
- Flexible hoses should be replaced at least every 2 years or when national regulations require it.
Changing the Gas Bottle
Note: Turn off the gas bottle's gas valve (a wrench is not required).
If you place the gas cylinder outside the grill, the gas cylinder must not be more than 80~cm high, 35~cm wide and 11~kg in weight.
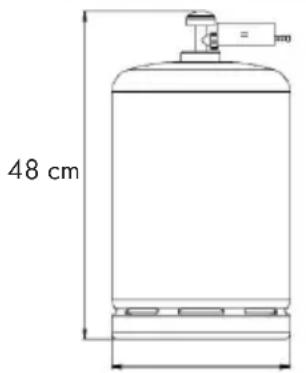
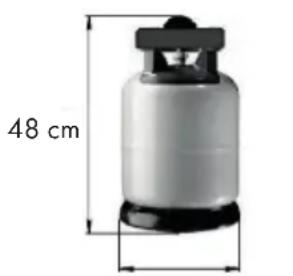
23.5 cm 23.5 cm
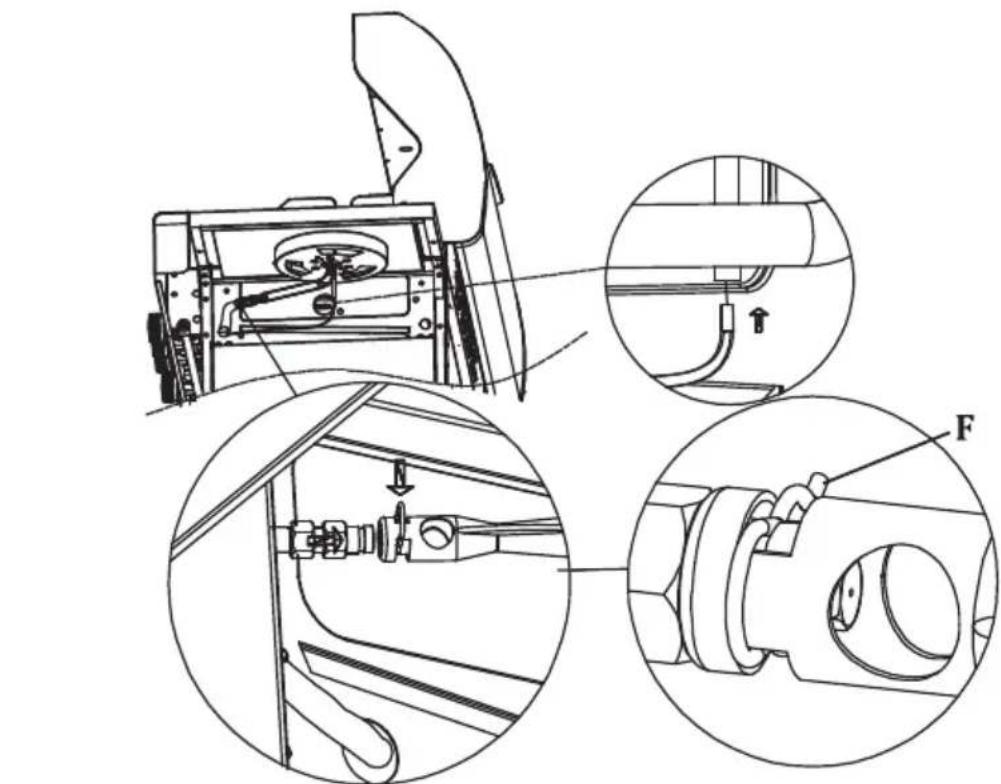
Connecting a Gas Bottle
- Rotate the orange protective cap so the arrow points to the gap in the cover.
- Remove the orange protective cap by first pulling out the pin and then removing the cap. Do not use tools and leave the protective cap hanging down on the gas cylinder.
- Make sure the black O-ring is inside the gas cylinder valve. Connect the gas pressure regulator to the valve.
- Turn the gas cylinder attachment clockwise and then switch on the gas grill according to the operating instructions.
Disconnecting the Gas Cylinder
- Turn off the gas tap if the gas bottle has one; unless there is a double cylinder installation with a switching valve. Wait for the burner and pilot light to go out. In the case of double cylinder installations, only the empty gas cylinder needs to be closed.
- Place the orange protective cap on the empty gas bottle.


WARNING Risk of burns
The black handle (pictured above) becomes very hot when using the gas grill. Never touch this area without protective gloves!
OPERATION
Information on how to save energy
- Reduce the opening time of the cover.
- Turn off the valve of the gas bottle as soon as the preparation process is finished.
- Preheat the appliance for 10 - 15 minutes only (except when using it for the first time).
- Do not preheat the appliance for longer than recommended.
- Do not set the temperature of the appliance higher than required.
- Connect the hose and the gas pressure regulator of the gas bottle to the left side of the appliance. Make sure the gas bottle is in a safe position and kept away from heat.
- Make sure the gas bottle is in a safe position and away from heat sources.
The diameter of the hose is 8 - 10 mm. - The maximum length of the hose should be 1.5 metres.
Before First Use
- The grill must be placed securely on a level surface before use.
- Before using the grill for the first time, it must be used on the highest setting for at least 30 minutes.
- Only use the device for grilling when the fuel elements have a light layer of soot.
- Do not use alcohol or petrol to ignite or re-ignite the grill, use only lighters that comply with the EN 1860-3 standard.
Lighting the Grill

WARNING
Danger of life-threatening burns
When igniting the grill, the cover must be open!
Make sure that your face is not directly above the grill when lighting the barbecue.
Light the grill
- Open the grill hood before attempting to light the burners.
- Turn all control knobs clockwise to the "OFF" position.
- Connect the regulator to the gas cylinder. Turn on the gas supply at the regulator.
Use soapy water to check for gas leaks between the cylinder and the regulator.
- Press down and hold the front left control knob while rotating it counter-clockwise to the "HIGH" position (a clicking sound will be heard). This will ignite the left burner.
Observe whether the burner has ignited. If not, repeat this process.
- If the burner does not light after trying again, wait 5 minutes and repeat step 4.
-
Adjust the heat by turning the knob to the High/Low position.
-
If the burner does not ignite. Light the device with a match using the lighting hole on the side of the device. Contact your gas dealer to have the ignition repaired.
- To light the remaining burners in sequence from left to right, repeat step 4 above. The cross lighting channel between the burners will light the adjacent burner. Never attempt to light any burner other than the left burner first.
- To turn off the grill, turn the cylinder valve or regulator to the OFF position, then turn the control knob on the unit clockwise to the OFF position.
WARNING: If the burner does not ignite, turn the control knob clockwise off and also turn off the cylinder valve. Wait five minutes before attempting to restart the ignition.
Lighting the Side Burner
- Open the side burner lid.
- Press down and hold the side burner control knob while turning it counter-clockwise to the "HIGH" position (a clicking sound will be heard). This will ignite the side burner. Observe whether the burner has ignited. If not, repeat this process.
- If the burner does not light after trying again, wait 5 minutes and repeat step 2.
- Adjust the heat by turning the knob to the High/Low position.
- If the burner does not ignite. Light the device with a match using a long match or a cone. Contact your gas dealer to have the ignition repaired.
- To turn off the side burner, turn the control knob clockwise to the OFF position. To turn off the entire grill, turn the cylinder valve or regulator to the "OFF" position, then turn the control knob on the unit clockwise to the "OFF" position.
Before cooking for the first time, run the grill on LOW for about 15 minutes with the lid closed and the gas on. This cleans the internal parts with heat and draws the odour away from the painted surface.
Clean your grill after each USE. DO NOT use abrasive or flammable cleaning agents as they may damage product parts and cause a fire. Clean in warm soapy water.
WARNING: Accessible parts can be very hot. Always keep small children away from the hot device (even when cooling down!). We recommend using protective gloves (e.g. oven gloves) when handling particularly hot components.

WARNING Risk of deflagration
If the burner still will not light, turn the gas control knob to the "Off" position and wait two minutes to allow the excess gas to dissipate before trying to light the grill again.
CAUTION Risk of burns
All cleaning and maintenance should only be carried out after the grill has cooled down and the gas supply has been turned off.
Cleaning
By "burning off" the grill after each use (about 15 minutes), excess food residues are kept to a minimum.
Outer surface
Use a mild detergent or baking soda and a hot water solution. For stubborn stains, a non-abrasive scouring pad can be used and then rinsed off with water.
If the inside of the grill lid has the appearance of a bluish colour, the paint burned on fat has turned to carbon and is peeling off. Clean thoroughly with hot soapy water. Rinse with water and let dry completely. Never use oven cleaner.
Grill base (inside)
Remove residues with a brush, scraper and/or cleaning pad and wash with a soapy solution. Rinse with water and let dry.
Wooden surface
Wash with a soft cloth and hot soapy water. Rinse with water. Do not use abrasive cleaners, degreasers or concentrated grill cleaners on wood parts.
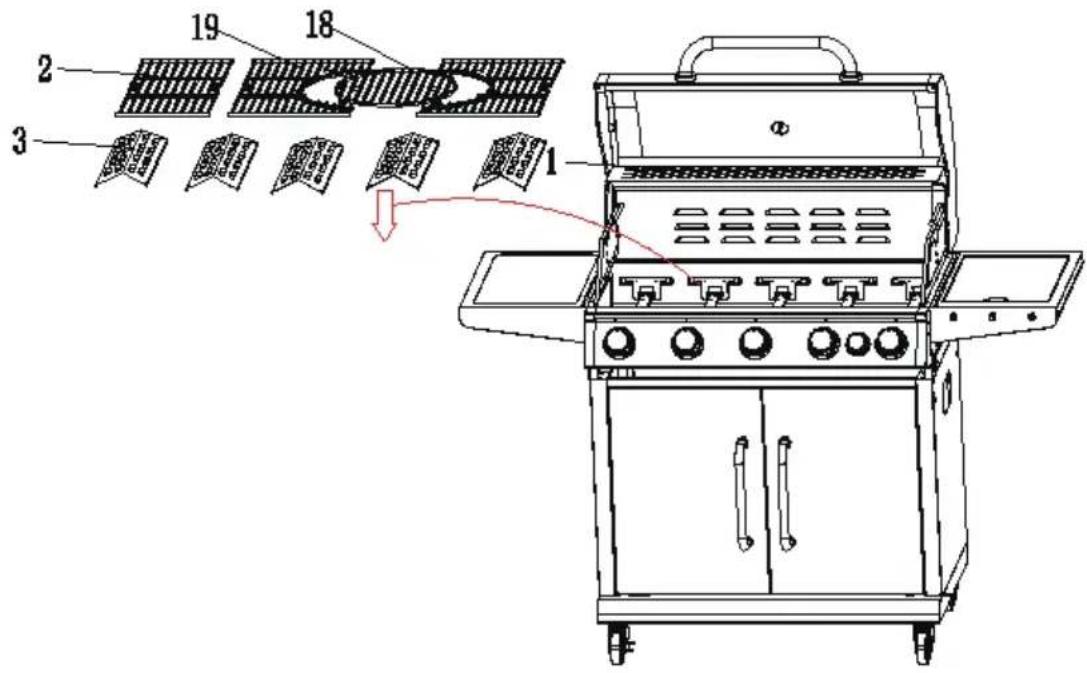
Grill grate
Use a mild soap solution. For stubborn dirt, a non-abrasive detergent can be used and then rinsed off with water.
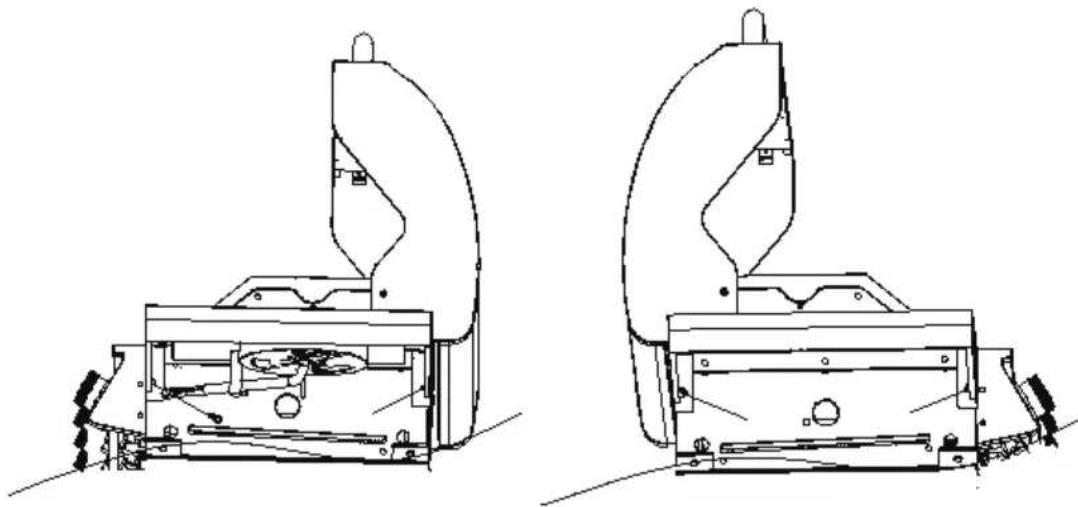
Cleaning the burner unit
Turn off the gas on the control knob and disconnect the gas cylinder.
Remove cooling grid.
Clean the burner with a soft brush or blow clean with compressed air and wipe with a cloth.
Clean out clogged connectors with a pipe cleaner or stiff wire (e.g. opened paper clip).
Check the burner for damage (cracks or holes). If damage is found, replace with a new burner. Reinstall the burner, making sure the gas valve orifices are properly positioned and secured in the burner inlet (venturi).
Storage
- The gas cylinder must be stored outside in a well-ventilated place and disconnected from the gas grill when not in use.
- Make sure that you disconnect the connection between the gas cylinder and the grill outdoors and that there are no sources of ignition nearby.
- After a long period of storage, check the gas barbecue for gas leaks and blockages in the burner openings before using it again.
- Follow the cleaning instructions to ensure that the barbecue is safe to use.
- Check all areas under the cover for insects and for blockages caused by insects if the barbecue has been stored outside. If blockages are present, remove them before use.
TROUBLESHOOTING
| Problem Possible reason | Solution | |
| Gas leak from damaged hose. | The hose is damaged. Turn off the gas valve on the gas cylinder and replace the hose. Perform a gas leak test before changing the hose. | |
| Gas leak from the gas bottle | Mechanical failure due to long term storage or mishandling. | Turn off the gas bottle valve. Take the gas cylinder back to your gas dealer. |
| Gas leak from gas cylinder valve | Errors due to mishandling or mechanical failure. | Turn off the gas bottle valve. |
| Gas leak between gas cylinder and gas pressure regulator. | Incorrect installation, the connection is not tight, the sealing ring is broken. | Turn off the gas cylinder valve, remove the gas pressure regulator and check the sealing ring for damage. Perform a gas leak test on all components. |
| Fire is coming out of the openings of the regulators. | Burner tube fire due to partial blockage. | Turn the control knobs and gas cylinder valve to the off position. After the fire is out and the grill has cooled, remove the burner and check the burner ports for spider nests or rust. |
| Grease fire or recurring large flames on the cooking surface. | Accumulation of grease in the burner area. | Turn off the gas bottle valve. Leave the cover open and let the flames go out. Allow the device to cool down and then remove any leftover food and grease build-up around the burner, drip tray and surfaces. |
| The igniter is being used but the burner does not light. | Gas supply problems: Attempting to light the wrong burner. | See the notes in the "Commissioning and Operation" section. |
| The burner is not connected to the control valve. | Make sure the valves are inside the burner tubes. | |
| The burner is blocked. Make sure the burner tubes are not blocked by cobwebs or similar. | ||
| No gas flow. Make sure the gas bottle is not empty. If there is still gas in the gas cylinder, see sub-item "Sudden drop in gas flow". | ||
| The igniter is being used but the burner does not light. | Gas lock on the gas cylinder connection nut. | Turn off all switches and disconnect the connection nut from the gas cylinder. Then plug them back in and try again. |
| The connection nut is not properly connected to the gas cylinder valve. | Turn the connection nut approximately half to three-quarters of a turn. | |
| The burner cannot be ignited with the igniter. | Cracked or broken electrode; "sparks at the crack". | Replace the electrode. |
| Electrode tip is not in the correct position. | The tip of the electrode should point toward the burner hole. The distance should be 1/8" to 3/16". Adjust if necessary. | |
| Wire and/or electrode covered with cooking residue | Clean the lead or electrode with alcohol and a clean swab. | |
| The wires are loose or pinched. | Reconnect leads or replace electrodes/leads. | |
| The wires short between the ignition device and the electrode. | Replace the line. | |
| The push button sticks to the bottom; sparking between ignition device and electrode. | Replace the igniter. | |
| The insulation could be damaged. | Check if the lines are properly connected. Replace the wires if the insulation is broken. | |
| The burner cannot be lit with a match. | See problem "The igniter is being used but the burner does not light". You are not using the correct lighting method. | See "Ignition with pilot gas control" in the "Commissioning and Operation" section. |
| Sudden drop in gas flow or low flame. | Fat accumulation. Clean the | burners and the inside of the grill. |
| Meat is too fatty. Cut away | fatty meat parts before cooking. | |
| Preparation temperatures too high | Prepare the food at lower temperatures. | |
| Flames erupt from the device | Strong, whipping winds. Turn the front of the grill into the wind or increase the flame height. | |
| Low gas level. Replace the gas bottle. | ||
| The excess valve has come loose. | See problem "Sudden drop in gas flow or low flame". | |
| Recurring fat fire. | Grease within the burner system cannot drain through food residue. | Turn all knobs to the off position and turn off the gas bottle. Leave the cover in place and let the flames go out. Allow the device to cool down and then remove all parts of the burner in order to clean them. |
| Flame flashback. | The burner and the burner tubes are blocked. | Turn all knobs to the off position and turn off the gas bottle. Clean burner and/or burner tubes. See the "Cleaning and Care" section. |
| Blazing flames. | Fat accumulation. Clean the | burners and the inside of the grill. |
| Meat is too fatty. Cut away | fatty meat parts before cooking. | |
| Preparation temperatures too high | Prepare the food at lower temperatures. | |
| The gas cylinder cannot be refilled. | Some gas cylinder dealers use older filling nozzles whose threads are worn out, | Contact another gas dealer. |
| One burner is not ignited by the other burners. | There is accumulation of fat or food residue in the transfer tube. | Clean the transfer tube with a wire brush. |
DISPOSAL CONSIDERATIONS
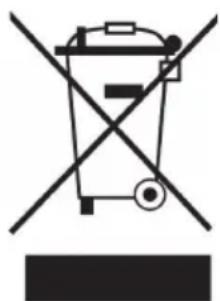
If there is a legal regulation in your country regarding the disposal of electrical and electronic equipment, this symbol on the product or on the packaging indicates that this product must not be disposed of with household waste. Instead, it must be taken to a collection point for the recycling of electrical and electronic equipment. By disposing of this product in accordance with the regulations, you are protecting the environment and the health of those around you from negative consequences. For information on recycling and disposal of this product, contact your local government or household waste disposal service.
MANUFACTURER & IMPORTER (UK)
Manufacturer:
Chal-Tec GmbH, Wallstrasse 16, 10179 Berlin, Germany.
Importer for Great Britain:
Berlin Brands Group UK Limited
PO Box 42
272 Kensington High Street
London, W8 6ND
United Kingdom
Cher client, chere clientele,
Berlin Brands Group UK Limited
PO Box 42
272 Kensington High Street
London, W8 6ND
United Kingdom
Estimado cliente:
Berlin Brands Group UK Limited
PO Box 42
272 Kensington High Street
London, W8 6ND
United Kingdom
Gentile cliente,
RICERCA DEI PROBLEMI
PRODUTTORE IMPORTATORE (UK)
Produttore:
Chal-Tec GmbH, Wallstraße 16, 10179 Berlin, Germania.
Berlin Brands Group UK Limited
PO Box 42
272 Kensington High Street
London, W8 6ND
United Kingdom
MONTÁZNY NÁVOD
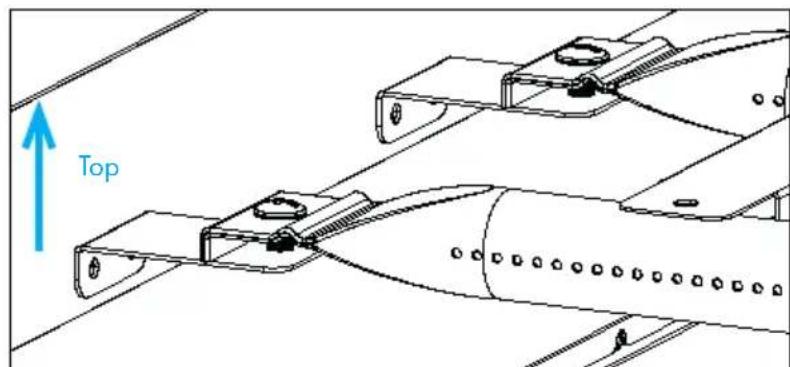
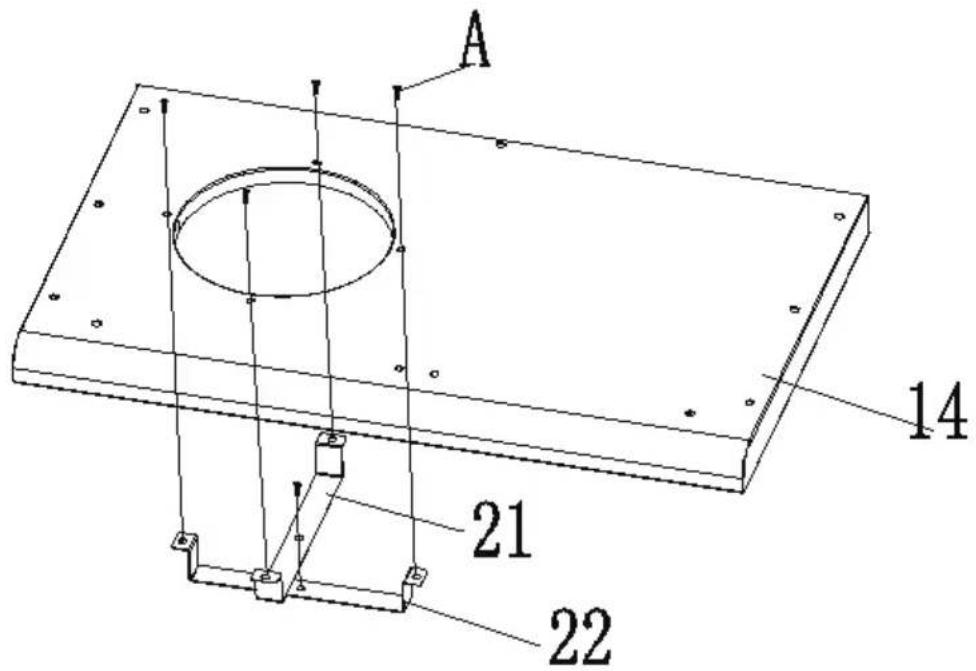
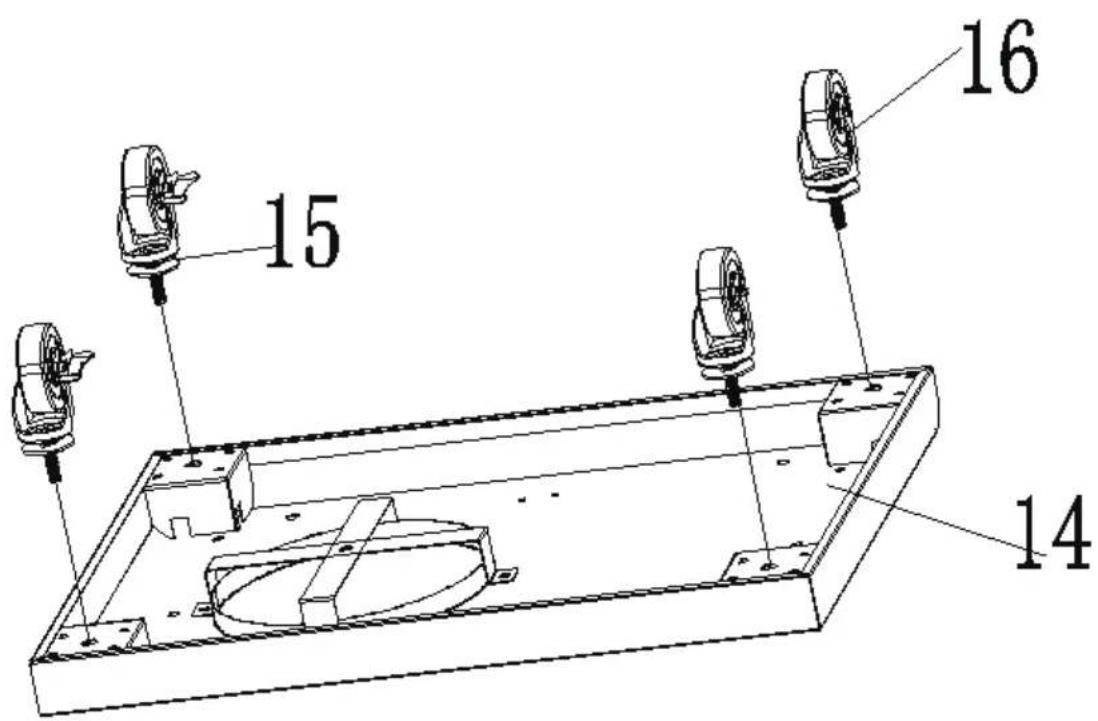
ASSEMBLY INSTRUCTIONS
INSTRUCTION DE MONTAGE
INSTRUCCIONES DE MONTAJE
A. X 44
B. X 4
C. X 2
D. X 1
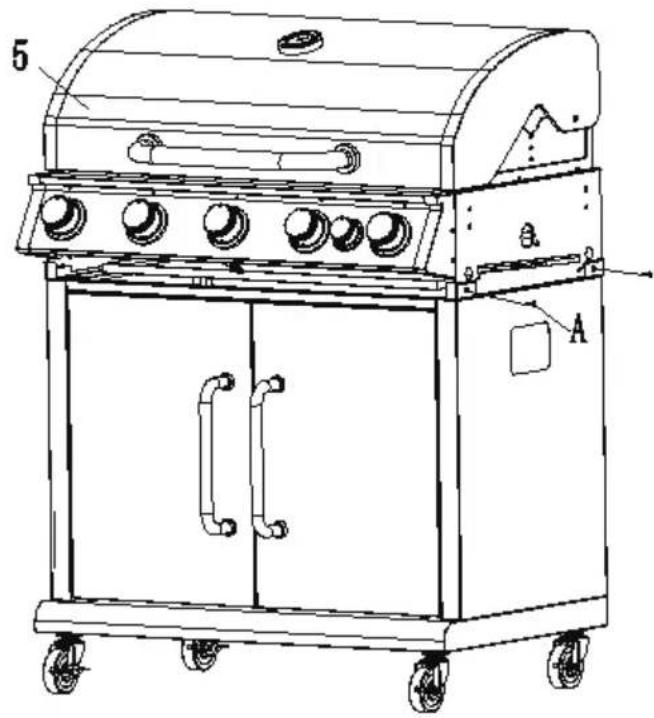
1
AX5
2
3
4
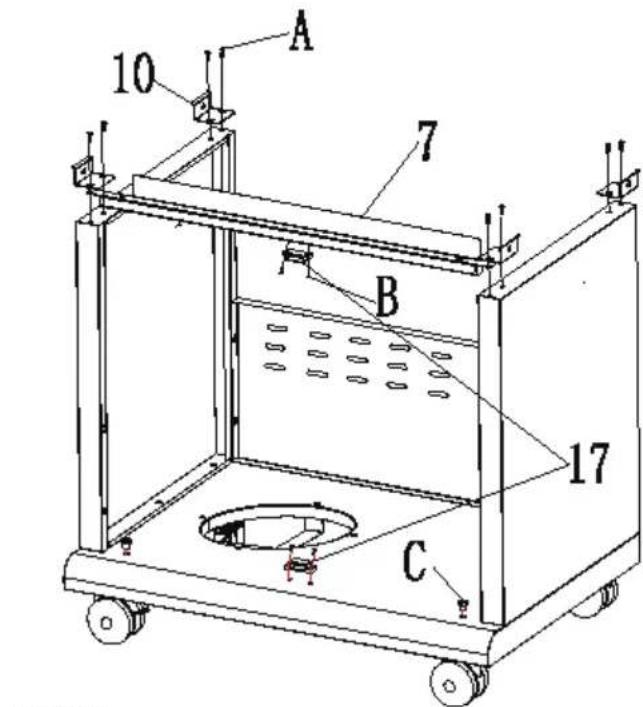
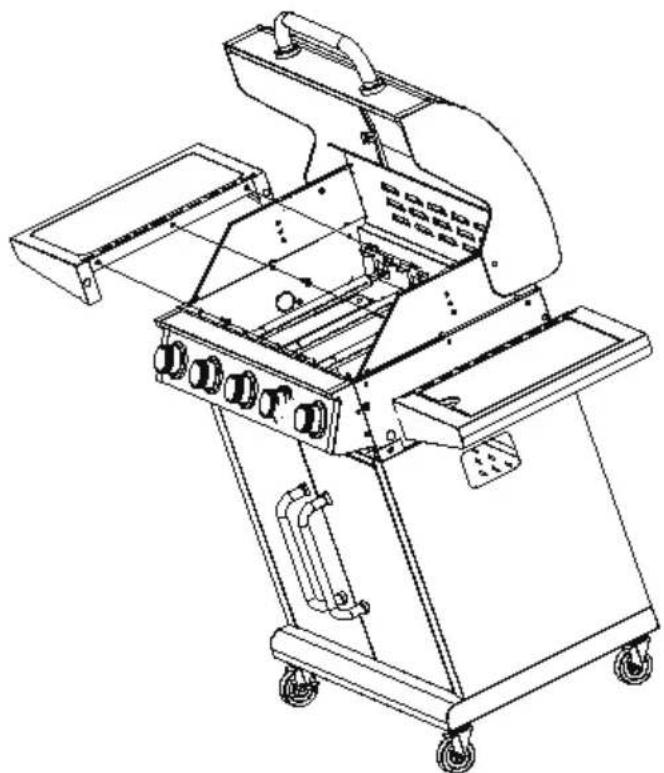
AX7
5
CX2
BX4
AX8
6
AX4
7
AX4
8
AX6
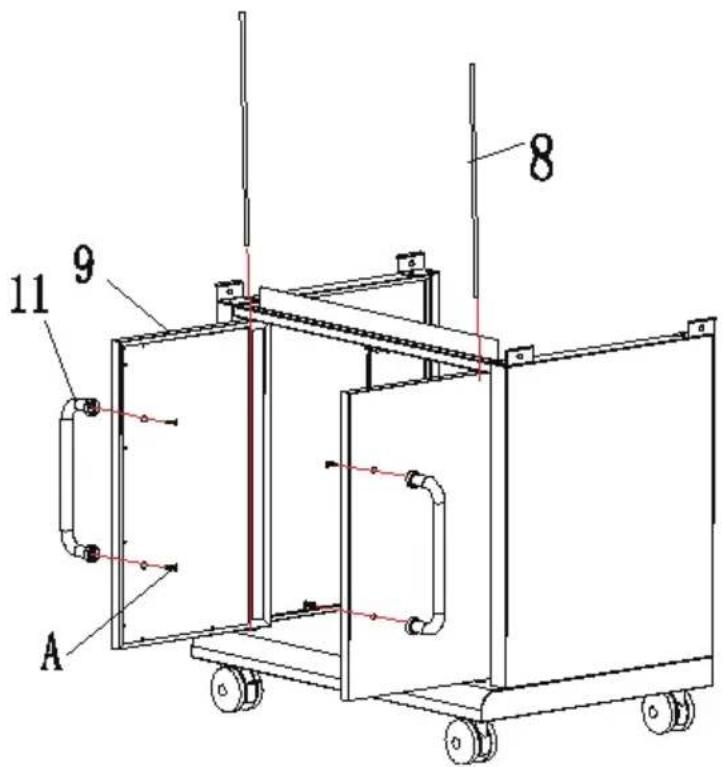
9
AX4
10
DX4
11
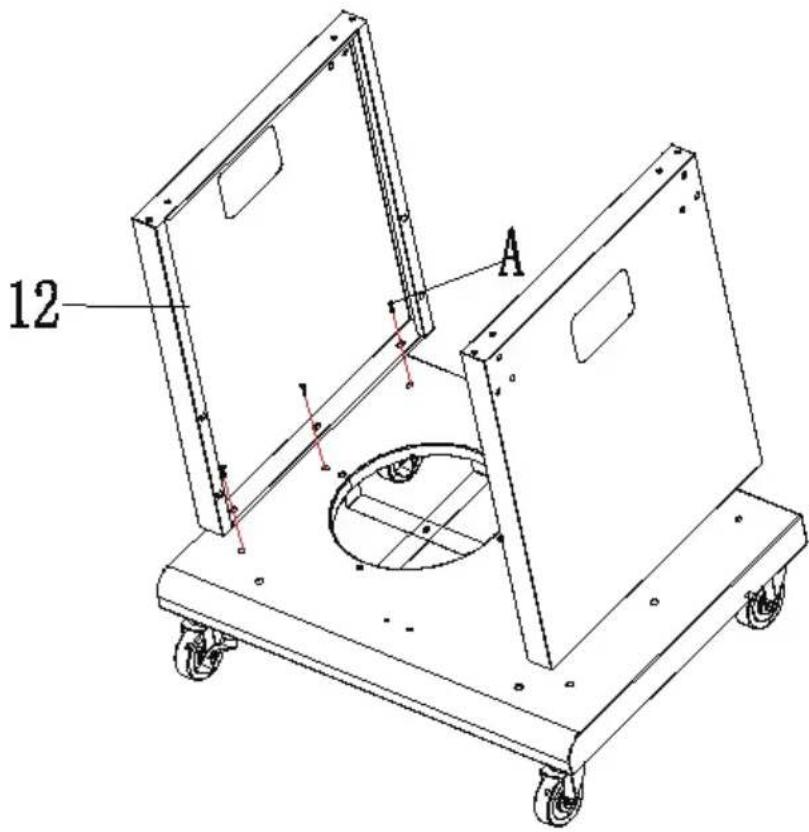
12


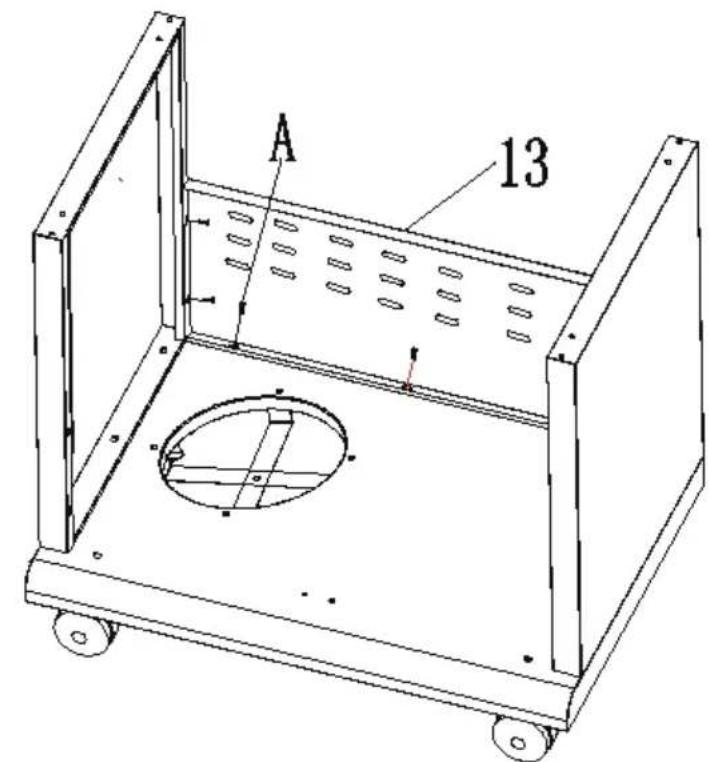
KLARSTEIN