
ALX260CARB - Vacuum Cleaner BESTRON - Free user manual and instructions
Find the device manual for free ALX260CARB BESTRON in PDF.
| Brand | Bestron |
| Model | ALX260CARB |
| Product type | Handheld car vacuum |
| Power supply | 12V DC (cigarette lighter socket) |
| Features | Dry and liquid vacuuming |
| Collector capacity | 500 ml (estimated) |
| Included accessories | Narrow nozzle, brush nozzle, liquid nozzle |
| Filter | Washable with lukewarm water |
| Dimensions (L x W x H) | 35 x 15 x 15 cm (estimated) |
| Weight | 1.2 kg (estimated) |
| Warranty | 60 months (5 years) |
| Usage | Household, car interior |
| Maintenance | Clean the filter regularly, empty the collector after use |
| Safety | Do not immerse the device, use only with the filter installed |
| Repairability | Contact Bestron after-sales service |
| Car adapter | Included (12V DC) |
Frequently Asked Questions - ALX260CARB BESTRON
User questions about ALX260CARB BESTRON
0 question about this device. Answer the ones you know or ask your own.
Ask a new question about this device
Download the instructions for your Vacuum Cleaner in PDF format for free! Find your manual ALX260CARB - BESTRON and take your electronic device back in hand. On this page are published all the documents necessary for the use of your device. ALX260CARB by BESTRON.
USER MANUAL ALX260CARB BESTRON
natural_image
White and black handheld vacuum cleaner with attached black cable (no visible text or symbols)


ALX260CARB
INSTRUCTION MANUAL
DE
Bedienungsanleitung
IT
R. Neyman Quality control
FUNKTION - Allgemein
natural_image
Diagram showing a mechanical assembly with a component being inserted into a housing (no text or symbols present)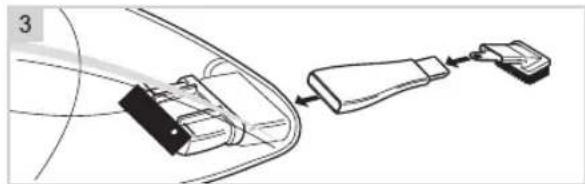
natural_image
Diagram of a cable or connector assembly with a connector and connector (no text or symbols visible)DÉCLARATION DE CONFORMITÉ CE
natural_image
Diagram showing a mechanical assembly with a component being inserted into a housing (no text or symbols present)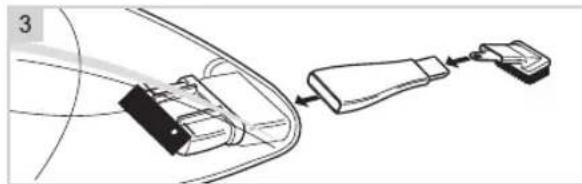
natural_image
Diagram of a cable or connector assembly with a connector and connector (no text or symbols visible)WAT U MOET WETEN OVER DIT APPARAAT
R. Neyman Quality control
WERKING - Algemeen
natural_image
Diagram showing a mechanical assembly with a component being inserted into a housing (no text or symbols present)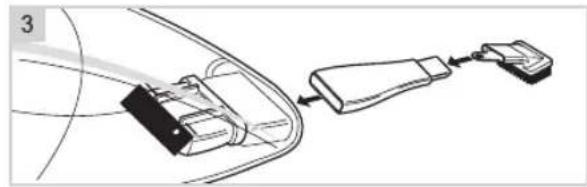
natural_image
Diagram of a cable or connector assembly with a connector and connector (no text or symbols visible)REINIGING EN ONDERHOUD - Buitenkant reinigen
Congratulations with the purchase of this Bestron product. These instructions tell you how the product works and how to use it. Read the instructions carefully before you start using the appliance. Only use the appliance in the manner described in the instructions. Keep these instructions in a safe place for future reference.
Defects:
If the appliance is defective, do not try to repair it yourself. Always have a qualified mechanic carry out any repairs.
Children:
- This appliance may be used by children over the age of 8 years old and persons with reduced physical, sensory or mental capabilities or lack of experience and know-how, but only if supervised or if they have been instructed on how to use the appliance safely and are aware of its potential dangers.
• Children are not allowed to clean and maintain the appliance, except if they are over the age of 8 years old and supervised. - Keep the appliance and the cable out of reach of children under the age of 8 years old.
- Keep an eye on children to ensure that they do not play with the appliance.
WHAT YOU SHOULD KNOW ABOUT ELECTRICAL APPLIANCES
- Check that the mains voltage corresponds with that shown on the rating plate of an electrical appliance before you use it.
• Always install electrical appliances on a stable and level surface where it cannot fall over.
• Certain parts of an electrical appliance may become warm or sometimes hot. Do not touch them as you may burn yourself.
• Make sure your hands are dry when you touch an electrical appliance, a cord or a plug. - Electrical appliances must be able to lose their heat to avoid fire hazards. Therefore, make sure that the appliance has sufficient clearance around it and that it does not come into contact with flammable materials. Electrical appliances must never be covered.
• Make sure that electrical appliances, cords or plugs do not come into contact with water. - Never immerse electrical appliances, cords or plugs in water or any other liquid.
- Do not touch electrical appliances if they have fallen in the water. Immediately pull the plug out of the socket. Stop using the appliance.
• Make sure that electrical appliances, cords and plugs do not come into contact with heat sources, such as a hot hob or open fire. - Never let cords hang over the edge of the sink, a worktop or a table.
• Always remove plug from the socket when you are not using the electrical appliance. - Remove the plug from the socket by pulling the plug itself and not the cord.
- Regularly check if the cord of the electrical appliance is not damaged. Do not use the electrical appliance if the cord shows signs of damage. If the cord is damaged, it should be replaced by the manufacturer, a technical service provider or a person with an equivalent qualification, to avoid any danger.
WHAT YOU SHOULD KNOW ABOUT THIS APPLIANCE
- Be careful when using the appliance outdoors.
• Never use the appliance in damp or wet locations. - Thoroughly clean the appliance after use (see Cleaning and Maintenance).
ENVIRONMENT

- Dispose of packaging material such as plastic and cardboard boxes in the designated containers.
Do not dispose of this product as normal domestic waste at the end of its life, but hand it in at a collection point for the reuse of electric and electronic equipment. Look for the symbol on the product, the user instructions or the packaging showing the type of waste.
- The materials can be used as indicated. By helping us reuse and process the materials or otherwise recycle the old equipment, you will be making an important contribution towards the protection of the environment.
- Your municipality can tell you where to find the designated waste collection point in your neighbourhood.
CE DECLARATION OF CONFORMITY
This product conforms to the requirements of the following European Directives on safety:
• EMC Directive 2014/30/EU
• Low Voltage Directive 2014/35/EU
• RoHS Directive 2011/65/EU
R. Neyman Quality control
OPERATION - General
The appliance is intended only for domestic use, not for professional use.
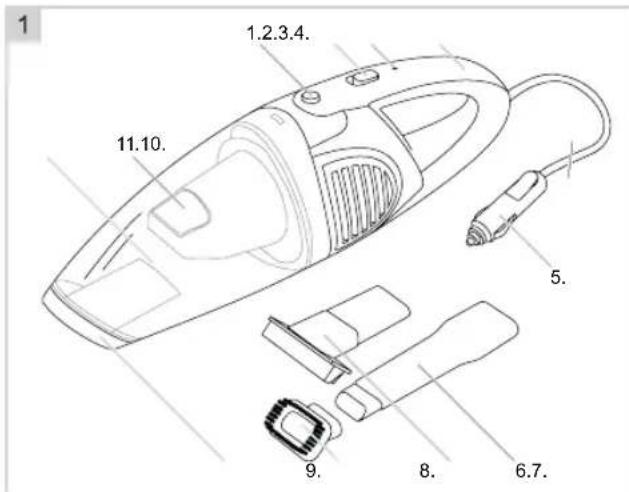
- Dust/Liquid compartmenten release button
- On/Off switch
- Indicator light
- Handle
- Car plug (12V DC)
- Crevice tool
- Nozzle with rubber attachment
- Nozzle with brush
- Suction nozzle
- Dust/Liquid compartment
- Washable dust filter
OPERATION - Before first use
Remove all packaging. Remove the black cap from the On/Off switch (2).
OPERATION - Dry vacuum cleaning
ATTENTION:
- Use the car vacuum cleaner only when the filter (11) is correctly placed (see 'Cleaning the filter'). A damaged or incorrectly-placed filter can cause damage to the appliance.
- If so required, fit an accessory to the appliance (see 'Fitting the accessories').
- Plug the car vacuum cleaner into the 12V DC cigarette lighter socket in your car.
- Switch on the appliance by sliding the On/Off switch (2) forwards.
- Switch off the appliance after use by sliding the On/Off switch (2) back.
- After use, disconnect the car plug (5) from the cigarette lighter socket.
OPERATION - Wet vacuum cleaning
ATTENTION:
- Use the car vacuum cleaner only when the filter (11) is correctly placed (see 'Cleaning the filter'). A damaged or incorrectly placed filter can cause damage to the appliance.
• Do not use the appliance to suck up solids and liquids at the same time or after each other.
• The level of liquid in the dust/liquid compartment (10) may not rise above the 'MAX.' level. -
Do not hold the car vacuum cleaner vertically upright or downwards, to prevent liquid from entering the appliance. Empty any liquid in the dust/liquid compartment (10) before storing the appliance.
-
Fit the rubber attachment to the appliance (see 'Fitting the accessories').
-
Plug the car vacuum cleaner into the 12V DC cigarette lighter socket in your car.
-
Switch on the appliance by sliding the On/Off switch forwards.
-
Switch off the appliance by sliding the On/Off switch back.
-
Empty the liquid from the dust/liquid compartment.
-
Disconnect the appliance.
OPERATION - Fitting the asseccories
The car vacuum cleaner is supplied with the following accessories:
- a crevice tool (6), which you can use to clean radiators, window frames, crevices, small openings, and similar;
• a nozzle with brush (8), which you can use to clean delicate or irregular surfaces;
• a nozzle with rubber attachment (7), which you can use to suck up liquids.
- a crevice tool (6), which you can use to clean radiators, window frames, crevices, small openings, and similar; - a nozzle with brush (8), which you can use to clean delicate or irregular surfaces; - a nozzle with rubber attachment (7), which you can use to suck up liquids.
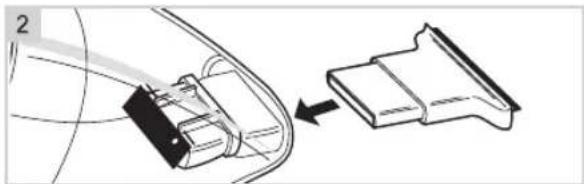
- Hold the car vacuum cleaner by the handle(4). Make sure you cannot accidentally switch on the appliance.
- Slide the nozzle with rubber attachment (7) or the crevice tool (6) into the nozzle of the car vacuum cleaner.
- If so required, slide the nozzle with brush (8) onto the crevice tool (6).
natural_image
Diagram showing a mechanical assembly with a component being inserted into a housing (no text or symbols present)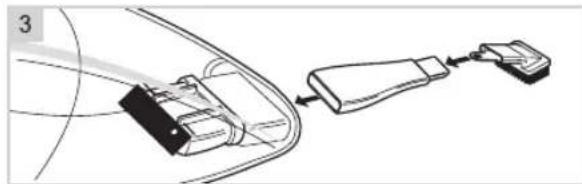
natural_image
Diagram of a cable or connector assembly with a connector and connector (no text or symbols visible)CLEANING AND MAINTENANCE - Cleaning the exterior
Clean the outer surface of all parts with a damp cloth and a cleaner that is suitable for plastics. Make sure no moisture gets into the car vacuum cleaner.
ATTENTION:
• Never immerse the appliance, the cord or the plug in water.
- Never use corrosive or scouring cleaning agents or sharp objects (such as knives or hard brushes) to clean the appliance.
CLEANING AND MAINTENANCE - Removing dust
Remove the dust from the compartment at periodic intervals.
- Press the release button (1) on the upper side of the appliance, and remove the compartment from the motor housing.
- Remove the filter holder (11) from the compartment.
- Clean the filter, if necessary (see 'Cleaning the filter').
- Dispose of the dust in a dustbin.
- Return the filter holder to the compartment.
- Fit the compartment to the motor housing.
CLEANING AND MAINTENANCE - Removing liquid
- Press the release button (1) on the upper side of the appliance, and remove the compartment from the motor housing.
- Remove the filter holder (11) from the compartment.
- Clean the filter, if necessary (see 'Cleaning the filter').
- Empty the liquid in a washbasin.
- Clean the interior of the compartment and the filter holder with water and a cleaner that is suitable for plastic and dry thoroughly.
- Return the filter holder to the compartment.
- Fit the compartment to the motor housing.
ATTENTION:
• You must always empty any liquid in the compartment before storing the car vacuum cleaner.
- Do not hold the compartment vertically upright, to prevent liquid from leaking from the compartment.
CLEANING AND MAINTENANCE - Cleaning the filter
You will need to clean the filter when it is severely fouled. Failure to do so can result in reduced suction, and may even cause damage to the motor.
- Remove filter (11) from the compartment (10).
- Rinse the filter in lukewarm water.
- Allow the filter to dry thoroughly.
- Return the filter holder to the compartment.
- Fit the compartment to the motor housing.
ATTENTION:
• Do not clean the filter in a dishwasher.
- Do not use appliances such as a hairdryer to dry the filter.
WARRANTY CONDITIONS
Bestron offers a 60-month warranty on this equipment against defects resulting from manufacturing and/or material errors, subject to the following conditions.
-
No labour or material costs will be charged during this warranty period.
-
Any repairs carried out under the warranty will not extend the warranty period.
-
Faulty parts, or in the event of exchange, the faulty equipment itself, will automatically become the property of Bestron.
-
The warranty is valid for the first buyer only and is non-transferable.
-
The warranty is not valid for damage caused by:
-
Accidents
- Improper use
- Wear and tear
- Neglect
- Faulty installation
-
Connection to a different mains voltage than indicated on the type plate
• Unauthorised changes
• Repairs carried out by unqualified third parties
• Use in violation with the applicable statutory, technical or safety standards
• Careless transport without suitable packaging or other protection -
Warranty cannot be claimed:
• For damage during transport
• If the serial number of the appliance is removed or changed
- Items excluded from warranty are:
- Cords
- Lamps
- Glass parts
-
The warranty does not entitle the purchaser to compensation for any damage other than replacement or repair of the faulty parts. Bestron cannot in any event be held liable for any indirect or consequential losses caused by or in relation to the equipment it has provided.
-
Claims under a warranty may only be submitted to your (online) retailer or directly to the Bestron Service Department. Never send items without being asked to. We may refuse the parcel and you will be liable for the costs. Contact us first and we tell you how the appliance should be packaged and sent. Each claim under a warranty must be accompanied by the relevant receipt.
SERVICE
If an unexpected problem occurs, please contact the BESTRON service department: www.bestron.com/service
COMPLIMENTI!
natural_image
Diagram showing a cable being inserted into a plastic component, with no visible text or symbols
natural_image
Diagram of a cable connector with connectors and a USB cable, no text or symbols presentR. Neyman
Control de calidad
natural_image
Diagram showing a cable being inserted into a plastic component, with no visible text or symbols
natural_image
Diagram of a cable and connector assembly with connectors and cables (no text or symbols)LIMPIEZA Y MANTENIMIENTO - Limpieza del exterior
natural_image
Diagram showing a cable being inserted into a plastic component, with no visible text or symbols
natural_image
Diagram of a cable and connector assembly with a connector, showing wiring connections (no text or symbols)R. Neyman
Quality control
KEZELÉS - Általános
natural_image
Diagram showing a mechanical assembly with a component being inserted into a housing (no text or symbols present)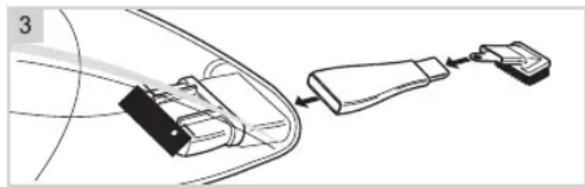
natural_image
Diagram of a cable connector with connectors and cable routing (no text or symbols)CE DECLARATION OF CONFORMITY
R. Neyman Kontrola kvality
natural_image
Diagram showing a mechanical assembly with a connector and a separate component, no text or symbols present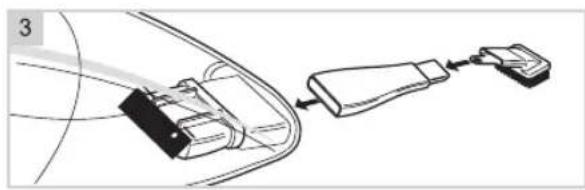
natural_image
Diagram of a cable and connector assembly with no visible text or symbolsnatural_image
Diagram showing a cable being inserted into a plastic component, with no visible text or symbols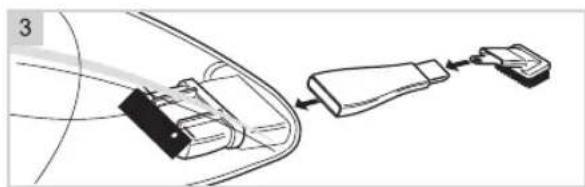
natural_image
Diagram of a cable and connector assembly with a connector, showing wiring connections (no text or symbols)CE DECLARATION OF CONFORMITY
R. Neyman Kalite Kontrol
ÇALIŞTIRMA- Genel
natural_image
Diagram showing a cable being inserted into a plastic component, with no visible text or symbols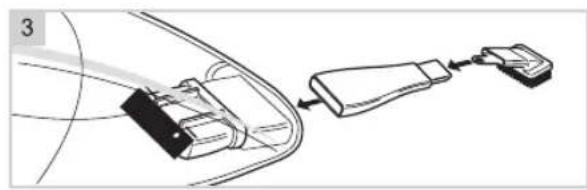
natural_image
Diagram of a cable connector with connectors and a USB cable, no text or symbols presentR. Neyman Kvalitetskontroll
natural_image
Diagram showing a cable being inserted into a plastic component, with no visible text or symbols
natural_image
Diagram of a cable and connector assembly with a USB port (no text or symbols visible)NEED HELP? CHAT WITH US! WHATSAPP CUSTOMER SERVICE

BESTRON.COM/WHATSAPP

- ALX260CARB
- INSTRUCTION MANUAL
- FUNKTION - Allgemein
- DÉCLARATION DE CONFORMITÉ CE
- WAT U MOET WETEN OVER DIT APPARAAT
- WERKING - Algemeen
- REINIGING EN ONDERHOUD - Buitenkant reinigen
- Defects:
- Children:
- WHAT YOU SHOULD KNOW ABOUT ELECTRICAL APPLIANCES
- WHAT YOU SHOULD KNOW ABOUT THIS APPLIANCE
- ENVIRONMENT
- CE DECLARATION OF CONFORMITY
- OPERATION - General
- OPERATION - Before first use
- OPERATION - Dry vacuum cleaning
- ATTENTION:
- OPERATION - Wet vacuum cleaning
- OPERATION - Fitting the asseccories
- CLEANING AND MAINTENANCE - Cleaning the exterior
- CLEANING AND MAINTENANCE - Removing dust
- CLEANING AND MAINTENANCE - Removing liquid
- CLEANING AND MAINTENANCE - Cleaning the filter
- WARRANTY CONDITIONS
- SERVICE
- COMPLIMENTI!
- LIMPIEZA Y MANTENIMIENTO - Limpieza del exterior
- KEZELÉS - Általános
- ÇALIŞTIRMA- Genel
Brand : BESTRON
Model : ALX260CARB
Category : Vacuum Cleaner