HGL64SGX - Cooker HOOVER - Free user manual and instructions
Find the device manual for free HGL64SGX HOOVER in PDF.

User questions about HGL64SGX HOOVER
0 question about this device. Answer the ones you know or ask your own.
Ask a new question about this device
Download the instructions for your Cooker in PDF format for free! Find your manual HGL64SGX - HOOVER and take your electronic device back in hand. On this page are published all the documents necessary for the use of your device. HGL64SGX by HOOVER.
USER MANUAL HGL64SGX HOOVER
BAPOUHbIE NOBEPXHOCTN
HCTPYKUNIPOJb3OBATEJI R
NAVODILA ZA UPORABO
VGRADNJO IN PRIKLJUCITEV SL
PIANI COTTURA
ISTRUZIONI PER L'USO IT
PLACAS
INSTRUÇÉS DE UTILIZAZão PT
TÜZHELYLAPOK
- Instructions For The Installer 05
1.1. Building In .05
1.2. Suitable Location .05 - Electrical Connection (For U.K. Only) 05
2.1. Electrical Connection 05
2.2. Gas Connection (For U.K. Only). 05
2.3. Adapting The Hob To Different Types Of Gas 06
2.4.Regulating The Minimum Flame.. 06
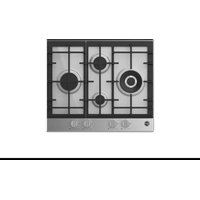
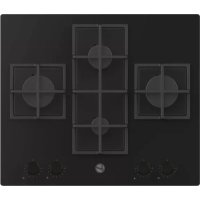
3.Use Of Hob-User Instructions .06
3.1. Using The Gas Burner 06
3.2.Use Of Cooktop Electrical Plates .06 - Maintenance and Cleaning 07
- Aftercare 07
- Protection Of The Environment 07
OBSAH
CZ
- Pokyny pro instalatéra 11
1.1 Vestavba 11
1.2 Vhodné misto instalace 11
2.1. Pripojenik elektrické siti 11
2.2.Pripojenif plynu 11
2.3.Zmena varne desky na jiny druh plynu 12
2.4. Nastaveni minimálho plamene 12 - Použiti varné desky 12
3.1.Pouziti plynového hořaku 12
3.2.Pouziti Elektrickych Ploten 12 - Udžba a Čišěné
5.Servis. 13
6.Ochrana zivotniho prostefi 13
CONTENIDO
ES
The hob may be installed in any worktop which is heat resistant to a temperature of 100^ and has a thickness of 25-45 mm. The dimensions of the insert to be cut out of the worktop are in shown in Figure 2.
If the Hob is fitted next to a cabinet on either side, the distance between the Hob and the cabinet must be at least 15cm (see Figure 4); while the distance between the hob and the rear wall must be at least 5.5cm .
The distance between the hob and any other unit or appliance above it (e.g. An extractor hood) must be no less than 70 cm (Figure 4).
When there is an accessible space between the built-in hob and the cavity below, a dividing wall made of insulating material should be inserted (wood or a similar material) (Figure 3).
Important - The diagram in figure 1 shows how the sealant should be applied.
The Hob unit is fitted by attaching the Fixing Clamps supplied, using the holes at the base of the unit.
If a hob of 60~cm is fitted above an oven which is not equipped with fan cooling system it is recommended that openings are created within the built in furniture to ensure correct air circulation.
The size of these openings must be at least 300cm^2 and placed as shown in Figure 5.
1.2. SUITABLE LOCATION
This appliance must be installed in accordance with applicable regulations and should only be used in well-ventilated locations. Before using this appliance carefully study the instruction book.
2. ELECTRICAL CONNECTION (FOR U.K. ONLY)
Warning - this appliance must be earthed
This appliance is designed for domestic use only. Connection to the main supply must be made by a competent electrician, ensuring that all current regulations concerning such installations are observed.
The appliance must only be connected to a suitably rated spur point, a 3 pin 13 amp plug/rod is not suitable. A double pole switch must be provided and the circuit must have appropriate fuse protection. Further details of the power requirement of the individual product will be found in the users' instruction and on the appliance rating plate. In the case of built-in product you are advised, should you wish to use a longer cable than the one supplied, that a suitably rated heat resistant type must be used.
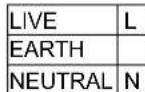
The wiring must be connected to the mains supply as follows: CONNECT TO SPUR TERMINAL
Green & Yellow Wire Earth Connection
Blue Wire Neutral Connection
Brown Wire Live Connection
Note: We do not advocate the use of earth leakage devices with electric cooking appliances installed to spur points because of the «nuisance tripping» which may occur. You are again reminded that the appliance must be correctly earthed, the manufacturer declines any responsibility for any event occurring as a result of incorrect electrical installation.
2.1. ELECTRICAL CONNECTION
Check the data on the rating plate, located on the outside of the unit, to ensure that the supply and input voltage are suitable.
Before connection, check the earthing system.
By Law, this appliance must be earthed. If this regulation is not complied with, the Manufacturer will not be responsible for any damage caused to persons or property. If a plug is not already attached, fit a plug appropriate to the load indicated on the rating plate. The earth wire is coloured yellow/green. The plug should always be accessible.
Where the Hob is connected direct to the electricity supply, a circuit breaker must be fitted.
If the power supply cord is damaged this is to be replaced by a qualified engineer so as to prevent any potential risk.
The earth wire (green and yellow coloured) must be at least 10mm longer than the live and neutral wires.
The section of the cable used must be of the correct size in relation to the absorbed power of the hob.
Please check rating plate for the power details and ensure that the power supply cord is of the type H05RR-F, H05VV-F, H05V2V2-F.
Mains Supply
Brown Wire Green/Yellow Wire Blue Wire
Power Cable
2.2. GAS CONNECTION
These instructions are for qualified personnel, installation of equipment must be in line with the relevant national standard. (For U.K. only: by law the gas installation\commissioning must be carried out by a "Gas Safe" installer)
All work must be carried out with the electricity supply disconnected.
The rating plate on the hob shows the type of gas with which it is designed to be used. Connection to the mains gas supply or gas cylinder should be carried out after having checked that it is regulated for the type of gas with which it will be supplied. If it is not correctly regulated see the instructions in the following paragraphs to change gas setting
For liquid gas (cylinder gas) use pressure regulators which comply with the relevant national standards.
Use only pipes, washers and sealing washers which comply with the relevant national standards.
For some models a conic link is furnished to outfit for the installation in the countries where this type of link is obligatory; in picture 8 it is pointed out how to recognize the different types of links (CY = cylindrical, CO = conic). In every case the cylindrical part of the link has to be connected to the hob.
When connecting the hob to the gas supply via use offlexible hoses please ensure that the maximum distance covered by the hose does not exceed 2 metres.
To prevent any potential damage to the hob please carry out the installation following this sequence (picture 6):
1)As illustrated, assemble parts in sequence:
A: 1/2 Male Adaptor Cylindrical
B:1/2 Seal
C: 1/2 Female Gas Adaptor Conical-Cylindrical or Cylindrical-Cylindrical
2) Tighten the joints with the spanner, remembering to twist the pipes into position.
3)Attach fitting C to mains gas supply using rigid copper pipe or flexible steel pipe.
IMPORTANT: carry out a final check for leaks on the pipe connections using a soapy solution. NEVER USE A FLAME. Also, make sure that the flexible pipe cannot come into contact with a moving part of the cabinet (eg.adrawer) and that it is not situated where it could be damaged.
Warning: If gas can be smelt in the vicinity of this appliance turn off the gas supply to the appliance and call the engineer directly. Do not search for a leak with a naked flame.
2.3. ADAPTING THE HOB TO DIFFERENT TYPES OF GAS
To adapt the Hob for use with different types of gas, carry out the following instructions:
remove the grids and burners
- insert on hexagonal spanner (7 mm) into the burner support (Figure 7)
- Unscrew the injector and replace it with one suitable for the gas to be used (see gas type table)
2.4. REGULATING THE MINIMUM FLAME
After lighting the burners, turn the control knob to the minimum setting and then remove the knob (this can easily be removed by applying gentle pressure).
Using a small «Terminal» type screwdriver the regulating screw can be adjusted as in Figure 9. Turning the screw clockwise reduces the gas flow, whilst turning it anticlockwise increases the flow - Use this adjustment to obtain a flame of approximately 3 to 4mm in length and then replace the control knob.
When the gas supply available is LPG - the screw to set the idle flame must be turned (clockwise) to the end stop.
When you have carried out the new gas regulation, replace the old gas rating plate on your appliance with one (supplied with hob) suitable for the type of gas for which it has been regulated.
3. USE OF HOB - USER INSTRUCTIONS
This appliance must only be used for the purpose for which it is intended, domestic cooking, and any other use will be considered improper and could therefore be dangerous. The Manufacturer will not be responsible for any damage or loss resulting from improper use.
This appliance is not intended for use by persons (including children) with reduced physical, sensory or mental capabilities, or lack of experience and knowledge, unless they have been given supervision or instruction concerning use of the appliance by a person responsible for their safety.
Children should be supervised to ensure that they do not play with the appliance.
To ignite the burners, place a lighted taper close to the burner, press in and turn the control knob anti-clockwise.
If the burners have not been used for a couple of days, wait for a few seconds before lighting the burner, this will allow any air present in the pipes to escape.
For appliances fitted with electronic ignition carry out the following:
-
push in and turn the knob anticlockwise to the ignition symbol.
-
ignite the burner by pressing the sparker button.
For hobs fitted with automatic ignition simply push in and turn the knob to the ignition symbol.
The ignition system will continue to generate sparks as long as the control knob is being pressed.
If the burner has not ignited within 5 seconds, turn the knob to the 0 position and repeat the operation.
For models fitted with a safety tap (which cuts-off the flow of gas if the flame is accidentally extinguished) the burners are ignited and described above, but care must be taken.
Prior to switching on the gas hob ensure that the burners and burner caps are correctly placed within their position.
GENERAL ADVISE
For best results, use cooking vessels with a flat surface. The size of the surface should match the gas burner side as follows. Table A.
Table A
| Burner Type | Ø pan / pot (cm) | |
| AUX | Auxiliary Burner | 12 - 18 |
| SR | Semi Rapid Burner | 18 - 24 |
| R | Rapid Burner | 24 - 26 |
For smaller containers the gas burner should be regulated so that the flame does not overlap the base of the pan. Vessels with a concave or convex base should not be used.
WARNING: If a flame is accidentally extinguished, turn the knob to the off position and do not attempt to re-ignite if for at least 1 minute.
If over the years the gas taps become stiff to turn it is necessary to lubricate them.
Such operation must be carried out only by qualified Service Engineers.
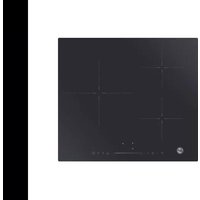
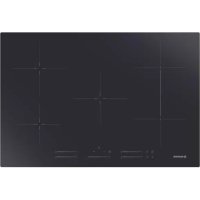
3.2. USE OF COOKTOP ELECTRICAL PLATES
Turn the knob to the position for the required temperature of the hot plate. The indicator light of the hot plate will come on and the hot plate will start to heat.
When cooking is completed, turn the knob to the "O" position. (Figure 10). Do not leave the hot plate turned on without a pan on it. The diameter and the base of the pan you use is critical. The maximum diameter of the pan base is 14cm and the base should be flat.
Leave the hot plate to heat up for 5 minutes before placing a pan on it. The first time you use it. This will allow the heat resistant coating of the plate to harden due to burning.
Use a wet cloth and detergent for cleaning the hot plates. Do not remove food residues from the hot plates with a knife or any other hard, sharp object.
Turn on the hot plate for a few moments to dry it after cleaning. However, it must never be left on for more than a few moments without a pan on top.
| Position | Power (Watt) | Power (Watt) | Explanation |
| 0 | 0 | 0 | Off |
| 1 | 100 W | 135 W | Heating |
| 2 | 180 W | 220 W | Cooking at low temperature |
| 3 | 250 W | 300 W | Cooking at low temperature |
| 4 | 500 W | 850 W | Cooking, Roasting, Boiling |
| 5 | 750 W | 1150 W | Cooking, Roasting, Boiling |
| 6 | 1000 W | 1500 W | Cooking, Roasting, Boiling |
Suitability of Cooking Pans (Figure 11)
Keep in mind that larger pans have larger heating surfaces.
This will help them to cook the food faster than pans with smaller heating surfaces.
Always use pan sizes proportionate to the amount of the food to be cooked. In order to prevent splashing, do not use very small pans, especially for foods with excess liquid. If you use excessively large pans for quick cooked foods, sausages and liquids will stick and residues will remain attached to the pan after being emptied.
Closed pans and baking trays or moulds are suggested for cooking sweets. Splashed sugar and juices from an open pan may stick to the cooker surface and will be difficult to remove.
This is especially important for pans used for roasting or pressurized cooking at high temperature.
Do not leave burners unattended without a pan or with an empty pan on top.
Check the suitability of cooking pans with respect to the following criteria:
They should be heavy.
They should completely cover the burner surface; they may be a little bigger but no smaller.
Base surfaces should be completely flat and fit well on the cooking surface.
- For the best use of the electric hotplates and to minimize energy consumption, only pans with smooth flat bases should be used. The size of the pan should be as close as possible to the diameter of the hotplate, and never smaller. The base of the pan should be dry and spillage should be avoided. Empty pans must not be left on the plates, and the plates should not be left switched on without a pan.
4. MAINTENANCE AND CLEANING
Before cleaning the hob, ensure the appliance has cooled down. Remove the plug from the socket or (if connected directly) switch off the electricity supply.
Never use abrasives, corrosive detergents, bleaching agents or acids. Avoid any acid or alkaline substances (lemon, juice, vinegar etc.) on the enamelled, varnished or stainless steel sections.
"WARNING" - Do not use a steam cleaner to clean the hob.
When cleaning the enamelled, varnished or chrome sections, use warm soapy water or a non caustic detergent. For stainless steel use an appropriate cleaning solution.
The burners can be cleaned with soapy water. To restore their original shine, use a household stainless steel cleaner. After cleaning, dry the burners and replace.
It is important the Burners are replaced correctly.
5. AFTERCARE
Before calling out a Service Engineer please check the following:
- that the plug is correctly inserted and fused;
- that the gas supply is not faulty.
If the fault cannot be detected:
Switch off the appliance and call the After Service Centre. DO NOT TAMPER WITH THE APPLIANCE.
6. PROTECTION OF THE ENVIRONMENT
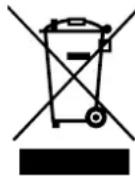
This appliance is marked according to the European directive 2002/96/EC on Waste Electrical and Electronic Equipment (WEEE). By ensuring this product is disposed of correctly, you will help prevent potential negative consequences for the environment and human health, which could otherwise be caused by inappropriate waste handling of this product.
The symbol on the product indicates that this product may not be treated as household waste. Instead it shall be handed over to the applicable collection point for the recycling of electrical and electronic equipment.
Disposal must be carried out in accordance with local environmental regulations for waste disposal.
For more detailed information about treatment, recovery and recycling of this product, please contact your local city office, your household waste disposal service or the shop where you purchased the product.
Declaration of compliance: This equipment, in the parts intended to come into contact with food, complies with the regulations laid down in EEC directives 89/109.
CE Appliance complies with European Directives 73/23/EEC and 89/336/EEC, replaced by 2006/95/EC and 2004/108/EC, and subsequent amendments.
The Manufacturer will not be responsible for any inaccuracy resulting from printing or transcript errors contained in this brochure. We reserve the right to carry out modifications to products as required, including the interests of consumption, without prejudice to the characteristics relating to safety or function.
Table 1
| BUILT IN HOBS | ||
| Burner | 1 | 2 |
| 4 gasR /2SR / AUX | 3 gasR / SR / AUX / E | |
| Type / reference | S60 / HBGS | S60 / HBGS |
| Flame failure device | YES | YES |
| Auxiliary burner ( AUX Ø 50 mm) | 1 | 1 |
| Electric Plate | - | 1 |
| Semirapid burner ( SR Ø 75 mm) | 2 | 1 |
| Rapid burner ( R Ø 100 mm) | 1 | 1 |
| Installed Gas Type / Power: | ||
| Gas Power | 7.1 kW | 5.4 kW |
| G 20/20 mbar (methane) | 676 l/h | 514 l/h |
| G 30/28-30 mbar (LPG) | 516 g/h | 393 g/h |
| Installation Class | 3 | 3 |
| Voltage / Frequency V / Hz | 220-240 V / 50-60 Hz | 220-240 V / 50-60 Hz |
| Electrical input power | 15 W | 1500 W |
| Electric ignition | YES | YES |
| Product dimension | 585 x 510 | 585 x 510 |
This appliance has been designed for non-professional, i.e. domestic, use.
1. INSTALLATION
LA MISE EN PLACE FONCTIONNELLE DES APPAREILS MENAGERS DANS LEUR ENVIRONNEMENT EST UNE OPÉRATION DÉLICATE QUI, SI ELLE N'EST PAS CORRECTEMENT EFFECTUEE, PEUT AVOIR DE GRAVES CONSEQUENCES SUR LA SECURITE DES CONSOMMATEURS. DANS CES CONDITIONS, IL EST IMPÉRATIF DE CONFIER CETTE TACHER À UN PROFESSIONNEL QUI LA RÉalisERA CONFORMÉMENT AUX NORMES TECHNIQUES EN VIGUEUR. SI MALGRÉ CÉTTE RECOMMANDATION, LE CONSOMMATEUR RÉALISAIT LUI-MÉME L'INSTALLATION, LE CONSTRUCTEUR DÉCLINERAIT TOUTE RESPONSABILITÉ EN CAS DE DÉFAILLANCE TECHNIQUE DU PRODUIT ENTRAINANT OU NON DES DOMMAGESA UX BIENS ET/OUA UX PERSONNES.
1.1. ENCASTREMENT
1.2 VHODNÉ MISTO INSTALACE
Tento spotbrebi musi byt instalovan v souladu s platnymi predpisy a smi se pouzivat pouze v dobre vetranych mistrnostech. Pred pouzitim spotbrebi ci prostudujte navod k pouziti.
3eeneHO-KeJITbI npOBd
3emJra
CnHnnpOBoD
Heitpanb
KopuHHeBbI npoBOd
Φa3a
PnmeaHne: He noKnIOaHte BapOHyIO nobepxHocTb uepe3 yctpoCTBO 0bApXeHnry Yeu Ka T haemIO, TaK Ka 3To MoKeT npBecTN K "NoXhBM OTKIOueHnM". Ee pa3 HanomnHaem, YTO 3NeKTponpI6Op DonKe H bItb PpaBnHbHO 3aEMeH, N To pnp3BoNTeB He npNtHMaeT HkAKNX pPeTeH3N B cNyAe NobpeXDeHn I HeCacTHbIX CNYaEB, BO3NHkUHX B peynbTaTE HnpBaBnHbHO NOKnIOueHn 3NeKTponpI6oPA K 3NeKTPOcETn.
2.1. NOДКЛIOUЧЕНЕ K 3JIΕΚΤΡΟСЕТИ
PpOBeTe DaHbIe, npBHeDHHbIe B NaCnOpTHo TaBmUKe, 3aKpenneHHo CHApYkN Ha BApOHOH NOBepxHOCTN, DnA TORO, YTO6bl y6dntbC B TOM, TTO BXoHoe HApPrKeHMe BApOHOH NOBepxHOCTN COOTBeTCTByeT HApPrKeHMO 3JIeKTPOcTeN.
Ipeep noKJIIOUeHEm BapOHOI NOBepXHOCTN K 3JIeKTPocETn IPOBepBe CNTcEMy 3a3EMHeHr.
DAnHHb 3NeKtpnpn6p o8a3aTeNbHO DoJKeH 6bItb 3a3eMneH. B cnyae HecO6HIOEHNr 3TOr Tpe6oBHaNr PnO3BOIeNB ChMaet C c6b4 OTBeTcBeHHoct3a HaHeceHEne Bpea 3dOpOBbIO IIODe N NOBpeXeHne IMyueCTBa.Ecn K Ka6eHIO NtAHNA He NDcoEOHNEHBAINka, NDcoEOHNIHTe K Ka6eHIO NtAHNA BNJKy, HarpyOCHNA CNOCo6HOCTb KOTOPONCOBTCTBYe YkasaHHo B nacnopTHoT Ta6nUKe. PPOBOD 3a3eMNEHn MMeET XeNTTo-3eHbI uBc. K 3NeKtpuueckoP03eTKoJKeH BcERda ObecneHnBaTBCB CBO6OHDh IOCTyn.
EcnnBapouhna NoBepxHocbI noKJIIOUaTeCk KJNEKTPOcEt HnPpMyIO,TO DOnKeH6blTbYCTaHOBHeAHTOMaTHeCKN BbIKIOuAtenB.
IpynpoTbpaueHnOnachocte3aMeHaNoBpeJeHHoroKa6enPiTuHnI DOnKHa BbInonHbTaCToJbKO KBaHmФuPObaHHbIM CneuaHCTOM.
PpOBOd 3a3eMnEHn (XeITo-3eHbI)doJIKeH 6bIT npIbIINrTeBHO Ha 10 MM dIIHHee PpOBODΦa3b I HeItpaII.
CeyHne npOBoHNKOB Ka6eIaNTaHnI OJINXHO COOTBeTCTByET MOUHOCTH, NOTpeBnEMoB BapOHyNOBepxHOCTbHO.
Поверпге 3начehи мошостс,Notpe6яземо 3нeктponрборm,уkaанhoeВибларггТо tabлмчke,а takе Поверпгte,ЧИ NGNOb3yETcra Ka6eNB nHTAHINI TnIa HO5RR-F,H05VV-FnHnHO5V2V-F.
| ФАЗА | L | Корчheels四项 |
| 3ЕМЛЯ | Жени-зелен的一项四项 | |
| HEITPAЛь | N | Сини四项 |
2.2. NOДКЛIOUЧЕНС KЛИNHи ГАЗСАБЖЕнЯ
HHe HcTpyKnn npEHa3NaHeBn Dn CneuaNtOB, Meoux N DoCTaOHTy KBAINFKNACUIO Dn BbIIOINHEHryCTAOBHO6OpyoBaHnB COOTBeTCTBn C Tpe6OBaHnMa HauNoHbHbX npaBn Hopm. TOnbKO Dn BeNKoBpTaHnM. CornAcho 3aOKy, yCTAOBkBAoB D kCNpyaTIOJIKHBI BInONHHTBCrTONKoCOTpyDnKOM cnyKb"Gas Safe".
Bce pa60tblonKhblbnoHHTbcraCOTcOeINHeHHbIM3JeKTponNTaHEm.
B3akpenHHOHa BapOCHNOBepxHocnNacnpTHoTab6nueKyka3aHTnra3aHa,Ha KOTOPOMDfXHpa60Tatb BApOCHNAOBepxHOCb. PepeNDKIOUeHEm BapOCHNOBEPXHCTKNJINHrAzoCHa6KeHN NkRA3OBOMByBaIHOHy Heo6XoDMOpOBepNTb,TObAPOHNAOBepxHOCbOTperynipobaha Ha TOT TnRtra3a,KOTOpBb6yETBHeNoDABaTbc.EcnBapOCHNAOBepxHOCbHe OTpeYnIPoBaHa Ha HyKbYtn Ra3a,ObpatntecbK INHCTpyKuMn, PnBeDeHHbIMnocneJeUox nparpaPax, rdeOncaHo,KAkImMeHnhpeYnIPoBKn.
PnpaOte Ha CKMKEHOM r3e (ra3 B 6aJIIOHe) CneDyET NOnb3oBaTbCerpeYrTOpOM DaBNeHn, OTBeauOcero Tpe6oBaHm HAuHOHaNbHbIXCTaHdApTOB.
Tpy6b, uai6b yynnoTHnTeBHe npoknadKn dONKb COOTBeTCTBOBaTb Tpe6oBAHmHaUHOHaNbHbX CTaHapTOB.
HeKoTOpBle MoDen NoCTabNIOCTc C KOJeHOM (nepeXoHNKOM), HMeHOUIM KOHnecKyO pe3b6y. B HeKoTOpBx cTpaHax NcNoIb3oBaHme TAKIX nepeXoHNKOB RAJIeTcO6BaTeNbHbIM. Ha pnc.8 NOka3aHo, KAc OTNIuHTb nepeXoHNK C UINHHDpueckCk Ope3b60 n OEpeXoHNK C KOHnueckO pe3b60 (CY = UINHHDpueckKa, CO = KOHnueckA). B INoBom Cnyae uINHHDpueckKa pe3b6a DOJNHa 6b1tB B INoBom Cnyae, KOHeC nepeXoHNKCA UINHHDpueckCk pe3b60 DoJNKe HNOCoEHNHTbCK BAPouHNO NobepxHocTn.
Ecnn noKnIOeHneB apOohn noBepxHOCTN K IINHN rAOCh6KeHHN OcuyseCTBnETc nOMoIbIy rn6KOro 1nHaN, npOBepbTe, 1TO dInHa r6KOro 1nHaNae HpeBbIaWae2M.
YTo6bHeNoBpeHbBapOHyIO NobepXHOCTb,BbINOHNHTe ee yCTaHOky,KAK OnncaHo (CM.pnc.6).
1)ПодcoeДинTeДeТаи,кak noka3aHoHa pncyHke:
A)IepexoDnK C HapyKHO UINHdpuecko pe3b601/2 DIOMa
B)Ppokka1/2IOHa
C)Ta3OBbI nepeXoHNK C BHyTpEHHe pe3b601/2IOHMa, KOHnueckar UINMHpUeCKa, INN UINHnDpUeCKa UINHnDpUeCKa.
2)3aTnHtce coeHHHeHc NOMOsbIraeHbIX KIOueH. IpeepTeKAK 3aTnHyTb coeHHHeHc yCTaHOBtETpy6bl B HxKHOe NOJOKeHne.
3)Io#coeHHHTe KoneHO C KJINHn NOaun Ra3a c NOMOuBIO XeCTKoM MeHNO Tpy6bUNrN 16KO CTaNbHO Tpy6bl.
BAXHOE 3AMEAHHE: Nocne noDcoeHHeN BapOuHn NOBepxHocTn Knnnn ra3oCna6KeHH npOBepbTe Ha oTCyCTBne yTeueK r3a Bce Tpy6hIe coaeHHn c NOMOoi bIOblbHoro pactbopa. HMKOTDA HE IcNOJb3yIe DN PNOBEPKN YTEeK RA3A IIAMr. PpOBepbTe TaKke, UTO R6Kn mHaahr He cOpNHkacAcetc C dBHXUIMNC qACTMn KxOHHO Me6eHN (HAnpHMep, BbIDBHXHO JnK) n He pNOxOHT B TaKOM MecTe, rDe OH MOKeT bItb NobpeXdH.
PnpEHNpEeHHe: Ecnn B6n3n BapOvHO nobEPxHOCTb NNoyOBCTByTe 3anaXra3a, nepeKpoNe npOaYra3a Ha BapOuHcy NOBepxHOCTb N Bi3OBtne CneuaNtcta. He mIte MeTo yTeyku rata c nOMoUbIO OTKpBTOrTO pnaMeHn.
2.3.AAANTAUBAPOUHOI NOBEPXHOCTN HA DPyTNE TINbI FA3A
ДяадаNTaUNBapOCHNOBEPXHOCTnДЯpa6OtbcIpyrIMnra3AMN BbINOHNTE ONICAHHBE HIXe INCTpyKUIN:
CHIMMITEpeeTKN KOHΦopKN
BCTaBBTe UeCTnRpaHHbIKIIOU (7 MM) B OCHOBAHHe KOHΦOpKn (puC.7)
BbIePHHe foOpcyHky 3aMeHnTe ee fOpcyHKo, COOTBeTCTByIOue TOMy Tnny r3a, KOtOpBiy 6yDet NcNoJb30BaTbcr (cm. ma6nuu muuno8 a3a).
2.4.PEYJINPOBKA MNHIMAJbHOI\PJAMEH
Nocne 3aXnraHnKoHΦopKn yctaHOBnTe pyky peryIaTopa BbICoTbI pIaMeHN B NIOXKeHne, COOTBeCTbYIOOe MmHMaJIbHOMy PIIaMeHN, a 3aTeM CHIMnTE pyky peYrTaTOPa, pIINIOXNB He6OBJLoe ycInne.
PerynnpOBka MNHmMaJIbHO rIaMeHN BblIOJIHReTcC NOMOuBBO BNHTa maneHbKo OTBeTpK, KAK NOKa3aHO Ha puc. 9. NobopOT BuHTa no yacoboi CTpeKke YMeHbJaaet NtOK ra3a, a nobopOT BnHTa npoTINB yacoboi CTpeKNYBEnMnBaet NtOK ra3a. C NOMUbO 3Toi peYrnpOBKn PONyHte Pnma BbcOTOn 3-4 MM, a 3aTeM yCTaHOBtHe Ma cto pykny peryIaTopa.
EcnncnONb3yETcCkXKeHbHneFTHHO(CH),NOBepHTe BNT doynopa no YacBOB cTpeKe.
NocIe BbInonHeHnpeynipOBOKdnaaTnBapOHyoNOBepxHOCTHaDpyroTNrA3a3aMeHnTe CtapyIO Tabmky, 3aKpenHeHHyOHa BApOHyoNobepxHOCTu,B KOTOpOH yKa3AH TnRra3a,H HOByIO (NoCTabnnrTaB KOMIIKeKTe C BapOHyo NOBepxHOCTbIO), B KOTOpOH yKa3AH TnRra3a,Ha KOTOpBn NepeBeDeHa BapOHya NOBepxHOCTb.
3. INHCTPYKUNI NO 3KCNJYATAUINBAPOUHOI NOBEPXHOCTN
DAnHb3JleKtpOnpnpop npEJaHaHaeHToIbKO pIgNcOJIb3OBaHnI NO erOpnpOMy Ha3HaueHIO,TO eCTb,ДЯ npriroTOBJeHnI NUsi B DomaunHX yCNOBHX. JIO6OE dpyroe npImeHeHne BapOCHoN IOBepxHOCTn CHTAeTcH He npabUNbHM, IN O3OTMy MOKeT 6blTb ONaCHbIM. POns3BOdTeJIb He HeceT OTBeTCTBeHHOCn 3a NOBpeXDeHn I nOTepn, ABJIAUncECA cNeCTBmE HnpabUNbHorO NCNoIb3OBaHnI BapOCHoN NOBepxHOCTn.
DAnHbI 3JIeKIpOnp6Op He npEHa3HaueH dIg NcNoB3ObaHnIIOBmC OrpaHHeHHbIMn F3NHeCKMn IINYMCTBeHHbIMn CnOCoBHCTMn,IOBm,He O5NaIaOuMMIOCTaTOHbIM ONbTOM IN3HaHnMI,a TAKKe DnIcNoB3OBAHMeDeTbMn,ecn OHn HE HaxoJrTa ND HaBIOJeHNMeIua,OTBEauHOeRo 3aHX6eONaCHOctb,NINHE NOyHnnOT Hero COOTBeTCTByIOUxINHCTpykui.
He pa3pewaIte TETM irpaTb c 3eKtponpnpoPOM.
3.1.NCIOJb3OBAHNE FA3OBOKOHΦOPKN
YTo6b3aKeey KoHΦopky, NOHeNCHTe K HeI 3axKeeHHyIO CnUky, HaxMITE Ha pyKy peRynipOBKn BbICOTbI NJaMeHN, INOBepHNTe ee npTINB YacOBoi CTpeKN.
Ecnn KOHOpKn He nCnoJb3OaNcB TeueHne DByx mnn 6oone dHe, To npExd Yeem 3aKeHb KOHOpKpy NdoXdTe HeckoIbKO cekyHd Inra TOrO, YToBbl N3 Tpybok BblweBn BO3dyx.
YTo6b3aKeCy KOHOpKy BapOHyON NOBepXHOCTN, Ch6KeHHyU OyTpoiCBOM 3NeKTPoONJKnRA, BBINOHNTe CneDyIOUne Opeaun:
- HaxMnTe Ha pyuKy peryIuPobKn BbICOTbl PnaMeH N IOBepHnTe ee npTtB YacOBoC TpeKN B NOJIOKeHne, O6O3NaeHHoe NOxNtra.
3axnTe KOHOpky C nOmoUbHO HxnatN KONKn 3JKeTPONoKnra.
EcnBapOnHn NOBepXHocTc ChAbxHea ABToMaTHuecknM
3JKeTPONoKnrom, npocTo HaxMMte Ha pykY peyIpyoBKN BbICOTb
PnAmEHn YcTaHOBnTE eB NoIOxKeHne, OOb0HaHeHHe 3HaKOM
NoKnra.Cntcema 3JKeTPONoKnRa 6yDet NocToHHo
reHepnoBaTB NcKpbI, Do Tex nop, Noka pyka peyIpyoBKn PnAmEH
6yDet HaxOOnTBcB HxKaTOM NIOJOKeHN.
EcnKoHΦopKa He 3aropaetcB TeueHHe 5 cekyH, yCTaHOBtpepyky peYInpOBKn B NOLOXeHHe 0, nIOBTOpTe ONICAHHy BblIe onepaunio.
B MoDJIaX, Ch6KeHHbIX 3aUHTbIM KlaIaHOM, KOToPbI aBTOMaTnueckn NepeKpbIbAe Tnoaay rata B cnUyae BHe3aNHO rOraCaHr nnameH, KOHΦopKn 3axKraHOTcK, KaONMaHO BblIe, HO npn 3tOM nocLe 3axnHaH N KOHΦopKn Heo6xOdmo Co6JIOdaTb OCTOpOXHOCTb.
Ipeed BKIOHHeHnEM ra3OBoB BapOCHoN IOBepXHOCTn IpOBepbTe, YTO KOHOpKIN KpbIuKN KOHOpOK npaBUNbHO ycTaHOBNeHbHa BapOCHyIO NOBepxHOCTb.
NOJE3HbIE COBETbl
IJIIOJUyHnHaNluyuHxpe3yJbTaTOBIOJIb3yHTecbCKOBOpOaMnIKacTpIOJHM CIIIOCKIM DHom,pa3MepbKOTopbIX COOTBeTCTBYOTpa3MepaRa3OBbX KOHΦopOK (cm.Ta5n.A).
The manufacturer will not be responsible for any inaccuracy resulting from printing or transcript errors contained in this brochure. We reserve the right to carry out modifications to products as required, including the interests of con sumption, without prejudice to the characteri stics relating to safety or function.