
GK564ONYA - Cooker Pelgrim - Free user manual and instructions
Find the device manual for free GK564ONYA Pelgrim in PDF.
| Product type | Built-in gas hob |
| Brand | Pelgrim |
| Model | GK564ONYA |
| Number of burners | 4 (1 reduced normal, 1 normal, 1 powerful, 1 simmer) |
| Dimensions (W x D x H) | 580 x 510 x 40 mm (approx.) |
| Net weight | 8 kg (approx.) |
| Gas supply | Natural gas (G20/G25) or LPG (G30/G31) |
| Electrical supply | 230-240 V ~ 50/60 Hz, 1.1 VA |
| Total power (natural gas) | 6.95 kW |
| Powerful burner power | 2800 W |
| Normal burner power | 1750 W |
| Reduced normal burner power | 1400 W |
| Simmer burner power | 1000 W |
| Ignition | Integrated piezo-electric with flame safety device |
| Safety | Flame safety device (thermocouple); automatic gas shut-off in case of flame failure |
| Cleaning | Removable burners and grates; clean glass hob with special ceramic cleaner |
| Wok burner | No |
| Warranty | 2 years (manufacturer standard) |
| Repairability | Original spare parts available via after-sales service |
| Gas category | II2L3B/P (NL) or II2E+3+ (BE) |
Frequently Asked Questions - GK564ONYA Pelgrim
User questions about GK564ONYA Pelgrim
0 question about this device. Answer the ones you know or ask your own.
Ask a new question about this device
Download the instructions for your Cooker in PDF format for free! Find your manual GK564ONYA - Pelgrim and take your electronic device back in hand. On this page are published all the documents necessary for the use of your device. GK564ONYA by Pelgrim.
USER MANUAL GK564ONYA Pelgrim
Kinderslot (GKT564/GKT595)
Operation with control knobs
Igniting and adjusting 7
Operation with touch controls
Igniting and adjusting 8
Burner switch-off time 9
Child lock 10
Timer 11
Comfortable cooking
Optimal use of the hob 12
Wokburner12
Maintenance
General 13
Cleaning 14
Faults
Faults table 15
Installation
General 17
Gas connection 17
Electrical connection 17
Building in 18
Technical data 22
Environmental aspects
Disposal of package and appliance 23
Introduction
This gas hob has been designed for the real lover of cooking.
Thanks to the integration of the spark ignition, you can ignite and control the burners with one hand. The gas hob combines high efficiency with a minimum of incompletely burned combustion gases. This gives you an appliance with short heating times, while also providing excellent simmering. With the GK575, GK595 and GKT595, thanks to the spacious positioning of the wok burners, while cooking with woks sufficient space remains for preparing other dishes.
The burners are fitted with a flame failure device, which ensures that the gas supply is shut off if the flame goes out during the cooking process.
This manual explains optimum use of the gas hob. In addition to information on operation, you will also find background information that may be useful to you when using this product.
Read the manual thoroughly before using the appliance, and store these instructions in a safe place for future reference.
The manual also serves as reference material for service technicians.
Please, therefore, stick the appliance identification card in the space provided, at the back of the manual. The appliance identification card contains all the information that the service technician will need in order to respond appropriately to your needs and questions.
Enjoy your cooking!
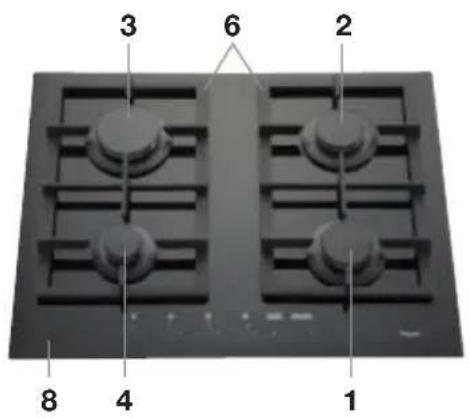
Description
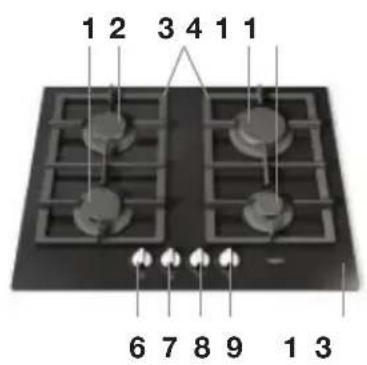
GK564
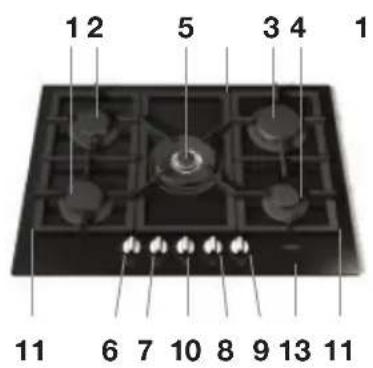
GK575
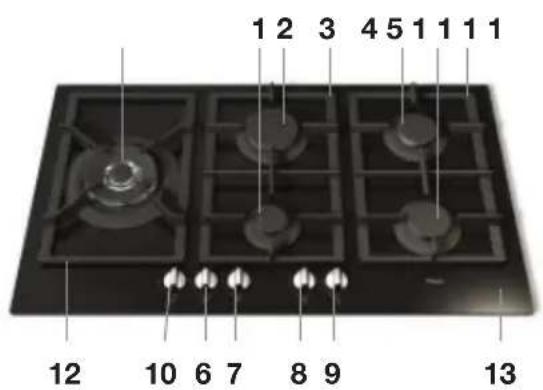
GK595
-
Semi-rapid burner lowered
-
Control knob rapid burner
-
Semi-rapid burner
-
Control knob simmer burner
-
Rapid burner
-
Control knob wok burner
-
Simmer burner
-
Pan support
-
Wok burner
-
Pan support wok
-
Control knob semi-rapid burner lowered
-
Glass top
-
Control knob semi-rapid burner
Description
GKT564
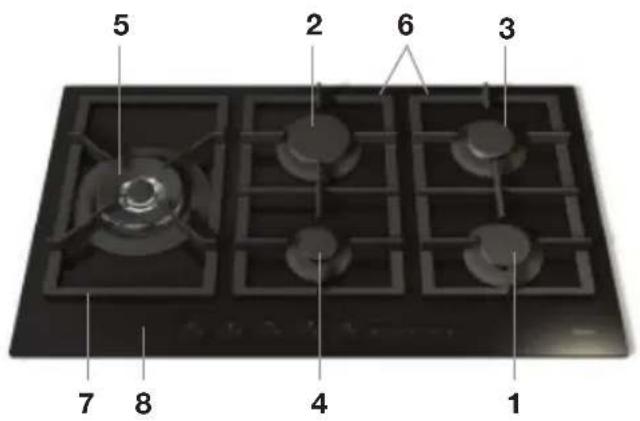
GKT595
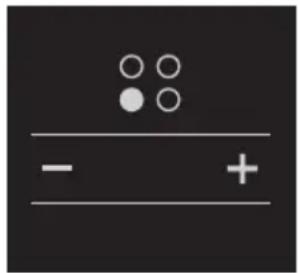
Control panel

GKT564

GKT595
- Semi-rapid burner lowered
- Semi-rapid burner
- Rapid burner
- Simmer burner
- Wok burner
- Pan support
- Pan support wok
-
Glass top
-
Touch control simmer burner
- Touch control rapid burner
- Touch control semi-rapid burner
- Touch control semi-rapid burner lowered
- Touch control wok burner
- Timer button
- Child lock
- On/Off button
Read the separate safety instructions before using the device!
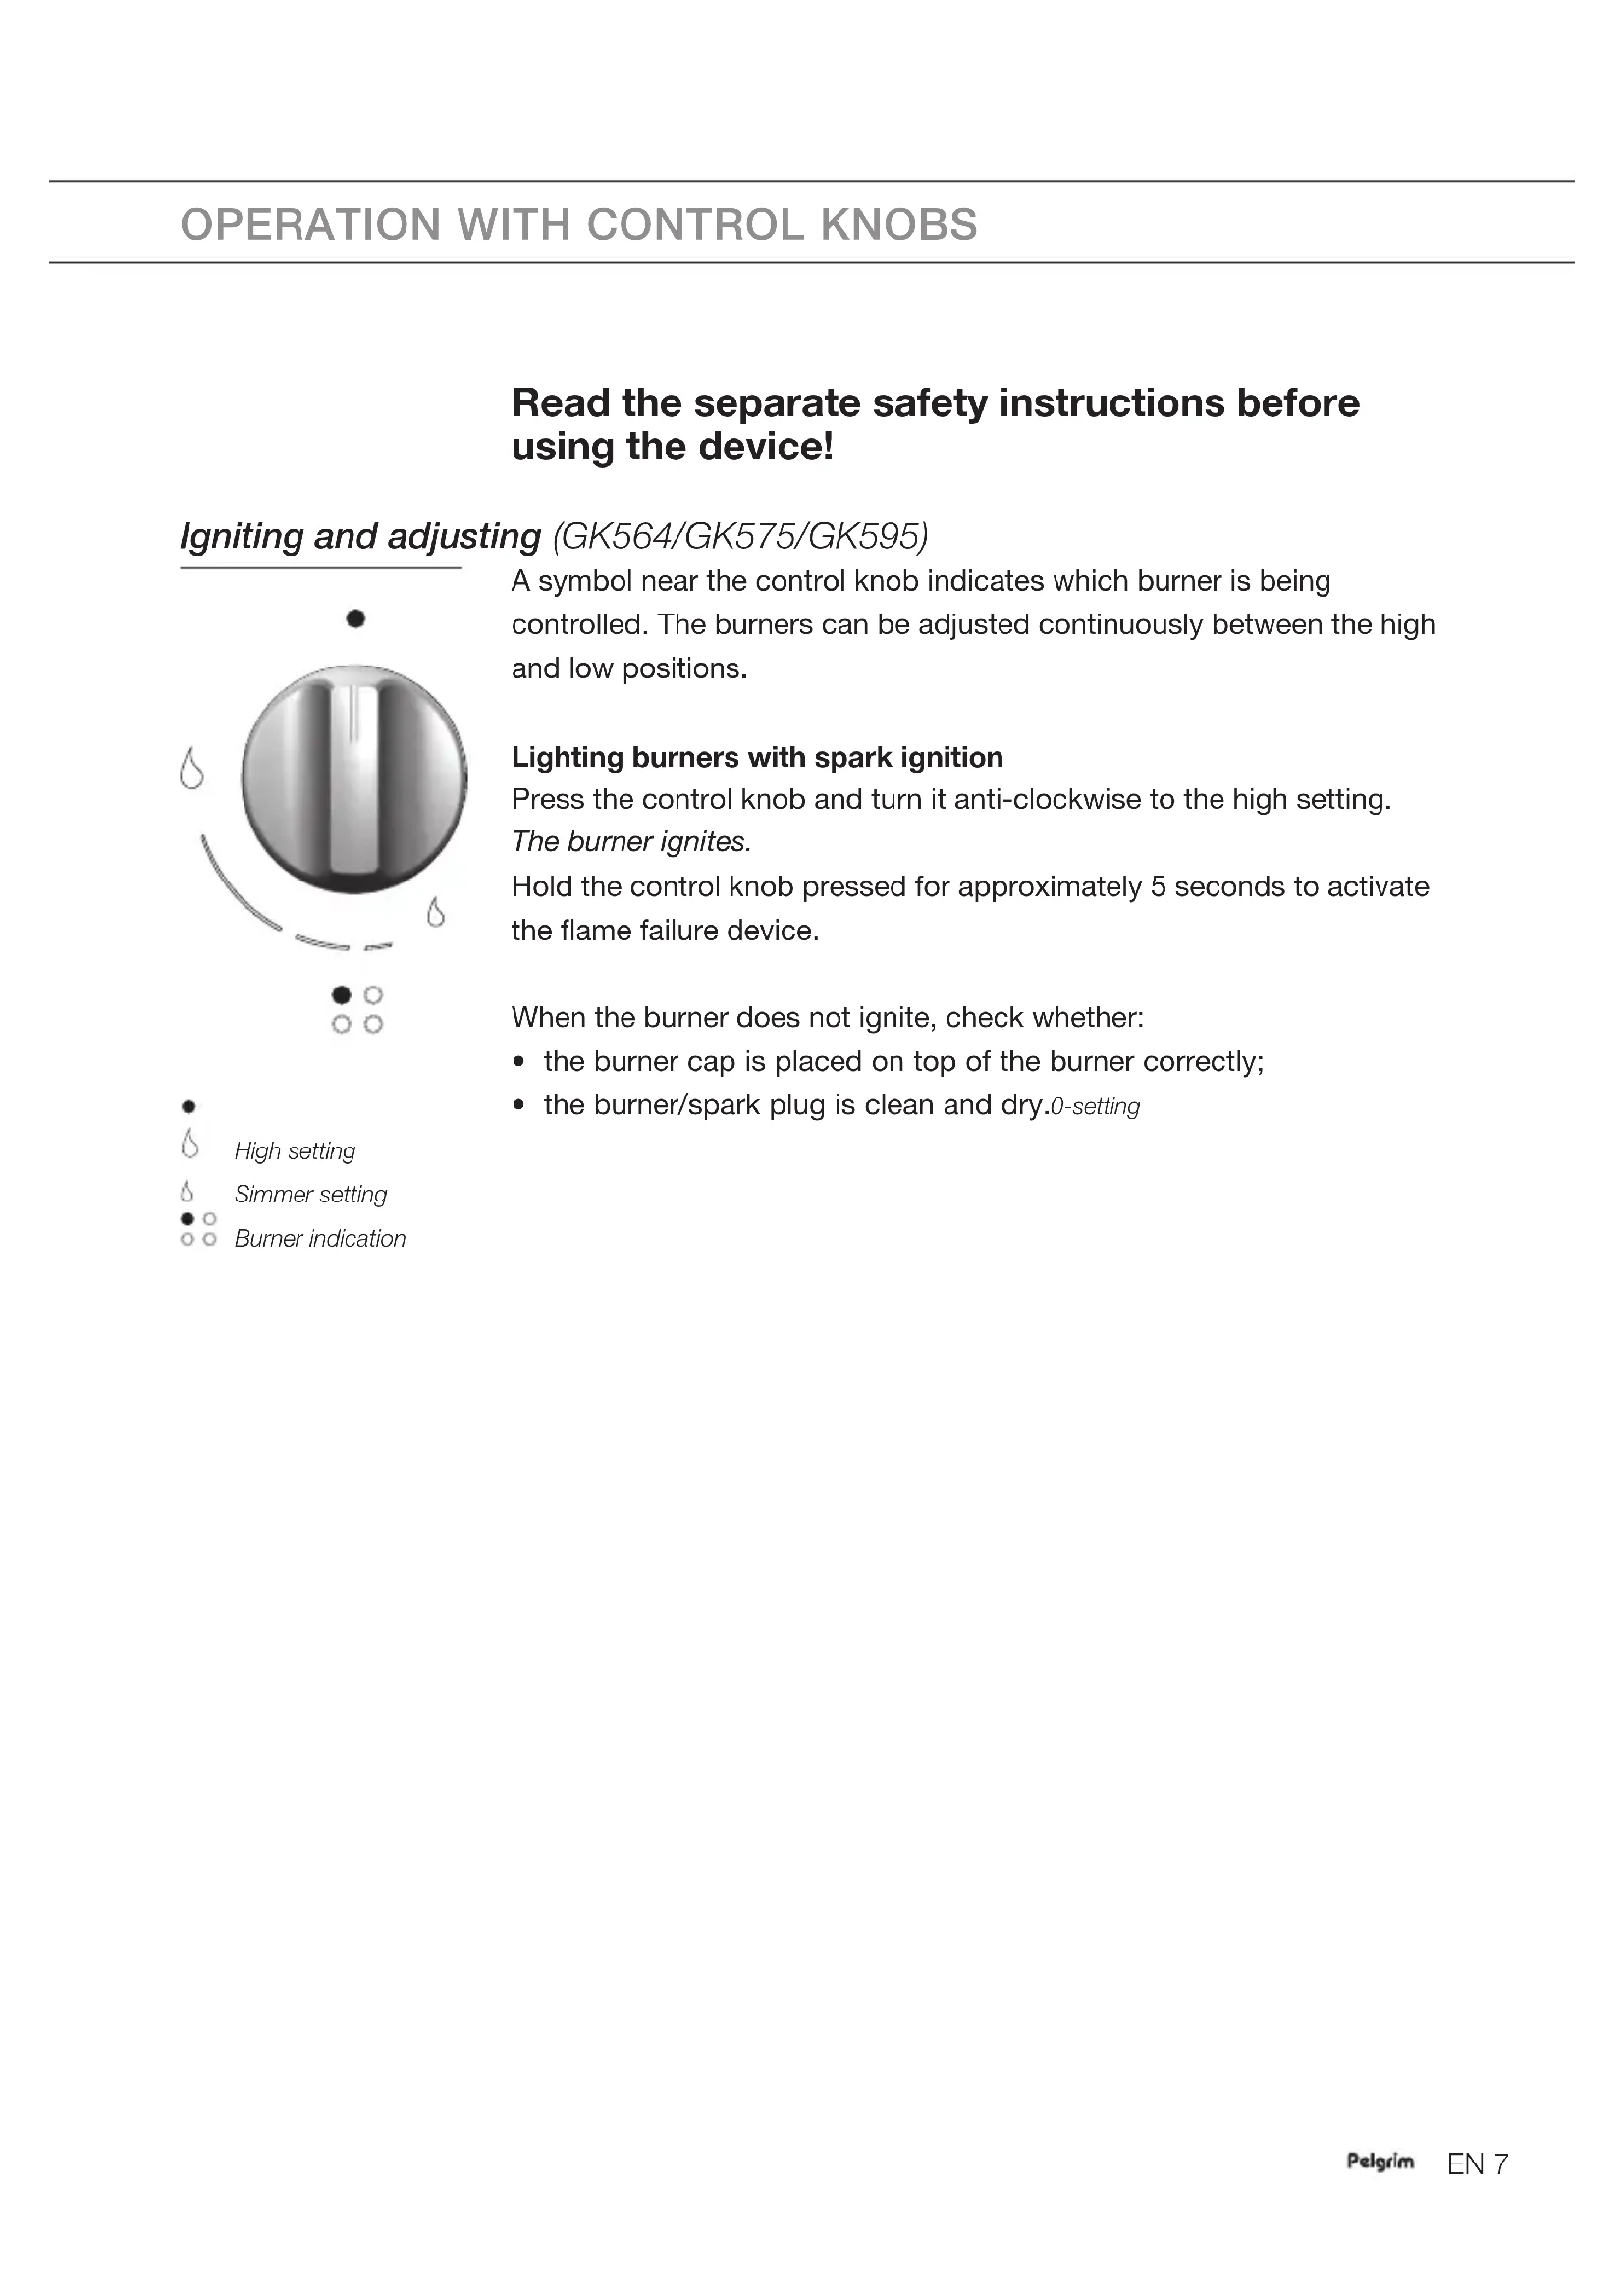
Igniting and adjusting (GK564/GK575/GK595)

A symbol near the control knob indicates which burner is being controlled. The burners can be adjusted continuously between the high and low positions.
Lighting burners with spark ignition
Press the control knob and turn it anti-clockwise to the high setting. The burner ignites.
Hold the control knob pressed for approximately 5 seconds to activate the flame failure device.
When the burner does not ignite, check whether:
- the burner cap is placed on top of the burner correctly;
- the burner/spark plug is clean and dry.0-setting
High setting Simmer setting Burner indication
Igniting and adjusting (GKT564/GKT595)
A burner indication above the touch controls indicates which burner is being controlled. The power can be set in 7 levels.

Switching on
Touch and hold the On/Off button for 2 seconds to switch on the hob. The hob switches on and the display for each cooking zone will show '0' to indicate that none of the burners is ignited.
Lighting burners with spark ignition
- Touch the + button of the burner you want to ignite. '0' is blinking for 3 seconds.
- Touch the + button again within 3 seconds to set level 7 or touch the - button within 3 seconds to set level 5.
The burner ignites and the display shows the level. The display above the timer button shows the burners that are ignited and that are linked to a timer.
The control system will make three attempts at intervals of 10 seconds to ignite the burner. Should the burner fail to light, it locks and the corresponding display shows 'b'. To use the burner again, you must release the burner.
Setting a burner level
If a burner has ignited, you can set the level with the corresponding + button or - button. You can touch the button several times or you can touch and hold the button until the correct level appears in the display.

Releasing a burner
- Be sure that the hob is switched on.
- Touch the most left-handed - button and the child lock button simultaneously for at least two seconds.
You will hear a short beep; you can release the buttons. The display of the burner that has to be released shows '0' to indicate that you can ignite the burner again.
When the burner does not ignite, check whether:
- the burner cap is placed on top of the burner correctly;
- the burner/spark plug is clean and dry.

If the release procedure is repeated 5 times in a row during a 15 minute time span, the device will indicate Flt06 and will accept no further request for release for another 15 minutes.

Switching off one burner
Touch the + and the - button simultaneously for 2 seconds of the burner you want to switch off or use the - button to set the burner to 0. The burner switches off and above the touch control a blinking 'H' will remain visible for some minutes to indicate that the burner is still hot.

Switching off all burners at the same time
Touch the On/Off button.
The hob is now switched off. If a burner is still hot, a blinking 'H' will remain visible in the display of the corresponding burner for some minutes.
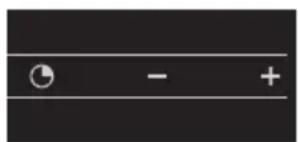
Burner switch-off time (GKT564/GKT595)
It is possible to set a switch-off time for every burner. The burner will then switch off automatically when the set time has passed. You can only set the switch-off time if the burner is ignited.
- The countdown starts as soon as the programming of the switch-off time for a burner has been confirmed. If you do not confirm the set time, the countdown will start after several seconds.
- The set switch-off time can be seen in the timer display for each burner (after the right burner has been selected).
- If the time has elapsed, the burner switches off and you will hear a beep several times during 30 seconds.
Programming the burner switch-off time
- Switch on the hob, ignite a burner and set the power.
- Touch the timer button.
An indicator above the timer button will start blinking to indicate that the burner is currently selected for programming the switch-off time. With the timer button you can select each burner that has been ignited. In the display 't0.00' appears to indicate that there has not been set a time yet for the selected burner.
- Touch the + button of the timer to set the switch-off time for the selected burner (steps of 1 minute).
- Touch the timer button again to confirm the setting. Above the timer button the indicator lights of burners that are linked to a timer will remain illuminated.


- During programming you can set the time to '0.00' by touching the + button and the - button of the timer simultaneously.
- You can see the remaining switch-off time for a burner by touching the timer button again. The time of the burner of which the indicator light is blinking, appears in the display. If you want to see the remaining switch-off time of another burner, you have to touch the timer button once more to select this burner.
- You can adjust the time by touching the timer button and selecting the correct burner with the timer button. With the + button and the - button of the timer you can adjust the time.
- If you switch off the burner by hand, the set switch-off time disappears.
Child lock (GKT564/GKT595)
Your hob is equipped with a childproof lock that lets you lock the appliance for cleaning or to prevent unintended switching on by children.

Switching on the child lock
- Be sure that the hob is switched off.
- Touch and hold the child lock button for at least two seconds. You will hear a single beep and will see a dot in every burner display. The child lock is now activated.
It is not possible to release a burner when the child lock is activated. First you have to deactivate the child lock.

Switching off the child lock
- Touch and hold the child lock button for at least two seconds. You will hear a single beep and the dot in every burner display disappears. The child lock is now deactivated.

Tip
Switch the hob to child lock mode before cleaning it to prevent it from accidentally switching on.
Clock (GKT564/GKT595)
It is possible to see the present time in the display. The correct time needs to be set before using the hob for the first time and after a power failure.


Setting the clock
- Be sure that the hob is switch on.
- Touch the timer button and the childlock button simultaneously for at least 3 seconds.
'0' in front of the dot is blinking. You can set the hours now.
- Touch the + or the - button of the timer to set the hours.
- Touch the timer button again. '00' after the dot is blinking. You can set the minutes now.
- Touch the + or the - button of the timer to set the minutes.
- To finish, touch the timer button again to confirm the setting. Now you will see the present time in the display when you activate the hob.

If there are burners that are connected to the timer, you cannot see the present time in the display. The remaining time of the timer which indicator light is blinking, is shown in the display. By touching the timer button (several times until no cooking zone is selected anymore; no blinking lights), you can see the present time in the display. After a few seconds the set time of the burner (which indicator light is blinking) reappears in the display.
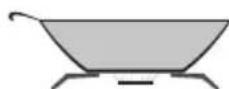
Optimal use of the hob

Wrong
Always ensure that the flames remain below the pan. If flames play around the pan, a lot of energy is lost. In addition, the handles can get too hot. Do not use pans with a base diameter less than 12cm . Smaller pans will not be stable.
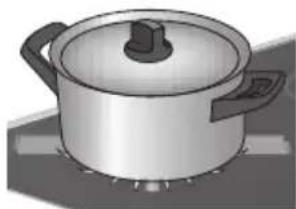
Right

- When frying, stir-frying, heating through large quantities and deepfrying it is best to use the rapid or wok burner.
- Preparing sauces, simmering and boiling can be done best on the simmer burner. On its high setting this burner is large enough for cooking food right through.
Cook with the lid on the pan. This way you save up to 50% energy. - Use pans with a flat, clean, dry base. Pans with a flat base stand stably and pans with a clean base transfer the heat more effectively to the food.
Wok burner
With the wok burner you can prepare dishes at a very high temperature. For this purpose it is important:
to cut the ingredients into strips, slices or pieces before cooking;
to use good-quality oil, such as olive, maize, sunflower or peanut oil when stir-frying. A small quantity is enough. Butter and margarine on the other hand will burn because of the high heat;
to place the dishes with the longest cooking time in the pan first, so that at the end of the cooking time all ingredients are cooked al dente at the same time.
Only use a flat-bottomed wok pan on the wok burner.

Use of a supportive wok ring is not permitted! It is not permitted to use a so-called grill plate. Using either a wok ring or a grill plate can cause irreparable damage to the appliance.
General
Your appliance has been manufactured from high-grade materials, which are easy for you to clean.
- Regular cleaning immediately after use prevents over-cooked food being able to become ingrained and cause stubborn stains that are difficult to remove. Use a mild cleaning agent.
- Clean the control knobs, burners and pan supports first and then the glass panel. This avoids the glass panel getting dirty again during cleaning.
- Clean the spark plugs preferably with a cloth. Do this carefully. The spark plug can become defective. The sparkplug will only operate correctly in a dry environment. If the plug is very dirty, you may clean the point with a tiny brush.
- Set the pan supports down vertically, without sliding them over the glass panel.
- Assemble the burner parts, paying attention to the cut-out sections for the spark-plug and thermocouple. Make sure that the burner parts lie flat.
Cleaning
Cleaning the pan support
Do not clean the pan supports in the dishwasher. The enamel on the pan supports is suitable for cleaning by dishwasher. However, the connection with the rubber feet is not. Moreover, the pan supports might show some discoloration if they were washed in the dishwasher. If the rubber feet are lost, the pan support is likely to damage the glass panel.
Stubborn stains on enamel (pan supports, burner caps)
Remove with a non-abrasive cream. Never use scouring powder, scouring pads, sharp objects or aggressive cleansing agents.
Cleaning removable burner components
Burner parts should not be cleaned in the dishwasher. The parts may be damaged by the dishwasher detergent! The removable burner components (including wok) are best cleaned with a mild cleaning product and a soft cloth. In the case of obstinate stains you can soak the parts in hot suds. Never use scouring powder, scouring pads, sharp objects or aggressive cleansing agents.
Stubborn stains on the glass top
Clean the glass top with a cleansing agent intended specifically for ceramic hobs. Water stains or limescale are most easily cleaned using a non-abrasive limescale remover.
Faults table
If the appliance does not work properly, this does not always mean that it is defective. Try to deal with the problem yourself first by checking the points mentioned below in the table or visit our website 'www.pelgrimservice.nl' for more information.
| Fault Possible cause Solution | ||
| There is a smell of gas in the vicinity of the appliance. | The gas connection of the gas hob is leaking. | Close the main gas tap.Contact your gas fitter. |
| A burner does not ignite. Plug nnot in socket. Push the plug into the socket. | ||
| Fuse defective/fuse in meter cabinet switched off. | Fit a new fuse or switch the automatic fuse back on. | |
| Sparkplug dirty/damp. Clean and dry the sparkplug. | ||
| Burner parts not correctly installed. | Assemble the burner parts using the centring ridges. | |
| Burner parts dirty/damp. Cleanand dry the burner parts, making sure that the outflow holes are open. | ||
| Main gas tap closed. Open the main gas tap. | ||
| Fault in the gas network. Checkwith your gas supplier. | ||
| Gas bottle or tank is empty. Connect a new gas bottle or have the tank filled. | ||
| Wrong type of gas used. Checkthat the gas used issuitable for the appliance. If not, contact your gas fitter. | ||
| Control knob not kept pressed in far enough. | Keep the control knob pressed in far enough between full and low. At first use this can take some more time because of the gas supply. | |
| The burner does not burn evenly. | Burner parts incorrectly installed. | Assemble the burner parts using the centring ridges. |
| Burner parts dirty or damp. Clear | an and dry the burner parts, making sure that the outflow holes are open. | |
| Wrong type of gas used. Check | that the gas used is suitable for the appliance. If not, contact your gas fitter. | |
| The burner goes out after igniting. | Control knob not kept pressed in long enough. | Keep the control knob pressed in for at least 5 seconds. |
| Fault code ‘b’. A single burner is locked. Release the burner, see page 9. | ||
| Fault code ‘Flt06’. Upper limit of 5 releases in 15 minutes exceeded. | The device will accept no further request for release for another 15 minutes. | |
| Fault code ‘Flt09’. Electronic error. Release the burner, see page 10. Contact the service department. | ||
| Other fault codes. Contact the service | department. | |
General

This appliance should only be connected up by a registered installer! The gas and electrical connection must comply with national and local regulations.
Warning!
The type of gas and the country for which the appliance has been designed are indicated on the data plate.
This is a class 3 appliance.
Gas connection

- We recommend that the hob be connected by means of a fixed pipe. Connection using a specially designed safety hose is also permitted.
Behind an oven use must be made of a pipe made entirely out of metal.
Warning!
- A safety hose may not be bent and must not come into contact with moving parts of kitchen units.
- In all cases the connection tap for the appliance must be positioned such that it is easily accessible.

Before using the appliance for the first time check the connections using water and washing-up liquid to ensure that there are no gas leaks.
Electrical connection
1.1 VA - 230-240 V~ - 50/60 Hz
- Wall socket and plug must be accessible at all times.
- Electrical leads and cables should not be allowed to touch the hob.
- If you want to make a fixed connection, ensure that a multi-pole switch with a distance between contacts of 3mm is installed in the supply cable.
- Do not use an adapter or an extension lead to connect the device to the electrical mains. Safe use of the device cannot be guaranteed with these accessories.

Warning!
This appliance must be earthed.
Installation, maintenance or repairs should only be carried out by professionals who are authorized by the manufacturer, as failure to do so will void the warranty.
The device should be disconnected from the mains prior to installation, maintenance or repairs. The device is only disconnected from the electric power if:
- the main switch of the electrical wiring/installation in the house is switched off, or
- the fuse for the electrical wiring/installation in the house has been completely removed, or
- the plug has been pulled out of the socket.
Faulty parts may only be replaced by original Pelgrim parts. Only those parts are guaranteed by Pelgrim to meet the safety requirements.
If the connecting cable is damaged, it may only be replaced by the manufacturer, the manufacturer's service organisation or equivalently qualified persons, in order to avoid dangerous situations.
Building in
Preparing the hob
Fit the elbow supplied (1/2" ISO 228 (straight)) and the sealing ring onto the appliance's gas connection. Next, via the elbow (1/2" ISO 10226-1 (conical)), connect the appliance to the gas supply using a safety hose or a fixed connection.
Cut opening in worktop
- Saw the opening in the worktop. This should be done very accurately (see building in dimensions on p. 21).
- If the woodtop is made of treated wood, then coat the sawn surfaces of the top with sealing varnish, to prevent moisture causing the top to swell.
Attachment points for mounting brackets (see 1^* )
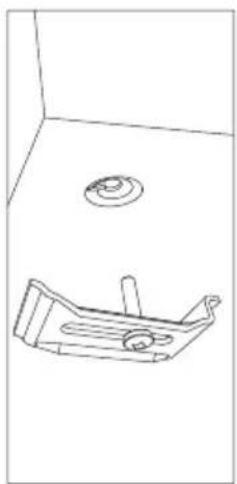
Screw hole for mounting bracket
Thin worktops
Thick worktops
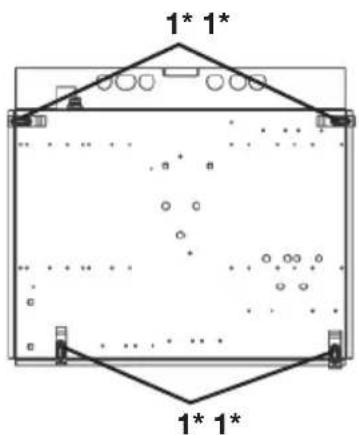
GK564/GKT564/GK575
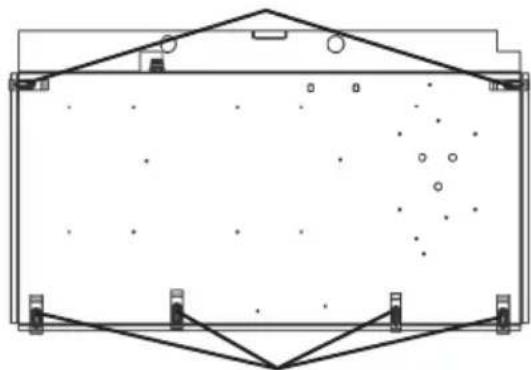
GK595/GKT595
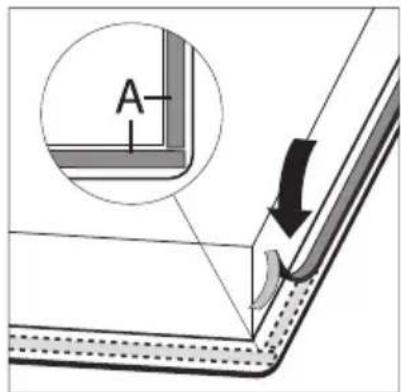
Placing the sealing tape
Remove the protective foil of the sealing tape (A) and attach the sealing strip in the edge of the glass plate. Do not attach the sealing strip through the corner. Instead, cut 4 pieces that fit tightly together in the corners.
Building in dimensions
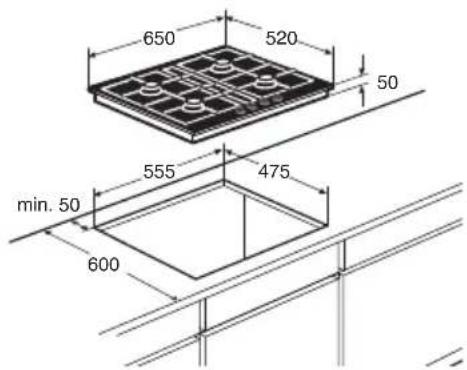
GK564/GKT564 GK575
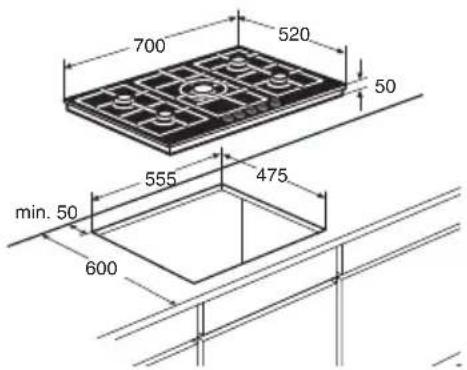
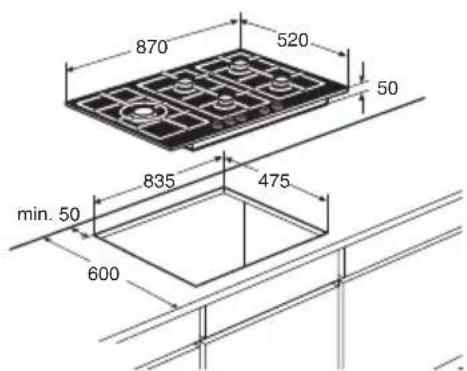
GK595/GKT595
Space to be left free around the appliance
A hob generates heat. Leave a sufficient distance between the appliance and non heat-resistant materials. Take care also with materials that may discolour (such as stainless steel).
The gas hob may only be built in next to one wall.

Caution!
The bottom of the hob becomes hot. Do not place combustible items in a drawer if the drawer is fitted directly below the hob.
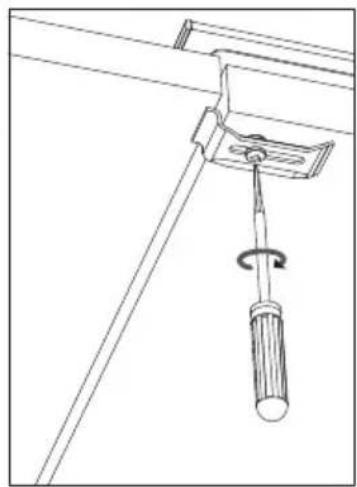
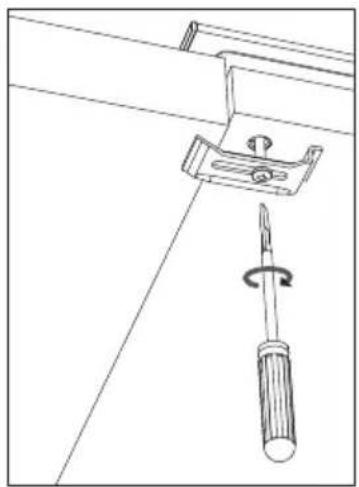
Install appliance and make connections
- Place the appliance in the worktop and secure it using the mounting brackets and screws supplied.
- Connect to the gas supply.
- Check with soap suds that the connection is gastight.
- Connect the appliance to mains electricity.
Technical data
On the label on the bottom of this equipment, you will find the total wattage, the required voltage and the frequency.
Gas information
| Burners Country Gas | Normal pressure | mbar | Nominal heat input (W) | |||
| N° | Description Min. Max. | |||||
| 1 | Semi-rapid (lowered) | BE | G20 | 20 | 550 | 1400 |
| NL | G25 | 25 | 550 | 1400 | ||
| BE | G30/G31 | 28-30/37 | 550 | 1350 | ||
| NL | G30/G31 | 30 | 550 | 1350 | ||
| 2 | Semi-rapid BE | G20 | 20 | 550 | 1750 | |
| NL | G25 | 25 | 550 | 1750 | ||
| BE | G30/G31 | 28-30/37 | 550 | 1750 | ||
| NL | G30/G31 | 30 | 550 | 1750 | ||
| 3 | Rapid BE | G20 | 20 | 800 | 2800 | |
| NL | G25 | 25 | 800 | 2800 | ||
| BE | G30/G31 | 28-30/37 | 800 | 2800 | ||
| NL | G30/G31 | 30 | 800 | 2800 | ||
| 4 | Simmer BE | G20 | 20 | 450 | 1000 | |
| NL | G25 | 25 | 450 | 1000 | ||
| BE | G30/G31 | 28-30/37 | 450 | 1000 | ||
| NL | G30/G31 | 30 | 450 | 1000 | ||
| 5 | Wok GK575 (4 kW) | BE | G20 | 20 | 1800 | 4000 |
| NL | G25 | 25 | 1800 | 4000 | ||
| BE | G30/G31 | 28-30/37 | 1800 | 4000 | ||
| NL | G30/G31 | 30 | 1800 | 4000 | ||
| Wok GKT595 (3,8 kW) | BE | G20 | 20 | 1800 | 3750 | |
| NL | G25 | 25 | 1800 | 3750 | ||
| BE | G30/G31 | 28-30/37 | 1800 | 3800 | ||
| NL | G30/G31 | 30 | 1800 | 3800 | ||
| Wok GK595 (5 kW) | BE | G20 | 20 | 1800 | 5000 | |
| NL | G25 | 25 | 1800 | 4750 | ||
| BE | G30/G31 | 28-30/37 | 1800 | 4750 | ||
| NL | G30/G31 | 30 | 1800 | 4750 | ||
| Appliance Country C | Category Total | heat input | |
| GK564ONYA NL | II2L3B/P G25: 6,95 kW | - G30: 505 g/h - G31: 496 g/h | |
| GK564ONYB | BE | II2E+3+ | G20: 6,95 kW - G30: 505 g/h - G31: 496 g/h |
| GKT564ONYA | NL | II2L3B/P G25: 6,95 kW - G30: 505 g/h - G31: 496 g/h | |
| GK575ONYA NL | II2L3B/P G25: 10,95 kW | - G30: 796 g/h - G31: 782 g/h | |
| GK575ONYB | BE | II2E+3+ | G20: 10,95 kW - G30: 796 g/h - G31: 782 g/h |
| GK595ONYA NL | II2L3B/P G25: 11,95 kW | - G30: 869 g/h - G31: 854 g/h | |
| GK595ONYB | BE | II2E+3+ | G20: 11,95 kW - G30: 869 g/h - G31: 854 g/h |
| GKT595ONYA | NL | II2L3B/P G25: 10,70 kW - G30: 778 g/h - G31: 764 g/h |
Disposal of packaging and appliance
In the manufacturing of this appliance durable materials were used. Make sure to dispose of this equipment responsibly at the end of its lifecycle. Ask the authorities for more information regarding this.
The appliance packaging is recyclable. The following may have been used:
cardboard;
polythene film (PE);
CFC-free polystyrene (PS hard foam).
Dispose of these materials in a responsible manner and in accordance with government regulations.
As a reminder of the need to dispose of household appliances separately, the product is marked with the symbol of a crossed-out wheeled dustbin. This means that at the end of its working life, the product must not be disposed of as urban waste. It must be taken to a special local authority differentiated waste collection centre or to a dealer providing this service.
Disposing of a household appliance separately avoids possible negative consequences for the environment and health deriving from inappropriate disposal and enables the constituent materials to be recovered to obtain significant savings in energy and resources.
C E
Declaration of conformity
We hereby declare that our products satisfy the applicable European directives, orders and regulations, as well as the requirements stated in the referenced standards.