NF942RVSA - Cooker Pelgrim - Free user manual and instructions
Find the device manual for free NF942RVSA Pelgrim in PDF.

User questions about NF942RVSA Pelgrim
0 question about this device. Answer the ones you know or ask your own.
Ask a new question about this device
Download the instructions for your Cooker in PDF format for free! Find your manual NF942RVSA - Pelgrim and take your electronic device back in hand. On this page are published all the documents necessary for the use of your device. NF942RVSA by Pelgrim.
USER MANUAL NF942RVSA Pelgrim
natural_image
Front view of a gas stove burner with control knobs and indicator lights (no visible text or symbols)NF942RVSA
text_image
Diagram showing two identical room layouts with numbered windows and a central circular icon, likely for architectural or instructional purposes.text_image
Diagram showing a circular object with labeled points and an arrow indicating rotation or movement.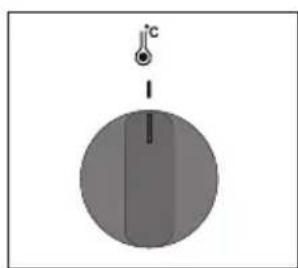
natural_image
Simple diagram showing a thermometer above a circular object with a vertical line and shaded region (no text or symbols)
flowchart
graph TD
    A["Input"] --> B["Process"]
    B --> C{Decision}
    C -->|Yes| D["Output 1"]
    C -->|No| E["Output 2"]
    D --> F["Final Output"]
    E --> G["Final Output"]

text_image
Diagram showing a circular object with arrows indicating rotation and a star symbol, likely illustrating a motion or positioning concept.1 0-stand
Vol-ontsteekstand
Kleinstand
Zone-aanduiding
natural_image
Illustration of a cooking pot on a gas stove (no text or symbols)Fout
natural_image
Illustration of a cooking pot on a gas stove (no text or symbols)Goed

text_image
Diagram showing a hand holding a tool interacting with a panel, labeled with numbers 1 and 2, indicating a step or component.text_image
Technical diagram showing labeled mechanical components F and R with alignment linesnatural_image
Close-up of a mechanical assembly with arrows indicating motion direction (no visible text or symbols)text_image
Technical diagram showing a mechanical assembly with labeled parts L and C, likely illustrating a component or assembly.Speciale emailcoating
natural_image
Simple line drawing of a table with legs and a curved arrow indicating motion (no text or symbols)Waterpas stellen
natural_image
Symbol of a trash bin crossed with no text or numbers, representing waste sorting or disposal (no text present)Operating the oven with timer 11
Operating the gas hob
Ignition and adjustment 12
Comfortable cooking
Optimal use of the hob 13
Wok burner 13
Maintenance
Cleaning the oven 14
Replacing the oven lamp 16
Cleaning the gas hob 17
Faults
Fault table 20
Installation
General 22
Gas connection 23
Electrical connection 23
Installation 24
Technical data 25
Environmental aspects
Disposal of packaging and appliance 26
Introduction
You have chosen a Pelgrim cooker. Optimum user comfort and easy operation were paramount during the development of this product. The extensive adjustment options always allow you to choose the perfect method of preparation.
The gas hob has been designed for people who love to cook. The many different burner capacities ensure that you can prepare every dish. The integrated spark ignition allows you to ignite and operate the burners with only one hand. The gas hob is also fitted with a flame safeguard that will shut off the gas supply if the flame goes out while cooking.
The oven functions are grouped logically on the function knob. The oven is also fitted with a timer. The timer switches the oven off when the cooking time has elapsed. Efficient and hassle-free.
This manual describes how you can make the best possible use of the cooker. In addition to information about operation, you will also find background information that may help you in using this product.

Before using the appliance for the first time please read the separate safety instructions!
Read the manual thoroughly before using the appliance, and store the instructions in a safe place for future reference.
The manual also serves as reference material for service technicians. The appliance identification card contains all the information that the service technician will need in order to respond appropriately to your needs and questions.
Happy cooking!
Description
text_image
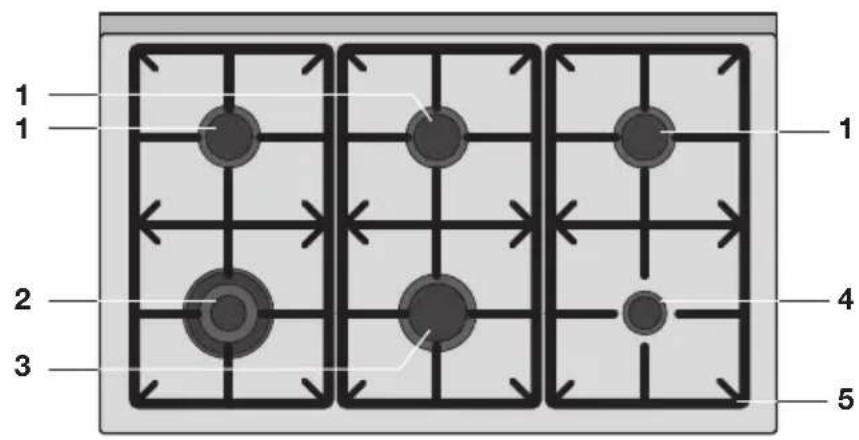
1 1 2 3 4 5 1
text_image
6 7 9 10 8- Standard burner rear left/rear middle/rear right
- Front right wok burner
- Front middle rapid burner
- Front right simmer burner
- Pan support
- Control panel
- Left oven (large)
- Levellers
- Right oven (small)
- Storage space flap
Control panel
text_image
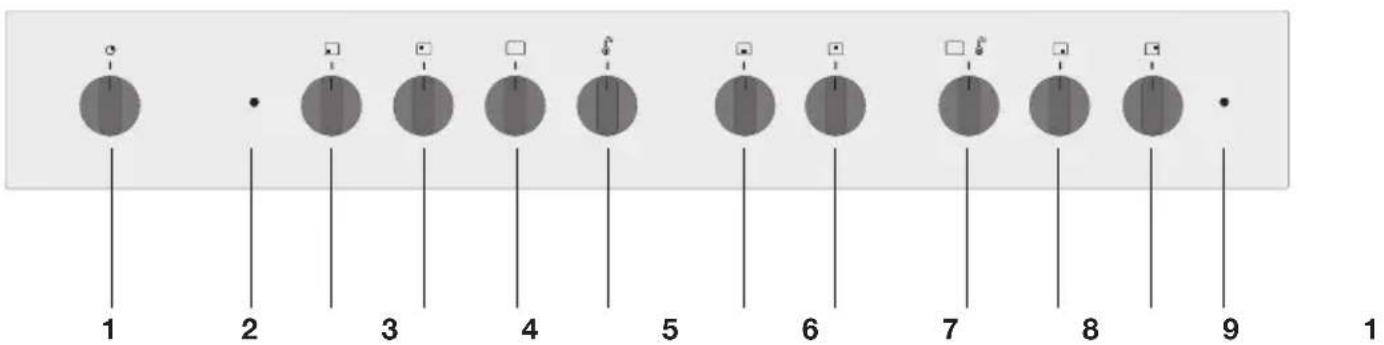
1 2 3 4 5 6 7 8 9 1- Timer
- Indicator light left oven
- Front left wok burner control knob
- Rear left standard burner control knob
- Function knob left oven (large)
- Thermostat button left oven (large)
- Front middle rapid burner control knob
- Rear middle standard burner control knob
- Function/thermostat button right oven (small)
- Front right simmer burner control knob
- Rear right standard burner control knob
- Indicator light right oven
Using the oven
- Remove all accessories from inside the oven and clean them with warm soapy water. Do not use any abrasive cleaning materials.
- Set the oven at its highest setting for one hour with top and bottom heat (see page 14). This will remove any protective grease used during manufacture.
- When you heat the oven for the first time you will notice a ‘new-oven smell’. Don’t worry, this is normal. If necessary, switch on the cooker hood.
• After letting it cool down, clean the oven with hot water. - Only preheat the oven if the recipe requires this.
Cooking tips
Energy-conscious use of the oven
- Open the oven door as little as possible.
- Prepare dishes with the same cooking temperature simultaneously (e.g., an apple pie and an oven dish) on the same grid, or above each other using hot air. You can also let meat stew at the same time.
- Prepare more meals after each other, for example an oven meal after a cake. Often, the preparation time of the second dish will be 10 minutes shorter because the oven is still hot.
- Because the oven is insulated, the residual heat from the oven will continue to cook dishes with longer cooking times (from 1 hour). Turn the oven off 10 minutes earlier than indicated, but leave the door closed.
- Pre-heating is generally not necessary, with the exception of dishes with cooking times of less than 30 minutes, or when indicated by a recipe.
- Remove everything you don't need for the dish from the oven.
- Turn the oven off before taking out the cooked dish.
Ovenware
- In principle, you can use any type of heat-resistant ovenware.
- Do not rinse glass ovenware with cold water immediately after use. The sudden temperature difference can cause the glass to crack.
- Use black or dark baking tins. These conduct heat better and allow the food to cook more evenly.
Do not cover the oven floor
- Covering the oven bottom with, for example, aluminium foil or a baking tray can lead to overheating and damage to the enamel.
- It is possible to prevent spring forms from leaking onto the oven floor by folding a container out of aluminium foil and placing it on the grid under the form or by laying baking paper under it.
Time setting
- Choose a 5 minute shorter cooking time than indicated in the recipe. This will allow you to check whether your food or cake is cooked through and golden brown at the last moment. If not, close the oven door and check again after some time. Opening and closing the door should be done slowly. Preferably not before three-quarters of the cooking time has elapsed.
Keep food warm
- You can use the oven to keep already-prepared dishes warm. To do so, select the hot air setting and a temperature of 75^ C. Cover dishes you want to keep warm to prevent them from drying out.
Roasting meat
- Large pieces of meat, from 1 kg, are the most suitable. The meat will get a regularly shaped, crispy crust, with virtually no weight loss.
- Rub the meat with salt and spices fifteen minutes beforehand. Use 80 to 100 g of butter or fat (or a mixture of the two) per 500 g of meat for roasting.
Cooking times
- Flat, thin pieces require approximately 5 minutes less cooking time than thick or rolled pieces of meat. When cooking larger pieces of meat, cook for 15 to 20 minutes longer per 500 grams extra.

text_image
4 3 2 1 4 3 2 1- Put the meat in a roasting pan and douse in hot butter or fat. Place the meat in the roasting pan with the fatty side facing up. Make sure to baste meat without a fatty side every 15 minutes. Meat with a fatty side should be basted every 30 minutes.
- If the gravy is too dark, add a few spoonfuls of water now and then during roasting.
- Cover the meat loosely with foil and let stand for 10 minutes before serving.
Oven runners
The oven walls are fitted with runners so that the oven grid or baking sheet can be placed at different levels. For the correct level, consult a baking guide or food packaging instructions.
Using the gas hob
- Regularly check that the burner caps and burner rings are correctly positioned on the burner bases. Incorrect positioning can result in poor ignition, poor combustion or damage to the caps.
- Over time, the enamel on the support point can become burnt-in because the pan support is heated very strongly by the burner. This is unavoidable and is therefore not covered by the guarantee.
Operating the left oven (large)
text_image
Diagram showing a circular object with labeled points and an arrow indicating rotation or movement.
natural_image
Simple diagram showing a thermometer above a circular object with a vertical line and shaded region (no text or symbols)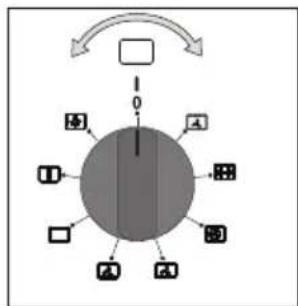
flowchart
graph TD
    A["Input"] --> B["Process"]
    B --> C{Decision}
    C -->|Yes| D["Output 1"]
    C -->|No| E["Output 2"]
    D --> F["Final Output"]
    E --> G["Final Output"]

-
Set the oven to 'manual operation'. Turn the timer left to the 'manual operation' symbol (1).
-
Select a temperature with the temperature knob and an oven function with the function knob.
The red function indicator light and the orange temperature indicator light will light up; the oven is switched on.
▶See the ‘oven functions’ table for more information on the various oven functions that are available.
- After the cooking time has elapsed, turn the temperature knob and the function knob to '0' to switch the oven off.
Please note: If the oven doesn't work, it is possible that the timer is not set to manual operation.
Operating the right oven (small)

text_image
50 75 100 125 150 175 Max 200 °C- Select a temperature (lighting or grill setting) with the function/ thermostat button.
The red function indicator light and the orange temperature indicator light will light up; the oven is switched on.
- After the cooking time has elapsed, turn the function knob to '0' to switch the oven off.
Oven functions
 | Oven lightThe oven light switches on and remains on for all other oven functions. |
 | DefrostingThe fan will start running. The air circulates in the oven without activating the heating element.This method is used for slowly defrosting food. |
 | Top and bottom heat (conventional)The heating elements at the top and bottom of the oven give off simultaneous heat. There is only one setting for baking pastries or roasting meat. |
 | Top and bottom heat (conventional) + fanThe heating elements at the top and bottom of the oven radiate even heat. The fan distributes this heat evenly. This function is especially suitable for fast-roasting meat and baking cakes on multiple levels. |
 | Bottom heat with fanThis oven function activates the fan and the bottom heating element simultaneously.This method is particularly useful for baking thin cakes.Use the bottom ledge and bakeware which is not too high to allow the air to circulate across the top of the dish. |
 | Hot air circulationThe fan at the rear of the oven ensures a continuous circulation of hot air around the meat or pastry. This function is especially suitable for roasting meat and baking cakes on multiple levels. |
 | GrillThe grill element and the oven element are activated simultaneously. The grill element radiates heat directly onto the dish. To optimise the heat effect, the top element is also activated. This method of heating is ideal for preparing small pieces of meat such as steaks, sausages and chops. |
 | Fan with grillYou can grill with the fan running. The radiant heat is distributed around the dish by the fan. |
Operating the left oven with timer
You can switch off the oven at a set time using the timer:
- Turn the timer clockwise to the desired switch-off time (0-120 minutes).
An audible signal will sound and the oven will be switched off once the time has elapsed.
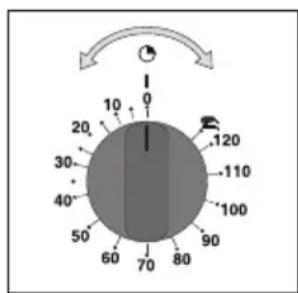
text_image
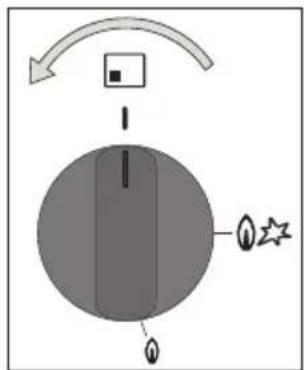
0 10 20 30 40 50 60 70 80 90 100 110 120Ignition and adjustment
text_image
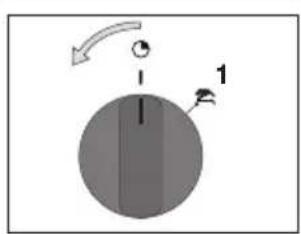
Diagram showing a circular object with arrows indicating rotation and a star symbol, likely illustrating a motion or positioning concept.1 0 position
Full ignition setting
Low setting
Burner zone
A symbol next to the control knob indicates which burner is being operated. Each burner is fully adjustable between high and low settings.
Spark ignition
Push in the control knob and turn it to the left.
The burner will ignite.
The control knob should be pushed in for about 10 seconds because of the flame safeguard.
Flame safeguard
Your gas hob has a flame failure device. This ensures that the gas supply is shut off if the flame goes out during cooking.

text_image
Tc AcIf the burner fails to ignite or doesn't stay on, check that:
- the burner cap and burner ring are seated correctly in the burner housing;
- the burner/spark plug (Aa) and thermocouple (Tc) are clean and dry.
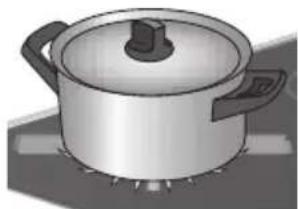
Optimal use of the hob

natural_image
Illustration of a cooking pot on a stove burner (no text or symbols)Wrong
Always ensure that the flames stay under the pan. A lot of energy is lost when flames burn around the outside of the pan. The handles will also become too hot. Do not use pans with a base diameter smaller than 12 cm. Smaller pans will not be stable.
natural_image
Illustration of a cooking pot on a stove (no text or symbols)Right

- When frying, stir-frying, cooking through large quantities or deep-frying, it is best to use the rapid or wok burner.
- Preparing sauces, simmering and boiling can be done best on the simmer burner. On its high setting this burner is large enough for cooking food right through.
• Cook with the lid on the pan. This way you save up to 50% energy.
- Use pans with a flat, clean, dry base. Pans with a flat base stand stably and pans with a clean base transfer the heat more effectively to the food.
Wok burner
With the wok burner you can prepare dishes at a very high temperature. For this purpose it is important:
• to cut the ingredients into strips, slices or pieces before cooking.
- to use good-quality oil, such as olive, maize, sunflower or peanut oil when stir-frying. A small quantity is enough. Butter and margarine on the other hand will burn because of the high heat.
- place the dishes with the longest cooking time in the pan first, so that at the end of the cooking time all ingredients are cooked al dente at the same time.
Warning!
Disconnect the appliance from the power supply before carrying out any repairs or cleaning. Preferably unplug the appliance, switch off the fuses, or set the switch in the meter cupboard to zero.
Do not use steam cleaners or high-pressure steam cleaners to clean the appliance.
Cleaning the oven
Front of the unit
Clean the surface with a liquid, non-abrasive cleaner for smooth surfaces and a soft cloth. Apply the cleaning product to the cloth and wipe away the dirt; then rinse with water. Do not apply the cleaning product directly onto the surface. Do not use harsh or abrasive detergents, sharp objects or steel wool, as this can cause scratches on the unit.
Aluminium surfaces
Aluminium surfaces should be cleaned with non-abrasive, liquid cleaning products designed for such materials. Apply the cleaning product to a damp cloth and wipe the surface clean; then rinse the surface with water. Do not apply the cleaning product directly onto the aluminium surface. Do not use abrasive detergents or scourers. The surface must not come into contact with oven sprays.
Stainless steel front panels
Clean the surface with a mild detergent (soapsuds) and a soft sponge that does not scratch the surface. Do not use abrasive or solvent-based detergents. If you do not follow these instructions the casing may become damaged.
Painted and plastic surfaces
Clean the knobs buttons and door handle with a soft cloth and liquid cleaning agent suitable for cleaning smooth, painted surfaces. You can also use cleaning agents specifically designed for this type of surface. In this case, follow the instructions of the manufacturer.
Enamelled parts
The inside of the oven door, the entire oven interior, and the baking tray and griddle plate are entirely enamelled. They can be cleaned best with warm soapy water.
Exterior
Clean the oven exterior with warm soapy water or liquid soap. Rinse with clean water.
Glass
Clean the glass panel with soapy water or Glassex.
Oven
- The oven can be cleaned in the traditional way (with cleaning agents or oven spray), but only when the oven is very dirty and the stains are very stubborn.
- The following procedure is recommended for regular cleaning (after each use):
Set the oven to 'top and bottom heat' mode to clean the oven. Set the temperature knob at 50°C.
Pour 0.6 litres of water into a baking tin and place it on the bottom ledge. After half an hour the food residues on the enamel of the oven will become soft and you can gently wipe them off with a damp cloth.

natural_image
Hand inserting a component into a rack (no text or symbols visible)Removing the oven runners
The oven runners can be removed for easy cleaning.
Left oven (large)
- Depress the last groove with your finger and remove the runner from the holder.
- Tilt the runner upwards and remove it.
Right oven (small)
- Remove the screws on the front of the runners.
- Pull the runners forwards out of the oven.
text_image
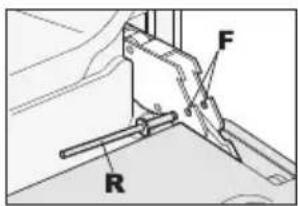
Technical diagram showing labeled mechanical components with annotations F and RRemoving the oven door
To clean the inside of the oven it is better to remove the oven door.
- Open the oven door and place a rivet (R) in the hole (F) of the hinge.
• Partially close the oven door. - Lift the door upwards to release the stop pin and the hinge sector.
- Remove the oven door as soon as it is released from the hinge.
- To replace the door follow the instructions in reverse order. Pay attention to the correct position of the hinge parts!
natural_image
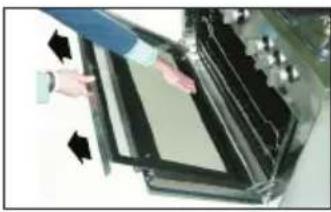
Person interacting with a large black panel or display unit, no visible text or symbolsRemoving the glass panel
The inner panel can be removed for easy cleaning of the glass panel.
- Remove the oven door.
- Slide the glass panel and frame upwards out of the oven door.

Note! The glass panel can also be removed when the door is fitted to the oven. In this event, do ensure that the hinge springs don't cause the door to slam unexpectedly.

Replacing oven lamp
The oven lamp fitting is live. There is a danger of electric shock! Before replacing the oven lamp, switch the appliance off by removing the plug from the socket or switching off the fuse in the fuse box.
text_image
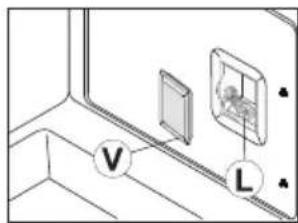
Diagram showing a window with labeled components V and L, and a small inset image of a device inside a wall.Left oven (large)
- Remove the runners.
- Remove the glass cover (V) of the fitting by placing a screwdriver between the cover and the oven wall.
- Replace the lamp (L).
Fit a new lamp with the following specifications: 15W/230V \~ 50Hz - 300°C (E14). - Replace the glass cover.
text_image
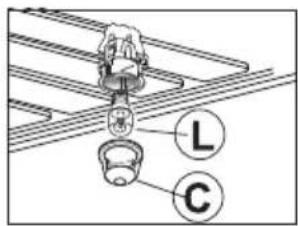
Technical diagram showing a mechanical assembly with labeled parts L and C, likely illustrating a component or assembly.Right oven (small)
- Unscrew the glass cover (C) anti-clockwise and replace the oven lamp (L) (15W/230V \~ 50Hz - 300°C E14).
In the event of stubborn stains, the following should be observed:
The oven should be cooled down before cleaning.
- Clean the oven and the accessories after each use, to prevent the dirt from burning into the oven.
- The easiest way to remove grease is by using warm soapy water while the oven is still warm.
- For very stubborn dirt, use conventional oven cleaners. Make sure to rinse the oven thoroughly afterwards with clean water, to remove any residual cleaning agent.
- Never use aggressive cleaning agents such as steel wool, scouring pads, stain removers etc.
- Varnished, stainless steel, and galvanised surfaces, and aluminium parts must never come into contact with oven sprays, because this will damage and discolour them.
The same applies to the thermostat sensor (if the device is equipped with a timer with a sensor), and to the heating elements that are accessible at the top.
- When purchasing and using cleaning agents, be sure to take account of the environment and heed the instructions of their manufacturer.
Practical tips
- It is recommended to wrap large pieces of fatty meat in aluminium foil or put them in a suitable roasting bag to prevent grease from splashing on the oven walls.
- Put a drip tray under the meat when grilling.
Accessories
Wash any accessories (baking trays, grids, etc.) with warm water and standard washing-up liquid.
Special enamel coating
The oven, the inside of the door and the baking trays have been treated with special enamel, which has a smooth and strong surface. This special coating makes cleaning at room temperature easier.
Cleaning the gas hob
Your gas hob has been manufactured from high-grade, easy-to-clean materials.
- Regular cleaning immediately after use prevents food spills from becoming ingrained and causing stubborn stains that are difficult to remove. Use a mild cleaning detergent to remove stains. Do not use too much moisture, as there is a risk that it will penetrate into the burner or vent holes.
- Clean the control knobs, burners and pan supports first and then the drip tray. This avoids the drip tray becoming dirty again during cleaning.
- The ignition plugs should preferably be cleaned with a cloth. Do this carefully. Otherwise the spark plug can become defective. The spark plug will only operate correctly in a dry environment. If the plug is very dirty, you can clean it with a tiny brush.
- Set the pan supports down vertically, without sliding them over the drip tray.
- Assemble the burner parts using the guide notches. Pay attention to the notches for the ignition plug and thermocouple. Make sure the burner parts are lying flat.
Cleaning the pan supports
Do not clean the pan supports in the dishwasher. The enamel on the pan supports is suitable for cleaning in the dishwasher, but the connection with the rubber feet is not. The pan supports might also show some discolouration if washed in the dishwasher. If the rubber feet are lost, the pan support is likely to damage the drip tray.
Stubborn stains on enamel (pan supports, burner caps and drip tray)
Stubborn stains can best be removed with a liquid cleaning agent. Never use scouring powder, scouring pads, sharp objects or aggressive cleaning products.
Cleaning removable burner components
Burner parts should not be cleaned in the dishwasher. Dishwasher detergents can corrode burner parts! The removable burner components (including those of the wok) are best cleaned with a mild cleaning agent and a soft cloth. For stubborn stains, soak the burner components in hot soapy water. Never use scouring powder, scouring pads, sharp objects or aggressive cleaning products.
Fault table
If you are uncertain about whether your appliance is functioning properly, this does not automatically mean there is a defect. Make sure to check the points mentioned below in the table first, or visit our website ‘www.pelgrim.nl’ for more information.
| Problems with the hob Possible cause Solution | ||
| There is a smell of gas in the vicinity of the appliance. | The appliance connection is leaking. | Turn off the main gas tap.Contact your installer. |
| A burner does not ignite. Plug not in socket. Plug the plug into the wall socket. | ||
| Problems with the hob Possible cause Solution | ||
| The burner does not burn evenly. | Burner parts not seated correctly. | Assemble the burner parts using the centring ridges. |
| Burner parts dirty/damp. Clean/ | dry the burner parts.Make sure that the outflow holes are open. | |
| Wrong type of gas used. Check | whether the gas used is suitable for the appliance.Contact your installer if it is not correct. | |
| The burner goes out after igniting. | Control knob not pressed in long enough. | Keep the control knob pressed in for at least 10 seconds. |
| Problems with the oven Possible cause Solution | ||
| The oven does not switch on. The oven is not set to manual operation. | Set the oven to ‘manual operation’ (see page 10). | |
| The oven does not heat up. No temperature set. Set the temperature using the temperature knob (see page 10). | ||

A visit by a service technician during the warranty period will be charged if the appliance is not functioning because of improper use!
General

This appliance should only be connected by a registered installer. The gas connection and the electrical connection must comply with national and local regulations.
Read the separate safety instructions first!
Note!
This appliance must be earthed at all times.
Installation, maintenance or repairs should only be carried out by professionals who are authorised by the manufacturer, as failure to do so will void the guarantee.
The device should be disconnected from the mains prior to installation, maintenance or repairs. The device is only disconnected from the electric power if:
- the main switch of the domestic electrical system is switched off, or
- the fuse of the domestic electrical system has been completely removed, or
- the plug has been pulled out of the socket.
Faulty parts may only be replaced with original Pelgrim parts. Only these parts are guaranteed by Pelgrim to meet the safety requirements.
If the connecting cable is damaged, it may only be replaced by the manufacturer, the manufacturer's service organisation or equivalently qualified persons, in order to avoid dangerous situations.
Gas connection

- We recommend that the hob be connected by means of a fixed pipe. Connection using a specially designed safety hose is also permitted.
- The pipe behind the oven must be made entirely out of metal.
Note!
- A safety hose may not be bent and must not come into contact with moving parts of kitchen units.
- The connection tap for the appliance must always be positioned such that it is easily accessible.
- The type of gas and the country for which the appliance has been designed are shown on the appliance identification card.

Before using the appliance for the first time check the connections using water and washing-up liquid to ensure that there are no gas leaks.
Electrical connection
230–240 V\~ - 50/60Hz
• The wall plug socket and plug should always be accessible.
- Make sure that the cable does not come into contact with parts of the oven that may become hot.
- If you want to make a fixed connection, make sure that an omnipolar switch with a contact separation of at least 3 mm is fitted in the supply cable.
- The appliance should not be connected to the mains via a multi-plug adapter or extension cable, as the safe use of the equipment cannot be guaranteed.
Installation
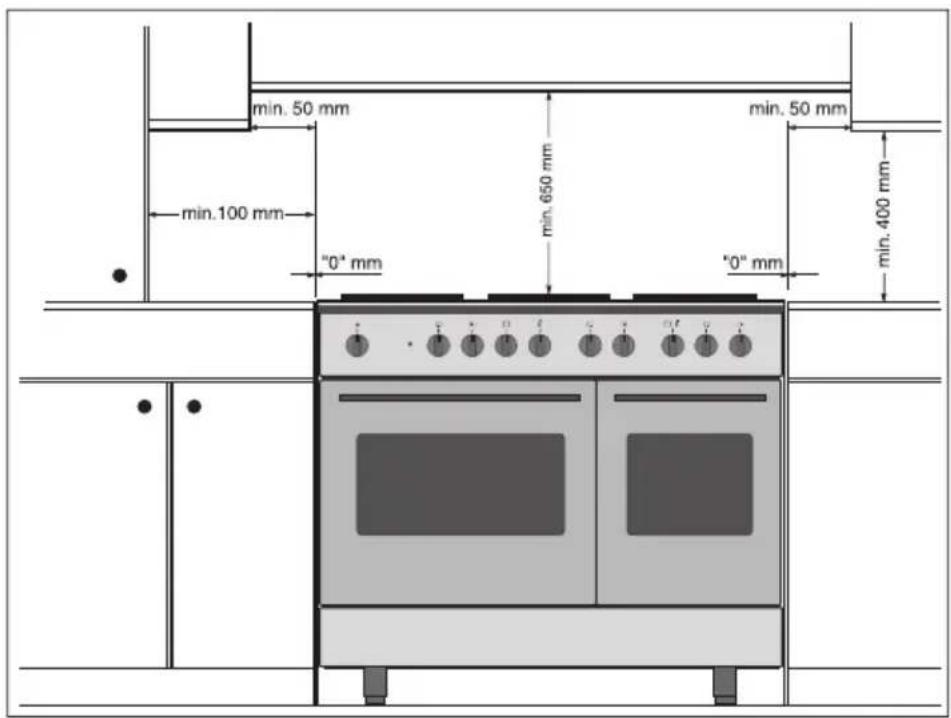
- When placing the cooker next to a tall cupboard or another wall made of flammable material, keep at least 50 mm distance between the cooker and the walls.
- Also keep a minimum distance of 650 mm between the hob and any cooker hood placed above the cooker.
- If you place the cooker in a kitchen unit, the minimum space must be adhered to.
- If the cooker is built in between kitchen cabinets, the lining of the units must be able to withstand temperatures up to 90°C.
natural_image
Simple line drawing of a mechanical component with a curved arrow indicating rotation (no text or symbols)Levelling
The height of the cooker can be adjusted with the adjusting feet.
If you want to install the cooker on a platform, make sure that it is securely fastened.

Note!
After installation of the device, check whether the burners work properly. The flame pattern should be regular and stable on the high setting, and the burners must not go out on low.
Technical data
The data plate on the underside of the appliance indicates the total nominal load, the required voltage and the frequency.
This appliance meets all relevant CE guidelines.
| Connection 230V - 50Hz | |
| Power output | 3.45 kW |
| External dimensions (mm) | |
| Width 902 | |
| Height 875-935 | |
| Depth 600 | |
| Volume | 105 litres |
Gas information
| Burner Gas | Operating pressure mbar | |
| Normal 1.8kW G25 25 | ||
| High (3kW) G25 25 | ||
| Simmer (1kW) G25 25 | ||
| Wok (3.8kW) G25 25 |
Disposal of packaging and appliance
Sustainable materials have been used during manufacture of this appliance. This appliance must be disposed of responsibly at the end of its service life. Ask your local authorities for more information about how to do this.
The appliance packaging is recyclable. The following materials may have been used:
- cardboard;
• polyethylene film (PE);
• CFC-free polystyrene (PS rigid foam).
Dispose of these materials in a responsible way and in compliance with government regulations.
natural_image
Symbol of a trash bin with crossed lines indicating no waste or discharge (no text or numbers present)The product has been marked with a crossed-out dustbin symbol to remind you of the obligation to dispose of electrical household appliances separately. This means that the appliance may not be included with normal domestic refuse at the end of its service life. The appliance must be taken to a special municipal centre for separated waste collection or to a dealer providing this service.
Separate collection of household appliances helps to prevent any potential negative impact on the environment and on human health caused by improper disposal. It ensures that the materials of which the appliance is composed can be recovered to obtain significant savings in energy and raw materials.
CE
Declaration of Conformity
We hereby declare that our products satisfy the applicable European directives, orders and regulations, as well as the requirements stated in the referenced standards.