NF940BRVSA - Cooker Pelgrim - Free user manual and instructions
Find the device manual for free NF940BRVSA Pelgrim in PDF.

User questions about NF940BRVSA Pelgrim
0 question about this device. Answer the ones you know or ask your own.
Ask a new question about this device
Download the instructions for your Cooker in PDF format for free! Find your manual NF940BRVSA - Pelgrim and take your electronic device back in hand. On this page are published all the documents necessary for the use of your device. NF940BRVSA by Pelgrim.
USER MANUAL NF940BRVSA Pelgrim
natural_image
Illustration of a cooking pot with lid and side legs (no text or symbols)fig. 4
text_image
R P F L A Gfig. 10
natural_image
Diagram showing three types of electronic components: a bulb, a screw, and a light bulb (no text or symbols present)fig. 12
natural_image
Diagram showing a circular object with an arrow and labeled point A, connected to a rectangular panel (no text or symbols beyond labels)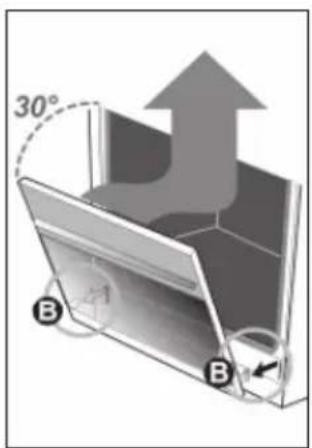
text_image
30° B Bnatural_image
Circular diagram showing a door with a switch and directional arrow, labeled 'A' (no text or symbols beyond the label)text_image
Technical diagram of an electrical switchgear with labeled components and directional arrows indicating flow or movement.fig.15
Gasaansluiting: RC 1/2" (ISO 7/1-RC 1/2)
text_image
Technical diagram illustrating installation or inspection process with labeled arrows and checkmarks for 'OK' and 'NO' conditions.fig. 17
Let op:
natural_image
Pure mechanical diagram showing a lever and pivot point without any text or symbolsfig. 19
When you have read these instructions for use, you will quickly be aware of all the facilities the appliance can offer you. You can read about safety and how you should look after the appliance. In addition you will find environmental tips and instructions that can help to save energy.
Keep the instructions for use and the installation instructions. Any later user of this appliance could benefit from them.
Enjoy your cooking!
Table of contents
■ Introduction.... 23
■ Appliance description ..... 24
■ Preparations 26
Before using your appliance ..... 26
Use 27 - 32
Lighting the burners 27
Saucepans 27
Cooking timer....27
Switching on the oven 28
Function knob 28 - 30
Spit set 30
Switching on with the clock ..... 31 - 32
■ Application 33 - 35
Baking-, roasting- and grilling tips .... 33
Table for grilling 34
Table for baking.... 35
■ Maintenance 36 - 37
Oven cleaning 36
Removing the door 37
■ Installation.... 38 - 40
Packaging 41
This appliance complies with the CE directives.
text_image
1 2 3 4 5 6 7NF940

text_image
1 2 3 4 5 6NF950
text_image
A B C D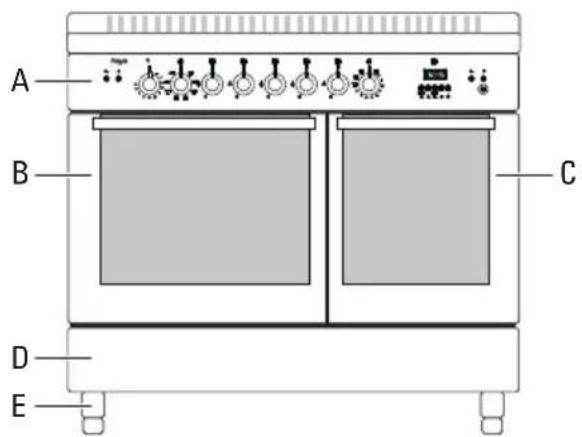
text_image
A B C D ENF940 NF950
text_image
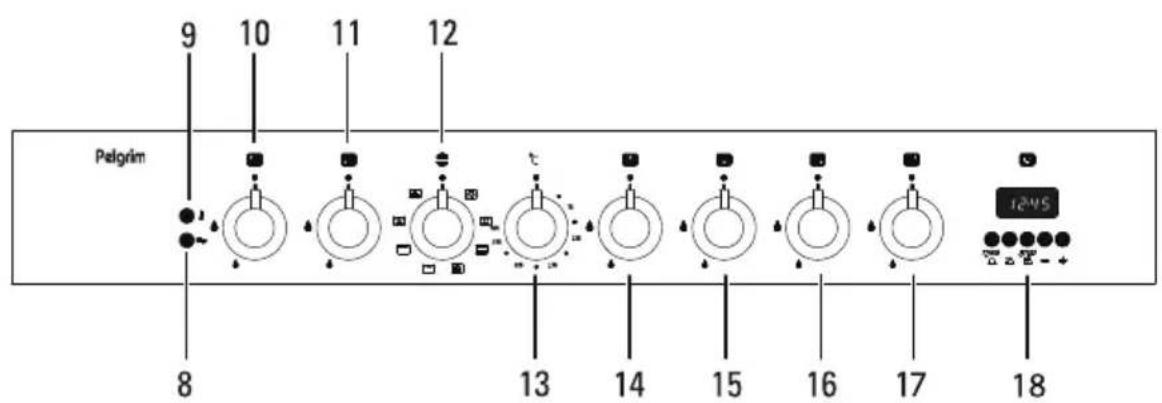
9 10 11 12 Pelgrim 8 13 14 15 16 17 18NF940
text_image
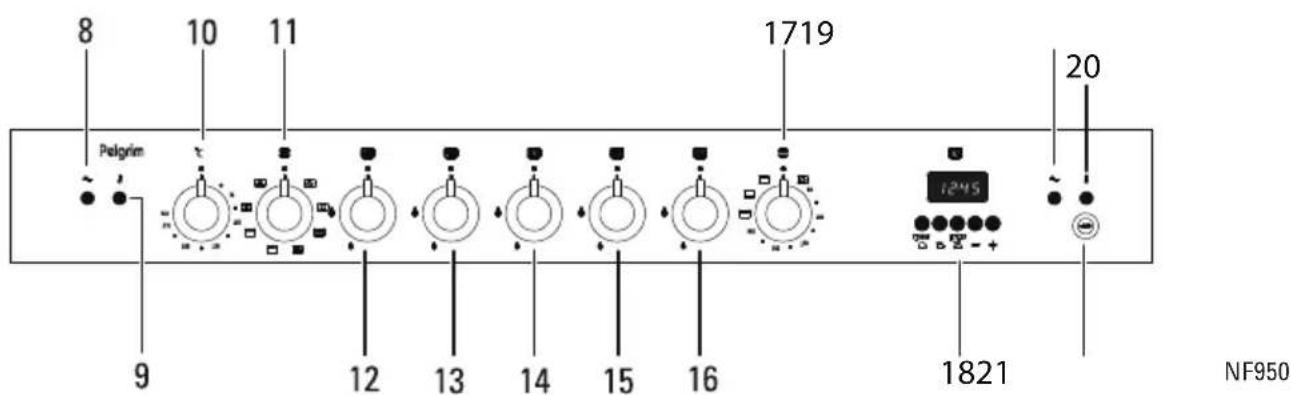
8 10 11 1719 20 Pelgrim 1245 1821 NF950Appliance description
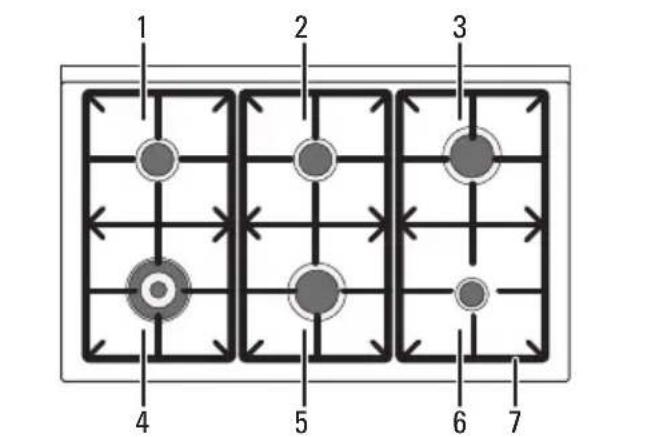
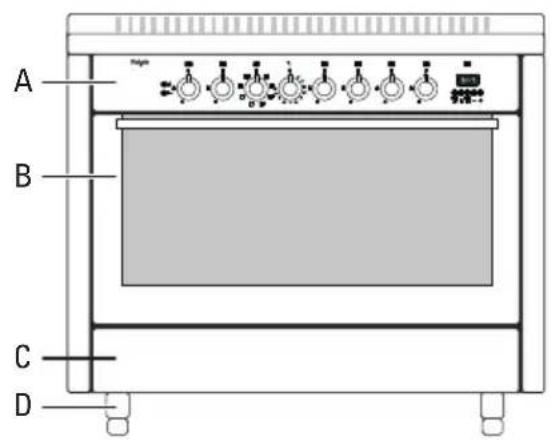
Type NF940
hotplate
1 - semi-rapid burner
2 - semi-rapid burner
3 - rapid burner
4 - wok burner (triple flame)
5 - rapid burner
6 - simmer burner
7 - cast iron saucepan supports
cooker
A - control panel
B - multisystem oven
C - storage space
D - adjustable feet
control panel
8 - indicator light on/off
9 – indicator light oven temperature
10 - control knob for semi-rapid burner 1
11 - control knob for wok burner 4
12 - control knob for oven functions
13 - control knob for oven temperature
14 - control knob for semi-rapid burner 2
15 - control knob for rapid burner 5
16 - control knob for simmer burner 6
17 - control knob for rapid burner 3
18 - timer clock
Type NF950
hotplate
1 - semi-rapid burner
2 - wok burner (triple flame)
3 - semi-rapid burner
4 - rapid burner
5 - simmer burner
6 - cast iron saucepan supports
cooker
A - control panel
B - multisystem oven
C - conventional oven
D - storage space
E - adjustable feet
control panel
8 - indicator light on/off left oven
9 - indicator light oven temperatur left oven
10 - control knob for oven temperature
11 - control knob for multisystem left oven functions
12 - control knob for semi-rapid burner 1
13 - control knob for rapid burner 4
14 - control knob for wok burner 2
15 - control knob for simmer burner 5
16 - control knob for semi-rapid burner 3
17 - control knob conventional right oven
18 - timer clock
19 - indicator light on/off right oven
20 - indicator light temperature right oven
21 - knob grill spit
Read the separate safety instructions before using the device!
Gashob
Burning in of the enamel
The burners cause the saucepan supports to get extremely hot. In time the enamel on the support points can burn in. This cannot be prevented and is not covered by the guarantee.
Burner caps
- Check regularly whether the caps of the burners are properly in position on the burner depressions. Improper positioning can make it difficult to light the burners, give rise to an irregular gas flame, or damage the burner caps.
Oven
Prepare for use
■ Remove the blue protective foil from the stainless steel doors.
■ Remove all accessories from the oven and clean them thoroughly using a dish-washing detergent. Switch on the closed, empty oven at the maximum temperature for about thirty minutes, after which the grilling element should be switched on for a period of fifteen minutes. Let the oven cool off and clean it with warm water.
Please note:
When the oven is heated to a high temperature for the first time, you will smell a "new appliance" odour. This is to be expected.
Clock

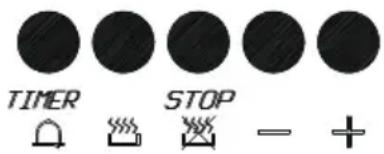
text_image
TIMER STOP - +fig. 1
If you have not set a time, 0.00 and the word "AUTO" will blink.
Setting the time
There is a normal clock on the display that shows the time. Press the 📋 and 🌐 buttons at the same time.
- Press the - / + buttons until the correct time is reached.
■ After a few seconds the time has been set and the appliance is set to manual control.
Setting the signal
- Press the – buttons for adjusting the signal. Three different signals can be set.
Lighting the burners
Electrical spark ignition
Turn the control knob anti-clockwise to maximum and press it at the same time. Sparks appear around the burner which then ignites. The gas flame can be smoothly adjusted from high to low. If the burner fails to light after repeated attempts, check to ensure that the burner cap is properly positioned.
Saucepans
The recommended pan sizes are:
For the wok burner minimal 28-34 cm;
For the rapid burner minimal 22-26 cm;
■ For the semi-rapid burner minimal 16-20 cm;
For the simmer burner minimal 12-14 cm.
Thermocouple protection
This appliance is fitted with a thermocouple. This is a thermoelectric protection system. It ensures that the gas tap is closed if the flame goes out. Press the desired control knob and turn it to the left to the maximum setting. Press the ignition until the burner ignites. Hold the control knob pressed in for 5 seconds.
natural_image
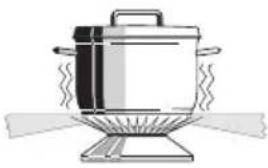
Illustration of a cooking pot with steam rising from its side (no text or symbols)fig. 3
Wrong : A great deal of heat is lost along the sides of the saucepan.

natural_image
Illustration of a cooking pot with lid and side legs (no text or symbols)fig. 4
Right : The heat is evenly distributed over the base of the saucepan.
Tip
When cooking without a lid, energy is wasted. Clean saucepans absorb heat more efficiently.
text_image
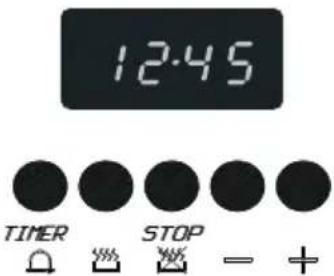
12:45 TIMER STOP - +fig. 5
Cooking timer
The timer only gives a signal when the time has elapsed. It does not switch the oven off.
■ Press the 🔒 button.
- Set the time with the - / + buttons.
△ lights up. The time appears five seconds after release of the button.
■ Press the button to see the remaining time. The remaining time is displayed in the display for 5 seconds.
The alarm goes off after the time set has elapsed. The symbol 🔒 in the display disappears. Use any key to turn the alarm off.
Switching on the oven
Indicator light
The indicator light comes on while the oven is warming up. Once the set temperature has been reached, the light goes out.
Thermostat control knob

text_image
°C MAX 275 225 175 125 75fig. 6
You use the thermostat control knob to set the temperature. The temperature range is continuous.
Switching on the oven without the switch clock function
Turn the function knob to the function you want. Adjust the recommended temperature by moving the thermostat knob to the left or right. You can adjust the oven to a variable temperature. The oven is now switched on. The pilot lamp is active. When the lamp goes off, the temperature you set has been reached.

flowchart
graph TD
    A["Top Circle"] --> B["Center"]
    B --> C["Bottom Circle"]
    C --> D["Left Side Icon"]
    C --> E["Right Side Icon"]
    C --> F["Left Side Icon"]
    C --> G["Right Side Icon"]
    C --> H["Bottom Right Side Icon"]
    C --> I["Left Side Icon"]
fig. 7 - NF940 / NF950 left oven
Function knob

text_image
50 100 250 200 150fig. 8 - NF950 right oven
| Symbol | Description |
| oven lighting | |
| thawing | |
| conventional | |
| hot air | |
| grill | |
| turbo-grill | |
| ventilation + grill | |
| ventilation + bottom heat | |
| bottom heat | |
| upper heat |
Remove from the oven everything which you are not using to prepare the dish. Slide the dish into the oven if it is not necessary to pre-warm the oven. See the temperature table to determine the height of the ledge.
Oven lighting
The oven lighting will switch on.
This is the best setting for cleaning the oven.
Thawing
You can thaw food using the convector oven blower. Remove the wrapping and put the frozen food in a dish. Slide the dish onto the shelf on the lowest runner. Set the mode switch to ☐ (the ventilator now blows cold air).
Conventional
The dish is heated by the radiation heat of the upper and lower elements. Always place the dish in the centre of the oven. See the temperature table to determine the height of the ledge. For the traditional way of preparing dishes. Dishes rise well and brown nicely.
Hot air
The air in the oven is heated by the hot air element. The fan in the back of the oven blows hot air into the oven. This is used to heat the dishes.
You can use several levels at the same time, thus saving energy. Because of the intensive heat you can select a temperature of 20 - 30 °C lower than indicated in the conventional recepy.
Grill
The dishes are heated by the radiation heat of the combined grillelement. Flat pieces of meat, chicken or other poultry may be grilled directly on the grid shelf. This grill setting is also suitable for toasting bread.
Turbo-grill
Food is heated by the radiant heat of the large grill; both grill elements are turned on; the ventilator is off. For this, see "Ventilation + grill" setting.
Ventilation + grill
By turning the knob to the ☒ position you can grill with the blower switched on. The radiated heat will be circulated around the dish by the blower.
The glass oven door can heat up (to a max. of 100 °C) when using the oven at maximum temperature for a long time (e.g. during grilling). Act with care if children are nearby.
Always grill with a closed oven door.
Ventilation + bottom heat
This setting is ideal for baking pastries with a wet topping, fruit tarts and moist pastries in moulds or on a plate. Place the dish on the first or second oven shelf from the bottom.
Bottom heat
This function is advised for dishes of which the bottom need good cooking. The bottom of the dishes are thoroughly cooked.
Before the end of the cooking process is reached (when there is still a quarter of the cooking time left), turn the function knob to bottom heat. Turn the temperature knob to its maximum setting. The dish will then be heated mainly by the bottom element, but will continue to brown on top.
Upper heat (NF950)
This setting is suitable for a giving a short extra burst of heat to soufflés, meringues, etc., to thoroughly cook them. At the end of the cooking process, turn the function knob to the top-heat setting.
Spit set (NF950)
Grilling with the spit or kebab set
By pressing the ⚙ button you can grill using the roasting spit. Dishes are warmed using radiant heat from the combined grill and baking element. The thermostat also regulates the grill. Consequently the element should light up red from time to time but not continuously. Dishes get a crunchy brown crust.
Placing the grill set
- Put the food on the spit (L) and secure it so that it is firmly attached and evenly distributed using the hooks (F). See fig. 10.
- Push the rotary spit into the opening (P) of the coupling and lay it at the front in the hook (G). Remove the handle (A).

text_image
R P F L A Gfig. 10
■ Position a baking tray with a little bit of water under the roasting spit.
Switching on with the clock
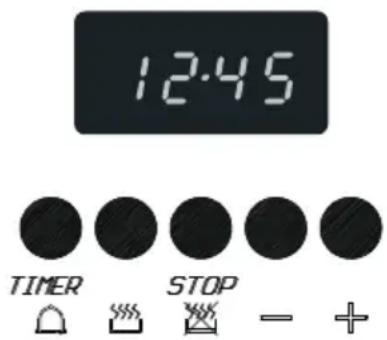
text_image
12:45 TIMER STOP - +fig. 11
Automatic switch off with cooking time
The oven switches off automatically when the cooking time has elapsed.
- Select an oven function by turning the knob to the required symbol.
- Select the temperature required. The temperature is continuously adjustable.
- Press the button. 0.00 appears in the display and "A" lights up.
- Press the - / + buttons until the correct cooking time has been reached.
The time appears again five seconds after release of the button. "A" and 📄 light up.
The oven has been switched on and it gives a signal when the cooking time has elapsed. The oven then switches off automatically.
Automatic switch off with ending time
The oven switches off automatically when the ending time has elapsed.
- Select an oven function by turning the knob to the required symbol.
- Select the temperature required. The temperature is continuously adjustable.
- Press the 📋 button. 0.00 appears in the display and "A" lights up.
- Press the - / + buttons until the correct cooking time has been reached.
The time appears again five seconds after release of the button. "A" and 📋 light up.
The oven has been switched on and it gives a signal when the ending time has been reached.
The oven then switches off automatically.
"A" will flash in the display. Set the oven to manual operation by pressing 📋 and 🌐 at the same time.
Delaying the start time/setting the finish time
Put a dish in the oven. Set the cooking time and the time at which the dish has to be ready.
The oven calculates the start time itself and switches off automatically when the cooking time has elapsed.
- Select an oven function by turning the knob to the required symbol.
- Select the temperature required. The temperature is continuously adjustable.
- Press the button. 0.00 appears in the display and "AUTO" lights up.
Press the - / + buttons until the correct cooking time has been reached. The time appears again five seconds after release of the button. "A" and 📋 light up. The oven has been switched on. - Press the 📋 button. The display shows the earliest possible finish time.
- Press the - / + buttons until the correct finish time has been reached. "A" lights up and goes out.
The oven switches on and off automatically. A signal can also be heard.
"A" will flash in the display. Set the oven to manual operation by pressing 📋 and 🌐 at the same time.
Switching the oven off during cooking
■ Turn the function and temperature knobs to 0. The indicator lights go out and the appliance has been switched off.
- Press the and at the same time.
The appliance is set to manual operation.
Baking-, roasting- and grilling tips
Oven levels
Depending on the height of the pastry or cookies, place the baking sheet on the second or third level from the bottom. Tins should be placed on a rack on the first or second level from the bottom.
Tins are important
In particular in ovens with upper and lower heating elements, the material from which the tin is made is extremely important. The best tins are made from black tin or are lined with a special synthetic material: these tins absorb the heat the quickest and can shorten the baking time.
How to test whether or not a cake is cooked:
Prick a skewer into the cake at its thickest point about 10 minutes before the end of the given baking time. If the skewer remains dry and no cake mixture sticks to it you can turn off the oven and use the residual heat to let the cake cook thoroughly.
The cake has not risen properly
Use less liquid next time or set the oven to a temperature 10 °C lower. You should adhere exactly to the mixing times given in your cookery book.
The cake has sunk in the middle
The cake has risen beautifully at the edges but sunk in the middle. Do not grease the sides of the cake tin. Loosen the cake carefully with a knife after baking.
The cake is too dark on the top
Put the cake on a lower ridge in the oven, set a lower temperature, bake the cake for a little longer and, perhaps, use black baking tins.
The cake is too dark on the bottom
Put the cake on a higher ridge in the oven and set a lower temperature.
The soufflé is much too dark on top
Remove the crust. Grill the top for a moment to give a golden brown crust to the soufflé. Do not use Parmesan cheese: this type of cheese browns too quickly and will taste bitter. Next time put the dish a little lower in the oven and set the temperature 10 °C lower.
The biscuits stick to the baking sheet
Slide the baking sheet back into the oven for a moment and then remove the biscuits immediately.
The cake will not turn out of the tin.
Carefully loosen the edge with a sharp knife. Turn the tin upside down again and cover with a cold, damp cloth a couple of times. Next time grease and flour the tin well.
Oven levels
When grilling smaller quantities, place the roasting tin at the top of the oven (shelf 4). Dishes which require a longer cooking time should be placed lower in the oven (shelf 3). This also applies when grilling dishes with larger surface areas.
Dark meat such as beef, game and mutton will brown more quickly than light meat, such as veal, pork and poultry. Light meat and fish filets will not be as brown on the outside, even when they are done to juicy perfection on the inside.
Smoke
Smoke caused by burning grease will often develop when meat is grilled directly on the rack. The smoke development can be minimised by filling the roasting sheet with water and placing it underneath the grill rack. This will, of course, result in increased condensation.
Table for grilling
| Grill meat Temp. Ridge Temp. Ridge Time in °C | level* | |||
| Thin items to be grilled | ||||
| Steak 180 - 200 4 10 - 12 | ||||
| Schnitzel/chops 180 - 200 4 12 - 16 | ||||
| Meatballs | 180 - 200 3 14 - 18 | |||
| Bratwurst | 180 - 200 3 16 - 20 | |||
| Fillet of fish | 180 - 200 4 14 - 16 | |||
| Toast | 180 - 200 4 2 - 4 | |||
| Toast sandwich | 180 - 200 3 2 - 4 | |||
| Kebab | 180 - 200 4 6 - 10 | |||
| Thicker items to be grilled | ||||
| Chicken, approx.1 kg | 200 3 | 50 - 60 | ||
| Rolled meat, approx. 1 kg | 200 2 | 50 - 60 | ||
| Casseler rib | 200 2 | 60 - 70 | ||
The figures in this table are guidelines.
*shelf height from the bottom
Table for baking
| Conventional | ||
| Dish Temp Ridge Time in | ||
| in | °C | |
| Stir dough | ||
| Shortbread 160 - 180 2 50 - 70 | ||
| Fruit-cake 160 - 180 2 70 - 80 | ||
| Cake with nuts 160 - 180 2 60 - 70 | ||
| Fruit pie baking tin 180 - 200 2, 3 35 - 45 | ||
| Fruit-cake cake tin 160 - 180 3 45 - 55 | ||
| Pie base | 180 - 200 3 20 - 30 | |
| Small pastries | 180 - 200 3 15 - 25 | |
| Sponges | ||
| Pie base | 180 - 200 3 25 - 25 | |
| Sponges | 190 - 210 3 15 - 30 | |
| Kneading dough | ||
| Cheesecake | 180 - 200 2 | 70 -80 |
| Biscuits | 180 - 200 3 15 - 20 | |
| Crumble | 180 - 200 3 40 - 50 | |
| Pie base | 180 - 200 3 15 - 25 | |
| Dough with yeast | ||
| Fruit pie baking tin 190 - 210 3 40 - 50 | ||
| Crumble | 190 - 210 3 35 - 45 | |
| Pizza | 190 - 210 2 20 - 35 | |
| Choux pastry | 190 - 210 3 20 - 30 | |
| Puff pastry | 200 - 220 3 15 - 25 | |
| Apple pastry | 200 - 220 3 20 - 25 | |
The figures in this table are guidelines.
When baking with hot air set the oven to a temperature about 20 °C lower.
*shelf height from the bottom
Oven cleaning
Please note:
Disconnect the appliance before starting with cleaning or reparation. Preferably by taking the plug out of the socket or by turning off the mains switch.
Enamelled parts
The inside of the oven door, the base of the oven, the baking sheet and the roasting tin are all completely enamelled. These are best cleaned with hot, soapy water; rinse well with clean water.
Stubborn stains on stainless steel
Remove with a special stainless steel cleaning agent. Always work with the structure of the cooking ring to prevent shiny spots. Follow up with a stainless steel brightening agent or a maintenance product.
Outside
Clean the outside of the oven with warm soapy water or liquid soap. Rinse with clean water.
Glass
Clean the glass in the oven door with soapy water. Do not use any abrasive agents or glass scrapers to clean the window of the oven door. Scratches can cause the oven window to crack.
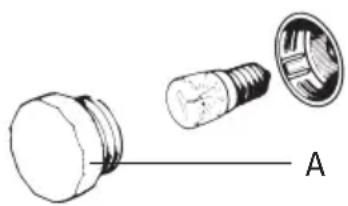
Replacing the oven light bulb
■ Remove the plug out of the socket.
■ Unscrew the protective cover (A) in an anticlockwise direction.
- Replace the bulb with a new one (230 V-50 Hz -300°C) of the same wattage.
Screw the protective cover back on, in a clockwise direction.
natural_image
Diagram showing three types of electronic components: a bulb, a screw, and a light bulb (no text or symbols present)fig. 12
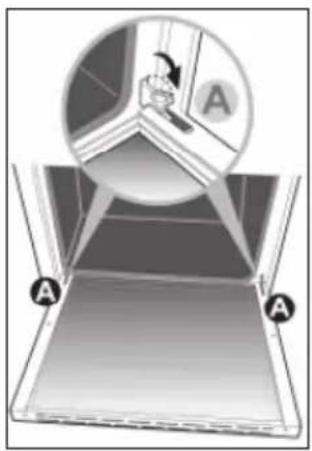
Disassembly of the oven door
In normal use, the oven door will not need to be removed. However, should you want to do this, please follow the instructions below.
Warning! The oven door is very heavy and should be well supported.
- Open the door and tilt lock A in both hinges fully to the outside.
- Close the oven door halfway, so that the tension is off of the springs (the oven door will be at an angle of approximately 30°).
- Hold the door securely at both sides, move along with the closing movement of the door, while simultaneously lifting the door.
■ Turn the lower part of the door with the hinges B towards you. The door has now been removed. - Clean the door. The door may optionally be tilted so as to clean the space between the glass with a soft bottlebrush.
text_image
Diagram illustrating a window or screen setup with labeled points A and a circular inset showing a hand holding a device.
text_image
30° B BTo put the door back in place, proceed in reverse order. The door hinges are in the extended position.
■ Slide the door hinges into the hinge openings.
■ Tilt the door in the horizontal position and click the hinges in place by tilting lock A back inwards.

natural_image
Circular diagram showing a window with a tool and a downward arrow, labeled 'A' (no text or symbols beyond the label)Please note: the hinge protectors must always be secured again after replacing the oven door.
Installation
General
The fitting of the appliance should only be carried out by a registered Corgi gas fitter. The appliance is not connected to the flue gas outlet channel.
Electrical connection 230 V - 50 Hz.
The electrical connection must comply with national and local regulations.
■ Wall socket and plug must be accessible at all times.
The appliance should always be earthed. Use good quality cable for connecting e.g. H05RRF, 1,5 or 2,5 mm ^4 , with 3 cores, depending on the regulations.
With following colour code:
brown = phase L
blue = N
green/yellow = earth (⊥)
The cable must have a plug suitable for a nominal load of at least 15 A.
If you want to make a fixed connection, ensure that a multi-pole switch with a distance between contacts of 3 mm is installed in the supply cable.
The cable must not touch any hot parts (>70 °C),
Replacing the cable
If the cable becomes damaged, replace it as follows:
■ Open the junction box (see fig. 15).
- Unscrew screw "A" from the pull relief.
■ Unscrew the screws from the terminals and remove the cable.
Place a new cable of the same type and length. To connect the cable, see the colour code for "Electrical connection".
- Secure the cable with screw "A" of the pull relief and close the junction box.
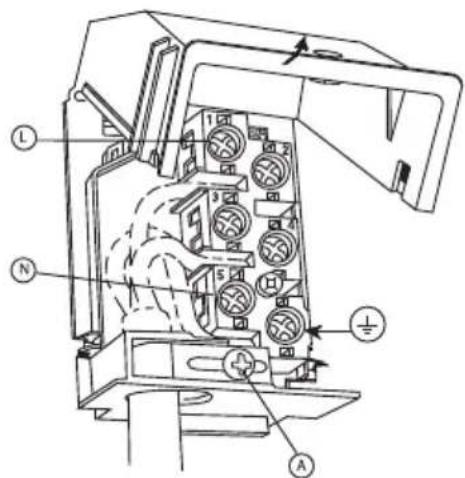
text_image
Technical diagram of an electrical switchgear with labeled components and directional arrows indicating flow or movement.fig.15
Gasconnection: RC 1/2" (ISO 7/1-RC 1/2)
The gas connection must comply with national and local regulations. Amongst other things these regulations instruct that: - only approved materials are to be used.
Connecting the gas can be done at the rear right-hand corner.
Please note:
The type of gas and the country for which the appliance has been designed are indicated on the ratings plate. The appliance is set in the factory for G25 (natural gas) with a pressure of 25 mbar Appliance category 2 sub category 1.
■ Connect the oven directly to the mains. This is because the oven can reach high temperatures. It can also be connected with a specially designed gas hose. Attach this hose at the side of the oven to prevent it touching any hot parts. A gas tap, which is easily accessible, should always be used for the appliance.
Table :
G25/25mBar
Burner type (kW)
simmerburner 1,00
semi rapid burner 1,75
rapid burner 3,00
wok burner 3,60
Built-in dimensions

text_image
600 900 950 50 900fig. 15
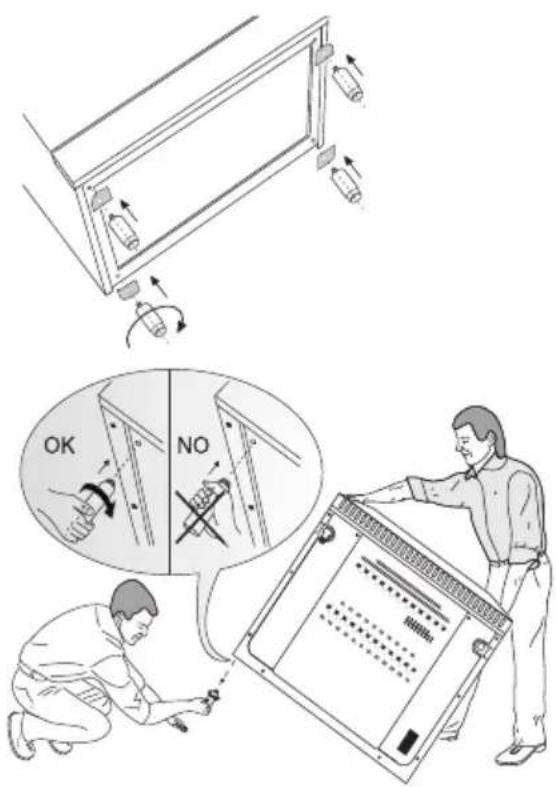
Fitting the adjustable feet
The oven is equipped with 4 adjustable feet that can be used to adjust the height of the oven. Lift the oven up and screw the feet into the special openings in the corners (see fig. 16).
text_image
Technical diagram illustrating installation or inspection process with labeled arrows and a thought bubble indicating 'OK' and 'NO' conditions.fig. 16
Attention:
When the oven is placed next to a high cupboard or another wall made of flammable material the minimum distance between the cooker and walls should be at least 50 mm. The minimum distance between the hotplate and a cooker hood installed above it should be at least 650 mm.
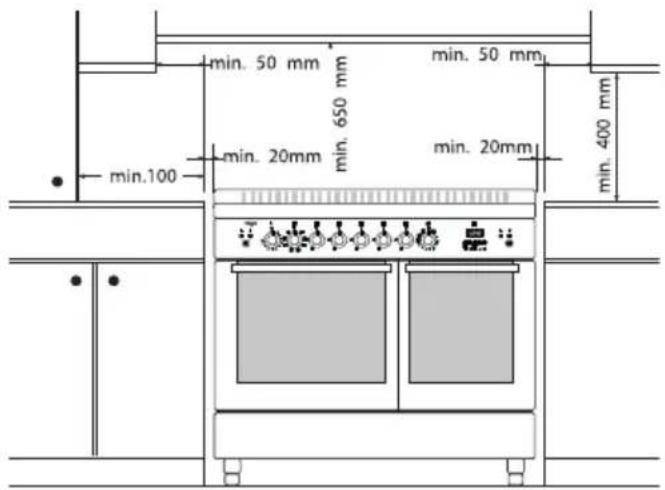
If the oven is installed in a kitchen unit, the minimum space must be observed as indicated in fig. 17. If the oven is to be installed between kitchen units, the panelling of the adjacent kitchen units must be able to withstand temperatures of at least 90 °C.
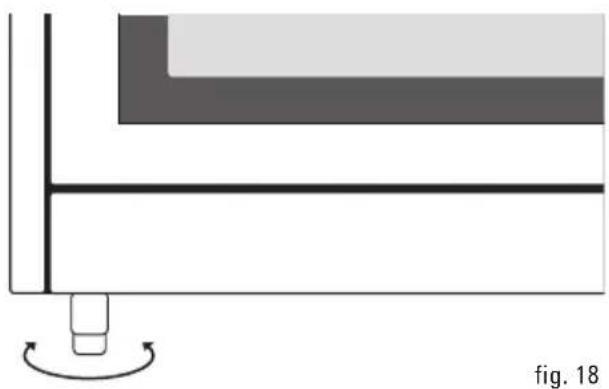
Levelling
The height of the oven can be adjusted with the adjustable feet (see figure 18).
If you want to place the oven on a raised surface, ensure that the unit cannot slide off.
Before using the appliance for the first time check the connections using water and washing-up liquid to ensure that there are no gas leaks.
■ After installation check that the appliance and the burners are working properly. The gas flames should be regular and stable when full on and the burners should not go out when turned to the lowest setting.
natural_image
Diagram showing a mechanical component with a rotating base and a curved arrow indicating rotation (no text or symbols)Disposal of packaging and appliances
In the manufacturing of this appliance use has been made of durable materials. The appliance packaging is recyclable. The following may have been used:
cardboard;
polythene film (PE);
■ CFC-free polystyrene (PS hard foam);
Dispose of these materials in a responsible manner and in accordance with government regulations.
On the data plate is put the symbol of a crossed-out wheeled dustbin.
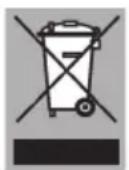
This means that at the end of its working life, the product must not be disposed of as urban waste. It must be taken to a special local authority differentiated waste collection centre or to a dealer providing this service.
Disposing of a household appliance separately avoids possible negative consequences for the environment and health deriving from inappropriate disposal and enables the constituent materials to be recovered to obtain significant savings in energy and resources.
As a reminder of the need to dispose of household appliances separately, the product is marked with a crossed-out wheeled dustbin.