
GKB477W - Cooker Pelgrim - Free user manual and instructions
Find the device manual for free GKB477W Pelgrim in PDF.
| Product type | Gas cooker |
| Brand | Pelgrim |
| Model | GKB477W |
| Dimensions (H x W x D) | 47 x 720 x 510 mm |
| Power supply | 230 V / 50 Hz, 0.6 VA |
| Compatible gas type | G20, G25, G30, G31 (according to adjustment) |
| Number of burners | 5 |
| Burner types | 1 powerful burner (3.00 kW), 1 wok burner (3.50 kW), 2 normal burners (1.75 kW), 1 simmer burner (1.00 kW) |
| Ignition | Built-in electric in knobs |
| Safety | Flame safety device (thermocouple) |
| Material | Stainless steel (deep pan), enamel (grates, burner caps) |
| Cleaning and maintenance | Manual cleaning of burners (not dishwasher safe), use non-abrasive products for enamel and a special stainless steel cleaner for steel. |
| Gas connection | G 1/2" |
| Installation | Built-in, by a certified technician; minimum distance 50 mm from rear wall |
| Repairability | Contact Pelgrim after-sales service |
| Included documents | User and installation manual in several languages |
Frequently Asked Questions - GKB477W Pelgrim
User questions about GKB477W Pelgrim
0 question about this device. Answer the ones you know or ask your own.
Ask a new question about this device
Download the instructions for your Cooker in PDF format for free! Find your manual GKB477W - Pelgrim and take your electronic device back in hand. On this page are published all the documents necessary for the use of your device. GKB477W by Pelgrim.
USER MANUAL GKB477W Pelgrim
Vlambeveiliging (GKB416/478/GKB478W)
specifications techniques 30
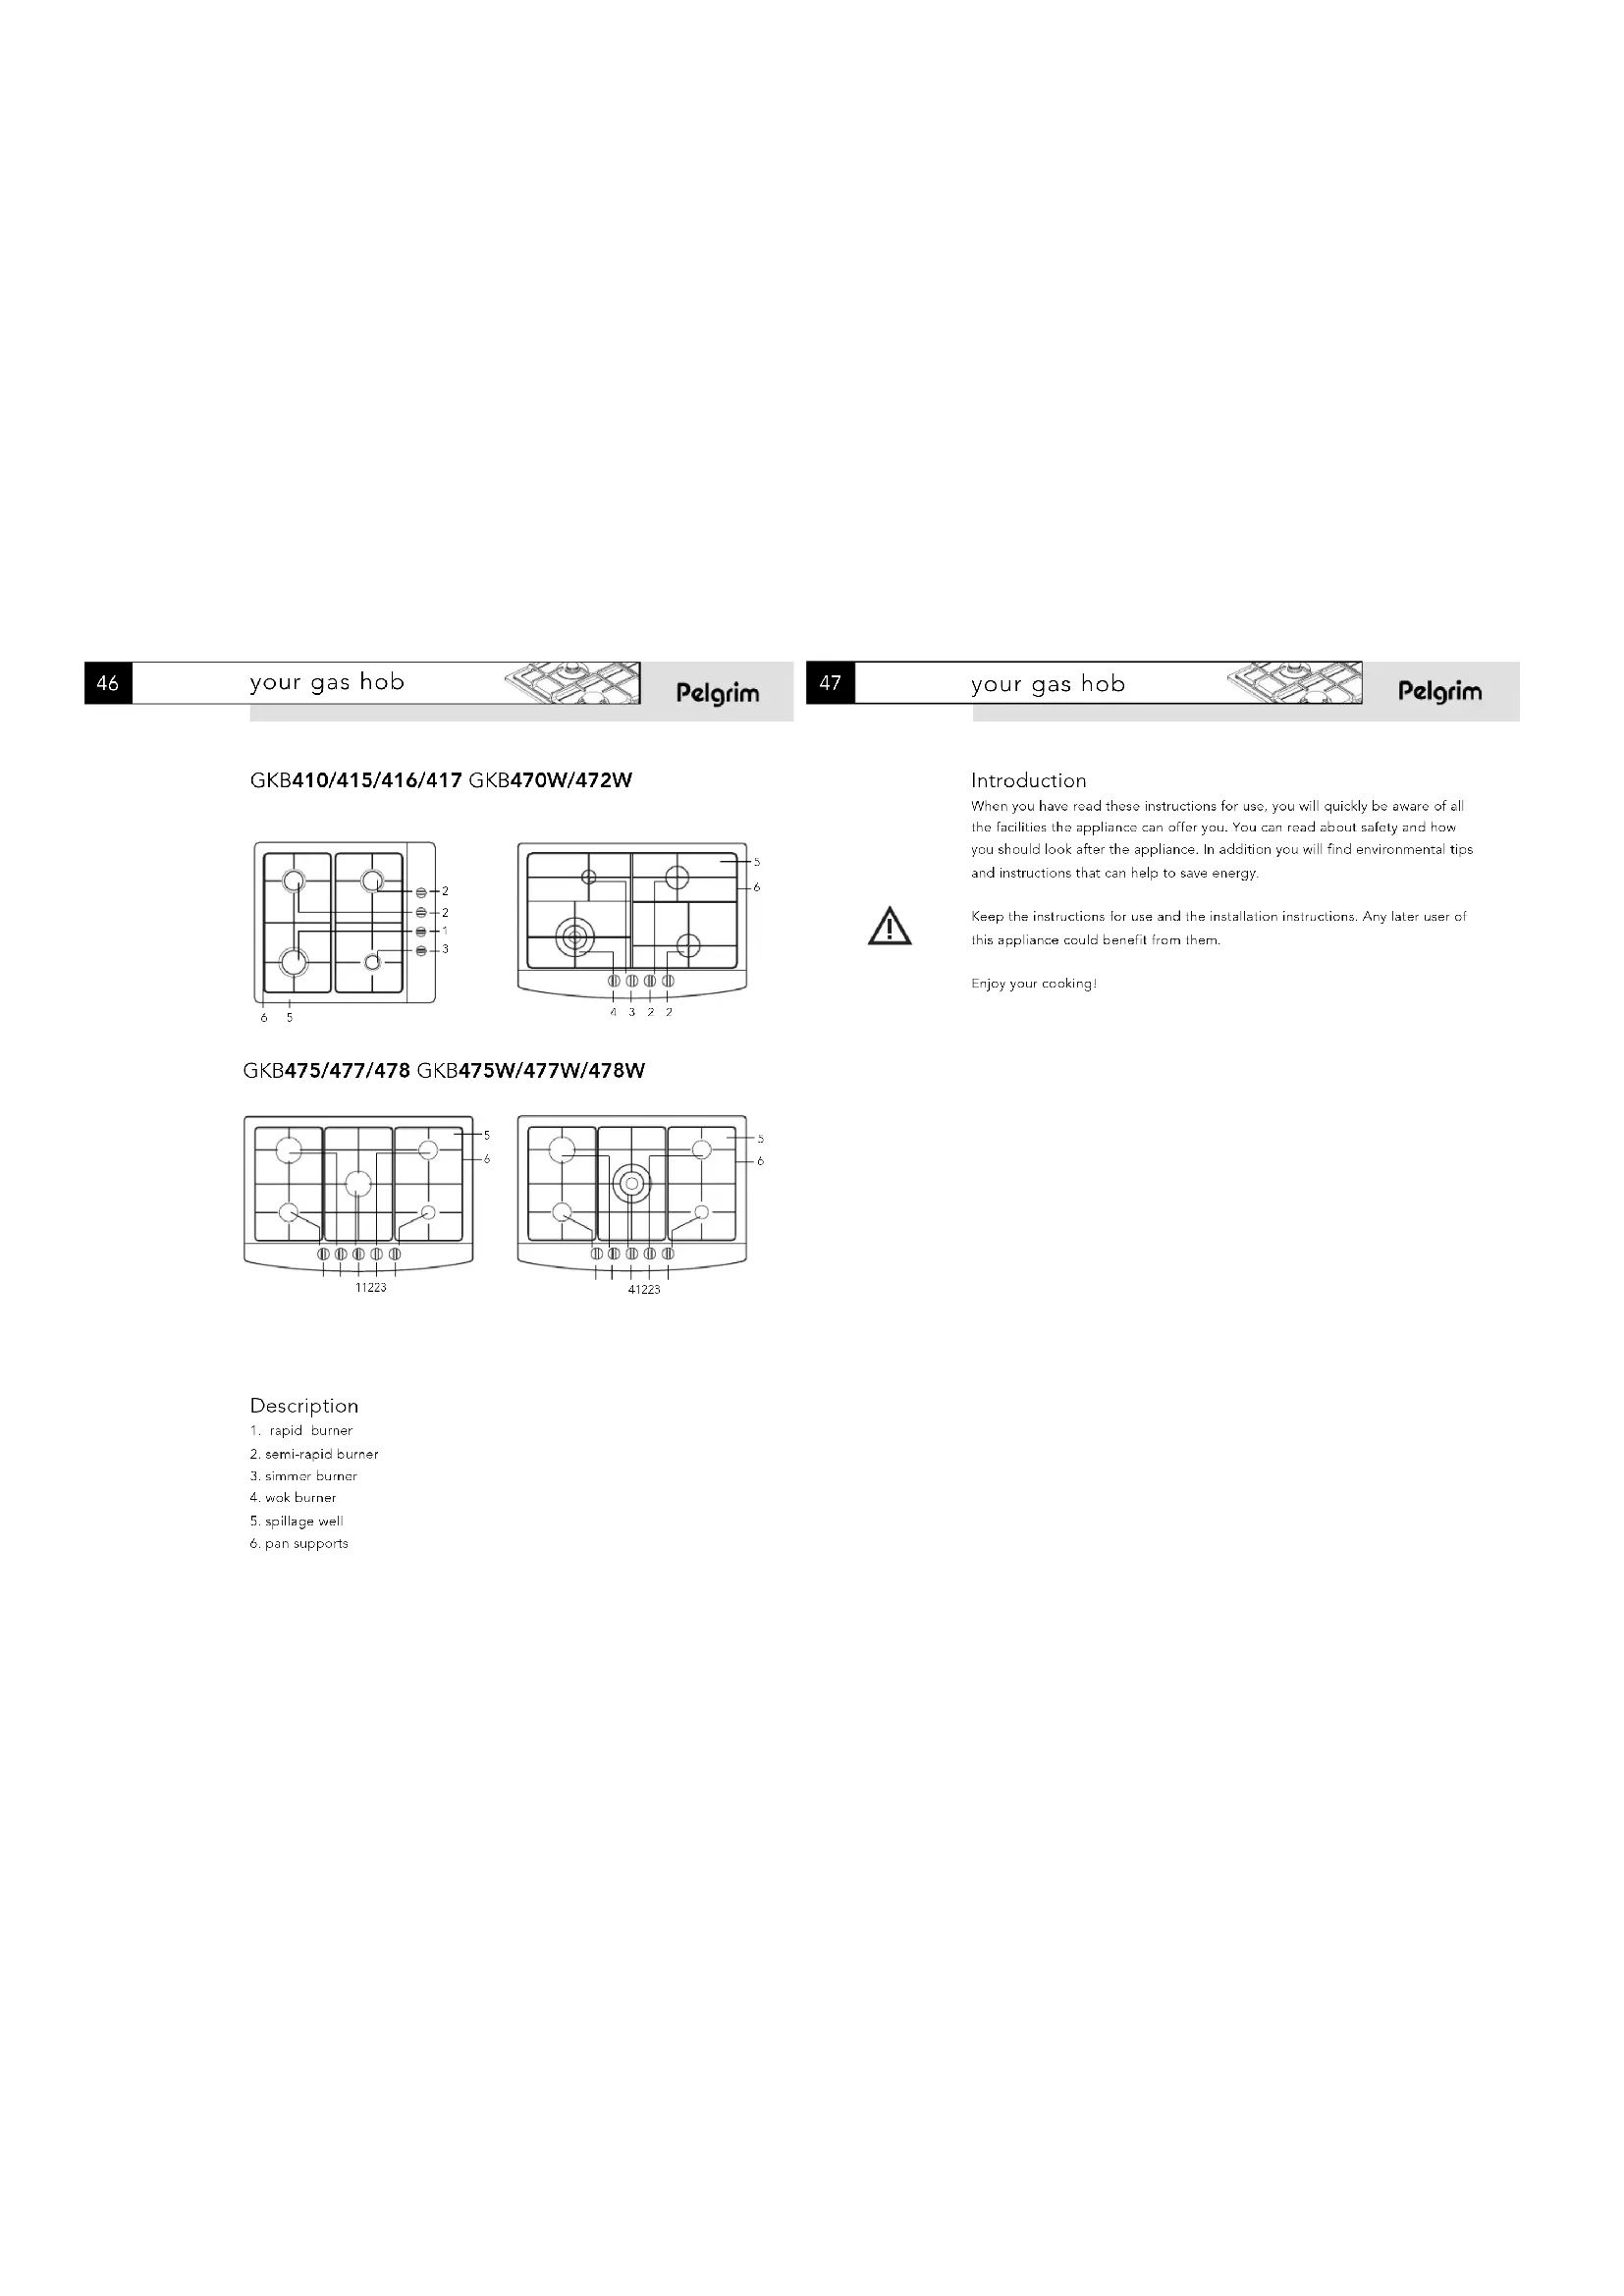
GKB410/415/416/417 GKB470W/472W

Introduction
Specifications techniques
what you should pay attention to 48
controls
igniting and adjusting 49
comfortable cooking
optimal use of the hob 50
maintenance
general 51-52
environmental aspects
disposal of packaging and appliance 53
installation instructions
general 54
electrical connection 54
gasconnection 55
building in 56-57
gas information 58
technical specifications 58

GKB410/415/416/417 GKB470W/472W


Introduction
When you have read these instructions for use, you will quickly be aware of all the facilities the appliance can offer you. You can read about safety and how you should look after the appliance. In addition, you will find environmental tips and instructions that can help to save energy.
Keep the instructions for use and the installation instructions. Any later user of this appliance could benefit from them.
Enjoy your cooking!
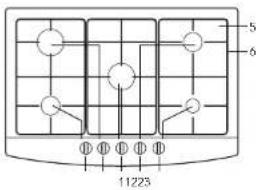
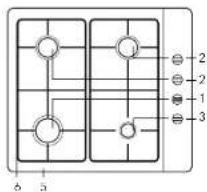
GKB475/477/478 GKB475W/477W/478W
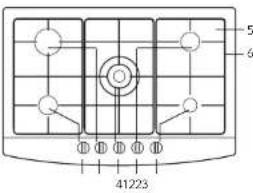
Description
rapidburner
2. semi-rapid burner
3. simmer burner
4. wok burner
5 spillage well
6. pan supports
What you should pay attention to

Ensure that there is adequate ventilation during use
- Keep natural ventilation openings open.
- When using the hob for long periods, extra ventilation is necessary. Open a window for instance or install a mechanical fan
Use the hob only for preparing dishes
The appliance is not suitable for space heating.
Never flâbé under an extractor hood
The high flames can cause a fire, even if the fan is switched off.
The burner parts are hot during and immediately after use
Do not touch them, and avoid contact with non-heat-resistant materials.
Never immerse hot burner parts in cold water. The rapid cooling can damage the enamel.
The distance from the pan to a knob or non-heat-resistant wall should always be greater than two centimetres
In the case of smaller distances the high temperature may cause the knots or wall to discolour and/or distort.
Always use the pan supports and suitable cooking utensils
Always place the pan on the pan support. Placing the pan directly on the burner head can result in dangerous situations.
Aluminium trays or foil are not suitable as cooking utensils. They can become burnt into the burners and pan supports.
Installing burner parts and pan supports
The hob can only function effectively if the burner parts have been assembled using the guide ridges.
Ensure that the pan supports Fe properly against each other and flat on the spillage well. Only then can the pans be positioned stably.
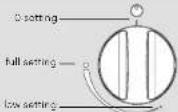
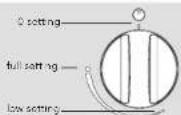
Igniting and adjusting
Each burner can be adjusted continuously between the full and low positions.
GKB410
While keeping the knob of the burner hold in turn the knob to the left and light the burner with a match.
GKB415/417/470/472/475/475W/477/477W/478/478W
Press the knob of burner in and turn it to the left. The burner ignites.

Flame failure device (GKB416/478/GKB478W)
The flame failure device ensures that the gas supply is closed if the flame goes out during the cooking process.
Hold the control knob pressed in in the full position for approximately 3 seconds.
The flame failure device will switch on.

Optimal use of the hob
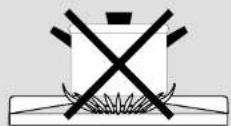
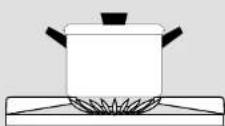
Always ensure that the flames remain below the pan. If flames play around the pan, a lot of energy is lost. In addition, the handles can get too hot.
Do not use pans with a base diameter less than 12 cm. Smaller pans will not be stable.
When frying, stir frying, heating through large quantities and deep frying it is better to use the strong or wok burner. Preparing sauces, simmering and boiling can be done best on the simmer burner. On its high setting this burner is large enough for cooking food right through. For all other dishes use the normal burners.
Cook with the lid on the pan. This way you save up to 50% energy.
Use pans with a flat, clean, dry base. Pans with a flat base stand stably and pans with a clean base transfer the heat more effectively to the food.

Wok burner
With the wok burner you can prepare dishes at a very high temperature. For this purpose it is important:
to cut the ingredients into strips, slices or pieces before cooking.
To use good quality oil, such as olive, maize, sunflower or peanut oil when stir-frying. A small quantity is enough. Butter and margarine on the other hand will burn because of the high heat;
- to place the dishes with the longest cooking time in the pan first, so that at the end of the cooking time all ingredients are cooked al dente at the same time.

General
Your appliance has been manufactured from high-grade materials, which are easy for you to clean.
- Burner parts should not be cleaned in the dishwasher. The parts may be damaged by the dishwasher detergent!
Do not use too much water as this can penetrate into the burner or ventilation openings.
Clean the spark plugs preferably with a cloth. Do this carefully. If too much pressure is applied, the distance from the point of the sparkplug to the burner may change, causing the burner to ignite poorly or not at all. The sparkplug will only operate correctly in a dry environment. If the plug is very dirty, you may clean the point with a tiny brush.
Set the pan supports down vertically, without sliding them over the spillage well.
■Assemble the burner parts using the guide ridges.
Regular cleaning immediately after use prevents over-cooked food being able to become ingrained and cause stubborn stains that are difficult to remove. Use a mild cleaning agent.
Clean the control knobs, burners and pan supports first and then the spillage well. This avoids the Hob getting dirty again during cleaning.

General
Stubborn stains on enamel (pan supports, burner caps, spillage wells)
Remove with a non-abrasive cream or a soft sponge. Never use scouring powder, scouring pads, sharp objects or aggressive cleansing agents.

Stubborn stains on stainless steel (spillage wells)
In particular boiled over red cabbage, red beetroot, soy sauce, mubarb and other foodstuffs with a high sugar content and acidic liquids can cause discoloration of the surface.
If you want to remove stubborn stains from stainless steel, you can best use a cleaning agent specially formulated (or stainless steel. In that case, always clean in the direction of the structure of the steel in order to avoid shiny spots. (Damage resulting from this are not covered by the warranty.)
If the stains cannot be removed using the method described above, you can clean the hob with HG oven and grill cleaner. Bear in mind, however, that you will have to clean the whole of the spillage well in order to avoid differences in 'colour'. You must also treat the spillage well afterwards with a polish or maintenance product for stainless steel. It is normal for the surface to discolour somewhat during the product's lifetime.
Disposal of packaging and appliance
In the manufacturing of this appliance use has been made of durable materials. At the end of its lifecycle this appliance must be disposed of in a responsible manner. The authorities can advise you on this.
The appliance packaging is recyclable. The following may have been used
cardboard;
■PAPERS
polythene fim (PE)
CFC free polystyrene (PS hard foam)
polypropylene tape (PP).
Dispos of these materials in a responsible manner and in accordance with government regulations.
General
The fitting of the appliance should only be carried out by a registered Corgi gas fitter.
Please note:
This appliance is not connected to a flue duct. Take care to ensure that there is sufficient ventilation.

Do not install a hob next to a high cupboard or wall made of flammable material. (If there is no alternative, ensure that there is a minimal distance of 100mm between the outer edge of the hob and the wall in question. Also ensure that there is a minimum distance of 650mm between the hob and any overhead extractor fan which may be installed.)
Electrical connection (solely for appliances with a spark switch)
Electrical connection: 230V - 50Hz
This appliance complies the regulations concerning electromagnetic compatibility in directive 89/336/EEC.
The electrical connection must comply with national and local regulations.
■Wall socket and plug must be accessible at all times.
If you want to make a fixed connection, ensure that a multi-pole switch with a distance between contacts of 3mm is installed in the supply cable.
Please note:
This appliance must be earthed.
If the connection cable becomes damaged, it should be replaced by the manufacturer's service department or by a person with equivalent qualifications, in order to prevent dangerous situations from arising.

Gasconnection RC 1/2" (ISO 7/1-RC 1/2)
Please note:
The type of gas and the country for which the appliance has been designed are indicated on the ratings plate.
The gas connection must comply with national and local regulations.
Amongst other things these regulations instruct that
only approved materials are to be used;
only a completely metal hose may be used behind a built in oven and beneath the hob.

We recommend that the hob be connected by means of a fixed pipe.
Connection using a specially designed safety hose is also permitted. In all cases the connection tap for the appliance must be positioned such that it is easily accessible, in an adjacent kitchen cupboard, for example.
The safety hose must not get kinks in it or get trapped and must not come into contact with moving parts of the kitchen furniture.
Before using the appliance for the first time check the connections using water and washing up liquid to ensure that there are no gas leaks.
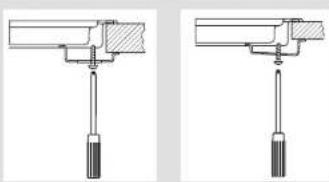
building in
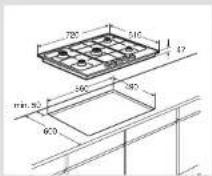
- Make the cut-out in the work surface. Ensure that there is sufficient space allowed at the sides and at the back.
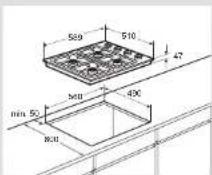
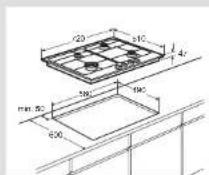
GKB410/415/416/417 GKB470W/472W
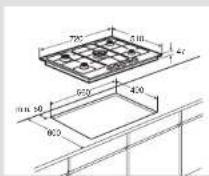
GKB475/477/478 GKB475W/477W/478W
- Secure the appliance in position.
S. Make the gas connection. Check the gas connections with a soap/water mixture (see 'Gas Connection').
6. Put the plug in the socket (see "Electrical Connection").
7. Test to check the appliance is operational.
The building in of the hob in combination with a built-in oven is described in the installation guide for the oven.
Attention:
The underside of this built-in hob becomes hot. Take care that you do not place any flammable or plastic objects in any drawer under the appliance.

Please note:
The distance between the hob and the rear wall must be at least 50 mm.
2. Make a hole in the side of the kitchen cabinet to enable the gas pipe to be passed through.
3. Place the appliance in the cut-out.
Gas information
| G25/25 mbar | G20/20 mbar | G25/20 mbar | G30/29 mbar | G30/29 mbar | G31/37 mbar | G30/50 mbar | |
| bureau bps | (€/W) | (€/W) | (€/W) | (€/W / €/h) | (€/W / €/h) | (€/W / €/h) | (€/W / €/h) |
| sinrnr | 1.00 | 1.00 | 1.00 | 1.00 / 72 | 0.88 / 63.4 | 1.00 / 72 | 1.00 / 72 |
| normal | 1.75 | 1.75 | 1.75 | 1.75 / 126 | 1.54 / 111 | 1.75 / 126 | 1.75 / 126 |
| strong | 3.00 | 3.00 | 3.00 | 3.00 / 216 | 2.64 / 191 | 3.00 / 216 | 3.00 / 216 |
| weak | 3.50 | 3.50 | 3.50 | 3.50 / 252 | 3.08 / 222 | 3.50 / 252 | 3.50 / 252 |
Technical specifications
| Type of hob GKB410 GK8415/416/ | GKB470W/472W 417 GKB475/475W GKB477/477W GKB478/478W | |
| Electric: 3-core connection lead | ||
| Connection AC 230 V - 50Hz - 0,6 VA | ||
| Spark switch integrated in control buttons | ||
| Gas: | ||
| Connection G1/2" | ||
| Dimensions (appliance): | ||
| 589x47x510 wхhxd in mm | ||
| 720x47x510 wхhxd in mm | ||
| Dimensions (recess): | ||
| 560x490 wxd in mm |