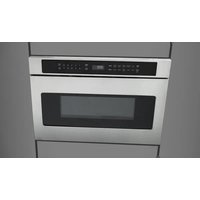
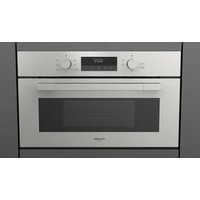
FQMO 4505 MT X - Microwave Oven Fulgor Milano - Free user manual and instructions
Find the device manual for free FQMO 4505 MT X Fulgor Milano in PDF.
User questions about FQMO 4505 MT X Fulgor Milano
0 question about this device. Answer the ones you know or ask your own.
Ask a new question about this device
Download the instructions for your Microwave Oven in PDF format for free! Find your manual FQMO 4505 MT X - Fulgor Milano and take your electronic device back in hand. On this page are published all the documents necessary for the use of your device. FQMO 4505 MT X by Fulgor Milano.
USER MANUAL FQMO 4505 MT X Fulgor Milano
| FULGOR MILANO | |
| FQMO 4505 MT X | |
| FORNO MICROONDE MICROWAVE OVEN FOUR À MICRO-ONDES MIKROWELLENHERD HORNO MICROONDAL FORNO MICROONDAL | IT ISTRUZIONI PER L'INSTALLAZIONE E L'uso EN INSTRUCTIONS FOR INSTALLATION AND USE FR MODE D'EMPLOI POUR L'INSTALLATION ET L'UTILISATION DE INSTALLATIONS- UND GEBRAUCHSANLEITUNG ES INSTRUCCIONES PARA LA INSTALLACION Y EL USO PT INSTRUÇOES PARA A INSTALAÇÃO E A UTILIZAZão |
Caro CLIENTE,
We would like to thank you and congratulate you on your choice.
This new product has been carefully designed and built using top quality materials, and meticulously tested to ensure that it meets all your culinary requirements.
Please read and observe these simple Instructions, which will enable you to achieve excellent results from the very first time you use it. We hope you enjoy using this modern appliance.
INDEX PAGE
1 - Safety instructions 2
2 - Warnings for microwave ovens 4
3 - Causes of damage 5
4-First use 6
5 - Assembling and disassembling the flat grill 7
6 - Respect for the environment 8
7-45 Microwave oven-knob control 9
8- Introduction to the oven 10
Installation and connection 10
First connection -
Setting the clock 10
9 - Main functions 11
Command overview 11
Cooking functions 11
Oven functions in clockwise order 11
Simple cooking commands 11
Setting the temperature 11
Residual heat 11
Oven light control 11
10-Microwave functions 12
Warnings for dishware 12
11- Manual function: microwave 13
12-Manual function: microwave +grill 14
13 - Conventional functions: grill 15
14-For the installer 16
Installing the oven in a cabinet 16
15 - Technical specifications 17
16- Electrical connection 18

IMPORTANT INSTRUCTIONS AND SAFETYWARNINGS
Read carefully and keep for future reference

THIS PRODUCT HAS BEEN DESIGNED FOR USE IN THE HOME.
THE MANUFACTURER DECLINES ALL RESPONSIBILITY IN THE EVENT OF DAMAGE TO PROPERTY OR PEOPLE CAUSED BY THE INCORRECT INSTALLATION OR THE IMPROPER, WRONG OR UNREASONABLE USE.
THE APPLIANCE MUST NOT BE USED BY PEOPLE (INCLUDING CHILDREN) WITH LIMITED PHYSICAL, SENSORIAL OR MENTAL ABILITIES, OR BY PERSONS WHO LACK THE NECESSARY EXPERIENCE AND KNOW-HOW IF NOT SUPERVISED OR UNDER INSTRUCTION ON HOW TO USE THE APPLIANCE BY A RESPONSIBLE PERSON FOR THEIR SAFETY.
CHILDREN MUST BE SUPERVISED TO ENSURE THEY DO NOT PLAY WITH THE APPLIANCE. DO NOT PLACE ALUMINIUM FOIL, POTS OR SIMILAR OBJECTS IN CONTACT WITH THE BASE INSIDE THE OVEN FOR COOKING THE APPLIANCE GETS VERY HOT WHEN USED. WARNING: DON'T TOUCH THE HEATING ELEMENTS INSIDE THE OVEN.

CAUTION
If the door or the door seals are damaged, the oven must not be used until it has been repaired by a service technician;
It is dangerous for anyone, except for service staff to carry out any maintenance work or repairs which require any covers to be removed which provide protection against exposure to microwave energy;
No liquids or other food must be heated in sealed containers because they could explode;
Children may not use the oven without supervision until they have been properly instructed in how to use the oven safely and have understood the dangers of using it incorrectly;
only use utensils that are specifically for microwave ovens;

CAUTION
when heating food in plastic or paper containers, check the oven frequently because of the risks of fire;
if you see smoke coming out, turn off the power or remove the plug and keep the door closed to extinguish any flames;
heating beverages in the microwave oven can often cause a delayed boil-over, so be very careful when handling the container;
the contents of baby bottles or baby food in jars must be mixed or shaken and the temperature must be checked before feeding to avoid scalding;
eggs in shells or hard boiled eggs must not be heated in the microwave oven because they could explode even after the end of heating in the microwave;

CAUTION
a detailed explanation on how to clean the oven door seals and the adjacent parts;
the oven must be cleaned periodically and all food residue should be removed;
failure to keep the oven clean could lead to a deterioration of the surface which could reduce the life of the appliance and cause dangerous situations;
Do not use rough, abrasive materials or sharp metal scrapers to clean the glass door of the oven because they could scratch the surface and cause the glass to shatter.
Do not use steam cleaners to clean the appliance.
Food preparation
Danger of fire!
Only use the microwave for the preparation of food to be eaten. Any other uses could be dangerous or cause damage.
For example, heated slippers and grain or cereal-filled pillows could
catch fire even after several hours.
Dishware
Danger of injury!
Porcelain or ceramic dishware may have small holes in the handles or lid.
There may be cavities hidden behind these holes. If liquid penetrates into these cavities, the dish may break.
Do not use dishware that is not specifically for use in microwave ovens.
Danger of burns!
The heat from the food may heat the dish. Always use pot holders when taking dishes and accessories out of the oven.
Microwave power and duration
Danger of fire!
Never set values that are too high for the microwave power or the cooking time. The food could catch fire and damage the appliance. Follow the indications given in these user instructions.
Packaging
Danger of fire!
Never heat food in thermal packaging.
Food in containers made of plastic, paper or other flammable materials must always be monitored constantly.
Danger of burns!
Air-tight packaging may explode. Follow the instructions shown on the packaging. Always use pot holders to remove dishes.
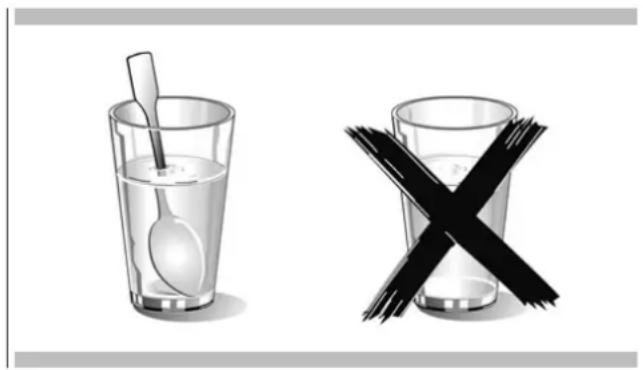
Beverages
Danger of burns!
When heating liquids, boiling can be delayed.
This means that the boiling temperature may be reached even if you do not see any typical steam bubbles. Even a slight knock can cause the liquid to spill or spray.
When heating liquids, always put a spoon in the container to avoid delayed boiling.
Danger of explosions!
Never heat drinks or other types of food in covered containers.
Never overheat alcoholic beverages.
Baby food
Danger of burns!
Never heat baby food inside containers with lids. Always remove the lid or teat.
After heating, carefully shake or mix the food so the heat is evenly distributed.
Test the temperature before giving the food to the baby.
Food with skin or peel
Danger of burns!
Never cook eggs in the shell. Never heat hard-boiled eggs because they could explode even after the microwave has been switched off. This also applies to shellfish and crustaceans.
In the case of fried eggs, pierce the yolk first.
In the case of foods with a hard peel or skin like apples, tomatoes, potatoes or sausage, the peel or skin could explode.
Pierce the skin or peel before cooking.
Drying food
Danger of fire!
Never dry food with the microwave function.
Food with low-water content
Danger of fire!
Do not defrost or heat food with a low water content, e.g. bread, for a long time or at a very high power.
oil
Danger of fire!
Never use the microwave function to heat just oil.
Juice leaking from fruit
When making desserts with very juicy fruit, do not overfill the baking dish. Fruit juices that overflow the baking dish can leave indelible stains.
Technical fault
- Never use enamelled baking dishes in the microwave as they could cause a technical fault.
Cooling with the door of the appliance open
The cooking chamber must be only be cooled with the door closed. Check that nothing is stuck in the door of the appliance.
Even if the door is ajar, nearby cabinets may be damaged over time.
Very dirty gasket seal
If the gasket seal is very dirty, the door of the appliance will not close properly during operation. The surface of nearby cabinets can be damaged. Always keep the gasket seal clean.
Using the door of the appliance as a support surface
Do not rest or lean on the open door of the appliance and do not put dishware or accessories on it.
Using the microwave function when the oven is empty
Only turn on the microwave when you have put food inside it. Without food inside, the appliance may overload. The only exception allowed is a brief test for dishes (see the warnings about pots and pans).
Moist food
Do not keep moist food inside the closed oven for prolonged periods of time.

IMPORTANT
The oven's identification plate is accessible even after the appliance has been installed. This identification plate, which is visible when you open the door, shows all the information you will need when requesting replacement parts for the appliance.
EN 4-First use
The oven must be thoroughly cleaned with soap and water and carefully rinsed.
Heat the oven for about thirty minutes at maximum power. This will eliminate all the residual manufacturing oils which could cause unpleasant odours during cooking. Use the grill function without accessories in the oven. Before using the accessories for the first time, clean them thoroughly with a very hot alkaline washing solution and a soft cloth.
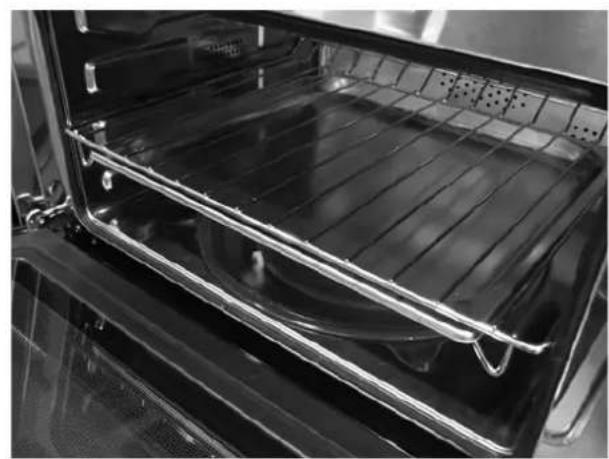
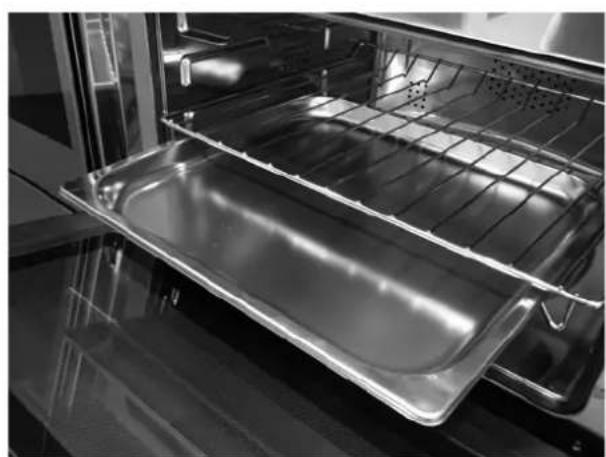
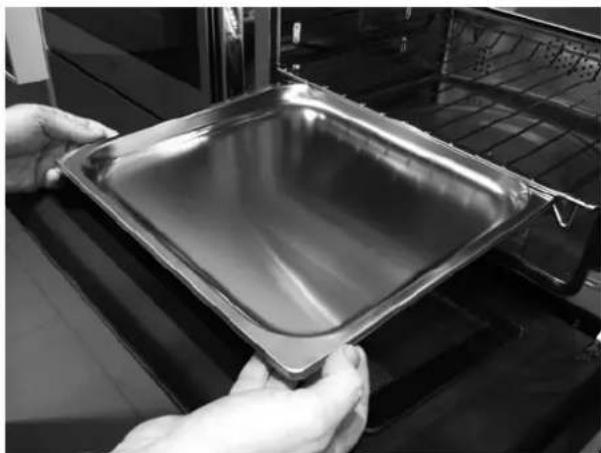
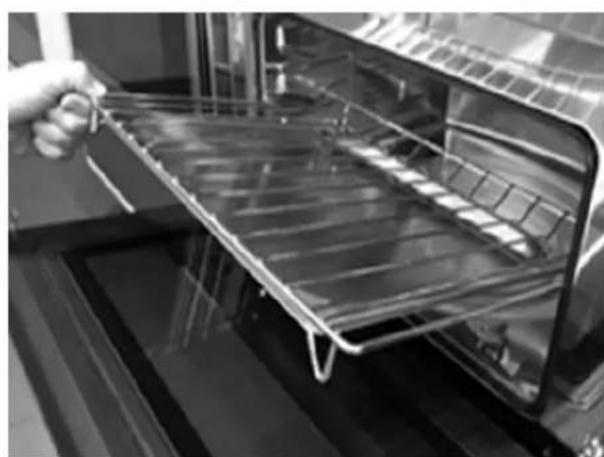
To remove the flat grill, pull the grill towards you until it stops and then lift, by pulling upwards, until it comes completely out.
To put the flat grill back in, insert it at a 45-degree angle and then position it horizontally and push it all the way in to the end of the grill track.
If the flat grill has a drip-pan (tray), to remove it, lift slightly and slide it towards you. To reinsert it, slide it back until it is correctly seated.

IMPORTANT
as a safety precaution, before cleaning the oven, always disconnect the plug from the outlet or remove the appliance's power cord. Do not use acid or alkaline substances (lemon juice, vinegar, salt, tomato, etc.). Avoid using products containing chlorine, acids or abrasives, especially for cleaning the coated parts.
The documentation for this appliance is made from paper whitened without chlorine or recycled paper to contribute to protecting the environment.
The packaging is designed to be environmentally-friendly.
They are ecological products that can be recovered or recycled.
Recycling the packing saves raw materials and reduces the volume of industrial and domestic waste.
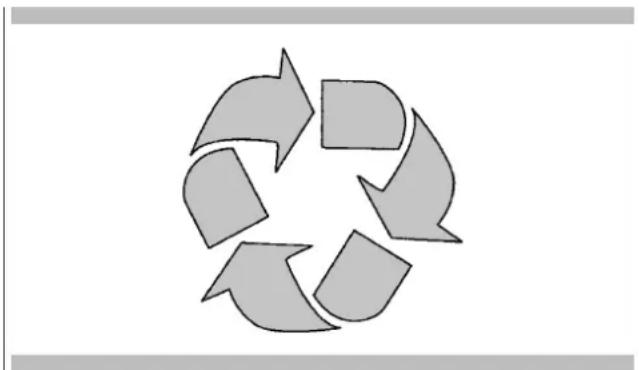
THE PACKAGING MATERIAL is 100% recyclable and is marked with the recycling symbol. Dispos of in conformity with local law. The packaging material (plastic bags, parts in polystyrene,etc.) must be kept out of the reach of children because it is potentially dangerous. THIS APPLIANCE is marked as Waste Electrical and Electronic Equipment (WEEE), in compliance with European Directive 2002/96/ EC. By making sure that this product is disposed of correctly, the user contributes towards preventing negative consequences for the environment and health.
THE SYMBOL on the product and the accompanying documentation indicates that this product must not be treated as domestic waste, but must be taken to a suitable recycling collection point for electric and electronic appliances.

DISPOSAL MUST BE DONE in accordance with local legislation for waste disposal. FOR FURTHER INFORMATION on the treatment, recovery and recycling of this product, contact your local office, the service for recycling domestic waste or the store where you purchased the product.
BEFORE SCRAPPING, render it unusable by cutting the power cable.
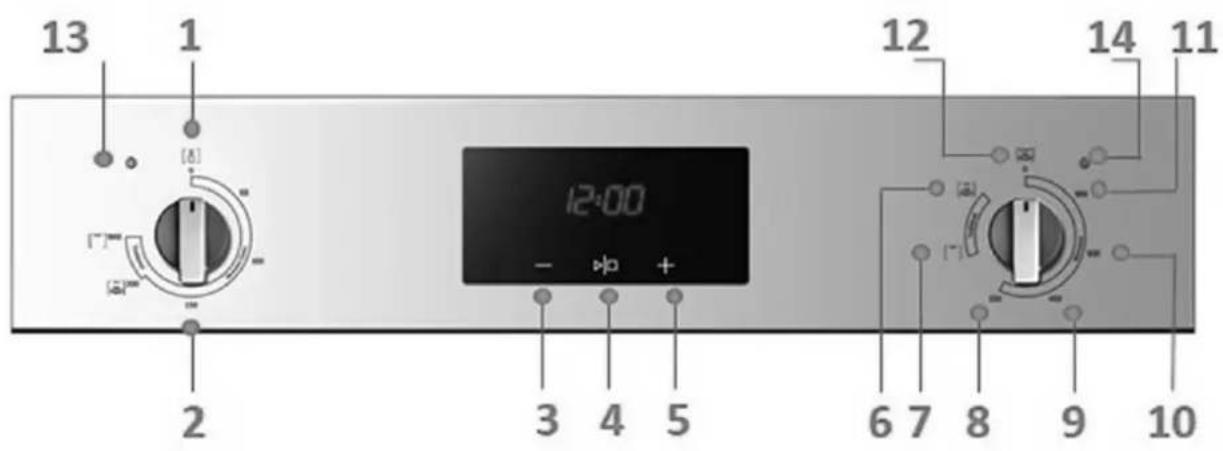
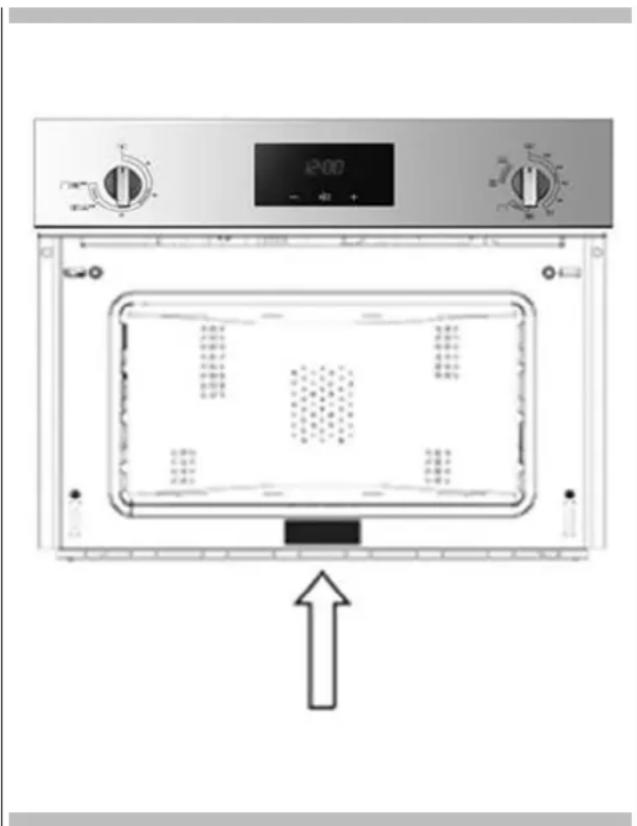
OVERVIEW OF CONTROLS
STANDARD COOKING FUNCTIONS: 7
SETTING STANDARD COOKING TEMPERATURE (thermostat): 2
OFF:1 and 12
MICROWAVE FUNCTIONS: from 8 to 11; COMBI FUNCTIONS (microwave and convention cooking): 6
TIMER FUNCTIONS (start and stop): 4
TIMER SETTING 3 and 5
1 Thermostat OFF;
2 SET thermostat - Min 50^ to Max (230^)
3 decrease time function;
4 time setting start and stop function;
5 increase time function;
6 light + standard grill cooking - microwave;
7 light + standard grill cooking;
8 light + standard microwave cooking 150W;
9 light + standard microwave cooking 450W;
10 light + standard microwave cooking 600W;
11 light + standard microwave cooking 900W;
12 OFF switch - All cooking modes and heating elements are switched off;
13 Thermostat light
14 Functions light
Dear customer, your new oven is controlled by an electronic thermostat and by a switch which allows you to select any cooking function you wish.
The interface is elegant, orderly and discrete, and more intuitive than ever!
Installation and connection
Dear customer, this oven is a sophisticated electronic appliance, classified as durable goods. Its installation requires qualified professionals for both the hook-up of the power line and its installation in the kitchen cabinets.
(SEE ASSEMBLY INSTRUCTIONS ON PAGE. 16)
Initial connection - Setting the clock
When the oven is connected to the mains for the first time, the timer display starts flashing. Press the middle button on the timer for more than 3 secs. Adjust the time using the + and - keys (24h format) and confirm with the middle button.
If you want to change the time, press and hold the - key and press the +^ key, the dot in the middle of the hour will start to flash, set the time using the +^ or - keys; confirm with the start and stop key.

IMPORTANT
Every control activated on the timer is confirmed by a beep.
Command overview
Cooking functions
The control panel gives you no less than six cooking functions!
To activate a function, just select the corresponding symbol with the switch.
Oven functions in clockwise order
| 1 Microwave 900W - Funct.11 |
| 2 Microwave 600W - Funct.10 |
| 3 Microwave 450W - Funct.9 |
| 4 Microwave 150W - Funct.8 |
| 5 - GRILL - Funct. 7 - Type of cooking for grilling and browning food. The grill with the food to cook is placed on the 2nd or 3rd position from the bottom. Preheat for at least 2 minutes before putting in the dish. |
| 6 Microwave combined with Grill - Funct.7 |
| The oven light always stays on during the various microwave and conventional cooking modes. The light automatically comes on when any function is selected on the switch or when the door is opened if the switch is set to OFF. The light cannot be turned off during cooking. |
The table below shows the results of the cooking tests conducted in our laboratories by a professional cook. These are, however, indications and the values suggested serve as a starting point for you to experiment with your own recipes and obtain the best results every time!
| F | |
| °C | MAX |
| 2-3 | |
| L | 14°-18' |
Simple cooking commands
Just a few simple gestures are required to set conventional cooking (Func. 7), thanks to the easy control logic used: select the most suitable function for the dish that you are cooking and choose it.
Setting the temperature
You can change the temperature at any time. After you have selected the cooking function, just change the thermostat from a minimum of +50^ to MAX (230^) by turning the knob control clockwise.
The control is automatically started after a few seconds and when the temperature set has been reached, you will hear a beep. The indicator (fig. 13) indicates that the desired temperature has been reached when the oven reaches the temperature, the indicator turns off.
Residual heat
While cooking food, the structure of the oven stores heat which is isolated from the rest of the kitchen thanks to generous thermal insulation and certain construction techniques.
This heat will gradually disperse over time and can still be used as a resource in the kitchen.

IMPORTANT
Use this feature to keep food hot or finish cooking gently!
Oven light control
The oven light comes on for all cooking functions.
When you open the door, the light inside the oven always turns on.
The microwaves are transformed into heat in the food. The microwave oven can be used on its own or in combination with another type of heating method. This section contains the information on the dishes and instructions on how to set the microwave oven.
Warnings for dishware
Suitable dishware
Heat-resistant dishware made of glass, glass-ceramic, porcelain, ceramic or refractory plastics
can be used. These materials are permeable to microwaves. You can also use serving plates. This means you do not have to transfer the food to another dish.
Dishes with gold or silver decorations can be only be used if the manufacturer guarantees that they are suitable for use in microwave ovens.
Remember that when you use the oven with the microwave function, the dish must be placed on the turntable.
When the oven is used in combi mode, the cooking dish should be placed on the low round grill, positioned in the centre of the turntable.
Unsuitable dishware
Metal dishes are unsuitable.
Metal is not permeable to microwaves. Food in metal containers will remain cold.

CAUTION
Metal components, e.g. spoons in glasses, must be kept no less than 2cm from the oven walls and from the inside of the door. The sparks could, in fact, cause serious damage to the glass on the inside of the door.

CAUTION
The flat grill rack must be removed when using the microwave or combined modes. Only use it for conventional cooking.
Testing dishware
Never start the microwave oven without first placing food inside it.
The only exception is for testing dishes.
If you are unsure whether a dish can be used in the microwave, we suggest you carry out the following test:
put the empty dish in the appliance for 12 - 1 minute on full power. Check the temperature regularly. The dish should be cold or slightly warm. If it is hot or there are sparks, the dish is not suitable.
Select the MICROWAVE function by choosing between the various oven options. There are four MICROWAVE levels that can be chosen, from a minimum of 150W to a maximum of 900W, with two intermediate settings of 450 W and 600W.
Select the most suitable MICROWAVE function for your requirements.
Press the start/stop key on the timer, press the + key to increase the time required.
Once the cooking time has been set, press the start/stop key again and the function will start. If you do not press the start/stop key, the function will automatically start after five seconds. If the door is open, the function will not start. If the - + keys are held down for more than three seconds, the time will change more quickly;
When the time has been set, the microwave countdown starts with the time shown on the display.
The microwave power will be automatically adjusted to obtain the best result possible.
If you need to open the door during cooking, the word 'door' will appear on the display. When the door is closed, the oven will automatically restart.
When the function concludes, there is a beep and the word END appears on the display.
You can increase the cooking time with the + key during the countdown.
If after opening the door, the food is cooked to your satisfaction, but there is still time showing on the display, you can reset the time by pressing the start/stop key on the display.
The microwave function can be paused during cooking by opening the door.
Every time the microwave functions are started, the turntable automatically turns. If the door is opened, the turntable stops turning and restarts when the door is closed.
If the door of the microwave stays open during microwave functions, the oven will not start and the turntable will not turn.
EN 12-Manual function: microwave + grill
Select the MICROWAVE + GRILL function unct. 6 on the switch;
Press the start/stop key on the timer, press the + key to increase the time required.
Once the cooking time has been set for the microwave function, press the start/stop key again and the function will start. If you do not press the start/stop key, the function will automatically start after five seconds. If the + keys are held down for more than three seconds, the time will adjust more quickly;
The left-hand control on the oven allows you to adjust the temperature inside the oven by turning the knob control clockwise from a minimum of 50^ to a maximum of 200^ . This combined function allows you to cook using both the microwaves and the grill element.
When the time has been set, the microwave countdown starts with the time shown on the display.
The microwave power will be automatically adjusted to obtain the best result possible.
If you need to open the door during cooking, the word 'door' will appear on the display. When the door is closed, press the start/stop key again to continue cooking to the end.
When the function concludes, there is a beep and the word END appears on the display.

IMPORTANT
The timer setting only controls the microwave operation. This means the grill element will continue to work at the set temperature. It will only turn off when the thermostat is turned to OFF (1) or when the switch is turned to OFF (12).
You can increase the time with the + key during the countdown.
If after opening the door, the food is cooked to your satisfaction, but there is still time showing on the display, you can reset the time by pressing the start/stop key l on the display.
The microwave function can be paused during cooking by opening the oven door.
During the combi function, the turntable is only activated during the microwave function. This function has been specifically developed to make the cooking more uniform.
Once the cooking chamber has reached the set temperature and the indicator, fig. 13, turns off, the turntable will stop turning. Every time the oven turns on again to maintain the inner temperature, the turntable will automatically restart during the microwave operations.
Therefore, if the turntable does not turn during cooking, you should not be concerned as the cooking still continues and the oven is hot enough.
If the door is opened, the turntable stops turning and restarts when the door is closed.
If the door of the microwave stays open during the microwave functions, ONLY the microwave function will not start, while the GRILL function will work normally.
The GRILL function, funct.7, allows you to grill or brown food to perfection. The grill with the food to cook is placed on the 2nd or 3rd position from the bottom. To activate this function, just turn the switch to GRILL funct.7 and adjust the oven temperature using the thermostat from a minimum of 50^ to a MAX (230^) .
Once the desired temperature has been set in the oven, when the oven reaches the temperature, there will be a beep and the indicator (fig. 13) will turn off. Preheat for at least 2 minutes before putting in the dish.
NB: The indicator (fig. 13) indicates the heating stages of the element. If the indicator turns off, it means that the oven has reached the set temperature. The indicator will continue to turn on and off during cooking. This indicates that the temperature is being maintained in the oven.
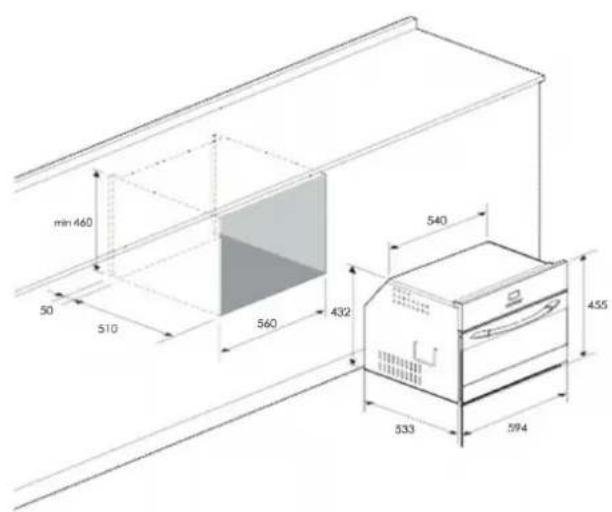
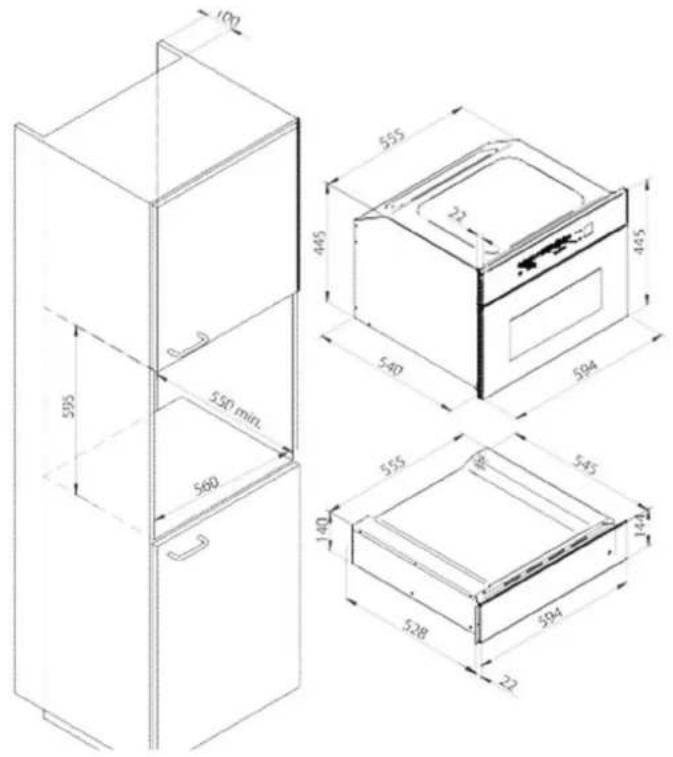
Installing the oven in a cabinet
The oven can be installed under a hob, in a tall cabinet or combined with a warming drawer. The dimensions of the space must those shown in the figure.
The cabinet material must be able to withstand heat. The oven must be centred within the walls of the cabinet and fixed with the screws and bushings provided.
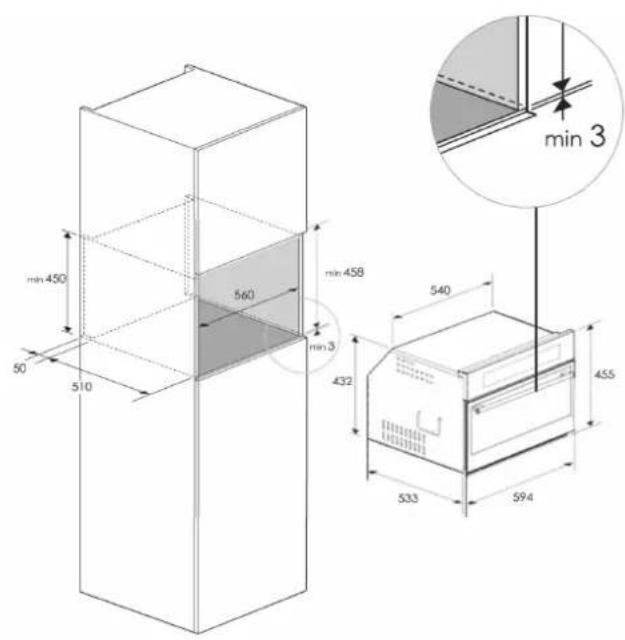
INSTALLING THE OVEN IN A CABINET
Power supply 220-240 V\~, 50Hz
Maximum absorbed power 3200 W
Microwave power 900 W
Grill 1500 W
Microwave frequency 2450 MHz
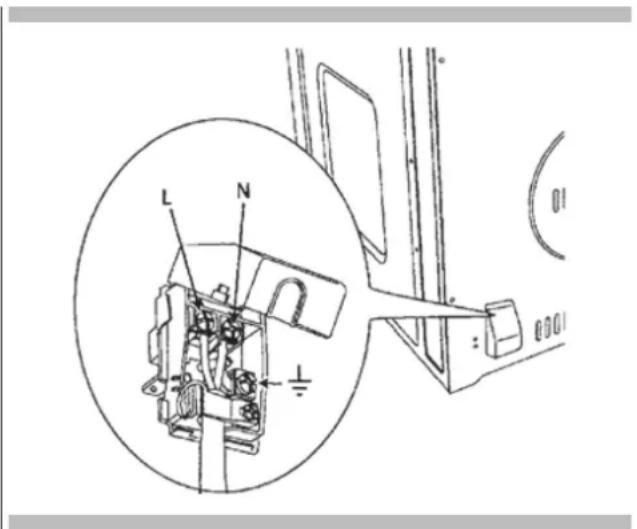
Before making the electrical connection, make sure that:
- the characteristics of the electricity supply fulfil the requirements indicated on the serial number plate fixed on the front of the oven;
- the electricity supply is earthed in accordance with current laws and regulations. Earthing is required by law. The cable should not, at any point, exceed 50^ above room temperature.
This oven must be connected to the power supply with the power cable and a suitable plug which is compatible with the socket installed on the electricity supply which is powering this oven.
If a fixed appliance does not have a power cord and plug, or another device that ensures disconnection from the mains, with an opening distance of the contacts that allows complete disconnection under the conditions of excessive voltage category III, such disconnection devices must be provided in the power supply mains conforming to the installation rules.
The omnipolar socket or switch must be easy to reach when the appliance is installed.
N.B. The manufacturer declines all responsibility if all of the above and the usual accident prevention regulations are not observed.
| TYPE AND MINIMUM DIAMETER OF THE CABLES | |||
| SASO | |||
| H05RR-F | 3×1.5 mm² H05 | RR-F | 3×2.5 mm² |
| H05VV-F | 3×1.5 mm² H05 | VV-F | 3×2.5 mm² |
| H05RN-F | 3×1.5 mm² H05 | RN-F | 3×2.5 mm² |
| H05V2V2-F | 3×1.5 mm² H05 | V2V2-F | 3×2.5 mm² |
Cher Client,
Atenda sempre as indications constantes das embalagens.