Excel - Smartwatch BUSHNELL - Free user manual and instructions
Find the device manual for free Excel BUSHNELL in PDF.
| Product type | Connected golf GPS watch |
| Brand | Bushnell |
| Model | Excel |
| Category | Smartwatch |
| Battery life | Up to 3 rounds of golf (4 hours each) or 1 year in watch mode |
| Battery type | Rechargeable lithium-ion |
| Charging method | Charging cradle with USB cable (USB port or wall charger) |
| Water resistance | Resistant and waterproof (not specified for diving) |
| Strap width | 22 mm (replaceable with Torx T-6 screwdriver) |
| Main functions | Golf GPS (distances, hazards, auto-advance), pedometer, fitness (distance, time, speed), weather (temperature, pressure), smartphone alerts, Swing Pro (speed and tempo) |
| Connectivity | Bluetooth (pairing with smartphone app iOS/Android) |
| Interface languages | English, German, French, Spanish, Italian |
| Time setting | Automatic via GPS or manual |
| Care and cleaning | Soft damp cloth; brush contacts with included brush; avoid chemical products |
| Safety instructions | Do not open, do not expose to temperatures above 60°C, do not puncture battery |
| Spare parts and repairability | No user-serviceable parts; internal battery replaceable only by qualified technician |
| Package contents | Watch, charging cradle with USB cable, cleaning brush, user manual |
| Warranty | 1 year (limited, excluding misuse) |
Frequently Asked Questions - Excel BUSHNELL
User questions about Excel BUSHNELL
0 question about this device. Answer the ones you know or ask your own.
Ask a new question about this device
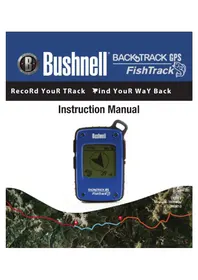
Download the instructions for your Smartwatch in PDF format for free! Find your manual Excel - BUSHNELL and take your electronic device back in hand. On this page are published all the documents necessary for the use of your device. Excel by BUSHNELL.
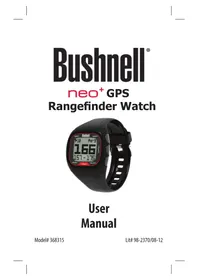
USER MANUAL Excel BUSHNELL
Congratulations on your purchase of the Bushnell Excel GPS Rangefinder Watch!
For ideal performance, please do the following:
- Fully charge your device before first time use.
- Log on and register your device at bushnell.igolf.com and full sync your device to get latest golf course information and data.
- Enter Play Golf mode 5 minutes prior to teeing off to allow for a satellite fix.
To maintain proper battery performance, please do the following:
- Charge your device using a computer USB port, a powered USB hub, or smartphone AC charger only.
- Disconnect the device from the charger once full charge is reached.
- Avoid leaving your device in extremely hot environments such as your vehicle during warm days.
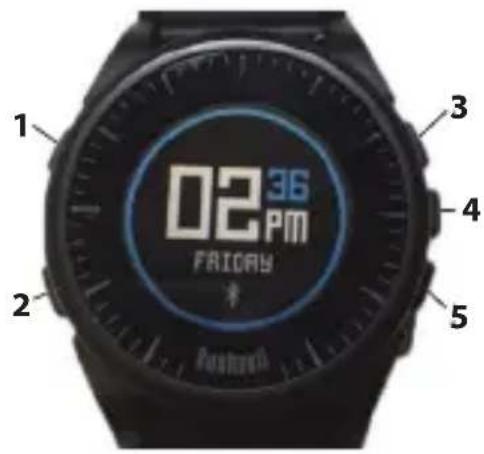
BUTTONS / FUNCTIONS
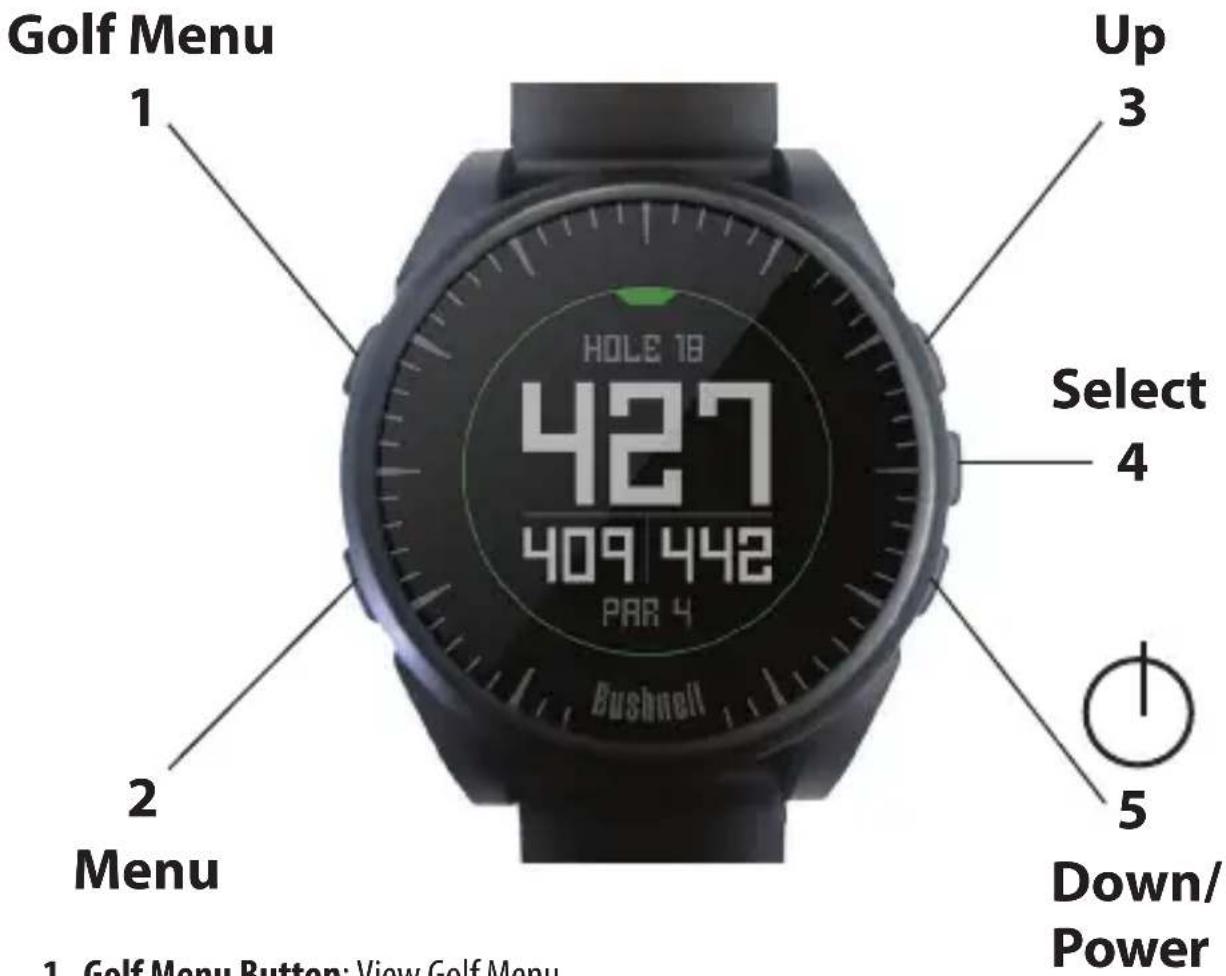
- Golf Menu Button: View Golf Menu
- MENU Button: View Main Menu Options.
- UP Button: Scrolls up through Menu items.
- SELECT Button: Selects from menu items.
- DOWN Button: Scrolls down through menu items. Press & hold (5 seconds) to power on/off.
*Note: Backlight is activated with any button push. The backlight will remain lit for 10 seconds after last button push.
Care and Maintenance
The Excel watch is durable and waterproof. To help ensure reliable operation, the following care and maintenance guidelines are recommended:
- Avoid exposing the watch to extreme environmental conditions for a prolonged period of time.
- Avoid severe impacts on the watch.
- You may clean the watch occasionally with a soft, damp cloth.
- Brush the clip contacts at the bottom of the watch regularly. Dirt build-up on the surface of the contact points may affect normal charging and data transfer. *Note: Use a soft-bristled brush (included). Hard bristles or wire brushes may leave scratches on the watch.
- DO NOT expose the watch to strong chemicals such as gasoline and alcohol, as they will damage the watch.
- Store the watch in a dry place when it is not in use.
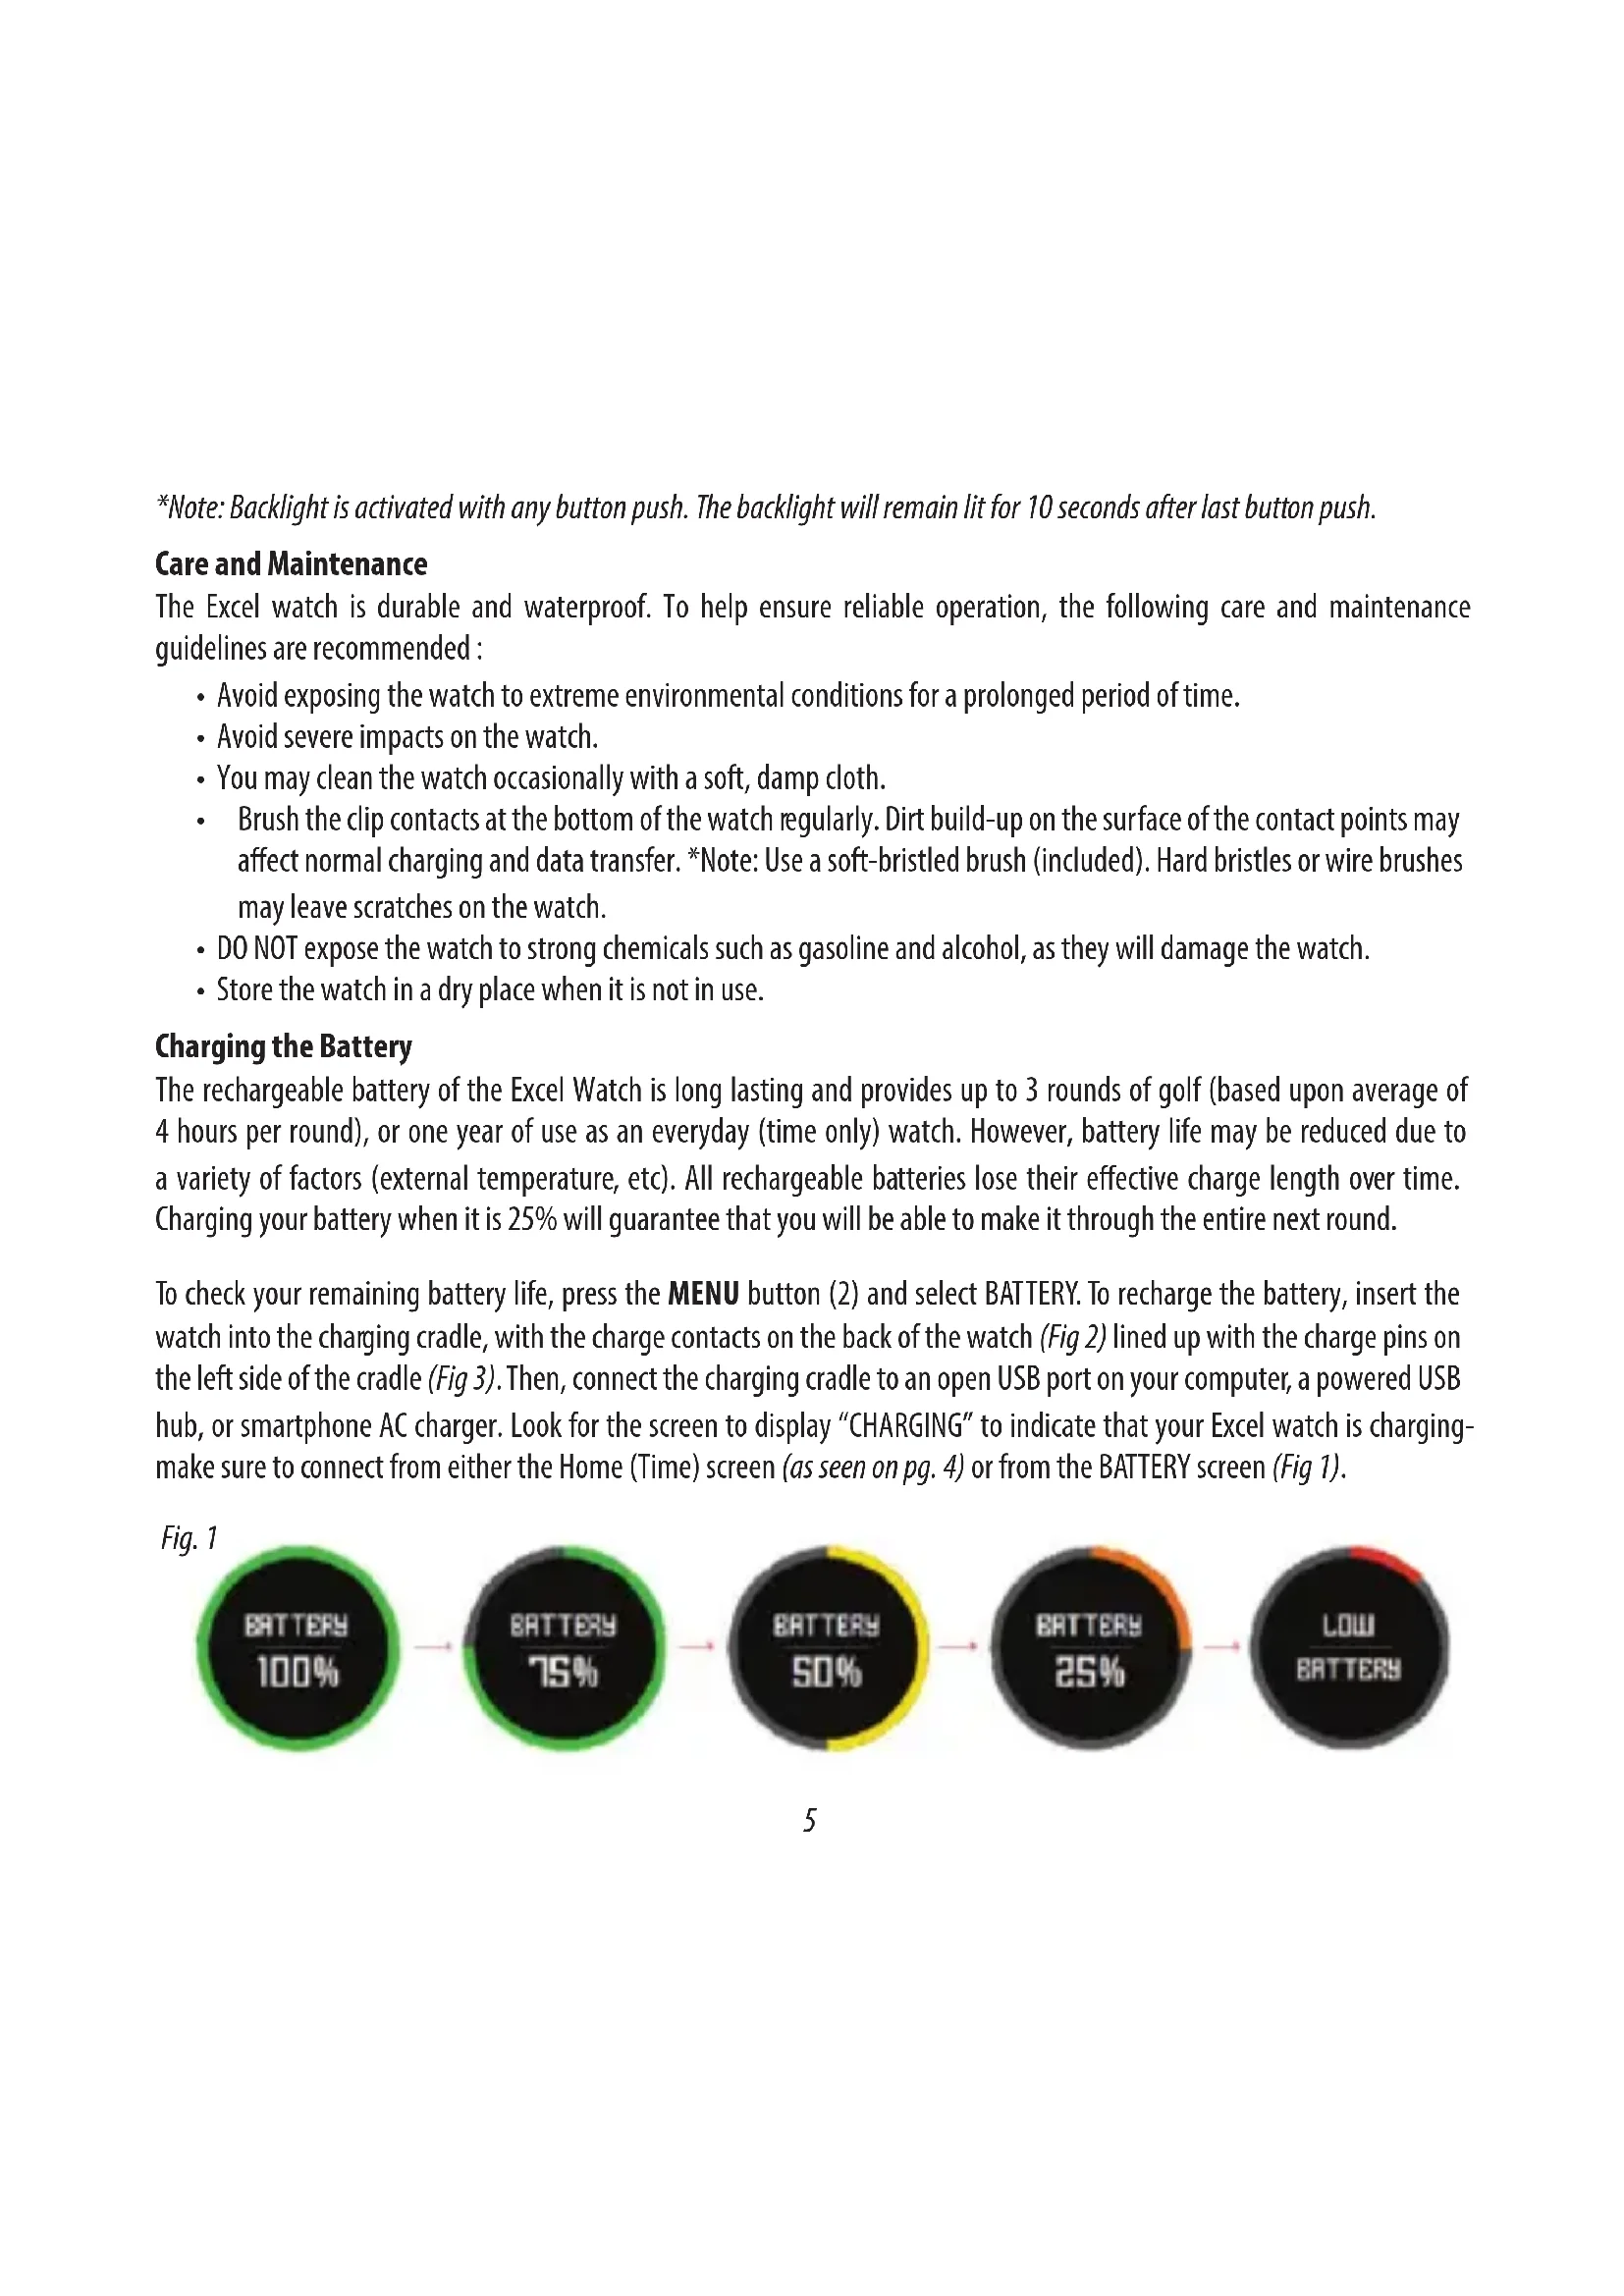
Charging the Battery
The rechargeable battery of the Excel Watch is long lasting and provides up to 3 rounds of golf (based upon average of 4 hours per round), or one year of use as an everyday (time only) watch. However, battery life may be reduced due to a variety of factors (external temperature, etc). All rechargeable batteries lose their effective charge length over time. Charging your battery when it is 25% will guarantee that you will be able to make it through the entire next round.
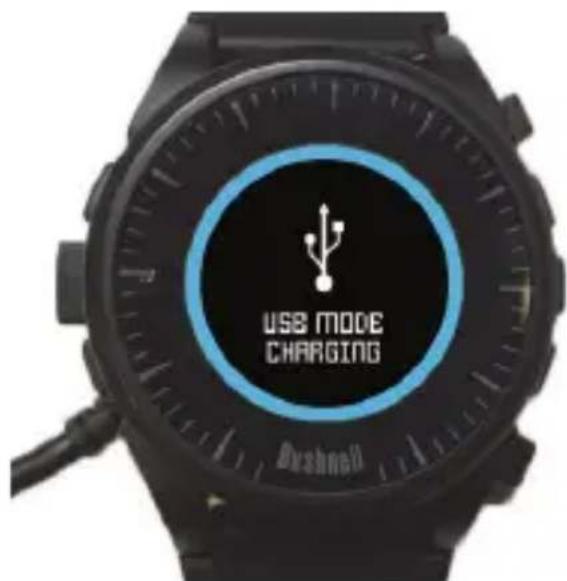
To check your remaining battery life, press the MENU button (2) and select BATTERY. To recharge the battery, insert the watch into the charging cradle, with the charge contacts on the back of the watch (Fig 2) lined up with the charge pins on the left side of the cradle (Fig 3). Then, connect the charging cradle to an open USB port on your computer, a powered USB hub, or smartphone AC charger. Look for the screen to display "CHARGING" to indicate that your Excel watch is charging-make sure to connect from either the Home (Time) screen (as seen on pg. 4) or from the BATTERY screen (Fig 1).
Fig. 1

pie
| Category | Value | | -------------- | ------ | | BATTERY | 100% | | BATTERY | 75% | | BATTERY | 50% | | BATTERY | 25% | | LOW BATTERY | - |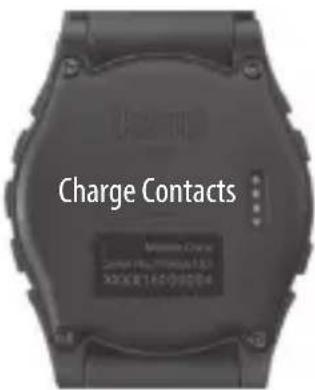
Fig. 2

Fig. 3 Charging Cradle
Package Contents
1 - Bushnell Excel GPS Rangefi nder Watch
1 - Charging Cradle w/USB Cable
1 - Contact Cleaning Brush
1 - User Manual
Band: 22mm width, replacable via T-6 torx screwdriver
Computer Requirements
USB Port
OS: Windows (XP or later), Mac (OS 10.6 or later)
Firmware/Software Updates
Please check www.bushnellgolf.com or www.bushnellgolf.eu periodically for the latest firmware and software releases.
SETTING THE TIME
Set Time by GPS
Watch on Charging Cradle
*To ensure reception, make sure you are outdoors away from tall buildings and trees, with a clear view of the sky. This is the easiest way to set the time. From the TIME Options Menu (Fig. 4), select SET TIME, then select BY GPS from the
SET TIME Menu (Fig. 5). The Excel will acquire GPS signal, and upon GPS Lock, will return to the Home (Time) screen, where the time and the date will be set via your longitude position. When BY GPS is selected (Fig 5), other GPS features (Play Golf, Fitness, GPS Status) will update your time via your longitude position as well, which is convenient for the travelling golfer. *Note: In rare instances, time zone boundaries may conflict. In these cases, it may be necessary to manually adjust the time as detailed in the Set Time Manually section.
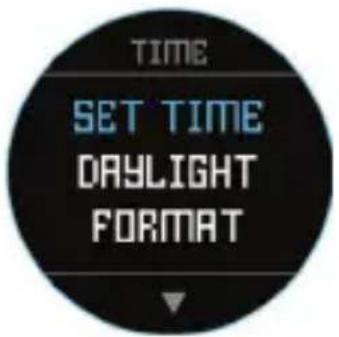
Fig. 4
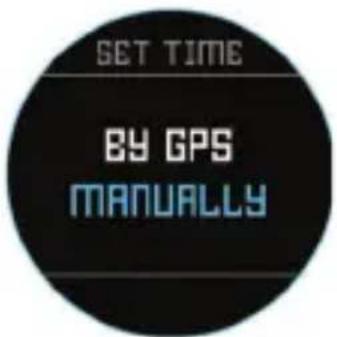
Fig. 5
Set Time Manually
To set the time manually, select MANUALLY from the SET TIME Menu (Fig. 5). Use the SELECT button (4) to cycle between fields. Use the UP button (3) and DOWN button (5) to change the setting of a field. After the year, time and date have been set, you can select the MENU button (2) to return to the TIME Options Menu.
PLAY GOLF MODE
To activate Play Golf Mode, press the GOLF MENU button (1), then select PLAY GOLF (Fig. 6). The Excel will search for a satellite signal, and upon acquisition will yield a list of local course results, with the nearest course at the top. Select your course to view the Front, Center, Back (FCB) screen for Hole 1 (Fig. 7, next page).
*To ensure reception, make sure you are outdoors away from tall buildings and trees, with a clear view of the sky.
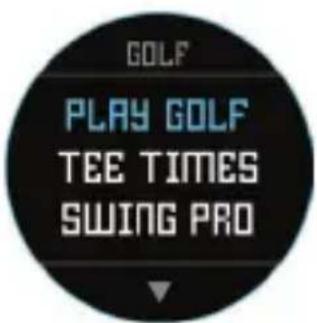
Fig. 6
Button Functions in Play Golf Mode (Fig.7)
Track Shot Distance: This feature allows you to easily check the distance between any two points and would normally be used to measure the length of your shot. Press the SHOT button (1) to set Point A (where you are standing) to "0". After walking to your ball (Point B), the Excel Watch will display the distance between Point A and Point B in a straight line (Fig. 8).
View Golf Menu Options: Press the MENU button (2) to view the Golf Menu options (SWING PRO, CHANGE COURSE, BATTERY, or EXIT ROUND). Press MENU again to return to your game.
Manual Hole Advance: Press NEXT HOLE (3) to manually advance to the next hole, or press PREVIOUS HOLE (5) to manually go back to the previous hole. *Note: the Excel does feature auto-advance; this one button advance feature is very useful for shotgun starts.
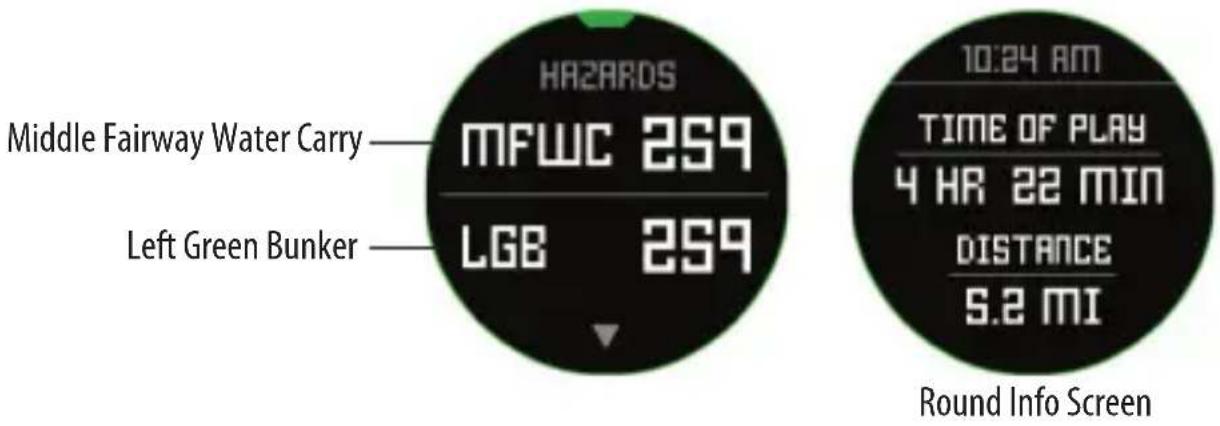
View Hazards/Round Information: Pressing the SELECT Button (4) will toggle between 1 or 2 Hazards screens, Round Info, and the FCB (Front, Center, Back) pages (Fig. 8a). Hazard and Round Info screens will automatically return to FCB after 7 seconds if no other button is pushed. See the list on page 8 for a complete glossary of Hazard definitions. Round Info is a Golf Odometer that tracks total round time and distance travelled.
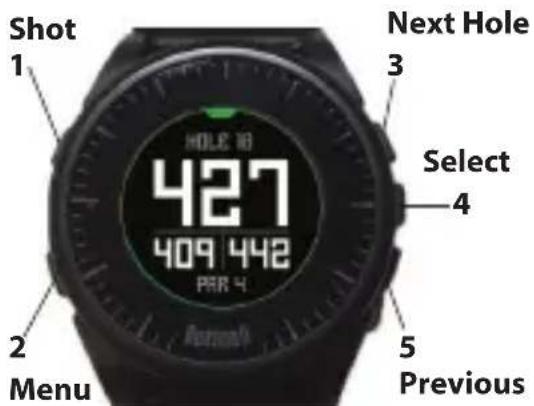
Fig. 7
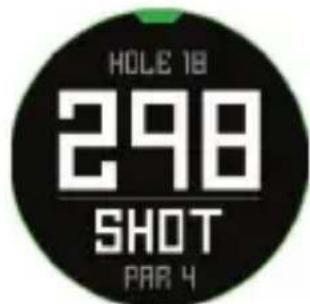
Fig. 8
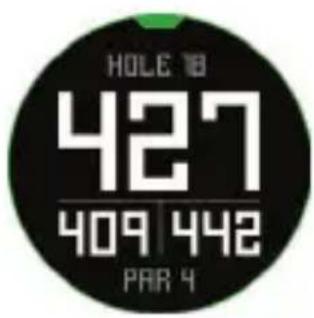
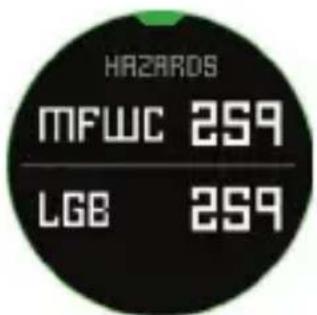
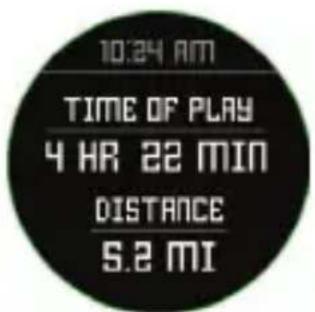
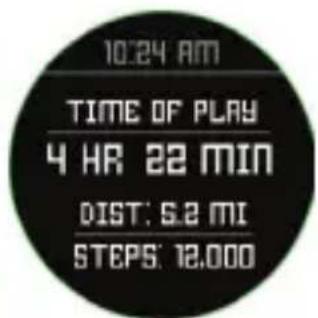
Fig. 8a
GOLF MENU OPTIONS
From the Time screen, pressing the Golf button will display Golf Menu options (PLAY GOLF, TEE TIME, SWING PRO, SETUP).
Tee Time
The Tee Time function allows the user to schedule and store multiple Tee Times on their device. A Tee Time can be set from both the watch and the app. The watch will display up to 7 Tee Times, while the App can store as many as the user schedules.
When a Tee Time is scheduled through the app and synced with your watch, at 10 minutes prior to start time, the user will get a Tee Time notification on their connected device. 7 minutes prior to scheduled start time, the watch will automatically begin searching for satellites. Once a GPS fix is established the watch will automatically select the golf course that was chosen by the user when creating the Tee Time on the App. If Tee Time is created manually on the watch, only the Date and Time can be specified, and the watch will only display the nearest courses upon GPS fix. A flag icon ( ) will appear on the time screen when a Tee Time is set.
Swing Pro
The Swing Pro feature allows the user to monitor the swing speed and swing tempo. When the watch is on the Swing Pro screen, the user will first select the club. Then the watch will continue to monitor and automatically display the last swing measurement. If the watch is connected to the mobile app, the swing data will be uploaded to the connected mobile device after each swing. The app on the mobile device displays and stores the swing data. The watch will continue to use the Swing Pro function until the user exits out of the Swing Pro screen (Fig. 11).
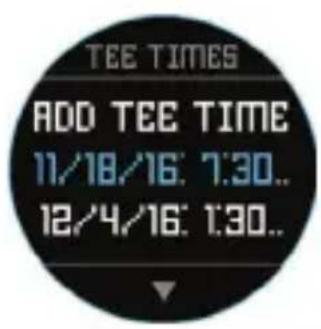
Fig. 9a
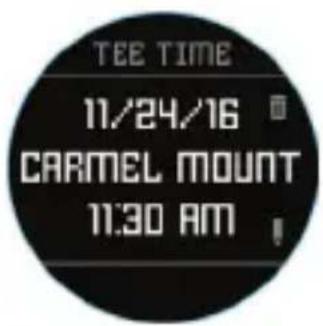
Fig. 9b
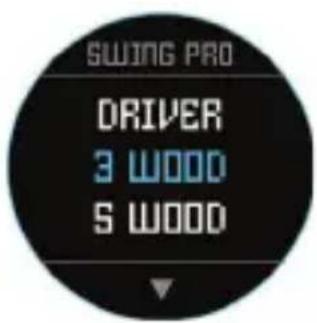
Fig. 10
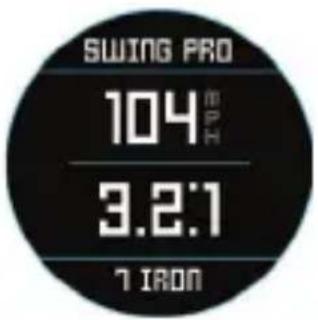
Fig. 11
GOLF SETUP
The SETUP Menu (Fig. 10) allows you to set your preferences for units of measurement in Play Golf mode (Yards or Meters), set the Auto-Off time, Configure the Pedometer for during Play Golf mode, and to view the battery charge level. To access the Setup Menu, Select SETUP from the GOLF Menu (Fig. 6). Use the UP Button (3) and the DOWN Button (5) to scroll between options. Use the SELECT Button (4) to select the desired option.
Golf Setup: Yards or Meters (Golf Preference)
Select YDS/M to set your preference for unit of measurement in Play Golf Mode. Use the UP Button (3) or the DOWN Button (5) to highlight YARDS or METERS. Use the SELECT Button (4) to confirm the selected option.
Golf Setup: Auto-Off
The Auto-Off feature is designed to automatically exit Play Golf mode when the preset time has expired. When in Play Golf mode, after the preset time has expired, the watch will automatically exit the round and return to the Home (Time) screen to preserve battery life.
To set the Auto-Off time, select AUTO-OFF from the Golf/Setup Menu. From the set AUTO-OFF screen (Fig. 12), use the UP Button (3) and the DOWN Button (5) to toggle the time up and down. Auto-Off is always set to whatever current time duration is showing on the set AUTO-OFF page. Time can be set between 1.5 and 9 hours, or press UP or DOWN once more at either end of the time range to select DISABLE and turn the feature off.
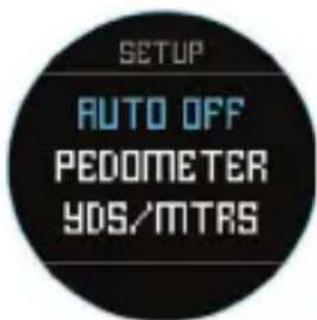
Fig. 12a
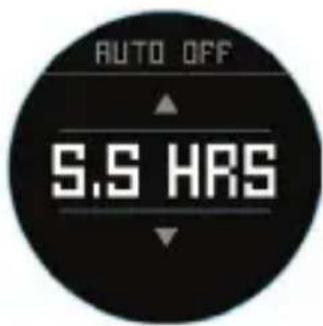
Fig. 12b
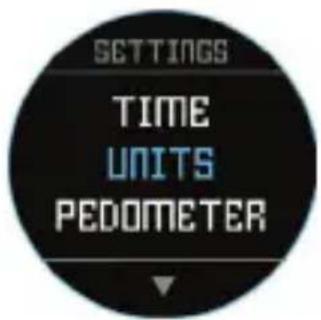
Fig. 13 Fig. 14

Golf Setup: Pedometer
For the pedometer to be active during Play Golf, the pedometer must be turned on from this menu.
MAIN MENU ITEMS
From the Time screen, pressing the MENU button will display the MAIN MENU options. The MAIN MENU provides access to the functions of: Pedometer, Fitness, Weather, Time functions, and Settings.
Main Menu: Pedometer
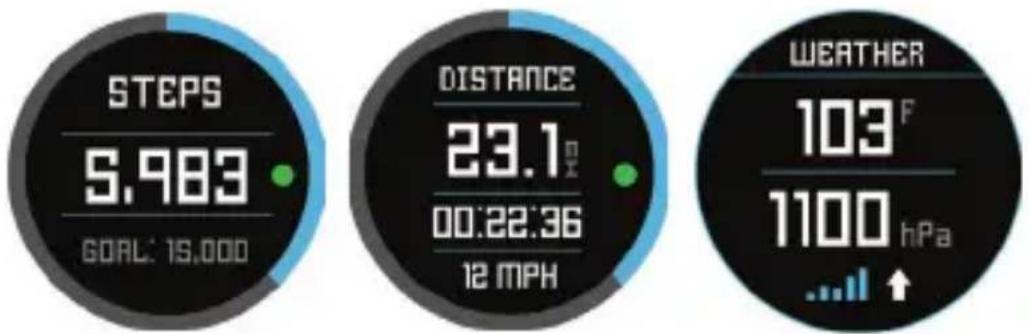
In order to track steps taken, the Excel Golf Watch supports a pedometer. This uses an internal accelerometer to track the number of steps taken. Once enabled, the pedometer screen can be accessed from the Time screen using the down button. In order for the Pedometer to be active during Play Golf, the Pedometer (Fig. 15) must be enabled from the Golf menu. The Pedometer goal is the target number of steps. The goal can be set in increments of 1000 from 1,000 to 99,000 steps. The Pedometer goal is set in the Menu – Settings section. The Pedometer goal may also be configured from the smartphone app.
Main Menu: Fitness
The Excel golf watch supports an odometer to track the distance traveled, time elapsed, and speed. Fitness uses GPS for its location. Once enabled, the Fitness screen can be accessed from the Time screen using the down button (Fig. 16).
other
| Metric | Value | | :--- | :--- | | STEPS | 5,983 | | GOAL | 15,000 | | DISTANCE | 23.1 m | | 00:22:36 | 12 MPH | | WEATHER | 103 F | | 1100 hPa | ↑ |Fig. 15 Fig. 16 Fig. 17
Main Menu: Weather
The Excel GolfWatch supports Weather Mode which provides temperature and pressure readings (Fig. 17).
Notes:
- The Excel Golf Watch is not intended as a substitute for a precision weather instrument
- Sudden changes in temperature can affect pressure readings which can introduce errors to the readings
- Body temperature, direct sunlight and GPS being active will affect the temperature readings.
- To more accurately measure temperature, remove watch, place in a well ventilated area out of direct sunlight for 20–30 mins before taking measurement.
Main Menu: Timing related functions
The Main MENU provides access to other watch related functions such as alarm, stopwatch, and timer.
Main Menu: Battery
The battery level can be read from the Main MENU.
Main Menu: Settings
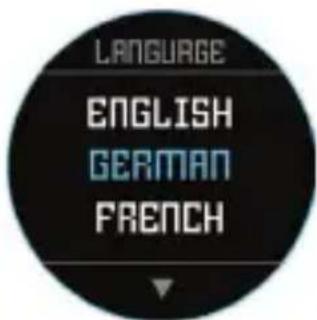
The Main Menu provides a SETTINGS menu (Fig. 13) to allow the user to configure the golf watch. Within the SETTINGS menu is the capability to set the time and time format, set the units, turn Bluetooth on/off and Pair with a mobile device, configure the clock screen, set the language, turn the sound on/off, check the GPS status and check the software version number.
Language Settings
The Excel Golf Watch features 5 language settings (English, German, French, Spanish and Italian). By default, the user interface is in English. To change the language setting, press the MENU Button (2), then use the UP Button or the DOWN Button to scroll to "SETTINGS." Press the SELECT Button to select "SETTINGS," then use the UP Button or the DOWN Button to scroll to "LANGUAGE" (Fig. 13) and select it using the SELECT Button. Use the UP Button or the DOWN Button to scroll between options on the Language menu (Fig. 14), then press the SELECT Button to set your preferred (highlighted) language.
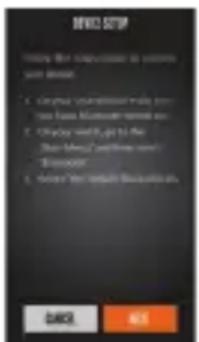
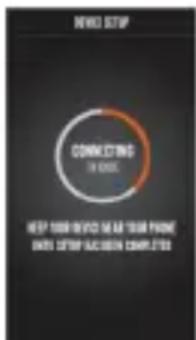
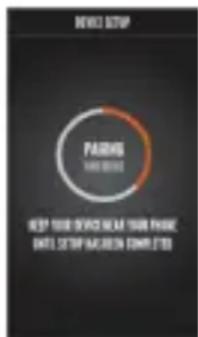
BLUETOOTH SETTINGS
The Excel Golf Watch can connect to the smartphone app via Bluetooth. Once connected the Excel Golf Watch can receive text, email, phone, calendar, and Tee Time alerts. Further the smartphone app can configure the Excel GolfWatch, display Fitness data and Swing Pro data.
The smartphone app can be obtained from the Apple Store and Google Play store for iPhone and Android devices, respectively. Download and install the app on the mobile device. Go to the mobile devices' settings page to turn on Bluetooth, then launch the app.
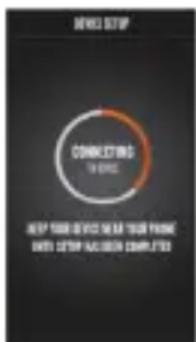
To connect your watch to the smartphone app follow the steps below:
- On your smartphone, make sure you have Bluetooth turned on.
- On your watch, go to the "Main Menu" and then select "Bluetooth" (Fig. 18).
- Select "Yes" to turn Bluetooth on.
- Your watch will then give you a code. Enter that code into the smartphone app when requested.
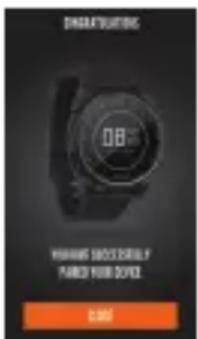
- Once paired correctly, your smartphone app will display a confirmation. The device is now paired with your smartphone.

Fig. 18

Alert Messages
Once the Excel GolfWatch is paired to the mobile device, the golf watch can receive alert messages. The various messages to be received can be configured in the smartphone app under the My Device Settings tab.
The Excel Golf Watch will only receive alerts from the mobile device while the app is running.
iGolf Hazard Glossary
Hazards within the iGolf application are shown as abbreviations. These abbreviations are defined as follows:
- LFB- Left Fairway Bunker
- MFB- Middle Fairway Bunker
- RFB- Right Fairway Bunker
- LFW- Left Fairway Water Layup
- LFWC- Left Fairway Water Carry
- MFW- Middle Fairway Water Layup
- MFWC- Middle Fairway Water Carry
- RFW- Right Fairway Water Layup
- RFWC- Right Fairway Water Carry
- FGB- Front Green Bunker
- RGB- Right Green Bunker
- LGB- Left Green Bunker
- BGB-Back Green Bunker
- RGW- Right Green Water
-
FGWC- Front Green Water Carry
-
FGW- Front Green Water Layup
- LGW- Left Green Water
- BGW- Back Green Water
- CRK- Creek Layup
- CRKC- Creek Carry
- EOF- End of Fairway
The Excel will provide up to 4 hazard callouts per hole. Press the SELECT Button to cycle between FCB, Hazards (up to 2 screens) & the Round Info Odometer.

WARNING
Do not attempt to open the Excel watch. Risk of explosion if battery is replaced with incorrect type.
- Do not attempt to open, disassemble, or service the device. There are no customer serviceable items in the unit.
- The device contains a rechargeable lithium ion battery. Lithium ion batteries can explode or catch fire if not handled correctly.
- Do not attempt to open, disassemble, or service the internal battery. The battery must be replaced by a qualified technician.
- Do not crush, puncture or short the battery's external contacts.
- Do not expose the device to temperatures above 140deg. F (60deg C). Do not leave unit in a hot car.
- Do not expose the device to high moisture surroundings.
- To store the unit for long time, discharge to 50% capacity, then store in a dry and low temperature place. Charge the unit every 3 months.
- If using a car charger, disconnect the device while starting the car.
- Properly recycle or dispose of device. Do not dispose in fire or water.
Legal Disclaimer
By using this product, you agree that Bushnell Outdoor Products will not be held legally responsible for any injury or damage to you or any person or property caused by the user's improper operation and/or poor judgment while using this product. Note: See Limited Warranty for other limitations to our liability.
Additional Information
The Global Positioning System (GPS), a network of 32 satellites orbiting Earth, is operated and maintained by the U.S. government. This GPS device requires at least 3 satellites to be acquired to accurately determine your position. Any change made to the system by the government could affect the accuracy and performance of this product.
Bushnell Golf GPS Website
www.bushnellgolf.com or www.bushnellgolf.eu is the best online resource for all our Golf GPS product owners, including product support, FAQs, etc. It also serves as a portal to access iGolf.com GPS course files to use with these Bushnell products. Registering your Excel Watch via www.bushnell.igolf.com is not required, but will ensure you have access to the latest updated GPS course data.
ONE YEAR LIMITED WARRANTY
Your Bushnell ^® product is warranted to be free of defects in materials and workmanship for one year after the date of purchase. In the event of a defect under this warranty, we will, at our option, repair or replace the product, provided that you return the product postage prepaid. This warranty does not cover damages caused by misuse, improper handling, installation, or maintenance provided by someone other than a Bushnell Authorized Service Department.
Any return made under this warranty must be accompanied by the items listed below:
- A check/money order in the amount of \$10.00 to cover the cost of postage and handling.
- Name, address and daytime phone # for product return.
- An explanation of the defect.
- Copy of your dated proof of purchase.
Do not send in accessories (batteries, SD cards, cables), only the product for repair.
Product should be well packed in a sturdy outside shipping carton to prevent damage in transit, and shipped to the address listed below:
IN U.S.A. Send To: IN CANADA Send To:
Bushnell Outdoor Products
Bushnell Outdoor Products
Attn.: Repairs Attn.: Repairs
9200 Cody 140 Great Gulf Drive, Unit # B
Overland Park, Kansas 66214 Vaughan, Ontario L4K 5W1
For products purchased outside the United States or Canada please contact your local dealer for applicable warranty information. In Europe you may also contact Bushnell at: Bushnell Germany GmbH
European Service Centre
Mathias-Brüggen-Str. 80
D-50827 Köln
GERMANY
This warranty gives you specific legal rights.
You may have other rights which vary from country to country.
©2017 Bushnell Outdoor Products
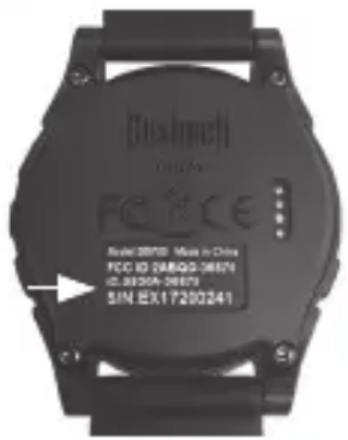
NOTE: Your Bushnell Golf GPS Rangefinder Watch should have a sticker with serial number on the outer package and on the product (see below). These serial numbers are used to ensure you are purchasing the unit from an authorized dealer. If you are unable to locate this sticker or if the serial number has been obscured, the product may not be authentic (counterfeit) or it may not have been purchased through an authorized dealer. In either case, Bushnell will not honor warranties on these products. You should return the unit to the seller for a refund, and purchase your GPS rangefinder from an alternate location.
For a list of authorized dealers, please visit www.bushnellgolf.com.

Serial # sticker on packaging
Serial # sticker on product
Disposal of Electric and Electronic Equipment
(Applicable in the EU and other European countries with separate collection systems)
This equipment contains electric and/or electronic parts and must therefore not be disposed of as normal household waste. Instead, it should be disposed at the respective collection points for recycling provided by the communities. For you, this is free of charge.
If the equipment contains exchangeable (rechargeable) batteries, these too must be removed before and, if necessary, in turn be disposed of according to the relevant regulations (see also the respective comments in this unit's instructions).
Further information about the subject is available at your community administration, your local waste collection company, or in the store where you purchased this equipment.
natural_image
Simple line drawing of a trash bin with crossed lines indicating no waste or discharge (no text or symbols)FCC NOTE
This device complies with Part 15 of the FCC Rules. Operation is subject to the following two conditions: (1) This device may not cause harmful interference, and (2) this device must accept any interference received, including interference that may cause undesired operation.
This equipment has been tested and found to comply with the limits for a Class B digital device, pursuant to Part 15 of the FCC Rules. These limits are designed to provide reasonable protection against harmful interference in a residential installation. This equipment generates, uses and can radiate radio frequency energy and, if not installed and used in accordance with the instructions, may cause harmful interference to radio communications. However, there is no guarantee that interference will not occur in a particular installation. If this equipment does cause harmful interference to radio or television reception, which can be determined by turning the equipment off and on, the user is encouraged to try to correct the interference by one of the following measures:
- Reorient or relocate the receiving antenna.
- Increase the separation between the equipment and receiver.
- Connect the equipment into an outlet on a circuit different from that to which the receiver is connected.
- Consult the dealer or an experienced radio/TV technician for help.
Shielded interface cable must be used with the equipment in order to comply with the limits for a digital device pursuant to Subpart B of Part 15 of FCC Rules.
FCC Caution: Any changes or modifications not expressly approved by the party responsible for compliance could void the user's authority to operate this equipment.
This transmitter must not be co-located or operating in conjunction with any other antenna or transmitter.
Radiation Exposure Statement:
The product complies with the FCC portable RF exposure limit set forth for an uncontrolled environment and is safe for the intended operation as described in this manual. Further RF exposure reduction can be achieved if the product can be kept as far as possible from the user's body or when set to lower output power if such function is available.

Industry Canada Statement
This device complies with ISED's licence-exempt RSSs. Operation is subject to the following two conditions: (1) This device may not cause harmful interference, and (2) this device must accept any interference received, including interference that may cause undesired operation.
Radiation Exposure Statement:
This device complies with the Industry Canada portable RF exposure limit set forth for an uncontrolled environment and is safe for the intended operation as described in this manual. Further RF exposure reduction can be achieved if the product can be kept as far as possible from the user's body or if the device is set to a lower output power if such function is available.
Fig. 5
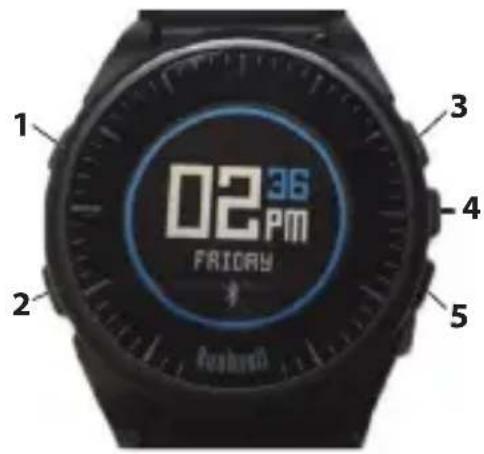
Fig. 9b
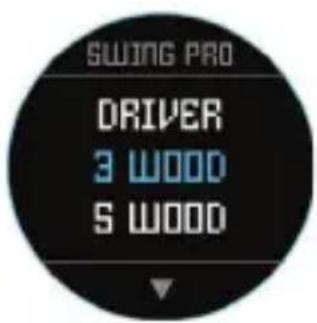
Fig. 10
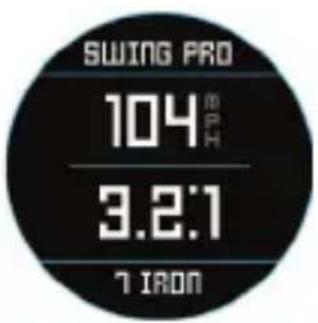
Fig. 11
CONFIG
Fig. 12a

Fig. 12b
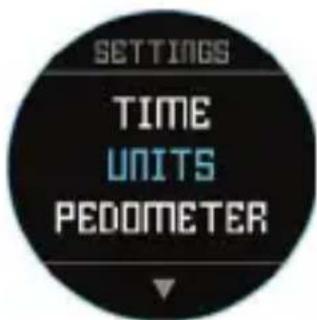
Fig. 13 Fig. 14

other
| Metric | Value | | :--- | :--- | | STEPS | 5,983 | | GOAL | 15,000 | | DISTANCE | 23.1 m | | 00:22:36 | 12 MPH | | WEATHER | 103 F | | 1100 hPa | ↑ |Fig. 15 Fig. 16 Fig. 17
MENU PRINCIPAL : MÉTÉO
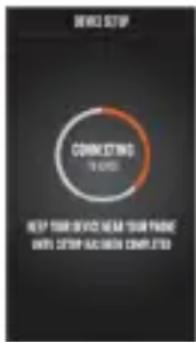

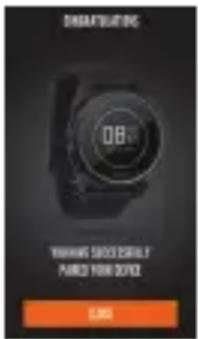
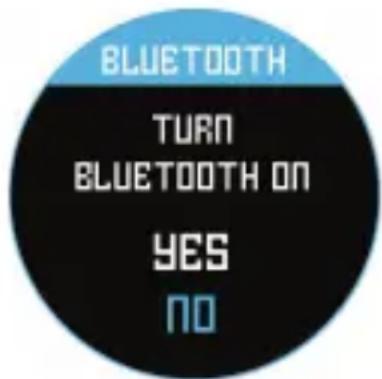
Fig. 18
Messages d'alerte
- LFB – Bunker Fairway Gauche
- MFB – Bunker Fairway Milieu
- RFB – Bunker Fairway Droite
- LFW – Layup Eau Fairway Gauche
- LFWC – Carry Eau Fairway Gauche
- MFW – Layup Eau Fairway Milieu
- MFWC – Carry Eau Fairway Milieu
- RFW – Layup Eau Fairway Droite
- RFWC – Carry Eau Fairway Droite
- FGB – Bunker Devant Green
- RGB – Bunker Green Droite
- LGB – Bunker Green Gauche
- BGB – Bunker Green Fond
- RGW – Eau Green Droite
-
FGWC – Carry Eau Devant Green
-
FGW – Layup Eau Devant Green
- LGW – Eau Green Gauche
- BGW – Eau Fond Green
- CRK – Layup Ruisseau
- CRKC – Carry Ruisseau
- EOF – Fin Fairway
Bushnell Outdoor Products
Attn.: Repairs Attn.: Repairs
9200 Cody 140 Great Gulf Drive, Unit # B
Overland Park, Kansas 66214 Vaughan, Ontario L4K 5W1
Bushnell
Outdo
©2017 Bushnell Outdoor Products
natural_image
Symbol of a trash bin crossed out by two crossed lines, with a solid black rectangle below (no text or labels)
Industry Canada Statement
Fig. 5
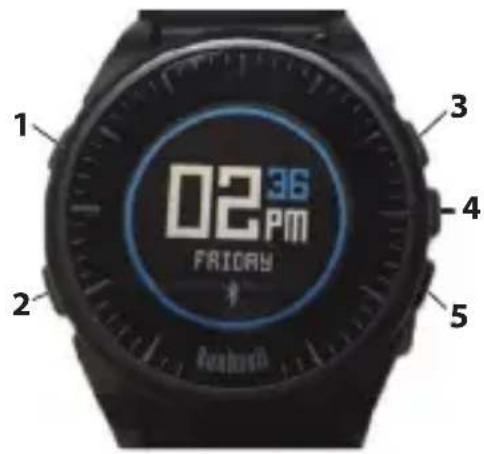
Fig. 9b
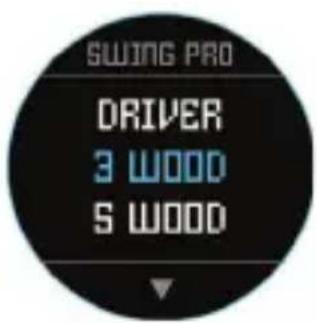
Fig. 10
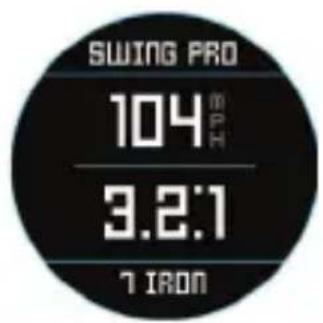
Fig. 11
GOLF SETUP
Golf Setup: yardas o metros (Golf Preference)
Fig. 12a

Fig. 12b

Fig. 13 Fig. 14
Golf Setup: Podómetro
other
| Metric | Value | | :--- | :--- | | STEPS | 5,983 | | GOAL | 15,000 | | DISTANCE | 23.1 m | | 00:22:36 | 12 MPH | | WEATHER | 103 F | | 1100 hPa | ↑ |Fig. 15 Fig. 16 Fig. 17
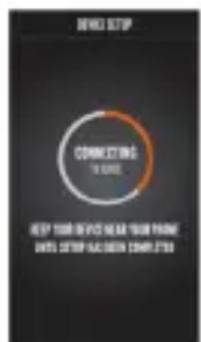

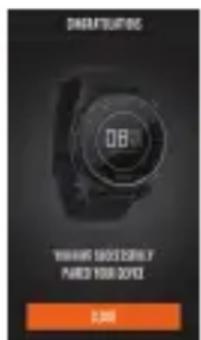
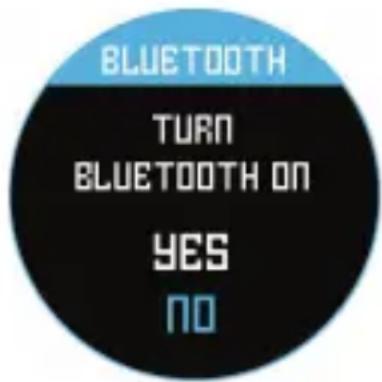
Fig. 18
Mensajes de alerta
Bushnell Outdoor Products
9200 Cody 140 Great Gulf Drive, Unit # B
Overland Park, Kansas 66214 Vaughan, Ontario L4K 5W1
Bushnell
Outdo
European Service Centre
Mathias-Brüggen-Str. 80
D-50827 Colonia
GERMANY
©2017 Bushnell Outdoor Products
natural_image
Simple line drawing of a trash bin with crossed lines indicating no waste or discharge (no text or symbols)
Abb. 5
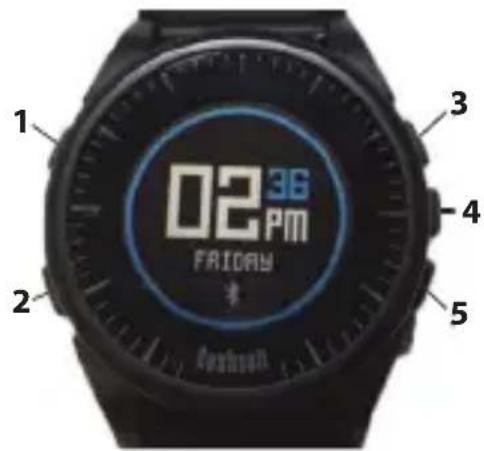
Abb. 9b
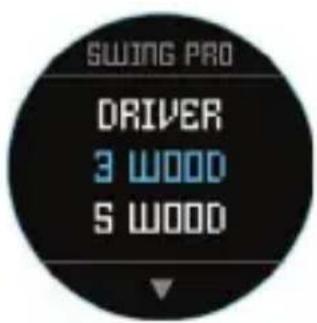
Abb. 10
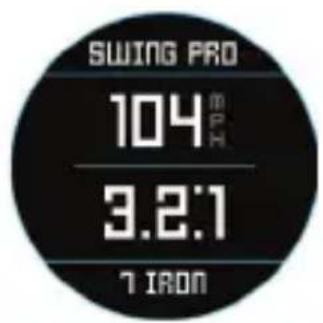
Abb. 11
GOLF SETUP
Abb. 12a
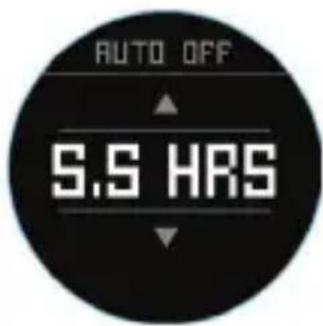
Abb. 12b

Abb. 13 Abb. 14

Golf Setup: Pedometer
other
| Metric | Value | |---|---| | STEPS | 5,983 | | GORL | 15,000 | | DISTANCE | 23.1 m/s | | 00:22:36 | 12 MPH | | WEATHER | 103 F | | 1100 hPa | ↑ |Abb. 15 Abb. 16 Abb. 17
Main Menu: Weather
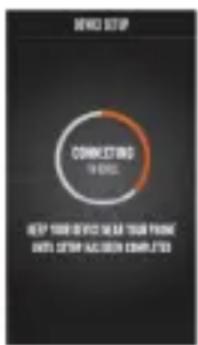

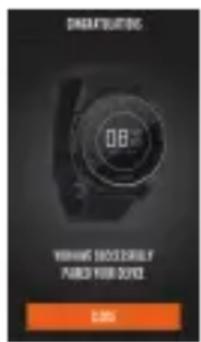
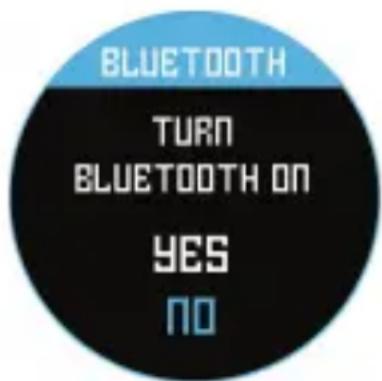
Abb. 18
Warnmeldungen
Bushnell Outdoor Products
Attn.: Repairs Attn.: Repairs
9200 Cody 140 Great Gulf Drive, Unit # B
Overland Park, Kansas 66214 Vaughan, Ontario L4K 5W1
Bushnell
Outdo
European Service Centre
Mathias-Brüggen-Str. 80
D-50827 Köln
GERMANY
©2017 Bushnell Outdoor Products
natural_image
Symbol of a trash bin crossed with two crossed lines and a horizontal bar below (no text or labels)
ITALIANO
Fig. 5
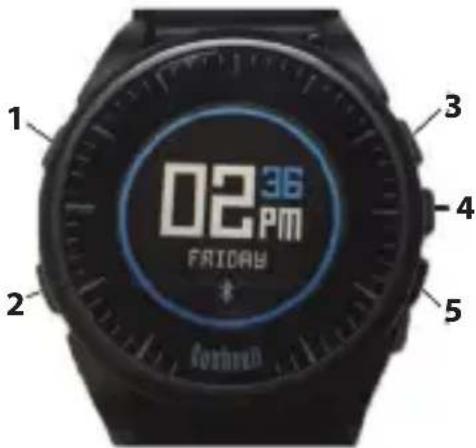
Fig. 9b
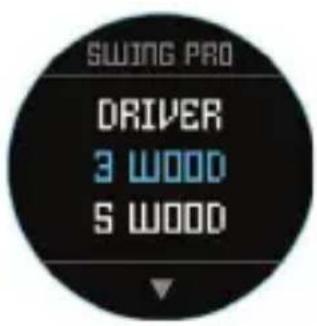
Fig. 10
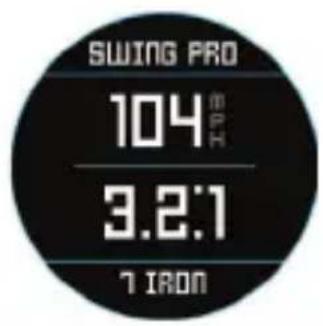
Fig. 11
CONFIGURAZIONE GOLF
Fig. 12a

Fig. 12b

Fig. 13 Fig. 14

Bushnell Outdoor Products
Recapito in CANADA:
Bushnell Outdoor Products
Attn.: Repairs Attn.: Repairs
9200 Cody 140 Great Gulf Drive, Unit # B
Overland Park, Kansas 66214 Vaughan, Ontario L4K 5W1
European Service Centre
Mathias-Brüggen-Str. 80
D-50827 Köln
GERMANY
©2017 Bushnell Outdoor Products
natural_image
Simple line drawing of a trash bin with crossed lines indicating no waste or discharge (no text or symbols)
Bushnell®
GOLF

User Manual
Customer Service: (800) 423-3537
www.bushnellgolf.com
©2017 Bushnell Outdoor Products