BackTrack DTour - Smartwatch BUSHNELL - Free user manual and instructions
Find the device manual for free BackTrack DTour BUSHNELL in PDF.
| Product Type | GPS Hiking Smartwatch |
| Brand | Bushnell |
| Model | BackTrack DTour |
| Power | 3 AAA batteries (lithium or alkaline, do not mix) |
| Display | LCD screen with backlight (30 seconds) |
| Main functions | Location marking (up to 10), route recording (up to 48h), digital compass, altimeter, thermometer, direction and distance indicator |
| GPS accuracy | ±3 to 5 meters (yards) |
| Connectivity | USB port for data transfer to computer |
| Included software | D-Tour Application (requires Adobe Air) for map visualization (4 types) |
| Storage | Up to 48 hours of route data |
| Auto shut-off | After 10 minutes of inactivity (except Route mode) |
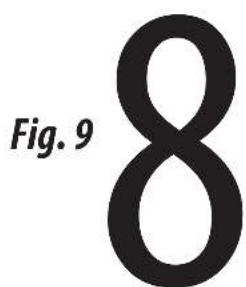
| Compass calibration | Perform a figure-eight motion |
| Compatibility | Windows and Mac |
| Box contents | D-Tour device, USB cable, quick start guide |
| Maintenance and cleaning | Wipe with a soft, dry cloth. Do not use solvents. |
| Safety | Pedestrian use only. Do not use while driving. Do not use for aerial navigation or precise surveying. |
| Warranty | 1 year against defects in materials and workmanship |
| Recycling | Do not dispose with household waste. Remove batteries and recycle separately. |
Frequently Asked Questions - BackTrack DTour BUSHNELL
User questions about BackTrack DTour BUSHNELL
0 question about this device. Answer the ones you know or ask your own.
Ask a new question about this device
Download the instructions for your Smartwatch in PDF format for free! Find your manual BackTrack DTour - BUSHNELL and take your electronic device back in hand. On this page are published all the documents necessary for the use of your device. BackTrack DTour by BUSHNELL.
USER MANUAL BackTrack DTour BUSHNELL
Bushnell®
BACK&TRACK
…D·TOUR
RECORD YOUR TRACK ▶ FIND YOUR WAY BACK
Instruction Manual
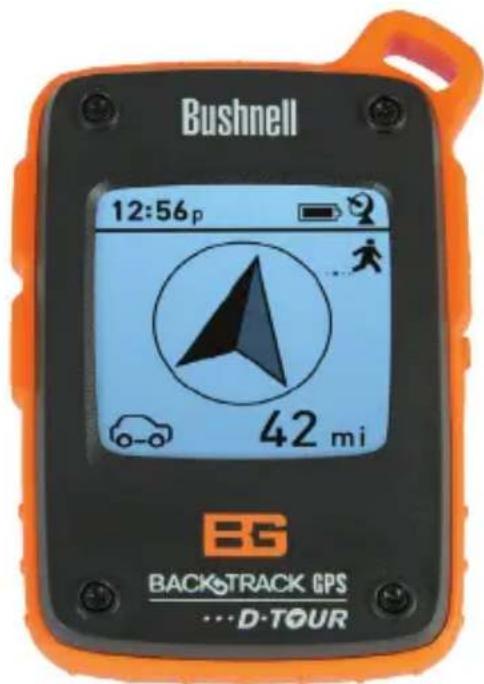
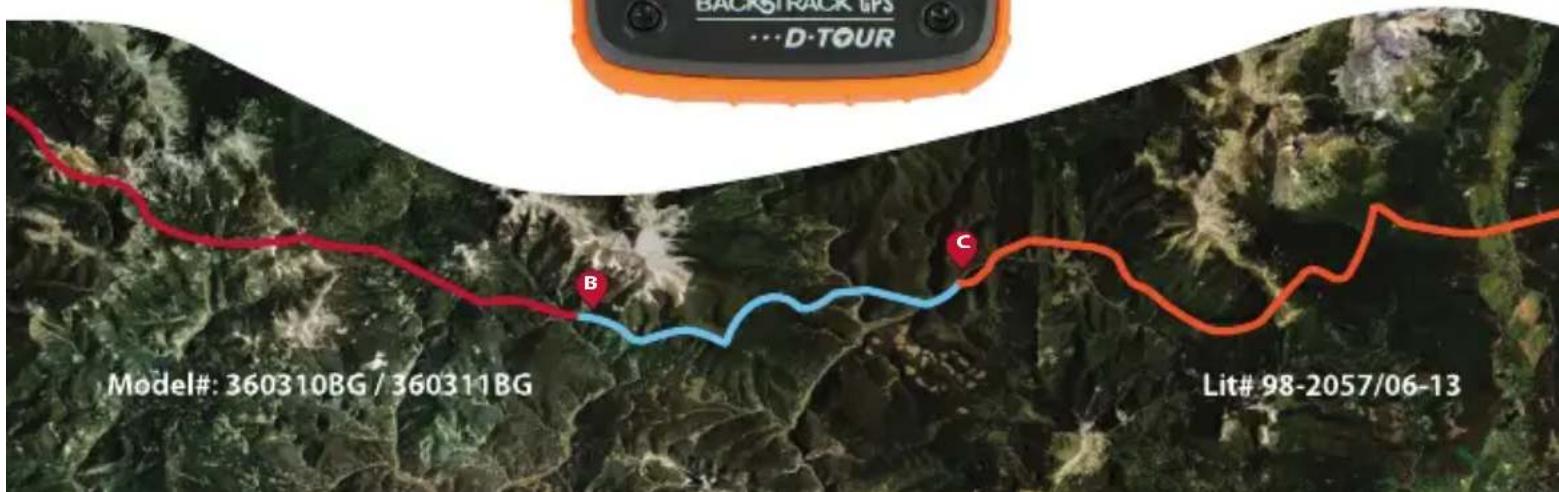
TABLE OF CONTENTS PAGE #
ENGLISH 3-13
FRANÇAIS 14-24
ESPAÑOL 25-35
DEUTSCH 36-46
ITALIANO 47-57
ENGLISH
Control & Display Guide
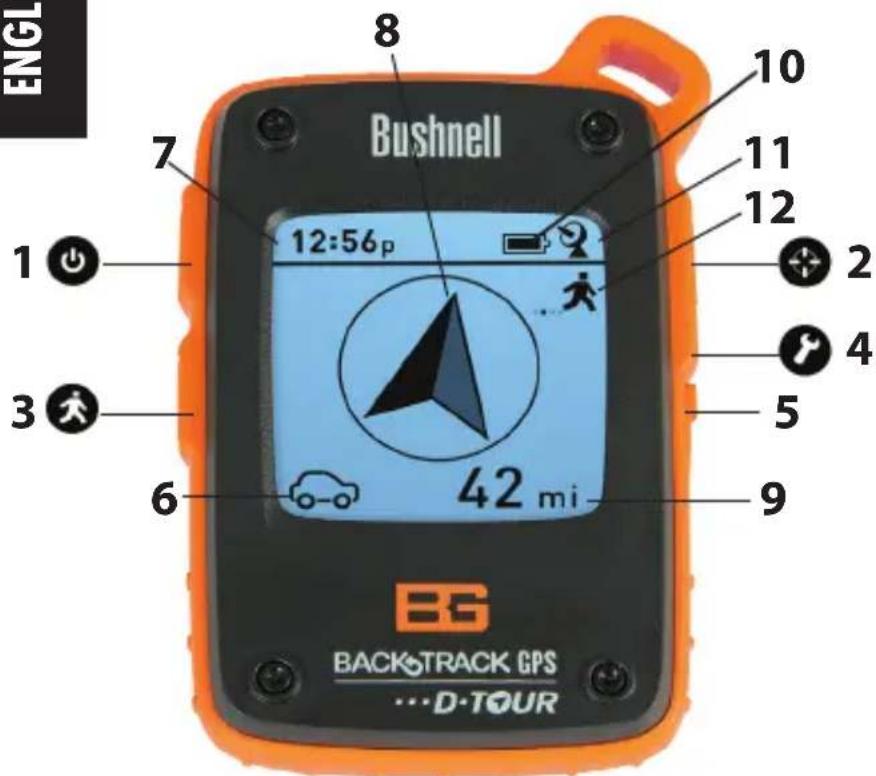
FRONT VIEW
- POWER Button
- MARK Button
- TRIP Button
- SETUP Button
- USB Port
- Location Icon (1 of 5)
- Local Time
- Direction to Location
- Distance to Location
- Battery Level Indicator
- Satellite Lock Icon
- Trip Icon
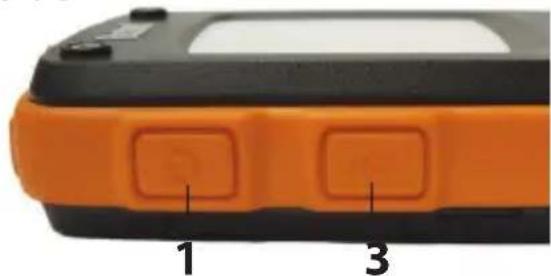
Left Side
natural_image
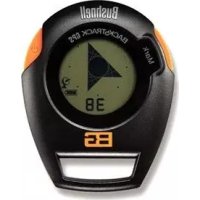
Close-up of an orange and black electronic device with two labeled buttons (1 and 3), no visible text or symbols beyond labels.SIDE & BACK VIEWS
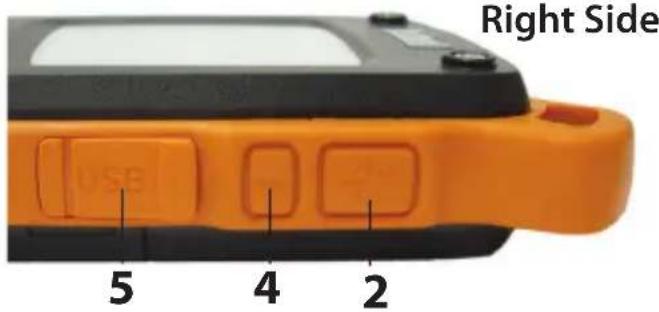
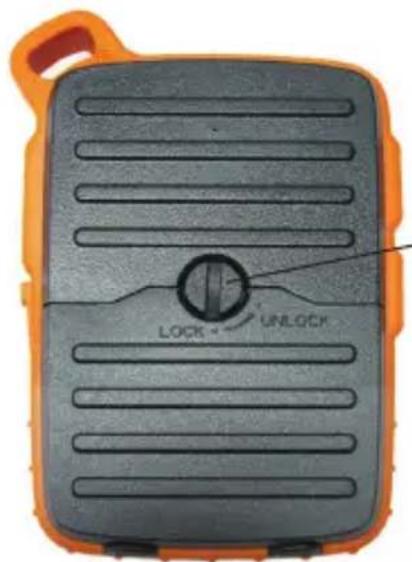
Fig. 1
Battery
Cover
Lock
Note: Serial # is inside battery compartment.
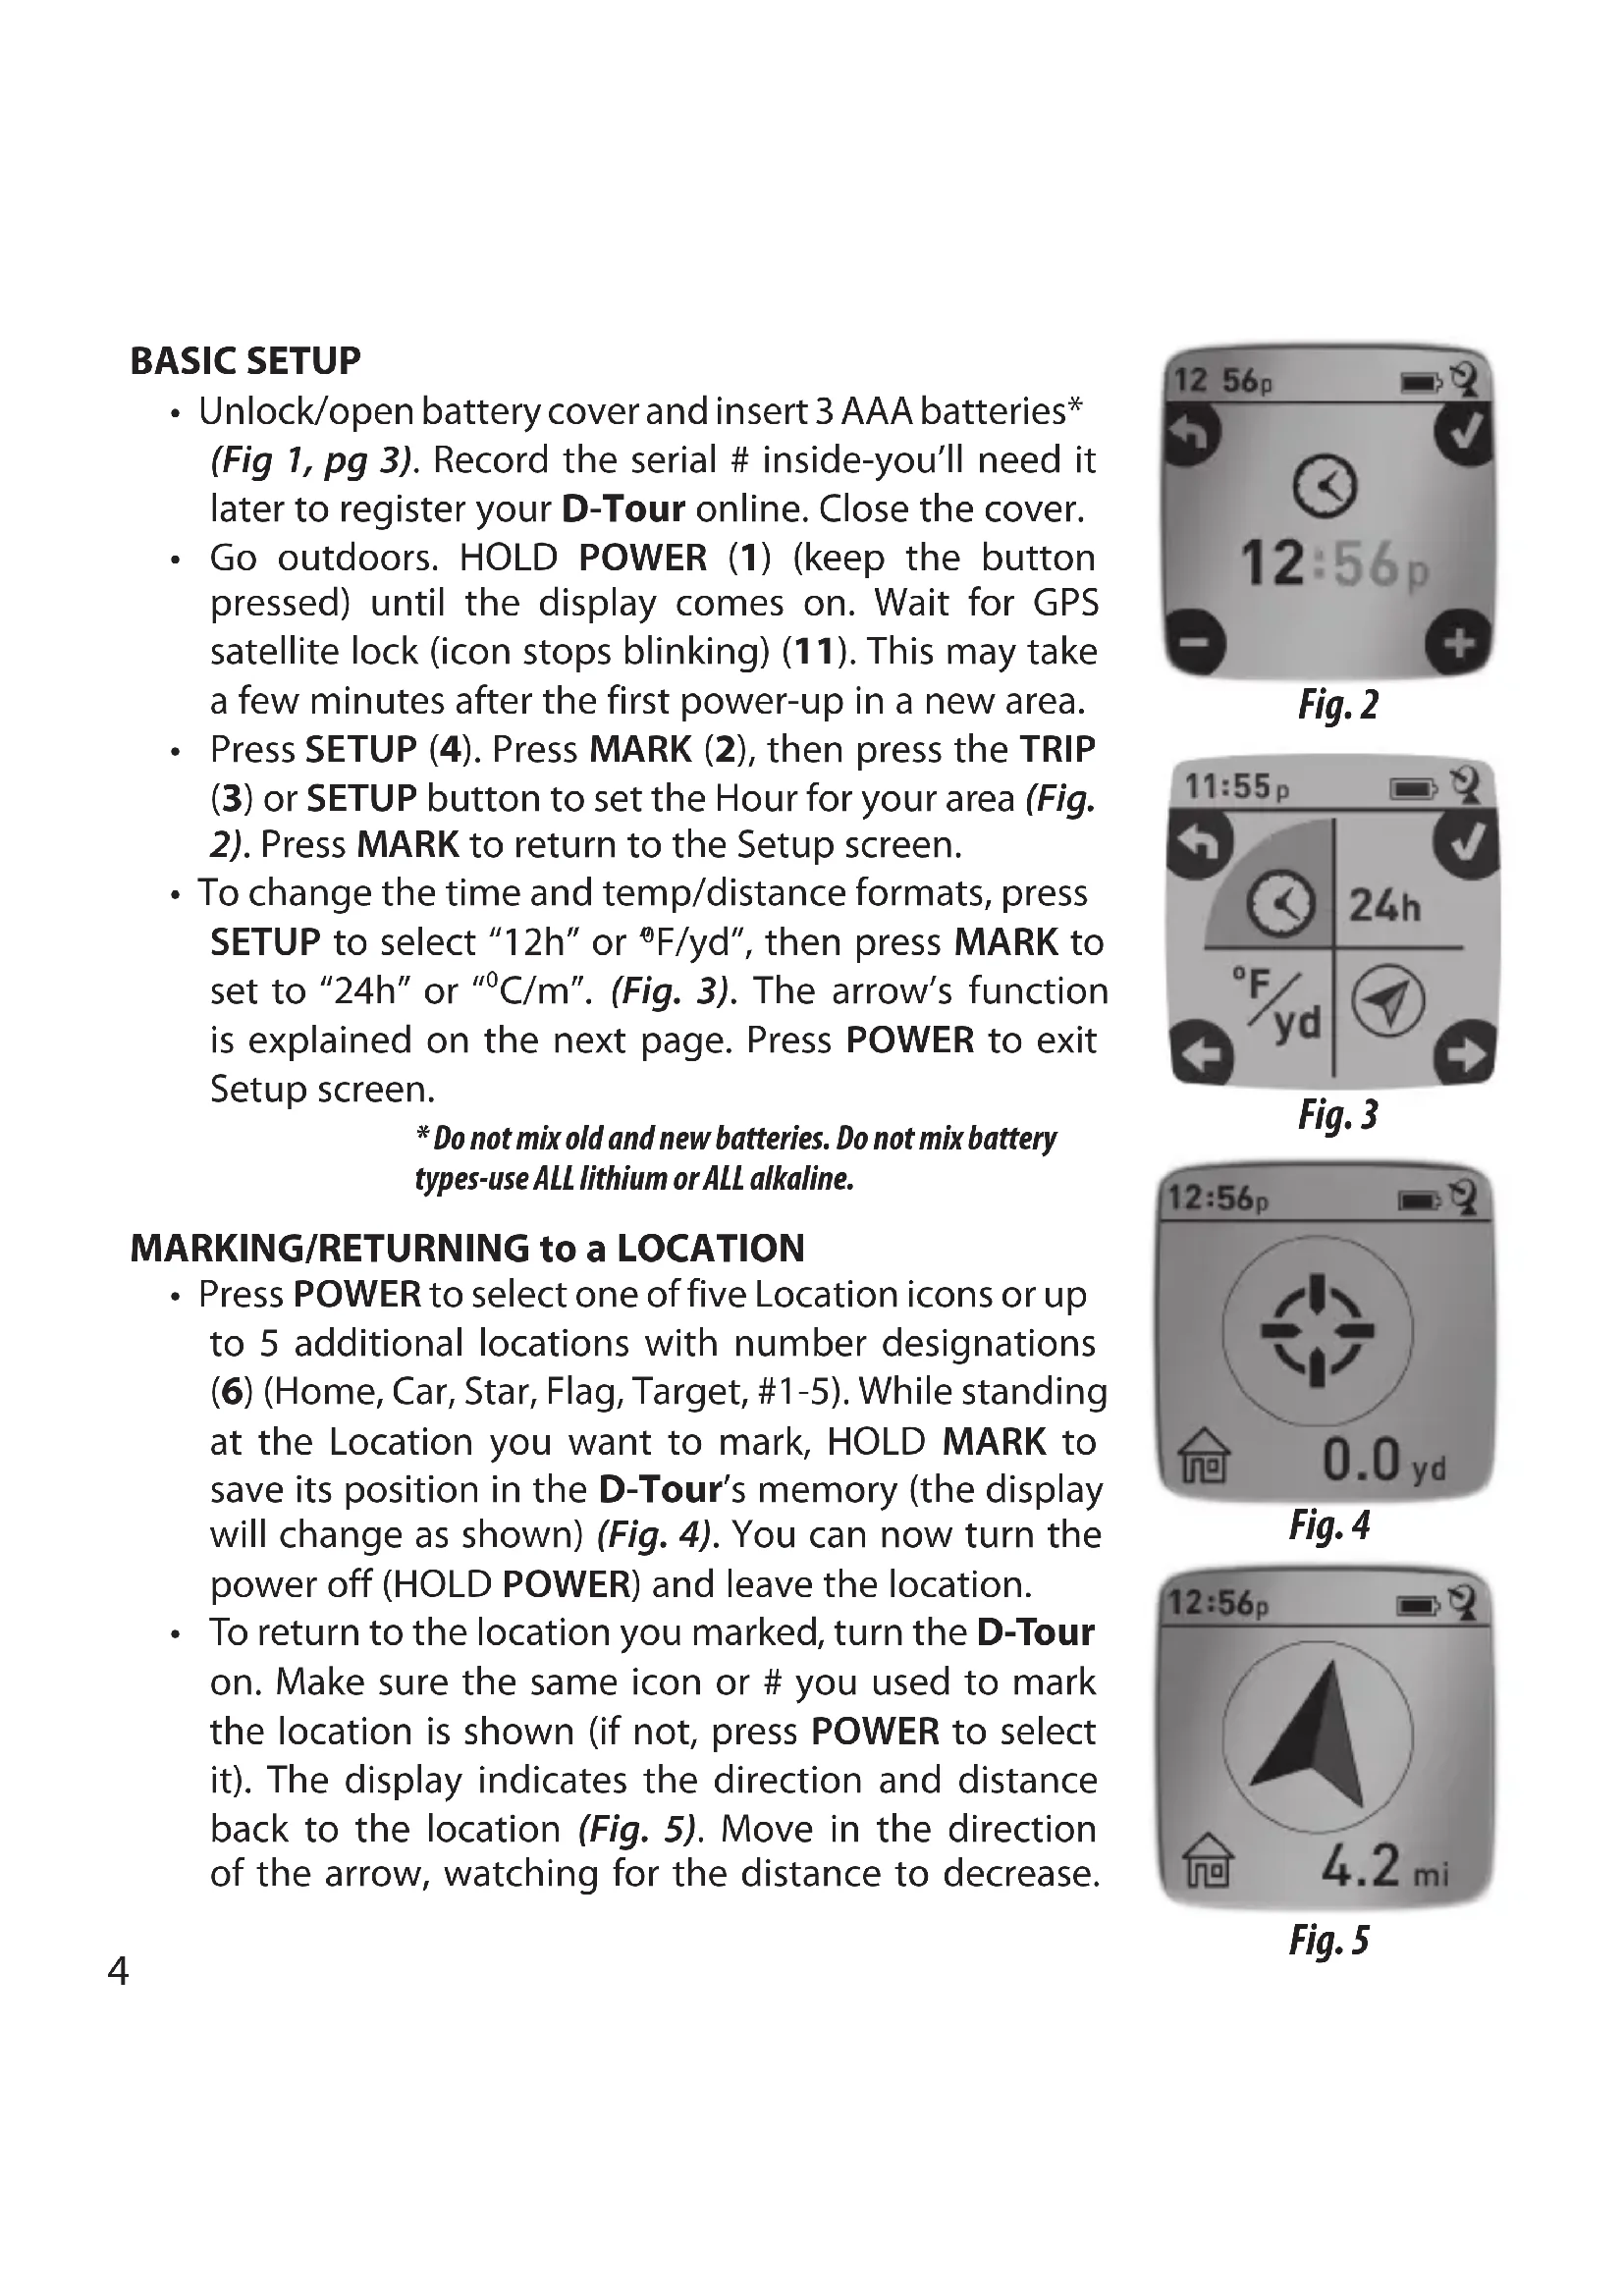
BASIC SETUP
- Unlock/open battery cover and insert 3 AAA batteries* (Fig 1, pg 3). Record the serial # inside-you'll need it later to register your D-Tour online. Close the cover.
- Go outdoors. HOLD POWER (1) (keep the button pressed) until the display comes on. Wait for GPS satellite lock (icon stops blinking) (11). This may take a few minutes after the first power-up in a new area.
- Press SETUP (4). Press MARK (2), then press the TRIP (3) or SETUP button to set the Hour for your area (Fig. 2). Press MARK to return to the Setup screen.
- To change the time and temp/distance formats, press SETUP to select "12h" or "F/yd", then press MARK to set to "24h" or "0C/m". (Fig. 3). The arrow's function is explained on the next page. Press POWER to exit Setup screen.
* Do not mix old and new batteries. Do not mix battery types-use ALL lithium or ALL alkaline.
MARKING/RETURNING to a LOCATION
- Press POWER to select one of five Location icons or up to 5 additional locations with number designations (6) (Home, Car, Star, Flag, Target, #1-5). While standing at the Location you want to mark, HOLD MARK to save its position in the D-Tour's memory (the display will change as shown) (Fig. 4). You can now turn the power off (HOLD POWER) and leave the location.
- To return to the location you marked, turn the D-Tour on. Make sure the same icon or # you used to mark the location is shown (if not, press POWER to select it). The display indicates the direction and distance back to the location (Fig. 5). Move in the direction of the arrow, watching for the distance to decrease.
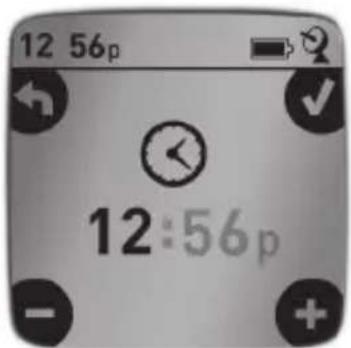
Fig. 2

Fig. 3
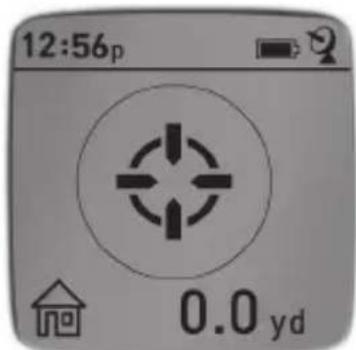
Fig. 4
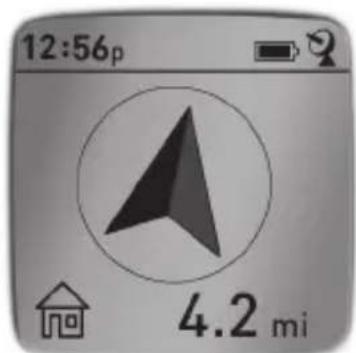
Fig. 5
When you reach the location, the "Mark" icon will flash in the center of the display.
- You can use the five icons (and up to 5 numbers) to mark five different locations of any kind (your car, tent, scenic area, etc.). Be sure you select a different icon or # to store each new location. If you hold down MARK with a previously used location icon still selected, you will replace that one with your current location.
- To expand or restrict the number of "extra" locations (numbers from 1 to 5) that are available, press SETUP (4) three times until the location arrow on the lower right is highlighted. Press MARK (2), then use the TRIP/DATA or SETUP buttons to decrease or increase the number below the arrow (Fig. 6). Press the MARK button to confirm and return to the Setup screen.
OTHER SCREENS
- Press POWER once again after the "Target" location icon screen to view the temperature and altitude at your current location (Fig. 7).
- Press POWER again to view the Compass screen, displaying the Latitude and Longitude of your current location, and a digital compass display including your heading (direction of travel) in degrees (Fig. 8).
- Power automatically turns off after 10 minutes if no buttons have been pressed (except in Trip mode, described next). HOLD POWER to turn the unit off manually.
- Press the MARK button to turn the display backlight on. It automatically turns off after 30 seconds.
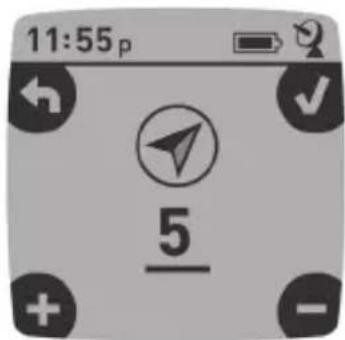
Fig. 6
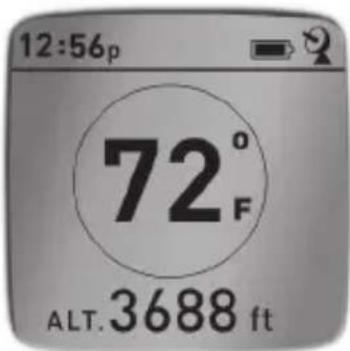
Fig. 7

Fig. 8

COMPASS CALIBRATION
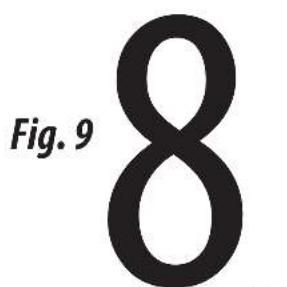
- To ensure directional accuracy, hold the D-Tour out in front of you and move it in a "Figure 8" pattern a few times to re-calibrate the compass (Fig. 9). A compass calibration video is available at: http://www.bushnell.com/products/gps/instruction-videos/.
- For best results, we recommend holding the D-Tour in a horizontal position (not tilted) during use (Fig. 10).
RECORDING A NEW TRIP (ROUTE)
- Press TRIP (3) to enter Trip mode. HOLD the TRIP button to start recording new trip data. The display shows a moving "hiker" icon, along with updated readouts of elapsed distance and average speed during your trip (Fig. 11). Keep the D-Tour powered ON during your trip.
- To stop recording the trip data, HOLD the TRIP button again.
- The D-Tour automatically saves the data it collects between the time you start and stop recording your trip, including the date and time of the trip, total distance traveled, your average speed, and changes in altitude and temperature.
VIEWING THE TRIP DATA SCREENS
- Press the TRIP button to view the distance and average speed of your last trip, along with a remaining memory indicator (% of trip data memory used) (Fig. 12). The D-Tour can store up to 48 hours of total trip data (can be multiple trips on different days).
- Press the TRIP button briefly again (don't hold the button down in Trip mode or you will start a new trip or stop your current trip) to display the "breadcrumb" screen (Fig. 13), showing your route traveled (from start to stop points of current or last trip).

natural_image
Hand holding a yellow and black handheld device (no visible text or symbols)Fig. 10

Fig. 11
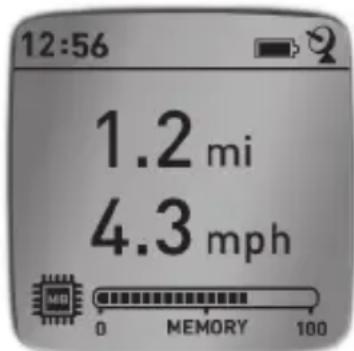
Fig. 12
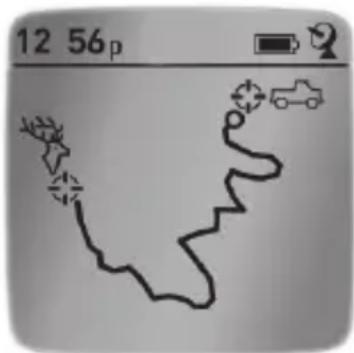
Fig. 13
VIEWING TRIP DATA
After recording at least one trip, connecting the D-Tour to your computer will enable you to see the path you took on any of 4 types of map, view a trip data graph, and share your trip via email or social media. To get the software:
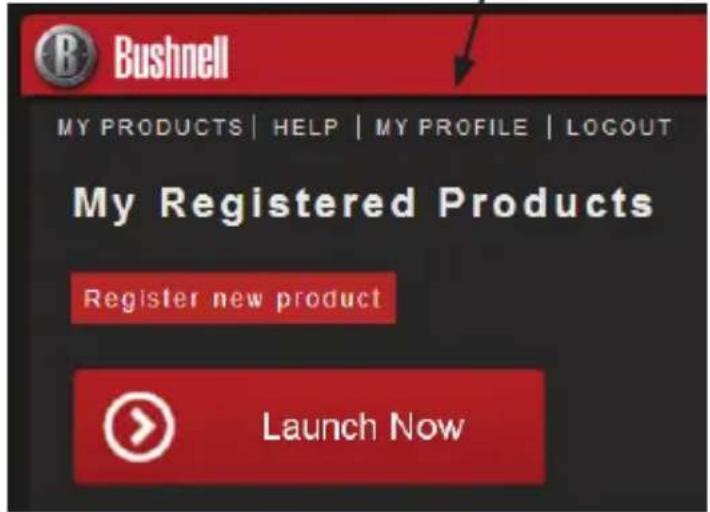
- Go to http://backtrackdtour.com/ and follow the directions to create an account (free) and register your D-Tour, and download the software app (Fig. 15, next pg.). Your account provides online backup for all your trip data. (Serial number is inside the battery compartment-(Fig. 14). After registering, you'll be taken to a screen to download the D-Tour application (Fig. 16) (Adobe Air® is required-it will be installed automatically if you do not already have it on your computer). Click "Download Now", then select "Open". A link to download the software will also be provided in your confirmation email. Turn on the D-Tour and connect its USB port to your computer with the supplied USB cable. On Windows® PCs, the app should open automatically (if not, click the desktop icon (Fig. 17).
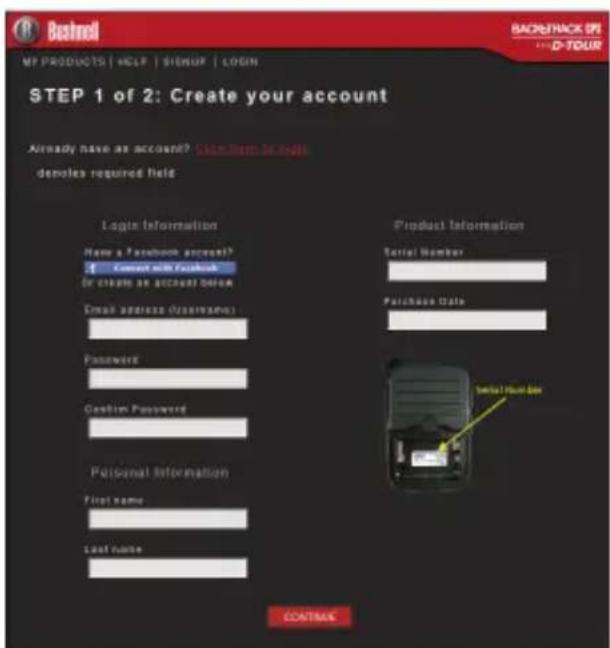
Fig. 15

Fig. 16
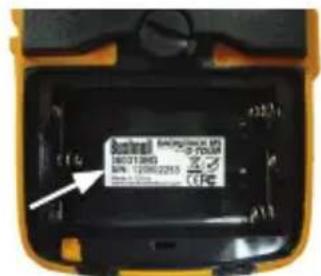
Fig. 14
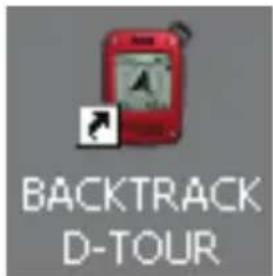
Fig. 17
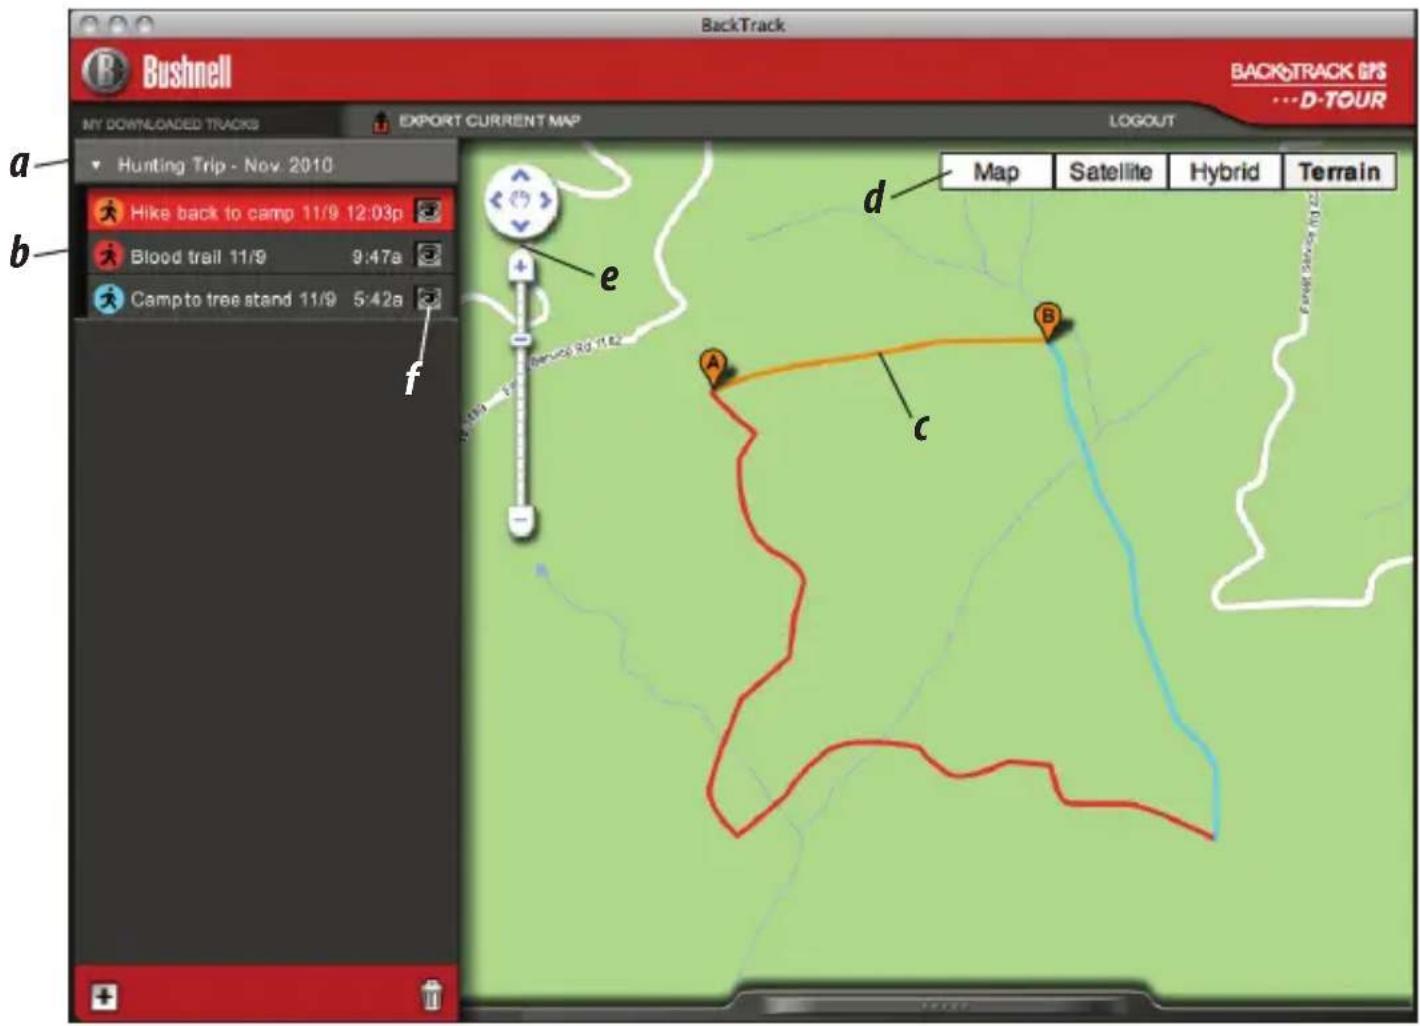
Fig. 19

Fig. 18
Note: if you get a Windows "AutoPlay" popup when you connect your D-Tour, click "Open Folder to View Files", then double click a .btk (trip data) file). On Mac®, double click the "D-Tour" icon in your Applications folder to launch the application.
- Enter the User Name (email address) and Password you used when setting up your account, then select "LOGIN" (Fig. 18). This will enable all your trip data to be stored within your online account, so it will be automatically backed up, and accessible to you from any computer.
USING THE D-TOUR APP-Basic Features (Fig. 19)
- After the D-Tour app opens, you will see one or more gray folders on the left (a) below "My Downloaded Tracks", each labeled with a date. Each folder contains information on the trips taken in a 24 hour period.
- Click the folder to open it and view the individual trips (b) you made on that date (the duration of each trip is based on the time elapsed between the starting and stopping of a new trip recording when you held down the TRIP button).
- The route you traveled for each trip is shown as a colored line (c) on a map. Four types of maps are available-click on the name of a map type (d) to change the view:
MAP-a "road map" style view, complete with road names.
SATELLITE-an aerial photo of the area.
HYBRID-a combination of the first two maps.
TERRAIN-this is a topographic map showing elevation data for the area.
- The zoom slider and position arrow pad allow you to zoom in/out and move around on the map (e).
- Click on the name of a trip to highlight it on the map. You can hide any trip by clicking on the "eye" icon next to it's name (f).
- To change the name of a folder (from the default date to something like "Canyon Trip Day 1"), right click on its name. You can also right click on a trip within the folder to rename it.
USING THE D-TOUR APP-Additional Features (Fig. 20)
- Clicking on the "handle" (g) at the bottom center of the map screen will open a popup graph displaying the altitude, temperature and speed data from the trip. You can use the pull-downs (h) to change how the data is displayed. This feature is ideal for runners and bikers that want to track their performance on an exercise course over time.
- To create a new folder, click the plus (+) icon on the bottom left (i). Existing trips can be dragged from their original folder into the new one.
• To delete a trip or trips folder, drag it to the trash icon (j). - If you'd like to share the details of your trips, we've made it easy. Just click "Export Current Map" (k) and select a save or share option.
- The "Save As" option allows you export the current map view as a .jpg photo.
- When you have finished using the D-Tour application, you don't need to logout, just close the application (I). Your trip data is automatically saved in your account.
USING THE D-TOUR APP ON OTHER COMPUTERS
If you want to access your D-Tour trip information from another computer, it is not necessary for you to create a new account. Simply login to your account at http://backtrackdtour.com click on the download link, and install the app.
LOGIN/CHANGE PASSWORD
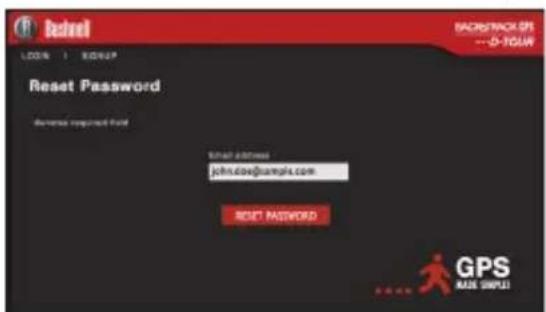
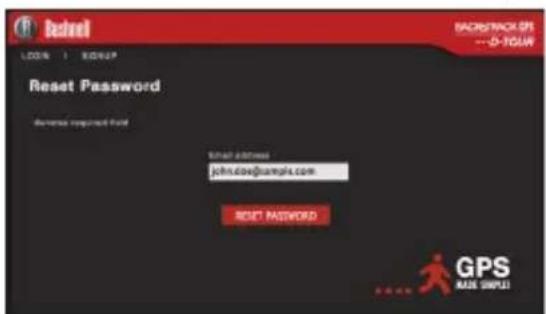
If you log out of the D-Tour application, you will be prompted to log in again the next time you launch the application. If you forget your password or want to change it, you may click on the “Forgot Password?” link on the application log in screen (Fig. 21). You may also change your password after logging in to your existing account at http://backtrackdtour.com. Click “My Profile” in the menu at the top of the screen (Fig. 22).
Please read the Google™ Maps Terms of Service at: http://maps.google.com/intl/en/help/terms_maps.html


Fig. 21

Fig. 22


ONE YEAR LIMITED WARRANTY
Your Bushnell® product is warranted to be free of defects in materials and workmanship for one year after the date of purchase. In the event of a defect under this warranty, we will, at our option, repair or replace the product, provided that you return the product postage prepaid. This warranty does not cover damages caused by misuse, improper handling, installation, or maintenance provided by someone other than a Bushnell Authorized Service Department.
Any return made under this warranty must be accompanied by the items listed below:
1) A check/money order in the amount of \$10.00 to cover the cost of postage and handling
2) Name and address for product return
3) An explanation of the defect
4) Proof of Date Purchased
5) Product should be well packed in a sturdy outside shipping carton, to prevent damage in transit, with return postage prepaid to the address listed below:
IN U.S.A. Send To: IN CANADA Send To:
Bushnell Outdoor Products Bushnell Outdoor Products
Attn.: Repairs Attn.: Repairs
9200 Cody 25A East Pearce Street, Unit 1
Overland Park, Kansas 66214 Richmond Hill, Ontario L4B 2M9
For products purchased outside the United States or Canada please contact your local dealer for applicable warranty information.
In Europe you may also contact Bushnell at:
Bushnell Germany GmbH
European Service Centre
Mathias-Brüggen-Str. 80
D-50827 Köln
GERMANY
This warranty gives you specific legal rights.
You may have other rights which vary from country to country.
©2013 Bushnell Outdoor Products
Warnings and Notices
GPS System & Location Accuracy Notice:
The Global Positioning System (GPS) is operated by the government of the United States, which is solely responsible for its accuracy and maintenance. The system is subject to changes which could affect the accuracy and performance of all GPS equipment. The inherent nature of the GPS system itself limits the accuracy of the distance indicated on the unit's display to within about ±35 meters (or yards) of the actual marked location.
Warning:
This device is intended as a supplemental handheld navigation aide only. The user assumes all responsibility associated with the use of this product. It must not be used for any purpose requiring precise measurement of location, direction, distance, velocity or topography. This device should not be used for any aircraft navigation applications.
Vehicular Use Notice:
Bushnell is committed to the safe and responsible enjoyment of the outdoors.
Do not use this product while driving. An accident can result in property damage, injury or death if the operator fails to practice prudent driving practices. It is the sole responsibility of the driver of any vehicle to operate the motor vehicle in a safe manner. Information from the GPS unit can distract the operator of a motor vehicle. It is unsafe to operate the controls of the GPS unit while operating a motor vehicle. If used in a motor vehicle, it must not be used by the operator of the motor vehicle. If it is used in a motor vehicle it must be mounted in a manner such that it does not distract the operator, does not interfere with the operator's field of view, and does not block or interfere with the air bags or other safety mechanisms of the motor vehicle. Windshields and car windows with integrated metallic materials, such as defrosters, or car window tinting films, can degrade GPS reception inside a car.
Liability Notice:
In no event shall Bushnell be liable for any incidental, special, indirect or consequential damages, whether resulting from the use, misuse, or inability to use this product or from defects in the product.
Some states do not allow the exclusion of incidental or consequential damages, so the above limitations may not apply to you.
FCC Note:
This equipment has been tested and found to comply with the limits for a Class B digital device, pursuant to Part 15 of the FCC Rules. These limits are designed to provide reasonable protection against harmful interference in a residential installation. This equipment generates, uses and can radiate radio frequency energy and, if not installed and used in accordance with the instructions, may cause harmful interference to radio communications. However, there is no guarantee that interference will not occur in a particular installation. If this equipment does cause harmful interference to radio or television reception, which can be determined by turning the equipment off and on, the user is encouraged to try to correct the interference by one or more of the following measures:
- Reorient or relocate the receiving antenna.
- Increase the separation between the equipment and receiver.
- Connect the equipment into an outlet on a circuit different from that to which the receiver is connected.
- Consult the dealer or an experienced radio/TV technician for help.
Shielded interface cable must be used with the equipment in order to comply with the limits for a digital device pursuant to Subpart B of Part 15 of FCC Rules.

Adobe ^® , Air ^® , Copyright © 2012 Adobe Systems Incorporated. All rights reserved. Google ^™ Maps Copyright © 2012 Google.
Windows® Copyright © 2012 Microsoft. Windows® is a registered trademark of Microsoft Corporation in the United States and other countries. All rights reserved.
Mac ^® , Copyright © 2012 Apple Inc. Mac ^® is a registered trademark of Apple Inc. in the United States and other countries. All rights reserved.
Third-party marks and brands are the property of their respective owners. All products, dates, and figures are preliminary and subject to change without notice.
natural_image
Close-up of a black and orange electronic device with two orange buttons labeled 1 and 3 (no text or symbols on the device body)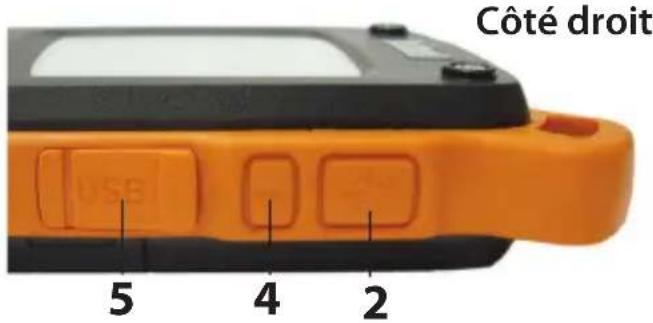
Fig. 1
Fig. 2

Fig. 3
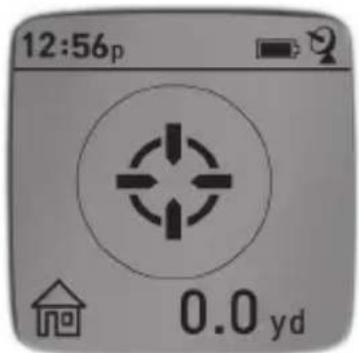
Fig. 4
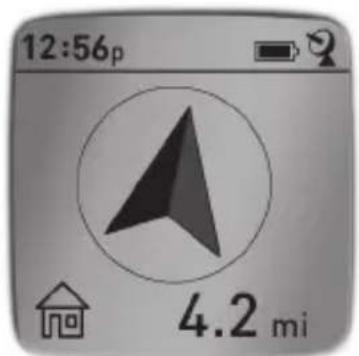
Fig. 5
Fig. 7

Fig. 8
natural_image
Hand holding a yellow and black handheld electronic device (no visible text or symbols)Fig. 10
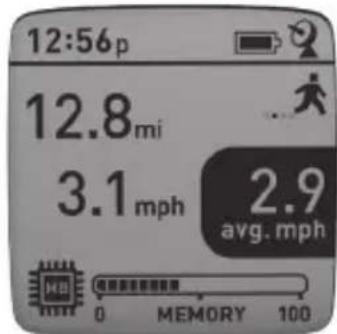
Fig. 11
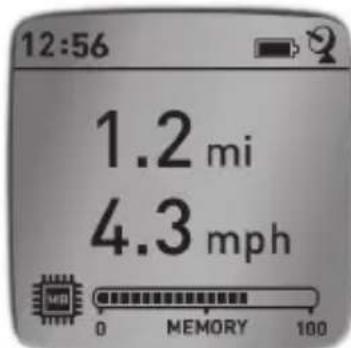
Fig. 12
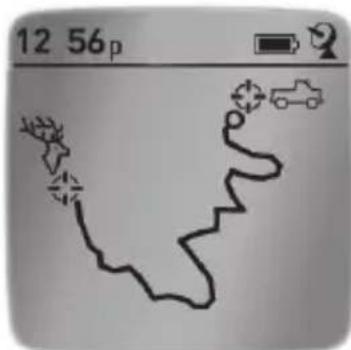
Fig. 13
Fig. 15
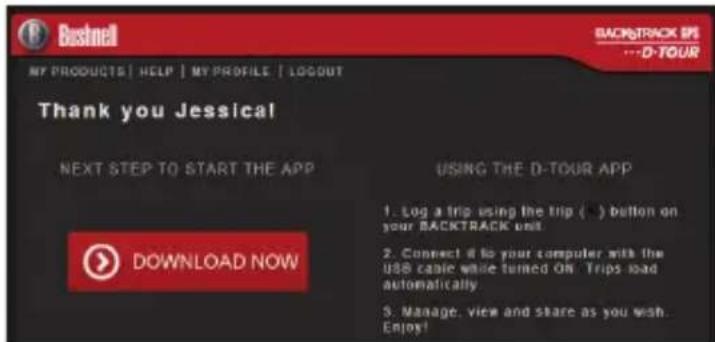
Fig. 16
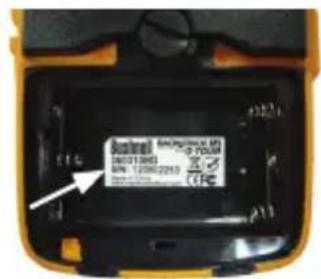
Fig. 14
Fig. 17

Fig. 19

Fig. 18
http://maps.google.com/intl/en/help/terms_maps.html


Fig. 21

Fig. 22
GARANTIE LIMITÉE de UNE ANNÉE
Bushnell Outdoor Products Bushnell Outdoor Products
Attn.: Repairs Attn.: Repairs
9200 Cody 25A East Pearce Street, Unit 1
Overland Park, Kansas 66214 Richmond Hill, Ontario L4B 2M9
European Service Centre
Mathias-Brüggen-Str. 80
D-50827 Köln
GERMANY
©2013 Bushnell Outdoor Products
Fig. 2
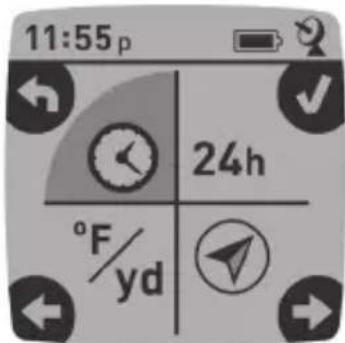
Fig. 3

Fig. 4

Fig. 5
Fig. 7
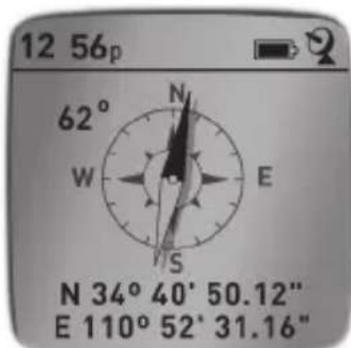
Fig. 8
natural_image
Hand holding a yellow and black handheld device (no visible text or symbols)Fig. 10

Fig. 11
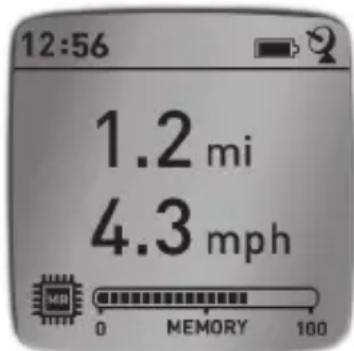
Fig. 12

Fig. 13
Fig. 15

Fig. 16

Fig. 14
Fig. 17

Fig. 19
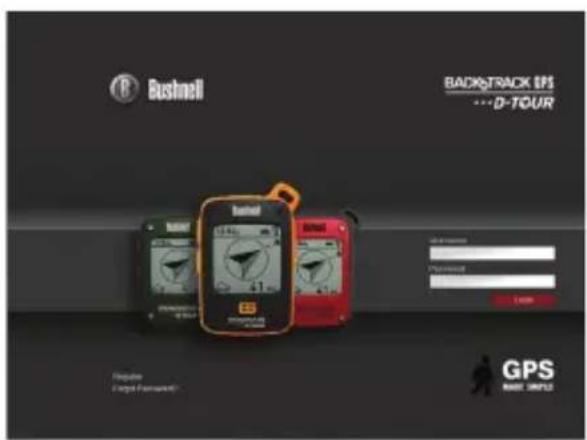
Fig. 18
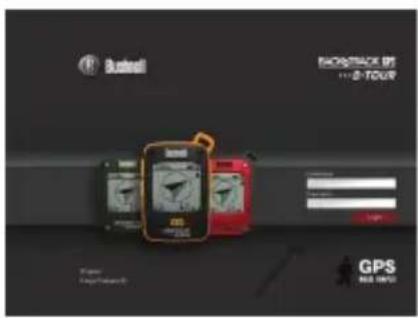
Fig. 21

Fig. 22

GARANTÍA LIMITADA de UN AÑO
Bushnell Outdoor Products Bushnell Outdoor Products
Attn.: Repairs Attn.: Repairs
9200 Cody 25A East Pearce Street, Unit 1
Overland Park, Kansas 66214 Richmond Hill, Ontario L4B 2M9
European Service Centre
Mathias-Brüggen-Str. 80
D-50827 Köln
GERMANY
©2013 Bushnell Outdoor Products
natural_image
Close-up of an orange and black electronic device with two labeled buttons (1 and 3), no visible text or symbols beyond labels.Fig. 2

Fig. 3

Fig. 4

Fig. 5
Fig. 7
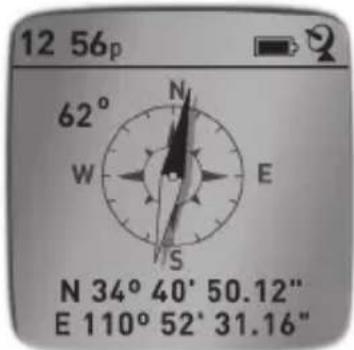
Fig. 8
Fig. 9

natural_image
Hand holding a yellow and black handheld device (no visible text or symbols)Fig. 10

Fig. 11

Fig. 12

Fig. 13
Fig. 15
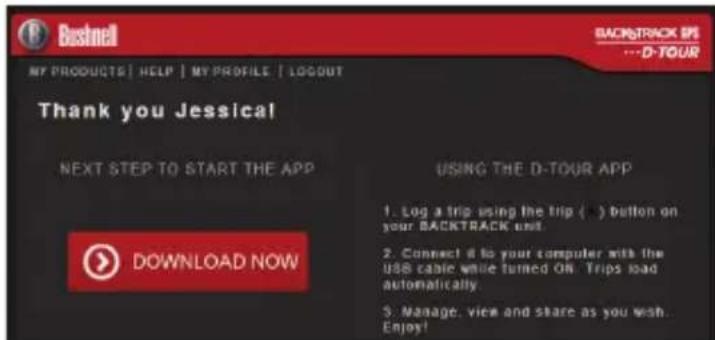
Fig. 16
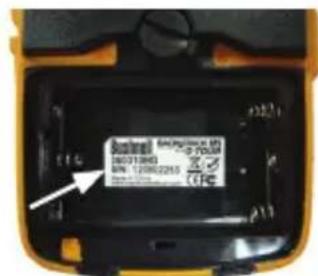
Fig. 14

Fig. 17
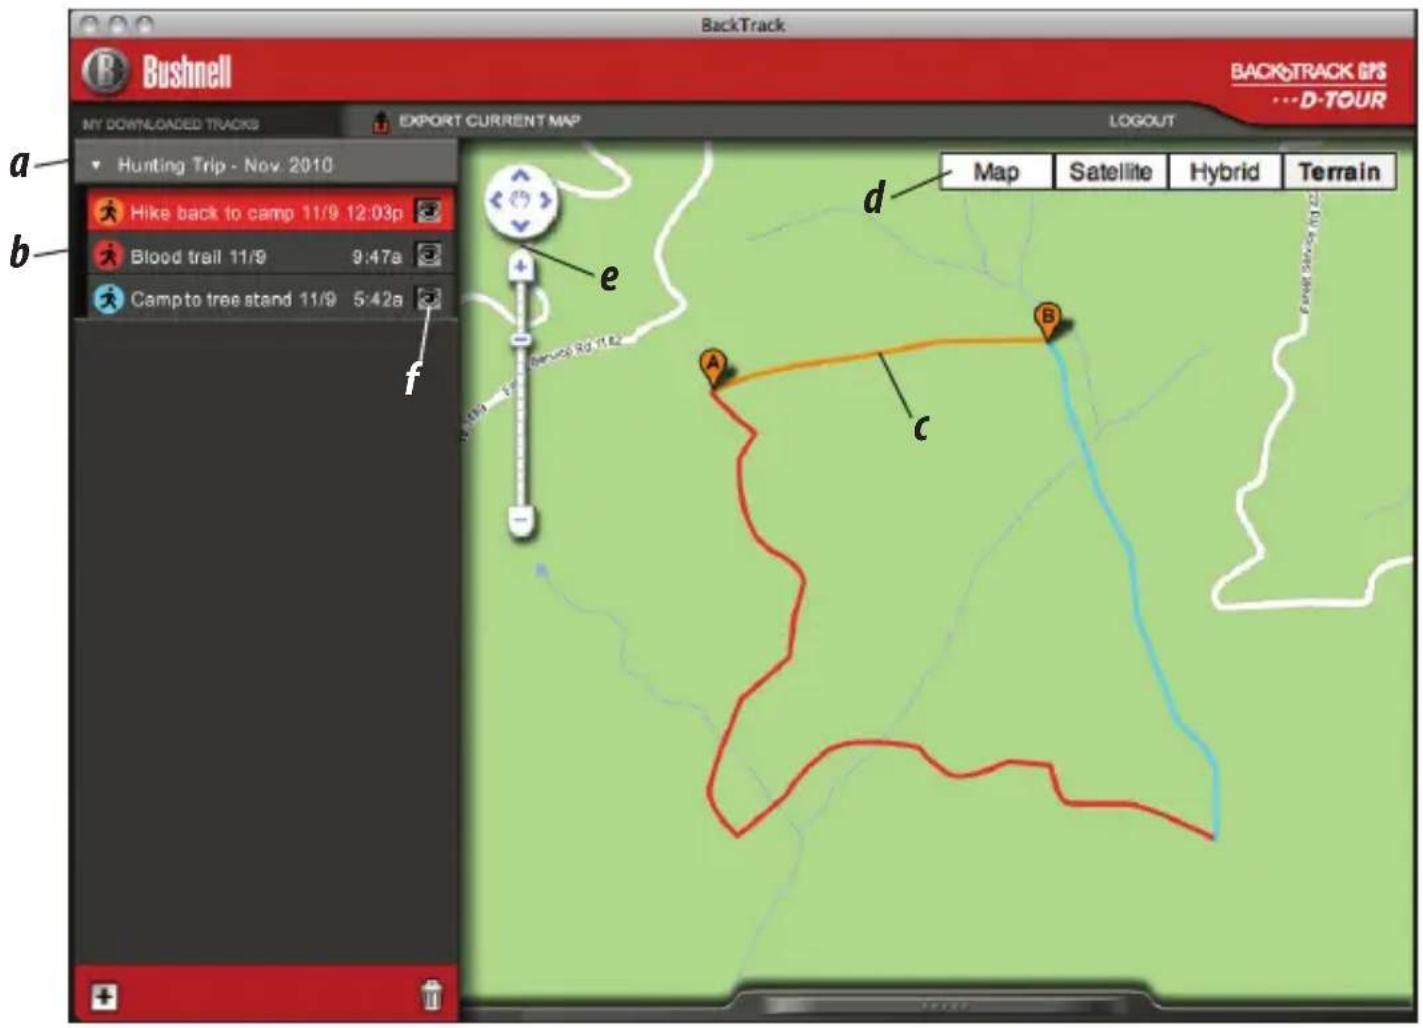
Fig. 19

Fig. 18
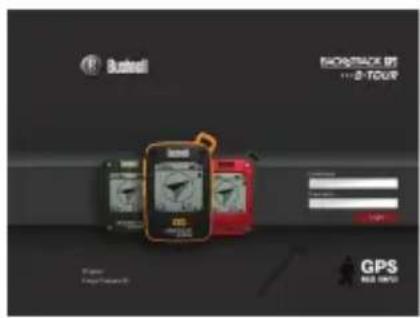
Fig. 21

Fig. 22


Bushnell Outdoor Products Bushnell Outdoor Products
Attn.: Repairs Attn.: Repairs
9200 Cody 25A East Pearce Street, Unit 1
Overland Park, Kansas 66214 Richmond Hill, Ontario L4B 2M9
European Service Centre
Mathias-Brüggen-Str. 80
D-50827 Köln
GERMANY
©2013 Bushnell Outdoor Products
natural_image
Close-up of an orange and black electronic device with two labeled buttons (1 and 3), no visible text or symbols beyond labels.VISTA POSTERIORE E LATERALE
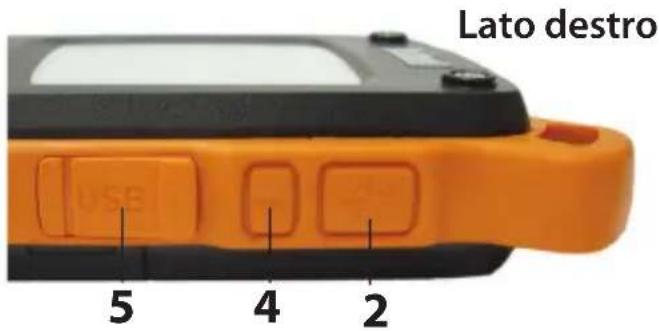

Fig. 2

Fig. 3
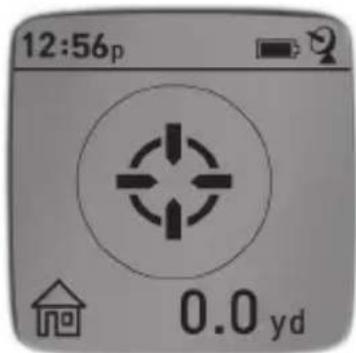
Fig. 4
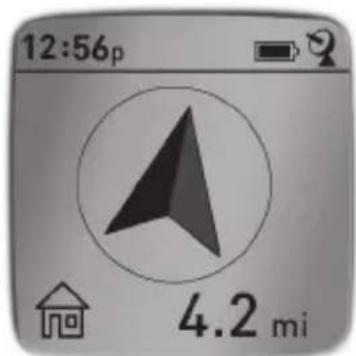
Fig. 5
Fig. 7
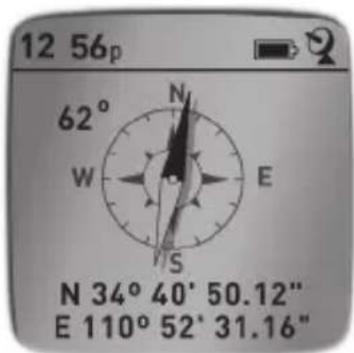
Fig. 8

TARATURA BUSSOLA
natural_image
Hand holding a yellow and black handheld device (no visible text or symbols)Fig. 10

Fig. 11

Fig. 12

Fig. 13
Fig. 15
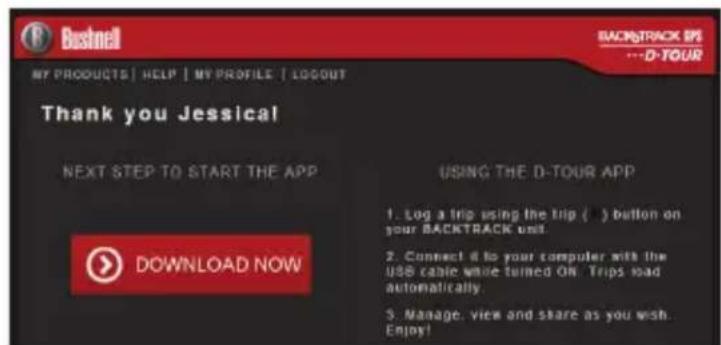
Fig. 16

Fig. 14

Fig. 17

Fig. 19

Fig. 18

Fig. 21

Fig. 22


GARANZIA LIMITATA PER UN ANNO
Bushnell Outdoor Products Bushnell Outdoor Products
Attn.: Repairs Attn.: Repairs
9200 Cody 25A East Pearce Street, Unit 1
Overland Park, Kansas 66214 Richmond Hill, Ontario L4B 2M9
European Service Centre
Mathias-Brüggen-Str. 80
D-50827 Köln
GERMANY
©2013 Bushnell Outdoor Products
Avvertenze e note
©2013 Bushnell Outdoor Products