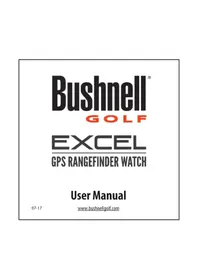
Neo+ GPS Rangefinder Watch - Smartwatch BUSHNELL - Free user manual and instructions
Find the device manual for free Neo+ GPS Rangefinder Watch BUSHNELL in PDF.
| Product Type | GPS Golf Watch |
| Brand | Bushnell |
| Model | Neo+ GPS Rangefinder Watch |
| Power | Rechargeable lithium-ion battery |
| Battery Life | Up to 14 hours in golf mode, 1 year in watch mode |
| Charging | Via 4-pin USB cable (included) on computer or wall charger |
| Main Functions | GPS golf (front, center, back distances), shot measurement, odometer, alarm, timer, GPS statistics |
| Display | Digital display with backlight and night mode |
| Water Resistance | Water resistant (splash and rain proof) |
| Case Material | Durable polymer |
| Approximate Dimensions | 45 mm diameter, 14 mm thickness |
| Approximate Weight | 55 g |
| Buttons | 5 buttons: SHOT, MENU, BACK, SELECT, FRONT |
| GPS | Built-in GPS, requires at least 3 satellites |
| Measurement Units | Yards or meters (selectable) |
| Course Updates | Via www.bushnell.igolf.com (download GPS files) |
| System Compatibility | Windows 7, Vista, XP (USB 1.1 or 2.0) |
| Kit Contents | Neo+ watch, USB cable/charger, user manual |
| Maintenance | Clean with a soft, damp cloth; brush charging contacts |
| Warranty | 1 year limited |
Frequently Asked Questions - Neo+ GPS Rangefinder Watch BUSHNELL
User questions about Neo+ GPS Rangefinder Watch BUSHNELL
0 question about this device. Answer the ones you know or ask your own.
Ask a new question about this device
Download the instructions for your Smartwatch in PDF format for free! Find your manual Neo+ GPS Rangefinder Watch - BUSHNELL and take your electronic device back in hand. On this page are published all the documents necessary for the use of your device. Neo+ GPS Rangefinder Watch by BUSHNELL.
USER MANUAL Neo+ GPS Rangefinder Watch BUSHNELL
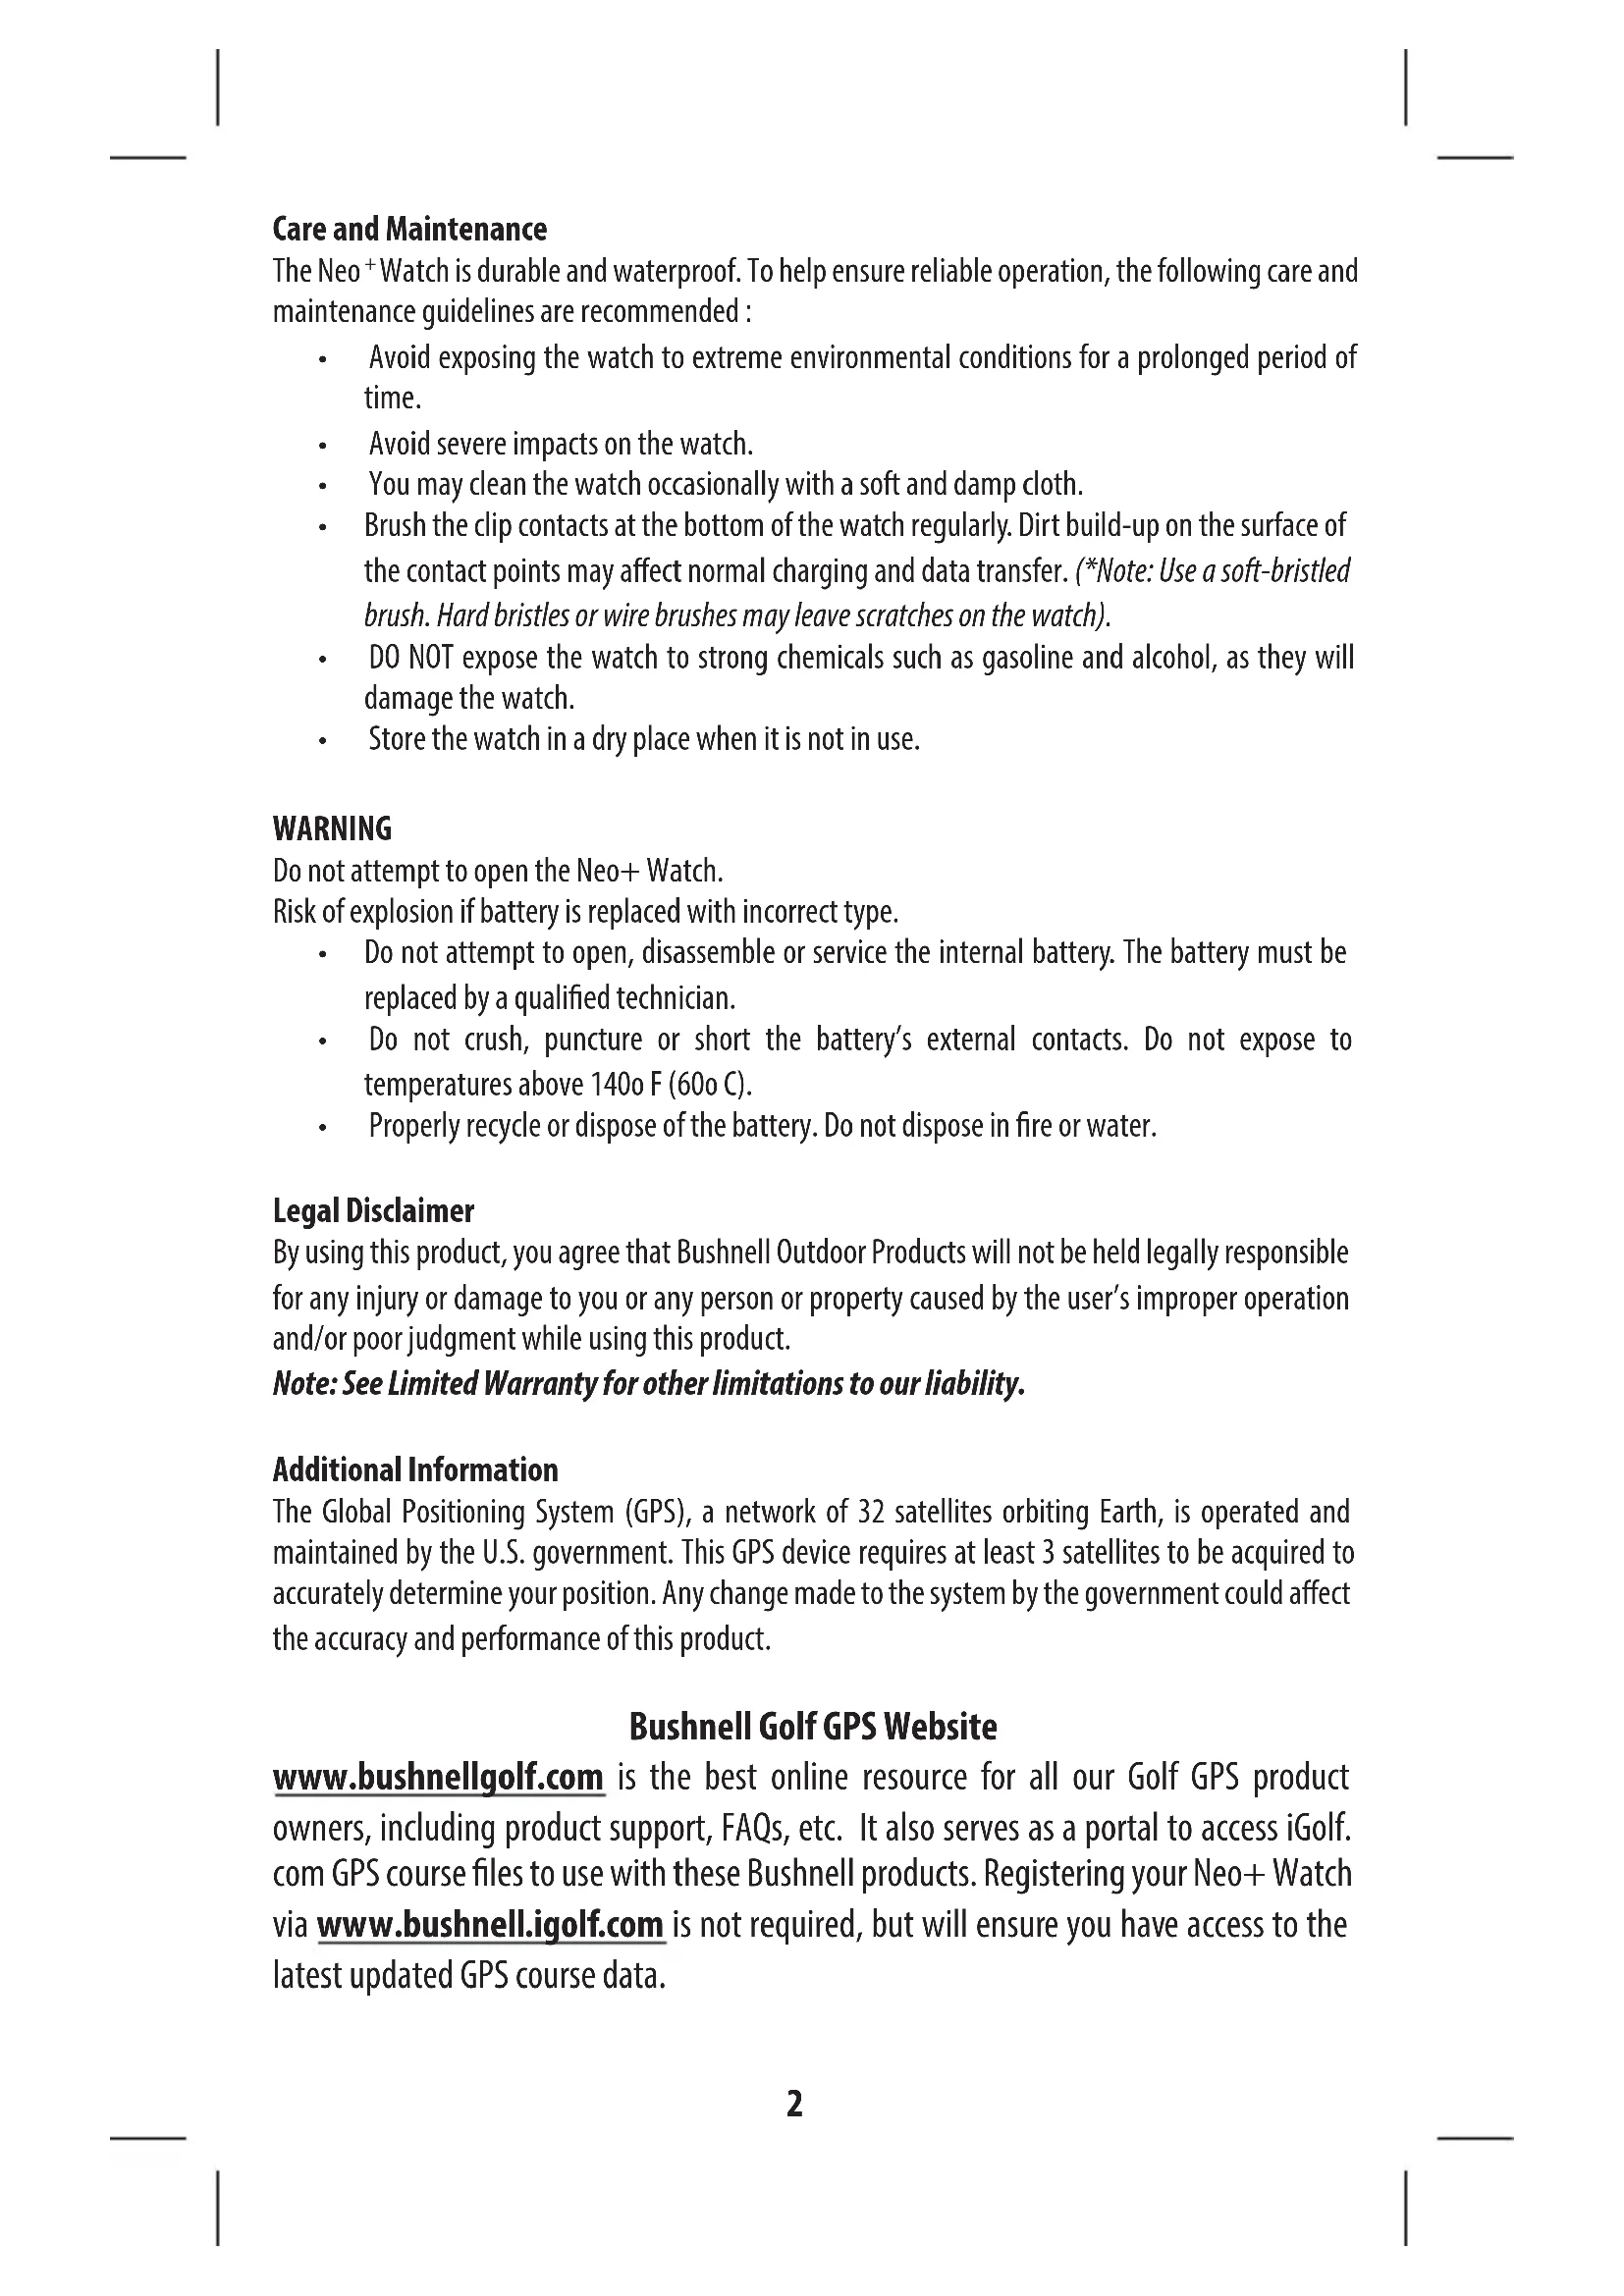
Care and Maintenance
The Neo ^+ Watch is durable and waterproof. To help ensure reliable operation, the following care and maintenance guidelines are recommended:
- Avoid exposing the watch to extreme environmental conditions for a prolonged period of time.
- Avoid severe impacts on the watch.
• You may clean the watch occasionally with a soft and damp cloth. - Brush the clip contacts at the bottom of the watch regularly. Dirt build-up on the surface of the contact points may affect normal charging and data transfer. (*Note: Use a soft-bristled brush. Hard bristles or wire brushes may leave scratches on the watch).
- DO NOT expose the watch to strong chemicals such as gasoline and alcohol, as they will damage the watch.
• Store the watch in a dry place when it is not in use.
WARNING
Do not attempt to open the Neo+ Watch.
Risk of explosion if battery is replaced with incorrect type.
- Do not attempt to open, disassemble or service the internal battery. The battery must be replaced by a qualified technician.
- Do not crush, puncture or short the battery's external contacts. Do not expose to temperatures above 140o F (60o C).
• Properly recycle or dispose of the battery. Do not dispose in fire or water.
Legal Disclaimer
By using this product, you agree that Bushnell Outdoor Products will not be held legally responsible for any injury or damage to you or any person or property caused by the user's improper operation and/or poor judgment while using this product.
Note: See Limited Warranty for other limitations to our liability.
Additional Information
The Global Positioning System (GPS), a network of 32 satellites orbiting Earth, is operated and maintained by the U.S. government. This GPS device requires at least 3 satellites to be acquired to accurately determine your position. Any change made to the system by the government could affect the accuracy and performance of this product.
Bushnell Golf GPS Website
www.bushnellgolf.com is the best online resource for all our Golf GPS product owners, including product support, FAQs, etc. It also serves as a portal to access iGolf.com GPS course files to use with these Bushnell products. Registering your Neo+ Watch via www.bushnell.igolf.com is not required, but will ensure you have access to the latest updated GPS course data.
Table of Contents
english
| Page Title Page # | |
| Charging the Battery 4 | |
| Package Contents / Computer Requirements / Updates 4 | |
| Buttons and Functions 5 | |
| Power On and Basic Operation / Using Play Golf Mode 6 | |
| Button Functions in Play Golf Mode 7 | |
| Other Menu Options 8 | |
| Other Menu Options: Screens/Button Functions 9 | |
| Using the Settings Menu 10-11 | |
| Registering and Updating Golf Course Data 12-13 | |
| Warranty 14 | |
| FCC Statement 15 |

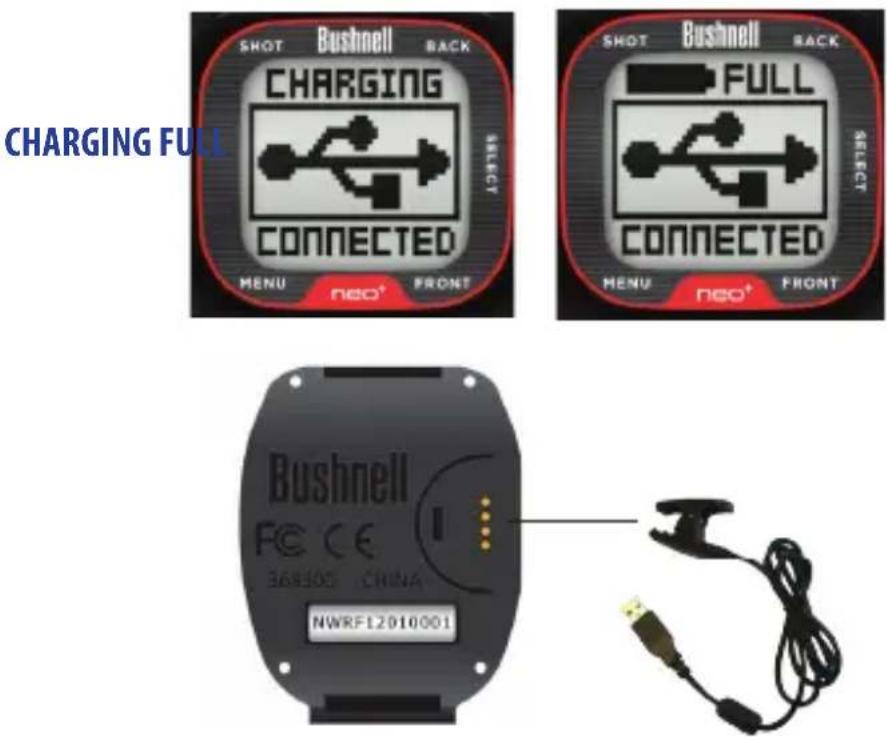
Charging the Battery
The rechargeable battery of the Neo ^+ Watch is long lasting and provides up to 14 hours of golf, or one year of use as an everyday (time only) watch. However, battery life may be reduced due to a variety of factors (external temperature, etc). All rechargeable batteries lose their effective charge length over time.
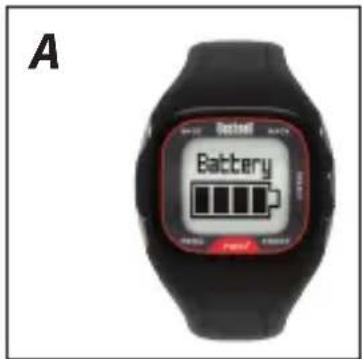
To check your remaining battery life, select "Battery" from Menu 1 (pg.8,9). To recharge the battery, attach the 4-pin end of the included USB cable to the contacts on the back of the watch and connect it to your computer. The Neo ^+ Watch and USB cable are compatible with all USB ports, including A/C style USB chargers. The battery charging/full displays and charging contacts are shown below:
Package Contents
1 - Bushnell Neo ^+ GPS Rangefinder Watch
1 - USB/Charging Cable
1 - Instruction Manual
Computer Requirements
USB (1.1 or 2.0) Port
OS: Windows (7, Vista or XP)
Firmware/Software Updates
Please check www.bushnellgolf.com periodically for the latest firmware and software releases.
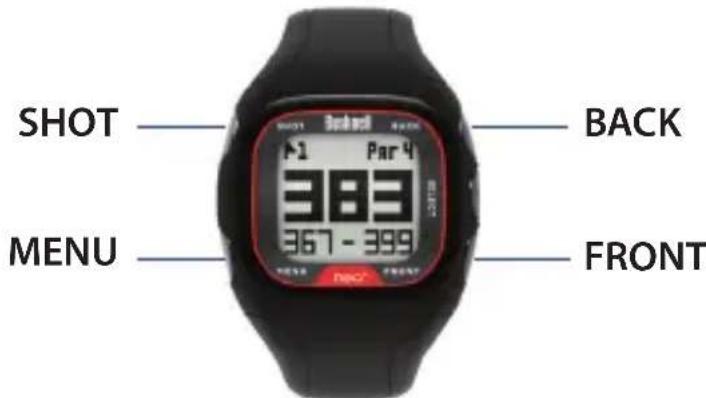
Buttons and Functions
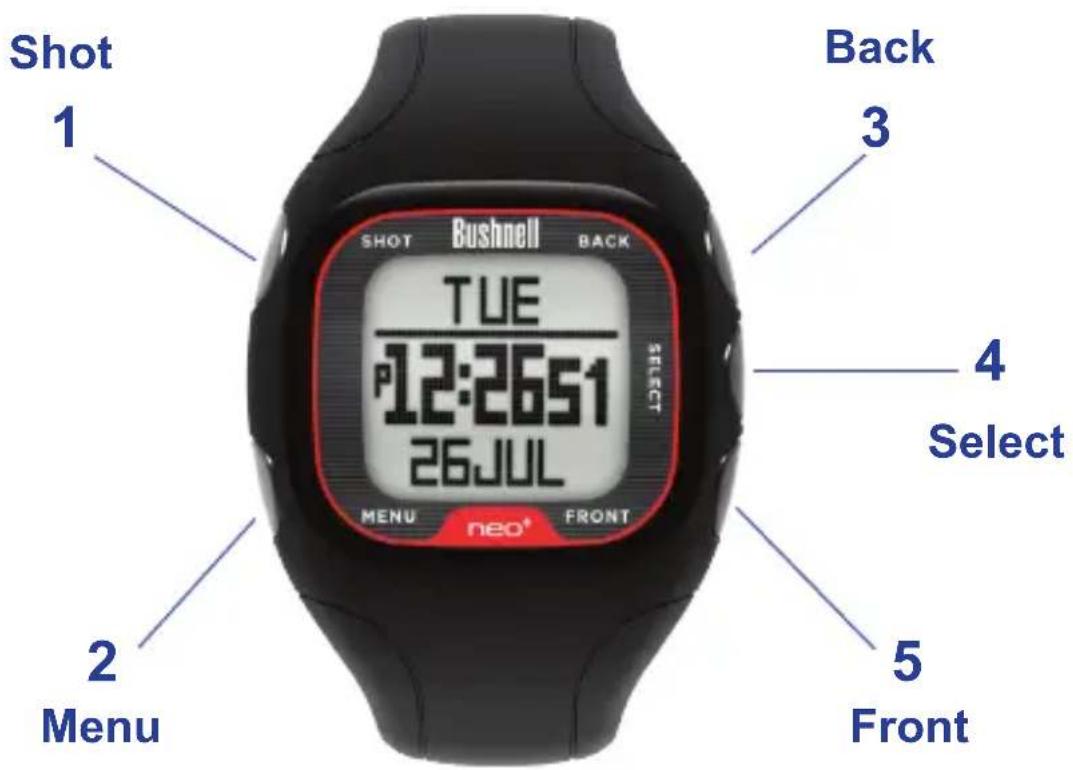
-
SHOT Button: Tracks shot distance in Play Golf mode. Controls backlight. Press & hold for night mode. Disable night mode with a single quick push. Press Select, Front, or Back to exit Shot Distance.
-
MENU Button: View Golf Menu in Play Golf mode. View Main Menu Options from Time screen.
-
BACK Button: Scrolls up through Menu items. View large Back of Green callout in Play Golf mode.
-
SELECT Button: Selects from menu items.
-
FRONT Button: Press & hold to power on/off. Scrolls down through menu items. View large Front of Green callout in Play Golf mode.
Power On and Basic Operation
Ready to start using your Neo+ Watch?
First, be sure the battery has a full charge. If you are using it for the first time, it should be charged until the "FULL" charge indication is displayed (refer to "Battery Charging" on pg. 7 for details). Next, make sure you are outdoors, in a location with a clear view of the sky overhead, to ensure good reception of GPS satellite signals Now, you're ready to power up and use your Neo ^+ Watch.
- Press and hold the FRONT button (5) to power on the Neo ^+ Watch.
- Press the MENU button (2).
- Scroll through the menu options by pressing the FRONT (5) and BACK (3) buttons. Press again at the bottom (or top) of a menu screen to go to the next (or previous) menu screen (see below).
- Select the desired feature by pressing the SELECT (4) button.
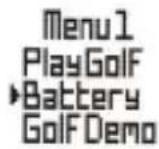
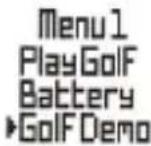
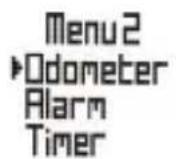
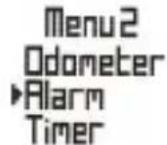
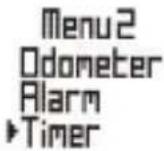
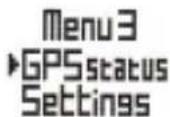
The Menu of features is displayed over a series of three screens as follows:
• Menu 1: Play Golf*, Battery, Golf Demo
- Menu 2: Odometer*, Alarm, Timer
- Menu 3: GPS status*, Settings
*GPS feature- using these features requires a satellite signal. To ensure reception, make sure you are outdoors away from tall buildings and trees, with a clear view of the sky.
Using Play Golf Mode
Menu1 Play Golf Battery Golf Demo
- Press MENU and select "Play Golf" (press FRONT or BACK if necessary) at the top of Menu 1 then press SELECT. The Neo ^+ Watch will search for GPS satellite signals. Once satellite lock has been acquired, the Neo ^+ Watch will display a list of courses in the local area.
- Scroll the course list with the BACK and FRONT buttons, and select your course by pressing the SELECT button. You are now in "Play Golf" Mode.
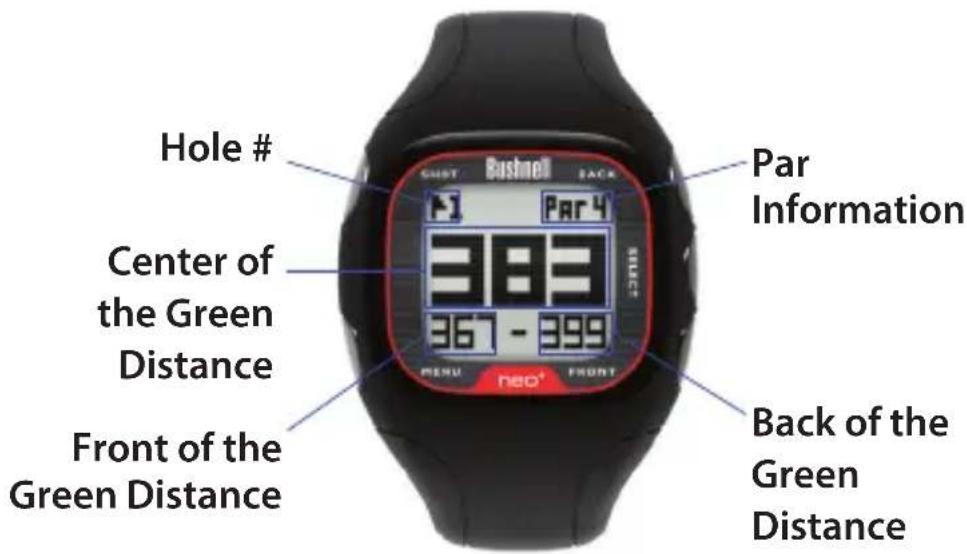
- After you've selected a course, the main screen will display Front, Center, and Back of the Green distances for Hole 1, as well as par information. The current Hole number is shown on the top left.
Using Play Golf Mode
Button Functions in Play Golf Mode
Track Shot Distance: This feature allows you to easily check the distance between any two points and would normally be used to measure the length of your shot. Press the SHOT button to set Point A (where you are standing) to "0". After walking to your ball (Point B), the Neo Watch will display the distance between Point A and Point B in a straight line.
View Golf Menu Options: Press MENU to view the Golf Menu, which allows you to manually change holes (view next/previous hole info), change the units of measurement (yards or meters), check the current time, or exit the game. Press MENU again to return to your game.
View Larger Back Distance Callout: Press BACK to display the Back Callout screen for 5 seconds, then return to the main Front, Center, Back (FCB) screen.
View Larger Front Distance Callout: Press FRONT to display the Front Callout screen for 5 seconds, then return to the main Front, Center, Back (FCB) screen.
Other Menu Options
Battery (A): To check the remaining battery charge, select "Battery" from Menu 1.
Golf Demo: Selecting "Golf Demo" from Menu 1 provides an overview of the functionality of Play Golf mode without requiring a GPS satellite signal. It will display sample screens of the main Front, Center, Back (FCB) screen, Shot Distance, Back of the Green, and Front of the Green Screen. Bring up the Golf Menu and select "Exit Game" to exit the Golf Demo.
The Golf Demo feature is intended primarily for retail demonstration purposes, but also provides a way for you to "show off" your Neo+ Watch to your fellow golfers when you're inside the clubhouse!
*Note: "Change Hole" and "Yds/Mtrs" are non-functional in the Golf Demo.
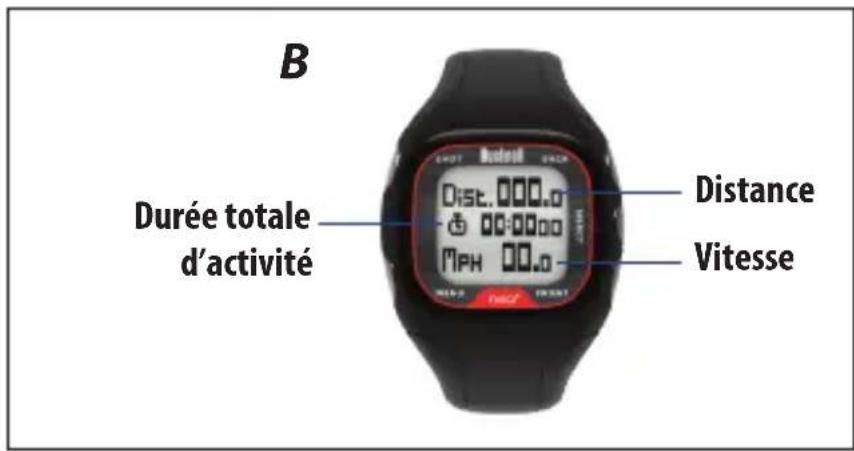
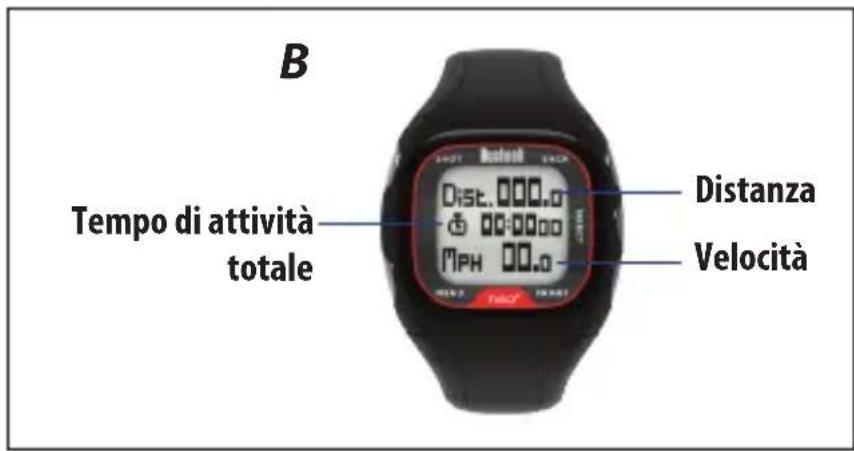
Odometer (B): Once a GPS satellite signal has been acquired, selecting the Odometer function allows you to track distance, speed, and total activity time.
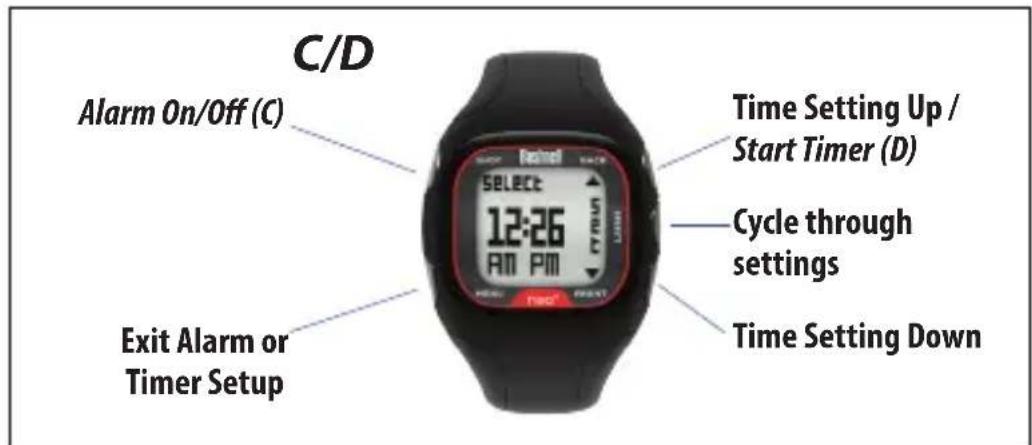
Alarm (C): The Neo+ Watch features a standard alarm function. The alarm sounds at the set time.
Timer (D): The Neo+ Watch timer function works like a kitchen timer (countdown timer). Set the desired time, and an alarm will sound when the time has elapsed.
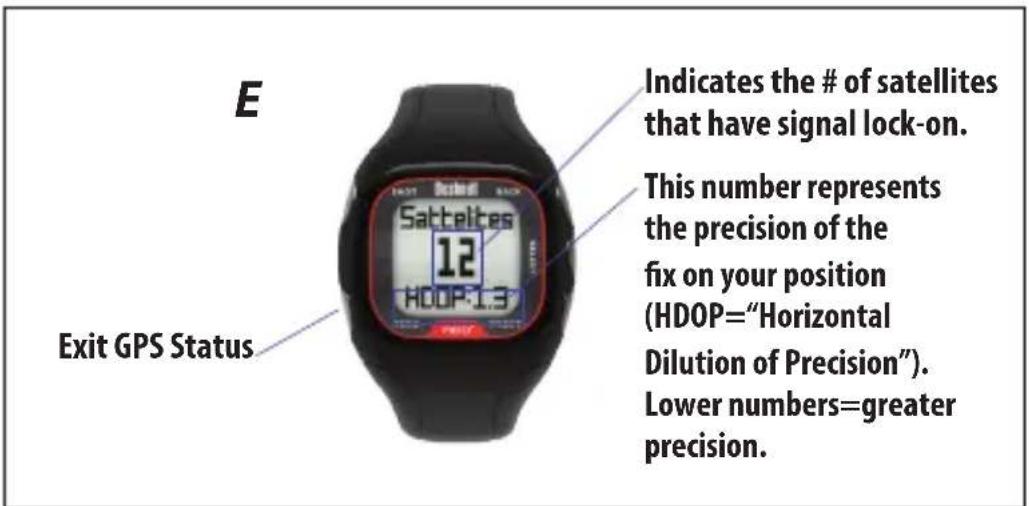
GPS Status (E): Once a GPS satellite signal has been acquired, selecting the GPS Status screen will show the strength of the signal.
Other Menu Options-Screens/Button Functions

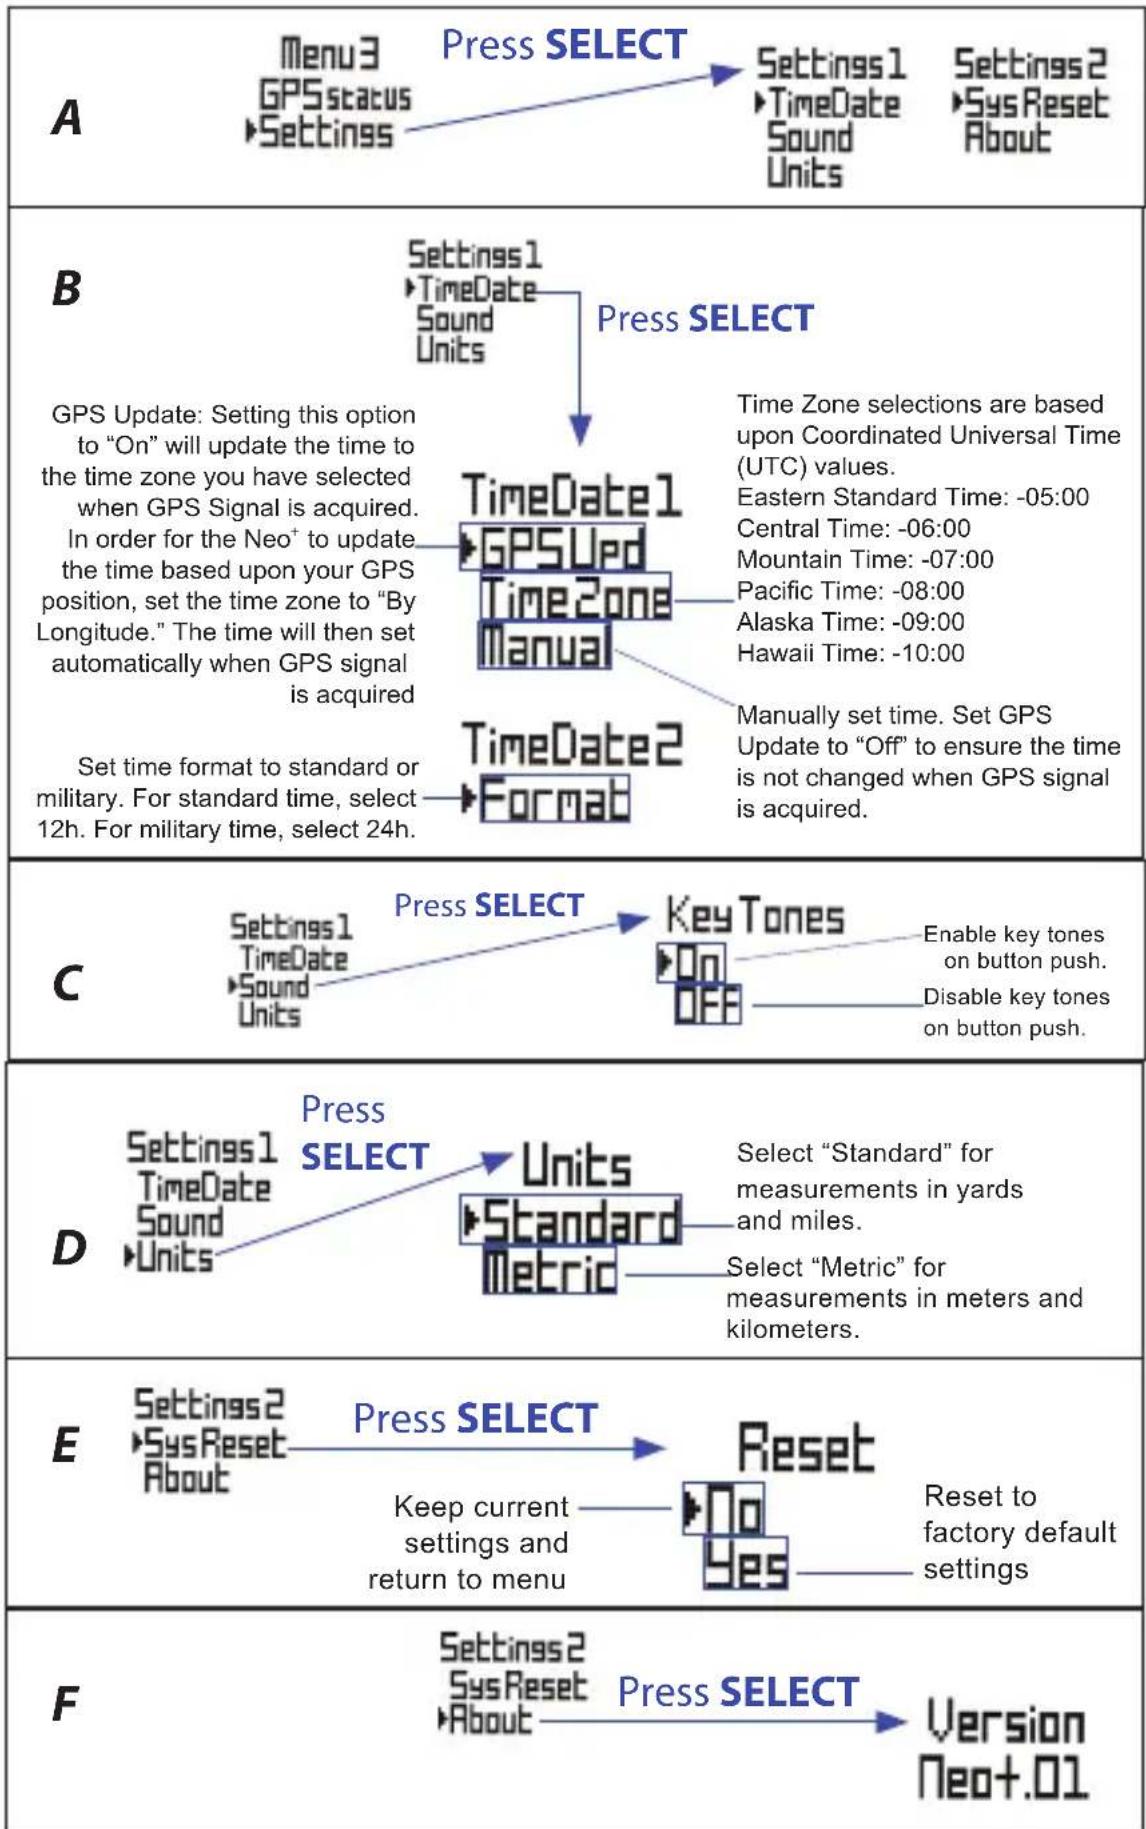
Using the Settings Menu
Settings (A): From the settings menu, you can adjust the time and date (select "TimeDate"), disable the key tones (select "Sound"), adjust the units of measurement between standard and metric (select "Units"), and perform a system reset (select "SysReset") to restore all original settings.
Time/Date (B): This option allows you to set the time and date, set the time zone, adjust the GPS update settings, and set the preferred time format.
Sound (C): This menu option allows you to disable key tones. When key tones are set to the "On" position, the Neo+ will emit beeping tones with each button push. When key tones are set to the "Off" position, the button pushes will be silent.
Units (D): This menu option allows you to change the units of measurement for distance readings from standard to metric.
System Reset (E): This menu option resets the Neo+ Watch to factory default settings.
About (F): The “About” screen displays the firmware/software version that is currently installed and running on your device. Please visit www.bushnellgolf.com for information regarding the availability of updates for the firmware/software.
Using the Settings Menu
flowchart
graph TD
A["Menu 3 GPS status"] -->|Press SELECT| Settings1["Settings1 TimeDate Sound Units"]
Settings1 -->|Press SELECT| Settings2["Settings2 Sys Reset About"]
Settings1 -->|Press SELECT| TimeDate1["TimeDate1 GPS Used"]
Settings2 -->|Press SELECT| TimeZone["TimeZone Selection"]
TimeZone -->|Press SELECT| TimeZoneSelections["Time Zone selections are based upon Coordinated Universal Time (UTC) values. Eastern Standard Time: -05:00 Central Time: -06:00 Mountain Time: -07:00 Pacific Time: -08:00 Alaska Time: -09:00 Hawaii Time: -10:00 Manually set time. Set GPS Update to "Off" to ensure the time is not changed when GPS signal is acquired."]
TimeZoneSelections -->|Press SELECT| TimeZoneSelectionsSelections
TimeZoneSelectionsSelectionsSelectionsSelectionsSelectionsSelectionsSelectionsSelectionsSelectionsSelectionsSelectionsSelectionsSelectionsSelectionsSelectionsSelectionsSelectionsSelectionsSelectionsSelectionsSelectionsSelectionsSelectionsSelectionsSelectionsSelectionsSelectionsSelectionsSelectionsSelectionsSelectionsSelectionsSelectionsSelectionsSelectionsSelectionsSelectionsSelectionsSelectionsSelectionsSelectionsSelectionsSelectionsSelectionsSelectionsSelectionsSelectionsSelectionsSelectionsSelectionsSelectiont
subgraph GPS Update
GPSUpdate["GPS Update: Setting this option to "On" will update the time to the time zone you have selected when GPS Signal is acquired. In order for the Neo+ to update the time based upon your GPS position, set the time zone to "By Longitude." The time will then set automatically when GPS signal is acquired"]
GPSUpdate --> GPSUpdate
GPSUpdate --> GPSUpdate
GPSUpdate --> GPSUpdate
GPSUpdate --> GPSUpdate
GPSUpdate --> GPSUpdate
GPSUpdate --> GPSUpdate
GPSUpdate --> GPSUpdate
GPSUpdate --> GPSUpdate
GPSUpdate --> GPSUpdate
GPSUpdate --> GPSUpdate
GPSUpdate --> GPSUpdate
GPSUpdate --> GPSUpdate
GPSUpdate --> GPSUpdate
GPSUpdate --> GPSUpdate
GPSUpdate --> GPSUpdate
PSUdTimeDate1["TimeDate1 GPS Ued"] -->|Press SELECT| TimesZone["TimeZone Selection"]
TimesZone -->|Press SELECT| TimesZoneSelections["Time Zone selections are based upon Coordinated Universal Time (UTC) values. Eastern Standard Time: -05:00 Central Time: -06:00 Mountain Time: -07:00 Pacific Time: -08:00 Alaska Time: -09:00 Hawaii Time: -10:00 Manually set time. Set GPS Update to "Off" to ensure the time is not changed when GPS signal is acquired. |<br> end<br> subgraph GPS Update<br> GPSUpdate --> GPSUpdate<br> GPSUpdate --> GPSUpdate<br> GPSUpdate --> GPSUpdate<br> GPSUpdate --> GPSUpdate<br> GPSUpdate --> GPSUpdate<br> GPSUpdate --> GPSUpdate<br> GPSUpdate --> GPSUpdate<br> GPSUpdate --> GPSUpdate<br> GPSUpdate --> GPSUpdate<br> GPSUpdate --> GPSUpdate<br> GPSUpdate --> GPSUpdate<br> GPSUpdate --> GPSUpdate<br> end<br> subgraph Military<br> MilitaryFormat[Set time format to standard or military. For standard time, select 12h. For military time, select 24h."] --> Format2["Format2 Format2 Format2 Format2 Format2 Format2 Format2 Format2 Format2 Format2 Format2 Format2 Format2 Format2 Format2 Format2 Format2 Format2 Format2 Format2 Format2 Format2 Format2 Format2 Format2 Format2 Format2 Format2 Format2 Format2 Format2 Format2 Format2 Format2 Format2 Format2 Format2 Format2 Format2 Format2 Format2 Format2 Format2 Format2 Format2 Format2 Format2 Format2 Format2 Format2 Format2<br> end<br> subgraph C<br> C[Settings1 TimeDate"] -->|Press SELECT| KeyTones["Key Tones On OFF"] --> EnableKeyTonesonbuttonpush.Disablekeytonesonbuttonpush.
end
subgraph D
D["Settings1 TimeDate"] -->|Press SELECT| Units["Units Standard Metric"] --> Select“Standard”formeasurementsinyardsandmiles.Select“Metric”formeasurementsinmeters andkilometers.
end
subgraph E
E["Settings2 SysReset"] -->|Press SELECT| Reset["Reset"] --> Resettofactorydefaultsettings.
end
subgraph F
F["Settings2 SysReset"] -->|Press SELECT| PressSelect["Press SELECT"] --> VersionNeo+01
end
Registering and Updating Golf Course Data
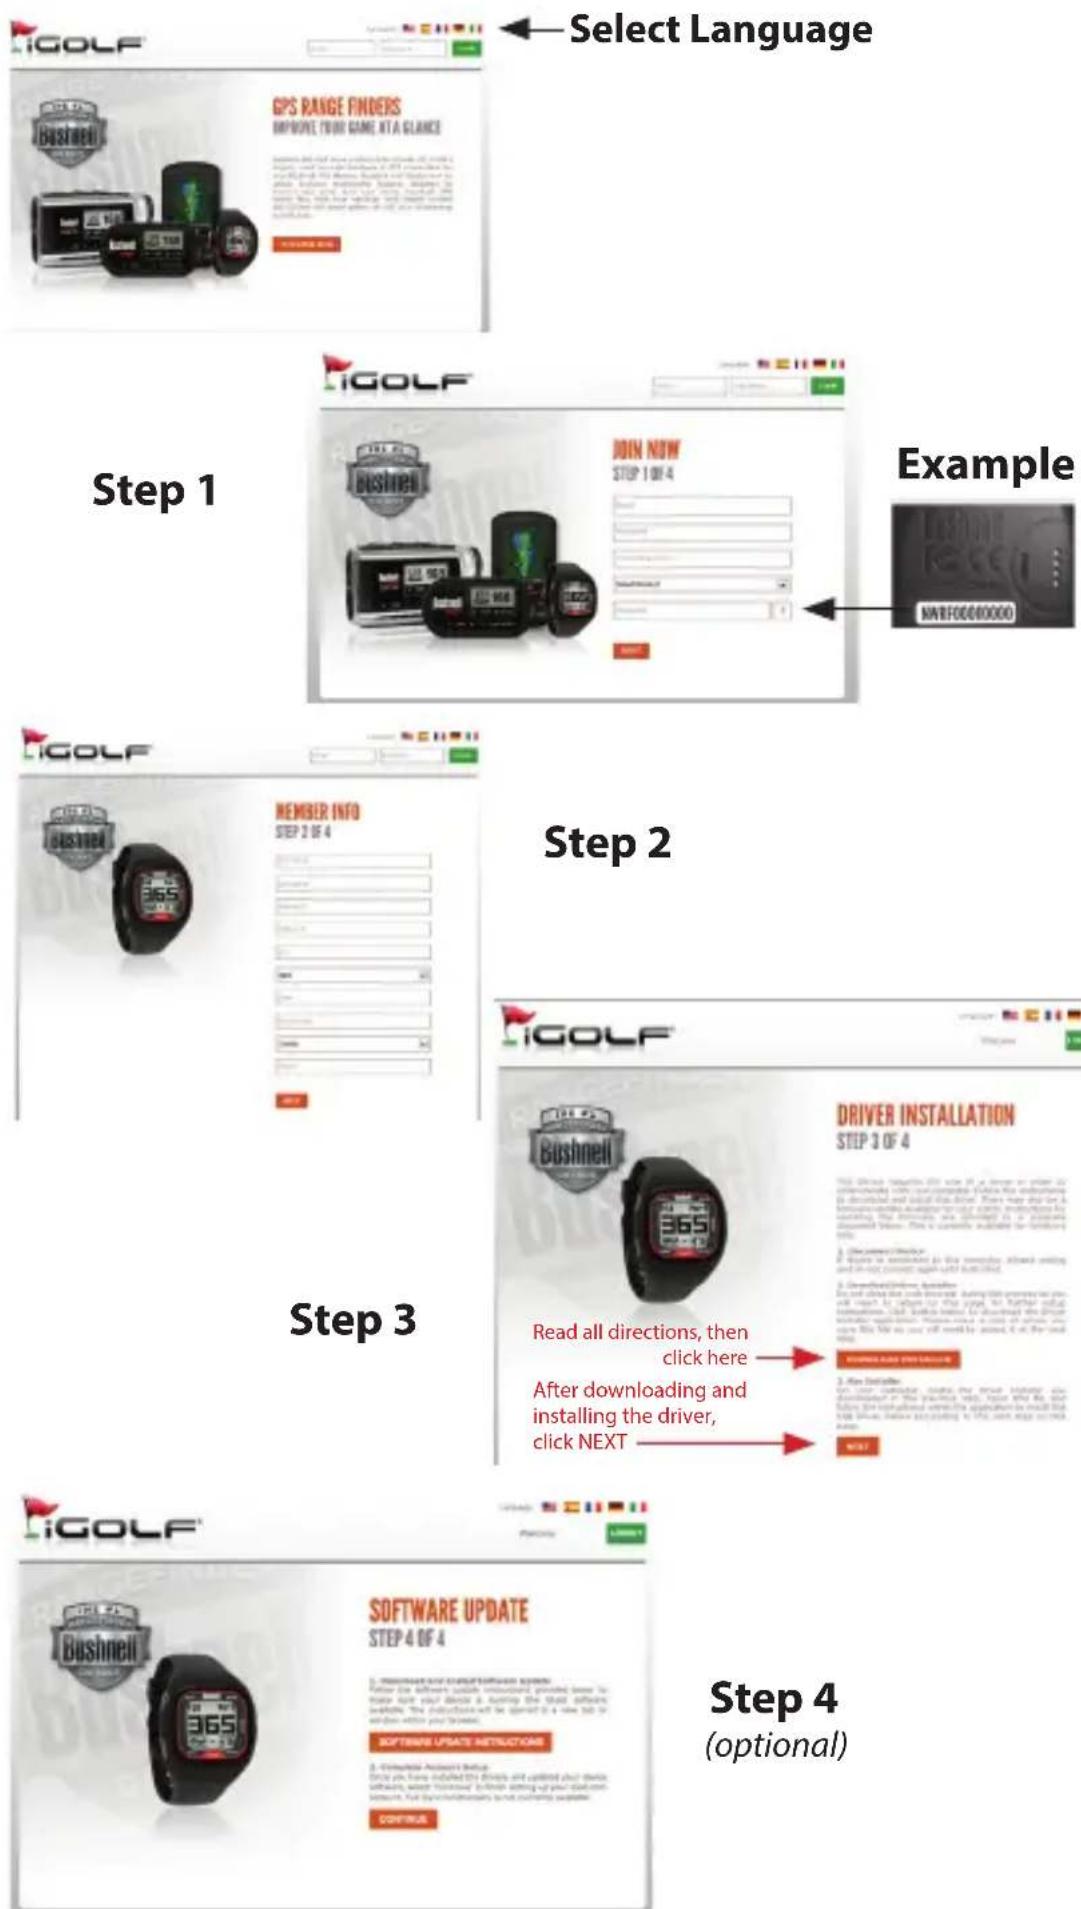
Setting up a free account and registering your Neo+ at www.bushnell.igolf.com is not required. However, doing so will allow you to update the preloaded GPS course data, and load any new courses. Registration is free and takes only a few minutes. Completing the registration will give you access to the latest GPS data for use on your device.
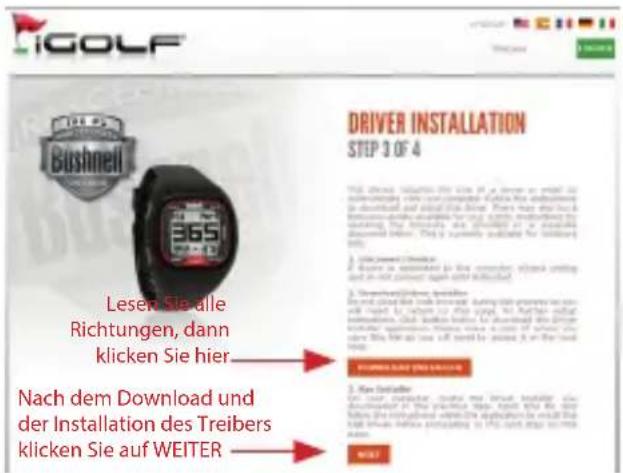
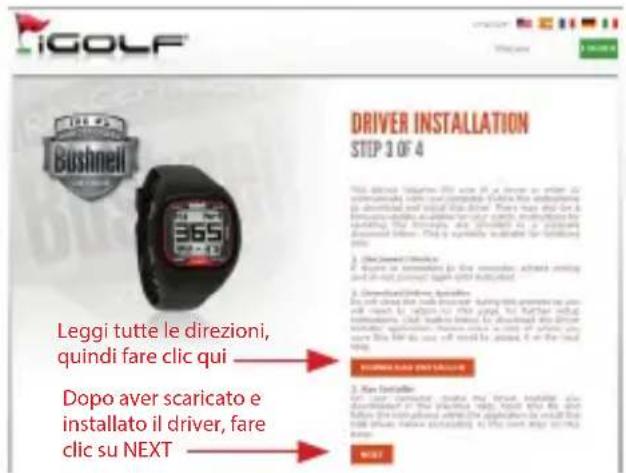
1) Go to www.bushnell.igolf.com and fill in your info to register your Neo+ Watch and create an account. The serial # of your Watch can be found on the back of the unit as shown in the example. Click "Next" at the end of Step 1 to go to Step 2 and complete your registration.
2) In Step 3, you will download and run an installer for the USB driver that allows your computer to recognize your Watch. The installer is compatible with Windows XP, Vista, and Windows 7 (to date, Mac OS is not supported). For best results, we recommend using Microsoft Internet Explorer as your browser.
3) After the driver installation is complete, click Next.
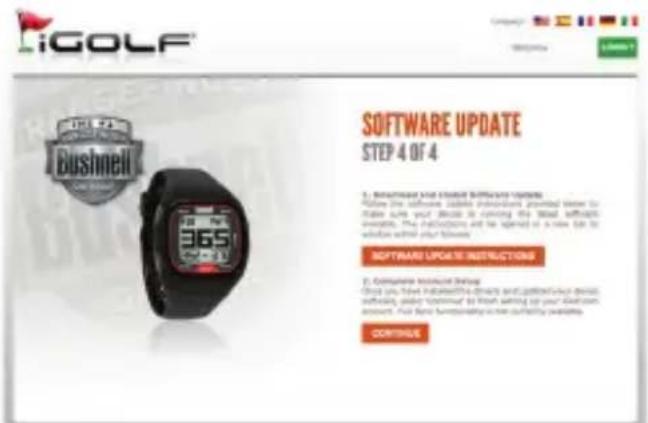
4) Step 4 (optional) provides access to a pdf document with detailed instructions for updating the internal operating software of the Neo+ Watch. A button (web link) is included in the pdf that will take you to the Software Wizard that downloads the update. Updating your Watch software is recommended to ensure that you have the latest features and operating improvements.
5) Once you've registered your Neo+ Watch and installed the USB driver, you'll be on the webpage that allows you to search for a golf course. Enter all or part of the course's name and click "Search". You'll be taken to the course info on the iGolf.com site, and can click "Download GPS Course File" to get the latest updated data for the course.
ONE YEAR LIMITED WARRANTY
Your Bushnell' product is warranted to be free of defects in materials and workmanship for one year after the date of purchase. In the event of a defect under this warranty, we will, at our option, repair or replace the product, provided that you return the product postage prepaid. This warranty does not cover damages caused by misuse, improper handling, installation, or maintenance provided by someone other than a Bushnell Authorized Service Department.
Any return made under this warranty must be accompanied by the items listed below:
A check/money order in the amount of \$10.00 to cover the cost of postage and handling
- Name and address for product return
- An explanation of the defect
- Proof of Date Purchased
- Product should be well packed in a sturdy outside shipping carton, to prevent damage in transit, with return postage prepaid to the address listed below:
IN U.S.A. Send To:
Bushnell Outdoor Products
IN CANADA Send To:
Bushnell Outdoor Products
Attn.: Repairs
Attn.: Repairs
9200 Cody
25A East Pearce Street, Unit 1
Overland Park, Kansas 66214
Richmond Hill, Ontario L4B 2M9
For products purchased outside the United States or Canada please contact your local dealer for applicable warranty information. In Europe you may also contact Bushnell at:
Bushnell Germany GmbH
European Service Centre
Mathias-Brüggen-Str. 80
D-50827 Köln
GERMANY
This warranty gives you specific legal rights.
You may have other rights which vary from country to country.
©2012 Bushnell Outdoor Products
FCC Compliance Statement
This device complies with Part 15 of the FCC interference limits for Class B digital devices FOR HOME OR OFFICE USE. These limits are designed to provide reasonable protection against harmful interference in a residential installation, and are more stringent than “outdoor” requirements.
Operation of this device is subject to the following conditions; (1) This device may not cause harmful interference, and (2) this device must accept any interference received, including interference that may cause undesired operation.
This equipment generates, uses and can radiate radio frequency energy and, if not installed and used in accordance with the instructions, may cause harmful interference to radio communications. However, there is no guarantee that interference will not occur in a particular installation. If this equipment does cause harmful interference to radio or television reception, which can be determined by turning the equipment off and on, the user is encouraged to try to correct the interference by one or more of the following measures:
- Reorient or relocate the receiving antenna.
- Increase the separation between the equipment and receiver.
- Connect the equipment into an outlet on a circuit different from that to which the receiver is connected.
- Consult the dealer or an experienced radio/TV technician for help.
The device does not contain any user-serviceable parts. Repairs should only be made by an Authorized Bushnell repair center. Unauthorized repairs or modifications could result in permanent damage to the equipment, and will void your warranty and your authority to operate this device under Part 15 regulations.
The shielded interface cable which is provided must be used with the equipment in order to comply with the limits for a digital device pursuant to Subpart B of Part 15 of FCC Rules.

Windows is a registered trademark of Microsoft Corporation in the United States and other countries. Mac and Mac OS are trademarks of Apple Inc., registered in the U.S. and other countries. Other names may be trademarks of their respective owners.
natural_image
Coiled black cable with a USB connector, no visible text or symbolsContenu du kit
l'étape 3

l'étape 4
(facultative)
Bushnell Outdoor Products Bushnell Outdoor Products
Attn.: Repairs Attn.: Repairs
9200 Cody 25A East Pearce Street, Unit 1
Overland Park, Kansas 66214 Richmond Hill, Ontario L4B 2M9
©2012 Bushnell Outdoor Products
Directive DEEE
natural_image
Symbol of a trash bin crossed with two crossed lines and a solid rectangle below (no text or labels)
B
Paso 4
(opcional)
Bushnell Outdoor Products Bushnell Outdoor Products
Attn.: Repairs Attn.: Repairs
9200 Cody 25A East Pearce Street, Unit 1
Overland Park, Kansas 66214 Richmond Hill, Ontario L4B 2M9
©2012 Bushnell Outdoor Products
Weee
natural_image
Simple line drawing of a trash bin with crossed lines indicating no waste or discharge (no text or symbols)

Schritt 2
Schritt 3
Schritt 4
(optional)
Bushnell Outdoor Products Bushnell Outdoor Products
Attn.: Repairs Attn.: Repairs
9200 Cody 25A East Pearce Street, Unit 1
Overland Park, Kansas 66214 Richmond Hill, Ontario L4B 2M9
European Service Cen
Mathias-Brüggen-Str. 80
D-50827 Köln
GERMANY
©2012 Bushnell Outdoor Products
Weee
natural_image
Simple line drawing of a trash bin with crossed lines and a blank rectangular base (no text or symbols)
Passo 2
Passo 3

Passo 4
(opzionale)
Bushnell Outdoor Products Bushnell Outdoor Products
Attn.: Repairs Attn.: Repairs
9200 Cody 25A East Pearce Street, Unit 1
Overland Park, Kansas 66214 Richmond Hill, Ontario L4B 2M9
©2012 Bushnell Outdoor Products
Weee
natural_image
Symbol of a trash bin crossed with two opposing diagonal lines (no text or numbers present)

©2012 Bushnell Outdoor Products