
ImageView 111026 - Camera BUSHNELL - Free user manual and instructions
Find the device manual for free ImageView 111026 BUSHNELL in PDF.
| Product Type | Digital binoculars with built-in camera |
| Brand | Bushnell |
| Model | ImageView 111026 |
| Power Supply | 2 AAA (LR03) alkaline, lithium, or NiMH batteries |
| Internal Memory | 8 MB |
| External Storage Support | SD card (max 1 GB) |
| Max Photo Resolution | 640 x 480 pixels |
| Max Video Resolution | 640 x 480 pixels at 15 frames per second |
| Max Video Recording Time | 53 seconds (High resolution) / 132 seconds (Low resolution) |
| Binocular Magnification | 8x |
| Minimum Focus Distance | 11 meters |
| Connectivity | USB (mass storage) |
| Compatible Operating Systems | Windows 98/ME/2000/XP, Mac OS 9/OSX |
| Shooting Modes | Photo, video, burst (3 or 5 images), self-timer (10 s) |
| Included Accessories | USB cable, wired remote control, CD-ROM with software |
| Included Software | MGI PhotoSuite (Windows) |
| Warranty | 2 years limited |
| Safety | Do not observe the sun directly with the binoculars |
| Maintenance and Cleaning | Clean the lenses with a soft microfiber cloth, avoid humidity |
Frequently Asked Questions - ImageView 111026 BUSHNELL
User questions about ImageView 111026 BUSHNELL
0 question about this device. Answer the ones you know or ask your own.
Ask a new question about this device
Download the instructions for your Camera in PDF format for free! Find your manual ImageView 111026 - BUSHNELL and take your electronic device back in hand. On this page are published all the documents necessary for the use of your device. ImageView 111026 by BUSHNELL.
USER MANUAL ImageView 111026 BUSHNELL
Make sure you download any pictures from your camera BEFORE removing or changing batteries, unless you have been using an SD card rather than the internal memory for photo storage. We recommend you download all current photo files for safekeeping before storing theImageView away if you are not using an SD card in the camera, in case the batteries become depleted during extended storage.
WARNING
Do NOT look directly at the sun through your binoculars. Doing so may cause permanent eye damage.
NOTE: To reset the camera if you experience problems or if the display becomes unresponsive, remove the batteries for at least one minute, then re-install them. This may result in the loss of all photos/videos stored in the internal memory.
ENGLISH
Congratulations on your purchase of the BushnellImageView binocular! The BushnellImageView binocular takes the technology of digital photography and combines it with a high-quality compact binocular. This allows you to observe sporting events, wildlife, scenic vistas or anything you would normally use a binocular for, and then save the image in a built-in attached digital camera. You can then download these images to your computer and e-mail them to your friends and family, print out the picture using the included software or save them in a photo album for future use. Before using the product, please read the instructions contained in this manual and take time to familiarize yourself with the different parts and features of the product.
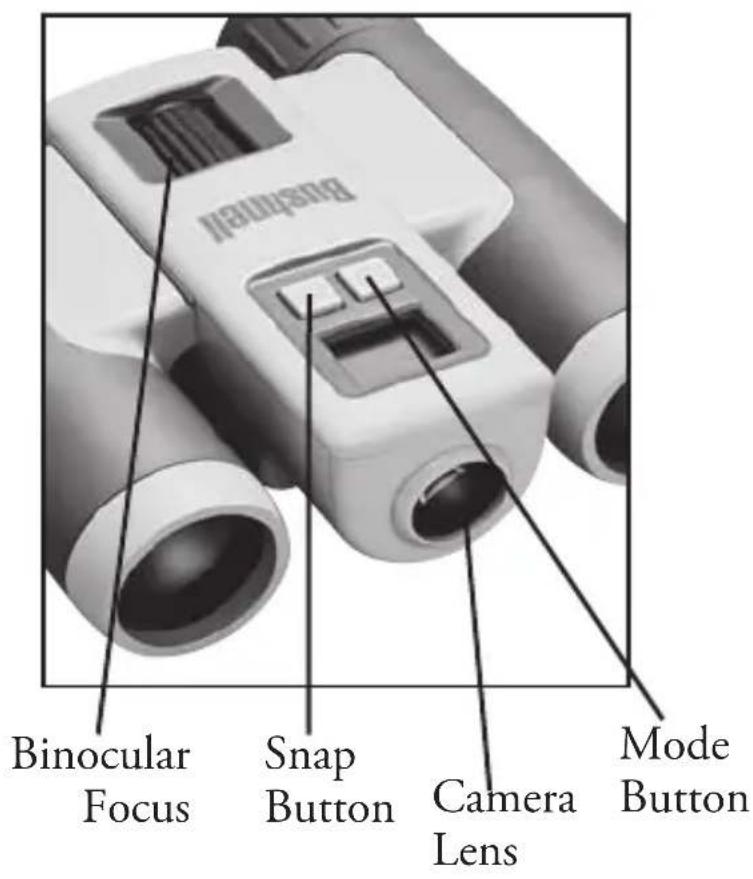
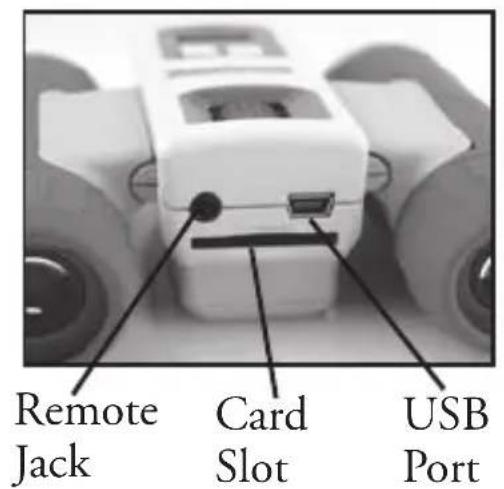
Camera and Binocular Parts Guide
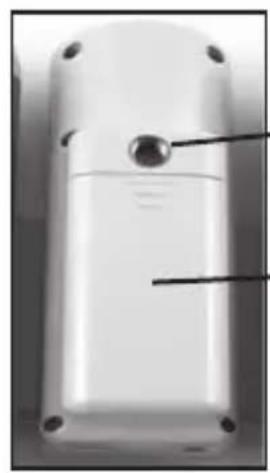
Tripod
Socket
Battery
Compartment
(Slide Open In
Direction of Arrow)
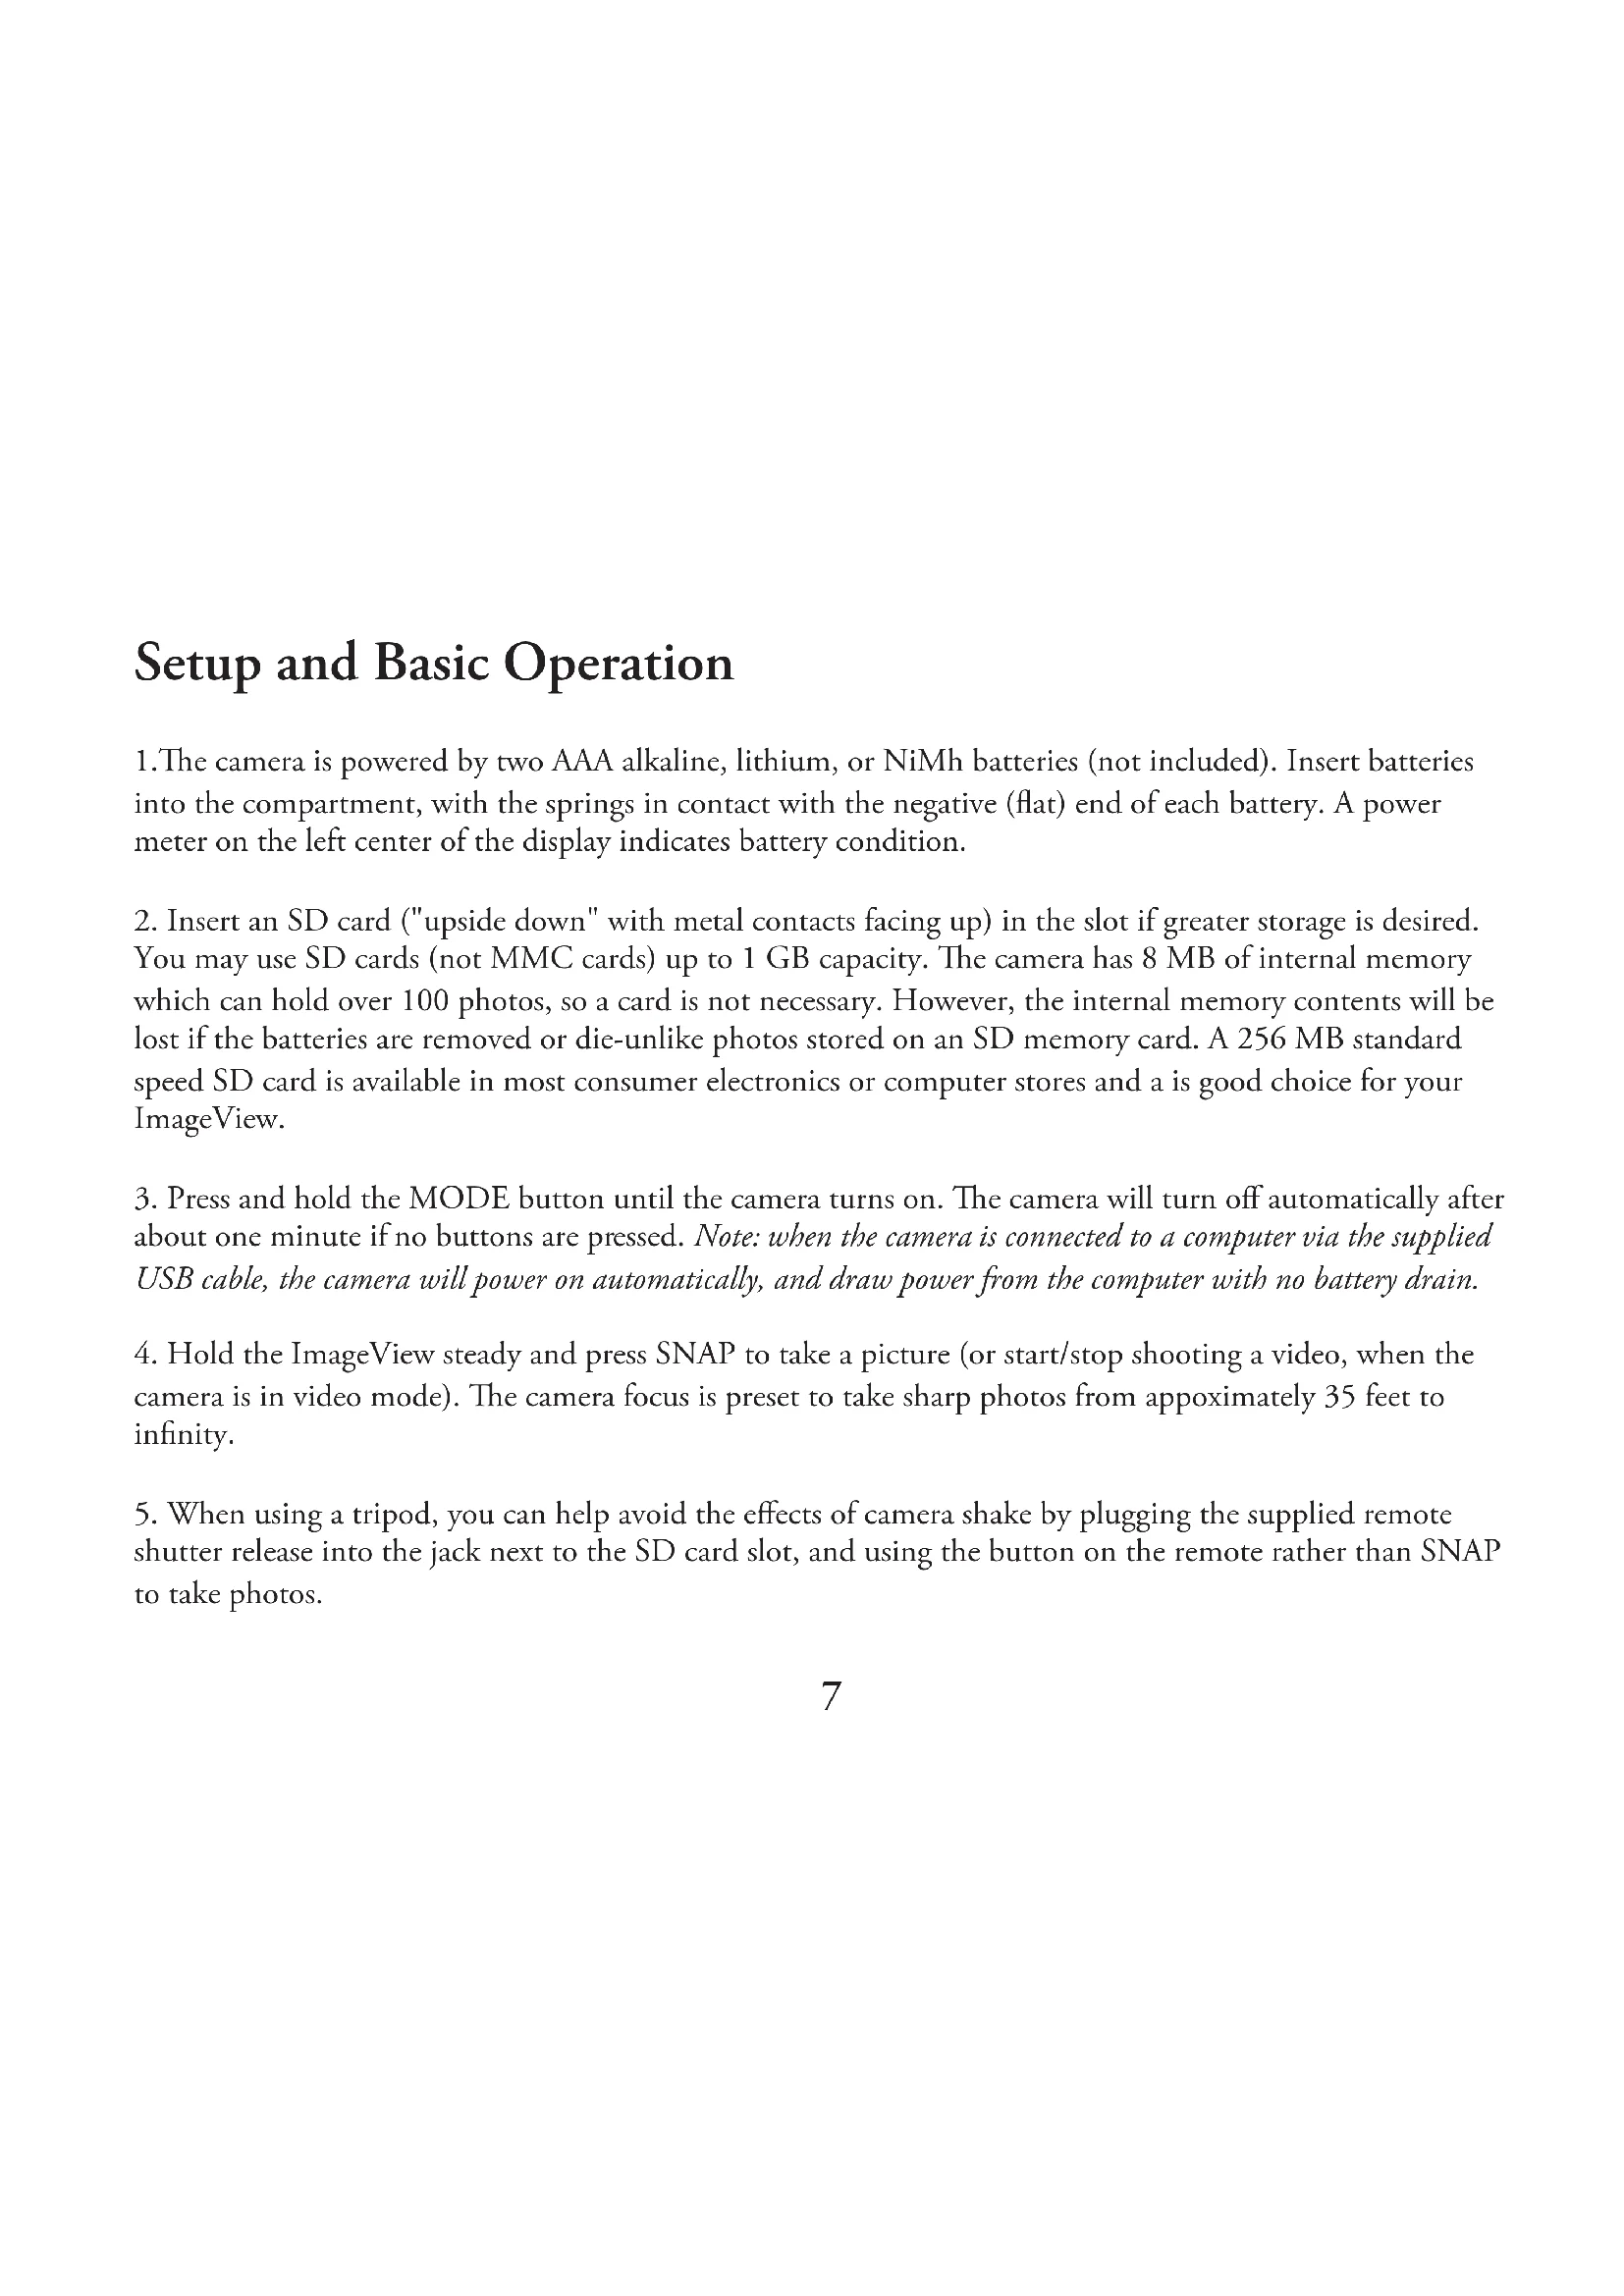
Setup and Basic Operation
-
The camera is powered by two AAA alkaline, lithium, or NiMh batteries (not included). Insert batteries into the compartment, with the springs in contact with the negative (flat) end of each battery. A power meter on the left center of the display indicates battery condition.
-
Insert an SD card ("upside down" with metal contacts facing up) in the slot if greater storage is desired. You may use SD cards (not MMC cards) up to 1 GB capacity. The camera has 8 MB of internal memory which can hold over 100 photos, so a card is not necessary. However, the internal memory contents will be lost if the batteries are removed or die-unlike photos stored on an SD memory card. A 256 MB standard speed SD card is available in most consumer electronics or computer stores and a is good choice for your ImageView.
-
Press and hold the MODE button until the camera turns on. The camera will turn off automatically after about one minute if no buttons are pressed. Note: when the camera is connected to a computer via the supplied USB cable, the camera will power on automatically, and draw power from the computer with no battery drain.
-
Hold the ImageView steady and press SNAP to take a picture (or start/stop shooting a video, when the camera is in video mode). The camera focus is preset to take sharp photos from approximately 35 feet to infinity.
-
When using a tripod, you can help avoid the effects of camera shake by plugging the supplied remote shutter release into the jack next to the SD card slot, and using the button on the remote rather than SNAP to take photos.
Using the Operational Modes/Setting Date & Time
TheImageView will imprint the date and time in the bottom right corner of your photos. To set the current date and time, after turning on the camera, press and hold both the MODE and SNAP buttons at the same time, until the display begins to flash. The display now shows the last two digits of the year. Press the MODE button to move the cursor to the second digit if necessary. Press the SNAP button to advance the digit to the current year ("07" for 2007, etc). Then press MODE to go to the next number, which is the month. Again, use SNAP to change this to the current month. Following the month display is: date, hour (24hr format), minute, and second-continue to set these following the same process using the MODE and then SNAP buttons. When you have completed all of the date/time settings, the display will stop flashing and return to normal. Note that you will need to reset the date/time after replacing batteries.
YourImageView is already set to high resolution and quality right out of the box, and it is not necessary to use the MODE settings and make any changes to get good results by simply pressing the SNAP button to take photos. However, as you might want to shoot a video clip, delete one or more previous photos, or explore other options, we recommend you review the available mode options listed on the following pages. Briefly pressing the MODE button will step through these operational modes in the listed order, and you will see the icon for each mode along with its current setting on the display. Use the SNAP button to select the desired setting for any mode. If you make no changes, and the SNAP or MODE button is not pressed within 5 seconds, the camera will return to normal operation and display.
Using the Operational Modes (Bold indicates default settings)
| Mode Icon Settings Description | |||
| Video Video | Camera | OFF, High(640x480 pixels per frame, 15 fps), Low (320x240 pixels) | Select "Hi" (recommended) or "Lo" video resolution instead of "OFF" to put the camera in video mode.Wait a few seconds for the camera to automatically return to the normal display, then begin shooting by pressing SNAP. The counter will show elapsed time-up to the 53 (Hi) or 132 (Lo) second maximum for each video clip. Press SNAP again to stop shooting.The counter will advance by one, indicating the video file has been saved. Return to the video mode setting and select OFF to reset the camera to still photo mode. |
| Quality | Hq or Lq | High, Low | Select "Hi" (recommended) or "Lo" quality to choose the amount of file compression, which affects the size of the photo file. "Lo" allows more photos to be stored in memory, but at reduced quality. |
| Resolution Hi or Lo | Lo High (640x480 pixels), Low(320x240 pixels) | Select "Hi" (recommended) or "Lo" resolution, based on your preference for better looking photos (Hi) or being able to take a greater number of photos (Lo). | |
Using the Operational Modes
| Mode Icon Settings Description | |||
| Line Frequency 60 or 50 60 Hz, 50 Hz Set to match the AC power frequency (cycles) of your country. This ensures that stills and videos shot under fluorescent lighting appear normal. | |||
| Continuous CT OFF, 3, 5 Select | 3 or 5 frames to shoot | a rapid series of photos instead of a single frame when SNAP is pressed (in normal still photo mode). To cancel, enter this mode again and select OFF. | |
| Memory Access MEM Sto (USB | Mass Storage), PC (USB Camera) | Select "Sto" to access the internal or card memory when the camera is connected to a computer with the USB cable. "PC" allows the camera to be used as a live USB/PC camera (note that the 8x magnification and lack of close focus capability limits usefulness in most size rooms) | |
| Delete Last | LSt+Trash Can | None-press SNAP to delete the last photo or video | Select this mode and press SNAP to delete only the last photo or video you took. The counter will go down one number. |
Using the Operational Modes
| Mode Icon Settings Description | |||
| Delete All ALL+Trash Can | None-press SNAP to delete all photo and video files | Select this mode and press SNAP to erase the entire memory contents (the counter resets to zero). Use this after downloading your files, to clear the memory so you can take new photos. If "Delete All" is selected accidentally, simply wait a few seconds and the camera will return to normal operation. | |
| Format FOr+Trash Can | None-press SNAP to format card or internal memory | If you are using a new SD card, or one previously used in other devices, we recommend you select Format and press SNAP before you start taking photos, to the card is setup with the correct data file system for this camera. Note that formatting a card erases its contents-please be sure you have backed up any previous files first. | |
| Self-Timer | Clock | OFF or On | Photo is taken after a 10 second delay when SNAP is pressed (in normal still photo mode.) This can be used to avoid accidentally shaking the camera when the SNAP button is pressed. If the remote shutter cable is available, it should be used instead of the self timer when the camera is tripod mounted. The timer automatically cancels after use. |
USING THE IMAGEVIEW WITH YOUR COMPUTER:
- The camera will be recognized as a USB mass storage device (if it is set to "STO" and not "PC"), which means no special drivers are required for all operating systems later than Windows 98 (Me, 2000, XP.) Mac OS 9 and OSX are also compatible. If you have a PC running Windows 98, you must install the driver found on the included CD-ROM BEFORE CONNECTING THE CAMERA TO YOUR PC.
- If you have a computer OS as listed above that is USB mass storage compliant, a new disc icon will appear in Windows Explorer (under "My Computer") as a new "Removable Disc" after plugging in the USB cable from the Imageview. Mac users will see the new disc device appear on their desktop. Clicking on the new disc icon will show the contents, a folder named "DCIM." The image folder inside this contains your photos, stored as JPEGs (.jpg file format). They may then be opened, edited, renamed and saved using any photo or graphics software that accepts .jpg files. If you do not have software that will open .jpg files, you should install MGI Photosuite (Windows only) from the included CD-ROM. See "Software Installation" for instructions.
- After you have copied or opened and saved the photo files to your computers hard drive, you may disconnect the Imageview camera (NEVER disconnect the camera while files are still being transferred to your computer.) Before disconnecting, you should "eject" or stop the removable disc representing the camera to avoid an error message (not necessary with Windows XP).
- See the following pages for full step by step instructions to download your photos.
System Requirements (Minimum)
OS:Windows*98/98SE/2000/ME/XP
CPU: MMX Pentium® 200MHZ equivalent or faster (Pentium® III 500 MHz for PhotoSuite5™)
Memory: 32MB minimum (64MB recommended for PhotoSuite)
SVGA video card w/2MB VRAM, 800x600 screen display, 16 bit High color
200 MB available hard disk space (if installing PhotoSuite)
Internal USB Port
Software Installation
If you are using Windows 98, you must install drivers before connecting the camera to your PC. Insert the CD-ROM into your computer's CD drive; it will auto-run and the install screen will be displayed. Select "Install Driver", then follow the directions. After installation, restart your computer. Windows 2000, ME, and XP do not require drivers, as the camera uses the USB mass storage standard, allowing the photo files to be accessed as if they were stored on an external hard drive. For any Windows OS, if you are not already using photo editing software you prefer, you may install Roxio PhotoSuite from the CD-ROM. Be sure to read the "Release Notes" completely, noting any tips or potential issues relevant to your PC configuration and OS.

WARNING: Make sure you download any picture from your camera before you remove the batteries from the camera.
Transferring The Photos & Videos to Your PC - Step by Step
- Be sure the driver has been installed first if you are on Windows 98/98SE.
- Connect the supplied cable to the ImageView's USB port, then directly to a main USB port on your computer-do not use front panel/keyboard USB ports or unpowered "hubs".
Transferring The Photos & Videos to Your PC continued
-
The LCD display will indicate "STO", and the ImageView will be recognized as a standard "USB Mass Storage" device. This means that the camera files can be easily viewed, edited, or copied to your hard drive, just as if they were stored on an external hard drive or a CD-ROM.
-
(This step is not required with Windows XP, simply use the options in the pop-up window to view, copy or edit your photos). Open My Computer or Windows Explorer. The camera will be seen as a new "Removable Disk" with an unused drive letter assigned to it. Double click this new "Disk" icon, open the "DCIM" folder inside, then the folder(s) inside that ("100MEDIA",etc). Your photos/videos are the files inside—they have the prefix "IMG" followed by a number, same as seen earlier on the camera's display when you review photos. Single clicking any file should show a small preview image.
-
Click "Edit>Select All" (or click on one photo, control+click to select multiple photos), then "Edit>Copy to Folder" (in Windows menus). Select an existing folder on your hard drive, such as "My Pictures", or create a new folder ("Hawaii Vacation", etc), then click "OK" to transfer copies of the photo files you want.
-
After the photos are transferred to your hard drive, you can disconnect the camera. Windows 2000 may produce a screen warning that you have disconnected a USB device without stopping or ejecting the "disk" first (your photo files will not be harmed). If so, check the box that adds an icon to your system tray or taskbar. Then next time you finish transferring photos, you can click that icon first, and "Stop the USB Mass Storage Device" before disconnecting the camera. (On Mac computers, you should "eject" the "disk" that appeared on your desktop when the camera was connected.)
Transferring The Photos & Videos to Your PC continued
-
You're now ready to open the photo files in any photo editing software. Just use File>Open and go to the folder where you stored the photos earlier. If you are using PhotoSuite, select File>Open Photo, then use the "Look in" pull down menu at the top of the Open window, select "My Computer", select your hard drive, and double click any photo in the folder where you copied the files from the camera. It is also possible to open and work with your photos directly from the ImageView while it is still connected. To do this with PhotoSuite, first follow steps 1-3, then open PhotoSuite, select File>Open Photo and use the "Look in" menu to select My Computer, then select the "Removable Disk", and open the folders inside until you get to the JPEG photo files. If you choose to work this way, from a connected camera, be sure that you save the photo (when you are done editing) to your hard drive, and not the camera's memory or card. To do this in PhotoSuite, after clicking "Done", answer "Save Changes?" with "Yes", but then answer "Replace Existing File"? with "No" and use the "Save As" dialog box to save the edited photo in a folder on your hard drive ("Save In>Local Disk"), not the "Removable Disk" (camera).
-
If you are new to photo editing on a computer, consult your software's Help menu (PhotoSuite has extensive built-in Help) for tips on using its features. Along with adjusting the brightness, contrast, sharpness and color of your photos, you can resize the photo to fit the paper if you are printing, or save a smaller, low or medium resolution version for email or inserting into documents. When you are ready to save your edited file, you may want to use "Save As" and give it a more descriptive name than "IMG_____". Doing this also preserves the original file as a backup to reopen and re-edit later. Make sure you have successfully transferred all the photos you wanted to save before using "Delete All" on your camera to make room for new images.
BINOCUIAR INSTRUCTIONS
Your Bushnell binocular is a precision instrument designed to provide many years of pleasurable viewing. This portion of the booklet will help you achieve optimum performance by explaining how you can adjust the binocular to your eyes, and how to care for this instrument. Read the instructions carefully before using your binocular.
EYE ADJUSTMENTS (Figure 1)
How to Adjust For Distance Between Your Eyes
The distance between the eyes, called "interpupillary distance," varies from person to person. To achieve perfect alignment of lens to eye, follow these simple steps.
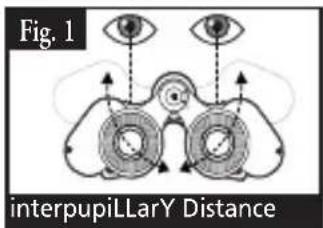
- Hold your binocular in the normal viewing position.
- Grasp each barrel firmly. Move the barrels closer together or further apart until you see a single circular field. Always re-set your binocular to this position before using.
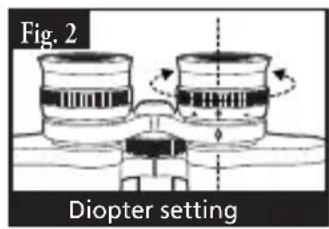
How to Adjust For Individual Eye Strength
As individual eyesight varies from one person to another, most Bushnell binoculars have a diopter setting feature which allows you to fine-tune the binocular to your vision. Follow the focusing instructions below for your type of binocular.
FOCUSING
- Adjust interpupillary distance. (Figure 1)
- Set the "diopter setting" (Figure 2) to zero and view a distant object.
- Keep both eyes open at all times.
- Using a lens cover or your hand, cover the objective (front) lens of the same side of the binocular that has the "diopter setting." This is usually the right side. (The left side on zoom models.)
- Using the center focus wheel, focus on a distant object with fine detail (e.g., brick wall, tree branches, etc.) until it appears as sharp as possible.
- Uncover the objective lens on the diopter side, cover the other objective lens, then view the same object.
- Using the "diopter setting" adjustment ring, focus the same object being viewed. Caution should be used as over turning or forcing the diopter eyepiece can cause damage or cause the eyepiece to break away from the chassis.
- Your binocular should be adjusted for your eyes. Focus at any far or near distances can now be attained simply by turning the center focus wheel. Make a note of the diopter setting for your eyes for future reference.
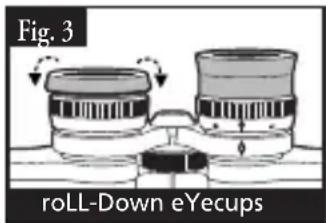
EYECUPS (Figure 3)
Your Bushnell binocular is fitted with rubber roll-down eyecups designed for your comfort and to exclude extraneous light. If you wear sun/eyeglasses, roll down the eyecups. This will bring your eyes closer to the binocular lens thus providing improved field of view.
INSTRUCTIONS FOR CARE OF BINOCUIARS
Your Bushnell binocular will provide years of trouble-free service if it receives the normal care you would give any fine optical instrument. The Imageview is not waterproof, and should not be exposed to any source of moisture. Water damage is not covered by the warranty.
- If your binocular has roll-down, flexible eyecups, store it with the eyecups up. This avoids excessive stress and wear on the eyecups in the down position.
- Avoid banging and dropping.
- Store in a cool, dry place.
- WARNING: Looking directly at the sun with your binocular can cause permanent eye damage.
- Never expose your ImageView binocular to any type of excessive liquid or fluid, as it is not water/ fogproof.
- Take the batteries out of your ImageView if you are not going to use it for a long period of time. (Make sure you download any pictures from your camera before you remove the batteries out of the camera.)
CLEANING
- Blow away any dust or debris on the lens (or use a soft lens brush.)
- To remove dirt or finger prints, clean with a soft cotton cloth rubbing in a circular motion. Use of a coarse cloth or unnecessary rubbing may scratch the lens surface and eventually cause permanent damage. A "microfiber" cleaning cloth (available at most photo dealers) is ideal for the routine cleaning of your optics.
- For a more thorough cleaning, photographic lens tissue and photographic-type lens cleaning fluid or isopropyl alcohol may be used. Always apply the fluid to the cleaning cloth – never directly on the lens.
TWO-YEAR LIMITED WARRANTY
Your Bushnell product is warranted to be free of defects in materials and workmanship for two years after the date of purchase. In the event of a defect under this warranty, we will, at our option, repair or replace the product, provided that you return the product postage prepaid. This warranty does not cover damages caused by misuse, improper handling, installation, or maintenance provided by someone other than a Bushnell Authorized Service Department.
Any return made under this warranty must be accompanied by the items listed below:
1) A check/money order in the amount of $10.00 to cover the cost of postage and handling
2) Name and address for product return
3) An explanation of the defect
4) Proof of Date Purchased
5) Product should be well packed in a sturdy outside shipping carton, to prevent damage in transit, with return postage prepaid to the address listed below:
IN U.S.A. Send To: IN CANADA Send To:
Bushnell Outdoor Products Bushnell Performance Optics
Attn.: Repairs Attn.: Repairs
8500 Marshall Drive 25A East Pearce Street, Unit 1
Lenexa, Kansas 66214 Richmond Hill, Ontario L4B 2M9
For products purchased outside the United States or Canada please contact your local dealer for applicable warranty information. In Europe you may also contact Bushnell at:
BUSHNELL Performance Optics GmbH
European Service Centre
MORSESTRASSE 4
D-50769 KÖLN
GERMANY
Tél: +49 (0) 221 709 939 3
Fax:+49(0)2217099398
This warranty gives you specific legal rights.
You may have other rights which vary from country to country.
©2006 Bushnell Outdoor Products
FCC Note:
This equipment has been tested and found to comply with the limits for a Class B digital device, pursuant to Part 15 of the FCC Rules. These limits are designed to provide reasonable protection against harmful interference in a residential installation. This equipment generates, uses and can radiate radio frequency energy and, if not installed and used in accordance with the instructions, may cause harmful interference to radio communications. However, there is no guarantee that interference will not occur in a particular installation. If this equipment does cause harmful interference to radio or television reception, which can be determined by turning the equipment off and on, the user is encouraged to try to correct the interference by one or more of the following measures:
Reorient or relocate the receiving antenna.
Increase the separation between the equipment and receiver. Connect the equipment into an outlet on a circuit different from that to which the receiver is connected. Consult the dealer or an experienced radio/TV technician for help.
The shielded interface cable must be used with the equipment in order to comply with the limits for a digital device pursuant to Subpart B of Part 15 of FCC Rules.
Specifications and designs are subject to change without any notice or obligation on the part of the manufacturer.
C
AVERTISSEMENT
Bushnell Outdoor Products Bushnell Performance Optics
Attn.: Repairs Attn.: Repairs
8500 Marshall Drive 25A East Pearce Street, Unit 1
Lenexa, Kansas 66214 Richmond Hill, Ontario L4B 2M9
European Service Centre
MORSESTRASSE 4
D-50769 Cologne
Allemagne
Tel: +49 (0) 221 709 939 3
Fax: +49 (0) 221 709 939 8
©2006 Bushnell Outdoor Products
Bushnell Outdoor Products B
ushnell Outdoor Products
Attn.: Repairs Attn.: Repairs
8500 Marshall Drive 25A East Pearce Street, Unit 1
Lenexa, Kansas 66214 Richmond Hill, Ontario L4B 2M9
European Service Centre
MORSESTRASSE 4
D-50769 K+LN
ALEMANIA
Tel: +49 (0) 221 709 939 3
Fax: +49 (0) 221 709 939 8
©2006 Bushnell Outdoor Products
Notade la FCC:
Bushnell Outdoor Products
Bushnell Outdoor Products
8500 Marshall Drive 25A East Pearce Street, Unit 1
Lenexa, Kansas 66214 Richmond Hill, Ontario L4B 2M9
European Service Centre
MORSESTRASSE 4
D-50769 KOLN
DEUTSCHLAND
Tel: +49 (0) 221 709 939 3
Fax: +49 (0) 221 709 939 8
©2006 Bushnell Outdoor Products
ISTRUZIONI PER I'USO DEL BINOCOIO
COME AVERE CURA DEI BINOCOIO
8500 Marshall Drive 25A East Pearce Street, Unit 1
Lenexa, Kansas 66214 Richmond Hill, Ontario L4B 2M9
European Service Centre
MORSESTRASSE 4
D-50769-Cologne
Germania
Tél: +49 (0) 221 709 939 3
Fax: +49 (0) 221 709 939 8
©2006 Bushnell Outdoor Products
Bushnell Outdoor Products Bushnell Performance Optics
Attn.: Repairs Attn.: Repairs
8500 Marshall Drive 25A East Pearce Street, Unit 1
Lenexa, Kansas 66214 Richmond Hill, Ontario L4B 2M9
European Service Centre
MORSESTRASSE 4
D-50769 KÖLN
Alemanha
Tel: +49 (0) 221 709 939 3
Fax: +49 (0) 221 709 939 8
©2006 Bushnell Outdoor Products
NotadaFCC:
©2006 Bushnell Outdoor Products

- WARNING
- ENGLISH
- Camera and Binocular Parts Guide
- Setup and Basic Operation
- Using the Operational Modes/Setting Date & Time
- Using the Operational Modes (Bold indicates default settings)
- USING THE IMAGEVIEW WITH YOUR COMPUTER:
- System Requirements (Minimum)
- Software Installation
- Transferring The Photos & Videos to Your PC - Step by Step
- Transferring The Photos & Videos to Your PC continued
- BINOCUIAR INSTRUCTIONS
- EYE ADJUSTMENTS (Figure 1)
- How to Adjust For Individual Eye Strength
- FOCUSING
- EYECUPS (Figure 3)
- INSTRUCTIONS FOR CARE OF BINOCUIARS
- CLEANING
- TWO-YEAR LIMITED WARRANTY
- IN U.S.A. Send To: IN CANADA Send To:
- FCC Note:
- AVERTISSEMENT
- Notade la FCC:
- ISTRUZIONI PER I'USO DEL BINOCOIO
- COME AVERE CURA DEI BINOCOIO
- NotadaFCC:
Brand : BUSHNELL
Model : ImageView 111026
Category : Camera