
Core S-4K - Camera BUSHNELL - Free user manual and instructions
Find the device manual for free Core S-4K BUSHNELL in PDF.


| Product Type | Trail Camera |
| Dimensions | Approx. 13.5 x 9.5 x 7.5 cm |
| Weight | Approx. 300 g (with batteries) |
| Power Supply | 4 x AA batteries (alkaline or lithium) or external 6V DC |
| Image Sensor | 4K Ultra HD (12 MP stills) |
| Trigger Speed | 0.2 seconds |
| Detection Range | Up to 30 meters |
| Night Vision | Infrared LEDs (no glow) |
| Memory | SD card up to 32 GB |
| Waterproof Rating | IP65 |
| Main Functions | Motion detection, time-lapse, video recording |
| Maintenance | Clean lens with soft cloth; store in dry place |
| Safety | Avoid extreme temperatures; use recommended batteries only |
| Spare Parts | Replacement straps, mounting brackets (available from Bushnell) |
| General Information | Bushnell Core S-4K high-resolution trail camera for wildlife monitoring |
Frequently Asked Questions - Core S-4K BUSHNELL
User questions about Core S-4K BUSHNELL
0 question about this device. Answer the ones you know or ask your own.
Ask a new question about this device
Download the instructions for your Camera in PDF format for free! Find your manual Core S-4K - BUSHNELL and take your electronic device back in hand. On this page are published all the documents necessary for the use of your device. Core S-4K by BUSHNELL.
USER MANUAL Core S-4K BUSHNELL
CORE DS-4K / S-4K
INSTRUCTION MANUAL
DS-4K MODEL #119987C / S-4K MODEL #119949C

WELCOME
Thank you for purchasing a Bushnell Trail Camera! This manual has all the instructions you need to set up your camera and your account, plus quick answers to your questions.
If your camera does not seem to be functioning properly or if you are having image quality issues, please check the Troubleshooting Tips section.
If your problem continues after trying the solutions in Troubleshooting Tips, please call Bushnell Customer Service at (800) 423-3537. In Canada, call (800) 361-5702.
Note: This Bushnell trail camera model is not designed or intended for operation or sale outside of the United States.
TABLE OF CONTENTS
Camera Overview 4
Viewscreen Indicators 5
Quick Start Guide 6
Helpful Setup Tips 8
Buttons & Functions Overview 12
Settings Menu 13
Reviewing & Deleting Photos & Videos 19
Troubleshooting Tips 20
Technical Specifications 25
Two Year Limited Warranty 29
CAMERA OVERVIEW
CORE DS-4K / CORE S-4K
![PIR Sensor, Video Mic, Daytime Lens, Nighttime Lens [only on Core DS-4K], Control Panel Cover, Light Sensor, Motion Indicator, LED IR Flash, Latch, Lock Hole.](/content/2026/06/1374861/images/fa2afc6a222904309a774d5c8d6ac9c56f7e0f73563a4364b4aaa1c035554fe9.jpg)


VIEWSCREEN INDICATORS
QUICK START GUIDE

- Make sure camera power switch is in the OFF position.

- Install 6 AA batteries (lithium or alkaline, lithium batteries are recommended).

- Make sure the write-protect switch on the side of the SD card is "OFF" (not in the "Lock" position.) Insert card (up to 512GB max). Do not insert or remove an SD card with the power switch in the ON position. A "click" sound indicates the card is installed properly.

- Switch the power ON.

- Set the date and time.

- Mount the camera using the tree strap.
Your camera is now ready to use at its default settings: photo mode, 10 sec intervals between photos, medium resolution, “Long Range” illumination mode. If you would like to customize your settings, see the Settings Menu section.
If you have questions, call Customer Service: 800-423-3537
HELPFUL SETUP TIPS
LEARN YOUR CAMERA AT HOME FIRST
We highly recommend that you first spend some time indoors with this manual and your camera to familiarize yourself with the Settings Menu and various functions like Video capture, as well as read the tips to help you mount it properly on a tree (see Mounting & Positioning).
INSTALLING BATTERIES
To load or remove batteries, locate the Battery Release Button. Press the button and the battery tray will release from the bottom of the camera. The battery tray will stop about 1/2 inch out of the device; this is a latch system to prevent the tray from dropping onto the ground. Just apply a little pressure when pulling and the tray will release. The battery tray has six battery slots. Install a full set of 6 batteries. Be sure to insert each battery with correct polarity (negative or “flat” end against the long spring of each battery slot).
USING SD CARDS
Choosing A Card
Your camera requires a standard SD (Secure Digital) memory card to save photos (.jpg format) and/or videos (.mp4 format). It supports SD and SDHC (High Capacity) cards up to a maximum 512GB capacity. We recommend high speed SD cards (SanDisk® SDHC rated class 6 or higher) if you are using the 1280x720 or 1920x1080 video settings.
Before Inserting
Make sure that the write-protect switch on the side of the card is “Off” (not in the “Lock” position).
Inserting
Insert the SD card into the card slot with its label side facing the front of the camera. A “click” sound indicates that the card is installed successfully. If the wrong side of the card is facing up, you will not be able to insert it.
Formatting
To assure the card is formatted to save images and video correctly, format the SD card by using the "Format" option.

Use this option especially when a card has been used in other devices.
Removing
To remove the SD card, be sure the camera's power is switched OFF, then gently push the card in and release it (do not try to pull it out without pushing in first). The card is released from the slot and ready to be removed when you hear the click.
CAMERA VIEWSCREEN
Check your viewscreen for the area your camera will see. Note: maximum distance of your camera is listed in Technical Specifications under Illumination Mode or on the box.
MOUNTING & POSITIONING
After you've set up the camera's settings to your preferences, you're ready start capturing images.
We recommend mounting the camera on a sturdy tree or post with a diameter of about 6 in. To get the optimal picture quality, the camera should be about 16-17 ft. away from the place to be monitored, with the camera placed at a height of 3.5-5 ft. Also, keep in mind that you will get the best results at night when the subject is within the ideal flash range, no farther than 80' and no closer than 10' from the camera.
The height away from the ground for placing the device should vary with the animal size appropriately. In general, 3 to 6 feet is preferred. You can avoid potential false triggers due to temperature and motion disturbances in front of the camera by not aiming it at a heat source or nearby tree branches or brush (especially on windy days).
There are two ways to mount the camera:
- Using the provided adjustable belt: Push one end of the belt through the two slots on the back of the trail camera. Thread the end of the strap through the buckle. Fasten the belt securely around the tree trunk by pulling the end of the strap firmly so there is no slack left.

- Using the tripod socket: The camera is equipped with a socket at the back (below the strap brackets) to enable mounting on a tripod or other camera mounting accessories that have a standard 1/4"-20 thread.

USING A SOLAR PANEL ACCESSORY
You can connect an optional Solar Panel accessory (model# 119986C) – please visit www.bushnell.com for more information) to the “DC In” jack on the bottom of your camera.
Other external power supplies should not be used, as the camera and/or display may not function correctly. If the solar panel is connected and AA batteries are installed, the camera will be powered by the solar panel's rechargeable lith-ion battery, as long as it provides adequate voltage (if not, the camera will switch to battery power). The solar panel's battery will power the camera at night.
BUTTONS & FUNCTIONS OVERVIEW
Power Off
Function
- “Safe” mode when replacing the SD card or batteries.
- When transporting the camera.
- When connecting camera to a computer's USB port to download your photos/videos.
- When storing the camera. NOTE: Remove batteries before storing for a long time. In OFF mode, your camera still consumes power at a very low level unless the batteries are removed.
Power On
Function
- When you are ready for the camera to begin taking photos or video. NOTE: After you switch the power ON, the motion indicator LED will blink red for about 10 seconds. This allows time to close the front cover, lock the latch, and leave the monitored area. The camera will take photos or videos automatically according to its current settings when the PIR sensors detect motion.
Menu
Function
- Press once to activate MENU options on view screen, press again to go back to the home screen.
- Allows you to change your specific settings for date & time, photos and videos. (See Settings Menu).
Right & Left Arrow
Function
- Press right button to go forward in the menu setting options, press left arrow to go backward.
Up & Down Arrow
Function
- Press to go up or down to choose a specific setting in the menu option you are currently viewing.
Ok Button
Function
- Press the OK button to save the setting you select in the Menu.
SETTINGS MENU

Time and Date
Sets the hour [24-hr format only, "00" = midnight, "12" = noon], minute, year, month, and date.

Pre-Sets
Allows you to select settings ideal for the following scenarios, or Advance mode to customize all settings.
Feeder: Medium Image Size, 3 Picture Capture, 3m Interval

Trail: Medium Image Size, 1 Picture Capture, 0.5s Interval
Food Plot: High Image Size, 1 Picture Capture, 2S Interval, Field Scan ON 5:30-9:00/15:30-19:30 with 5M Interval
Advanced: To customize all settings.

Mode
Selects the format your camera will record in.
Camera: For photos only.
Video: For videos only.
Hybrid: A photo (multiple photos, if NUM PICS is set >1) followed by a video clip will be captured for each PIR trigger event.

Image Size
Chooses the image resolution and size. Note: Larger sizes mean higher image resolutions that take up more space on the SD card. Medium is the recommended default for good resolution and smaller size.

Capture Number
Selects how many photos are taken in sequence per trigger. This setting affects photos taken in Camera, Hybrid, and Field Scan mode.

Image Format
Selects the aspect ratio of your photos.


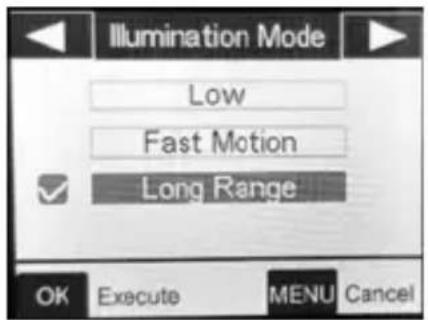
Illumination Mode
Selects the shutter speed.
Note: These settings only affect the quality of your nighttime images.
Low: Recommended for subjects at less than 60'.
Fast Motion: Recommended for subjects moving quickly through the frame.
Long Range: Recommended for maximum illumination range and field of view. (You may experience more motion blur at this.)


Camera Name
Allows you to enter a name for your camera that will appear on the image time stamp. Press the OK button to choose "Input" and go to the name input screen. If necessary, select the arrow in the upper right of the keyboard to erase the current camera name, then enter the new name using the arrow buttons and keyboard. Press the OK button to select a letter. Press MENU to save the name to memory.

Video Size
Selects video resolution.
3840x2160: Maximum resolution, takes up the most space on your SD card.
1920x1080: The recommended default resolution, clear resolution without filling up your SD too fast.
1280x720: Lowest resolution. Good for videos when resolution is not critical. Note: We recommend SanDisk® SDHC class 10 or higher.

Video Length
Sets length per video clip. 10 seconds is the recommended default. Press OK to see other options.
Nighttime limit of 15 seconds when Illumination Mode = “Long Range”. The “Dynamic” setting provides a variable video length, based on animal activity within PIR range and your Interval and Illumination Mode settings.

Delay
Selects the length of time that the camera will “wait” until it responds to any additional triggers from the PIR. Settings begin with 10 second default when parameter is first selected. To choose other intervals, press OK, and select by using the arrow buttons.
The shorter your delay, the more images you'll get.
Sensor Level
Auto sensor level will automatically adjust the sensor level depending on the surrounding temperature.
Auto: Automatically sets sensor level based upon temperature.
High: Recommended when air temperature is above 70° or when maximum range is desired.
Med: Recommended when air temperature is 45-70° or when range is up to 70'.
Low: Recommended when air temperature is below 45° or when range is up to 40'.


Camera Mode
Allows you to limit operation to day or night period if desired.
Day: Only captures images at daytime.
Night: Only captures images at nighttime.
24hrs: Captures pictures day and night.

Format
Deletes all files stored on a card to prepare it for reuse. Always format a card that has been previously used in other devices.
Caution! Make sure you have downloaded and backed up any files you want to save first!

Time Stamp
Selects on or off for time stamps, current temperature, moon phase, and camera name on images.

Field Scan
Allows you to capture images without requiring a trigger during a specified time period and interval. For instance, it will take picture every 5 minutes between 8am and 5pm if that is your desired time period.
On: Allows you to select two time periods within a 24-hour period and the interval.
Off: The recommended default.

Coordinate to Input
Allows you manually input GPS coordinates that will appear on image time stamps. This can be useful when running multiple cameras in an area, especially in research scenarios.
On: Takes you to coordinate setting options.
Off: The default setting.

Default
Restores all settings to the factory defaults.

Firmware Version
If you choose to update firmware, this is the screen you'll use. See firmware update instructions at https://www.bushnell.com/bu-product-software-updates.html or call Customer Service at (800) 423-3537 for details.
REVIEWING & DELETING PHOTOS & VIDEOS
After you have set up, mounted, and activated your camera, you will return later to review the images it has captured. We recommend viewing the images directly from the SD card.
Reviewing Images Directly From the SD Card
This is the most popular method of viewing images. Power the camera OFF and remove the SD card. Insert the SD card into an SD card viewer or the SD card slot on your computer to open and view your files.
Reviewing Images On the Camera
From the home screen, select the OK button. This will take you to the last image captured. Use the Up and Down arrows to scroll through and view all the images captured on the card. Press the MENU button to delete images from here. Press the OK button to exit view mode.
Deleting Photos or Videos
To delete all photos from the installed SD card, use the Format function on the camera. Or delete them when viewing on your computer.
TROUBLESHOOTING TIPS
1) Camera won't power on.
Possible Cause
Batteries not fully installed, or not installed correctly.
Recommended Solution(s)
- Install new AA alkaline or Bushnell recommended Energizer® Lithium AA batteries.
- Make sure the positive (+) and negative (−) poles are lined up properly in each compartment, with the (−) pole making contact with the spring.
2) Camera takes images without animals.
Possible Cause
A “false trigger” caused by motion (branches, water, etc.) and/or high heat in front of the camera lens when there is no subject in the image.
Recommended Solution(s)
- Move camera to spot without branches or water close to camera.
- Change sensor level in menu settings.
- Move camera to inside area without movement to check and see if it still takes pictures without movement. Contact customer service for possible repair or replacement.
3) Camera responds slowly to movement, does not always capture image when triggered.
Possible Cause
PIR sensitivity setting needs to be adjusted.
Recommended Solution(s)
- Go to “Sensor Level” in the Setting Menu and increase the PIR sensitivity.
4) Battery life is shorter than expected.
Possible Cause
Battery life will vary with operating temperature and the number of images taken over time. Setting the Interval time to 0.5 second will decrease battery life. Typically, you will be able to capture several thousand images before the batteries die.
Recommended Solution(s)
- Make sure you install all new alkaline or Bushnell recommended Energizer® Lithium AA batteries.
- Use Bushnell recommended SanDisk® brand SD Cards.
- Longer delays and shorter night illumination will increase battery life (you'll take less images and use less flash). Adjust these in the Settings Menu.
5] Camera stops taking images or won't take images.
Possible Cause
The SD Card is full, in the locked position, improperly formatted, or the batteries are dead.
Recommended Solution(s)
- Check SD card. If full, download images, erase from card, reinstall empty card in camera.
- Move the “write protect” switch to the unlocked position.
- Reformat the card by using the “FORMAT” option in the Settings Menu.
6) Night images or videos look too dark.
Possible Cause
Batteries are low or Settings are not set for good night quality.
Recommended Solution(s)
- Check battery power. If low, replace.
- Check distance of subject from camera. If beyond 80', subject may not be in flash range.
- Go to Setting Menu, make sure Illumination Mode is set to “Long Range”.
- Note: When the Capture Number is set higher than “1”, or with very short Interval settings, some images may appear darker than others due to the quick response and rapid retriggering of the camera.
7] Night images or videos look too bright.
Possible Cause
Subject is coming too close to camera for settings.
Recommended Solution(s)
- If animals are coming within 10' of camera, go to Settings Menu, select Illumination Mode and go to "Low" or "Fast Motion".
8) Daytime images or videos look too dark.
Possible Cause
Camera is aimed at sun or extremely bright sources during day.
Recommended Solution(s)
- Re-aim camera so not facing direct sun.
- Make sure Light Sensor on camera is not in shade while camera is aimed into a bright area during day.
9) Daytime images or videos look too bright.
Possible Cause
Camera is aimed at a dark area during the day.
Recommended Solution(s)
- Re-aim camera to an area with more daylight.
10) Images appear off-color, i.e., red, green, or blue.
Possible Cause
Sensor is confused in certain lighting conditions.
Recommended Solution(s)
- If seen consistently, sensor may need repair. Contact Customer Service.
11) Videos are too short, not recording to the length set.
Possible Cause
Batteries are low, SD card is full, or settings need adjustment.
Recommended Solution(s)
- Check battery power.
- Check SD card. Replace or erase if full.
- When Illumination Mode is set to “Long Range”, the maximum video length is 15 seconds to avoid potential overheating of batteries and/or electronic components.
12) Date/Time stamp does not appear in images.
Possible Cause
"TIMESTAMP" setting is off.
Recommended Solution(s)
- Go to the Settings Menu, select "TIMESTAMP", select "ON".
13) Viewscreen powers on, but no text appears.
Possible Cause
Batteries are low or dead.
Recommended Solution(s)
- Replace with new AA Alkaline or Lithium batteries.
14) Viewscreen comes on but then powers off.
Possible Cause
Viewscreen automatically turns off after 30 seconds unless a control key is pressed.
Recommended Solution(s)
- Press a MENU button to reactivate the screen.
15) Camera won't retain settings.
Possible Cause
Setting changes have not been saved.
Recommended Solution(s)
- Make sure to press "OK" after changing the settings.
16) Moisture or ants inside camera.
Possible Cause
The "DC in" plug is not firmly in place.
Recommended Solution(s)
- Make sure the DC in plug is firmly in place. This prevents humidity and keeps rain out, as well as ants attracted to the camera's low-level vibrations.
17) Field Scan not working.
Possible Cause
Field Scan is not set properly.
Recommended Solution(s)
- Make sure the start and stop times of Field Scan A and B do not overlap. [Ex: If start time of A is 10am, stop time of B cannot be 8am].
TECHNICAL SPECIFICATIONS
CORE DS-4K #119987
Lens - FOV=50° Horizontal
Display Screen - 1.5" Color
Image Size (pixel count in 16:9 format)
- Low-2MP = 1920x1080 • Medium 10MP = 4208x2368
- High- 32MP = 7552x4248
Video Size
- 4K [3840x2160] @ 30FPS
- 1080p (1920x1080) @ 60FPS
- 720p (1280x720) @ 60FPS
Video Length - 5-60 seconds.
PIR Sensitivity - 4 settings: Low/Normal/High/Auto
Operation - User selectable: 24 Hour, Day only, or Night only (based on ambient light level)
Response Time - 0.15 second (Photo), 0.5 second (Video). 0.5 second interval
Delay - 0.5s - 60s and 1m-60m programmable
Images per Trigger - 1—6 programmable
Illumination Mode - Low, Fast Motion, Long Range (120' maximum range)
Power Supply - 6x AA batteries, lithium (recommended) or alkaline
Stand-by Current - > 0.075mA(75uA)
Average Battery Life*
approx. 12 mos. at 30 images per day average (15 day, 15 night w/LEDs)
Operating Temperature
-20 - 60°C (Storage temperature: -30 - 70°C)
Operating Humidity - 5% - 90%
TECHNICAL SPECIFICATIONS
CORE S-4K #119949
Lens - FOV=50° Horizontal
Display Screen - 1.5" Color
Image Size (pixel count in 16:9 format)
- Low-2MP = 2048x1152 • Medium 4MP = 2592x1464
- High-23MP = 6400x3600
Image Size (pixel count in 4:3 format)
- Low-2MP = 2048x1536 • Medium 5MP = 2592x1944
- High- 30MP = 6400x4800
Video Size
- 4K [3840x2160] @ 30FPS
- 1080p [1920x1080] @ 60FPS
- 720p [1080x720] @ 30FPS
Video Length - 5-60 seconds.
PIR Sensitivity - 4 settings: Low/Normal/High/Auto
Operation - User selectable: 24 Hour, Day only, or Night only (based on ambient light level)
Response Time - 0.2 second (Photo), 0.7 second (Video). 0.5 second interval
Delay - 0.5s - 60s and 1m-60m programmable
Images per Trigger - 1-6 programmable
Illumination Mode - Low, Fast Motion, Long Range (110' maximum range)
Power Supply - 6x AA batteries, lithium (recommended) or alkaline
Stand-by Current - > 0.8mW
Average Battery Life*
approx. 12 mos. at 30 images per day average (15 day, 15 night w/LEDs)
Operating Temperature
-20 - 60°C (Storage temperature: -30 - 70°C)
Operating Humidity - 5% - 90%
WARNING: This product can use Lithium based batteries. Lithium batteries can overheat and cause damage if physically abused. Do not use any batteries that are damaged or show signs of physical wear. Never use a mix of old and new batteries, or batteries with different brand names.
TWO-YEAR LIMITED WARRANTY
Your Bushnell® product is warranted to be free of defects in materials and workmanship for two years after the date of purchase. In the event of a defect under this warranty, we will, at our option, repair or replace the product, provided that you return the product postage prepaid. This warranty does not cover damages caused by misuse, improper handling, installation, or maintenance provided by someone other than a Bushnell Authorized Service Department.
Any return made under this warranty must be accompanied by the items listed below:
- A check/money order in the amount of $10.00 to cover the cost of postage and handling.
- Name, address and daytime phone # for product return.
- An explanation of the defect.
- Copy of your dated proof of purchase.
- Do not send in accessories (batteries, SD cards, strap), only the product for repair.
Product should be well packed in a sturdy outside shipping carton to prevent damage in transit, and shipped to the address listed below:
IN U.S.A. Send To: Bushnell Outdoor Products Attn: Repairs 9200 Cody Overland Park, Kansas 66214
IN CANADA Send To: Bushnell Outdoor Products Attn.: Repairs 140 Great Gulf Drive, Unit # B Vaughan, Ontario L4K 5W5
For products purchased outside the United States or Canada please contact your local dealer for applicable warranty information. In Europe you may also contact Bushnell at:
Bushnell Germany GmbH European Service Centre Mathias-Brüggen-Str. 80 D-50827 Köln GERMANY Tel: +49 221 995568-0 Fax: +49 221 995568-20
This warranty gives you specific legal rights. You may have other rights which vary from country to country. ©2021 Bushnell Outdoor Products
Specifications and designs are subject to change without any notice or obligation on the part of the manufacturer.
FCC COMPLIANCE STATEMENT
This device complies with part 15 of the FCC Rules. Operation is subject to the following two conditions: (1) This device may not cause harmful interference, and (2) this device must accept any interference received, including interference that may cause undesired operation.
This equipment has been tested and found to comply with the limits for a Class B digital device, pursuant to Part 15 of the FCC Rules. These limits are designed to provide reasonable protection against harmful interference in a residential installation. This equipment generates, uses and can radiate radio frequency energy and, if not installed and
used in accordance with the instructions, may cause harmful interference to radio communications. However, there is no guarantee that interference will not occur in a particular installation. If this equipment does
cause harmful interference to radio or television reception, which can be determined by turning the equipment off and on, the user is encouraged to try to correct the interference by one or more of the following measures:
- Reorient or relocate the receiving antenna.
- Increase the separation between the equipment and receiver.
- Connect the equipment into an outlet on a circuit different from that to which the receiver is connected.
- Consult the dealer or an experienced radio/TV technician for help.
Shielded interface cable must be used with the equipment in order to comply with the limits for a digital device pursuant to Subpart B of Part 15 of FCC Rules. Specifications and designs are subject to change without any notice or obligation on the part of the manufacturer.

Disposal of Electric and Electronic Equipment
(Applicable in the EU and other European countries with separate collection systems)
This equipment contains electric and/or electronic parts and must therefore not be disposed of as normal household waste. Instead, it should be disposed at the respective collection points for recycling provided by the communities.
For you, this is free of charge. If the equipment contains exchangeable (rechargeable) batteries, these too must
be removed before and, if necessary, in turn be disposed of according to the relevant regulations (see also the respective comments in this unit's instructions). Further information about the subject is available at your community administration, your local waste collection company, or in the store where you purchased this equipment.
Bushnell® TRAIL CAMERAS
For further questions or additional information please contact:
Bushnell Outdoor Products 9200 Cody, Overland Park, Kansas 66214
(800) 423-3537 | www.bushnell.com
©2021 Bushnell Outdoor Products



- WELCOME
- TABLE OF CONTENTS
- CAMERA OVERVIEW
- CORE DS-4K / CORE S-4K
- QUICK START GUIDE
- HELPFUL SETUP TIPS
- LEARN YOUR CAMERA AT HOME FIRST
- INSTALLING BATTERIES
- USING SD CARDS
- CHOOSING A CARD
- BEFORE INSERTING
- INSERTING
- FORMATTING
- REMOVING
- CAMERA VIEWSCREEN
- MOUNTING & POSITIONING
- THERE ARE TWO WAYS TO MOUNT THE CAMERA
- USING A SOLAR PANEL ACCESSORY
- BUTTONS & FUNCTIONS OVERVIEW
- POWER OFF
- FUNCTION
- POWER ON
- MENU
- RIGHT & LEFT ARROW
- UP & DOWN ARROW
- OK BUTTON
- SETTINGS MENU
- TIME AND DATE
- PRE-SETS
- MODE
- IMAGE SIZE
- CAPTURE NUMBER
- IMAGE FORMAT
- ILLUMINATION MODE
- CAMERA NAME
- VIDEO SIZE
- VIDEO LENGTH
- DELAY
- SENSOR LEVEL
- CAMERA MODE
- FORMAT
- TIME STAMP
- FIELD SCAN
- COORDINATE TO INPUT
- DEFAULT
- FIRMWARE VERSION
- REVIEWING & DELETING PHOTOS & VIDEOS
- REVIEWING IMAGES DIRECTLY FROM THE SD CARD
- REVIEWING IMAGES ON THE CAMERA
- DELETING PHOTOS OR VIDEOS
- TROUBLESHOOTING TIPS
- CAMERA WON'T POWER ON
- POSSIBLE CAUSE
- RECOMMENDED SOLUTION(S)
- CAMERA TAKES IMAGES WITHOUT ANIMALS
- CAMERA RESPONDS SLOWLY TO MOVEMENT, DOES NOT ALWAYS CAPTURE IMAGE WHEN TRIGGERED
- BATTERY LIFE IS SHORTER THAN EXPECTED
- ] CAMERA STOPS TAKING IMAGES OR WON'T TAKE IMAGES
- NIGHT IMAGES OR VIDEOS LOOK TOO DARK
- ] NIGHT IMAGES OR VIDEOS LOOK TOO BRIGHT
- DAYTIME IMAGES OR VIDEOS LOOK TOO DARK
- DAYTIME IMAGES OR VIDEOS LOOK TOO BRIGHT
- IMAGES APPEAR OFF-COLOR, I.E., RED, GREEN, OR BLUE
- VIDEOS ARE TOO SHORT, NOT RECORDING TO THE LENGTH SET
- DATE/TIME STAMP DOES NOT APPEAR IN IMAGES
- VIEWSCREEN POWERS ON, BUT NO TEXT APPEARS
- VIEWSCREEN COMES ON BUT THEN POWERS OFF
- CAMERA WON'T RETAIN SETTINGS
- MOISTURE OR ANTS INSIDE CAMERA
- FIELD SCAN NOT WORKING
- TECHNICAL SPECIFICATIONS
- IMAGE SIZE (PIXEL COUNT IN 16:9 FORMAT)
- AVERAGE BATTERY LIFE
- OPERATING TEMPERATURE
- IMAGE SIZE (PIXEL COUNT IN 4:3 FORMAT)
- TWO-YEAR LIMITED WARRANTY
- FCC COMPLIANCE STATEMENT
- DISPOSAL OF ELECTRIC AND ELECTRONIC EQUIPMENT
- BUSHNELL® TRAIL CAMERAS
Brand : BUSHNELL
Model : Core S-4K
Category : Camera