
RHO8323BT - Heating BEKO - Free user manual and instructions
Find the device manual for free RHO8323BT BEKO in PDF.
| Product type | Oil-filled electric radiator |
| Brand | Beko |
| Model | RHO8323BT |
| Power supply | 220-240 V ~ 50 Hz |
| Rated power | 2300 W (adjustable powers: 1000 W / 1300 W / 2300 W) |
| Main functions | Control panel with LED display, remote control, 24-hour timer, temperature adjustment, 3 heating modes (low, medium, high), memory function |
| Safety | Overheat protection (display shows "FF"), programmable automatic shutoff, safety distance 0.9 m, do not cover |
| Maintenance and cleaning | Clean with a dry cloth, do not use detergents or water, store in original carton |
| Spare parts and repairability | Oil tank repairs by manufacturer or its agent; power cord not replaceable by user |
| Compliance | WEEE (2012/19/EU), RoHS (2011/65/EU) |
| Package contents | Radiator, feet (to assemble), remote control, AAA batteries (2×), instruction manual |
| Weight | Approximately 12 kg (estimated) |
| Dimensions (W × D × H) | Approximately 60 × 25 × 65 cm (estimated) |
| Remote control battery type | 2 × AAA 1.5 V (alkaline or manganese) |
| Remote control range | Up to 5 m, 30° angle |
Frequently Asked Questions - RHO8323BT BEKO
User questions about RHO8323BT BEKO
0 question about this device. Answer the ones you know or ask your own.
Ask a new question about this device
Download the instructions for your Heating in PDF format for free! Find your manual RHO8323BT - BEKO and take your electronic device back in hand. On this page are published all the documents necessary for the use of your device. RHO8323BT by BEKO.
USER MANUAL RHO8323BT BEKO
This product is only suitable for well insulated spaces or occasional use.
EN-FR-IT-RU-KZ
CONTENTS
ENGLISH 03-17
FRANÇAIS 18-33
ITALIANO 34-51
PYCCKN 52-75
Ka3akwa 76-94
Please read this user manual first!
Dear Customer,
Thank you for preferring a Beko product. We hope that you get the best results from your product which has been manufactured with high quality and state-of-the-art technology. Therefore, please read this entire user manual and all other accompanying documents carefully before using the product and keep it as a reference for future use. If you handover the product to someone else, give the user manual as well. Follow all warnings and information in the user manual.
Meanings of the symbols
Following symbols are used in the various section of this manual:
| i | Important information or useful hints about usage. |
| ! | Warning for hazardous situations with regard to life and property. |
| 4 | Warning for electric shock. |
| Warning for danger of fire. | |
| Do not cover it. |
1 Important safety and environmental instructions
This section includes safety instructions that will help ensure the protection from risks of personal injuries or materialistic damages. Failure to follow these instructions shall void the warranty.
1.1 General safety
- This appliance complies with international safety standards.
-
This appliance can be used by children aged from 8 years and above and persons with reduced physical, sensory or mental capabilities or lack of experience and knowledge if they have been given supervision or instruction concerning use of the appliance in a safe way and understand the hazards involved. Children shall not play with the appliance. Cleaning and user maintenance shall not be made by children without supervision.
-
This appliance is intended to be used in household and similar applications such as:
-
Staff kitchen areas in shops, offices and other working environments;
- Farm houses
- By clients in hotels, and other residential type environments;
- Bed and Breakfast type environments.
Children of less than 3 years should be kept away unless continuously supervised. - Children aged from 3 years and less than 8 years shall only switch on/off the appliance provided that it has been placed or installed in its intended normal operating position and they have been given supervision or instruction concerning use of the appliance in a safe way and understand the hazards involved.
1 Important safety and environmental instructions
Children aged from 3 years and less than 8 years shall not plug in, regulate and clean the appliance or perform user maintenance.
- Do not use this heater in the immediate surroundings of a bath, a shower or a swimming pool.
- CAUTION: Some parts of this product can become very hot and cause burns. Particular attention has to be given where children and vulnerable people are present.
-
This heater is filled with a precise quantity of special oil. Repairs requiring opening of oil-container are only to be made by the manu facturer or his service agent who should be contacted if there is an oil leak. When scrapping the heater, follow the regulations concerning the disposal of oil.
-
This heater cannot achieve accurate temperature control of the environment, and thus cannot be used as insulation device for storage environment, items, animals and plants.
- This heater is hot when in use. To avoid burns, do not let bare skin touch hot surfaces. If provided, use handles when moving this heater. Keep combustible materials, such as furniture, pillows, bedding, papers, clothes, and curtains at least 3 feet (0.9 m) from the front of the heater and keep them away from the sides and rear.
- Extreme caution is necessary when any heater is used by or near children or invalids and whenever the heater is left operating and unattended.
- Always unplug heater when not in use.
1 Important safety and environmental instructions
- Do not operate any heater with a damaged cord or plug or after the heater malfunctions, has been dropped or damaged in any manner. Discard heater, or return to authorized service facility for examination and/or repair.
- Do not use outdoors.
- This heater is not intended for use in bathrooms, laundry areas and similar indoor locations. Never locate heater where it may fall into a bathtub or other water container.
- Do not run cord under carpeting. Do not cover cord with throw rugs, runners, or similar coverings. Do not route cord under furniture or appliances. Arrange cord away from traffic area and where it will not be tripped over.
-
To disconnect heater, press the button to off, then remove plug from outlet.
-
Do not insert or allow foreign objects to enter any ventilation or exhaust opening as this may cause an electric shock or fire, or damage the heater.
- To prevent a possible fire, do not block air intakes or exhaust in any manner. Do not use on soft surfaces, like a bed, where openings may become blocked.
- A heater has hot and arcing or sparking parts inside. Do not use it in areas where gasoline, paint, or flammable liquids are used or stored.
- Use this heater only as described in this manual. Any other use not recommended by the manufacturer may cause fire, electric shock, or injury to persons.
1 Important safety and environmental instructions
- Always plug heaters directly into a wall outlet/ receptacle. Never use with an extension cord or relocatable power tap (outlet/power strip).
1.2 Compliance with the WEEE Directive and Disposing of the Waste Product:
This product complies with EU WEEE Directive (2012/19/EU). This product bears a classification symbol for waste electrical and electronic equipment (WEEE).
This symbol indicates that this product shall not be disposed with other household wastes at the end of its service life. Used
device must be returned to official collection point for recycling of electrical and electronic devices. To find these collection systems please contact to your local authorities or retailer where the product was purchased. Each household performs important role in recovering and recycling of old appliance. Appropriate disposal of used appliance helps prevent potential negative consequences for the environment and human health.
1.3 Compliance with RoHS Directive
The product you have purchased complies with EU RoHS Directive (2011/65/EU). It does not contain harmful and prohibited materials specified in the Directive.
1.4 Package Information
Packaging materials of theproduct are manufactured fromrecyclable materials in accordancewith our National
Environment Regulations. Do not dispose of the packaging materials together with the domestic or other wastes.
Take them to the packaging material collection points designated by the local authorities.
1.5 Information on waste batteries
This symbol on rechargeable batteries/batteries or on the packaging indicates that the rechargeable battery/battery may not be
disposed of with regular house hold rubbish. For certain rechargeable batteries/ batteries, this symbol may be supplemented by a chemical symbol. Symbols for mercury (Hg) or lead (Pb) are provided if the rechargeable batteries/batteries contain more than 0,0005% mercury or more than 0,004% lead.
1 Important safety and environmental instructions
Rechargeable batteries/batteries, including those which do not contain heavy metal, may not be disposed of with household waste. Always dispose of used batteries in accordance with local environmental regulations. Make enquiries about the applicable disposal regulations where you live.
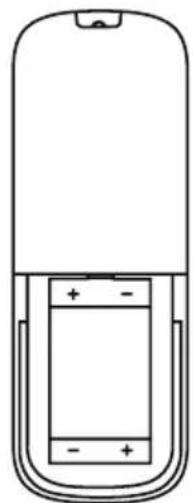
1.6 Batteries instructions
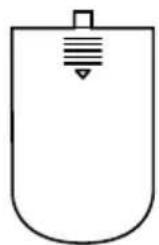
- Slide open the battery compartment cover located on the backside of the remote controller.
- Remove the batteries from the battery compartment.
- Insert two new AAA 1,5 V batteries in the battery compartment with putting attention on the polarities (+ and -) marked on the battery and the battery compartment.
- Slide close the battery compartment cover, Make sure it locks in place.
- Non-rechargeable batteries are not to be recharged
- Different types of batteries or new and used batteries are not to be mixed
- Batteries are to be inserted with the correct polarity
- Exhausted batteries are to be removed from the appliance and safely disposed of
- If the appliance is to be stored unused for a long period, the batteries are removed
- The supply terminals are not to be short-circuited
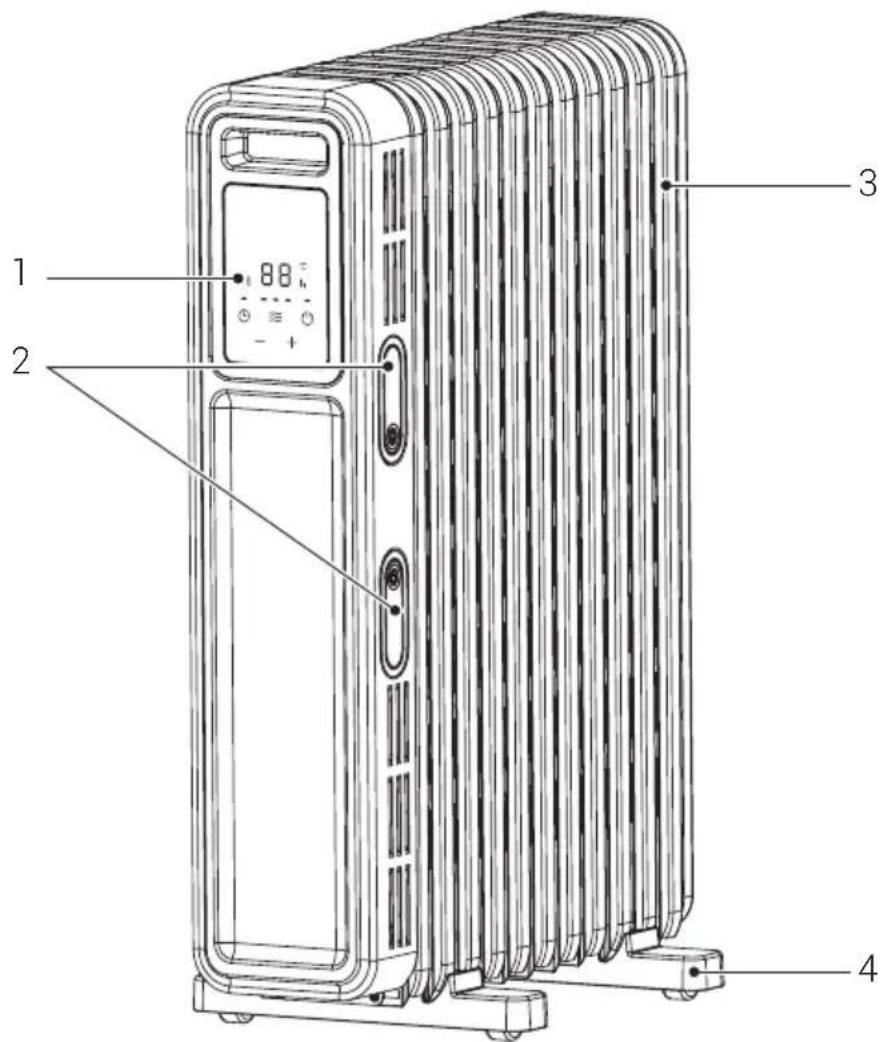
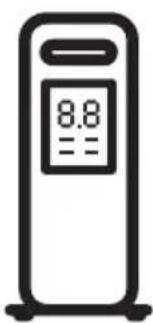
2.1 Control and parts
- Control panel
- Cord wrap
- Fin
- Feet assembly
2.2 Technical data
Voltage:220-240V\~
Frequency : 50 Hz
Rated Power : 2300 W
Electrical insulation class: I
| Selectable power | ||
| Low Medium | High | |
| 1000W 1300W 2300W | ||
Technical and design modifications reserved.
Values stated on the markings on the product or in the printed materials supplied with the product are the values obtained in laboratory in accordance with relevant standards. Such values may vary depending on the usage of the product and the ambient conditions.
2.3 Information requirements for electric local space heaters
| Item Symbol | Value Unit Item | Unit | |||
| Heat output | Type of heat output/room temperature control (select one) | ||||
| Nominal heat output | Pnom | 0.962 | kW | Single stage heat output and no room temperature control | [no] |
| Minimum heat output (indicative) | Pmin | 0.852 | kW | Two or more manual stages, no room temperature control | [no] |
| Maximum continuous heat output | Pmax | 0.962 | kW | With mechanical thermostat room temperature control | [no] |
| Power consumption | With electronic room temperature control | [yes] | |||
| In off mode | Po | N.A. | W | Electronic room temperature control plus day timer | [no] |
| In standby mode | Psm | 0.22 | W | Electronic room temperature control plus week timer | [no] |
| In Idle mode | Pidle | 0.25 | W | Other control options (multiple selections possible) | |
| In network standby | Pnsm | N.A. | W | Room temperature control, with presence detection | [no] |
| Standby mode with display information or status | N.A. | Room temperature control, with open window detection | [no] | ||
| Seasonal space heating energy efficiency in active mode | ηson | 91.5 % | Distance control option | [no] | |
| Adaptive start control | [no] | ||||
| Working time limitation | [yes] | ||||
| Black bulb sensor | [no] | ||||
| Self-learning functionality | [no] | ||||
| Control accuracy | [no] | ||||
| Remark: For electric local space heaters, the declared seasonal space heating energy efficiency ηs, on cannot be higher than the measured value at the nominal heat output of the unit. | |||||
| Contact details | Arçelik A.Ş. Kara/YYYY Caddesi No: 2-6, 34445, Sūtlüce, İstanbul, Türkiye | ||||
3 Assembly instructions
- Turn the body of the electric heater upside down with the bottom facing up.
- As shown in Figure 1, Align the installation slot of one foot assembly between the second and third fins, and then press down to clip it in; Align the installation slot of the other foot assembly between the Second to last and third to last fins, and then press down to clip it in.

Figure 1
- After the installation is firm as Figure 2, It is OK after you check, to put the electric heater right and the wheel can touch the ground.

Figure 2
4.1 Inspection before start
- The power cord shall not be damaged or fractured.
- Please verify the rated current of the power socket is in line with the requirements in the table above and is equipped with a safety grounding device before use; otherwise, replace the socket.

To use the machine for the first time or to re-insert the socket, please pay attention to check whether the plug and the socket are fitted well.
4.2 Inspection method
Insert the power plug into the socket and start for use; after about half an hour, turn off and pull out the plug. Check whether the plug pins are hot; replace the socket if so (more than about 50^ ) to avoid burning the plug or even causing a fire caused by overheating of the socket due to poor contact.
4.3 Control panel
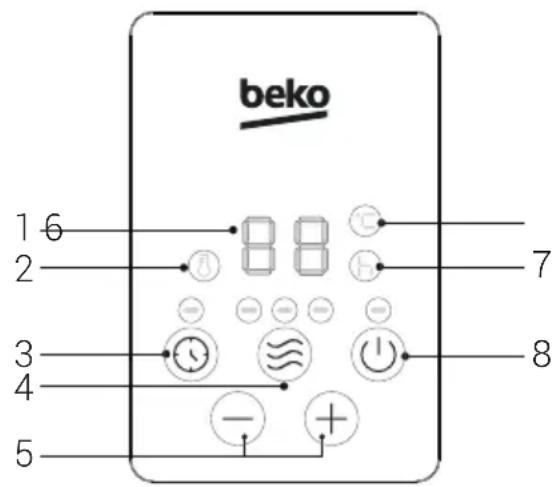
- LED Display
- Heating
- Timer key
- Mode key
- " +/ - " key
- Temperature
- Hour
- On/standby key
4 Operation
| Function description | ||
| 1 | ○ | Plug in the power, the buzzer will "beep" for along time, press the power key "○" to enter the heating working state, and then press the power key "○" to enter the standby state. <Shut down>: Under the working state, press the power key "○" on the control panel to enter the standby state, unplug the power cord, wait for the whole machine to cool, and place the heater stably. |
| 2 | ≈ | For work status, press "≡" key to select one of work modes such as high gear, medium gear and low gear. |
| 3 | ○ | Tap the timer key "○" in standby mode to enter the scheduled work setting screen. Press "+" key or "─" key to set the scheduled time, press "+" key or "─" key for along time to quickly set the scheduled time, and the scheduled time will reach the working status of the machine. Under the working status, press the timer key "○" to enter the scheduling standby setting screen. Press "+" key or "─" key to set the scheduling time, press "+" key or "─" key for along time to quickly set the scheduling time, and the scheduling time is in the standby state to the machine. 1. The scope of scheduling is for 0~24 hours, and press "+" key or "─" key each time to increase or decrease 1 hour. When the set value is 0H, press the "─" key to set the time for 24H. When the set value is 24H, press the "+" key, and the setting time is 0H. When the set value is 0H the scheduling is canceled. When the set value is not 0H the scheduling is started. Set the appointment time, press the timing key "○" key or "≡" key, or without operation for 5 seconds, exit scheduling mode. 2. If the scheduling time is set, press the power button "○" to enter the standby state and cancel the scheduling. After the scheduling is started, press the scheduling key "○" to check the reh maining time of the appointment and reset the scheduling time. During the scheduled time, the machine is shut down or started upunder temperature control, and the scheduled time is always normal and free from down time. During the scheduled time, it is cleared incase of power failure. |
| 4 | + - | Under the working status, press and hold the "+" key or "─" key to set the temperature, press and hold the "+" key or the "─" key to quickly set the temperature; after setting the temperature, have non-operation for 5 seconds, exit the temperature setting screen. <Timer Setting>: Press and hold the "+" key or the "─" key to quickly set the scheduling time. |
4 Operation
4.4 Memory function
When started up the machine again and it will operate according to the status before the last standby.
4.5 Safety protection function
When the indoor ambient temperature Th exceeds 50^ under the standby or working state, all out puts are turned off, the buzzer prompts 10 long beeps, the digital screen displays "FF" and flash es at 1 Hz for 75 seconds. As long as there is protection, even if the ambient temperature is less than 50^ , the running or operation can not be resumed, and the operation can only be performed after the power is turned off and on again.
5 Remote control
Control range of remote controller The remote controller control can be normally used within 5 meters in front of the product and in the left and right angles of 30 degrees.
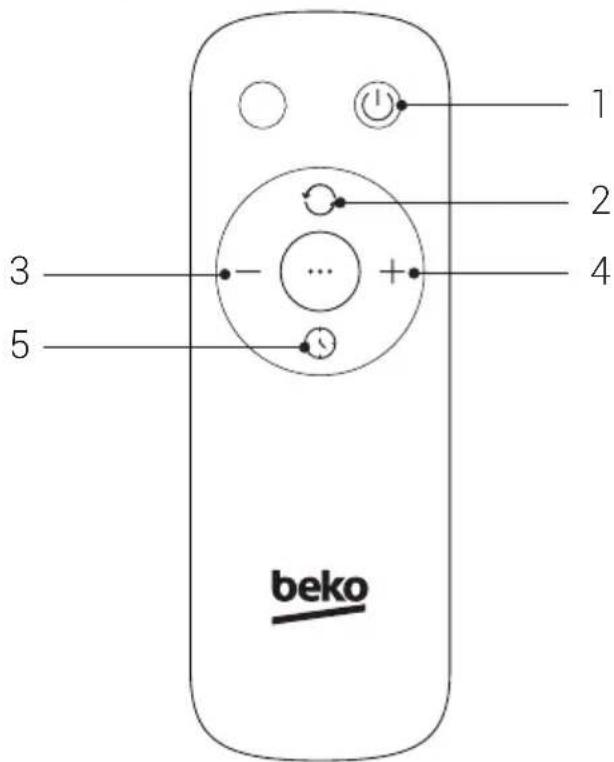
5.1 Description
| 1 | ON/OFF key |
| 2 | Mode key |
| 3 | key— |
| 4 | +key |
| 5 | Timer key |
| i | Please use a manganese or alkaline battery of type “AAA” and do not use a nonrecyclable battery. |
(AAA battery 1.5V)

6.1 Cleaning
Before cleaning and assembling, fan must be unplugged.

WARNING: Do not use any abrasive detergent or solvents to avoid scratching the surface. Do not use any of the following as a cleaner: gasoline, thinner.
It is recommended that the heater be cleaned at least one time during the operating season in order to provide the optimum level of performance. ALWAYS TURN THE POWER SWITCH OFF AND UNPLUG THE HEATER BEFORE CLEANING. Be sure to save the box for off- season storage.
- Turn the heater "OFF", unplug it and wait for the heater to cool down.
- Use a dry cloth to clean only external surfaces of the heater.
- Do not use any cleaning agents or detergents.
- Never immerse the heater in water.
- Pack the heater in the original carton and store it in a cool and dry place

WARNING: This heater cannot achieve accurate temperature control of the environment, and thus cannot be used as insulation device for storage environment.
6.2 Handling and transportation
- During handling and transportation, carry the appliance in its original packaging. The packaging of the appliance protects it against physical damages.
- Do not place heavy loads on the appliance or on the packaging. The appliance may get damaged.
- Dropping the appliance may render it non operational or cause permanent damage.
7 Troubleshooting
Operation of your appliance can lead to errors and malfunctions. The following tables contain possible causes and notes for resolving an error message or malfunction. It is recommended to read the table below carefully in order to save your time and money that may cost for calling to the service center.
| Problem Cause Solution | ||
| The machine does not work properly after installed | The power cable is not plugged in or has poor contact. | Make sure the plug is properly inserted into the socket. |
| The switch on the body is not turned on. | Turn on the switch on the body. |
Cher/Chere client(e),
PykoBoDCTBO NOIb3OBaTeJia
RHO 8323BT
3TOT npOdyKT NOxODNT TOLbKO DnX OPOoN 30JInpOBaHHbIX NOMEeHNI nn DnpeOOnueCKoR NcNoJIb3OBaHn.
RU
10.3aXIMbl nCTOuHnKa PNTaHnHa He doJIxHbI 6bITb KOpOTKo3aMKHyTbIMN
Nokynateb c ycnOBnMa rapaHTn O3HaKOMJeH
Iodnucb Pokynamena

OmpbIeKynoHbI zapaHmuHo2o manoHa enaomc cpeCmeom omemHocMu o ebINOHeHu cepucbIM uehpmo zapaHmuHbIX pa6om. Kynoh u3bImaemc u3 zapaHmuHo2o manoHa nocne ydoennemopeHua Bawux npemeh3u.

cepu RUS N

Data npodaxn

ceprn RUS No

cepu RUS Nd

Data npoDAxN
Data npodaXn
NE4ATb
MAFA3NHAA

TAPAHNTIa 2 TOA
NE4Atb
MA7A3VHA

TAPAHNTIa 2 TOA
NE4ATb
MAFA3NHA
TAPAHNTIa 2 TOA
UCIOBNA TAPAHNHOOBCNUKBAHNA
Ybaxaembl Pokynatelb!
BbI npno6peHn3dEJIne npOn3BOODCTBa KOMNaHn, BxOJaSei B rpynny KomnaHn Arcelik. N3dEJIne cepTnΦnucnpoBaHO Ha COOTBeTCTBnE MeKdyHapOHBiM CTAHApTAM, TexHnueckm perIaMeHTam n INbIM HOpMaM, yCTaHOBLeHHbIM DeiCTByIOUIm 3aKOHOdaTeJIbCTBOM Pocsncko Fedepaunn I EbpA3NCKoro ekOHOMuYeCKoro coo3a.
- Ha TeppnTopnn PΦ n3roTOBnTeJIb yCTaHaBnBaet Na n3dJIeNc cIeDyUoJne rapaHTnHbIe cPOKn:
Ha kpynhora6apntHyIO n MaIor6apntHyIO 6bITOByIO texHnky, Ha KOHNzHOhepb2 roda n cpoK cnJx6bl 10 let co dHr nepedauu n3deennra (TObapa) notpe6nteIo (nepbOMy nokynataIIO).
B clyuae oTCyTCTBn IAOKyMeHtA, NOaTBepKJaIOUeI O KaKT npOaJN, 3TN CpOKn HauHaOT NCuNCJIbTbC r O DaTbI IPOIN3BOcTBA N3DeJIIn, KOToPA MoKeT 6bITb BByHCLeHa n3 cepiHoro Homepa. INΦOpMaunr O TOM, KaK npOHTaTb CepiHbI Homep CoepKHTcB U HcTpyKUnn no EKcPnyatauun.
-
YcnoBna rapaHTn paCnpocTpaHIOCTcHa n3dEJIa, nCNoIb3yHOUeCe TOnbKO dJa INuHbIX, CeMeiHbIX, DOMaunHX HxJd, He CBraHHbIX C OcyuEcTBJeHNem npedpnuHmATEbcKo JTeJIbHOCTn.
-
При покунке и установке Издени порочende, утобы rapашильный дokумент бли правильно заолен, не ямен Исторгий и в hem sixлу указаны: Data prodkи, neчати полесь постадац, мodyел и серийнblй Homeр Истени, Data установки, наразане и Neчать Фирмы-установшиka.
-
CoxpanaIte rapaHTnHbI DOkMeHr, Yek Ha npOdaHHoe n3dEJIne N KBNTaHcIIO Ha ycLyr no ero yctaHOBe (doCTabKe), DopapOTke BOJAHbIX N 3JIeKTPnueCKNX BHyTPNKBapTnpHBIX KOMMyHNkaIi, a TaKHe IIO6bIe dpyRnE DOkMeHrbl, OTHOcAunecra K rapaHTnHOMy IIN NHOMY TEXHnueckOMy o6ClyXnBaHnIO n3dEJIIn.
-
Пи обнаружени НedoctаTKOB в Идени в пою rapантуного срoka oprанизаця, осушесвляюая ремонт (авториobаньий сервicьй сеHTP), пистурает к IXУстранец в Кратушие сроки 6e3 HeobochoBaHHbIX 3aDEpxek. ГаANTиньсрOK на заменhhbie B rapaHTnHbIпөрнOD komпктuyioue INdelenN coCTaBHbIчacTN nCTeKaET pri OkOHuaHnRapaHTnHOrO cPOka Ha Идени в сeLOM.
-
B OTHOWeHn KOHdIuNoHePoB u CnIIT-CnCTeM, BApOuHbIX NOBepXHOcTe N IHOI BCtpanBaEMoTexHnKn BblIOJIHeHne rapaHTnHbIX 06a3aTeNbCTB OcyueCTBlaeTcN PocNe DeMoHTaxa N3deJIN cnilAmn Notpe6ntela nll CneuaJIIn3npOBaHHo OPraHn3aUHN.
-
B clyuae Heo6xOdmocTn dnaHocTKn n peMOHTa 3deleny B nomeueHHn opraHHaun, ocyuectBlaIOSei peMOHT (abTOpN3OBaHHbI cepBnCHbI ueHtp), TpaHCnpTIpOBKa 3deleny
ocuieCTBJIeTcB COOTBeTCTBnC 3aKOHOM PΦ «O 3aIHTe IpaB IOTpe6HTeJe. B clyuae BbI3OBA CneuaJIHCTa IIN IPOBepKN KaueCTBa H3dJIIn, B pe3yIbTaTE KOTopoB BbIaHIOcb OTCyTCTBHe HeIOCTaTKa HIN 6blIO BbIBLeHO, YTO HeIOCTaTKN BO3HNKJN BCJeICTBHe HApUWeHHa IpaBNITPahCnOpTnOBKn, yCTaHOBKn, 3KcIIyaTaun H3dJIIn, DeIECTBNI TpeTBNX JInu HIn o6ctOaTeJBCTB HeIpeOIOJIMo CNJIbI, DnaHIOCTHa H3dJIIn IPOBOJNTc8 BeCIIaTHo, a TpaHCIOPTHBie paCXoDbI ONlaUHbOTcIOTpe6HTeIeM IO IpeckypaHTy ABTOP3OBaHHoro cepBnCHoro ueHTpa. B clyuae OTCyTCTBnIOTpe6HTeJIaDOMA B MOMENT npHXoJaCneuaJIHCTa ABTOP3OBaHHoro cepBnCHoro ueHTpa K Ha3NaueHHOMy BpeMeHH, IIpH IIOBtOPHom BbI3OBe B3MaETc8 IIaTa 3a BbIe3d CneuaJIHCTa IIN IpeckypaHTy ABTOP3OBaHHoro cepBnCHoro ueHTpa.
IpeKJe Yem BbI3BaTb CneuHaJIHCTa aBTOpN3OBaHHORO cepBnCHORO ueHTpa, BHIMaTeJbHO IpoUHTaIe HnCTpyKIIIO IO 9KcIIyatauH N3dJIIN.
- Любiales претенции по Качеву Издени расматпсьотся пося прдовпьноги поверки Качевы Издени прдоста вплем асторизованого сөрвсного сөнтpa.
- I3ROTOBHTeJIb He Hecet KaKoJ-JIH6O OTBeTCTBeHHOCTH 3a JIO60B O3MOXHbI yUeep6, HAHeceHHbI IOTpe6HTeJIHO, INbIM H3NueCKHM, IOpHINueCKM JIuMa B CJIyae HecO6JIHOJeHN IOTpe6HTeJIem Tpe6OBaHn I3ROTOBHTeJIa, Yka3aHHbIX B daHHbIX YcIOBHX rapaHTnHOro 06CJIyXKBaHn H IHCTpyKIIIN IO 3KCIJIyatauHN.
UcTaHOBka NIOkJIIOUeHHe:
1.ИЗROTOВИТЕЛь HabToTeJIbHo peKOMeHДуET Bam IOBepHTb yCTaHOBKY I NOДКЛIOUeHne H3IeJIIN CIEUHaJIInCTam aBTOpH3NpOBAHHbIX cepBnCHbIX ueHTPOB .
ДяуTOUHeHЯ aIpeca n TeJeΦOHa AKTyaJIbHOr o ABTOpH3nPoBaHHOro cepBnCHOro IeHTpa Bam Heo6xOIMo O6paTHTbcra IIO HOMepy TeJeΦOHa rOpJeuN JINHN 8-800-200-23-56
BbI MoKeTe TaKKe 6paTbcB IIO6yIO npTyIO CneHn3nPoBaHHyIO opraHn3aHIO, H MeIOuHO COOTBeTCTByOuNcepTHoHKaT Ha OKa3aHHe NIOOBhIX yClyr.
2. Onlata pa6ot no yctaHOBe n IoKJIIOUeHHIO H3JeJIINr IPOHCXODHT no npEckypaHTy aBTOpH3OBAHHoro cepBnCHOrO 1eHTpa/ cIeIHaJIN3HpOBaHHoR opraHH3aIHH. YcIOBnOII JaTbI pa6ot no yCTaHOBe n IIOKJIIOUeHHIO peryIInpyOTc JeICTBYIOIIM 3aKOHOaTeJIbCTBOM.
I3rOToBnTeIb He Hecet KaKoJ-JIb6 OTBeTCTBEHHOCTN 3a JIO6oYuep6, HaHeceHHbI N MyIeCTBy rpaJdaH BCJeIDCTBHe yCTaHOBKn IIOKJIIOUeHHN, He COOTBeTCTByIOUx Tpe6OBaHHM, yKa3aHHbIM B IHCTpyKcIINo 3KcIIyatauIN, H/IIIN pON3BeDEHHbIX He yIOJIHOMOueHHbIMn Ha 3TO LIuaMn.
3. B cIyuae HapuweHnra Tpe6oBaHn H3rOToBnTeJIa NO yCTaHOBKe I NIOKJIHOueHHNOHTBeTCTBeHHOCb 3a PpUHNHeHbI yUep6 HeCet JIIO, PpOBODHBWee 3Ty pa60Ty.
TapaHTnHbIMn He npn3HaOTc cnyan, B KOTOpBX HeoCTaTKN B N3DeJIN BO3HKnBcJeDCTBNE:
- He co6liOeHnra Tpe6oBaHn H3rOToBHTeIa, yKa3aHHbIX B HaCToAunx YcNoBnx rapaHTnHoro o6cnyKuBaHn;
- He co6IIODeHnnoTpe6nteHem npaBn yCTaHOBKn, noKJIoueHnna, 3KcNpyTaun, xpaHeHn nn TpaHCnpOTnpOBKn n3dEInn, yKa3aHHbIX B INhCTpyKUnn NO 3KcNpyTaun;
- Pemonta He ynoHOMOeHHbIMn Ha To IuIaMn, eCNI TAKoI peMOHT NOBLeK 3a co6oHapUweHne B pa6ote n3dEInr;
- Pa36opkn n3deJn, n3MeHEnn KOHcTpyKuN n dpyrNX BMeaTeJIbCTB, He npedymOTpeHHbIX HHcTpyKuNei no 3KcIyatau;
- HencpaBHOCTeH NOBpeKDeHn, Bbl3BaHHbIX 3KCTpeMaJIbHbIMN yCIOBnMn H/ nIIN DeIcTBHeM HeIpeOdoJInMo Cnbl (noXap, CTnxHbIe 6edCTBn, n T. d.), a TaKke 3KcIIyataune I3deJInB NOMEseHn C NOBbUeHHoB BLaXHoCTbIO, TeMnpaTpyoN t. d;
- Поврждени Тхнки пи Нарушени ee Hopmaльhoи pa60ы, Bbl3BaHHbIX XINBOTbIMn пи Hacekomblm, a TaKke Cne damn nx Xn3HeJeTeIbHOCTN;
- Повөдөний Идөлгий Илп_Hаушөний ee Hopмальног pa60ы, Вl3BaHHbIX CBepхHopMaTINBbIMN OTKIOHeHnЯMn napametpoB ceTN əJIeKtpo-, ra3O-, Ил NBoDocHa6xeHnЯ OT HOMHaIbHbIX 3NaueHn, a TaKke HeCTa6HbHog pa60ToJ napametpoB BblweyKa3aHHbIX KOMMyHnKaци;
- Историческая релеговедoresпrelеговедoresделя пrelеговедoresделя пrelеговедoresделя пrelеговедoresделя пrelеговедoresделя пrelеговедoresделя пrelеговедoresделя пrelеговедoresделя пrelеговедoresделя пrelеговедoresделя пrelеговедoresделя пrelеговедoresделя пrelеговедoresделя пrelеговodelацьх;
- Поврждений уушени Функшионьнххаразерпсгн Идени, ВиЗВаньИХ Исторбим Роставлия Исторбим Исторбим Исторбим Исторбим Исторбим Исторбим Исторбим Исторбим Исторбим Исторбим Исторбим Исторбим Исторбим Исторбим Исторбим Исторбим Исторбим ИстOR ИстOR ИстOR ИстOR ИстOR ИстOR ИстOR ИстOR ИстOR ИстOR ИстOR ИстOR ИстOR ИстOR ИстOR ИстOR ИстOR ИстOR ИстOR ИстOR ИстOR ИстOR ИстOR ИстOR ИстOR ИстORE ИстOR ИстOR ИстOR ИстOR ИстOR ИстOR ИстOR ИстOR ИстOR ИстOR ИстOR ИстOR ИстOR ИстOR ИстOR ИстOR ИстOR ИстOR ИстOR ИстOR ИстOR ИстOR ИстOR ИстOR ИстORY ПОБРЕЖDEHNYI YUHДSEHNYI XAFAQPTEPNCNTK IN3DEJIYN, BVIIBAHHBIX NCSOJIb3OBaHbEM HeCTaHdapTHbIX IN (INN) HeKAueCTBeHHbIX PACXODHBIX MaTePnaJIOB, Принолжносте, срedingв StbyTOBOW XIMN, BKIOUyAЯ KICLOTOCODEpJxuime n a6pa3NBbIe ЧИСТЯШЕ ИЛМ MOJOUSHNE cpeDcTBa, o6pa3OBaHbEM Ha HArpeBaTeJbHBIX 3JIeMeHTax IN36bIToUHOrO СLOЯ HabIKII (прп NOBbIseHHOJ JECTKOcTn BOdI HeO6XoJIMa O6pa6OTka COOTBeTCTBYUOIMN CocTaBAm), a TAKKHe NOJaDAHNe M BHyTpB INHOpOДHBIX ppeMToB, OCTaTKOB INIQUI, IN MexaHnuecknx npimcei.
- BheuHnx BHyTpeHHnx MexaHuecknx NOBpeJdeHn H3delen (apanHbI, TpeunHbI, cKoJIbI, nOtepTOCTn I npOue MexaHueckne NOBpeJdeHn), BO3HNkUnx B npOcece yCTaHOBKn, EKcnLyatau nn TpaHCnpTnpOBKn H3delen.
- Tepmuecknx i npuynx noo6hbx noBpeJdeHnax, KOtOpbIe BO3HnKIn B npOcece 3KcPnyatau.
- rapaHTnIu3roTOBnteJI He paCnpocTpaHaeTc Hau 3dEJIy C ydaJIeHHbIMn IIN NcnpOHeHHbIMN
Ta6JIuKamn,copeJkaUmmn nIeHTnΦNkaUHHbI n cepHbI HOpE u3JeJIa.
- rapaHTnI n3rotOBtTeJI He paCnpocTpaHaeTcH a KOCMeTnueckne DeΦeKtbl, He BInraUoIne Ha notpeBntbckne cBoICTBa n3dJIIN, a TaKHe Ha paCXoIhBiE MaTePnaIbI, NOdBepKeHHbIe ecteCTBeHHOMy n3HOcy (ΦnIbTpbl, npOKlaIKn, yNlOTHeHn, calbHnK, pezHOBbl e IlaHn, DeKopatNBbIe HakLaIKn, 3LeKtpnueckne IaMnbl, aApATOpbl, 3JeMeHTbl NITaHn I dp. B TOM YICNe Ha nepemeuaemblie BpyHyIO pIaCTNKOBblc, CTekJIaHHbIe IMetALIIueckne DeTaLI).
- Изrogenын He HeceT KaKoI-лбО OTBETCTBEHOCTH 3a ЛбОВ BO3MOxHbI ysep6, HaheceHHbI NOTpe6ntelIO,ФИЗЧECKIM,IOPINuECKM LlUaM,B Clyuae KacAHN3aDHeC TcEHKn np6opa cToRkOB OTOpLeHnRA3OByIX Tpy6,MeTALnuecknx 3JIeMeHTOB nT.I.,HecO6dENHnNotpe6ntelEM Tpe6OBaHn I3ROTOBTeJIy,уka3aHHbIX B HaCTOaX YcNoBHX rapaHTnHorO 6cLyJxBaHnI,ИВИHCTpyKcII N O EKcPnyatauN.
- По�стechен rapаHTиHOrO cpoKa peKOMeHyETcR He peKe OndHoro pa3a B 1 roD obpaatbcB aBTOpN3OBaHHbI cepBnCHbI ueHrDЯ npOBepKn KaueCTBa BaWero n3dEInna.ДиarHocTka ONlaUBAeTcR BlaAedJIbUeM NO npEeCKypaHTy aBTOpN3OBaHHo R cepBnCHoro ceHTpa.
16.ИЗROTOВNTeIb He peKOMeHdyET nCNoJIb3OBAt b N3dEJIne 3a npedeJAMn yCTaHOBJIeHHORo cPOKa Cnyk6bl. OBeceNeuB npabNlBHyU yTNIIN3aCNUO daHORo N3dEJIIn, Bbl nOMOKeTe npedOTbpaTb NOteHuaJIbHbIe HeratNBHbIe NocJeDCTBnI dJIr OkpyKaIOUeI cpeBl I 3dOpOBBy qeIOBeka, KOToPbIe MoIb 6bl IMeTB MeCTO B nPoTNBHom clyuae.

MaJ XbIbITKbIi
PaindaHnblHyckaybIFbl

RHO 8323 BT
Бул eHIM TeK JkaKcbl OkShaynaHFaH KeHicTiKTepe KOndaHyFa Hemece Ke3deiCOK NaJaIaHaYFa FaHa apHaIFaH.
KZ
AldbImeh,ocblnnaHnybIHyckaylbIFbIH Okblb13!
KypmeTTi TyTbIHywbl!
Beko eHimT aHaHaHbIb3 ywiH paKMeT. XofapbI canaIbI xHe 3aMaHayn TexHoIogmEn JxacalFaH eHIMiHizI naJaIaHydaH y3iK HAtnxJep aIacbI3 DeN yMiTTeHemI3. CoHdbIKtAH eHIMdi naJaIaHy aIdbIHda, ocbI naJaIaHybl HysckaylbIFbIH xHe baplbIK backa IleCne KykaTTapDbI MkykIaT OKbI IN sbIFbIHbI3 xHe 6oIaKaTa naJaIaHy yWiH aHbIKTaMa peTInDe caKaTHbI3. Erep eHIMdi bacKa bipeyre bepceHi3, naJaIaHybl HysckaylbIFbIH da IbFbIBapMbIK eCKeptyIep MeH aKnapaTTbI opbIHdaHbI3.
Tahbaapdbih Mafbihapa
Ocbl HycKayIbIKtbiH apTypni 6eJIiHne KeIeCi TaHbaIap naJaIaHbIaIbI:

PaiandaHny TypalbI MaHbI3DbI aKnapaT HeMece PaiJaIbI KeHeCTep.

Ömipre XəHe Mylɪkke Kayin
TəHɪpɪeɪn Kayiɪnti Xaɪdʌnap
TypaJIbI eCKepty.
3neKtp TofbIHbIH COfybl TypaJIbI eckepTy.
Θρτ κayπi typalbie ckepty.

OhbI eWTeHem HxannhaB13.
1 Kayinci3dkxhe Kopshafah opTa TypalbIMaHbI3dbI HycKaynap
Бул 6eIIMde
JapaKaTtahydbiH JxHe
MylIKTIH 3aKbIMdaHybIHbIH
aIbH aIyFa KMeKTeceTiH
Kayinci3diK HycKaynapbl
Ycblnfan. BvI
HcyaynapblOpbIHdAmay
KeipidikTIn XoNbIyBaHa
eKeJIeI.
1.1 Kaanbikayinci3dk
BvI Kpblfbl XaIbIkapalbIK Kayinci3dk TaIaIantapbHa caikec kelei.
BvI Kpyblf bHbI 6aKbIayda Hemece Kpyblf bHbI Kayinci3 NaIdaIahy TypaIbI H yckayapMeH TaHbc BoIca XaHe OdaH KeIeTIN Kayinti TycIHReH XaFdaIda,8 Hemece OdaH XoFapbl XactaBl BaIalap XaHe Qn3nkBk, ce3im OpranDapbl Hemece akbl-0n KaBileTtepi WeekteyIi Hemece TnicTi TaXipnbere XaHe BilIMre Ne eMec aIamdap
naiandaanhybl MymkH. BaIaIap KypbIINFBImeH OHaMaByi Tnic.Ta3aay XaHe TexHnKaIbIK Kbi3MeT Kepcety CnAKTbI JyMbICTapDbI BaIaIap epeceKTeprin KaIaF aJaay bIHcbl 3 opbIHdaMaybl KepeK.
BvI Kypblfbl Ynde XaH e KeIecire YKcac KaFdaJnapda NaJaHaHyFa apHaJFaH:
-Дукендер徴i, Keнсelenер徴i XXaHHe 6aKa XyMbIC OptaIapbIHndaFbl Kbl3MeTKepepdiH ac 6eImeJIepi;
-ΦeρMaJIbI K yIJIepi
- KoHaK yIepeeri XaHe 6aKa Da TypaTbH XepIepeeri KIneHTTeP TaapanbHaH;
- Tocek XaHe TaHfbl ac TypiHe XaTaTbH optanap.
1 Kayinci3dkxhe Kopshafah opTa TypalbIMaHbI3dbI HycKaynap
3 kaca deiHri 6aIanapdbi Kaiafanaay MymKIn BoImaca, OIapdbi KypblfbiHaH aIshaK yCTay Kepek.
3JxactanackanXaHe8 XacKa DeinHri BaIalap Kypblfblnbl Kocy/ Owipy ywiH Kypbilfbi KaIbIITbI JyMbIC KyiHe opHaTbIByI XaHe TnicTi Xepre opHaIacTbIpblIybi KaKet, aI BaIalap KypblfblHbl Kayinci3 NaIdaIaNHy XaHe OdaH TybIaIbTbIH KATEpJIep XeHInDe HvCKayIap aIbI, KaJaFaIaHbIN OTbIPybl KepeK.
3 kactaH aKcH
XaHe 8 XacKa DeiHri
6aIaIapFa KypblfblHbI
Kocyfa, petteyre XaHet a3aIayFa, coHda-ak
OfaH TexnkaJIk
KbI3MeT KOpceTyre
TbIM caIbHaDbI.
BvI XbIbITKbIbTBi BaHHaFa, DyUka Hemece 6accenHre XaKbIn Xepe naJaIaNbAHy3.
A6AJIAHbI3: ByI eHIMHIn Kei6ip 6oJIkTepi KaTbI Kbl3bIn, KyIK TyDbIpByI MymKIn. BaIaIap MeH ocal aamnap OphalacKaH JepIepre epeKeWe Ha3ap aydapy KepeK.
BvI XbIbITKbIa Ka aPnaHbMaIbIH HaKTbIMeIsePi KYbIaIbI. Ma bIDbcIH aWydbI KaJcET eTeiH XoHdey XMbICTapbIH TeK OHdipyH HeMeCE OHbIH KbI3MeT KOpCey aReHTi Xypri3iN, OFaH MaIdbIH Kemyi TypaJIbXabaplay KaJcET. XbIbITKbIaTbI CbIHbIKKa TaNCbIPy Ke3iHne MaIdbI KaITa oHdey epExeJIepiH caKaTaHbI3.
BvJ XblbITKbI KOpshaFaH optaHbH TemnepatypacbH dJI 6aackapa aImaIdbI, coI ce6enti OHbI KOIMaIapDbI,3aTTapDbI, XaHyapapdbI
1 Kayinci3dkxhe Kopshafah opTa TypalbMaHbI3dbI HycKaynap
XaHe 0cimdiKTepei OKwaynaTbIH Kypblfbl peHne naJaIaNHyFa 6oMaIdbI.
-Паидалану кeзIHne 6yI Kypblfbl bICnIb. KyiIN KaImac yWih bICTbIK 6eTTepdi KOpFaHbICCbI3 YcTamaHbI3. ByJ Xblbl TKbl W Tbl TYTKaJIapblHaH (6ap 6oIca) YcTan XblXbITbIHbI3. Xnha3, XactbIKTap, TeceK-opbIH Xa6DbIFbl, KaFa3dap, KmIM XaHe nepdeIep CnAKTbl XaHfbl 3aTTapdbI Xblbl TKbl W Tbl H aIbHaH KeMInDe 3 cyT (0,9 M) KaawbIKTBkTa opHaJacTbIPbIHbI3 XaHe OIapdbI XbIbITkbIWtBln 6vip XaHe apTkbl Ka6blpfaIapblHa TaNir36eHiz3.
•Жылыткышбалалармeh Жэн e MуМКiHdiГi ШeКТeУЛi aДaMДapМeH Hemece OlaРДыH ЖаНында паданfан Ke3de, coHdaN-aK KocylbI
KbIbITKbIi KaaycbI3 KaIFaH ZaFdaIapda epeKeWe caK bOly KepeK.
XbIbITKbIi
naJaHaHbImaFaH
kaFdaIa OHbl apDaIbIM
KeIiDeH aXbIpTaBih3.
CbMb/aascbi 3aKbIMdaIFaH XblbITKbIStbI HeMece icTeH sbIKKaH, KylafAH Xane KaHdaJaBip XoImeH 6y3blfAH XblblT KbI W Tbl NaJdaHaHbI3. XblbITKbIStbITacTaHbI3 Hemece OHbl TeKcepy Xane/Hemece XeHney ysiH yakineTTi KbI3Met Kepcety optalbIFbHa KaTapbIHbI3.
CbIPTa naJaIaNyFa 6OJMaIDbI
БулЖыltКыш Куыну ьлмелеріндe, кір 昂атун -блмелердe 昂энукасяабык 昂ерпсдпайдалиануfa apналma-fan.Ваннafа hemecé baska cy
1 Kayinci3dkxhe Kopwaefan opTa TypalbIMaHbI3dbI HycKaynap
bɪdɪcɪha Kʌŋaɪn Kætɪy
bɪKTɪməlaɪdɪbɪfɒbɪ ɑp
jæpJIepre XbɪlɪbɪTkɒbɪIWIHTbɪ
KɔɪMaHbɪ3.
CbIMdbi kilenm actbl 0TKi36eHiz. CbIMdbi KIJIeMnepMeH, TeceHiwTePmeH HeMece baca da YKcac Xa6bIHndapMeH XaIIpaHb13. CbIMdbi XInha3dbIH HeMece TyPMbICTbIK TexHnKaHbIH actbHaH 0TKi36eHiz. CbIMdbi Jyprin 6oJIkTeH XaHe ofaH cypin KeTy MymKIn XepepeH aIshaK opHaJAcTbIPbIHbI3.
XbIbITKbIbIeWipy ysiH <0wipy>TyIMeciH 6acbIHbI3, cOdaH KeiHaahbI po3eTKaDaH cyblpbIHbI3.
KeIeTkiH HeMece copfbls cahblaynapfa 6eIe 3aTTapdbI calmaHb3/KipyIHe xoI bepmeHiz, ce6e6i 6yI 3JIeKTp TOfbIHbIH coFybHa/0ptKe AkeIyI
XaHe XbIbITKbIUt bI 3aKbIMdaybIMyMKiH.
biktmam opttih andbih any yshin ekaan aya taptaTBH HeMece shifapatbIH Ky6bipnapdbi Xaannah3. Kypblfblhbcnaynpbi 6itein KaIybl MymKIn JyMcaK 6eTepde, MbicalbI TeceKe TcJdaHbHa3.
XbIbITKbIbIH iHne bICTbIK, 0fTaTap3i HeMece yWKBiHdaFaH 6oJIweKtep 6ap. OhbI 6eH3nH, 6oay HeMece XaHbIw cybIKTBkTap nai aHaHbIaTbIH HeMece caKaTaIaTbIH KepJIepDe KOJaHaHbI3.
БулЖыltKbIITbI TEK Ocbl Hyckaylta CnnaTtalFaHdai NaIДaJIaHbIHb3. ΘHdiPywi YcblHfAH MaKcaTTaH TblC Ke3 KeIgren Baca NaIdaIahy optKe, əJIeKtp TOfbIHbIH COfybHa Hemece XapaKaTka AkeIyIMYMkiH.
1 Kayinci3dkxhe Kopshafah opTa TypalbImaHbI3dbI HycKaynap
•Жыл bITK bI WS TapdbI эрkaшан TiKeilei po3eTKaFa JxalFaHbI3. Eшkaшан y3apTKbIw сыMMeH Hemece TacbIMaIbI Jxelii БeиIM DeIiShimEH (pO3eTKa/Y3apTKbIw cblm) naДанaHbI3.
1.2 WEEE KOKbIc OHiIMH KOKbIcka IaKTbIpy TypaJIbI NPeKTKBaHbIH TaIaNTapbHa caI:
Бул оним EU WEEE Директвасьнын (2012/19/EU) талпарын саи. Бул ониме ольктгхэн ольктpoндыЖабдыКардыКарынжikteyбел Rici yap.
TOO "BEKO CENTRAL ASIA (BEKO LECTHTPAJ A3NIA)"
Ö6iW Keik6aIyIbI Kəweci, 34, BO "Capital Tower", 10 ka6aT, 050060 AImatbl,
Ka3aKcTaH
Kypmetti CatbIn anywbl!
BEKO cayda mapkacbHbH 6yHbIMbIH TaHaFaHbHb3 ywiH aIbfc 6iJipemi3.
BEKO ipi TpyMbICTbIK TexHnKaFA TyTbIHyBbIFa TancBipFaH KyHHHeh 6acTan 10 (OH) Kbl peCMN Kb3Met KepceTy MEP3imH bclrilei. O3re TpymbictbIK TexHnKaFA, TepeHapnapfa, aydno-Bndeo XeHe paHNO annapatypanapfa, Tpymbicta KondaHyf a apHaFah KOHNIOHepnepre naDanahy XeHiHderi HycaylbkTby YCTaHaH JxafdaHa, 5 (6ec) Kbl pecmKb3Met KepceTy MEP3imH bclrilei. BEKO eHIMdepHin Xofapbl CanacbH, bepiKTiri MeH kayinc3dk dApexekciEckepceK, eHIMH IN Kbl3MET KepceTy MEP3imi peCMn naDanahy MEP3imHen edayip y3apaDb. Befirli bip Memleketke catyfa apHaFah BEKO eHIM coI MemleketTIN naDanahy XeHHderi TaanaptbHa HerizdeNe OTbIPbIn XacaFAN. OcbHan Ke3 XeTKi3y UwHm Men 6yBIMnOpamblraftpcmN bclrilepDih CaiKeCTIRH TekcepYIH3di cypaMbl3. Erep KaHdA da bip cypakTap tybHDAHTBnB6onca, Cztden MInDeTTI Typde BEKO Kb3MET KepceTy opTaIbIbHa xaBapLacByHbI3dbI cypaMbI3. Kb3MET KepceTy opTaIbIbIH MeKehXkaBIMe HtepeOHem TenePoh HemipLePiK eNlIDK TaHObHa 6epinReH KocBIMuadn Kepe anacbI (Ka3akctan PecnybHKacbi AymabHda TetePoh cofy teri). Ocb KenlIDK TaONbIMe BEKO, erep De 6yBIMDa KEMWIIIKTeP aHbIKTaIFAH XAFdaJa, TYTbIHUWBH IN KYKbIFBH KOFay 6OyBHLWA 3aHMn epeket etineTI H TyTBHyBbTAanTAPbIH KaHaFATTAnDbipy BoibHsA 03iHe MiHDETMeJepDi Ka6bldaybH pactaDbI. Aala, BEKO KompanncbI TyTbIHUWBttemHe aTaIgAH TaanTAPdbI opbHdAmafn XaFdaJa KeiNilIKTeH, COhdai-ak 6yBIMFa TerIH Kb3MET KepceTydeH bac TapTy KYKbIFBH 03iHe KaNbipAbI. Kenilnk mHndETMeJep MeTH TerIH Kb3MET KepceTy TaanTAPbI TyTBHyBbIapDbIH KYKbIKTapbIH KOFay XeHHderi 3aHHama aChBaHda opeket etedi.
Kenilik mHdETTemeIepi MeH TerIH Kbl3MeT Kepcety TaJanTapbI:
www.bekoeurope.com/safety
Arçelik A.Ş. Karağac Caddesi No:2-6, 34445, Sütluce / ISTANBUL / TÜRKİYE
www.beko.com

- CONTENTS
- Please read this user manual first!
- Meanings of the symbols
- Important safety and environmental instructions
- General safety
- Compliance with the WEEE Directive and Disposing of the Waste Product:
- Compliance with RoHS Directive
- Package Information
- Information on waste batteries
- Batteries instructions
- Control and parts
- Technical data
- Assembly instructions
- Inspection before start
- Inspection method
- Control panel
- Operation
- Memory function
- Safety protection function
- Remote control
- Cleaning
- Handling and transportation
- Troubleshooting
- UCIOBNA TAPAHNHOOBCNUKBAHNA
- Ybaxaembl Pokynatelb!
- UcTaHOBka NIOkJIIOUeHHe:
- MaJ XbIbITKbIi
- AldbImeh,ocblnnaHnybIHyckaylbIFbIH Okblb13!
- Tahbaapdbih Mafbihapa
- Kayinci3dkxhe Kopshafah opTa TypalbIMaHbI3dbI HycKaynap
- Kaanbikayinci3dk
- Kayinci3dkxhe Kopshafah opTa TypalbMaHbI3dbI HycKaynap
- Kayinci3dkxhe Kopwaefan opTa TypalbIMaHbI3dbI HycKaynap
- WEEE KOKbIc OHiIMH KOKbIcka IaKTbIpy TypaJIbI NPeKTKBaHbIH TaIaNTapbHa caI:
- Kypmetti CatbIn anywbl!
- BEKO cayda mapkacbHbH 6yHbIMbIH TaHaFaHbHb3 ywiH aIbfc 6iJipemi3.
- Kenilik mHdETTemeIepi MeH TerIH Kbl3MeT Kepcety TaJanTapbI:
Brand : BEKO
Model : RHO8323BT
Category : Heating