
KI6130.0SE - Cooker Küppersbusch - Free user manual and instructions
Find the device manual for free KI6130.0SE Küppersbusch in PDF.
| Product type | Induction hob |
| Brand | Küppersbusch |
| Model | KI6130.0SE |
| Number of cooking zones | 4 (including one Flex zone) |
| Control type | Touch with slider bar |
| Dimensions (W × D × H) | 60 × 52 × 5 cm (approximate) |
| Power supply | 220-240 V ~ 50/60 Hz |
| Maximum total power | 7.4 kW (depending on model) |
| Power function (Booster) | Yes, limited duration (10 min at level 9) |
| Stop&Go function | Pauses cooking without losing settings |
| Lock function (child safety) | Yes, locks all keys except On/Off |
| Pan detection | Integrated, displays «U» if no pan or unsuitable pan |
| Timer | Independent per zone, from 1 to 99 minutes |
| Safety shut-off | Yes, after a maximum duration depending on power level |
| Residual heat indicator | Displays «H» or «-» if zone is hot |
| Power management | Yes, total power limitation (depending on model) |
| Cooking surface | Ceramic glass |
| Cleaning | Ceramic glass cleaner, scraper for burnt-on residue |
| Included accessories | User manual, warranty certificate |
Frequently Asked Questions - KI6130.0SE Küppersbusch
User questions about KI6130.0SE Küppersbusch
0 question about this device. Answer the ones you know or ask your own.
Ask a new question about this device
Download the instructions for your Cooker in PDF format for free! Find your manual KI6130.0SE - Küppersbusch and take your electronic device back in hand. On this page are published all the documents necessary for the use of your device. KI6130.0SE by Küppersbusch.
USER MANUAL KI6130.0SE Küppersbusch
Please read the users and installation instructions carefully before installation of the appliance and before starting to use it.
m = 311 ;
Warning. If the ceramic glass breaks or cracks, immediately unpl the stovetop to a void elementshocks.
This appliance is not designed to work with external timer (not built into appliance) or a separate remote control system.
Do not steam clean this device.
Warning. The device and its accessible parts may heat up during operation. Avoid touching the heating elements. Children younger than 8 years old must stay away from the hob unlest they are permanently supervised.
This device may solely be used by children 8 years old or older, people with a physical, sensory or mental abilities, or those who lack experience and knowledge, ONLY
when supervisedor if they have beengiven adequateinstruction on theuse of the deviceand understandthedangers its use
involvesUser cleaning and maintenance may not be done by unsupervised children.
p! tChildren must not play with the e device.
Warning. It is dangerous to cook with fat or oil without b represent, as these may catch fire. N E V E R t r extinguish a fire with water! In this event disconnect the device and cover the flames with a lid, a plate or a blanket.
Do not store any object on the cooking areas of the induction hob.
Prevent possible fire hazards.
The induction agenerator complies with current EU legislation We however recommend that Anyone fitted with
a device such as a pacemaker should refer to their physician, or if in doubt abstain from using the induction areas.
Metal object such as knives, forks, spoons and lids may not be placed on the surface of the hob as they may overheat.
After use always disconnect the hot plate, do not simply remove the pot or pann otherwise a malfunction may occur if inadvertently another pot or pan is placed on it within the detection period. Prevent possible accidents!
If the supply cord is damaged, it must be replaced by a manufacturer, its service agent or similarly qualified persons in order to avoid hazard.
WARNING: Use only stovetop protectors designed by appliance manufacturer or indicated by the
manufacturer in the instructions for use as adequate or stovetop protectors incorporated into the device. The use of in a deq protectors can cause accidents.
is installed in the same unit.
Warning:
The electrical connection must be properly grounded, following current legislation, otherwise the induction hob may falction.e
Unusually high power surges can damage the control system (like with any electrical appliance).
The It is advised to refrain from using the induction hob during the pyrolytic cleaning function in the case of pyrolytic ovens, due to the high temperature that this type of device attains.
! Only the Kuppersbusch official technical service can handle or repair the appliance, including replacement of the power cable.
Before disconnecting the hob form the mains, we recommend switching off the cutoff switch and waiting for approximately 25 seconds before disconnecting from the mains. This time is required to allow for the complete discharge of the
electronic circuitry and thus preclude the possibility of electric shock from the cable terminals.
Keep the Guarantee Certificate or the technical data sheet together with the instructions manual throughout the product's service life. These contain important technical information.
About induction
Advantages
With an induction hob, the heat is transmitted directly to the pan.
This has a number of advantages:
-Saves time.
-Saves energy.
-Easy to clean as if the food comes into contact with the glass plate, it does not burn easily.
-Improved energy control. The energy is transferred to the pan as soon as the power controls are pressed. In addition, as soon as the pan is removed from the cooking zone, the power supply stops. It is not necessary to switch the power off first.
It is necessary to allow aplian c discharge after installation. Disconnection devices must be incorporated to the fixed electrical installation, according to the installation regulations.
Installation
Installation with cutlery drawer
If you wish to install furniture or a cutlery drawer under the hob, sepa-ration board must be fitted between the two. Accidental contact with the hot surface of the device's housing is thus prevented.
The board must be fitted 20 m beneath the under part of the stovetop.
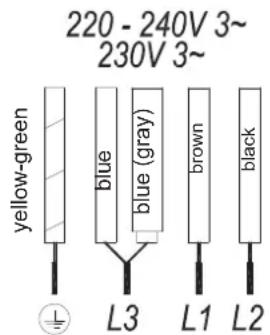
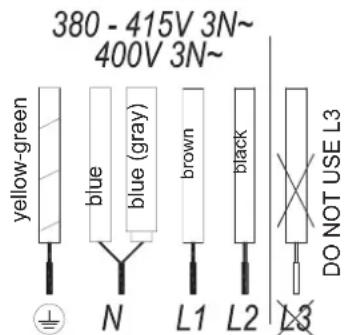
Electrical connection
Before you connect the stovetop to the mains, check that the voltage and frequency match those specified on the stovetop nameplate, which is underneath it, and on the Guarantee Sheet, or if applicable on the technical data sheet, which you must keep together with this manual throughout the product's service life.
Ensure that the inlet cable does not come into contact with the induction top housing or the oven housing, if it
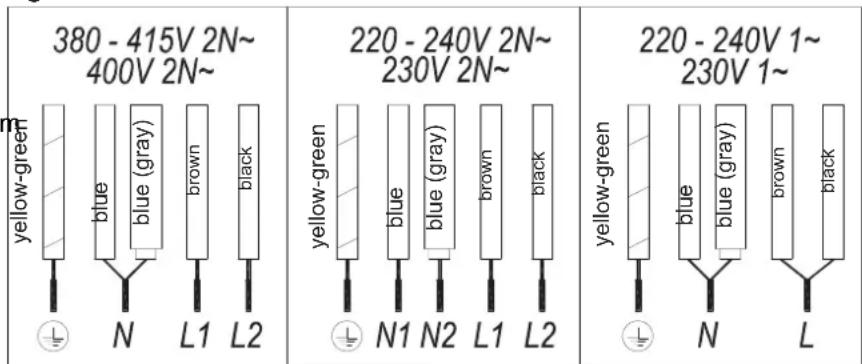
Fig.2
EN

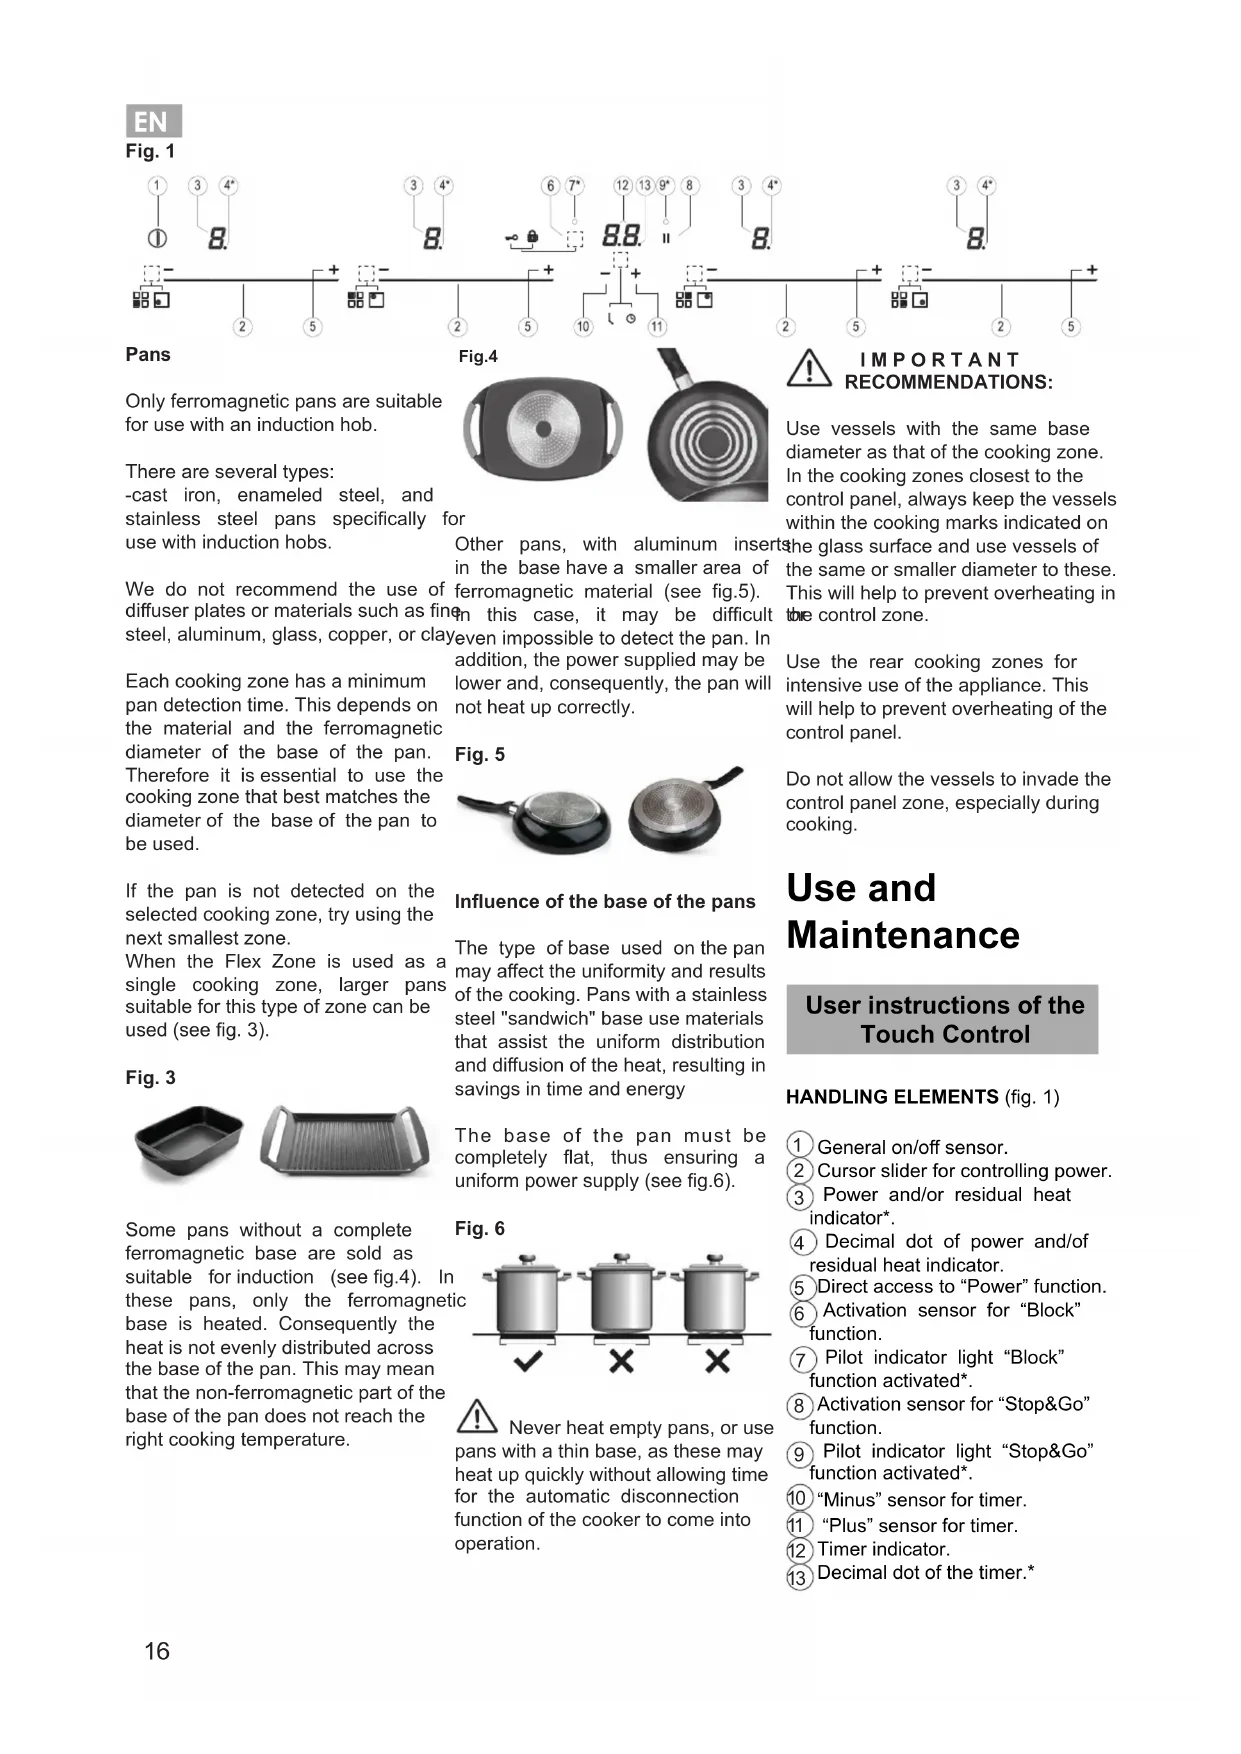
Fig. 1
Pans
Only ferromagnetic pans are suitable for use with an induction hob.
There are several types: cast iron, enameled steel, and stainless steel pans specifically for use with induction hobs.
We do not recommend the use of diffuser plates or materials such as fine steel, aluminum, glass, copper, or clay.
Each cooking zone has a minimum pan detection time. This depends on the material and the ferromagnetic diameter of the base of the pan. Therefore it is essential to use the cooking zone that best matches the diameter of the base of the pan to be used.
If the pan is not detected on the selected cooking zone, try using the next smallest zone.
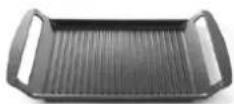
When the Flex Zone is used as a single cooking zone, larger pans suitable for this type of zone can be used (see fig. 3).
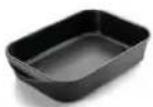
Fig. 3
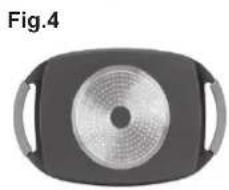
Some pans without a complete ferromagnetic base are sold as suitable for induction (see fig.4). In these pans, only the ferromagnetic base is heated. Consequently the heat is not evenly distributed across the base of the pan. This may mean that the non-ferromagnetic part of the base of the pan does not reach the right cooking temperature.
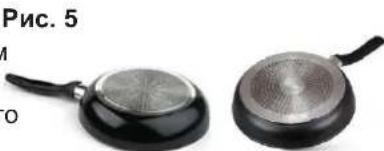
Other pans, with aluminum insert in the base have a smaller area of ferromagnetic material (see fig.5). In this case, it may be difficult even impossible to detect the pan. In addition, the power supplied may be lower and, consequently, the pan will not heat up correctly.
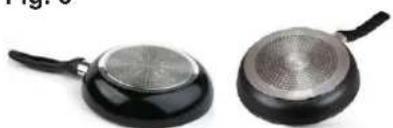
Fig. 5
Influence of the base of the pans
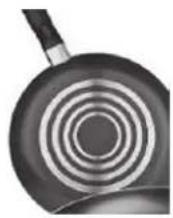
The type of base used on the pan may affect the uniformity and results of the cooking. Pans with a stainless steel "sandwich" base use materials that assist the uniform distribution and diffusion of the heat, resulting in savings in time and energy
The base of the pan must be completely flat, thus ensuring a uniform power supply (see fig.6).
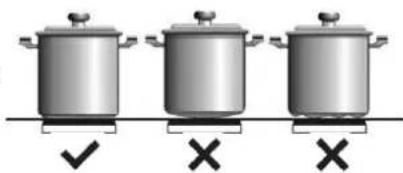
Fig. 6
Never heat empty pans, or use pans with a thin base, as these may heat up quickly without allowing time for the automatic disconnection function of the cooker to come into operation.

IMPORTANT RECOMMENDATIONS:
Use vessels with the same base diameter as that of the cooking zone. In the cooking zones closest to the control panel, always keep the vessels within the cooking marks indicated on
She glass surface and use vessels of the same or smaller diameter to these. This will help to prevent overheating in the control zone.
Use the rear cooking zones for intensive use of the appliance. This will help to prevent overheating of the control panel.
Do not allow the vessels to invade the control panel zone, especially during cooking.
Use and Maintenance
User instructions of the Touch Control
HANDLING ELEMENTS (fig. 1)
① General on/off sensor.
② Cursor slider for controlling power.
③ Power and/or residual heat indicator*.
Decimal dot of power and/of residual heat indicator.
⑤Direct access to "Power" function.
Activation sensor for "Block" function.
⑦ Pilot indicator light "Block" function activated.
⑧ Activation sensor for "Stop&Go" function.
⑨ Pilot indicator light "Stop&Go" function activated*.
10 "Minus" sensor for timer.
11 "Plus" sensor for timer.
12 Timer indicator.
13 Decimal dot of the timer.
- Only visible while running.
The manoeuvres are done by means of the touch keys. You do not need to exert force on the desired touch key, you only need to touch it with your fingertip to activate the required function
Each action is verified by a beep.
Use the cursor slider (2) to adjust power levels (0 - 9) by sliding your finger over it. Sliding towards th
right increases the value, whereas sliding towards the left decreases it.
It's also possible to directly select a power level by placing your finger directly on a desired point of the cursor slider (2)
In order to select a plate on these models, directly touch the cursor slider (2).
SWITCHING ON THE DEVICE
1 Touch the On touch key (t) for at least one second. The touch control will become active, a beep will be heard and the indicators (3) will light up displaying a "-". If any cooking area is hot, the relat indicator will flash an H.
If you do not take any action in the next 10 seconds the touch control will switch off automatically.
When the touch control is activated, you can disconnect it at any time by touching the touch button (1) even if it has been locked (lock function activated). The touch button (1) always has priority to disconnect the touch control.
ACTIVATING PLATES
Once the Touch Control is activated with sensor () any plate can be turned on by following these steps:
1 Slide the finger or touch in a position of one of the cursors "slider" (2). The zone has been selected and simultaneously the power level will be set between 0 and 9. That power value will be shown on the corresponding
power indicator and its decimal dot (4) will keep light up during 10 seconds.
2 Use the cursor slider (2) to choose a new cooking level between 0 and 9.
As long as the plate is selected, in other words, with the decimal dot light up, its power level can be modified.
TURNING OFF A PLATE
Using the touch slider key (2) lower the power to level 0. The hotplate will switch off.
When a hot plate is switched off an H will appear in its power indicator (3), if the glass surface of the related cooking area is hot and there is a risk of burns. When the temperature drops the indicator (3) switches off (if the hob is disconnected), or otherwise a "-" will light up if the hob is still connected.
TURING ALL PLATES OFF
All plates can be simultaneously disconnected by using the general on/off sensor (1). All plate indicators (3) will turn off. If the heating zone turned off is hot, its indicator shows an H..
When finished, turn off the cooking zone by using the touch controls. Otherwise an undesired operation could occur if a pan is accidentally placed on the cooking zone during the 30 seconds. Avoid possible accidents!
Block Function
With the Block Function, you can block the other sensors, except for the on/off sensor (1), in order to avoid undesired operations. This function is useful as a childproof safety.
To activate this function, touch sensor (6) for at least one second. Once you have done so, the pilot (7) turns on indicating that the control panel is blocked. To deactivate the function, simply touch sensor (6) again.
If the on/off sensor (1) is used to turn off the appliance while the block function is activated, it won't be possible to turn the cooktop on again until it unblocks.
Pan detector
Make sure that the bottom of the vessel, covers one or more of the references (on the surface of the hob; (see fig.7 and table 1).
Induction cooking zones have a built-in pan detector. This way, the plate will stop working if there is no pan present or if the pan is not suitable.
The power indicator (3) will show a symbol to designate "there is no pan U if, while the zone is on, no pan is detected or the pan is not suitable
If a pan is taken off the zone while it is running, the plate will automatically stop supplying energy and it will show the symbol for "there is no pan". When a pan is once again placed on the cooking zone, energy supply will resume at the same power level previously selected.
Silencer of the beep
When the hob is on, if one presses the touch key + (11) and the locking touch key = 0 (6) simultaneously for three seconds, the beep that accompanies each action will be deactivated. The time indicator (12) will display "OF".
This deactivation will not be applied to all the functions, as for example the beep for on/off, the ending of the timer or the locking/unlocking of the touch keys always remain activated.
To once again activate all the beeps that accompany each action, again simultaneously press the touch key + (11) and the locking touch key 6 for three seconds. The time indicator (12) will display "On"
Stop&Go Function
or repeating step 3.
This function puts the cooking process on pause. The timer will also be paused if it is activated.
Timer Function (countdown clock)
zone. If the heating zone turned off is hot, its power indicator (3) will display alternately the H symbol and a " -".
If you wish to time another hotplate at the same time, repeat steps 1 to 3.
Activating the Stop&Go function.
Touch the Stop&Go sensor (8) for one second. The pilot (9) lights up and the power indicators will show the symbol to indicate cooking has been paused.
Deactivating the Stop&Go function
Touch Stop&Go sensor (8) again. The pilot (9) turns off and co resumes under the same power and timer settings that were established before the pause.
Power Function
This function supplies "extra" power to the plate, above the nominal value. Said power depends on the size of the plate, with the possibility of reaching the maximum value permitted by the generator.
1 Slide the finger above the corresponding cursor slider (2) until the power indicator (3) shows "9" and keep the finger pressed for one second, or touch directly on " + " and keep pressed the finger for one second.
2 The power level indicator (3) will show the symbol P , and the plate will start to supply extra power.
The Power function has a maximum duration specified in Table 1. After this time, the power level will automatically adjust to 9. A beep sounds.
On activating the Power function in one hotplate, it is possible that the performance of some of the others may be affected, reducing its power to a lower level, in which case this will be displayed on its indicator (3).
Deactivation of Power Function, before its working time passes, can be done either by means of touching cursor "slider" modifying its power level
This function facilitates cooking given that you don't have to be present: You can set a timer for a plate, and it will turn off once the desired time is up.
For these mod es, yosimultaneously program each plate for durations ranging from 1 to 99 minutes.
Setting a timer on a plate.
Once the power level is set on the desired zone, and while the decimal dot of the zone keeps on, the zone will be able to be timed.
To that end:
1 Touch sensor - (10) or (11). Timer Indicator (12) will show "00" and corresponding zone indicator
e (3) will show the symbol blinking alternately with its current power level.
2 Immediately afterwards set a cooking time between 1 and 99 minutes, using the sensors (10) o + (11). With the first one the value will start at 60, whereas with the second it will start at 01. By keeping sensors - (10) o + (11) pressed, the value will be restored to 00. When there is less than one minute left, the clock will begin to count down in seconds.
- When the timer indicator (12) stops flashing, it will start to count down the time automatically. The indicator (3) relating to the timed hotplate will alternately display the selected power level and the symbol.
Once the selected cooking time has elapsed, the heating zone being timed is turned off and the clock emits series of beeps for several seconds. To turn off the audible signal, touch any sensor. The timer indicator (12) will display a flashing 00 beside the decimal dot (4) of the selected
If one or more zones are already timed, the timer indicator (12) will show by default the shortest remaining time to finish, showing a "t" on the related zone. Rest of timed zones will show on their corresponding indicator zones the decimal dot blinking. When cursor "slider" of another timed zone is pressed, the timer will show the remaining time of that zone for a few seconds and its indicator will show its power level and the "t" alternately.
Changing the programmed time.
For modifying programmed time, cursor "slider" (2) of timed zone has to be pressed. Then it will be possible to read and modify the time.
Through sensors - (10) and + (11), you can modify the programmed time.
Disconnecting the clock
If you wish to stop the clock before the programmed time is up, this can be done at any time by simply adjusting its value to - .
Select the desired plate.
2 Adjust the value of the clock to "00" by using the sensor - (10). The clock is cancelled. This can also be done more quickly by pushing the "sensors - (10) and + (11) at the same time.
Power Management function (depending on model)
Some models are equipped with a power limiting function (Power Management). This function allows the total power generated by the hob to be set to different values selected by the user. To do this, for the first minute after having connected the hob to the power supply, it is possible to access the power limiting menu.
of
1 Press the + (11) touch key for three seconds. The letter PL will
appear on the timer indicator (12)
2 Press the locking touch key (6). The different power values to which the hob can be limited will appear and these can be changed using the + (11) and - (10) sensors.
3 Once the value has been selected, once again press the locking touch key (6). The hob will be limited to the chosen power value.
If you want to change the value again, you must unplug the hob and plug it in again after a few seconds. Thus you will again be able to enter the power limiting menu.
| 1 | 8 |
| 2 | 8 |
| 3 | 5 |
| 4 | 4 |
| 5 | 4 |
| 6 | 3 |
| 7 | 2 |
| 8 | 2 |
| 9 | 1 |
| P | 10 minutes, readjusts to level 9 (depending on model) |
When the "safety switch off" function has been triggered, a 0is displayed if the glass surface temperature is not dangerous for the user or an H if there is a burn risk.
Warning
Keep the control panel of the heating areas clean and dry at all times.
In the event of operating problems or incidents not mentioned in this manual, disconnect the appli nce and contact Ruppersbusch technical service.
Every time the power level of a hotplate is changed, the power limiter will calculate the total power the hob is generating. If you have reached the total power limit, the touch control will allow you to increase the power level of that hotplate. The hob will beep and the power indicator (3) will blink at the level that cannot be exceeded. If you wish to exceed that value, you must lower the power of the other hotplates. Sometimes it will not be enough to lower another by a single level as this depends on the power of each hotplate and the level it is set at. It is possible that to raise the level of a large hotplate that of several small ones must be turned down.
If you use the quick switch-on at maximum power function and the said value is above the value set by the limit, the hotplate will be set to the maximum possible level. The hob will beep and the said power value will blink twice on the indicator (3).
Safety switch off function
If due to an error one or several heating zones do not switch off, the appliance will be automatically disconnected after a set amount of time (see table 1).
Table 1
| Selected power level | MAXIMUN OPERATING TIME (in hours) |
| 0 | 0 |
- Use pots or pans with thick, completely flat bottoms.
- Do not slide pots and pans over the glass because they could scratch it.
- Although the glass can take knocks from large pots and pans without sharp edges, try not to knock it.
- To avoid damaging the ceramic glass surface, do not drag pots and pans over the glass and keep the undersides of them clean and in good condition.
- Recommended diameters of the pot bottom (see "Technical Data Sheet supplied with the product).
Try not to spill sugar or products containing sugar on the glass as while the surface is hot these could damage it.
Cleaning and maintenance
To keep the appliance in good condition, clean it using suitable products and implements once it has cooled down. This will make the job easier and avoid the build-up of dirt. Never use harsh cleaning products or tools that could scratch the surface, or steam-operated equipment.
Light dirt not stuck to the surface can be cleaned using a damp cloth and a gentle detergent or warm soapy water. However, for deeper stains or grease use a special cleaner for ceramic hot plates and follow the instructions on the bottle. Dirt that is firmly stuck due to being burned repeatedly can be removed using a scraper with a blade.
Slight tinges of colour are caused by pots and pans with dry grease residue underneath or due to grease between the glass and the pot during cooking. These can be removed using a nickel scourer with water or a special cleaner for ceramic hot plates. Plastic objects, sugar or food containing a lot of sugar that have melted onto the surface must be removed immediately using thecraper.
Metallic sheens are caused by dragging metal pots and pans over the glass. These can be removed by cleaning thoroughly using a special cleaner for ceramic glass hot plates, although you may need to repeat the re-cleaning process several times.
Warning:
A pot or pan may become stuck to the glass due to a product having melted between them. Do not try to lift the pot while the heating zone is cold! This could break the glass.
Do not step on the glass or lean on it as it could break and cause injury. Do not use the glass as a surface for placing objects.
Küppersbusch Hausgeräte GmbH reserves the right to make changes to its manuals that it deems necessary or useful, without affecting the product's essential features.
Environmental considerations

The symbol the product or its packaging means that product cannot be treated I ordinary household waste. The product must be taken to a recy collection point for electrical an electronic appliances. By ensure that this product is dispose correctly, you will avoid harm the environment and public health which could happen if this prod is not handled properly. For modetailed information about recycle this product, please contact you local authority, household w service or the store where you p chased the product.
The packaging materials used are environmentally friendly and can be recycled completely. Plastic components are marked >PE < , >LD < , EPS < , etc. Dispense of packaging materials, like household waste, in your local container.
F u l f i l l m e n t w i t h Efficiency of the appliance: -Appliance has been tested according to standard EN 60350-2 and the obtained value, in W Kg, is available in the appliance's rating plate.
Following advices will help you to save energy anytime you cook:
- Use the correct lid for each whenever is possible. Cooking without lid uses more energy.
- Use pans with flat bases and appropriate base diameters in order to match size of the cooking zone. Pan manufacturers usually provide top diameter of the pot that is always larger than base diameter
- When water is used for cooking, use little quantities in order to preserve vitamins and minerals of vegetables and set the minimum power level that allows maintaining the cooking. High power level is unnecessary and a waste of energy.
- Use small pots with small quantitiespot or pan on a hotplate or it is of an of food. unsuited type.
The sound of a fan is heard while cooking, which continues even after cooking has ended: The induction zones have a fan to keep the electronics cool. This only operates when the electronic circuits get hot. It stops again when the circuits cool whether the hob is turned on or not.
The symbol will appear on the power indicator of a hotplate:
The induction system does not find a
If something does not work
Before calling the technical service, perform the verifications described below.
The appliance does not work: ensure that the power cable is plugged in.
The induction zones do not produce heat:
The container is not appropriate (it does not have a ferromagnetic bottom or is too small). Check that the bottom of the container attracts a magnet, or use a larger container.
A humming is heard when starting to cook in the induction zones:
With containers which are not very thick or not of one piece, the humming results from the transmission of energy directly to the bottom of the container.
The humming is not a defect, but if you wish to avoid it anyway, reduce the power level slightly or use a container with a thicker bottom, and/or of one piece. Energy
The touch control does not light up or, despite lighting, does not respond:
No heating zone has been selected.
Be sure to select a heating zone before operating it.
There is humidity on the sensors, and/or your fingers are wet. Keep the touch control surface and/ or your fingers clean and dry. The locking function is activated. Unlock the controls.

The hotplate will switch off and the message C81 or C82 will appear on the indicators:
Excessive temperature in the electronics or on the glass. Wait for a while for the electronics to cool down or remove the pot or pan so that the glass can cool.
The appliance switches off and the message C90 appears on the power indicators (3):
The touch control detects on/off (1) sensor is covered and doesn't allow switching on the cooktop. Remove the possible objects or liquids keeping the touch control surface, clean and dry until the message disappears.
ACCENSIONEL DISPOSITIVO
SPEGNIMENTO DI TUTTE LE PIASTRE
HET APPARAAT INSCHAKELEN
EcnB bIbpaHHo30He npuroTOBnHIOXeT 6bIb CHIXKeHa nepeDaBaemar nCNoJIb3yEmaJ NOcyJa He o6HApUKeHaMOuHOCtB, I3-3a Yero Nocya He 6byet nonpo6yTe NCNoJIb3OBAtB CNeDyUShyHarpeBaTcR HaAnneKaUM O6pa3OM. HanMeHbSyI0 3OHy.
Korda B KaueCTBe eDINHO 30HbI Pnc.5 nprirotOBJIeHn IcNoIb3yETcpeXIM Flex Zone, nla 30HbI Takoro Tuna MoXHO NcNOJb3OBAbI Nocdy6oBjwepoa3Mepa (cm.Pnc.3).
PnemmyeCTBa
B INHyKunOHn BapOuHn npiroTOBHeHn HCNOJb3yeTcpeKIM NOBepxHOCTn TEnno nepeaETc Flex Zone, nra 30hbl TaKoro Tnna HENOCpeDCTBeHHo B KuxOHHyIO Nocdy MoXHo HCNoJIb3OBaTB Nocdy BoNbWero TaKo npoueCC mMeet pApa3Mepa (CM.Pnc.3).
Pnc.3
BnHHe CBOIcTB OCHOBaHnKyXOHHO nocydbl
TnO OCHOBaHn, nCNoIb3yEmbI B NocSyde, MoKET NOBnIaTb Ha eDInHOo6pa3ne I pe3yIbTaTb npiroTOBnEHnPiu. B nocSyde c OCHOBaHnEM TnA «CaHDbNv» N3 HepXaBeIOUe CTaII NcNoIb3yIOTc MaTePnaJI, KOTOpIe CnOCo6CTByIOT paBHomepHOMy pacpeDeNEHIO n pacCeuBaHnIO TENla, pe3yIbTaTOM qero RaBnEeTc 3KOHOMn BpeMeHn IN
-3KOHOMB BpeMeHN.
-3KOHOMn3Heprnn.
- PpocToTa OuyCTKn B Cnyuee,KOrda nIuSeBbIe npOdykTbI BXoJrT B KOHTaKT CO CTekJIaHHo nnlTOn, NcKOJIbky OHn He pnpropaOT Ha Hei.
-ycobepseHCTBOBaHHoe ynpabnene 3heprnonotpe6JIeHem.3Heprna
nepedaetc B nocdy, KaK TOnbKO npOncxOoNT HaxKaTne OpraHOB ynpabIeHn MOuHocTbIO. KpOME TOR KA KToNko Nocdy ydaJrHOT 30HbI nproTOBHeHn, NOaA MoUHOCrN ppekpaaetc. Het Heo6xOIMOCTn Chayana BblIOuATb NTaHne.
B npoDAxke HMeOTc npedMeTbkyxOHHOncyDbl,3aBnEHHbIe KaKnoXODAuzne IINCNOb3OBAHNAH NkUHOHbIXBaPOHbIXNOBepxHOCTax,HHe HMeOuNe
NOJHOCTbO OpeppomarHHTHOOCHOBAHn (cm. 4).B TAKoNOCyDe IPONCXODHT HarpeB TOIbKOpeppomarHHTHOO OCHOBAHn.
TneObaTeNbHO,TeNIO He 1baccnpocpaHaretc paBHOMepHo
OCHOBAHNE NOCyDbl DOJIKHO 6bITb NOINHOCTbIO NIOCKM, OBeCneuBaB paBHOMePHoe NoCTynJIeHne 3Heprn (cm.Pnc.6).
Kyxonnna nocya
IINCNOB0AHN C NHyKUHOHbIMNeOBaTeNbHO,TENHO BapOyHbIMN NOBepxHOCTMn NOxDxOaPacnpocpTaHReTc paBHomepHO
Pnc.6
OCTaTOUHOro TENNa*.
4 DecTnHbN 3HaK INDnKaTopa MOUHOCTN N/INN OCTaTOUHORO TENla*.
⑤Пямов дocун K Функци «Моцно».
⑥ДатунakakTиBaциДЯФунки«БлokирOBka».
⑦ KOHTpOJbHbI C Beto HnDKaTOp aKTNaUuN FyHKuN 《BLOKINPOBa》*
T8 DaTuNK aKTNaCnN dIaYHKcNn «Stop&Go».
9KoHTpOJIbHbIcB HnDnKaTOp aKTNaCnN φyHKuN «Stop&Go》*.
10 DaTnK «MnHyc» dna TaMepa. 11 DaTnK «PnOc» dna TaMepa.
12HnDnKaTOp TaMepa.
13 DecTnHbN 3HaK TaMepa.
HnkOrda He HarpeBaIte NcyTo 10nocdy HnHe nCNoB3yIe nocdy C TOHKIM DHom, NOCKoNbKy MOKeT npOcXODHT b6ICTpbHarpeB, npKOTOPOM FyHKUaABTomatueckoro OTKnIOUeHn He XBataet BpemeHn dJa cpaBaTbIBaHn.
BAXHbIEPEKOMEHdAUIN:
IcnoB3yTe COcyDbIC TaKIM Xe DnAmETpOM OCHOBAHNA, YTO N y 3OHbI npuroToBJeHNA.
KaKdoe DeICTBne NOITBepKdaetc3ByKObblm CnHaONM.
C nOMOzbu NOJ3yHka Kypcopa (2) OTPeryu npyTe MoUHOCTb (0-9), nepemea naIeU. PnnpereMeueHN BnPaBO 3NaueHne yBENuNBAeTcra,ByMeHbuaeTcra.
3KcPnyaTauny IN Texo6cIyXnBaHn

Takke MoXHO BbI6paTb yPOBeHb MOUHOCTn HAnpMyIO, YcTaHOVB NaJIeB Tpe6yEmyTOuy NOJ3yHka Kypcopa (2).
ДЯ Bыбopa KOHФорк ДаHHbIX MOдянх Heo6xOДМо HaxKaTb Ha non3yHOK Kypcopa HapryMyI (2).
BKNIOUCHNEIPIUBOPA
①O6uI DaTnK BKJIOUeHnB/ BbIKHOUeHn.
② Kypco npon3yH ynpabJIeHnMoUHOCTbIO.
③ UNIKATOP MOUHOCTN UUN
HaKMTe Ha ceHcOpHyo KnaBnuy «BKn.» ①(1) n ydepXnBaIte ee He MeHee 1 cekyHdbI. CeHcOpHoe
ynpabJIeHne CTAHeT AKTNBbIM, 6yIET CblIeH 3ByKOBo CNHaJI, n 3aIropaTcNHNkAtOpbI (3), npn 3Tom 6yIET OTo6paXaTbcra 3NAK «-». Ecn KakaJ-NIO BO n3 BapouhIX 3OH 6yIET rOpaYeH, Ha COOTBeTCTBlyoUeM INDNkatope 6yIET OTo6paXaTbcra 6yKBa H n 3NAK «-».
BOI EcnB TeeyHne NocJeDyUOx 10 ckyHn He 6yDet BbInOnHeHa kakaJ-NbO onepaun, ceHCOPHoE ynpabLeHne 6yDet OTKnIOueHo aBTOMATNueCKn. eTOB0I
Korda ceHcOpHoe ynpabIeHne 6yDet BkIIOHeHO, eO MoXHo 6yDet OTKnIOHTb B JIOBOJ MOMENT IYTEM HaxaTna CeHCOPHO KnABnUu (1), daKe ecn OHa 3aBNOkpOBaHa (fynKzna 6NoKpOBKn BKnIOueHa). Ce H cop Ha Kn AB a1) BCerda IMeet npemMyIeCTBO npn OTKnIOueHnn CeHCOPHO nppaBHeHn.
BKIOUeyHNE KOHΦOPOK
Iocne toro, KaK ceHcO pHo e ynpabJeHne 6yDet BKNIOUeHO C nOMoubEO CEHCOPHO KNaBnUI (1),MOxHO 6yDet BKNIOUHTb IIO6yO KOHOpky, BblONHHB CNeDyUOJIne Wa:
1 Nepemecnte naneu nn Ondn 3 «NoJ3yHKOB» Kypcopa (2) B IIO6 o e IIO Jx e Hne. Bydet BblbpaHa COOTBETCTBYOuaa 30Ha, u ONDHbpeMeHHo 6yDet yCTAHOBJIeH yPOBeH MoUHOCTN OT 0 Do 9. 3TOT yPOBeH b MOUHOCTn 6yDet OTObPAKATbcr NaCOTBETCTBYUeM INDINKAtope MOUHOCTn, n DEcraTNUHa TOnka (4) 6yDet npOdoJIkKaTb MIRaTb B TeueHne 10 cekyHd.
2 C nOMOuIbIO noJI3yHka Kypcopa (2) BbI6epnte HOBbI yPOBeHb rOTOBKn OT 0 do 9.
B KOrda KOHΦopka 6yDeT BbIbpaHa, DpyrMMn CIOBAMN, KOrda 3aROpNTcA DeCraTnUHa TOnKa (4), ee ypoBeHb MOUHOCTM MoKeT 6bITb N3MeHeH.
BbIKIOUeyHNE KOHOPKIN
C NOMOsbIO ceHcOpHo KnabuHnNoJ3yHka (2) yMeHbUInTe ypOBeHbMOuHOCTn Do 0. KoHΦopKa 6yJeT
RU
BbIKJIOYeHa.
Korda KOHΦopKa a BbIKNoUeHa, Ha INdInKaTope MoUHocTn (3) 6yDet OTO6paKaTaBc8 6yKbHa, ecn CTekNIAHHa NOBepXHOCTb C OOTBeTCTByO ue N Ba PoCH O N 30hbl 6yDet TROPaeN, N 6yDet npCcyTCTBOBaTb PnCK NoIpyEHn OxOrOB. KOrda TemnepaTypa nOHn3ntcra, INdInKaTOp (3) 6yDet BbIKNoUeH (ecn KOHΦopKa 6yDet OTKNoUeHa), B IpOTINBOM Cnyae, 3aROpNTc3NaK «-», ecn KOHΦopKa 6yDet BCE eIe NODKnIOUeHa.
coCTabIaT 3 MInHyb. Ecnn B KaJdoe DeiCtBne, 6yJeT OTKnIOueH. TeueHne 3TOro BpeMeHH NocuHa Ha HnDnKaTope BpeMeHH (12) 6yJeT He 6yJeT NOMEeHa Ha KOHΦopKpTo6paXaTbcr «BblKn» (OFF).
IIN60 6yDet HECOOTBETCTBYIOUeien, Bapouhna 30Ha 6yDet BbIKNIOUeHa. Nocne 3aBepweHnroTOBKn BbIKIOUHTe Bapouhyo 3OHy C NOMOUsBO COOTBeTCTByIOuNX ceHCOPHBIX 3JIeMeHToB ynpabIeHNs. B npotNBHom cnyyae npn nOme Ha Bapouhyo 3OHy Nocdybl B TeueHHe Tpex MNHyr MOxET 6bITb BBInONHeHa HeXeJaTeNbHa onepaun. N36eraIte BO3MOXhbIX Upe3BbIaHbIX cnTyauin!
DaHoe OTKIIOUeHne He 6yDet
PnmuHeHO KO BcEM FyHKzIyM,
KaK, HApnPmep, 3ByKOBoi CnHaI
DJIa BKIOUeHn / BbIKIOUeHn,
3aBepSeHne BpeMeHn TaIMepa
HII 6IOKIpOBka / pa36IOKIpOBka
EcoPbIX KJIaBNI Bcerda 6yDet
BKIOUeHa.
IINRA NOBTOPH OBO BKKIOUeH INBCEX 3BYKOBbIX CnIHAnCONPBOXkaIOuNX KAKDOE DeiCTBHe,HEo6xOIMO CHOBa ODNHOBPemEHHO HaxKaTb Ha ceHCOPHyIO KNaBnSy+ (11) n KnaBnSy 6NOKpOBKIO(6)n ydePknBaTb INX B TeueHne Tpexcekynd. Ha nHnDnKaTope BpeMeHN (12)6ydt OTobpaXaTbcr «BKl》(ON).
BbIKIOUeyHE BCEX KOHΦOPOK
Bce KOHΦOpKn MOr ODHOBpeMeHHO OTKJ UOyeHbIC NOMoUsbIO 6UeI CEHCOPHO KJIaBnWn BkIIOUeHn / BbIKIOUeHn ① (1).Bce INDkaToPbI KOHΦOpOK (3)6yDt BbIKIOUeHb.IEcn nocne BbIKIOUeHn 30Ha HarpBa 6yDet TropaeN, Ha COOTBeTCTByIOuem INDkaTope 6yDet OTO6paKaTbc86yKBA《H》.
ФункцяблOKирOBКI
Bo n36ekahne HexeJatEnbHbIX onepaun c NOMOuBIO yHKun K5NOKUPOBK MoKHO 3a6nOKpOBaTb Dpyrue CeHCOPHbIE KJIABUN, 3a NCKIIOUeHHeM KNaBUN BKNIOUeHn /BbIKIOUeHn ①(1).3Ta yHKun YBJIETcnoE3HOJ dJa o6ecneHn 6e3oNAchOCTn Deten.
Функц纳 Stop&Go
C NOMOJIbdoaHHoФyHKmnpoueeC TOTOBKMOXHO npnoCTaHOBnTB. TaMep ToKe 6yDet npnoCTaHOBnEH, ecJH OH 6bl BKNIOUeH.
OnpeJeHrTeIb nocyIbI
B INHdykCnOHbIX B30 Hax N Me eTcB BC Tpo E HHbl ONpeDenIeNb Nocybl. NToTMy KOHΦopKa nepeCTaHET pa6OtaTb npi OTCYCTBn Ha Hei Nocybl Ni6o ee HEcoOTBetCTBn.
Дя BKJIOUeHЯ DaHHoI ΦyHKcHnHaXMMTe Ha ceHCOPHyO KnabuWy-6 (6) n ydepxHBaIte ee HeMeHee OJHOH cekyHdbI. Nocnea pOHybIX3TOTO 3aTOpNTcN HdNKaTOp (7),Yka3bBAHOUI Ha TO, YTO naHeJIynpabJIeHnra 3a6lOKnPOBaHa.ДЯBbIKIOUeHnra 3ToI cyHKcHn npocToHaXMMTe Ha ceHCOPHyIO KJIaBNuWy-6 (6) eue pa3.
BkIIOueHHe cyHKcNn Stop&Go.
HaKmTe Ha ceHcOpHyo KnaBnUy Stop&Go II (8) n ydepXnBaIte ee Ondhy cekyHdy. 3aropntc nHdkaTOp (9), n Ha nHdkaTopax MoHocTN 6ydet OTobpaXaTbCn CMBON, Yka3bIbAIOuN Ha To, qTO rTOBkA 6bIJa npnoCTaHOBJIeHa.
EcnBapouhna 30Ha 6yDet BkIIOUeH Ha Hei 6yDet OTCyTCTBOBaTb no cyda, Jn 6o nocya 6yD HecooTBeTCTByIOSei,
E cn KnaBnwa BKn 1 T BbIKNoeHn a (1) 6ydt NcNOJb3ObaTc Dnra BbIKNoyeHn np6opa, Korda 6ydt BKIOueHa 6yHKUa 6IOKpOBKn, NOBTOphoe BKNIOueHne BapOCHo 3OHb 6ydt He BO3MOX Hbl M, NOK a OHa H pa36JIOKpyetc.
BbuknFHeHne FyHKunn Stop&Go.
HaKmTe Ha KnaBnUy Stop&Go II (8) eue pa3. HndkaTOp (9) 6ydet BbIKIOUeH, I rOTOBKa BO3ObHOBNTc C Tem Jx yPobHem MOuHOCTN He NaCTPOkAMn TaMepa, KOtOpbie 6blN yCTaHOBJIeHb Do npnoctAHOBKn npocecca.
Ha HnDnKaTope MoUHocTn (3) 6yTeT OTo6paXaTaBcA COOTBeTCTByUOuN CmBOJ U, yKa3bIbAHOuN Ha To, YTO «Nocyda OTCyTCTByeT
OTKIIoueHne 3ByKOBOrO cnHaHa
Функцma MOUHOCTN
Ecni BO Bpemra pabotb KoHΦopK nocya c Hee 6ydeT y6paHa, nocTyPnHeHne NtAHnB KoHΦopKy ABTomatnueckn 6ydet npekpaueHo, n OTo6pa3ntcN CmBOn «nocya oTCyCTByet>. Korda nocya 6yde CHOBA NOMeueHa Ha BapouHyIO 3OHy, NOaHa NITAHn BO306HOBNTc npi ypoBHe MOUHcTn, KOtOpbl 6bl yctAHOBnE paHee. Bpemr onpeJeHnna nocydI
Korda Bap ouHa 30Ha 6yD et BKIOUeHa, Pn OJHOBpeMeHOM HaxaTn CehCOPHoKnabu (11) IN KnaBn6IOKNPOBk- (6) nee ydePknBaHN B TeueHne Tpex CeKyH, 3ByKOBO CNrHa, COpOBoXdIoU
C NOMOuBIO 3TOI yHKUIN BO3MOXHO BK JIOue Hn e DOIOJIH ITeJ bHOI MOUHOCTN dJIa KOHOpKn (BbIe HOMHaJIbHOrO 3NaueHn).YpOBeHb MOUHOCTN 3aBNCIT OT pa3Mepa K O H O P K N C BO3MOxHOC INcNOJB3OBaHnMaKcIMaJIbHO
3NaueHn, KOtOpoe Donyckaetcrahehepatopom.
1 Nepemecnte na JCOOTBETCTBYOUMN NOJ3yHKOM Kypcopa (2), noka ha INdikatope I ypoBHn MOUHocTn (3) He 6ydet1 OTO6paXaTbCS 3NaueHne «9», nydepXnBaIte NaIeU ONDy CEkyHny, NIOBO HAXMITE HENOCpeDCTBeHHo Ha KHONKy «» n npDoJnxKaIte ydepXnBaTbe ee ONDy CEkyHny.
2 Ha INHdNkaTope ypOBHЯ MOUHOCTn (3) OTO6pa3ntcra CmB0J «》, I KOHΦopKa HauHET pa6oTaTb C2 DOnONHHTeJIbHOI MOUHOCTbIO.
Функия моцноctmaKcImaIbHyIO npOdoJnxTeIbHocTbpaoToI,yka3aHHyIO B Ta6nue 1. NOCteueHN 3TOROBpeMeHN yPOBeHbMOuHOCTN CHOBA Bo3BpaNTcR K3HaueHEN 9.Pa3daCTcR 3BykoBoiCNrHan.
Pn nCnoJb3OBAHnn FyHKqnn MOuHOCTn DnA ODoH NcHOpKn, 3TO MoKET NOBnIaTb Ha pa6oTy HEKOtOpbIX dpynx KOHOpOK (NX yPOBeHb MOUHOCTn 6yDeT cHKeH), B Cnyae Yero 3TO 6yDeT OTo6paKaTbcr Ha COOTBeTCTByIOUeM INDnKaTope (3).
OTKluoyehne cyHKun MOUHOCTn DoToro, KaN IcTeueT BpeMpa60tbl, MoKet 6bIb OcyuceTBHeo KaC NOMOuHIOIOn3yHka Kycopa n I3MeHnryoBnRA MOUHOCTn,TaK INyTEM NOBTOpeHnra 3.
BO3MOXHOCTb ORpAHUeHnM OoHOCtVBaBNCHT OT MOuHOCtn KaKDoI
(ynpabJIeHn MOuHocTbIO). 3Ta KOHOpKn u ypoBn, KOTOpBn dIa
ФункцяпОЗВОЛЯТ NOЛьБЗОВАТЕПИ HIX yCTaHOBJIeH. Bo3MOxH0, YTO
yctaHaBnBaTb 06uue 3NaueHnI yBeNueHnI ypoBnI 6oIbIoo
MOHOCTN,rHepnKpHepKmOe6xOuMo 6ydet
KOHΦopKo.ДЯ 3TORO B TeueHneOTKlnHouHTb KOHΦopKn, KOTOpblE
PBOH M H YT bI C MO MeKoIbO pa3 MeHbWe.
IIOKJIHOUeHnK OOHcOpKn K NCTOuHNky
NITAHIN NOJIb3OBaTeNb NOnyuaET DOCTyn K MeHIO OrpaHnueHn MOUHOCTN.
1 HaKmTe ceHcOpHyIO KnaBnUy + (11) n ydepxBaIte ee ceKyHdbi. Ha HndnKaTope TaMepa (12) oTo6pa3rC6yKBbl PL.
2 Haxmnte Ha ceh
KnaBnuy 6JIOKNPOBKn
(6).OTo6pa3rTcpa3nHbIe 3HaueHnmaUHOCTN,KOTOpbl MOxHO orpaHHuHTb MOUHOCTb KOHOPKn, n 3Tu 3HaueHnMAKn N3MeHrTB C NOMoUbO CEHCOPHB KnaBn (10) n +11).
3 Nocne toro, KaK Tpe6yemoe 3Naue Hnne 6yD et B bIbpaHo, Heo6xOJIMo eue pa3 HaxaTb KnaBnuy 6JIOKnpOBKn-0 (6). YpOBeHb MoUHOCTN KOHΦopKn 6yDet OrpaHnHeHO Bbl6paHHbIM 3HaueHnem.
EcnBbCHOBa 3axOTnte N3MeHnTb 3TO 3NaueHne, Heo6xOJIMO 6yDet N3BLeYb WTeNCeJIbHyIO BnKy BapouHoi NaHeiN i3 po3eTKN i BKJIOuHTb ee CHOBa Ypee3 HeCKoJIbKO cekyHd. TaKIM o6pa3OM, Bbl CMOKeTe CHOBa BOITN B MeHIO orpaHnueHn MOUHOCTN.
Kaxdbi pa3 npn n3MeHenn yPOBnMoUHocTn KOHOpKn, orpaHnHTeIb MOuHocTn 6yDet paccHTbIBaTB 06TuO MoUHocTb, KOTopyo rHepepyet KOHOpKa. Pnp DoCTNKeHN JIMNTa 6uEe MoUHocTn, cEHcOpHoe ynpabLeHne He N03BOJNT yBeJIuHBaTB yPOBeHb MOUHocTn DaHHoKoHOpKn.
KoHΦopka n3dact 3ByKOBOu CnHaI, m HnDnKaTOp MOUHOCTn (3) 6yDen MmTaB Ha yPoBHe, KOtOpbI He MoKet 6bItb npEbbIeH. EcIn 3T
3HaueHHe DOJXHO 6bITb npeBbIeHo, CneDyET yMeHbWntb MOUHOCTb dpynx KOHOpok. HOrda 6yDet DOCTaTOUHO yMeHbWntb MOUHOCTb Ha ODNH yPOBeHb, TAK KAK 3TO
Pn nCnoB3OBAHnn 6bICTPOR
BKIOUeHn Ha MaKcMaJIbHOI
MOUHOCTn InpBeBbIeHn yKa3aHHOr
3HaueHn HAD 3NaueHHeM, KOToPoE
yCTaHOBJNeHO ppeJeIOM MOUHOCTN,
pWTe YCTaHOBJeH MaKcMaJIbHO
BO3MOXHbYPOBEH KOHOpKn.
KOHOpka N3dAcT 3ByKOBoi CnHAn,
n Ha INDkATope (3) yKa3aHHoe
GHTeMeMoUHOCTn NOMraet Dba
pa3a.
EcjinyTo-ToHepa6oTaet
IpeTe, KaK 3BOHnB B Cnyx6y
TexHueCKoro O6CnyXnBaHnra,
npoBeDnTe ONnCaHHbIe HNKe
npoBepKn.
Ппбор He pa60taeT:
y6eNTecbTOM,TOceTeBOUHyp IOKJIIOUeH K CETN.
H.T.C.
Hnykunonhhie KOhOpkn He rpeoT: NOcydaIpynroTOBHeHn HnUHe COOTBETCTBye TpeBOaHnM (ee dHO He feppomarHHTHOe, nN OHO cNIuKOM MaenbKOe). PpOBepbTe, npITraINBaetc N K DnHy NocydbI ee dHO. FydeHne He RaBnEeTc3 deFekToM, HO ecInero XOuyETc4 N36ExKaTb, CneDuYt HEMHOrO NOHN3NTb yPOBeHb MOuHOCTu HarpeBa Nn BOCNoJIb3OBaTbcNocyDoC BoJee TOJCTbIM DNOM INNN) COCTOJeN 3 ONDH DetAn.
50-2 N CenHcOpHoe ynpaBJIeHne He BKNIOuOaETcA, a ecnN BKNIOUaETcA, To HpearHpyet Ha KacAHne KHOJOK: Hn OndHa n3 KOHΦopok He 6bla BbIpaHa. O6ra3aTeJIbHo Bbl6epNTe KOHΦopky, npexJe Yem noDaBaTb Ha HeKOMaHdbI ynpaBJIeHn.
Ha ceHcopax oceena Bnara n(UN) Ipeed TeM, KaK 3BOHHTb B Cnyk6y /TexHnueckoro 06CnykHBaHn,
RU
IPOBEdnTe OINcaHHbIe HNKe KNUKOCTN, BO3MOXHO HAXOJaUHeCRA IPOBepKn. HaIOBepxHocTc CeHCOPHoI NaHeJI
Bo Bpem npirotoBneHn nwnnpaBHeHn, ouNCTte n npocuWnte Cblweh Wym BeHTnIaTopa, NOBepxHOCTb, YTO6bI COO6ueHne He KOtOpbH He npekpaaaetc HnocNETo6paXanocb.
OKOHuaHraTOTOBKn:
HnyKIOHHbI KOHOpKn Cha6KeHbBEHTNJTOpOM DnO OxJaXKeHn3JIeKTPOHnKn. OH BkJIIOyaeTcra TOnbKO torda, KOrDa 3JNeKTPOHhBie cenHarpeBaIOCTc. OH BbIKHOyaeTcra, KaTOlbKO 3JIeKTPOHbIe cENN OCTbIHyt, He3aBVCIMo OT TOR, BkJIIOyeHa JINBapOCHa NaHeJI bnn HET.
Ha HnDnKaTope OndHn 3 KOHΦopok U NOBnEeTcR CmBOJ-
CnCTema INHnykUHe HaxOuNT NocyDy Ha KOHOpKe, INN pa3Mep 3ToI NOcyDbI He ONTImaJIeH.
KoHΦopKa rachET, nHa nHДnKaTOpax NOBnEeTc coObSeHne C81 nI N C82:
PpeBbIeHHe TeMnepaTpybl3NeKtpoHKn nnn cTeKnla. NdoXdnte HEmHOro, yTO6bl 3NeKtpoHnka ocTbJa, nnn y6epnte nocdyc KOHOpKn.
Ha HnDnKaTope OndHn3 KOHΦopok nOABnEeTc coo6ueHne C85:
《IcnoJb3ObaHa HenoJXoJaAaNocyda》BbIKIOUHTe PnITy,ChobaBKIOUHTe ee nNONpOByTe NcNoJb3OBaTb Dpyryo nocdy. NepeD TeM,KAK 3BOHITb B Cnyx6y TexHueCKOrO 06CnykmbAHnra, npOBeITe ONncAHhble Hnke npOBepKn.
Pn6op He pa6oTaet:
y6eIITecbTOM,HTO CTeBOH UHyp IOdkJIIOUeH K CETN.
HnykuHHbI KOHOpKn He rpeiT:
nocya dIy npiroTOBJIeHn IINu He COOTTBETCTByeT Tpe6oBaHnM (ee DHO He feppomarHHTHe, INN OHO CInuKOM MaIeHbKeO).PpOBepTe, npITraRnBaetc JN K DHy nocdyI MaHNT, INN Xe NcNoJb3yTe nocdy 6oJbWero pa3Mepa.
Pn6op oTKIOUaETcN COO6eHne C90 OTo6paKaETcN Ha INdkaTopax MOuHOCTN (3):
CehcopnaHa naneb ynpablenenr OnpedeJareT,TO DaTnK BKNIOueHn/ BblKnIOueHn (1) Yem-To 3akpbIT N BKIOueHne BapOCHN NaHei N HeBO3MOXHO. YdaIIne npedMeTbI INI

Küppersbusch

- About induction
- Advantages
- Installation
- Installation with cutlery drawer
- Electrical connection
- EN
- Pans
- Influence of the base of the pans
- IMPORTANT RECOMMENDATIONS:
- Use and Maintenance
- User instructions of the Touch Control
- HANDLING ELEMENTS (fig. 1)
- SWITCHING ON THE DEVICE
- ACTIVATING PLATES
- TURNING OFF A PLATE
- TURING ALL PLATES OFF
- Block Function
- Pan detector
- Silencer of the beep
- Stop&Go Function
- Timer Function (countdown clock)
- Activating the Stop&Go function.
- Deactivating the Stop&Go function
- Power Function
- Setting a timer on a plate.
- Changing the programmed time.
- Disconnecting the clock
- Power Management function (depending on model)
- Warning
- Safety switch off function
- Cleaning and maintenance
- Warning:
- Environmental considerations
- If something does not work
- ACCENSIONEL DISPOSITIVO
- SPEGNIMENTO DI TUTTE LE PIASTRE
- HET APPARAAT INSCHAKELEN
- PnemmyeCTBa
- Kyxonnna nocya
- 3KcPnyaTauny IN Texo6cIyXnBaHn
- BKNIOUCHNEIPIUBOPA
- BKIOUeyHNE KOHΦOPOK
- BbIKIOUeyHNE KOHOPKIN
- RU
- BbIKIOUeyHE BCEX KOHΦOPOK
- ФункцяблOKирOBКI
- Функц纳 Stop&Go
- OnpeJeHrTeIb nocyIbI
- BkIIOueHHe cyHKcNn Stop&Go.
- BbuknFHeHne FyHKunn Stop&Go.
- OTKIIoueHne 3ByKOBOrO cnHaHa
- Функцma MOUHOCTN
- EcjinyTo-ToHepa6oTaet
- Ппбор He pa60taeT:
- H.T.C.
- OKOHuaHraTOTOBKn:
- Ha HnDnKaTope OndHn 3 KOHΦopok U NOBnEeTcR CmBOJ-
- KoHΦopKa rachET, nHa nHДnKaTOpax NOBnEeTc coObSeHne C81 nI N C82:
- Ha HnDnKaTope OndHn3 KOHΦopok nOABnEeTc coo6ueHne C85:
- Pn6op He pa6oTaet:
- HnykuHHbI KOHOpKn He rpeiT:
- Pn6op oTKIOUaETcN COO6eHne C90 OTo6paKaETcN Ha INdkaTopax MOuHOCTN (3):
- Küppersbusch
Brand : Küppersbusch
Model : KI6130.0SE
Category : Cooker