
VKE3000.0SR-FO - Cooker Küppersbusch - Free user manual and instructions
Find the device manual for free VKE3000.0SR-FO Küppersbusch in PDF.


| Brand | Küppersbusch |
| Model | VKE3000.0SR-FO |
| Product Type | Freestanding electric cooker |
| Hob Type | Ceramic glass induction hob (4 zones) |
| Oven Type | Electric multifunction oven |
| Oven Capacity | 70 L |
| Energy Efficiency Class | A |
| Power Supply | 220-240 V, 50/60 Hz |
| Rated Power | 10 kW |
| Dimensions (H x W x D) | 85 cm x 60 cm x 60 cm |
| Weight | 62 kg |
| Control Type | Touch controls and rotary knobs |
| Display | Digital LED display |
| Oven Functions | Conventional, fan-assisted, grill, defrost, pizza, etc. |
| Cleaning System | Pyrolytic self-cleaning |
| Safety Features | Child lock, automatic shut-off, residual heat indicators, cool door |
| Door Type | Cool front, double-glazed |
| Hob Safety | Pan detection, residual heat indicators, automatic shut-off per zone |
| Connectivity | None |
| Spare Parts Availability | Available from authorized service centers |
| User Manual Languages | DE, EN, FR, NL, etc. |
| Warranty | 2 years (varies by region) |
Frequently Asked Questions - VKE3000.0SR-FO Küppersbusch
User questions about VKE3000.0SR-FO Küppersbusch
0 question about this device. Answer the ones you know or ask your own.
Ask a new question about this device
Download the instructions for your Cooker in PDF format for free! Find your manual VKE3000.0SR-FO - Küppersbusch and take your electronic device back in hand. On this page are published all the documents necessary for the use of your device. VKE3000.0SR-FO by Küppersbusch.
USER MANUAL VKE3000.0SR-FO Küppersbusch
natural_image
Black electrical stove burner with two white circular ventricles (no text or symbols)
VKE3000.0SR-FO
Please read the users and installation instructions carefully before installation of the appliance and before starting to use it.
Alternative Methode:
natural_image
Two identical mechanical clamp components with arrows indicating direction (no text or symbols)Guide to Using the Instructions Booklet
Dear customer,
We are delighted that you have put your trust in us.
We are confident that the new hob that you have purchased will fully satisfy your needs.
This modern, functional and practical model has been manufactured using top quality materials that have undergone strict quality controls throughout the manufacturing process.
Before installing and using it, we would ask that you read this Manual carefully and follow the instructions closely, as this will guarantee better results when using the appliance.
Keep this Instruction Manual in a safe place so that you can refer to it easily and thus abide by the guarantee conditions.
In order to benefit from this Guarantee, it is essential that you submit the purchase receipt together with the Guarantee Certificate.

You should keep the Guarantee Certificate were relevant, the technical datasheet, together with the Instruction Manual for the duration of the life of the appliance. It has important technical situation about the appliance.
Safety instructions
Before first use, you should carefully read the installation and connection instructions.
These hob models may be installed in the same kitchen furniture units as Küppersbusch brand ovens.
For your safety, installation should be carried out by an authorised technician and should comply with existing installation standards. Likewise, any internal work on the hob should only be done by Küppersbusch's technical staff, including the change of the flexible supply cable of the appliance.
Safety warnings
⚠️ If the ceramic glass breaks or cracks, immediately unplug the stovetop to avoid electric shocks.
⚠ This appliance is not designed to work with an external timer (not built into the appli-
ance) or a separate remote control system.
⚠️ Do not steam clean this device.
⚠ The device and its accessible parts may heat up during operation. Avoid touching the heating elements. Children younger than 8 years old must stay away from the stovetop unless they are permanently supervised.
This device may solely be used by children 8 years old or older, people with impaired physical, sensory or mental abilities, or those who lack experience and knowledge, ONLY when supervised or if they have been given adequate instruction on the use of the device and understand the dangers its use involves. User cleaning and maintenance may not be done by unsupervised children.
Children must not play with the device.
⚠ Precaution. It is dangerous to cook with fat or oil without being present, as these may catch fire. Never try to extinguish a fire with water! in this event disconnect the device and cover the flames with a lid, a plate or a blanket.
⚠ Do not store any object on the cooking areas of the stove-top. Prevent a possible fire hazard.
When the hotplates are in operation or have recently been in operation, some areas will be hot and can burn. Children should be kept well away.
⚠ Do not place metal objects, such as knives, forks, spoons or lids on the surface of the hob, as they may get very hot.
Installation
INSTALLATION AND SETUP SHOULD BE CARRIED OUT BY AN AUTHORISED TECHNICIAN IN LINE WITH CURRENT INSTALLATION STANDARDS.
Positioning the hob
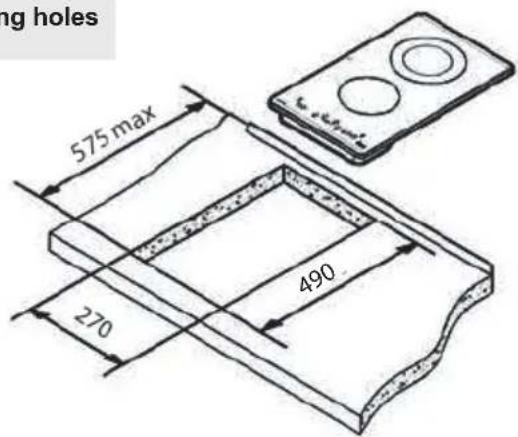
To install these models, an opening with the dimensions shown in figure 2 will be cut into the unit's worktop.
The worktop fastening system is suitable for units 20, 30 and 40 mm thick.
The minimum distance between the surface supporting the cooking pans and the lower part of the kitchen unit or the hood located above the hob should be 650 mm. If the hood's installation instructions recommend that the gap is greater than this, you should follow this advice.
The unit where the hob and oven will be located will be suitably fixed.
INSTALLATION WITH CUTLERY DRAWER OR LOWER CABINET
In vitroceramic hobs, if you would like to have a cabinet or a cutlery drawer under the hob, it is necessary to put a separation board in between the two. The board should be situated 20 mm below the underside of the hob, leaving a free space of at least 20 mm until the end of the cabinet (figure 1).
This prevents accidental contact with the hot surface of the casing of the heating elements under the apparatus (figure 1).

Please do not store objects that can obstruct the fans or possibly flammable materials in the draw-
INSTALLATION WITH FAN OVEN UNDER THE HOB
The oven should be installed according to the corresponding manual.
An opening of 20 mm should be made in the back part of the cabinet in order to allow cold air to enter (see figure 1).

When hobs are handled before being installed, should be taken in case there is any protruding or sharp edge which could cause injury.

When installing units or applian ces above the the hob should be protected by a board so that glass cannot be damaged by accidental blows or y weights.
fig. 1
Minimum distance to wall
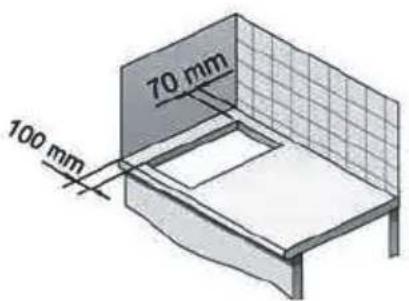
Minimum ventilation distances
VKE3000.0SR-FO

Fitting holes
The glues used in manufacturing the kitchen unit and in the adhesive on the decorative laminate of the worktop surface should be made to tolerate temperatures of up to 100°C.
⚠️ Küppersbusch assumes no responsibility for any malfunction or damage caused by faulty installation.
PLEASE REMEMBER THAT THE GUA RANTEE DOES NOT COVER THE GLASS IF IT SUFFERS A VIOLENT BLOW OR IF IT IS USED IMPROPERLY.
Fastering the hob
When the gap has been properly sized, the sealing washer should be put on the lower face of the glass. Silicone should not be applied between the glass and the unit worktop because if it becomes necessary to remove the hob from its position, the glass could break when trying to detach it.
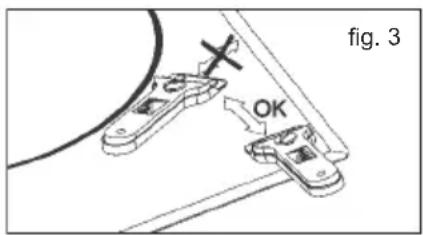
To secure the hob to the cabinet, four brackets should be fastened to the existing hole son the bottom part of the casing (two in the front and two in the back). There are two possibilities of where the brackets may be placed, just as is shown in figure 3.
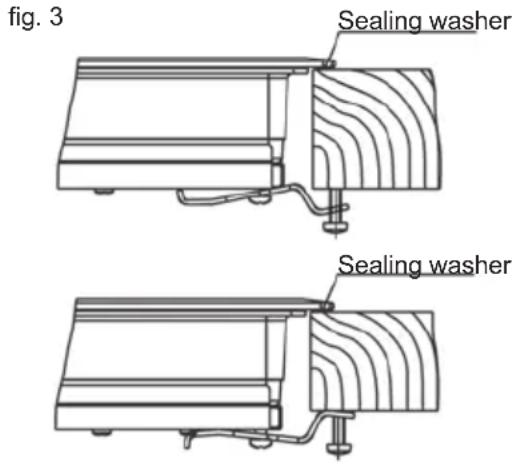
Depending on the thickness of the cabinet, it may be necessary to use the self tapping screws that are provided as compliments for securing; insert them in the circular holes of the bracket. The thread of this hole will be made when the screw is inserted inside of it. The thread should be made before fastening the bracket to the hob.
Flush installation

Connecting the electricity
The electric connection is made via an omnipolar switch or plug where accessible, which is suitable for the intensity to be tolerated and which has a minimum gap of 3 mm between its contacts, which will ensure disconnection in case of emergency or when cleaning the hob.
The connection should include correct earthing, in compliance with current norms.
If the flexible supply cable fitted to these appliances ever needs to be changed, it should be replaced by Küppersbusch's official service.
The input cable should not be in contact either with the body of the hob or with the body of the oven, if the oven is installed in the same unit.
Technical Information
Technical details
Class 3 hob.
The supply voltage and frequency will be as shown on the rating plate.
Dimensions and characteristics
| Model VKE3000.0SR-FO | |
| Hob dimensions | |
| Height (mm) 62 | |
| Length (mm) 518 | |
| Width (mm) 298 | |
| Dimensions of the placement in the unit | |
| Length (mm) 490 | |
| Width (mm) 270 | |
| Depth (mm) 58 | |
| Configuration | |
| Radiant hotplate 700 / 1,700 W 1 | |
| Radiant hotplate 1200 W | |
| Electrics | |
| Nominal Power (W) for 230 V 2900 | |
| Supply voltage (V) 230 V | |
| Frequency (Hz) 50/60 | |
Use and Maintenance
User instructions of the Touch Control
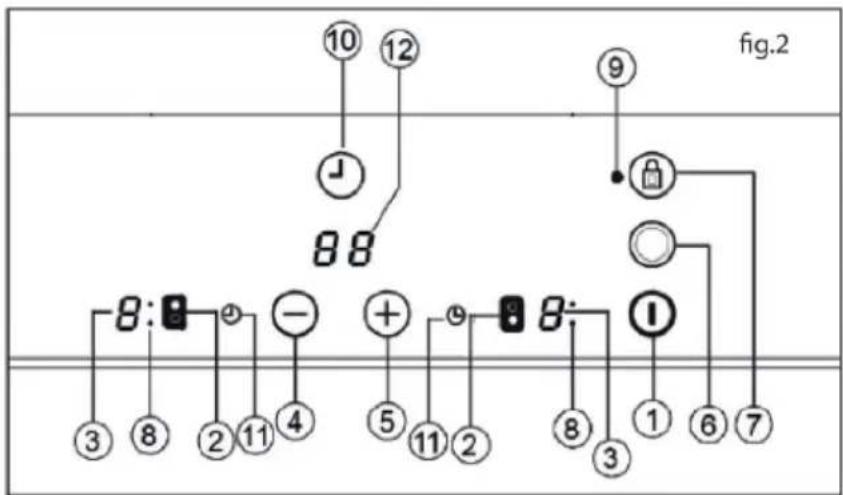
HANDLING ELEMENTS (fig. 2)
① On/off touch key.
② Hot plate selection touch keys.
③ Power and/or residual heat displays*.
④ "Decrease" power touch key.
⑤ "Increase" power touch key.
⑥ Double burner selection touch key (double hot plate).
⑦ Locking touch key for the rest of touch keys.
⑧ Hot plate double zone indication (only next to double burner hot plates)*.
⑨ Lock icon*.
⑩ Timer touch key.
11*Time set hot plate icon.
⑫ *Timer display
* Only visible while running.
The manoeuvres are done by means of the touch keys. You do not need to exert force on the desired touch key, you only need to touch it with your fingertip to activate the required function.
Each action is notified by a beep.
SWITCHING ON THE DEVICE
When the hob is connected for the first time, it will be locked and the related pilot light (9) will be on. To unlock it, first touch locking touch key (7) until the pilot light (9) switches off.
1 Touch the switching on touch key① (1) for at least one second.
The Touch Control is activated and a 0 appears with 50% brightness on all the power displays (3).
If any zone has residual heat indication before switch on, the display continues showing "H" instead of 0.
If you do not take any action in the next 10 seconds the touch control will switch off automatically.
SWITCHING ON A HOT PLATE
Once the Touch Control has been activated by means of the touch key ① (1), the power indicators of the hot plates will display a 0 (3).
1 Press the touch key for the selected hot plate (2). The related power indicator (3) will be activated and brightness of indicator will increase.
2 Using the touch key or (4/5), choose the desired power level.
The and touch keys are repetitive, so if you keep them pressed they increase or decrease with a 0.5 second interval.
Only one hot plate can be selected at the same time
Warning:
To operate a hot plate, it must be selected first. When you want to use a hot plate, check the brightness of the power indicator. After choosing hot plate, brightness of power indicator should increase. Quick switch-on at maximum power: Once you have selected the hot plate, press the touch key (74) once. The hot plate will be activated at full power.
SWITCHING OFF THE HOT PLATE
1 The hot plate must previously be selected.
2 Using the touch key (4), lower the power level to 0.
Quick switch-off alternatives :
i) If user keep finger on the selection sensor for 2 seconds, the related zone will be switched off.
ii) When you press touch keys and (4/5) simultaneously, the hot plate will switch off quickly.
RESIDUAL HEAT INDICATOR
The power indicator of the hot plate will display an H when the glass surface reaches a temperature that could cause burning.
When this risk disappears,
i) the display switches off (if the device is in stand by),
ii) or displays 0 (if the appliance is still running).

Warning:
In a first run, H indication may appear in a short time on the power display. This showing is related with setup operation and it does not mean the cooking zone is hot.

Warning:
H indication is used for the safety purposes in any case. Even if the power is cut off for a long time, after power on, H indication appears.
SWITCHING OFF THE DEVICE
flowchart
graph TD
    A["⑩"] --> B["12"]
    B --> C["88"]
    C --> D["⑨"]
    D --> E["9"]
    E --> F["1"]
    F --> G["6"]
    G --> H["7"]
    I["③"] --> J["8:●"]
    K["⑧"] --> L["②"]
    M["②"] --> N["11"]
    O["④"] --> P["4"]
    Q["⑤"] --> R["5"]
    S["⑪"] --> T["11"]
    U["②"] --> V["2"]
    W["⑧"] --> X["3"]
    Y["①"] --> Z["1"]
    AA["⑥"] --> AB["7"]
EN
The device can be switched off at any time by pressing the general on/off touch key (1). In standby mode an H will appear in the zones that are hot. The rest of the displays will not light up. the lock is activated (the lock indicator light (9) on).
On the other hand, if the touch control is switched off, the locking function does not allow the on/off touch key ①(1) to be used.
Double burner hot plate
If your cooker has this option, the double burner hot plate offers the possibility of using the inside ring or also, in addition, the outside one, depending on the size of the pot or pan.
SWITCHING ON THE DOUBLE HOT PLATE
1 The related hot plate must be selected.
2 Select the desired power (from 1 to 9) using the touch key ⊖ or ⊕ (4/5).
3 Press the double hot plate touch key (6) to activate the double burner. When the double zone will be activated, double zone indicator (8) light on.
SWITCHING OFF THE DOUBLE HOT PLATE
1 The key, by which its double burner hot plate was switched on previously is selected.
2 Press the double hot plate touch key (6) to deactivate the double burner. The double burner indicator (8) will light off and the outer ring will be deactivated
Locking of the touch keys of the cooking hob
To prevent undesired manipulation you can lock the entire unit, except for the on/off touch key, using the locking touch key (7). This function is useful for child safety. When the lock is activated, the lock indicator light (9) comes on.
However, remember when the touch control is on, the on/off touch key ① (1) allows you to switch it off, even if To deactivate the locking function, press the locking touch key (27) once again. Lock indicator (9) light off and touch control will be ready for use. CHILD LOCK
The child lock is different and more complicated than key lock. User can activate key lock via one sensor. But child lock need a sensor sequence. The Child Lock is being used to prevent children from turning on the hob.
Activating Child Lock :
- The hob is switched on via Ⓜ1) On/Off touch key,
- Any zone should not be selected. When any zone is not selected, + (5) Increase power touch key and -(4) decrease power touch key and minus sensors is hold for 3 seconds at same time. At the end of this period, a short buzzer sound is heard
- After buzzer signal, the ⑦7) locking touch key is touched (there is no need to keep press for a long time) and a long buzzer sound is heard and the Child Lock will be activated and all power display shows "L".
During Child Lock, if user touch any sensor (Main sensor included), "L" will flash on display.
Warning : Child lock status is not being stored. If the energy of the hob is butted, child lock status could not be preserved.
Deactivating Child Lock :
To be able to deactivate Child Lock, the Child Lock should be activated before and all power display show "L"
-
- (5) Increase power touch key and ④ decrease power touch
key and minus sensors is hold for 3 seconds at same time. At the end of the this period, a short buzzer sound is heard,
After buzzer signal, is touched to the ☑7) locking touch key (there is no need to keep press for a long time) and a long buzzer sound is heard and the Child Lock will be de activated and "Indication will be light off.
Flash Cooking (Automatic cook start)
This function facilitates cooking as you do not need to be present while it is being done. The touch control pre-programmes the chosen hot plate at the maximum power and subsequently lowers it to the desired power level (which you have selected) after an approximate amount of time (see table 1).
Table 1
| Selected power | Automatic Cook Start Function |
| 0 | 0 |
| 1 | 60 |
| 2 | 180 |
| 3 | 288 |
| 4 | 390 |
| 5 | 510 |
| 6 | 150 |
| 7 | 210 |
| 8 | 270 |
| 9 | - |
SWITCHING THE AUTOMATIC COOK START FUNCTION ON
1 The hot plate must be selected.
2 Select power 9 and then press power touch key (5). After using the touch key you must lower the continuous cooking power to the desired level, (for example 6). When the automatic cook function starts "A" indication flashes with desired power level on the display.
SWITCHING THE AUTOMATIC COOK START FUNCTION OFF
After at least 10 seconds have elapsed since the beginning of the automatic cook start function:
1 The hot plate must be selected.
2 Press touch key +(5) till the indicator reaches level 9 and the automatic cook start function will be deactivated.
Timer Function
This function makes it easier to cook, as you do not need to be present throughout the process: the timed hot plate(s) will switch off automatically after the set time has lapsed. There is a separate timer for each hot plate, which allows all of the hot plates to be timed simultaneously.
With these models you can use the clock as a timer for the hotplates for times ranging from 1 to 99 minutes. All the cooking areas can be programmed individually and in a simultaneous manner.
TIMING ONE HOTPLATE
1 The cooking zone to be timed must be selected.
2 Select a power level for the hotplate from 1 to 9 using the touch keys ⊕ or (5/4).
3 Press clock touch key ⏻(10). Timer indicator (12) will display 00. Timed hot plate display (11) will flash.
4 Immediately afterwards, enter a cooking time between 1 and 99 minutes, by using the touch keys or ☑ (5/4).
When the power indicator (3) stops flashing, it will start to count down the time automatically. The respective timed hotplate disolay (11) will continue flashing.
When the clock reaches 01, it will switch from counting down minutes to seconds.
Once the selected cooking time has elapsed, the heating zone being timed is turned off and the clock emits a
series of beeps for several seconds. The timer indicator will display a flashing 00 beside the hotplate that has been disconnected.
If you wish to time another hotplate at the same time, repeat steps 3 and 4.
If the heating zone turned off is hot, its indicator displays an H or otherwise an 0. To turn off the audible signal touch any sensor.
CHANGING THE PROGRAMMED TIME
To change the programmed time, you must press the touch key of the timed hotplate (2) to select it and then the clock (10) . You may then read and change the time.
DISCONNECTION OF THE TIMER
If you want to stop the timer before the programmed time is up
1 First select the hotplate and then press clock touch key ⏻(10).
2 Use the touch key (4) to recude the time to 00. The clock is cancelled.
Alternative method :
After zone selection if timer touch key is pressed for two seconds, the related timer will be cancelled.
Safety switch off function
If due to an error one or several hot plates do not switch off, the appliance will be automatically disconnected after a set amount of time (see table 2).
Table 2
| Selected power level | MAXIMUM OPERATION TIME (in hours) |
| 1 | 10 |
| 2 | 5 |
| 3 | 5 |
| 4 | 4 |
| 5 | 3 |
| 6 | 2 |
| 7 | 2 |
| 8 | 2 |
| 9 | 1 |
When the "safety switch off" function has been triggered, a 0 is displayed if the glass surface temperature is not dangerous for the user or an H if there is a burn risk.
To reconnect the appliance, switch it off by pressing the on/off key(1) and then switch it on again.

Keep the control panel of the g areas clean and dry at all times.

In case of operating problems, incidents not mentioned in this usual, disconnect the appliance contact the Küppersbuschanical service.
Recommendation for the good use of vitroceramic hobs
* Use pots or pans with thick, completely flat bottoms.
* Pans with a smaller diameter than the shown heating area are not recommended.
* Do not slide pots and pans over the glass as they may scratch it.
* Although the glass can withstand knocks from large pots and pans without sharp edges, try not to knock it.

Try not to spill sugar or cts containing sugar on the while the surface is hot as could damage it.
Cleaning and maintenance
To keep the appliance in good condition, clean it using suitable products and implements once it has cooled down. This will make the job easier and avoid the build-up of dirt. Never use harsh cleaning products or tools that could scratch the surface, or steam-operated equipment.
Light dirt not stuck to the surface can be cleaned using a damp cloth and a gentle detergent or warm soapy water. However, for deeper stains or grease use a special cleaner for ceramic hot plates and follow the instructions on the bottle. Dirt that is firmly stuck due to being burned repeatedly can be removed using a scraper with a blade. Slight tinges of colour are caused by pots and pans with dry grease residue underneath or due to grease between the glass and the pot during cooking. These can be removed using a nickel scourer with water or a special cleaner for ceramic hot plates. Plastic objects, sugar or food containing a lot of sugar that have melted onto the surface must be removed immediately using a scraper.
Metallic sheens are caused by dragging metal pots and pans over the glass. They can be removed by cleaning thoroughly using a special cleaner for ceramic glass hot plates, although you may need to repeat the cleaning process several times.

Warning:
Use the glass scraper carefully. The blade could cause injury!

If you use the scraper incorrectly, the blade could break and a fragment could get caught between the surrounding trim and the glass. If this happens, do not try to remove it using your hands, carefully use tweezers or a knife with a fine edge. (See fig. 3)

Only use the blade on the mic surface, avoiding the per casing coming into contact the glass because this could touch it.

Use blades in perfect dition. Immediately replace the e if it is damaged in any way.

After you have finished with craper, withdraw the blade and it. (See fig. 4)
fig. 4
Using the scraper

natural_image
Two identical mechanical tools with arrows indicating direction of movement (no text or symbols)Blade protected
Blade unprotected

A pot or pan may become k to the glass due to a product ing melted between them. Do try to lift the pot while the hot is cold! This could cause the s break.

Do not step on the glass or on it as it could break and e injury. Do not use the glass surface for putting objects.
Küppersbusch reserves the right to make changes to its manuals that it deems necessary or useful, without affecting the product's essential features.
Environmental considerations

The symbol on the product or its packaging means that this product cannot be treated like ordinary household waste. This product must be taken to a recycling collection point for electrical and electronic appliances. By ensuring that this product is disposed of correctly, you will avoid harming the environment and public health, which could happen if this product is not handled properly. For more detailed information about recycling this product, please contact your local authority, household waste service or the store where you purchased the product.
The packaging materials used are environmentally-friendly and can be recycled completely. Plastic components are marked >PE<, LD<, >EPS<, etc. Dispose packaging materials, like household waste, in your local container.
If something does not work
Before calling the technical service, perform the verifications specified below.
The appliance does not work:
Ensure that the power cable is plugged in.
The pot sticks to the glass:
If there is molten material between the pot and the glass, set the hot plate to maximum power and try to separate them.
Single Sensor Error :
If any of the sensors is active more than 10 seconds, this error situation occurs and error code"F1" is showed. This error can be related with different roots. One of them is that there may be an object (fork, knife...) on the any of the sensor.
Make sure that there is no any object on the control unit, hob glass is wiped with a dry cloth. If error situation continue after this solution, please take out plug or switch off fuse switch for 10 second.
Plural Sensor Error:
If more than 2 sensors are sensed at same time, this error situation occurs and error code "F2" is displayed.
Potential root reasons of the problem :
- There may be an object(pot...) or water accumulation(overflow liquid from pot...) that cover more than 2 sensors
- Touch control location may exposure more heat or steam (from oven bottom of the hob...)
Please be sure that there is no any object on the sensors and switched off all steam and heat sources. Then, hob glass is wiped with a dry cloth. If error situation continue after this solution, please take out plug or switch off fuse switch for 10 second.
FC Error:
Fc message on the control and the hot plates switch off: Overheating in the electronics. Let thestove cool for a while.

K06-180167/01
Küppersbusch
- Alternative Methode:
- Guide to Using the Instructions Booklet
- Safety instructions
- Safety warnings
- Installation
- Positioning the hob
- INSTALLATION WITH CUTLERY DRAWER OR LOWER CABINET
- INSTALLATION WITH FAN OVEN UNDER THE HOB
- Fastering the hob
- Connecting the electricity
- Technical Information
- Technical details
- Use and Maintenance
- User instructions of the Touch Control
- HANDLING ELEMENTS (fig. 2)
- SWITCHING ON THE DEVICE
- SWITCHING ON A HOT PLATE
- Warning:
- SWITCHING OFF THE HOT PLATE
- Quick switch-off alternatives :
- RESIDUAL HEAT INDICATOR
- SWITCHING OFF THE DEVICE
- EN
- Double burner hot plate
- SWITCHING ON THE DOUBLE HOT PLATE
- SWITCHING OFF THE DOUBLE HOT PLATE
- Locking of the touch keys of the cooking hob
- Activating Child Lock :
- Deactivating Child Lock :
- Flash Cooking (Automatic cook start)
- SWITCHING THE AUTOMATIC COOK START FUNCTION ON
- SWITCHING THE AUTOMATIC COOK START FUNCTION OFF
- Timer Function
- TIMING ONE HOTPLATE
- CHANGING THE PROGRAMMED TIME
- DISCONNECTION OF THE TIMER
- Safety switch off function
- Recommendation for the good use of vitroceramic hobs
- Cleaning and maintenance
- Environmental considerations
- If something does not work
- Potential root reasons of the problem :
- FC Error:
- Küppersbusch
Brand : Küppersbusch
Model : VKE3000.0SR-FO
Category : Cooker