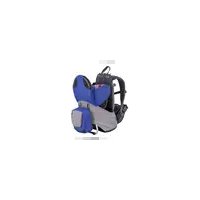
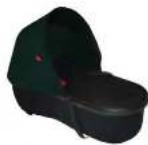
peanut - Baby products Phil & Teds - Free user manual and instructions
Find the device manual for free peanut Phil & Teds in PDF.
| Product Type | Carrycot (stroller) |
| Brand | Phil & Teds |
| Model | peanut |
| Maximum child weight | 9 kg (19.8 lbs) |
| Safety standards | EN 1466:2004, EN 1888:2005, AS/NZS 2088:2000, ASTM F833-07a, ASTM F2194-07a |
| Frame material | Aluminum and fabric |
| Base material | Plastic |
| Hood | Yes, removable |
| Apron | Yes, with zipper |
| Mattress | Included, hand washable |
| Harness | Yes, attachment points integrated under the mattress |
| Carrying handles | Yes, retractable |
| Stroller attachment system | Attachments for Vibe; mounting tabs for Classic, Sport, Dash, Hammerhead |
| Care | Clean with a damp cloth; mattress hand wash in cold water, dry flat; do not use solvents, bleach, or dryer |
| Warranty | 1 year against defects in material and workmanship |
| Recommended accessories | Rain cover, sun cover, fitted sheets |
| Folding | Yes, with removal of support bars and untying of cords |
| Usage | From birth up to 9 kg (child unable to sit up alone) |
Frequently Asked Questions - peanut Phil & Teds
User questions about peanut Phil & Teds
0 question about this device. Answer the ones you know or ask your own.
Ask a new question about this device
Download the instructions for your Baby products in PDF format for free! Find your manual peanut - Phil & Teds and take your electronic device back in hand. On this page are published all the documents necessary for the use of your device. peanut by Phil & Teds.
USER MANUAL peanut Phil & Teds
pewer for classic sport drinks, such as handels and lollies. (Complete)
()
051 052
g 1074-292-2328
ggs 1074-292-2327
A
and the 2015 UK census data. We also suggest that this will bring a residual security
adapisurvive!
M
peanut survival guide
adapt&suivive!
adapisurvivel


+0000
PG female parental guidance required
NB baby not included

peanut™ instructions
IMPORTANT - READ THE INSTRUCTIONS CAREFULLY BEFORE USE AND KEEP THEM FOR FUTURE REFERENCE.
Use only for children weighing no more than 9kg/19.8lbs
Follow these simple steps and you'll be ready for some home & away rest assurance in no time!
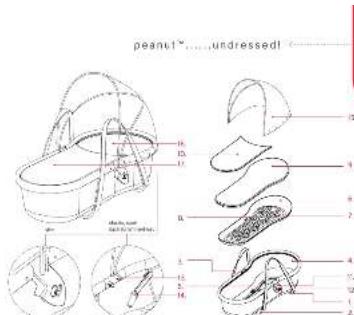
bits & bobs
Red numbers below refer to peanut parts indicated on the inside back flap of this guide.
- Head end leg
- Foot end leg
- Handles (x2)
- Aluminium frame and fabric wall
- Fabric wall cord
- Plastic base
- Plastic base brackets (x4)
- Harness fixing points
- Mattress
- Cover
- Vibe latch hooks
- Vibe latch lever
-
Classic/Sport/Dash/Hammerhead frame grips
-
Classic/Sport/Dash/Hammerhead locking arms (left & right hand)
- Nutshell
- Head end
- Foot end
safe & sound
We've attained the following safety standards:
EN 1466:2004
EN1888:2005
- ASNZS 2088:2000
ASTM F833-07a
ASTM F2194-07a
getting to grips
Letters in red refer to line drawings on the inside front cover.
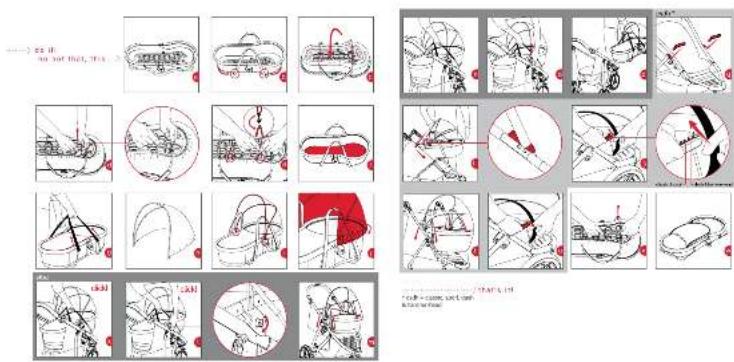
a Carefully remove the peanut and its component parts from the packaging. Remove the cover and mattress from the aluminium frame and fabric wall and check the plastic base is correctly positioned; making sure the curved edges face upwards.
b Standing side-on to your peanut rotate both legs downwards towards the centre of the peanut, as shown. Push the plastic base down into the fabric wall.
c Turn the peanut upside down on a flat surface keeping hold of the plastic base as you turn it over. Locate the plastic base brackets, two at each end of the base. Note that there are
also raised bumps between each set of brackets - these will help keep the legs in place once they are hooked into the brackets.
d To hook the legs into the plastic base brackets; hold the plastic base with one hand and the head end leg with the other. Lift the base upwards and hook the leg under the two small plastic brackets on the base. Ensure they are fully engaged in each bracket before moving on. Repeat for the legs at the foot end.
The legs are made from spring steel, giving them tension, so you'll have to use a bit of muscle power to hook them under the second set of brackets!
e Next, locate the four exposed sections of the cord loop that runs around the bottom of the fabric side wall. Pull the cord sections from opposite sides into the middle of the plastic base and hook them together. Repeat for the second set of cord loops, making sure they are securely fastened to each other before moving on.
f Turn the peanut over and place the mattress inside, so the sponge-like fabric is facing upwards.
g The peanut's cover zips on and off as required. When you're ready to carry the peanut the handles will slide up the legs to provide more handle length.
final check points!
Before placing your precious bundle into the peanut, ensure:
- The legs are fully engaged under the brackets on the plastic base (see step 'd')
- The cord loops are hooked together securely.
attaching the nutshell
Pick up your nutshell and open it out with the elastic edge at the bottom, as shown.
i Locate the two holes on the top of the peanut frame (on both sides of your peanut) and slot the ends of the nutshell rods fully into the holes, making sure the hood is facing the right way (so it covers the head end of your peanut!).
j Ease the elastic bottom of the hood around the aluminium frame.
harness fixing points
If you want to secure your little one in the peanut, there are two fixing points located either side of the base, under the mattress (see no. 8 in the parts diagram). This will allow you to fasten a harness to the peanut.
attaching the peanut to the vibe buggy
NOTE: Do not use the peanut fitted to the buggy in combination with a child in the main buggy seat and/or double kit.

Make sure the vibe buggy brake is engaged, the seat is in the lie-flat position and the pull bar is removed.
k Stand side-on to your vibe buggy and extend the peanut handles to their full length. Hold the peanut by its handles with one hand and position it over the frame of
the vibe. NOTE: The head end of the peanut should point towards the vibe front wheel. With your free hand, guide the peanut latch hooks, located on either side of the peanut frame, over the upper pull bar slots on the vibe frame.
Press down on the latch hook closest to you, listening for the sound of the hooks locking in place. Look to make sure the latch housing is sitting flush on the vibe frame and the peanut latch lever has returned to the downward position.
I Still holding the peanut handles with one hand: reach over to the second latch, furthest away from you, and press down on the peanut latch hooks until you hear them lock into place.
Check both latches are fully engaged by gently tugging on the handles and making sure the peanut doesn't come free from the frame.
m Slide the handles down the legs to sit neatly out of the way and you're good to go!
removing the peanut from the vibe buggy
Make sure the vibe buggy brake is engaged.
n Extend the peanut handles to their full length. Stand side-on to the peanut and hold it by its handles with one hand.
o Reach over the peanut to the side furthest away from you and release the latch hooks from the vibe frame by rotating the peanut latch lever upwards and lifting the latch hooks backwards and upwards. Take the w eight of the peanut with the handles in one hand, to prevent the far latch from re-engaging.
p With your free hand: release the second latch, as before, and lift the peanut away from the vibe frame.
attaching the peanut to the classic/sport/dash or hammerhead buggy
NOTE: Do not use the peanut fitted to the buggy in combination with a child in the main buggy seat and/or double kit.
Make sure the buggy brake is engaged and the seat is in the lie-flat position. Do not remove the fabric seat from your buggy
q Remove the pull bar from the buggy and replace with the locking arms (left and right hand). Make sure they are fully secured
and the nib springs are engaged.
Next, stand side-on to your buggy and extend the peanut handles to their full length. Position the peanut above the buggy frame; holding the peanut handles in one hand and the head end of the aluminium frame in the other.
NOTE: The head end of the peanut should point towards the buggy front wheel.
Lower the peanut downwards and forwards towards the buggy seat tilting the foot end downwards slightly, this will capture the buggy frame between the grips on either side of the peanut. Check to make sure the peanut is secure within the buggy frame on both sides.
Push both handles down the legs and pull forward slightly. Next, reach down and secure the locking arm to the front end leg by 'clipping' it onto the wire, as shown. Reach over the peanut and repeat for the side furthest away from you. NOTE: there are two separate 'clipping slots', the furthest away is for the dash & hammerhead models, the other for the classic & sport models.
Check that both sides of the peanut are fully secure by gently tugging on the handles and making sure the peanut doesn't come free from the frame.
Slide the handles down the legs to sit neatly out of the way and you're good to go!
removing the peanut from the classic/sport/dash or hammerhead buggy
Make sure the buggy brake is engaged.
u Stand side-on to your buggy, reach over the peanut to the side furthest away from you and release the head end leg by unclipping it from the locking arm. Taking the weight of the peanut with the handles, release the side closest to you and lift the peanut up and away from the buggy frame, tilting the foot end slightly to release the frame grips.
pack down!
v To pack your peanut down for safe keeping, remove the nutshell from peanut's main frame. Turn the peanut upside down, unhook the fabric side wall cord and release the legs from the plastic base; unhooking them from the small plastic brackets at the head and the foot end of the base.
w Rotate both legs downwards towards the outside edges of the peanut. The base, frame and fabric side wall will now flatten down to a smaller size, ready to be re-assembled next time around.
add & adapt
Other stuff that works fantastically with peanut:
- storm cover & UV mesh
sheet set
cuts & bruises
Cleaning & caring for your peanut.
The once over
Check the peanut for cuts & bruises. If your peanut is damaged in any way, or you're not sure how to use it, contact your retailer immediately.
Caring for peanut
Unlike children, your peanut likes to stay clean. In case of little accidents, sponge wash with a wet cloth. Do not submerse the peanut, its fabric wall and aluminium frame in water. The peanut mattress may be hand washed in warm water with mild natural soap. Do not tumble dry. Line dry. Do not use any solvents or bleach based products as these may harm the materials. Do not wring. Dry your peanut thoroughly before storage. Store in a well ventilated space, away from direct sunlight which could damage or fade your peanut's colourful coat.
rights & remedies
- consumers may have extra rights in some countries or states.
Our products are warranted against defects in materials and workmanship for one year from the date of purchase. If the product has a manufacturing fault we will repair it for free. If not practical to repair it, we will, at our discretion, replace the part in question. If the product fails due to wear and tear, accident, neglect or negligence, or is outside the warranty, we will happily repair it for a reasonable charge.*
Who is covered? Original purchaser buying product from an authorised dealer. Proof of purchase is required.
What is covered? Workmanship or materials that are deemed faulty, providing the peanut has at all times been used in normal conditions in accordance with instructions, and been properly maintained.
What is not covered? Second hand product, modified product, poorly maintained product, normal wear, fading and fabric cuts, improper use (by way of example): abnormal use; not following instructions; child left unattended; excessive load; transport damage i.e. airline or freight damage.
Customer costs within warranty The customer is responsible for any inwards freight charge to return the product to the manufacturer or its representative for warranty and/or service.
Customer costs outside warranty Where proof of purchase is not provided or the product is outside of the one year warranty period. The manufacturer (or agent) reserves right to charge a service fee and/or charge for parts replaced/ repaired. A return freight charge may apply.
Exclusions Any consequential loss or damage to any person or property directly or indirectly as a result of using the product.
Who do I contact? Please discuss any warranty or service queries with your store of purchase. You will be required to show proof of purchase. They will inform you of the next steps. Products returned directly to the manufacturer by the customer will NOT be eligible for warranty.
log on & relax
Please register your product purchase through our online warranty registration by visiting
www.philandreds.com
WARNING

IMPORTANT - READ
THE INSTRUCTIONS
CAREFULLY BEFORE
USE AND KEEP THEM
FOR FUTURE REFERENCE.
Do not use the peanut fitted to the buggy in combination with a child in the main buggy seat and/or double kit.
Suffocation Hazard: Infant carrier can roll over on soft surfaces and suffocate child. NEVER place carrier on beds, sofas, or other soft surfaces.
Fall Hazard: Child's movement can slide carrier. NEVER place carrier near edges of counter tops, tables or other elevated surfaces.
NEVER use this carrier as a means to transport an infant in a motor vehicle.
Use only for one child weighing no more than 9kg/19.8lbs.

WARNING

American Safety Standard (ASTM F833-07a) states:
WARNING

NEVER leave child unattended. Use only for children weighing no more than 9kg/19.8lbs.
WARNING

American Safety Standard (ASTM F2194-07a) states:
WARNING

Failure to follow these warnings and the instructions could result in serious injury or death.
FALL HAZARD - To help prevent falls, do not use this product when the infant begins to push up on hands and knees or has reached manufacturer's recommended maximum weight, whichever comes first.
SUFFOCATION HAZARD - Infants can suffocate:
In gaps between an extra pad and side of the carrycot/cradle.
- On soft bedding.
NEVER add a mattress, pillow, comforter, or padding. Use ONLY the pad provided by manufacturer.
To reduce the risk of SDS, paediatricians recommend healthy infants be placed on their backs to rest, unless otherwise advised by your physician.
If a sheet is used with the pad, use only the one provided by the carrycot or cradle manufacturer or one specifically designed to fit the dimension of the carrycot or cradle mattress.
WARNING

Strings can cause strangulation!
Do not place items with a string
around a child's neck, such as hood strings or pacifier cords. Do not
suspend strings over a carrycot
or cradle or attach strings to toys.
WARNING
European Safety Standard (EN1466:2004(E)) states:
IMPORTANT - KEEP FOR FUTURE REFERENCE.
Never use this carry cot on a stand.
Use only on a firm, horizontal level and dry surface.
Use only replacement parts supplied or approved by the manufacturer.
Be aware of the risk of open fire and other sources of strong heat, such as electric bar fires, gas fires, etc., in the near vicinity of carry cot.
NOTE: Check the handles and bottom of carrycot regularly for signs of damage and wear.
Do not leave your child unattended.
Never use the carry cot on a stand.
WARNING
This product is only suitable for a child who cannot sit up unaided.
WARNING
Do not let other children play unattended near the carry cot.
WARNING
Do not use if any part is broken, torn or missing.
WARNING
European Safety Standard (EN1888:2005) states:
WARNING
READ THESE INSTRUCTIONS CAREFULLY BEFORE USE AND KEEP THEM FOR FUTURE REFERENCE. YOUR CHILD'S SAFETY MAY BE AFFECTED IF YOU DO NOT FOLLOW THESE INSTRUCTIONS.
Do not use with accessories other than those approved by the manufacturer.

WARNING

It may be dangerous to leave your child unattended.
WARNING
Ensure that all the locking devices are engaged before use.
WARNING
Do not add a mattress thicker than 5mm.
WARNING
Check that the pram body or seat unit attachment devices are correctly engaged before use.
WARNING
This product is not suitable for running or skating.
WARNING

Australian/New Zealand Safety Standard (AS/NZS 2088:2000) states:
WARNING: FOLLOW THE MANUFACTURER'S INSTRUCTIONS.
Do not leave children unattended.
NOTE (peanut for vibe): check the latch lever regularly to ensure if moves freely and the latch hooks remain engaged when fitted to the buggy frame.
NOTE (peanut for classic/ sport/ dash / hammerhead): Check the nib springs on the locking arms regularly to ensure they remain engaged when fitted to the buggy frame. Check the locking arms remain securely clipped to the front end legs when fitted to the buggy frame.

©Phil & Teds Most Excellent Buggy Company Ltd 2009.
© Phil and Teds Most Excellent Buggy Company Ltd 2009.
storm cover
UV mesh
sheet set
Kratzer & Beulen
© Phil and Teds Most Excellent Buggy Company Ltd 2009.
storm cover
UVmesh
sheet set
Cortes y moratones
American Safety Standard (ASTM F833-07a) dicta:
ADVERTENCIAS

storm cover
UV mesh
sheet set
Vallen & opstaan
Je peanut schoonmaken & verzorgen.
Voor je begint
log in phil&teds relax
This product is not suitable for running or skating.
WAARSCHUWINGEN