
ICM12 - Crepe maker Duronic - Free user manual and instructions
Find the device manual for free ICM12 Duronic in PDF.
| Product type | Ice maker |
| Brand | Duronic |
| Model | ICM12 |
| Dimensions (L x D x H) | 26,5 x 28 x 20 cm |
| Weight | 6,54 kg |
| Power supply | 220-240 V, 50-60 Hz, 120 W |
| Ice cube shape | Bullet shape (small or large) |
| Ice production | 12 kg/24 h (8 cubes every 9 minutes) |
| Ice basket capacity | 1 L / 600 g |
| Water tank capacity | 1 L |
| Refrigerant | R600a |
| Noise level | ≤ 50 dB |
| Cable length | 122 cm |
| Main functions | Automatic ice production, size selection (large/small), automatic stop when basket full, low water alarm, self-cleaning |
| Maintenance and cleaning | Manual cleaning or self-cleaning cycle (white vinegar recommended) |
| Safety | Automatic stop when basket full or water shortage; do not use near flames; hot surface during operation |
| Spare parts and repairability | Repairs only by Duronic; do not open by yourself |
| General information | Indoor household use only; use mineral water (not distilled); do not tilt more than 45° |
Frequently Asked Questions - ICM12 Duronic
User questions about ICM12 Duronic
0 question about this device. Answer the ones you know or ask your own.
Ask a new question about this device
Download the instructions for your Crepe maker in PDF format for free! Find your manual ICM12 - Duronic and take your electronic device back in hand. On this page are published all the documents necessary for the use of your device. ICM12 by Duronic.
USER MANUAL ICM12 Duronic
Features and Specifications
| Size Noise | Level Weight | Cable Power Voltage | |||
| 26.5x28x20cm 10.4x11x7.9in | ≤50dB | 6.54kg | 122cm 48in | 120W | 220-240V 50-60Hz |
| Ice Shape | Ice per Round | Ice Output | Basket Capacity | Water Tank Capacity | Refrigerant |
| Bullet shaped | 8 pieces / 9 minutes | 12kg / 24 hours | 1L / 600g 1L | R600a |
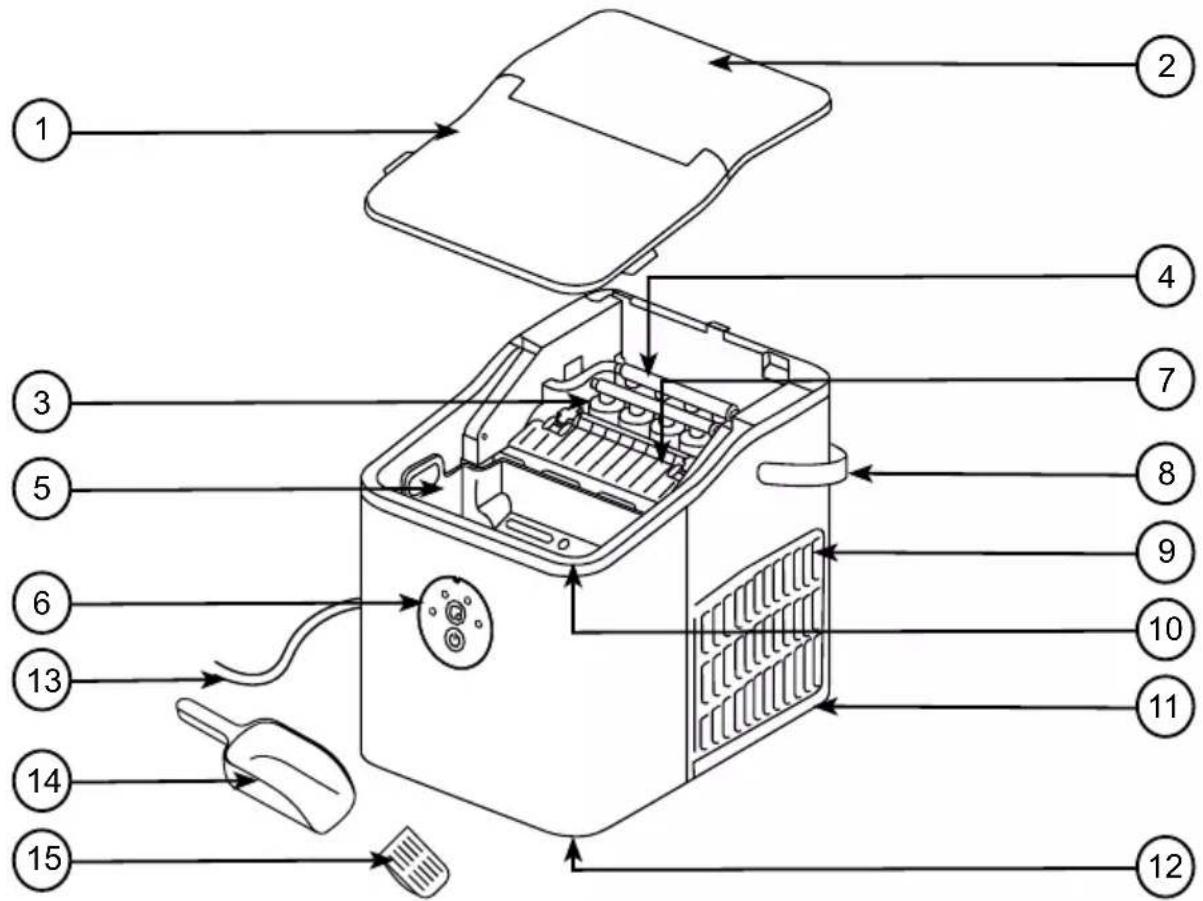
Components
- Lid
- Top cover
- Ice prongs
- Evaporator
- Ice basket
- Control panel
- Ice shovel
-
Handle
-
Air vent
-
Water tank
- Main unit
- Drainage hole & plug
- Power cable & plug
- Ice scoop
15.Filter
DURONIC
Safety Information
PLEASE READ THIS MANUAL CAREFULLY AND RETAIN FOR FUTURE REFERENCE
- This appliance is for indoor/household use only. Do not use outdoors.
- This appliance is not intended for use by persons (including children) with reduced physical, sensory or mental capabilities, or lack of experience and knowledge, unless they have been given supervision or instruction concerning use of the appliance by a person responsible for their safety.
- Children should be closely supervised at all times to ensure that they do not play with the appliance.

CAUTION:
Do not operate this appliance if the power cable or plug is damaged. If either is damaged, return it to Duronic for service or repair by professional technician.
- Never try to replace the parts and repair the unit by yourself.
- Never open and repair the machine yourself. Do not modify the machine in any way that is not described in the instructions for use. The machine contains live parts. Repairs may only be carried out by Duronic, using original spare parts and accessories.
- Always operate the appliance on a dry, smooth, even and stable surface. Do not place the unit on a hot surface.
- Disconnect the mains plug from the power socket if you are going to be absent for long periods.
- Make sure that the appliance and its mains cable are not located close to hot surfaces.
- To reduce the risk of electric shock, never operate this product near water, with wet hands, spill liquid on the appliance or submerge it in water or any other liquid.
DURONIC
Safety Information (Continued)
- Do not use the ice maker machine near gas or other inflammable materials (such as benzene, paint thinner, sprays, etc.)
- Do not place the appliance on or near a hot gas or on a heated oven.
- Keep the machine 15cm from other objects to ensure heat has space to escape from the vents.
- Do not put any extension leads or portable power supplies near or behind the appliance.
- Do not use any accessories which are not recommended by Duronic.
- Do not insert any foreign or electrical objects into the appliance.
- Do not store explosive substances such as aerosol cans with a flammable propellant in or next to this appliance.
- The refrigerant and insulation blowing gas inside this machine is flammable. When disposing of the appliance, do so only at an authorised waste disposal centre. Do not expose the appliance to flames.
- Unplug the appliance after using it or before cleaning it.
- When cleaning the ice maker machine, do not use sharp utensils, steel wool, metal scouring pads or abrasive cleaners as they will scratch or damage the appliance.
- Do not use distilled water in this machine. Mineral water is recommended.
- When moving the appliance, do not tilt the machine more than 45 degrees and do not turn the machine upside down. This may damage the compressor and the sealing system.
- Before using the ice maker for the first time, please wait 2 hours after positioning it, and keep the transparent lid open for at least 2 hours.
- It is normal for the compressor and condenser surface to reach temperatures between 70^ and 90^ during operation and the surrounding areas may be very hot.
DURONIC
Safety Information (Continued)
- Due to the fast freezing process, ice cubes may appear "cloudy". This is normal, it is air trapped in the water during the freezing process and it will not affect the quality or taste of the ice.
- Clean water tanks if they have not been used for 48h ; flush the water system connected to a water supply if water has not been drawn for 5 days.
- If the refrigerating appliance is left empty for long periods, switch off, defrost, clean, dry, and leave the door open to prevent mould developing within the appliance.
Introduction
If you like your drinks served over ice, you'll love the ICM12 ice maker.
With the ICM12 automatic ice cube maker, you can make batches of ice in just 9 minutes. This is perfect if you want to make ice for a single drink or you can keep the machine running to cater for a party or barbeque. In 24 hours it can produce up to 12kg of ice.
This machine is very easy to use and you can even choose between small or large-sized bullet-shaped ice, which means you can even add ice to your water bottle too!
Before First Use
- Before first use, remove all packaging and set aside.
- Clean the ice basket, scoop and inside the machine for the first time as per the instructions in 'Cleaning and Maintenance'.
- Wipe clean the motor unit and dry.
- Place the ice machine on a flat, dry surface and located close to an electrical mains socket.
DURONIC
The Control Panel
| ADD WATER | Water shortage alarm | |
| LARGE Large ice indicator light | ||
| SMALL Small ice indicator light | ||
| ICE FULL Ice full alarm | ||
| POWER START/STOP button | ||
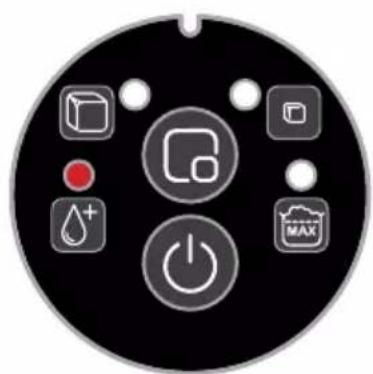
ADD WATER:
- When the ADD WATER light turns red, it means that there is not enough water left in the tank. You will need to add more water and then press the power button to restart the machine.

Do not fill up the tank directly from a tap. When refilling the water tank, use a bottle or jug to pour water into it.
LARGE:
- Select this option to make large-sized bullet ice.
SMALL:
- Select this option to make smaller-sized bullet ice.
ICE FULL:
-
When the ice cubes fill up the ice basket and it reaches the maximum capacity, the 'ICE FULL' light will flash, and the machine will automatically stop. You will then need to empty the ice basket using the ice scoop.
-
Once the sensor inside the machine can detect the ice basket is empty, the machine will restart automatically and continue making ice cubes.
DURONIC
How to Use
- Open the transparent lid, take out the ice basket and add water to the water tank. The water should not exceed the MAX mark. Use either cold or room-temperature water to fill the tank. Do not fill the tank with hot water.
If the water exceeds the MAX mark, you will need to drain a little water away. You do this by opening the bottom drain plug and releasing some water.
-
Put the ice basket back into the machine and close the lid.
-
Plug in the machine and switch it on at the plug.
-
Press the power button. All 4 indicator lights will momentarily light up and then turn off. Only the 'SMALL' light will remain on. The machine is now in standby mode.
-
To select the size ice you would like to make, press the power button again. The indicator lights for 'SMALL' and 'LARGE' will light up alternately switching between each one. Wait for the light to be lit on the size option you prefer and then press the power button to select the size.
-
The machine will then start to make ice cubes.
-
When the ice basket is full, the machine will automatically stop. Remove the ice cubes using the ice scoop. The machine will then restart and continue making ice cubes.
-
When you have finished making ice cubes, turn off the machine by pressing the power button again. Switch off the plug socket and unplug the cable from the mains socket.
To ensure the ice made is fresh, change the water in the reservoir at least once a day. If you do not plan to use the machine for a long time, drain the water out and clean the machine before storing it away.
DURONIC
Cleaning and Maintenance
Clean the inside of the machine (ice basket, water tank, ice shovel) and the ice scoop frequently. Before cleaning, unplug the machine and remove any ice cubes from the ice basket. Allow the machine to de-ice for a 2-3 hours. Do not use any mechanical devices or any other means to accelerate the defrosting process.
The machine can be cleaned in two ways: by hand or by using the Self-Clean function.
Self-Clean Function
- Press and hold the power button for 3 seconds. All four indicator lights will flash alternately, and the machine will enter the self-cleaning function.
- Water will flow through the machine in several cycles to flush it through.
- For an extra deep clean, use a diluted solution of water and white vinegar to the water before using the self-clean mode.
- After it has run a cycle of self-cleaning with this solution, empty the vinegar water solution, refill the tank with fresh water and run the self-cleaning cycle again
- Allow the machine to air and dry thoroughly. Keep ventilation openings on the machine clear of obstruction.
Clean by Hand
- Use a diluted solution of water and white vinegar to clean the inside and the outside surface of the machine using a cloth. Do not use chemicals or diluted agents such as acids, gasoline or oil on the machine.
- After using the water/vinegar solution to wipe over the machine, rinse the cloth in water and wipe over the same parts again to clean away the solution.
- Allow the machine to air and dry thoroughly. Keep ventilation openings on the machine clear of obstruction.
To ensure the ice made is fresh, change the water in the reservoir at least once a day. If you do not plan to use the machine for a long time, drain the water out and clean the machine before storing it away

Do not get the base of the juicer wet at any time as this may damage the unit or create an electrical safety hazard.
Troubleshooting
Note: If the power is accidentally disconnected while the machine is on during an ice making cycle, small ice chips may form and lodge in the ice shovel. If this occurs, check that the machine is switched off at the mains socket, then gently push the shovel backwards towards the rear of the machine to remove ice chips. Then restart the machine as normal.
| Problem Possible | Cause Suggested Solutions | |
| The ice shovel does not move ice into the ice basket. | The water tank is not on a flat even surface. | Check that the surface the machine is on is flat and even. With the machine switched off at the plug, gently push the ice shovel using your finger, then press the power button to restart it. |
| The compressor works abnormally with a buzzing noise | The voltage is lower than recommended. | Stop the machine and do not restart it until it's plugged into the correct voltage. |
| Water shortage indicator light is on. | 1. There is no water 2. The pump is full of air | 1. Add to some water until it reaches MAX position. 2. Press POWER button to restart the machine. |
| Indicator lights on display are not on. | 1) No power 2) Blown fuse | 1) Turn the power on 2) Replace fuse |
| The ice made is too large and with pieces sticking together. | Ice of previous cycles left in the water tray. | Switch off the machine by pressing the power button and remove the ice. |
Troubleshooting (Continued)
| Problem Possible | Cause Suggested Solutions | |
| The ice making process was correct, but no ice has come out. | 1. The compressor has no refrigerant2. Compressor damaged3. Fan motor damaged | Call Duronic Customer Care Team for advice. |
| All indicators twinkle simultaneously. | Water tray is blocked by ice cubes. | Unplug the power, take out the ice which blocking the tray, then plug in the power and press the POWER button.The machine will restart after around 3 minutes. |
| The machine has been working, but the water has been warming up | Solenoid has broken down | Call Duronic Customer Care Team for advice |
| When the ice is full, the machine does not display the ICE FULL icon | ‘Ice Full’ sensor is damaged | Call Duronic Customer Care Team for advice |
Information for consumers on the disposal of Waste Electrical & Electronic Equipment (WEEE).
This mark on a product and/or accompanying documents indicates that when it is to be disposed of, it must be treated as Waste Electrical & Electronic Equipment, (WEEE).
Any WEEE marked products must not be mixed with general household waste, but kept separate for the treatment, recovery and recycling of the materials used. For proper treatment, recovery and recycling; please take all WEEE marked waste to your Local Authority Civic waste site, where it will be accepted free of charge.
If customers dispose of Waste Electrical & Electronic Equipment correctly, they will be helping to save valuable resources and preventing any potential negative effects upon human health and the environment, of any hazardous materials that the waste may contain.

Information for consumers on the disposal of Waste Electrical & Electronic Equipment (WEEE).
- Features and Specifications
- DURONIC
- Safety Information
- PLEASE READ THIS MANUAL CAREFULLY AND RETAIN FOR FUTURE REFERENCE
- CAUTION:
- Safety Information (Continued)
- Introduction
- Before First Use
- The Control Panel
- ADD WATER:
- LARGE:
- SMALL:
- ICE FULL:
- How to Use
- Cleaning and Maintenance
- Self-Clean Function
- Clean by Hand
- Troubleshooting
- Troubleshooting (Continued)
- Information for consumers on the disposal of Waste Electrical & Electronic Equipment (WEEE).
Brand : Duronic
Model : ICM12
Category : Crepe maker