
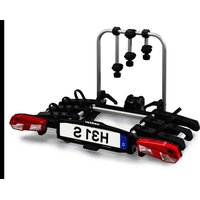
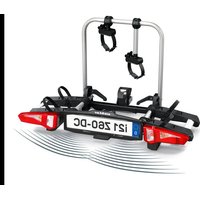
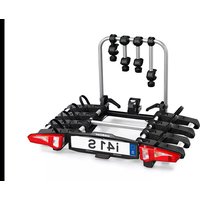
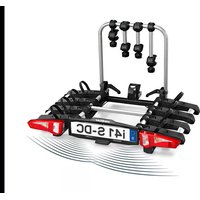
P22S - Bike rack Uebler - Free user manual and instructions
Find the device manual for free P22S Uebler in PDF.
| Product type | Towbar bike carrier |
| Brand | Uebler |
| Model | P22S |
| Base capacity | 2 bikes |
| Capacity with 3rd bike extension kit (ref. 19710) | 3 bikes |
| Unladen weight (P22S + 3-bike extension) | 16 kg |
| Maximum load (with extension, according to nose weight) | 34 kg (for 50 kg nose weight) or 52 kg (for 75 kg nose weight) |
| Maximum frame tube diameter | 75 mm (round) / 75x45 mm (oval) |
| Maximum weight per bike | 30 kg |
| EC approval | Yes (number 26R-036629) |
| Tools required | 8 mm and 10 mm wrenches |
| Tilting possible (with 3-bike extension) | Yes |
| Tilting possible (with 4-bike extension) | No |
| Maximum permitted speed | 130 km/h |
| Regular maintenance | Cleaning with soapy water, greasing threaded screws |
| Checks before each trip | Tightening of fasteners, lighting test |
| Safety instructions | Do not exceed 130 km/h, do not cover the lighting, adapt your driving |
| Spare parts available | At the Uebler specialist dealer |
| Repairs | To be carried out by a specialist company |
Frequently Asked Questions - P22S Uebler
User questions about P22S Uebler
0 question about this device. Answer the ones you know or ask your own.
Ask a new question about this device
Download the instructions for your Bike rack in PDF format for free! Find your manual P22S - Uebler and take your electronic device back in hand. On this page are published all the documents necessary for the use of your device. P22S by Uebler.
USER MANUAL P22S Uebler
Extension kit for bicycle rack
- Extension kit for 3rd bicycle for P22-S, order no. 19710
- Extension kit for 4th bicycle for P32-S, order no. 19720
Mounting and Operating Instructions
Die Fahrräder themselves most likely need to be able to get the right of the road.
Thank you for choosing an extension kit for UEBLER bicycle racks.
The operating steps and safety instructions described in these mounting and operating Instructions must be adhered to. UEBLER shall not accept liability for any damage resulting from a failure to do so.
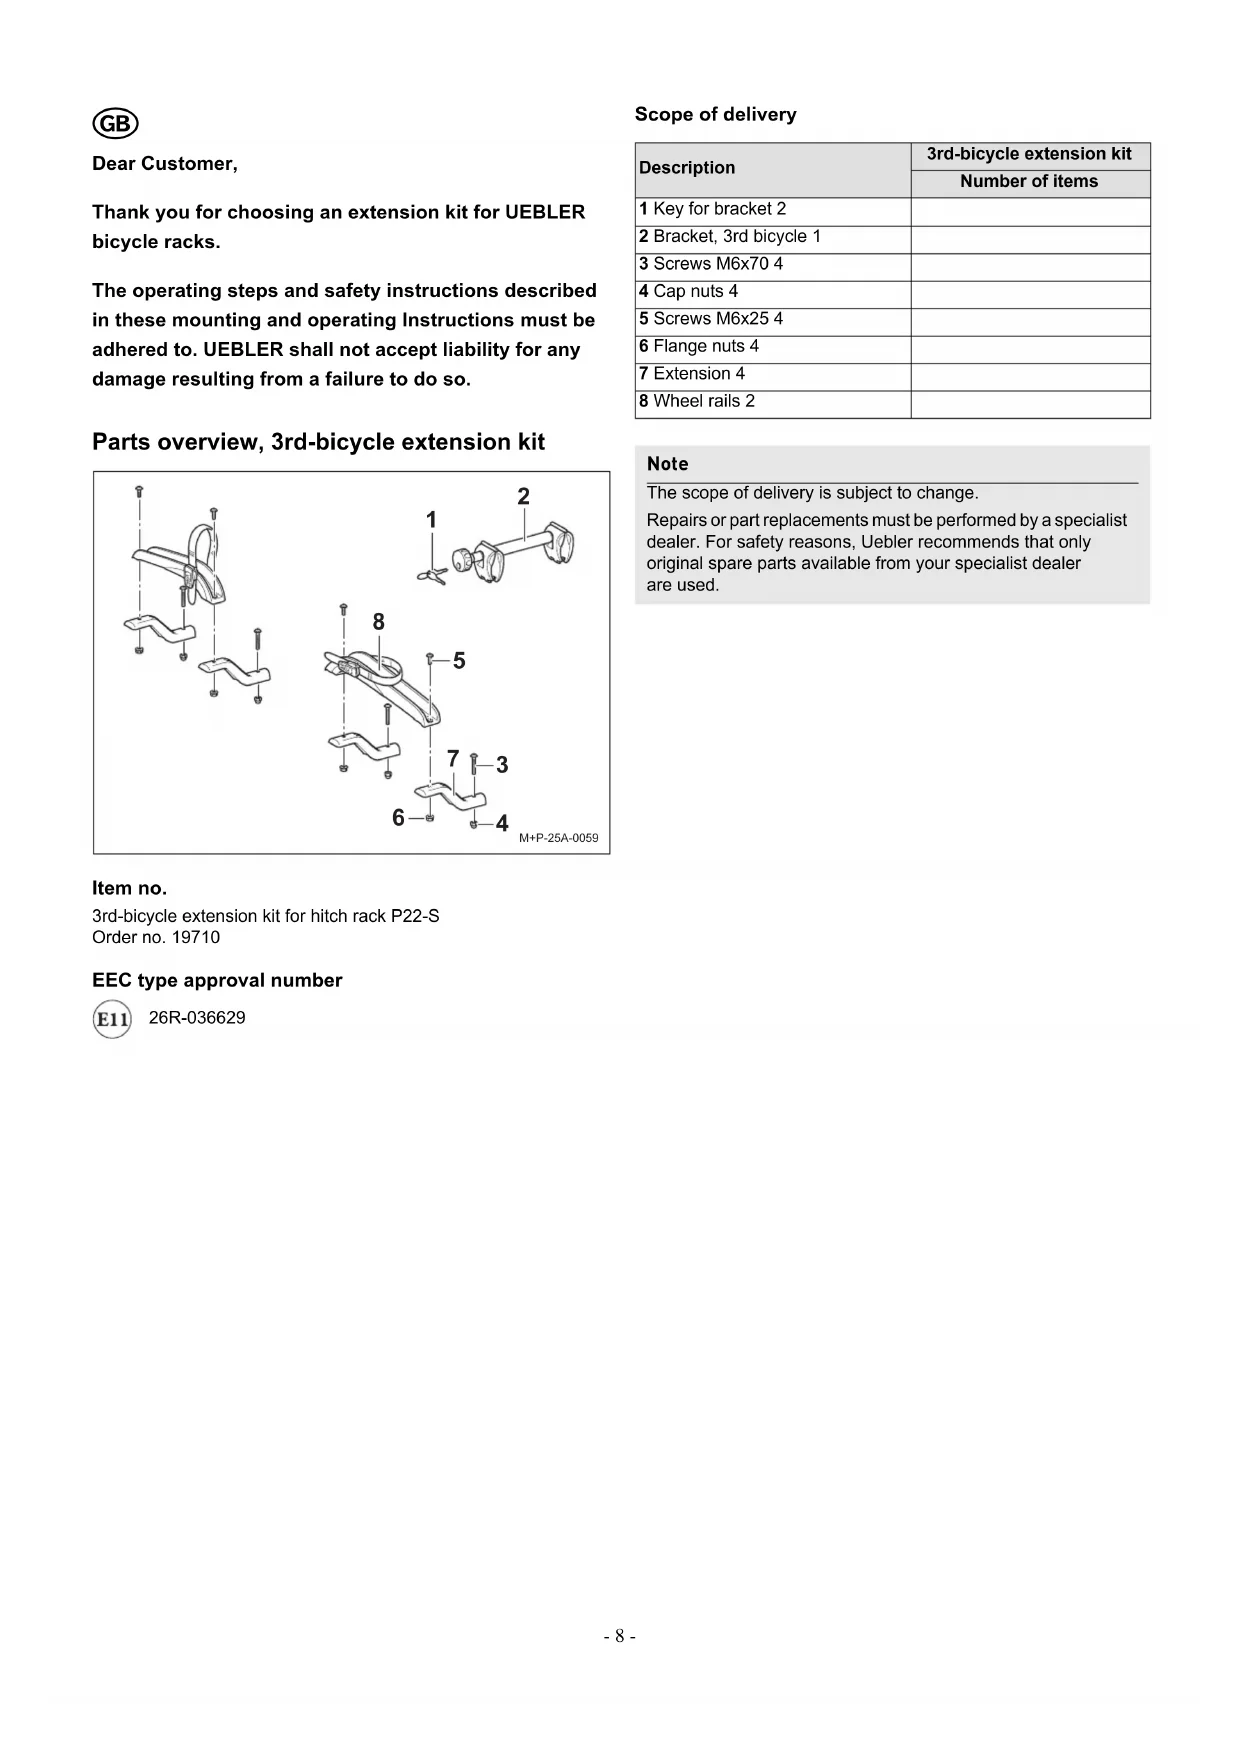
Parts overview, 3rd-bicycle extension kit
Item no.
3rd-bicycle extension kit for hitch rack P22-S
Order no. 19710
EEC type approval number

26R-036629
Scope of delivery
| Description | 3rd-bicycle extension kit |
| Number of items | |
| 1 Key for bracket 2 | |
| 2 Bracket, 3rd bicycle 1 | |
| 3 Screws M6x70 4 | |
| 4 Cap nuts 4 | |
| 5 Screws M6x25 4 | |
| 6 Flange nuts 4 | |
| 7 Extension 4 | |
| 8 Wheel rails 2 |
Note
The scope of delivery is subject to change.
Repairs or part replacements must be performed by a specialist dealer. For safety reasons, Uebler recommends that only original spare parts available from your specialist dealer are used.
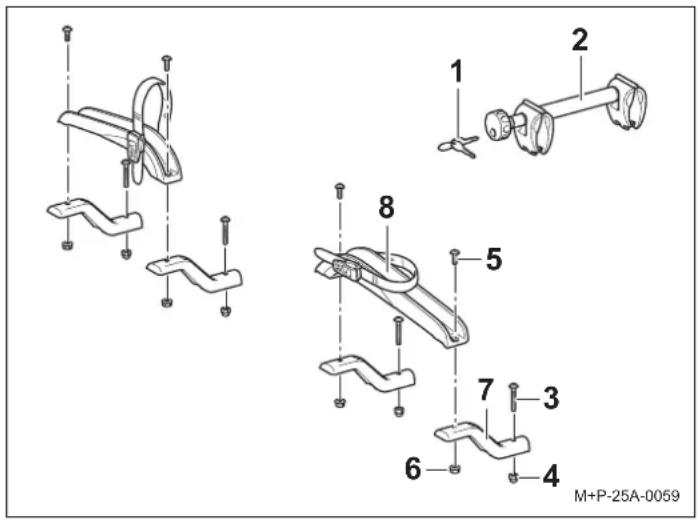
Parts overview, 4th-bicycle extension kit
Item no.
4th-bicycle extension kit for hitch rack P32-S Order no. 19720
EEC type approval number

26R-036629
Scope of delivery
| Description | 4th-bicycle extension kit |
| Number of items | |
| 1 Key for bracket 2 | |
| 3 Screws M6x70 4 | |
| 4 Cap nuts 4 | |
| 5 Screws M6x25 2 | |
| 6 Flange nuts 4 | |
| 7 Extension 4 | |
| 8 Wheel rails 2 | |
| 9 Screws M6x30 2 | |
| 10 Washers 2 | |
| 11 Extension strut 1 | |
| 12 Rack frame 1 | |
| 13 Screws M6x40 2 | |
| 14 Washers 6 | |
| 15 Buckles 2 | |
| 16 Cap nuts 2 | |
| 17 Bracket, 4th bicycle 1 | |
| 18 Paintwork protection film forluggage compartment lid | 2 |
| 19 Lashing straps | 2 |
Note
The scope of delivery is subject to change. Repairs or part replacements must be performed by a specialist dealer. For safety reasons, Uebler recommends that only original spare parts available from your specialist dealer are used.
Technical data
| Rack weight | |
| P22-S + extension kit for max. 3 bicycles | 16 kg |
| P32-S + extension kit for max. 4 bicycles | 18 kg |
| Maximum load (load capacity) | |
| P22-S + extension kit, D-value1 6.7 kN and higher - min. tow bar load of 50 kg | 34 kg |
| - min. tow bar load of 75 kg | 52 kg |
| P32-S + extension kit, D-value1 6.7 kN and higher - min. tow bar load of 75 kg | 57 kg |
| - min. tow bar load of 90 kg | 72 kg |
| Maximum tube diameter of bicycle frames | |
| Round tube | 75 mm |
| Oval tube | 75x45 mm |
See type label on trailer hitch
Required auxiliary materials
Ring spanner SW 10
Ring spanner AF 8
Mounting the extension kit
Note
This section describes and illustrates how to mount the 4th-bicycle extension kit for hitch rack P32-S. The 3rd-bicycle extension kit for hitch rack P22-S is mounted in a similar manner.

-
Can be used with 3rd-bicycle extension kit
** Can be used with 4th-bicycle extension kit -
Remove the wheel rail (20). Do not reuse the screws and nuts.
- Install the extensions (7) with the wheel rail (20), screws (3) M6x70, spacer washer (34) and nut (4).
- 3rd-bicycle extension kit: Tighten the wheel rails (8) with the screws (5) M6x25 and nuts (6).
- 4th-bicycle extension kit: Tighten the wheel rails (8) with the strut (11), screws (5) M6x25 and (9) M6x30, spacer washers (10) and nuts (6).
Mounting the rack frame for the extension kit for a 4th bicycle
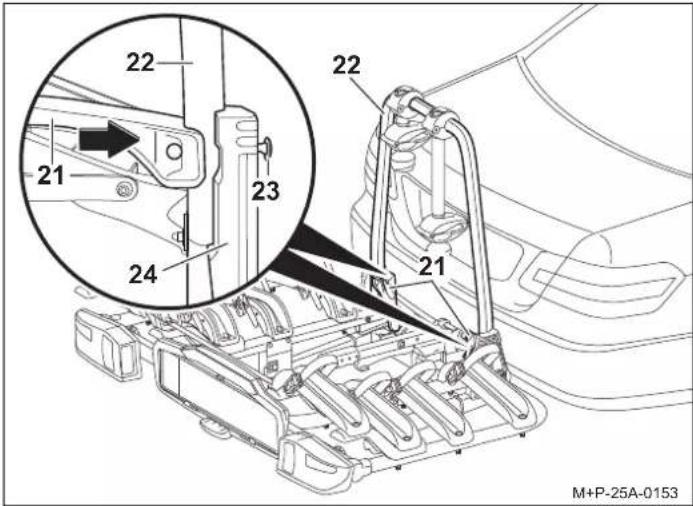
- Open the quick release clamp (21) on both sides upwards by approx. 90^
- Press the quick release clamp (21) against the rack frame (22) and press out the screws (23) as far as shown from plastic guide (24).
Note
The screws (23) may be jammed in the hub of the plastic guide (24). In this case, press the quick release clamp (21) more forcefully against the rack frame (22).
- Using the ring spanner AF 8, completely unscrew 8 screws (23).
- Remove the rack frame (22) from the bicycle rack.
- Remove the bicycle bracket; see the installation and operating instructions of the bicycle rack P22-S/P32-S.
- Place the rack frame (12) of the extension kit on the bicycle rack.
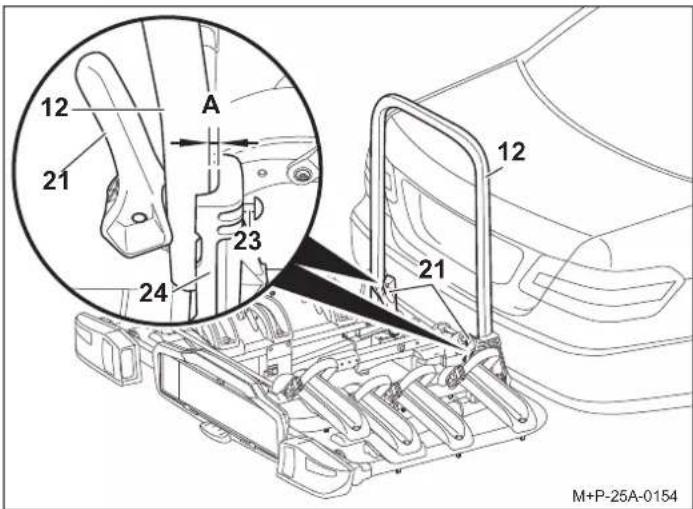
- Position the quick release clamp (21) on both sides in the transport position on the rack frame (12) and screw in the screws (23) far enough that the distance between the rack frame (12) and plastic guide (24) is 9mm A

Attention
When you are closing the quick release clamp (21), there is a crushing hazard. Make sure that your hands are not pinched when you are closing the quick release clamp (21).
- Close the quick release clamp (21) again completely so that the rack frame (12) is fixed.
Note
If the rack frame (12) is too loose, open the quick release clamp (21) on both sides by about 90^ upwards, press the screws (23) outwards, screw them in by an additional quarter turn, and completely close the quick release clamp (21). If the quick release clamp (21) cannot be closed or is very difficult to close, open the quick release clamp (21) on both sides by about 90^ upwards, press the screws (23) outwards, screw them out by a quarter turn, and completely close the quick release clamp (21). If the quick release clamp (21) is still impossible or very difficult to close, repeat the procedure.
-
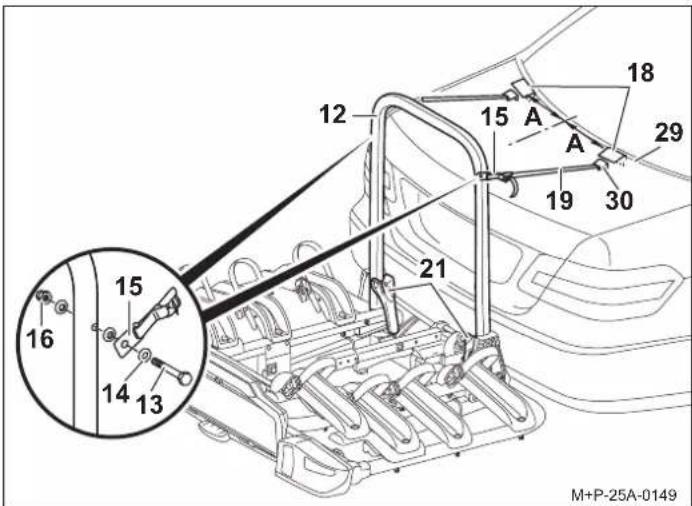
Screw in the buckles (15) with screws (13), washers (14) and nuts (16) tight enough that the buckles (15) can still be rotated.
-
Adhere the paint protection film (18) to the luggage compartment lid (29).
The dimension (A) should be approx. 200mm
- Hang the hooks (30) on the luggage compartment led (29) and pull the tensioning straps (19) taut with the buckles (15).

Attention
The hooks (30) should not be hung on plastic parts (such as the rear spoiler) or glass panes.
Mounting the bicycles

Attention
The bicycle rack for the trailer hitch is only intended for transporting bicycles.
Only bicycles, each with a max. weight of 30kg may be transported on the bicycle rack.
The maximum allowable load capacity of the bicycle rack, the tow bar load of the trailer hitch, the allowable total vehicle weight and the maximum allowable vehicle axle load (see vehicle owner's manual) must not be exceeded.
If these instructions are not followed, the bicycle rack together with the mounted bicycles may free themselves from the vehicle and cause injury to you and other persons, and/or may result in an accident.

Attention
The bicycles must be mounted evenly and with a low centre of gravity on the bicycle rack. Each must be secured against falling off using a bracket on the bicycle frame and lashing straps on front and rear wheels.
If this is not adhered to, bicycles and/or the loose parts could free themselves from the vehicle and lead to an accident and associated injury and property damage other road users.
Before mounting, remove child seats and all loose parts, such as water bottles, saddlebags, batteries from E bikes etc., from the bicycles and stow them.

Attention
A risk of injury exists if bicycles slip or tilt. Secure the bicycles against slipping off/tilting.
Mount and dismount the bicycles together with another person.
Mounting bicycles for the 3rd-bicycle extension kit
Note
Mount heavy bicycles close to the vehicle and light bicycles (e.g. children's bikes) further out on the bicycle rack. Mount the first bicycle with the toothed gear wheel facing the vehicle.
Mounting bicycles for the 4th-bicycle extension kit
Note
Mount heavy bicycles close to the vehicle and light bicycles (e.g. children's bikes) further out on the bicycle rack. Mount the first bicycle with the toothed gear wheel facing the vehicle.
1. Mount the first two bicycles, see Mounting and Operating Instructions of the bicycle rack P22-S/P32-S.
1. Mount the first three bicycles, see Mounting and Operating Instructions of the bicycle rack P22-S/P32-S.

Attention
Only attach the bracket (2) to the bicycle frame, as other parts of the bicycle could be damaged. Do not pinch components such a s gear or brake cables.
Faulty clamps must be replaced immediately.
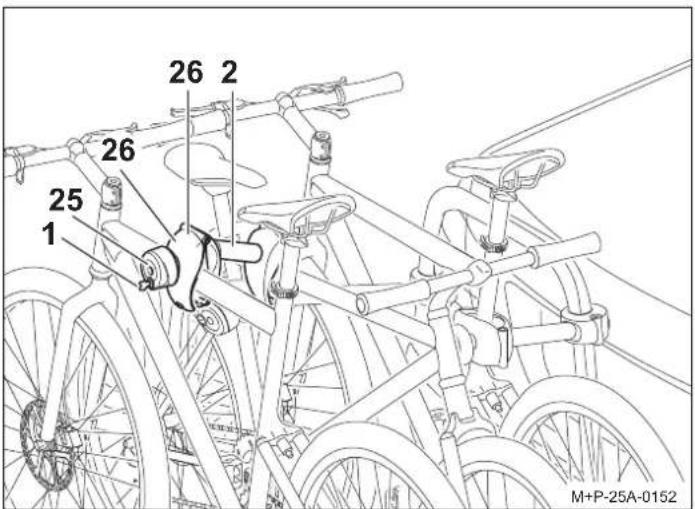
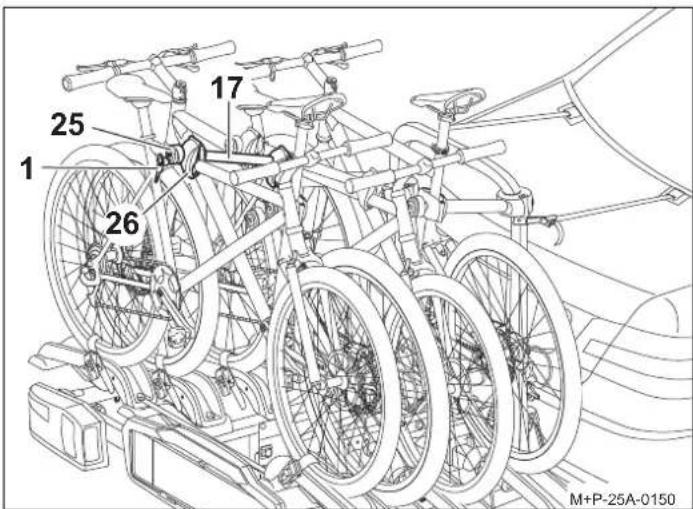
- Position the third bicycle in a manner similar to the first bicycle and secure it with bracket (2) from the second to the third bicycle at a suitable location.
- Tighten the clamp (26) with the twist grip (25), lock it with the key (1), and remove the key (1).
- Tighten the lashing straps, see the Mounting and Operating Instructions of the bicycle rack P22-S/P32-S.
Note
The threaded screws on the bracket must be cleaned and greased at regular intervals to avoid the rotary handles getting stuck.

Attention
Only attach the bracket (17) to the bicycle frame, as other parts of the bicycle could be damaged. Do not pinch components such as gear or brake cables.
Faulty clamps must be replaced immediately.
- Position the fourth bicycle like the first and fasten at a suitable location with the bracket (17) from the third bicycle to the fourth bicycle.
- Tighten the clamp (26) with the twist grip (25), lock it with the key (1), and remove the key (1).
- Tighten the lashing straps, see the Mounting and Operating Instructions of the bicycle rack P22-S/P32-S.
Note
The threaded screws on the bracket must be cleaned and greased at regular intervals to avoid the rotary handles getting stuck.
Removing bicycles
The bikes are removed in the reverse order.
Tilting the bicycle rack
The bicycle rack P22-S + extension kit for max. 3 bicycles can be tilted to load and unload the vehicle, see the Mounting and Operating Instructions of the bicycle rack P22-S/P32-S.
Note
With the hitch rack P32-S + extension kit (order no. 19720) for up to 4 bicycles, tilting due to weight and the tensioning straps used is no longer possible.
Folding open/closed the rack frame
The rack frame can be folded to save space when stowing, see the Mounting and Operating Instructions of the bicycle rack P22-S/P32-S.
Note
The quick-release clamps and rack frame must be regularly cleaned with soapy water, especially if they are dirty or stiff.
Preparations before driving

Attention
All screw connections and attachments of the bicycle rack and the bicycles must be checked before assembly, before every trip and during lengthy trips to ensure they are sitting firmly, and they must be retightened if necessary.
The lighting system must be checked to ensure it is working properly before every trip.
If these instructions are not followed, the bicycle rack together with the mounted bicycles may free themselves from the vehicle and cause injury to you and other persons, and/or may result in an accident.
This check must be repeated at regular intervals regardless of road conditions.
Note
The bicycle rack license plate and the lighting system must not be covered.
If the bicycle is not fully loaded, it must ensured that:
- brackets not in use are removed from the rack frame and stowed in the car boot,
- all keys are removed and stored,
- all wheel rail lashing straps are closed.
General safety instructions
The vehicle owner is responsible for ensuring that his or her field of view and hearing are not impaired by the load or the condition of the vehicle. It must be ensured that the vehicle and load are in accordance with regulations and that vehicle road safety is not impaired by the load.
The required lighting and lighting systems must also be present and operational during the day.
These mounting and operating Instructions contain the general approval of the bicycle rack for trailer hitches and must always the kept in the vehicle when the rack is mounted.
Observe the legal regulations regarding use of the bicycle rack in the country of use.

Attention
The operating steps and safety instructions described in these mounting and operating Instructions must be adhered to. The bicycle rack for the trailer hitch is intended only for transporting bicycles. The bicycle rack is not suitable for use on rough terrain.
All screw connections and attachments of the bicycle rack and the bicycles must be tested before assembly, before every trip and during lengthy trips to ensure they are sitting firmly, and they must be retightened if necessary. This check must be repeated at regular intervals regardless of road conditions. During the trip, the driver should check the bicycle rack and bicycles for any shifting/changes in position by glancing in the rear view mirror.
If changes are noticed, proceed to the next possible stopping area at reduced speed and retighten the screw connections and attachments of the bicycle rack or bicycles.
If these instructions are not followed, the bicycle rack and/or the load may free themselves from the vehicle and cause injury to you and other persons, or may result in an accident.

Attention
Do not use lubricants on the pre-mounted screw connections. This could cause the screw connections to loosen and the bicycle rack together with the mounted bicycles may free themselves from the vehicle; this may cause injury to you and other persons, or may result in an accident.

Attention
If the load (the bicycles) extends more than 40~cm beyond the outer edge of the lit area of the side-marker lights or tail lights of the rear rack system, the load must be marked at most 40~cm from the edge and at most 150~cm above the road surface, at the front by a white light and at the back by a red light.
Separately mark the bicycle wheels extending out laterally during transport.
When driving at night, cover the rear lights and reflectors of the bicycles to prevent confusion with the rearward-facing-vehicle lighting and to avoid hindering or confusing other road users.
Failure to do so could result in an accident

Attention
Before starting a trip, check that the lighting system is functioning correctly. When the rear fog light on the bicycle rack is switched on, the rear fog light of the vehicle must be switched off, i.e they must be illuminated at the same time. In vehicle models whose type approval was initially issued after 1 October 1998, the mounted rear-rack system and the load must not cover the third brake light of the vehicle. The third brake light of the vehicle must be visible: on the left and right, relative to the longitudinal vehicle axis, at a horizontal angle of 10^ ; at the top relative to the top edge of the lamp, at a vertical-angle of 10^ ; and at the bottom, relative to the lower e-edge of the lamp, at a vertical angle of 5^ . If these values are not met, a "third" replacement brake light must be installed.
Failure to do so could result in an accident

Attention
The mounted bicycle rack and bicycles alter the driving and braking characteristics as well as the lateral wind sensitivity of the vehicle. A maximum speed of 130km / h must not be exceeded.
Do not cover the bicycles with tarps, protective covers or similar as this greatly influences both areas exposed to the wind and driving behaviour.
Slide any heavy cargo in the luggage compartment as far forward as possible to avoid excessively loading down the rear of the vehicle.
Always adjust your driving style to the road, traffic and w-weather conditions and exercise special care when driving with a loaded bicycle rack.
If these instructions are not followed, the bicycle rack and/or the load may free themselves from the vehicle and cause injury to you and other persons, or may result in an accident.

Attention
If the vehicle is equipped with an electrical luggage compartment lid, allow for the necessary clearance when mounting the bicycle rack. If possible, the electrical luggage compartment lid should be de-activated and operated manually.
Remove the bicycle rack before using automatic car washes. Otherwise, the bicycle rack, the vehicle and/or the car-wash could be damaged.

Cher client,
Retirar as bicyclicetas

- Extension kit for bicycle rack
- Mounting and Operating Instructions
- Note
- Parts overview, 4th-bicycle extension kit
- Item no.
- EEC type approval number
- Scope of delivery
- Technical data
- Required auxiliary materials
- Mounting the extension kit
- Mounting the rack frame for the extension kit for a 4th bicycle
- Attention
- Mounting the bicycles
- Mounting bicycles for the 3rd-bicycle extension kit
- Mounting bicycles for the 4th-bicycle extension kit
- Removing bicycles
- Tilting the bicycle rack
- Folding open/closed the rack frame
- Preparations before driving
- General safety instructions
- Retirar as bicyclicetas
Brand : Uebler
Model : P22S
Category : Bike rack