
SMT4011N - Soundbar SAMSUNG - Free user manual and instructions
Find the device manual for free SMT4011N SAMSUNG in PDF.

| Product type | Soundbar |
| Brand | Samsung |
| Model | SMT4011N |
| Dimensions (L x H x D) | 940 x 60 x 90 mm |
| Weight | 2.5 kg |
| Power supply | Mains, 100-240 V AC, 50/60 Hz |
| Power consumption | 30 W (standby < 1 W) |
| Main functions | Built-in stereo amplifier, sound modes (Standard, Music, Cinema, Voice, Custom), SRS TruSurround XT, FM Radio, audio PIP, volume control, mute |
| Audio inputs | Analog audio (RCA), optical (depending on model) |
| Audio outputs | Built-in speakers, line audio output |
| Maintenance and cleaning | Use a soft, dry cloth. Do not use chemicals (benzene, alcohol, thinner). Unplug before cleaning. |
| Safety | Do not expose to moisture, do not insert metal objects, use on a stable surface, do not open the casing. |
| Spare parts and repairability | Consult a Samsung authorized service center for any repair or replacement of parts. |
| Included accessories | Remote control, AAA batteries (x2), audio cable (depending on version) |
| General information | Color and appearance may vary. Specifications subject to change without notice. |
Frequently Asked Questions - SMT4011N SAMSUNG
User questions about SMT4011N SAMSUNG
0 question about this device. Answer the ones you know or ask your own.
Ask a new question about this device
Download the instructions for your Soundbar in PDF format for free! Find your manual SMT4011N - SAMSUNG and take your electronic device back in hand. On this page are published all the documents necessary for the use of your device. SMT4011N by SAMSUNG.
USER MANUAL SMT4011N SAMSUNG
Adjusting the LCD monitor
Troubleshooting
Specifications
Information
Appendix
TFT-LCD Monitor
www.samsung.com
The color and appearance of the product may vary depending on the model, and the product specifications are subject to change without prior notice for reasons of performance enhancement.
Safety Instructions
Notational

Please read the following safety instructions as they are designed to prevent damage to property and harm to the user.

Warning / Caution

Failure to follow directions noted by this symbol could result in bodily harm or damage to the equipment.

Notational Conventions

Prohibited Important to read and understand at all times

Do not disassemble Disconnect the plug from the outlet

Do not touch Ground to prevent an electric shock
Power

When not used for an extended period of time, set your computer to DPM. If using a screen saver, set it to active screen mode.
The images here are for reference only, and are not applicable in all cases (or countries).
Shortcut to Anti-Afterimage Instructions
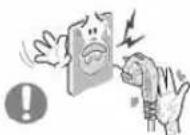
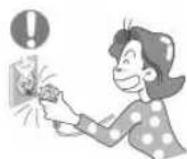
Do not use a damaged or loose plug.
This may cause electric shock or fire.
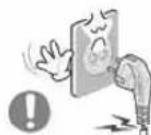
Do not pull the plug out by the wire nor touch the plug with wet hands.
This may cause electric shock or fire.

Use only a properly grounded plug and receptacle.
- An improper ground may cause electric shock or equipment damage.(Class I Equipment only.)

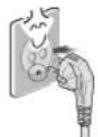
Insert the power plug firmly so that it does not come loose.
- A bad connection may cause fire.
Do not excessively bend the plug and wire nor place heavy objects upon them, which could cause damage.
This may cause electric shock or fire.

Do not connect too many extension cords or plugs to one outlet.
This may cause fire.
Do not disconnect the power cord while using the LCD monitor.
- A surge may be caused by the separation and may damage the LCD monitor.
Do not use the power cord when the connector or plug is dusty.
-
If the connector or plug of the power cord is dusty, clean it with a dry cloth.
-
Using the power cord with a dusty plug or connector may cause electric shock or fire.
To disconnect the apparatus from the mains, the plug must be pulled out from the mains socket, therefore the mains plug shall be readily operable.
This may cause electric shock or fire.
Installation
Be sure to contact an authorized the Service Center, when installing your LCD monitor in a location with heavy dust, high or low temperatures, high humidity, and exposed to chemical substances and where it operates for 24 hours such as at airports, train stations etc.

Failure to do so may cause serious damage to your LCD monitor.
Place your LCD monitor in a location with low humidity and a minimum of dust.
- Failure to do so may cause electric shock or fire inside the LCD monitor.

Do not drop the LCD monitor when moving it.
This may cause damage to the product or the person carrying it.

Install the LCD monitor base in a showcase or shelf so that the end of the base does not protrude from the showcase or shelf.
- Dropping the product may cause damage to the product or the person carrying it.
Do not place the product on an unstable or small surface area.
- Place the product on an even and stable surface, as the product may fall and cause harm to someone walking by, specifically children.
Do not place the product on the floor.
Take care, as someone, specifically children may trip over it.
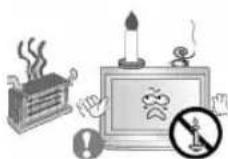
TO PREVENT THE SPREAD OF FIRE, KEEP CANDLES OR OTHER OPEN FLAMES AWAY FROM THIS PRODUCT AT ALL TIMES.
- Otherwise, this may cause fire.
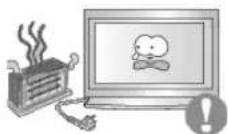
- Keep any heating devices away from the power cable.
A melted coating may cause electric shock or fire.
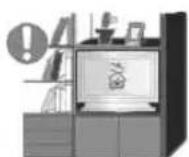
Do not install the product in places with poor ventilation, for instance, a bookshelf, closet, etc.
Any increase in the internal temperature may cause fire.
Put down the LCD monitor carefully.
- Failing to do so may damage the LCD monitor.

Do not place the LCD monitor face down.
This may damage the TFT-LCD surface.
The installation of the bracket must be done by a qualified professional.
- Installing the bracket by unqualified personnel may result in injury.
Always use the mounting device specified in the owner's manual.
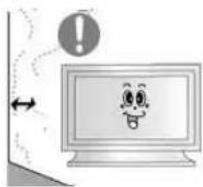
When installing the product, make sure to keep it away from the wall (more than 10cm / 4 inches) for ventilation purposes.
- Poor ventilation may cause an increase in the internal temperature of the product, resulting in a shortened component life and degraded performance.
Keep the plastic packaging (bag) out of children's reach.
The plastic packaging (bag) may cause suffocation if children play with it.
Clean

When cleaning the LCD monitor case or the surface of the TFT-LCD screen, wipe with a slightly moistened, soft fabric.

Do not spray water or detergent directly onto the LCD monitor.
This may cause damage, electric shock or fire.
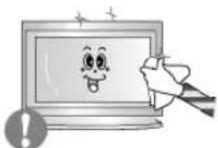
Use the recommended detergent with a smooth cloth.

If the connector between the plug and the pin is dusty or dirty, clean it properly using a dry cloth.
- A dirty connector may cause electric shock or fire.
Make sure to unplug the power cord before cleaning the product.
- Otherwise, this may cause electric shock or fire.
Unplug the power cord from the power outlet and wipe the product using a soft, dry cloth.
- Do not use any chemicals such as wax, benzene, alcohol, thinners, insecticide, air freshener, lubricant or detergent.
Others
Do not remove the cover (or back).
This may cause electric shock or fire.
Refer to a qualified servicing company.
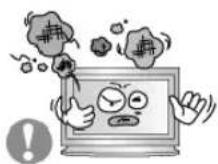
If your LCD monitor does not operate normally - in particular, if there is any unusual sound or smell coming from the LCD monitor - unplug it immediately and contact an authorized dealer or the Service Center.
This may cause electric shock or fire.
Keep the product away from places exposed to oil, smoke or moisture; do not install inside a vehicle.
This may cause a malfunction, electric shock or fire.
In particular, avoid operating the LCD monitor near water or outdoors where the LCD monitor could be exposed to snow or rain.

If the LCD monitor is dropped or the casing is damaged, turn the LCD monitor off and unplug the power cord. Then contact the
Service Center.
The LCD monitor may malfunction, causing electric shock or fire.
Disconnect the plug from the outlet during storms or lightning or if it is not used for a long period of time.
- Failure to do so may cause electric shock or fire.
Do not try to move the LCD monitor by pulling only the wire or the signal cable.
- This may cause a breakdown, electric shock or fire due to damage to the cable.
Do not move the LCD monitor right or left by pulling only the wire or the signal cable.
- This may cause a breakdown, electric shock or fire due to damage to the cable.
Do not cover the vents on the LCD monitor cabinet.
Bad ventilation may cause a breakdown or fire.

Do not place water containers, chemical products or small metal objects on the LCD monitor.
-
This may cause a malfunction, electric shock or fire.
-
If a foreign substance enters the LCD monitor, unplug the power cord and contact the Service Center.
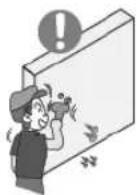
Keep the product away from combustible chemical sprays or inflammable substances.
This may cause an explosion or fire.

Never insert anything metallic into the LCD monitor openings.
This may cause electric shock, fire or injury.
Do not insert metal objects such as chopsticks, wire and tools or inflammable objects such as paper or matches into the vent, headphone port or AV ports or etc.
- This may cause electric shock or fire. If an alien substances or water enters the product, turn the product off, unplug the power connector from the wall outlet and contact the Service Center.

When viewing a fixed screen for an extended period of time, residual image or blurriness may appear.
- Change the mode to energy saving mode or set a screensaver to a changing picture when away from the LCD monitor for an extended period of time.
Adjusts the resolution and frequency to the level appropriate for the model.
An inappropriate resolution may cause undesirable picture quality. 40 inch (101 cm) - 1360 X 768
Viewing the LCD monitor continuously at a too close angle may result in damage to your eyesight.
To ease eye strain, take at least a five-minute break after every hour of using the LCD monitor.
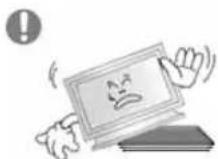
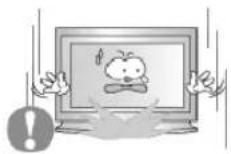
Do not install the product on an unstable, uneven surface or a location prone to vibrations.
- Dropping the product may cause damage to the product or the person carrying it. Using the product in a location prone to vibrations may shorten the lifetime of the product or may cause the product to catch fire.
When moving the LCD monitor, turn off and unplug the power cord. Make sure that all cables, including the antenna cable and cables connected to other devices, are disconnected before moving the LCD monitor.
- Failure to disconnect cables may damage it and cause fire or electric shock.
Make sure there are more than two people when moving the product.
- Dropping the product may cause a malfunction or injury to the person carrying it.
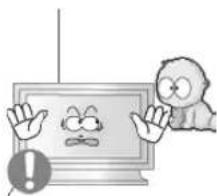
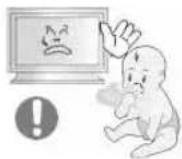
Place the product out of children's reach, as they could damage by hanging onto it.
- A falling product may cause injury to the person or even fatality.
When not using the product for an extended period of time, keep the product unplugged.
- Otherwise, this may cause heat emission from the accumulated dirt or degraded insulation, causing electric shock or fire.
Do not place your children's favorite toys or any other objects of interest on the product.
Children may try to climb on the product to retrieve an object. The product could fall, causing injury or even fatality.

When removing batteries from the remote control, be careful that they are not swallowed by children. keep the batteries out of children's reach.
If the batteries are swallowed, see a doctor immediately.
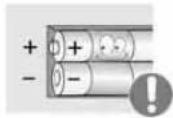
When replacing batteries, place the batteries in the correct +/polarity position as indicated on the battery holder.
The incorrect polarity may cause a battery to break or leak and may cause fire, injury, or contamination (damage).

Use only specified standard batteries. Do not use new and used batteries together.
- This may cause a battery to break or leak and may cause fire, injury, or contamination (damage).

The batteries (and rechargeable batteries) is not ordinary refuse and must be returned for recycling purposes. The customer is responsible for returning the used or rechargeable batteries for recycling purposes as the consumer.
- The customer can return used or rechargeable batteries to a nearby public recycling center or to a store selling the same type of the battery or rechargeable battery.
© 1995-2008 SAMSUNG. ALL Rights Reserved
Contents
Safety Instructions 1
Notational 1
Power 1
Installation 2
Clean 4
Others 5
Introduction 12
Package Contents 12
Your LCD Monitor 13
Mechanical Layout 20
Connections 26
Installing the Stand KIT 26
Connecting the LCD Monitor 27
MDC System 33
Adjusting the LCD Monitor 52
Input 52
Picture [PC/BNC/DVI Mode] 53
Picture [AV / S-Video /Component / DVI-Video Mode] 55
Sound. 57
Setup 58
Multi Control 61
Direct Functions 61
Troubleshooting 62
Self-Test Feature Check 62
Check List 63
Q&A 63
Specifications 67
General 67
PowerSaver 68
Preset Timing Modes 68
Information 70
For Better Display 70
PRODUCT INFORMATION (Image Retention Free) 70
Appendix 74
Contact SAMSUNG WORLDWIDE 74
74
Correct Disposal 77
Authority 77

Safety Instructions
Introduction
Package Contents
Your LCD monitor
Mechanical Layout
Connections
Using the Software
Adjusting the LCD monitor
Troubleshooting
Specifications
Information
Appendix
TFT-LCD Monitor
www.samsung.com

The color and appearance of the product may vary depending on the model, and the product specifications are subject to change without prior notice for reasons of performance enhancement.
Introduction
Package Contents
Note
- Please make sure the following items are included with your LCD monitor.
If any items are missing, contact your dealer.
Contact a local dealer to buy optional items.
Note
- This stand is not for the Floor Standing Type.
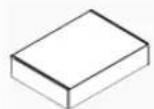
LCD monitor
Manuals

USERS MANUAL

Warranty Card
(Not available in all locations)

User's Guide, MDC Software
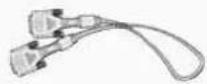
Cables

D-Sub Cable Power Cord
Other

Remote Control Batteries (AAA X 2) Cover-Hole
BNC to RCA Adaptor Jack
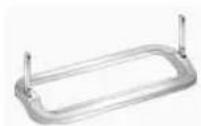
Semi Stand
Sold separately
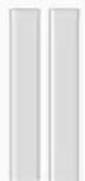
Wall Mount KIT Speaker Set Stand KIT
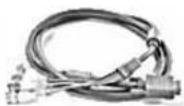
DVI Cable BNC Cable
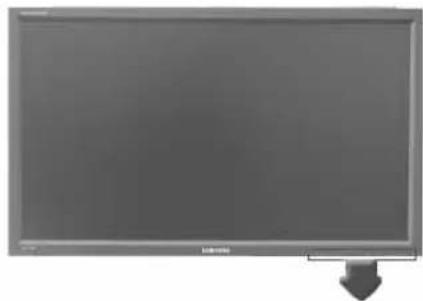
Your LCD monitor
Front

1) MENU
Opens the on-screen menu and exits from the menu or closes the adjustment menu.
2) Navigate buttons (Up-Down buttons)
Moves from one menu item to another vertically or adjusts selected menu values.
3) Adjust buttons (Left-Right buttons)/Volume buttons
Moves from one menu item to another horizontally or adjusts selected menu values.
Adjusts the audio volume.
4) ENTER
Activates a highlighted menu item.
5) SOURCE
Switches from PC mode to Video mode. Changing the source is only allowed for external devices that are connected to the LCD monitor at the time. [PC] [BNC] [DVI] [AV] [S-Video] [Component]
Click here to see an animation clip.
6)PIP
Push the PIP button to turn the PIP screen On / Off.
More than one PIP cannot overlap on screen as BNC and the component use the same terminal.
Click here to see an animation clip.
PC
AV / S-Video / Component Mode
BNC
AV/S-Video Mode
DVI
AV / S-Video / Component Mode
AV/S-Video
PC/BNC/DVI Mode
- Component
PC/DVI Mode

Power button
Turns the LCD monitor On/Off.
8) Power indicator
Shows PowerSaver mode by blinking green.
9) Remote Control Sensor
Aim the remote control towards this spot on the LCD monitor.

- See PowerSaver described in the manual for further information regarding power saving functions. For energy conservation, turn your LCD monitor OFF when it is not needed or when leaving it unattended for long periods.


- For detailed information concerning cable connections, refer to Connecting Cables under Setup. The LCD monitor's configuration at the back may vary slightly depending on the LCD monitor model.
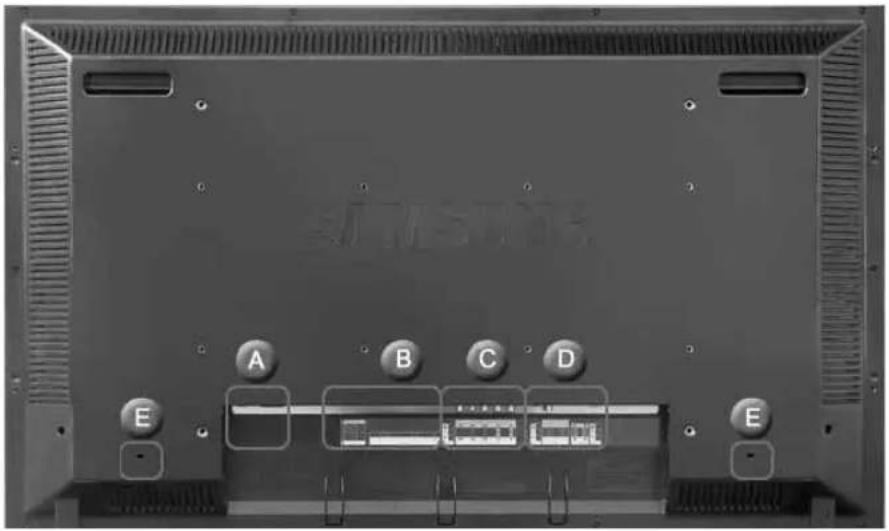

A
1) POWER S/W ON [I] / OFF [O]
Switches the LCD monitor On/Off.
2) POWER IN
The power cord plugs into the LCD monitor and the wall plug.
B
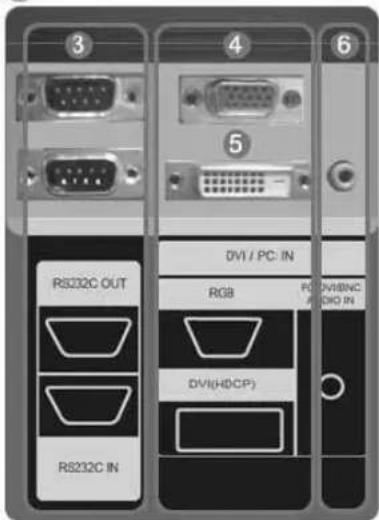
3) RS232C OUT/IN (RS232C Serial PORT)
MDC(Multiple Display Control) Program P
4) DVI/PC IN [DVI(HDCP)] (PC Video Connection Terminal) Using a DVI Cable (DVI-D to DVI-D)-DVI mode (Digital PC)
5) DVI / PC IN [RGB] (PC Video Connection Terminal) Using a D-Sub Cable (15 pin D-Sub)-PC mode (Analog PC)
6) DVI / PC IN [PC/DVI/BNC AUDIO IN] (PC/DVI/BNC Audio Connection Terminal (Input))
C
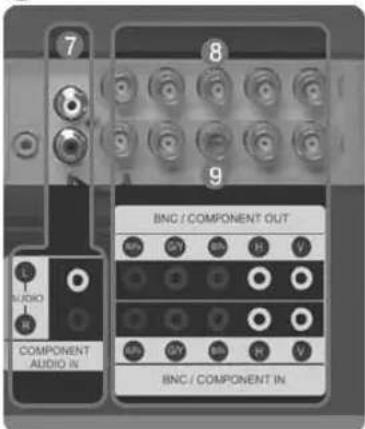
7) COMPONENT AUDIO IN [L-AUDIO-R] (Component Audio Connection Terminal (Input))
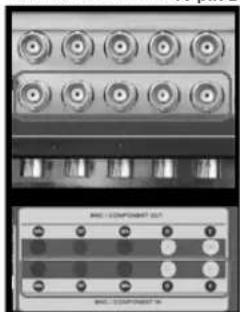
8) BNC/COMPONENT OUT [R/P R, G/Y, B/PB, H, V] (BNC/Component Connection Terminal (Output))
BNC (Analog PC) Connection: connecting the R, G, B, H, V ports
Component Connection: connecting the PR, Y, PB ports
9) BNC/COMPONENT IN [R/P R, G/Y, B/P B, H, V] (BNC/Component Connection Terminal (Input))
10) AV AUDIO IN [L-AUDIO-R] (LCD monitor

Audio Connection Terminal (Input))
11) AV OUT [VIDEO] (VIDEO Connection Terminal): AV mode (Output)
12) AV IN [VIDEO] (VIDEO Connection Terminal) (Input)
13) AV OUT [S-VIDEO] (S-VIDEO Connection Terminal): S-VIDEO mode (Output)
14) AV IN [S-VIDEO] (S-VIDEO Connection Terminal) (Input)
15)EXT SPEAKER(8Ω)[--L-+,--R-+]EXT Speaker Connection Terminal)
16) AUDIO OUT [L-AUDIO-R] (LCD monitor Audio Connection Terminal (Output)) AUDIO OUT is the terminal for sound output of PC, DVI or BNC.
Note
- The number of LCD monitors that can be connected to loopout may differ depending on the cables, signal source etc. With cables where there is no degradation or signal source, up to ten LCD monitors can be connected.
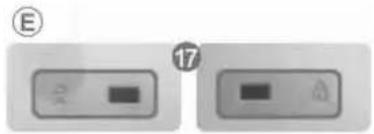
17) Kensington Lock

The Kensington lock is a device used to physically fix the system to something when using it in a public place. (The locking device has to be purchased separately.) For using a locking device, contact the place of purchase.
Note
See Connecting the LCD monitor for further information regarding cable connections.
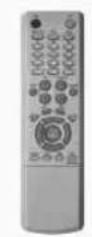
Remote Control
Note
The performance of the remote control may be affected by a TV or other electronic device operating near the LCD monitor, causing a malfunction due to interference with the frequency.
- ON/OFF
- MAGICNET
3.MDC - LOCK
- MagicNet buttons
6.+100--
7.VOL - MUTE
- TTX/MIX
- MENU
- ENTER
12.M/B P.MODE
13.AUTO - PRE-CH
15.VCH/P A - SOURCE
- INFO
- EXIT
- Up-Down Left-Right buttons
20.1S.MODE - STILL
- FM RADIO
23.P.SIZE

24.()SRS
25. H DUAL/MTS
26. P
27. SOURCE
28. SWAP
29. SIZE
30. REW
31. STOP
32. PLAY/PAUSE
33.FF
1) ON/OFF
Turns the LCD monitor On/Off.
2) MAGICNET
MagicNet Quick Launch Button.
- This fuction does not work for this monitor.
3) MDC
MDC Quick Launch Button.
4) LOCK
Activates or deactivates all function keys on both the remote control and the LCD monitor except for the Power and LOCK buttons.
5) MagicNet buttons
Used for MagicNet.
- Alphanumeric: Used to enter the Internet address.
- DEL: Functions as the backspace.
- SYMBOL: Used to enter the symbols. (O_-)
- ENTER: Used to enter values.
- This fuction does not work for this monitor.
6) +100 ---
Press to select channels over 100.
For example, to select channel 121, press +100 then press "2" and "1".
- This fuction does not work for this monitor.
7) VOL
Adjusts the audio volume.
8) MUTE
Pauses (mutes) the audio output temporarily.
This is displayed on the lower left corner of the screen.
The audio resumes if MUTE or -VOL + is pressed in the Mute mode.
9) TTX/MIX
TV channels provide text information services via teletext.
- This fuction does not work for this monitor.
10) II MENU
Opens the on-screen menu and exits from the menu screen or closes the screen adjustment menu.
11) ENTER
Activates a highlighted menu item.
12) M/B.P.MODE
When you press this button, current picture mode is displayed on the lower center of the screen.
AV / S-Video / Component : P.MODE
The Monitor has four automatic picture settings that are preset at the factory.
Then push button again to circle through available preconfigured modes.
(Dynamic Standard Movie Custom)
PC/DVI/BNC:M/B(MagicBright)
MagicBright™ is a new feature providing the optimum viewing environment depending on the contents of
the image you are watching.
Then push button again to circle through available preconfigured modes.
(Entertain Internet Text Custom)
13) AUTO
Adjusts the screen display automatically in PC mode.
By changing the resolution in the control panel, auto function is performed.
14) PRE-CH
Returns to the immediately previous channel.
- This fuction does not work for this monitor.
15) VCH/P A
In TV mode, selects TV channels.
- This fuction does not work for this monitor.
16) SOURCE
Changes the video source.
17) INFO
The current picture information is displayed in the top left corner of the screen.
Exits from the menu screen.
19) Up-Down Left-Right buttons
Moves from one menu item to another horizontally, vertically or adjusts selected menu values.
20) S.MODE
When pressing this button, the current mode is displayed at the bottom centre of the screen.
The LCD monitor has a built-in high fidelity stereo amplifier.
Then press the button again to circle through available preconfigured modes.
(Standard Music Movie Speech Custom)
21) STILL
Press the button once to freeze the screen. Press it again to unfreeze.
22) FM RADIO
Turns the FM Radio on/off.
In PC/DVI mode, sets the SOUND to FM Radio.
In general Video mode, selects FM Radio, and turns off the screen.
In areas where the signal is weak, noise may occur during FM radio broadcasts.
- This fuction does not work for this monitor.
23) P.SIZE
Press to change the screen size.
24) (●) SRS
SRS
25) I-II DUAL/MTS
DUAL-
STEREO/MONO, DUAL I / DUAL II and MONO/NICAM MONO/NICAM STEREO can be operated depending on the broadcasting type by using the DUAL button on the remote control while watching
MTS-
You can select MTS (Multichannel Television Stereo) mode.
| Audio Type | MTS/S_Mode | Default | |
| FM Stereo | Mono Mono | Manual Change | |
| Stereo | Mono ↔ Stereo | ||
| SAP | Mono ↔ SAP | Mono | |
- This fuction does not work for this monitor.
26) 三PIP
Every time you press the button, a PIP screen appears.
27) SOURCE
Changes the source of the PIP window signal.
28) SWAP
Swaps the contents of the PIP and main image.
The image in the PIP window will appear on the main screen, and the main screen image will appear in the PIP window.
29) SIZE
Switches the PIP Picture Size.
30) REW
Rewind
31) STOP
Stop
32) PLAY/PAUSE
Play/Pause
33)FF
Fast forward
© 1995-2008 SAMSUNG. ALL Right Reserved
1. Mechanical Layout

2. Monitor Head

3. Stand

4. Speaker

5. Installation VESA Bracket
- When installing VESA, make sure to comply with the international VESA standards.
- Purchasing VESA Bracket and Installation Information : Please contact your nearest Samsung Distributor to place an order. After your order is placed, installation professionals will visit you and install the bracket.
- At least 2 persons are needed in order to move the LCD Monitor.
Samsung is not responsible for any product damage or any injury caused by installation at customer's discretion.

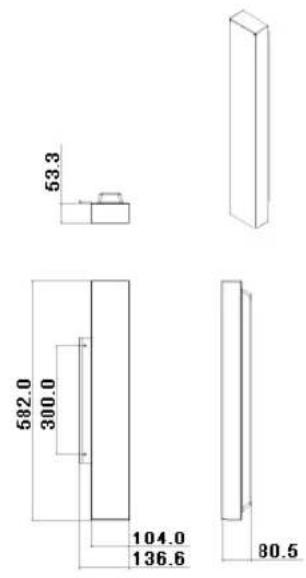
Dimensions
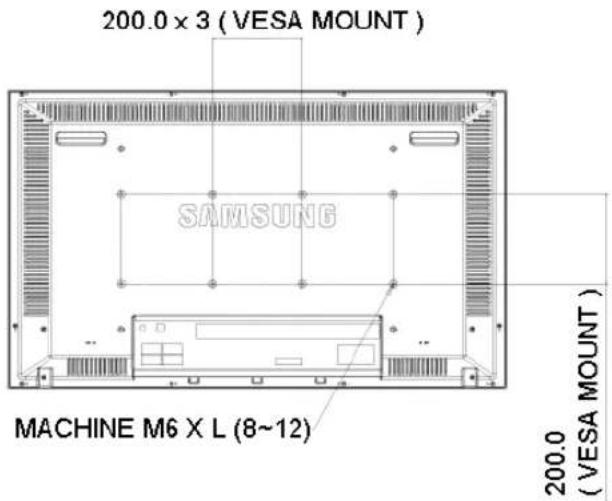

For securing the bracket on a wall, use only machine screws of 6mm diameter and 8 to 12mm length.
UP
6. Wall Bracket Installation
- Contact a technician for installing the wall bracket.
Samsung Electronics is not responsible for any damages to the product or harm to customers when the installation is done by the customer. - This product is for installing on cement walls. The product may not stay in place when installed on plaster or wood.

Components
Only use the components and accessories shipped with the product.
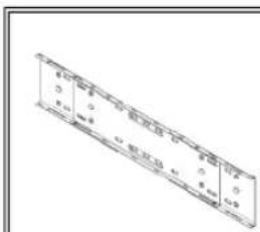
Wall Bracket (1)
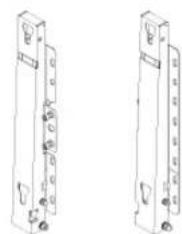
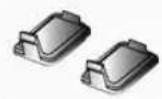
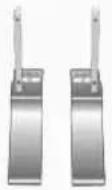
Hinge (Left 1, Right 1)

Plastic Hanger (4)


Screw(B) (4)

Anchor (11)

Wall Bracket Assembly
1
Insert and tighten the Captive Screw in the direction of the arrow.
When done, mount the wall bracket on the wall.
A. Captive Screw
B. Wall Bracket
C. Hinge (Left)
D. Hinge (Right)
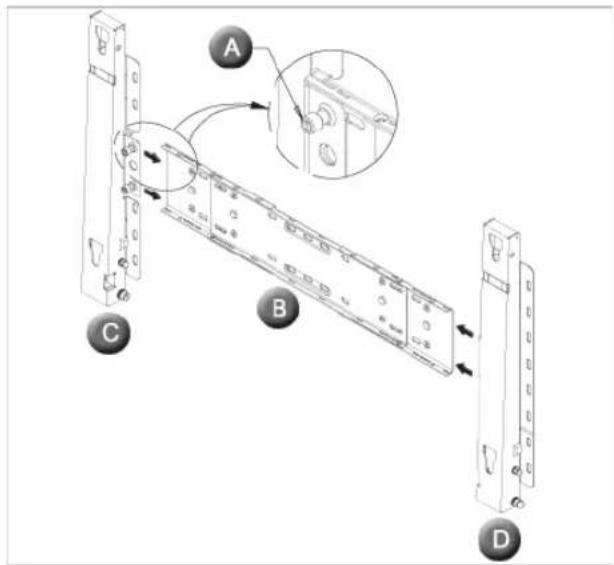
There are two hinges(left and right). Use the correct one.
2

Before drilling into the wall, check if the length between the two locking holes at the back of the product is correct. If the length is too short or long, loosen all or some of the 4screws on the wall bracket to adjust the length.
A. Length between the two locking holes
3
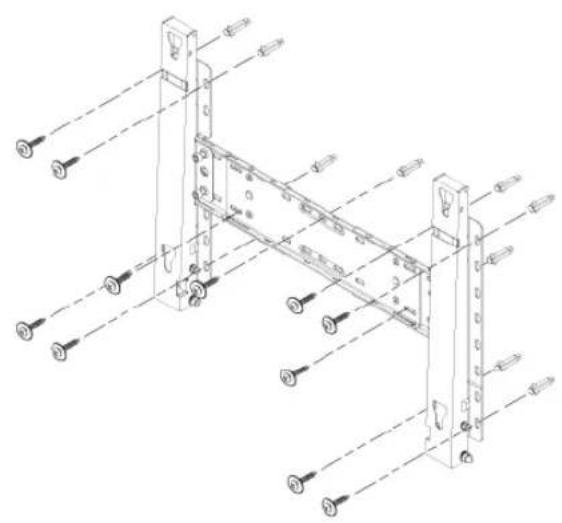
Check the installation diagram and mark the drill points on the wall. Use the 5.0mm bit to drill holes deeper than 35~mm . Fix each anchor in the corresponding hole. Match each of the brackets and hinge holes to the corresponding anchor holes and insert and tighten the 11 screws A.

To mount the product on the wall bracket
The shape of the product may vary depending on the model. (The assemblies of the plastic hanger and the screw are the same)

1
Remove the 4 screws on the back of the product.

2
Insert the screw B into the plastic hanger.

- Mount the product on the wall bracket and make sure it is properly fixed to the left and right plastic hangers.
- Be careful when installing the product on the bracket as fingers can be caught in the holes.
- Make sure the wall bracket is securely fixed to the wall, or the product may not stay in place after installation.

3
Tighten the 4 screws in step 2 (plastic hanger + screw B) to the rear holes of the product.
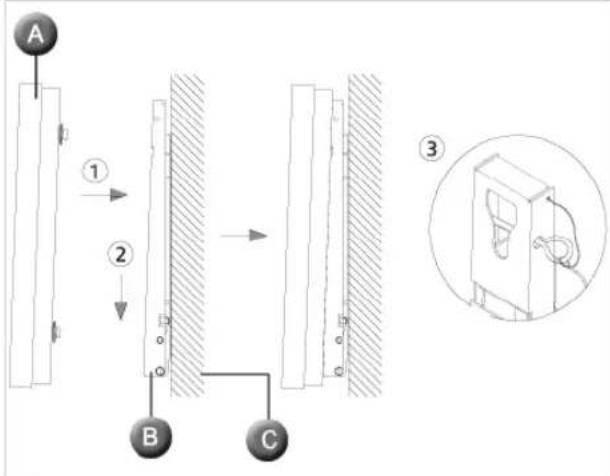
4
Remove safety pin (3) and insert the 4 product holders into the corresponding bracket holes (1). Then place the product (2) so that it is firmly fixed to the bracket. Make sure to re-insert and tighten the safety pin (3) to securely hold the product to the bracket.
A. Monitor
B. Wall Bracket
C.Wall

Wall Bracket Angle Adjustment
Adjust the bracket angle to -2^ before installing it on the wall.
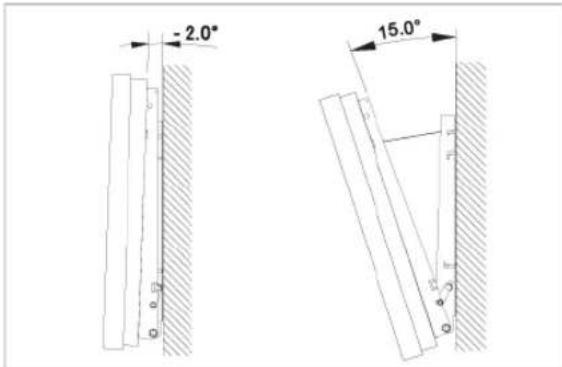
- Fix the product to the wall bracket.
- Hold the product at the top in the center and pull it forward (direction of the arrow) to adjust the angle.
- You can adjust the bracket angle between -2° and 15°.
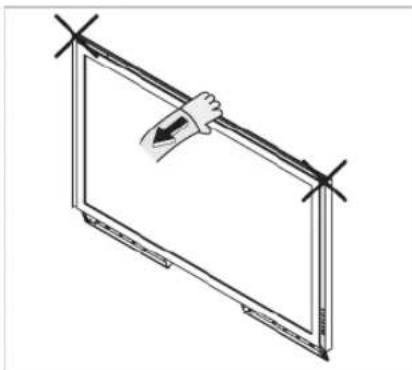
Make sure to use the top center, and not the left for the right side of the product to adjust the angle.


Safety Instructions
Introduction
Connections
Installing the Stand KIT
Connecting the LCD
monitor
Using the Software
Adjusting the LCD monitor
Troubleshooting
Specifications
Information
Appendix
TFT-LCD Monitor
www.samsung.com

The color and appearance of the product may vary depending on the model, and the product specifications are subject to change without prior notice for reasons of performance enhancement.
Connections
Installing the Stand KIT

- Only the supplied bolts should be used.

Samsung Electronics will not be responsible for damages caused by using a base other than those specified.

Caution
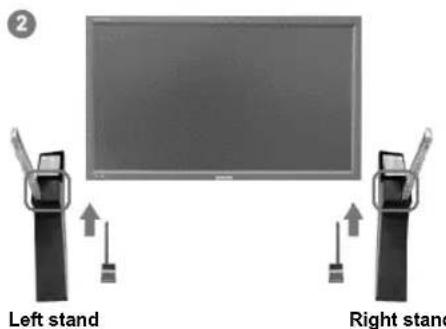
Make sure to install the stand with the Caution label folded backwards.
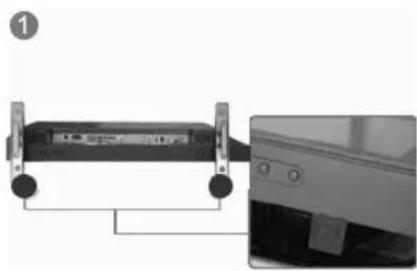
1) A 'Cover-Protection' is used to protect the hole at the bottom of the LCD monitor, where the stand is inserted. Be sure to remove the 'Cover-Protection' when attaching the provided Semi Stand or Stand KIT (sold separately) and cover the hole using the 'Cover-Hole' when attaching the wall mount kit.
2) Set up the left and right stands respectively.
3) Insert the stand into the hole at the bottom of the LCD monitor. Insert the screw into the hole indicated and tighten it. (M4 x L15)

This stand is designed for adjusting the screen angle. The company is not responsible for any problem caused when using this stand. Under no circumstances use the product as a stand for placing something on.
Installing the Stand KIT (sold separately)

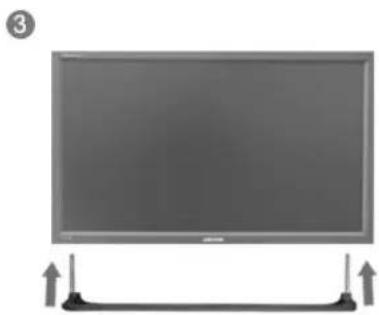

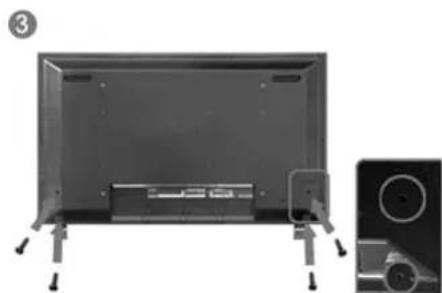
1) A 'Cover-Protection' is used to protect the hole at the bottom of the LCD monitor, where the stand is inserted. Be sure to remove the 'Cover-Productor' when attaching the provided Semi Stand or Stand KIT (sold separately) and cover the hole using the 'Cover-Hole' when attaching the wall mount kit.
2) Ensure that the parts are inserted in the right direction and in the right place. (M4 × L15)
3) Insert the stand into the hole at the bottom of the LCD monitor.
4) Insert the screw into the hole indicated and tighten it. (M4 × L15)
Connecting the LCD monitor
Using a Power cord with Earth
In the event of failure, the earth lead may cause electric shock. Make sure to wire the earth lead in correctly, before connecting the AC power. When un-wiring the earth lead, make sure to disconnect the AC power in advance.

Note
- AV input devices such as DVD players, VCR's or camcorders as well as your computer can be connected to the LCD monitor. For detailed information on connecting AV input devices, refer to the User Controls under Adjusting Your LCD monitor.
Connecting to a Computer
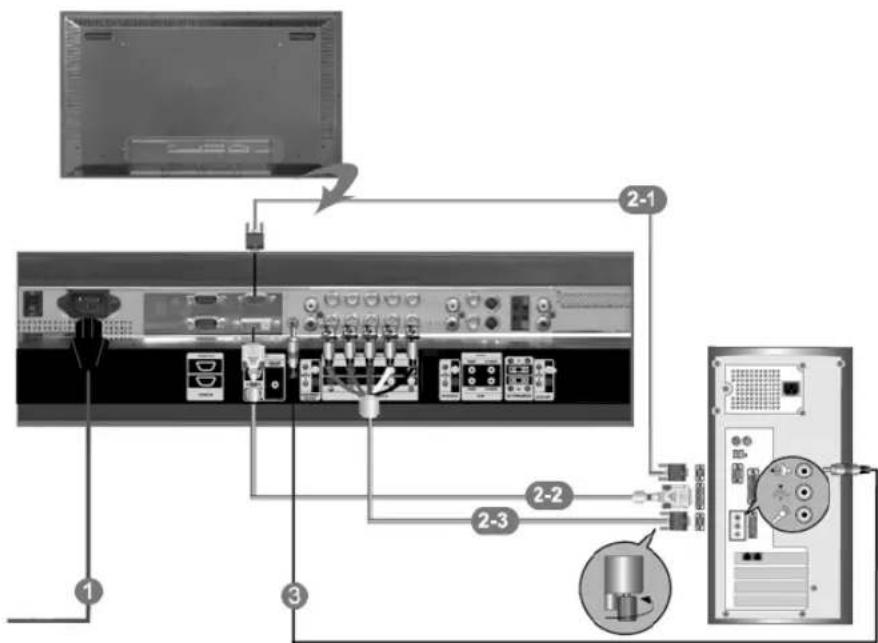
1) Connect the power cord for your LCD monitor to the power port on the back of the LCD monitor. Trun on the power switch.
2) There are 3 ways to connect the D-sub to your LCD monitor. Choose one of the following:
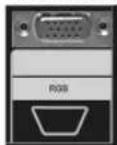
2-1) Using the D-sub (Analog) connector on the video card.
Connect the D-sub to the 15-pin, RGB port on the back of your LCD monitor and the 15 pin D-sub Port on the computer.
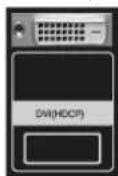
2-2) Using the DVI (Digital) connector on the video card.
Connect the DVI Cable to the DVI(HDCP) port on the back of your LCD monitor and the DVI port on the computer.
2-3) Using the BNC (Analog) connector on the video card.
Connect the BNC Cable to the BNC/COMPONENT IN - R, G, B, H, V ports on the back of your LCD monitor and the 15 pin D-sub Port on the computer.
3) Connect the audio cable for your LCD monitor to the audio port on the back of your computer.
4) Turn on both your computer and the LCD monitor.

The DVI cable or BNC cable is optional.
Contact a local Samsung Electronics Service Center to buy optional items.
Connecting Digital DVD
Note
-
Input devices such as digital DVD are connected to the DVI IN terminal of the monitor using the DVI cable.
-
Then, start the DVD with a DVD disc inserted.
-
Select Digital using the SOURCE button.
Note
The monitor has DVI IN connection terminals to connect DVI input devices digital DVD.
Connecting to a VCR
Note
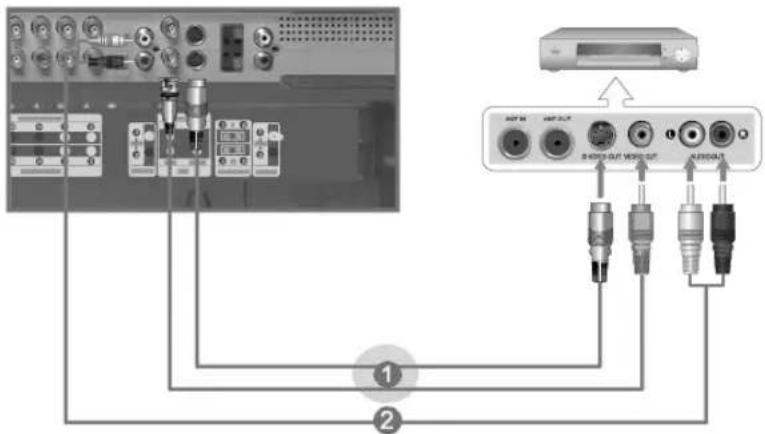
1) AV input devices such as VCRs or Camcorders are connected via the AV IN [VIDEO] or AV IN [S-VIDEO] of the LCD monitor using an S-VHS or BNC cable.
2) Connect the Audio (L) and Audio (R) terminals of a VCR or Camcorders to the LCD monitor's AV AUDIO IN [L-AUDIO-R] using audio cables.
3) Select AV or S-Video for a connected VCR or Camcorder using the SOURCE button on the front of the LCD monitor or on the remote control.
4) Then, start the VCR or Camcorders with a tape inserted.
The S-VHS or BNC cable is optional.
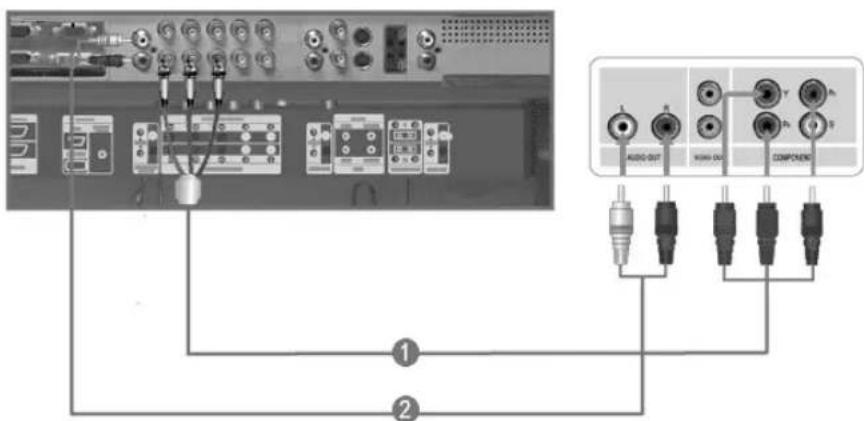
Connecting to a DVD Player
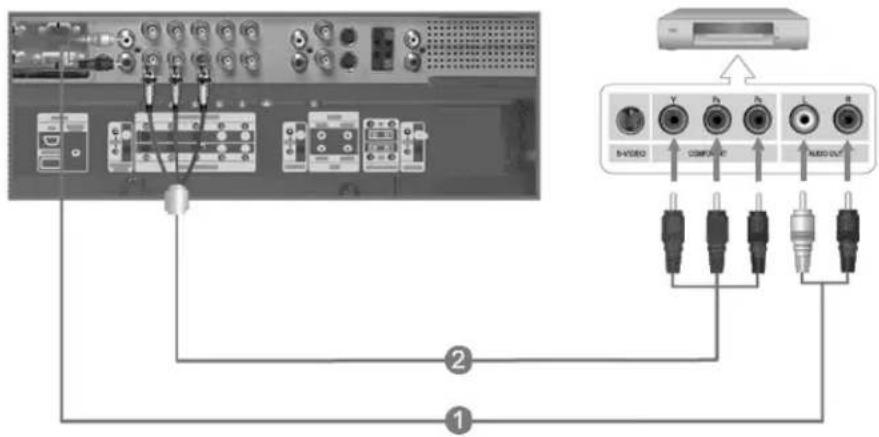
1) Connect a set of audio cables between the the AUDIO OUT jacks on the DVD player
COMPONENT AUDIO IN [L-AUDIO-R] on the LCD monitor and
2) Connect a Component cable between the the PR,Y,PB jacks on the DVD player.
BNC/COMPONENT IN -PR, Y, PB port on the LCD monitor and
3) Select
Component for the connection to a DVD player using the SOURCE button on the front of the LCD
monitor or on the remote control.
4) Then,
Note
- A component cable is optional.
For an explanation of Component video, consult your DVD manual.
Connecting to a Camcorder
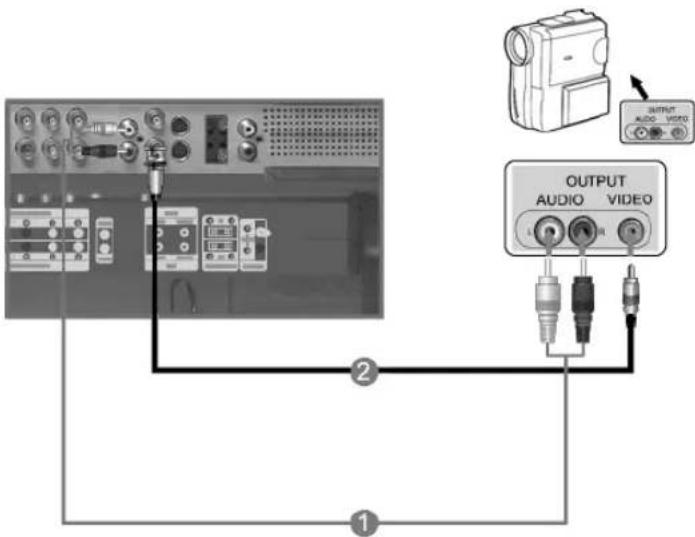
1) Locate the A/V output jacks on the camcorder. They are usually found on the side or back of the camcorder.
Connect a set of audio cables between the AUDIO OUTPUT jacks on the camcorder and the AV AUDIO IN [L-AUDIO-R] on the LCD monitor.
2) Connect a video cable between the VIDEO OUTPUT jack on the camcorder and the AV IN [VIDEO] on the LCD monitor.
3) Select AV for the Camcorder connection using the SOURCE button on the front of the LCD monitor or on the remote control.
4) Then, start the Camcorders with a tape inserted.
Note
The audio-video cables shown here are usually included with a Camcorder.
(If not, check your local electronics store.)
If your camcorder is stereo, you need to connect a set of two cables.
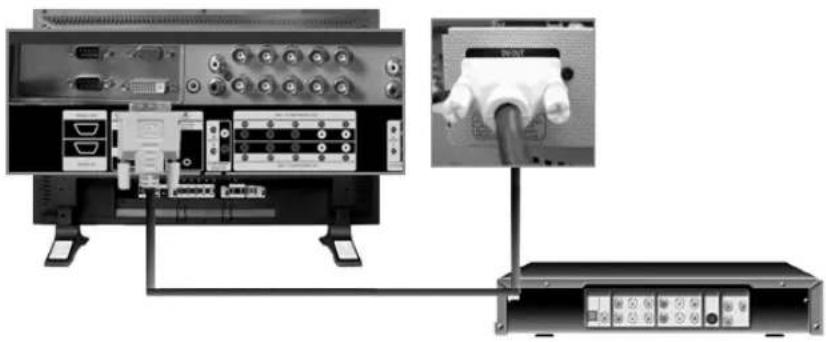
Connecting to a DTV Set Top Box
Note
The connections for a typical Set Top Box are shown below.
1) Connect a Component cable between the PR, Y, PB jacks on the Set Top Box.
BNC / COMPONENT IN - PRY, PB port on the LCD monitor and
2) Connect a set of audio cables between the the AUDIO OUT jacks on the Set Top Bo
COMPONENT AUDIO IN [L-AUDIO-R] on the LCD monitor and
3) Select Component for the connection LCD monitor or on the remote control.
DTV Set Top Box using the SOURCE button on the front of the
Note
- For an explanation of Component video, see your Set Top Box owner's manual.
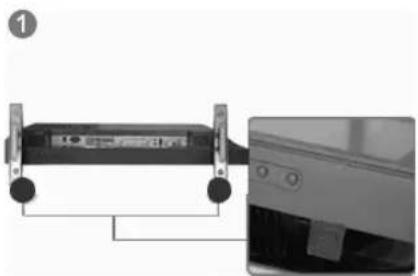
Connecting Speakers
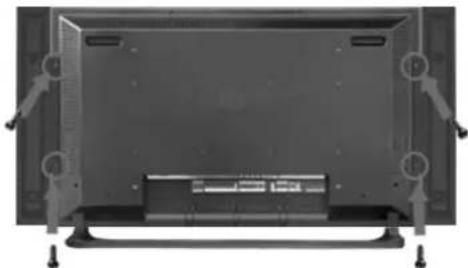
1) Fasten the SET and the speaker using the screws.
* Mount the speaker set without the speaker stand.
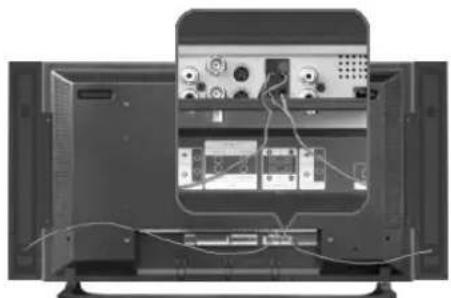
2) Connect the speaker connection cable between the speaker connection jack on the back of the SET and
the speaker connection jack on the back of the speaker.
Note
- Do not move the SET while the SET is connected to the speakers. The speaker-bracket for connecting the SET speaker my become damaged.
Connecting to an Audio System
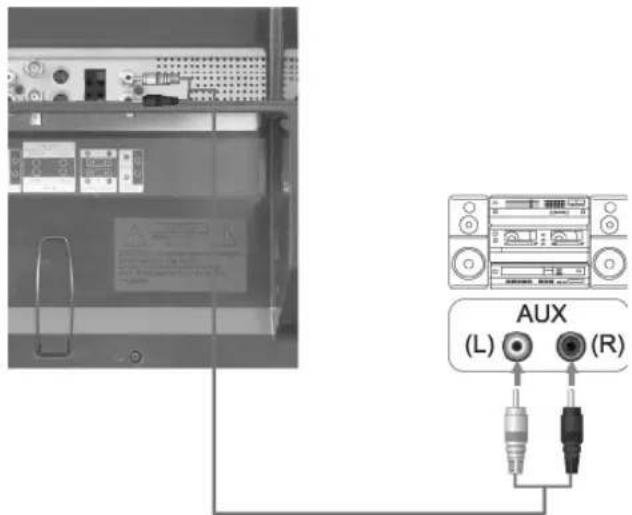
1) Connect a set of audio cables between the AUX L, R jacks on the AUDIO SYSTEM and the AUDIO OUT [L-AUDIO-R] on LCD monitor.
© 1995-2008 SAMSUNG. ALL Right Reserved
Introduction

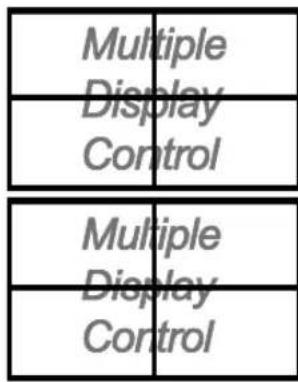
A Multiple Display Control (MDC) is an application allowing various monitors to be easily and simultaneously operated on a PC. RS-232C, a standard of serial communication, is used for the communication between a PC and a monitor. Therefore, a serial cable should be connected between the serial port on a PC and the serial port on a monitor.
Main Screen
Click Start > Program > Samsung > MDC System to start the program.
Select a set to see the volume of the selected set within the slider.

1 Main Icons Select Button 5
2 Remocon Info Grid 6
3 Safety Lock Monitor Selection 7
4 Port Selection Control Tools 8
- Use the main icons to switch into each screen.
- Allows you to enable or disable the remote control signal receiving function of the monitor unit.
- Set the Safety Lock function.
When setting the Lock function, you can only operate power and lock buttons on the remote control and set.
- The setting for the PC Serial Port can change. The original value is COM1.
- Click Select all or Clear to select or clear all monitors.
- Use Grid to view brief information on selected monitor.
- Select a monitor from monitor Selection.
- Use Control Tools to control monitors.
Port Selection

- The Multiple Display Control is originally set to COM1.
- If any port other than COM1 is used, COM1 through COM4 can be selected in the Port Selection Menu.
- If the exact port name that is connected to the LCD monitor using a serial cable is not selected, communication will be unavailable.
- The selected port is stored in the program and used for the next program as well.

Power Control
- Click Power Control of the main icons and the Power Control screen appears.
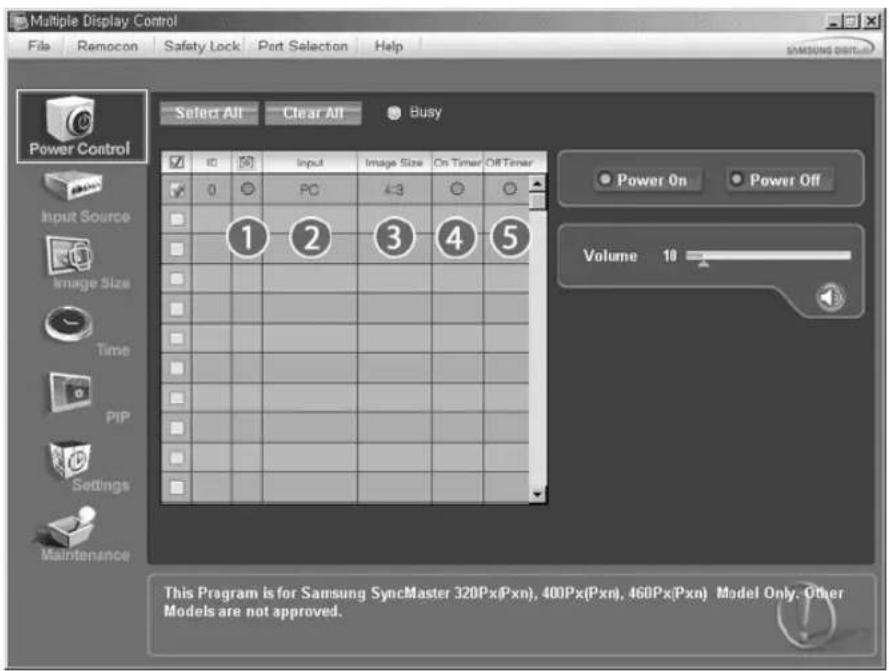
- Info Grid shows some basic information necessary to Power Control.
1) (Power Status)
2) Input
3) Image Size
4) On Timer
5) Off Timer
- Use the Select All button or Check Box to choose a monitor to control.

Power Control allows controlling some of the functions of the selected monitor.
1) Power On/Off
- Turns the power of the selected monitor On/Off.
2) Volume
- Controls the volume level of the selected monitor.
It receives the volume value of the selected monitor from the sets and monitors it in the slider.
(When you cancel the selection or choose Select All, the value returns to the default value 10)
3) (Mute On/Off)
- Turns on/off the Mute function of the selected monitor.
When selecting one set at a time, turn on the Mute function for the selected set.
The Mute function is disabled automatically when you adjust the volume level.
(The values return to the default settings when you undo the selections or choose "Select All".)
\* The Power Control feature is available for all monitors.
\* The Volume Control and Mute features are available only for the monitors whose power status is ON.

Input Source
- Click Input Source of the main icons and the Input Source control screen appears.
Click Select All or use Check Box to select a monitor to control.
- TV Mode
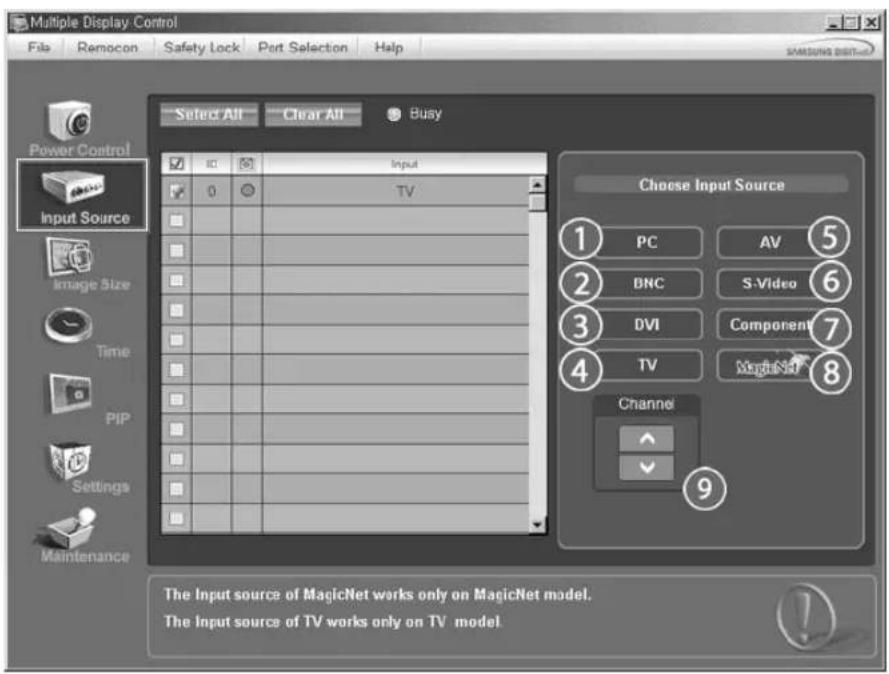
- PC Mode
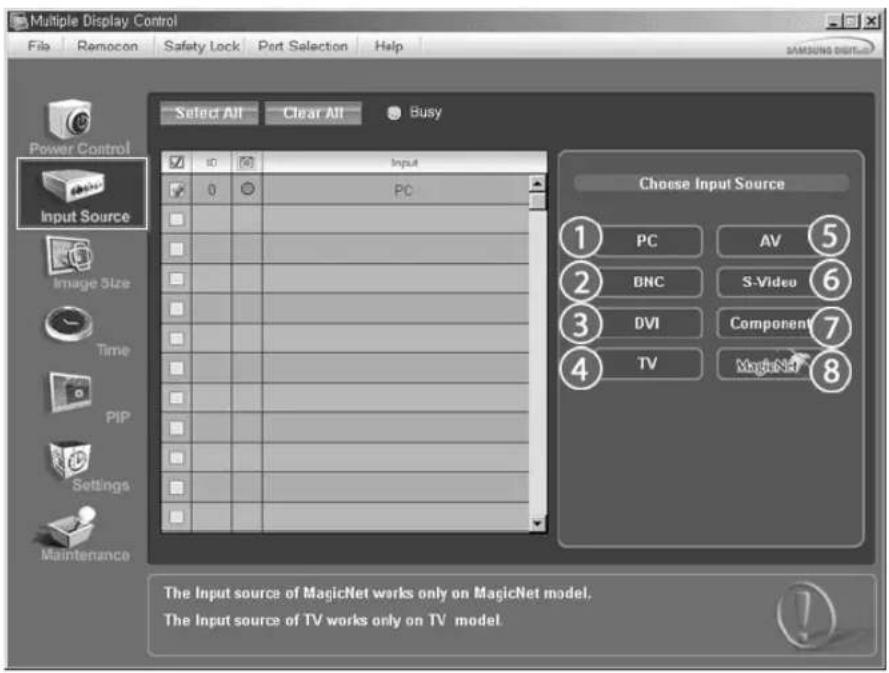
* Info Grid shows some basic information necessary to Input Source Control.
1)PC
- Changes the Input Source of the selected monitor to PC.
2) BNC
- Changes the Input Source of the selected monitor to BNC.
3) DVI
- Changes the Input Source of the selected monitor to DVI.
4) TV
- Changes the Input Source of the selected monitor to TV.
5)AV
- Changes the Input Source of the selected monitor to AV.
6) S-Video
- Changes the Input Source of the selected monitor to S-Video.
7) Component
- Changes the Input Source of the selected monitor to Component.
8) MagicNet
- The Input source of MagicNet works only on MagicNet model.
9) Channel
- Channel arrow appears when the Input Source is TV.
* TV Source can be selected only in products with TV and controlling channels is allowed only when Input Source is TV.
The Input Source Control feature is available only for the monitors whose power status is ON.

Image Size
PC, BNC, DVI
- Click Image Size of the main icons and the Image Size control screen appears.
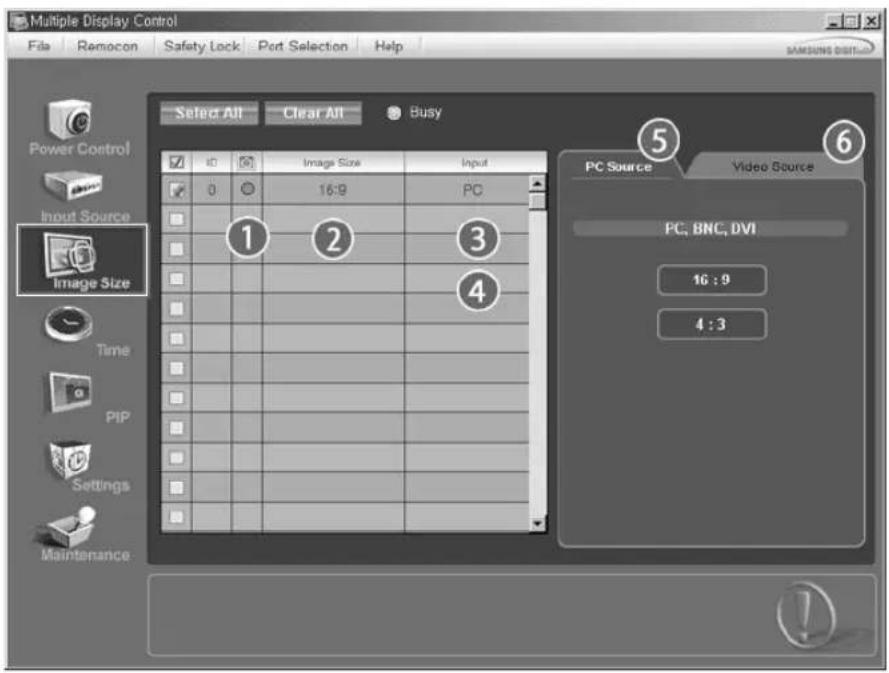
Info Grid shows some basic information necessary to Image Size Control.
1) (Power Status)
- Shows the power status of the current monitor.
2) Image Size
- Shows the current Image Size of the monitor in use.
3) Input
- Shows the current Input Source of the monitor in use.
4) Info Grid Displays only the monitors whose Input Source is PC, BNC, DVI.
5) PC Source - When you click Image Size, the PC Source tab first appear. The Image Size Control button controls Image Size available for PC, BNC, DVI.
6) Video Source
- Click the Video Source tab to control Image Size for respective Input Source.
The Input source of MagicNet works only on MagicNet model.
Image Size Control is available only for the monitors for which power status is ON.

Image Size
TV, AV, S-Video, Component, DVI(HDCP)
- Click Image Size of the main icons and the Image Size control screen appears.
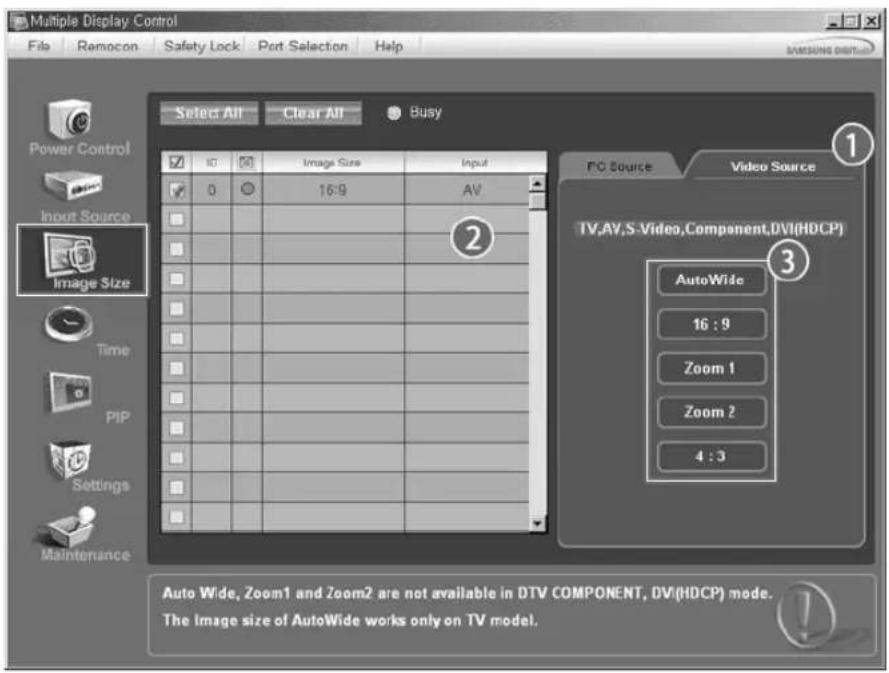
- Info Grid shows some basic information necessary to Image Size Control.
1) Click the Video Source tab to adjust Image Size for TV, AV, S-Video, Component. DVI(HDCP). Click Select All or use Check Box to select a monitor to control.
2) Info Grid Displays only the monitor having TV, AV, S-Video, Component or DVI(HDCP) as input source.
3) Switch Image Size of the selected monitor randomly.
Note: Auto Wide, Zoom1 and Zoom2 are not available for selection when the input signal type for Component and DVI (HDCP) is 720p or 1080i.
The Input source of MagicNet works only on MagicNet model.
The Image Size Control feature is available only for the monitors whose power status is ON.

Time
- Click Time of the main icons and the Time Control screen appears.
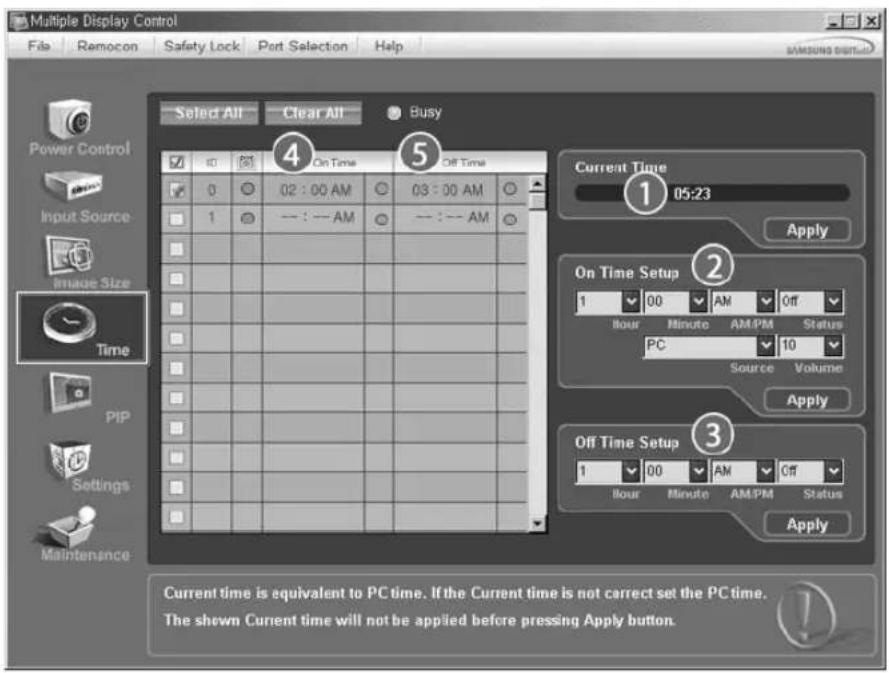
- Info Grid shows some basic information necessary to Time Control.
1) Current Time
- Set the current time for the selected monitor (PC Time).
- To change the current time, first change the PC Time.
2) On Time Setup
- Set the Hour, Minute, AM/PM of On Time Setup, Status, Source, Volume of the selected monitor.
3) Off Time Setup
- Set the Hour, Minute, and AM/PM, Status for Off Time Setup of the selected monitor.
4) Shows the On Time settings.
5) Shows the Off Time settings.
The Input source of MagicNet works only on MagicNet model.
* Time Control is available only for the monitors for which the power status is ON.
* At On Time Setup, TV Source functions only for TV Model.
At On Time Setup, MagicNet Source functions only for MagicNet Model.

PIP
PIP Size
- Click PIP of the main icons and the PIP control screen appears. Click Select All or use Check Box to select a monitor to control.
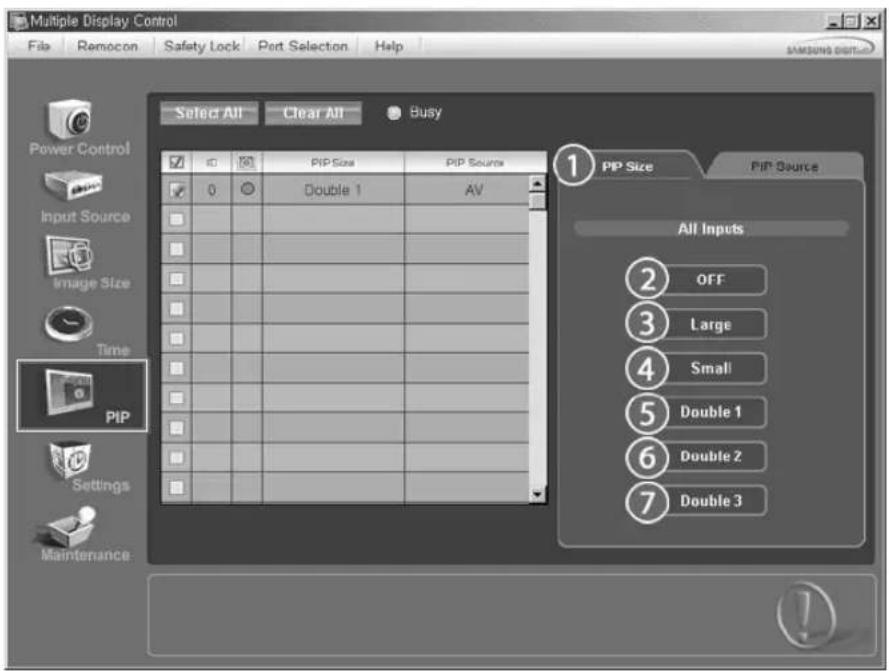
- Info Grid shows some basic information necessary to PIP Size Control.
1)PIP Size
- Shows the current PIP Size of the monitor in use.
2) OFF
- Turns off the PIP of the selected monitor.
3) Large
- Turns on the PIP of the selected monitor and changes the size to Large.
4) Small
- Turns on the PIP of the selected monitor and changes the size to Small.
5) Double 1
- Turns on the PIP of the selected monitor and changes the size to Double 1.
6) Double 2
- Turns on the PIP of the selected monitor and changes the size to Double 2.
7) Double 3 (Picture By Picture)
- Turns on the PBP of the selected monitor and changes the size to Double 3.

The Input source of MagicNet works only on MagicNet model.
PIP Size can be controlled with turning on the LCD monitor power.

PIP
PIP Source
-
Click PIP of the main icons and the PIP control screen appears.
-
PIP TV Mode
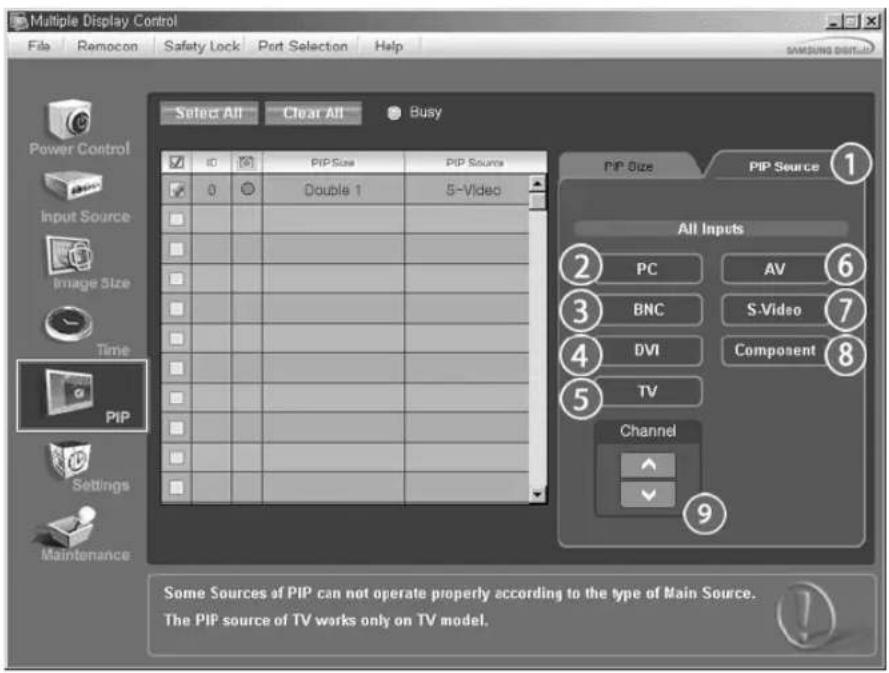
- PIP S-Video Mode
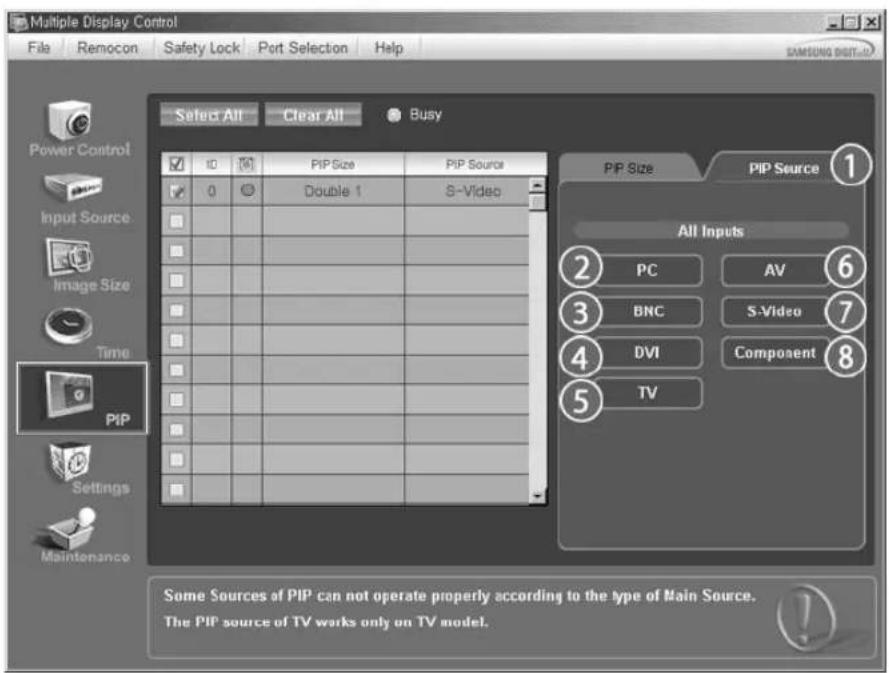
Info Grid shows some basic information necessary to PIP Source Control.
1) PIP Source
- PIP Source can be controlled with turning on the LCD monitor power.
2)PC
- Changes the source of the PIP of the selected monitor to PC.
3) BNC
- Changes the source of the PIP of the selected monitor to BNC.
4) DVI
- Changes the source of the PIP of the selected monitor to DVI.
5) TV
-Changes the source of the PIP of the selected monitor to TV.
6)AV
- Changes the source of the PIP of the selected monitor to AV.
7) S-Video
- Changes the source of the PIP of the selected monitor to S-Video.
8) Component
- Changes the source of the PIP of the selected monitor to Component.
9) Channel
- Channel arrow appears when the PIP Source is TV.
Note: Some of the PIP Sources may not be available for selection, depending on the input source type of the Main Screen.
The Input source of MagicNet works only on MagicNet model.
TV Source can be selected only in products with TV and controlling channels is allowed only when PIP Source is TV.
The PIP Control feature is available only for the monitors whose power status is ON and the PIP function is set to ON.

Settings
Picture
- Click Settings of the main icons and the Settings Control screen appears.
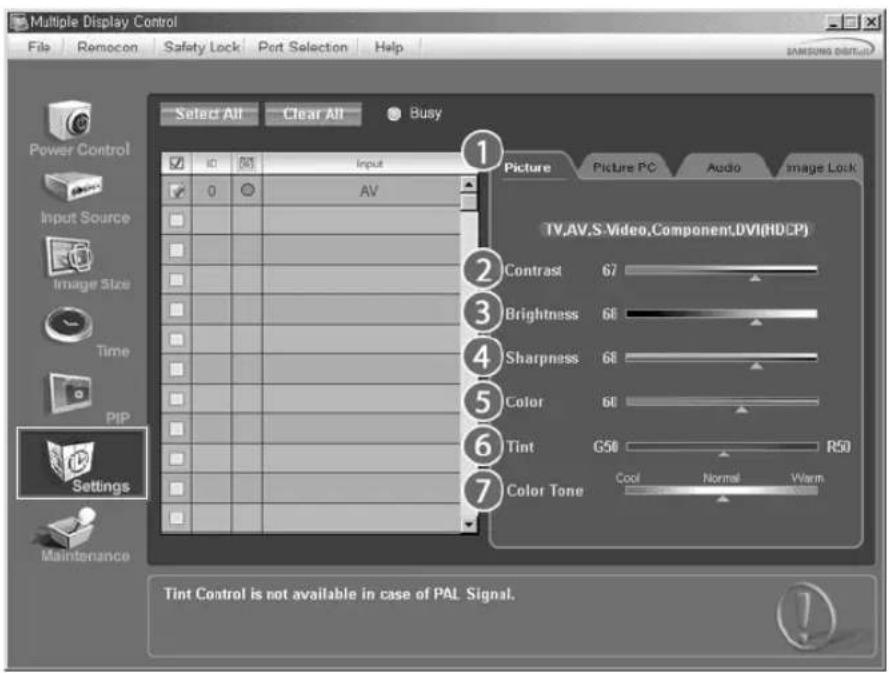

Info Grid shows some basic information necessary to Settings Control.
When each function is selected, the set value of the selected function is Displayed in the slide. When selected, each function fetches the value for the set and Displays it on the slide bar. When "Select All" is chosen, the default value is Displayed. Changing a value in this screen will automatically change the mode to "CUSTOM."
1) Picture
Available only for TV, AV, S-Video, Component, DVI(HDCP).
2) Contrast
- Adjusts Contrast of the selected monitor.
3) Brightness
- Adjusts Brightness of the selected monitor.
4) Sharpness
- Adjusts Sharpness of the selected monitor.
5) Color
- Adjusts Color of the selected monitor.
6)Tint
- Adjusts Tint of the selected monitor.
Available only for NT.
7) Color Tone
- Adjusts the Color Tone for the selected monitor.
The Input source of MagicNet works only on MagicNet model.
* This feature is available only for the monitors whose power status is ON and if no selection is made, the factory default is Displayed.

Settings
Picture PC
- Click Settings of the main icons and the Settings Control screen appears.
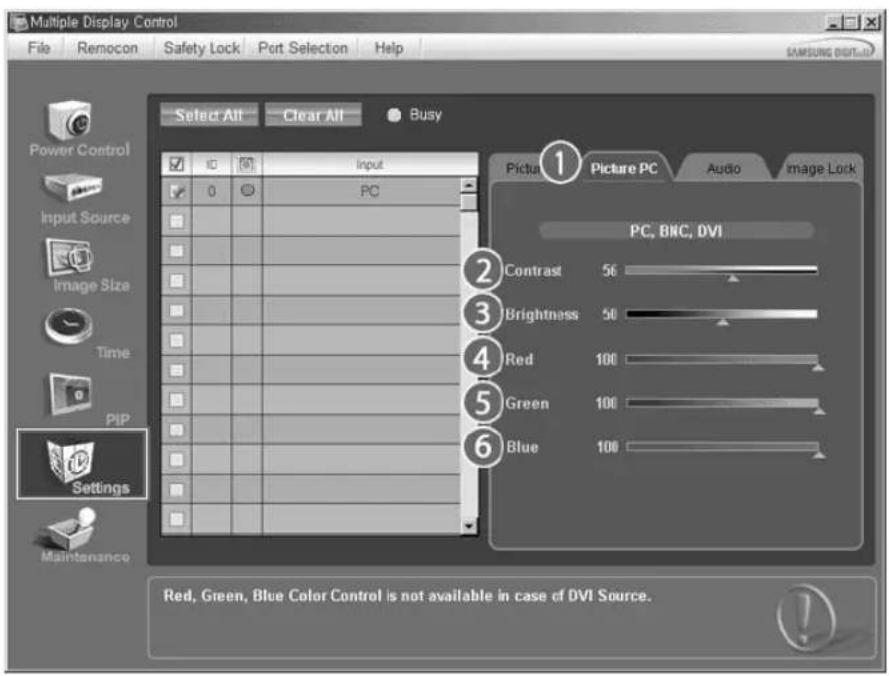
- Info Grid shows some basic information necessary to Settings Control. When each function is selected, the set value of the selected function is Displayed in the slide. When selected, each function fetches the value for the set and Display it on the slide bar. When "Select All" is chosen, the default value is Displayed. Changing a value in this screen will automatically change the mode to "CUSTOM."
1) Picture PC
Available only for PC, BNC, DVI.
2) Contrast
- Adjusts Contrast of the selected monitor.
3) Brightness
- Adjusts Brightness for the selected monitor.
4) Red
- Adjusts red Color of the selected monitor.
Available only for NT.
5) Green
- Adjusts green Color of the selected monitor.
Available only for NT.
6) Blue
- Adjusts blue Color of the selected monitor.
Available only for NT.
The Input source of MagicNet works only on MagicNet model.
* This feature is available only for the monitors whose power status is ON and if no selection is made, the factory default is Displayed.
Audio
- Click Settings of the main icons and the Settings Control screen appears.
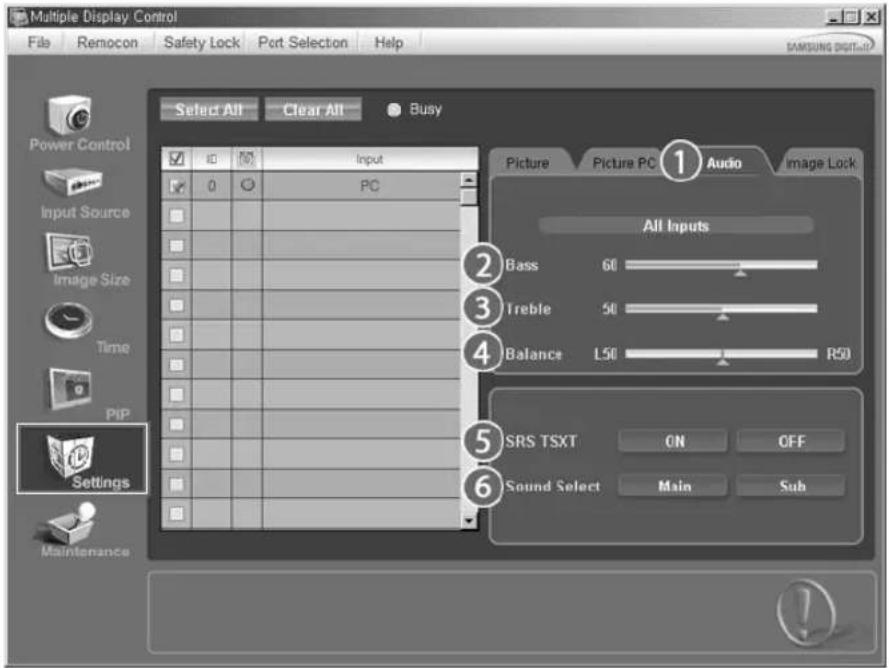
- Info Grid shows some basic information necessary to Settings Control. When each function is selected, the set value of the selected function is Displayed in the slide. When selected, each function fetches the value for the set and Displays it on the slide bar. When "Select All" is chosen, the default value is Displayed. Changing a value in this screen will automatically change the mode to "CUSTOM."
1) Audio
Controls audio settings for all input sources.
2) Bass
- Adjusts Bass of the selected monitor.
3) Treble
- Adjusts Treble of the selected monitor.
4) Balance
- Adjusts Balance of the selected monitor.
5) SRS TSXT
- SRS TSXT Sound ON/OFF of the selected monitor.
6) Sound Select
- Select either Main or Sub when PIP is On.
The Input source of MagicNet works only on MagicNet model.
* This feature is available only for the monitors whose power status is ON and if no selection is made, the factory default is Displayed.

Settings
Image Lock
- Click Settings of the main icons and the Settings Control screen appears.
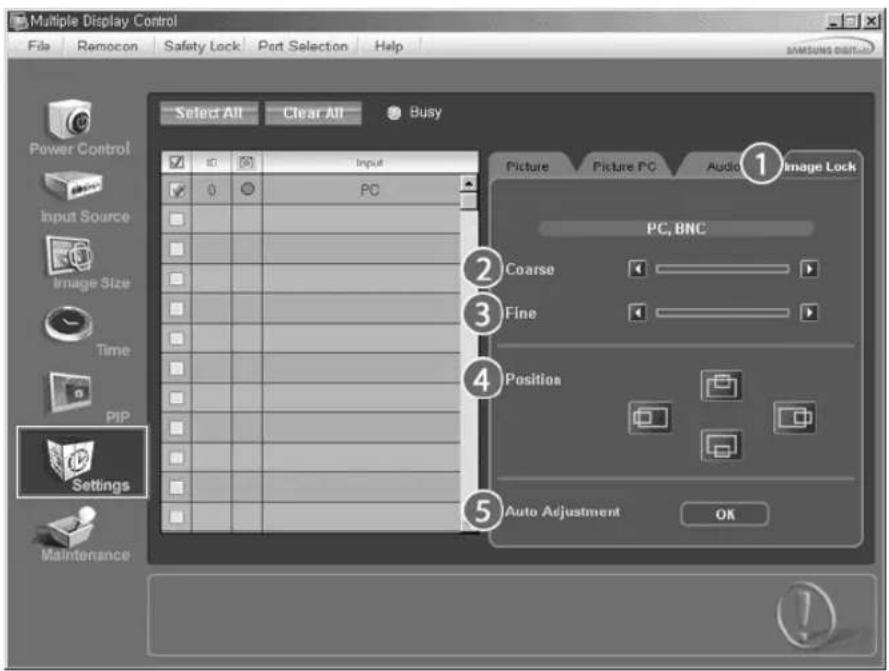
Info Grid shows some basic information necessary to Settings Control.
1) Image Lock
Available only for PC, BNC.
2) Coarse
- Adjusts Coarse of the selected monitor.
3) Fine
- Adjusts Fine of the selected monitor.
4) Position
- Adjusts Position of the selected monitor.
5) Auto Adjustment
- Self-Adjust to the incoming PC signal.
The Input source of MagicNet works only on MagicNet model.
* Settings Control is available only for the monitors for which the power status is ON.

Maintenance
Lamp Control
- Click on the "Maintenance" icon in the Main Icon column to Display the Maintenance screen.

An "Info Grid" showing several basic data items appears.
1) Maintenance
- Allows the Maintenance Control function for all input sources.
2) Auto Lamp Control
- Automatically adjusts the backlight of the selected monitor at a specified time.
The Manual Lamp Control automatically turns off if you adjust using the Auto Lamp Control.
3) Manual Lamp Control
- Allows you to adjust the backlight of the selected monitor regardless of the time.
The Auto Lamp Control automatically turns off if you adjust using the Manual Lamp Control.
* The Maintenance Control feature is available only for the monitors whose power status is ON.
* The Input source of MagicNet works only on MagicNet model.

Maintenance
Scroll
- Click on the "Maintenance" icon in the Main Icon column to Display the Maintenance screen.
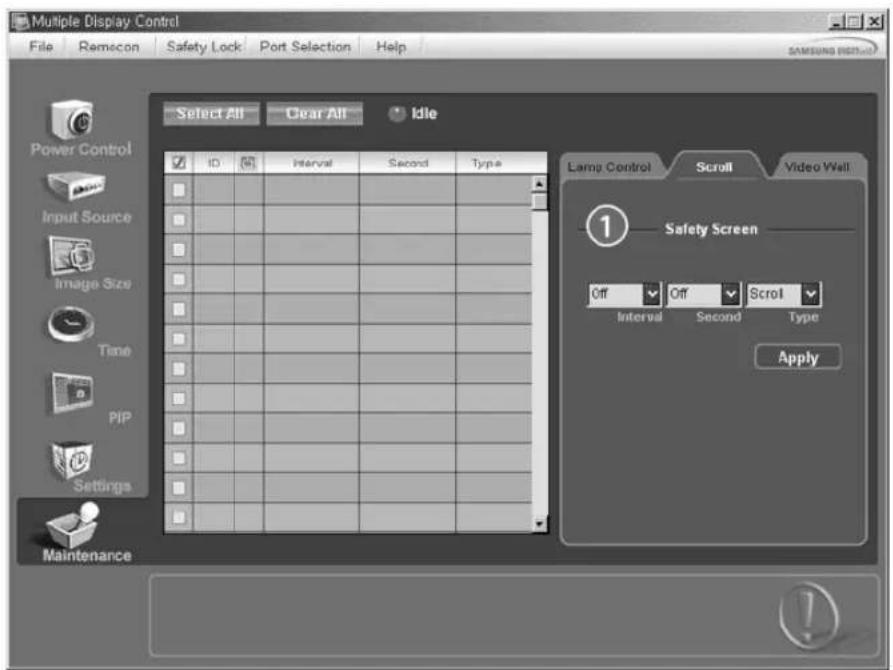
1) Safety Screen
- Eliminates the afterimages that can result when the selected monitor stays in Pause mode for an extended period of time. You can set the repeat cycle timer by selecting the "Interval" by hour and "Second" by second. It can be set to Scroll, Pixel, Bar and Eraser by Screen Type.
The Input source of MagicNet works only on MagicNet model.
* Setting Second, you can set to 1, 2, 3, 4, 5 for Scroll Type and to 10, 20, 30, 40, 50 for Pixel, Bar, and Eraser Type.
The Maintenance Control feature is available only for the monitors whose power status is ON.

Maintenance
Video Wall
- Click on the "Maintenance" icon in the Main Icon column to Display the Maintenance screen.
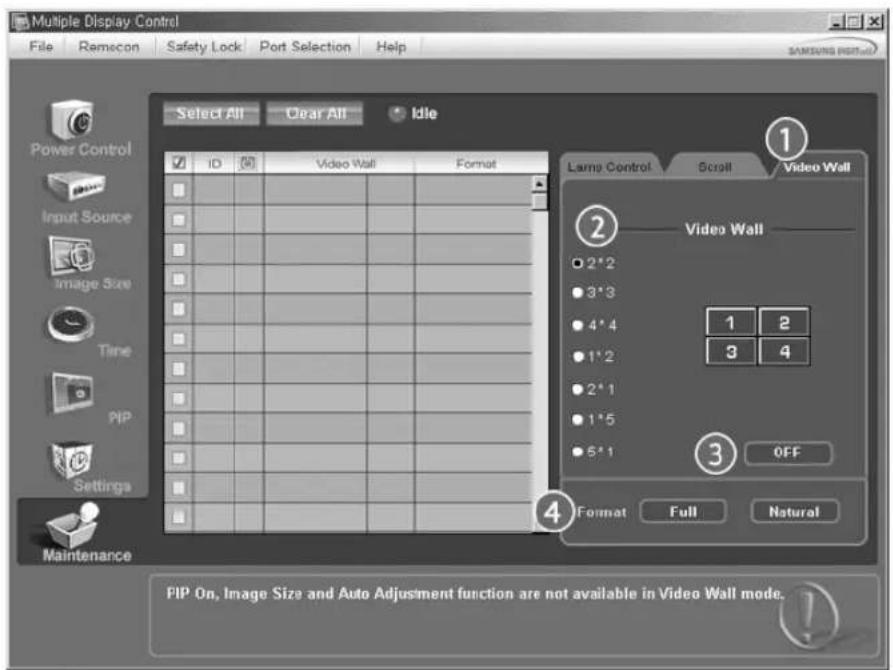
1) Video Wall
- A Video Wall is a set of video screens that are connected together, so that each screen shows a part of the whole picture or so that the same picture is repeated on each screen.
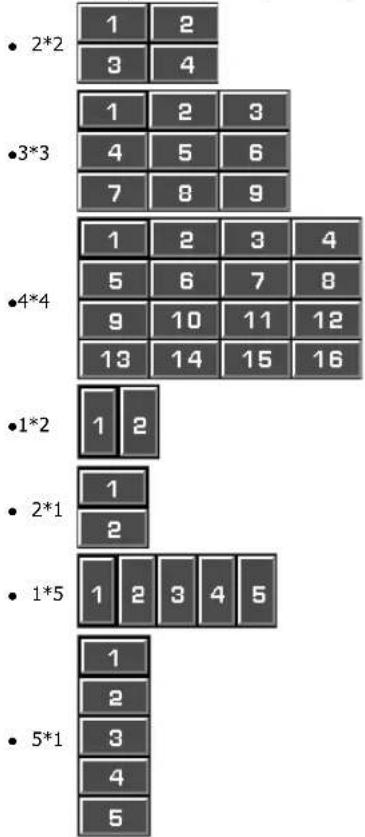
2) Video Wall (Screen divider)
- The screen can be divided into.
You can select a number of screens with a different layout when dividing.
-Select a mode from Screen divider.
-Select a display from Display Selection.
The place will be set up by pressing a number in the selected mode.
The MDC program supplied by Samsung supports up to 4x4 LCD monitores.
3) On/Off
- Turns on/off the Video Wall function of the selected monitor.
4) Format
- The format can be selected to see a divided screen.
Full
Natural
- You may not operate this function in MagicNet.
The Maintenance Control function is available only for the monitors where the power status is ON.
Troubleshooting
-
The monitor you wish to control does not appear on the Power Control Info Grid
-
Check the connection of RS232C. (Check if it is properly connected to the Com1 port)
- Check the monitors to see if any of the other monitors connected have the same ID. If more than one monitors
have the same ID, those monitors are not properly detected by the program due to data conflict. - Check if the monitor Set ID is a number between 0 and 16. (Adjust using the Display menu)
Note: A monitor Set ID must be a value between 0 and 16.
-
The monitor you wish to control does not appear on the other Control Info Grids
-
Check to see if the monitor power is ON. (You can check this in Power Control Info Grid)
-
Check if you can change the input source of the monitor.
-
The dialogue box appears repeatedly.
-
Check to see if the monitor you wish to control is selected.
-
Both On Timer and Off Timer have been set but different time is showing.
-
Apply current time to synchronize the monitor clocks.
-
The remote may not function properly when you turn off the remote Function, disconnect the RS-232C cable, or exit the program in an Irregular manner. Rerun the program and turn the remote function again to Restore normal functions.

Settings Value display In Multiple Display Mode
-
When there are more than one monitors connected, the settings values are displayed as follows.
-
No selection: displays the Factory Default Value.
- Selected one monitor: Fetches and displays the settings value for the selected monitor.
- Selected one monitor (ID1) and add another monitor (ID3): The program, which was displaying the settings value of ID 1, fetches and displays the value of ID3.
- Selected all sets using Select All: Returns to the Factory Default Value.

Safety Instructions
Introduction
Connections
Using the Software
Adjusting the LCD monitor
Input
Picture
[PC/BNC/DVI Mode]
Picture
[AV/S-Video/
Component/DVI-Video
Mode]
Sound
Setup
Multi Control
Direct Functions
Troubleshooting
Specifications
Information
Appendix
TFT-LCD Monitor
www.samsung.com
The color and appearance of the product may vary depending on the model, and the product specifications are subject to change without prior notice for reasons of performance enhancement.
Adjusting the LCD monitor
Input
Available Modes

PC/BNC/DVI

S-Video

Component

DVI-Video
Source List PASCD
[MONTH]→[ENTER]→[ENTER]→[A/V]→[ENTER]
Use to select PC, BNC, or other external input sources connected to the LCD monitor.
Use to select the screen of your choice.
[The direct button on the remote control is the 'SOURCE' button.]

Note
- PIP turns off when the LCD monitor is switched to an external source.
PIP PASC0
When external A/V devices such as VCRs or DVDs are connected to the LCD monitor, PIP allows you to watch video from those devices in a small window super-imposed on the PC Video signal. (Off/On)
Note
- More than one PIP cannot be overlapped on screen as BNC and the component use the same terminal.
1)PIP
[MONTH] [ENTER] [A/V] [ENTER] [ENTER] [A/V] [ENTER]
Turns the PIP Screen Off/On.
-Off
- On
[The direct button on the remote control is the 'PIP' button.]
2) Source
[MONTH]→[ENTER]→[△/V]→[ENTER]→[△/V]→[ENTER]→[△/V]→[ENTER]
Selects the input source for the PIP.
-PC:AV/S-Video/Component Mode
-BNC:AV/S-Video Mode
-DVI:AV/S-Video/ComponentMode
-AV/S-Video:PC/BNC/DVI Mode
- Component:PC/DVI Mode
[The direct button on the remote control is the 'SOURCE' button.]
3) Swap
[MONTH] [ENTER] [A/√] [ENTER] [A/√] [ENTER]
Swaps the contents of the PIP and main image.
The image in the PIP window will appear on the main screen, and the main screen image will appear in the PIP window.
[The direct button on the remote control is the 'SWAP' button.]
4) Size
[MONTH] [ENTER] [A/V] [ENTER] [A/V] [ENTER] [A/V] [ENTER]
Changes the Size of the PIP window.
[The direct button on the remote control is the 'SIZE' button.]
5) Position
[MONTH] [ENTER] [A/V] [ENTER] [A/V] [ENTER] [A/V] [ENTER]
Changes the Position of the PIP window.
6) Transparency
[MONTH] [ENTER] [A/V] [ENTER] [A/V] [ENTER] [A/V] [ENTER]
Adjusts the Transparency of PIP windows.
- High
- Medium
- Low
-Opaque
Note
If you select in Size Position and Transparency will not be activated.
Available Modes: PIP
Edit Name PASC0
[MONTH]→[ENTER]→[^/V]→[ENTER]→[^/V]→[ENTER]→[^/V]→[ENTER]
Name the input device connected to the input jacks to make your input source selection easier.
Picture [PC / BNC / DVI Mode]
Available Modes
PC/BNC/DVI

S-Video
Component
DVI-Video
MagicBrightTM
[ \text{[MENU]} \rightarrow [\wedge / \vee] \rightarrow [\text{ENTER} ] \rightarrow [\text{ENTER}] \rightarrow [\wedge / \vee] \rightarrow [\text{ENTER}] ]
MagicBright™ is a new feature providing the optimum viewing environment depending on the contents of the image you are watching.
Currently four different modes are available: Entertain, Internet, Text and Custom.
Each mode has its own pre-configured brightness value. You can easily select one of the four settings by simply pressing the MagicBrightTM control button.
1) Entertain
High brightness
For watching motion pictures such as a DVD or VCD.
2) Internet
Medium brightness
For working with a mixture of images such as the text with graphics added.
3) Text
Normal brightness.
For documentations or work involving a lot of text.
4) Custom
Although the values are carefully chosen by our engineers, the pre-configured values may not be comfortable for your eyes depending on your taste.
If this is the case, Adjusts the brightness and contrast by using the OSD menu.
[The direct button on the remote control is the 'M/B' button.]
Custom P
[ \text{[MENU]} \rightarrow [\wedge / \vee] \rightarrow [\text{ENTER}] \rightarrow [\wedge / \vee] \rightarrow [\text{ENTER}] \rightarrow [\text{ENTER}] \rightarrow [\wedge / \vee] / [< / >] \rightarrow [\text{ENTER}] ]
By using the on-screen menus, the contrast and brightness can be changed to your personal preference.
1) Contrast
Adjusts the Contrast.
2) Brightness
Adjusts the Brightness.
Note
- By adjusting the picture using the Custom function, MagicBright will change to Custom mode.
Color Tone P
[ \text{[MENU]} \rightarrow [\wedge / \vee] \rightarrow [\text{ENTER} ] \rightarrow [\wedge / \vee] \rightarrow [\text{ENTER}] \rightarrow [\wedge / \vee] \rightarrow [\text{ENTER}] ]
The color tones can be changed.
(Available in PC, BNC mode only)
Color Control
[ \text{[MENU]} \rightarrow [\wedge / \vee] \rightarrow [\text{ENTER} ] \rightarrow [\wedge / \vee] \rightarrow [\text{ENTER} ] \rightarrow [\text{ENTER} ] \rightarrow [< / >] \rightarrow [\text{ENTER}] ]
Adjusts the individual R, G, B color controls.
(Available in PC, BNC mode only)
- If you adjust the picture by using the Custom function, Color Tone will turn to the Cusome mode.
Image Lock P
Image Lock is used to fine-tune and get the best image by removing noise that creates unstable images with jitters and shakiness. If satisfactory results are not obtained using the Fine adjustment, use the Coarse adjustment and then use Fine again.
(Available in PC, BNC mode only)
1) Coarse
[MONTH] [A/V] [ENTER] [A/V] [ENTER] [ENTER] [</>] [ENTER]
Removes noise such as vertical stripes. Coarse adjustment may move the screen image area. You may relocate it to the center using the horizontal control menu.
2) Fine
[MONTH] [A/V] [ENTER] [A/V] [ENTER] [A/V] [ENTER] [</>] [ENTER]
Removes noise such as horizontal stripes. If the noise persists even after fine tuning, repeat it after adjusting the frequency (clock speed).
3) Position
[ \text{[MENU]} \rightarrow [\wedge / \vee] \rightarrow [\text{ENTER}] \rightarrow [\wedge / \vee] \rightarrow [\text{ENTER}] \rightarrow [\wedge / \vee] \rightarrow [\text{ENTER}] \rightarrow [< / >] \wedge [\wedge / \vee] \rightarrow [\text{ENTER}] ]
Adjusts the screen location horizontally and vertically.
Auto Adjustment P
[MONTH] [A/V] [ENTER] [A/V] [ENTER]
The values of Fine, Coarse, Position are adjusted automatically.
By changing the resolution in the control panel, the auto function is performed.
(Available in PC, BNC mode only)
[The direct button on the remote control is the 'AUTO' button.]
Signal Balance P
This is used to make up for the weak RGB signal transmitted by a long signal cable.
(Available in PC, BNC mode only)
1) Signal Balance
[ [\text{MENUR} ]\rightarrow [\text{A} /\text{V} ]\rightarrow [\text{ENTER} ]\rightarrow [\text{A} /\text{V} ]\rightarrow [\text{ENTER} ]\rightarrow [\text{ENTER} ]\rightarrow [\text{A} /\text{V} ]\rightarrow [\text{ENTER} ] ]
Selects either On or Off with the signal control.
2) Signal Control
[ \text{[MENU]} \rightarrow [\wedge / \vee] \rightarrow [\text{ENTER}] \rightarrow [\wedge / \vee] \rightarrow [\text{ENTER}] \rightarrow [\wedge / \vee] \rightarrow [\text{ENTER}] \rightarrow [\wedge / \vee] \rightarrow [\text{ENTER}] \rightarrow [\wedge / \vee] \rightarrow [\text{ENTER}] \rightarrow [\wedge / \vee] \rightarrow [\text{ENTER}] \rightarrow [\wedge / \vee] \rightarrow [\text{TENUR}] \rightarrow [\text{ENTER}] \rightarrow [\text{TENUR}] \rightarrow [\text{TENUR}] \rightarrow [\text{TENUR}] \rightarrow [\text{TENUR}] \rightarrow [\text{TENUR}] \rightarrow [\text{TENUR}] \rightarrow [\text{TENUR}] \rightarrow [\text{TENUR}] \rightarrow [\text{TENUR}] \rightarrow [\text{TENUR}] \rightarrow [\text{TENUR}] \rightarrow [\text{TENUR}] \rightarrow [\text{TENUR}] \rightarrow [TENUR] ]
[ \left[ \land \right] \lor ] \rightarrow \left[ < \right] \rightarrow \left[ \text{ENTER} \right] ]
Adjusts the R Phase, G Phase, B Phase, Gain and Sharpness manually.
Size P
[MONTH] [A/√] [ENTER] [A/√] [ENTER] [A/√] [ENTER]
The Size can be switched.
1) 16:9
2) 4:3
PIP Picture P
[MONTH] [A/V] [ENTER] [A/V] [ENTER] [A/V] [ENTER] [A/V] [ENTER] [A/V]
] [ENTER ] [< / > ] [ENTER ]
Adjusts the PIP Screen Settings.
1) Contrast
Adjusts the Contrast of the PIP window on the screen.
2) Brightness
Adjusts the Brightness of the PIP window on the screen.
3) Sharpness
Adjusts the difference between the lightest and darkest areas of the PIP window.
4)Color
Adjusts the Color of the PIP window on the screen.
5) Tint
Adds a natural tone to the PIP window.
You can view a picture from AV, S-Video through the PIP screen in PC, BNC and DVI (PC) mode.
Operates only if the video signal is NTSC.
Available Modes: PIP
Picture [AV/S-Video/Component/DVI-Video Mode]
Available Modes
PC/BNC/DVI
AAV
S-S-Video
Component
D DVI-Video
Mode ASCD
[ \text{[MENU]} \rightarrow \left[\frac{\wedge}{\vee}\right] \rightarrow \left[\text{ENTER}\right] \rightarrow \left[\text{ENTER}\right] \rightarrow \left[\frac{\wedge}{\vee}\right] \rightarrow \left[\text{ENTER}\right] ]
The LCD monitor has four automatic picture settings ("Dynamic", "Standard", "Movie" and "Custom") that are
preset at the factory.
Dynamic, Standard, Movie, or Custom can be activated.
[The direct button on the remote control is the 'P.MODE' button.]
Custom ASCD
[ \text{[MENU]} \rightarrow [\wedge / \vee] \rightarrow [\text{ENTER} ] \rightarrow [\wedge / \vee] \rightarrow [\text{ENTER} ] \rightarrow [\wedge / \vee] \rightarrow [\text{ENTER} ] \rightarrow [< I>] \rightarrow [\text{ENTER}] ]
By using the on-screen menus, the contrast and brightness can be changed to your personal preference.
1) Contrast
Adjusts the Contrast.
2) Brightness
Adjusts the Brightness.
3) Sharpness
Adjusts the picture sharpness.
4)Color
Adjusts the picture color.
5) Tint
Adds a natural tone to the monitor.
Operates only for AV and S-Video mode. Operates only if the video signal is NTSC.
Color Tone ASCD
[MONTH] [A/V] [ENTER] [A/V] [ENTER] [A/V] [ENTER]
The color tones can be changed. The individual Color components are also user adjustable.
The Size can be switched.
[The ZOOM1, ZOOM2 are not available in 1080i (or over 720p) of DTV.]
Digital NR (Digital Noise Reduction) ASCD
[ \text{[MENU]} \rightarrow [\wedge / \vee] \rightarrow [\text{ENTER} ] \rightarrow [\wedge / \vee] \rightarrow [\text{ENTER} ] \rightarrow [\wedge / \vee] \rightarrow [\text{ENTER}] ]
Turns the Digital Noise Reduction feature Off/On.
The Digital Noise Reduction feature allows you to enjoy clearer and crisper images.
1) Off
2) On
Film Mode ASC
[MONTH] [A/V] [ENTER] [A/V] [ENTER] [A/V] [ENTER]
Turns Film Mode Off/On.
The Film Mode feature offers you a theater-quality viewing experience.
Not available in DVI-Video Mode.)
1) Off
2) On
PIP Picture ASCD
[ \text{[MENU]} \rightarrow [\text{A} / \text{V}] \rightarrow [\text{ENTER} ] \rightarrow [\text{A} / \text{V}] \rightarrow [\text{ENTER} ] \rightarrow [\text{A} / \text{V}] \rightarrow [\text{ENTER} ] \rightarrow [\text{A} / \text{V}] \rightarrow [\text{ENTER} ] \rightarrow [\text{A} / \text{V}] \rightarrow [\text{ENTER} ] \rightarrow [\text{A} / \text{V}] \rightarrow [< / >] \rightarrow [\text{ENTER}] ]
Adjusts the PIP Screen Settings.
1) Contrast
Adjusts the Contrast of the PIP window on the screen.
2) Brightness
Adjusts the Brightness of the PIP window on the screen.
Available Modes: PIP
Sound
Available Modes
PC/BNC/DVI
AAV
S-S-Video
Component
D DVI-Video
Mode PASC0
[MONTH] [A/√] [ENTER] [ENTER] [A/√] [ENTER]
The LCD monitor has a built-in high fidelity stereo amplifier.
1) Standard
Selects Standard for the standard factory settings.
2) Music
Selects Music when watching music videos or concerts.
3) Movie
Selects Movie when viewing movies.
4) Speech
Selects Speech when watching a show that is mostly dialogue (i.e., news).
5) Custom
Selects Custom if you want to Adjusts the settings according to your personal preferences.
Custom PASCD
[ \text{[MENU]} \rightarrow [\wedge / \vee] \rightarrow [\text{ENTER}] \rightarrow [\wedge / \vee] \rightarrow [\text{ENTER}] \rightarrow [\wedge / \vee] \rightarrow [\text{ENTER}] \rightarrow [\langle / \rangle] \rightarrow [\text{ENTER}] ]
The sound settings can be adjusted to suit your personal preferences.
1) Bass
Emphasizes low frequency audio.
2) Treble
Emphasizes high frequency audio.
3) Balance
Allows you to Adjusts the sound balance between the left and right speakers.
[You can hear the sound even when sound value is set to 0.]
Note
- If you adjust picture using Sound Custom function, Sound Mode will turn to Custom mode.
Auto Volume PASCD
[ \text{[MENU]} \rightarrow [\wedge / \vee] \rightarrow [\text{ENTER} ] \rightarrow [\wedge / \vee] \rightarrow [\text{ENTER}] \rightarrow [\wedge / \vee] \rightarrow [\text{ENTER}] ]
Reduces the difference in volume control between broadcasters.
1) Off
2) On
SRS TS XT PASC0
[ \text{[MENU]} \rightarrow [\text{A} / \text{V}] \rightarrow [\text{ENTER} ] \rightarrow [\text{A} / \text{V}] \rightarrow [\text{ENTER} ] \rightarrow [\text{A} / \text{V}] \rightarrow [\text{ENTER} ] ]
SRS TS XT is a patented SRS technology that solves the problem of playing 5.1 multichannel content over two speakers. TruSurround delivers a compelling, virtual surround sound experience through any two-speaker playback system, including internal television speakers. It is fully compatible with all multichannel formats.
1) Off
2) On
[The direct button on the remote control is the 'SRS' button.]
Sound Select PASC0
[ \text{[MENU]} \rightarrow [\wedge / \mathbb{V}] \rightarrow [\text{ENTER} ] \rightarrow [\wedge / \mathbb{V}] \rightarrow [\text{ENTER} ] \rightarrow [\wedge / \mathbb{V}] \rightarrow [\text{ENTER} ] ]
Selects either Main or Sub when PIP is On.
1) Main
2) Sub
[Available Modes:PIP]
Setup
Available Modes
PC/BNC/DVI
AV
S S-Video
Component
DVI-Video
Language PASCD
[MONTH] [A/√] [ENTER] [ENTER] [A/√] [ENTER]
You can choose from 11 languages.
Note
The language chosen affects only the language of the OSD.
It has no effect on any software running on the computer.
- English, Deutsch, Espanol, Français, Italiano, Svenska, 日本語, 中国语, Pycckn, 愛国語, Portugues
Time PASCD
Selects from one of 4 time settings, Clock Set, Sleep Timer, On Timer, and Off Timer.
1)Clock Set
[ \text{[MENU]} \rightarrow [\wedge / \vee] \rightarrow [\text{ENTER}] \rightarrow [\wedge / \vee] \rightarrow [\text{ENTER}] \rightarrow [\text{ENTER}] \rightarrow [< / >] \rightarrow [\text{ENTER}] ]
Current Time Setting.
2) Sleep Timer
[ \text{[MENU]} \rightarrow [\wedge / \vee] \rightarrow [\text{ENTER}] \rightarrow [\wedge / \vee] \rightarrow [\text{ENTER}] \rightarrow [\wedge / \vee] \rightarrow [\text{ENTER}] \rightarrow [\wedge / \vee] \rightarrow [\wedge / \vee] \rightarrow [\wedge / \vee] \rightarrow [\wedge / \vee] \rightarrow [\wedge / \vee] \rightarrow [\wedge / \vee] \rightarrow [\wedge / \vee] \rightarrow [\wedge / \vee] \rightarrow [\wedge / \vee] \rightarrow [\wedge / \vee] \rightarrow [\wedge / \vee ] \rightarrow [\wedge / \vee ] \rightarrow [\wedge / \vee ] \rightarrow [\wedge / \vee ] \rightarrow [\wedge / \vee ] \rightarrow [\wedge / \vee ] \rightarrow [\wedge / \vee ] \rightarrow [\wedge / \vee ] \rightarrow [\wedge / \vee ] \rightarrow [\wedge / \vee ] \rightarrow [\wedge / \vee] \rightarrow [\wedge / \vee ] \rightarrow [\wedge / \vee ] \rightarrow [\wedge / \vee ] \rightarrow [\wedge / \vee ] \rightarrow [\wedge / \vee ] \rightarrow [\wedge / \vee ] \rightarrow [\wedge / \vee ] \rightarrow [\wedge / \vee ] \rightarrow [\wedge / \vee]
[ENTER]→[</>]→[∧/∨]→[ENTER]
Turns the LCD monitor off automatically at certain times. (Off, 30, 60, 90, 120, 150, 180)
3) On Timer
[ \text{[MENU]} \rightarrow [\wedge / \vee] \rightarrow [\text{ENTER}] \rightarrow [\wedge / \vee] \rightarrow [\text{ENTER}] \rightarrow [\wedge / \vee] \rightarrow [\text{ENTER}] \rightarrow [\wedge / \vee] \rightarrow [\wedge / \vee] \rightarrow [\wedge / \vee] \rightarrow [\wedge / \vee] \rightarrow [\wedge / \vee] \rightarrow [\wedge / \vee] \rightarrow [\wedge / \vee] \rightarrow [\wedge / \vee] \rightarrow [\wedge / \vee] \rightarrow [\wedge / \vee] \rightarrow [\wedge / \vee ] \rightarrow [\wedge / \vee ] \rightarrow [\wedge / \vee ] \rightarrow [\wedge / \vee ] \rightarrow [\wedge / \vee ] \rightarrow [\wedge / \vee ] \rightarrow [\wedge / \vee ] \rightarrow [\wedge / \vee ] \rightarrow [\wedge / \vee ] \rightarrow [\wedge / \vee ] \rightarrow [\wedge / \vee] \rightarrow [\wedge / \vee ] \rightarrow [\wedge / \vee ] \rightarrow [\wedge / \vee ] \rightarrow [\wedge / \vee ] \rightarrow [\wedge / \vee ] \rightarrow [\wedge / \vee ] \rightarrow [\wedge / \vee ] \rightarrow [\wedge / \vee ] \rightarrow [\wedge / \vee]
[ENTER]
Turns the LCD monitor on automatically at a preset time.
Controls the mode and the volume level at the time the LCD monitor turns on automatically.
4) Off Timer
[ \text{[MENU]} \rightarrow [\text{A} / \text{V}] \rightarrow [\text{ENTER}] \rightarrow [\text{A} / \text{V}] \rightarrow [\text{ENTER}] \rightarrow [\text{A} / \text{V}] \rightarrow [\text{ENTER}] \rightarrow [\text{A} / \text{V}] \rightarrow [\text{A} / \text{V}] \rightarrow [\text{A} / \text{V}] \rightarrow [\text{A} / \text{V}] \rightarrow [\text{A} / \text{V}] \rightarrow [\text{A} / \text{V}] \rightarrow [\text{A} / \text{V}] \rightarrow [\text{A} / \text{V}] \rightarrow [\text{A} ] ]
[ENTER]
Turns the LCD monitor off automatically at a preset time.
Note
- When selecting Yes for the On Timer or Off Timer when the Clock is not set up, a guiding message pops up: "Set the clock first."
Menu Transparency PASC
[MONTH] [A/√V] [ENTER] [A/√V] [ENTER] [A/√V] [ENTER]
Changes the opaqueness of the OSD background.
Safety Lock PIN PASC0
[ \text{[MENU]} \rightarrow [\wedge / \vee] \rightarrow [\text{ENTER} ] \rightarrow [\wedge / \vee] \rightarrow [\text{ENTER} ] \rightarrow [0 \sim 9] \rightarrow [0 \sim 9] \rightarrow [0 \sim 9] \rightarrow [0 \sim 9] ]
The password can be changed.
Energy Saving PASCD
[MONTH] [A/√] [ENTER] [A/√] [ENTER] [A/√] [ENTER] [MONTH]
This feature adjusts the power consumption of the unit in order to save energy.
1) On
2) Of f
Video Wall PASCD
A Video Wall is a set of video screens connected together, so that each screen shows a part of the whole picture or where the same picture is repeated on each screen.
When the Video Wall is on, you can adjust the Video Wall screen setting.
1) Video Wall
[ [\text{MENUR} ]\rightarrow [\text{A} /\text{V} ]\rightarrow [\text{ENTER} ]\rightarrow [\text{A} /\text{V} ]\rightarrow [\text{ENTER} ]\rightarrow [\text{ENTER} ]\rightarrow [\text{A} /\text{V} ]\rightarrow [\text{ENTER} ] ]
Turns Off/On the Video Wall function of the selected monitor Off/On.
-Off
- On
2) Format
[MONTH] [A/V] [ENTER] [A/V] [ENTER] [A/V] [ENTER] [A/V] [ENTER]
The format can be selected to see a divided screen.
- Full
Provides a full screen without any margins. - Natural
monitors a natural image with the original aspect ratio intact.
3) Screen Divider
[ \text{[MENU]} \rightarrow [\text{A} / \text{V}] \rightarrow [\text{ENTER}] \rightarrow [\text{A} / \text{V}] \rightarrow [\text{ENTER}] \rightarrow [\text{A} / \text{V}] \rightarrow [\text{ENTER}] \rightarrow [\text{A} / \text{V}] \rightarrow [\text{ENTER}] ]
The screen can be divided into several images.
A number of screens can be selected with a different layout when dividing.
- Select a mode in Screen Divider.
- Select a monitor in monitor Selection.
The selection will be set up by pressing a number in the selected mode.
-2x2
-3x3
-4x4
-5x5
-1x2
-2x1
-1x5
-5x1
Note
- When Video Wall is running, the PIP, Auto Adjustment, Image Lock, and Size functions are not available. Launching Video Wall while PIP is running, will switch PIP Off.
Safety Screen PASCD
The Safety Screen function is used to prevent afterimages that may appear when a still picture is monitored on the screen over a long time.
- The Screen Scroll function scrolls the screen for the specified period of time.
- This function is not available when the power is turned off.
1) Safety Screen
[MONTH] [AIV] [ENTER] [AV] [ENTER] [ENTER] [AV] [ENTER]
Determines whether to turn the Screen Scroll function Off or On.
-Off
- On
2) Interval
[ \text{[MENU]} \rightarrow [\wedge / \vee] \rightarrow [\text{ENTER}]\rightarrow [\wedge / \vee] \rightarrow [\text{ENTER}]\rightarrow [\wedge / \vee] \rightarrow [\text{ENTER}]\rightarrow [\wedge / \vee] \rightarrow [\text{ENTER}] ]
Determines the time interval to run the Screen Scroll operation. (1~10 Hour)
The time is calculated on the basis of the power on time.
By default, the time is set to 10 hours.
-1~10 Hour
3) Second
[M E N U ] [ A I V ] [ E N T E R ] [ A I V ] [ E N T E R ] [ A I V ] [ E N T E R ] [ A I V ] [ E N T E R ]
Determines the time period to run the Screen Scroll operation. (1~5 Second)
By default, the time is set to 5 seconds.
-
Type-Scroll: 1~5 Second
-
Type-Pixel, Bar, Eraser : 10~50 Second
4) Type
[ \text{[MENU]} \rightarrow \left[\frac{\wedge}{\vee}\right] \rightarrow \left[\text{ENTER}\right] \rightarrow \left[\frac{\wedge}{\vee}\right] \rightarrow \left[\text{ENTER}\right] \rightarrow \left[\frac{\wedge}{\vee}\right] \rightarrow \left[\text{ENTER}\right] \rightarrow \left[\frac{\wedge}{\vee}\right] \rightarrow \left[\text{ENTER}\right] ]
You can change the Safety Screen Type.
- Scroll
- Pixel
- Bar
Eraser
Resolution Select
[ \text{[MENU]} \rightarrow [\text{A} / \text{V}] \rightarrow [\text{ENTER} ] \rightarrow [\text{A} / \text{V}] \rightarrow [\text{ENTER} ] \rightarrow [\text{A} / \text{V}] \rightarrow [\text{ENTER} ] ]
When the picture is not monitored properly on the screen when setting the graphics card resolution of the computer to 1024 × 768 @ 60Hz , 1280 × 768 @ 60Hz , 1360 × 768 @ 60Hz or 1366 × 768 @ 60Hz , by using this function(Resolution Select), you can have the picture monitored on the screen in the specified resolution.
(Available in PC/BNC mode only.)
1) Off
2)1024X768
3) 1280 X 768
4) 1360 X 768
5) 1366 X 768
Note
- Selecting the menu is only allowed when the graphics resolution is set to 1024 x 768 @ 60Hz, 1280 x 768 @ 60Hz, 1360 x 768 @ 60Hz or 1366 x 768 @ 60Hz.
Lamp Control PASCD
[ \text{[MENU]} \rightarrow \left[\frac{\wedge}{\wedge} \vee\right] \rightarrow \left[\text{ENTER}\right] \rightarrow \left[\frac{\wedge}{\wedge} \vee\right] \rightarrow \left[\text{ENTER}\right] \rightarrow \left[\text{ENTER}\right] \rightarrow \left[\frac{<1>}{<1>}\right] \rightarrow \left[\text{ENTER}\right] ]
Adjusts the inverter lamp in order to reduce energy consumption.
Power On Adjustment PASCD
[ \text{[MENU]} \rightarrow [\wedge / \vee] \rightarrow [\text{ENTER}] \rightarrow [\wedge / \vee] \rightarrow [\text{ENTER}] \rightarrow [\text{ENTER}] \rightarrow [\wedge / \vee] \rightarrow [\text{ENTER}] ]
Adjusts the Power On time for the screen.
*Caution: Set the Power On time to be longer to avoid overvoltage.
Reset
The picture parameters are replaced with the factory default values.
1) Image Reset
[MENU] [ / ] [ENTER] [ / ] [ENTER] [ENTER] [< / > ] [ENTER]
(Available in PC/BNC mode only.)
2)Color Reset P
[ \text{[MENU]} \rightarrow [\wedge / \vee] \rightarrow [\text{ENTER}] \rightarrow [\wedge / \vee] \rightarrow [\text{ENTER}] \rightarrow [\wedge / \vee] \rightarrow [\text{ENTER}] \rightarrow [< / >] \rightarrow [\text{ENTER}] ]
Available Modes
PC/BNC/DVI
AAV
S S-Video
Component
D DVI-Video
Multi Control
Assigns an individual ID to the SET.
1) ID Setup
[MONTH] [A/V] [ENTER] [A/V] [ENTER] [ENTER] [0~9]
Assigns distinctive IDs to the SET.
2) ID Input
[ \text{[MENU]} \rightarrow \left[\frac{\wedge}{\vee}\right] \rightarrow \left[\text{ENTER}\right] \rightarrow \left[\frac{\wedge}{\vee}\right] \rightarrow \left[\text{ENTER}\right] \rightarrow \left[\text{ENTER}\right] \rightarrow [0-9] ]
Use to select the transmitter functions of the individual SET. Only a SET where the ID corresponds to the transmitter setting becomes activated.
Direct Functions
Available Modes
PC/BNC/DVI
AV
S-Video
Component
D VDI-Video
MDC P ASCO
Moves to the Multi Control OSD screen.
LOCK PASC0
Sets the Safely Lock function.
1) Lock On
It will be locked.
2) Lock Off
It will be unlocked.
Note
- When setting the Lock function, you can only operate the lock button on the remote control and set.
The preset password on the LCD monitor is "0000".
Note
- Resetting the password for the function key lock.
Press MUTE 1 8 6 On. The password will be reset to '0000'. The remote control is required for resetting the password.

Safety Instructions
Introduction
Connections
Using the Software
Adjusting the LCD monitor
Troubleshooting
Self-Test Feature Check
Check List
Q&A
Specifications
Information
Appendix
TFT-LCD Monitor
www.samsung.com

The color and appearance of the product may vary depending on the model, and the product specifications are subject to change without prior notice for reasons of performance enhancement.
Troubleshooting
Self-Test Feature Check
Note
- Check the following items yourself before calling for assistance. Contact a Service Center for problems that you cannot solve by yourself.
Self-Test Feature Check
Your LCD monitor provides a self test feature that allows you to check whether your LCD monitor is functioning properly.
1) Turn off both your computer and the LCD monitor.
2) Unplug the video cable from the back of the computer.
3) Turn on the LCD monitor.
The figure shown below ("Check Signal Cable") appears on a black background when the LCD monitor is working normally even though no video signal is detected. While in the Self-Test mode, the LED power indicator remains green and the figure moves around on the screen.

Check Signal Cable PC
4) Turn off your LCD monitor and reconnect the video cable; then turn on both your computer and the LCD monitor
If your LCD monitor screen remains blank after using the previous procedure, check your video controller and computer system; your LCD monitor is functioning properly.
Check Cooling System
If the "Check Cooling System" message is monitored on the screen, this is because the cooling fan has a problem. Contact a service center to repair or replace the fan.
Not Optimum Mode
You can even view the screen at a resolution of 1360X768. However, you will receive the following message for a minute; You can choose to change the screen resolution or stay in the current mode during that time. And if the resolution is more than 85Hz , you will see the black screen because the LCD monitor does not support over 85Hz .
Not Optimum Mode
Recommended Mode 1360x768 60Hz
Note
Refer to Specifications > Preset Timing Modes for the resolutions or frequencies supported by the LCD monitor.
> Maintenance and Cleaning
1) Maintaining the LCD monitor Case.
Clean with a soft cloth after disconnecting the power cord.

- Do not use benzene, thinner or other flammable substances, or a wet cloth.
- We recommend that a Samsung cleansing agent is used to prevent damage to the screen.
2) Maintaining the Flat Panel monitor Screen.
Clean with a soft cloth (cotton flannel) smoothly.

- Never use acetone, benzene or thinner.
(They may cause flaws or deformation of the screen surface.) - The user will be required to pay costs and related expenses for repairing damages caused.
> Symptoms and Recommended Actions
Note
- A LCD monitor recreates visual signals received from the computer. Therefore, if there is a problem with the computer or the video card, this can cause the LCD monitor to become blank, have poor coloring, become noisy, and video mode not supported, etc. In this case, first check the source of the problem, and then contact a Service Center or your dealer.
1) Check if the power cord and the video cables are properly connected to the computer.
2) Check if the computer beeps more than 3 times when booting. (If it does, request an a service for the main board of the computer.)
3) If you installed a new video card or if you assembled the PC, check if you installed the Adaptor(video).
4) Check if the scanning ratio of the video screen is set to between 50Hz 85Hz . (Do not exceed 60Hz when using the maximum resolution.)
5) If you have problems in installing the Adaptor (video) driver, boot the computer in Safe Mode, remove the display Adaptor in the "Control Panel, System, Device Administrator" and then reboot the computer to reinstall the Adaptor (video) driver.
Check List
Note
- The following table lists possible problems and their solutions. Before calling for assistance, check the information in this section to see if you can remedy any problems for yourself. If you do need assistance, please call the phone number on the Information section or contact your dealer.
For more network-related information, refer to the MagicNet Troubleshooting section.
Problems related to the Installation (PC Mode)

- Problems related to the LCD monitor installation and their solutions are listed.
Problems Solutions
The LCD monitor screen flickers.
- Check if the signal cable between the computer and the LCD
monitor is securely connected.
(Refer to Connecting to a Computer)
Problems related to the Screen

- Problems related to the LCD monitor screen and their solutions are listed.
Problems Solutions
The screen is blank and the power indicator is off.
- Ensure that the power cord is firmly connected and the LCD LCD monitor is on.
(Refer to the Connecting the LCD monitor )
"Check Signal Cable" message.
- Ensure that the signal cable is firmly connected to the PC or video sources.
(Refer to the Connecting the LCD monitor )
- Ensure that the PC or video sources are turned on.
"Not Optimum Mode" message.
-
Check the maximum resolution and the frequency of the video Adaptor.
-
Compare these values with the data in the Preset Timing Modes Chart.
The picture rolls vertically.
- Check if the signal cable is securely connected.
Re-connect it, if necessary.
(Refer to Connecting to a Computer)
The image is not clear; picture is blurred.
Run Frequency Coarse and Fine tuning.
- Turn on again after removing all accessories
(video extension cable, etc.)
- Set the resolution and frequency to the recommended ranges.
The picture image is unstable and shakes.
- Check if the resolution and frequency set for the computer video card falls in the range supported by the LCD monitor.
If not, reset them referring to the current Information under the LCD monitor menu and Preset Timing Modes.
Ghost images are shown in the picture.
- Adjusts the brightness and contrast.
(Refer to the Brightness, Contrast)
The image is too light or too dark.
The screen color is inconsistent.
The color image is distorted by dark shadows.
- Adjust color using Custom under OSD Color Adjustment menu.
The color white is poor.
The power Indicator blinks green.
- The LCD monitor is currently saving the changes made to the settings to the OSD memory.
The screen is blank and the power indicator light is steady green or
The LCD monitor is using its power management system.
- Press a key on the keyboard.
blinks every 0.5 or 1 seconds.
The screen is blank and it is blinking.
- If you see the "TEST GOOD" message on the screen when you pressing the MENU button, check the cable connection between the LCD monitor and the computer to ensure that the connector is properly connected.
Problems related to Audio
Note
- Problems related to audio signals and their solutions are listed below.
Problems Solutions
No sound.
- Ensure that the audio cable is firmly connected to both the audio-in port on your LCD monitor and the audio-out port on your sound card. (Refer to the Connecting the LCD monitor)
- Check the volume level.
The sound level is too low.
- Check the volume level.
- If the volume is still too low after turning the control to its maximum, check the volume control on the computer sound card or software program.
The sound is too high or too low.
- Adjusts the Treble and Bass to the appropriate levels.
Problems related to the Remote Control
Note
- Problems related to the remote control and their solutions are listed.
Problems Solutions
The remote control buttons do not respond.
- Check the polarities (+/-) of the batteries.
- Check if the batteries are empty.
- Check if the power is on.
- Check if the power cord is securely connected.
- Check if a special fluorescent or neon lamp is on in the vicinity.
Question Answer
How can I change the frequency?
The frequency can be changed by reconfiguring the video card.
Note that video card support can vary, depending on the version of the driver used. (Refer to the computer or the video card manual for details.)
How can I Adjust the resolution?
- Windows XP: Set the resolution in the Control Panel Appearance and Themes display Settings.
- Windows ME/2000: Set the resolution in the Control Panel display Settings.
- Contact the video card manufacturer for details.
How can I set the Power Saving function?
- Windows XP: Set the resolution in the Control Panel Appearance and Themes display Screen Saver. Set the function in the BIOS-SETUP of the computer. (Refer to the Windows / Computer Manual).
- Windows ME/2000: Set the resolution at the Control Panel display Screen Saver. Set the function in the BIOS-SETUP of the computer. (Refer to the Windows / Computer Manual).
How can I clean the outer case/LCD Panel?
Disconnect the power cord and then clean the LCD monitor with a soft cloth, using either a cleaning solution or plain water.
Do not leave any detergent or scratches on the case. Do not let any water enter the LCD monitor.
How can I play the video?
The video supports the MPEG1 and WMV codec only. Install the corresponding codec to play the video. Note that some of the codec can be incompatible.
© 1995-2008 SAMSUNG. ALL Right Reserved

Safety Instructions
Introduction
Connections
Using the Software
Adjusting the Monitor
Troubleshooting
Specifications
General
PowerSaver
Preset Timing Modes
Information
Appendix
TFT-LCD Monitor
www.samsung.com

The color and appearance of the product may vary depending on the model, and the product specifications are subject to change without prior notice for reasons of performance enhancement.
Specifications
General
General
General
Model Name SMT-4011
LCD Panel
Size 40" Diagonal (101.6 cm)
Display area
885.168 mm (H) x 497.664 mm (V)
Pixel Pitch 0.648 mm (H) x 0.648 mm (V)
Synchronization
Horizontal 30 81kHz
Vertical 56-75 Hz
Display Color
Display Color 16.7 M Colors
Resolution
Optimum resolution 1360 x 768 / 1366 x 768 @ 60 Hz depends on graphics card used
Maximum resolution 1366 x 768 @ 60 Hz
Input Signal, Terminated
RGB Analog, DVI(Digital Visual Interface) Compliant Digital RGB.
0.7 Vp-p Positive at 75Ω ± 10%
Separate H/V sync, Composite sync, SOG, TTL level, positive or negative.
Maximum Pixel Clock
100MHz
Power Supply
AC 100 - 240 V~ (+/- 10%), 50/60 Hz
Signal Cable
15pin to 15pin D-sub cable, Detachable
DVI-D to DVI-D connector, Detachable (option)
Signal Connectors
D-sub, BNC, DVI-D, YPbPr, S-VHS, VCR
Dimensions (WxHxD)/Weight
971 x 582 x 118 mm / 38.2 x 22.9 x 4.6 inch (without Stand)
971 x 629.5 x 223 mm / 38.2 x 24.8 x 8.8 inch (with Stand), 23 kg/50.7 lbs
971 x 629.5 x 228 mm / 38.2 x 24.8 x 9.0 inch (with glass & with Stand), 27.7 kg/61.0 lbs
VESA Mounting Interface
200 mm x 200 mm (for use with Specialty(Arm) Mounting hardware.)
Environmental considerations
Operating
Temperature: 50^ 104^ (10^ 40^)
Humidity: 10% 80% , non-condensing
Temperature: -4^ 113^ (-20^ 45^)
Humidity: 5% 95% , non-condensing
Storage
Audio Characteristics
Audio Input 1 RCA Jack Red(R) White(L), 0.5 Vrms (-9 dB)
Audio Input 2 RCA Jack Red(R) White(L), 0.5 Vrms (-9 dB)
PC Audio Input 3.5 Ø Stereo Jack, 0.5 Vrms (-9 dB)
Frequency RF: 80Hz 15kHz (at -3 dB)
Response AV: 80 Hz ~ 20 kHz (at -3 dB)
Plug and Play Capability
This monitor can be installed on any Plug & Play compatible system. The interaction of the monitor and the computer systems will provide the best operating conditions and monitor settings. In most cases, the monitor installation will proceed automatically, unless the user wishes to select alternate settings.
Dot Acceptable
TFT LCD panels manufactured by using advanced semiconductor technology with precision of 1ppm (one millionth) above are used for this product. But the pixels of RED, GREEN, BLUE and WHITE color appear to be bright sometimes or some black pixels may be seen. This is not from bad quality and you can use it without any problems.
For example, the number of TFT LCD sub pixels contained in this product are 3,133,440.
Note
- Design and specifications are subject to change without prior notice.
Class B Equipment (Information Communication equipment for residential use)
- This product complies with the Electromagnetic Compatibility Directives for residential use and can be used in all areas including common residential areas. (Class B equipment emits less electromagnetic waves than Class A equipment.)
PowerSaver
This monitor has a built-in power management system called PowerSaver. This system saves energy by switching your monitor to low-power mode when it has not been used for a certain amount of time. The monitor automatically returns to normal operation when you press a key on the keyboard. For energy conservation, turn your monitor OFF when it is not needed, or when leaving it unattended for long periods. The PowerSaver system operates with a VESA DPM compliant video card installed in your computer. Use the software utility installed on your computer to set up this feature.
State
Normal
Power saving
Power off
Power off
Power Indicator Green Green, Blinking Amber Black
Power Consumption
Less than
Less than 1 W
Less than 1 W
0W

This monitor is EPA E NERGY STAR ③ compliant and ENERGY2000 compliant when used with a computer equipped with VESA DPM functionality.
As an E NERGY STAR® Partner, SAMSUNG has determined that this product meets the E NERGY STAR® guidelines for energy efficiency.
Preset Timing Modes
Preset Timing Modes
If the signal transferred from the computer is the same as the following Preset Timing Modes, the screen will be adjusted automatically. However, if the signal differs, the screen may go blank while the power LED is on. Refer to the video card manual and Adjusts the screen as follows.
Display Mode
Horizontal
Frequency
(kHz)
Vertical
Frequency
(Hz)
Pixel Clock
(MHz)
Sync Polarity
(HV)
IBM, 640 x 350 31.469 70.086 25.175 +/-
IBM,640x48031.46959.94025.175
IBM,720x40031.46970.08728.322-/+
MAC, 640 x 480 35.000 66.667 30.240 -/-
MAC,832x624 49.726 74.551 57.284 -/
VESA, 640 x 480 37.861 72.809 31.500 -/
VESA,640×48037.50075.00031.500-f-
VESA, 640 x 480 43.269 85.008 36.000 -f-
VESA,800x60035.15656.25036.000+/+
VESA, 800 x 600 37.879 60.317 40.000 +/-
VESA,800x60048.07772.18850.000+/+
VESA,800x60046.87575.00049.500+/+
VESA,800x60053.67485.00056.250+/+
VESA, 1024 x 768 48.363 60.004 65.000 -/-
VESA, 1024 x 768 56.476 70.069 75.000 -/-
VESA, 1024 x 768 60.023 75.029 78.750 +/-
VESA, 1024 x 768 68.677 85.997 94.500 +/-
VESA, 1360 x 768 47.712 60.000 85.500 +/-

Horizontal Frequency
The time to scan one line connecting the right edge to the left edge of the screen horizontally is called the Horizontal Cycle and the inverse number of the Horizontal Cycle is called the Horizontal Frequency. Unit: kHz
Vertical Frequency
Like a fluorescent lamp, the screen has to repeat the same image many times per second to display an image to the user. The frequency of this repetition is called the Vertical Frequency or Refresh Rate. Unit: Hz
© 1995~2007 SAMSUNG. ALL Right Reserved

Safety Instructions
Introduction
Connections
Using the Software
Adjusting the LCD monitor
Troubleshooting
Specifications
Information
For Better display
PRODUCT INFORMATION
(ImageretentionFree)
Appendix
TFT-LCD Monitor
www.samsung.com
The color and appearance of the product may vary depending on the model, and the product specifications are subject to change without prior notice for reasons of performance enhancement.
Information
For Better display
Adjust the computer resolution and screen inlection rate (refresh rate) on the computer as described below to enjoy the best picture quality. You can have an uneven picture quality on screen if the best picture quality is not provided for TFT-LCD.
Resolution: 1360 x 768
Vertical frequency (refresh rate): 60 Hz
TFT LCD panels manufactured by using advanced semiconductor technology with a precision of 1ppm (one millionth) and above is used for this product. But the pixels of RED, GREEN, BLUE and WHITE color seem to be bright sometimes or some of black pixels could be seen. This is not from bad quality and you can use it without any problems.
For example, the number of TFT LCD sub pixels contained in this product are 3,133,440
When cleaning the monitor and the panel outside, please apply the recommended small amount of cleaner by using a soft cloth to polish. Do not force the LCD area but rub softly. If excessive force is applied, you may stain it.
If you are not satisfied with the picture quality, you can get better quality of picture by performing the "auto adjustment function" in display screen that is appeared as window termination button is pressed. If there's still noise after the automatic adjustment, use the FINE/COARSE adjustment function.
When viewing a fixed screen for an extended period of time, a residual image or blurriness may appear. Change the mode to energy save or set a screenshot to move the picture when you need to be away from the LCD monitor for an extended period of time.
PRODUCT INFORMATION (Image Retention Free)
What is Image Retention?
Image retention may not occur when a LCD panel is operated under normal conditions.
Normal conditions are defined as continuously changing video patterns. When the LCD panel is operated for a long time with a fixed pattern (over 12 hours), there may be slight difference in voltage between electrodes that work the liquid crystal (LC) in a pixel. The voltage difference between electrodes increases with time, forcing the liquid crystal to lean. When this occurs, the previous image may be seen when the pattern is changed. To prevent this, the accumulated voltage difference must be decreased.
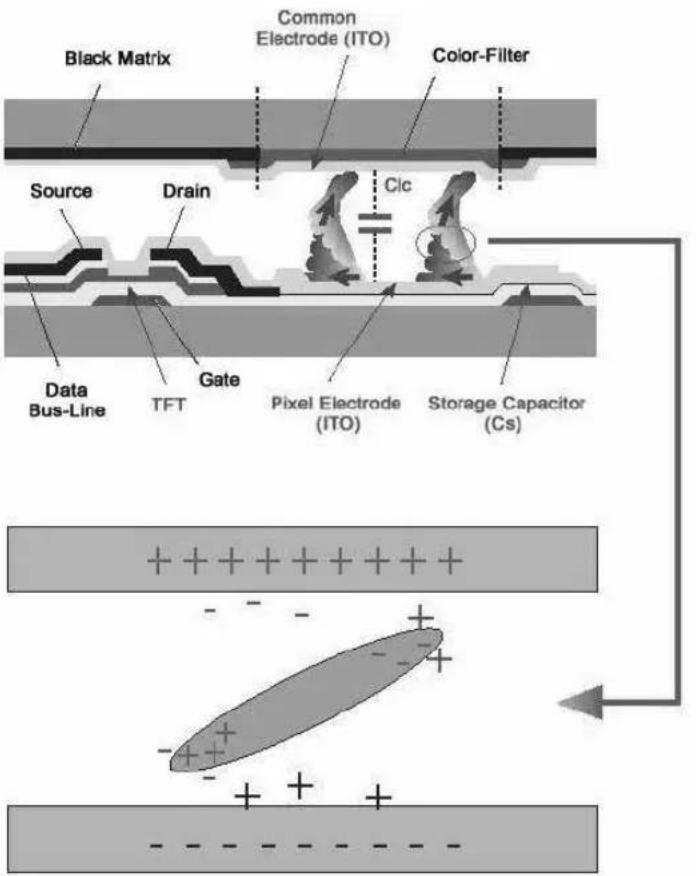
Power Off, Screen Saver, or Power Save Mode
- Turn the power off for 4 hours after 20 hours in use
- Turn the power off for 2 hours after 12 hours in use
- Set the Monitor to power off with the PC display Properties Power Scheme.
- Use a Screen saver if possible - Screen saver in one color or a moving image is recommended.
Change the Color Information periodically
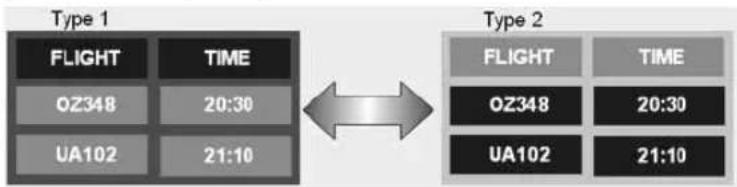

- Use Two different colors
Rotate the Color Information with 2 different colors every 30 minutes.
- Avoid using a combination of characters and background color with large difference in luminance.
Avoid using Grey colors, which can cause Image retention easily.
Avoid: Colors with big difference in luminance (Black & White, Grey)
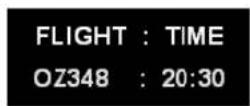
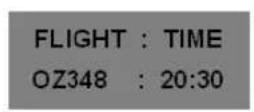
Change the characters color periodically
Use Bright colors with little difference in luminance
- Cycle : Change the characters color and background color every 30 minutes

Every 30 minutes, change the characters with movement.

-
All area display Moving image together with Logo periodically.
-
Cycle: Display moving image together with Logo for 60 seconds after 4 hours in use.
-
The best way to protect your monitor from Image retention is to turn Power off, or set your PC, or System to operate a Screen Saver program when you are not using it. Also Warranty service will be limited based on instruction guide.
Apply the Screen Scroll function on Product
-
Apply the Screen Scroll function
-
Symptom: Horizontal Bar with Black Color move up and down.
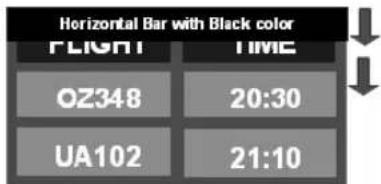
- Select method
Instruction Guide : OSD Menu-> Set Up-> Safety Screen-> Screen Scroll
. Time Interval : 1 ~ 10 hours ( Recommend : 1 )
. Time Period : 1 ~ 5 second ( Recommend : 5 )

- (Please check CD's User Guide at "OSD Function", some model's will not available)
Apply the Screen Pixel function on Product
-
Apply the Screen Pixel function
-
Symptom: Dot with Black Color move up and down.

-
Select method
Instruction Guide: OSD Menu -> Set Up -> Safety Screen -> Pixel
Time Interval: 1 ~ 10 hours (Recommend: 1)
Time Period: 10 ~ 50 second (Recommend: 50) -
Apply the Screen Bar function
-
Symptom: Horizontal / Vertical Bar with Black Color move up and down.
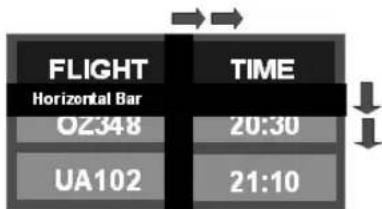
- Select method
. Instruction Guide : OSD Menu -> Set Up -> Safety Screen -> Bar
Time Interval: 1 ~ 10 hours (Recommend: 1)
Time Period: 10~50 second (Recommend: 50)
Note
- (Please check CD's User Guide at "OSD Function", some model's will not available.)
Apply the Screen Erasing function on Product
Apply the Screen Erasing function
- Symptom: 2 Vertical blocks move with erasing the display

- Select method
- Instruction Guide : OSD Menu -> Set Up -> Safety Screen -> Eraser
Time Interval: 1 ~ 10 hours (Recommend: 1)
Time Period: 10~50 second (Recommend: 50)
Note
- (Please check CD's User Guide at "OSD Function", some model's will not available)
© 1995-2008 SAMSUNG. ALL Right Reserved
Safety Instructions
Introduction
Connections
Using the Software
Adjusting the LCD monitor
Troubleshooting
Specifications
Information
Appendix
Contact SAMSUNG
WORLDWIDE
Terms
Correct Disposal
Authority
TFT-LCD Monitor
www.samsung.com

The color and appearance of the product may vary depending on the model, and the product specifications are subject to change without prior notice for reasons of performance enhancement.
Appendix
Contact SAMSUNG WORLDWIDE
Note
- If you have any questions or comments relating to Samsung products, please contact the SAMSUNG customer care center.
North America
U.S.A 1-800-SAMSUNG(726-7864) http://www.samsung.com/us
CANADA 1-800-SAMSUNG(726-7864) http://www.samsung.com/ca
MEXICO 01-800-SAMSUNG(726-7864) http://www.samsung.com/mx
Latin America
ARGENTINE 0800-333-3733 http://www.samsung.com/ar
BRAZIL 0800-124-421 http://www.samsung.com/br 4004-0000
CHILE 800-SAMSUNG(726-7864) http://www.samsung.com/c/
COLOMBIA 01-8000112112 http://www.samsung.com.co
COSTA RICA 0-800-507-7267 http://www.samsung.com/latin
ECUADOR 1-800-10-7267 http://www.samsung.com/latin
EL SALVADOR 800-6225 http://www.samsung.com/latin
GUATEMALA 1-800-299-0013 http://www.samsung.com/latin
JAMAICA 1-800-234-7267 http://www.samsung.com/latin
PANAMA 800-7267 http://www.samsung.com/latin
PUERTO RICO 1-800-682-3180 http://www.samsung.com/latin
REP. DOMINICA 1-800-751-2676 http://www.samsung.com/latin
TRINIDAD & TOBAGO 1-800-SAMSUNG(726-7864) http://www.samsung.com/latin
VENEZUELA 0-800-100-5303 http://www.samsung.com/latin
Europe
AUSTRIA 0800-SAMSUNG(726-7864) http://www.samsung.com/at
BELGIUM 0032 (0)2 201 24 18 http://www.samsung.com/be
844 000 844 http://www.samsung.com/cz
| CZECH REPUBLIC | Distributor pro Českou republiko:Samsung Zrt., Česka organizačné složka Vyskočilova 4,14000 Praha 4 |
| DENMARK | 70 70 19 70 http://www.samsung.com.dk |
| FINLAND | 030-6227 515 http://www.samsung.com/fi |
| FRANCE | 3260 SAMSUNG(726-7864)http://www.samsung.com/fr08 25 08 65 65 (€ 0,15/min) |
| GERMANY | 01805-121213 (€ 0,14/Min) http://www.samsung.de |
| HUNGARY | 06-80-SAMSUNG(726-7864) http://www.samsung.com/hu |
| ITALIA | 800-SAMSUNG(726-7864) http://www.samsung.com/it |
| LUXEMBURG | 0035 (0)2 261 03 710 http://www.samsung.com/be |
| NETHERLANDS | 0900 20 200 88 (€ 0,10/Min) http://www.samsung.com/nl |
| NORWAY | 815-56 480 http://www.samsung.com/no |
| POLAND | 0 801 801 881http://www.samsung.com/pl |
| 022-607-93-33 | |
| PORTUGAL | 80 8 200 128 http://www.samsung.com/pt |
| REPUBLIC OF IRELAND | 0818 717 100 http://www.samsung.com/ie |
| SLOVAKIA | 0800-SAMSUNG(726-7864) http://www.samsung.com/sk |
| SPAIN | 902 10 11 30 http://www.samsung.com/es |
| SWEDEN | 0771-400 200 http://www.samsung.com/se |
| SWITZERLAND | 0800-SAMSUNG(726-7864) www.samsung.com/ch |
| U.K | 0870-SAMSUNG(726-7864) http://www.samsung.com/uk |
| CIS | ||
| ESTONIA | 800-7267 http://www.samsung.ee | |
| LATVIA | 800-7267 http://www.samsung.com/lv | |
| LITHUANIA | 8-800-77777 http://www.samsung.1t | |
| KAZAKHSTAN | 8-10-800-500-55-500 | http://www.samsung.kz |
| KYRGYZSTAN | 00-800-500-55-500 | |
| RUSSIA | 8-800-555-55-55 | http://www.samsung.ru |
| UKRAINE | 8-800-502-0000 | http://www.samsung.ua |
| UZBEKISTAN | 8-800-120-0-400 | http://www.samsung.uz |
| Asia Pacific | ||
| AUSTRALIA | 1300 362 603 | http://www.samsung.com/au |
| CHINA | 800-810-5858, 010-6475 1880 | http://www.samsung.com.cn |
| HONG KONG | 3698-4698 | http://www.samsung.com/hk |
| INDIA | 3030 8282, 1800 110011 | http://www.samsung.com/in/ |
| INDONESIA | 0800-112-8888 | http://www.samsung.com/id |
| JAPAN | 0120-327-527 http://www.samsung.com/jp | |
| MALAYSIA | 1800-88-9999 http://www.samsung.com/my | |
| NEW ZEALAND | 0800SAMSUNG(726-7864) | http://www.samsung.com/nz |
| PHILIPPINES | 1800-10-SAMSUNG(726-7864) | http://www.samsung.com/ph |
| SINGAPORE | 1800-SAMSUNG(726-7864) http://www.samsung.com/sg | |
| THAILAND | 1800-29-3232, 02-689-3232 | http://www.samsung.com/th |
TAIWAN 0800-329-999 http://www.samsung.com/tw
VIETNAM 1800588889 http://www.samsung.com/vn
Middle East & Africa
SOUTH AFRICA 0860-SAMSUNG(726-7864) http://www.samsung.com/za
TURKEY 4447711http://www.samsung.com.tr
Sync (Synchronized) Signals refer to the standard signals that are required to display desired colors on the LCD monitor. They are divided into Vertical and Horizontal Sync Signals. These signals display normal color images by the set resolution and frequency.
Types of Sync Signals
| Separate | This is a scheme of transmitting individual vertical sync signals to the LCD monitor. |
| Composite | This is a scheme of combining vertical sync signals into one composite signal and transmitting it to the LCD monitor. The LCD monitor monitors the color signals by separating the composite signal into original color signals. |
Dot Pitch
The image on a LCD monitor is composed of red, green and blue dots. The closer the dots, the higher the resolution. The distance between two dots of the same color is called the 'Dot Pitch'. Unit: mm
Vertical Frequency
The screen must be redrawn several times per second in order to create and display an image for the user. The frequency of this repetition per second is called the Vertical Frequency or Refresh Rate. Unit: Hz
Example: If the same light repeats itself 60 times per second, this is regarded as 60Hz
Horizontal Frequency
The time to scan one line connecting the right edge to the left edge of the screen horizontally is called the Horizontal Cycle. The inverse number of the Horizontal Cycle is called Horizontal Frequency. Unit: kHz
Interlace and Non-Interlace Methods
Showing the horizontal lines of the screen from the top to the bottom sequentially is called the Non-Interlace method while showing odd lines and then even lines in turn is called the Interlace method. The Non-Interlace method is used for the majority of LCD monitors to ensure a clear image. The Interlace method is the same as that used in TVs.
Plug & Play
This is a function that provides the best quality screen for the user by allowing the computer and the LCD monitor to exchange information automatically. This LCD monitor follows the international standard VESA DDC for the Plug & Play function.
Resolution
The number of horizontal and vertical dots used to compose the screen image is called the 'resolution'. This number shows the accuracy of the display. A high resolution is good for performing multiple tasks as more image information can be shown on the screen.
Example: If the resolution is 1360 X 768, this means the screen is composed of 1360 horizontal dots (horizontal resolution) and 768 vertical lines (vertical resolution).
Multiple display Control (MDC)
A Multiple display Control (MDC) is an application allowing various monitors to be easily and simultaneously operated on a PC. RS-232C, a standard of serial communication, is used for communicating between a PC and a monitor.
Correct Disposal of This Product (Waste Electrical & Electronic Equipment) - Europe only

(Applicable in the European Union and other European countries with separate collection systems)
This marking shown on the product or its literature, indicates that it should not be disposed with other household waste at the end of its working life. To prevent possible harm to the environment or damage to health from uncontrolled waste disposal, please separate this from other types of waste and recycle it responsibly to promote the sustainable reuse of material resources.
Household users should contact either the retailer where they purchased this product, or their local government office, for details of where and how they can take this item for environmentally safe recycling.
Business users should contact their supplier and check the terms and conditions of the purchase contract. This product should not be mixed with other commercial wastes for disposal.
Authority
Information in this document is subject to change without notice. © 2008 Samsung Electronics Co., Ltd. All rights reserved.
Reproduction in any manner whatsoever without the written permission of Samsung Electronics Co., Ltd. is strictly forbidden.
Samsung Electronics Co., Ltd. shall not be liable for errors contained herein or for incidental or consequential damages in connection with the furnishing, performance, or use of this material.
Samsung is the registered trademark of Samsung Electronics Co., Ltd.; Microsoft, Windows and Windows NT are registered trademarks of Microsoft Corporation; VESA, DPM and DDC are registered trademarks of Video Electronics Standard Association; the ENERGY STAR ® name and logo are registered trademarks of the U.S. Environmental Protection Agency (EPA). As an ENERGY STAR ® Partner, Samsung Electronics Co., Ltd. has determined that this product meets the ENERGY STAR ® guidelines for energy efficiency. All other product names mentioned herein may be the trademarks or registered trademarks of their respective owners.
CALIFORNIA USA ONLY (Applicable for networking models only.)
This Perchlorate warning applies only to primary CR( Manganese Dioxide ) Lithium coin cells in the product sold or distributed ONLY in California USA
Perchlorate Material - special handling may apply, See www.dtsc.ca.gov/hazardouswaste/perchlorate.
User's Gids

AV/S-Video/Component Mode:P.MODE(Picture Mode)
- De S-VHS of BNC-kabel is optioneel.
TV, AV, S-Video, Component, DVI(HDCP)
- Adjusts Bass of the selected display.
3) Treble
SRS TSXT Sound On/Off.
6)Sound Select
Picture[PC / BNC /DVI]
Beschikbare modi
PC/BNC/DVI
AAV
S S-Video
Component
D DVI-Video
MagicBrightTM
[ \text{[MENU]} \rightarrow [\wedge / \vee] \rightarrow [\text{ENTER} ] \rightarrow [\text{ENTER} ] \rightarrow [\wedge / \vee] \rightarrow [\text{ENTER}] ]
Digital NR (Digital Noise Reduction) ASCD
[ \text{[MENU]} \rightarrow [\wedge / \vee] \rightarrow [\text{ENTER} ] \rightarrow [\wedge / \vee] \rightarrow [\text{ENTER}] \rightarrow [\wedge / \vee] \rightarrow [\text{ENTER}] ]
Safety Lock PIN PASCD
[ \text{[MENU]} \rightarrow [\wedge / \vee] \rightarrow [\text{ENTER}] \rightarrow [\wedge / \vee] \rightarrow [\text{ENTER}] \rightarrow [0 \sim 9] \rightarrow [0 \sim 9] \rightarrow [0 \sim 9] ]
Power On Adjustment PASCD
[ \text{[MENU]} \rightarrow [\wedge / \vee] \rightarrow [\text{ENTER} ] \rightarrow [\wedge / \vee] \rightarrow [\text{ENTER} ] \rightarrow [\text{ENTER} ] \rightarrow [\wedge / \vee] \rightarrow [\text{ENTER} ] ]
Check Signal Cable PC
Bericht "Check Signal Cable"
Audio Characteristics
Audio Input 1 RCA-jack Rood(R) Wit (L), 0,5 Vrms (-9 dB)
Audio Input 2 RCA-jack Rood(R) Wit (L), 0.5 Vrms (-9 dB)
PC Audio Input 3,5 Ø stereoplug, 0,5 Vrms (-9 dB)
Frequency Radiofrequency: 80Hz 15kHz (bij -3 dB)
Response A/V: 80Hz 20kHz (bij -3 dB)
VESA,800x60035,15656,25036,000+/+
VESA,800x60037,87960,31740,000+/+
VESA,800x60048,07772,18850,000+/+
VESA,800x60046,87575,00049,500+/+
VESA,800x60053,67485,00056,250+/-
VESA,1024x76848,36360,00465,000-/-
VESA,1024x76856,47670,06975,000-/-
VESA, 1024 x 768 60,023 75,029 78,750 +/-
VESA,1024x76868,67785,99794,500+/-
VESA,1360x76847,71260,00085,500+/-

Horizontale frequenta
Middle East & Africa
| SOUTH AFRICA | 0860-SAMSUNG(726-7864) http://www.samsung.com/za |
| TURKEY | 444 77 11 http://www.samsung.com.tr |
| U.A.E | 800-SAMSUNG (726-7864) http://www.samsung.com/ |
| 8000-4726 |
Woordenlijst
Sync-sigmaal
Avertissement/Attention

Shortcut to Anti-Afterimage Instructions
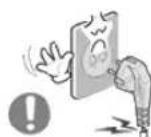
programme port MDC (Multi Device Control)
4) DVI / PC IN [RGB] (Connexion video PC)
Displayed on the lower left corner of the screen.
The audio resumes if MUTE or -VOL + is pressed in the Mute mode.
9)

PC/DVI Mode:M/B(MagicBrightTM)
6. Installation murale
S-VHS or BNC cable is optional.

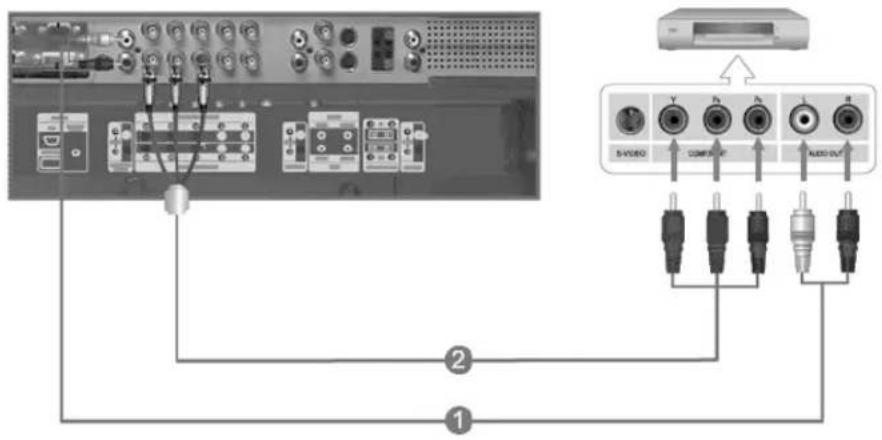
TV, AV, S-Video, Component, DVI(HDCP)
[PC / BNC /DVI Mode]
Image
[AV/S-Video/
Component / DVI-Video]
Son
Configuration
Multi controle
Image [PC / BNC /DVI]
Modes dispensibles
PC/BNC/DVI
AAV
S-Viséo
Composante
D DVI-Video
MagicBrightTM P
[ \text{[MENU]} \rightarrow [\wedge / \vee] \rightarrow [\text{ENTER} ] \rightarrow [\text{ENTER}] \rightarrow [\wedge / \vee] \rightarrow [\text{ENTER}] ]
Verrouillage Image P
Renforce lessonshaute frquence.
3) Balance
[Modes dispensibles:PIP]
Setup(Configuration)
Modes dispensibles
PC/BNC/DVI
AAV
S-S-Video
Composante
D DVI-Video
Langue PAsCD
[ \text{[MENU]} \rightarrow [\text{A} / \text{V}] \rightarrow [\text{ENTER} ] \rightarrow [\text{ENTER} ] \rightarrow [\text{A} / \text{V}] \rightarrow [\text{ENTER} ] ]
VESA Interface de support
Middle East & Africa
| SOUTH AFRICA | 0860-SAMSUNG(726-7864) http://www.samsung.com/za |
| TURKEY | 444 77 11 http://www.samsung.com.tr |
| U.A.E | 800-SAMSUNG (726-7864) http://www.samsung.com/ |
| 8000-4726 |
Terme
Shortcut to Anti-Afterinage Instructions
© 1995~2008 SAMSUNG. ALL Rights Reserved
Inhalt
Displayed on the lower left corner of the screen.
The audio resumes if MUTE or -VOL + is pressed in the Mute mode.
9) TTX/MIX
(Dynamic Standard Movie>Custom)
PC / DVI Mode : M/B ( MagicBrightTM )
Then push button again to circle through available preconfigured modes.
(Standard Music Movie Speech Custom)
21) STILL
© 1995-2008 SAMSUNG. ALL Right Reserved
© 1995-2008 SAMSUNG. ALL Right Reserved
Einführung

Main Screen
TV, AV, S-Video, Component, DVI(HDCP)
7) Double 3 (Picture By Picture)
© 1995~2008 SAMSUNG. ALL Rights Reserved

© 1995-2008 SAMSUNG. ALL Right Reserved

Sicherheitshinweise
Einführung
IBM,720x40031,46970,08728,322-/+
MAC,640x48035,00066,66730,240-/-
MAC,832x624 49,726 74,551 57,284 -/
VESA,640x48037,86172,80931,500-
VESA,640x48037,50075,00031,500-
VESA,640x48043,26985,00836,000-
VESA,800x60035,15656,25036,000+/-
VESA,800x60037,87960,31740,000+
VESA,800×600 48,077 72,188 50,000 +/+
VESA,800x60046,87575,00049,500+
VESA,800x60053,67485,00056,250+
VESA,1024x76848,36360,00465,000-/-
VESA,1024x76856,47670,06975,000-/-
VESA, 1024 x 768 60,023 75,029 78,750 +/-
VESA, 1024 x 768 68,677 85,997 94,500 +/-
VESA,1360x76847,71260,00085,500+
Horizontalfrequency
© 1995-2008 SAMSUNG. ALL Right Reserved

© 1995-2008 SAMSUNG. ALL Right Reserved
Middle East & Africa
SOUTH AFRICA 0860-SAMSUNG(726-7864) http://www.samsung.com/za
TURKEY 4447711http://www.samsung.com.tr
U.A.E 800-SAMSUNG (726-7864) http://www.samsung.com/mea 8000-4726
Bezeichnungen
Sync.-Signal
© 1995-2008 SAMSUNG. ALL Rights Reserved
Contenuo
Imagine [PC/BNC/DVI] 54
Imagine [AV/S-Video/Comp./DVI-Video] 56
Suono 58
Impostazione 59
Controllo multi-schermo 62
Tasto MagicNet Quick Launch.
Tasto MDC Quick Launch.
4) LOCK
In PC/DVI mode, sets only SOUND to FM Radio.
© 1995-2008 SAMSUNG. ALL Right Reserved
1. Layout mecanico
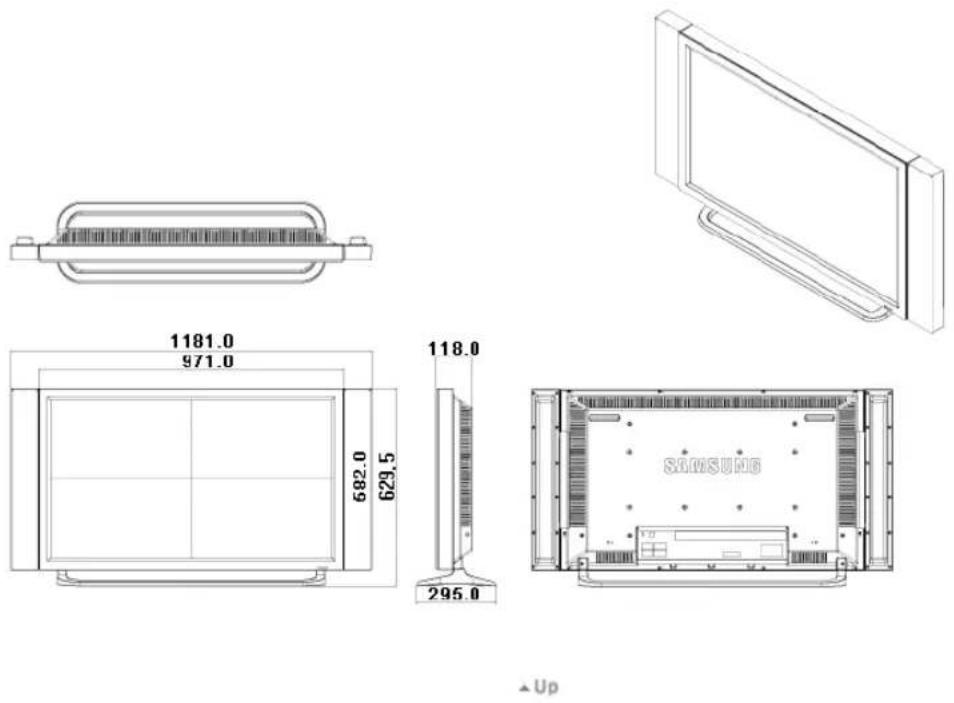
2. Testa del monitor
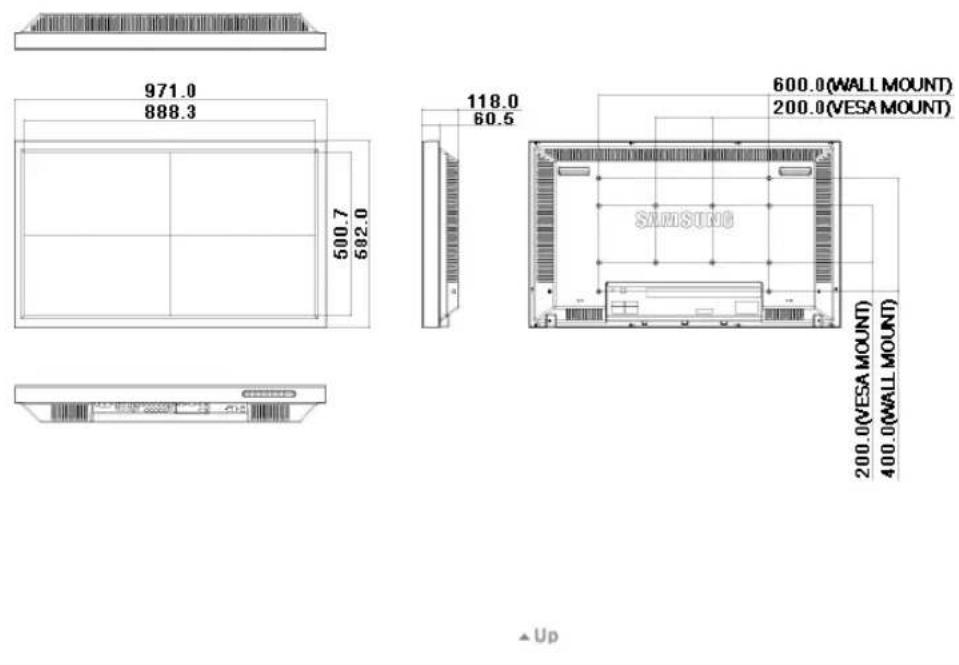
2-2) Utilizzo del connettore DVI (digitale) con la scheda video. Connect the DVI Cable to the DVI(HDCP) port on the back of your monitor and the DVI port on the computer.
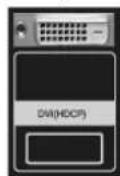
© 1995~2008 SAMSUNG. ALL Right Reserved
Introduzione
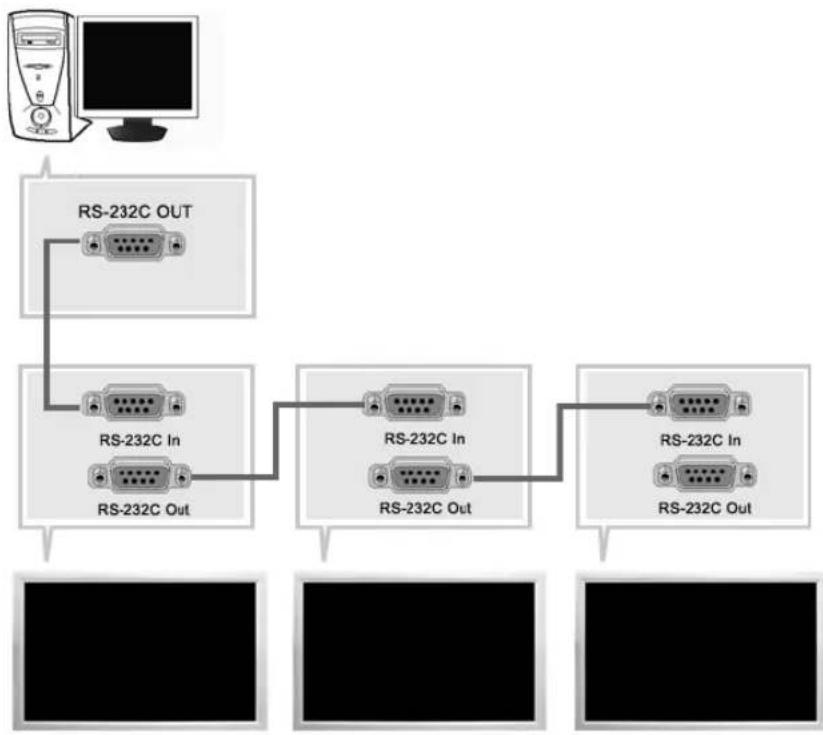
TV, AV, S-Video, Component, DVI(HDCP)
- Adjusts Color Tone of the selected display.
Controllo multi-schemo
Turn the PIP Screen on or off.
-Off
-On
Emphasize low frequency audio.
2) Alti
Emphasize high frequency audio.
Controllo multi-schemo
Controllo multi-schemo PASC
[ \text{[MENU]} \rightarrow [\wedge / \vee] \rightarrow [\text{ENTER} ] \rightarrow [\wedge / \vee] \rightarrow [\text{ENTER} ] \rightarrow [\text{ENTER} ] \rightarrow [0 \sim 9] ]
© 1995~2008 SAMSUNG. ALL Rights Reserved

© 1995-2008 SAMSUNG. ALL Right Reserved

IBM,640x35031,46970,08625,175+/-
IBM,640x48031,46959,94025,175-/-
IBM,720x40031,46970,08728,322-/+
MAC,640x48035,00066,66730,240-/-
MAC,832x624 49,726 74,551 57,284 -/
VESA,640x48037,86172,80931,500-
VESA,640x48037,50075,00031,500-/-
VESA,640x48043,26985,00836,000-/-
VESA,800x60035,15656,25036,000+/-
VESA,800x60037,87960,31740,000+/-
VESA,800x60048,07772,18850,000+/-
VESA,800x60046,87575,00049,500+
VESA,800x60053,67485,00056,250+
VESA, 1024 x 768 48,363 60,004 65,000 -/-
VESA,1024x76856,47670,06975,000-/-
VESA, 1024 x 768 60,023 75,029 78,750 +/-
VESA, 1024 × 768 68,677 85,997 94,500 +/-
VESA, 1360 x 768 47,712 60,000 85,500 +/-
© 1995-2008 SAMSUNG. ALL Right Reserved

© 1995-2008 SAMSUNG. ALL Right Reserved
Middle East & Africa
| SOUTH AFRICA | 0860-SAMSUNG(726-7864) http://www.samsung.com/za |
| TURKEY | 444 77 11 http://www.samsung.com.tr |
| U.A.E | 800-SAMSUNG (726-7864) http://www.samsung |
| 8000-4726 |
Termini
Segnale Sinc
默默默默默默默默默默默默默默默默默默默默默默默默默默默默默默默默默默默默默默默默默默默默默默默默默默默默默默默默默默默默默默默默默默默默默
普起上图
-
© 1995~2008 SAMSUNG. ALL Rights Reserved
目录
中 1
五吉
第卷 1
塞尔港 2
4
5
译音 12
12
韵的明
Mechanical Layout 20
译音 26
2 暖峰的性质 … 26
Kaii 27
MDC 33
52
52
[PC/BNC/DVI] 53
55
音韵 57
58
Multi Control 60
61
生
62
MONIrTaJIeJI 62
63
F 65
66
J 66
67
67
69
H
69
69
70
73
七
73
通用通信及技术 73
74

安朝将用中所
子告
郾本的明
Mechanical Layout
新
六元用
如图所示
无期转生
串串串
早
TFT-LCD Monitor
www.samsung.com
国
琵
一
#
·国造音目多自,自在有之
国
#
·本页刊载于http://www.floorsanding.com/
LCD Display

中


首
MDC Software
Kai
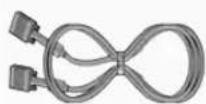
D-Sub(15Pin)

图
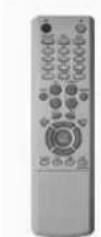
L
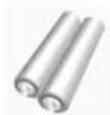
员 圆 员 圆 (AAA X 2)
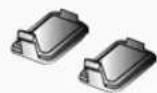
出
BNC to RCA 电
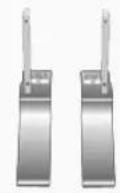
Kanai S. Shan
皆叫舌
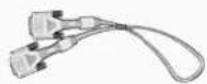
封装代码应用KIT
DVI制01备

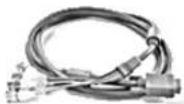
三
BNC 00
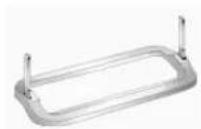
KIT
高部的明
>
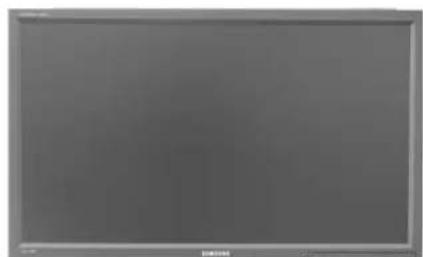


1) MENU
国
2)
贝到用
3)孕早孕兑皂贝I皂藻贝
国
音樂樂樂乐樂樂樂樂樂樂樂樂樂樂樂樂樂樂樂樂樂
4) ENTER
首默藥中贝阿信
5) SOURCE
원신지에 힍을 썸고다.
[PC] → [BNC] → [DVI] → [AV] → [S-Video] → [Component]
``
<h1 id="6pip-4">6)PIP</h1>

```txt
BNC与格无用是的台子自
PC
BNC
AV/S-通号本
DVI
司
·外服日
PC/BNC/DVI 0
·卡托尼巨
PC/DVI 20
7)
中
8)
中
9)
RIOE
#
·
>吴
#
1) POWER S/W ON [I] / OFF [O]
朝的,
2) POWER IN
国
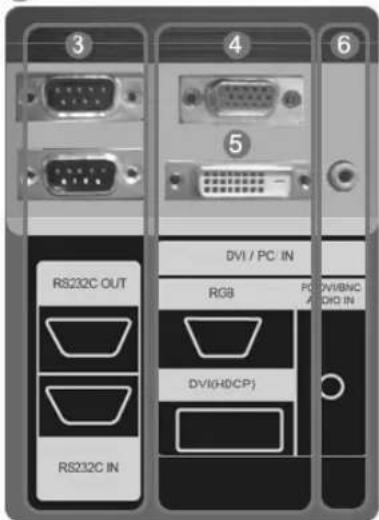
B
9) BNC/COMPONENT IN [R/P R, G/Y, B/P B, H, V] (BNC bitioo 0i 10000000000000000000000000000000000000000000000000000000000
10) AV AUDIO IN [L-AUDIO-R] (MOUH ODO
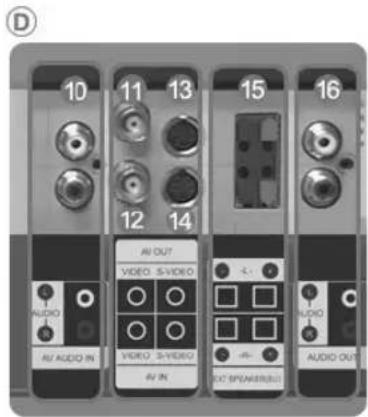
(1)
11)AVOUTVIDEO:와부일
<|im_start|>assistant
10.25.2018 10:30 PM
12)AVIN[VIDEO](biDiOIOWLREKD)
13)AVOUTS-VIDEOAVIN[S-VIDEO](S-皂皂皂皂皂皂皂皂皂皂皂皂皂皂皂皂皂皂皂皂皂皂皂皂皂皂皂皂皂皂皂皂皂皂皂皂皂皂皂皂皂皂皂皂皂皂皂皂皂皂皂皂皂皂皂皂皂皂皂皂皂皂皂皂皂皂皂皂皂皂皂皂
15)EXT SPEAKER(8Ω)[--L-+,--R-+](卡贝
16)AUDIOOUT[L-AUDIO-R](OoDIOOCHREDL
J)
OUTPC,DVI,BNC
#
-01 MO LI E T E H E N I E I G I C H L
7) VOL
合当
8) MUTE
日
海的用中贝
MUTEVOL+
9) TTX/MIX
TV
一
10) II MENU
国
11) ENTER
首默电电电电电电电电电电电电电电电电电电电电电电电电电电电电电电电电电电电电电电电电电电电电电电电电电电电电电电电电电电电电电电电电电电电电电
12) M/B.P.MODE
电电电电电电电电电电电电电电电电电电电电电电电电电电电电电电电电电电电电电电电电电电电电电电电电电电电电电电电电电电电电电电电电电电电电电电电电电电电电电电电电电电电电
© 1995~2008 SAMSUNG. ALL Right Reserved

1. Mechanical Lay-out
2. MOniTe HeD

3. 三
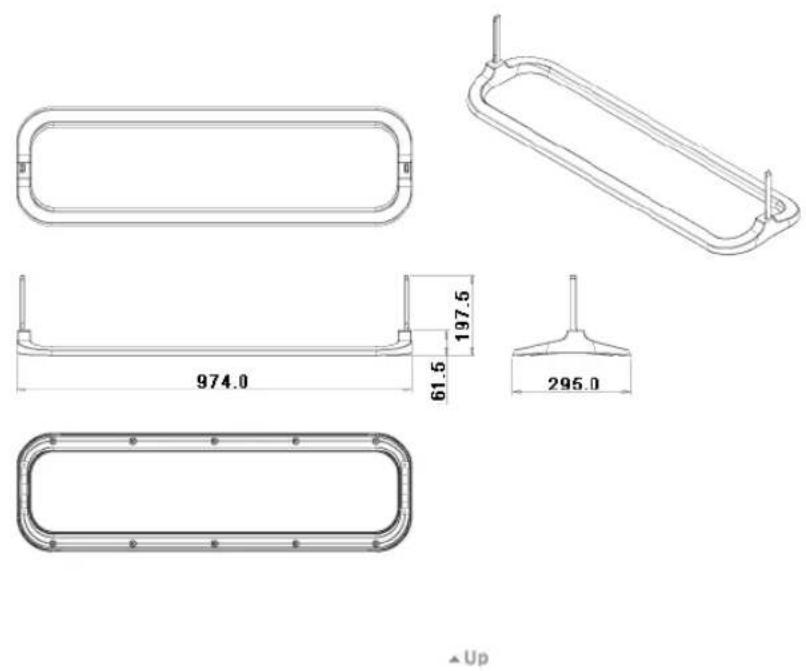
4. 丶丶丶
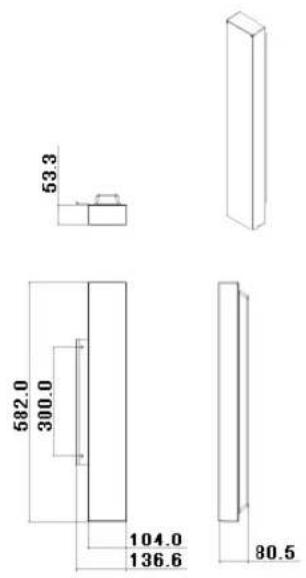
Up
5. VESA プラフ科学发展
VESA
VESABraLcKJUHJFJIiJiJiJiJiJiJiJiJiJiJiJiJiJiJiJiJiJiJiJiJiJiJiJiJiJiJiJiJiJiJiJiJiJiJiJiJiJi
LCDMOHITREIIEOMINTHNNTTNTNNTNNNTNNNTNNNTNNNTNNNTNNNTNNNTNNNTNNNTNNNTNNNTNNNTNNNTNNNTNNNTNNNTNNNTNNNTNNNTNNNTNNNTNNNTNNNTNNNTNNNTNNNTNNNTNNNTNNNTNNNTNNNTNNNTNNNTNNNTNNNTNNNTNNNTNNNTNNNTNNNTNNNTNNNTNNNTNNNTNNNTNNNTNNNTNNNTNNNTNNNT
·社吉皂的原电自半生是国的,如云山,当海,于,

世志 卡


默也108mm,日机
UP
6. 形成的、有形的、无形的、自然的
- 原来将被击击击击击击击击击击击击击击击击击击击击击击击击击击击击击击击击击击击击击击击击击击击击击击击击击击击击击击击击击击击击击击击击击击击击击击击击击击击击击击击击击击击
- 电电电电电电电电电电电电电电电电电电电电电电电电电电电电电电电电电电电电电电电电电电电电电电电电电电电电电电电电电电电电电电电电电电电电电电电电电电电电电电电电电电电电电电电电电电电电电电电电电电电电
- 勃羅巴拉克尼伊勒上達哈圖達耶爾在日國國國國國國國國國國國國國國國國國國國國國國國國國國國國國國國國國國國國國國國國國國國國國國國國國國國國國國國國國國國國國國國國國國國國國國國國國國國國國國國國國國國國國國國國國國國國國國國国
3
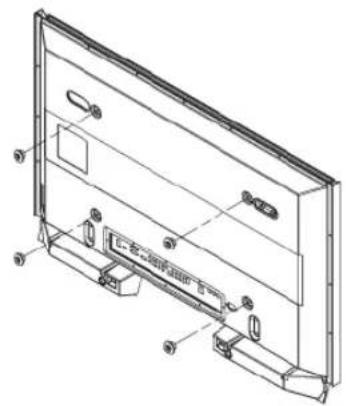
此云
2的其和如在已成自的上()+A)的4
4
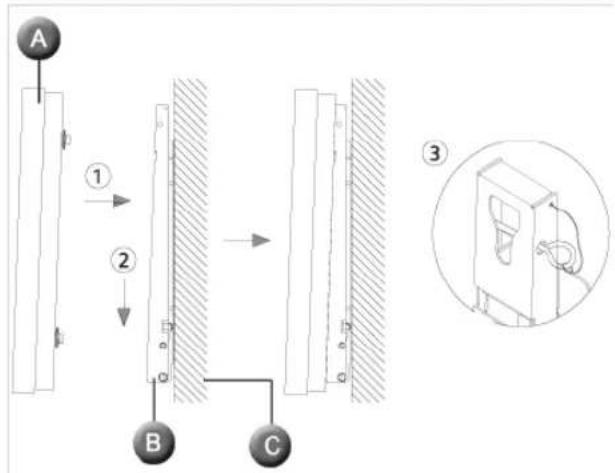
2-3) BNC [1] 00000000000000000000000000000000000000000000000000000

3)SOLIENL
4)开开日和云尼自
#
DVI BNC 10000000000000000000000000000000000000000000000000
DIJIETVDD
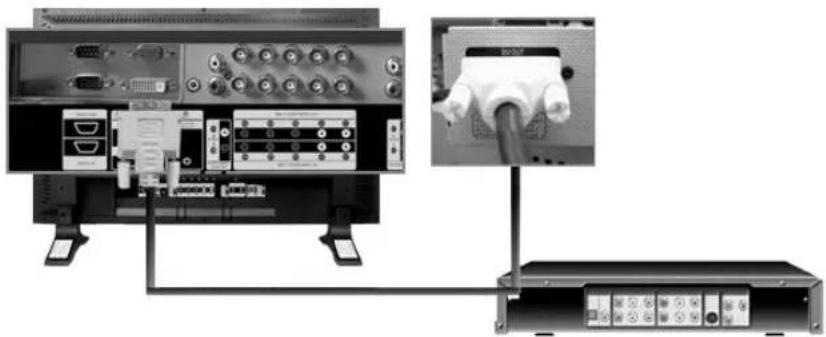
#
DVI翻贝将自用电HDV的MNTER的DVIN当于
DVD
·SOURCEH请将可登录到DVD的用户登录到“用户登录”账户
#
- DDIVDVDVIDEN
> VCR和简历请
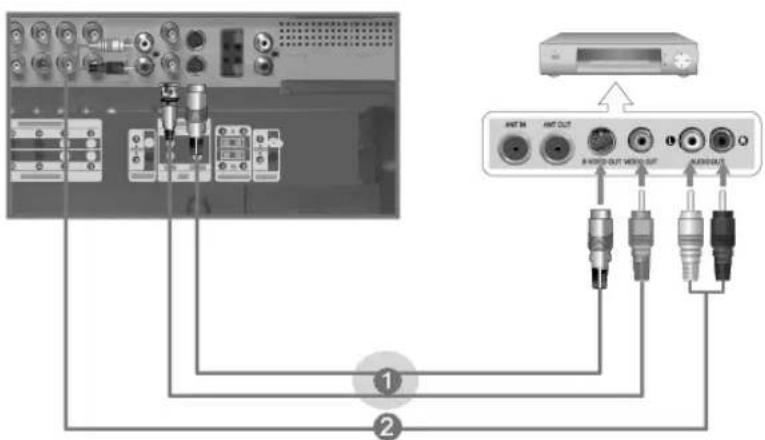
1) DVD, VCR, 標品一的AV 信的,到的 AV IN [VIDEO] S-VHS BNC 则在载于国
2)VCR,KMOO的OIO(L,R)DJTA和MOU的AVAUDIOIN[L-AUDIO-R]R
3)MOIHTTIND=RIOMG'OSOURCEBTHHJLWJUHJLWJUHJLWJUHJLWJUHJLWJUHJLWJUHJLWJUHJLWJUHJLWJUHJLWJUHJLWJUHJLWJUHJLWJUH
4)日口
#
S-VHS HNNBNCKIIIEEINI
DVD

1)MOIHTOICOMPONENTAUDIOIN[L-AUDIO-R]VDD音LREHOH的OIOHO 香歌TJ 2
2)MOIHTERBNC/COMPONENTIN-PRYPBportdZHAPFENETPQIITIOE
3)MOIETJHJL2R0EIN'0SOURCE"BHTTRELL
4)DVD
#
·中F1EETI
>

© 1995-2008 SAMSUNG. ALL Right Reserved

山
D3
PC上,
PC与MONIETAN的通信是机联DHTI通信主证RS-232C可
枚首码串(Terms port)与MOSI端口的枚首码串(Terms port)如RS-232C枚首码串代码为
就阿有可下。
#
日 >FIOI>MultipleDisplayControl
T

1 华 电 电

日
2 Remocon
7 Dslo
3 Safety Lock
8 壬景雪
4 Port Selection
<中> 1MDCMDCMDCMDCMDCMDCMDCMDCMDCMDCMDCMDCMDCMDCMDCMDCMDCMDCMDCMDCMDCMDCMDCMDCMDCMDCMDCMDCMDCMDCMDCMDCMDCMDCMDCMDCMDCMDCMDCMDCMDCMDCMDCMDCMDCMDCMDCMDCMDCMDCM
兆旦整
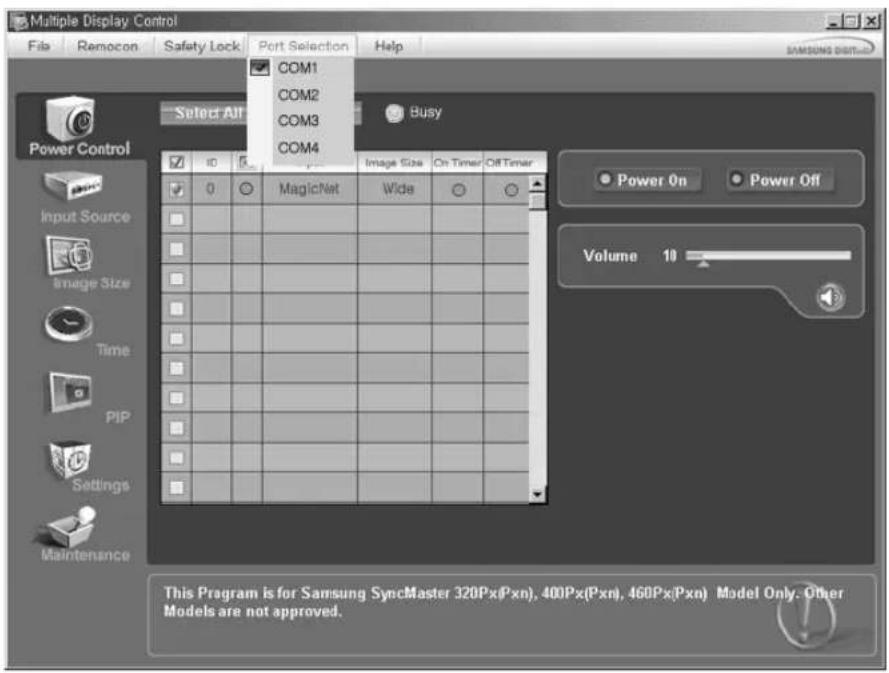
- Multiple Display Control 是其基本属性可由 COM1 逻辑表达出来,如图 1-2 所示。
-
- 号的,如:COM1010000000000000000000000000000000000000000000000000000000000000000000000000000000000000
- MoLiTeTJ& SiRlEeKJIeIeRlO EnCJIeRrEni TcH PtoTmGg EeRtAeH JIeR eRgU TnSiIe IeiJ tJ
- 他范,首默中,影是,影云,影云,影云,影云,影云,影云,影云,影云,影云,影云,影云,影云,影云,影云,影云,影云,影云,影云,影云,影云,影云,影云,影云,影云,影云,影云,影云,影云,影云,影云,影云

首原
- Select All Überheiten, Check Backslash or I/O usage to set up a character file for the character file.

*F
1) Power On/Off
TV, AV, S-Video, Component, DVI(HDCP)
TV SourceTV有在T中用可动PISourceTV时,

Setting
Picture
Manual Lamp Control for the following are Auto Lamp Control Off.
3) Manual Lamp Control
-
- Display 的 部署的 1
Auto Lamp ControlrooTgHaeJyJuaDor Manual Lamp Controln Offnui.
PC/BNC/DVI
A
S-
C. 哉示-13
DVI
ASCD
[MONTH] [A/V] [ENTER] [ENTER] [A/V] [ENTER]
日
PG/BNC/DVI
A
S-
C. 品田田
Multi Control
中
1) ID值
[ \text{[MENU]} \rightarrow [\text{A} / \text{V}] \rightarrow [\text{ENTER} ] \rightarrow [\text{A} / \text{V}] \rightarrow [\text{ENTER} ] \rightarrow [\text{ENTER} ] \rightarrow [0-9] ]
三田二同异ID可
2) ID 付款
[ \text{[MEN] \rightarrow [A / V] \rightarrow [ENTER] \rightarrow [A / V] \rightarrow [ENTER] \rightarrow [ENTER] \rightarrow [0\sim 9]} ]
国期的会电信能电电电电电电电电电电电电电电电电电电电电电电电电电电电电电电电电电电电电电电电电电电电电电电电电电电电电电电电电电电电电电电电电电电电电电电电电电电电
音有
PC/BNC/DVI
A
S-
C 岩石巨
D DVI完整性
MDC P ASCD
Multi Control OSD 1
LOCK PASC
安全锁功能(SafetyLock)
1) 唐朝通典
中
2)首頁
© 1995~2008 SAMSUNG. ALL Rights Reserved

安朝将用中所
财
公元
华
二、应急预案编制情况
MONIJTAJI
中
国
串串串
早告
TFT-LCD Monitor
www.samsung.com

国
文
MOIHTJZ
#
"Check Cooling System" 1.2.3.4.5.6.7.8.9.10.11.12.13.14.15.16.17.18.19.20.21.22.23.24.25.26.27.28.29.30.31.32.33.34.35.36.37.38.39.40.41.42.43.44.45.46.47.48.49.50.51.52.53.54.55.56.57.58.59.60.61.62.63.64.65.66.67.68.69.70.71.72.73.74.75.76.77.78.79.80.81.82.83.84.85.86.87.88.89.90.91.92.93.94.95.96.97.98.99.100
,
1360x768海信电能电电电电电电电电电电电电电电电电电电电电电电电电电电电电电电电电电电电电电电电电电电电电电电电电电电电电电电电电电电电电电电电电电电电电电电电电电电电电电电电电电电电电电电电电电电电电
司
85Hz主可自
默当者,
习
1360x768 60Hz
#
010
>企孔贝电
1)
国

- 陳國正對書表中所列之書目,請予同意。
(
2)
甲三贝定(号)之月三贝制如不

- 03.2019, 10:54, 10:54
(
-
>
#
·MOLIETPCF 1000000000000000000000000000000000000000000000000000000000000000000000
(Windows/Windows/Windows/Windows/Windows/Windows/Windows/Windows/Windows/Windows/Windows/Windows/Windows/Windows/Windows/Windows/Windows/Windows/Windows/Windows/Windows/Windows/Windows/Windows/Windows/Windows/Windows/Windows/Windows/Windows/Windows/Windows/Windows/Windows/Windows/Windows/Windows/Windows/Windows/Windows/Windows/Windows/Windows/Windows/Windows/Windows/Windows/Windows/Windows/Windows/Windows
Windows ME/2000:
新贝→口士普国→海蒙贝
I 1
© 1995-2008 SAMSUNG. ALL Right Reserved

安朝将用中所
财
公元
哉明王昌
二、应急预案编制情况
中国
中
T
早
TFT-LCD Monitor
www.samsung.com

国
音分
賊音
世
写
SMT-4011
开
BE40PS
LCD
3
40(101.6cm)
□本报社址/电话
885.168 mm (H) × 497.664 mm (V)
马
0.648 mm (H) × 0.648 mm (V)
习
甲 王卫 个
30 81kHz
孙仲平卫孙
56 75Hz
K
16.7 M 裁剪
海盛
最速的
1360x768/1366x768@60Hz
图中:海通证券
1366x768@60Hz
日
RGB0B0DVI B RGB sync
LCDPanelSubPixel3,133,440
#
·的国
B贝贝贝()
IBM,640x35031.46970.08625.175+/-
IBM,640x48031.46959.94025.175-/-
IBM,720x40031.46970.08728.322-/+
MAC,640x48035.00066.66730.240-/-
MAC,832x624 49.726 74.551 57.284 -f
VESA,640x48037.86172.80931.500-/-
VESA,640x48037.50075.00031.500-/-
VESA,640x480 43.269 85.008 36.000 -/-
VESA,800x60035.15656.25036.000+/-
VESA,800x60037.87960.31740.000+/-
VESA,800x60048.07772.18850.000+/-
VESA,800x60046.87575.00049.500+/+
VESA,800x60053.67485.00056.250+
VESA,1024x76848.36360.00465.000-/-
VESA,1024x76856.47670.06975.000-
VESA, 1024 x 768 60.023 75.029 78.750 +/-
VESA, 1024 x 768 68.677 85.997 94.500 +/-
VESA,1360x76847.71260.00085.500+

全明 甲 十
© 1995-2008 SAMSUNG. ALL Right Reserved

安朝将用中所
财
公元
华
云
串串串
一
封的
中国证券報
(
早
TFT-LCD Monitor
www.samsung.com

国
SerBiSAnNlMg
串B
中 电
#
·新的云,
·
中
-
念
02-541-3000
080-022-3000
1
http://www.sec.co.kr/monitor
中
回默在,自
AaBnBnBnS nBnTnBnBnBnBnBnBnBnBnBnBnBnBnBnBnBnBnBnBnBnBnBnBnBnBnBnBnBnBnBnBnBnBnBnBnBnBnBnBnBnBnBnBnBnBnBnBnBnBnBnBn
http://www.samsungsvc.co.kr
中国
宰奉蕃社马多率尚建国国国国国
山

尚心的
TFTLCD
- 1360×768
- 60HZ
SRS(TruSurroundXT, SRS和()匝人是SRS Labs, Inc.的同默昌阳口。TruSurroundXT为SRS Labs,Inc.的R01斯有
賊普保
音否
1
部
4
S ACD = S COD + S_ CDA
Picture [PC/BNC/DVI] 53
Picture [AV / S-Video /Component / DVI-Video] 55
Sound 57
Setup 58
Multi Control 61
Pilot Baterie (AAA X 2) Zaslepka
1) POWER S/W ON [I] / OFF [O]
(Dynamic Standard Movie>Custom)
PC / DVI Mode : M/B ( MagicBrightTM )
© 1995~2008 Samsung Electronics Co., Ltd.
© 1995~2008 Samsung Electronics Co., Ltd.
Wprowadzenie

TV, AV, S-Video, Component, DVI(HDCP)
Picture [PC / BNC /DVI]
Dostepne tryby
PC/BNC/DVI

S S-Video
Component
D VDI-Video
MagicBrightTM
[ \text{[MENU]} \rightarrow [\wedge / \vee] \rightarrow [\text{ENTER} ] \rightarrow [\text{ENTER}] \rightarrow [\wedge / \vee] \rightarrow [\text{ENTER}] ]
MagicBright™ to nowa funkja offeruja opymalne warunki ogladania w zaleznosci od zwartosci
Parametry R Phase, G Phase, B Phase, Gain and Sharpnessfoundland et c.
Size
[MONTH] [A/V] [ENTER] [A/V] [ENTER] [A/V] [ENTER]
Adjusts the picture Tint.
Digital NR (Digital Noise Reduction) ASCD
[MONTH] [A/V] [ENTER] [A/V] [ENTER] [A/V] [ENTER]
The Film Mode feature offers you a theater-quality viewing experience.
Safety Lock PIN PASCD
[ \text{[MENU]} \rightarrow [\wedge / \vee] \rightarrow [\text{ENTER}] \rightarrow [\wedge / \vee] \rightarrow [\text{ENTER}] \rightarrow [0-9] \rightarrow [0-9] \rightarrow [0-9] ]
Haslo所提供zmienić.
Energy Saving PASCD
[ \text{[MENU]} \rightarrow [\wedge / \vee] \rightarrow [\text{ENTER} ] \rightarrow [\wedge / \vee] \rightarrow [\text{ENTER} ] \rightarrow [\wedge / \vee] \rightarrow [\text{ENTER} ] \rightarrow [\text{MENU}] ]
© 1995~2008 Samsung Electronics Co., Ltd.

Check Signal Cable PC
Picture image is unstable and vibrates.
© 1995~2008 Samsung Electronics Co., Ltd.
© 1995~2008 SAMSUNG. ALL Right Reserved

Middle East & Africa
| SOUTH AFRICA | 0860-SAMSUNG(726-7864) http://www.samsung.com/za |
| TURKEY | 444 77 11 http://www.samsung.com.tr |
| U.A.E | 800-SAMSUNG (726-7864) http://www.samsung |
| 8000-4726 |
Terminologia
Sync Signal
Types of Sync Signals
MDC (Multiple Display Control)
RpbkHnCTpyKmnpOTNbOcTaOnHO H3o6paKeHH

He nCnoIb3yIe NOBpeXdeHHbI IIN IIOxO 3aKpeNJIeHHbI Wtencenb.
TO MOKET Bb3BaTb 3NEKTPNeCKn WOK INN 3aRopaHne.
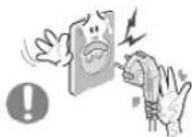
He TnHTe wTencEnb n3 po3eKn 3a WHyp H He Tpo"ae e"o BnaxHbIMn pykAMn.
TO MOKET BbI3BaTb 3NEKTPnueckm WOK Nnn 3aropahne.

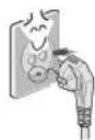
IcnoJIb3yIteToIbKO3a3eMnEHHbIeNo npabUNAM WTeNCenb I po3ETK.
!IenpaBnIbHoe 3a3eMHeHne MOKeT Bb3BaT b3eKTPmuecknn Wok nIN nobpeXdHne 6obpyoDaHn.(ToNbKO dNObpyoDaHnKnaccA1)

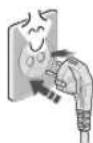
HadexHo,6e3 cna6nHbI, BCTaBbTe BuNkY nHTAHJ.
!eyctoHnBOe coeHNHeHMe MOKET nocnykntb npuHNOB 03rOpaHna.
He donyckaIte n3nIuHHe"o n3"nbAHn uHypa co 7TeNceIem Hne NOMEaIte Ha HIX TAgKeIbIe PpeDMeTbI, YTO MOKeT Bbl3BaTb NOBpeXdHeHc.
TO MOKET Bbl3BbT bJKeTpHecn WOK INN 3aRopaHne.
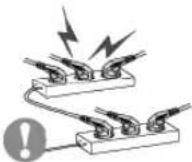
He nooCoeHNHnTe cNnKOM MHO"O ydnnHnTeNe H wTeNCeNe B Ody po3ety.
TO MOKET Bbl3BaT 3aRopaHne.
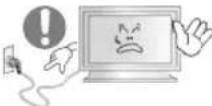
He oToeDnHnTe Ka6eNb NHTaHn BO BpeM nCNoIb3ObaHHN MOHTOPa.
- PnO tCOeMHHeHH MoKET Bo3HkATb BpocOK HApJKeHH, Bpe3yIbTaTe KToTporo BO3MOxHO NOBpeKdHeHH MOHITopa.
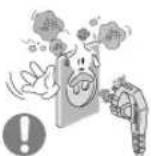
He ncoNob3yTe Ka6eBn NHTAHn,ecn BnIka nn pa3bEm 3a"p3HeHbl.
% cnyuae nonadHnBbINB Bnky nIN pa3bEM npOTpTe IN MkKoTKaHbO.
VcnoIb3ObaHHe Ka6eI NHTAHN C bInbHOB BnIKo Hn pa3bEOM MOKET npBecT K BO3rOpAHIO INN NOPAKEHNO 3NEKTPNHECKM TOKOM.
4TobbyOTKn&yHTb yctpoCTBO OT 3NeKTPOcETn, cneJeYET N3BneY Bnky Ka6eJIaNTAHN H3 po3eTKn 3NeKTponHTAHN. Ka6eJIb NTaHIN pRi TOM OCBOoDTcI INBbINOJIHeHn DaJIbHeJHX DeICTBN.
TO MOKET Bbl3BaTb 3neKtpueckn WOK INN 3aropaHne.
YCTaHOBka

npedhaHaeHHbIX dIpa0BoC xMMNecKMMpeAKTBAAM,rE n3dene6ydet 3KcnnpyATPOBAtBCKpyTIOcyTOHO H BOK3anax,BaPONOpTAX,nT.
IeBbINONHeHne 3TOrO yCNoBn MOKeT npBcTeN K cepBe3HOMy NOBpeKDeHHo MOHITopa.
YCTAHABINBAIte MOHITOP B CYXOM HENbJIbHOM MecTe.
% npOTHBOM Cnyae 3TO MOKET pINBECTN K KOPOTKMOY 3aMbKAHIO HnI 3aRopAHIO BHTPN MOHTopa.

IpepeBn"aa MOHITOp,he ypoHHTe e"o.
TO MOKET npBECTN K ERO NOBpeKDeHIO UIN K TeneChbIM TpaBMAM.
YctahOBHTe OCHOBAHHe MOHITOPa Ha CTeHN HnHa NoJky TaK, TTo6bl KpaOCHOBAHn He BbICTyana 3a"paHnbl.
- PaedHne n3dennr MOKeT NOBpeNTb ero HnHaHeCTN TpaBMy.
He yctahabnbaite H3dene Ha HeycToHBy& nobepxhoctb nHa noBepxHOCTb C HeoctatoaHOnPioua&.
- YctahabnBaIte n3denne Ha poBHyO, yCTOHmByIO nobepxHocTb, HnAe H3denne MoKet ynaCTb IN npuHHntb Bpe, HeNoBEky, HaxoJaEmycnoBn3OCTn,OCoBHeHO DetM.
He yctaHaBnBaIte n3dennHa nony.
% 3TOM CNYae O HERO MOXHO CNOTKHHTBCRA, BOCO6EHHOCTN 3TO OTHOCHTCRKETAM.
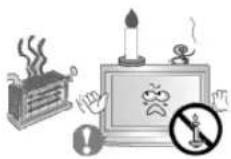
\*O N36EKAHNE \*O3TOPAHN HNKOTDA HE PACNOJAGAITE C\*EHN INIIN DPYRNE ICTOCHN KOTKpblTOI0 ORH PRAIOC DAHHbl< N3DEJIIE<.
% npoTUBHOM Cnyueae 3TO MOKeT pNBeCTK BO3rOpaHIO.
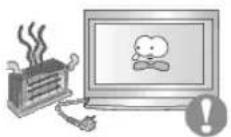
He yctanabnbaTe Ha"peBaTeIbHbIe npnbopbl prdOM co shypom nHTaHJ.
PacnabBueeecnokpbTneUHpyaMOKETnpbEcTnKnopaeHHIO 3NEKTPNHECKIMTOKOMINBO3ROPAHIO.
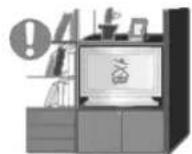
He yctahabnbaute H3dene B MeCTa C nnoxO BENTHnIaue, HAnpMep,B KHNKbIe NOJIKN, B CTeHHo WkaΦ N.T.D.
IIO6oe noBbIeHHe BHyTpEHHe TemnepaTypbI n3dennr MoKeT npBecTu BO3ropanHO.
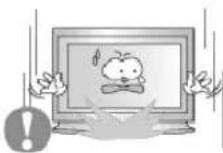
OnyckaTe MOHHTOp Ha IpeHa3HaueHHoe MecTo C OCTopoXHOCTb&.
EROMOXHO NOBpeNTbNNCNOMATb.

He cTabbTe MOHHTOp 3KpaHOM BHN3.
Ero noBepxHOCTb MOKcT 6bITb NOBpeXeHa
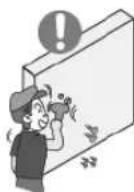
<ONTAX KPOHHTeHa DnKpnJIeHnHa CTeHe DoJIKeH BbIIOHNrTbCBAJINuPBOAHbIM NepCOHAnOM.
% npoTHBOM Cnyae MOxHO NOnyHtB TpaBMY.
&63aTeBnHO HcNoB3yIe INHCTpyMeHTb IJRA yCTAHOBK, yKa3aHHbE BY pyKOBOCTBE NOb3OBAteJIa.
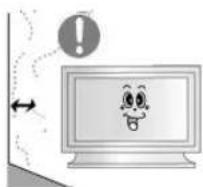
Ipn yctahOBKe Heo6xOaHMo ocTaBnTb 3aOp MeKdy N3deHem CTeHOi (6oone 10 cm/4 d&Ma), YTO6bHe npenrTcBOBaTb BEHTUNAun.
!IeOCTaTOHnA BENTINIA MOKET npNBECTN K YBEENHEnBHYTpEHHe TEmNepaTpybI N3dEInra,HTO,B CBOIO OHepeDb,MOKET npNBECTN K COkpaueHHo CpOKOB 3KcNpyaTALIN KOMNOHEHOB IN CHIXeHHIO KaueCTBa pa60tI N3dEInra.
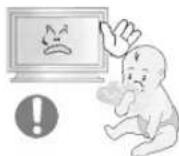
XpaHNTe nactKOBy& ynaKOBky (naket) B HeDocrynHom dIra deTei MECTE.
VrpaDeTeC nactKOBOn ynaKOBKO (naketOM) MOKET CTaTB npuHHOydyuB.
UncTka

HuaTe KOpNc MOHToPa Hn NOBepXHOCTb Ero 3KpaHa CnerKa BnaXHO MAnKO TKAHbO.
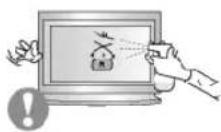
He onpblicknbaite MOHNTOP Mo&uM CpeDCTBOM.
TO MOKET BbI3BaTb NOBpeXdEHn, 3NEKtpueckn IOK nHn 3aRopaHne.

IpnntaTe peKOMeHDoBaHHbIM MOUcIM cpeCTBOM Mrgkyo TkaHB.

Ecn coeHNHTbHbI Hyp MeJy WTeNcIeM npo3rKo pKaBBn nnn rpa3Hb, noocntte erO kak cndyet cyxOn TKaHbU.
- Pra3Hb COeHHHTeHbHbI UHP MOKET Bb3BaTb 3NEKTPHECKNI WOK HIN 3aropaHne.

Ipeepnctkno3denny y6euntecb,TOOHynp nHTaHnO tKnouen.
% npOTINBHOM CNyue 3TO MOKeT npMBecTN K npaKeHIO 3neKTPueckHM TOKOM INI BO3ropaHIO.
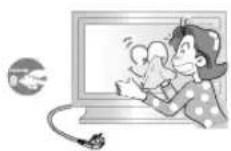
OTKIOHTeIHyp NHTAHnO TcTeBOH po3eTKn HnpotpTe H3dENRA MRKO, CYX0 TKaHBIO.
- le nCnONb3yInTe XmMnWeckHe CpeDCTBa, HApnpMeP, npapdHn, 6eH3nH, cnHPT, pactBopUTeN, INCeKTHuNDbl, OCBeknteB Bo3dyxa, Cma3ky HIN MOIOUne CpeDCTBa.
Dpyroe
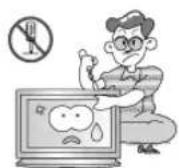
He CHIMaIe KpbIuKy (HIN 3aADHIOKpbIuKy).
TO MOKET Bbl3BaTb 3JIeKTpHecKm WOK JINI 3aRopaHne.
&6cnyKbHaHne DOJXHO npoBOaTbcra KBaINpUnpoBaHHbIM TexHNuecknM nepcoHAnOM.
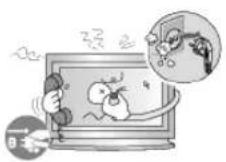
Ecnn MOHnTOp He pa6oTaet HopMaIbHo - B OcO6eHHocTh, ecnn n3 Hero NdyT Heo6bUHbIe 3ByKn Hnn 3aIaxn - HeMeJeHHO OTKlnOHHTe ero OT cTeN I o6paTnTEcb K ABTopu3OBAHHomy dInepy nnB cHTp TEXnueckoro 06cnyKnBaHna.
TO MOKET BB3BaTb 3NEKTPnueckm WOK INN 3aRopaHne.
YctahabnBaTe n3dJIne TAK, YTO6bI n36eXaTb BO3dEChTBnHa Hrero MacNa, dIbMa IIN NOBbIeHHeBn BlaxHoCTn; He yctahabnBaTe n3dJIne B TpaHCnOpTHOM CpeDCTBe.
TO MOKET PnBECTN K BO3HKNHOBEOHN HOVCnpaBHOCTN, NOPAKEHNO 3NEKTPNCCKNM TOKOM MNIO NOXAPY.
%oc06eHHoN36eRaIteHcNoIb30BaTbMOHITOpB6n3nBOBbINHaOTKpbTOMBO3dyXe,rHeHAHERO MoKETNONaDaTbDOJkbNNCHer.
Bcnyae naeHnMoHTopa nn nobpeXdeHn KOpnyCa BbIKNoHTe ero H BbIHbTe BNkY n3 po3eTK. 3aTeM CBxntecb C ceHTpOM o6cnyKuBAHH.
% npOTNBHOM Cnyae BO3MOXHO BO3HNKHOBEHHe HNCpABHOCTN, NOPAXHEHNE 3NEKTPHHeCKHM TOKOM ININ NOKAP.

*bIKn&yainTe nHTaHne MOHTopo BO Bpemra "po3bl Nn Ko"da OH He HcnoJIb3yETcB TeueHHe npOdoJNKeTEnbHO"o nepnoDa BpeMeHN...
% npOTnHBOM Cnyae BO3MOXHO BO3HKNHOBEHEHe HcnpaBHOCTM, NOPaxHe HeNekTPnHeckm TOKOM NIN NOxap.

He nbitaTcB NOBHyb MOHITOP,NOTAHYB TOnbKO 3a npOBd HnCn"HaNbHbKabEnb.
TOMOKETBb3BaTbNOJOMky,3NEKTPuyeckmIUKIN3aropAHneH3-3a NOBPExDeHnKa6en.
He cTapaIeTcB NOBHyTb MOHITOP BJIeBO HIN BnPaBO,ep"ar 3a Hypnnn Cn"Hanhblk Ka6enb.
TO MOKET Bb3BaTb NOLOMKY, 3IeKtpueckn WOK INN 3aropAHne H3-3a NOBpeXDeHnKa6en.
He 3aKpbIbAaTe BeHTnIaHIOHHbIe OTBepCTNa Ha Kopnyce MOHITOPa.
- IIOxA BENTINIaM MoKet Bb3BaTb IOBpeXeHne Nn 3aropAHne.
He nomeuahe Ha MOHTop eMKoCTn C BDOJ, XMMueckne peakTBBbl Nnn MeJIKe MEaJIINueCKNe PpeDMtB.
TO MOKET PINBECTN K BO3HKNHOBEHNHO HENCnPaBHOCHT, NOPaKeHNHO 3NEKTPnueckm TOKOM HIN NOXAPy.
% cnuyae nonaHa HByTp b MOHtOp a NOCTOPOHHX BBeueCTB BbHbTE BNIKy uHypa nHTAHN V3 PO3ETKN CBAKITcB c UENTPM OcCnyKBAHNA.
DepKnte n3dene BdaeneKe ot BocnnaMeHa&uxcra a3po3oNe nnBeeCTB.
TO MOXET npBecTN K B3pBiBy INN 3aropAHIO..

Hnko"da He BCTaBJIte MeTaNIIueCKne npedMeTbI B OTBepCTHa MOHTope.
TO MOKET Bb3BaTb 3eKtpnueckn WOK, 3aropahne HIN TpaBMy.
He bctabnIte metanlneecckne npedmetbl, taKne KAK KYCKN npobolokn Hnn wypynbl HNN BocnnaMeH&meC6oBeKtbl, KaK HanpImep 6yMa"u nn CnUKNB BeHTnlaunOHoe OTBepCTne,

pa3bem nI HayuHnKOB nn nopTb AV.
*TO MoKET npHBeCTN K npopaeKeHHO 3neKtpnueckm TOKOM HIN BO3rOpAHIO. EcnB IN3dEIne nonana Boga INn INHO BeUcTeBO, BbIKNoHTe erO, OTCoeDInHte KaBEnb NITaHnO T pO3eTKN IOBpaTInTEcb B cepBnCHbl CEHTP.

Ipn OTo6paXeHHn HEnoDbNkHo KApTnHKn B TeueHne npOdoJIKTeBHo"O nepHOa BpeMeHN Mo"yt NOBnTbCn OCTatoOHhie H3OpaXeHHn HInn Hepe3KocTb.
Ecn%bI He cO6paTeCb NcNOb30BaTb MOHITOp B TeCHHe NdNTeBHO BpEmHn, nepeKnOHTe ero B pexm 3heproScBepeXeHn nn AKTbN3pyte XpaHntBkPapa, OTo6paKaiou nOdBKHOe IIO6paXeHne.
Hactpoite pa3peuHHe n cactOy co"JacHO yPOBnM, COOTBeTCTBy&mMaHHO MoeHn.
!IenpaBnBHa yCTaHOBKa yPObHe pa3peuHn H NactOTb MoKet npBecT K NOBpeJeHHo rna3.
40dHIOMOB(101,6cm)-1360X768
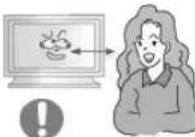
IpoDIOJIKNKITeNBbI npOCMOTp MOHITOPa NOJ OCTpbIM y"nom MoXET Bb13BaTb np6nEMbI CO 3peHEm.

4 Tro6bI CHN3NTb Ha"py3ky Ha "na3a BO Bpemra paoBtby MOHToPa, dAeIaTe NATMmHyThbI nepepbIb Yeep3 KaxdbI yac.
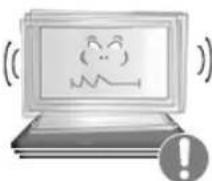
He yctahabnbaTe n3dennHe hyectoynBy&, HepOBHy& NOBepxHOCTb mN B MeTO, NOdBepxeHHoe BN6paun.
- PAneHHe N3dEHN MoKet NOBpeNTb erO HnH HaeCTn TpaBMy. KcNpyataaHnDenn B MceTe, NoDBepKeHHOM B6paun MoKet COKpatntb cPck erO cnky6bl nnn npNBECTn K BocnnaMeHeHIO.
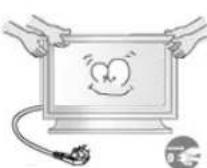
Ipn nepemeenu HMOHTopa Ha py"oe MeTo nepebeHnTe BbIK&yateB NTaHnB B COCTOHN H NOTCOeHNHTe HHP NTaHn. Ipeed nepemeueHem MOHTopa 683aTeJbHO OTcoeHNHTe BCE KaBEn, BKN&yau ANTEHHBI KABeN b COeHNHTeJIbHbIe Ka6en Dpy"nx yctpoiCTB.
- 1eBbnonHHe 3TO Tpe6oBaHnMAOKeT npMBecn K NOBpeKdEHHKabene, BO3rpaHnIO INI NopaeHnHO 3NeKTPueeCKM TOKOM.

TpaHcnpTnpoBka Hn npemaehne H3dennnoJokhnaOcyuectbIbTBcB6oonee Yem DByMnIOdbmN.
- PadeHne n3dennMOKeT npBecTe K eero noBpeKdeHIO UIN TpaBMe ueNoBeka.

YCTAHOBHTe H3dene TAK, YTO6bI y6peyEero OT DeTei (DETMORYT NOBPeNTb H3dene, 3a6npaCb Ha Hero).
- PanaeHne n3dennn MOKeT npBecn K TpaBMam nn daKe rn6en.
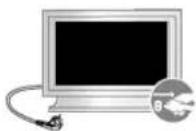
EcnH3dene He HcnoJb3yeTcB TeueHne npoDOnKHTenbHoro BpeMeHH, xpaHNTe ERO OTKNIOUeHHbIM OT NHTAHN.
% npoTHBOM Cnyae 3TO MOKET npuBecTN K BbIeJIeHIO TELNA I3-3a CKONBWeJcRp3n HmN NOBpeJeHIO N3OJIaUN, QTO B CBOIO Ouepeb MOKET npuBecTN K NOPaKeHIO 3NEKTPnueckHM TOKOM.
He knaIte Ha n3dJeHne IIO6MbIe npEmTebl detEi (nIINpeDMbI, MORYUe Bb13BaTb HX INHTepc).
=ETM MORYTNONbIATbC3a6paTbCnHaN3dEInna, YTO8bI B3aTBnX. N3dEInne MOKET yNaCTb, BB3BaB TpABMy nHn DaKe RnBn.

Iocne n3BleueHn 6atapen n3 nybTa dNCTaHNOHOrO ynpabHeHHxpanHTe nx BHe doCraeMoCTn OT dete, KOtOpbE MOryt nx nporNotb. Bepernte 6atapen ot dete.
% cnyuae nx cnyuahHoro npornatbHaHn HEmeJeHHo o6paHTecb K BPaY.
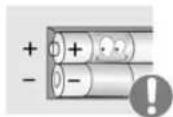
Pn3ame He 6aTape BCTABNHe Ix B NOJoxeHn COOTBETCTByHOUcEM npabINbHOH NOJAPHOCTn +/-, yKa3AHHOHa KOpnyce 6aTape.
!IecobHdHeHneNoJpHcTmMokTe npBecTn KbIXOy6BatapEn H3 cTpornnYteKHe Hee 3NeKtpoNTa, a TaKKe npBecTn B03rpaHIO,TPaBMAMnN3aqr3HHeHNOOKpyXaUoero npocTpaHCTBa (N NOBpeXdeHIOyctpoiCTBa).

IcnoJb3yIte ToJIbKO 6aTapeH yKa3aHHOro cTAndapTa. He IcnoJb3yIte OndHOBpeMeHNO HOByU n CTapYIO 6aTapeKy.
*TO MOKET npBecTKe N Ke NOBpeXeHnIO Unn yTeUke BHyTpEnerHO BcIeCTBa, a TaKKe MOKET Bb3BaTb BOrOpaHne, TpaMbY nn 3aRpa3HeHne (NOBpeXeHne).

Баразен, равно кад и Akkymлгторье бразен, Heялг&Tса obikhoberHHbIM 6bITOBbIM NTXDAMH И NOДпжат сдачдп nepepa60kn.Кak notpe6ntelb 6разен, NOIb3ObaTeNb 6bra3an cdaTb OTPa6oTaHHbIe 6разен ИИн Akkymлгторье 6разен дп nepepa60kn.
&tpa60taHbIe 6bapen HnAkkymyTOpHbIe 6bapen MoXHO cdaTB B 6bnkaaHmri rocydapcTBHeHHbIeHTp nepepa60TKn OTxOIOB HnB Mara3Hn, IMeIOuMn B npOdaKe Otpa60taHHbIe 6bapen HnAkkymyTOpHbIe 6bapen TAKORo Xe Tnna.
© 1995-2008 SAMSUNG. ALL Rights Reserved
Copepkane
IpaBnlaTexHnK6e3oNaChocTn 1
Hnfoepmaue 1
Питане 1
YcTaHOBKa 2
UncTka 4
Дргroe 5
\*BedeHne 12
Coepexmoe ynaKOBkn 12
BaM MoHITop 13
Mexahnueckay KOMnoHOBka 20
Iopkn&yHne 26
KoMnJIeKT dIy yCTaHOBKn IODCTaBKn 26
IoknueHne MoHTopa 27
MDC 33
Hactpoika MoHTopa 53
BxoD 53
I3o6paKeHne [I.K/BNC/DVI Pexm] 54
I3o6paKeHne [AV / S-Video / KomnoHeHT. / DVI-Video Pekm] 57
3ByK 58
YcTaHOBka 59
Mhoroakp. Ynp. 62
Функци npramoro ynpablenna 62
YcTpaHHe HeNCnPaBHoCTe 64
Функциа Camonpoверки 64
Cnncok IpoBepok 65
%onpocbl&TBetbl 65
Cneunpkauu 69
&6uie 69
*KOHOMaI3ep 70
Φa6pHnO!actpoKn=ncnpe 70
HnΦopMaζη 72
72
N!Φ&PMAUJIY &B I3=ENIN (IpeoXpaHHeHne oT 0fΦeKta ocTaOHTHO n3o6paKeHH) .... 72
Appendix 76
C8a3bBaTecb c SAMSUNG no Bcemy mpy 76
TepMNbI 78
Полимочь 79
SAMSUNG
PpabunTaXnKn
6e30nacCHOCTN
BVeJdHeHne
Copepkmoe ynaKOBKn
BaM MOHITOP
%exaHueckKa KOMNOHOBka
TnKn"eHne
Pa60a c nporppaMMHbIM
06cne"eHnem
Hacrponka MOHTOPa
*ctpaHHeHne
HEnCnpaBHOCTeN
Cneunfkaumn
HnΦopMaun
PpJIOKeHne
TFT-LCD Monitor
www.samsung.com
BETN BHeHnBnD n3dEINMOryT pa3nnHbC8 B 3aBNCMOCTN OT MOnEN, a XapakTePmCTNK n3dEIN
MOrTy N3MeHrTbC863 npEeBapuTeIbHoro yBeDoMneHn C cIeJIy ycOBepWeHCTBOBaHn.
BVeJeHne
CoepxHmoe ynaKOBKn
Приимechанинe
- Ptoxanynta, npOBepbTe, BCE Nn HIXepeHcneHHbIe Yactn HAXOITCBY yNakOBKe Bmecte C
MOHHTOPOM.
Icnnyero-to Hxbataet,CBRAKNTecc C BauHm Dnnepom.
Pn Heo6xOaMocTn NOKynKn DonONHntBbX KOMNoHErTOB ObaPHTecb K MeCTHOmy DInnepey KOMnaHN.
N PnIMeHaHHe
- He yctaHaBnBaIte n3dene Ha nony.
MOHITOP
PykoBODCTBO

PYKOBOCTBO NOJB3OBATEN

TapaHTnHbI TaIOH
(BbIaETcH BO BCEx
permoHan)

PykoBOdCTBO
NOLb3OBaTeNa
nporpaMMHoe o6ecne"ehne
MDC
Ka6enb
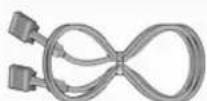

CnHaJIbHbI KAb(15-7MbKOBbD-SUB) Ka6eB 3JekTpOnrTaHH
Dpyroe
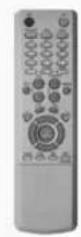
KhONKn nynbTa dNCTaunHOHOrO ynpabNeHH
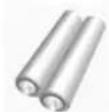
6atapen(AAAX2)
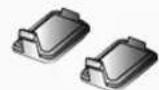
KpbIka dIg OTBepCTHa

AV/S-Video/KomnoHeHT PekIM
BNC
AV/S-VideoPekim
DVI
AV/S-Video/KomnoHeHT
AV/S-Video
PC/BNC/DVI PeXMM
KOMNOHEHT
PC / DVI PeXMM
7) C
Knabuwa-BbiknioateB
3Ta KhoNka CnyKNT DnB BKNIOUeHn N BbIKIOUeHn MOHITopa.
8) INHdkatop peknma nHTaHna
InHdkatop pexkma nitaHn 3aropaetc npn Bknuehen nitaHn. Cm. pa3den Texnueckne XapakTepeNTKn.
9) DaTnK DnCTaHcNoHHOrO ynpBaJIeHnI
HanpaBnIe npbIy dNCTaHcMOnHHo ynpabHeHn Ha 3Ty TOkY MOHTOPa.
MeyaHne
PaedekHOHOMa3epcoepKNT daIbHeuHy INHOpMaunH, Kacaiouyoc cyHKn pexkma 30HOmm 3NEKTPOINTAHm. Ia coXpaehnHa3epn, OTKIOUaHTe MOHITOP, ECn OH He HyKeH, nIe ECn OH OCTaETc HEnCNOB3OBAHHbIM B TeueHne DOnrTO BpeMeHN.
Bn
c3a
Meuahne
- PódrpóbHyu HnΦopMaHIO O pOKnIQUeHm KabeNe CM. B nyHKTe "PódkIQUeHne KabeNeS" B pa3dJe "YcTaHOBKa" KoHpfuRpyaua 3aHei naHei MoHITOpOB pa3NHybIX ModeNe MoKeT He3NaHTeNbHO OTNIHaTbcra.
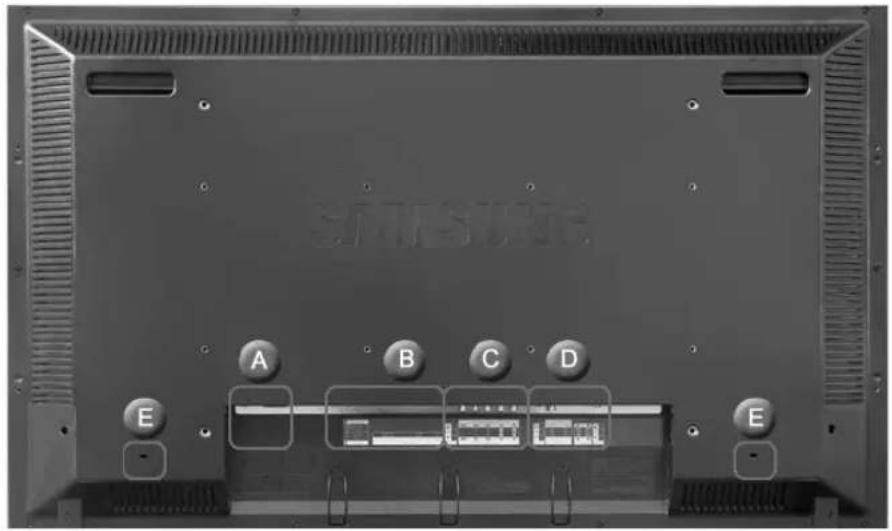
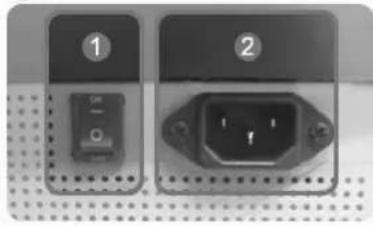
A
1) POWER S/W ON/OFF
BknouBaHe n 3KJIOUbaHe Ha MoHITopa
2) POWER IN
3axpaHbauT Kaben Ce BkIOUba B MOHTopa KOHTAKTA HA CTHeTATA.
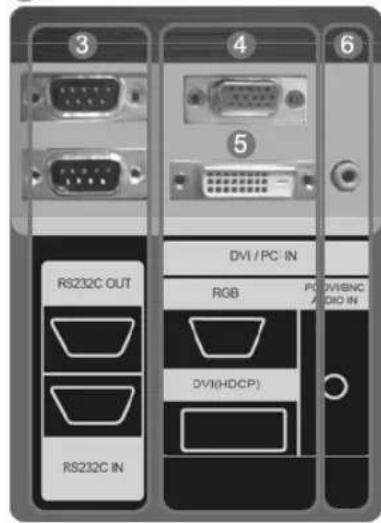
B
3) RS232C OUT/IN (nocJeDoBaTeIbHbI nopt RS232C):
Iporpammmbnopt MDC (Multiple Display Control)
DVI-D - DVI-D - peKIM DVI (LHpOBOB cHnAn or TIK)
6) DVI/PC IN [PC/DVI/BNC AUDIO IN] (KJEMma aydnochrana PC/BNC/DVI (BXoD))
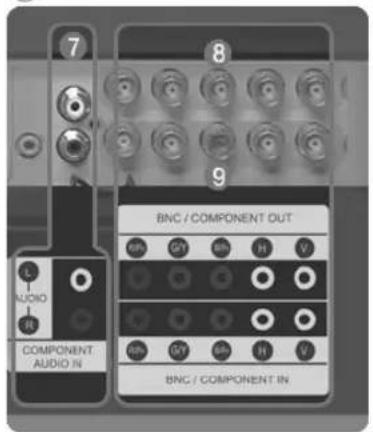
C
7) COMPONENT AUDIO IN [L-AUDIO-R] (KJEMma aydnochra KaMNOHeHToB (BXoD))
8) BNC/COMPONENT OUT [R/P R, G/Y, B/PB, H, V] (Pa3bEmДгл NOДКЛЮЧЕНь ВДЕОСИнHLaHа O T KOMЛБЮТepa / Pa3bEmДгл NOДКЛЮCHЕH N KOMПОHTOB(BbIXOd))
Pnoknouhe BNC (aHaonorobm ciHAn ot PI): noKnouhe npTOB R, G, B, H, V noKnouhe KOMnoHeTOB: noKnouhe npTOB PR, Y, PB
9) BNC/COMPONENT IN [R/P R, G/Y, B/PB, H, V] (Pa3bemДЯ NOДКПЮЕн� BADEOCURHANA OT KOMMbIOTepa / Pa3bemДЯ NOДКПЮЕн� KOMMOHEHTOB(BXOD))
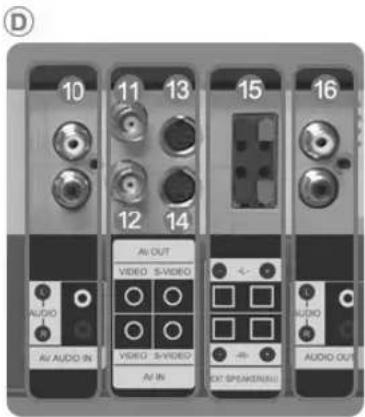
10) AV AUDIO IN [L-AUDIO-R] (Pa3bEm nna
noaKnIOueHnaydNocHrHana MONITOR)
(BXoD)
11) AV OUT [VIDEO] (PazbemДЯ NOKIOUChENa Video):PexmAV(BbIXoD)
12)AVINVIDEO(BxOa)
13)AVOUTS-VIDEOPexmS-Video(BblxOd)
14) AV IN [S-VIDEO] (Pazbemдя подуончehнrs SVideo)(Bxod)
15)EXT SPEAKER(8Ω)--L-+,--R-+)
16) AUDIO OUT [L-AUDIO-R] (Pa3bEm nIy nodknquhen aynocnHana MONITOR) (BbIXoJ)
BbIXOД-MOHHTOP: noKIOHueHne KOMNbIepe PC, DVI, BNC
Приимechanicals
KoJIHueCTBO MOHITOPOB, KOtOpBIE MoXHO NOcEOeHNHTb K NtneBOMy BixOxy, 3aBNCIT OT Ka6eI, nToCHNkCaHrHaA n T.D. Ecnn Ka6eJb He yxduaet yPOBeHb CnHana nn 3fFekTINBHOCTb nToCHNka CnHana, TO MOXHO NOcEOeHNHTb DecaTb MOHITOPOB.
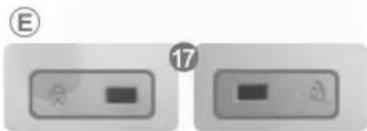
Displayed on the lower left corner of the screen.
Pn HkaTnn KhoKm Mute nn KhoK - VOL + B pexime Mute BoCnpo3BeHne ayDnocrHana BO306HOBnRETC.
9) TTX/MIX
TeNaIbI obecneuBAIOY cnyr npedau NkCTOBO INHOpMaUN,Ha3BaemyTO TeNETeKTOM.
[BEBPone BOCOBHOM Ncnonb3yetra TTX/MIX.]
10) II MENU
3Ta KhoNkA nCOnb3yETcTg dIg OTKpbITnA 3KpaHHOrO MeHIO (OSD) n AKTNBn3aunn BbIeNeHHOro NHyKtA MEHIO.
11) ENTER
AKTINBn3npyET BbIpaHHbI NyHKT MeHIO.
12) M/B.P.MODE
Hactpoika n3o6paKeHHa MoHnTope nyTeM BbIbopa OHOH m3aBODcKHX (nnn nepcoHaJIbHbIX) Hactpoek.
AV / S-Video /KomnoheHT. Mode: P.MODE
MoHTOp IMeET YeTbIpe npedyctaHOBnEHbIX Ha 3aBOde-IMrTOBNTeNE BapnaHTa ABTomATueckOyCTaHOBKn napaMeTPOB INo6paKeHn.
IaIcKmueckoro BbIopa npedabntelbHO HAcTpoeHHbIX peKMIOB HAKMITE nocJe 3TOrO KHONKy eHpepa.
(HnHa. ChaHApTH.KnHO-Flnb3.)→
PC/DVI Mode:M/B(MagicBrightM)
MagicBrightTM-30noHOBaФyHKUNaMOHITOPa,ObecneHbAIOUaIaDyBkPaTHOEyUyueHeNKeAueCTBa 136paKHeHnO no CpaBHeHnO C cyuEcTByUcUMM MoHITOPaMn NytEm NOBbIeHnE rO npKOCTn UeTKoCTn. (PaBNeKaT.NItePHT TeKT→PiIb.)→
13) AUTO
KhONka Auto (ATo) o6ecneuHbAeT ABToMaTHueckyIO HAcTpOky 3kpHa.(PC)
EcBn Bn3MeHNTpe pa3peSeHHe Ha naHEn ynpaBHeHn, 6yET BbONHeHa cyHKnAUTO.
14) PRE-CH
06ecneHbAeT npemeueHHe MeJxdy nyHKTaMn MeHIO no BepTKaJIIN nIM n3MeHHe 3Haehn BBbpaHHbIX nyKTOB MeHIO.
-Функци HeoctynHЯ n3TORO MOHtopa.
15) VCH / PA
B pexme TV 3a KhoKa O6ecneHbAe BB6Op TeEnBnHOHbIX KaHaNoB.
-Функцн HeodctynHa dln 3TO MOHHTopa.
16) SOURCE
BkIIOaET INDnKATOp, COOTBETCTBtuOuN TEKyuEmy BXoDHOMy CINrHany, IcNOnb3yEmomy MOHITOPOM.
17) INFO
B BepxHem IeBom yIy 3kpaHa OTo6pKaaeTc HnHOpMaunr O TeKyuE m N3o6paKeHHM.
In PC/DVI mode, sets only SOUND to FM Radio.
In general Video SOURCE mode, sets to FM RADIO, turning off the screen.
In areas where signal is weak, noise may occur while FM radio is broadcast.
-Функци HeoctynHЯ n3TOrO MOHTopa.
23) P.SIZE
Cnyknt dnnn 3MeHeHHpa3MepoB 3KpaHa.
24) (SRS
SRS
25) I-II DUAL/MTS
DUAL-
Pexmbi CTEPEO/MOHIO, DBOHOI I / DBOHOI II MOHO/NICAM MOHO/NICAM CTEPEO moryT BkIOuHbca npn npocmoTe TeneepoPamB 3aBNCmocTn OT Tna BeuaHnC nMOouKhoNkDUAL Na nyIbte D.
MTS-
BbnoJnHaeIpeKnOHeHepKmOBMOHO/CTEPEO,DBOH01/DBOH02nMOHO/NICAM MOHO/NICAM CTEPEO.
| Audio Type | MTS/S_Mode | Default | |
| FM Stereo | Mono Mono | Manual Change | |
| Stereo | Mono ↔ Stereo | ||
| SAP | Mono ↔ SAP | Mono | |
-Функин HeDocTynHaДЯ 3TO"OMHHTopa.
26) 三PIP
UnpaBneHnE OKHom n3o6paKeHnI PIP.
27) SOURCE
BknHaaet HndkaTOp, COOTBETCTByoIuIe TekyuIeMy BxOHaOMy CnHany, IcNoJIb3yeMoMv MOHTOpom.
28) SWAP
MeHReT MeCTaMn COePckmOe PIP n OCHOBHOe N3o6paKeHne.
1306paKeHHe OKHa PIP oTo6pa3ntcHa OCHOBHom 3kpaHe, a I3o6paKeHHe OCHOBHO 3kpaHa oTo6pa3ntcB OKHe PIP.
29) SIZE
P03B0JraET BbIbupaTb pa3nHbIe pa3MepbI N3o6paKeHna.
30) REW
06paTHaNEpeMoTka
31) STOP
Stop (Cron)
32) PLAY/PAUSE
Bocnpou3BeJeHne / Nay3a
33)FF
YckopenHHa nepeMoTKa Bnepe
© 1995-2008 SAMSUNG. ALL Right Reserved
1.


2. *epx MOHITopa


3. Noidctabka

4.ДиHamNK

UP
5. KaYcTaHOBnTB KpOHwTeH VESA
- Пиустановке VESA Heo6xodIMO HANMHe COOTBeTCTBnC MeKdyHapOndbIMn CTaHdApTaMn VESA.
HΦopMaunno nokynke n yctahOBKe kpoHtneHa VESA: tO6bI noaTb 3aKa3, o6paTntcB K 6nKaiMeMy DnCTPn6bHToTpOy fnpMb Samsung. Nocne pa3meueHHa 3aKa3a kpoHtneH 6yET yCTaHOBHeN CNEuaHNTamn.
- IpepeMaTb MOHITOp c KK-DnCnJneem DoJIKHBi, no KpaHHe Mepe, 2eNoBeka.
KOMnAHHa Samsung He Hecet OTBETCTBeHHocTh 3a NIObIe NOBpeXdHnN 3dEINr INTpaMbI, pON3OWeDwne B Cnyae camoCToTeJIbHOyCTAHOBKe KpENNEHn HA CTHe NOKynATEm.


MONTAKKa KPOHTeHa Ha CTeHe NcNoB3yIe ToJIbKO KpeNExKHbIe BnHTbI C "ONOBKO NOJ WnUdAmETpOM 6 MM n dnnHOIOT 8 do 12 MM.
UP
6. YctaHOBka HAcTeHHO"O KPOHtEiHa
-Дя установский Крштейнам obpaитecь к спунлесу.
Samsung Electronics He Hecet OTBETBeHHocTn 3a NOBpeKdEHNr H3dEINr Hnn yUeep6 nOtp6HTeHn npn yCTaHOBe N3dEINr nOTpe6bTeHem.
- N3dene npeHa3haeHO nIy yctaHOBKn Ha 6eTOHHbIX cTeHX. PnYcTaHOBKe Ha OTHTyKATypeHHbIe IIN DEpeBAAHbIe NOBepxHOCTN N3dene MOKET DEpKaTbCt He HADEXHO.

KOMNOHEThbI
IcnoJIb3yIte TOJIbKO Te KOMnOHeHTbI n pInHaJdNExKHOCTN, KOToPbIE NOCTABnIOTcB MBeCTe C 3dJIeHEm.

HacteHHbKPOHHTeH (1)

ПeТЯ (Лeвая: 1, Правая 1)

Пл actikobblдерха teь (4)

BnHT(A) (11)

BnHT(B) Ankep (4) (11)

C6opKa HacTeHHoro KpoHHTeHa
1
BCTaBtE n 3aTnHTe qKcnpyUoU BnHT no HAnpaBHeHIO CTpeKN. Pocne 3TOrO 3akpenITE KPOHHTeH HA CTHe.
A.ФИКСИРУЮДПИ
B.HaTeHHbKPOHHTeH
C.Петли(Левая)
D. Петта (правая)

ImeHOTcA DBe netn (neBa n npab).NcnoB3yTe HxHyIO netnIO.
2

Ipejde yem CBePnTb CTehy, npOBepbTe
pacToHHe MExdy DBymra KOHTPOBOUHbIMN
OTBepCTnMM Ha 3aDHei CTOPOHe n3DeJIYr.
Ecnn paCToHHe cNIuKOM MaIO NIn BENko,
tOBoIero OTperynpoBaTb, Ocna5Be BCE nIN
HEKOTOpHe n4 BnHToHa CTEHOM
KpOHTeHHe.
A.PacctoHMe MEKdy DByM KHTPOBOUHbIMN OTBepCTnMn

3
PpOBepbTe CXemy yCTaHOBKN IOTMeTbTe MeCt aCBpeHnHa CTeHe. DnA CBpeHnA OTBePcTn rny6HnO 60nee 35 MM nCnonbayte CBepNo 5,0 MM.
3aKpEnTe KaKdbI aHKepe B COOTBeTCTByIOUeM OTBepCTIM. CoMeCTNe KaKdoe OTBepCTne KPOHUsTeHa NnETIN C COOTBeTCTBYIOUIMN OTBepCTmMn aHKepeBACTaBtE N 3aTaNHTe 11 BuHToB A.

Для крениня Идения На HabteHHOM КpoHштейне
BHeuHn BnI3eJnMa MoKet BapbnpoBaTbcra B 3aBcunMoCTN OT MoeJIn. (C6opka nactkoBOrO dePkaTeJI n BuHTa npOnCxOAnT TaK JVE.)

1

2

1.3akpeINBn3deIHe Ha hacteHHom kpoHHTeHne, y6eDITcEb, YTO OHO npaBnH0 3aФKcnpoBaHO HaJeBOM N npaBOM nPACTIKOBbXdepKaTeJx.
2.При установке Идения на кронштейн сеньITE,чTOБы пальи He nonanB OТВеретгЯ.
3.Y6eHNTecb,HTo HAcTeHHbKpOHHTeHN HAdEXKHO pNkpenHeKCTeHe,BIpOTNBOM Cnyae NocYe YcTaHOBKn NdEJIne MOKeT He DePKaTbCa Ha MeCTe.

3

4
OTBnHTte 4 BNHTa Ha 3aDHe CTOpOHe n3DeNIA.
BCTaBtBe BHT B nTnactKOBbI DepeKaTeIb.
3aTnHTe 4 BHTa B ware 2 (nlaactNKOBbI depkataB + BHT B OTBepCTna Ha 3aHei CTopoH eNII.
YdAnTe CTOnOpHbI WtNΦT 3 N BCTaBbTe 4
DEpKaTeRn I3DEnn B COOTBETCTBYIOuHe
OTBePcTH Ra KPOHTeHa 1. 3aTeM npOHO
3AkpeNTe I3DeNe 2 Ha KPOHTeHe. He
3a6yDbTe 3aHOBO BCTaBbTb N 3aФHKCnpoBaTb
3aUHTbIb WtNΦT 3, YTO6bI N3DEnne npOHO
DEpKaNoCb Ha KPOHTeHe.
A. MoHITOP
B. HacteHHbI KPOHHTeH
C. CTeHa

Pe"yInpOBka y"Ja hAcTeHNo"o KpoHtTeHa
Ipeed yctahOBKOHa CTEny yCTAHOBnTe yroH NAKHOHa KPOHHTeHa Do-2°

1.3aKpeHnTe H3dJIne Ha HAcTeHHOM KpoHHTeHe.
2.ДЯperулровкугларжн'teидениез capeDnHyBepxHue ChactuTIN TAHHTe BnpeD (no HanpaBneHIO CTpeKKn).
3. Moxho yctahOBtbyrnoHaKHOHaKPOHHTeHaMeJy-2"n 20°

Y6eINTEcB, YTO npn yCTaHOBKe Yrna
NCNOL3yTe npn peryIuropOBKe Yrna cepeHNHy
BepxHeu cactn, a He neByIO nII npabyIO
CTOPOHy N3dEJIIN.


Ppabnna TeHHNK
6e3onacHcTn
BVeIeHne
IopdknloyuHne
KOMNNEKT DnY yCTaHOBKn NOCTABKN
PoiKIOUeHMe MOHTOPa
Pabota c nporpaMMHbIM oecneueHHeM
Hactpo"ka MOHITOPa
UcTaPHeHne
HEnCnpaBHOCTe"
Cneunphkaun
&HΦopMaun
PpnoKeHne
TFT-LCD Monitor
www.samsung.com

Lbet H BHeHnBn H3dNMA MOry PaHbAChB 3aBNCIMoCTn OT MoEIN, a XapakTePcNTKn H3dNMA MOrY I3MeHrTcB6e npBaPntbHorO yBeDOMneHnC cIeNo yCOBepueHCTBOAHn.
PoiKJIuOyeHne
KommneKTdna
yCTAHOBKnIOdCTABKn
PnmuMeaHne
Vcnonb3yIe TOnbKO BuHtbl, BKNHOeHHbE B KOMnNEKt NOCTaBKn.
npeodocTepexeHne
Samsung Electronics He Hecet OTBETCTBEHOCTHa NOpeKDeHnB B pe3yIbTaTe NcNoIb3OBAHnRA KpOHHTeHOB,OTNmuOHXxCR OTNCAHHBX Bblwe.
> YctaHOBKa BpeMeHHa noCTaBka

npeodocTepexeHne
NepeBepHnTe Ta6nHy "CAUTION".

1)3aunTHA KpbIbKa IcNoB3yETcI dI 3aunTbI OTBepCTra B HnKHeH qACTn MOHITopA, Kyda BCTaBnRAeTc naCTabKa. O6a3aTeNbHO ydaNTe 3aunTHyO KpbIbKy npn pnpcoedHHeHH BXoJaueB KOMnNEKT BPemHNO IOCTaBKn INN KOMnNEkTA NOCTaBKn (npOaTaC TOnJIbHo), a npn npncoeDHeHH KOMnNEkTA dI yCTaHOBKn HA CTeH 3akpoite OTBepCTne, IcNoB3y KpbIbKy dIg OTBepCTra.
2)YcTaHOBHTneByIO npaByIO nOCTaKN.
3)BCTaBBte NOCTaBky BOTBepCTne BOCHOBAHMMOHTOPA. BCTaBBte BHT BYkAsaHHoe OTBepCTne H3aBepHnre erO.(M4xL15)

npedocetepexeHne
DAnHHaNoCTabKa npedHa3HauHe dnapeynpOBk yra na 03opa 3kaHa. KomnHaHa He Hecet OTBETCBHHOCTNa 3a yueep6, BO3HKuWn B pe3yIbTaTe NIOBOrO nCnONb3OBAHm NoCTabKn. HIKOrDa He nCnONb3yTe I3dEneB KaueCTBe NoCTabKn noNIO6bIe ppeMetbl.
KOMNNEKT dny yctaHOBN NOCTABKN (npOdaetc rOtdbHo)


1)3aunTHnA KpbIuKa IcNoB3yETc nI 3aunTbI OTBepCTra B HnKHe Nactn MOHITOPa, Kyda BCTABnEeTc naCTabKa.Ob3aTeNbHO ydaNITE 3auNTHyO KpbIuKy npnpncOeHNHeHH BXoJaue B KOMnNEKT BPemHHOIOCTABKn INI KOMnJIeKTA NOCTABKN (npOdaetcO TdJIbHo), a npnpncOeHNHeHH KOMnNEKTA DnY YCTAHOBKn HA CTHe 3akpoTe OTBepCTne, IcNoB3y KpbIuKy dNt OTBepCTra.
2)Obpatnte BnMaHne Ha To, TTo6bl DeTaln 6bln yTaHOBHeB b npabInbHom noIOxHm n B COOTBeTCTByIOUne no3uNN. (M4 x L15)
3) BCTaBbTe noCTaBkY B OTBepCTne B OCHOBAHM MOHITopa.
4) BCTaBtBe BuHT Byka3aHHoe OTBepCTne 3aBepHnTe erO. (M4 x L15)
NoKHOeHMe MOHTopa
Ka6enb nHTaHn3a3emne
Bcnyae HncnpabHocn npoBOd 3aemneHmOKeT npBecTe N npopaeHIO 3JeKtpueckm TOKOM. BbnoJNHte npabNbHOe noKnKooHMe npoBOda 3aemneHm nepeD noKnKooHEmyCTPOCTBA K 3JeKTPocETn. PnpOTKnIOHm npoBOda 3aemneHm npedBaPntBHO OTKnIOHTyCTPOCTBO OT 3JeKTPocETn.

PnmuMeaHne
KMOHITOPy, KpOme KOMNbHTepa, MoKHO NOKnIOuATb TaKHe NcTOHnKy aYdNO-BuDEOCnHAnOB, KaKDVDnpomrPBbATEnn, BvdeOMaHHTofohBy ININ BvdeOKaMpeB. NpOboHyIO HnFOpMaUIO No NOkNIooHIO nCTOHmKOB ayDNO-BuDEOCnHAnOB CM. B NyHKeTcPecdCTBa ynpabEnHnNoIb3OBaTeR"B paadene "HaCtpoKa MOHITOPa",
PnoknHueHHe K KomnbHotepy

1) POncoeHnHTe 3neKtpueckn uhp BaWero MOHTopa K pa3bemy nTuHa H a3aHe nHaHeu MoHTopa.
BknHouYte BbIKNoyatEn bNTaHn.
2) CyueCTByeT 3 cnocoba D-sub ka6enr KMOHnToP.
Bb6epure OaHn 3 onncaHHbx Hxke cncoc6ob:
2-1)Unonb30aHme coeHHntenD-sub (ahanororo) Ha Bndeonnate.
IIOKINHOHTe Ka6eBb D-SUB K 15-KOHrAKTHOMy NOpTy RGB Ha 3aDHeN NaHEn MoHITopo a 15- KOHTAKTHOMY NOpTy D-SUB HA KOMNbIOTpe.

2-2) NcnoIb3OBAHnE CoeHHInTeJ DVI (uΦpOBoro) Ha BnDeonnaTe.
Iopknoyte kaebb DVI K npTy DVI(HDCP)Ha 3aHne nanein MoHntopa N npTy DVI Ha KOMnboTepe.

2-3) NcnoIb3ObaHHe coeHHInTeNa BNC (aHaanorOBoro) Ha BnDeonlaTe.
IIOKNIOTHE KABeB BNC K npOy BNC/COMPONENT IN -R, G, B, H, V Ha 3aHne nAHeN MOHTOPA IN K15-KoHTAKTHOMY npOy D-SUBHa KOMNbIoTepe

3) CoeINHnTE ayINOka6enmpa3bEmbA Audio (L) n Audio (R) DVD-nponrpBbATEn, BIndeomarHnToPOHa INI BInDeOKaMepb C pa3bEamn ayINO-BxOoB MOHTopa L R.
4) BkniouHTe KOMnbHOTep mMOHTOp.
PnIMeHaHHe
#
Ka6eB DVI INN BNC HE BXOJNT B KOMNJIeKT NOCTABKIN.
Дя NOKynkДОONHNTeBHorO OOBpyoBaHnO obpaaHTecb MecTHbI cepBnchbl ueHtp Samsung
Electronics.
PnDkN&yHHe nCpOBO"o npOn"pbIbATEeY DVD

PpimmeaHne
Takne htoHnKc cnHana, kau nphiobon npoirpbaTeNB DVD, noKnIOaOTc Ka pa3bemy MOHTopa DVI IN c noMooucbu Ka6eBraDVI.
- Pocne 3TOrO BCTabBe DNck DVD B npOnpBbATEnb N BKIOHnTE BOCnpON3BEdHe.
Bb6epnte npn noomou KhoNk Source
Приимецниwo
- MoHITop ochaueh coeHHHTenbHbIM pa3bemAMN DVI Ira noKIOUeHn ictOHHa CTHana DVI Hap.. cnffpoBOr npoIRpbIbTeRaN DVD.
POnkN&YeHNE BnDeOma"HNTOΦOHa

1) Bce yctpoiCTBa - iCtOuHKn Aynio-BnDEoCHHanOB, HanpIMep, BIneOMaHHToFOhB HIN BIneOkaMepebl, noKIOUaOTcK pa3bemy Pa3bem IIN noKIOUChENy AV IN [VIDeo] nIN Pa3bEm nIN noKIOUChENy AV IN [S-VIDEO] Ha MoHHTope c nomouBo Ka6eJr S-VHS nIN BNC.
2)ПОДКИОПЕРаьемьAudio(L)(Aудно(П))иAudio(R)(Aудно(П))ВIDeOMaHITOnTOФОнИN BVDeOKAMepbI K pa3bEMaM MOHITOPa AV AUDIO IN [L-AUDIO-R] cnomouhko KaBene.
3)Bb6epnte Bxod AV INN S-Vide, K KOTOPOMY NOKINIOH EN BIDeOMARHTOFOH INN BIDeOKAMepa, NcnoIb3y KONky Bb6opa nctouhka (Source) Ha nepeDHe nahEn MOHTOPa.
4) 3aTeM 3aTcHTE BnDEOMarHHTofoH nnn BnDEOKaMEpy, npEaBapntelbHO BCTABNB DVD-dnck nnn Kaccety.
Pnpmeaane
KaBbS-VHS Hn BNC He BXoNT B KOMNNEKT nocTabK.

1) CoeDInHTe C nOmoBtu KOMnIeKta ayDIO-KaBeJIe pa3bEmbl BxOJa ayDIOcMHa (AUDIO OUTPUT) BVDeOKaMEpbI bXoDHepePa3bEmbl ayDIOcMHa component AUDIO IN [L-AUDIO-R] Ha MOHITOpE.
2) CoeHNHITc c nOMOJIbU BnDEOKa6Eg PA3bEM BbIXOJa BnDEOCnHana (VIDEO OUTPUT) Ha BnDEOKaMepe IN BxOHOpa3bEM BnDEOCnHana BNC/COMPONENT IN - noKn&neHne npToB PR, Y, PB Ha MOHHTope.
3) Bb6epnre BxoD Component, K KOtOpOmy nooknouen DVD-npOwPbBaTeB, nnonb3y Khonky Bb6opa nctOchnika (Source) Ha nepeHne naHeJ moHITopa.
4)3aTeM 3anyctHte DVD-npOurPbIbAteNB, npEbnapntBHO BCTABnB DVD-dnck.
Приимechанинe
Kabenb Component He Bxodnt B KOMnneT NoCTaBKn. OncaHne BixoDa Component video cm. B pykoOcTBe nonb3oBaTeJy DVD-npOurpbIbaTeJy.
POnk&YeHne BnDeokamepbi

1)HaIInTe BbIXOINHe pa3bEmbl ayINO/BnDEOCINHAnOB Ha BnDEOKaMepe.ObHyHO OHn HaxoTcHb6OKOBnn 3adHeN CTOpHe.CoEHNHe c nOMoBbIO KOMnNeKTA ayINO-Kabenei pa3bEmbl BbIXOa ayINOcHana (AUDIO OUTPUT)BnDEOKaMepbl BXOINHe pa3bEmbl ayINOcHana AV AUDIO IN [L-AUDIO-R] Ha MoHHTope.
2) CoeINHITc nOMOuBIO BnDEOKa6Eg PA3bEM BxOda BnDEOCnHana (VIDEO OUTPUT) HA BnDEOKaMepe IN BXoHn PA3bEM BnDEOCnHana AV IN [VIDEO] HA MOHITOpe.
3)Bb6epnte BxOa AV, K KOtOpomy noKnOueH BIndeokamepa, nCOnb3yA KHONky Bb6opa nCTouHHka (Source) Ha nepedne naHenn MOHTopa.
4) 3aTeM 3aNyCTHe BnDeOkaMepy, npedBaHpTeBbHO BcTaBbKaccety.
Ппмочаиме
-ИЗбрахенныеаудно-bидаокавпгобьчнвхоггТКOMПпгпрнанджнсоктейВидаокамерbl.
(B pntBnHOM cnyuae Hx Hykno npno6pctn.)
EcnBnDneokamepo obecneuBaet ctepeo-3anncb 3yka,To Heo6xOIMKOMnIeKr n3 DByx KaBeNei.
PoiKn&YeHne BnDeOpncTbKn
Пгимechаиме
-ПОДКЛЮЧЕНМТИСИЙ ВДЕОПЦИТАБКИ NOKA3AHO HIXKE

1) CoeINHnTE BIndeOkaBeIem pa3bEmbl NOKJIIOHeHMe KOMHOHETOB BNC/COMPONENT IN - noKn&yeHne noptoR PR, Y, PB Ha MOHHTope I pa3bEmbl PR, Y, PB Ha BIndeOpncTabke.
2) CoeINHnTE C NOMOuIIO KOMNKeTA ayINOkaBeNe pa3bEmbPa3bEm nIa NOkNIOHeHna ayDIOcHrHaA COMPONENT AUDIO IN [L-AUDIO-R] HaMOHTOpE n pa3beMBAUDIO OUT Ha BInDeoepnctabe.
3)Bb6epnTe BxoD Component, K KOToPOmy noKnIOHEn BHeOeONpIcTABKn, HcNoJIb3y KhONky Bb6opa nctOuHnka (Source) Ha nepeHne naHEn MoHITopa.
PnIMeuaHne
- OnncanHe BbIXOa Component video cm. B pykoOoCTBe nonb30BaTeRnBnDeonnpctabKn.
POnKn&YeHne DnHaMnKOB

1)PnKpENNTeINHAMNK K TeneBn3Opy c nOMoUbBOHHTOB. YcTahOBNTe KOMNIEKT rPOMKOrOBOpNTeJe 6eNoCTaBKn.

2) CoeMHInTe npedHa3HaueHbIM dIraTOro Ka6eHem pa3bEm IINIOKIIuOHeHn DaHAMKa Ha 3aHHei CTOpOE TELBUN3opa n COOTBEcTBcyIoum eMy pa3bEm Ha 3aHHei CTOpOE DnHAMKa.
Ппмочаимe
-1e npemeeaIte TeneBnO3p,epkaero 3a npHKpenHbK Hemy DnHaMnK. %npoTHOBOM cIyae MOxHO NOpeDHTb yCTPOINCTBO KpennneHn DnHaMMKa TeneBnO3py.
>Подкн&Ченеaydnocntembl

1) CoeHHnHTe c nmoIbIO KOMnKeTAt ayDnOka6enei pa3bEmbl AUX L, R ayDnOCnCTembl np3bEmbl AUDIO OUT [L-AUDIO-R] Ha MOHlTope.
© 1995-2008 SAMSUNG. ALL Right Reserved
BVeDHeNc

Iporpamma ynpablenen HeckobkmmoHOTopamn (Multiple Display Control; MDC) npedctabnetcoob npinoKHe, no3Bolnooee pa60taTb Ha NK oDHOpeMeHHo C HeckobkmmoHOTopAM. Dnra cB3N MeKdy PK mOHOTOpOM nCNoJb3yETc TAndapThbIOncJeObaTeNbHm INTepeEe RS-232C. IOsToM yMeKdy nocOBaTeNbHm NpTaMn PI K moHOTopm Heo6xOIMO nCNoB3ObTa Ka6eN bocneobatBoHoro nHTepfca.
Haayano pa60TbI - TnaBHOe OKHO
Длэзундаха npограмь Вьбepит Start > Program > Samsung > MDC System.
Bb6epnte MoHtOp Ia npOBepKn ypoBn rpoMkoCTn B npedeJax nOla no3yHaKa.

1 OCHOBHbIe 3NauchK KhonKa Bbl6opa 5
Remocon INΦopMaunOHnha Ta6nna 6
3 Safety Lock Bb6op MOHUTOPA
4 Port Selection 3nementb ynpabneHna8
1.OCHOBHbIe 3HaKIN CNOJb3yOTcI Ia nepeKeJIIOueHn Ha IIO60I KpaH.
2.ПОЗВОЛЯТ AKТИВИЗИРОВАТ bIJI 6IOKIPOBaT bФYHKUHIO pIeMa CnIHana DnCTAHUNHO rYnpaBNeHn MOHITOPOM.
3.YctaHaBImBaetyHkUIO6NoKIpOBKM.
4. YctaHabnBaet yHKuio 6IOKupOBKn. IIO yMOJuaHHIO BbIbpaH nopT COM1.
5. Khonk Select All Clear All nolb3yotc nBb6opa nC6pocx MoHtopoB.
6.Дя npocmoTpa kpatKoI INHΦopMaunO BbIbpaHHOM MOHITope IcNoJIb3yETcTaSIIuca.
7. Bb6epnte dncnnn B nyHKe Display Selection (Bb6op nncnne)
8.3nemeHbI ynpaBHeHn IcNoIb3yIOrC IINy npaBHeHMoHHTopAMN.
<πpmea.> *yHKUaKTHB3aUH/6IokpOBKn (Enable/Disable) dIcTaHIOHO ynpabHeNJaIeCTByET He3aBNCMO OT TOFO, BKNIOEHO pITAHne NIN HET, n 3TO npABINO pACnPOCTpaHReTc Ha BCE MOHTOpB, NOKJIIOUeHHbIE K MOHTOPaM, NOKJIIOUeHHbIM K MDC OJHaKO, HE3aBICMO OT CTAtyCa, cyueCTbYIOUeBO B MOMENT 3aKpyITNA MDC, nlaФyHKUm npHema CrrHana DnCTaHIOHOHO ynpabNeHnB Bcex MOHTOpOB yctahAbNBAeTc 3aHaHHe Enable, korga MDC 3akpbIto.
Port Selection

1. *yHKUmae Multy Dispaly Cnrol no yMOnuHaHNo yCTaHOBHeA dIra pa6ObIc nOpTOM COM1.
2. Ecnn nncnblbetyra IIO60Ipyro npT,HexeHn COM1,TO B MeHIO Port Selection MoKHO BbIpaTb npT B dnaanaOHe COM1 \~ COM4.
3.EcHHe Bb6paHO ToUHoe HmApTa, NODKIOUeHHOro K MOHTOpy C NOMOuBIO NOCNEOBaTeNbHOrO Ka6Era,CBA3b 6yET HeBO3MOxHOH.
4. Bb6paHHbI npOT coXpAHReTcB INporpAMMe nHcNoJIb3yETcTaKKe i dIe cIeDyUoSe I porpAMMbI.

Power Control
1. LcENKHTeMbIbHOHaOCHOBHOM3HauekeBkIIOUeHHa/BbIKIOUeHHaPiTaHHa (Power Control),OTKpbIbAEcRgOKHO Power Control.

B INΦOPMaIOHHO TabJIe coIepKHTc HekOTopa 6a3OBa INΦOpMaU, Heo6xOIMa IpaIIN3aU mФyHKuIN Power Control.
1) Power Status ( :TaTc nTahnia
2) Input Source
3) Image Size
4) On Timer Status
5) Off Timer Status
2.ДлЯ Вьбopa монитopa,настоюк которо Трбуетс Быногитб,испьыетс Кногka Select All nIи phlaxok.

\*yHKnna Power Control no3BOJnAeBbIOnJIHbTb ynpaBHeHne HeKOTOpbIMn yHKnmaM Bb6paHHOro MOHTop.
1) Power On/Off
-BKIIIOHaaET/BbIKHIOHaeT NITaHHe (On/Off) BbIbpaHHoro.
2) Volume
-PerynpyeT ypoBeHb rpmKocTH Bbl6paHHOro MOHTopa.
3Ta cyHKnI npHmMaet 3aueHHe rpoMKoCTN BbIbpaHHoro MOHTOPa OT MOHTOPOB N OTO6pKaJaTe erHa non3yHke peryJrTopa.
(B Cnyae OTMeHb Bb6paHHoro 3HaueHn nn npn Bb6ope onu Select All yctaHaBnBaetc 3HaueHme 10, nCnoJb3yEmoe no ymoJuaHnIO)
3) Mute On/Off
-BKIIIOaET/BbIKIIOaETyHKUIO OTKIOUeHn 3Byka Bb6paHHoro MOHITopa.
EcnB Kaxkbim MOMENT BpemeHN BBiBnpaetc OINH MOHTOP,TO
Korda B BbIpaHOM MOHTope yKe yCTaHOBHeHa FyHKUma MUTE, Heo6xOuMo OTMeTuMb MOHToP c FyHKUneMUTE.
(EcIn Bb6pHaФyHKUaOTMeHbBb6paHHbIX3HaueHn(undo)INBb6paHaOnuSelectAll,IJIrBce npametpoB yCTaHaBnBAIOCT3HaueHn,NCNOb3yEmbIeNoYMOnuHaHIO).
ΦyHKnra Power Control npmehreTc nBce MoHtopoB.
\*Функцн Volume Mute DeIcTByIOT TOnbKO B MOHITOPaX C BKIOUeHHbIM NHTAHmE (CTATYC NNTAHN ON).

Input Source
1. LcENKHIne MbiHbO Ha OCHOBOM 3Haueke Input Source, OTKpbIbAetcR OKHO ynpaBHeH NCTOCHNkOM BXoHOro CnHana (Input Source Control).
Bb6epnte Select All ("Bb6paTb BCE") nnn yctaHOBnTE fnaXOK Ira Bb6opa ynpabnemoro MoHToPA.
- TV Mode

- PC Mode

B INΦopMaioHoi TabIe codepKHTcH HeKOTOPa 6a3OBa INΦopMaia, Heo6xOIMa dYnpAbeHH Knei Input Source Control.
1) PC -Изменягпосточимь BXODHORO сигналдя ВьбраHHORO MOHITOPA Ha PC.
2) BNC -ИзменягпICTОУнIK BXODHORO CINHanaДЯ BBi6paHHORO MOHITOPaHa BNC.
3)DVI -I3MeHReT IcToUHnK BxOdHOro CnHaJa Ira BbIbpaHHoro MoHITopa Ha DVI.
4)TV -Изменигосточик BXODHORO CURHaja Дд ВьбраHHORO MOHITOPA Ha PC.
5)AV -I3MeHReT NCTOCHNK BXoDHoro CnHaJa DnB Bb6paHHoro MOHITopa Ha AV.
6) S-Video
- Изменет ectочнь BXODHORO CINHana Дд ВИбраHHORO MOHITOPa Ha S-Video.
7) Component
- ИзменетICTОУнК BXODHOrO CINHana Дд ВьбpaHOrO MoHITopa Ha Component.
8) MagicNet -Источник Ввда дд MagicNet pa60ает только дд морени MagicNet.
9) Channel - Ctpenka kaHaoB oTo6paXaETc, KOrda TeJeBn3Op RaJIaETcRg Input Source (VctOCHNKOM BxOHO rHaJa).
TeNEBn3Op B KaueCTBe HcOuHnKa CHHaJa MoKet 6bItb bI6paH ToJbKO Ha yCTPOINCTBax C TeNEBn3OpM N ynpabLeHHeMa KaHJaAM, eCmN HcToUHnKOM BxOHDoro CHHaJa RBJIRETCa TEEBn3Op.
\*FyHKnIg Input Source Control doctynha TOLbKO dJa MOHITOpOB, nHTaHHe KOtOpbIX BKNIOUeHO (coCToHHe nTahnn - ON)

Image Size
PC, BNC, DVI
1. Haxmnte Ha nKtorpammy Image Size ("Pa3mep n3o6paXeHnra") cpeHn oChOBbIX nKtorpAMM, noBHTcR 3kpan ynpabHeHH pa3MePOM n3o6paXeHnra.

B INHΦopMaioHHoT Ta6nue OTO6paKaetcra OCHOBa HNΦopMaua, Heo6xoIma dIy npabHeHpa3MePOM 1306paJKeHn.
1) Power Status (Ctatync nntaHna
- Yka3bIbaeCT CTATYC NITAHN TEKUJero MOHITOPA.
2) Image Size
- POKa3bIbAe TeKyuIe pa3MepbI n3o6paXKeHnI dIe Bbl6paHHOrO MOHITopa.
3) Input
SYka3bBaetekyuiuNIOCTOuyHk BXODHO RGNHala NcONb3yeMOro B DaHHbIMOMeHT MOHITOPa.
4) B INHΦOpMaUHOHHo Ta6nue OTo6paXaKoTcra ToIbKO MOHHTopbl, BXOHNbIM HCTOHHKOM KOToPbIX RaBnEePC, BNC, DVI.
5) PC Source - Pnp Bb6ope Image Size ("Pa3mep n3o6paxenra") Chaana noBnHOTc KAPTOKN PC, BNC, DVI.
-Khonka Image Size Control ("YnpaBHeHne pa3Mepom n3o6paKeHnra") no3BOJrET ynpaBnTb BO3MOxHbIM pa3Mepom n3o6paKeHnra dIe nCTOuHnka PC, BNC, DVI.
6) Video Source
- UeJIKNHe Ha KapToHKe Video Source yCTaHOBKn pa3Mepa N3O6paXeHn Iy COOTBeTCTByIOUeBOxOHDoro NCTOCHKA CnHaHa.
XToCHNK BBOda nla MagicNet pa6oTaet TOnbKO nla Moedn MagicNet.
KhONka Image Size Control doctynha TOnbKO dN MaHToPOB, NHTAHne KOTOpbIX BKIOUeHO (coCTOHNHe NTaHn - ON)

Image Size
TV, AV, S-Video, Component, DVI(HDCP)
1. Haxmnte Ha nKtorpammy Image Size ("Pa3mep n3o6paXeHnra") cpeH oCHOBbIX nKtorpAMM, NOBHTcR 3kpan ynpablenenpa3mepom n3o6paXeHnra.

B INΦopMaioHHO TabIe OTO6paKaTc8 OCHOBHa INΦopMaua, Heo6xOIma 1n ynpabHeHpa3MePOM H306paKeHH.
1) ΜιεικΗΝΙΕ έλαρτουχενΤΑ, AV, S-VIDΕΟ, Component tab ευγαταθουκην πασμερα ηιδόβαρχενην ἀπεικόνηκον Μιαίνης Μιαίνης Μιαίνης Μιαίνης Μιαίνης Μιαίνης Μιαίνης Μιαίνης Μιαίνης Μιαίνης Μιαίνης Μιαίνης Μιαίνης Μι αύβαργος Φλαρχοκόν ἀπεικόνης Μιαίνης Μιαίνης Μιαίνης Μιαίνης Μιαίνης Μιαίνης Μιαίνης Μιαίνης Μιαίνης Μιαίνης Μιαίνης Μιαίνης
2) B INHΦρMaUNHOHNOH Ta6Bnue OTObpaKaAeTcR ToBko MOHHTOp C NCTOuHNKOM CunHaJa TV, AV, S-VIDEO, Component.
3) MoxHNO pOONBOLbHO H3MeHInTb pa3MepbI H3o6paXeHnIa Iy Bb6paHHOrO MOHToP.
Ппмeuанe:: Pekmbl Auto Wide, Zoom1, and Zoom2 Heocrynhb IЯ Bb6opa, ecn B KaueCTBe Tna BXoHoro CnHana Component n DVI (HDCP) Bb6pa7 720p nnn 1080i.
HCTOuHk BBOda nra MagicNet pa6oTaet TOnbko nra MoeJN MagicNet.
KhONka Image Size Control doCTyHa TOnbKO dIa MOHtOpOB, NHTAHne KOTOpbIX BKNIOUeHO (coCTOHNHe NHTAHn - ON)

Time
1. UeKHTMeMbHbHa OCHOBHOM 3aueKe Time, oKpbBaetcO KHO npabHeINBpemeHem (Time Control).

B INHΦopMaioHHo Ta6Ie npeCTabHeHa HeKOTOPa 6a3OBa HΦopMaua, Heo6xOIma dIpaIIN3aunn ΦHKU Time Control.
1) Current Time
-Испόньзуетс дя установкиTekушero Времени БыбраHHORO монтopa (Время ПК)
-ДЯнИЗМЕHENI TEKUYUERO BPEMENI CHAQUANA Heo6xOdmo IN3MeHHTB BPEMnIK.
2) On Time Setup
IcnoJb3yETC Jny yctahOBK uaca, MInHyTbN BpeMeH Nn .(do noLynd (AM)/nocne noLynd (PM)) taMepa BKIOUeHn (On Timer) BB6paHHo MOHTopo.
3) Off Time Setup
NcnoB3yETCnI yCTaHOBK Yaca, MInHyTbI IN BpeMeHN DnR .(do nOlydH (AM)/nocne nOlydH (PM)) TaMepa BkIOUeHn (Off Timer) BB6paHHoro MOHITopa.
4) OTo6paKaET yCTaHOBJIeHHbIe npaMeTpbl TaIIMePA BKNIOHeHN.
5) OTo6paXaet yCTaHOBnEHHbIe npaMeTpbl TaIMePa BbIKIOUeHnA.
MCTOUYHK BBODA pA MagicNet pa6oTaET TOnbKO pA MoEIN MagicNet.
\*FyHKnra Time Control deiCTByeT TOnbKO B MOHITOPaX C BKIOUeHHbIM NHTAHmE (CTATYC NNTAHN ON).
At On Time Setup, TV Source functions only for TV Model.

PIP
PIP Size
1. HaxMMte Ha NIKTORpAMMy PIP ("KapTNHka B KapTNHke") cpeIN OCHOBhIX NIKTORpAMM, NOBNTcKpaH ynpaBHeHpa3MePOM OKHa PIP.
Bb6epnte Select All ("Bb6paTb BCE") nnn yctaHOblte fnaKOK dIy Bb6opa ynpabnemoro MOHToPA.

B INHΦopMaioHHoT Ta6Jnue OTO6paKaetcra OCHOBa HNΦopMaua, Heo6xoIma dIy npabHeHpa3MePOM 1306paKeHnOkHa PIP.
1) PIP Size
- OTo6paKaaETeKyuCn pa3Mep OKA PIP nCnoJb3yeMoro MOHtopa.
2) OFF
- BbIKHIOaET ΦyHKUIO PIP Ha BbI6paHHOM MOHHTope.
3) Large
- BkHouaET cyHKUHO PIP Ha bbl6paHHOM MOHTope n 3MeHReT pa3Mep ee OKHa HA Large.
4) Small
-BKIIIOaETyHKUIO PIP Ha BbIbpaHHOM MOHHTope Nn3MeHReT pa3Mep ee OKHa HA Small.
5) Double1
- BkIIOaET ΦyHKUIO PIP Ha BB6paHHOM MOHHTope n 3MeHReT pa3Mep ee OKHa Ha Double 1.
6) Double2
- BkIIOaET cyHKUIO PIP Ha BaIbpaHOM MOHTope n 3MeHReT pa3Mep ee OKHa Ha Double 2.
7) Double3 (Picture By Picture)
- BkIIOuAeT cyHKUIO PIP Ha BaIbpaHOM MOHTope n 3MHeReT pa3Mepe ee OKHa Ha Double 3.
* IctouHHK BbOa dIy MagicNet pa60aer TOnbKO dIy MoeHN MagicNet.
Pa3mep OKha PIP MOxHPOperynpoBaT npBkHoueHHOM NTaHHMOHTopa.

PIP
PIP Source
1. HaxMMte Ha NIKTORpAMMy PIP ("KapTINHka B KapTHHe") cpeN OCHOBbIX NIKTORpAMM, NOBNTcR 3kpaH ynpaBHeNA pa3MePOM OKHa PIP.
- PIP TV Mode

- PIP S-Video Mode

B INHΦOPMaUHOHHo Ta6nue OTo6paXaETcA OCHOBHAR INHΦOpMaUN, Heo6xOuMmA Dn ynpabHeHn MCTOHN CnHana OKHa PIP.
1) PIP Source
-Управлъ Источник сгнана PIP можно пи вкlioчehном петань монитopa.
2) PC -Изменягп CTочнк сгнда PIP Ha BыбpaHOM MOHITOpe Ha PC.
3) BNC -Изменигосточимсигнела PIP Ha BB6paHOM MOHITOpe Ha BNC.
4)DVI -I3MeHReT NCTOCHK CnTHa PIP Ha Bb6paHHOM MOHHTope Ha DVI.
5) TV
- IN3MeHReT NCTOCHNK CNHana PIP Ha BaIbIbpaHOM MOHTope Ha TV.
6) AV
- N3meHReT NCTOCHNK CnHana PIP Ha BbI6paHHOM MOHHTope Ha AV.
7) S-Video
-ИЗменияntСTOУнКсгнэРIPHAВБбранHOMMOHHTopeHaS-Video.
8) Component
-ИЗмehугETиctouHнснэпаPIPHa BbIбpaHOMMOHITopeHa Component.
9) Channel
- CtpeIka KaHAnOB OTo6paKaAeTcRA, KOrda NCTOCHNKOM DnIyHKnIP RABnEeTcTeNeBn3Op.
PnmeHHe. HeKOTOpbIe H3 NcTOuHKnOB PIP MOrY 6bITb HeOCTynHbI dRy Bbl6pa. 3To 3aBNCt OT Tnna nctouHnKa BXoHORo CnHana Ha OCHOBHom kpaHe.
* NctouHn BBOda dna MagicNet pa6oTaET ToIbKO dna Moedn MagicNet.
TeNEBn3Op B KaueCTBe HcToHHKa CnHrHa MoKet 6bIb Bbl6paH ToBko Ha yCTpoiCTBaX C TeNEBn3Opm N ynpaBHeHem KaHaNAM, eCN HcTOHHKOM dNf FyHKuNN PIP ABnETcTaeNBn3Op.
\*ФункцИР Control (ynpabneHne peKIMOM PIP)doCTynHa TOnbko IaI Tex MOHtOpOB,NTaHHe KOToPbIX yCTaHOBNeHO BpeKIM ON (BkIIOueHo),nФункцИР PIP KOToPbIX TAKKe yCTaHOBNeHa B peKIM ON (BkIOueHo).

Settings
Picture
1. UeKHTMeMbHbHa OCHOBHom 3aHKe Settings, OTKpbBaetcOHO HAcTPOKn npaMetpoB (Settings Control).

B INHΦopMaioHOHTo Ta6nue npedctabneHa HeKOToPA 6a3OBa HΦOpMaun, Heo6xOaMma dna peaNa3auNn ΦHKUN Settings Control.
PnBbIbOpoe kaxdoi n3 cyHKuHn Ha cnaJe oTo6paxaetcBb6paHHe OE Hee 3aueHne. Pn BbIbOpoe onuSelect All OTo6paxaetc 3aueHne no yMOnuaHnO (50).
I3MeHeHne 3HaueHnHa 3TOM 3KpaHepnpBODNT K aBTOMaTnueCKOMy I3MeHeHIO pexkima Ha "CUSTOM" (noIb3oBaTeNbckn).
1) Picture
- OTo6paKaJaTcra TOnIbKo IaI onIuI TV, AV, S-Video, Component, DVI(HDCP).
2) Contrast
- NcnoIb3yeTcra Iya perynipOBKn KOHtpaTcToB BblpaHHoro MOHHTopa.
3) Brightness
- McnoIb3yeTcraIpeRynipOBK npKoCTBb6paHoro MOHTopa.
4) Sharpness
- McnoIb3yeTcraI pyerynipOBk pe3KoCTn Bbl6paHHoro MOHTopa.
5) Color
- Ncnonb3yETcra HacTpoKu CBeTOB BbIbpaHHOro MOHToPa.
6)Tint
- IcnoIb3yeTcraIpeRynipOBKnHacbiueHHoCTN Bb6paHHoro MOHHTopa.
7) Color Tone
- Hactpoika CBetOBoro ToHa BbIbpaHHoro MOHITopa.
* NctouHnBbOa Dnla MagicNet pa6oTaET TOnbko Dnla MoeHN MagicNet.
3Ta yHKpIaIOCTyTHA TObko dIg DNcNIIeB, NITAHne KOTopbIX BKNIOyeHO, a ECnN Bbl6Op He CdeNaH, To OTO6paKaTeCA 3aBOcka HAcTPOka No YMOnuHaHIO.

Settings
Picture PC
1. ⅢeKNHtmeMbIbHOHaOCHOBHOM3Haueke Settings,OTKpbBaetcKOHO HAcTpoiKnnapaMeTPOB (Settings Control).

B INHOpMaOnHOH TAbIe npEcdTabIeHa HeKOTopA 6a3OBa HINHOpMaUH, HeoXoIMMae IpeaN3auHn FyHKmN Settings Control. Pn BbIbope kaxdoH n3 FyHKmHa cnaJe OTo6paKaetcBbIbpaHoe dH Hee 3NaHeHne.
PnBbIbOpoeOnuN selctAIO6paKaTc3HaueHHe no yMOnUaHnIO(50).
N3MeHeHne 3HaHeHnHa 3TOM 3KpaHe npBODNT K ABTOMaTHueCKOMy N3MeHeHIO pEKIMHa "CUSTOM"().
1) Picture PC
- OTo6paKaTaTc TOnbko DnA onCm PC, BNC, DVI.
2) Contrast
IcnoIb3yeTcI dIpeRyIuPObKn KOHTpAcTOCTN Bbl6paHHO MOHITopa.
3) Brightness
-ИспόньуетсдяруларовуразкостиБыбраHHORO MOHITOPa.
4) Red
- Hacptpoka zebetoboy TemnepaTpyb Bb6paHHoro MOHTopa.
5) Green
- HactpoMa Ka ZbEToBoT TempeaTpby BbIbpaHOrO MoHtOpa.
6) Blue
- HactpoMa Ka ZbEToBo TEmnepaTpyb BbIbpaHOrO MoHtopa.
* IctouHk BBoDA pR MagicNet pa6oTaET TOnbKO dR MaOeHN MagicNet.
3TaФyHKUHIOCTYUNHATOJbKO DnI DNCHNIIeB,NTAHNE KOTOpbIX BKNHOeHO,a ECIN BBIO6p He CdeNaH, TO OTO6paKaTeC3aBOcKra HAcTPOJa NO YMOnuHaHIO.
Audio
1. ΒeIKNHITeMbIbHO Ha OCHOBHom 3HaayKe Settings, oTKpbBaTeCk OKHO HAcTPOIKn NapaMeTpPoB (Settings Control).

B INHOpMaHOHHo Ta6nue npeCTaBHeHa HeKOTopA 6a3OBa HINHOpMaU, HeOxOIMMa dIpeaH3auu HYNKcMn Settings Control. PnB BbIbope kaxdoi h3 FyHKuHa cnaJe OTObpaKaeTcB bIbpaHoe dIne Hee 3NaueHne.
PnBbIbOpe onuun Select All oTo6paKaTeTc3aHueHne No yMoJHaHmO (50).
M3MeHHe 3aHuE H A TOM kPaHe nPiBODiT K ABOTMATUeCKOMy N3MeHHeMIO pEKIMa Ha "CUSTOM" (
1) Audio
-Испόньуетс дя ретуниювкй Audio част ВьбраHHORо монитор.
2) Bass
-Иснользуетс дя рergулповки Инзкх част ВьбpaHHORO MOHITOPA.
3) Treble
- IcnoIb3yETcIaIpeRynOpBKn BbICOKx qACTOT Bb6paHHoro MOHITopa.
4) Balance
- IccnoIb3yeTcraIpeRynipOBK6aIahCaBb6paHoroMOHITopa.
5) SRS TSXT
- BkIIIOueHHe/BykIIIOueHHe 3ByuHaHH SRS TSXT.
6) BbI6Op 3Byka
-ПиВКIOUeHHOДФИКUIN PIPMOKHO BbIbPaTb Main nN Sub.
\* NcToUHnK BBOda nla MagicNet pa6oTaET TOnbKO nla MoeHN MagicNet.
3TaФyHKUHIOCTYINHATOLbKO DnIgDnCnIeB,NTaHHeKOTOpbIX BKNIOyeHO,aECNbBbI6Op He CdenaH, TO OTO6paKaTeCA3ABoDCKa HAcTPOka NO YMOnuHaHHO.
Image Lock
1. JIeKHTe MblbHa OCHOBHOM 3Haueke Settings, OTKpbBaetcOHO HAcTpoiKn npaMeTPOB (Settings Control).

B INHΦopMaioHHoT Ta6nue npedctabHeHa HeKOTopa 6a3OBa HΦopMaqra, Heo6xOIMma dna peaIINaCn
fynkun Settings Control.
1) Image Lock
- OTo6paKaTaTc TOnbKo DnA onCn PC, BNC.
2) Coarse
- IcnoIbayetcIЯ NaHctpoiK Coarse MoHntopa.
3) Fine
-Исноьуетсдянскгп Fine moHntopa.
4) Position
- IcnoIb3yeTcI dIy hAcTpoIKn IIOJoxeHn IIO6paXeHn Bb6paHHoro MOHToPa.
5) Auto Adjustment
- ABTomatnueckar aadantauK cnHany, noctynaoemy OT KOMnbTepe.
* HctouHk BBoDa dny MagicNet pa6oTaET TOnbKO dny MoDEn MagicNet.
\*FyHKnra Settings Control deHCTByET TObko B MOHHTopax C BKIOUeHHbIM NNTAHmE (CTATYC NNTAHN ON).

Maintenance
Lamp Control
1.卍KHTHe Ha 3aHKe "Maintenance" B cTOn6e OCHOBbIX 3aHcKOB. PONBtCkpaH Maintenance (o6cIyKBAHne).

B INHOPmaIOHOHHoT a6nue("Info Grid") nOKa3aHbI HeKOTOpbIe OCHOBHbIe daHHbIe.
1) Maintenance
-AkTNBn3Npyet yHKuO ynpaBHeHnOBcIyKbAHHem (Maintenance Control) nra Bcex BXoDhBX nCTOCHIKOB.
2) Auto Lamp Control
- ABToMaTuYeCKn HAcTpaNbaET NoCBeTKy BbI6paHHoro MOHtOpa Byka3aHHoe BpeMra.
Функць� ManuaL Lamp Control abTomatueckn Bbiknoaetc npn BbinoJIeHn HactpoKc n noMoIbO yHKznn pyHoro ynpabHeHn noCBeTkoH Auto Lamp Control.
3) Manual Lamp Control
- No3BOJRAET HAcTpaBaTb NcCBeTKy Bb6paHHOro MOHITopa B JIO60m MOMENT BpEmHeN.
Функць Auto Lamp Control abTomatueckn Bbikluoayetc npn BblonHeHn HactpoKn C nomoBIO yHKuyn pyHoro ynpablenen noDcBeTkoi Manual Lamp Control.
\*Функua Maintenance Control (ynpabneHne 06cnyxuBaHnEM) DOCTyHa TOnbKO nMa MOHtOpOB, nHTAHNE KOtOpbIX yctAHOBHeO B pexMM ON (BkIoueHo).
* HctouHk BbOa dIa MagicNet pa6oTaET TOnbko dIa MoeIN MagicNet.

Maintenance
Scroll
1. ⅢeIeKHTHe Ha 3aHKe "Maintenance" B cTOn6be OCHOBbIX 3aHcKOB. IoRbITcK kpaH Maintenance (O6cnyKbAHne).

1) Safety Screen
- NCKIIIOaET NOBILHNEOCTaOHTbIX 3IO6paXeHn, BO3HNKAIooHx B pe3yIbTaTe DIINTEbHO pa60tBJ Bb6paHHORO MOHITOPA B pEXKIMPeN3by. MoXHO yCTaHOBnTb TaMep ZIKNA NOBTOpeHn pyTEM Bb6opa 3HaueHn "Interval" n "Second".
MoXHO yCTaHOBt bnapMeTpbl Scroll (PpOKpyTka), Pixel (PiKceN), Bar (:tpoka) n Eraser (YdaJIeHne) c nOmoIbNo HAcToPoiKn Screen Type (Tn 3KpaHa).
\*IctouHk BbOa dna MagicNet pa6oTaet TOnbko dna MoeJin MagicNet.
\* npapamtpa cekyhbmoKHO yctahOBnTB 3aueHn 1,2,3,4,5 nra Tnna npokpyTKn 3aueHn 10,20,30,40,50 nnkceJe, cTPOKn Hn Tnna ydaJIeHn.
品 FyHKnma Maintenance Control (ynpabneHne 6cIyKbAHmE) DOCTynHa TOnbKO dR MOHTopoB, nTahHe KOtOpbIX yCTaHOBNeHo B pexm ON (BkIOUeHo).

Maintenance
Video Wall
1.卍eKHTHe Ha 3aueKe "Maintenance" B cTOn6be OCHOBbIX 3aHcKO.BIpaH Maintenance (O6CnyKbAHne).

1) Video Wall
-BndeocTeHa 3TO HeckoJIbKO CoeINHeHHbIX BmCTe BInDeOeKpAHOB, KaJbI N3 KOtOpbIX NOKa3bBAet Yactb O6JIero n306paKeHn IIN CoeINHeHHbIX BInDeOeKpAHbI, KaKbI N3 KOtOpbIX NOKa3bBAet OdHO I TO Xe I306paKeHne.
2) Screen Divider
-3KpaH MoXeT 6bITb pa3deneH.
Pn pa3deneHm MOxHO Bb6paTb KOInueCTBO 3KpaHOB C pa3HOI KOMNOHOBKOJ.
BbI6epnte pexim B nyHkTe Screen divider (Pa3dennTeb 3KpaHa)
-БыберптЕ диспелов руннкTe Display Selection (Быбор диспелera)
- Пи Нахатун сифсы в ВьбраHHOM peЖIMe 6удт уст.
- PporpaMa MDC, npedocTabrma KOMnHaHne Samsung, noepKbAeT naHb n4 4x4 KK-dncnneeB.

3) On / Off
-BkIIOUeHHe/BbIKIOUeHHe yHKmV Video Wall (BndeocTeHa) Bb6paHHoro ducnnie.
4) Format
-MoKHO Bb6paTb foPMaT nI npocMOTpa pa3deJeHHoro 3kpaHa.

* Hebo3MOxHOb BkIIOHTb DaHHyO ΦyHKzNBA pexKmE MagicNet.
\*Функцma Maintenance Control (ynpabneHne 6cnykBaHnEM) DOCTynHa TOnbko dIa MOHTopoB, nHTaHne KOTopbIX yCTAHOBNeHO B pexm ON (BKNIOyeHo).
YcTpaHHe HEnCnPaBHOCTe
1. B INHΦopMaunHOH Ta6JIne He yKa3aH MOHTOP, HAcTPOy KoTOpO Tpe6yeTcB BInNoHNtB.
-Поверпге-coeHHeHne RS232C.(Поверпге павиьнocь erо noДКIOHHeHЯ K npTy Com1)
- Ecnn OdnH n TOT Xe NdeHTNfHKATOp NMeetcY HeCKoJIbKIX MOHITOPOB, To 3TO YKa3bIaET Ha HENpaBnIbHOe paCNO3HaBaHne 3TNX MOHITOPOB nporpAMMO IN3-3a KOHfIKTA daHHbx.
IPOBepbTe, YTO INeHTnHnKATOp MOHITOPa NMeET 3HaueHHe B Dmna3OHe OT O do 16. (YCTaHOBtpe npabnBHOe 3HaueHne C nOMoubIO MeHIO 3KpaH)
IpmeHn: NdeHTnФKATOp MOHTOP DOJIKeH IMeTb 3aueHHe B Dnana3OHe O-16. EIN 3aueHHe NdeHTnФKATOp BAixoJIT 3a npedeJIb ITO rAnana3OHa, CNTema MDC He MoKet ynpabTb MOHTOPOM.
2. MoHTOp, HAcToPky KOtOPO Tpe6yETcBbINOHNHTb, He npEcdTaBJeH BpyrNx INHΦopMaOnHOHbIX Ta6nuaX.
IPOBepbTe, BKIOueH IIN MOHTOp. (3TO MOXHO IPOBepntb NO INHOPMaUHOHO Ta6NIe BKIOUeHn/BBIKIOUeHn IITAHNA)
- PpOBepe, 6bI Jn H3MeHEn HCTOCHK BXoHOrO CnHaJa MOHToPa.
3. NepnoDnueckn noBnEeTc daIaIorOBoe OKHO.
-Поверпг, Вьбан Лин монитор, Насточу Которо Тpe6yeTсь ВиюнHTB.
4. yctahOBHeT TaMep BkHoueHn (On Timer) n TaMep BbIKHOeHn (Off Timer), HO OTo6paKaetcBpeM, OTnHoeOT yCTAHOBHeHOrO.
- YctahOBHTe Tekyueee BpeMnIg CnHxpoHHaunu YacOB MOHITopa.
5. Bo3moKHa HeHOpMaIbHa pa6Ota InCTaHUnOHNo HAcTpoKn Pnp BblKIOueHm FyHKmN DnCTaHUnOHOr OynpaBHeHn,OTKnIOeHm Ka6eRr RS-232C mnn npn HeHOpMaIbHOM BbxOde n3 nporpaMMb. BepHInTeCb B nporpaMMy IBOcTaHOBtte HopMaIbHyIO pa6Oty FyHKmN DnCTaHUnOHOro ynpaBHeHn.
<πPnmeaHne.> HapyeHHe HopMaIbHO pa6Ot b3oT npOrpaMMb MoKet 6bItb Bb3BaHO np6leMaMn B KaHaJax CBA3N INI NmExAMn OT pACNOIOKeHHbIX P4OM 3NEKTPOHHbIX YCTpoCTB.

OTo6paXeHne yCTaHOBJIeHHbIX 3HaueHn npn pa6oTe B peKmE c HeCKoJIbKIMM MOHHTopamN
Pn pa6oTe C HeckOblkMIM MOHITOpamu YcTaHOBHeHHbIe 3HaueHmro OTo6paKaHOTcRc CneDyIOUm 06pa3OM.
1.He Bb6paHO HN OJHOrO MOHITOpa: OTo6paxaOTcYCTAHOBJIeHHbIe Ha 3aBOJe-U3rOToBtTeJIe 3HaueHnA, IcNoJIb3yEmIbe No YMOnUHaHIO.
2. Bb6paH OINH MOHTOP: pOu3BOJTCaHTbIBaHne I OTO6paXeHHe YCTaHOBJIeHHbIX 3HaueHn I JRA BB6paHHORMOHTOPa.
3. Bb6paH OINH MOHTOP (ID1) INO6aBHeN DpyroM MOHTOP (ID3): nporpamma, oTO6paXabwA yCTAHOBHeHoe 3HaueHHe ID 1, CHTbIbAeT NOTo6paXaet 3HaueHHe ID3.
4. Bb6paHb BCE MOHTOpBc I cNcNoIb3OBAHmE OOnu Selected all: ChOba OTobpaKaOTc yCTaHOBHeHbIe Ha 3aBoDeHn3rOToBHTe 3HaueHn, IcNoJIb3yEmbIe no yMOnuaHnIO.

PpabNJIaTexHnKn
&e3onacHocTn
BVeIeHne
IopdkJIOUeyHne
\*a&ota c nporppaMMHbIM
o&ecneueHnem
HactpoKaMOHHTopa
BxOa
N306pa&eHne
[ \text{[IK / BNC / DVI Pe&NM]} ]
1306pa&eHne
[AV/S-Video/
KOMHOENT. / DVI-Video
Pe&m]
3ByK
YCTaHOBKa
MHoro3kp. Ynp.
Функи npamorO
ynpabneHn
yctpaehne
HEnCpNaBHOCTe
Cne"uΦnka"nn
HnΦopMa"n
PpnoJoxeHne
TFT-LCD Monitor
www.samsung.com

Lbet H BHeHnBn H3dNMA MOryT paHNaHbC B 3aBNCIMoCTn OT MoEN, a XapakTepeNtKu H3dNMA MOrY T3MeHrTaCB 603 PpEBaPHTeHbTO yBeDOMeHnC U C eBbIO YCOBepueCHBOAHH.
HacTpoNka MoHITopa
BxOa
Ooctynhbiepekmbi
PC/BNC/DVI
AAV
S-S-Video
KOMTIOHEHT
D DVI-Video
Cnncok nctouh.PASCD
[MONTH]→[ENTER]→[ENTER]→[A/V]→[ENTER]
BknnoaetnHdkatop,cootBetCTbYIOIe TekyUcMy BxOHDomy CnHany,ncnonb3yEmomy MoHTOpom.
1)πK
2) BNC
3) DVI
4)AV
5) S-Video
6) KOMNOHEHT
[Длгпрамогу Вьзова ЗToHФннHa nynbTe DnncnoB3yetc KhoNka 'SOURCE']
!pIMMeYaHHe
- EcJIM MOHITOP nepeKIOHHTb HA BHeUHH NCTOCHNK,ФYHKUNI PIP OTKIOHNTCA.
PIP PASC0
!pn noKnIOHcHm K MOHtOpy BHeHnX NCTOCHKOB ayHO-BnEOcHrHa, TaNX KAK BnEOMaHHToHOF HNN DVD-npOurpbBaTeB, fHyKuIa PIP No3bONETPPOCMATPBAtb BnEO3aNcC %Tnx yCTpoiCTB MaNEhKOM OKHe, Hano&EHHom HA OCHOHoe OKHO, B KOToPOM oTO6pa&aetcBnEOcHrAN KOMnbOTepa. (BKn/BbKn)
!pIMMeYAHNE
Ha%kpaHe HebO3Mo&Ho Hano&eHne HeckOJIbKx n3o6pa&eHn PIP, nockOJIbky dny BCN KOMHOHeHTHO CnHana NCNoB3yETcOdH N TOT &e pa3\*EM.
1)PIP
[MENU] [ENTER] [ / ] [ENTER] [ENTER] [ / ] [ENTER]
UynpaBHeHne OKHom n3o6pa&eHnI PIP.
-BK
-BbIKN
[Дя npmaOBO bI3OBA 3ToHФнК"mHa nIyIbTe DY nCOnIb3aYcTc KhONKa 'PIP']
2) NCTOCHNK
[MONTH] [ENTER] [A/√] [ENTER] [A/√] [ENTER] [A/√] [ENTER]
Bb6op BxOdHoro nctOTHnKa CnHana dnnyHKnPiP
-PC/DVI:AV/S-Video/KomnoHeHT Pe&MM
- BNC: AV / S-Video Pe&um
-DVI:AV/S-Video/KOMNOHEHT Pe&MM
-AV/S-Video:PC/BNC/DVI Pe&nm
- KOMNOHEHT: PC / DVI Pe&MM
[Дя npmaoro BblOba 3ToH Φнк"и HA nIyIbTe D'нсnonb3yeTc KhONka 'SOURCE']
3) CmeHa
[MONTH] [ENTER] [A/V] [ENTER] [A/V] [ENTER]
MeHReT MeCTaMn COePXMoe PIP n OCHOBHe n3OpaKeHne.
1306paKeHne OKHa PIP oTo6pa3nTcHa Ha OCHOBHom 3KpaHe, a I3o6paKeHne OCHOBHOrO 3KpaHa oTo6pa3nTcB oKHe PIP.
[Длгпрмогу Вьзова 3ToHФннHa hynte DNY nCnObl3yETcR Khonka 'SWAP']
4) a3Mep
[ \text{[MENU]} \rightarrow \text{[ENTER]} \rightarrow [\wedge / \vee] \rightarrow \text{[ENTER]} \rightarrow [\wedge / \vee] \rightarrow \text{[ENTER]} \rightarrow [\wedge / \vee] \rightarrow \text{[ENTER]} ]
daet BO3MOXHOCTb Nolb3ObaTeNIO BbIKIOHaTb 3KpaH PIP nnn HacTpbanBaTb ero pa3Mep.
[Длп npMOrO BbI3OBA 3ToN ΦyHк"ин Ha nyIbTe DYNCnONb3yETcK hONka 'SIZE']
5)Пози"ия
[MONTH] [ENTER] [A/V] [ENTER] [A/V] [ENTER] [A/V] [ENTER]
I3MeHeHnne no3nncn okHa PIP.
6)Пpo3paqHocTb
[MONTH] [ENTER] [A/V] [ENTER] [A/V] [ENTER] [A/V] [ENTER]
HactpoiKa ypOBnI npO3paUHOCTn OKOH PIP (KapTInHkBA KapTInHke).
- BbICOKa
- CpeHn
-Hn3kaj
- Henp03p
Приимechanicals
- PnBb6ope 1 aMeH No Size nyHKtbl Po3uia N Transparencycncy He 6ydt actnbnpoabaHbI.
DocTynhBiepeXnMbI:PIP
\*eDakTnpu.Ha3B.PASCD
[MONTH] [ENTER] [A / V] [ENTER] [A / V] [ENTER] [A / V] [ENTER]
PncB0te IMeHa yctpOCTBaM, NOKIOUeHbIM KO BxOdbIM pa3bEmAM TeneBn3Opa,TO6bi O6IerHTb B daNbeHwEM Bb6op NcToHnka BxOdHoro CnHana.
1) NK
2) BNC
3) DVI
4) AV
5) S-Video
6) KomnoHeHT
I30&paXeHne[IK/BNC/DVI\*ekm]
DocynHbIepeKIMbl
PIK/BNC/DVI
AV
S-Video
C KomnoHeHT
DVI-Video
MagicBrightTM
[MONTH] [A/V] [ENTER] [ENTER] [A/V] [ENTER]
MagicBrightTM-3TO HOBAIyHKU,06eCneHVAIOUaONTIMALbHyO CpeDy IINpOCMOTpaB 3ABNCMOCTN OT codeKAAHNI pOcMaTPBaEMoI 3O6paKeHH.
Ha daHHbI MOMENT doCTynHbI 4 pa3nHbIX peKIMa: Pa3BNeKAT. INHTepHET TekT Nolb3.
Kazdny pejmm Imeet cBoN npedyctaHOBneHbIe 3aueHHraKoCTn. POnb30BaTeN bMOKeT bIbIpaTb Odn H3 TpE npDBePHTbNo yCTaHOBNeHHbIX pexMMOB npKocTN n pa3peWauOe cnoc6HoCTn IpocTbIM hakatmem OdnHn 3 KHNOK uynpabHeHHaYHKUeM MagicBrightTM, pacnoJoxeHHbIx Ha IInceBOI CTOpone MOHITopa.
1)a3Bnekeat
BbCOKa npKoCTb
ДяnpocmToPaBndeOeHnIbMoB,HanpImeR,BΦopMaTeDVDnnVCD.
2) VHTepHET
CpeHra npKocTb
Дя pa60ыс n3o6paXeHЯMn CmEuHaHHoro xapaKTepa, HAnpUmep, TeKCTOM n rpaФИКОД OДНOBpeMeHNO.
3) TekCT
HopmaNbHaJaRPKoCTb
Ipa6oTbIC DOKyMeHtauueHnn Dpynx pa60r, CBA3aHHbIX CTeHNEM 6OnbWoO 6bema TeKCTA.
4) Nonb3
XOT3N 3NaHEnH6bIIN TtAteHbNO NOO6paHbHaaMMn HKeHePamN OH, OJHaKO, MOrT OKa3aTbCn HEKOMΦOpTHbIMN DnHEKOTOpbIX NOnb3ObaTeNe, TAK KAK 3aBNCIT OT INHdNBdyanHbIX OC0eHHoCTe3peHn.
B 3OM cnyae OtperynnpyTe npKocTb (Brightness) n KOHTpactHocTb (Contrast) c nomoubIO kpaHoro MeHO.
[Дя npmaO bI3OBA 3ToHФн"и Ha nyIbTe Yu nCnoJIb3yertc KhoNka'M/B].
Ponb3
[ \text{[MENU]} \rightarrow [\wedge / \vee] \rightarrow [\text{ENTER} ] \rightarrow [\wedge / \vee] \rightarrow [\text{ENTER} ] \rightarrow [\text{ENTER} ] \rightarrow [\wedge / \vee] / [< / >] \rightarrow [\text{ENTER}] ]
IcnoB3y 3KpaHbIe MeHIO, MoXHO 3MeHATb KOHTpactHOCTb I apKOCTb 3o6paKeHnA corNaCHO NmHbIM npedNoTHeHnM.
1) KoHTpACT
BbInonHnre perynipOBky Kohtpact.
2)RpokocTb
BbnonnHTe perynnpOBky RpkocTB.
Ппмочаиме
- Пи Насгюке ИЗбрахеня сиспьзованем Функци Custom MeHо MagicBright nepexodHT bpexim Custom.
OTTeHOK P
[MONTH] [A/V] [ENTER] [A/V] [ENTER] [A/V] [ENTER]
ToH zBETA MOXHO N3MeHrTb OT KpachOBaTO-6nOro Do rOly6oBaTO-6nOro.
1)Xon
2)O&bIyHoe
3) Tenn
4)Ппьз
(Функ"ия дoc'tунна только в рекиme PC/BNC)
\*erynnpovka"Beta P
[ \text{[MENU]} \rightarrow [\wedge / \vee] \rightarrow [\text{ENTER} ] \rightarrow [\wedge / \vee] \rightarrow [\text{ENTER} ] \rightarrow [\text{ENTER} ] \rightarrow [< / >] \rightarrow [\text{ENTER}] ]
3TaФyHKUINONbEyETcDnpeYynipOBNnapaMeTPOB UeTHOCTN.
(Функ"ияdoctynhaToIbkoBpeximePC/BNC)
1) Kp.
2) 3en.
3) CnH.
Ппмецане
- Пинасгюке ИЗбрахеня с Истпьзованем Функциm Color Control MeHIO Color Tone nepexodit в ржим Custom.
PoiocTpoKa n3o&p.
IpOMeHIO "3aOpKc. h06bp." (ΦHKcaUIN H06paKeHn) nCnONb3yETcT dNToHou HAcTppoKn nOnyEnHn ONTMAbHO rH0r 13o6paKeHn 3a CHT ydaENHn WMyOBbIX NOMEX, pNtBODaUNX K HeCTaBnBHOCTn, DpOkaHIO mEepaHIO H06paKeHn. Ecn c nCnONb3OBAHNm ToHou HAcTppoKn ("TouHO") yDObNETbOpuTeNbHbIe pe3yIbTaTI bI NOyHTb He ydaETc, nONONb3yIte IpybYIO HAcTppoKy ("IpybO"), a 3aTEM ONaTb ToHyIO HAcTppoKy ("ToHNO").
(Функ"ияdoctynhaToIbkoBpekmePC/BNC)
1) < py \& 0
[ \text{[MENU]} \rightarrow [\wedge / \vee] \rightarrow [\text{ENTER} ] \rightarrow [\wedge / \vee] \rightarrow [\text{ENTER} ] \rightarrow [\text{ENTER} ] \rightarrow [< / >] \rightarrow [\text{ENTER}] ]
YctpaHHe Hyma, HanpMep, BepTKaJIbHbIX nOIOc. FpyBa HAcTpoKa No3BONAEr N3MeHHTb NOJoxHe
06nactn 306paKeHna Ha 3KpaHe. Ee MoXHO nepEMeCTNb B ueHTp C nOmoUbIO MeHIO ynpaBneHnra TROP30HTaJIbHbIM NOnOKeHInEM.
2) ToHNO
[ \text{[MEN] \rightarrow [A / V] \rightarrow [ENTER] \rightarrow [A / V] \rightarrow [ENTER] \rightarrow [A / V] \rightarrow [ENTER] \rightarrow [< / >] \rightarrow [ENTER]} ]
Ydannet nomexn, hanympmep, B vBne rnp3oHTaIbHbIX nOnc. Ecnn nomexn coxpanraTcdaXe nocne BblnoJIHeHHaTOHO ("ToHNO") HAcTpOkiN, NOBtOpHTe HAcTpOkiN yocne perynipOBKn cactOTb TaKTOBO CINHana.
3)Поциця
[ \text{[MENU]} \rightarrow [\text{A} / \text{V}] \rightarrow [\text{ENTER}] \rightarrow [\text{A} / \text{V}] \rightarrow [\text{ENTER}] \rightarrow [\text{A} / \text{V}] \rightarrow [\text{ENTER}] \rightarrow [\text{A} / \text{V}] \rightarrow [\text{ENTER}] ]
No3B0JrE N3MeHbTb No3nIO 3KpaHa No rOpN3OHTaNN HBePTNKaII.
AToTIOaCTpOkaP
[MENU] [A/V] [ENTER] [A/V] [ENTER]
TBenuHnA TOHOn Hnnrpy6oHnactpOKn HAcTpaNbaeTcABTOMaTneckn.
Ecnn BbI 3MeHnTe pa3peSeHHe Ha naHenn ynpaBHeHn, 6yDet BbINOnHeHa cyHKnA AUTO.
(Функцядoc'tуннToIbkoBpeximePC/BNC)
Ipy nprrmo Bb30Ba 3Toi fynknn Ha nynble Dy ncoNob3yETc KhONka AUTO
Bajahc CnHana P
IcnoIb3yETcTnI KOMnEHaCauu Cna6o CnHana RGB, nepeDaaemoro Hepe3 dnnHbI cHnBbI Ka6eb.
(ФункцядocунhaToJbkoBpeKmpePC/BNC)
1)BananCnHana
[ \text{[MENU]} \rightarrow [\wedge / \vee] \rightarrow [\text{ENTER}]\rightarrow [\wedge / \vee] \rightarrow [\text{ENTER}]\rightarrow [\text{ENTER}]\rightarrow [\wedge / \vee] \rightarrow [\text{ENTER}] ]
B MeHIO PerynnpoBkca Crrhana MoKHO Bbipat BKn. nnN Bkn.
2) Perynipobka cnHana
[ \text{[MENU]} \rightarrow [\text{A} / \text{V}] \rightarrow [\text{ENTER}] \rightarrow [\text{A} / \text{V}] \rightarrow [\text{ENTER}] \rightarrow [\text{A} / \text{V}] \rightarrow [\text{ENTER}] \rightarrow [\text{A} / \text{V}] \rightarrow [\text{ENTER}] \rightarrow [\text{A} / \text{V}] \rightarrow [\text{A} / \text{V}] \rightarrow [\text{ENTER}] \rightarrow [\text{A} / \text{V}] \rightarrow [\text{A} / \text{V}] \rightarrow [\text{ENTER}] ]
YctahOBky npametpoB R Phase, G Phase, B Phase, YcHneHne N YeTKocb MoKHO npOn3BODnTB BPyHyIO.
Pa3Mep P
[MENU] [ / ] [ENTER] [ / ] [ENTER] [ / ] [ENTER]
T03B0nAeT BbIbnpaTb pa3NnHbIe pa3MebpI n3o6paKeHn.
1) 16:9
2) 4:3
3kpah PIP
\[ \text{[MENU]} \rightarrow [\wedge / \vee] \rightarrow [\text{ENTER}] \rightarrow [\wedge / \vee] \rightarrow [\text{ENTER}] \rightarrow [\wedge / \vee] \rightarrow [\text{ENTER}] \rightarrow [\wedge / \vee] \rightarrow [\text{ENTER}] \rightarrow [\wedge / \vee] \rightarrow [\text{ENTER}] \rightarrow [\wedge / \vee] \rightarrow [\text{ENTER}] \rightarrow [\wedge / \vee] \rightarrow [\text{T} ] \rightarrow [\text{ENTER}] \rightarrow [\text{T} ] \rightarrow [\text{ENTER}] \rightarrow [\text{T} ] \rightarrow [\text{ENTER}] \rightarrow [\text{T} ] \rightarrow [\text{ENTER}] \rightarrow [\text{T} ] \rightarrow [\text{ENTER}] \rightarrow [\text{T} ] \rightarrow [\text{ENTER}] \rightarrow [\text{T} ] \rightarrow [\text{ENTER}] \rightarrow [\text{T} ] \rightarrow [\text{ENTER}]
Mozho perynipoBaTb HAcToPmKn 3kpaHa PIP.
1)KoHTpACT
I03B0JrE T HAcTpoTb npaMeTp Contrast (KoHTpactHocTb) OkHa PIP Ha 3kpaHe.
2)Jrpkocrb
IIO3B0JrT HAcTpoNTb napamet Brighthness (Rpkoctb) OKHa PIP Ha 3KpaHe.
3) YeTKOCTb
IcnoJIb3yETcI pyeIIpOBKn pa3nUHm MEXdy Hau6Oonee JRPKIMN Hau6Oonee TEMHbIMN 3OHAMN B OKHe PIP.
4)UBeT
OtperynpyIte npametp Color (LBeT) dny okha PIP ha 3kpahe.
5) ToH
DobabnE cTcTBeHHocn Cbeta OKHy PIP.
B pexnme "PC", BNC" moKHO npocmatpnbAt b 3o6paKeHne Ha ekpaHe PIP, nCnoNb3y nCTOuHKn BXoDHorO CnHnA "AV", S-Video". Pa6oTaT TOnbKO dRn BnDeocnHnA NTSC.
DocTynHbIepeXmbl:PIP
DocTyNbIepeXnMbI PC/BNC/DVI AV S-Video KomnoHcT DVI-Video
Pekim ASCD
[ \text{[MENU]} \rightarrow [\wedge / \vee] \rightarrow [\text{ENTER} ] \rightarrow [\text{ENTER}] \rightarrow [\wedge / \vee] \rightarrow [\text{ENTER}] ]
MoHTOp IMeET YteIpe npEcyTahOBnEHbIX Ha 3aBode-N3rTOBnTEne BapnaHTa aBTOMaTHeCKo yCTaHOKn napametpo n3o6pa&enHa.HactpoKa napametpoDnCnner.
1) DnHAM
2) CtaHapTH .Pa6ToaTeT TOnbKO DnR BnDeocnHana NTSC.
3)KnHo DocTyHbIe pexmbl:PIP 4)TnB3
[Длп npamorBo bI3Oba 3ToI ΦyHKuHn H an lybTe IY nCnoB3yeTcK hONka 'P.MODE']
H3o6paXeHne[AV / S-Video / KomnoHeHT. / DVI-Video
56
Nonb3 ASCD
[ \text{[MENU]} \rightarrow \left[\wedge / \vee\right] \rightarrow \left[\text{ENTER}\right] \rightarrow \left[\wedge / \vee\right] \rightarrow \left[\text{ENTER}\right] \rightarrow \left[\wedge / \vee\right] \rightarrow \left[\text{ENTER}\right] \rightarrow \left[\langle < / >\right] \rightarrow \left[\text{ENTER}\right] ]
NcnoB3y %KpaHbIe MeHIO, MO&HO N3MeHbTb KOHTpactHOCTb I npKOCTb N3O6pa&EHHa cornacHO HnHbIM npednoHTeHHM.
1)KoHTpact
!pnaet HATypanbHoctb UBEtOBOMy TOHy n3o6pa&eHn.
2)RpKocTb
Perynipobka npKoCTN
3) YeTKoCTb
PerynpoBka pe3KocTn n306pa&eHna.
4) LBeT
Perynpobka zbeta n3o6pa&ehna.
5) ToH
D6abnreT OTo6pa&aemomy N3o6pa&eHHIO eCTeCTBEHHOCtB Ubeta.
Pabotaet tobnko B peximax AV n S-Video. Pa6otaet tolbko dny Bndeocirhana NTSC.
OTTEHOK ASCD
[ \text{[MENU]} \rightarrow [\text{A} / \text{V}] \rightarrow [\text{ENTER} ] \rightarrow [\text{A} / \text{V}] \rightarrow [\text{ENTER} ] \rightarrow [\text{A} / \text{V}] \rightarrow [\text{ENTER} ] ]
ToH zeta Mo&Ho m3MeHrBt O KpachOBaTO-6eIoro Do rOly6oBaTO-6eIoro. ToH zeta Mo&Ho m3MeHrBt O KpachOBaTO-6eIoro Do rOly6oBaTO-6eIoro.
1) Xon.2
2) Xon.1
3)O6bIyHoe
4) Tenn.1
5) Temn.2
Pa3Mep ASCD
[ \text{[MENU]} \rightarrow [\wedge / \vee] \rightarrow [\text{ENTER} ] \rightarrow [\wedge / \vee] \rightarrow [\text{ENTER}] \rightarrow [\wedge / \vee] \rightarrow [\text{ENTER}] ]
I03BONJET BbIbIpaTb pa3nUHbIe pa3mpe bI3O6pa&eHna.
1) 16:9
2)YBen.1
3)YBen.2
4) 4:3
[3haeHnYBEn.1,YBEn.2,PaHopama HeocTyNbI B pexImax 1080i (nnn Bblwe 720p) nTTDTV.]
UΦp. w/noA ASCD
[MENU] [A/V] [ENTER] [A/V] [ENTER] [A/V] [ENTER]
BKNHOUHTb HIN BbIKHOUHTb FyHKUHO NOaBNeHmI WymA.
Функця поадьненя сфрбогоууma no3bonaet noIyayt b6one yetkoe n3o6pa&ehne.
1)BbIKn.
2)ПОИ.
Pexm"ΦnMb" ASC
[MENU] [A/V] [ENTER] [A/V] [ENTER] [A/V] [ENTER]
103BONJET BKNIOHTb NIN BBYKIOHTb pe&n m npocmotpa nIbMoB (Film Mode).
Функшpe&иma npocmoTpaфьmoB (Film Mode) obecneuBaert %ффekt OT Bocnpnra H3o6pa&eHn,
aHaONHnBn NOCEeHNIO KNHOeTa
(Bpekmax DVI-VideoФункци HeodocTynHa)
1)BbIKn.
2)PonH.
3KpaH PIP ASCD
[MONTH] [A/V] [ENTER] [A/V] [ENTER] [A/V] [ENTER] [A/V] [ENTER] [] [ENTER]
Mo&Ho perynipoBaT hAcToPouK %kpaHa PIP.
1) KoHTpACT
PerynpoBka KOthpacta OKha PIP Ha %KpaHe.
2)RpKocTb
PerynpoBka npKocTn OKHa PIP Ha %KpaHe.
DocTyNhbIepeKIMbli:PIP
3ByK
OoctynHbIepeXmbl
PC/BNC/DVI
AV
S S-Video
KOMNOHEHT
D DVI-Video
Pekum PASC0
[MONTH] [A/√] [ENTER] [ENTER] [A/√] [ENTER]
MOHTOP IMeET BCTPOEHHBbBICOKOKaueCTBeHHbI CTepeOyCNITEnb 3BYKOBORO CNHana.
1)CTaHdapTH
Bb6epTe pe&m Standard 7n B03bpueHn K CTaHdpTHbIM yCTaHOBkAM.
2) Music
BbIbepuTe pe&m Music npn npocMTope My3bikalhBix Bndeonporpamm nnKoHcepTOB.
3) KInHO
Bb6epntpe&m Movie nnpocmoTpa mboM
4) Peyb
Bb6epHpe pe&MM Speech npn npocMOrpe nporpaMM, coep&auix B ochOBHom pehy n dHaonr (HanpMep, HOBOTe).
5)Пльз
MOHITOP IMeET BCTPOEHHHB BICOKOKAHeCTBeHHB CTpeOyCNHTeN 3ByKOBORO CnHana
Pn3 PASC0
[MENU] [A/V] [ENTER] [A/V] [ENTER] [A/V] [ENTER] [] [ENTER]
MOHTOP IMeET BCTPOEHHbBbICOKOKaHeCTBeHHb CTpeOyCNITb 3ByKOBORo CMHana.
1) H/U
IOpHepKnBaet3ByuHaHHe Hn3Knx TaCTOT.
2) B/4
IOnyepKnBaet3ByuHHe BBICOKx YactOT.
3)Баланс
BanaHc 3Byka = > No3BOnraT perynipOBaTB 6anaHC 3ByaHaM MExdy JneBbIM npaBBIM DnHaAMKaM.
3Byk cnblweh dake B TOM cnyae,ecn dnn rpoMkoT yctahOBneHO 3aueHHe 0.
Приимechанинe
-Пин Habсторе ИЗБрахеня с Ипользованем Функци Custom MeHIO MagicBright nepexodntВ peKM Custom.
PpOMK. aBTO PASC0
[MONTH] [A/V] [ENTER] [A/V] [ENTER] [A/V] [ENTER]
Reduces the differences in volume level among broadcasters.
1)BbIKn.
2)ПОЛн.
SRS TS XT PASCD
[MONTH] [A/V] [ENTER] [A/V] [ENTER] [A/V] [ENTER]
SRS TS XT YANETCZ anateHToBAHHO TExHONorE SRS, KOTOPa no3BOJrT BOCPOn3BODy5.1- KaHbIy 38yK Hepe3 DBA DNAMnKA. FHyKzIa TRuSurround oecneHBAeT BOCpOn3BeDeHne 3XBaTbIAUoero BuPTyAnhoro 06bEmHO 3ByaHnuepe3 CCTemy C DByMnHNAMKAMN, BKNIOVA BCTPOEHHbIe DNAMnIK TeneBnOpa. FHyKzIa pa6otaet CO BCEMM MHorokAHaJIbHbIMm fOpMaTAM.
1) BbIKn.
2)Полн.
[Дя npamorO bI3OBA 3ToI ΦyHKuH H an nyIbTe IY nCnONb3yETcK hONka 'SRS'].
BbI6op 3Byka PASC
[ \text{[MENU]} \rightarrow [\triangle / \vee] \rightarrow [\text{ENTER}] \rightarrow [\triangle / \vee] \rightarrow [\text{ENTER}] \rightarrow [\triangle / \vee] \rightarrow [\text{ENTER}] ]
Pn BkHueHHo FyHKuIN PIP MoKHO Bb6paTb Main uN Sub.
1)OCH
2)Дон
[DocTynHbIe pexNMBi:PIP]
YCTaHOBka
DocyHbpeKmbi
PC/BNC/DVI
AAV
S S-Video
KOMnoHEHT
D DVI-Video
Y3bIK PASC0
[MONTH] [A/V] [ENTER] [ENTER] [A/V] [ENTER]
IaIINMeHHeNRA3bIka3KpaHHbIX MEHIO BbINOJIHHTe ONICAHHbIE Hnke Opeaun.
N PnMMeaHne
-Ⅰ3MeHEHNE np03paHOCHTn FOHa MEHO OSD.
OH He BnraeHa nporpammbl, BbInonHr eMbIe B KOMNbOtepe.
- English, Deutsch, Espanol, Français, Italiano, Svenska, 日本語,中国语,Pycckn,荷兰,Portugués
Bpem PASCD
NcnoIb3yETcra nIy Bb6pa OAnHn 3 YcTbipex fynKuH yacob - "YCT.Yacob", "TaMep cHa", "TaMep BKn." N "TaMep BkKn".
1)YCT.yacOB
$$
[ M E N U ] \rightarrow [ \wedge / \vee ] \rightarrow [ E N T E R ] \rightarrow [ \wedge / \vee ] \rightarrow [ E N T E R ] \rightarrow [ E N T E R ] \rightarrow [ < / > ] \rightarrow [ E N T E R ]
$$
Tekyua yctahOBka BpeMeHn.
2) TaHmep cHa
$$
\begin{array}{l}\text {[ M E N U ]} \rightarrow [ \wedge / \vee ] \rightarrow [ \text {E N T E R} ] \rightarrow [ \wedge / \vee ] \rightarrow [ \text {E N T E R} ] \rightarrow [ \wedge / \vee ] \rightarrow [ \text {E N T E R} ] \rightarrow [ \wedge / \vee ] \rightarrow\\[ \text {E N T E R} ] \rightarrow [ < / > ] \rightarrow [ \wedge / \vee ] \rightarrow [ \text {E N T E R} ]\end{array}
$$
IcnoJIb3yeTcIaIyABOMATUeCKOToKTIIOueHmMOHTOPaYepe33aHaHHbI npOMeKyTOK BpemeHn(B mHytax). (BbIKI., 30, 60, 90, 120, 150, 180)
3) TaHmep BKn
$$
\begin{array}{l}\text {[ M E N U ]} \rightarrow [ \wedge / \vee ] \rightarrow [ \text {E N T E R} ] \rightarrow [ \wedge / \vee ] \rightarrow [ \text {E N T E R} ] \rightarrow [ \wedge / \vee ] \rightarrow [ \text {E N T E R} ] - [ < / > ] \rightarrow [ \wedge / \vee ] \rightarrow\\[ \text {E N T E R} ]\end{array}
$$
NcnoIb3yETcA DnABOTOMaTHeCKOROBKIOHcHMOHTOPaBnpEaBPaTeNbHO 3aDaHHoe BpeMa.
Ecn nnapametpo TaMep BKn. n TaMep BbKn. yCTaHOBJIeHO 3HaHeHne p a napametp Yct. hacob He hactpoeh, oTO6pa3NTc coo6eHne "Chana yCTaHOBITE HaCb".
4) TaMep BbIKn
$$
\begin{array}{l}\text {[ M E N U ]} \rightarrow [ \wedge / \vee ] \rightarrow [ \text {E N T E R} ] \rightarrow [ \wedge / \vee ] \rightarrow [ \text {E N T E R} ] \rightarrow [ \wedge / \vee ] \rightarrow [ \text {E N T E R} ] - [ < / > ] \rightarrow [ \wedge / \vee ] \rightarrow\\[ \text {E N T E R} ]\end{array}
$$
VcnoIb3yeTcIaIyABOMATUeCKOBOBblKIOeHnMOHITOpaBnpdBAPNTelbHO3aHaHHeBpMa npYCTaHOBNEHHOMypOBHErpmKOCTNpeKIMME.
PnIMeuaHne
- EcnI nI npametpoB TaImeB BkN. n TaImeB BbIK. yCTaHOBHeO 3HaHEne p , a napametp YcT.hacOB He HAcTPOE, OTo6pa3ntCraoocheHne "Chauana yCTaHOBnTe YaCb".
PpO3paHocTb MeHIO PASC0
[ \text{[MENU]} \rightarrow [\wedge / \vee] \rightarrow [\text{ENTER} ] \rightarrow [\wedge / \vee] \rightarrow [\text{ENTER}] \rightarrow [\wedge / \vee] \rightarrow [\text{ENTER}] ]
I3MeHHe Ipo3paHocT foHa MeHIO OSD.
1) BbICOKa
2) CpeHnra
3) Hn3kay
4) Henp03p
YctaHOBka NcXoHbIX napaMeTpOB

[ \text{[MENU]} > [\text{A} / \text{V}] > [\text{ENTER}] > [\text{A} / \text{V}] > [\text{ENTER}] > [0 - 9] > [0 - 9] > [0 - 9] ]
Paponb MoXHO N3MeHHTb.
Energy Saving PASCD
[ \text{[MENU]} \rightarrow [\wedge / \vee] \rightarrow [\text{ENTER} ] \rightarrow [\wedge / \vee] \rightarrow [\text{ENTER} ] \rightarrow [\wedge / \vee] \rightarrow [\text{ENTER} ] \rightarrow [\text{MENU}] ]
Iporpamma MDC, npedoctabnemar komnaHnei Samsung, noedepknaeT naHb 4x4 KK-dncnneeB.
1)PonH.
2) BbIKI.
PnIMeuaHne
- Pn Heo6xOIMOCTN Ch3ntb noTpe6JIeHHe 3HePmB pexMme OxndHn, yctahOBtne dna napametpa 3KOH. 3HePm 3HaueHHe BKn. Ondako, ecnn nnapaMeTPa Energy Saving ycTaHOBNeHO 3HaueHHe BKn, fYHKUIO ydaenHoro BkIouHHe NITAHn Power On MHOrO3KpaHOrO ynpabHeHn MDC n fYHKUIO WOL (Wake On LAN) nporpammu MagicNet icnoIb3ObaTb HeIb3.
Video Wall PASCD
Bndeocteha 3TO Heckolbko CoeINHeHHbIX BmEcTe BnDeo3KpaHOB, KaJdbI n3 KOTopbix noka3bIbAet Yactb
06tero I3o6paKeHnI IN CoeINHeHHbIe BnDeo3KpaHbI, KaJdbI n3 KOTopbIX noka3bIbAET OHO I TO JKe
n3o6paKeHne.
Korda BknIOeH peKIM Video Wall, moXHO hactpontb napaMeTpbl 3kpHa Video Wall.
1)Bnneota&no
[MONTH] [A/V] [ENTER] [A/V] [ENTER] [ENTER] [A/V] [ENTER]
BkIouHHe/ByIKIouHHe yHKm Video Wall (BndeocTeHa) BbipaHoro dncnnera.
BbIK.
-Nonn.
2)ΦopMaT
[ \text{[MENU]} \rightarrow [\text{A} / \text{V}] \rightarrow [\text{ENTER}] \rightarrow [\text{A} / \text{V}] \rightarrow [\text{ENTER}] \rightarrow [\text{A} / \text{V}] \rightarrow [\text{ENTER}] \rightarrow [\text{A} / \text{V}] \rightarrow [\text{ENTER}] ]
Moxho Bb6paBf pOpmT dNn npocmoTpa pa3deneHHoro 3kpaHa.
Full
PonHcKpaHHoe n306paXeHne 6e3 nonei.
- Natural
OTo6paKeHHe eCTeBHeHHOro H306paKeHnC coXpaHeHmE mCxOdHOro foPmaTa.
3) Pa3deneHrTeJIb 3KpaHa
[ \text{[MENU]} \rightarrow [\wedge / \vee] \rightarrow [\text{ENTER} ] \rightarrow [\wedge / \vee] \rightarrow [\text{ENTER} ] \rightarrow [\wedge / \vee] \rightarrow [\text{ENTER} ] \rightarrow [\wedge / \vee] \rightarrow [\text{ENTER}] ]
3KpaH MoKeT 6bItb pa3deJeH.
Ppna3aDeneHmMOKHO Bbl6paTb KOnuueCTBO 3kpaHOBCpa3HOKOOMHOBOKOH.
- Bb6epTe peKIM B nyHKTe Screen divider (Pa3dennenb kpaHa).
- Bыберпг дснney в nyнкг Display Selection (Bыбор дснney).
-ПиннхатилфрьВьбpaHHOMpeKHM6yETyCTAHOBHeMecTONONOKeHMe.
-2x2
-3x3
-4x4
-5x5
-1x2
-2x1
-1x5
-5x1
PnmeuHne
- Bo В薪酬 pa60ы BiNeOTo6Lo ФнкиIM PIP, АТоноДстpoиka, ПОдстpoиka ИЗБраженя и Размер HeIoCTyInHb. Ecп пгл зауcke BiNeOTo6Lo pa60aet PIP, PIP bIknIOuHaETcR. BiNeOTo6Lo He pa60TaetВ ржиме MagicNet.
3Kpah6e0nacnoCTn PASCD
FyHKsna Safety Screen (3KpAn 6e3oNaHcOCTn) nCnONb3yeTcI nI npEOTBpaUeHn IOBnEHn OCTaTOHbIX 1306paKeHn noCne dInTeNbHO BOCPOn3BeDHeHn HENODBnHOrO 1306paKeHn.
-ФункцяЗкpan6e3oanachocnTncnoNb3yTecIpynpkpyK3kpapaC onpepeHHO 即TOI.
- Ecnn nntaHne OTKIOHeHO, 3Ta FyHKnna HeNoCTynHa.
1) 3KpaH 6e30nacHOCTN
\[
[\text{MENUR} ]\rightarrow [\wedge / \vee ]\rightarrow [\text{ENTER} ]\rightarrow [\wedge / \vee ]\rightarrow [\text{ENTER} ]\rightarrow [\text{ENTER} ]\rightarrow [\wedge / \vee ]\rightarrow [\text{ENTER} ]
\]
Icnonb3ayetraonopedeeneHHcoCTOHHBkN.)fHKnKpH6eONaCHOCHTN
- BblKn.
-ПОЛн.
2) Yactota
[ \text{[MENU]} \rightarrow [\wedge / \vee] \rightarrow [\text{ENTER} ] \rightarrow [\wedge / \vee] \rightarrow [\text{ENTER} ] \rightarrow [\wedge / \vee] \rightarrow [\text{ENTER} ] \rightarrow [\wedge / \vee] \rightarrow [\text{ENTER}] ]
Icnonb3yertc nra onpeelenenna cactoTB bblonne Hnene onepaan Screen Scroll (Ppokpyka kpaha).
(1~10 yacob)
INHTepBaI ONTCHTbIBAeTcR OT MOMeHTa BKNIOUeHn IINTAHN.
No ymonuahnIO nHTepBaI coCTaBnaeT 10 yacob.
-1~10yacob
3) CekyHda
[ \text{[MENU]} \rightarrow [\wedge / \vee] \rightarrow [\text{ENTER}] \rightarrow [\wedge / \vee] \rightarrow [\text{ENTER}] \rightarrow [\wedge / \vee] \rightarrow [\text{ENTER}] \rightarrow [\wedge / \vee] \rightarrow [\text{ENTER}] ]
IcnoIb3yETcTn onpeJeHHeNHa cactoBbInonHeHHe Nonepaun Screen Scroll (Ppokpytka ekpana). (1-5
cekynd)
No ymouhanHIO INTEPBAN COCTABNRE 5 ckyu.
-Tnn-Ipokpyka:1-5cekynd
-Tn-πκcei,Naenb,NctnpaTeB:10~50cekynd
4) Tnn
[ \text{[MENU]} \rightarrow [\wedge / \vee] \rightarrow [\text{ENTER}] \rightarrow [\wedge / \vee] \rightarrow [\text{ENTER}] \rightarrow [\wedge / \vee] \rightarrow [\text{ENTER}] \rightarrow [\wedge / \vee] \rightarrow [\text{ENTER}] ]
Moxho 3meHb Tn 3KpaHa dna FyHKuN Safely Screen Type (Tn 3aunb 3kpaHa).
- Ppokpytka
-ПикSEL
- NaheNB
- Nctnpatenb
BbI6op pa3peuhenna P
[ \text{[MENU]} \rightarrow [\wedge / \vee] \rightarrow [\text{ENTER} ] \rightarrow [\wedge / \vee] \rightarrow [\text{ENTER} ] \rightarrow [\wedge / \vee] \rightarrow [\text{ENTER} ] ]
Ecn pa3peuHHe rpaHuecko KapbKOMbTepe yaCTaHOHeHa 1024 x 768 npn 60 n, 1280 x 768 npn
60T,1360x768 npn 60 Tn nnn 1366 x768 npn 60 Tn,HO n3o6paKeHne HcBocnpn3BOJNTcHaNDnKaUMO6pa3OM,CnmoIbdoHHoФyHKU(BbIbOp pa3peHn)MOXHO doBntbc OTo6paKeHn KaPTnHKn Ha3kpane B onpeDeneHHom pa3peHn.
(Функ"ия дocунна только в реким PC/BNC)
1)BbIKI.
2) 1024 X 768
3) 1280 X 768
4) 1360 X 768
5) 1366 X 768
PpIMMeaHne
Bb60 MeHIO B3MOKeH, TOnIbKO eCn pAspeHHe BIndeOeKApTbYcTaHOHa 1024 x 768 npn 60 T, 1280 x 768 npn 60 T, 1360 x 768 npn 60 T nn n 1366 x768 npn 60 T.
Hactpoika npkoctn

[MONTH] [A/√] [ENTER] [A/√] [ENTER] [ENTER] [] [ENTER]
Bb MoKeTe BbIbPaTb OINH 3 I MHeOuXxCra 3bIKOB English
Power On Adjustme

[MONTH] [A/V] [ENTER] [A/V] [ENTER] [ENTER] [A/V] [ENTER]
Hactpoika Power On time (BpeMeHH pa60t) nla 3kpaHa.
\*npedocetepkenghe:YctahOBNTe&onee npodjNtEnbHoe Power On time (Bpempaotbl) dny npedotbpaueHHnepehanprkengn.
C&poc
YcTaHOBKa HcXoHbIx npaMeTpOB
1) C&poc hactp P
$$
[ M E N U ] \rightarrow [ \wedge / \vee ] \rightarrow [ E N T E R ] \rightarrow [ \wedge / \vee ] \rightarrow [ E N T E R ] \rightarrow [ E N T E R ] \rightarrow [ < t > ] \rightarrow [ E N T E R ]
$$
$$
(\Phi \mathrm {Y N K} ^ {\prime \prime}) \text {H A D O C T y n h a T o l b k o B p e x i m e P C / B N C)}
$$
2) Boccr."Bera P
$$
[ M E N U ] \rightarrow [ \wedge / \vee ] \rightarrow [ E N T E R ] \rightarrow [ \wedge / \vee ] \rightarrow [ E N T E R ] \rightarrow [ \wedge / \vee ] \rightarrow [ E N T E R ] \rightarrow [ < / > ] \rightarrow [ E N T E R ]
$$
Mhoro3kp. Ynp
DocTyNhbIepeKIMbl
PC/BNC/DVI
A AV
S S-Video
C KomnoheHT
D DVI-Video
Mhoro3kp.Ynp
$$
[ \text {M E N U} ] \rightarrow [ \wedge / \vee ] \rightarrow [ \text {E N T E R} ] \rightarrow [ \wedge / \vee ] \rightarrow [ \text {E N T E R} ] \rightarrow [ \text {E N T E R} ] \rightarrow [ 0 \sim 9 ]
$$
YcTaHOBKa pa3hBix NdeHTnФkATopoB dIy annapata.
1) Yct. ID
YcTaHOBKa pa3HbIX NIDEHTUΦnKaTOpOB dIra annapata.
2)BbOaID
IcnoIb3yETcIraIbIbopaФyHKuINnepeaTnkaOTdIbHoro annapata.BKIOUaETcTOnIbKO annapat, IeHTNΦkATOp KOTOPORo COOTBETCTByET HactpoKe nepeaTnka.
Функ"и npЯмого
ynpaBHeHn
Docynhbiepexmbi
PC/BNC/DVI
AV
S S-Video
G KomnoHeHT
D DVI-Video
MDC P ASCD
PepenDITBE3KpaHHeMeHIO MagicNet.
LOCK PASC
YCTAHOBHTe FyHKnIO 3aunTHaB 6nOKnPOBka.
1) BkN. &JIoKnIpOBoKy
OH 6yET3aBnOKnpOBaH.
2) BbIKJ. &nOKpOBky
OH 6ydt pa36nKnpoBaH.
PnIMMeaHne
-Пин actpoke Фнкlm Lock moKHO ynpaBnTb TOnbKO KhoNkAMn Lock Ha nyIbTe duCTaHIOHoro ynpaBHeHn TeneBn3ope.
Pepdabapntbno 3aadhhbipassword (naponb) MoHToTa - "0000".
PIMMeaHne
C6poc npoJnIyBnOKOpBkIyHKnOHaNbHbIX KHO
Hakmute KhoNkMUTE 186On. NapoB6yDenC6pouEn Do 3HaueHnE '0000'.
© 1995-2008 SAMSUNG. ALL Rights Reserved

Ppabnna TeHHNK
6e3onacHcTn
BVeIeHne
IopdknloyuHne
Pa60aC nporpamMhbIM
06ecneenuem
HactpoKa MOHTOPa
YctpaHHeHne
HEnCnpaBHOCTe
Функця CamonpoBepKn
Cnncok PpOBepk
Bonpocbn OTBebti
CneuΦnkaun
Hdopmaun
PpIIOJKeHne
TFT-LCD Monitor
www.samsung.com

LbETN BHeHnBnI3dEINMORYTpaJIHATcB 3aBNCIMOCTNOTMOeIN,aXapakTePNCTKN3dEINMORYT N3MeHrTaCBe3 npedBaPntelHoYbeOMNEHnC LcBkoycOBepueHCTBOAHN.
YcTpaHHe HeCnPaBHOCTe
Функця CamonpoBepkn
Приимechанинe
- PpeT TEM, KAK oBpaaTaBc B CepBnchbIeHTp, npOBepBe TcNeDyUOuHne NyKtBi CamoCToRteNbHO. Ecnn KaKHe-Ni6o npObnemBbI He MoKeTe yCtpAHbCaMoCToRteNbHO, ObaPntecB CepBnchbl eHTp.
>ФункцуСамоноьеркN
B MOHITope IMeETcA FyHKUa ABTOCTnPOBaHnA, KOtOPa no3BOJrT NOBepN, npabINbHO nn pa6Otae MOHHP.
1) BbIKKIOHTe BaUN KOMNBIOTep mMOHITOP.
2)OTcoeINHtBeBnDEOKa6enbOT3aHHeNnaHEnKoMnBIOTepe.
3) BknoHTe MoHITOp.
IokaaHHoe Hnke n3o6paeKeHe ("PnpOBepntcHn. KaBeb") Ha cpeHom fOe NOBnEETcK, KOrda MOHITOP HaxoNDTCB HOpMaNBOM paOohem COCTOHNN, Ho HA Hero He NoaH BnDEOCnHAn: B pexkme camonpoBepK CBeTOnIObHb INDkaTOp NHTaHn CoXpaHRe TcneHb IcET, a noka3aHHoe Ha PcyHKe n3o6paeKeHe nepemeeaaetcNo 3KpaHy.

Check Signal Cable PC
4) OTCYCTBNE OJHORO IN 3TINX KBaDpaTOB MOxET O3HaaybI npo6nmbc MoHHTOpOM.
Ecnn 3kpan MOHNTOPA OCTaETC NcTbIM NOcne npOdenaHHbx npOeDpy, npOBepbTe BIndeokapTy IN KOMNbIOTep; BaW MoHNTOP pa6oTaET HOpMaJIbHo.
> Check Cooling System
EcnHa 3kpahe OTo6paKaetc4 Coo6eHne "Check Cooling System", 3NaHT, npn0toen c5oB OxnaDaIOUeM BEHTINrATope. O6patntecb CepBnchbl CEHTP DnpeMoHTa INI 3MeHb BEHTINrATope.
>HeoTmAlbHbI pEXMM
Moxho yctahobntb dae 60nbue pa3pehenhe, em 1360 x 768. B teuehme mnyb6ydt oTo6paKaTbcra cootBcTCTbyuouee coo6uHne. 3a 3to Bpem Moxho Bbl6paTb Mekdy nMeHHnem pa3peHnna 3kpaHa HncoxpaHHeM Tekyuero pexHMa. B cnyae ecn h cactota o6HbNEHn npebbiAet 85 T, oTo6paNTcR cepHbI 3kpan, Tak kak MOHTOP He noDdePkmBaet YACTOTy o6HbNEHn Bblue 85 T.
Not Optimum Mode
Recommended Mode 1360x768 60Hz
Плимочаиме
-3aHnpmauee noDpejkmbaemopnpaepaaouenCnooc6hoctn yactotax obohne Hna 6pataTeceK pa3dny TexHmueckne 3abOckne HacptpoKn dmnnner.
> yxodn nuctka
1)YXoⅢaKOpnycomMOHHTopa.
OuCTKMOHITOPa npoTHBODHTe YCTOJ MRAKO TKAHBIO, npeBaPHTeBHO OTCoeDHNIB WHyp NHTAHIA.

He nCnoB3yIte 6eH3nH, pactBopHTeIN HnDpyTne orHeonacHbIe BEECTBa, a TaIOKe MOKpyIO TKAHb.
-Bo n36eKaHHe NoBpeKdEHHa 3KpaHa peKoMeHdyETcHcNoJIb3ObaTb OHnauHIOy JxNkOCTb, peKoMeHdoBaHHyo Samsung.
2)YxOa3aekpaHOMIIOCKONaHEbHO MOHTopoA.
OuCTky 3kpaH npoINBODIne OCTOPOXHO MRAKOH TKAHbIO (XONHATOBMyMAHHOI pHaHeIbIO).

HnB Koem cnyae He nncnoj3yute aetoh,6eH3HHnn pactbopntJIb.
(3To MoXeT Bb3BaT nobpeKdHHe UIN DeFOMaUHO NOBepxHocTH 3kpaHa).
CTONMOCTbYcTpaHHeHHNoBpeKdHn, npOn3oUeJHX NO BnHE NOb30BaTeIa, INCB3aHHbIe C3TNM 3aTpTaIb ONNaHBAOTcR NOb30BaTeIeM.
Henonadkn cnco&blnx yctpaHnna
Плгимechанинe
- MoHHTOP BOCNPOIN3BODNT Bn3yAInhIe CnHnIb, nonyaemble OT KOMNBOTepa. CneOBATEbHO, npo6nEMblcKOMBIOTOpm IIN BnDaeokapTaoM OryT bblpnuHoi nponaxn H3O6paKeHHa HA MOHTope, noTePbB CBeTe, yMa, nobBiWeHnY aCtoTbI, n.T.I. B TAKOM cnyae CHaHane nonuHtE NCTOCHIK npo6nEMbla, a 3aTeM CBAKITecb C CEHTPOM TEXHNecKO rO BCNYKBAHn IIN C BaAMM DInlepom.
1)PpOBepbTe, npaBnIbHo JIN NOcOeHHeH K KOMNbIOTepy 3JeKTPuYeckm HHyp N Ka6eB.
2)Поверъ, He n3daet nI KOMNbIOTep 6Oone Tpex 3ByKOBbIX CnHAnOB npn BKNIOeHNN. (Ecnn da, Heo6xOIMTOxNHueckoe 06cNoyKINBaHme MaTePNHCkONnAaTb KOMNbIOTepa).
3)EcnnBb noctabunno Hobyu BndeokapTy nnn ecnn Bbl cmontnpobann KOMnbHOTep, npoebpTe, yctahOBnebln npaBep BndeoadaTepa n dpaBep MOHTopa.
4)Y6eHNTecb,HTO3NaueHHe NaCToBtckAaHmPoBaHHn BInDe03KpaHa 50Tc-85Tc(He CTabTe BblIe 60TpnpMakCMmaHbHom p3peHenn.)
5) EcnB 03HnKaeI np6Iema C yctaHOBKoi dpaIbepa (BnDeo)aIantepa, nepeBeJeTe KOMNbIeTp B BezonacnB Pekm, ydaInte AanTep Dncnner cep3 cyHKmPiHaNb YnpabHeHn, CnCTema, =dminHcptop UcTpoiCTB, a 3aTeM nepe3arpy3HTe KOMNbIeTp, TTObl nepeHHCTaIIIpObaTb dpaiBep (BnDeo)aIantepa.
Cnncok PpoBepok
PnmeaHne
B cnedyuie TaTabnue nepeuHcnIe B03MOnKHe np6IeMb n Cnooc6b Hx pa3peuHn. Npeed Tem, kak obpaatacB a cepbnch ly cHTp, 03NaKOBtEc b c HNΦopMaueH eToro pa3dena, YTO bY He moKte PeWHTb np6IeMy camOCToTeNbHO. Ecni Bam deHCTBntbHo Tpe6yetc nomoUb, no3BOHNTe, noXanyIcTa, no TenePhOHy, yka3aHHOM By rapaHTnHOM TanOHe IIN B pa3dene "InHcpmaun" daHHoro pykoBOcTBa, INI CBAJHtceb C BaAMm Dnepom.
PpO6JIeMbI,CBRAaHHbIe CyCTaHOBkoi (PC)
PnmeaHne
Hnke nepeunncnehbl np6bnbI, cBra3aHHbIe C yctaHOBKO MOHTopa, n cnoocboix pa3pehenia.
Ipo6nema Cnooc6 pa3peuHn
3KpaH MOHTOPa Mmraet.
PpoepeBte, HadeKHO Nn noKnHouen 3akpenne BHeOka6eIb,NyUyniOT KOMNbOTepa KMOHTopy. (Cm.pa3den PNOKIOHHeN KOMNbOTepy)
PpO6JIeMbI, CBA3aHHbIe C 3KpaHOM MOHHTopa
PpIMMeaHne
Hnke nepueineneb npoBneMb,CBA3aHHbIe C 3KpaHOM MOHITopa u cnoCo6blnx pa3peHnna.
Ipo6Jema Cnoc06 pa3pehenna
3KpaH npCT, mHnkaTOp nHTaHnBbIKNoeH.
- PpOBeBpTe, HApEckHO Nn PoKnIOChen UHyp NtTaHnA, IN BKnIOHeHO Nn NtTaHmE LCD-MoHITopa. (CM. pa3dEn POnkIOChENe K KomIbIoTepy)
IpoBnEeTc coo6eHne "PpOBepntb cnH. ka6eJb"
- PpOBeBpTe, HApExHO nI npKnIOUeH BnDEoKa6eBb K KOMNbIoTepy UIN NCTOCHNY BnDEoCnIHana. (CM. pa3dEn IOnKJIIOUeHne K KomNbIoTepy)
- PpOBeBpTe, BKNIOUeH nI KOMNbIoTepy UIN NCTOCHNY BnDEoCnIHana.
IorBnTcCoo6eHne HeonTmAlbHy peKm
PnOBepbTe MaKcImaIbHyO pa3peuauUyO cnoc6HocTb N aactOTy BndeoaanTepa.
1306paXeHne"6exnT"B BepTKaJIbHOM HapabJeHN.
CpaBHnTe 3TN 3NaHHeHn C daHHbHM B Ta6Piue (CM. pa3dien PoiKNIuHHeHne TeneBn3NoHHOro CnHana.)
№6paKeHne HeeTeKoe npa3MbItoe. 06paKeHne HcEeTkoe npa3MbItoe.
- PnoBepbTe, HadeXHo IIN noDknHueH BndeOka6enb. HadeXHo noDknHouHte erO. (Cm. pa3dien NoDknHouHeH K KomNbIeTpEpy)
I3o6paXeHHe HeCTa6nIbHoe n npoxnt.
BbInOnHnTe rpy6yio Tpy6o NToCHyIO ToHO hAcTpoNky HAcTObTbI.
HmEHTcpaHTOMhBie H3o6paKeHH.
BkIIOHITMe MoHITOp 3aHOBO, npeBaPHTeHbO OTKIOUHB BCE akceccyapbl (BndeokabEnb-ydlnHHTeHb N T.D.)
- UcTaHOBnTE peKOMeHdyEmbIe 3HaueHnIaP3peUHOuIe CNOC6HOCTN uCACTObl O6HOBnEHnI.
1306paXeHne CnIuKOM CBetJIOe HJN CnIuKOM TEMHOE.
PpOBepbTe, HaxoJATcN 3NaHaeHn pa3peaioue cnoc6hOCTn uacToby, yCTAHOBJIeHbIe IINBUNEOJIaTbKOMNbIOtepa, B NOdEpcKIMBaEMOM MOHITOpOM dHaana3OHe. EcnHET, TO nepeyctaHOHTe INCOrnaCHO TEkyuIm DaHHbIM "InHΦopMaUry" B MeHIO MOHITOpA n Ta6nIe 3abOdcKe NaCTPOkN DnCnIe.
HecootBETCTBNE UBeTob 3KpaHa.
- HactpoTe RaKoCTb N KoHTpact 1306paKeHnA. (Refer to the Brightness, Contrast)
Zbeta n3o6paXeHnIckaxKeHbI
HactpoTeUBeT,MCnoIb3yraNyHKT"PiNb3oBaT.PeKIMB 66
TEMHBIMNTEHMNI.
MENHOHACTPOKINOSD"LBet".
Hn3Koe KaueCTBO 6enoro Ubeta.
Muraet 3eIeHbI HndkaTOp nHTAHn.
- MoHITop B daHHbI MOpHT BbINOHnHET coXpaHeHne
N3MeHeHIn yCTaHOBK B nAmrTH OSD.
3KpaH npCT, HndkaTOp nHTAHnnyctOuHBO CBETNC3eNeHbIMcBETOM NIN Mnaet KaxDbIe 0,5nn1 cekyHdy.
- MonHToP haxoAnTcBpeXmE 3HeProc6epeKeHnA.
- PapeBnHbTeMbIbNnHaxMnte JIObyo KnaBnHy HaKnabnType Komnbhotepa.
3KpaH Nyct H Mepuaet.
Ecn nocne hakatna KhoNkMN MENU noBnreTc coocheHne "TEST GOOD", npOBepTe, naEeNo IIOKNoH e Ka6bI Mekdy MOHITOPM IN KOMNbIOTepom.
Pp6nemblcBra3AHbIeC3KpaHOMMOHITopa
Приимеанно
Hnke nepeuncneHb Bo3MOxHbIe npoBneMbI, CBy3aHbIe cayIOcnHnHaAMn, nCnoc6bIux pa3peWenH.
Ipo6JIema Cnoc6 pa3peuHn
Het 3Byka
PpOeBpTe, HApExHNo Nn noKnHouen ayDnoka6ebNko BxOHOMy ayDnO-nOpTy Ha MOHTope N BbXoHOMy ayDnO-nOpTy Ha 3ByKOBOn nNaTe. (Cm. pa3den PtoKnIOuHne K KomnbItepy)
PpOBepeTe ypoBeHrpoMkoCTN.
CINUKOM HN3KN ypoBeHb rpOMKoCTH
- PpOBeBpeYpOBeHrpOMKocTH.
EcnnoeYCTAHOBMMAKCMAMbHOro ypOBHr pOMKOCTByKaNo-PrpexHemy HeOcTaTOHa, POBepTe YCTAHOBKYPOBHR pOMKOTn Ha 3ByKOBoI NaTe KOMbTopea IIN BCOOTBeTCTBHyOeM nporpaMMHom ObecneHm.
CINUKOM60JIbwoecoepJAHNE BbICOKNXHINHN3KNXCACTOT.
- OtperynpyTe napametpy "BbIcOKne yactoTby" n "Hn3Kne YactoTby"do npneMnEMoro ypOBH.
> Ipo6nemblcBra3aHHbIe CnyltomDnctaHOnHOynpaBHeHH
Приимechаиме
Hnke nepeuncneHb03MOxHbI npo6nemblcBraaHHbI cnyltom ductaunohoro ynpabneHn, n Cnoocobix pa3peeHn.
Ipo6JIema CnOco6 pa3peWENH
MonHTop He pearnpyet Ha HaxkTne KhONK nyIbTa dNCTaHnOHnOу npabIe
PpOBepeTe nnonpaHocTb 6aTapei (+/-)
PpOBeBpTe, He n3pacXoOBoH nn pecypc 6aTapei.
- PpOBepbTe, BKNIOUeHO JIN NITaHne.
PpOBeBpTe, HAdExKHO nI nOdknKUeH eHyp nITaHn.
- PpOeBpTe, HeT JIN B NONE DeIcTBnI pyNbTa IINCTaHIOHOY OynpaBHeHn CneuAnbHbIX pIIOopeCteHTbIX INI HeHOBbIX naMn.
BonpocbN OTBtB
Bonpoc OTBet
Kak MoXHo N3MeHnTb YaCTOу?
Yactota n3MeHReTc npTeM n3MeHeHn KOHpypaun BnDEOKapTb.
3aMetbTe,HTO NOdepkKa BnDeoekapTb 3aBNCNT OT BepCN
HcnoB3yEmo DpaBepa.(NoDpo6Ho 06 3ToM B B INHCTpyKUHX KOMNbHOtepy NIN K BIDeo.)
KaK MoXHO OTperyNIpOBAbTa pa3peLeHne?
Windows XP:
I3mEnIte pa3pe7aOu7yO cnoc6Hoc7b, Bbl6paB IaHeIb
ynpabJIeHHa OΦopMJIeHne I TeMbI 3KpaH IpaMaTePbI.
Windows ME/2000:
I3MEnHte pa3peWauOuYku CnOco6HoCTb, BbI6paB PaHeJIb
ynpabHeHna 3KpaH NapaMeTpbl. ^* C8Rkntecb c u3rTOBHTenEM BUneOkaTbI dnyTOUHeHNI.
KaHactpontbФyHK"mIO 3KohOMn3Heprn?
Windows XP:
Измене паразшалюук сисбость, вьбрав панельупавлени →Оформени « Temы → « Кразн → « Паметрь.
I3MeHHTe npaMeTpbypeKIMa 3HePROc6peXeHnBb6paB
PAnHeNb ynpaBHeHn-->3KpA H-->3actabKa,nnC nNoMoUbIO
MeHO HAcTPOKn npaMeTpoB BIOS (BIOS SETUP)
KOMlbOTepa.(PiocMToPTBe BInCTpyKmN K Windows/Computer)
Windows ME/2000:
I3mehnte pa3pe7aioyio cnooc6noctb, bbl6paB PaHelenb ynpabneHnra 3kpan Pnapemptb.
I3mehnte npametpbipexkma3heproc6pejexnna, bbl6paB PaHelenb ynpabneHnra-->3kpan->3actabka, nncn Cnmoouko MeHIO hactpoikn npametpoB BIOS (BIOS SETUP) KOMNbIoTepa.(IocmOtnpe B INHCTpyKunn K Windows/Computer)
KakHyxHOnuNCTnTbKOpnyc N PAnenbKKD?
OTKIOHHTIe UHPOT ceTN, 3aTe mIpOITe MOHTOp MRAKOJ TKAHbO, NCIOJIb3yra MOIOUIN pACTBOP ININ BODY.
He octabnneHa noBepxHocTm MOHTopa OCTaTKOB MOIOeOcpeCTBa nIu capanHH. He donyckaTe nonaAHH BODb BYtpbMOHTopa.
© 1995-2008 SAMSUNG. ALL Right Reserved

PapBnIaTexHnKn
6e3onacHcTn
BVeIeHne
Iopdknloyehne
Pa60aC nporpaMMHbIM
06ecneenuem
HactpoKa MOHTOPa
YctpaHHeHne
HEnCnpaBHOCTeI
Cneunpkauu
06nne
3KOHOMa3ep
Φa6pHnHn HacrpoKn
DnCnnner
HnΦopMaun
PpIIOJKeHne
TFT-LCD Monitor
www.samsung.com

BETN BHeuHn BnI3dEINM MOrTy pa3nnHaTbcra 3aBNCIMOCTN OT MOeIN, a XapakTePncNTK IN3dEIN
MOrTy N3MeHrTbC863 npEeBapuTeIbHoro yBeDoMneHn C cIeJIy ycOBepWeHCTBOBaHn.
Cneunkaun
067ne
>067ne
067ne
Ha3BaHne Moden SMT-4011
NaHEnbKKD
Pa3Mep dnaarOHaJIb 40dIOHMOB (101,6cm)
06nactb n3o6paeHn8 885,168 MM (Top) x 497,664 MM (BepT)
Uar nukcen 0,648 MM (Top) x 0,648 MM (Bepr)
CnHxpoH3aun
Tnropn3oHTan 30\~81K
NoBepTnKaann 56\~75
UBETn
LBeT DmCnner 16,7M Ubeta Lbeta
Pazpeшени
OntnmabHoe pa3peuHne
1360x768/1366x768@60TUBaBNCUMOCTOTHCNOJIb3yEMOI
rpaΦnueckoK KapTbI
MakcmaBhoepaPeWeHne
1366x768@60Tg
BxOaunCnHn, npeBaH
AHaIorOBbI RGB, cHpOBoR RGB, COBMeTmblc DVI (nHTepaKTHBHe cHpOBoe BJeoo).0,7 Vp-p
nookntbhl np7 50m ±10% Pa3dehba CnHxpoH3aunrTop. n Bept. pa3BepTK, KOMnO3HTbI
CINXP.SOG,nonoxntenbHbI INN OTPuataTeNbHbI ypoBeHbTTL.
MaKcImaMbHaYacToTa
100 MHz
3NeKtpoHa6xehnE
ПеременнынТOK 100-240В,(+/-10%),50/60Ф
Notpe6nemar Moocctb
Ka6eJb 15pin-to-15pin D-sub,cbemHbI
Ka6eB DVI-D to DVI-D, cBeMhBn (Onua)
UnpoBpa3bem
D-sub, BNC, DVI-D, YPbPr, S-VHS, VCR
Pa3mepb1(UxDxBx)/Be
971×582×118MM/38.2×22.9×4.6ДIOHMOB(6e3noCTaKN)
971x629,5x223MM/38,2x24,8x8,8HIOHMOB(CnoDCTABKO),23Kr/50,7yHTOB
971 x 629,5 x 228 mm / 38,2 x 24,8 x 9,0 inch (C noctabko n cTeKlOM), 27,7 kg/61,0 lbs
HHTeppeicnoctabKN VESA
200 MM x 200 MM (Дпя ИСОЛБЗОВАНЯ CO CсeинальнIM AnnapaTHbIM cpeCTBaMn NOДТаBKM (Дпя рк))
KnMaTnueckne
Pa604a
TEMnepa:at 10^ 40^ (50^ 104^)
BlnkHoctb:10%~80%,HeKoHdeCpUouuHc
Temnepa:ot-20°C~45°C(-4°F~113°F)
XpaHEnn
BlaJxHoctb:5%~95%,HeKoHdeCnpyuOui
AydnoxapakTepeNCTnKn
AynboXo1 THe3O RCA KpaChbI (I) 6bn (II),0,5B (-9dB)
AynobxOJ 2 He3do RCA kpaHbI (I) 6eIbI (I), 0,5B (-9D5)
AynobxokomnbpoTepa Ctepeopa3bem 3,5OM,0,5B(-9dB)
Yactota Pu:80Γu~15KΓu (npn-3dB)
YbCTBNTeHOCtB A/B:80Tg\~20Kf(npn-3dB)
CoBMeCTHMOCTb c Plug & Play
3TOT MOHITOP MOKET 6bIbYcTaHOBnHa IIOBOH IN COBMeCTMlbIX c Plug & Play cnCTem. B3aIMoDEiCTBMEkdy MOHITOPOM I KOMMbHTOpOM ObceneuBaet HAnlyuUHe YCIOBnI da PaobToI h NaCTpoIK MOnHITopA.
B 60bnHCTBe CnyaEB MOHITOP HAcTpaNBaETcABTOMaTHeCKN,ecn TOnbKO NOnb3OBaTeNb He NoKEnaET bIb6pTa Dpytne napaMeTpbl.
DonyctHMoe KOINHcCTBO TOeK
B daHHO MOeIN IcnoIb3yETcTO TOnKoJIeHOuHHa KK-naHeB (TFT-LCD), INrOToBnEHHa C npImeHEmm COBpeMeHHoI TexHOONIM NOynPBOoDnIKOB C ToHocTbIO 1 ppm (Oda MnnNIOHNA). HOrDa NIKCebl KPACHO, 3EIEHO, CInHErO u BENOTO cBeTob CTAnOBaTcRA pKIMM nN YepHBIM. 3TO He ABnETCa CnEDCTBnEM mNOXOrO KaueCTBa H e BblBaTaBt HeyDo6CTB B pa6ote.
Hanpimep, konuheCTBO cy6-nKceneB DAHNOM n3dennn coCTaBnEeT 3.133.440.
MnmeuHne
·BHOCHTbCAI3MeHHeHn6e3npedBapntelbHorOyBeDOMHeHn"KIN3HeHHbIuKn-7Net
06opyoBaHne Knaccs B (HnFopmaunohno-KOMMyHKaunOHoe 6opyoBaHne dnn HcnoB3OBAHHB D oMaunHX ycNoBnx)
JaHnbl npOdyKT COOTBETCTBYET Tpe6OBaHNrM DInpeKTHbI 3neKtpOMaHHTHO CoMBecTUMOCtN NO NcIOJIb3OBaHNBO B DOMaUHNX YCNOBnX IN MOKeT IcNoJIb3OBaTbCBA JIObIX NOMEeHINX, BKJIOHAR O6bUHbIe XUNIbe NOMEeHINr.
(ObopydoBaHnneKnaccaBn3nyaet MehIe 3neKtpomarHnTHbIX BOnH, Yem obopydoBaHne KnaccA.)
3koHOMaH3ep
B 3TOT MOHITOP BCTPOEHa CNTeMaY ynpabneHnra 3NEKTPoNHTaHnem, HAsbBaema 3KOHOMa3ep. 3Ta CNTeMa 3KOHOMIT 3NEKTPO3HePnIO npTeM nepeKnIOUeHnBAWero MOHITOP a H pexm NOHKeHHORo Ntpe6HeHn 3NEKTPuYeCTBa, KOrda OH 6e3JeCTByET B TeEHnne ONpeDeHnHO BPemHn. MoHITOP ABOMATUHeCKn BO3BpaAaetc K HopMaIbHo npBoTe, KOrda Bbl nepeDbIgAeTeMbIs Hn HaxmaeTe Ha Ih6yI KnabNuHa KnaBauType. B CEJx 3KOHOMIN 3NEKTPo3HePnIBbIKIOuayte MOHITOP, KOrda OH He B pa6ote Hn KOrda Bbl OCTaBnIeTe Ero Ha DoJIroe BpEMr. CNTeMa 3KOHOMa3ep pa6oTaET Ha COBMeCTIMoC VESA DPM BIndeokapTe, BCTPOEHNO B BaW kOMNbToep. IcNoIb3yIte nporpamMHyO yTHNHT, INctaIIINpOBaHHyO B BaW KOMNbToep dI na pImMeHHeN 3ToI fynkun.
Соctогнées Hорmaльна
Раобота Зкohомчны
реким петань Питунées
OTКlioуно
EPA/ENERGY 2000 Питунées
OTКlioуно Иndikатор
Злестоцпатону 3eн. 3eнень,
Магалош Жeльный Черный Пotравлиая
мошисть Мeнee чe
210Вт Мeнee чe m 1Вт
(Bыкл. реким) Мeнee чe m 1Вт
(Kлавиша-
выкlioуател) 0W
(Kлавишa-
выкlioуател)

ENERGY STAR
3TOT MOHITOP COBMECTM C EPA ENERGY STAR® IN ENERGY2000, KORDA NIOJb3yETcC KOMNbIePOM, CHa6KeHHbIM FyHKUaMn VESA DPM.
KaK yactHmnapThepckOn npOrpaMMbI ENERGY STAR, KOMnHaHnSAMSUNG ycTaHOBnA, YTO daHHoe n3dJIne COOTBeTcTByeTepeBOAHnM K 3KOHOMN 3JIeKTpo3Heprn, IN3NOKeHHbIM B dIpEeKTHBaX ENERGY STAR.
Фабунов Насторки
Dinnnne
>ФабруновНЯстpoукДиспляe
Ecnn noctynaoucn kcmnbtopea cinnan taokn jke, kak hnecenyuua npedbapntbno FoabpnHn HactpoKn Dncttnner, npom3oienat ABtomatunckar camoperynipobka 3kpana. Ondako, ecnin cinrnan
OTNnHaETc, %KpaH Mo&et onyctetb, XOTa INHdkatop BKNIOHeH. IOpperynpyIe %KpaH B COOTBETCTBN C HHTCPKzmaM K BnDEOKapTe.
*eximДистпя Частota no Частota
Кадров
(<") Частota
(q<") Синхонида"Ия
ПолуарноCTN
(H/V) <op Изонтani
(K<") IBM, 640 x 350 31,469 70,086 25,175 +/- IBM, 640 x 480 31,469 59,940 25,175 -/- IBM, 720 x 400 31,469 70,087 28,322 -/+ MAC, 640 x 480 35,000 66,667 30,240 -/- MAC, 832 x 624 49,726 74,551 57,284 -/- VESA, 640 x 480 37,861 72,809 31,500 -/- VESA, 640 x 480 37,500 75,000 31,500 -/- VESA, 640 x 480 43,269 85,008 36,000 -/- VESA, 800 x 600 35,156 56,250 36,000 +/+ VESA, 800 x 600 37,879 60,317 40,000 +/+ VESA, 800 x 600 48,077 72,188 50,000 +/+ VESA, 800 x600 46,875 75,000 49,500 +/+ VESA, 800 x600 53,674 85,000 56,250 +/+ VESA, 1024 x 768 48,363 60,004 65,000 -/- VESA, 1024 x 768 56,476 70,069 75,000 -/- VESA, 1024 x 768 60,023 75,029 78,750 +/+ VESA, 1024 x 768 68,677 85,997 94,500 +/+ VESA, 1360 x 768 47,712 60,000 85,500 +/+

Yactota no
BpemHa npopncobbA Hne OOnH CTPOKn, CoednHIOe npabn n IeBkpar %Kpana no rOpnoHTaHn, Ha3bBaTcra?OpnoHTaBbHIM!epnoDM,a o6paTHoe?OpnoHTaBHOmy!epnoDy uCNO Ha3bBaTcra YactoToN no?OpnoHTaH. EInHHua N3MpeHmR: K?u.
Yactota no Beptnkaan
Iodobho fnyopeceHTHO namne, %Kpah Don&En Bocpon3Becn OdoHo To e 306pa&ehne MHO&ectBO pa3 B cekyHdy, YTObbl nonb3OBaTeB CMOR erO yBnDEb. Yactota taTKNX NOBtOPB H3bBaetcY AcTota KaDPoB, INN YAcTOTO N6HOJIeHHe. EINHua N3MepeHHe?U.
© 1995-2008 SAMSUNG. ALL Right Reserved

Ppabnna TeHHNK
6e3onacHcTn
BVeIeHne
Iopdknloyehne
Pa6ota c nporppaMMHbIM
06ecneenuem
HactpoKa MOHTOPa
YctpaHHeHne
HEnCnpaBHOCTeI
Cneunpkauu
HnΦopMaun
DnB6Oonee BbICOKoro
KaueCTBa H3o6paXeHn
NHΦOPMALJNRAO5
N3DEENIN
(Ппсдoxраннго ot 3фхekta octatoHoro n3o6paKeHH)
PpIJIoxKeHne
TFT-LCD Monitor
www.samsung.com

LbETN BHeHnBnI N3dEINMAOTy paJIHATcB 3aBNCIMOCTN OT MOnEIN, aXapakTePNCTKN I3dEINMAOTY IN3MeHrTcB6e npedBaPntelbHorO yBeDOMNEHnC LcBky COBepueHCTBOAHIN.
HOpopMaun
Ja60Jee BBICOKO KAeCTBa
n3o6paXeHHN
Дя поуеня ontmanbHoro kaucctBa H36paekhenia B KOHTponbHOn naHEn KOMnbIotepa HAcptpoTe pa3peuhenie n Ko3pfnueent HnKekzim 3kpaHa (hactOty perehepaun) cornacho HnHexeNeyUcIM nyHKTAM nHCTpykUn. CyueCTByET bepoTHocB noLuyenra H36paekhenia HepOBHOro KaeeCTBA, ecn BB He BbIbepeTe dny Baew ToHkonneHouHOn KK-naHEn (TFT-LCD) ontmanbHoe kaucctBO H36paekhenia
-Pa3peeHHe:1360x768
Vertical frequency 60
B D aHHO Moen Hcnoh3yetc ToKoHneHouHa JK-naHEnb (TFT-LCD), nroToBHeHHa c npimeHeHMc COpeMeHHo TExHoHOrn NoIpyPoBoDnIKOB C ToHocTbO 1 ppm (OHa MInIOHHa). HOrda Nkcebl KPACHO, 3EJIeHO, CNHEO u BELIO qBeTOB cTaHOBraTc RpKmMn Hn HepHbIMN.
3TO He AEBTcR CNECTBnEM INOXO KAeCTBa H He Bb3bIaET HeyDo6CTB pa6ote.
Hapmep, konueCTBO cy6-nKceneB daHHOM nndnn coctabnreT 3.133.440.
Дячсн ChapyкMonHToPаианeнHaHecnTe He6oJIbwoe KoJInHeCTBo peKOMeHnyEmoro 电TRE BoeCtBaHa cyxHy mRkyTKaHbN npOTpIte NoBepXHoCTN. He npKnaDbBaIte n3mUHee DabNeHne Ha KK-3kpan, npocTo octopoxHo erO npOTpIte.
PnH3NIMHEm DaBHeHH Bb MoKeTe ero NOBpeDHTb.
BbI CMOKTe NOJYuHTb 60e ee KaHeCTBeHoe M3o6paKeHne, ecJIaKTINBn3IpyTe Ha 3kpaHe onUIO "ABTOHaCTpOka" ("auto adjustment function").
Ecnn noce aBTOHaCTpoKn Bce eue npCyTCTByOT nomexn, nCnoIb3yIe pejkm ToHKoHAcTpoKn (FINE/COARSE).
PnOTo6paKeHm HEnoDnKHO KApTnKn B TeueHHe npOdoNKeTeNbHoro nepNoa BpeMeHn MOryt NOBnTbC8 OCTaOHTbHe N3o6paKeHn Hn Hepe3KoCTb.
EcnBbHe cobpaetecb nCnOlb3OBaTb MOHITOP B TeueHne IInTeIbHoro BpeMeHN, nepeKIOUHTe erO Be peKIM 3heproc6epexehn Hnn AKTINB3Npyte XpaHntelb 3kpaHa, otobpaKaIoUs nOdaNXHOe N306paKeHne.
INHOPMALUNOBN3DEENNN(NpeoopaenneOt3Φfekta
octaToCHoro u3o6paXeHHa
4To TaKoe 3ΦΦeKT OCTaTOUHOrO H3o6paKeHnE?
30000000000000000000000000000000000000000000000000000000000000000000000000000000000000000000000000000

BbIKIOHHe HHTaHnY, yCTaHObKa 3KpaHHo 3AcTaBKn NIIpeXIM 3Heproc&epExeHHN
BbiknoyaTe nHTaHHe Ha 4 caca nocne 20-Yacoboro nCnoIb3OBAHnA.
BbIKIOuayte nHTAHHe Ha 2 yaca nocne 12-yacOBoro nCnonb3OBAHNA.
BbIKIOHaiTe MOHTOP C NOMOUsBO CXEMBI ynpaBneHnI NTAHm B MEHIO CBOINCTB INCNner KOMNtboTePA.
- Ecnn Bo3MOKHO, nCOnb3yTe 3kpanHyIO 3actABky. - PekomeHdyETcNcNoB3ObaTb 3kpaHHyIO 3actABky ODHoro CBeta NIN DBNKUeecr NIO6paKeHne.
PepnoDnueckoe 3MeHeHne HnFopMa"Hn O Bete

PnIMeuaHHe
-нсповьтдураразиньхцьета
KaKdbie 30 MmHyT mMehnTe HOpmauO uBete, nCnoJb3yra 2 pa3NHybix Ubeta.
I36eataHeNCnoJIb3oBaHnRAKOM6HaCnN CnMBOOBnFOHOBOrOzBETAc60nboupa3HnueB
136eatae nnoBbOaHn cepbix cBeTob, T.K. B daHHOM cnUyae 0c0f0KT octatoHoro 136paXeHn MoKet BO3HNKHyb 6bIcTepe.
H36eraIte hCnOJb3OBaHmra CBETOB C 6oBwO pa3HnueB BApKocT (eepbN n 6ebl, cepb).


PepnoDnueckmMeHnTe"BetaCNMBONB
- IcnoIb3yIte HacbIeHHBeIe CHe6oBbOpa3HnEeB RApKocTn
-Bpemr:IM3MeHHeNcUBeTaCNMBONOBuCBeTaΦOHaKaJDbte 30 MNHyT.

KaKdbte 30 MNHTNMEHnTE CMBONbI c NMOOJIbOp nepeMeueHn.

Ha ekpahe nepnoDneckn OTo6paKaeTcB DmNkyUeecra N3o6paKeHHe C norOTINOM.
-BpMa:OTo6paKeHHe DnKxUeROc H3o6paKeHn C norOtnmOB TeueHne 60 cekyhd nocne 4- hacoboro nCnonb3oBAHn.
HaIyHnCnOc 3aunTb MOHOTOP OTOBHNKHOENH 30fKeTAOHTOHO 3o6paKeHn - 3TO BkIOHTb NtAHNE INN YCTaHOBTb DnA KOMbHOtepa INN CNTeMb, eCN OH He IcONb3yOTc, nporpAMMy 3kpanHo 3actABn. TapaHTmHOe 6cnyKBAHne TaKke 6ydet OrpaHnHeO cOrnACHO HnCTpyKuHm PyKOBOCTBa nONbOBATeNa.
Mcnonb3OBaHHe yHK"m Screen Scroll (PpokpyKa kpaHa)
- Icnonb3yIte fhykuuio Screen Scroll (Ipokpytka 3kpana)
- HencpabHoctb: cepna ropn3oHTaJIbHa nonOca nepemaeTcB BBeP x BHN3.

-Bb6epntcncoc6yctpaehnna
PykoOCTBO nonb3OBaTeNA: 3KpaHHOe MeHO -> Set Up (HAcTPOKa) -> Safety Screen (3KpaHBe3oNaocHcTo) -> Screen Scroll (PpokpyTa 3KpaHa)
.Bpemehno INHTepban:1-10 yacob (pekomehdyetcra:1)
BpeMeHHoepnoD:1-5cekyH(peKOMeHNyETcra:5)
PnMmeHne
(Cm.pa3enpykoBODCTBA nonb3oBaTeN KOMnAKT-DnCKa,ncBraeHHbI pYHKuM 3KpaHHOrMeHO. HeKOTOpBie MoEN MOrYT OTCyTcBOBaTb.)
McnoIb3ObaHne cyHK"n Screen Pixel (NkceJn ekpana)
- Icnonb3yTe dyHKuio Screen Pixel (IinKceJn 3kpaHa)
- HenncpabHocb: YepHaT TOka nepemeuaetcBBePx Hn3.

-Bb6epntcncoc6yctpaHeHH
PykoOCTBO nonb3OBATEIA :KpaHHOe MeHIO Set Up (HactpoKa) Safety Screen (KpAH 6e3oNaChOCTn) Pixel (ToKa)
Bpemehno INHTepban:1-10cacobpekomedyetc:1
BpeMeHHo npno:10-50 ckyH (peKoMeHHyETc:50)
IcnojblayteykuuScreenBar(NonocahkaPae)
- HenncpabHocb: Hepn ropn3oHTaBna nn BepnKaIbHa nOloca nepemaeTcB Bepx IN BH3.

-BbIepeCnoc6yCTpaHHeHH
PykoDBCTBO nonb3OBateJRA: 3KpaHHe MeHIO -> Set Up (HaCtpoKa) -> Safety Screen (KpaHBeaONaCHOCTn) -> Bar (Nonoca)
BpeMeHHoHnHTepBaJ:1-10yacOB(peKOMeHdyTeTcA:1)
BpeMeHHo nepno:10-50cekyH(peKoMeHnyetc:50)
PpHmEaHne
(Cm.pa3enpykoBODCTBA nonb3oBaTeIaKOMnAKT-DnCKa,ncBraeHHbIyHKuIM 3kpaHHO MeHO.HeKOTOpBie MoENM MOrY TcYCTBOBaTb.)
MncnoIb3ObaHne yHK"nn Screen Erasing (ydaJIeHHe n3o&paXeHnC 3KpaHa)
- Icnonb3yute fyHKuio Screen Erasing (Ydaene Hne 3o6paekenna c3kpaHa)
- HencnpaBHOCTb: 2 BepTikanbHbX bNoK npemeuauoTc, ydaen n3obpaKeHne c ducnner.

-BbIepeTe cnooc yctpaHnna
PykoBocBO nonb3OBaTeN: 3KpaHHOe MeHO -> Set Up (HactpoKa) -> Safety Screen (3KpaH6e3oNaCHOCTn) -> Eraser (YdaneHeNe H3O6paxEHn)
BpeMeHHoHnHTepBaJ:1-10yacOB(peKOMeHNdyETcA:1)
BpeMeHHo npHoi 10-50 cekyhd (peKOMeHHdyTeTc:50)
Ппмочаиме
(Cm.pa3enpykoBODCTBA nonb30BaTeNaKOMnakT-dNcKa,ncBraeHHbIyHKUIM 3kpaHHO MeHO. HeKOTOpBie MoDenM MOrY TcYCTBOBaTb.)
© 1995-2008 SAMSUNG. ALL Right Reserved

PapBnIaTexHnKn
6e3onacHcTn
BVeIeHne
IopdknloyuHne
Pa60aC nporpaMMHbIM
06ecneenuem
HactpoKa MOHTopa
YctpaHHeHne
HEnCnpaBHOCTeI
Cneunpkauu
Hdopmaun
Appendix
CB83bBaIeTecBc
SAMSUNG no Bcemy Mnpy
TepMHHbI
HOMO
TFT-LCD Monitor
www.samsung.com

BETN BHeuHn BnI3dEINM MOrTy pa3nnHaTbcra 3aBNCIMOCTH OT MOeIN, a XapakTePncTKN IN3dEIN
MoryT H3MeHbTaBc6e3 npdBaPntelbHOrO yBeDOMneHn C cIeJIbO yCOBepWeHCTBOBAHn.
Appendix
CBAIbAIaTecb c SAMSUNG no Bcemy
Mnpy
PnMMeaHne
- Ecn y BAC ecb npednokeHnBONPOcB no npodykTAM Samsung, cBra3baiTecb C
HΦopMaIIOHHbIM ΚeHTpOM Samsung.
North America
U.S.A
1-800-SAMSUNG(726-7864)http://www.samsung.com/us
CANADA
1-800-SAMSUNG(726-7864) http://www.samsung.com/ca
MEXICO
01-800-SAMSUNG(726-7864) http://www.samsung.com/mx
Latin America
ARGENTINE
0800-333-3733 http://www.samsung.com/ar
BRAZIL
0800-124-421
http://www.samsung.com/br
CHILE
800-SAMSUNG(726-7864) http://www.samsung.com/c
COLOMBIA
01-8000112112 http://www.samsung.com.co
COSTARICA
0-800-507-7267 http://www.samsung.com/latin
ECUADOR
1-800-10-7267 http://www.samsung.com/latin
EL SALVADOR
800-6225 http://www.samsung.com/latin
GUATEMALA
1-800-299-0013 http://www.samsung.com/latin
JAMAICA
1-800-234-7267 http://www.samsung.com/latin
PANAMA
800-7267 http://www.samsung.com/latin
PUERTO RICO
1-800-682-3180 http://www.samsung.com/latin
REP. DOMINICA
1-800-751-2676 http://www.samsung.com/latin
TRINIDAD & TOBAGO
1-800-SAMSUNG(726-7864) http://www.samsung.com/latin
VENEZUELA
0-800-100-5303 http://www.samsung.com/latin
Europe
AUSTRIA
0800-SAMSUNG(726-7864)http://www.samsung.com/at
0032 (0)2 201 24 18 http://www.samsung.com/be
BELGIUM
CZECH REPUBLIC 844 000 844 http://www.samsung.com/cz
Distributor pro Českou republika:
Samsung Zrt, Česka organizačné složka Vyskočilova 4,
14000 Praha 4 DENMARK 70 70 19 70 http://www.samsung.com.dk FINLAND 030-6227 515 http://www.samsung.com/Fl FRANCE 3260 SAMSUNG(726-7864)
08 25 08 65 65 (€ 0,15/min) http://www.samsung.com/fr GERMANY 01805-121213 (€ 0,14/Min) http://www.samsung.de HUNGARY 06-80-SAMSUNG(726-7864) http://www.samsung.com/hu ITALIA 800-SAMSUNG(726-7864) http://www.samsung.com/it LUXEMBURG 0035 (0)2 261 03 710 http://www.samsung.com/be NETHERLANDS 0900 20 200 88 (€ 0,10/Min) http://www.samsung.com/nl NORWAY 815-56 480 http://www.samsung.com/no POLAND 0 801 801 881
022-607-93-33 http://www.samsung.com/pl PORTUGAL 80 8 200 128 http://www.samsung.com/pt REPUBLIC OF IRELAND 0818 717 100 http://www.samsung.com/ie SLOVAKIA 0800-SAMSUNG(726-7864) http://www.samsung.com/sk SPAIN 902 10 11 30 http://www.samsung.com/es SWEDEN 0771-400 200 http://www.samsung.com/se SWITZERLAND 0800-SAMSUNG(726-7864) www.samsung.com/ch U.K 0870-SAMSUNG(726-7864) http://www.samsung.com/uk
CIS ESTONIA 800-7267 http://www.samsung.ee LATVIA 800-7267 http://www.samsung.com/lv LITHUANIA 8-800-77777 http://www.samsung.IT KAZAKHSTAN 8-10-800-500-55-500 http://www.samsung.kz KYRGYZSTAN 00-800-500-55-500 RUSSIA 8-800-555-55-55 http://www.samsung.ru UKRAINE 8-800-502-0000 http://www.samsung.ua UZBEKISTAN 8-800-120-0-400 http://www.samsung.uz
Asia Pacific AUSTRALIA 1300 362 603 http://www.samsung.com/au CHINA 800-810-5858, 010- 6475 1880 http://www.samsung.com.cn HONG KONG 3698-4698 http://www.samsung.com/hk INDIA 3030 8282, 1800 110011 http://www.samsung.com/in/ INDONESIA 0800-112-8888 http://www.samsung.com/id JAPAN 0120-327-527 http://www.samsung.com/jp MALAYSIA 1800-88-9999 http://www.samsung.com/my NEW ZEALAND 0800SAMSUNG(726-7864) http://www.samsung.com/nz PHILIPPINES 1800-10-SAMSUNG(726-7864) http://www.samsung.com/ph
SINGAPORE 1800-SAMSUNG(726-7864) http://www.samsung.com/sg THAILAND 1800-29-3232, 02-689-3232 http://www.samsung.com/th TAIWAN 0800-329-999 http://www.samsung.com/tw VIETNAM 1 800 588 889 http://www.samsung.com/vn
Middle East & Africa
SOUTH AFRICA 0860-SAMSUNG(726-7864) http://www.samsung.com/za TURKEY 444 77 11 http://www.samsung.com.tr U.A.E 800-SAMSUNG (726-7864) http://www.samsung.com/MEA 8000-4726
TepMHbI
CnHxpcnHan
CnHxpocirhannmHa3bIaKOTcCTaHdapTHe CnHnbl,Heo6xOIMMbIeDnOTo6paKeHnHa MoHHTope Tpe6yEmbixCBetOB.OHnNoP4a3dEIAKOTcHa CnHnblBepTKaJIbHOI RopINoHTaJIbHOI CNHXPOH3aUIM. 3Tu CnHnblObecneuBAKOT OTo6paKeHHe HOpMaJIbHbIX CBETbX N3OpaKeHn cYCTaHOBNEHHbIM PaapeWauoe cnOCo6HoCTbIO uactOtio OBHOBNeHn.
TnblcHxpcnHaIOB
Рацеловая Зто Метор падуни на монитор одельно Сигналы Вerte Кально синхрони заши. Полный Зто метор БКЮчени Сигналов Вerte Кально синхрони заши вkompoшпунь (полный) телесганл и падуни nx на монитор. Монитор отообраожает zebeta Изobраоженя руtem рацелени Кмpoшпного сигнала на ясхODье zbeToBье сигналы.
3epnctcb
M36paKeHHe Ha MoHHTope cnaeraTcN 3KpaChbIX, 3enebIX IN CNHHX ToeK. TEM BblIe pa3peWHeHne. PaCtOraHHe MEXdy DByMa TOnKaAMn OndHOrO CBeTa H3aBbAeTcR "3epHnCTocb". EInHnua N3MepeHnra: I
Yactota no Beptnkann
3KpaH npenncbIaBaeTc 3aHOBO NO HeckonbKO pa3 B cekyHy, YTO6bI co3daTb N3O6paKeHne, BNDIMoe dnn nONb3OBaTeN. Yactota TAKNX NOBTOPOB B cekyHy ha3bIaBcTc YactOTOn no BePTnKaHn, INN YactOTOn O6HOBNeHn. Yactota TAKNX NOBTOPOB Ha3bIaBcTc Yactota KaPOb, INN YactOTOn O6HOBNeHn. EdnHnca n3MepeHn: T.
Pnmep: Ecnn nn Hnndkatop mraet 60 pa3 B cekny, 3to COOTBETCTBYET 60 Tc.
Yactota no Topn3oHTan
BpMaHa npopncobbAHAe OndHcTPOKn, coednHIOeI npabbl n Iebl Kpa HcpaHa no ropnoHTanm, na3bAeTcra TOpniOHTaBbHM PepnoDM. ObpaTHoe TOpniOHTaBbHOMy PepnoDy NcNo Ha3bBaetc TaCToTo No TOpniOHTaN. EdnHua 3MepeHn: kT.
Metodyepe3ctpoHn He-yepe3cTPOHpa3BepTK
TOKa3 roPHTaBbHx HnHH Ha 3KpaHe B npAke CBepxBy HnH3 HAsbBaETcM MeTOOM He-uepe3ctPOuHO pa3BeptTK, TOrda KaK noka3 no OChepdi ChauHa a HeeTHbX LnHH, a Notom HeeTHbX, HAsbBaETc MToDOM uepe3ctpOHO pa3BePTK. B60bnHCTBe MOHtOpOB NcONb3yEtc MToD He-uepe3ctPOUHO pa3BeptTK, YTO ObecneHBAet YeTkoE h3o6paXeHHe. MeToD uepe3ctPOUHO pa3BeptTK 3TO TO MeTO, KOTOpBI INcOnb3yETcB TeneBn3opax.
Plug & Play (авTomатическая насточа)
3TaФyHKUHOTBeuHaETa HauNlyuWue KaueCTBO 3KpaHaNyTeM OeBcneHeHnA BtOMaTnueckOrO 6MeHa HINFOPMaueH MekDy KOMbIOpEPOm MOHITOpM. 3TO TMOHITOP CJeDyET MekDyHapOnHbIM CTaHApTAM VESA DDC dRyHKUHn Plug & Play (ABtOMaTnuecka HaCtpoKa).
Pazpeшени
KoIueCTBO TOUeK NO rOpH3OHTaII IN BepTtKaIaII, IcNoJIb3yEmOE dIg cO3dHaN H306paKeHn Ha 3kPaHe, Na3bBaETc" pa3peSeHHeM". 3Ta IuPpA nok3bIbaet ToHocB n306paKeHn. BbICOKe pa3peSeHHe XopoIo NIOJb3OBA TbIg KOMPiEckChbIX 3aDaH, NoCKoJIbKO Ha 3kPaHE MoXHO NOKa3aTb BoJIbWe N306paNTeHbHO INHOpMaun.
Плпмер:Есгп рашшени павно 1360X768,to STO OЗначаET,чTOибражени Ha 3кразен COCTONI 1360TOUeK no ropИЗоNTANH (roPИЗоNTANbHoe pa3peшени) n 768 cTPOK no BEPTIKANI (BepITKANbHoe pa3peшени).
Multiple Display Control(MDC)
PporpmaM ynpaBneHn HeckonbKMM MOHTopam (Multiple Display Control; MDC) npdctabn ecoB npnoKeHne, no3BOJHOe pa6oTaB Ha PIK ONDOBpeMeHHO C HeCKoJIbKMM MOHTopam. IIN CB3N MeKdy PI K MOHTOPOM nONb3yETcA TAnDAPThb NOcNEoBaTeNbH INTEppeC RS-232C.
PONHOMOHN
DaHHbIe, codepkauneC B 3tOM DOKymente, MoryT 6bITb N3MeHbI 6e3 npedBapntelbHorO yBeDOMHeHr.
© 2008 Camcyh3neKtpoHkC Ko. JtD. Bce npaba 3aunuehbl.
Bocnpn3BeHne B kakoi 6bl-TO Hn 6blno fOpme 6e3 nncbMeHHoro pa3peHnra ot Samsung Electronics Co., Ltd. cTporo 3anpeHo.
Samsung Electronics Co., Ltd. He HeceT OTBETCEHHOCTn 3a OIN6Kn nnn CnyAHHe DEICTBn Hn nocEnyUOuHne NobpeXeHn, noIyHeHHbE B CBAH C yCTaHOBHeHMem, paBToH nn cNoNb3OBaHmEm daHHoro MaTePnana:
Samsung ABNIOCT3apeHCTPPOBAAHbIMTOPTOBbIMMapKaAMM Samsung Electronics Co., Ltd.; Microsoft, Windows NT ABNIOCT3apeHCTPPOBAAHbIMTOPTOBbIMMapKaAMKopnpaumMaikpocodT; VESA,DPMN DDC ABNIOCT3apeHCTPPOBAAHbIMMTOPTOBbIMMapKaAMAccouaunBndeOJNEKTPOHHK CtaHApT;HaBaHne NORO ENERGY STARABNIOCT3apeHCTPPOBAAHbIMMTOPTOBbIMMapKaAMM AmePKaHcKOReAreHTCTBa 3aunBuOkpykaioe CpeB (EPA).Kaknaphep ENERGY STAR, Camcyhr 3abeepET, YTO TOT MOHITOP COOTBETCTBYET peKOMHeDauimEMENERGY STAR B OTHoWeHm 3ΦΦeKTHBOHO 3HEPRONl30BAHn. Bce octaIbHbe HaBaHnIpoDyKuIN, yOnMAHyTBe B DAHNOM DOKyMeHTe, MOrY ABnTBCr TOPROBIM MapkAMNII 3apeHCTPPOBAAHbIMMTOPTOBbIMMapKaAMN IX yBaJaemBX BnadeJIbcB.

1 TruSurround xt, SRS n CnMBoJ (●) RBAJIOTc TOBapHbIMN 3HaKaMNI KOpnpaun N SRS Labs, Inc.
2 TexHonorra TruSurround XT nCnONb3ObaHa no IInueH3nn KOpnpaun N SRS Labs, Inc.
TFT-LCD MONITOR
Espanol
SMT-4011
Guía de usuario

Instrucciones de seguidad
Simbologia
Encendido
Instalacion
Limpieza
Otros
Introduccion
Conexiones
Uso del software
Ajuste del monitor
Resolución de problemas
Especificaciones
Information
Apendice
TFT-LCD Monitor
www.samsung.com

El aspecto externo y el color del producto pueda variar dependiendo del Modelo; las specifications del producto se puedaCambiar sin previo aviso para la mejora del rendimiento.
Instrucciones de seguridad
Simbologia

Lea atentamente las siguientes instrucciones de seguridad que han sido 创建as para prevenir dfños al producto y al usuario.

Advertencia / Precaución

Negligencia en el cumplimiento de lasindicaciones signaladas por este simbolo podra occasionar daños fisicos o perjuicios al equipo.

Simbolos convenciones

Prohibido Es importante leer yentar en todo momento


Desconectar la clavija del tomacorriente

No tocar Conectar a tierra para prevenir una descarga electrica
Encendido

Cuando no use el computador durante largos periodos de tiempo, ajustelo a DPM. Si usa un protector de pantalla, póngalo al modo de pantalla activa.
La imagenes que se muestran son solo de referencia y no se pueda aplicar en todos los casos (o paises).
Acceso directo a las instrucciones paraatar la persistencia de imagenes

No use un enchufe estropeado o flojo.
- Esto podria originar una descarga electrica o fuego.

No jale del cordón ni toque el tomacorriente con las manos mojadas.
- Esto podrila causar una descarga eletrica o fuego.


Use solamente connectores y receptáculos apropriados para hacer la conexión a tierra.
- Una connexion a tierra inapropiada可以帮助azar una descarga electrica o una avería en el equipo. (Sólo equipo de Clase I.)


Apriete firmamente el enchufe del cable de alimentacion deforma que no se afloje.
- Una conexión Incorrecta podría provocar un incendio.

No doble excessivamente el enchufe ni el cordón, tampoco coloque objetos pesados sobre él, esteoulda occasionar daños.
- El incumplimiento de esta recomendacion podra causar una descarga electrica o fuego.

No connecte muchas extensiones o enchufes a un tomacorriere.
Esto podrla occasionar fuego.

No desconecte el cable de alimentacion cuando esse usingo el monitor.
- Debido a la desconexión se pueda producir un sobrevoltej que dañe el monitor.

No utilise el cable de alimentacion si el conector o el enchufe estan sucios.
- Si el conector o el enchufe está sucios, limpielos con un paño seco.
- Si conecta el cable de alimentacion con el conector o el enchufe sucios se pueda causar un cortocircuito o un incendio.

Para desconectar el aparato de la corriente, deben desenchufar el cable de la toma principal, por lo que el enchufe principalDebe estar tiempoly fácilmente accesible.
- El incumplimiento de esta recomendacion podra causar una descarga electrica o fuego.
Instalación
Póngase en contacto con un centro de servicios专业技术o autorizzato cuando instale el monitor en un lugar expuesto a gran calidad de polvo, temperatas extremas, alto nivel de humedad y produits químicos, y en Lugares donde el producto se vaya a utiliser las 24 del día, como

aeropuertos,estaciones,etc.
El incumplimiento de estas indicaciones pueda causar serios desperfctos en el monitor.

Ponga el monitor en un lugar con poca humedad y un minimo de polvo.
- Podria producirse un corto circuito o fuego en el interior del monitor.

No deje caer el monitor cuando lo mueva.
Esto podria causar dafo al producto o al cuerpo humano.

Instale la base del monitor en una vitrina o un estante de tal mannersque la base no sobresalga.
- Una caía del producto podría dāñar este o causar lesiones fisicas.

No coloque el aparato en una superficiekeepequeia o inestable.
- Coloque el aparato en una superficie lisa y estable, ya que el aparato pueda caer y producir lesiones a algoien que pase bajo aél, especialmente a los niños.

No deje el aparato en el suejo.
- Una persona (especialmente un niño) podra tropezar con él.

Para IMPEDIR QUE EL FUEGO SE PROPAGUE, MANTENGAL LAS VELAS U OTRAS LLAMAS EXPUESTAS SIempre ALEJADAS DE Este PRODUCTO.
- Podria provoc un incendio.

Mantenga el cable de alimentacion alejado de las fuentes de calor.
- Un aislamento fundido pode provocar un incendio o una descarga electrica.

No instale el aparato en lugarares mal ventilados, como por exemple una estanterias, un armario, etc.
- Un aumento de la temperature interna peuvent causar un incendio.

Cologne el monitor cuidadosamente.
- Podria dañarse o romperse.

No asiente el monitor sobre la pantalla.
Se podria dañar la superficie TFT-LCD.

La instalación de un soporte de pared debe hace ser por un instalador profesional calificado.
- La instalacion por parte de personal incompete希望能 dar lugar a lesiones.
- Use siempre el dispositivo de montaje spécifique en el manual del propietario.

Cuando instale el equipo, procure guardar una distancia de mas de 10 cm desde la pared para poder la ventilacion.
- Una ventilación inadequada puede causar un aumento de laTemperatura interna del producto que da como resultado que los componentes tengan una vidautilmasarda yel rendimientosea menor.

Mantenga el embalaje de plastico (bolsa) lejos del alcance de los niños.
- Si jugean con el embalaje de plástico (bolsa) los niños peuvent asfiarse.
Limpieza

Cuando limpie la caja del monitor o la superficie del TFT-LCD, limpie con una tela suave, ligeramente mojada.

No rocie detergente directamente sobre el monitor.
- Puede causar daños, una descarga electrica o un incendio.

Use el detergente recomendado con una tela suave.

Si el conector entre el enchufe y el pin está oxidado o sucio, limpielo apropiamente con una tela seca.
2. Un conector sueio能把caesaruna descarga eletrica o fuego.

No olvide desenchufar el cable de alimentacion antes de limpar el producto.
Podriva provocar un incendio o una descarga electrica.

Desenchufe el cable de alimentacion de la toma de corriente y seque el aparato con un paño suave y seco.
No utilise ningún producto químico como cera, benzol, alcohol, disolventes, insecticida, ambientador de aire, lubricante o detergente.
Otros
IMPORTANTE:
PARA PREVENIR CUALQUIER MAL FUNCIONAMENTO Y EVITAR DANOS, LEA DETALLADAMENTE Este MANUAL DE INSTRUCCIONES ANTES DE CONECTAR Y OPERAR EL APARATO, CONSERVE EL MANUAL PARA FUTURAS REFERENCIAS, GRACIAS. POR FAVOR LEA ESTE MANUAL ANTES DE OPERAR EL APARATO Y GUARDELO PARA REFERENCIAS FUTURAS.

No retire la cubierta (o la tapa posterior).
Esto podria causar una descarga eletrica o fuego.
2. Solicite la revision al personal calificado de reparaciones y mantenimiento.

Si su monitor no funciona normalmente- en particular, si hay algunos sonidos inusuales o sale某个 olor del interiordesconectelo inmediamente ycontactese con un centro de vente autorizzato o un centro de servicios.
Esto podria causar una descarga electrica o fuego.

Mantenga el aparato alejado de lugares expuestos a petróleo, humo o humedad; no lo instale en el interior de un vehiculo.
2 Esteouldacauseunfunacionamentoincorrecto,una descargaeléctricaofuego.
Evite especialmente la Utilizacion del monitor circa del agua o al aire libre donte podria estar expuesto a la nieve o a la lluvia.

Si se cae el monitor o se daña la cubierta, apáguelo y desenchufe el cordón de suministro electrico. A continuación, consulte al Centro de Servicio.
El monitor puede functionar Incorrectamente, provocando una descarga electrica o un fuego.

Mantenga launidad apagada cuando haya truenos y relampagos en el exterior, y no permitta que el monitor deje de utiliserse durante un periodo de tiempo prolongado.
- El monitor puede functionar Incorrectamente, provocando una descarga electrica o un fuego.

No intente mover el monitor tirando solamente del cable o del cable deASN.
- Estoouldracausarunaaveria,descargaeléctricaofuegodebidoal daño del cable.

No nuevo el monitor a la izquierda o a la referencia jalando solamente el cordón o el cable deSEO.
- Estoouldracausarunaaveria,descargaeléctricaofuegodebidoal daño del cable.

No cubrir las rejillas de ventilacion del gabinete del monitor.
- Una mala ventilación podra Causear averías o fuego.

No coloque objetos contenedores de agua, produits químicos oPEGUEOs Objetos de metal sobre el monitor.
- Esto podria causar un funciona incorrecto, una descarga electrica o fuego.
Si un cuerojo extraño en el monitor, desenchufe el cable de alimentacion ypongase en contacto con el Centro de Servicio.

Mantenga el aparato alejado de aerosoles químicos combustibles y sustancias inflamables.
- Esto podria causar una explosión o fuego.

Nunca meta algo metalico en las aberturas del monitor.
- Esto podría Causea una descarga electrica, fuego o lesiones.
No introduzca objetos de metal como la punta de un destornillador, un cable o un taladro, ni objetos inflamables como papel o cerillas en los orificios de ventilacion, conectores de altevoces o puertos

AV.
- Podría provocar un incendio o una descarga electrica. Si se introducen sustancias extrñas o se vierte agua en el aparato, apague este, desenchúfelo ypongase en contacto con un centro de servicios专业技术.


Si el aparato muestra unaImagen fija durante un长大o periodo de tiempo, pueda quedar unaImagen residual o cierta indefinccion.
- Establishzca el modo de ahorro de energia o configure un protector de pantalla con una imagen en movimiento, cuando seanecessaryamente deraj desatendido el monitor durante un长大o periodo de tiempo.

Ajuste laResolution y la fecuencia a los niveles apropriados para el Modelo.
- Los niveles inadequados de resolution y de Frequencia能把 dañar la vista del usuario.
40 pulgadas (101,6 cm) - 1360 X 768

Mirar el monitor continually deqse una corta distancia puede caesar daños en la vista.

Para registrar la tensión del ojo, tome un descanso de al menos cinco Minutes antes de cada hora de uso del monitor.

No instale el producto en una superficie inestable, desigual o que pueda experimentar vibraciones.
- Una caía del producto podra darar este o causar lesiones fisicas. El uso del producto en unaubicaciónque experimente vibracionesuede acortar la vidautil del aparato o provocar un incendio.

Cuando quiera desplazar el monitor, apaguelo y desenchufelo de la toma de corrente. Cerciorese de que todos los cables, incluyendo el cable de la antenna y los cables de conexion con除外 dispositivos, esten desconectados antes de mover el monitor.
- No desconectar correctamente un cable pourrait fazer y provocar un incendio o una descarga electrica.

Traslade el aparato entre dos o mas personas.
- Una caía del aparato pueda darar este o causar lesiones fisicas.

Coloque el aparato fuera del alcance de los niños ya que podrianestropearlo si se suben encima.
- La caía del aparato pueda causar daños fisicos o inclujo la muerte.

Si no va a utiliser el producto durante un periodo de tiempo prolongado, desenchufe el cable de alimentación.
- Podria producir emisiones de calor por la acumulacion de polvo o la disminuccion del aislamento que causaran descargas lectricas o un incendio.

No deposite los objetivos favoritos de los niños (orialquier otro)...
objet que pueda resultarles atractivo) encima del aparato.
- Los niños peuvent intentar subirse al aparato para coger el的对象. El aparato pueda caer y causar lesiones fisicas o incluo la muerte.

Cuando que las pilas del mando a distancia,onga cuidado de noURTARLAS al alcance de los niños, ya que podrian tragarlas. Mantenga las pilas fuera del alcance de los niños.
- En caso de intoxicacion, consulte a un medico inmediatamente.

reemplazar las pilas, colóquelas en la polaridad correcta (+/-) según lo indicado en el compartmentido de las pilas.
- La polaridad Incorrecta puede hacer que una pila se rompa o sufra un derrame del liquido interior, con riesgo de incendio, lesiones, o contaminacion (daños).

Use solo pilas estar degun lo especificado.No use pilas nuevas y usadas juntas.
- pueda hacer que una pila se rompa o sufra un derrame del liquido interior, con risiego de incendio, lesiones, o contaminacion (daños).

Las baterias (y las baterias recargables) no son residuos normales y deben devolverse al lugar adecuado para su reciclaje. El usuario es responsable de devolver las baterias usadas o recargables al lugar adecuado para que se procee a su reciclaje.
- El usuario可以选择 devolver las baterías usadas o recargables al centro municipal de reciclaje más(PRXTO)o a un establishimiento que vendal el mesmo tipo de baterías o de baterías recargables.
© 1995-2008 SAMSUNG. ALL Rights Reserved
Contidente
Instrucciones de seguridad 1
Simbologia 1
Encendido 1
Instalacion 2
Limpieza 4
Otros 5
Introduccion 12
Contenido del paquete 12
Su monitor 13
Disposión mecánica 20
Conexiones 26
Instalacion del kit del soporte 26
Conexión del monitor 27
MDC 33
Ajustedemonitor 53
Entrada 53
Picture [PC/BNC/DVI Modo] 54
Picture [AV / S-Video /Component / DVI-Video Modo]. 56
58
Setup 59
Control multiple 62
62
Resolucion de problemas 65
Comprobación de las functions de autoverficación 65
66
Q&A 68
Especificaciones 70
Generales 70
Ahorro de energia 71
Modos de temporizacion predefinidos 71
Information 73
Para Obtener una Mejor Presentacion 73
INFORMACION de PRODUCTO (Libre de retencion de imagenes) 73
Apéndice 77
Contacte con SAMSUNG WORLDWIDE 77
Téminos 79
Eliminación correcta 80
Autoridad 80
SAMSUNG
Instrucciones de seguidad
Introduccion
Contedio del paquete
Su monitor
Disposition mechanism
Conexiones
Uso del software
Ajuste del monitor
Resolución de problemas
Especificaciones
Information
Apendice
TFT-LCD Monitor
www.samsung.com

El aspecto externo y el color del producto pueda variar dependiendo del modelo; las specifications del producto se puedaCambiar sin previo aviso para la mejor del rendimiento.
Introduccion
Contenido del paquete
Nota
- Compruebe que los siguientes elementos se incluyen con el monitor.
Si falta algo n elemento, contacte se con su proveedor.
Pongase en contacto con un distribuidor local para adquirir los articulos adiconiales.
Nota
- Nouveleaparatoen elsuelo.

Monitor
Manual

Guía de usuario

Documento de garantía
(no esta disponible en todas las
localidades)

Guide de l'utilisateur,
logiciels MDC
Cable

Cable de senal Cordon electrico

Otros


Control remoto Baterias (AAA X 2) Cubierta-tapon

Conector adaptor BNC a RCA.

Soporte temporal
Se vende por separado


Kit de montaje en la pared Juego de altavoces Kit del soporte


Cable DVI Cable BNC
Su monitor
> Parte Delantera


1) MENU
Abre el menu OSD. Internacional se usa para pagar del menu OSD o:volver al menu anterior.
2) Botón Arriba-Abajo
Mueve verticalmente desde un elemento de menu a other oajsta los values del menu seleccionados.
3) Botón Izquierda-Derecha / Botón Volumen
Mueve horizontallymente desde un elemento de menu a other oajusta los values del menu seleccionados.
Tambien ajusta el volumen del audio.
4) ENTER
Bolón Source (Fuenté) Se usa para selección el menu OSD.
5) SOURCE
Cambia desde modo de pantalla PC a modo de pantalla Video.
Cambiar la fuente se permite solamente para los dispositivos externos que estan connectados con el monitor en ese momento.
[PC] [BNC] [DVI] [AV] [S-Video] [Component]
>> Hagaclinicaquilparaveruna secuenciadeanimacion.
6)PIP
Pulse este boton para controlar la ventana PIP.
No se可以选择 solapar más de un PIP en la pantalla, bajo que BNC y el componente utilizes el本身就是 terminal.
>>Haga Cliq aquipara veruna secuencia de animacion.
PC
AV / S-Video / Component Modo
BNC
AV/S-Video Modo
DVI
AV / S-Video / Component Modo
AV/S-Video
PC/BNC/DVI Modo
- Componente
PC/DVI Modo
7) Energia
Use this boton para encender y apagar el monitor.
8) Indicador de encendido
Use this boton para encender y apagar el monitor.
9) Sensor de control remoto
Oriente el control remoto hacía esta zona del monitor.
Nota
- Vea Ahorrode de Energía, descripto en el manual, para mayor información en lo referente a las configuraciones de ahorro de energia. Para ahorroar energia, apague el monitor cuando no lo necesse o cuando no lo use por periodos largos de tiempo.
> Parte Posterior
Nota
- Para más informaciónreferente a las Conexiones de cable, vexe Conexión de cables en Instalación. La disposición trasera del monitor pueda variar levamente dependiendo delmodelo del monitor.


A
1) POWER SW ON [ ] / OFF [O] (Botón de alimentación on/off)
Encendidoyapagadodelmonitor.
2) POWER IN (Toma de corriente)
Cable de alimentacion, Conexiones en el monitor y enchufe de pared.

B
3) RS232C OUT/IN (Puerto serie RS232C) Puerto de programa de MDC (Multiple Display Control, Control de dispositivos multiples)
4) DVI / PC IN [RGB] (Terminal de connexion de video de PC)
Usando el D-SUB de 15 contactos - modo PC (PC Analógico)
5) DVI/PC IN [DVI(HDCP)] (Terminal de conexión de video de PC)
Usando el DVI-D a DVI-D - modo DVI (PC digital)
6) DVI / PC IN [PC/DVI/BNC AUDIO IN] (Terminal de connexion audio (entree) PC/DVI/BNC)

C
7) COMPONENT AUDIO IN [L-AUDIO-R] (Terminal de connexion audio (entree) compuesta)
8) BNC/COMPONENT OUT [R/P R, G/Y, B/PB, H, V] (Terminal de connexion de video de BNC / Terminal de connexion de senal compuesta (salida)) Conexión BNC (PC Analógico): connexion del puerto R, G, B, H, V Conexión de senal compuesta: connexion del puerto PR, Y, PB
9) BNC/COMPONENT IN [R/P R, G/Y, B/PB, H, V] (Terminal de connexion de video de BNC / Terminal de connexion de signal compuesta (entrada))

D
10) AV AUDIO IN [L-AUDIO-R](Terminal de conexión de audio compuesto) (entrada)
11) AV OUT [VIDEO] (Terminal de connexion de Video): Modo de AV (salida)
12) AV IN [VIDEO] (Terminal de connexion de Video) (entrada)
13) AV OUT [S-VIDEO] (Terminal de connexion de S-Video): Modo de S-Video (salida)
14) AV IN [S-VIDEO](Terminal de connexion de S-Video) (entradada)
15)EXT SPEAKER(8Ω)[--L-+,--R-+](Terminal de connexion de altavoz (8))
16) AUDIO OUT [L-AUDIO-R] (Terminal de conexión de audio compuesto) (salida)
Salida del monitor: conexión de PC, DVI y BNC
Nota
- El número de monitores que se pueda conectar con la calidad del bucle pueda variar según el cable, la fuente de la seals, etc. Se pueda conectar diez monitores con un cable si no hay daños en este ni en la fuente de señal.

E
17) Bloqueo Kensington

Nota
El bloqueo Kensington es un dispositivo que se usa para fjar fisicamente el sistemas cuando se usa en un situatorio. (El dispositivo de bloqueo debe adquirirse por separado.)
Si necesita informacion sobre el uso del dispositivo de bloqueo,pongase en contacto con el establishimiento sobre lo haya adquirido.
Nota
- Vea Conexión del Monitor para mayor información en lo referente a las Conexiones de cable.
> Control remoto
- El funciona del mando a distancia可以选择 entrepecdido por un teilevisor oalgun other dispositivo.
electrnoutilizzato cerca del monitor,provocando un funciona incorreto deblado a las
interferencias con la fecuencia.
1. ON/OFF
2. MAGICNET
3.MDC
4.L
5. Botón MagicNet
6.+100--
7.VOL
8. MUTE
9. TTX/MIX
10. MENU
11. EN
12.M/B P.MODE
13.AUTO
14. PRE-CH
15.VCH/P
16. SOURCE
17. INFO
18. EXIT

19. Arriba-abajo Izquierda-derecha
20. S.MODE
21. STILL
22. FM RADIO
23.P.SIZE
24.()SRS
25. H DUAL/MTS
26. PIP
27. SOURCE
28. SWAP
29. 312E
30. REW
31. STOP
32. PLAY/PAUSE
33.FF
1) ON/OFF
Enciende y apaga el monitor.
2) MAGICNET
Botón de Inicio rápido de Magicnet.
-Estamericanoestadisponderableparaeste monitor.
3) MDC
Boton de Inicio rápido de MDC.
4) LOCK
Este boton activar o desactivar todas las teclas de referencia tanto del mando a distancia como del monitor excepto los botones de encendid y LOCK.
5) Botón MagicNet
Use these botones para MagicNet.
- Letras y númeroos: use"These botones para书写ir una direccion de Internet.
- DEL:utilicelo para retroceder.
- SYMBOL:utilicelo para asignR signos.(O-)
- ENTER: utiliser el commando intro.
-EstafunciOnnoestadisponibleparaeste monitor.
6) +100 /--
Pulselo para seleccionar los canales superiores al 100.
Por典型案例, para seleccionar el canal 121 pulse +100 y, a continuacion, pulse 2 y 1
-Estamericano no está disponible para este monitor.
7)-VOL+
Tambienajustaelvolumedelaudio.
8) MUTE
Interrumpe (silencia) la calidad de audio temporalemente.
Aparece en la esquina inferior izquierda de la pantalla.
El audio se reanuda si se pulsa el botón Silencio o El sonido vuelve si se pulsa Mute, +o - en el modo Mute (Silencio).
9) TTX/MIX
Los canales de TV proportionsan servicios informativos他们在线电视。
[TTX/MIX se utilizes principalmente en Europa.]
10) II MENU
Abre el OSD y activa un elemento del menu resultado.
11) ENTER
Activa un elemento del menu resultado.
12) M/B.P.MODE
Cuando se pulsa este boton, el modo actual se visualiza en la parte inferior central de la pantalla.
AV/S-Video/Component Mode:P.MODE
El monitor Tiene quatre configuraciones automaticas de imagen que viennent predefinidas desde fabrica. Pulse el boton或其他 vez para携带 entre los modelos configurados previamente disponibles. (Dinamic Normal Cine Favorito)
PC / DVI Mode : M/B ( MagicBrightTM )
MagicBrightTM es unamerican que proporciona un entorno de visualizacion optimo en funcion del contentido de la imogen que estamirando. Pulse el boton otra vez para携带 entre los modos configurados previamente disponibles. (DiversiOn Internet Texto Favorito)
13) AUTO
Ajusta la visualizacion de la pantalla automatisticamente. (PC)
14) PRE-CH
Este boton se usa para volver al canal正常使用 anteriormente.
-Estafuncionnoestadisponibleparaeste monitor.
15) VCH / PA
En el modo TV, selecciona los canales de TV.
-Estafuncionnoestadisponibleparaeste monitor.
16) SOURCE
Cambia desdemodo de pantaillacap a modo de pantaillavideo.
17) INFO
La informacion actual de la imagen se visualiza en la esquina superior izquierda de la pantalla.
18) EXIT
Sale de o cierra la pantalla del menu.
19) Botones Arriba-Abajo e Izquierda-Derecha
Mueve horizontalmente, verticalmente desde un elemento de menu a othero o ajusta los values del menu seleccionados.
20) S.MODE
Cuando se pulsa este boton, el modo actual se visualiza en la parte inferior central de la pantalla.
Cuando pulse este botón, el modo de audio actual se muestra en la esquina inferior izquierda de la噎.
Pulse el botón other vez para embarir entre los modelos configurados previamente disponibles.
(Normal Música Cine Dílogo Favorito)
21) STILL
Pulse una vez el botón para congelar la pantalla. Pulselo othera vez para descongelar.
22) FM RADIO
Enciende o apaga FM Radio (Radio FM).
En el modo PC/DVI,sole configuratura SOUND (SONIDO) como FM Radio (Radio FM).
En el modo general de Video SOURCE (FUENTE de video), configurara FM RADIO (RADIO FM), apagando la pantalla.
En las zonas donde la seals de bille, peut haber ruido de fondo durante una emisión de FM.
-Estafuncionnoestadisponibleparaeste monitor.
23) P.SIZE
Pulselo para combustir el tamafo de pantalla.
24) (SRS
SRS
25) I-II DUAL/MTS
DUAL-
Utilice el botón DUAL en el mando a distancia para selección Estéreo o Mono cuando el monitor está en el modo TV.
MTS-
Puede seleccionar el modo MTS (Multichannel Television Stereo).
-EstafunciOnnoestadisponibleparaeste monitor.
26) 三PIP
Avance
rápido
27) SOURCE
MagicBright
28) SWAP
Intercambio del Descripción de laImagen PIP y de laImagen principal.
LaImagen de laventanaPIPapreceré en la pantalla principal,ylaImagen de la pantalla principal.
apreceré en la ventana PIP.
29) SIZE
Drag
30) REW
Rebobinar
31) STOP
Parar
32) PLAY/PAUSE
Reproducir/Pausa
33)FF
Avance rápido
© 1995-2008 SAMSUNG. ALL Right Reserved
1. Disposition mecánica

2. Monitor


3. Pie

4. Altavoz

Up
5. Como instalar el soporte VESA
- Cuando instale VESA, asegürese de que cumpla con los estandares VESA internaciones.
- Información para adquirir e instalar el soporte VESA: Póngase en contacto con el distribuidor de Samsung más cercano para realizar el pedido. Una vez realizado el pedido, le visitaran技术和 especializados y le instalarán el soporte.
- Se necesitan al menos 2 personas para mover el monitor LCD.
Samsung no se hace responsable de ningun daño producido al producto ni de las lesiones personales produidas por la instalacion realizada directamente por el cliente.


Para filar el soporte a la pared, utilise unicamente tornillos para metal de 6 mm de diametro y de 8 a 12 mm de longitud.
UP
6. Instalación del soporte mural
- Para la instalación del soporte mural,pongase en contacto con un technician.
Samsung Electronics no se hace responsable de los días causados al producto o al usuario si la instalacion ha efectuado el usuario.
- Este produit está indicado para su instalación en paredes de cemento. Puede que este produit no quede bien sujejo si se instala sobreyeso o madera.

Components
Utilice solo los componentes y accesos entrega con el producto.

Soporte de pared (1)

Bisagra (Izquierda 1, Derecha 1)

Colgador de plástico (4)

Tornillo(A) (11)

Tornillo(B) (4)

Taco (11)

Conjunto del soporte mural
1
Inserte y apriete el tornillo de sujecion en la direction de la flecha.
A continuación, monte el soporte en la pared.
A. Tornillo de sujeción
B. Soporte de pared
C. Bisagra(izquierda)
D. Bisagra(derecha)

Hay dos bisagras izquierda y derecha).Use la adecuada.
2

Antes de praticar los orificios en la pared, compruebe si ladistancia entre los dos orificios de bloqueo de la parte pos-terior del producto es correcta.
Si la distancia es demasiado corta o demasiado larga, aflo-je los 4 tornillos del soporte de pared para ajustarla.
A. Distancia entre los dosorificios de bloqueo
3

Consulte el diagrama de instalacion y marque los+puntos detaladro en la pared. Utilice la broca de 5mm para taladrar orifi-cios de una profundidad superior a los 35~mm
Inserte cada taco en el orificio correspondiente. Alinee cada uno de los orificios del soporte y de la bisagra conel orificio del taco correspondiente y a continuacion inserte yapriete los 11 tornillos A.

Para montar el aparato en el soporte de pared
El aspecto del aparato puede variar según el modelo. (Los juegos de colgadores de plástico y de tornillos son iguales)

1

2

1. Monte el aparato en el soporte de pared y asegürese de quequeda bien sujeto por los colgadores de plástico izquierdo yderecho.
2. Cuando instale el aparato en el soporte,onga cuidado de noatraparse los dedos en los orificios.
3. Asegürese de que el soporte de pared está bien sujeto para QUEEL aparato se mantenga en su situó antes de la instalación.

3

4
Retire los 4 tornillos de la parte posterior del aparato.
Inserte el tornillo Ben el colgador de plástico.
Apriete los 4 tornillos del caso 2 (colgador de plastico +tornillo B) en los orificios posteriores del aparato.
Retire el pasador de seguidad (3) e inserte los 4 soportesdel aparato en los orificios correspondentes del soporte (1).Instale el aparato (2) de mannersque quede bien sujeto alsoporte. Recuerde queDebe volver a insertar y aplutar elasador de seguidad (3) para sutjar firmamente el aparatoal soporte.
A. Monitor
B. Sopporté depared
C. Pared

Ajuste del angulo del soporte de pared
Ajuste el ángulo del soporte a -2°antes de instalarlo en la pared.

1. Acople el aparato al soporte de pared.
2. Sostenga la parte superior del aparato por el centro y empujeloHCIaciadelante (en la direccion de la flecha) para ajustar el angulo.
3. Puede ajustar el ángulo del soporte entre -2°y 15°

Asegürese de ajustar el aparato según el centro dela parte superior, y no según elazo derecho oizquierdo del aparato.


Instrucciones de seguidad
Introduccion
Conexiones
Instalacion del kit del soporte
Conexión del monitor
Uso del software
Ajuste del monitor
Resolución de problemas
Especificaiones
Information
Apendice
TFT-LCD Monitor
www.samsung.com

El aspecto externo y el color del producto pueda variar dependiendo del Modelo; las specifications del producto se puedaCambiar sin previo aviso para la mejora del rendimiento.
Conexiones
Instalacion del kit del
soporte
Nota
- Sólo se deben usar los permos que se incluyen.
Pozor
Samsung Electronics no sera responsable de los dafios causados por la utilizacion de una base distinta de las especialidades.
>Instalacion del Semi-soporte

Ponga la etiqueta "CAUTION" hacía atrás.

1) Para proteger el orificio ubicado en la parte inferior del monitor, alli donde se acoplá el soporte, se usa una cubierta protectora. Aseguèrese de quitar la "cubierta de protección" antes del acoplimiento del Semi-Soporte o del Kit del soporte (vendido por分开ado) y de tapar el orificio usingla cubierta-tapon durante el acoplimiento del it de montaje de pared.
2) Instalacion de los soportes izquierdo y derechocho respectivamente.
3) Ponga el soporte en el agujero situado en la parte inferior del monitor.
Inserte el tornillo en el agujero indicado y apriete. (M4 x L15)

Pozor
Este soporte está diseñado esspecífico. para el ajuste del ángulo de la pantalla. La Empresa no se hace responsable de problema algoo derivado del uso de este soporte. No utilise nunca este soporte para colocar otheros objetivos.
>Instalacion del kit del soporte (Vendido por separado)


1) Para proteger el orificio ubicado en la parte inferior del monitor, alli donde se acoplá el soporte, se usa una cubierta protectora. Asegúrese de quitar la "cubierta de protección" antes del acoplimiento del Semi-Soporte o del Kit del soporte (vendido por分开ado) y de tapar el orificio usingo la cubierta-tapon durante el acoplimiento del it de montaje de pared.
2) Asegürese de colocar las piezas en la direction adequada y en el situ correcto. (M4 × 15)
3) Ponga el soporte en el agujero situado en la parte inferior del monitor.
4) Inserte el tornillo en el agujero indicado y apriete. (M4× 15)
Conexión del monitor
En el caso de un cable de alimentacion con conexion a tierra
Si se produce un fallo, la connexion a tierra peut provocar una descarga electrica. Antes de conectar la alimentacion de CA, debe asegurarde que el cable de connexion a tierra este instalado correctamente. Asimismo, cuando vaya a desconectar el cable de connexion a tierra, no se olvide de desactivar la alimentacion de CA.


- Los dispositivos de entrada de audio y video (AV) como DVD, VCR o Camaras de video, al igual que su computadora, se pueda conectar con el monitor. Para más información sobre是如何 conectar los dispositivos de entrada de audio y video (AV), vease Controles de usuario en Ajuste del monitor.
> Conexión con una computadora

1) Conecte el cordón de suministro electrico del monitor a la toma de corriente de la parte trasera del monitor.
Active el interruptor de alimentacion.
2) Hay 3 formas para conectar el D-sub al monitor.
Seleccionauna de lassiguientes:
2-1) Usando el conductor D-sub (analógico) en la tarjeta de video.
Conecte el cable D-sub al puertoRGB de 15 patillas de la parte posterior del monitor y al puerto D-sub de 15 patillas del ordinador.

2-2) Usando el conductor DVI (digital) en la tarjeta de video.
Conecte el cable DVI al puerto DVI(HDCP) de la parte posterior del monitor y al puerto DVI del ordinador.

2-3) Usando el conector BNC (analogico) en la tarjeta de video.
Conecte el cable BNC al puerto BNC/COMPONENT IN -R, G, B, H, V en la parte posterior del monitor y al puerto D-sub de 15 patillas del ordinador.

3) Conecte un cable qui para recibir el sonido de la tarjeta de sonido de la computadora.
4) Encienda la computadora y el monitor.
Nota
- El cable de DVI o de BNC es optional.
Consulte a un centro de servicei local de Samsung Electronics para comprar los elementospcionales.

> Conexión de un DVD digital
Nota
- Los dispositivos de entrada como el DVD digital está conectados al terminal de DVI IN del monitor mediante el cable DVI.
- Después, incié el DVD con un disco DVD insertado.
- Selezione Digitale mediating el boton SOURCE.
Nota
- El monitor dispone de terminales de connexion de DVI IN para conectar los dispositivos de entrada DVI como un DVD digital.

> Conexión a un VCR
1) Los dispositivos de audio y video como los VCR o Camaras de video se conectan con el terminal AV IN [VIDEO] o AV IN [S-VIDEO] del monitor usingo el cable de S-VHS o de BNC.
2) Conecte los terminales Audio (L) (Audio (I))y Audio (R) (Audio (D)) del aparato de video o de la videocamera a los terminales AV AUDIO IN [L-AUDIO-R] del monitor mediante los cables de audio.
3) SeLECTION AV o S-Video cuando esté conectado un VCR o una CAMERA de video usando el botón Fuente en la parte delantera del monitor.
4) Seguidamente, inicia el VCR o la-camera de video con una cinta.
Nota
- El cable de S-VHS o de BNC es optional
> Conexión con un reproductor DVD

1) Conectar el cableado de audio necessario entre los conectores COMPONENT AUDIO IN [L-AUDIO-R] en el monitor y los conectores AUDIO OUT en el reproductor DVD.
2) Conectar un cable de video entre los conectores BNC/COMPONENT IN - conexión del puerto PR, Y, PB en el monitor y los conectores PR, Y, PB en el reproductor DVD.
3) Selección Componento whene este conectado un DVD using el boton Fuente en la parte delantera del monitor.
4) Seguidamente, inicia el DVD con una cinta.
Nota
- El cable de Component es optional Para más información sobre video de componente, consulte el manual del usuario del reproductor DVD.
> Conexión con una CAMERA de video

1) Localice los conectores de calidad A/V en la webcam de video. Suelen estar ubicados en un lateral o en la parte de atras de la webcam de video.
Conecte el cableado de audio necessario entre los conectores AUDIO OUTPUT en la webcam de video y los conectores AV AUDIO IN [L-AUDIO-R] en el monitor.
2) Conecte un cable de video entre el conector VIDEO OUTPUT de la CAMERA de video y el conector AV IN [VIDEO] en el monitor.
3) Selección AV cuando esté conectado unaámara de video el botón Fuente en la parte delantera del monitor.
4) Seguidamente, inicia la-camera de video con una cinta.
Nota
Los cables de audio y video que se muestran aquie suelenvenir incluidos con la camarara de video.
(Si no fuera asi, consulte a la tienda de electrònica más cercana).
Si la CAMERA de video fuera estereo, seria necessario conectar dos cables.
> Conexión de un decodificador de BCHDTV
Nota
Las conexiones habituales de un decodificador de senal se muestran a continuacion.

1) Conecte un cable de video entre los conectores BNC / COMPONENT IN - conexión del puerto PR, Y, PB en el monitor y los conectores PR, Y, PB en el decodificador digital.
2) Conecte el cableado de audio necessario entre los conectores COMPONENT AUDIO IN [L-AUDIO-R] en el monitor y los conectores AUDIO OUT en el decodificador de serial.
3) SeLECTION Component when este conectado un decodificador de serial DTV el boton Fuente en la parte delantera del monitor.
Nota
- Para mas informacion sobre video de componente, consulte el manual de usuario del decodificador digital.
> Conexión de altavoces

1) Acople el television y los altavoces usingo los tornillos.
* Monte el altavoz sin el pie.

2) Conecte el cable de connexion del altavoz entre el conductor de altavoz en la parte posterior del telesor y el
conector de altovoz en la parte posterior del altovoz.
Nota
- Nouve el televisor que sostiene el altavoz cuando estan conectados el televisor y el altavoz.
Se podra dañar el soporte de altavozdonde se conecta el altavoz del televisor.
> Conexión a un equipo de audio

1) Conecte un Conjunto de cables de audio entre las Telecoms AUX L, R del AUDIO SYSTEM (SISTEMA DE AUDIO) y las Telecoms AUDIO OUT [L-AUDIO-R] (SALIDA AUDIO [I-AUDIO-D]) del monitor.
© 1995-2008 SAMSUNG. ALL Right Reserved
Introduccion

Un MDC (Multiple Display Control) (MDC, Multiple Display Control) es una aplicacion que permite trabajo en un PC con varias pantallas fácil y simultaneamente. RS-232C, un estandar de communicated serial, se usa para la comunicacion entre un PC y una pantalla. Por tanto, es necessario conectar un cable serial entre el puerto serial del PC y el puerto serial de cada pantalla.
Pantalla principal
Haga cli en Start > Program > Samsung > MDC System para inicial el programa.
Selección un jeu para ver su volumen seleccionado con el control deslizante.

1 Iconos principales Botón Select (select har)
2 Remocon
Info Grid (Cuadrícula de información)
3 Safety Lock SeLECTION de pantalla

4 Port Selection Herramentas de control

1. Use los iconos principales para modifier en cada pantalla.
2. Permitte que se active o se desactive la functiOn de recepcion de control remoto de la unidad de la pantalla.
3. Establishe la funciona Lock (seguridad para niños)
4. La configuración para el puerto série del PC pueda cambiar. El valor original es COM1.
5. Hagablick en SeLECTIONAR todo o Borrar para selec tionar o para borrar todas las pantallas.
6. Use Cuadrícula para ver cierta información sobre control de la pantalla selecciónada.
7. Seleectionauna pantalla dentro de la section Selection de pantalla.
8. Use Herramentas de control para controlar las pantallas.
La funciona Activar/Desactivar del control remoto funciona este o no activada la energia, yesto se aplica a todas las pantallas activadas y conectadas con el MDC. Sin embargo, independientelemente del estado en el momento en que está apagado el MDC, la funciona de recepcion de Signals del control remoto de todas las pantallas se inicializa con el estado Enable (activado) cuando se cierra el MDC.
Port Selection

1. El Control de pantallas multiples está configurado originalmente como COM1.
2. Si se utilizes cualquier puertoDistincto de COM1, se pueda selectionar desde COM1 hasta COM4 en el menu de SeLECTION de puertos.
3. Si el nombre de puerto exacto que está conectado al monitor usingo un cable serial no está seleccionado, la comunicacion no sera possible.
4. Le port sélectionné est enregistré dans le programme et également utilisé pour le programme suivant.

Power Control
1. Haga click en el icono Power Control (Control de energia), de entre los iconos principales, y aparecerá la pantalla Power Control (Control de energia).

\* Info Grid muestra informacion bica necessaria para gestionar Control de energia.
1) (Power Status (Estado de energia))
2) Input
3) Image Size
4) On Timer Status
5) Off Timer Status
2. Use el botón Select All (Selecciónar todo) o la casilla de verificacion correspondiente para ajustar las propiedades de pantalla.

Control de energia permite controlar algumas de las funidades de la pantalla seleccionada.
1) Power On/Off
- Activ o desactiva la energia de la pantalla seleccionada.
2) Volume
- Controla el nivel de volumen de la pantalla seleccionada.
Está definido con el valor del volumen de la pantalla seleccióna a partir de los juegos y lo muestra en la barra de desplazimiento.
(Cuando se cancela la selección o se escoge SeLECTIONAR todo, el valor toma la configuracion predeterminada de 10)
3) (Mute On/Off (Activar/desactivar silencio))
- Activ o desactiva el silencio de la pantalla seleccionada On / Off .
Cuando se selección un jeu cada vez, si el juego selecciónado ya está definido como MUTE (Silencio), esnecessarymarcar la pantalla MUTE.
(Si elige deshacer las selecciones o escoge SeLECTIONAR todo, los values vuelven a la configuracion predeterminada).
\* Control de energia se aplica a todas las pantallas.
Las functions volumen y Mute solo está disponible para pantallas bajo el estado de energia está ON (activado).

Input Source
1. Haga cig en Input Source (Fuente de entrada), situada en los iconos principales, y aparecerá la pantalla de control de fuente de entrada.
Haga click en Select All (Selecciónar todo), o utilise la casilla de verificacion, para seleccionar una pantalla con intencion de controlarla.
- TV Mode

PC Mode

\* Info Grid muestra informacion bica cnea necessaria para controlar la fuente de entrada.
1)PC
- Cambia la fuente de entrada de la pantalla selectionada a PC.
2) BNC
- Cambia la fuente de entrada de la pantalla selectionada a BNC.
3) DVI
- Cambia la fuente de entrada de la pantalla seleccionada a DVI.
4) TV
- Cambia la fuente de entrada de la pantalla seleccionada a TV.
5) AV
- Cambia la fuente de entrada de la pantalla seleccionada a AV.
6) S-Video
- Cambia la fuente de entrada de la pantalla seleccionada a S-Video.
7) Component
- Cambia la fuente de entrada de la pantalla selectionada a Component.
8) MagicNet
- La source d'entree de MagicNet ne fonctionne que sur le modele MagicNet.
9) Channel
- La flecha del canal aparece cuando la.option Input Source (Fuente de entrada) es TV.
* La fuente TV se pueda selectionar solo en produits con TV, y el control de los canales únicamente se permite cuando la option Input Source (Fuente de entrada) es TV.
* El control de Fuente de entrada se aplicá sólo está disponible para las pantallas para las cuales está activado (ON) el estado de suministro electrico.

Image Size
PC, BNC, DVI
1. Haga ticn Tamao de imagen, situado en los iconos principales, y aparecerá la pantalla de control de Tamao de imagen.

Info Grid (Cuadrula de informacion) muestra cierta informacion basia necesaria para tener el control Tamanio deImagen.
1) (Power Status (Estado de energia))
- Muestra el estado de energia de la pantalla selectionada.
2) Image Size
- Muestra el的时间里 de imagen actual de la pantalla seleccionada.
3) Input
- Muestra la fuente actual de entrada de la pantalla realizada.
4) Info Grid (Cuadrícula de información) sólo muestra las pantallas cuya Fuente de entrada es PC, BNC, DVI.
5) PC Source - Cuando haga ticn en Tamaño de imagen, aparecen primero las fichas PC, BNC, DVI. El boton Control de Tamaño de imagen controla el Tamaño de imagen disponible para PC,BNC,DVI.
6) Video Source
- Haga tic en la ficha AV, S-VIDEO, Componente para controlar el Tamaño de imagen para la Fuente de entrada respectiva.
La source d'entrée de MagicNet ne fonctionne que sur le modele MagicNet.
* El control Tamanio deImagen solo está disponible para las pantallas para las cuales está activado (ON) el estado de suministro electrico.

Image Size
TV, AV, S-Video, Component, DVI(HDCP)
1. Haga clicked Tamanio de imagen, situado en los iconos principales, y aparecerá la pantalla de control de Tamanio de imagen.

Info Grid (Cuadrula de informacion) muestra cierta informacion basia necessitiesa para entender el control Tamanio deImagen.
1) Haga click en la pestaña (Fuente de video) paraaabrar el tameno de la imagen para TV, AV, S-video, componentes. Haga click en Select All (SeLECTIONAR todo), outilice la casilla de verificacion, para seleccionar una pantalla con intencion de controlarla.
2) Info Grid (Cuadrula de informacion) solo muestra la pantalla queiene TV, AV, S-VIDEO, Componente como fuente de entrada.
3) Cambia aleatoriamente el時間 de imagen de la pantalla seleccionada.
Note: Auto Wide (Ancho automatico), Zoom1 (Zoom1) y Zoom2 (Zoom2) no se pueda seleccionar cuando el tipo de Signals de entrada para componentes y DVI (HDCP) es 720p o 1080i
La source d'entrée de MagicNet ne fonctionne que sur le modele MagicNet.
* El control Tamanio de imagen solo está disponible para las pantallas para las cuales está activado (ON) el estado de suministro electrico.

Time
1. Haga tic en Time (hora), entre los iconos principales, y aparecerá la pantalla Control de Time (hora).

\* Info Grid muestra informacion basia de Time (hora).
1) Current Time
-Selezione la hora actual para la pantalla seleccionada PC Time (hora del PC)
- Para cambiar la hora actual, cambie primero PC Time (hora del PC).
2) On Time Setup
- Define la hora, el minuto, y el valor de AM/PM para On Timer (Temporizador activado) de la pantalla seleccionada.
3) Off Time Setup
- Define la hora, el minuto, y el valor de AM/PM para Off Timer Setup (Configuración de hora desactivada) de lapellata selecciónada.
4) Muesra la configuración de On Timer (Temporizador activado).
5) Muesra la configuración de Off Timer (Temporizador desactivado).
La source d'entrée de MagicNet ne fonctionne que sur le modele MagicNet.
* Control de Time (hora) está disponible solo para las pantallas cuando el estado de energia está ON (activado).
En On Time Setup (Configuracion de hora de apagado), las functions TV Source (Fuente de TV) solo en los modelos con TV.

PIP
PIP Size
1. Hagablick en PIP,entre los iconos principales,y aparecerá lathora Control PIP. Haga click en Select All (SeLECTIONAR todo),o utilise la casilla de verificacion,para seleccionar unathora con intencion de controlarla.

Info Grid (Cuadrula de informacion) muestra cierta informacion basia necesaria para tener el control Tamanio PIP.
1) PIP Size
- Muestra el Tamaño PIP actual de la pantalla realizada.
2) OFF
- Desactiva el modo PIP de la pantalla selectionada.
3) Large
- Activ a modo PIP de la pantalla selectionada y cambia el taman a Large.
4) Small
- Activ el modo PIP de la pantalla seleccionada y cambia el tamanio a Small.
5) Double1
- Activ el modo PIP de la pantalla selectionada y cambia el tamanio a Double 1.
6) Double 2
- Activ el modo PIP de la pantalla selectionada y cambia elullan a Double 2.
7) Double3 (Picture By Picture)
- Activ a modo PIP de la pantalla seleccionada y cambia el taman o a Double 3.

^ 念 La source d'entrée de MagicNet ne fonctionne que sur le modele MagicNet.

El Tamaño PIP se pueda controlar cuando se enciende el monitor.

PIP
PIP Source
1. Haga cig en PIP, entre los iconos principales, y aparecerá la pantalla Control PIP.
- PIP TV Mode

- PIP S-Video Mode

Info Grid (Cuadrula de informacion) muestraCERTa informacionbasica necessitiesa para entender el control Fuente PIP.
1) PIP Source
- La Fuente PIP se pueda controlar cuando se enciende el monitor.
2)PC
- Cambia la Fuente PIP de la pantalla seleccionada a PC.
3) BNC
- Cambia la Fuente PIP de la pantalla seleccionada a BNC.
4)DVI
- Cambia la Fuente PIP de la pantalla seleccionada a DVI.
5) TV
- Cambia la Fuente PIP de la pantalla seleccionada a TV.
6) AV
- Cambia la Fuente PIP de la pantalla seleccionada a AV.
7) S-Video
- Cambia la Fuente PIP de la pantalla selectionada a S-Video.
8) Component
- Cambia la Fuente PIP de la pantalla seleccionada a Component.
9) Channel
-La flecha del canal aparece cuando la option PIP Source (Fuente PIP) es TV.
Nota: Algunas de las fuentes PIP peuvent no estar disponibles dependiendo del tipo de fuente de entrada de la pantalla principal.
\* La source d'entrée de MagicNet ne fonctionne que sur le modele MagicNet.
* La fuente TV se pueda selectionar solo en produits con TV, y el control de los canales únicamente se permite cuando la.option PIP Source (Fuente PIP) es TV.
* La funciona de Control PIPsole está disponible para las pantallasdonde el estado de la energia sea activado (ON) y la funciona PIP está configurada como ON.

Settings
Picture
1. Haga cig en Configuracion , entre los iconos principales, y aparecerá la pantalla Control Brightness (Brillo).

* Info Grid muestra informaciónBsica necessitiesa para Settings Control. Cuando se selecciona cada direccion, el valor definido de la referencia seleccionada se muestra en la diaposita.
Cuando Select All (Seleccionar todo) está seleccionado, vuelle el valor predeterminado de (50).
El cambio de un valor en esta pantalla cambia automatistically el modo a "CUSTOM".
1) Picture
- Disponible solo para TV, AV, S-Video, Component, DVI(HDCP).
2) Contrast
- Ajusta el contraste de la pantalla seleccionada.
3) Brightness
- Ajusta la luminosidad de la pantalla seleccionada.
4) Sharpness
- Ajusta la nitidez de la pantalla selectionada.
5)Color
- Ajusta el color de la pantalla selectionada.
6)Tint
- Ajusta el matiz de la pantalla seleccionada.
7) Color Tone
- Ajusta el tono de color para la pantalla selectionada.
La source d'entrée de MagicNet ne fonctionne que sur le modele MagicNet.
\* Cette fonction est disponible uniquement pour les affichages dont I'alimentation est active.

Settings
Picture PC
1. Haga cig en Configuracion , entre los iconos principales, y aparecerá la pantalla Control Brightness (Brillo).

* Info Grid muestra información-basica necesaria para Settings Control. Cuando se selección cada funciona, el valor definido de la función seleccionada se muestra en la diapositiva.
Cuando Select All (Seleccionar todo) está seleccionado, vuelle el valor predeterminado (50).
El cambio de un valor en esta pantalla cambia automatistically el modo a "CUSTOM".
1) Picture PC
- Disponible solo para PC, BNC, DVI.
2) Contrast
- Ajusta el contraste de la pantalla selectionada.
3) Brightness
- Ajusta la luminosidad de la pantalla selectionada.
4) Red
- Ajusta la Temperatura del color de la pantalla seleccionada.
5) Green
- Ajusta la Temperatura del color de la pantalla selectionada.
6) Blue
- Ajusta la Temperatura del color de la pantalla selectionada.
La source d'entrée de MagicNet ne fonctionne que sur le modele MagicNet.
\* Cette fonction est disponible uniquement pour les affichages dont l'alimentation est active.

Settings
Audio
1. Haga cig en Configuracion , entre los iconos principales, y aparecerá la pantalla Control Brightness (Brillo).

* Info Grid muestra información.baidu necessaria para Settings Control. Cuando se selecciónca造血funció,el valor definido de la functión seleccionada se muestra en la diapositiva.
Cuando Select All (Seleccionar todo) está seleccionado, vuelve el valor predeterminado de (50).
El cambio de un valor en esta pantalla cambia automatistically el modo a "CUSTOM".
1) Audio
- Controla la configuración de audio para todas las fuentes de entrada.
2) Bass
- Ajusta los graves de la pantalla selectionada.
3) Treble
- Ajusta los agudos de la pantalla seleccionada.
4) Balance
- Ajusta el balance de la pantalla seleccionada.
5) SRS TSXT
- Encendido y apagado de Sonido SRS TSXT.
6) Sound Select
- Puede seleccionar Main (Principal) o Sub (Secundario) quando PIP esté activado.
La source d'entrée de MagicNet ne fonctionne que sur le modele MagicNet.
* Cette fonction est disponible uniquement pour les affichages dont l'alimentation est active.

Settings
Image Lock
1. Haga cig en Configuracion , entre los iconos principales, y aparecerá la pantalla Control Brightness (Brillo).

Info Grid muestra informacion basia necesaria para Settings Control.
1) Image Lock
- Disponible solo para PC, BNC.
2) Coarse
- Ajusta la fase de la pantalla Coarse.
3) Fine
- Ajusta la fase de la pantalla Fine.
4) Position
- Ajusta la posicion de la pantalla seleccionada.
5) Auto Adjustment
- Púlselo para que se ajuste automatistically a la seals proveniente del PC.
La source d'entrée de MagicNet ne fonctionne que sur le modele MagicNet.
* Control Brightness (Brillo) está disponible sólo para las pantallas cuando el estado de energia está ON (activado).

Maintenance
Lamp Control
1. Haga clicked en el icono "Maintenance (Mantenimiento)" en la columna Main Icon (Icono principal) para("");
pantalla de mantenimiento.

Aparece una cuadrula de informacion "Info Grid" Blockingando varios elementos basics de datos.
1) Maintenance
- Permitte la direccion Maintenance Control (Control de mantenimiento) para todas las fuentes de entrada.
2) Auto Lamp Control
- Ajusta automatically la luz posterior de la pantalla selectionada a una hora spécifique.
El Manual Lamp Control (Control de lampara manual) se desactiva automatically when el ajuste se realiza con Auto Lamp Control (Control de lampara automatico).
3) Manual Lamp Control
- Le permite ajustar la luz posterior de la pantalla seleccionada sin importar la hora.
La direccion de Control de lampara automatico se desactiva automatistically si se ajusta usingla direccion Control de lampara manual.
* La funciona de Control del mantenimiento solo está disponible para las pantallas para las cuales está activado (ON) el estado de suministro electrico.
\* La source d'entree de MagicNet ne fonctionne que sur le modele MagicNet.

Maintenance
Scroll
1. Hagablick en el icono "Maintenance (Mantenimiento)" en la columna Main Icon (Icono principal) para encontrar la pantalla demantimiento.

1) Safety Screen
- Elimina las imagenes residuales que pueda producirse cuando la pantalla seleccionada está en modo de pausa durante un periodo de tiempo prolongado. Puede usar el temporizador del ciclo de repetitiones seleccionando el periodo "Interval" por hora y las vezes "Second" porsegundo.
Screen Type ( Tipo de pantalla) se pueda configurar como Scroll (Desplazamente), Pixel (Pixel), Bar (Barra) o Eraser (Borrador).
La source d'entrée de MagicNet ne fonctionne que sur le modele MagicNet.
* Configuración de lossegundos:el tipo de desplazamente se pueda configurar como 1,2,3,4,5 y el tipo depixel,barra yborrador como 10,20,30,40,50.
* La funciona de Control del mantenimientosole está disponible para las pantallas para las cuales está activado (ON) el estado de suministro electrico.

Maintenance
Video Wall
1. Haga click en el icono "Maintenance (Mantenimiento)" en la columna Main Icon (Icono principal) para("");
pantalla de mantenimiento.

1) Video Wall
- Un video mural es un Conjunto de pantallas de video conectadas entre si, de manière que cada una pueda estar en una parte de la imagen completa o la mesma imagen repetida en cada pantalla.
2) Video Wall (Screen divider)
- Se puede dividir la pantalla en除外 varias.
Puede seleccionar varias pantallas con una distribuccion differente al dividirlas.
-Selezione un modo en el Divisor de pantalla.
-Selección una pantalla en la Display Selection (Selección de pantalla).
- La ubicacion se configurar pulsando un numero en el modo seleccionado.
- El programa MDC suministrado por Samsung admite hasta 4x4 pantallas LCD.

3) On/Off
- Enciende o apaga la funciona Video Wall (Védo mural) en la pantalla selecciónada.
4) Format
- Se puede selectionar el formatting para ver una pantalla dividida.
Full

Natural
\* La source d'entree de MagicNet ne fonctionne que sur le modele MagicNet.
* La funciona de Control del mantenimientosole está disponible para las pantallas para las cuales está activado (ON) el estado de suministro electrico.
Soluciones de problemas
1. La pantalla que desea controlar no aparece en la cuadrula de informacion de control de energia.
- Compruebe la connexion de RS232C. (Compruebe que esté connectada correctamente con el puerto Com1)
- Compruebe las pantallas por si una de las others Tiene el mesmo ID. Si hay mas de una pantalla con el).(el programa no puee detectarlas correctamente debido a un conflicto de datos.
- Compréue si el ID de jeu de pantalla es un número entre 0 y 16. (ajustelo con el menu Pantalla)
Note: Un ID de juego de pantalla debe tener un valor de entre 0 y 16, Si el valor está fuera del intervalo, el Sistema MDC (Multiple Display Control, MDC (Multiple Display Control)) no pueda controlar la pantalla.
2. La pantalla que se desea controlar no aparece en el resto de cuadrillas de informacion de control.
- Compruebe que la pantalla seleccionada este activada (ON). (Puede comprobarlo en Cuadrula de informacion de control Energia)
- Compréue si se puedaCambiar la fuente de entrada de la pantalla.
3. El cuadro de dialogo aparece en varias occasions.
- Compruebe si la pantalla que desea controlar está seleccionada.
4. Se ha configurado On Timer (Temporizador activado) y Off Timer (Temporizador desactivado) pero muestran una hora diferente.
- Aplique la hora actual para sincronizar los relojes de la pantalla.
5. La funciona remota no funciona correctamente cuando se desactiva la misma, se desconecta el cable RS-232C, o se sale del programa de forma irregular. Vuela a executar el programa y active de nuevo la funciona remota para volver al funciona normal.
Este programa pode functionar Incorrectamente deben a problemas en los circuitos de la communicatedo interferencias de aparatos electricos cercanos.

Pantalla Settings Value (Valor de configuración) en Modo Multiple Display (Pantallas multíples)
* Cuando hay más de una pantalla conectada, los values de la configuración se muestran de esta manière.
1. No hay selección: Muestra el valor predeterminado de fabrica.
2. Una pantalla selectionada: Obtiene y muestra el valor de configuracion para la pantalla seleccionada.
3. SeLECTIONADA una pantalla (ID1) y se anade另外一个 pantalla (ID3): el programa, que mostraba el valor de configuracion de ID 1, obtiene y muestra el valor de ID3.
4. SeLECTIONados todos los juegos using Select All (SeLECTIONAR todo): devuelte el valor predeterminado de fabrica.
Instrucciones de seguidad
Introduccion
Conexiones
Uso del software
Ajuste del monitor
Entrada
Picture
[PC / BNC /DVI Modo]
Picture
[AV/S-Video/
Component / DVI-Video
Modo]
Sonido
Setup
Control multiple
Characteristicas de Control
Directo
Resolución de problemas
Especificaiones
Information
Apendice
TFT-LCD Monitor
www.samsung.com

El aspecto externo y el color del producto pueda variar dependiendo del Modelo; las specifications del producto se puedaCambiar sin previo aviso para la mejora del rendimiento.
Ajuste del monitor
Entrada
Modos disponibles
PC/BNC/DVI
AAV
S S-Video
Componente
D DVI-Video
Fuentes PASCD
[MONTH]→[ENTER]→[ENTER]→[A/V]→[ENTER]
Activa el indicator para reflejar la SERIAL de entrada que se muestraactualmente.
1)PC
2) BNC
3) DVI
4)AV
5) S-Video
6) Componente
[El botón directo en el mando a distancia es el botón 'SOURCE'.]
Nota
- El PIP se apaga si el monitor se conecta a una fuente externa.
PIP PASC
Cuando los dispositivos externos de A/V (audio y video), tales como VCR o DVD, estan conectados con el monitor, PIP permite ver el video de dichos dispositivos en una ventanackaenia superpuesta sobre la senal de video del PC. (Des.
Nota
- (Act.) No se pue de solapar mas de un PIP en la pantalla, bajo que BNC y el componente utilizean el mismo terminal.
1)PIP
[MONTH] [ENTER] [A/V] [ENTER] [ENTER] [A/V] [ENTER]
Act. Activ a desactiva la pantalla PIP
-Des.
-Act.
[El botón directo en el mando a distancia es el botón 'PIP'].
2) Source (Fuente)
[MONTH] [ENTER] [A/V] [ENTER] [A/V] [ENTER] [A/V] [ENTER]
Selección la fuente de entrada para el modo PIP.
-PC:AV/S-Video/Componente Modo
- BNC: AV / S-Video Modo
-DVI:AV/S-Video/ComponenteModo
-AV/S-Video:PC/BNC/DVI Modo
- Componente: PC / DVI Modo
[El botón directo en el mando a distancia es el botón 'SOURCE'.]
3) Fuente
[MONTH] [ENTER] [A/V] [ENTER] [A/V] [ENTER]
Intercambio del Descripción de laImagen PIP y de laImagen principal.
LaImagen de laventanaPIPapareceré en la pantalla principal,ylaImagen de la pantalla principal.
apareceré en la ventana PIP.
[El botón directo en el mando a distancia es el botón 'SWAP'].
4) Tamaño
[ \text{[MENU]} \rightarrow \text{[ENTER]} \rightarrow [\wedge / \vee] \rightarrow \text{[ENTER]} \rightarrow [\wedge / \vee] \rightarrow \text{[ENTER]} \rightarrow [\wedge / \vee] \rightarrow \text{[ENTER]} ]
Permite que el usuario desactive o ajuste al dato de la Pantalla PIP.
[El botón directo en el mando a distancia es el botón 'SIZE'].
5) Posicion
[MONTH] [ENTER] [A/V] [ENTER] [A/V] [ENTER] [A/V] [ENTER]
Cambia la posicón de la ventana PIP.
6) Transparenc.
[MONTH] [ENTER] [A/V] [ENTER] [A/V] [ENTER] [A/V] [ENTER]
Ajusta la transparencia de las ventanas PIP.
- Alto
-Medio
-Bajo
-Opaco
Nota
- Si se selección en Tamaño, Posición y Transparencycia no se desactivar.
Modos disponibles: PIP
Editor name PASCD
[MONTH] [ENTER] [A / V] [ENTER] [A / V] [ENTER] [A / V] [ENTER]
Da nombre al disposito v de entada de informacion conctado con los conectores de entada para hacer la selec tion de fuente de entada mas fácil.
1) PC
2) BNC
3) DVI
4) AV
5) S-Video
6) Componente
Picture [PC / BNC /DVI Modo]
Modos disponibles
PC/BNC/DVI
AAV
S-S-Video
Componente
D VDI-Video
MagicBrightTM
[ \text{[MENU]} \rightarrow [\wedge / \vee] \rightarrow [\text{ENTER} ] \rightarrow [\text{ENTER}] \rightarrow [\wedge / \vee] \rightarrow [\text{ENTER}] ]
MagicBright™ es una nuevo funciona que proportionsca un entorno de visualizacion optimo, de acuerdo con el contenido de la imogen que este vivo.
En laactualidad hay 4 modelos diferentes disponibles: Entertain, Internet, Text y Custom.
Cada modo tiene su propio valor de brillo configurado previamente. Puede selectionar fácilmente una de las 4 configuraciones pulsando el botón 'MagicBrightTM.
1)Ocio
Luminosidad Alta
Para visualización de imagenes en movimiento, como un DVD o un VCD.
2) Internet
Luminosidad Media
Para trabajo con una mezcla visual de texto ygraficos.
3) Texto
Luminosidad Normal
Apropiado para documents o problemas que requiren la visualizacion de grancantidad de texto.
4) Personal
Aúnque los valores se han elegido con minuciosidad por nuestros ingenieros, los valores preconfiguradosSEO.SEOSEOSEOSEOSEOSEOSEOSEOSEOSEOSEOSEOSEOSEOSEOSEOSEOSEOSEOSEOSEOSEOSEOSEOSEOSEOSEOSEOSEOSEOSEOSEOSEOSEOSEOSEOSEOSEOSEOSEOSEOSEOSEOSEOSEOSEOSEOSEOSEOSEOSEOSEOSEOSEOSEOSEOSEOSEOSEOSEOSEOSEOSEOSEOSEOSEOSEOSEOSEOSEOSEOSEOSEOSEOSEOSEOSEOSEOSEOSEOSEOSEOSEOSEOSEOSEOSEOSEOSEOSEOSEOSEOSEOSEOSEOSEOSEOSEOSEOSEO SEO
[El botón directo en el mando a distancia es el botón 'M/B'].
Personal
[ \text{[MENU]} \rightarrow [\wedge / \vee] \rightarrow [\text{ENTER} ] \rightarrow [\wedge / \vee] \rightarrow [\text{ENTER} ] \rightarrow [\text{ENTER} ] \rightarrow [\wedge / \vee] / [< / >] \rightarrow [\text{ENTER}] ]
Puede usar los manos en pantalla para携带 el contraste y la luminosidad según sus preferencias personales.
1) Contraste
Calibre el Contraste.
2)Brillo
Calibre el Luminosidad.
Nota
- Si se ajusta laImagen usingo la func tion Personal, entonces MagicBright cambia al modo Personal.
Tono de color P
[ \text{[MENU]} \rightarrow [\wedge / \vee] \rightarrow [\text{ENTER} ] \rightarrow [\wedge / \vee] \rightarrow [\text{ENTER} ] \rightarrow [\wedge / \vee] \rightarrow [\text{ENTER}] ]
El tono del color se puedaCambiar.
1) Frio
2) Normal
3) Calido
4) Personal
(Disponible solamente en el modo PC/BNC)
Control de color
[ \text{[MENU]} \rightarrow \left[\hat{\Lambda} / \hat{\mathbb{V}}\right] \rightarrow \left[\text{ENTER}\right] \rightarrow \left[\hat{\Lambda} / \hat{\mathbb{V}}\right] \rightarrow \left[\text{ENTER}\right] \rightarrow \left[\text{ENTER}\right] \rightarrow \left[\langle I \rangle\right] \rightarrow \left[\text{ENTER}\right] ]
utilice esta funciona para ajustar ligeramente el color.
(Disponible solamente en el modo PC/BNC)
1) Rojo
2) Verde
3) Azul
Nota
- Si se ajusta laImagen usingo la funcion Control de color, entones Tono de color cambia al modo Personal.
Fijar la Imagen
Fijar laImagen se usa para ajustar y Obtener la mejorImagen quitando las perturbaciones que provocan imagenes inestables con agitaciones y resplandores débiles. Si no se obtienen resultados satisfactorios usingo el Ajuste bajo, use la configuracion Ajuste grueso y, despues, use Ajuste bajo otra vez.
(Disponible solamente en el modo PC/BNC)
1) Grueso
[ \text{[MENU]} \rightarrow [\wedge / \vee] \rightarrow [\text{ENTER} ] \rightarrow [\wedge / \vee] \rightarrow [\text{ENTER} ] \rightarrow [\text{ENTER} ] \rightarrow [< / >] \rightarrow [\text{ENTER}] ]
Suprime las interferencias como las bandas verticas. El ajuste grueso puede mover el area deImagen de la pantalla. Puede volver a ubicarla en el centro mediante el menu Horizontal Control (Control horizontal).
2) Fino
[MONTH] [AIV] [ENTER] [AV] [ENTER] [AV] [ENTER] [<1>] [ENTER]
Quita perturbaciones tales como rayas horizontales. Si persiste la perturbacion incluo despues de Ajuste fino, repitalo afterwards de ajustar la Frequencia (velocidad del reloj).
3) Posición
[ \text{[MENU]} \rightarrow [\text{A} / \text{V}] \rightarrow [\text{ENTER}] \rightarrow [\text{A} / \text{V}] \rightarrow [\text{ENTER}] \rightarrow [\text{A} / \text{V}] \rightarrow [\text{ENTER}] \rightarrow [\text{A} / \text{V}] \rightarrow [\text{ENTER}] ]
Esto ajusta laubicacion de la pantalla horizontalmente y verticalmente.
Ajuste automatico P
[MONTH] [A/V] [ENTER] [A/V] [ENTER]
Los valores de fino, grueso y posicón se ajustan automatistically.
(Disponible solamente en el modo PC/BNC)
[El botón directo en el mando a distancia es el botón 'AUTO'].
Balance de laseaI
Se utilizes para recomponer la SERIAL RGB débil que se ha transmisido a工程技术 de un cable largo de serial.
(Disponible solamente en el modo PC/BNC)
1) Balance de la penal
\[
[\text{MENUR} ]\rightarrow [\text{A} /\text{V} ]\rightarrow [\text{ENTER} ]\rightarrow [\text{A} /\text{V} ]\rightarrow [\text{ENTER} ]\rightarrow [\text{ENTER} ]\rightarrow [\text{A} /\text{V} ]\rightarrow [\text{ENTER} ]
\]
Puede seleccionar que el control de la seals este en Act. o Des.
2) Control de la seals
[ \text{[MENU]} \rightarrow [\wedge / \vee] \rightarrow [\text{ENTER}] \rightarrow [\wedge / \vee] \rightarrow [\text{ENTER}] \rightarrow [\wedge / \vee] \rightarrow [\text{ENTER}] \rightarrow [\wedge / \vee] \rightarrow [\text{ENTER}] \rightarrow [\wedge / \vee] \rightarrow [\text{ENTER}] ]
Puede ajustar manualmente R Phase, G Phase, B Phase, Aumento y Nitidze.
Tamaño P
[ \text{[MENU]} \rightarrow [\wedge / \vee] \rightarrow [\text{ENTER} ] \rightarrow [\wedge / \vee] \rightarrow [\text{ENTER}] \rightarrow [\wedge / \vee] \rightarrow [\text{ENTER}] ]
Puede combustar el tamafo.
1) 16:9
2) 4:3
Imagen PIP
[ \text{[MENU]} \rightarrow [\wedge / \vee] \rightarrow [\text{ENTER}] \rightarrow [\wedge / \vee] \rightarrow [\text{ENTER}] \rightarrow [\wedge / \vee] \rightarrow [\text{ENTER}] \rightarrow [\wedge / \vee] \rightarrow [\text{ENTER}] \rightarrow [\wedge / \vee] \rightarrow [\text{ENTER}] \rightarrow [\wedge / \vee] \rightarrow [\text{ENTER}] \rightarrow [\wedge / \vee] \rightarrow [\text{x} ] \rightarrow [\text{x} ] \rightarrow [\text{x} ] \rightarrow [\text{x} ] \rightarrow [\text{x} ] \rightarrow [\text{x} ] \rightarrow [\text{x} ] \rightarrow [\text{x} ] \rightarrow [\text{x} ] \rightarrow [\text{x} ] \rightarrow [\text{x} ] \rightarrow [\text{x} ] \rightarrow [\text{x} ] \rightarrow [\text{x} ] \rightarrow [\text{x} ] ]
Puedeajustarlosparametrosde laimagenPIP.
1) Contraste
Ajusta el contraste de la ventana PIP en la pantalla.
2)Brillo
Ajusta la Luminosidad (Brightness) de la ventana PIP en la pantalla.
3) Sharpness
Se usa paraaabstar la diferencia entre las areas mas claras y mas oscuras de la ventana PIP.
4) Nitidez
Se usa para ajustar la luminosidad y la oscuridad de la pantalla.
5) Matiz
Agrega un tono natural a la ventana PIP.
Puede ver una imagen desde las fuentes AV, S-Video a trovés de la pantalla PIP en los modelos PC, BNC. Funciona solo si la signaled video es NTSC.
Modos disponibles: PIP
Picture [AV/S-Video/Component/DVI-Video Modo]
Modos disponibles

PC/BNC/DVI

AV

S-Video

Componente

DVI-Video
Modo ASCD
[ \text{[MENU]} \rightarrow [\text{A} / \text{V}] \rightarrow [\text{ENTER}] \rightarrow [\text{ENTER}] \rightarrow [\text{A} / \text{V}] \rightarrow [\text{ENTER}] ]
El monitor Tiene quatre configuraciones automaticas de imagen ("Dinamico", "Estandar", "Pelicula", y
"Personal") que estan establecidas previamente en la fabrica.
Puede activar Dinamico, Estandar, Pelicula, o Personal. Puede seleccionar "Personal" que automatisticamente
establece su configuración deImagen personalizada.
1) Dinámico
2) Estándar
3) Peliculas
4) Personal
[El botón directo en el mando a distancia es el botón 'P.MODE'.]
Personal ASCD
[ \text{[MENU]} \rightarrow [\wedge / \vee] \rightarrow [\text{ENTER}]\rightarrow [\wedge / \vee] \rightarrow [\text{ENTER}]\rightarrow [\wedge / \vee] \rightarrow [\text{ENTER}]\rightarrow [< / >] \rightarrow [\text{ENTER}] ]
Puede usar los manos en pantalla paraCambiar el contraste y la luminosidad segun sus preferencias personales.
1) Contraste
Ajusta el Contraste.
2)Brillo
Ajusta el Luminosidad.
3) Nitidez
Ajusta la nitidez de la imagen.
4) Color
Ajusta el color de laImagen.
5) Matiz
Agrega un tono natural a la pantalla.
Funciona solo en los modos AV y S-Video. Funciona solo si la seals de video es NTSC.
Tono de color ASCD
[ \text{[MENU]} \rightarrow [\wedge / \vee] \rightarrow [\text{ENTER} ] \rightarrow [\wedge / \vee] \rightarrow [\text{ENTER}] \rightarrow [\wedge / \vee] \rightarrow [\text{ENTER}] ]
El tono del color se pueda cambiar.
1) Frio 2
2) Frio 1
3) Normal
4) Calido1
5) Calido2
Tamaño ASCD
[ \text{[MENU]} \rightarrow [\wedge / \vee] \rightarrow [\text{ENTER} ] \rightarrow [\wedge / \vee] \rightarrow [\text{ENTER} ] \rightarrow [\wedge / \vee] \rightarrow [\text{ENTER}] ]
Puedechangiarel tamanode imagen.
1) 16:9
2) Zoom 1
3) Zoom 2
4) 4:3
[ZOOM1, ZOOM2, Panorama no está disponible en 1080i (o más de 720p) de DTV.]
Digital NR (Reducción digital del nivel de ruidos.) ASCD
[ \text{[MENU]} \rightarrow [\text{A} / \text{V}] \rightarrow [\text{ENTER} ] \rightarrow [\text{A} / \text{V}] \rightarrow [\text{ENTER} ] \rightarrow [\text{A} / \text{V}] \rightarrow [\text{ENTER} ] ]
Puede activar y desactivar la caracteristica Eliminacion de ruido (Noise Elimination).
La función Eliminación digital de ruido (Digital Noise Elimination) permite gozar de imagenes más claras y vibrantes.
1) Des.
2) Act.
Modopellicula ASC
[ \text{[MENU]} \rightarrow [\wedge / \vee] \rightarrow [\text{ENTER} ] \rightarrow [\wedge / \vee] \rightarrow [\text{ENTER}] \rightarrow [\wedge / \vee] \rightarrow [\text{ENTER}] ]
Puede activar o desactivar (Des./Act.) el Modo de cine (Film Mode).
La caracteristica Modo de cine (Film Mode) offre una experiencia visual con la calidad de las salas de expectáculos.
(No disponible en el modo DVI-Video)
1) Des.
2) Act.
Imagen PIP ASCD
[ \text{[MENU]} \rightarrow [\wedge / \vee] \rightarrow [\text{ENTER} ] \rightarrow [\wedge / \vee] \rightarrow [\text{ENTER} ] \rightarrow [\wedge / \vee] \rightarrow [\text{ENTER} ] \rightarrow [\wedge / \vee] \rightarrow [\text{ENTER} ] \rightarrow [< / >] \rightarrow [\text{ENTER}] ]
PuedeajustarosparatemetroldaimagenPIP.
1) Contraste
Ajusta el contraste de la ventana PIP en la pantalla.
2)Brillo
Ajusta el brillo de la ventana PIP en la pantalla.
Modos disponibles: PIP
Sonido
Modos disponibles
PC/BNC/DVI
AV
S-S-Video
C Componente
D VDI-Video
Modo PASC
[ \text{[MENU]} \rightarrow [\text{A} / \text{V}] \rightarrow [\text{ENTER} ] \rightarrow [\text{ENTER} ] \rightarrow [\text{A} / \text{V}] \rightarrow [\text{ENTER} ] ]
El monitor tiene un amplificador integrado de audio estéreo de alta fidélidad.
1) Estándar
Selección Normal para volver a la configuración estándar de fibrica.
2) Música
Selezione Música quando esté visualizando videos musicales o conciertos.
3) Peliculas
Selezione Cine quando está visualizando largometrajes.
4) Dálogo
Selección Dálgo when este visualizing Descripciónns ricos en dialgos (por ejemplo, noticias).
5) Favorito
Selección Favorito para volver a la configuración personalizada.
Personal PASCD
[MONTH] [A/√] [ENTER] [A/√] [ENTER] [A/√] [ENTER] [<1>] [ENTER]
La configuración del sonido se pueda ajustar para satisfacer sus preferencias personales.
1) Graves
Intensifica el audio de baja Frequencia.
2) Agudos
Intensifica el audio de alta Frequencia.
3) Balance
Balance de sonido = = > Permite ajustar el balance de sonido entre los altavoces izquierdo y correcho.
[Puede oir sonido awhile el valor del sonido sea 0.]
Nota
- Si ajusta laImagen con la función de Sound Custom (Sonido personal), el Sound Mode (Modo de sonido) cambiará al Custom Mode (Modo personal).
Volumen autom. PASC0
[ \text{[MENU]} \rightarrow [\wedge / \vee] \rightarrow [\text{ENTER} ] \rightarrow [\wedge / \vee] \rightarrow [\text{ENTER}] \rightarrow [\wedge / \vee] \rightarrow [\text{ENTER}] ]
Reduce las diferencias en el nivel del volumen para las distinctas fuentes de emisión.
1) Des.
2) Act.
SRS TS XT PASC0
[ \text{[MENU]} \rightarrow [\text{A} / \text{V}] \rightarrow [\text{ENTER} ] \rightarrow [\text{A} / \text{V}] \rightarrow [\text{ENTER} ] \rightarrow [\text{A} / \text{V}] \rightarrow [\text{ENTER} ] ]
SRS TS XT es una Tecnología SRS patentada que solventa el problema de reproducir contenido multicastanal 5.1 en dos altavoces. TruSurround proportionsa una sensación de sonido virtual convincente a工程技术 de综合素质 de producción con dos altavoces, incluso con los altavoces internos del televisor. Es totalmente compatible con todos los formatos multicastanal.
1) Des.
2) Act.
[El botón directo en el mando a distancia es el botón 'SRS']
Selección de sonido PASC
[ \text{[MENU]} \rightarrow [\wedge / \vee] \rightarrow [\text{ENTER}]\rightarrow [\wedge / \vee] \rightarrow [\text{ENTER}]\rightarrow [\wedge / \vee] \rightarrow [\text{ENTER}] ]
Puede seleccionar entre Principal o Sub cuando PIP este activado (On).
1) Principal
2) Sub
[Modos disponibles: PIP]
Setup
Modos disponibles
PC/BNC/DVI
AAV
S S-Video
C Componente
D DVI-Video
Idioma PASCD
[ \text{[MENU]} \rightarrow [\wedge / \vee] \rightarrow [\text{ENTER} ] \rightarrow [\text{ENTER}] \rightarrow [\wedge / \vee] \rightarrow [\text{ENTER}] ]
Puede escoger uno de los 11 idiomas siguientes.
Nota
- El idioma elegido afecta solo al idioma del OSD.
No afecta en absoluto al software que se ejecta en el equipo.
- English, Deutsch, Espanol, Français, Italiano, Svenska, 日本語, 中国語, Pycckn, 愛國語, Portugues
Hora PAsco
Se usa para seleccionar una apagado.
1) Reloj prog.
[ \text{[MENU]} \rightarrow [\text{A} / \text{V}] \rightarrow [\text{ENTER} ] \rightarrow [\text{A} / \text{V}] \rightarrow [\text{ENTER} ] \rightarrow [\text{ENTER} ] \rightarrow [\text{A} / \text{V}] \rightarrow [\text{ENTER} ] \rightarrow [\text{A} / \text{V}] \rightarrow [\text{ENTER} ] \rightarrow [\text{A} / \text{V}] \rightarrow [\text{ENTER} ] \rightarrow [\text{A} / \text{V}] \rightarrow [\text{ENTER} ] ]
Ajuste de la hora.
2) Temp. de desc.
[ \text{[MENU]} \rightarrow [\wedge / \vee] \rightarrow [\text{ENTER}] \rightarrow [\wedge / \vee] \rightarrow [\text{ENTER}] \rightarrow [\wedge / \vee] \rightarrow [\text{ENTER}] \rightarrow [\wedge / \vee] \rightarrow [\wedge / \vee] \rightarrow [\wedge / \vee] \rightarrow [\wedge / \vee] \rightarrow [\wedge / \vee] \rightarrow [\wedge / \vee] \rightarrow [\wedge / \vee] \rightarrow [\wedge / \vee] \rightarrow [\wedge / \vee] \rightarrow [\wedge / \vee] \rightarrow [\wedge / \vee ] \rightarrow [\wedge / \vee ] \rightarrow [\wedge / \vee ] \rightarrow [\wedge / \vee ] \rightarrow [\wedge / \vee ] \rightarrow [\wedge / \vee ] \rightarrow [\wedge / \vee ] \rightarrow [\wedge / \vee ] \rightarrow [\wedge / \vee ] \rightarrow [\wedge / \vee ] \rightarrow [\wedge / \vee ]] ]
[ENTER]→[]→[A/V]→[ENTER]
Se usa para que el monitor se apague automatistically tras una série de Minutes. (Apagado, 30, 60, 90,
120, 150, 180)
3) Temp. de encen.
[ \text{[MENU]} \rightarrow [\wedge / \vee] \rightarrow [\text{ENTER}] \rightarrow [\wedge / \vee] \rightarrow [\text{ENTER}] \rightarrow [\wedge / \vee] \rightarrow [\text{ENTER}] \rightarrow [< / >] \rightarrow [\wedge / \vee] \rightarrow ]
[ENTER]
Se usa para que el monitor se enciende a una hora determinada.
Se usa para controlar el modo y el niveau de volumen en el momento en que se encienda el monitor
automàcamente.
4) Temp. de apag.
[MONTH] [A/√] [ENTER] [A/V] [ENTER] [A/V] [ENTER] [] [A/V]
[ENTER]
Se usa para ajustar cuando se debe apagar automatamente el monitor, el volumen y el modo.
- Si noiene configurado Reloj prog. y selecciona Si en (Temporizador de encendido) Temp. de encen. o en (Temporizador de apagado) Temp. de apag., aparecerá el mensaje Reloj(Ajustar la hora)"
Transpar. de menus PASC
[ \text{[MENU]} \rightarrow [\text{A} / \text{V}] \rightarrow [\text{ENTER} ] \rightarrow [\text{A} / \text{V}] \rightarrow [\text{ENTER} ] \rightarrow [\text{A} / \text{V}] \rightarrow [\text{ENTER} ] ]
Cambia la opacidad del fondo del OSD.
1) Alto
2) Medio
3) Bajo
4) Opaco
PINbloqueo de seguridad PASC
[ \text{[MENU]} \rightarrow [\wedge / \vee] \rightarrow [\text{ENTER}] \rightarrow [\wedge / \vee] \rightarrow [\text{ENTER}] \rightarrow [0 \sim 9] \rightarrow [0 \sim 9] \rightarrow [0 \sim 9] ]
Puede combustiar la contraseña.
Ahorro energia PASCD
[ \text{[MENU]} \rightarrow [\text{A} / \text{V}] \rightarrow [\text{ENTER} ] \rightarrow [\text{A} / \text{V}] \rightarrow [\text{ENTER} ] \rightarrow [\text{A} / \text{V}] \rightarrow [\text{ENTER} ] \rightarrow [\text{MENU}] ]
Estamericano.
1) Act.
2) Des.
Nota
- Si DEA reducir el consumo eletrico en el modo de esper, ajuste Ahorro energia en Des. Sin embargo, cuando Ahorro energia está en Des, no pueda usar la referencia remota Power On de MDC ni la referencia WOL (Wake On LAN) de MagicNet.
Video Wall PASCD
Un video mural es un Conjunto de pantallas de video conectadas entre sí, de manière que cada una pueda做不到 lo que el imagen不完mente o la misma imagen repetida en cada pantalla.
Si Video Wall está activado se podra ajustar la configuracion de la pantalla Video Wall.
1) Video Wall
[ \text{[MENU]} \rightarrow [\text{A} / \text{V}] \rightarrow [\text{ENTER}] \rightarrow [\text{A} / \text{V}] \rightarrow [\text{ENTER}] \rightarrow [\text{ENTER}] \rightarrow [\text{A} / \text{V}] \rightarrow [\text{ENTER}] ]
Enciende o apaga la funciona Video Wall (Video mural) en la pantalla seleccionada.
- Des.
- Act.
2) Formato
[ \text{[MENU]} \rightarrow [\wedge / \vee] \rightarrow [\text{ENTER} ] \rightarrow [\wedge / \vee] \rightarrow [\text{ENTER} ] \rightarrow [\wedge / \vee] \rightarrow [\text{ENTER} ] \rightarrow [\wedge / \vee] \rightarrow [\text{ENTER}] ]
Se peutesecionar el formatting para ver una pantalla dividida.
- Llena
Proporciona una planta completa sin margenes.
- Natural
Muestra una imagen natural con su relacion de aspecto original intacta.
3) Divisor de pantalla
[ \text{[MENU]} \rightarrow [\text{A} / \text{V}] \rightarrow [\text{ENTER} ] \rightarrow [\text{A} / \text{V}] \rightarrow [\text{ENTER} ] \rightarrow [\text{A} / \text{V}] \rightarrow [\text{ENTER} ] \rightarrow [\text{A} / \text{V}] \rightarrow [\text{ENTER} ] ]
Se peuté dividir la pantalla en autres varias.
Puede seleccionar varias pantallas con una distribuccion differente al dividirlas.
- Selezione un modo en el Divisor de pantalla.
- Selecciona una pantalla en la Display Selection (Seleccion de pantalla).
- La ubicacion se configurar pulsando un numero en el modo selectionado.
-2x2
-3x3
-4×4
-5x5
-1x2
-2x1
-1x5
-5x1
- Cuando Video Wall está en funciona,[1] las unidades PIP, Ajuste automatístico, Bloqueo de Imagen y Tamaño no está disponible. Si se inicia Video Wall cuando PIP está en funciona,[2] la funciona PIP隨著 a Des. Video Wall no funciona en el modo MagicNet.
Pantalla de seguidad PASCD
La función Safety Screen (Pantalla de segundad) se utilizes para evitar que poderanaparecer restos de imagenes en la pantalla cuando se visualiza una imagen fija por un periodo prolongado.
- La funciona Screen Scroll (Desplazamente de pantalla) desplaza la pantalla el tiempo que se haya sido asignado.
-Estamericano no está disponible cuando el aparato está apagado.
1) Pantalla de seguidad
[MENU] [A / V] [ENTER] [A / V] [ENTER] [ENTER] [A / V] [ENTER]
Determine si la direccion Screen Scroll (Desplazamento de pantalla) deben estar Act. o Des.
- Des.
-Act.
2) Intervalo
[MONTH] [A/V] [ENTER] [A/V] [ENTER] [A/V] [ENTER] [A/V] [ENTER]
Determine el intervalo que debe pagar hasta que se execute Screen Scroll (Desplazamente de pantalla).
(1~10 hours)
El tiempo se calcula tomando como base el tiempo de encendido.
De forma predeterminada, el tiempo se establiece en 10 horas.
-1~10 hours
3) Segundos
\[
[\text{MENUR} ]\rightarrow [\wedge \vee ]\rightarrow [\text{ENTER} ]\rightarrow [\wedge \vee ]\rightarrow [\text{ENTER} ]\rightarrow [\wedge \vee ]\rightarrow [\text{ENTER} ]\rightarrow [\wedge \vee ]\rightarrow [\text{ENTER} ]
\]
Determine el periodo que debe pagar hasta que se ejecte Screen Scroll (Desplazamiento de pantalla).
(1~5 segundos)
De forma predelearminada, el tiempo se establece en 5segundos.
- Tipo-Despl.: 1~5 segundos
- Tipo-Pixel, Barra, Borrador: 10~50 segundos
4) Tipo
[MONTH] [A/V] [ENTER] [A/V] [ENTER] [A/V] [ENTER] [A/V] [ENTER]
Se peuteschangierelSafetyScreenType(Tipo de pantalla de seguridad).
- Despl.
- Pixel
- Barra
- Borrador
Selecc.resoluciona

[ \text{[MENU]} \rightarrow [\wedge / \vee] \rightarrow [\text{ENTER} ] \rightarrow [\wedge / \vee] \rightarrow [\text{ENTER} ] \rightarrow [\wedge / \vee] \rightarrow [\text{ENTER}] ]
Si laImagen no aparece correctamente en la pantalla alaabstar la resolucion de la tarjeta grfica del ordinador
a 1024 x 768 a 60 Hz, 1280 x 768 a 60 Hz, 1360 x 768 a 60 Hz o 1366 x 768 a 60 Hz, graties al uso de esta
funciion (Selec. resolucion) pue de seguir que la imagen aparezca en la pantalla del ordinador con la
resoluciónspecificada.
(Disponible solamente en el modo PC/BNC)
1) Des.
2)1024X768
3) 1280 X 768
4) 1360 X 768
5) 1366 X 768
Nota
Solamente se pueda selectionar un menu si los values de la resolution de graficos son 1024 x 768 a 60
Hz, 1280 x 768 a 60 Hz, 1360 x 768 a 60 Hz o 1366 x768 a 60 Hz.
PASCD
[MONTH] [A/V] [ENTER] [A/V] [ENTER] [ENTER] [] [ENTER]
Se usa para ajustar la luz de fondo, con el fin de reducir el consumo de energia.
Ajuste de encendidopASCD
[ \text{[MENU]} \rightarrow [\text{A} / \text{V}] \rightarrow [\text{ENTER} ] \rightarrow [\text{A} / \text{V}] \rightarrow [\text{ENTER} ] \rightarrow [\text{ENTER} ] \rightarrow [\text{A} / \text{V}] \rightarrow [\text{ENTER} ] ]
Ajusta el Power On time (Tiempo de encendido) de la pantalla.
*Precaución: Ajuste el Power On time (Tiempo de encendido) para que sea más largo, a finpreventir las sobrecargas de tension.
Restablecer
Los parámedos de color se sustituyen con los values predeterminados de fabrica.
1) RestablecerImagen P
[ \text{[MENU]} \rightarrow [\wedge / \vee] \rightarrow [\text{ENTER}] \rightarrow [\wedge / \vee] \rightarrow [\text{ENTER}] \rightarrow [\text{ENTER}] \rightarrow [< / >] \rightarrow [\text{ENTER}] ]
(Disponible solamente en el modo PC/BNC)
2) Restablecer color P
[ \text{[MENU]} \rightarrow [\Delta / \mathbb{V}] \rightarrow [\text{ENTER} ] \rightarrow [\Delta / \mathbb{V}] \rightarrow [\text{ENTER} ] \rightarrow [\Delta / \mathbb{V}] \rightarrow [\text{ENTER} ] \rightarrow [< / >] \rightarrow [\text{ENTER}] ]
Control multiple
Modos disponibles
PC/BNC/DVI
AAV
S-Video
Componente
DVI-Video
Control multiple PASCD

[ \text{[MENU]} \rightarrow [\wedge / \vee] \rightarrow [\text{ENTER}] \rightarrow [\wedge / \vee] \rightarrow [\text{ENTER}] \rightarrow [\text{ENTER}] \rightarrow [0 \sim 9] ]
Asigna un ID al aparato.
1) Configuración de ID
Asignacion de ID diferenciadores al aparato.
2) Entrada de ID
Se utilizes para seleccionar las funcciones del transmisor del aparato. Solo se activa el aparato bajo ID se corresponda con el valor del transmisor.
Characteristicas de Control
Directo
Modos disponibles
PC/BNC/DVI
AAV
S-Video
Componente
DVI-Video
MDC PASC0
Vaya a la pantalla OSD de Multi Control.
Bloquear PASCD
Ajuste la funciona Bloqueo de segundad.
1) Activarbloqueo
Se bloqueara.
2) Desactivarbloqueo
Se desbloqueara.
Nota
- Cuando se configura la direccion Lock,sole运营管理 los botones Lock del mando a distancia y del equipo.
La password (contraseña) preestablecida del monitor es "000000".
Nota
- Restablecimiento de la contraseña para lock (bloqueo) de la tecla de funciona.
Pulse MUTE 1 8 6 On. La contraseña se debe restablecer como '0000'. El mando a distancia es NEEDario para restablecer la contraseña.
© 1995~2008 SAMSUNG. ALL Rights Reserved
Instrucciones de seguidad
Introduccion
Conexiones
Uso del software
Ajuste del monitor
Resolución de problemas
Comprobación de las
funciones de
autoverificacion
Lista de chequeo
Q&A
Especificaiones
Information
Apéndice
TFT-LCD Monitor
www.samsung.com

El aspecto externo y el color del producto pueda variar dependiendo del modelo; las specifications del producto se puedaCambiar sin previo aviso para la mejora del rendimiento.
Resolución de problemas
Comprobación de las
funidades de
autoverificacion
Nota
- Compruebe lo siguientes antes de llamar al serviceo tecnico. Consulte con el centro de serviceo acerca de problemas que no pueda SOLUTIONAR por si mismo.
> Comprobación de las functiones de autoverficación
Se provee un dispositivo de autoprueba que permite inspeccionar la functiOn apropiaDe del monitor. Si el monitor y el computador estan connectados apropiadamente pero la pantalla del monitor permanece obscura y el indicator de abastecimiento de energia esta intermitente, execute la autoprueba del monitor, siguiendo los siguientes pasos:
1)Apaguencomputador yel monitor.
2) Desconecte el cable de video de la parte trasera del computador.
3) Prenda el monitor.
La figura que aparece bajo ("Comprobar cable de senal") aparece sobre un segundo plano negro cuando el monitor está en situación de functiónamente normal pero no detecta ninguna senal de video: Mientras está en el modo Autoprueba, el indicator de suministro de energia LEDcede verde y la figura se mueve por la pantalla.

Comprobar el cable de senal.
PC
4) Apague el monitor y vuelva a conectar el cable de video; bajo prenda el computador y el monitor.
Si la pantalla del monitor vigues en blanco afterwards seguir el procedimiento anterior, compruebe el controlador de video y el sistemas de la computadora; el monitor está的功能正好。
> Check Cooling System
Si en la pantalla se muestra el mensaje "Check Cooling System", quiere decir que hay un problema con el ventilador de refrigeracion. Póngase en contacto con un centro de servicios para reparar o reemplazar el ventilador.
> Modo no optimo
Puede ver la pantalla con unaResolution superior a 1360 x 768. No obstarve, ver a mensaje seguiente durante un minuto; durante es timeo, puee cabiar la resolucion de la pantalla o continuar en el modo actual. Si la fecuencia deactualizacion es de mas de 85Hz ver la tableta negra porque el monitor no admite mas de
85Hz.
Mode no optimo Modo recomendado 1360 x 768 60Hz
Nota
- Véase Especificações > Modos de Pantalla Prefijados acerca de las resoluções o frequencias compatibles con el monitor.
> Mantenimiento y Limpieza
1) Mantenimiento de la Caja del monitor
Limpie con un paño suave après de desconectar el cordón de suministro electrico.

- No use benceno, disolvente u other sustancias inflamables, o un paño mojado.
- Se recomienda un produit de limpieza de Samsung para prevenir daños en la pantalla.
2)Mantenimiento de la Pantalla de panel plano.
Limpie con un paño blando (una bayeta de algodón) suavamente.

- Nunca use acetona, benceno o disolvente. (Pueden causar defectos o deformaciones en la superficie de la pantalla).
- El usuario tendrá que pagar los costes y los gastos relacionados por la reparación de los días causados por el o ella.
Sintomas y Acciones recomendadas
Nota
- Un monitor reconstruye señales visuales que recibe del computador. Por lo tanto, si haydle problema con el PC o la tarjeta de video, esta podra causar que el monitor se ponga en blanco, o tenga malos colocores, sonido, Sincronizacion Fuera de Rango, etc. En este caso, primero inspeccione la fuente del problema y bajo pongase en contacto con el centro de service o el distribuidor.
1) Inspeccione si el cordon de suministro de energia esta conectado apropiamente al computador.
2) Inspeccione si el computador emite el sonido "beep" mas de 3 vezes cuando se inicia. (Si es affirmative, Solicite un service deutenimiento para la placa base del computador).
3) Si instalala una nuevo tarjeta de video o si ensambla el PC, inspeccione si la unidad del adaptor (video) o el controlador del monitor está instalado.
4) Compruebe si la fecuencia de exploracion de la pantalla de video está configurada en 50Hz 85Hz (Cuando use la maxima resolution no exceeda 60~Hz ).
5) Si Tiene problemas en la instalacion del controlador del adaptador (video), inceie el computador en el Modo Seguro, remueva el Adaptador de Pantalla en "Panel de Control, Sistema, Dispositivo de Administracion y bajo reiniciar el computador para reinstalar el controlador del adaptador (video).
Lista de chequeo
Nota
La tablasumaque enumerated los posibles problemas y sus soluiones. Antes de llamar al serviceo tcnico, compruebe la informacion de esta section para ver si possible remediar el problema usted mesmo. Si
necesite aplicay, Iame al numero del telfo n de la tarjeta de garantia, el numero de telfono en la seccion Informacion o consulte con su distribuidor.
Problemas relacionados con la instalacion (PC)
Nota
- Los problemas relacionados con la instalacion del monitor y sus soluciones estan en la lista.
Problemas Soluciones
La pantalla del monitor parpadea.
- Compruebe si el cable de senal entre el equipo y el monitor está
conectado y acoplado con firmeza.
(Véase Conexión con una computadora)
Blemas relacionados con la pantalla
Nota
- Los problemas relacionados con la pantalla del monitor y susmericanos estan en la lista.
Problemas Soluciones
La pantalla está en blanco y el indicator de suministro de energia está apagado
- Aseguresede que el cordon de suministro electrico este
conectarod firmamente y el monitor LCD esta encendido.
(Véase Conexión del Monitor)
Mensaje "Check Cable Serial"
- Aseguresede que el cable de senial estedecortado firmamente
con las fuentes de PC o de video.
(Véase Conexión del Monitor)
- Asegürese de que las fuentes de PC o de video estén
activadas.
Mensaje "Modo no optimo".
- Comprue la resoluzione y la Frequencia的最大s del adaptor
de video
Compare these values con los datos del Grafico Modos de
Pantalla Prefijados.
La imagen rueda verticalmente.
- Compruebe si el cable de senal está conectado con seguidad.
Conéctelo或其他方式。
(Véase Conexión con una computadora)
LaImagenoestaclara.La
- Execute el Ajuste de fecuencia Ajuste Grueso y Ajuste Fino.
- Enciendalo或其他方式,比如使用键盘、移动鼠标或用其他方式。
(cable de extension de video, etc)
Establezca la resoluzione y la Frequencia bajo de los rangos
recomendados. Modelo 19 pulgadas(1280 x 768 @ 60Hz)
LaImagenesinstableyvibra.
- Compruebe si la resoluzione y la Frequencia definidos para la
tarjeta de video del equipo está ndro del rango admitido por
el monitor
Si no,whelming a establecerlos segun Informacion en el menu del
monitor y Modos de Pantalla Prefijados.
LaImagenesdemasiadoclara o
- Ajuste la Luminosidad y el Contraste.
(Véase Luminosidad, Contraste)
demasiado oscura.
El color de la pantalla es
inconsistent.
El color de laImagen está
distorsionado con sombras
oscuras.
- Ajuste el color usando Favorito en el menu OSD Color
Adjustment (Ajuste del color OSD).
El color blanco es pobre.
El indicator de suministro de energia parpadea en verde.
- El monitor está guardando los Cambios realizados en la configuración en la memoria de OSD.
La pantalla está en blanco y la luz del indicator de suministro de energia es verde constante o parpadea cada 0,5 o 1segundos
- El monitor está usingo su Sistema de administracion de energia.
- Mueva el ratón del equipo o pulse una tecla del teclado.
- Si aparece el mensaje "TEST GOOD" en pantalla al pulsar el botón MENU, disfruebe la connexion del cable entre el monitor y el equipo informativo para asegurar que el conector está connectado correctamente.
Problemas relacionados con el audio
Nota
- Los problemas relacionados con las señales de audio y sus SOLUTIONES se enumeran a continuación.
Problemas Soluciones
No hay sonido
- Asegúrese de que el cable de audio está correctamente conectado al puerto de entrada de audio del monitor y el puerto de salute de audio de su tarjeta de sonido. (Véase Conexión del Monitor)
- Compruebe el nivel del volumen.
El nivel del sonido es demasiado bajo
- Compruebe el nivel del volumen.
- Si el volumen vigue siendo demasiado bajo afterwardsajustar el control al maximo, compruebe el control del volumen en la tarjeta de sonido del equipo o en el programa de software.
El sonido está demasiado alto o demasiado bajo
- Ajuste Agudo y Grave al nivel apropriado.
Problemas relacionados con el Control remoto
Nota
- Los problemas relacionados con el control remot y susmericanas se enumeran a continuacion.
Problemas Soluciones
Los botones del control remoto no responden.
- Compruebe las polaridades de las baterias (+/-).
- Compruebe si se han agotado las baterias.
- Compruebe si está encendido
- Compruebe si el cordón de suministro electrico está conectado con seguidad.
- Compruebe si hay encendida una lampara fluorescente o de neón en su cercania.
Q&A
Pregunta Respuesta
¿Cóme se puedaonian la fecuencia?
Se peutéckiar la fecuencia reconfigurando la tarjeta de video.
Note que el soporte de la tarjeta de video pueda variar,dependiendo de la version del controlador usado. (Busque detalles en el manual del computador o de la tarjeta de video).
¿Cóme se pueda regular la resolution?
- Windows XP: Restablezca la resolution能做到 en Panel de control
Apariencia y temas Pantalla Configuracion.
Windows ME/2000:
Restablezca la resoluzione hacerly clic en Panel de control Pantalla Configuracion.
* Contáctese con el fabricante de la tarjeta de video para Obtener más detalles.
¿Cóme se puedaponer la función Ahorro de Energía?
Windows XP:
Poner la funciona en Programa de Instalacion-BIOS(sistema Basicsico de entrada -salida) del computador o del protector de pantalla.
Poner la funciona en Programa de Instalacion-BIOS(sistema Basicsico de entrada -salida) del computador o del protector depellantla.Consulte el Manual del Computador/Windows
Windows ME/2000
Set the resolution at the Control Panel Display Screen Saver.
Poner la funciona en Programa de Instalacion-BIOS(sistema Basicsico de entrada -salida) del computador o del protector depellantilla.Consulte el Manual del Computador/Windows
Cóme se pueda limpiar el Tubo deImagen/Panel LCD?
Desconecte el cordón de suministro de energia y bajo limpie el monitor con unaTELa suave,usandounaSolution limpiadora o simplemente agua.
No deje restos de detergente ni raye la caja. No permitted que entre agua en el computador.
© 1995~2008 SAMSUNG. ALL Right Reserved

Instrucciones de seguidad
Introduccion
Conexiones
Uso del software
Ajuste del monitor
Resolución de problemas
Especificaiones
Generales
Ahorro de energia
Modos de temporización
predefinidos
Information
Apendice
TFT-LCD Monitor
www.samsung.com

El aspecto externo y el color del producto pueda variar dependiendo del modelo; las specifications del producto se puedaCambiar sin previo aviso para la mejor del rendimiento.
Especificaciones
Generales
Generales
Generales
Nombre del Modelo SMT-4011
Panel LCD
Tamaño 40 pulgadas de diagonal (101,6 cm)
Area de Presentación 885,168 mm (H) x 497,664 mm (V)
Distancia entre Pixels 0,648 mm (H) x 0,648 mm (V)
Sincronizacion
Horizontal 30 81kHz
Vertical 56 75Hz
Color de Pantalla
Color de Pantalla 16,7 M colocores
Resolución
Analógico
1360 x 768 / 1366 x 768 @ 60 Hz: depende de la tarjeta grafica que se
utilice
Digital 1366 x 768 @ 60 Hz
Señal de entrada, terminado
RGB analogico, RGB digital compatible con DVI (Interfaz visual digital).
0,7 Vp-p positivo a 75 ohmios ±10 % sincronizacion de H/V分开ado, compuesto, SOG, nivel TLI, posicao o negativo.
H/V independiente, nivel TTL, positivo o negativo
100 MHz
Fuente de poder
CA 100-240V\~ (+ - 10%) ,50/60 Hz
Cable de Senal
15pines-a-15pines D-sub cable, desarmable
DVI-D-a-DVI-D connector, desarmable - Opcion
Conector de senal
D-sub, BNC, DVI-D, YPbPr, S-VHS, VCR
Dimensiones (PxAxD) / Peso
971 x 582 x 118 mm / 38,2 x 22,9 x 4,6 inch (Sin soporte)
971 x 629,5 x 223 mm / 38,2 x 24,8 x 8,8 inch (Con soporte), 23 kg/50,7 lbs
971 x 629,5 x 228 mm / 38,2 x 24,8 x 9,0 inch (con soporte y con cristal), 27,7 kg/61,0 lbs
Interfase de Montaje VESA
200 mm x 200 mm (Para uso con hardware de Montaje especial (Brazo))
Consideraciones medioambienteles
Operación
Temperatura: 10^ C 40^ C (50°F ~ 104°F)
Humedad: 10% 80% , no-condensacion
Almacenamento
Temperatura: -20°C ~ 45°C (-4°F ~ 113°F)
Humedad : 5% ~ 95%, no-condensation
Characteristicadelaudio
Entrada de audio 1 Clavija RCA roja (D) blanca (I), 0,5 Vrms (-9 dB)
Entrada de audio 2 Clavija RCA roja (D) blanca (I), 0,5 Vms (-9 dB)
Entrada de audio de PC Clavija estereo de 3,50,0,5 Vrms (-9 dB)
Frecuencia RF:80 Hz 15 kHz (a-3 dB)
Respuesta A/V: 80 Hz ~ 20 kHz (a -3 dB)
Posibiliidad de Plug y Play
Este monitor可以选择 instalarse en cualquier sistemas con Plug & Play compatible. Las Interactiones de los sistemas del monitor y el PC proveen las最好的 conditiones operativas y configuracion del sistema. En la mayoria de los casos, la instalacion del monitor se hara automatamente, a menos que el usuario deseee seleccionar configuraciones alternas.
Punto acceptable
Para este producto se usa la pantalla TFT LCD fabricada con的技术ia avanzada de semiconductores con una precision de 1 ppm (una millionesa). Pero a vezes, los pixeles de color ROJO, VERDE, AZUL y BLANCO parecen estar brillantes o se pueda ver algunos pixeles negros. Esto no es bajo a una mala calidad yastedepuertoconconfianza.
- Por exemple, el número de pixeles secundarios de TFT LCD contentsados en este producto es 3.133.440
Nota
- El diseño y las espécificaciones están susjetos a Cambios sin previo aviso.
Equipo de Clase B (equipo de comunication de informacion para uso domestico)
- Este equipo cumple con las directrices de Compatibility electromagnética para uso dométrico y se pueda usar en todas las areas incluso las zonas residenciales comunes. (El equipo de Clase B irradia menos ondas electromagnéticas que el equipo de Clase A.)
Ahorro de energia
Este monitor tiene un sistema incorporeal de manejo de energia llamado Ahorroder de Energia. Este sistemas por cieo periodo de time. El monitor regresa automaticamente a una operation normal cuando se mueve el mouse del computador o se presiona una tecla del teclado. Para ahorrar energia, apague el monitor cuando no lo necesse, o cuando no lo use durante largos periodos de time. El system del Ahorroder de Energia funciona con un VESA DPM de acuero a la tarjeta de video instalada en el computador. Use un programa de Herramentas instalado en el computador para instalar esta caracteristica.
Estado Operación normal Modo de ahorro energetico Apagado de la Fuente de Alimentación EPA/ENERGY 2000 Apagado de la Fuente de Alimentación Apagado de la Fuente de Alimentación Indicador de Suministro de Energía Verde Verde, intermitente Ambar Negro Consumo de Energía Menos de 210 W Menos de 1 W (Modo Off) Menos de 1 W (Energía) 0 W (Botón de suministro de energia)

ENERGY STAR
Este monitor es compatible con EPA ENERGY STAR y con ENERGY2000 es uso con un computador que está equipado con VESA DPM.
Como socio de NERGY STAR® Partner, SAMSUNG ha determinado que este producto sigue las directrices de ENERGY STAR® sobre eficiencia energetica.
Modos de temporizacion predefinidos
> Modos de temporación predefinidos
Si la signal transferida del computador es laquia a la de los Modos de Pantalla Prefijados seguides, la pantalla se regula automatically. Sin embargo, si la signal difiere, la pantallaoulda ponerse en blanco,mientras el indicator de suministro de energia LED esta prendido.Consulte el manual de la tarjeta de video y
regule la pantalla de lasuma manera.
Modo Pantalla Frecuencia H (kHz) Frecuencia V (Hz) Ancho de Banda (MHz) Polaridad Sync (H/V) IBM, 640 x 350 31,469 70,086 25,175 +/- IBM, 640 x 480 31,469 59,940 25,175 -/- IBM, 720 x 400 31,469 70,087 28,322 -/+ MAC, 640 x 480 35,000 66,667 30,240 -/- MAC, 832 x 624 49,726 74,551 57,284 -/- VESA, 640 x 480 37,861 72,809 31,500 -/- VESA, 640 x 480 37,500 75,000 31,500 -/- VESA, 640 x 480 43,269 85,008 36,000 -/- VESA, 800 x 600 35,156 56,250 36,000 +/+ VESA, 800 x 600 37,879 60,317 40,000 +/+ VESA, 800 x 600 48,077 72,188 50,000 +/+ VESA, 800 x600 46,875 75,000 49,500 +/+ VESA, 800 x600 53,674 85,000 56,250 +/+ VESA, 1024 x 768 48,363 60,004 65,000 -/- VESA, 1024 x 768 56,476 70,069 75,000 -/- VESA, 1024 x 768 60,023 75,029 78,750 +/+ VESA, 1024 x 768 68,677 85,997 94,500 +/+ VESA, 1360 x 768 47,712 60,000 85,500 +/+

Frecuencia H
El tiempo para escanear una linea que conecta horizontally el lado de la planta al lado izquierdo es llamado Ciclo Horizontal y el número inverso del Ciclo Horizontal es llamado Frecuencia H. Unidad: kHz
Frecuencia V
A semejanza de una lámpara fluorescente, la pantalla tiene que repetir la misma imagen muchas vezes porsegundo para做不到 una imagen al usuario. La Frequencia de esta repetition es llama Frecencia V o
Frecuencia de Escaneo. Unidad: Hz
© 1995-2008 SAMSUNG. ALL Right Reserved

Instrucciones de seguidad
Introduccion
Conexiones
Uso del software
Ajuste del monitor
Resolución de problemas
Especificaiones
Information
Para Obtener una Mejor
Presentación
INFORMACION de
PRODUCTO
(Libre de retencion de
imagenes)
Apéndice
TFT-LCD Monitor
www.samsung.com

El aspecto externo y el color del producto pueda variar dependiendo del Modelo; las specifications del producto se puedaCambiar sin previo aviso para la mejora del rendimiento.
Information
Para Obtener una Mejor Presentacion
Ajuste la resolution de la computadora y la velocidad de inyeccion de la pantalla (intervalo deactualizacion) del panel de control de la computadora, como se indica a continuacion, para que disfunte delmejor calidad de imagen. Usted peut tener una calidad irregular de imagen en la pantalla si la mejor calidad de imagen no se provee en TFT-LCD.
- Resolución : 1360 x 768
Frecuencia Vertical (actualizacion) : 60 Hz
Para este produit se usa la pantalla TFT LCD fabricada con的技术ia avanzada de semiconductores con una precision de 1 ppm (una millionesa). Pero a vezes, los pixeles de color ROJO, VERDE, AZUL y BLANCO parecen estar brillantes o se pueda ver algunos pixeles negros.
Esto no es defaulted a una mala calidad y usted pueda usarlo con confianza.
- Por exemple, el número de pixeles secundarios de LCD Contents en este producto es
Cuando limpie el monitor y el panel exterior, por favor aplique con un pafo suave y seco la pequeña cantidad de limpiador que se recomienda, y pulalo. No aplique fuerza al area del LCD sino estregue suavamente.
Si se aplica mucha fuerza, pueda mancharse.
Si no está satisficho con la calidad de la imagen, pueda lograr mejor calidad de imagen allearvaracabo la "funci deajuste automatico" en la pantalla que aparece cuando se presiona el boton de cierre de ventana.
Si hay todas ruido despues del ajuste automatico, use la functiOn de ajuste FINO / GRUESO.
Si el aparato muestra una imagen fija durante un长大o periodo de tiempo, pueda quedar una imagen residual o cierta indefinccion.
Establezca el modo de ahora de energia o configure un protector de pantalla con una imagen en movementio, cuando seanecessary扣除adendido el monitor durante un largo periodo de tiempo.
INFORMACION de PRODUCTO (Libre de retencion de imagenes)
念 Que es la retencion de imagen?
La retencion deImagen no debe producirse cuando un panel LCD functiona en conditiones normales. Estas se defineen como patrones de video que cambian continuamente. Cuando el panel LCD functiona largo tiempo con un patron fijo (más de 12 horas), se produce una liga diferencia de voltaje entre los electrodos que introducen el cristal liquido (LC) en un pixel. Con el tiempo la diferencia de voltaje entre los electrodos se va incrementando, con lo que el cristal liquido se va hacer más delgado. Cuando este sucede, pueda que se vea laImagen anterior si el patron ha comeado. Para impeder this, se debe reduir la diferencia de voltaje acumulado.

Apagar, salvapantallas o modo de ahorro de energia
- Aquare el aparato durante 4 horas tras un periodo de uso de 20 horas.
- Apague el aparato durante 2 horas tras un periodo de uso de 12 horas.
- Configure el monitor para que se apague con el esquema de alimentacion de las propiedades de la pantalla del PC.
- Utilice un salvapantallas si es posible. - Es aconsejable usar un salvapantallas de un color o una imagen en movimiento.
Cambiar la informacion de color periodicamente

Nota
- Use dos colores differentes
Alterne la informacion de color con dos colores differentes cada 30 instantos.
- Evite usar una combinación de caracteres y color de fondo con una gran diferencia de luminancia. No utilise colocores grises, ya que pueda producir fácilmente una retencion deImagen.
Evite: colores con gran diferencia de luminancia (blanco y negro, gris).


Camblar el color de los caracteres periodicamente
- Use colors brillantes conlittle de luminancia Clico: cambie el color de los characteres y del fondo cada 30 minutes

Cada 30 Minutes, cambie los characteres con movimiento.

- LaImagen en mouvemento de toda el area junto con el logo periodicamente.
- Ciclo: Imagen en movimiento de la pantalla+junto con el logo durante 60segundos despues de 4 horas de uso.
- El mejor modo de impeder la retencion deImagen en el monitor es apagar este o configurar el PC o sistemas para que se active un salvapantallas cuando el equipo no se utilise. El servicios de garantía también se limitara de acuerdo con la guía de instructaciones.
Aplicar la functiOn de desplazamente de pantalla en el producto
- Aplique la direccion de desplazamente de pantalla
- Sintoma: la barra horizontal de color negro se mueve arriba y abajo.

-Seleccione el método
. Guia de instrucciones: Menu OSD -> Set Up (Configurar) -> Safety Screen (Pantalla de seguidad)-
> Screen Scroll (Desplazamente de pantalla)
Intervalo de tempo: 1~10 horas (Recomendado: 1)
Periodo de tiempo: 1~5segundos (Recomendado:5)

- (Consulte la guía del usuario del CD en "Función OSD"; en algunos modelos no está disponible)
Aplicar la referencia de pixeles de la pantalla en el producto
- Aplique la direccion de la Pixel de la pantalla
- Sintoma: El punto de color negro se mueve arriba y abajo.

-Seleccionelmetodo
Gula de instrucciones: Menu OSD -> Set Up (Configurar) -> Safety Screen (Pantalla de seguridad)-
>Pixel (Pixel).
Intervalo de tiempo: 1~10 horas (Recomendado: 1)
Periodo de tiempo: 10~50segundos (Recomendado:50)
- Aplique la direccion de la barra de la pantalla
- Sintoma: las barras horizontal y vertical de color negro se mueven arriba y abajo.

-Seleccione el método
. Guia de instrucciones; Menu OSD -> Set Up (Configurar) -> Safety Screen (Pantalla de seguidad)-
> Bar (Barra)
Intervalo de tempo: 1~10 horas (Recomendado: 1)
Periodo de tempo: 10-50 segundos (Recomendado: 50)

- (Consulte la guía del usuario del CD en "Función OSD"; en algunos modelos no está disponible)
Aplicar la direccion de borrado de la pantalla en el producto
- Aplique la direccion de borrado de la pantalla en el producto
- Sintoma: Dos bloques verticales se desplazan cuando se borra la pantalla.

-Selección el método
. Guia de instrucciones: Menu OSD -> Set Up (Configurar) -> Safety Screen (Pantalla de segundad)-
>Eraser (Borrador)
Intervalo de tiempo: 1~10 horas (Recomendado: 1)
Periodo de tempo: 10~50segundos (Recomendado:50)

- (Consulte la guía del usuario del CD en "Función OSD"; en algunos modelos no está disponible)
© 1995-2008 SAMSUNG. ALL Right Reserved
Instrucciones de seguidad
Introduccion
Conexiones
Uso del software
Ajuste del monitor
Resolución de problemas
Especificaciones
Information
Apendice
Contacte con SAMSUNG
WORLDWIDE
Téminos
Eliminación correcta
Autoridad
TFT-LCD Monitor
www.samsung.com

El aspecto externo y el color del producto pueda variar dependiendo del Modelo; las specifications del producto se puedaCambiar sin previo aviso para la mejora del rendimiento.
Apéndice
Contacte con SAMSUNG WORLDWIDE
Nota
- Si Tiene alguna pregunta o commentario referente a nuestros productos, por favor contacte con nosotros. Servicio de Atencion al Cliente
North America
U.S.A 1-800-SAMSUNG(726-7864) http://www.samsung.com/us
CANADA 1-800-SAMSUNG(726-7864) http://www.samsung.com/ca
MEXICO 01-800-SAMSUNG(726-7864) http://www.samsung.com/mx
Latin America
ARGENTINE 0800-333-3733 http://www.samsung.com/ar
BRAZIL 0800-124-421 http://www.samsung.com/br
CHILE 800-SAMSUNG(726-7864) http://www.samsung.com/c/
COLOMBIA 01-8000112112 http://www.samsung.com.co
COSTARICA 0-800-507-7267 http://www.samsung.com/latin
ECUADOR 1-800-10-7267 http://www.samsung.com/latin
EL SALVADOR 800-6225 http://www.samsung.com/latin
GUATEMALA 1-800-299-0013 http://www.samsung.com/latin
JAMAICA 1-800-234-7267 http://www.samsung.com/latin
PANAMA 800-7267 http://www.samsung.com/latin
PUERTO RICO 1-800-682-3180 http://www.samsung.com/latin
REP. DOMINICA 1-800-751-2676 http://www.samsung.com/latin
TRINIDAD & TOBAGO 1-800-SAMSUNG(726-7864) http://www.samsung.com/latin
VENEZUELA 0-800-100-5303 http://www.samsung.com/latin
Europe
AUSTRIA 0800-SAMSUNG(726-7864) http://www.samsung.com/at
BELGIUM 0032 (0)2 201 24 18 http://www.samsung.com/be
CZECH REPUBLIC 844 000 844 http://www.samsung.com/cz Distributor pro Českou republika: Samsung Zrt., Česka organizačné složka Vyskočilova 4, 14000 Praha 4 DENMARK 70 70 19 70 http://www.samsung.com/dk FINLAND 030-6227 515 http://www.samsung.com/fi FRANCE 3260 SAMSUNG(726-7864) http://www.samsung.com/fr 08 25 08 65 65 (€ 0,15/min) GERMANY 01805-121213 (€ 0,14/Min) http://www.samsung.de HUNGARY 06-80-SAMSUNG(726-7864) http://www.samsung.com/hu ITALIA 800-SAMSUNG(726-7864) http://www.samsung.com/it LUXEMBURG 0035 (0)2 261 03 710 http://www.samsung.com/be NETHERLANDS 0900 20 200 88 (€ 0,10/Min) http://www.samsung.com/nl NORWAY 815-56 480 http://www.samsung.com/no POLAND 0 801 801 881 http://www.samsung.com/pl 022-607-93-33 PORTUGAL 80 8 200 128 http://www.samsung.com/pt REPUBLIC OF IRELAND 0818 717 100 http://www.samsung.com/ie SLOVAKIA 0800-SAMSUNG(726-7864) http://www.samsung.com/sk SPAIN 902 10 11 30 http://www.samsung.com/es SWEDEN 0771-400 200 http://www.samsung.com/se SWITZERLAND 0800-SAMSUNG(726-7864) www.samsung.com/ch U.K 0870-SAMSUNG(726-7864) http://www.samsung.com/uk
CIS ESTONIA 800-7267 http://www.samsung.ee LATVIA 800-7267 http://www.samsung.com/lv LITHUANIA 8-800-77777 http://www.samsung.1t KAZAKHSTAN 8-10-800-500-55-500 http://www.samsung.kz KYRGYZSTAN 00-800-500-55-500 RUSSIA 8-800-555-55-55 http://www.samsung.ru UKRAINE 8-800-502-0000 http://www.samsung.ua UZBEKISTAN 8-800-120-0-400 http://www.samsung.uz
Asia Pacific AUSTRALIA 1300 362 603 http://www.samsung.com/au CHINA 800-810-5858, 010-6475 1880 http://www.samsung.com.cn HONG KONG 3698-4698 http://www.samsung.com/hk INDIA 3030 8282, 1800 110011 http://www.samsung.com/in/ INDONESIA 0800-112-8888 http://www.samsung.com/id JAPAN 0120-327-527 http://www.samsung.com/jp MALAYSIA 1800-88-9999 http://www.samsung.com/my NEW ZEALAND 0800SAMSUNG(726-7864) http://www.samsung.com/nz PHILIPPINES 1800-10-SAMSUNG(726-7864) http://www.samsung.com/ph SINGAPORE 1800-SAMSUNG(726-7864) http://www.samsung.com/sg
THAILAND 1800-29-3232, 02-689-3232 http://www.samsung.com/th
TAIWAN 0800-329-999 http://www.samsung.com/tw
VIETNAM 1800588889 http://www.samsung.com/vn
Middle East & Africa
SOUTH AFRICA 0860-SAMSUNG(726-7864) http://www.samsung.com/za
TURKEY 4447711 http://www.samsung.com.tr
800-SAMSUNG (726-7864)
8000-4726
http://www.samsung.com/mea
Téminos
Señal de Sincronización (Sync.)
Las señales de sync (sincronizzato) son las señales estandar necessities para loar los colores deseados en el monitor. Se divid en Señales de sincronizacion Vertical y Horizontal. Estas snales muestran las imagenes de color normales medianta la resoluion y la fecuencia establecidas.
Tipos de senales de synchronization
Separada Este es un esquema de transmisión de señales de sincronización verticales individuales al monitor. Compuesta Este es un esquema de combinación de las señales de sincronización verticales dentro de una SIGNAL compuesta y de transmitirlas al monitor. El monitor mystra las señales del color分开ando la SIGNAL compuesta en las señales del color originales.
Dot Pitch (Ancho de Punto)
LaImagen en el monitor está compuesta de punto de color rojo, verde y azul. Mientras más cercanos estén, mejor sera la nitidez. La distancia entre dos punto del mesmo color es llamada "dot pitch". Unidad: mm
Frecuencia V
La planta de ser dibujada varias vezes en un intervalo de un secondo a fin de crear yETHERuna imagen al usuario. La Frequencia de esta repeticion es llamada Frecuencia Vertical o Tasa de Refresco. Unidad: Hz
Ejempo : Si la mtsma luz se repite 60 vezes por segundo, se considera como de 60Hz
Frecuencia H
El tiempo que toma para escanear una linea que conecta horizontalmente el extremo derecho con el extremo izquierdo de la pantalla es llamado Ciclo Horizontal. Al número inverso del Ciclo Horizontal se le llama Frecuencia Horizontal. Unidad: kHz
Metodos de Entrelazamento y No-Entrelazamento
A la muestra de las lineses horizontales en la pantalla, desde el tope hasta la base,se le llama método de NoEntrelazamiento,mienes que a la muestra de lineas impares y bajo lineas pares alternativamente se le llama método de Enlazamiento. El método de No-Entrelazamiento es uso por la mayoria de monitores para asegurar una imagen clara. El método de Entrelazamiento es el mesmo que se usa en la TV.
Plug & Play (Enchufar y Operar)
Esta es una funciona que otorga al usuario la mejor calidad de pantalla, permitiendo al monitor y al computador intercambiari informacion automatistica. Este monitor cumple con el estandar internacional VESA DDC para la funciona Plug & Play.
Resolución
Al número de punto que se alinean vertical y horizontalmente para formar laImagen se le llama "resolución". Este número muestra la precision de la pantalla. Es buena tener unaResolution alta para realizar tareas multiples ya que se pueda estar mas informacion en la pantalla.
Ejemplo : Si la resolveduon es 1360 X 768, esta significa que la pantalla está compuesta de 1360 puntos horizontales (resolución horizontal) y 768 lineas verticales (resolución vertical).
Un MDC (Multiple Display Control)
Un MDC (Multiple Display Control) es una aplicacion que permiteeworkar en un PC con varias pantallas fácil y simultaneamente. RS-232C, un estandar de comunication serial, se usa para la comunication entre un PC
y una pantalla. Por tanto, esnecessary conectar un cable serial entre el puerto serial del PC y el puerto serial de cada pantalla.
Eliminación correcta
Eliminación correcta de este producto (material electrico y electrónico de descarte) - Europa solamente

(Aplicable en la Unión Europea y en paises europeos con sistemas de recogida selectiva de residuos)
La presencia de estamarca en el producto o en el material informativo que lo accompanies, indica que al finalizar su vidautilnodeferaleliminarasejuntoconotros residuosdomesticos.Paraevitarlosposiblesdañosalmedioambienteoalaludhumanaquerepresenta laeliminacionincontroladaresiduos,separe este producto deoterostiposderesiduos yreciclocorrectamenteparapromover la reutilizacionsosteniblederecursosmaterialia.

Los equipos particulares pueden contactar con el establishimiento donde adquirieron el producto, o con las autoridades locales pertinentes, para informarse sobre como ydondeDICuen levarlo para quesea sometido a un reciclaje ecologico y seguro.
Los)."
con除外s commerciales.
Autoridad
La información de este manual está sujeta a Camblos sin previo avis.
© 2008 Samsung Electronics Co., Ltd. Todos los derechos reservados.
Está estricmente prohibida la reproducción de este manual, por cualquier medio, sin el permiso escrito de Samsung electronics Co., Ltd.
Samsung electronics Co., Ltd. no sera responsable de los erros incurridos aqui o de los daños consequentes o incidentales relacionados con el suministro, interpretacion o uso de este material
El logoloto " Samsung " son MARas registradas de Samsung Electronics Co., Ltd.; " Microsoft ", " Windows " y " Windows NT" son MARas registradas de Microsoft Corporation; " VESA", " DPM " y " DDC " son MARas registradas de Video Electronics Standard Association; el nombre y logoloto " ENERGY STAR " son MARas registradas de la Agencia de Proteccion Ambiental de EE.UU. (APA). Como socio de ENERGY STAR, Samsung Electronics Co., Ltd. ha determinado que este producto cumple con las directrices de ENERGY STAR sobre eficiencia energetica. Todos los demas nombres MentionadosAquí podrián ser MARas commerciales o MARcas registradas de sus respectivos dueños.
SAMSUNG
-MEXICO SOLO -
IMPORTADO POR:
AV.PRESIDENTE MASARIK No.111 INT.701
Col. Chapultepec Morales, DELEGACION MIGUEL HIDALGO
C.P. 11570, MEXICO, DISTRIBUTO FEDERAL
Tel:01(55)5747.5100/01.800.726.7864
Fax:01(55)5747.5202/01.800.849.1743
TFT-LCD MONITOR
SMT-4011
Türkce
Kullanici Kilavuzu


Güvenlik Talimatlari
Isaretleme
AÇık/Kapalı durumu
Kurulum
Temizlik
Diger
Giris
Baolantylar
Yazilimn Kullanilmasi
Monitorun Ayarlanmasi
Sorun Giderme
Özellikler
Bilgiler
Appendix
TFT-LCD Monitor
www.samsung.com

Urun renge ve gorunmu modeline bagl olarak farklik gosterebilir ve performans gelistirmeler nedeniyle urn ozellikleri onceden haber verilmeksizin degistirilebilir.
Güvenlik Talimatlari
isaretleme

Asagidaki givenulik talimatlan urunlerin ve kullanicilarin zarar gormesini onlemek icin hazirlanmistir, lufen okuyun.

Uyari/Dikkat

Bu simgeyle isaretlenmis olan yonergelerin izlenmemesi cihaza fiziksel zarar verebilir vya hasara ugramasina neden olabilir.

isaretler

Yasaktir Her zaman okunmus ve anlasilmis olmasi onemlidir

Parcalina ayirmayin Figt elektrik prisinden cikanr

Dokunmayin Elektrik carpasini engellemek icin topraklama
Açık/Kapalı durumu

Uzunbir sure kullanilmayacaksa,bilgisayariniziGoruntu GucYonetimi Sstemi'ne(DPM)ayarlayin.
Ekran koruyucu kullaniyorsaniz, etkin ekran moduna ayarlayin.
Buradaki görtüller sadece referans amaçldir, tum durumlar (veya ülkeler)icens geleidir.
Gorinti Iz Kalma Onleyici Talimallan'na Kisa Yol

Zarar gormus veya gevsek priz kullanmayin.
- Bu, elektrik carpmasina veya yangina neden olabilir.

Fişi kablosundan tutarak cekmeyin veya elleriniz islakken fisedokunmayin.
- Bu, elektrik carpmasina veya yangina neden olabilir.
#

Yalinzca gerekti gibi topraklanmis fi ve prisleri kullanin.
- Topraklama isleminin duzgün yapilmamasi elektrik carpmasina veya cihazin bozulmasina neden olabilir.(Sadece Sinif Cihazi.)
#

Elektrik fisi, gevsemeyecek sekilde sikica takin.
Duzgün olmayan baglantilar yangina neden olabilir.

Fişi ve kabloyu asiri derecede bukmeyin ve uzerine aigr nesneler koymayin; bunlar hasar gormesine nden olabilir.
- Bu, elektrik carpmasina veya yangina neden olabilir.

Prize cok fazla uzatma kablosu veya fiş baglamayin.
- Bu, yangina neden olabilir.

Monitoru kullairken elektrik kablosunu cikarmayin.
- Čikarma sirasinda dalgalanma meydana gelebilir ve monitore zarar verebilir.

Konektor veya pris tozluyken elektrik kablosunu kullanmayin.
- Elektrik kablosunun prizi veya konektör tozluysa kuru bir bezle iyice temizleyin.
Tozl prizi olan bir elektrik kablosu veya konektfor kullanilmasi, elektrik carpmasina veya yangina neden olabilir.

Cihazin elektrik baglantisini kesmek icin, fisin elektrik prizinden cikarilmasi gerekir ve boylece fis kullanilabilir durumda olur.
- Bu uyarilara uyulmamasielektrik carpmasina veya yangina yol acabilir.
Kurulum
Monitor to zu tozlu yerler, asyuk se ya da uuk sicakiklar maruz kalan yerler, cok nemliyer, kymasal maddelerin kullanildigi yerler vya urun tekrar tekrar uzun sureler kullanildigi havaalanlan ve istasyonlar gibi yerere kurmad an once yetkil bir servis merkeziyle gurun.

Bunun yapilmaması, monitoruzde ciddi hasara neden olabilir.

Monitörunüz az nemli ve az tozlur yere koyun. Monitorin incinde elektrik carpmasi veya yangin olusat

Monitoru ta:sirken yere sert bir sekilde birakmayin. Bu hareket, urune veya size zarar verebilir.

Monitor altigi n vitrine ya da rafa yerlestirken, altigi n ucunun, vitrinden ya da raftan disari tasmamasina dikkat edin. Urunun yere duurulmesi, urune zarar verebilir ya da kisi sel yaralanmalara neden olabilir.

Urun dengesiz ya da yuzey alanikuk yerlere yerlestirmeyin. Urun duup ozellikc colocuklar olmak uzere yanindan yuriyenlere zarar verebileceginden, yalinzca duz ve dengeli bir yuzeye yerlestiin.

Urunu, yere yerlestirmeyin. Ozellikc cocuklar olmak uzere insanlar uzerinden gelebilir.

YANGIN CIKMASINI ONLEMEK ICIN, MUMLARI VEYA DIGER ACIK ALEVLI NESNELERI HER ZAMAN URUNDEN UZAKTA TUTUN. Aksi takdirde yangina yol aqabilir.

Tum istma cihazlarini, elektrik kablosundan uzakta tutun. Eriyen kaplama, elektrik carpmasina ya da yangina neden olabilir.

Uruni, bir raf ya da dolap gibi havalandirmanin yetersiz oldugu yerlere yerlestirmeyin. Ic sicakltaki yukselme, yangina neden olabilir.

Monitoru yerine dikkatle koyun.
Zarar gorebilir veya kirlabilir.

Monitoru yuz iustukoymayin.
- Ekran yüzeyi zarar gorebilir.

Monitorü taban destegi olmadan kullanmayin.
Kotu havalandirma nedeniyle bozulabilir veya yangina neden olabilir.
- Monitor taban destegiyle kullanilmayacaksa, yeterli havalandirma saglamak icin gereken adimlari uygulayin.

Urunu monte ederken, havalandirmanin saglanmasi icin duvarlaarasinda mesafe (10 cm/4 incten fazla) biraktigizdan emin olun.
Havalandirmanin yetersiz olmasi, urunin ic sicakliginda bir artisa, dolayisiyla parca omrunk kisalmasina ve performansin duuk olmasina neden olabilir.

Ambalaj naylonunu cocuklarin ulasamayacagi bir yere koyun.
Cocuklar ambalaj naylonu ile oynarsa bogulma tehlikesi olabilir.
Temizlik

Monitörun kasasini veya ekran yüzeyini hafif nemli, yumusak bir bezle silerek temizleyin.

Deterjani dokrudan monitore piskurtmeyin.
- Bu, hasara, elektrik carpmasina veya yangina neden olabilir.

Önerilen bir deterjani yumusak bir bez kullanarukuygulayin.

Prizle pinarasindaki konektor tozlu veya kirliyse kuru bir bezle iyice temizleyin.
- Kirli bir konektor elektrik carpmasina veya yangina neden olabilir.

Uruni temizlemeden once guc kablosunu cikartiginizdan emin olun.
- Aksi takdirde, bu durum elektrik carpmasina veya yangina neden olabilir.

Elektrik kablosunu prizden Çıkartin ve ürünü yumusak, kuru bir bezle silin.
Balmumu, benzin, alkol, tiner, bocek ilaci, oda spreyi, yaqlayicilar ya da deterjan gibi kimyasal maddeler kullanmayin.
Diger

Kapagi (veya arka kismi) cikarmayin.
- Bu, elektrik carpmasina veya yangina neden olabilir.
- Bakim icin yetkili bir servis personeline basvurun.

Monitorunuz normal calismiyorsa, ozellikle alismadik sesler ckiyor ya da koku gelyorsa hemen fisten cekin ve yetkili saticiya veya servise basvurun.
- Bu, elektrik carpmasina veya yangina neden olabilir.

Urunu, yag, duman ya da neme maruz kalan yerlerden uzakta tutun; bir arabanin icine monte etmeyin.
- Bu, elektrik carpmasina veya yangina neden olabilir.
- Monitoru kar ve yagmurla karsi karsiya kalabilecegi acik havada vya su yakininda calistirmayin.

Monitor duserge veya kasasi zarar gürse, monitoru kapatin ve elektrik kablosunu çiarkin. Bu durumda Service Center (Servis Merkezi) ile iletşim kurun.
- Bu, monitor hatal calismasina, elektrik carpmasina vya yangina neden olabilir.

Firtinalhavalarda veyasimsek caktiginda ya da uzun sureyle kullanilmayacaksamonitorurinfgini prizdencekin.
- Bu uyarilara uyulmaması elektrik Çarpmasina veya yangina yol acabilir.

Monitorélektrik kablosundan veya sinyal kablosundan cekerek hareket ettirmye calismayin.
- Bu, kablonun hasar gormesine, elektrik carpmasina veya yangina neden olabilir.

Yalnizca elektrik veya sinyal kablosundan cekerek monitoru saga veya sola hareket etirmeyin.
- Bu, kablonun hasar gormesine, elektrik carpmasina veya yangina neden olabilir.

Monitor kabinindeki havalandirma noktarini kapatmayin.
Kotu havalandirma anizaya veya yangina neden olabilir.

Monitorun uzerine aigr nesneler koymayin.
- Bu, elektrik carpmasina veya yangina neden olabilir.
- Monitorünione yabanci bir madde kacarsa, elektrik kablosunu cikartin ve Servis Merkezi'yle gürün.

Uruni yanici kimyasal spreylerden ya da yanici maddelerden uzak tutun.
- Bu, patlamaya veya yangina neden olabilir.

Monitorun uzerindeki deliklerden iceri hcbir metal nesne sukmayin.
- Bu, elektrik carpmasina, yangina veya yaralanmaya neden olabilir.

Monitörun havalandirma deliklerinden, kulaklik ya da AV baglanti noktalarindan, bicak, tel, igne gibi metal nesneler ya da kağit, kibrit gibi yanici nesneler sukmayin.
- Bu, elektrik carpmasina veya yangina neden olabilir. Ürünün İncine yabancı madde kacaşa ya da su doküürse, cihazi kapatın, elektrik fişini prizden Çkıntin ve servis merkeziyle进展情况.


Uzun bir sure sabit bir ekran görtüleniyorsa, görtü artigi denen durum veya bulaniklik meydana gelebilir.
Uzun sure monitorden uzak kalacaksaniz, enerji tasarrufu moduna gein veya hareketli goruntuler iceren bir ekran koruyucu ayarlayin.


Modele uygun gezünurluk ve frekans dizeyleri ayarlayin.
Uygun olmayanoczunurluk istemmenyeresim kalitesine neden olabilir.
40 inc (101,6 cm) - 1360 X 768

Monitorun surekli olarak cok yakindan izlenmesi, gozlerde bozulmaya neden olabilir.

Göz yorgunluğunu gidermek icin monitoru kullanırken-SAatte bir en az beş dakika ara verin.

Urunu, dengesiz, dizgün olmayan ya da titresime maruz kalan yerlere yerlestirmeyin.
- Ürünün yere扭矩ilmesi, ürüne zarar verebilir ya da kisisel yaralanmalaraneden olabilir. Ürünün, titresime maruz kalan yerlere yerleştilimesi, ürünün Ömrünün kiskaltbilir ya da yangina neden olabilir.

Monitori taşirken, monitoru duğmesinden kapatin ve elektrik kablosunu prisden*cikann. Monitoru tasmadan once anten kablosu ve diiger cihazlara®, kabolar da dahil, tum kablo®, baglantilarin*, ckardiginizdan emin olun.
Kablonun cikarilmamasi zarar gormesine ve yangina neden yol acabilecegi gibie elektrik carpmasina da neden olabilir.

Urunun, ikiden daha fazla kisiyle tasinmasi gerekmektedir. Urunun yere dinurulmesi, bozulmasina ya da fiziksel olarak zaragormesine neden olabilir.

Uzerinden asilarak zarar verebileceklerinden urunu cocuklarn ulasamayacagi bir yere yerleştin. Yere duşen urun, fiziksel hasara hatta olume neden olabilir.

Urinu uzun bir sure kullanmayacaksiniz elektrik kablosunu prizden gikartin. Aksi takdirde biriken toz isi yayilmasinya da yalitin azalmasin yol acarak elektrik carpmalarina ya da yangina neden olabilir.

Cocuklarin sevdigi nesneleri (ya da cekici gelebilecek herhangi bir seyi), urunun uzerine yerlestirmeyin. Cocuklar, nesneleri almak icin urunun uzerine tirmanmaya calisabillirer. Urun dusebilir ve fiziksel hasara veya olume nden olabilir.

Uzaktan kumananin pillerini cikardiginizda, cocuklarin pilleri yutmamasina dikkat edin. Pilleri cocuklann erisemeyecgi bir yerde saklayin.
- Yutarlarsa, hemen bir doktora gidin.

Pilleri degistirken, +/- uclarini pilleri tutan kismda belirtildigi sekilde dokru konuma yerlestitir.
Uclarin yanlis yerleistirmesi pilin catlamasina veya akmasina neden olarak yangin, yaralanma veya kirtilige (hasar) yol acabilir.

Yalnizca belirtilen standart pilleri kullanin. Yeni ve kullanlms pilleri bir arada kullanmayin.
- Bu pilin Çatlamasina veya akmasina neden olarak yangin, yaralanma veya kirtiligi (hasar) yol acabilir.

Pil (ve sarj edilebilar pil), siradan bir atik degildir ve geri donusume gonderilmelidir. Kullanilmis ya da sarj edilebilar pilin geri donusum amacyla gonderilmesinden, pilin tuketicisi olarak musteri sorumludur.
- Mûsteri, kullaniímís ya da sarj edilebilir pili bulundugu yere yakin bir geridonüsum merkezine ya da benzer turde piller ya da sarj edilebilir pillersatanbir magazaya gotürebilir.
© 1995~2008 SAMSUNG. ALL Rights Reserved
Içindekiler
Güvenlik Talimatlari 1
Isareletleme 1
Açık/Kapalı durumu 1
Kurulum 2
Temizlik 4
Diger. 5
Giris 12
Paket Ycindekiler 12
Monitörunuz 13
Mekanik Duzen 20
Baolantylar 26
Altlik Kitinin Takilmasi 26
Monitörun Baglanmasi 27
MDC 33
Monitor Ayarlanmasi 53
Input 53
Picture [PC/BNC/DVI Mode] 54
Picture [AV / S-Video /Component / DVI-Video Mode]. 56
Sound 58
Setup 59
Multi Control 62
Doigrudan Islevler 62
Sorun Giderme 63
Kendi Kendine Test Ozelligi Kontrolu 63
Denetim Listesi 64
SorveYanit 66
Özellikler 68
Genel 68
PowerSaver 68
Onceden Ayari Zamanlama Modlari 68
Information 71
Daha Iyi Goruntu Elde Etmek Icin 71
URUN BILGILERI (Goruntu Sabitlemesiz) 71
Appendix 75
Dunyanin her yerinden SAMSUNG'a ulasin 75
Koşullar 77
Yetki Bildirimi 78

Güvenlik Talimatlari
Giris
Paket Ycindekiler
Monitorunuz
Mekanik Düzen
Baolantylar
Yazilimin Kullanilmasi
Monitorun Ayarlanmasi
Sorun Giderme
Özellikler
Bilgiler
Appendix
TFT-LCD Monitor

www.samsung.com
Urun renge ve gorunmu modeline bagl olarak farklik gosterebilir ve performans gelistirmeler nedeniyle urn ozellikleri onceden haber verilmeksizin degistirilebilir.
Giris
Paket Ycindekiler
Not
Lüften monitorunüzle birlikte asagidakilerin de geldiginden emin olun.
Eksik parca varsa saticiniza basvurun.
Istege bagli ogeleri satin almak icin bir yerel saticiya basvurun.
Not
- Urūnú, yere yerleştimeyin.

Monitor
Kilavuz

Kullanici Klavuzu

Garanti Karti
(Tum bolgelerde olmayabilir)

Kullanic Kilavuzu,
MDC yazilimi
Kablosu


D-sub kablosuyla Elektrik Kablosu
Diger


Uzaktan Kumanda Piller (AAA X 2) Delik kapagi
BNC - RCA Adaptor Jak

Yarim Altlik
Ayr satiril


Duvara Takma Seti Hoparlor Seti Altik Seti

DVI Kablosu BNC Kablosu
Monitorunuz

On Taraf

1) MENU
Ekran menu sstemini açmak, menu ekranindan Çikmak veya ekran ayar menusūkapatmak icin bu duğmeyi kullanin.
2) Hareket dugmesi (Yukari-Asagi Dugmesi)
Bir menü ögesinden digerine dikey olarak hareket eder veya secilen menu degerlerini ayarlar.
3) Ayarlama dugmesi (Sol-Sag Dugmesi)/ Ses yuksekligi dugmesi
Bir menus ögesinden digerine yatay olarak hareket eder veya seçilen menu degerlerini ayarlar. Ayrica ses duzyeyini de ayarlar.
4) ENTER
OSD menusūnseçmek icin kullanlir.
5) SOURCE
PC modundan Video moduna geirir.
Kaynak degistirme islemine, yalnizca monitore bagli harici aygtilar icin izin veril.
Ekran moduna geçirmek icin
[PC] [BNC] [DVI] [AV] [S-Video] [Component]
>>Animasyon klibini gormek icin burayiklatin.
6)PIP
PIP ekranini açip/kapatmak (On/Off) için PIP duğmesine basir.
BNC ve component ayni terminali kullandiklarindan birden fazia PIP ekranda ust ute acilamaz.
>>Animasyon klibini gormek icin burayiktlatin.
PC
AV / S-Video / Component
BNC
AV/S-Video
DVI
AV / S-Video / Component
AV/S-Video
PC/BNC/DVI
- Component
PC / DVI
7) Guc dugmesi
Bu dugmeyi monitó r acip kapmat kgin kullanin.
8) Güç böstergesiv
Bu isik normal calisma sirasinda yesil yanar ve ayarliniz monitor tarafinda kaydedilirken yesil olarak bir kez yanip soner.
9) Uzaktan Kumanda Algilayicişi
Uzaktan kumandanin yönun Televizyondaki bu noktaya cevir.
Not
- Guc tasarrufu islevleryle ilgili daha fazla bilgi edinemek icin kilavuzda aqiklanan PowerSaver konusuna bakin. Enerji tasarrufu saglamak icin, kullanmaniz gerekmyen zamanlarda veya uzun surek kullanmayacaginiz durumlarda monitorunzü KAPATIN.
>Arka Taraf
Not
Kablo baglantulariya ilgili ayrinti bilgi icin Kurulum altunda Kablolarin Baglanmasi konusuna bakin. Monitur arka duzeni, modeline bagli olarak biraz farkl olabilir.


A
1) POWER SW (Guc A/C/Kapat Düɡmesi):
Monitörü acar ve kapatir.
2) POWER IN (Guc baglanti noktası):
Elektrik kablosu, monitoreve prize takilir.

B
3) RS232C OUT/IN (RS232C Seri Baglanti Noktas)):
MDC(Coklu Aygit Kontrolu) Program Baglanti Noktasi
4) DVI IN(HDCP) (PC Video Baglanti Terminali)
D-Sub Kablo kullanilarak (15 pin D-Sub)-PC mod (Analog PC)
5) DVI / PC IN(HDCP) (PC Video Baglanti Terminali)
DVI Kablo (DVI-D - DVI-D) kullanilarak - DVI modu (Dijital PC)
6) PC/DVI/BNC AUDIO IN (PC/DVI/BNC Audio Baglanti Terminali (Giris))

C
7) COMPONENT AUDIO IN [L-AUDIO-R]
(Komponent Audio Baglanti Terminali (Giris))
8) BNC/COMPONENT OUT [R/P R, G/Y, B/PB, H, V] (BNC/Komponent Baglanti Terminali(Cikis))
BNC (Analog PC) Baglantisi: R, G, B, H, V baglanti noktalarini baglar
- Component Baglantisi: PR, Y, PB baglanti noktalarini baglar
9) BNC/COMPONENT OUT [R/P R, G/Y, B/PB, H, V] (BNC/Komponent Baglanti Terminali (Giris))

D
10) AV AUDIO IN [L-AUDIO-R](Monitor Audio Baglanti Terminali) (Giris)
11) AV OUT [VIDEO](VIDEO Baglanti Terminali): AV modu (Cikis)
12) AV IN [VIDEO](VIDEO Baglanti Terminali) (Giris)
13) AV OUT [S-VIDEO](S-Video Baglanti Terminali): S-Video modu (Cikis)
14) AV IN [S-VIDEO](S-Video Baglanti Terminali) (Giris)
(15)EXT SPEAKER(8Ω)[-L-+,--R-+](HARICI Hoparlor (8Ω))
16) AUDIO OUT [L-AUDIO-R](Audio Baglanti Terminali) (Girig)
-MONITOR CIKI SI:PC, DVI, BNC baglanir
Not
Kablo, sinalay kaynagis vs. gibi durumlarda devreye baglanabilecek monitor sayisi farkli olabilir. Sinyal kaynaginn azalmadibir kablo 1e 10 taneye kadar monitor baglanabilir.

E
18) Kensington Lock

Uzal
Not
Kensington kilidi, TV'yi halka aik bir ortamda kullaniyorsaniz; sistemi fiziksel olarak sabitlemek icin kullanilan bir aygittir. (Kilitleme aygitinin ayrina satin alinmasi gerekmektdir.)
Kilitlteme cihazi kullanmak icin satin aldiginiz yere basvurun.
Not
Kablo baIantlar hakkinda daha fazla bilgi edinmek icin Monitorunuzu BaIlama konusuna bakin.
Uzaktan kumandanin performansi, monitorin yaninda calistiran TV vya baska elektronik aygittar tarafindan etkilenebilir ve frekans girisimi nedeniyle hatali calismasina neden olabilir.
1. ON/OFF
2. MAGICNET
3.MDC
4. LOCK
5. MagicNet Dügmesi
6.+100--
7.VOL
8. MUTE
9. TTX/MIX
10. MENU
11. N
12.M/B P.MODE
13.AUTO
14. PRE-CH
15.VCHP
16. SOURCE
17. INFO
18. EXIT
19. Yukari-Asagi Sol-Sag Dugmesi
20.14 S.MODE
21. STILL

22. FM RADIO
23. P.SIZE
24.()SRS
25. H DUAL/MTS
26.
27. SOURCE
28. SWAP
29.5E
30. REW
31. STOP
32. PLAY/PAUSE
33. FF
1) ON/OFF
Bu duğmeyi monitoru açıp kapatmak icin kullanın.
2) MAGICNET
MagicNet Hizli Bapatma Dugmesi.
-Bu islev, bu monitörde kullanilamaz.
3) MDC
MDC Hizli Başlatma Düğmesi.
4) LOCK
Bu duğme, uzaktan ve monitor üzerindeki Güç ve LOCK dügmeleri disindaki tüm ilev tuşları etkinleştinir ya da kapatır.
5) MagicNet Dügmesi
- MagicNet incn budugmeleri kullanin.
- Alfabe/Numara: Bir web sitesi adresi girerken bu duğmeleri kullanin.
DEL: Bir onceki karakteri siler.
- SYMBOL : Isaret girerken bunu kullanin. (O-)
- ENTER: Giriç icin bunu kullanin.
- Bu islev, bu monitörde kullanlamaz.
6) +100 -/--
100'ün uzerinde kanal sejmek icin basin.
Örneşin, kanal 121'I seçmek icin once "+"100" daha sonra "2" ve son olarak "1" dugmesine basir.
-Bu iglev, bu monitörde kullanilamaz.
7) VOL
Ses duzeyini ayarlar.
8) MUTE
Ses cikisini geci olarak duraklatir (sessizlestirir).
Mute (sessiz) modundayken Mute veya - VOL + dugmesine basildiginda sesli duruma geri donulur.
9) TTX/MIX
TV kanallan teleeks araciligiyla yazil bilgi hizmeti saglar.
[TTX/MIX genellikke Avrupa' da kullanilir.]
10) II MENU
Ekran menu/systemini acmak, menu ekranindan cikmak veya ekran ayar menusinu kapatmak icin bu dugmeyi kullanin.
11) ENTER
Menu ekranindan cikar veya ekran ayar menusun kapatir.
12) M/B.P.MODE
Bu duğmeye bastıgünizda, ekranın alt orta kisminda geleçeri modGORntlülenir.
AV/S-Video/Component Mode : P.MODE( Picture Mode )
Monitor fabrikada onceden ayarlanmis dort otomatik resim ayari vardir.
Önceden yapilandirilmı mevcut modlararasinda dolasm icin dugmeye yeniden basin.
(Dynamic Standard Movie>Custom)
PC/DVI Mode:M/B(MagicBright)
MagicBright™ görtülediginiz resmin icerigine baglı olarak en iyi görtüleme ortamini saglayan yen bil özellktir.
Önceden yapilendirilmigi mevcut modalarasinda dolasmak icin dugmeye yeniden basin.
Entertain Internet Text-Custom)
13) AUTO
Dogrudan erisimi otomatik olarak ayarlamak icin bu duigmeyi kullanin. (PC)
Kontrol panelinde gezūnūrūgū değistirirsiniz, AUTO islevi yūrūtūr.
14) PRE-CH
Bu duğme onceki kanala donmek 参数 kullanlir.
-Bu islev, bu monitörde kullanilamaz.
15) VCH/P A
TV modunda, TV kanallarini secer.
-Bu islev, bu monitörde kullanilamaz.
16) SOURCE
PC modundan Video modunaGPCIR
17) INFO
Geerli resim bilgileri ekranin sol ust kosesinde grotulenir.
18) EXIT
Menu ekranindan gikar.
19) Yukari-Asagi Sol-Sag Dugmesi
Bir menu ögesinden digerine yatay veya dikey olarak hareket eder ya da seçilen menu degerlerini ayarlar.
20) S.MODE
Bu dugmeye bastiginzda, ekranin alt ora kisminda gecerli mod goruntuleinr.
Monitor, yeresik uygunluk duzeyi yuksek stereo amplifikator iceri.
Önceden yapilalandirilmı mevcut modlararasinda dolasmık icin dugmeye yeniden basin.
(Standard Music Movie Speech Custom)
21) STILL
Ekrani dondurmak icin duqmeye bir kere basin. Cozmek icin yeniden basin.
22) FM RADIO
FM Radio'yu acar veya kapatir.
PC/DVI modunda yalnizca SOUND'u FM Radio olarak ayarlar.
Sinyalin zayif oldugu alanlarda, FM RADIO yayin yaparken gurultu olabilir.
Genellike Video SOURCE modunda, ekrani kapatarak FM RADIO olarak ayarlar.
-Bu islev, bu monitörde kullanilamaz.
23) P.SIZE
Zoom1, Zoom2, DTV - 1080i (veya 720p üsti) 参数 mevcut degildir.
24) (SRS
SRS
25) I-DUAL/MTS
DUAL-
STEREO/MONO, DUAL I / DUAL II ve MONO/NICAM MONO/NICAM STEREOyticurine bagli olarak calistirilabilir; bunun icin TV seyrederken uzaktan kummandadaki DUAL dugmesini kullanin.
MTS-
MTS (Multichannel Television Stereo) modunu secebilirsiniz.
Audio Type MTS/S_Mode Default FM Stereo Mono Mono Manual Change Stereo Mono ↔ Stereo SAP Mono ↔ SAP Mono
-Bu iglev, bu monitörde kullanilamaz.
26) 三PIP
PIP ekranimi açip/kapatmak (On/Off) 参数 PIP duğmesine basin.
27) SOURCE
Video kaynagini seger.(PIP)
28) SWAP
PIPveana grotunun iceriklerini degistirir.
PIP penceresindeki görtü ana ekranda, ana ekrandaki görtü PIP penceresinde görtülenir.
29) SIZE
Resim Boyutu'nu degistirebilirsiniz.
30) REW
Geri sar
31) STOP
Stop (Durdur)
32) PLAY/PAUSE
Oynat / Duraklat
33)FF
Hizli ileri
© 1995~2008 SAMSUNG. ALL Right Reserved
1. Mekanik Düzen


2. Monitor Kafasi


3. Altlik

4. Hoparlör

UP
5. VESA Braketinin Takilmasi
VESA taktiginizda, uluslararasi VESA standartlarina tam olarak uyduugunuzdan emin olun.
- VESA Braketini Satin Alma ve Kurulum Bilgileri: Lüften siparis vermek icin en yakin Samsung Distributörune ugrayin. Siparisiniz verildikten sonra kurulum uzmanlari sizi ziyaret edecek ve braketinizi takacaktir.
- LCD Ekranı tasimak icin en az 2 kisi gereklidir.
Samsung, musterin istegine bagl olarak yaplan islemlerde meydana gelebilecek urun hasarlarindan ve kisel yaralanmalardan sorumlu olmayacaktir.

Boyutlar


Braket duvara sabitlemek icin, yalnizca 6 mm capinda ve 8-12 mm uzunlugunda makine vidalarini kullanin.
UP
6. Wall Bracket Installation Duvar Braketi Montaji
Duvar braketini takmak icin bir teknisyenle gorusun.
Samsung Electronics, montaj musteri tarafindan yapildiginda urune ya da musterilere gelecek zararlardan sorumlu degildir.
- Bu urun, cimento duvarlara monte edilmek icindir. Urun, siva ya da ahsap uzerine monte edildiginde yerinde durmayabilir.

Parçalar
Yalinizca urunle birlikte verilen parcalari ve aksesuarlki kullanin.


Duvar Braketi Montaji
1
Tutturma Vidasini, takin ve ok yonunde sik. Islem tamamlandiiginda, duvar braketini duvara takin.
A. Tutturma Vidasi
B. Duvar Braketi
C. Menteş (Sol)
D. Menteş (Sag)

Iki menteşebulunmaktadir(solve sag).Dogrusunu kullanin.
2

Duvari delmeden once, urunun arkasindaki iki kilitleme deligiarasindaki mesafeninogr u oldugunu kontrl edin. Bu mesafe,cok kisa ya da uzuna,ayarlamak icin dubraketinin uzerindeki tum ya da 4 vidayr gevsetin.
A. iki kilitleme deligiarasindaki mesafe
3

Montaj semasinikontrol edin ve matkapla delinecek noktalaru davarda isaretleyin.35 mm'den derin delikleri delmek icin 5,0 mm matkap ucu kullanin.Her dubeli ilgili delige takin. Braketlerin ve menteşdeliklerini, karsilik gelen dubelli deliklerle esleşirin ve 11 viday A takip sikin.

Urūnü duvar braketine takma
Urunun sekli, modeline bagl olarak farklik gosterebilir. (Plastik aski tertibati ve vidalar ayinir)
Plazma monitor arkasindaki 4 vidayi

1
cikartin.

2
Viday B, plastik askiya takin.

1. Üründuvar braketine takin ve sol ve sag plastik askilara dizgün bogimde takildigiindan emin olun.
2. Ürünü brakete takken parmaklarinizi deliklere sikstirmamaya dokkat edin.
3. Duvar braketin duvara sikica takilmis oldugundan emin olun. Aksi takdirde montaj sonrasinda urun yerinde durmayabilir.

3
adimdaki 4 vidayi (plastik aski + vida B), urunun arka deliklerine takin ve sikin.

4
Güvenlik pimini 3 Çıkartin ve 4 Ürün tutucuyu, karsilik gelen braket deliklerini 1 yerleştinir. Ardindan braket sika sabitleneckek sekilde ürün 2 yerleştinir. Ürün bilbraket Güvenl biçimde baglanması-SAğlamak依據 Güvenlik pimini 3 tekrar takmayi ve sikmayi unutmayin.
A. Monitor
B. Duvar Braketi
C.Duvar

Duvar Braketi Açisinin Ayarlanmasi
Duvara takmadan once braket aciin-2"ye ayarlayin.

1. Urunu, duvar braketine tutturun.
2. Urünün üst, orta kismindan tutun ve ileriye dokerek (ok yönunde) acisini ayarlayin.
3. Braket aciisini -2 1le 15'arasinda ayarlayabilirsiniz.

Aciyi ayarlarken urunun sag ya da sol tarafindan degil, ust, orta kismindan tutmaya dikkat edin.


Güvenlik Talimatlari
Giris
Baolantylar
Altlik Kitinin Takilmasi
Monitorin Baglanmasi
Yazilimin Kullanilmasi
Monitorun Ayarlanmasi
Sorun Giderme
Özellikler
Bilgiler
Appendix
TFT-LCD Monitor
www.samsung.com

Urun renge ve gorunmu modeline bagl olarak farklik gosterebilir ve performans gelistirmeler nedeniyle urn ozellikleri onceden haber verilmeksizin degistirilebilir.
Baolantylar
Althik Kitinin Takilmasi

- Yalnizca urunle birlikte verilen civatalar kullanilmaldir.

Dikkat
Samsung Electronics, belirtlen dignda bir alkik kullanlmasindan kaynaklanacak hasarlardan sorumlulmayacaktir.

1. Yarim Altiligin Takilmasi


Dikkat
"CAUTION" etiketini arkaya donukormalak
yerlestitir.


1) Monitor altinda bulunan, atlligin takildigi deligi korumak icin bir 'Kapak Koruyucu kullanilir. Ürunle birlke verilen Yarim Altlik ya da atllik setini (ayrica satilir) taraken 'Kapak Koruyucu'yu Çikartmayi ve duvara takma setini tarkanken 'Delik-Kapaqi nii kullanarak deligi kapatmayi unutmayin.
2) Sirasiyla sol ve sag althiklari takin.
3) Altiigi, monitori altundaki delige yerlestitin. Vidayi, belirilen delige yerlestitin ve sikin. (M4 x L15)

Dikkat
Bu stand, orijinal olarak ekran acisinin ayarlanmasi icin tasarlanmistr. Bu standin herhangi bir kullanimindan kaynaklanabilecek sorunlardan firma sorumlu degildir. Ürün asla üzerine nesneler konan bir sehpə olarak kullanmayin.
2. Altlik Setinin (ayrica satir) Takilmasi


1) Monitörun allinda bulunan, alltin takildigi deligi korumak icin bir 'Kapak Koruyucu' kullanilir. Ürünle birlikte verilen Yarim Altlik ya da alltk setini (ayrica satilir) takken 'Kapak Koruyucu'yu qikartmayi ve duvara takma setini takken Delik-Kapagi nki kullanarak deligi kapatmayi unutmayin.
2) Parcalari dogru yonde ve dogru yere yerlestirdiginizden emin olun. (M4 × L15)
3)Altligi,monitortun altindaki delige yerlestirin.
4) Vidayi, belitilen delige yerlesteirin ve sikin. (M4 × L15)
Monitorin Baglanmasi
Toprakl bir Guc kablosu durumunda
Aiza olmasi durumunda topraklama ucu elektrik carpmasina yol acabilir. AC gucunu fse takmadan once topraklama baglantisini uygun bir sekilde yaptiginizdan emin olun. Ya da, topraklama baglantisini sokmeden once AC gucunu fisten ckardiginizdan emin olun.

Not
DVD'ler, VCR'lar ya da Video kameralar gibi AV grits aygtllarin yani sira bilgisayariniz monitore baglayabilirsiniz. AV grits aygtllarin baglanmasiya ilgili daha ayrintul bilgi icin Monitrorn Ayaranmasi bolumunde Kullanici Kontrolleri konusuna bakin.
1. Bilgisayara Baglama

1) Monitorunuzin guc kablosunu monitorun arkasindaki guc baglanti noktasina takin. Acoma/kapatma dugmesini acik duruma getirin.
2) D-sub kablosunu monitore iç sekilde baglayabilirsiniz. Asagidaki yontemlerden birini segin:
2-1) Video kartindaki D-sub (Analog) konektoru kullanarak. Sinyal kablosunu, monitor arkasindaki 15 pin RGB baglanti noktasa takin.

2-2) Video kartindaki DVI (Dijital) konektoru kullanar.
DVI Kablosunu monitorunuzn arkasindokti DVI(HDCP) baglanti noktasina takin.

2-3) Video kartindaki BNC (Analog) konektör kullanarak.
BNC Kablosunu Monitorūzün arkasindaki BNC/COMPONENT IN -R, G, B, H, V baglantı noktasina baglayarak.

3) Monitorunuzun guc kablosunu monitoru arkasindaki guc baglanti noktasina takin.
4) Bilgisayarinizi ve monitorunuzu acin.
Not
DVI kablosu ya da BNC kablosu iste ge baglidir. Istge bagli ogeleri satin almak icin bolgenizdeki Samsung Electronics servis merkezine basvurun.
> Dijital DVD Baglama

Not
Dijital DVD'ler gibi giris cihazlan, DVI kablosu kullanilarak monitor DVIN terminaline baglanir.
- Ardindan DVD diski takili halde DVD'yi calistirin.
- SOURCE duğmesini kullanarak Digital seksin.
Not
- Monitor DVI in giris cihazlarin dijital DVD'ye baglamak icin DVI baglanti noktalari vardir.
VCR

1) VCR'lar ya da Video Kameralar gibi AV giris aygitlar, S-VHS ya da BNC kabolar kullanilarak monitor IN [VIDEO] ya da AV IN [S-VIDEO] baglanlar.
2) VCR veya Video kameranin Audio (L) ve Audio (R) terminallerini, ses kablolari kullanarak monitorun AV IN [L-AUDIO-R] baglayin.
3) Monitorün onunde ya da uzaktan kumandada yer alan Kaynak dugmesini kullanarak VCR ya da Video kameraya bagl olan AV ya da S-Video'den birini seksin.
4) Ardindan kaset takili halde VCR ya da Video kameray calistirin.
Not
S-VHS ya da BNC kablosi stege baglidir.
DVD
Oynaticiya Baglama

1) Monitor COMPONENT AUDIO IN [L-AUDIO-R] ile DVD oynaticinin AUDIO OUT jaklari arasina bir takim audio kablosu baglayin.
2) Monitor BNC/COMPONENT IN -PR, Y, PB baglanti noktasi ile DVD oynaticin PR, Y, PB jaklan arasa bir Component kablosu baglayin.
3) Monitor on tarafinda ya da uzaktan kumandada bulunan Kaynak dugmesini kullanarak DVD oynaticin bagli oldugu Component kaynagini seksin.
4) Ardindan DVD diski takili halde DVD Oynaticiyi calistirn.
Not
- Component kablosu istege baglidir.
Ko mponent video hakinda daha fazla aciklama icin DVD oynaticinizin kullana kilavuzuna bakin.
Video Kamera Baglama

1) Video kameranin A/V cikis jaklarini bulun. Genellikle video kameranin yan ya da arka tarafinda bulunurlar. Video camera uzerindeki AUDIO OUTPUT jaklarinya monitor AV AUDIO IN [L-AUDIO-R]arasina bir takim ses kablosu takin.
2) Video kameranin VIDEO OUTPUT jaki ile monitor üzerindeki AV IN [VIDEO](AV GIRIS [VIDEO]) arasina bir video kablosu takin.
3) Monitor on tarafinda ya da uzaktan kumandada bulunan Kaynak dugmesini kullanarak Video kameraya bagli AV kaynagini segin.
4) Ardindan kaset takil halde Video kamerayi calistirn.
Not
Burada gosterilen audio-video kabolar genellike Video camera ile birlikte verilir. (Birlikte verilmediyse, bolgenizdeki elektronik urun magazalarina bakabilirsiniz.)
> DTV Set Üstü Kutusunu Baglama
Not
Tipik bir Set Üstü Kutusunun baglantilari aşagida gosterilmistir.

1) Monitor BNC/COMPONENT IN -PR, Y, PB baglanti noktas ile Set Üstü Kutusunun PR, Y, PB jaklanarasina bir Component kablosu baglayin.
2) Monitor COMPONENT AUDIO IN [L-AUDIO-R] ile Set Üstü Kutusunun AUDIO OUT jaklariarasina bir takim audio kablosu baglayin.
3) Monitor on tarafinda ya da uzaktan kumandada bulunan Kaynak dugmesini kullanarak DTV Set Ustu Kutusun bagli oldugu Component kaynagini segin.
Not
- Komponent video hakkinda daha fazla aciklama icin Set Üstü Kutusunn kullanma kilavuzuna bakin.
> Hoparlorlerin Baglanmasi

1) Vidalari kullanarak SETi ve hoparlorleri sikin.
* Hoparlör standsiz hoparlör setini takin.

2) SET in arkasindaki hoparlbor baglanti jaki ile hoparlorun arkasindaki hoparlbor baglanti jaki arasa bir hoparlbor baglanti kablosu baglayin.

Not
- SET hoparlorre baglyken hoparlu tutarak SETi hareket etllmeyin.
SET hoparlorun beghanmasi icin kullanlan hoparfor destegi zarar gorebilir.
> Ses Sistemine Baglama

1) AUDIO SISTMI Uzerindeki AUX L, R jaklariyla Monitörn MONITOR IN [L-AUDIO-R]arasina bir takim audio kablosu takin.
© 1995-2008 SAMSUNG. ALL Right Reserved
Giris

Coklu Ekran Kontrolu (MDC), cesisi ekranlarin kolayce ve aynianda bir bilgisayar uzerinde calistirmasini saglayan bir uygulamadir. Bilgisayar ve ekranarasindaki iletisim icin bir seri iletisim standardi alan RS-232C kullanilr. Bunedenle bilgisayarin seri baglanti noktası ile ekranin seri baglanti noktası arasina bir seri kablo takilmaldir.
Baslangic - Ana Ekran
Programi baslatmak icin Start > Program > Samsung > MDC System ögesini seçin.
Segilen setin ses yuksekligini kaydirmal kontrolde gormek icin bir set segin.

1 Ana Simgeler Segme Düngmesi 5
Remocon Bilgi Tablosu
3 Safety Lock Ekran Seçimi 7
4 Port Selection Kontrol Araçları 8
1. Herbir ekrana gegm icin ana simgeleri kullanin.
2. Ekran biriminin uzaktan kumanda sinyal alim islevini etkinlestirmenizi ya da devre dişi birakmanişi saglar.
3. Kilitleme İslevini ayarlar.
Lock function' (Kilitleme islevi) ayarlarken yalnizca uzaktan kumanda ve set uzerindeki guc ve kilitleme duğmelerini kullanabilirsiniz.
4. PC Seri Baglanti noktas ayarli deigsebilir. Original deger COM1'dir.
5. Tum ekranlari segmek ya da segimleri kaldirmak icin Select all (Tumunu sec) ya da Clear (Temizle) duğmelerini tklatin.
6. Segilen ekranla ilgili kisa bilgeler gormek icin Tabloyu kullanin.
7. Ekran Segimi kismindan bir ekran segin.
8. Ekranlari kontrol etmek icin Kontrol Araçlarini kullanin.
Uzaktan kumanda Etkinlestirme/Kapatma islevi, aygit aik ya da kapali haldeyken calisir ve bu durum, MDC'ye bagli tum ekranlar icin geleerlidir. Ancak MDC kapalyken durum ne olursa olsun, MDC kapandiignda tum ekranlarin uzaktan kumanda sinaly alim islevi Etkin hare getirilir.
Port Selection

1. Coklu Ekran Kontrolü ilk olarak COM1'e ayarlanmşir.
2. COM1 disinda herhangi bir baglanti noktasi kullaildiginda, Port Selection (Baglanti Noktasi Segimi) menusunden COM1-COM4 arasi portlar segilebilir.
3. Seri kablo kullanlarak monitore baglanan tam baiglanti noktas ad sejlmezse, itetigim saqlanamayacaktir.
4. Seçilen böglanti noktas programa kaydedilir ve bir sonraki programda da kullanilir.

Power Control
1. Ana simgelerden Power Control'u (Güç Kontrolü) tklättiginizda Power Control (Güç Kontrolü) ekrani agrilir.

Bilgi Tablosu, Güç Kontrolü—in gerekli bazi temel bilgileri gosterir.
1) (Power Status(Güç Durumu))
2) Input
3) Image Size
4) On Timer
5) Off Timer
2. Kontrol etmek istediginiz ekrani sejmek icin Select All (Tumunu Se) duugmesini ya da Check Box (Kutuyu Isaretle) duugmesini kullanin.

Power Control (Guc Kontrolu), segilen ekranin islevlrinden bazilarinin kontrl edilmesine izin verir.
1) Power On/Off
- Seçilen ekrani acar ya da kapatir.
2) Volume
- Segilen ekranin ses seviyesini kontrol eder.
Setlerde seçilen ekranin ses yüksekligi degerini alir ve kayar kontrolde gosterir.
(Seçimi iptal ederseniz ya da Select All (Tümün Ü Seç) seçerseniz ayar, varsaylan degeri olan 10'a geridöner)
3) Mute On/Off (Sessiz A_C /Kapat)
- Segilen ekranin Mute (Sessiz) ilevini etkinleştinir/kapatir. Her seferinde bir set segildigiinde, segilen set icin Mute (Sessiz) ilsevi etkken Mute (Sessiz) etkindir. Ses seviyesini ayarladiginiza Mute (Sessiz) ilsevi otomatik olarak devre di kalir. (Segimleri kaldirigiiniza ya da "Select All" (Tumunu Seç) sextiginizde ayarlar varsaylan degerlerine geri doner.)
\* Power Control (Guc Kontrolu) iglevi, tum ekranlar icin kullanilir.
* Volume (Ses) Kontrolü ve Mute (Sessiz) ilevleri yalinizca güç durumu ON (AÇIK) GPL ekranlarda kullanilabilir.

Input Source
1. Ana simgelerden Input Source (Girig Kaynag) tilkattiinzda Input Source (Guc Kaynag) ekranı acilir. Kontrol etmek istediğiniz ekrani seçmek icin Select All (Tümunu Sec) duğmesini ya da Check Box (Kutuyu Üsaretle) duğmesini kullanin.
- TV Mode

- MagicNet Mode

Bilgi Tablosu, Input Source (Giris Kaynagi) Kontrolü icin gerekli bazi temel bilgileri gosterir.
1)PC
- Segilen ekranin Giriş Kaynagını PC'yedehyişirir.
2) BNC
- Segilen ekranin Giriş Kaynakın BNC'ye degişirir.
3) DVI
- Segilen ekranin Giriş Kaynagın DVTye degişirir.
4) TV
- Segilen ekranı Girş Kaynakıni TVdehyşirir.
5)AV
- Segilen ekranin Giriş Kaynagıni AV'ye degişirir.
6) S-Video
- Seçilen ekranın Giris Kaynakı S-Video'yadehyigitirir.
7) Component
- Seçilen ekranın Giris Kaynakı Componente (Component)dehyşirir.
8) MagicNet
-MagicNetGirigaynagyalinizcaMagicNetmodelinde calisir.
9) Channel
- Input Source (Girig Kaynag) TV oldugunda, Channel (Kanal) oku görtülenir.
* TV Kaynagi sadece televizyonlu ürünlerde seçilebilir ve kanallari kontrol etme islemine Input Source (Giris Kaynagi) TV ilek izin verilir.
\* Input Source (Giris Kaynag) Kontrolu yalnizca guc durumu ON (ACIK) alan ekranlarda kullanlabilir.

Image Size
PC, BNC, DVI
1. Ana simgelerden Image Size (Göruntü Boyutu) tklattgünizda Image Size (Göruntü Boyutu) ekraniçir.

Bilgi Tablosu, Image Size (Göründü Boyutu)—in gerekli bazı temel bilgileri gosterir.
1) (Power Status(Strömstatus))
- Geçerli ekranın açık veya kapali olduğunu gosterir.
2) Image Size
- Kullanilan ekranin gelerli Image Size (Goruntu Boyutu) degerini gosterir.
3) Input
- Kullanilan ekranin geleçeri Input Source (Girş Kaynagi) değerini gosterir.
4) Bilgi Tablosu, Input Source (Girş Kaynagı) degeri PC, BNC, DVI olan ekranlari gosterir.
5) PC Source -PC Kaynagi Image Source (Goruntu Kaynagi) sekmesini tiklattiginzida goruntuliner.
- Image Size (Görüntü Boyutu) Kontrolü dügmesi, PC, BNC, DVI,—in kullanilaben Image Size (Görüntü Boyutu) degerlerini kontrol eder.
6) Video Source
- Ilgili Input Source (Giriş Kaynagi) ile Image Size (Göruntü Boyutu) degerini kontrol etmek amacyla Video Source (Video Kaynagi) sekmesini tklatin.
\* MagicNet Giris kaynagi yalnizca MagicNet modelinde calisir.
\* Image Size (Goruntu Boyutu) kontrlu yalnizca guc durumu ON (ACIK) olan ekranlar icin kullanilabilir.

Image Size
TV, AV, S-Video, Component, DVI(HDCP)
1. Ana simgelerden Image Size (Göruntü Boyutu) tklattgünizda Image Size (Göruntü Boyutu) ekrani agrilir.

Bilgi Tablosu, Image Size (Göründü Boyutu)—in gerekli bazıtem bilgileri gosterir.
1) TV, AV, S-Video, Component (Component) icin Image Size (Goruntu Boyutu) degerini ayarlamak amacyla Video Source (Video Kaynagi) sekmesini tiklatin. Kontrol etmek istediiginiz ekrani sejmek icin Select All (Tumunu Sec) duugmesini ya da Check Box (Kutuyu Isaretle) duugmesini kulanin.
2) Bilgi Tablosu, giriş kaynagi yalınizca TV,AV, S-Video, Component (Koponent) ya da DVI (HDCP) olan ekranlari goesterir.
3) Segilen ekranin Image Size (Görüntü Boyutu) değerinidehyşirir. Not: Auto Wide (Otomatik Genişlik), Zoom1 (Yakınlaştrma 1) ve Zoom2 (Yakınlaştrma 2) ayarlı, Component (Koponent) ve DVI (HDCP) giris sinyali Türü 720p ya da 1080i olduğunda seçilebilir durumdadehyildir.
MagicNet Giris kaynagi yalnizca MagicNet modelinde calisi.
\* Image Size (Goruntu Boyutu) Kontrolu yalinizca guc durumu ON (ACIK) atan ekranlarda kullanilabilir.

Time
1. Ana simgelerden Time' (Saat) tiklattiginizda Time Control (Saat Kontrolü) ekrani açilir.

Bilgi Tablosu, Time (Saat) Kontrolü icin gerekli bazı temel bilgileri gosterir.
1) Current Time
- Seçilen ekran,—çın)—geçerli)—saati)—belirir (PC Saati).
- Geçerli saati degişirmek,—ün ce PC Saatini degişirin.
2) On Time Setup
- Segilen ekranin Hour (Saat), Minute (Dakika), On Time Setup (Açilis Saati Ayari) AM/PM bilgisini, Status (Durum), Source (Kaynak), Volume (Seis seviyesi) degerini ayarlayin.
3) Off Time Setup
- Segilen ekranin Off Time Setup (Kapanis Saati Ayari) ayari icin Hour (Saat), Minute (Dakika), AM/PM bilgisini, Status (Durum) bilgilerini ayarlayin.
4) On Time (Aglis Saati) ayarlini gosterir.
5) Off Time (Kapanis Saati) ayarlarni gosterir.
\* MagicNet Giris kaynagl yalnizca MagicNet modelinde calisir.
* Time (Saat) kontrlü yalnizca guç durumu ON (AÇİK) alan ekranlar yüz kullanilabilir.
* On Time Setup (Açilis Saati Ayari), TV Source (TV Kaynagī) islevleri yalnizca TV Modelinde calişir.

PIP
PIP Size
1. Ana simgelerden PIP'iklattiginzda PIP Control (PIP Kontrolü) ekrani aclr.
Kontrol etmek istediginiz ekrani segmek icin Select All (Tumunu Sec) duugmesini ya da Check Box (Kutuyu Isaretle) duugmesini kullanin.

Bilgi Tablosu, PIP Size (PIP Boyutu)增長 gerekli bazi temel bilgileri gosterir.
1)PIP Size
- Kullanlan ekranin geleeri PIP Size (PIP Boyutu) degerini gosterir.
2) OFF
- Segilen ekranin PIP'ini kapatir.
3) Large
- Segilen ekranin PIP'ini和地区 boyutu Large (Büyük) degerine getirir.
4) Small
- Segilen ekranin PIP'ini和地区 boyutu Small (Küçük) değerine getirir.
5) Double1
- Segilen ekranin PIP'ini acar ve boyutu Double 1 (Cift 1)degerine getirir.
6) Double2
- Segilen ekranin PIP'ini acar ve boyutu Double 2 (Cift 2)degerine getirr.
7) Double 3 (Resim Yaninda Resim)
Seçilen ekranın PBP'sinicastle boyutu Double 3 (Gift 3) degérine getirir.

MagicNet Giriç kaynagl yalnizca MagicNet modelinde calisir.
PIP Size (PIP Boyutu), monitor açık haldeyken kontrol edilebilir.

PIP
PIP Source
1. Ana simgelenden PIP'ti tiklattiginizda PIP Control (PIP Kontrolü) ekrani açilir.
- PIP TV Mode

- PIP S-Video Mode

Bilgi Tablosu, PIP Source (PIP Kaynagi) Kontrolü icin gerekli bazı temel bilgileri gosterir.
1) PIP Source (PIP Kaynağt)
- PIP Source (PIP Kaynag), monitor agik haldeyken kontrol edilebirir.
2)PC
- Seçilen ekranın PIP kaynakıncı PC'yedehyşistirir.
3) BNC
- Seçilen ekranın PIP kaynakın BNC'yedehyişirir.
4) DVI
- Segilen ekranin PIP kaynagini DVI'ye degistirir.
5) TV
- Segilen ekranin PIP kaynaginci TV'ye degişirir.
6)AV
- Secilen ekranin PIP kaynakıni AV'ye degişirir.
7) S-Video
- Seçilen ekranın PIP kaynakın S-Video'yadehyegristirir.
8) Component
- Segilen ekranin PIP kaynagini Componente (Koponent) degistirir.
9) Channel
- PIP Source (PIP Kaynagi) TV iken Kanal oku görtülenir.
Not: Ana Ekranin giris kaynagi türüne baglı olarak PIP kaynaklarindan bazilari seçilemeyebilir.
\* MagicNet Giri kaynagl yalnizca MagicNet modelinde calisir.
* TV Kaynagi sadece televizyonlu ürünlerde seçilebilir ve kanallari kontrol etme,islemine PIP Source (PIP Kaynagi) TV ileken izin verilir.
* PIP Control (PIP Kontrolü = özelliği yalnizca güç durumu ON (AÇIK) alan ve PIP ilevi ON (AÇIK) halde bulunan ekranlarda kullanilabilir.

Settings
Picture
1. Ana simgelenden Settings' (Ayarlar) tiklattiginizda Settings Control (Ayarlar Kontrolü) ekrani aclrir.


Bilgi Tablosu, Settings (Ayarlar) Kontrolü icin gerekli baz temel bilgileri gosterir.
Her bir islev segildigiinde, segilen islevin ayar degeri kayar kontrlode gosterilir. Select All (Tumunu Se) segildigiinde, varsayilan degere (50) geri donulur. "Select All" (Tumunu Se) segildigiinde, varsaylan deger goruntulenir. Bu ekranda herhangi bir degerin degistirmesi modu otomatik olarak "CUSTOM" (OZEL) yapacaktir.
- Yalnizca TV, AV, S-Video, Component (Component), DVI(HDCP)同胞 kullanilabilir.
1) Picture
2) Contrast
- Seçilen ekranın Contrast (Kontrast) değerini ayarlar.
3) Brightness
- Segilen ekranin Brightness (Parlaklik) degerin ayarlar.
4) Sharpness
- Segilen ekranin Sharpness (Netlik) degerini ayarlar.
5) Color
- Segilen ekranin Color (Renk) degerini ayarlar.
6)Tint
- Segilen ekranin Tint (Ton) degerini ayarlar.
7) Color Tone
- Segilen ekranin Color Tone (Renk Tonu) degerini ayarlar.
MagicNet Giris kaynagl yalnizca MagicNet modelinde calisi.
* Bu Özellik yalınizca güç durumu ON (AÇİK) GPLanlada kullanilabilir. Herhangi bil seksim yapilmazsa fabrika varsayilan degeri gosterilir.

Settings
Picture PC
1. Ana simgelerden Settings' (Ayarlar) tilkattiinizda Settings Control (Ayarlar Kontrolü) ekrani açilir.

Bilgi Tablosu, Settings (Ayarlar) Kontrolü icin gerekli bazim temel bilgileri gosterir. Her bir islev secildigiinde, sejen islevin ayar degeri kayar kontrlde gosterilir.
Select All (Tumunu Seg) seildigiinde, varsaylan degere (50) geri donulur. Bu ekranda herhangi bir degerin degistirmesi modu otomatik okayak "CUSTOM" (OZEL) yapacaktir.
1) Picture PC
- Yalnizca PC, BNC, DVI ijcin kullanilabilir.
2) Contrast
- Segilen ekranı Contrast (Kontrast) degerini ayarlar.
3) Brightness
- Seçilen ekranın Brightness (Parlaklik) degeri ayarlar.
4) Red
- Seçilen ekranın Red (Kirmizi) renk değerini ayarlar.
5) Green
- Segilen ekranin Green (Yeşil) renk değerini ayarlar.
6) Blue
- Segilen ekranin Blue (Mavi) renk degerini ayarlar.
\* MagicNet Giris kaynagl yalnizca MagicNet modelinde calisir.
\* Bu ozellik yalnizca guc durumu ON (AciK) alan ekranlarda kullanilabilir. Herhangi bir sejm yapilmazsa fabrika varsayilan degeri gosterilir.

Settings
Audio
1. Ana simgelerden Settings' (Ayarlar) tklattiginizda Settings Control (Ayarlar Kontrolu) ekranı acilir.

Bilgi Tablosu, Settings (Ayarlar) Kontroli icin gerekli bazim temel bilgileri gosterir. Her bir islev segildigiinde, seilen iglevin ayar degeri kayar kontrolde gosterilir. Select All (Tumunu Se) segildigiinde, varayilan degere (50) geri donulur. Bu ekranda herhangi bir degerin degistirlimesi modu otomatikormal "CUSTOM" (OZEL) yapacaktir.
1) Audio
-Tum giris kaynaklarinin ses ayaralarini kontrl eder.
2) Bass
- Segilen ekranin Bass (Bas) degerini ayarlar.
3) Treble
- Segilen ekranin Treble (Tiz) degerini ayarlar.
4) Balance
- Seçilen ekranin Balance (Denge) değerini ayarlar.
5) SRS TSXT
- Seçilen ekranin SRS TSXT Sound Özigiğinci Aşkık/Kapali hare getirir.
6) Sound Select
- PIP açikken Ana veya Alt ekrani seçebilirsiniz.
\* MagicNet Giris kaynagl yalnizca MagicNet modelinde calisir.
* Bu özellik yalnizca güç durumu ON (AÇİK)olean ekranlarda kullanilabilir. Herhangi bir seçim yapilmazsa fabrika varsayilan değeri Güsterilir.

Settings
Image Lock
1. Ana simgelerden Settings'i (Ayarlar) tiklattiginzda Settings Control (Ayarlar Kontrolü) ekrani acilir.

Bilgi Tablosu, Settings (Ayarlar) Kontrolü—in gerekl bazı temel bilgiler:i Güsterir.
1) Image Lock
- PC, BNC胆固醇 kullantilabilir.
2) Coarse
- Segilen ekranin Coarse (Iri) degerini ayarlar.
3) Fine
- Segilen ekranin Fin (Ince) degerini ayarlar.
4) Position
- Segilen ekranin Position (Konum) degerini ayarlar.
5) Auto Adjustment
- Gelen PC sinyaline gore Kendiliginden ayarlar.
\* MagicNet Giris kaynagl yalnizca MagicNet modelinde calisir.
\* Settings (Ayarlar) kontrlü yalinizca güç durumu ON (AÇİK) alan ekranlar yüz kullanilabilar.

Maintenance
Lamp Control
1. Maintenance (Bakim) ekranini görtülemek icin Ana Simgeler sütununda "Maintenance" (Bakim) simgesini tklatn.

Bir cok temel veri ögesini goisteren "Bilgi Tablosu" görtülenir.
1) Maintenance
-Tum girig kaynaklar icin Maintenance Control (Bakim Kontrolu) iglevine izin verir.
2) Auto Lamp Control
- Secilen ekranin arka isigini, belirtilen zamanda otomatik okayaraylar.
Manual Lamp Control (Manuel Lamba Kontrolü), Auto Lamp Control'u (Otomatik Lamba Kontrolü) kullanarak ayarlama yaptıgünizda otomatik olarak kapanir.
3) Manual Lamp Control
- Saatten bagimsiz olarak seçilen ekranin arka isigini ayarlanamizi saglar.
Auto Lamp Control (Otomatik Lamba Kontrolü), Manual Lamp Control'u (Manuel Lamba Kontrolü) kullanarak ayarlama yaptıgünizda otomatik olarak kapanir.
\* Maintenance Control (Bakim Kontrolu) yalnizca guc durumu ON (AciK) alan ekranlarda kullanilabilir.
\* MagicNet Giris kaynagl yalnizca MagicNet modelinde calisir.

Maintenance
Scroll
1. Maintenance (Bakim) ekranini görtülemek icin Ana Simgeler sütununda "Maintenance" (Bakim) simgesini tklatn.

1) Screen Scroll
- Segilen ekran uzun sure Pause (Duraklatma) modunda kaldiginda ortaya seksabilecek görtü izlerini önler. "Interval" ayarini staat ve "Second" ayarini saniye cinsinden seçerek tekrallama ürelerini ayarlayabilirsiniz. Screen Type (Ekran Türü) ile Scroll (Kaydirma), Pixel (Piksel), Bar (Cubuk) vya Eraser (Silici) olarak ayarlanabilir.
MagicNet Giris kaynagi yalnizca MagicNet modelinde calisir.
\* Second (Saniye) degerini yaplandirrken Scroll (Kaydirma) Turunu 1, 2, 3, 4, 5 degerlerine, Pixel (Piksel), Bar (Cubuk) veya Eraser (Silici) Turunu 10, 20, 30, 40, 50 degerlerine ayarlayabilirsiniz.
\* Maintenance Control (Bakum Kontrolu) yalnizca guc durumu ON (ACIK) alan ekranlarda kullanilabilir.

Maintenance
Video Wall
1. Maintenance (Bakim) ekranini görtülemek icin Ana Simgeler sütununda "Maintenance" (Bakim) simgesini tklatn.

1) Video Wall
- Video duvari, bir dizi video ekraninir birbirine baglanarak, her ekranin resmin bir parcasini gostermesi ya da tum ekranlarda ayni resmin tekrarlanmasidir.
2) Video Wall (Screen divider)
-Ekran bolunebilir.
Bölme sirasinda, farkli sayida ekran seçebilirsiniz.
- Ekran bölcüden bir modSECTION.
- Ekran Seçimi kismindan bir ekran segin.
- Yer, segilen modda bir numaraya basilarak ayarlanacaktir.
Samsung'un sagladiMDC programen fazla 4x4 LCD Ekranlari destekler.

3) On/Off
- Segilen ekranin Video Duvari ilelvini acar/kapatir.
4) Format
-Bicim,bolunmu ekran gosterecek sekilde seclebilir.

\* MagicNet Giris kaynagl yalnizca MagicNet modelinde calisir.
* Maintenance Control (Bakim Kontrolü)yalnizca Güç durumu ON (AÇIK)alan ekranlarda kullanilabilir.
Sorun Giderme
1. Kontrol etmek istediginiz ekran Power Control (Güç Kontrolü) Bilgi Tablosunda görünmyor
- RS232C baglantisini kontrol edin. (Com1 baglanti noktasina dizgün bicimde bagli olup olmadigi kontrl edin)
- Bagli ekranlardan herhangi birinin ayni ID degerine sahip olup olmadigi gormek icin ekranlar kontrol edin. Eger birden fazla ekran ayni ID degerine sahipse, veri cakismasi nedeniyle bu ekranlar program tarafindan dizgün bicomde algilanmaz.
Display Set ID (Ekran Seti ID)情况进行查询,以确定是否可以进行控制。Display (Ekran) menü sunu kullanarak ayarlayin.)
Not: Display Set ID (Ekran Seti ID), 0-16 arasi bir deger olmaldir.
Eger deger, bu deger araligi disindaysa, MDC systemi ekrani kontrl edemez.
2. Kontrol etmek istedigin ekran diiger kontrollerin Bilgi Tablosunda gorunmuyor
Ekranin ON (ACIK) durumda oldugunu kontrol edin. (Bunu, Power Control (Guc Kontrolü) Bilgi Tablosunda gorebilirsiniz)
-Ekranin giris kaynagini degistirip degistiremediinizi kontrl edin.
3. Iletisim kutusu, tekrar tekrar görtüleniyor.
- Kontrol etmek istediiginiz ekranin segili olup olmadigina bakin.
4. Hem On Timer (Açilma Saati) hem de Off Timer (Kapanma Saati) ayarli olmasina kşn farkl bir saat gosteriliyor.
-Ekranlarin saatini ayni degere getirmek icin gecerli saati tum ekranlara uygulayin.
5. Uzaktan kumanda islevini kapattiignizda, RS-232C kablosuno gikarttignizda ya da programdan normal olmayan bir sekilde ciktiignizda uzaktan kumanda duzgün calismayabilir. Normal calismaya geri donmek icin programi yeniden calistirin ve uzaktan kumanda islevini acin.
Bu program, iletigim devrelerindeki sorunlar ya da yakinaldaki elektronik cihazlarin yarattiqi parazitten dolayi dizgün calismayabilir.

Coklu Ekran Modunda Ayar Değerlerinin Gösterilmesi
* Birden fazla ekran baglì oldugunda, ayar degerleri asagidaki gibi görtülenir.
1. Seçim yok: Fabrika Varsaylan Değerini gosterir.
2. Bir ekran segili: Seçilen ekranın ayar değerleri alınir veGORuntulenir.
3. Bir ekran seçili (ID1) ve böcka bir ekran ekleniyor (ID3): ID 1 ayar değerini güisteren program, ID3'ün değerlerini alir ve görtüller.
4. Select All (Tumunu Seg) ile tum setter segili: Fabrika Varsaylan Degerine geri dorer.

Güvenlik Talimatlari
Giris
Baolantylar
Yazilimin Kullanilmasi
Monitor Ayarlanmasi
Input
Picture
[PC / BNC /DVI Mode]
Picture
[AV/S-Video/
Component / DVI-Video
Mode]
Sound
Setup
Multi Control
Dogrudan Istevler
Sorun Giderme
Özellikler
Bilgiler
Appendix
TFT-LCD Monitor
www.samsung.com

Urun renge ve gorunmu modeline bagl olarak farklik gosterebilir ve performans gelistirmeler nedeniyle urn ozellikleri onceden haber verilmeksizin degistirilebilir.
Monitor Ayarlanmasi
Input
Kullanilabilir Modlar

PC/BNC/DVI

S-Video

Component

DVI-Video
Source List PASCD
[MONTH]→[ENTER]→[ENTER]→[A/V]→[ENTER]
Uzaktan kumandadaki dokrudan dugme 'SOURCE' dugmesidir.
Istediginiz ekrani segmek icin kullanin.
1)PC
2) BNC
3) DVI
4)AV
5) S-Video
6) Component
[Uzaktan kumandadaki dokrudan dugme 'SOURCE'dugmesidir.]
Not
- Monitor harici bir kaynaşa geleirildigiinde PIP kapanir.
PIP PASC0
VCR ve DVD gibi harici A/V aygtllari monitore baglidir; PIP, PC Video sinyalinde eklenmis kucuk bir pencerede bu aygtllardan video seyretmenize olanak sag (Off/On)
Not
- BNC ve component ayni terminali kullandiklarindan birden fazla PIP ekranda ust uste aglamaz.
1)PIP
[MONTH]→[ENTER]→[A/V]→[ENTER]→[ENTER]→[A/V]→[ENTER]
PIP Ekranini kapatir veya aça.
-Off
- On
[Uzaktan kumandadaki dokudugradu dugme 'PIP'dugmesidir.]
2) Source
[MONTH] [ENTER] [A/V] [ENTER] [A/V] [ENTER] [A/V] [ENTER]
PIP injin giri kaynagi segin.
-PC:AV/S-Video/Component Mode
-BNC:AV/S-Video Mode
-DVI:AV/S-Video/ComponentMode
-AV/S-Video:PC/BNC/DVI Mode
- Component: PC / DVI Mode
[Uzaktan kumandadaki dokudugdan dugme 'SOURCE' dugmesidir.]
3) Swap
[MONTH] [ENTER] [A/√] [ENTER] [A/√] [ENTER]
PIPveana gortunun iceriklerini degistirir.
PIP penceresindeki görtü ana ekranda, ana ekrandaki görtü PIP penceresinde görtülenir.
[Uzaktan kumandadaki dokudugradu dugme 'SWAP'dugmesidir.]
4) Size
[MONTH] [ENTER] [A/V] [ENTER] [A/V] [ENTER] [A/V] [ENTER]
PIP penceresinin Boyutunu degiştrir.
[Uzaktan kumandadaki dokudan dugme SIZE'dugmesidir.]
5) Position
[MONTH] [ENTER] [A/V] [ENTER] [A/V] [ENTER] [A/V] [ENTER]
PIP penceresinin Konumunu degistirir.
6) Transparency
[MONTH] [ENTER] [A/V] [ENTER] [A/V] [ENTER] [A/V] [ENTER]
PIP pencerelerinin Saydamligi ayarlar.
- High
- Medium
- Low
-Opaque
Not
Size icinde agesini secerseniz, Position ve Transparencycye etkinlemez.
Kullanlabilir Modlar:PIP
Edit Name PASC0
[MENU] [ENTER] [A/V] [ENTER] [A/V] [ENTER] [A/V] [ENTER]
Giris kaynagi seciminizi kolaylasmirk icin giris jaklarina bagli giris cihazini adlandirin.
1)PC
2) BNC
3) DVI
4) AV
5) S-Video
6) Component
Picture [PC / BNC /DVI Mode]
Kullanilabilir Modlar

PC/BNC/DVI

AV

S-Video

Component

DVI-Video
MagicBrightTM
[MENU] [A/V] [ENTER] [ENTER] [A/V] [ENTER]
MagicBright™, görtülediginiz resmin icerigine bagh olarak en iyi görtüleme ortamini saglayan yen bir özelliktir.
Su anda uc farkli moddan biri kullanilabilir: Metin, Internet ve Eglence.
Her modun kendine ozgu onceden yapilandinlmis bir parlaklik degeri vardir. MagicBright TM denetim
duqmelerine basarak bu uc ayardan birin kolayca segebilirsiniz.
1) Entertain
Yuksek Parlaklik
DVD veya VCD gibi filmleri izlemek icin.
2) Internet
Orta Parlaklik
Metin ve grafik gibi karmaGORuntulerin bulundugu calismalar icin.
3) Text
Normal Parlaklik
Buyuk metinler iceren belge veya calismalar icin.
4) Custom
Muhendislerimiz tarafindankatkile seilmis olmasina ragmen onceden ayarlanmis degerler, zevkinize
bagl olarak, gozleriniz icin uygun olmayabilir.
Bu durumda, OSD menusunu kullanarak Parlaklik ve Kontrasti ayarlayin.
[Uzaktan kumandadaki dokudugran duigme M/B'dugmesidir.]
Custom P
[ \text{[MENU]} \rightarrow [\wedge / \vee] \rightarrow [\text{ENTER}] \rightarrow [\wedge / \vee] \rightarrow [\text{ENTER}] \rightarrow [\text{ENTER}] \rightarrow [\wedge / \vee] / [< / >] \rightarrow [\text{ENTER}] ]
Kontrast ve parlakiigi kisel tercihlerinize gore degistirmek icin ekran menulerini kullanabilirsiniz.
1) Contrast
Yesil Rengi ayarla.
2) Brightness
Dogrudan Denetim Ozellikleri

- Resmi Custom islevini kullanarak ayarlarsaniz, MagicBright Custom moduna doner.
Color Tone
[ \text{[MENU]} \rightarrow [\wedge / \vee] \rightarrow [\text{ENTER}]\rightarrow [\wedge / \vee] \rightarrow [\text{ENTER}]\rightarrow [\wedge / \vee] \rightarrow [\text{ENTER}] ]
Renk tonu degiistirilebilir.
1) Cool
2) Normal
3)Warm
4) Custom
(Yalnizca PC/BNC Modunda Kullanilir)
Color Control
[MENU] [A / V] [ENTER] [A / V] [ENTER] [ENTER] [< / > ] [ENTER]
R,G,B renk dengesini ayri ayri ayarlamak icin aagidaki admlari uygalayin.
(Yalnizca PC/BNC Modunda Kullanilir)
1) Red
2) Green
3) Blue
Not
- Resmi Color Control islevini kullanarak ayarlarsaniz, Color Tone Custom moduna doner.
Image Lock
Image Lock (Göruntü Kilitleme), titrek ve pariltili kararısiz görtüntürol olşturan parazitleri kaldirarak ince ayapmak ve en iyi görtüntüyü almak icin kullanı. Fine ayari kullanarak elde edilen sonçlar yeterli degilse, Coarse ayarı ve sonra da yeniden Fine ayarı kullanı.
(Yalnizca PC/BNC Modunda Kullanilir)
1) Coarse
[ \text{[MENU]} \rightarrow [ \land / \lor ] \rightarrow [ \text{ENTER}] \rightarrow [ \land / \lor ] \rightarrow [ \text{ENTER}] \rightarrow [ \text{ENTER}] \rightarrow [ < / > ] \rightarrow [ \text{ENTER}] ]
Dikey cizgiler gibi istenmeyen goruntuleri giderir. Genel ayar, ekran goruntu alanini tasiyabilir. Bu alan
Yatay Kontrol menusun kullanarak yeniden yerine yerleştrebilirsiniz.
2) Fine
[MONTH] [AV] [ENTER] [AV] [ENTER] [AV] [ENTER] [] [ENTER]
Yatay cizgiler gibi istenmeyen görtuntüleri giderir. lstenmeyen görtuntü Ince ayar sonrasinda da
kaybolmadiya, frekansi (saat hizini) ayarladiktan sonra bu islemi tekrarlayin.
3) Position
\[
[\text{MENUR} ]\rightarrow [\text{A} /\text{V} ]\rightarrow [\text{ENTER} ]\rightarrow [\text{A} /\text{V} ]\rightarrow [\text{ENTER} ]\rightarrow [\text{A} /\text{V} ]\rightarrow [\text{ENTER} ]\rightarrow [\text{A} /\text{V} ]\rightarrow
\]
[ENTER]
Ekranin konumunu yatay ve dikey olarak ayarlar.
Auto Adjustment P
[ \text{[MENU]} \rightarrow [\wedge / \vee] \rightarrow [\text{ENTER} ] \rightarrow [\wedge / \vee] \rightarrow [\text{ENTER}] ]
Fine, Coarse ve Position degerleri otomatik olarak ayarlanir.
Kontrol panelinde czūnūrūgū degīstirirseniz, AUTO iševi yūrūtūr.
(Yalnizca PC/BNC Modunda Kullanilir)
[Uzaktan kummandadaki dokrudan dügme 'AUTO' dügmesidir.]
Signal Balance P
Uzun sinyal kablosuyla iliteten zayif RGB sinyalini telafi etmek icin kullanir.
(Yalnizca PC/BNC Modunda Kullanilir)
1) Signal Balance
[ \text{[MENU]} \rightarrow [ \wedge / \vee ] \rightarrow [ \text{ENTER}] \rightarrow [ \wedge / \vee ] \rightarrow [ \text{ENTER}] \rightarrow [ \text{ENTER}] \rightarrow [ \wedge / \vee ] \rightarrow [ \text{ENTER}] ]
Signal control, On ya da Off haldeyken secebilirsiniz.
2) Signal Control
[ \text{[MENU]} \rightarrow [\wedge / \vee] \rightarrow [\text{ENTER}] \rightarrow [\wedge / \vee] \rightarrow [\text{ENTER}] \rightarrow [\wedge / \vee] \rightarrow [\text{ENTER}] \rightarrow [\wedge / \vee] \rightarrow [\wedge / \vee] \rightarrow [\text{ENTER}] \rightarrow [\wedge / \vee] \rightarrow [\text{ENTER}] \rightarrow [\wedge / \vee] \rightarrow [\text{ENTER}] \rightarrow [\wedge / \vee] \rightarrow [\text{ENTER}] \rightarrow [\wedge / \vee] \rightarrow [\text{ENTER}] \rightarrow [\wedge / \vee] \rightarrow [\text{ENTER}] \rightarrow [\wedge / \vee] \rightarrow [\text{T} ] \rightarrow [\text{T} ] \rightarrow [\text{T} ] \rightarrow [\text{T} ] \rightarrow [\text{T} ] \rightarrow [\text{T} ] \rightarrow [\text{T} ] \rightarrow [\text{T} ] \rightarrow [\text{T} ] \rightarrow [\text{T} ] \rightarrow [\text{T} ] \rightarrow [\text{T} ] \rightarrow [\text{T} ] \rightarrow [\text{T} ] \rightarrow [\text{T} ] ]
R Phase, G Phase, B Phase, Gain and Sharpness degerlerini kendiniz ayarlayabilirsiniz.
Size
[ \text{[MENU]} \rightarrow [\text{A} / \text{V}] \rightarrow [\text{ENTER} ] \rightarrow [\text{A} / \text{V}] \rightarrow [\text{ENTER} ] \rightarrow [\text{A} / \text{V}] \rightarrow [\text{ENTER} ] ]
Boyutudegistirebilirsiniz.
1) 16:9
2) 4:3
PIP Picture P
[ \text{[MENU]} \rightarrow [\wedge / \vee] \rightarrow [\text{ENTER}] \rightarrow [\wedge / \vee] \rightarrow [\text{ENTER}] \rightarrow [\wedge / \vee] \rightarrow [\text{ENTER}] \rightarrow [\wedge / \vee] \rightarrow [\text{ENTER}] \rightarrow [\wedge / \vee] \rightarrow [\text{ENTER}] \rightarrow [\wedge / \vee] \rightarrow [\text{ENTER}] \rightarrow [\wedge / \vee] \rightarrow [\text{x} ] \rightarrow [\text{x} ] \rightarrow [\text{x} ] \rightarrow [\text{x} ] \rightarrow [\text{x} ] \rightarrow [\text{x} ] \rightarrow [\text{x} ] \rightarrow [\text{x} ] \rightarrow [\text{x} ] \rightarrow [\text{x} ] \rightarrow [\text{x} ] \rightarrow [\text{x} ] \rightarrow [\text{x} ] \rightarrow [\text{x} ] \rightarrow [\text{x} ] ]
PIP Ekran Ayarlarini ayarlayabilirsiniz.
1) Contrast
Ekranda PIP penceresinin Kontrastini ayarlar.
2) Brightness
Ekranda PIP penceresinin Parlakiigiinyarlar.
3) Sharpness
PIP penceresinin en acik ve en koyu bolgeleriarasindaki farki ayarlamak icin kullanin.
4) Color
PIP penceresinde Renk ayarlar.
5) Tint
PIP penceresine, dogal bir ton katar.
PC, BNC modunda PIP ekrani ile AV, S-Video' den resmi görtüleyebilirsiniz. Yalnizca video sinyali NTSC ise calisir.
Kullanilabilir Modlar: PIP
Picture [AV / S-Video / Component / DVI-Video Mode]
Kullanilabilir Modlar
PC/BNC/DVI
AV
S-Video
Component
D DVI-Video
Mode ASCD
[ \text{[MENU]} \rightarrow [\wedge / \vee] \rightarrow [\text{ENTER} ] \rightarrow [\text{ENTER} ] \rightarrow [\wedge / \vee] \rightarrow [\text{ENTER}] ]
Monitor fabrikada onceden ayarlanmig dort otomatik resim ayari ("Custom", "Dynamic", Standard" ve "Movie") vardir.
Custom, Dynamic, Standard veya Movie ayarindan birini etkinlestirebilirsiniz. Otomatik olarak kisiellestirimis resim ayararinizi caliran " Custom" ayarini seebilirsiniz.
1) Dynamic
2) Standard
3) Movie
4) Custom
[Uzaktan kumandadaki dokrudan dugme 'P.MODE' dugmesidir.]
Custom ASCD
[ \text{[MENU]} \rightarrow [\wedge / \vee] \rightarrow [\text{ENTER} ] \rightarrow [\wedge / \vee] \rightarrow [\text{ENTER} ] \rightarrow [\wedge / \vee] \rightarrow [\text{ENTER} ] \rightarrow [< / >] \rightarrow [\text{ENTER}] ]
Kontrast ve parlakiigi kisesil tercihlerinize gore degistirmek icin ekran menulerini kullanabilirsiniz.
1) Contrast
PIP penceresine dogal bir ton ekler.
2) Brightness
Yesil Rengi ayarla.
3) Sharpness
Göruntünun nettiğinayarlar.
4) Color
Resim renghi ayarlar.
5) Tint
Ekrana, dogal bir ton katar.
Sadece AV ve S-Video modari icin calisir. Yalnizca video sinyali NTSC ise calisir.
Color Tone ASCD
[MENU] [A/√] [ENTER] [A/√] [ENTER] [A/√] [ENTER]
Renk tonu degiistirilebilir. Buna ek olarak renk Componentleri de kullanici tarafindan ozellestirilebilir.
1) Cool 2
2)Cool 1
3) Normal
4)Warm1
5)Warm2
Size ASCD
[MONTH] [A/V] [ENTER] [A/V] [ENTER] [A/V] [ENTER]
Boyutudegiistirebilirsiniz.
1)16:9
2)Zoom 1
3)Zoom 2
4)4:3
[ZOOM1, ZOOM2, DTV - 1080i (veya 720p üsti) ∈in mevcut degildir.]
Digital NR (Dijital Gurultu Azaltma) ASCD
[MONTH] [A/V] [ENTER] [A/V] [ENTER] [A/V] [ENTER]
Gurultu Yoketme ozelligi icin Off/On islemini uygulayin.
Dijital Gurultu Yoketme ozelligi, daha temiz ve net resimlerden zevk almani saglar
1) Off
2) On
Film Mode ASC
[MONTH] [A/ V] [ENTER] [A/ V] [ENTER] [A/ V] [ENTER]
Film Modunu Acp/Kapatabilirsiniz (Film Mode Off/On).
Film Modu özelliigi, tiatro kalitesinde görtunüleme deneyimi sunar.
(DVI-Video Modda KullaniIamaz)
1) Off
2) On
PIP Picture ASCD
[ \text{[MENU]} \rightarrow [\text{A} / \text{V}] \rightarrow [\text{ENTER} ] \rightarrow [\text{A} / \text{V}] \rightarrow [\text{ENTER} ] \rightarrow [\text{A} / \text{V}] \rightarrow [\text{ENTER} ] \rightarrow [\text{A} / \text{V}] \rightarrow [\text{ENTER} ] \rightarrow [\text{A} / \text{V}] \rightarrow [\text{ENTER} ] \rightarrow [\text{A} / \text{V}] \rightarrow [< / >] } ]
PIP Ekran Ayarlarini ayarlayabilirsiniz.
1) Contrast
Ekranda PIP penceresinin Kontrastini ayarlar.
2) Brightness
Ekranda PIP penceresinin Parlakligini ayarlar.
Kullanlabilir Modlar:PIP
Sound
Kullanilabilir Modlar
PC/BNC/DVI
AAV
S S-Video
C Component
D DVI-Video
Mode PASC0
[MONTH] [A/V] [ENTER] [ENTER] [A/V] [ENTER]
Monitor, yerleşik uygunluk dizeyi yüksek stereo amplifakator icerir.
1) Standard
Standard fabrika ayarlari icin Standart segeneğini belirtin.
2) Music
Müzik videoso veya konseri seyrederken Muzik seceneğinci belirtin.
3) Movie
Filim seyrederken Filim seceneğini belirtin.
4) Speech
Dahaçok konusma icerenbir (ormejin,haberler)programseyrederkenKonusma'yi segin.
5) Custom
Ayarli kisesil tercihlere gore ayarlamak isterseniz, Ozel secenegini belirtin.
Custom PASC0
[MONTH] [A/V] [ENTER] [A/V] [ENTER] [A/V] [ENTER] [] [ENTER]
Ses ayarli, kisel tercihlerinize uygun olarak ayarlanabilir.
1) Bass
Ses ayarli, kisesi tercihlerinize uygun olarak ayarlanabilir.
2) Treble
Yuksek frekans sesi vurgular.
3) Balance
Sol ve sag hopartorarasinda ses dengesini ayarlanamizi saglar.
[Se degeri 0'a ayarlanmis olsa bile ses duyabilirsiniz.]
Not
- Resmi Sound islevini kullanarak ayarlarsaniz, Sound Mode Custom moduna doner.
Auto Volume PASCD
[MENUR] [A /V] [ENTER] [A /V] [ENTER] [A /V] [ENTER]
Yayinlayanlararasinda sesduzeyifarkliliikarini azaltir.
1) Off
2) On
SRS TS XT PASCD
[ \text{[MENU]} \rightarrow \left[\frac{\wedge}{\vee}\right] \rightarrow \left[\text{ENTER}\right] \rightarrow \left[\frac{\wedge}{\vee}\right] \rightarrow \left[\text{ENTER}\right] \rightarrow \left[\frac{\wedge}{\vee}\right] \rightarrow \left[\text{ENTER}\right] ]
SRS TS XT, 5.1 cok kanalli iceriigi iki hoparlor uzerinde calma sorununu czen patentli bir SRS teknojisidir.
TruSurround, sanal surround ses deneyimini dahili televizyon hoparlorerini de kapsayacak sekilde tum iki hoparlo calma systemleri uzerinden sunar. Tum cok kanalli bicimlerle tamamen uyumludur.
1) Off
2) On
[Uzaktan kumandadaki dokrudan dugme 'SRS' dugmesidir.]
Sound Select PASC
[MONTH] [A/V] [ENTER] [A/V] [ENTER] [A/V] [ENTER]
PIP açikken Ana veya Alt seçeneğini belirbetbilirsiniz.
1) Main
2) Sub
[Kullanilabilir Modlar: PIP]
Setup
Kullanilabilir Modlar

PC/BNC/DVI

AV

S-Video

Component

DVI-Video
Language PAsCD
[MONTH] [A/V] [ENTER] [ENTER] [A/V] [ENTER]
11 dilden birini secebilirsiniz.

- Segilen dil yalnizca OSD'nin dilini etkiler. Bilgisayarda calisan yazilimlari etkilemez.
- English, Deutsch, Espanol, Français, Italiano, Svenska, 日本語, 中国语, Pycckn, 汉國詞, Portugués
Time PASCD
Monitóru dacika cinsinden beliri bir sure icinde otomatik olarak kapanacak sekilde ayarlamak icin kullanin.
1)Clock Set
\[
\begin{array}{l}
[\text{MEN}]\rightarrow [\text{A}/\text{V}]\rightarrow [\text{ENTER}]\rightarrow [\text{A}/\text{V}]\rightarrow [\text{ENTER}]\rightarrow [\text{ENTER}]\rightarrow [\text{A}/\text{V}]\rightarrow [\text{ENTER}]\rightarrow [\text{A}/\text{V}]\rightarrow [\text{ENTER}]\rightarrow [\text{A}/\text{V}]\rightarrow [\text{ENTER}]\rightarrow [\text{A}/\text{V}]\rightarrow [\text{ENTER}]\rightarrow [\text{A}/\text{V}]\rightarrow [\text{ENTER}]\rightarrow [\text{A}/\text{V}]\rightarrow [\mathrm{enter}] \end{array}
\]
2) Sleep Timer
[ [MENU] \rightarrow [\wedge / \vee] \rightarrow [\text{ENTER}] \rightarrow [\wedge / \vee] \rightarrow [\text{ENTER}] \rightarrow [\wedge / \vee] \rightarrow [\text{ENTER}] \rightarrow [\wedge / \vee] \rightarrow [\text{ENTER}] \rightarrow [\wedge / \vee] \rightarrow [\text{ENTER}] \rightarrow [\wedge / \vee] \rightarrow [\text{ENTER}] \rightarrow [\wedge / \vee] \rightarrow [\text{x} / \vee] \rightarrow [\text{x} / \vee] \rightarrow [\text{x} / \vee] \rightarrow [\text{x} / \vee] \rightarrow [\text{x} / \vee] \rightarrow [\text{x} / \vee] \rightarrow [\text{x} / \vee] \rightarrow [\text{x} / \vee] \rightarrow [\text{x} / \vee] \rightarrow [\text{x} ]]
Dakika cinsinden beliri bir süre sonra Monitörün otomatik olarak kapanmasini saglamak icin kullanin (kapali), 30, 60, 90, 120, 150, 180)
3) On Timer
& [MENU] [ / ] [ENTER] [ / ] [ENTER] [ / ] [ENTER] [ / ] [ / ] [ENTER]\ & [ENTER] Monitorun belirenmis bir saatte otomatik olarak acilmasini ayarlamak icin kullanin. Monitorun otomatik olarak acildigi zaman kullanilacak modu, ses seviyesini kontrol etmek icin kullanin
4) Off Timer
[ \text{[MENU]} \rightarrow [\text{A} / \text{V}] \rightarrow [\text{ENTER}] \rightarrow [\text{A} / \text{V}] \rightarrow [\text{ENTER}] \rightarrow [\text{A} / \text{V}] \rightarrow [\text{ENTER}] \rightarrow [\text{A} / \text{V}] \rightarrow [\text{ENTER}] ]
Monitörun otomatik olarak acldigi zaman kullanilacak modu, ses seviyesini kontrol etmek icin kullanin.

- On Timer'da Yes seçerseniz, Off Timer'da Clock Set ayari yoksa, mesaji görtülenir: "Set the clock first".
Menu Transparency PASCD
[MONTH] [A/V] [ENTER] [A/V] [ENTER] [A/V] [ENTER]
Bilgisayarda calisan yazilmalar etkilemez.
1) High
2) Medium
3) Low
4)Opaque
Safety Lock PIN PASCD
[ \text{[MENU]} \rightarrow [\wedge / \vee] \rightarrow [\text{ENTER}] \rightarrow [\wedge / \vee] \rightarrow [\text{ENTER}] \rightarrow [0 \sim 9] \rightarrow [0 \sim 9] \rightarrow [0 \sim 9] ]
Parolayi degistirebilirsiniz.
Energy Saving PASCD
[MONTH] [A/V] [ENTER] [A/V] [ENTER] [A/V] [ENTER] [MONTH]
Bu ozellik enerji tasarrufu icin unitenin guc tuketimini ayarlar.
1) On
2) Off
Not
Bekleme guc tuketimini azaltmak istiyorsaniz, Energy Saving ogesini On olarak ayarlayin. Ancak, Enerji Tasarrufu nOn Olarak ayarladiinizda, MDC'nin uzaktan Power On islevini ve MagicNefin WOL (Wake On LAN) islevini kullanamazsiniz.
Video Wall PASCD
Video duvari, bir dizi video ekraninin birbirine baglanarak, her ekranin resin bir parcasini gostermesi ya da tum ekranlarda ayni resmin tekrarlanmasidir.
Video Wall açikken, Video Wall ekrani ayarlınülenebilir.
1) Video Wall
[MONTH] [A/V] [ENTER] [A/V] [ENTER] [ENTER] [A/V] [ENTER]
Secilen ekranin Video Duvarı ilelevi açar/kapatir.
-Off
- On
2) Format
\[
[\text{MENUR} ]\rightarrow [\text{AIV} ]\rightarrow [\text{ENTER} ]\rightarrow [\text{AIV} ]\rightarrow [\text{ENTER} ]\rightarrow [\text{AIV} ]\rightarrow [\text{ENTER} ]
\]
Bicim, bolunmug ekran gosterecek sekilde secilebilir.
- Full
Kenar boşluksuz tam ekran görtü saglar.
- Natural
Original en-boy oranini degistirmeden dogal bir görtuntu verir.
3) Screen Divider
[ \text{[MENU]} \rightarrow [\text{A} / \text{V}] \rightarrow [\text{ENTER} ] \rightarrow [\text{A} / \text{V}] \rightarrow [\text{ENTER} ] \rightarrow [\text{A} / \text{V}] \rightarrow [\text{ENTER} ] \rightarrow [\text{A} / \text{V}] \rightarrow [\text{ENTER} ] ]
Ekran bolunebilir.
Bolme sirasinda, farki sayida ekran secebilirsiniz.
- Ekran boluciden bir mod secin.
- Ekran Seçimi kismindan bir ekran seçın.
- Yer, secilen modda bir numaraya basilarak ayarlanacaktir.
-2x2
-3x3
-4×4
-5x5
-1x2
-2x1
-1x5
-5x1

- Video Wall (Video Duvari) calisiyyorken, PIP (Resim icinde Resim), Auto Adjustment (Otomatik Ayarlama), Image Lock (Goruntu Kilidi) ve Size (Boyut) islevleri kullanilamaz. PIP (Resim icinde Resim) calisiyyorken
Video Wall (Video Duvari) szelligin baslatilmasi PIP Off (PIP Kapali) durumuna geçilmesine neden olur.
Video Wall, MagicNet modunda calismaz.
Safety Screen PASC0
Safety Screen islevi, ekranda uzun sure sabit bir görtûgosterildiginde meydana gelebilecek görtû izlerini onlemek icin kullanilmaktadir.
-- Safety Screen islevi, beliri bir sure icin ekrundaki goruntuyu kayirirr.
-Bu islev, guc katpatildiginda kullanilamaz.
1) Safety Screen
[ \text{[MENU]} \rightarrow [\wedge / \vee] \rightarrow [\text{ENTER}] \rightarrow [\wedge / \vee] \rightarrow [\text{ENTER}] \rightarrow [\text{ENTER}] \rightarrow [\wedge / \vee] \rightarrow [\text{ENTER}] ]
Safety Screen islevinin, On (açik) ya da Off (Kapali) olmasini belirler.
-Off
- On
2) Interval
[MONTH] [A/ V] [ENTER] [A/ V] [ENTER] [A/ V] [ENTER] [A/ V] [ENTER]
Safety Screen isleminin calistirilmasi inc gerekli zaman araligi berlir. (1-10 Saat)
Zaman, aik kalma sresine gore hesaplanir.
Varsayilan olarak sure, 10 saate ayarlanmistir.
-1\~10 Saat
3) Second
[ \text{[MENU]} \rightarrow [\wedge / \vee] \rightarrow [\text{ENTER}] \rightarrow [\wedge / \vee] \rightarrow [\text{ENTER}] \rightarrow [\wedge / \vee] \rightarrow [\text{ENTER}] \rightarrow [\wedge / \vee] \rightarrow [\text{ENTER}] ]
Safety Screen isleminin calisturlacagi sureyi belirler. (1~5 Saniye)
Varsaylan olarak sure, 5 saniyeye ayarlanmistir.
Type-Scroll: 1~5 Second
- Type-Pixel, Bar, Eraser: 10~50 Second
4) Type
[MENUR ] [ / ] [ENTER ] [ / ] [ENTER ] [ / ] [ENTER ] [ / ] [ENTER ]
Safety Screen Type (Güvenlik Ekrani Tür) ayaralarıdehyişistire bilirsiniz.
- Scroll
- Pixel
- Bar
Eraser
Resolution Select P
[MONTH] [A/V] [ENTER] [A/V] [ENTER] [A/V] [ENTER]
Grafik kartinin czunurlugunu 1024 x 768 @ 60Hz, 1280 x 768 @ 60Hz, 1360 x 768 @ 60Hz ya da 1366 x768
@ 60Hz'e ayarladiginzda ekrandaki goruntu dizgun olmuyorsa bu islevi kullanarak (Resolution Select)
goruntunun belirtlen ozunurlukte gosterilmesini saglayabilirsiniz.
(Yalnizca PC/BNC Modunda Kullanilir)
1) Off
2) 1024 X 768
3) 1280 X 768
4) 1360 X 768
5)1366X768

- Menūn seīlmesine, yalīnizca grafik czūnūrūgū 1024 x 768 @ 60Hz, 1280 x 768 @ 60Hz, 1360 x 768 @ 60Hz ya da 1366 x768 @ 60Hz olduğunda izin verilir.
PASCD
\[
[\text{MENUR} ]\rightarrow [\text{A} /\text{V} ]\rightarrow [\text{ENTER} ]\rightarrow [\text{A} /\text{V} ]\rightarrow [\text{ENTER} ]\rightarrow [\text{ENTER} ]\rightarrow [< / > ]\rightarrow [\text{ENTER} ]
\]
Enerji tuketimini azaltmak amacyla Arkla 1sigi ayarlamak icin kullanilir.
Power On Adjustment PASCD
[ \text{[MENU]} \rightarrow [\wedge / \vee] \rightarrow [\text{ENTER} ] \rightarrow [\wedge / \vee] \rightarrow [\text{ENTER} ] \rightarrow [\text{ENTER} ] \rightarrow [\wedge / \vee] \rightarrow [\text{ENTER} ] ]
Ekranin Power On time degerini ayarlayin.
*Dikkat: Aşiril voltaj engellemek icin Power On time değerini daha uzun ayarlayin.
Reset
Parlayi degistirebilrsiniz.
1) Image Reset
[ \text{[MENU]} \rightarrow [\wedge / \vee] \rightarrow [\text{ENTER} ] \rightarrow [\wedge / \vee] \rightarrow [\text{ENTER} ] \rightarrow [\text{ENTER} ] \rightarrow [< / >] \rightarrow [\text{ENTER}] ]
(Yalnizca PC/BNC Modunda Kullanilir)
2)Color Reset P
[ \text{[MENU]} \rightarrow [\text{A} / \text{V}] \rightarrow [\text{ENTER} ] \rightarrow [\text{A} / \text{V}] \rightarrow [\text{ENTER} ] \rightarrow [\text{A} / \text{V}] \rightarrow [\text{ENTER} ] \rightarrow [< / >] \rightarrow [\text{ENTER}] ]
Multi Control
Kullanilabilir Modlar
PC/BNC/DVI
AAV
S S-Video
Component
D VDI-Video
Multi Control PASC
[ \text{[MENU]} \rightarrow [\wedge / \vee] \rightarrow [\text{ENTER} ] \rightarrow [\wedge / \vee] \rightarrow [\text{ENTER} ] \rightarrow [\text{ENTER} ] \rightarrow [0 \sim 9] ]
SET'e ayri bir ID atar.
1) ID Setup
SETeayribIDatar.
2) ID Input
Herbir SETin lletici iglevlerini semcik iqin kullan. Yalnizca ID'si lletici ayarina karstik gelen SET
etkinlestrupiril.
Dogrudan islevler
Kullanilabilir Modlar
PC/BNC/DVI
AAV
S S-Video
Component
D DVI-Video
MDC PASCD
Multi Control OSD ekranina gecer.
LOCK PASCD
Safety Lock islevini ayarlayin.
1) Lock On
2) Lock Off
:Kilidi aqiri.
Not
- Lock islevini ayarlfarken yalinizca uzaktan kumanda ve set uzerindeki Lock duğmelerini kullanabilirsiniz.
Monitor uzerinde onceden ayarlanmis password (parola) "0000"dir.
Not
- Lock islev tuşu icin parolayi sifirlama.
MUTE 1 8 6 On dugmesine basin. Parola '0000' olarak sifrlanacaktir. Parolanin sifrlanmasi
için uzak kontrl gereklidir.
Güvenlik Talimatlari
Giris
Baolantylar
Yazilimin Kullanilmasi
Monitor Ayarlanmasi
Sorun Giderme
Kendi Kendine Test Özelliigi
Kontrolu
Denelim Listesi
Sorve Yanit
Özellikler
Bilgiler
Appendix
TFT-LCD Monitor
www.samsung.com

Urun renge ve gorunmu modeline bagl olarak farklikk gosterebilir ve performans gelistirmeler nedeniyle urun ozellikleri onceden haber verilmeksizin degistirilebilir.
Sorun Giderme
Kendi Kendine Test Özelligi
Kontrolü
Not
- Servis cagirmadan once kontrol edin Servis cagirmadan once asaigidaki ogeleri kendiniz kontrol edin. Qzemediginiz sorunlar icin servise danisin.
Kendi Kendine Test Özelliigi Kontrolü
Monitorunzde,duzguncalisp calismadiginkontrol etmenizi saglayan bir kendi kendini sinama ozelligi vardir.
1) Hem bilgisayarinizi hem de monitorunuzi kapatin.
2) Video kablosunu bilgisayarin arkasindan cikarin.
3) Monitor acin.
Monitor video sinyali algilamadi normal calisma durumnda oldugunda siyah bir arka plan uzerinde asagida gosterilen sekil ("Sinyal Kablosunu Kontrol Edin") görtülenir. Kendini Sinama modundayken gug östergesi isigi yesil kalir ve sekil ekranda hareket eder.

Check Signal Cable PC
4) Monitorunzukapatin ve video kablosunu yeniden baglayin; sonra bilgisayarinizi ve monitorunuzu acin.
Önceki yordami uyguladiktan sonra monitorunuz,enkrani karanlik kaldiya, video denetleycisini ve bilgisayar sisteminizi kontrl edin;cunku monitorunuz dizgün calismaktadir.
> Check Cooling System
Ekranda "Check Cooling System" lletisi gosterilire, soogutma faninda bir sorun var demektir. Fani onarmak veya degistirmek icin bir servis merkezine basvurun.
Not Optimum Mode(En Uygun Mod Degil)
Ekranı 1360x768'den daha yuksek Çozunurlükte bile gorebilirsiniz. Ancak, bir dakka boyuncu aşagidaki mesaji görürsunüz. Ekran Çozunurlügün degişirmeyi ya da o sirada bulundugunuz modda kalmayi segebilirsiniz. Çozunurlük 85 Hz'den yuksekse, monitor 85 Hz'den yukseğini desteklemediğinden siyah bir ekran görürsunüz.
Not Optimum Mode
Recommended Mode 1360x768 60Hz
Not
- Monitor des stékledigi czünürkler veya frekanslar ögrenmek icin Belirtimler > Önceden Ayari Zamanlama Modlari konusuna bakir.
> Bakim ve Temizlik
1) Monitor Kasasinin bakim Güç kablosunun baglantisini).(ikardiktan sonra yumusak bir bezle temizleyin.

- Benzin, tiner veya benzeri yanici maddeler veya islak bez kullanmayin.
Ekranin zarar gormesini engellelemek icin Samsung temizlik malzemesi kullanilmasini oneririz.
2) Düz Panelli Göründü Ekrani Bakimi
Yumusak bir bezle (pamuklu) bastirmadan temizleyin.

- Hicbir zaman aseton, benzin veya tiner kullanmayin. (Ekran yizeyinde catlaklarvey abozumlaya neden olabilir.)
Kullanici kendisinin neden oldugu hasarlarin onarimiyla iliskili harcamalar ve maliyetleri odemekle yukumludur.
> Belirtiler ve Onerilen Eylemler
Not
- Monitor PC'den alinan gorsel sinyalleri yeniden olusturur. Bu nedenle, PC'de veya video kartinda sorun olmasi monitork karamasina, renklerin bozulmasina, parazite, Video modunun desteklenmemesine ve benzeri durumlara neden olur. Bu durumda oncelikle sorunun kaynagini kontrol edin, sonra da servis merkezine veya satciniza danisin.
1) Guc kordonunun ve kablosunun bilgisayara dizgun bir sekilde bagli olup olmadigi kontrl edin.
2) Bilgisayarin acilirken 3'len fazla sinyal sesi cikarip cikarmadi gini konrol edin. (Cikariyorsa, bilgisayarin ana karti igin satnsonrasi servis isteyin.)
3) Yeni bir video karli taktysaniz veya PC'yi monte etiyseniz, adaptor (video) sürcusun ve monitor sürcusun takip takmadiginizi kontrol edin.
4) Video ekraninin tarama hizinin 50 Hz -85Hz olarak ayarlanip ayarlanmadigi kontrl edin. (Maksimum gezünurluk kullanirken 60 Hz hizi gezmeyin.)
5) Adaptor (video) surucusunu yuklerken sorunla karilasarsaniz, bilgisayari Gvenli Mod da acin, "Denetim Masasi, Sistem, Aygit Yoneticisi" allndaki Ekran Bagdaustuncisi'm kaldirin ve adaptor (video) surucusunu yeniden yuklemesi icin bilgisayari yeniden baslatin.
Denetim Listesi
Not
- Asagidaki tablo olasorunlar ve czumlerini listeler. Servisi aramadan once soruno czup czemeyecinizi gormek icin bu bolmdekil bilgileri konrol edin. Yardima gereksiniminiz varsa lufen garanti karndaki veya Bilgi bolmundeki Telefon numarasini arayin ya da satiniza danisin.
Yuklemeyle ilgili sorunlar
Not
Sorunlar Czumleri
Monitor ekram titriyor
- Bilgisayar ve monitorarasindaki sinyal kablosunun saglam bir sekilde baglanmis ve sikistirlimis olup olmadigi ini kontrl edin. (Refer to Bilgisayarabgama konusuna bakin)
> Ekrana ilgili sorunlar

- Monitor ekramyla ilgili sorunlar ve gezumleri aşàgida listenmişir.
Sorunlar Czozumleri
Ekran bos ve guc goftergesi kapali
Guc kablosunun sikbir sekilde bagli ve LCD monitorn acik oldugundan emin olun. (Monitorunze Baglama konusuna bakin)
"Check Signal Cable" mesaji
Sinyal kablosunun PC veya video kaynaklarina sik bir sekilde bagloldugundan emin olun. (Monitoruna Bgama konusuna bakin)
- PC veya video kaynaklarinin aqik oldugundan emin olun.
Video adaptörünün seksimum Özūnūluk ve frekansı kontrol edin.
- Bu degerleri Onceden Ayari Zamanlama Modlar Cizelgesindeki veilerle karsilastirin.
Resim dikey olarak salinyor.
- Sinyal kablosunun sağlam bir sekilde bagl olup olmadigi kontrol edin. Sağlam bir sekilde yeniden baglayin. (Refer to Bilgisayara Baglama konusuna bakin)
Göntü net degil. Resim bulanik.
Frekansai iliskin Coarse ve Fine ayaralarini calistirin.
- Tum aksesuarlari cikardiktan sonra yeniden acin (video uzatma kablosu, vb.)
- Czünurluk ve frekansi önerilen aralijklara ayarlayin.
- Bilgisayar video kartinda ayarlanan cüzünurluk ve frekans degerlerinin monitorun destekledigi aralık icinde olup olmadigi kontrl edin. Bu arahika degillerse monitor命数sunn altindaki geleeri Bilgi'ye ve Önceden Ayari Zamanlama Modlari 'na bakarak sifirlayin.
- Brightness ve Contrast degerlerini ayarlayin. (Brightness, Contrast konularina bakun)
Resim görtütsu kararl degil ve titriyor.
Resimde golge goruntuler var.
- OSD Renk Ayari menusunun altindaki Custom secenegini kullanarak rengi ayarlayin.
Göntü cok aik veya cok koyu
Ekran rengi tutarli degil
Renkli görtündu koyu gölgerle bozuluyor.
- Monitor ayarlarda:yapilan degisiklikleri OSD bellegine kaydediyor.
Beyaz renk kalitesi kotu.
Guc Gostergesi yesil olarak yanip sonuyor.
- Monitor Güç yönetimi sistemi kullaniyor.
Bilgisayarin faresini hareket ettirin veya klavyede bir tuasa basin.
Ekran karanlik veGPC goftergesisiurekli yesil yaniyor vya 0,5 vaya1 saniyel arahiklarla yanipsoniyor
Ekran boş ve yanıp.Sinceyor.
- MENU dugmesine bastiginzda "TEST GOOD" mesajini
Ekrana ilgili sorunlar

- Ses sinyalleryle ilgili sorunlar veçozumlere asagida listelenmistir.
Sorunlar Czozumlere
Ses yok
- Ses kablosunun hem monitorunuzdeki ses girisi baglanti noktasina hem de ses kartinizdaki ses cikişi baglanti noktasina sikica bagli oldugundan emin olun. (Monitorunze Baglama konusuna bakin)
- Ses dizeyini kontrol edin.
- Ses duzeyini kontrol edin.
Denetimi en yuksek noktaya cevirdirigin halde ses cok azsa, bilgisayarin ses karindaki veya yazilm programindaki ses denetimini kontrl edin.
Ses duzyeyi cok duiguk.
- Adjust the Treble and Bass to appropriate level.
>Uzaktan Kumandayla ilgili sorunlar

- Uzaktan kumandayla ilgili sorunlar ve gezumlere aşağida listenmişir.
Sorunlar Czumleri
Uzaktan kumanda Dügmeleri yanit vermiyor.
- Pil kutuplarin (+/-) kontrol edin.
- Pillerin bitmis olup olmadigi n kontrl edin.
Cihazin acik olup olmadigi nki konrol edin.
Güç kablosunun-SAğlambir sekilde bagl olup olmadınti kontrl edin.
Etrafta fluoresan veya neon isik olup olmadigi nktrol edin.
Soru ve Yanit
Soru Yanit
Frekansi :(
Frekans, video kart yeniden yapilandirlak degistirilebilir.
Video karti desteginin, kullananan surucunun surumune bagli oldugunu unutmayin. (Ayrintilar icin bilgisayarin veya video kartinin kilavuzuna bakin.)
Czunurlugu nasil ayarlayabilirim?
- Windows XP:
- Özunurlugu Denetim Masasi, Görünüm ve Temalar, Göruntü, Ayarlar seçeneklerini kullanarak ayarlayin.
- Windows ME/2000:
- Özunurlugu Denetim Masasi, Göruntü, Ayarlar seçeneklerini,
kullanar ayarlayin.
- Ayrınlutar ile video kartı üretişine dinmiş.
Guc Tasarrufu islevini nasil ayarlayabilirim?
- Windows XP:
- Özünurlı Denetim Masasi, Gırkıum ve Temalar, Gırkı,
- Ayarlar seçeneklerini kullanarak ayarlayin.
- İslevi bilgisayarin BIOS-SETUP uygulamasindo veya ekran
- koruyucusunda ayarlayin. (Windows/Bilgisayar Kilavuzu'na\
- bakın).
- Windows ME/2000:
Czunurlu Denetim Masasi, Goruntu, Ayarlar seceneklerini kullanarak ayarlayin.
Isevi bilgisayarin BIOS-SETUP uygulamasinda veya ekran koruyucusaanda ayarlayin. (Windows/Bilgisayar Kilavuzu'ha bakin).
Dis kasayi/LCD panelini nasil temizleyebilirim?
Güç kablosunu;cikarin vesulandirlmis temizlik malzesemi veya dokrudan su kullanarak yumusak bir bezle monitör temizleyin.
Kasanin uzerinde deterjan veya k kalmamasina dikkat edin. Monitorn icine su girmemesine ozen gosterin.
© 1995-2008 SAMSUNG. ALL Right Reserved

Güvenlik Talimatlari
Giris
Baolantylar
Yazilim Kullanilmasi
Monitorun Ayarlanmasi
Sorun Giderme
Özellikler
Genel
PowerSaver
Önceden Ayari
Zamanlama Modari
Bilgiler
Appendix
TFT-LCD Monitor
www.samsung.com

Urūn rēngī ve gōrūnūmū modeline bóglī ocak farklilik gōsterebilir ve performans gelistirmeleri nedeniyle urūn özellikleri Ónceden haber verilmeksizin degiştrilebilir.
Özellikler
Genel
> Genel
Genel
Model Adi SMT-4011
LCD Panel
Boyut 40,0 inc (diagonal) (101,6 cm)
Goruntu alan 885,168 mm (H) x 497,664 mm (V)
Piksel Araiigi 0,648 mm (H) x 0,648 mm (V)
Senkronizasyon
Yatay 30 81kHz
Dikey 56 75Hz
Ekran Rengi
Ekran Rengi 16,7 M renkler
Özünurlük
En iy cozunurluk 1360 x 768 / 1366 x 768 @ 60 Hz, kullanan grafik kartina baglidir
Maksimum czunurluk 1366 x 768 @ 60 Hz
Giris Sinyali, Sonlu
RGB Analog, DVI (Dijital Gorsel Arayuz) Uyumlu Dijital RGB.
75U ±%10'da 0,7Vp-p Pozitif Ayri H/V senk, Kompozit senk, SOG, TTL seviyesi, positif ya da negatif.
Maksimum Pikel Hizi
100MHz
Güç Kaynag
AC 100 - 240 V~ (+/- %10), 50/60 Hz
Sinyal Kablosu
15 pin - 15 pin D-sub kablo, cikarilabilir
DVI-D - DVI-D konektoru, cikarilabilir - istege bagli
Sinyal Konektoru
D-sub, BNC, DVI-D, YPbPr, S-VHS, VCR
Boyutlar (AxYxD) / Agirlik
971 x 582 x 118 mm / 38,2 x 22,9 x 4,6 inch (Altiksid)
971 x 629,5 x 223 mm / 38,2 x 24,8 x 8,8 inch (Altikli), 23 kg/50,7 lbs
971 x 629,5 x 228 mm / 38,2 x 24,8 x 9,0 inch (altikli ve caml), 27,7 kg/61,0 lbs
VESA Montaj Arayuzu
200 mm x 200 mm (Specialty(Arm) Montaj donanimiya birlikte kullanilir.)
Ortam kosullan
Calisma
Sicaklig: 10^ 40^ (50F\~104°F)
Nem : %10 ~ %80, yogunlasmayan
Sicaklig: -20^ 45^ (-4^ 113^)
Nem:%5~%95,yogunlaşmayan
Depolama
Ses Ozellikleri
Ses Girisi 1 RCA Jaki Kirmizi(Saç) Beyaz(Sol), 0,5 Vrms (-9 dB)
Ses Girisi 2 RCA Jaki Kirmizi(Sag) Beyaz(Sol), 0,5 Vrms (-9 dB)
PC Ses Girigi 3.5 0 ereo Jak,0,5 Vrms (-9 dB)
Frekans RF: 80 Hz ~ 15 kHz (-3 dB'de)
Tepki A/V: 80 Hz ~ 20 kHz (at -3 dB)
Tak ve Kullan Özelliigi
Bu monitor Tak ve Kullan uyumu sistemiere takilabilir. Monitor ve bilgisayar sistemleriarasindaki etkileşim en iyi calisma kosullarini ve monitor ayarlarini saglar. Cogunlukia, kullanin farki ayarlar seçmek istedigi duruml dirinda monitor kurulumu otomatik olak ilerler.
Kabul Edilebilen Nokta Sayisi
Bu urunde, 1ppm (milyonda bir) oranda duyarlaiga sahip gelismis yari iletken teknojisi kullanilarak uretilen TFT LCD panel kullanilmsti. Ir. Ancak KIRMIZI, YESIL, MAVi ve BEYAZ renk pikseleri arada sirada parlak gurunebilir vya arada bazisi siyah pikseler gorunebilir. Bunun nedeni kaliten dinusuk olmasi degildir, paneli herhangi bir kuskuya kapilmadan kullanabilisiniz.
- Ömeğin, bu uründeki TFT LCD alt piksellerinin sayisi 3.133.440dur.
Not
-Tasarim ve belirtimler onceden belirtilmeden degistirilebilir.
B Sinfi Cihaz (Meskende kullanimi için Bilgi illetisim cihazi)
- Bu urun meskende kullanim icin Elektromanyetik Uyumluk Yonetmelikleri ile uyumludur ve genel yerleşim bølgeleri dahil olmak üzere tum bølgelerde kulla bililir.
(B Sinifi cihazlar A Sinifi cihazlara gore daha az elektromanyetik etkiye sahiptir.)
PowerSaver
Bu monitorde PowerSaver adi verilen yerlegik bir guc yonetim sistemi vardir. Bu system, monitorunuzu, belli bir sure kullanilmadiiginda dusuk erenerj moduna geirerek erenerj tasarrufu saglar. Fareyi hareket ettirdiginizde veya klavyedekir bir taasa bastiginzda monitor otomatik olarak normal calisma durumuna doner. Enerji tasarrufu saglamak icin, kullanmaniz gerekmyen zamanlarda veya uzun sure kullanmayacaginiz durumlarda monitorunuzu KAPATIN. PowerSaver sistemi bilgisayariniza takilan VESA DPM uyumlu bir video kartiyla calisir. Bu ozelligi kurmak icin bilgisayariniza yuklu bir yazilm yardinici programini kullanin.
Durum Normal Caliima
Power saving mode
Mekanik Guc S/W
kapali
EPA/ENERGY 2000
Mekanik Guc S/W kapali
Guc Gostergesi Yesil Yesil Yanip S
Güç Tuketimi 210 W'dan daha az
1 W'dan daha az (Kapali modu)
1 W'dan daha az (Kapali modu)
0W (Guc duğmesi)

Bu monitor VESA DPM islevi alan bir bilgisayarla kullanilrsa EPA ENERGY STAR® ve ENERGY2000 ile uyumludur. SAMSUNG ENERGY STAR® is orte alarak, bu urun ereri verimlligi acisindan ENERGY STAR® yongelerine uygun oldugunu belirlemistir.
Önceden Ayarlı Zamanlama Modlari
> Onceden Ayarli Zamanlama Modlan
Bilgisayardan gonderilen sinyal asagidaki Onceden Ayari Zamanlama Modlari ile ayniya, ekran otomatik olarak ayarlanir. Ancak sinyal farklya saig tsigi yanmaya devem ederken ekran kararabilir. Video kartinin kilavuzuna bakin ve ekran asagidaki gibi ayarlayin.
Ekran Modu Yatay Frekans (kHz) Dikey Frekans (Hz) Pikesel Saati (MHz) Sync Polaritesi (H/V) IBM, 640 x 350 31,469 70,086 25,175 +/- IBM, 640 x 480 31,469 59,940 25,175 -/- IBM, 720 x 400 31,469 70,087 28,322 -/+ MAC, 640 x 480 35,000 66,667 30,240 -/-
MAC,832x624 49,726 74,551 57,284 -/-
VESA,640x48037,86172,80931,500-/-
VESA,640x48037,50075,00031,500
VESA,640x48043,26985,00836,000-/-
VESA,800x60035,15656,25036,000+/+
VESA,800x60037,87960,31740,000+/+
VESA,800x60048,07772,18850,000+/+
VESA,800x60046,87575,00049,500+/-
VESA:800x60053,67485,00056,250+/-
VESA, 1024 x 768 48,363 60,004 65,000 -/
VESA,1024x76856,47670,06975,000-/-
VESA, 1024 x 768 60,023 75,029 78,750 +/-
VESA, 1024 x 768 68,677 85,997 94,500 +/-
VESA,1360x76847,71260,00085,500+

Yatay Frekans
Ekranin sag kenarini sol kenarina baglayan bir satrin yatay olarak taranma suresine Yatay Dongu denir ve Yatay Dongun tersi alinarak elde edilen sayiya da Yatay Frekans ad verilir. Birim: kHz
Dikey Frekans
Ekranda kullanicinngorebilecebirgoruntolusmasisin, floresan lambalara benzer sekilde,ayni goruntunun saniyede pek cok defa yinelenmesi gerekir. Bu yineleme sikligina Dikey Frekans veya Yenileme Hizdenir.Birim:Hz
© 1995-2008 SAMSUNG. ALL Right Reserved

Güvenlik Talimatlari
Giris
Baolantylar
Yazilimin Kullanilmasi
Monitorun Ayarlanmasi
Sorun Giderme
Özellikler
Bilgiler
Daha Iyi Goruntu Elde
Etmek Icin
URUN BILGILERI
(Görüntü Sabitlemesiz)
Appendix
TFT-LCD Monitor
www.samsung.com

Urun renge ve gorunmu modeline bagl olarak farklik gosterebilir ve performans gelistirmeler nedeniyle urn ozellikleri onceden haber verilmeksizin degistirilebilir.
Information
Daha Iyi Goruntu Elde Etmek icin
En iyi goruntu kalitesini elde etmek icin bilgisayarin denetim masasindan bilgisayar cozunurlugunve ekran enjeksiyon hizini (yenileme hizi) aagida agklandigi gibi ayarlayin. TFT-LCD de en iyigortu kalitesi saglanmazsa, ekrandaki goruntun kalitesi dusuk olabilir.
Czunurluk:1360x768
-Dikey frekans (yenileme hizi): 60 Hz
Bu urunde, 1ppm (milyonda bir) oraninda duyarilgha sahip gelismis yari itletken teknojisi kullanilarak uretilen TFT LCD panel kullanimistr. Ancak KIRMIZI, YESIL, MAVi ve BEYAZ renk pikselleri arada sirada parlak gurunibilir veya arada bazi siyah pikseller gurunbilir.
Bunun nedeni kalitenin dusuk olmasi degildir, paneli herhangi bir kuskuya kapilmadan kullanabilirsiniz.
Orneigin, bu urundeki TFT LCD alt piksellerinin sayisi 3.133.440dur.
Monitoru ve dis panel temizlerken luften onerildigi gibi cok az miktarda temizleme maddesyle yumusak ve kuru bir bez kullanin; temizledikten sonra urunu iyice silerek parlatin. LCD alan, uzerine bastirmadan yumusak bir sekilde silimmelidir.
Fazla bastinirsa, uzerinde iz birakilabilir.
Resim kalitesinden memnun degilseniz, pencere kapatma dugmesine bastiginiza ekranda gorunecek olan "otomatik ayar islevini" kullanarak daha iyi bir resim elde edebilirsiniz.
Otomatik ayar sonrasinda da görtünde bozkluklar vara, FINE/COARSE ayar islevini kullanin.
Uzun sure sabit bir ekrani goruntulerseniz, goruntu kalintilari vya bulaniklik olusabilir.
Uzun sure monitörden uzak kalacaksaniz, enerji tasarrufu moduna gecin veya hareketti görtüntüler iceren
bir ekran koruyucu ayarlayin.
URUN BILGILERi (Goruntu Sabitlemesiz)
Görüntü Sabitlemesi nedir?
Bir LCD paneli normal kosullarda calistirildiginda goruntu sabittemesi olugmayibilir. Normal kosullar, surekli olarak degisen desenler olarak tanimlanir. LCD paneli uzun sure sabit bir desende calistirldiginda (12 saatten fazla),bir pikselde svi kristalini (LC) calistiran elektrolararasinda hafif bir voltaj farko olabilir. Elektrolararasindaki voltaj farka zamanla artar ve svi kristalin zayiflamasina neden olur. Bu durum olustugunda, desen deigtiginde bir onceki goruntu gortunebilir. Bunonlemek icin, toplam voltaj farka azaltimaldir.

Güç Kapali, Ekran Koruyucu ya da Enerji Tasarrufu Modu
20 saatlik kullanimin ardindan 4 saat gucu kapali tutun
12 saatlik kullanimin ardindan 2 saat gucu kapali tutun
- Monitor PC Ekran Özelikleri Güç Şeması ile kapanmaya ayarlayin.
Mumkunse bir Ekran Koruyucu kullanin - Tek renkli bir ekran koruyucu ya da hareketli bir gortuniÖnerilir.
Renk Bilgilerini periyodik olarak degistirin

Not
- iki farkli renk kullanin
2 farki renkle Renk Bilgilerini 30 dakikada bir dondurun.
- Buyuk parlaklik farkina sahip karakter ve arka plan rengi kombinasyonlari kullanmaktan seksin.
Kolayca goruntu sabittemesine yol açabilen gri renklerini kullanmaktan kaçınin.
Kacinlmasi gerekenler: Buyuk parlaklik farkina sahip renkler (Siyah ve Beyaz, Gri)


Karakterlerin rengini periyodik olarak degistirin
Kucuk parlaklik farkina sahip parlak renkler kullanin
- Dongü : 30 dakikada bir karakterlerin rengini ve arka plan rengini degişirin.

30 dakikada bir hareketli karakterleri degistirin.

- Tum alan periyodik olarak Logo ile birlikte hareketli görtü görtültler.
- Dongü: 4 saatlik kullanimin ardindan 60 saniye boyunca Logo ile birlikte hareketli görtunj görtunjüter.
- Monitorunüz gürntu sabitlemesinden korumanin en iyi yolu, Güç kapatmak ya da siz
kullanmadiginiz zamanlarda PC'nizin vya Sisteminizin bir Ekran Koruyucu programi calistimasidir.
Ayrica talimat kilavuzuna dayanarak Garanti hizmeti de sinirlanacaktir.
Urune Screen Scroll (Ekran Kayirdma) islevi uygulayin
Screen Scroll (Ekran Kayirdma) islevi uygulayin
-Beliri: Yukari aaga hareket eden Siyah Renkli Yatay Qubuk.

-Yontem segin
. Talimat Kilavuzu : OSD Menu -> Set Up -> Safely Screen -> Screen Scroll (OSD Menu → Ayarlar
→Güvenlik Ekrani -> Ekran Kayirdma)
ZamanAraligi:1\~10saat(Onerilen:1)
. SURE: 1~5 saniye (Onerilen: 5)


(Lüften CD Kullanim Kilavuzunun "OSD İslavi"nde olmasina dikkat edin, bazı modellerde bulunmaz)
Urune Pixel (Piksel) islevi uygulayin
Ekran Pixel (Piksel) islevi uygulayin
-Belirti: Yukari aaga hareket eden Siyah Renkli Nokta.

- Yontem segin
. Talimat Kilavuzu: OSD Menu -> Set Up -> Safety Screen -> Pixel (OSD Menu -> Ayarlar ->
Güvenlik Ekrani -> Pikesel
ZamanAraligi:1\~10saat(Onerilen:1)
. SURE: 10-50 saniye (Onerilen: 50)
Ekran Cubugu islevi uygulayin
-Beliri: Yukari aaga hareket eden Siyah Renkli Yatay / Dikey Cubuk.

-Yontem secin
. Talimat Kilavuzu :OSD Menu Set Up Safety Screen Bar (OSD Menu Ayarlar Güvenlik Ekrami Cubuk)
. Zaman Araligi : 1 ~ 10 saat ( Onerilen : 1 )
. SURE : 10 - 50 saniye ( Onerilen : 50 )

(Lutfen CD Kullanim Kilavuzunun "OSD lsevi"nde olmasina dikkat edin, bazimodellerde bulunmaz)

Urine Ekran Silme Iglevi uygulayin
Ekran Silme islevi uygulayin
-Belirti:2 Dikey blok, ekrani silerek hareket eder

- Yontem segin
. Talimat Kilavuzu : OSD Menu -> Set Up -> Safety Screen -> Eraser (OSD Menu -> Ayarlar -> Güvenlik Ekramı -> Ekran Kayirdma -> Silici)
ZamanAraligi:1\~10saat(Onerilen:1)
. SURE: 10~50 saniye (Onerilen : 50 )

(Lutfen CD Kullanim Kilavuzunun "OSD İslavi"nde olmasina dikkat edin, bazı modellerde bulunmaz)
© 1995-2008 SAMSUNG. ALL Right Reserved
TFT-LCD Monitor

www.samsung.com
Urūn rēngī ve gōrūnūmū modeline bóglī ocakarkfrikik gōsterebilir ve performans gelistirmeleri nedeniyte urūn özellikleri Ónceden haber verilmeksizin degiştrilebilir.
Appendix
Dünyanin her yerinden SAMSUNG' a ulasin
Güvenlik Talimatlari
Giris
Baolantylar
Yazilimin Kullanilmasi
Monitorun Ayarlanmasi
Sorun Giderme
Özellikler
Bilgiler
Appendix
Dunyanin her yerinden
SAMSUNG'alaasin
Kosullar
Yetki Bildirimi
Not
Samsung ürünleri ile ilgili sorulariniz ya da yorumliniz varsa lüften SAMSUNGMusteri hizmetleri merkezi ile temasaGPC.
North America
U.S.A 1-800-SAMSUNG(726-7864) http://www.samsung.com/us CANADA 1-800-SAMSUNG(726-7864) http://www.samsung.com/ca MEXICO 01-800-SAMSUNG(726-7864) http://www.samsung.com/mx
Latin America
ARGENTINE 0800-333-3733 http://www.samsung.com/ar BRAZIL 0800-124-421
4004-0000 http://www.samsung.com/br CHILE 800-SAMSUNG(726-7864) http://www.samsung.com/cl COLOMBIA 01-8000112112 http://www.samsung.com.co COSTA RICA 0-800-507-7267 http://www.samsung.com/latin ECUADOR 1-800-10-7267 http://www.samsung.com/latin EL SALVADOR 800-6225 http://www.samsung.com/latin GUATEMALA 1-800-299-0013 http://www.samsung.com/latin JAMAICA 1-800-234-7267 http://www.samsung.com/latin PANAMA 800-7267 http://www.samsung.com/latin PUERTO RICO 1-800-682-3180 http://www.samsung.com/latin REP. DOMINICA 1-800-751-2676 http://www.samsung.com/latin TRINIDAD & TOBAGO 1-800-SAMSUNG(726-7864) http://www.samsung.com/latin VENEZUELA 0-800-100-5303 http://www.samsung.com/latin
Europe
AUSTRIA 0800-SAMSUNG(726-7864) http://www.samsung.com/at
BELGIUM 0032 (0)2 201 24 18 http://www.samsung.com/be
CZECH REPUBLIC 844 000 844 http://www.samsung.com/cz Distributor pro Českou republika: Samsung Zrt., Česka organizačné složka Vyskočilova 4, 14000 Praha 4 DENMARK 70 70 19 70 http://www.samsung.com.dk FINLAND 030-6227 515 http://www.samsung.com/fi FRANCE 3260 SAMSUNG(726-7864) http://www.samsung.com/fr 08 25 08 65 65 (€ 0,15/min) GERMANY 01805-121213 (€ 0,14/Min) http://www.samsung.de HUNGARY 06-80-SAMSUNG(726-7864) http://www.samsung.com/hu ITALIA 800-SAMSUNG(726-7864) http://www.samsung.com/it LUXEMBURG 0035 (0)2 261 03 710 http://www.samsung.com/be NETHERLANDS 0900 20 200 88 (€ 0,10/Min) http://www.samsung.com/nl NORWAY 815-56 480 http://www.samsung.com/no POLAND 0 801 801 881 http://www.samsung.com/pl 022-607-93-33 PORTUGAL 80 8 200 128 http://www.samsung.com/pt REPUBLIC OF IRELAND 0818 717 100 http://www.samsung.com/ie SLOVAKIA 0800-SAMSUNG(726-7864) http://www.samsung.com/sk SPAIN 902 10 11 30 http://www.samsung.com/es SWEDEN 0771-400 200 http://www.samsung.com/se SWITZERLAND 0800-SAMSUNG(726-7864) www.samsung.com/ch U.K 0870-SAMSUNG(726-7864) http://www.samsung.com/uk
CIS ESTONIA 800-7267 http://www.samsung.ee LATVIA 800-7267 http://www.samsung.com/lv LITHUANIA 8-800-77777 http://www.samsung.IT KAZAKHSTAN 8-10-800-500-55-500 http://www.samsung.kz KYRGYZSTAN 00-800-500-55-500 RUSSIA 8-800-555-55-55 http://www.samsung.ru UKRAINE 8-800-502-0000 http://www.samsung.ua UZBEKISTAN 8-800-120-0-400 http://www.samsung.uz
Asia Pacific AUSTRALIA 1300 362 603 http://www.samsung.com/au CHINA 800-810-5858, 010- 6475 1880 http://www.samsung.com.cn HONG KONG 3698-4698 http://www.samsung.com/hk INDIA 3030 8282, 1800 110011 http://www.samsung.com/in/ INDONESIA 0800-112-8888 http://www.samsung.com/id JAPAN 0120-327-527 http://www.samsung.com/jp MALAYSIA 1800-88-9999 http://www.samsung.com/my NEW ZEALAND 0800SAMSUNG(726-7864) http://www.samsung.com/nz PHILIPPINES 1800-10-SAMSUNG(726-7864) http://www.samsung.com/ph SINGAPORE 1800-SAMSUNG(726-7864) http://www.samsung.com/sg
THAILAND 1800-29-3232, 02-689-3232 http://www.samsung.com/th
TAIWAN 0800-329-999 http://www.samsung.com/tw
VIETNAM 1800588889 http://www.samsung.com/vn
Middle East & Africa
SOUTH AFRICA 0860-SAMSUNG(726-7864) http://www.samsung.com/za
TURKEY 4447711 http://www.samsung.com.tr
800-SAMSUNG (726-7864)
8000-4726
http://www.samsung.com/mea
Kosullar
Senk. Sinyali
Senk. (Senkronize) Sinyaller, monitorde istenen renkleri görtülemek,—çin gereken standart sinyalleri belirrt.
Dikey ve Yatay Senk. Sinyalleri olarak ikiye ayiril. Bu sinyaller ayarlanan gezünurluk ve frekansta normal
renkli görtüller gosterir.
Senk. Sinyali türleri
Ayrı Bu, monitör dikey senk. sinyalleri iletme Şemas,idir. Birleşik Bu, dikey senk. sinyallerin bir birleşik sinalde birleşimi ve monitör iletme Şemas,idir.Monitor Birleşik sinyali Özgün renk sinyalliner ayirarak renk sinyallerin,gürünüler.
NoktaAraligi
Monitördeki görtüntü kirmizi, yesil ve mavi noktalandan olusur. Noktalar birbirine yakinlattachika gezünurluk artar.
Ayni renkteki iki nokta arasindaki uzakliga "Nokta Araiigi" denir. Birim: mm
Dikey Frekans
Gortuyu olusturnak ve kullanciya gostermek icin ekranin saniyede birkac defa yeniden czilmesi gerekir.
Saniyedeki yineleme sikligina Dikey Frekans veya Yenileme Hizi denir. Birim: Hz
Örnek: Ayni,isn kendini saniyede 60 defa yinelerse,bu 60Hz olar kabul edilir.
Yatay Frekans
Ekranin sag kenarini sol kenarina baglayan bir satir yatalak tarama suresine Yatay Dongu denir. Yatay
Döngün lersi alinar edle edilen sayiya Yatay Frekans denir. Birim: kHz
Taramali ve Taramasiz Yontemler
Ekranin en ustunden en alta kadar olan yatay salirlari sirasiyla gostermeye Taramasiz Yontem, tek
numarali satlarla cift numarali satlarl donusumlu olarak gostermeye Taramali yontem denir. Net bir grotu
olusmasini saglamak icin cogu monitor Taramasiz yontemi kullanilir. Taramal yontem televizyonlarda
kullanilan yontemdir.
Tak ve Kullan
Bu islev, bilgisayarla monitor arasinda otomatik bilgi degisimine alanak taniyar kullanciya yuksek kaliteli bir
ekran sunar. Bu monitor Tak ve Kullan islevi icin uluslararasi VESA DDC standardina uygundur.
Czunurluk
Ekran gortusu olusturmak icin kullanan yatay ve dikey noka sayisina "cozunurtuk" denir. Bu sayi ekranin
hassasiyetini gosterir. Yuksek cozunurluk, ekranda daha fazla goruntu bilgisigi gosterilmesine olanak
sagladigindan bircok gorevi gerceklestimeye uygundur.
Örnek: Çozünurlık 1360 X 768 ise, ekran 1360 yatay nokta (yatay Çozünurlık) ve 768 dikey
cizgiden (dikeyoczūnūrūk) olusuyor demektir.
Multiple Display Control (MDC)
Coklu Ekran Kontrolu (MDC), ceseitli ekranlarin kolayca ve aynianda bir bilgisayar uzerinde calistinimasini
saglayan bir uygulamadir. Bilgisayar ve ekranarasindaki iletisim icin bir seri iletisim standardi olan RS-232C
kullanilir.
Bu belgedeki bilgiler onceden belirtilmeden deigistirilebilir.
© 2008 Samsung Electronics Co., Ltd. All rights reserved.
Samsung Electronics Co., Ltd. sirketinin yazili izni olmadan herhangi bir sekilde yeniden uretilmesi kasinlikle yasaktir.
Samsung Electronics Co., Ltd. bu belgedeki hatalardan veya bu malzemenin yapisi, performansi veya kullanimina bagli olarak ortaya cikan veya olusan zararlardan sorumlu tutulamaz.
Samsung, Samsung Electronics Co., Ltd. sirketinin kaytili ticari markasdir; Microsoft, Windows ve Windows NT Microsoft Corporation sirketinin kaytili ticari markalandir; VESA, DPM ve DDC Video Electronics Standard Association'in kaytili ticari markalarir; ENERGY STAR adi ve amblemi U.S. Environmental Protection Agency'nin (EPA) kaytili ticari markasdir. Samsung Electronics Co., Ltd. sirketi ENERGY STAR ı Ortağlıralak, enerji verimiligi açsindan bu urünün ENERGY STAR yonergelerine uygün Oldaguṇu belirlemistir. Burada sozu edilen diger tum urun adlan ilgili sahiplerinin ticari markaları vya kaytili ticari markalandir.
SAMSUNG
Manufacturer:SAMSUNG ELECTRONICS CO.,LTD
12th FL., Samsung Main Bldg., 250, 2-ga, Taepyung-Ro
Seoul, Korea
Tel:+8227277114
LVD: P.O. Box 73 Blindern, N-0314 Oslo, Norway
Tel)47-22-96-03-30,Fax)44-22-96-05-50
EMC: Samsung Electronics Co., Ltd. EMC Test Laboratory
416 Maetan-3 Dong, Yeongtong-gu, Suwon City, Gyeonggi-do,
Korea, 442-742
Tel) 82-31-200-2185, Fax) 82-31-200-2189

TruSurround xt, SRS ve (●) Sembolu SRS Labs, Inc. in ticari markalandir. TruSurround xt teknojisi SRS Labs, Inc. in lisansiyla kullanilmistr.
2. *epx MOHITopa
    3. Noidctabka
4.ДиHamNK
 UP5. KaYcTaHOBnTB KpOHwTeH VESA
- Пиустановке VESA Heo6xodIMO HANMHe COOTBeTCTBnC MeKdyHapOndbIMn CTaHdApTaMn VESA. HΦopMaunno nokynke n yctahOBKe kpoHtneHa VESA: tO6bI noaTb 3aKa3, o6paTntcB K 6nKaiMeMy DnCTPn6bHToTpOy fnpMb Samsung. Nocne pa3meueHHa 3aKa3a kpoHtneH 6yET yCTaHOBHeN CNEuaHNTamn. - IpepeMaTb MOHITOp c KK-DnCnJneem DoJIKHBi, no KpaHHe Mepe, 2eNoBeka. KOMnAHHa Samsung He Hecet OTBETCTBeHHocTh 3a NIObIe NOBpeXdHnN 3dEINr INTpaMbI, pON3OWeDwne B Cnyae camoCToTeJIbHOyCTAHOBKe KpENNEHn HA CTHe NOKynATEm.   MONTAKKa KPOHTeHa Ha CTeHe NcNoB3yIe ToJIbKO KpeNExKHbIe BnHTbI C "ONOBKO NOJ WnUdAmETpOM 6 MM n dnnHOIOT 8 do 12 MM. UP6. YctaHOBka HAcTeHHO"O KPOHtEiHa
-Дя установский Крштейнам obpaитecь к спунлесу. Samsung Electronics He Hecet OTBETBeHHocTn 3a NOBpeKdEHNr H3dEINr Hnn yUeep6 nOtp6HTeHn npn yCTaHOBe N3dEINr nOTpe6bTeHem. - N3dene npeHa3haeHO nIy yctaHOBKn Ha 6eTOHHbIX cTeHX. PnYcTaHOBKe Ha OTHTyKATypeHHbIe IIN DEpeBAAHbIe NOBepxHOCTN N3dene MOKET DEpKaTbCt He HADEXHO. KOMNOHEThbI
IcnoJIb3yIte TOJIbKO Te KOMnOHeHTbI n pInHaJdNExKHOCTN, KOToPbIE NOCTABnIOTcB MBeCTe C 3dJIeHEm.  HacteHHbKPOHHTeH (1)  ПeТЯ (Лeвая: 1, Правая 1)  Пл actikobblдерха teь (4)  BnHT(A) (11)  BnHT(B) Ankep (4) (11) C6opKa HacTeHHoro KpoHHTeHa
1
BCTaBtE n 3aTnHTe qKcnpyUoU BnHT no HAnpaBHeHIO CTpeKN. Pocne 3TOrO 3akpenITE KPOHHTeH HA CTHe. A.ФИКСИРУЮДПИ B.HaTeHHbKPOHHTeH C.Петли(Левая) D. Петта (правая)  ImeHOTcA DBe netn (neBa n npab).NcnoB3yTe HxHyIO netnIO. 2  Ipejde yem CBePnTb CTehy, npOBepbTe pacToHHe MExdy DBymra KOHTPOBOUHbIMN OTBepCTnMM Ha 3aDHei CTOPOHe n3DeJIYr. Ecnn paCToHHe cNIuKOM MaIO NIn BENko, tOBoIero OTperynpoBaTb, Ocna5Be BCE nIN HEKOTOpHe n4 BnHToHa CTEHOM KpOHTeHHe. A.PacctoHMe MEKdy DByM KHTPOBOUHbIMN OTBepCTnMn  3 PpOBepbTe CXemy yCTaHOBKN IOTMeTbTe MeCt aCBpeHnHa CTeHe. DnA CBpeHnA OTBePcTn rny6HnO 60nee 35 MM nCnonbayte CBepNo 5,0 MM. 3aKpEnTe KaKdbI aHKepe B COOTBeTCTByIOUeM OTBepCTIM. CoMeCTNe KaKdoe OTBepCTne KPOHUsTeHa NnETIN C COOTBeTCTBYIOUIMN OTBepCTmMn aHKepeBACTaBtE N 3aTaNHTe 11 BuHToB A. Для крениня Идения На HabteHHOM КpoHштейне
BHeuHn BnI3eJnMa MoKet BapbnpoBaTbcra B 3aBcunMoCTN OT MoeJIn. (C6opka nactkoBOrO dePkaTeJI n BuHTa npOnCxOAnT TaK JVE.)  1  2  1.3akpeINBn3deIHe Ha hacteHHom kpoHHTeHne, y6eDITcEb, YTO OHO npaBnH0 3aФKcnpoBaHO HaJeBOM N npaBOM nPACTIKOBbXdepKaTeJx. 2.При установке Идения на кронштейн сеньITE,чTOБы пальи He nonanB OТВеретгЯ. 3.Y6eHNTecb,HTo HAcTeHHbKpOHHTeHN HAdEXKHO pNkpenHeKCTeHe,BIpOTNBOM Cnyae NocYe YcTaHOBKn NdEJIne MOKeT He DePKaTbCa Ha MeCTe.  3  4 OTBnHTte 4 BNHTa Ha 3aDHe CTOpOHe n3DeNIA. BCTaBtBe BHT B nTnactKOBbI DepeKaTeIb. 3aTnHTe 4 BHTa B ware 2 (nlaactNKOBbI depkataB + BHT B OTBepCTna Ha 3aHei CTopoH eNII. YdAnTe CTOnOpHbI WtNΦT 3 N BCTaBbTe 4 DEpKaTeRn I3DEnn B COOTBETCTBYIOuHe OTBePcTH Ra KPOHTeHa 1. 3aTeM npOHO 3AkpeNTe I3DeNe 2 Ha KPOHTeHe. He 3a6yDbTe 3aHOBO BCTaBbTb N 3aФHKCnpoBaTb 3aUHTbIb WtNΦT 3, YTO6bI N3DEnne npOHO DEpKaNoCb Ha KPOHTeHe. A. MoHITOP B. HacteHHbI KPOHHTeH C. CTeHa  Pe"yInpOBka y"Ja hAcTeHNo"o KpoHtTeHa Ipeed yctahOBKOHa CTEny yCTAHOBnTe yroH NAKHOHa KPOHHTeHa Do-2°  1.3aKpeHnTe H3dJIne Ha HAcTeHHOM KpoHHTeHe. 2.ДЯperулровкугларжн'teидениез capeDnHyBepxHue ChactuTIN TAHHTe BnpeD (no HanpaBneHIO CTpeKKn). 3. Moxho yctahOBtbyrnoHaKHOHaKPOHHTeHaMeJy-2"n 20°  Y6eINTEcB, YTO npn yCTaHOBKe Yrna NCNOL3yTe npn peryIuropOBKe Yrna cepeHNHy BepxHeu cactn, a He neByIO nII npabyIO CTOPOHy N3dEJIIN.   Ppabnna TeHHNK 6e3onacHcTn BVeIeHne IopdknloyuHne KOMNNEKT DnY yCTaHOBKn NOCTABKN PoiKIOUeHMe MOHTOPa Pabota c nporpaMMHbIM oecneueHHeM Hactpo"ka MOHITOPa UcTaPHeHne HEnCnpaBHOCTe" Cneunphkaun &HΦopMaun PpnoKeHneTFT-LCD Monitor
www.samsung.com  Lbet H BHeHnBn H3dNMA MOry PaHbAChB 3aBNCIMoCTn OT MoEIN, a XapakTePcNTKn H3dNMA MOrY I3MeHrTcB6e npBaPntbHorO yBeDOMneHnC cIeNo yCOBepueHCTBOAHn.PoiKJIuOyeHne
KommneKTdna yCTAHOBKnIOdCTABKn PnmuMeaHne Vcnonb3yIe TOnbKO BuHtbl, BKNHOeHHbE B KOMnNEKt NOCTaBKn.npeodocTepexeHne
Samsung Electronics He Hecet OTBETCTBEHOCTHa NOpeKDeHnB B pe3yIbTaTe NcNoIb3OBAHnRA KpOHHTeHOB,OTNmuOHXxCR OTNCAHHBX Bblwe. > YctaHOBKa BpeMeHHa noCTaBka  npeodocTepexeHne NepeBepHnTe Ta6nHy "CAUTION".  1)3aunTHA KpbIbKa IcNoB3yETcI dI 3aunTbI OTBepCTra B HnKHeH qACTn MOHITopA, Kyda BCTaBnRAeTc naCTabKa. O6a3aTeNbHO ydaNTe 3aunTHyO KpbIbKy npn pnpcoedHHeHH BXoJaueB KOMnNEKT BPemHNO IOCTaBKn INN KOMnNEkTA NOCTaBKn (npOaTaC TOnJIbHo), a npn npncoeDHeHH KOMnNEkTA dI yCTaHOBKn HA CTeH 3akpoite OTBepCTne, IcNoB3y KpbIbKy dIg OTBepCTra. 2)YcTaHOBHTneByIO npaByIO nOCTaKN. 3)BCTaBBte NOCTaBky BOTBepCTne BOCHOBAHMMOHTOPA. BCTaBBte BHT BYkAsaHHoe OTBepCTne H3aBepHnre erO.(M4xL15) npedocetepexeHne
DAnHHaNoCTabKa npedHa3HauHe dnapeynpOBk yra na 03opa 3kaHa. KomnHaHa He Hecet OTBETCBHHOCTNa 3a yueep6, BO3HKuWn B pe3yIbTaTe NIOBOrO nCnONb3OBAHm NoCTabKn. HIKOrDa He nCnONb3yTe I3dEneB KaueCTBe NoCTabKn noNIO6bIe ppeMetbl. KOMNNEKT dny yctaHOBN NOCTABKN (npOdaetc rOtdbHo)     1)3aunTHnA KpbIuKa IcNoB3yETc nI 3aunTbI OTBepCTra B HnKHe Nactn MOHITOPa, Kyda BCTABnEeTc naCTabKa.Ob3aTeNbHO ydaNITE 3auNTHyO KpbIuKy npnpncOeHNHeHH BXoJaue B KOMnNEKT BPemHHOIOCTABKn INI KOMnJIeKTA NOCTABKN (npOdaetcO TdJIbHo), a npnpncOeHNHeHH KOMnNEKTA DnY YCTAHOBKn HA CTHe 3akpoTe OTBepCTne, IcNoB3y KpbIuKy dNt OTBepCTra. 2)Obpatnte BnMaHne Ha To, TTo6bl DeTaln 6bln yTaHOBHeB b npabInbHom noIOxHm n B COOTBeTCTByIOUne no3uNN. (M4 x L15) 3) BCTaBbTe noCTaBkY B OTBepCTne B OCHOBAHM MOHITopa. 4) BCTaBtBe BuHT Byka3aHHoe OTBepCTne 3aBepHnTe erO. (M4 x L15) NoKHOeHMe MOHTopaKa6enb nHTaHn3a3emne
Bcnyae HncnpabHocn npoBOd 3aemneHmOKeT npBecTe N npopaeHIO 3JeKtpueckm TOKOM. BbnoJNHte npabNbHOe noKnKooHMe npoBOda 3aemneHm nepeD noKnKooHEmyCTPOCTBA K 3JeKTPocETn. PnpOTKnIOHm npoBOda 3aemneHm npedBaPntBHO OTKnIOHTyCTPOCTBO OT 3JeKTPocETn. PnmuMeaHne
KMOHITOPy, KpOme KOMNbHTepa, MoKHO NOKnIOuATb TaKHe NcTOHnKy aYdNO-BuDEOCnHAnOB, KaKDVDnpomrPBbATEnn, BvdeOMaHHTofohBy ININ BvdeOKaMpeB. NpOboHyIO HnFOpMaUIO No NOkNIooHIO nCTOHmKOB ayDNO-BuDEOCnHAnOB CM. B NyHKeTcPecdCTBa ynpabEnHnNoIb3OBaTeR"B paadene "HaCtpoKa MOHITOPa",PnoknHueHHe K KomnbHotepy
 1) POncoeHnHTe 3neKtpueckn uhp BaWero MOHTopa K pa3bemy nTuHa H a3aHe nHaHeu MoHTopa. BknHouYte BbIKNoyatEn bNTaHn. 2) CyueCTByeT 3 cnocoba D-sub ka6enr KMOHnToP. Bb6epure OaHn 3 onncaHHbx Hxke cncoc6ob: 2-1)Unonb30aHme coeHHntenD-sub (ahanororo) Ha Bndeonnate. IIOKINHOHTe Ka6eBb D-SUB K 15-KOHrAKTHOMy NOpTy RGB Ha 3aDHeN NaHEn MoHITopo a 15- KOHTAKTHOMY NOpTy D-SUB HA KOMNbIOTpe.  2-2) NcnoIb3OBAHnE CoeHHInTeJ DVI (uΦpOBoro) Ha BnDeonnaTe. Iopknoyte kaebb DVI K npTy DVI(HDCP)Ha 3aHne nanein MoHntopa N npTy DVI Ha KOMnboTepe.  2-3) NcnoIb3ObaHHe coeHHInTeNa BNC (aHaanorOBoro) Ha BnDeonlaTe. IIOKNIOTHE KABeB BNC K npOy BNC/COMPONENT IN -R, G, B, H, V Ha 3aHne nAHeN MOHTOPA IN K15-KoHTAKTHOMY npOy D-SUBHa KOMNbIoTepe  3) CoeINHnTE ayINOka6enmpa3bEmbA Audio (L) n Audio (R) DVD-nponrpBbATEn, BIndeomarHnToPOHa INI BInDeOKaMepb C pa3bEamn ayINO-BxOoB MOHTopa L R. 4) BkniouHTe KOMnbHOTep mMOHTOp. PnIMeHaHHe # Ka6eB DVI INN BNC HE BXOJNT B KOMNJIeKT NOCTABKIN. Дя NOKynkДОONHNTeBHorO OOBpyoBaHnO obpaaHTecb MecTHbI cepBnchbl ueHtp Samsung Electronics. PnDkN&yHHe nCpOBO"o npOn"pbIbATEeY DVD  PpimmeaHne Takne htoHnKc cnHana, kau nphiobon npoirpbaTeNB DVD, noKnIOaOTc Ka pa3bemy MOHTopa DVI IN c noMooucbu Ka6eBraDVI. - Pocne 3TOrO BCTabBe DNck DVD B npOnpBbATEnb N BKIOHnTE BOCnpON3BEdHe. Bb6epnte npn noomou KhoNk Source Приимецниwo - MoHITop ochaueh coeHHHTenbHbIM pa3bemAMN DVI Ira noKIOUeHn ictOHHa CTHana DVI Hap.. cnffpoBOr npoIRpbIbTeRaN DVD. POnkN&YeHNE BnDeOma"HNTOΦOHa  1) Bce yctpoiCTBa - iCtOuHKn Aynio-BnDEoCHHanOB, HanpIMep, BIneOMaHHToFOhB HIN BIneOkaMepebl, noKIOUaOTcK pa3bemy Pa3bem IIN noKIOUChENy AV IN [VIDeo] nIN Pa3bEm nIN noKIOUChENy AV IN [S-VIDEO] Ha MoHHTope c nomouBo Ka6eJr S-VHS nIN BNC. 2)ПОДКИОПЕРаьемьAudio(L)(Aудно(П))иAudio(R)(Aудно(П))ВIDeOMaHITOnTOФОнИN BVDeOKAMepbI K pa3bEMaM MOHITOPa AV AUDIO IN [L-AUDIO-R] cnomouhko KaBene. 3)Bb6epnte Bxod AV INN S-Vide, K KOTOPOMY NOKINIOH EN BIDeOMARHTOFOH INN BIDeOKAMepa, NcnoIb3y KONky Bb6opa nctouhka (Source) Ha nepeDHe nahEn MOHTOPa. 4) 3aTeM 3aTcHTE BnDEOMarHHTofoH nnn BnDEOKaMEpy, npEaBapntelbHO BCTABNB DVD-dnck nnn Kaccety. Pnpmeaane KaBbS-VHS Hn BNC He BXoNT B KOMNNEKT nocTabK.  1) CoeDInHTe C nOmoBtu KOMnIeKta ayDIO-KaBeJIe pa3bEmbl BxOJa ayDIOcMHa (AUDIO OUTPUT) BVDeOKaMEpbI bXoDHepePa3bEmbl ayDIOcMHa component AUDIO IN [L-AUDIO-R] Ha MOHITOpE. 2) CoeHNHITc c nOMOJIbU BnDEOKa6Eg PA3bEM BbIXOJa BnDEOCnHana (VIDEO OUTPUT) Ha BnDEOKaMepe IN BxOHOpa3bEM BnDEOCnHana BNC/COMPONENT IN - noKn&neHne npToB PR, Y, PB Ha MOHHTope. 3) Bb6epnre BxoD Component, K KOtOpOmy nooknouen DVD-npOwPbBaTeB, nnonb3y Khonky Bb6opa nctOchnika (Source) Ha nepeHne naHeJ moHITopa. 4)3aTeM 3anyctHte DVD-npOurPbIbAteNB, npEbnapntBHO BCTABnB DVD-dnck.Приимechанинe
Kabenb Component He Bxodnt B KOMnneT NoCTaBKn. OncaHne BixoDa Component video cm. B pykoOcTBe nonb3oBaTeJy DVD-npOurpbIbaTeJy.POnk&YeHne BnDeokamepbi
 1)HaIInTe BbIXOINHe pa3bEmbl ayINO/BnDEOCINHAnOB Ha BnDEOKaMepe.ObHyHO OHn HaxoTcHb6OKOBnn 3adHeN CTOpHe.CoEHNHe c nOMoBbIO KOMnNeKTA ayINO-Kabenei pa3bEmbl BbIXOa ayINOcHana (AUDIO OUTPUT)BnDEOKaMepbl BXOINHe pa3bEmbl ayINOcHana AV AUDIO IN [L-AUDIO-R] Ha MoHHTope. 2) CoeINHITc nOMOuBIO BnDEOKa6Eg PA3bEM BxOda BnDEOCnHana (VIDEO OUTPUT) HA BnDEOKaMepe IN BXoHn PA3bEM BnDEOCnHana AV IN [VIDEO] HA MOHITOpe. 3)Bb6epnte BxOa AV, K KOtOpomy noKnOueH BIndeokamepa, nCOnb3yA KHONky Bb6opa nCTouHHka (Source) Ha nepedne naHenn MOHTopa. 4) 3aTeM 3aNyCTHe BnDeOkaMepy, npedBaHpTeBbHO BcTaBbKaccety. Ппмочаиме -ИЗбрахенныеаудно-bидаокавпгобьчнвхоггТКOMПпгпрнанджнсоктейВидаокамерbl. (B pntBnHOM cnyuae Hx Hykno npno6pctn.) EcnBnDneokamepo obecneuBaet ctepeo-3anncb 3yka,To Heo6xOIMKOMnIeKr n3 DByx KaBeNei. PoiKn&YeHne BnDeOpncTbKn Пгимechаиме -ПОДКЛЮЧЕНМТИСИЙ ВДЕОПЦИТАБКИ NOKA3AHO HIXKE  1) CoeINHnTE BIndeOkaBeIem pa3bEmbl NOKJIIOHeHMe KOMHOHETOB BNC/COMPONENT IN - noKn&yeHne noptoR PR, Y, PB Ha MOHHTope I pa3bEmbl PR, Y, PB Ha BIndeOpncTabke. 2) CoeINHnTE C NOMOuIIO KOMNKeTA ayINOkaBeNe pa3bEmbPa3bEm nIa NOkNIOHeHna ayDIOcHrHaA COMPONENT AUDIO IN [L-AUDIO-R] HaMOHTOpE n pa3beMBAUDIO OUT Ha BInDeoepnctabe. 3)Bb6epnTe BxoD Component, K KOToPOmy noKnIOHEn BHeOeONpIcTABKn, HcNoJIb3y KhONky Bb6opa nctOuHnka (Source) Ha nepeHne naHEn MoHITopa. PnIMeuaHne - OnncanHe BbIXOa Component video cm. B pykoOoCTBe nonb30BaTeRnBnDeonnpctabKn. POnKn&YeHne DnHaMnKOB  1)PnKpENNTeINHAMNK K TeneBn3Opy c nOMoUbBOHHTOB. YcTahOBNTe KOMNIEKT rPOMKOrOBOpNTeJe 6eNoCTaBKn.  2) CoeMHInTe npedHa3HaueHbIM dIraTOro Ka6eHem pa3bEm IINIOKIIuOHeHn DaHAMKa Ha 3aHHei CTOpOE TELBUN3opa n COOTBEcTBcyIoum eMy pa3bEm Ha 3aHHei CTOpOE DnHAMKa. Ппмочаимe -1e npemeeaIte TeneBnO3p,epkaero 3a npHKpenHbK Hemy DnHaMnK. %npoTHOBOM cIyae MOxHO NOpeDHTb yCTPOINCTBO KpennneHn DnHaMMKa TeneBnO3py. >Подкн&Ченеaydnocntembl  1) CoeHHnHTe c nmoIbIO KOMnKeTAt ayDnOka6enei pa3bEmbl AUX L, R ayDnOCnCTembl np3bEmbl AUDIO OUT [L-AUDIO-R] Ha MOHlTope. © 1995-2008 SAMSUNG. ALL Right ReservedBVeDHeNc
 Iporpamma ynpablenen HeckobkmmoHOTopamn (Multiple Display Control; MDC) npedctabnetcoob npinoKHe, no3Bolnooee pa60taTb Ha NK oDHOpeMeHHo C HeckobkmmoHOTopAM. Dnra cB3N MeKdy PK mOHOTOpOM nCNoJb3yETc TAndapThbIOncJeObaTeNbHm INTepeEe RS-232C. IOsToM yMeKdy nocOBaTeNbHm NpTaMn PI K moHOTopm Heo6xOIMO nCNoB3ObTa Ka6eN bocneobatBoHoro nHTepfca.Haayano pa60TbI - TnaBHOe OKHO
Длэзундаха npограмь Вьбepит Start > Program > Samsung > MDC System. Bb6epnte MoHtOp Ia npOBepKn ypoBn rpoMkoCTn B npedeJax nOla no3yHaKa.  1 OCHOBHbIe 3NauchK KhonKa Bbl6opa 5 Remocon INΦopMaunOHnha Ta6nna 6 3 Safety Lock Bb6op MOHUTOPA 4 Port Selection 3nementb ynpabneHna8 1.OCHOBHbIe 3HaKIN CNOJb3yOTcI Ia nepeKeJIIOueHn Ha IIO60I KpaH. 2.ПОЗВОЛЯТ AKТИВИЗИРОВАТ bIJI 6IOKIPOBaT bФYHKUHIO pIeMa CnIHana DnCTAHUNHO rYnpaBNeHn MOHITOPOM. 3.YctaHaBImBaetyHkUIO6NoKIpOBKM. 4. YctaHabnBaet yHKuio 6IOKupOBKn. IIO yMOJuaHHIO BbIbpaH nopT COM1. 5. Khonk Select All Clear All nolb3yotc nBb6opa nC6pocx MoHtopoB. 6.Дя npocmoTpa kpatKoI INHΦopMaunO BbIbpaHHOM MOHITope IcNoJIb3yETcTaSIIuca. 7. Bb6epnte dncnnn B nyHKe Display Selection (Bb6op nncnne) 8.3nemeHbI ynpaBHeHn IcNoIb3yIOrC IINy npaBHeHMoHHTopAMN. <πpmea.> *yHKUaKTHB3aUH/6IokpOBKn (Enable/Disable) dIcTaHIOHO ynpabHeNJaIeCTByET He3aBNCMO OT TOFO, BKNIOEHO pITAHne NIN HET, n 3TO npABINO pACnPOCTpaHReTc Ha BCE MOHTOpB, NOKJIIOUeHHbIE K MOHTOPaM, NOKJIIOUeHHbIM K MDC OJHaKO, HE3aBICMO OT CTAtyCa, cyueCTbYIOUeBO B MOMENT 3aKpyITNA MDC, nlaФyHKUm npHema CrrHana DnCTaHIOHOHO ynpabNeHnB Bcex MOHTOpOB yctahAbNBAeTc 3aHaHHe Enable, korga MDC 3akpbIto.Port Selection
 1. *yHKUmae Multy Dispaly Cnrol no yMOnuHaHNo yCTaHOBHeA dIra pa6ObIc nOpTOM COM1. 2. Ecnn nncnblbetyra IIO60Ipyro npT,HexeHn COM1,TO B MeHIO Port Selection MoKHO BbIpaTb npT B dnaanaOHe COM1 \~ COM4. 3.EcHHe Bb6paHO ToUHoe HmApTa, NODKIOUeHHOro K MOHTOpy C NOMOuBIO NOCNEOBaTeNbHOrO Ka6Era,CBA3b 6yET HeBO3MOxHOH. 4. Bb6paHHbI npOT coXpAHReTcB INporpAMMe nHcNoJIb3yETcTaKKe i dIe cIeDyUoSe I porpAMMbI. Power Control
1. LcENKHTeMbIbHOHaOCHOBHOM3HauekeBkIIOUeHHa/BbIKIOUeHHaPiTaHHa (Power Control),OTKpbIbAEcRgOKHO Power Control.  B INΦOPMaIOHHO TabJIe coIepKHTc HekOTopa 6a3OBa INΦOpMaU, Heo6xOIMa IpaIIN3aU mФyHKuIN Power Control. 1) Power Status ( :TaTc nTahnia 2) Input Source 3) Image Size 4) On Timer Status 5) Off Timer Status 2.ДлЯ Вьбopa монитopa,настоюк которо Трбуетс Быногитб,испьыетс Кногka Select All nIи phlaxok.  \*yHKnna Power Control no3BOJnAeBbIOnJIHbTb ynpaBHeHne HeKOTOpbIMn yHKnmaM Bb6paHHOro MOHTop. 1) Power On/Off -BKIIIOHaaET/BbIKHIOHaeT NITaHHe (On/Off) BbIbpaHHoro. 2) Volume -PerynpyeT ypoBeHb rpmKocTH Bbl6paHHOro MOHTopa. 3Ta cyHKnI npHmMaet 3aueHHe rpoMKoCTN BbIbpaHHoro MOHTOPa OT MOHTOPOB N OTO6pKaJaTe erHa non3yHke peryJrTopa. (B Cnyae OTMeHb Bb6paHHoro 3HaueHn nn npn Bb6ope onu Select All yctaHaBnBaetc 3HaueHme 10, nCnoJb3yEmoe no ymoJuaHnIO) 3) Mute On/Off -BKIIIOaET/BbIKIIOaETyHKUIO OTKIOUeHn 3Byka Bb6paHHoro MOHITopa. EcnB Kaxkbim MOMENT BpemeHN BBiBnpaetc OINH MOHTOP,TO Korda B BbIpaHOM MOHTope yKe yCTaHOBHeHa FyHKUma MUTE, Heo6xOuMo OTMeTuMb MOHToP c FyHKUneMUTE. (EcIn Bb6pHaФyHKUaOTMeHbBb6paHHbIX3HaueHn(undo)INBb6paHaOnuSelectAll,IJIrBce npametpoB yCTaHaBnBAIOCT3HaueHn,NCNOb3yEmbIeNoYMOnuHaHIO). ΦyHKnra Power Control npmehreTc nBce MoHtopoB. \*Функцн Volume Mute DeIcTByIOT TOnbKO B MOHITOPaX C BKIOUeHHbIM NHTAHmE (CTATYC NNTAHN ON). Input Source
1. LcENKHIne MbiHbO Ha OCHOBOM 3Haueke Input Source, OTKpbIbAetcR OKHO ynpaBHeH NCTOCHNkOM BXoHOro CnHana (Input Source Control). Bb6epnte Select All ("Bb6paTb BCE") nnn yctaHOBnTE fnaXOK Ira Bb6opa ynpabnemoro MoHToPA. - TV Mode  - PC Mode  B INΦopMaioHoi TabIe codepKHTcH HeKOTOPa 6a3OBa INΦopMaia, Heo6xOIMa dYnpAbeHH Knei Input Source Control. 1) PC -Изменягпосточимь BXODHORO сигналдя ВьбраHHORO MOHITOPA Ha PC. 2) BNC -ИзменягпICTОУнIK BXODHORO CINHanaДЯ BBi6paHHORO MOHITOPaHa BNC. 3)DVI -I3MeHReT IcToUHnK BxOdHOro CnHaJa Ira BbIbpaHHoro MoHITopa Ha DVI. 4)TV -Изменигосточик BXODHORO CURHaja Дд ВьбраHHORO MOHITOPA Ha PC. 5)AV -I3MeHReT NCTOCHNK BXoDHoro CnHaJa DnB Bb6paHHoro MOHITopa Ha AV. 6) S-Video - Изменет ectочнь BXODHORO CINHana Дд ВИбраHHORO MOHITOPa Ha S-Video. 7) Component - ИзменетICTОУнК BXODHOrO CINHana Дд ВьбpaHOrO MoHITopa Ha Component. 8) MagicNet -Источник Ввда дд MagicNet pa60ает только дд морени MagicNet. 9) Channel - Ctpenka kaHaoB oTo6paXaETc, KOrda TeJeBn3Op RaJIaETcRg Input Source (VctOCHNKOM BxOHO rHaJa). TeNEBn3Op B KaueCTBe HcOuHnKa CHHaJa MoKet 6bItb bI6paH ToJbKO Ha yCTPOINCTBax C TeNEBn3OpM N ynpabLeHHeMa KaHJaAM, eCmN HcToUHnKOM BxOHDoro CHHaJa RBJIRETCa TEEBn3Op. \*FyHKnIg Input Source Control doctynha TOLbKO dJa MOHITOpOB, nHTaHHe KOtOpbIX BKNIOUeHO (coCToHHe nTahnn - ON) Image Size
PC, BNC, DVI
1. Haxmnte Ha nKtorpammy Image Size ("Pa3mep n3o6paXeHnra") cpeHn oChOBbIX nKtorpAMM, noBHTcR 3kpan ynpabHeHH pa3MePOM n3o6paXeHnra.  B INHΦopMaioHHoT Ta6nue OTO6paKaetcra OCHOBa HNΦopMaua, Heo6xoIma dIy npabHeHpa3MePOM 1306paJKeHn. 1) Power Status (Ctatync nntaHna - Yka3bIbaeCT CTATYC NITAHN TEKUJero MOHITOPA. 2) Image Size - POKa3bIbAe TeKyuIe pa3MepbI n3o6paXKeHnI dIe Bbl6paHHOrO MOHITopa. 3) Input SYka3bBaetekyuiuNIOCTOuyHk BXODHO RGNHala NcONb3yeMOro B DaHHbIMOMeHT MOHITOPa. 4) B INHΦOpMaUHOHHo Ta6nue OTo6paXaKoTcra ToIbKO MOHHTopbl, BXOHNbIM HCTOHHKOM KOToPbIX RaBnEePC, BNC, DVI. 5) PC Source - Pnp Bb6ope Image Size ("Pa3mep n3o6paxenra") Chaana noBnHOTc KAPTOKN PC, BNC, DVI. -Khonka Image Size Control ("YnpaBHeHne pa3Mepom n3o6paKeHnra") no3BOJrET ynpaBnTb BO3MOxHbIM pa3Mepom n3o6paKeHnra dIe nCTOuHnka PC, BNC, DVI. 6) Video Source - UeJIKNHe Ha KapToHKe Video Source yCTaHOBKn pa3Mepa N3O6paXeHn Iy COOTBeTCTByIOUeBOxOHDoro NCTOCHKA CnHaHa. XToCHNK BBOda nla MagicNet pa6oTaet TOnbKO nla Moedn MagicNet. KhONka Image Size Control doctynha TOnbKO dN MaHToPOB, NHTAHne KOTOpbIX BKIOUeHO (coCTOHNHe NTaHn - ON) Image Size
TV, AV, S-Video, Component, DVI(HDCP)
1. Haxmnte Ha nKtorpammy Image Size ("Pa3mep n3o6paXeHnra") cpeH oCHOBbIX nKtorpAMM, NOBHTcR 3kpan ynpablenenpa3mepom n3o6paXeHnra.  B INΦopMaioHHO TabIe OTO6paKaTc8 OCHOBHa INΦopMaua, Heo6xOIma 1n ynpabHeHpa3MePOM H306paKeHH. 1) ΜιεικΗΝΙΕ έλαρτουχενΤΑ, AV, S-VIDΕΟ, Component tab ευγαταθουκην πασμερα ηιδόβαρχενην ἀπεικόνηκον Μιαίνης Μιαίνης Μιαίνης Μιαίνης Μιαίνης Μιαίνης Μιαίνης Μιαίνης Μιαίνης Μιαίνης Μιαίνης Μιαίνης Μιαίνης Μι αύβαργος Φλαρχοκόν ἀπεικόνης Μιαίνης Μιαίνης Μιαίνης Μιαίνης Μιαίνης Μιαίνης Μιαίνης Μιαίνης Μιαίνης Μιαίνης Μιαίνης Μιαίνης 2) B INHΦρMaUNHOHNOH Ta6Bnue OTObpaKaAeTcR ToBko MOHHTOp C NCTOuHNKOM CunHaJa TV, AV, S-VIDEO, Component. 3) MoxHNO pOONBOLbHO H3MeHInTb pa3MepbI H3o6paXeHnIa Iy Bb6paHHOrO MOHToP. Ппмeuанe:: Pekmbl Auto Wide, Zoom1, and Zoom2 Heocrynhb IЯ Bb6opa, ecn B KaueCTBe Tna BXoHoro CnHana Component n DVI (HDCP) Bb6pa7 720p nnn 1080i. HCTOuHk BBOda nra MagicNet pa6oTaet TOnbko nra MoeJN MagicNet. KhONka Image Size Control doCTyHa TOnbKO dIa MOHtOpOB, NHTAHne KOTOpbIX BKNIOUeHO (coCTOHNHe NHTAHn - ON) Time
1. UeKHTMeMbHbHa OCHOBHOM 3aueKe Time, oKpbBaetcO KHO npabHeINBpemeHem (Time Control).  B INHΦopMaioHHo Ta6Ie npeCTabHeHa HeKOTOPa 6a3OBa HΦopMaua, Heo6xOIma dIpaIIN3aunn ΦHKU Time Control. 1) Current Time -Испόньзуетс дя установкиTekушero Времени БыбраHHORO монтopa (Время ПК) -ДЯнИЗМЕHENI TEKUYUERO BPEMENI CHAQUANA Heo6xOdmo IN3MeHHTB BPEMnIK. 2) On Time Setup IcnoJb3yETC Jny yctahOBK uaca, MInHyTbN BpeMeH Nn .(do noLynd (AM)/nocne noLynd (PM)) taMepa BKIOUeHn (On Timer) BB6paHHo MOHTopo. 3) Off Time Setup NcnoB3yETCnI yCTaHOBK Yaca, MInHyTbI IN BpeMeHN DnR .(do nOlydH (AM)/nocne nOlydH (PM)) TaMepa BkIOUeHn (Off Timer) BB6paHHoro MOHITopa. 4) OTo6paKaET yCTaHOBJIeHHbIe npaMeTpbl TaIIMePA BKNIOHeHN. 5) OTo6paXaet yCTaHOBnEHHbIe npaMeTpbl TaIMePa BbIKIOUeHnA. MCTOUYHK BBODA pA MagicNet pa6oTaET TOnbKO pA MoEIN MagicNet. \*FyHKnra Time Control deiCTByeT TOnbKO B MOHITOPaX C BKIOUeHHbIM NHTAHmE (CTATYC NNTAHN ON). At On Time Setup, TV Source functions only for TV Model. PIP
PIP Size
1. HaxMMte Ha NIKTORpAMMy PIP ("KapTNHka B KapTNHke") cpeIN OCHOBhIX NIKTORpAMM, NOBNTcKpaH ynpaBHeHpa3MePOM OKHa PIP. Bb6epnte Select All ("Bb6paTb BCE") nnn yctaHOblte fnaKOK dIy Bb6opa ynpabnemoro MOHToPA.  B INHΦopMaioHHoT Ta6Jnue OTO6paKaetcra OCHOBa HNΦopMaua, Heo6xoIma dIy npabHeHpa3MePOM 1306paKeHnOkHa PIP. 1) PIP Size - OTo6paKaaETeKyuCn pa3Mep OKA PIP nCnoJb3yeMoro MOHtopa. 2) OFF - BbIKHIOaET ΦyHKUIO PIP Ha BbI6paHHOM MOHHTope. 3) Large - BkHouaET cyHKUHO PIP Ha bbl6paHHOM MOHTope n 3MeHReT pa3Mep ee OKHa HA Large. 4) Small -BKIIIOaETyHKUIO PIP Ha BbIbpaHHOM MOHHTope Nn3MeHReT pa3Mep ee OKHa HA Small. 5) Double1 - BkIIOaET ΦyHKUIO PIP Ha BB6paHHOM MOHHTope n 3MeHReT pa3Mep ee OKHa Ha Double 1. 6) Double2 - BkIIOaET cyHKUIO PIP Ha BaIbpaHOM MOHTope n 3MeHReT pa3Mep ee OKHa Ha Double 2. 7) Double3 (Picture By Picture) - BkIIOuAeT cyHKUIO PIP Ha BaIbpaHOM MOHTope n 3MHeReT pa3Mepe ee OKHa Ha Double 3. * IctouHHK BbOa dIy MagicNet pa60aer TOnbKO dIy MoeHN MagicNet. Pa3mep OKha PIP MOxHPOperynpoBaT npBkHoueHHOM NTaHHMOHTopa. PIP
PIP Source
1. HaxMMte Ha NIKTORpAMMy PIP ("KapTINHka B KapTHHe") cpeN OCHOBbIX NIKTORpAMM, NOBNTcR 3kpaH ynpaBHeNA pa3MePOM OKHa PIP. - PIP TV Mode  - PIP S-Video Mode  B INHΦOPMaUHOHHo Ta6nue OTo6paXaETcA OCHOBHAR INHΦOpMaUN, Heo6xOuMmA Dn ynpabHeHn MCTOHN CnHana OKHa PIP. 1) PIP Source -Управлъ Источник сгнана PIP можно пи вкlioчehном петань монитopa. 2) PC -Изменягп CTочнк сгнда PIP Ha BыбpaHOM MOHITOpe Ha PC. 3) BNC -Изменигосточимсигнела PIP Ha BB6paHOM MOHITOpe Ha BNC. 4)DVI -I3MeHReT NCTOCHK CnTHa PIP Ha Bb6paHHOM MOHHTope Ha DVI. 5) TV - IN3MeHReT NCTOCHNK CNHana PIP Ha BaIbIbpaHOM MOHTope Ha TV. 6) AV - N3meHReT NCTOCHNK CnHana PIP Ha BbI6paHHOM MOHHTope Ha AV. 7) S-Video -ИЗменияntСTOУнКсгнэРIPHAВБбранHOMMOHHTopeHaS-Video. 8) Component -ИЗмehугETиctouHнснэпаPIPHa BbIбpaHOMMOHITopeHa Component. 9) Channel - CtpeIka KaHAnOB OTo6paKaAeTcRA, KOrda NCTOCHNKOM DnIyHKnIP RABnEeTcTeNeBn3Op. PnmeHHe. HeKOTOpbIe H3 NcTOuHKnOB PIP MOrY 6bITb HeOCTynHbI dRy Bbl6pa. 3To 3aBNCt OT Tnna nctouHnKa BXoHORo CnHana Ha OCHOBHom kpaHe. * NctouHn BBOda dna MagicNet pa6oTaET ToIbKO dna Moedn MagicNet. TeNEBn3Op B KaueCTBe HcToHHKa CnHrHa MoKet 6bIb Bbl6paH ToBko Ha yCTpoiCTBaX C TeNEBn3Opm N ynpaBHeHem KaHaNAM, eCN HcTOHHKOM dNf FyHKuNN PIP ABnETcTaeNBn3Op. \*ФункцИР Control (ynpabneHne peKIMOM PIP)doCTynHa TOnbko IaI Tex MOHtOpOB,NTaHHe KOToPbIX yCTaHOBNeHO BpeKIM ON (BkIIOueHo),nФункцИР PIP KOToPbIX TAKKe yCTaHOBNeHa B peKIM ON (BkIOueHo). Settings
Picture
1. UeKHTMeMbHbHa OCHOBHom 3aHKe Settings, OTKpbBaetcOHO HAcTPOKn npaMetpoB (Settings Control).  B INHΦopMaioHOHTo Ta6nue npedctabneHa HeKOToPA 6a3OBa HΦOpMaun, Heo6xOaMma dna peaNa3auNn ΦHKUN Settings Control. PnBbIbOpoe kaxdoi n3 cyHKuHn Ha cnaJe oTo6paxaetcBb6paHHe OE Hee 3aueHne. Pn BbIbOpoe onuSelect All OTo6paxaetc 3aueHne no yMOnuaHnO (50). I3MeHeHne 3HaueHnHa 3TOM 3KpaHepnpBODNT K aBTOMaTnueCKOMy I3MeHeHIO pexkima Ha "CUSTOM" (noIb3oBaTeNbckn). 1) Picture - OTo6paKaJaTcra TOnIbKo IaI onIuI TV, AV, S-Video, Component, DVI(HDCP). 2) Contrast - NcnoIb3yeTcra Iya perynipOBKn KOHtpaTcToB BblpaHHoro MOHHTopa. 3) Brightness - McnoIb3yeTcraIpeRynipOBK npKoCTBb6paHoro MOHTopa. 4) Sharpness - McnoIb3yeTcraI pyerynipOBk pe3KoCTn Bbl6paHHoro MOHTopa. 5) Color - Ncnonb3yETcra HacTpoKu CBeTOB BbIbpaHHOro MOHToPa. 6)Tint - IcnoIb3yeTcraIpeRynipOBKnHacbiueHHoCTN Bb6paHHoro MOHHTopa. 7) Color Tone - Hactpoika CBetOBoro ToHa BbIbpaHHoro MOHITopa. * NctouHnBbOa Dnla MagicNet pa6oTaET TOnbko Dnla MoeHN MagicNet. 3Ta yHKpIaIOCTyTHA TObko dIg DNcNIIeB, NITAHne KOTopbIX BKNIOyeHO, a ECnN Bbl6Op He CdeNaH, To OTO6paKaTeCA 3aBOcka HAcTPOka No YMOnuHaHIO. Settings
Picture PC
1. ⅢeKNHtmeMbIbHOHaOCHOBHOM3Haueke Settings,OTKpbBaetcKOHO HAcTpoiKnnapaMeTPOB (Settings Control).  B INHOpMaOnHOH TAbIe npEcdTabIeHa HeKOTopA 6a3OBa HINHOpMaUH, HeoXoIMMae IpeaN3auHn FyHKmN Settings Control. Pn BbIbope kaxdoH n3 FyHKmHa cnaJe OTo6paKaetcBbIbpaHoe dH Hee 3NaHeHne. PnBbIbOpoeOnuN selctAIO6paKaTc3HaueHHe no yMOnUaHnIO(50). N3MeHeHne 3HaHeHnHa 3TOM 3KpaHe npBODNT K ABTOMaTHueCKOMy N3MeHeHIO pEKIMHa "CUSTOM"(Audio
1. ΒeIKNHITeMbIbHO Ha OCHOBHom 3HaayKe Settings, oTKpbBaTeCk OKHO HAcTPOIKn NapaMeTpPoB (Settings Control).  B INHOpMaHOHHo Ta6nue npeCTaBHeHa HeKOTopA 6a3OBa HINHOpMaU, HeOxOIMMa dIpeaH3auu HYNKcMn Settings Control. PnB BbIbope kaxdoi h3 FyHKuHa cnaJe OTObpaKaeTcB bIbpaHoe dIne Hee 3NaueHne. PnBbIbOpe onuun Select All oTo6paKaTeTc3aHueHne No yMoJHaHmO (50). M3MeHHe 3aHuE H A TOM kPaHe nPiBODiT K ABOTMATUeCKOMy N3MeHHeMIO pEKIMa Ha "CUSTOM" (Image Lock
1. JIeKHTe MblbHa OCHOBHOM 3Haueke Settings, OTKpbBaetcOHO HAcTpoiKn npaMeTPOB (Settings Control).  B INHΦopMaioHHoT Ta6nue npedctabHeHa HeKOTopa 6a3OBa HΦopMaqra, Heo6xOIMma dna peaIINaCn fynkun Settings Control. 1) Image Lock - OTo6paKaTaTc TOnbKo DnA onCn PC, BNC. 2) Coarse - IcnoIbayetcIЯ NaHctpoiK Coarse MoHntopa. 3) Fine -Исноьуетсдянскгп Fine moHntopa. 4) Position - IcnoIb3yeTcI dIy hAcTpoIKn IIOJoxeHn IIO6paXeHn Bb6paHHoro MOHToPa. 5) Auto Adjustment - ABTomatnueckar aadantauK cnHany, noctynaoemy OT KOMnbTepe. * HctouHk BBoDa dny MagicNet pa6oTaET TOnbKO dny MoDEn MagicNet. \*FyHKnra Settings Control deHCTByET TObko B MOHHTopax C BKIOUeHHbIM NNTAHmE (CTATYC NNTAHN ON). Maintenance
Lamp Control
1.卍KHTHe Ha 3aHKe "Maintenance" B cTOn6e OCHOBbIX 3aHcKOB. PONBtCkpaH Maintenance (o6cIyKBAHne).  B INHOPmaIOHOHHoT a6nue("Info Grid") nOKa3aHbI HeKOTOpbIe OCHOBHbIe daHHbIe. 1) Maintenance -AkTNBn3Npyet yHKuO ynpaBHeHnOBcIyKbAHHem (Maintenance Control) nra Bcex BXoDhBX nCTOCHIKOB. 2) Auto Lamp Control - ABToMaTuYeCKn HAcTpaNbaET NoCBeTKy BbI6paHHoro MOHtOpa Byka3aHHoe BpeMra. Функць� ManuaL Lamp Control abTomatueckn Bbiknoaetc npn BbinoJIeHn HactpoKc n noMoIbO yHKznn pyHoro ynpabHeHn noCBeTkoH Auto Lamp Control. 3) Manual Lamp Control - No3BOJRAET HAcTpaBaTb NcCBeTKy Bb6paHHOro MOHITopa B JIO60m MOMENT BpEmHeN. Функць Auto Lamp Control abTomatueckn Bbikluoayetc npn BblonHeHn HactpoKn C nomoBIO yHKuyn pyHoro ynpablenen noDcBeTkoi Manual Lamp Control. \*Функua Maintenance Control (ynpabneHne 06cnyxuBaHnEM) DOCTyHa TOnbKO nMa MOHtOpOB, nHTAHNE KOtOpbIX yctAHOBHeO B pexMM ON (BkIoueHo). * HctouHk BbOa dIa MagicNet pa6oTaET TOnbko dIa MoeIN MagicNet. Maintenance
Scroll
1. ⅢeIeKHTHe Ha 3aHKe "Maintenance" B cTOn6be OCHOBbIX 3aHcKOB. IoRbITcK kpaH Maintenance (O6cnyKbAHne).  1) Safety Screen - NCKIIIOaET NOBILHNEOCTaOHTbIX 3IO6paXeHn, BO3HNKAIooHx B pe3yIbTaTe DIINTEbHO pa60tBJ Bb6paHHORO MOHITOPA B pEXKIMPeN3by. MoXHO yCTaHOBnTb TaMep ZIKNA NOBTOpeHn pyTEM Bb6opa 3HaueHn "Interval" n "Second". MoXHO yCTaHOBt bnapMeTpbl Scroll (PpOKpyTka), Pixel (PiKceN), Bar (:tpoka) n Eraser (YdaJIeHne) c nOmoIbNo HAcToPoiKn Screen Type (Tn 3KpaHa). \*IctouHk BbOa dna MagicNet pa6oTaet TOnbko dna MoeJin MagicNet. \* npapamtpa cekyhbmoKHO yctahOBnTB 3aueHn 1,2,3,4,5 nra Tnna npokpyTKn 3aueHn 10,20,30,40,50 nnkceJe, cTPOKn Hn Tnna ydaJIeHn. 品 FyHKnma Maintenance Control (ynpabneHne 6cIyKbAHmE) DOCTynHa TOnbKO dR MOHTopoB, nTahHe KOtOpbIX yCTaHOBNeHo B pexm ON (BkIOUeHo). Maintenance
Video Wall
1.卍eKHTHe Ha 3aueKe "Maintenance" B cTOn6be OCHOBbIX 3aHcKO.BIpaH Maintenance (O6CnyKbAHne).  1) Video Wall -BndeocTeHa 3TO HeckoJIbKO CoeINHeHHbIX BmCTe BInDeOeKpAHOB, KaJbI N3 KOtOpbIX NOKa3bBAet Yactb O6JIero n306paKeHn IIN CoeINHeHHbIX BInDeOeKpAHbI, KaKbI N3 KOtOpbIX NOKa3bBAet OdHO I TO Xe I306paKeHne. 2) Screen Divider -3KpaH MoXeT 6bITb pa3deneH. Pn pa3deneHm MOxHO Bb6paTb KOInueCTBO 3KpaHOB C pa3HOI KOMNOHOBKOJ. BbI6epnte pexim B nyHkTe Screen divider (Pa3dennTeb 3KpaHa) -БыберптЕ диспелов руннкTe Display Selection (Быбор диспелera) - Пи Нахатун сифсы в ВьбраHHOM peЖIMe 6удт уст. - PporpaMa MDC, npedocTabrma KOMnHaHne Samsung, noepKbAeT naHb n4 4x4 KK-dncnneeB.  3) On / Off -BkIIOUeHHe/BbIKIOUeHHe yHKmV Video Wall (BndeocTeHa) Bb6paHHoro ducnnie. 4) Format -MoKHO Bb6paTb foPMaT nI npocMOTpa pa3deJeHHoro 3kpaHa.  * Hebo3MOxHOb BkIIOHTb DaHHyO ΦyHKzNBA pexKmE MagicNet. \*Функцma Maintenance Control (ynpabneHne 6cnykBaHnEM) DOCTynHa TOnbko dIa MOHTopoB, nHTaHne KOTopbIX yCTAHOBNeHO B pexm ON (BKNIOyeHo).YcTpaHHe HEnCnPaBHOCTe
1. B INHΦopMaunHOH Ta6JIne He yKa3aH MOHTOP, HAcTPOy KoTOpO Tpe6yeTcB BInNoHNtB. -Поверпге-coeHHeHne RS232C.(Поверпге павиьнocь erо noДКIOHHeHЯ K npTy Com1) - Ecnn OdnH n TOT Xe NdeHTNfHKATOp NMeetcY HeCKoJIbKIX MOHITOPOB, To 3TO YKa3bIaET Ha HENpaBnIbHOe paCNO3HaBaHne 3TNX MOHITOPOB nporpAMMO IN3-3a KOHfIKTA daHHbx. IPOBepbTe, YTO INeHTnHnKATOp MOHITOPa NMeET 3HaueHHe B Dmna3OHe OT O do 16. (YCTaHOBtpe npabnBHOe 3HaueHne C nOMoubIO MeHIO 3KpaH) IpmeHn: NdeHTnФKATOp MOHTOP DOJIKeH IMeTb 3aueHHe B Dnana3OHe O-16. EIN 3aueHHe NdeHTnФKATOp BAixoJIT 3a npedeJIb ITO rAnana3OHa, CNTema MDC He MoKet ynpabTb MOHTOPOM. 2. MoHTOp, HAcToPky KOtOPO Tpe6yETcBbINOHNHTb, He npEcdTaBJeH BpyrNx INHΦopMaOnHOHbIX Ta6nuaX. IPOBepbTe, BKIOueH IIN MOHTOp. (3TO MOXHO IPOBepntb NO INHOPMaUHOHO Ta6NIe BKIOUeHn/BBIKIOUeHn IITAHNA) - PpOBepe, 6bI Jn H3MeHEn HCTOCHK BXoHOrO CnHaJa MOHToPa. 3. NepnoDnueckn noBnEeTc daIaIorOBoe OKHO. -Поверпг, Вьбан Лин монитор, Насточу Которо Тpe6yeTсь ВиюнHTB. 4. yctahOBHeT TaMep BkHoueHn (On Timer) n TaMep BbIKHOeHn (Off Timer), HO OTo6paKaetcBpeM, OTnHoeOT yCTAHOBHeHOrO. - YctahOBHTe Tekyueee BpeMnIg CnHxpoHHaunu YacOB MOHITopa. 5. Bo3moKHa HeHOpMaIbHa pa6Ota InCTaHUnOHNo HAcTpoKn Pnp BblKIOueHm FyHKmN DnCTaHUnOHOr OynpaBHeHn,OTKnIOeHm Ka6eRr RS-232C mnn npn HeHOpMaIbHOM BbxOde n3 nporpaMMb. BepHInTeCb B nporpaMMy IBOcTaHOBtte HopMaIbHyIO pa6Oty FyHKmN DnCTaHUnOHOro ynpaBHeHn. <πPnmeaHne.> HapyeHHe HopMaIbHO pa6Ot b3oT npOrpaMMb MoKet 6bItb Bb3BaHO np6leMaMn B KaHaJax CBA3N INI NmExAMn OT pACNOIOKeHHbIX P4OM 3NEKTPOHHbIX YCTpoCTB. OTo6paXeHne yCTaHOBJIeHHbIX 3HaueHn npn pa6oTe B peKmE c HeCKoJIbKIMM MOHHTopamN
Pn pa6oTe C HeckOblkMIM MOHITOpamu YcTaHOBHeHHbIe 3HaueHmro OTo6paKaHOTcRc CneDyIOUm 06pa3OM. 1.He Bb6paHO HN OJHOrO MOHITOpa: OTo6paxaOTcYCTAHOBJIeHHbIe Ha 3aBOJe-U3rOToBtTeJIe 3HaueHnA, IcNoJIb3yEmIbe No YMOnUHaHIO. 2. Bb6paH OINH MOHTOP: pOu3BOJTCaHTbIBaHne I OTO6paXeHHe YCTaHOBJIeHHbIX 3HaueHn I JRA BB6paHHORMOHTOPa. 3. Bb6paH OINH MOHTOP (ID1) INO6aBHeN DpyroM MOHTOP (ID3): nporpamma, oTO6paXabwA yCTAHOBHeHoe 3HaueHHe ID 1, CHTbIbAeT NOTo6paXaet 3HaueHHe ID3. 4. Bb6paHb BCE MOHTOpBc I cNcNoIb3OBAHmE OOnu Selected all: ChOba OTobpaKaOTc yCTaHOBHeHbIe Ha 3aBoDeHn3rOToBHTe 3HaueHn, IcNoJIb3yEmbIe no yMOnuaHnIO.  PpabNJIaTexHnKn &e3onacHocTn BVeIeHne IopdkJIOUeyHne \*a&ota c nporppaMMHbIM o&ecneueHnem HactpoKaMOHHTopa BxOa N306pa&eHne [ \text{[IK / BNC / DVI Pe&NM]} ] 1306pa&eHne [AV/S-Video/ KOMHOENT. / DVI-Video Pe&m] 3ByK YCTaHOBKa MHoro3kp. Ynp. Функи npamorO ynpabneHn yctpaehne HEnCpNaBHOCTe Cne"uΦnka"nn HnΦopMa"n PpnoJoxeHneTFT-LCD Monitor
www.samsung.com  Lbet H BHeHnBn H3dNMA MOryT paHNaHbC B 3aBNCIMoCTn OT MoEN, a XapakTepeNtKu H3dNMA MOrY T3MeHrTaCB 603 PpEBaPHTeHbTO yBeDOMeHnC U C eBbIO YCOBepueCHBOAHH.HacTpoNka MoHITopa
BxOa Ooctynhbiepekmbi PC/BNC/DVI AAV S-S-Video KOMTIOHEHT D DVI-Video Cnncok nctouh.PASCD [MONTH]→[ENTER]→[ENTER]→[A/V]→[ENTER] BknnoaetnHdkatop,cootBetCTbYIOIe TekyUcMy BxOHDomy CnHany,ncnonb3yEmomy MoHTOpom. 1)πK 2) BNC 3) DVI 4)AV 5) S-Video 6) KOMNOHEHT [Длгпрамогу Вьзова ЗToHФннHa nynbTe DnncnoB3yetc KhoNka 'SOURCE'] !pIMMeYaHHe - EcJIM MOHITOP nepeKIOHHTb HA BHeUHH NCTOCHNK,ФYHKUNI PIP OTKIOHNTCA.PIP PASC0
!pn noKnIOHcHm K MOHtOpy BHeHnX NCTOCHKOB ayHO-BnEOcHrHa, TaNX KAK BnEOMaHHToHOF HNN DVD-npOurpbBaTeB, fHyKuIa PIP No3bONETPPOCMATPBAtb BnEO3aNcC %Tnx yCTpoiCTB MaNEhKOM OKHe, Hano&EHHom HA OCHOHoe OKHO, B KOToPOM oTO6pa&aetcBnEOcHrAN KOMnbOTepa. (BKn/BbKn) !pIMMeYAHNE Ha%kpaHe HebO3Mo&Ho Hano&eHne HeckOJIbKx n3o6pa&eHn PIP, nockOJIbky dny BCN KOMHOHeHTHO CnHana NCNoB3yETcOdH N TOT &e pa3\*EM. 1)PIP [MENU] [ENTER] [ / ] [ENTER] [ENTER] [ / ] [ENTER] UynpaBHeHne OKHom n3o6pa&eHnI PIP. -BK -BbIKN [Дя npmaOBO bI3OBA 3ToHФнК"mHa nIyIbTe DY nCOnIb3aYcTc KhONKa 'PIP'] 2) NCTOCHNK [MONTH] [ENTER] [A/√] [ENTER] [A/√] [ENTER] [A/√] [ENTER] Bb6op BxOdHoro nctOTHnKa CnHana dnnyHKnPiP -PC/DVI:AV/S-Video/KomnoHeHT Pe&MM - BNC: AV / S-Video Pe&um -DVI:AV/S-Video/KOMNOHEHT Pe&MM -AV/S-Video:PC/BNC/DVI Pe&nm - KOMNOHEHT: PC / DVI Pe&MM [Дя npmaoro BblOba 3ToH Φнк"и HA nIyIbTe D'нсnonb3yeTc KhONka 'SOURCE']3) CmeHa
[MONTH] [ENTER] [A/V] [ENTER] [A/V] [ENTER] MeHReT MeCTaMn COePXMoe PIP n OCHOBHe n3OpaKeHne. 1306paKeHne OKHa PIP oTo6pa3nTcHa Ha OCHOBHom 3KpaHe, a I3o6paKeHne OCHOBHOrO 3KpaHa oTo6pa3nTcB oKHe PIP. [Длгпрмогу Вьзова 3ToHФннHa hynte DNY nCnObl3yETcR Khonka 'SWAP']4) a3Mep
[ \text{[MENU]} \rightarrow \text{[ENTER]} \rightarrow [\wedge / \vee] \rightarrow \text{[ENTER]} \rightarrow [\wedge / \vee] \rightarrow \text{[ENTER]} \rightarrow [\wedge / \vee] \rightarrow \text{[ENTER]} ] daet BO3MOXHOCTb Nolb3ObaTeNIO BbIKIOHaTb 3KpaH PIP nnn HacTpbanBaTb ero pa3Mep. [Длп npMOrO BbI3OBA 3ToN ΦyHк"ин Ha nyIbTe DYNCnONb3yETcK hONka 'SIZE']5)Пози"ия
[MONTH] [ENTER] [A/V] [ENTER] [A/V] [ENTER] [A/V] [ENTER] I3MeHeHnne no3nncn okHa PIP.6)Пpo3paqHocTb
[MONTH] [ENTER] [A/V] [ENTER] [A/V] [ENTER] [A/V] [ENTER] HactpoiKa ypOBnI npO3paUHOCTn OKOH PIP (KapTInHkBA KapTInHke). - BbICOKa - CpeHn -Hn3kaj - Henp03p Приимechanicals - PnBb6ope 1 aMeH No Size nyHKtbl Po3uia N Transparencycncy He 6ydt actnbnpoabaHbI. DocTynhBiepeXnMbI:PIP \*eDakTnpu.Ha3B.PASCD [MONTH] [ENTER] [A / V] [ENTER] [A / V] [ENTER] [A / V] [ENTER] PncB0te IMeHa yctpOCTBaM, NOKIOUeHbIM KO BxOdbIM pa3bEmAM TeneBn3Opa,TO6bi O6IerHTb B daNbeHwEM Bb6op NcToHnka BxOdHoro CnHana. 1) NK 2) BNC 3) DVI 4) AV 5) S-Video 6) KomnoHeHT I30&paXeHne[IK/BNC/DVI\*ekm] DocynHbIepeKIMbl PIK/BNC/DVI AV S-Video C KomnoHeHT DVI-Video MagicBrightTM [MONTH] [A/V] [ENTER] [ENTER] [A/V] [ENTER] MagicBrightTM-3TO HOBAIyHKU,06eCneHVAIOUaONTIMALbHyO CpeDy IINpOCMOTpaB 3ABNCMOCTN OT codeKAAHNI pOcMaTPBaEMoI 3O6paKeHH. Ha daHHbI MOMENT doCTynHbI 4 pa3nHbIX peKIMa: Pa3BNeKAT. INHTepHET TekT Nolb3. Kazdny pejmm Imeet cBoN npedyctaHOBneHbIe 3aueHHraKoCTn. POnb30BaTeN bMOKeT bIbIpaTb Odn H3 TpE npDBePHTbNo yCTaHOBNeHHbIX pexMMOB npKocTN n pa3peWauOe cnoc6HoCTn IpocTbIM hakatmem OdnHn 3 KHNOK uynpabHeHHaYHKUeM MagicBrightTM, pacnoJoxeHHbIx Ha IInceBOI CTOpone MOHITopa. 1)a3Bnekeat BbCOKa npKoCTb ДяnpocmToPaBndeOeHnIbMoB,HanpImeR,BΦopMaTeDVDnnVCD. 2) VHTepHET CpeHra npKocTb Дя pa60ыс n3o6paXeHЯMn CmEuHaHHoro xapaKTepa, HAnpUmep, TeKCTOM n rpaФИКОД OДНOBpeMeHNO. 3) TekCT HopmaNbHaJaRPKoCTb Ipa6oTbIC DOKyMeHtauueHnn Dpynx pa60r, CBA3aHHbIX CTeHNEM 6OnbWoO 6bema TeKCTA. 4) Nonb3 XOT3N 3NaHEnH6bIIN TtAteHbNO NOO6paHbHaaMMn HKeHePamN OH, OJHaKO, MOrT OKa3aTbCn HEKOMΦOpTHbIMN DnHEKOTOpbIX NOnb3ObaTeNe, TAK KAK 3aBNCIT OT INHdNBdyanHbIX OC0eHHoCTe3peHn. B 3OM cnyae OtperynnpyTe npKocTb (Brightness) n KOHTpactHocTb (Contrast) c nomoubIO kpaHoro MeHO. [Дя npmaO bI3OBA 3ToHФн"и Ha nyIbTe Yu nCnoJIb3yertc KhoNka'M/B]. Ponb3 [ \text{[MENU]} \rightarrow [\wedge / \vee] \rightarrow [\text{ENTER} ] \rightarrow [\wedge / \vee] \rightarrow [\text{ENTER} ] \rightarrow [\text{ENTER} ] \rightarrow [\wedge / \vee] / [< / >] \rightarrow [\text{ENTER}] ] IcnoB3y 3KpaHbIe MeHIO, MoXHO 3MeHATb KOHTpactHOCTb I apKOCTb 3o6paKeHnA corNaCHO NmHbIM npedNoTHeHnM. 1) KoHTpACT BbInonHnre perynipOBky Kohtpact. 2)RpokocTb BbnonnHTe perynnpOBky RpkocTB. Ппмочаиме - Пи Насгюке ИЗбрахеня сиспьзованем Функци Custom MeHо MagicBright nepexodHT bpexim Custom. OTTeHOK P [MONTH] [A/V] [ENTER] [A/V] [ENTER] [A/V] [ENTER] ToH zBETA MOXHO N3MeHrTb OT KpachOBaTO-6nOro Do rOly6oBaTO-6nOro. 1)Xon 2)O&bIyHoe 3) Tenn 4)Ппьз (Функ"ия дoc'tунна только в рекиme PC/BNC) \*erynnpovka"Beta P [ \text{[MENU]} \rightarrow [\wedge / \vee] \rightarrow [\text{ENTER} ] \rightarrow [\wedge / \vee] \rightarrow [\text{ENTER} ] \rightarrow [\text{ENTER} ] \rightarrow [< / >] \rightarrow [\text{ENTER}] ] 3TaФyHKUINONbEyETcDnpeYynipOBNnapaMeTPOB UeTHOCTN. (Функ"ияdoctynhaToIbkoBpeximePC/BNC) 1) Kp. 2) 3en. 3) CnH. Ппмецане - Пинасгюке ИЗбрахеня с Истпьзованем Функциm Color Control MeHIO Color Tone nepexodit в ржим Custom. PoiocTpoKa n3o&p. IpOMeHIO "3aOpKc. h06bp." (ΦHKcaUIN H06paKeHn) nCnONb3yETcT dNToHou HAcTppoKn nOnyEnHn ONTMAbHO rH0r 13o6paKeHn 3a CHT ydaENHn WMyOBbIX NOMEX, pNtBODaUNX K HeCTaBnBHOCTn, DpOkaHIO mEepaHIO H06paKeHn. Ecn c nCnONb3OBAHNm ToHou HAcTppoKn ("TouHO") yDObNETbOpuTeNbHbIe pe3yIbTaTI bI NOyHTb He ydaETc, nONONb3yIte IpybYIO HAcTppoKy ("IpybO"), a 3aTEM ONaTb ToHyIO HAcTppoKy ("ToHNO"). (Функ"ияdoctynhaToIbkoBpekmePC/BNC) 1) < py \& 0 [ \text{[MENU]} \rightarrow [\wedge / \vee] \rightarrow [\text{ENTER} ] \rightarrow [\wedge / \vee] \rightarrow [\text{ENTER} ] \rightarrow [\text{ENTER} ] \rightarrow [< / >] \rightarrow [\text{ENTER}] ] YctpaHHe Hyma, HanpMep, BepTKaJIbHbIX nOIOc. FpyBa HAcTpoKa No3BONAEr N3MeHHTb NOJoxHe 06nactn 306paKeHna Ha 3KpaHe. Ee MoXHO nepEMeCTNb B ueHTp C nOmoUbIO MeHIO ynpaBneHnra TROP30HTaJIbHbIM NOnOKeHInEM. 2) ToHNO [ \text{[MEN] \rightarrow [A / V] \rightarrow [ENTER] \rightarrow [A / V] \rightarrow [ENTER] \rightarrow [A / V] \rightarrow [ENTER] \rightarrow [< / >] \rightarrow [ENTER]} ] Ydannet nomexn, hanympmep, B vBne rnp3oHTaIbHbIX nOnc. Ecnn nomexn coxpanraTcdaXe nocne BblnoJIHeHHaTOHO ("ToHNO") HAcTpOkiN, NOBtOpHTe HAcTpOkiN yocne perynipOBKn cactOTb TaKTOBO CINHana. 3)Поциця [ \text{[MENU]} \rightarrow [\text{A} / \text{V}] \rightarrow [\text{ENTER}] \rightarrow [\text{A} / \text{V}] \rightarrow [\text{ENTER}] \rightarrow [\text{A} / \text{V}] \rightarrow [\text{ENTER}] \rightarrow [\text{A} / \text{V}] \rightarrow [\text{ENTER}] ] No3B0JrE N3MeHbTb No3nIO 3KpaHa No rOpN3OHTaNN HBePTNKaII.AToTIOaCTpOkaP
[MENU] [A/V] [ENTER] [A/V] [ENTER] TBenuHnA TOHOn Hnnrpy6oHnactpOKn HAcTpaNbaeTcABTOMaTneckn. Ecnn BbI 3MeHnTe pa3peSeHHe Ha naHenn ynpaBHeHn, 6yDet BbINOnHeHa cyHKnA AUTO. (Функцядoc'tуннToIbkoBpeximePC/BNC) Ipy nprrmo Bb30Ba 3Toi fynknn Ha nynble Dy ncoNob3yETc KhONka AUTOBajahc CnHana P
IcnoIb3yETcTnI KOMnEHaCauu Cna6o CnHana RGB, nepeDaaemoro Hepe3 dnnHbI cHnBbI Ka6eb. (ФункцядocунhaToJbkoBpeKmpePC/BNC) 1)BananCnHana [ \text{[MENU]} \rightarrow [\wedge / \vee] \rightarrow [\text{ENTER}]\rightarrow [\wedge / \vee] \rightarrow [\text{ENTER}]\rightarrow [\text{ENTER}]\rightarrow [\wedge / \vee] \rightarrow [\text{ENTER}] ] B MeHIO PerynnpoBkca Crrhana MoKHO Bbipat BKn. nnN Bkn. 2) Perynipobka cnHana [ \text{[MENU]} \rightarrow [\text{A} / \text{V}] \rightarrow [\text{ENTER}] \rightarrow [\text{A} / \text{V}] \rightarrow [\text{ENTER}] \rightarrow [\text{A} / \text{V}] \rightarrow [\text{ENTER}] \rightarrow [\text{A} / \text{V}] \rightarrow [\text{ENTER}] \rightarrow [\text{A} / \text{V}] \rightarrow [\text{A} / \text{V}] \rightarrow [\text{ENTER}] \rightarrow [\text{A} / \text{V}] \rightarrow [\text{A} / \text{V}] \rightarrow [\text{ENTER}] ] YctahOBky npametpoB R Phase, G Phase, B Phase, YcHneHne N YeTKocb MoKHO npOn3BODnTB BPyHyIO.Pa3Mep P
[MENU] [ / ] [ENTER] [ / ] [ENTER] [ / ] [ENTER] T03B0nAeT BbIbnpaTb pa3NnHbIe pa3MebpI n3o6paKeHn. 1) 16:9 2) 4:33kpah PIP
\[ \text{[MENU]} \rightarrow [\wedge / \vee] \rightarrow [\text{ENTER}] \rightarrow [\wedge / \vee] \rightarrow [\text{ENTER}] \rightarrow [\wedge / \vee] \rightarrow [\text{ENTER}] \rightarrow [\wedge / \vee] \rightarrow [\text{ENTER}] \rightarrow [\wedge / \vee] \rightarrow [\text{ENTER}] \rightarrow [\wedge / \vee] \rightarrow [\text{ENTER}] \rightarrow [\wedge / \vee] \rightarrow [\text{T} ] \rightarrow [\text{ENTER}] \rightarrow [\text{T} ] \rightarrow [\text{ENTER}] \rightarrow [\text{T} ] \rightarrow [\text{ENTER}] \rightarrow [\text{T} ] \rightarrow [\text{ENTER}] \rightarrow [\text{T} ] \rightarrow [\text{ENTER}] \rightarrow [\text{T} ] \rightarrow [\text{ENTER}] \rightarrow [\text{T} ] \rightarrow [\text{ENTER}] \rightarrow [\text{T} ] \rightarrow [\text{ENTER}] Mozho perynipoBaTb HAcToPmKn 3kpaHa PIP. 1)KoHTpACT I03B0JrE T HAcTpoTb npaMeTp Contrast (KoHTpactHocTb) OkHa PIP Ha 3kpaHe. 2)Jrpkocrb IIO3B0JrT HAcTpoNTb napamet Brighthness (Rpkoctb) OKHa PIP Ha 3KpaHe. 3) YeTKOCTb IcnoJIb3yETcI pyeIIpOBKn pa3nUHm MEXdy Hau6Oonee JRPKIMN Hau6Oonee TEMHbIMN 3OHAMN B OKHe PIP. 4)UBeT OtperynpyIte npametp Color (LBeT) dny okha PIP ha 3kpahe. 5) ToH DobabnE cTcTBeHHocn Cbeta OKHy PIP. B pexnme "PC", BNC" moKHO npocmatpnbAt b 3o6paKeHne Ha ekpaHe PIP, nCnoNb3y nCTOuHKn BXoDHorO CnHnA "AV", S-Video". Pa6oTaT TOnbKO dRn BnDeocnHnA NTSC. DocTynHbIepeXmbl:PIP DocTyNbIepeXnMbI PC/BNC/DVI AV S-Video KomnoHcT DVI-VideoPekim ASCD
[ \text{[MENU]} \rightarrow [\wedge / \vee] \rightarrow [\text{ENTER} ] \rightarrow [\text{ENTER}] \rightarrow [\wedge / \vee] \rightarrow [\text{ENTER}] ] MoHTOp IMeET YteIpe npEcyTahOBnEHbIX Ha 3aBode-N3rTOBnTEne BapnaHTa aBTOMaTHeCKo yCTaHOKn napametpo n3o6pa&enHa.HactpoKa napametpoDnCnner. 1) DnHAM 2) CtaHapTH .Pa6ToaTeT TOnbKO DnR BnDeocnHana NTSC. 3)KnHo DocTyHbIe pexmbl:PIP 4)TnB3 [Длп npamorBo bI3Oba 3ToI ΦyHKuHn H an lybTe IY nCnoB3yeTcK hONka 'P.MODE'] H3o6paXeHne[AV / S-Video / KomnoHeHT. / DVI-Video 56Nonb3 ASCD
[ \text{[MENU]} \rightarrow \left[\wedge / \vee\right] \rightarrow \left[\text{ENTER}\right] \rightarrow \left[\wedge / \vee\right] \rightarrow \left[\text{ENTER}\right] \rightarrow \left[\wedge / \vee\right] \rightarrow \left[\text{ENTER}\right] \rightarrow \left[\langle < / >\right] \rightarrow \left[\text{ENTER}\right] ] NcnoB3y %KpaHbIe MeHIO, MO&HO N3MeHbTb KOHTpactHOCTb I npKOCTb N3O6pa&EHHa cornacHO HnHbIM npednoHTeHHM. 1)KoHTpact !pnaet HATypanbHoctb UBEtOBOMy TOHy n3o6pa&eHn. 2)RpKocTb Perynipobka npKoCTN 3) YeTKoCTb PerynpoBka pe3KocTn n306pa&eHna. 4) LBeT Perynpobka zbeta n3o6pa&ehna. 5) ToH D6abnreT OTo6pa&aemomy N3o6pa&eHHIO eCTeCTBEHHOCtB Ubeta. Pabotaet tobnko B peximax AV n S-Video. Pa6otaet tolbko dny Bndeocirhana NTSC.OTTEHOK ASCD
[ \text{[MENU]} \rightarrow [\text{A} / \text{V}] \rightarrow [\text{ENTER} ] \rightarrow [\text{A} / \text{V}] \rightarrow [\text{ENTER} ] \rightarrow [\text{A} / \text{V}] \rightarrow [\text{ENTER} ] ] ToH zeta Mo&Ho m3MeHrBt O KpachOBaTO-6eIoro Do rOly6oBaTO-6eIoro. ToH zeta Mo&Ho m3MeHrBt O KpachOBaTO-6eIoro Do rOly6oBaTO-6eIoro. 1) Xon.2 2) Xon.1 3)O6bIyHoe 4) Tenn.1 5) Temn.2Pa3Mep ASCD
[ \text{[MENU]} \rightarrow [\wedge / \vee] \rightarrow [\text{ENTER} ] \rightarrow [\wedge / \vee] \rightarrow [\text{ENTER}] \rightarrow [\wedge / \vee] \rightarrow [\text{ENTER}] ] I03BONJET BbIbIpaTb pa3nUHbIe pa3mpe bI3O6pa&eHna. 1) 16:9 2)YBen.1 3)YBen.2 4) 4:3 [3haeHnYBEn.1,YBEn.2,PaHopama HeocTyNbI B pexImax 1080i (nnn Bblwe 720p) nTTDTV.] UΦp. w/noA ASCD [MENU] [A/V] [ENTER] [A/V] [ENTER] [A/V] [ENTER] BKNHOUHTb HIN BbIKHOUHTb FyHKUHO NOaBNeHmI WymA. Функця поадьненя сфрбогоууma no3bonaet noIyayt b6one yetkoe n3o6pa&ehne. 1)BbIKn. 2)ПОИ. Pexm"ΦnMb" ASC [MENU] [A/V] [ENTER] [A/V] [ENTER] [A/V] [ENTER] 103BONJET BKNIOHTb NIN BBYKIOHTb pe&n m npocmotpa nIbMoB (Film Mode). Функшpe&иma npocmoTpaфьmoB (Film Mode) obecneuBaert %ффekt OT Bocnpnra H3o6pa&eHn, aHaONHnBn NOCEeHNIO KNHOeTa (Bpekmax DVI-VideoФункци HeodocTynHa) 1)BbIKn. 2)PonH. 3KpaH PIP ASCD [MONTH] [A/V] [ENTER] [A/V] [ENTER] [A/V] [ENTER] [A/V] [ENTER] [] [ENTER] Mo&Ho perynipoBaT hAcToPouK %kpaHa PIP. 1) KoHTpACT PerynpoBka KOthpacta OKha PIP Ha %KpaHe. 2)RpKocTb PerynpoBka npKocTn OKHa PIP Ha %KpaHe. DocTyNhbIepeKIMbli:PIP 3ByK OoctynHbIepeXmbl PC/BNC/DVI AV S S-Video KOMNOHEHT D DVI-Video Pekum PASC0 [MONTH] [A/√] [ENTER] [ENTER] [A/√] [ENTER] MOHTOP IMeET BCTPOEHHBbBICOKOKaueCTBeHHbI CTepeOyCNITEnb 3BYKOBORO CNHana. 1)CTaHdapTH Bb6epTe pe&m Standard 7n B03bpueHn K CTaHdpTHbIM yCTaHOBkAM. 2) Music BbIbepuTe pe&m Music npn npocMTope My3bikalhBix Bndeonporpamm nnKoHcepTOB. 3) KInHO Bb6epntpe&m Movie nnpocmoTpa mboM 4) Peyb Bb6epHpe pe&MM Speech npn npocMOrpe nporpaMM, coep&auix B ochOBHom pehy n dHaonr (HanpMep, HOBOTe). 5)Пльз MOHITOP IMeET BCTPOEHHHB BICOKOKAHeCTBeHHB CTpeOyCNHTeN 3ByKOBORO CnHana Pn3 PASC0 [MENU] [A/V] [ENTER] [A/V] [ENTER] [A/V] [ENTER] [] [ENTER] MOHTOP IMeET BCTPOEHHbBbICOKOKaHeCTBeHHb CTpeOyCNITb 3ByKOBORo CMHana. 1) H/U IOpHepKnBaet3ByuHaHHe Hn3Knx TaCTOT. 2) B/4 IOnyepKnBaet3ByuHHe BBICOKx YactOT. 3)Баланс BanaHc 3Byka = > No3BOnraT perynipOBaTB 6anaHC 3ByaHaM MExdy JneBbIM npaBBIM DnHaAMKaM. 3Byk cnblweh dake B TOM cnyae,ecn dnn rpoMkoT yctahOBneHO 3aueHHe 0. Приимechанинe -Пин Habсторе ИЗБрахеня с Ипользованем Функци Custom MeHIO MagicBright nepexodntВ peKM Custom.PpOMK. aBTO PASC0
[MONTH] [A/V] [ENTER] [A/V] [ENTER] [A/V] [ENTER] Reduces the differences in volume level among broadcasters. 1)BbIKn. 2)ПОЛн.SRS TS XT PASCD
[MONTH] [A/V] [ENTER] [A/V] [ENTER] [A/V] [ENTER] SRS TS XT YANETCZ anateHToBAHHO TExHONorE SRS, KOTOPa no3BOJrT BOCPOn3BODy5.1- KaHbIy 38yK Hepe3 DBA DNAMnKA. FHyKzIa TRuSurround oecneHBAeT BOCpOn3BeDeHne 3XBaTbIAUoero BuPTyAnhoro 06bEmHO 3ByaHnuepe3 CCTemy C DByMnHNAMKAMN, BKNIOVA BCTPOEHHbIe DNAMnIK TeneBnOpa. FHyKzIa pa6otaet CO BCEMM MHorokAHaJIbHbIMm fOpMaTAM. 1) BbIKn. 2)Полн. [Дя npamorO bI3OBA 3ToI ΦyHKuH H an nyIbTe IY nCnONb3yETcK hONka 'SRS'].BbI6op 3Byka PASC
[ \text{[MENU]} \rightarrow [\triangle / \vee] \rightarrow [\text{ENTER}] \rightarrow [\triangle / \vee] \rightarrow [\text{ENTER}] \rightarrow [\triangle / \vee] \rightarrow [\text{ENTER}] ] Pn BkHueHHo FyHKuIN PIP MoKHO Bb6paTb Main uN Sub. 1)OCH 2)Дон [DocTynHbIe pexNMBi:PIP] YCTaHOBka DocyHbpeKmbi PC/BNC/DVI AAV S S-Video KOMnoHEHT D DVI-VideoY3bIK PASC0
[MONTH] [A/V] [ENTER] [ENTER] [A/V] [ENTER] IaIINMeHHeNRA3bIka3KpaHHbIX MEHIO BbINOJIHHTe ONICAHHbIE Hnke Opeaun. N PnMMeaHne -Ⅰ3MeHEHNE np03paHOCHTn FOHa MEHO OSD. OH He BnraeHa nporpammbl, BbInonHr eMbIe B KOMNbOtepe. - English, Deutsch, Espanol, Français, Italiano, Svenska, 日本語,中国语,Pycckn,荷兰,PortuguésBpem PASCD
NcnoIb3yETcra nIy Bb6pa OAnHn 3 YcTbipex fynKuH yacob - "YCT.Yacob", "TaMep cHa", "TaMep BKn." N "TaMep BkKn". 1)YCT.yacOB $$ [ M E N U ] \rightarrow [ \wedge / \vee ] \rightarrow [ E N T E R ] \rightarrow [ \wedge / \vee ] \rightarrow [ E N T E R ] \rightarrow [ E N T E R ] \rightarrow [ < / > ] \rightarrow [ E N T E R ] $$ Tekyua yctahOBka BpeMeHn. 2) TaHmep cHa $$ \begin{array}{l}\text {[ M E N U ]} \rightarrow [ \wedge / \vee ] \rightarrow [ \text {E N T E R} ] \rightarrow [ \wedge / \vee ] \rightarrow [ \text {E N T E R} ] \rightarrow [ \wedge / \vee ] \rightarrow [ \text {E N T E R} ] \rightarrow [ \wedge / \vee ] \rightarrow\\[ \text {E N T E R} ] \rightarrow [ < / > ] \rightarrow [ \wedge / \vee ] \rightarrow [ \text {E N T E R} ]\end{array} $$ IcnoJIb3yeTcIaIyABOMATUeCKOToKTIIOueHmMOHTOPaYepe33aHaHHbI npOMeKyTOK BpemeHn(B mHytax). (BbIKI., 30, 60, 90, 120, 150, 180) 3) TaHmep BKn $$ \begin{array}{l}\text {[ M E N U ]} \rightarrow [ \wedge / \vee ] \rightarrow [ \text {E N T E R} ] \rightarrow [ \wedge / \vee ] \rightarrow [ \text {E N T E R} ] \rightarrow [ \wedge / \vee ] \rightarrow [ \text {E N T E R} ] - [ < / > ] \rightarrow [ \wedge / \vee ] \rightarrow\\[ \text {E N T E R} ]\end{array} $$ NcnoIb3yETcA DnABOTOMaTHeCKOROBKIOHcHMOHTOPaBnpEaBPaTeNbHO 3aDaHHoe BpeMa. Ecn nnapametpo TaMep BKn. n TaMep BbKn. yCTaHOBJIeHO 3HaHeHne p a napametp Yct. hacob He hactpoeh, oTO6pa3NTc coo6eHne "Chana yCTaHOBITE HaCb". 4) TaMep BbIKn $$ \begin{array}{l}\text {[ M E N U ]} \rightarrow [ \wedge / \vee ] \rightarrow [ \text {E N T E R} ] \rightarrow [ \wedge / \vee ] \rightarrow [ \text {E N T E R} ] \rightarrow [ \wedge / \vee ] \rightarrow [ \text {E N T E R} ] - [ < / > ] \rightarrow [ \wedge / \vee ] \rightarrow\\[ \text {E N T E R} ]\end{array} $$ VcnoIb3yeTcIaIyABOMATUeCKOBOBblKIOeHnMOHITOpaBnpdBAPNTelbHO3aHaHHeBpMa npYCTaHOBNEHHOMypOBHErpmKOCTNpeKIMME. PnIMeuaHne - EcnI nI npametpoB TaImeB BkN. n TaImeB BbIK. yCTaHOBHeO 3HaHEne p , a napametp YcT.hacOB He HAcTPOE, OTo6pa3ntCraoocheHne "Chauana yCTaHOBnTe YaCb".PpO3paHocTb MeHIO PASC0
[ \text{[MENU]} \rightarrow [\wedge / \vee] \rightarrow [\text{ENTER} ] \rightarrow [\wedge / \vee] \rightarrow [\text{ENTER}] \rightarrow [\wedge / \vee] \rightarrow [\text{ENTER}] ] I3MeHHe Ipo3paHocT foHa MeHIO OSD. 1) BbICOKa 2) CpeHnra 3) Hn3kay 4) Henp03pYctaHOBka NcXoHbIX napaMeTpOB
 [ \text{[MENU]} > [\text{A} / \text{V}] > [\text{ENTER}] > [\text{A} / \text{V}] > [\text{ENTER}] > [0 - 9] > [0 - 9] > [0 - 9] ] Paponb MoXHO N3MeHHTb.Energy Saving PASCD
[ \text{[MENU]} \rightarrow [\wedge / \vee] \rightarrow [\text{ENTER} ] \rightarrow [\wedge / \vee] \rightarrow [\text{ENTER} ] \rightarrow [\wedge / \vee] \rightarrow [\text{ENTER} ] \rightarrow [\text{MENU}] ] Iporpamma MDC, npedoctabnemar komnaHnei Samsung, noedepknaeT naHb 4x4 KK-dncnneeB. 1)PonH. 2) BbIKI. PnIMeuaHne - Pn Heo6xOIMOCTN Ch3ntb noTpe6JIeHHe 3HePmB pexMme OxndHn, yctahOBtne dna napametpa 3KOH. 3HePm 3HaueHHe BKn. Ondako, ecnn nnapaMeTPa Energy Saving ycTaHOBNeHO 3HaueHHe BKn, fYHKUIO ydaenHoro BkIouHHe NITAHn Power On MHOrO3KpaHOrO ynpabHeHn MDC n fYHKUIO WOL (Wake On LAN) nporpammu MagicNet icnoIb3ObaTb HeIb3.Video Wall PASCD
Bndeocteha 3TO Heckolbko CoeINHeHHbIX BmEcTe BnDeo3KpaHOB, KaJdbI n3 KOTopbix noka3bIbAet Yactb 06tero I3o6paKeHnI IN CoeINHeHHbIe BnDeo3KpaHbI, KaJdbI n3 KOTopbIX noka3bIbAET OHO I TO JKe n3o6paKeHne. Korda BknIOeH peKIM Video Wall, moXHO hactpontb napaMeTpbl 3kpHa Video Wall. 1)Bnneota&no [MONTH] [A/V] [ENTER] [A/V] [ENTER] [ENTER] [A/V] [ENTER] BkIouHHe/ByIKIouHHe yHKm Video Wall (BndeocTeHa) BbipaHoro dncnnera. BbIK. -Nonn. 2)ΦopMaT [ \text{[MENU]} \rightarrow [\text{A} / \text{V}] \rightarrow [\text{ENTER}] \rightarrow [\text{A} / \text{V}] \rightarrow [\text{ENTER}] \rightarrow [\text{A} / \text{V}] \rightarrow [\text{ENTER}] \rightarrow [\text{A} / \text{V}] \rightarrow [\text{ENTER}] ] Moxho Bb6paBf pOpmT dNn npocmoTpa pa3deneHHoro 3kpaHa. Full PonHcKpaHHoe n306paXeHne 6e3 nonei. - Natural OTo6paKeHHe eCTeBHeHHOro H306paKeHnC coXpaHeHmE mCxOdHOro foPmaTa. 3) Pa3deneHrTeJIb 3KpaHa [ \text{[MENU]} \rightarrow [\wedge / \vee] \rightarrow [\text{ENTER} ] \rightarrow [\wedge / \vee] \rightarrow [\text{ENTER} ] \rightarrow [\wedge / \vee] \rightarrow [\text{ENTER} ] \rightarrow [\wedge / \vee] \rightarrow [\text{ENTER}] ] 3KpaH MoKeT 6bItb pa3deJeH. Ppna3aDeneHmMOKHO Bbl6paTb KOnuueCTBO 3kpaHOBCpa3HOKOOMHOBOKOH. - Bb6epTe peKIM B nyHKTe Screen divider (Pa3dennenb kpaHa). - Bыберпг дснney в nyнкг Display Selection (Bыбор дснney). -ПиннхатилфрьВьбpaHHOMpeKHM6yETyCTAHOBHeMecTONONOKeHMe. -2x2 -3x3 -4x4 -5x5 -1x2 -2x1 -1x5 -5x1 PnmeuHne - Bo В薪酬 pa60ы BiNeOTo6Lo ФнкиIM PIP, АТоноДстpoиka, ПОдстpoиka ИЗБраженя и Размер HeIoCTyInHb. Ecп пгл зауcke BiNeOTo6Lo pa60aet PIP, PIP bIknIOuHaETcR. BiNeOTo6Lo He pa60TaetВ ржиме MagicNet.3Kpah6e0nacnoCTn PASCD
FyHKsna Safety Screen (3KpAn 6e3oNaHcOCTn) nCnONb3yeTcI nI npEOTBpaUeHn IOBnEHn OCTaTOHbIX 1306paKeHn noCne dInTeNbHO BOCPOn3BeDHeHn HENODBnHOrO 1306paKeHn. -ФункцяЗкpan6e3oanachocnTncnoNb3yTecIpynpkpyK3kpapaC onpepeHHO 即TOI. - Ecnn nntaHne OTKIOHeHO, 3Ta FyHKnna HeNoCTynHa. 1) 3KpaH 6e30nacHOCTN \[ [\text{MENUR} ]\rightarrow [\wedge / \vee ]\rightarrow [\text{ENTER} ]\rightarrow [\wedge / \vee ]\rightarrow [\text{ENTER} ]\rightarrow [\text{ENTER} ]\rightarrow [\wedge / \vee ]\rightarrow [\text{ENTER} ] \] Icnonb3ayetraonopedeeneHHcoCTOHHBkN.)fHKnKpH6eONaCHOCHTN - BblKn. -ПОЛн. 2) Yactota [ \text{[MENU]} \rightarrow [\wedge / \vee] \rightarrow [\text{ENTER} ] \rightarrow [\wedge / \vee] \rightarrow [\text{ENTER} ] \rightarrow [\wedge / \vee] \rightarrow [\text{ENTER} ] \rightarrow [\wedge / \vee] \rightarrow [\text{ENTER}] ] Icnonb3yertc nra onpeelenenna cactoTB bblonne Hnene onepaan Screen Scroll (Ppokpyka kpaha). (1~10 yacob) INHTepBaI ONTCHTbIBAeTcR OT MOMeHTa BKNIOUeHn IINTAHN. No ymonuahnIO nHTepBaI coCTaBnaeT 10 yacob. -1~10yacob 3) CekyHda [ \text{[MENU]} \rightarrow [\wedge / \vee] \rightarrow [\text{ENTER}] \rightarrow [\wedge / \vee] \rightarrow [\text{ENTER}] \rightarrow [\wedge / \vee] \rightarrow [\text{ENTER}] \rightarrow [\wedge / \vee] \rightarrow [\text{ENTER}] ] IcnoIb3yETcTn onpeJeHHeNHa cactoBbInonHeHHe Nonepaun Screen Scroll (Ppokpytka ekpana). (1-5 cekynd) No ymouhanHIO INTEPBAN COCTABNRE 5 ckyu. -Tnn-Ipokpyka:1-5cekynd -Tn-πκcei,Naenb,NctnpaTeB:10~50cekynd 4) Tnn [ \text{[MENU]} \rightarrow [\wedge / \vee] \rightarrow [\text{ENTER}] \rightarrow [\wedge / \vee] \rightarrow [\text{ENTER}] \rightarrow [\wedge / \vee] \rightarrow [\text{ENTER}] \rightarrow [\wedge / \vee] \rightarrow [\text{ENTER}] ] Moxho 3meHb Tn 3KpaHa dna FyHKuN Safely Screen Type (Tn 3aunb 3kpaHa). - Ppokpytka -ПикSEL - NaheNB - NctnpatenbBbI6op pa3peuhenna P
[ \text{[MENU]} \rightarrow [\wedge / \vee] \rightarrow [\text{ENTER} ] \rightarrow [\wedge / \vee] \rightarrow [\text{ENTER} ] \rightarrow [\wedge / \vee] \rightarrow [\text{ENTER} ] ] Ecn pa3peuHHe rpaHuecko KapbKOMbTepe yaCTaHOHeHa 1024 x 768 npn 60 n, 1280 x 768 npn 60T,1360x768 npn 60 Tn nnn 1366 x768 npn 60 Tn,HO n3o6paKeHne HcBocnpn3BOJNTcHaNDnKaUMO6pa3OM,CnmoIbdoHHoФyHKU(BbIbOp pa3peHn)MOXHO doBntbc OTo6paKeHn KaPTnHKn Ha3kpane B onpeDeneHHom pa3peHn. (Функ"ия дocунна только в реким PC/BNC) 1)BbIKI. 2) 1024 X 768 3) 1280 X 768 4) 1360 X 768 5) 1366 X 768 PpIMMeaHne Bb60 MeHIO B3MOKeH, TOnIbKO eCn pAspeHHe BIndeOeKApTbYcTaHOHa 1024 x 768 npn 60 T, 1280 x 768 npn 60 T, 1360 x 768 npn 60 T nn n 1366 x768 npn 60 T. Hactpoika npkoctn  [MONTH] [A/√] [ENTER] [A/√] [ENTER] [ENTER] [] [ENTER] Bb MoKeTe BbIbPaTb OINH 3 I MHeOuXxCra 3bIKOB English Power On Adjustme  [MONTH] [A/V] [ENTER] [A/V] [ENTER] [ENTER] [A/V] [ENTER] Hactpoika Power On time (BpeMeHH pa60t) nla 3kpaHa. \*npedocetepkenghe:YctahOBNTe&onee npodjNtEnbHoe Power On time (Bpempaotbl) dny npedotbpaueHHnepehanprkengn.C&poc
YcTaHOBKa HcXoHbIx npaMeTpOB 1) C&poc hactp P $$ [ M E N U ] \rightarrow [ \wedge / \vee ] \rightarrow [ E N T E R ] \rightarrow [ \wedge / \vee ] \rightarrow [ E N T E R ] \rightarrow [ E N T E R ] \rightarrow [ < t > ] \rightarrow [ E N T E R ] $$ $$ (\Phi \mathrm {Y N K} ^ {\prime \prime}) \text {H A D O C T y n h a T o l b k o B p e x i m e P C / B N C)} $$ 2) Boccr."Bera P $$ [ M E N U ] \rightarrow [ \wedge / \vee ] \rightarrow [ E N T E R ] \rightarrow [ \wedge / \vee ] \rightarrow [ E N T E R ] \rightarrow [ \wedge / \vee ] \rightarrow [ E N T E R ] \rightarrow [ < / > ] \rightarrow [ E N T E R ] $$ Mhoro3kp. Ynp DocTyNhbIepeKIMbl PC/BNC/DVI A AV S S-Video C KomnoheHT D DVI-Video Mhoro3kp.Ynp $$ [ \text {M E N U} ] \rightarrow [ \wedge / \vee ] \rightarrow [ \text {E N T E R} ] \rightarrow [ \wedge / \vee ] \rightarrow [ \text {E N T E R} ] \rightarrow [ \text {E N T E R} ] \rightarrow [ 0 \sim 9 ] $$ YcTaHOBKa pa3hBix NdeHTnФkATopoB dIy annapata. 1) Yct. ID YcTaHOBKa pa3HbIX NIDEHTUΦnKaTOpOB dIra annapata. 2)BbOaID IcnoIb3yETcIraIbIbopaФyHKuINnepeaTnkaOTdIbHoro annapata.BKIOUaETcTOnIbKO annapat, IeHTNΦkATOp KOTOPORo COOTBETCTByET HactpoKe nepeaTnka. Функ"и npЯмого ynpaBHeHn Docynhbiepexmbi PC/BNC/DVI AV S S-Video G KomnoHeHT D DVI-VideoMDC P ASCD
PepenDITBE3KpaHHeMeHIO MagicNet.LOCK PASC
YCTAHOBHTe FyHKnIO 3aunTHaB 6nOKnPOBka. 1) BkN. &JIoKnIpOBoKy OH 6yET3aBnOKnpOBaH. 2) BbIKJ. &nOKpOBky OH 6ydt pa36nKnpoBaH. PnIMMeaHne -Пин actpoke Фнкlm Lock moKHO ynpaBnTb TOnbKO KhoNkAMn Lock Ha nyIbTe duCTaHIOHoro ynpaBHeHn TeneBn3ope. Pepdabapntbno 3aadhhbipassword (naponb) MoHToTa - "0000". PIMMeaHne C6poc npoJnIyBnOKOpBkIyHKnOHaNbHbIX KHO Hakmute KhoNkMUTE 186On. NapoB6yDenC6pouEn Do 3HaueHnE '0000'. © 1995-2008 SAMSUNG. ALL Rights Reserved  Ppabnna TeHHNK 6e3onacHcTn BVeIeHne IopdknloyuHne Pa60aC nporpamMhbIM 06ecneenuem HactpoKa MOHTOPa YctpaHHeHne HEnCnpaBHOCTe Функця CamonpoBepKn Cnncok PpOBepk Bonpocbn OTBebti CneuΦnkaun Hdopmaun PpIIOJKeHneTFT-LCD Monitor
www.samsung.com  LbETN BHeHnBnI3dEINMORYTpaJIHATcB 3aBNCIMOCTNOTMOeIN,aXapakTePNCTKN3dEINMORYT N3MeHrTaCBe3 npedBaPntelHoYbeOMNEHnC LcBkoycOBepueHCTBOAHN.YcTpaHHe HeCnPaBHOCTe
Функця CamonpoBepkn Приимechанинe - PpeT TEM, KAK oBpaaTaBc B CepBnchbIeHTp, npOBepBe TcNeDyUOuHne NyKtBi CamoCToRteNbHO. Ecnn KaKHe-Ni6o npObnemBbI He MoKeTe yCtpAHbCaMoCToRteNbHO, ObaPntecB CepBnchbl eHTp. >ФункцуСамоноьеркN B MOHITope IMeETcA FyHKUa ABTOCTnPOBaHnA, KOtOPa no3BOJrT NOBepN, npabINbHO nn pa6Otae MOHHP. 1) BbIKKIOHTe BaUN KOMNBIOTep mMOHITOP. 2)OTcoeINHtBeBnDEOKa6enbOT3aHHeNnaHEnKoMnBIOTepe. 3) BknoHTe MoHITOp. IokaaHHoe Hnke n3o6paeKeHe ("PnpOBepntcHn. KaBeb") Ha cpeHom fOe NOBnEETcK, KOrda MOHITOP HaxoNDTCB HOpMaNBOM paOohem COCTOHNN, Ho HA Hero He NoaH BnDEOCnHAn: B pexkme camonpoBepK CBeTOnIObHb INDkaTOp NHTaHn CoXpaHRe TcneHb IcET, a noka3aHHoe Ha PcyHKe n3o6paeKeHe nepemeeaaetcNo 3KpaHy.  Check Signal Cable PC 4) OTCYCTBNE OJHORO IN 3TINX KBaDpaTOB MOxET O3HaaybI npo6nmbc MoHHTOpOM. Ecnn 3kpan MOHNTOPA OCTaETC NcTbIM NOcne npOdenaHHbx npOeDpy, npOBepbTe BIndeokapTy IN KOMNbIOTep; BaW MoHNTOP pa6oTaET HOpMaJIbHo. > Check Cooling System EcnHa 3kpahe OTo6paKaetc4 Coo6eHne "Check Cooling System", 3NaHT, npn0toen c5oB OxnaDaIOUeM BEHTINrATope. O6patntecb CepBnchbl CEHTP DnpeMoHTa INI 3MeHb BEHTINrATope. >HeoTmAlbHbI pEXMM Moxho yctahobntb dae 60nbue pa3pehenhe, em 1360 x 768. B teuehme mnyb6ydt oTo6paKaTbcra cootBcTCTbyuouee coo6uHne. 3a 3to Bpem Moxho Bbl6paTb Mekdy nMeHHnem pa3peHnna 3kpaHa HncoxpaHHeM Tekyuero pexHMa. B cnyae ecn h cactota o6HbNEHn npebbiAet 85 T, oTo6paNTcR cepHbI 3kpan, Tak kak MOHTOP He noDdePkmBaet YACTOTy o6HbNEHn Bblue 85 T.Not Optimum Mode
Recommended Mode 1360x768 60Hz
Плимочаиме
-3aHnpmauee noDpejkmbaemopnpaepaaouenCnooc6hoctn yactotax obohne Hna 6pataTeceK pa3dny TexHmueckne 3abOckne HacptpoKn dmnnner.> yxodn nuctka
1)YXoⅢaKOpnycomMOHHTopa. OuCTKMOHITOPa npoTHBODHTe YCTOJ MRAKO TKAHBIO, npeBaPHTeBHO OTCoeDHNIB WHyp NHTAHIA.  He nCnoB3yIte 6eH3nH, pactBopHTeIN HnDpyTne orHeonacHbIe BEECTBa, a TaIOKe MOKpyIO TKAHb. -Bo n36eKaHHe NoBpeKdEHHa 3KpaHa peKoMeHdyETcHcNoJIb3ObaTb OHnauHIOy JxNkOCTb, peKoMeHdoBaHHyo Samsung. 2)YxOa3aekpaHOMIIOCKONaHEbHO MOHTopoA. OuCTky 3kpaH npoINBODIne OCTOPOXHO MRAKOH TKAHbIO (XONHATOBMyMAHHOI pHaHeIbIO).  HnB Koem cnyae He nncnoj3yute aetoh,6eH3HHnn pactbopntJIb. (3To MoXeT Bb3BaT nobpeKdHHe UIN DeFOMaUHO NOBepxHocTH 3kpaHa). CTONMOCTbYcTpaHHeHHNoBpeKdHn, npOn3oUeJHX NO BnHE NOb30BaTeIa, INCB3aHHbIe C3TNM 3aTpTaIb ONNaHBAOTcR NOb30BaTeIeM.Henonadkn cnco&blnx yctpaHnna
Плгимechанинe
- MoHHTOP BOCNPOIN3BODNT Bn3yAInhIe CnHnIb, nonyaemble OT KOMNBOTepa. CneOBATEbHO, npo6nEMblcKOMBIOTOpm IIN BnDaeokapTaoM OryT bblpnuHoi nponaxn H3O6paKeHHa HA MOHTope, noTePbB CBeTe, yMa, nobBiWeHnY aCtoTbI, n.T.I. B TAKOM cnyae CHaHane nonuHtE NCTOCHIK npo6nEMbla, a 3aTeM CBAKITecb C CEHTPOM TEXHNecKO rO BCNYKBAHn IIN C BaAMM DInlepom. 1)PpOBepbTe, npaBnIbHo JIN NOcOeHHeH K KOMNbIOTepy 3JeKTPuYeckm HHyp N Ka6eB. 2)Поверъ, He n3daet nI KOMNbIOTep 6Oone Tpex 3ByKOBbIX CnHAnOB npn BKNIOeHNN. (Ecnn da, Heo6xOIMTOxNHueckoe 06cNoyKINBaHme MaTePNHCkONnAaTb KOMNbIOTepa). 3)EcnnBb noctabunno Hobyu BndeokapTy nnn ecnn Bbl cmontnpobann KOMnbHOTep, npoebpTe, yctahOBnebln npaBep BndeoadaTepa n dpaBep MOHTopa. 4)Y6eHNTecb,HTO3NaueHHe NaCToBtckAaHmPoBaHHn BInDe03KpaHa 50Tc-85Tc(He CTabTe BblIe 60TpnpMakCMmaHbHom p3peHenn.) 5) EcnB 03HnKaeI np6Iema C yctaHOBKoi dpaIbepa (BnDeo)aIantepa, nepeBeJeTe KOMNbIeTp B BezonacnB Pekm, ydaInte AanTep Dncnner cep3 cyHKmPiHaNb YnpabHeHn, CnCTema, =dminHcptop UcTpoiCTB, a 3aTeM nepe3arpy3HTe KOMNbIeTp, TTObl nepeHHCTaIIIpObaTb dpaiBep (BnDeo)aIantepa. Cnncok PpoBepokPnmeaHne
B cnedyuie TaTabnue nepeuHcnIe B03MOnKHe np6IeMb n Cnooc6b Hx pa3peuHn. Npeed Tem, kak obpaatacB a cepbnch ly cHTp, 03NaKOBtEc b c HNΦopMaueH eToro pa3dena, YTO bY He moKte PeWHTb np6IeMy camOCToTeNbHO. Ecni Bam deHCTBntbHo Tpe6yetc nomoUb, no3BOHNTe, noXanyIcTa, no TenePhOHy, yka3aHHOM By rapaHTnHOM TanOHe IIN B pa3dene "InHcpmaun" daHHoro pykoBOcTBa, INI CBAJHtceb C BaAMm Dnepom. PpO6JIeMbI,CBRAaHHbIe CyCTaHOBkoi (PC) PnmeaHne Hnke nepeunncnehbl np6bnbI, cBra3aHHbIe C yctaHOBKO MOHTopa, n cnoocboix pa3pehenia.Ipo6nema Cnooc6 pa3peuHn
3KpaH MOHTOPa Mmraet. PpoepeBte, HadeKHO Nn noKnHouen 3akpenne BHeOka6eIb,NyUyniOT KOMNbOTepa KMOHTopy. (Cm.pa3den PNOKIOHHeN KOMNbOTepy) PpO6JIeMbI, CBA3aHHbIe C 3KpaHOM MOHHTopa PpIMMeaHne Hnke nepueineneb npoBneMb,CBA3aHHbIe C 3KpaHOM MOHITopa u cnoCo6blnx pa3peHnna.Ipo6Jema Cnoc06 pa3pehenna
3KpaH npCT, mHnkaTOp nHTaHnBbIKNoeH. - PpOBeBpTe, HApEckHO Nn PoKnIOChen UHyp NtTaHnA, IN BKnIOHeHO Nn NtTaHmE LCD-MoHITopa. (CM. pa3dEn POnkIOChENe K KomIbIoTepy) IpoBnEeTc coo6eHne "PpOBepntb cnH. ka6eJb" - PpOBeBpTe, HApExHO nI npKnIOUeH BnDEoKa6eBb K KOMNbIoTepy UIN NCTOCHNY BnDEoCnIHana. (CM. pa3dEn IOnKJIIOUeHne K KomNbIoTepy) - PpOBeBpTe, BKNIOUeH nI KOMNbIoTepy UIN NCTOCHNY BnDEoCnIHana. IorBnTcCoo6eHne HeonTmAlbHy peKm PnOBepbTe MaKcImaIbHyO pa3peuauUyO cnoc6HocTb N aactOTy BndeoaanTepa. 1306paXeHne"6exnT"B BepTKaJIbHOM HapabJeHN. CpaBHnTe 3TN 3NaHHeHn C daHHbHM B Ta6Piue (CM. pa3dien PoiKNIuHHeHne TeneBn3NoHHOro CnHana.) №6paKeHne HeeTeKoe npa3MbItoe. 06paKeHne HcEeTkoe npa3MbItoe. - PnoBepbTe, HadeXHo IIN noDknHueH BndeOka6enb. HadeXHo noDknHouHte erO. (Cm. pa3dien NoDknHouHeH K KomNbIeTpEpy) I3o6paXeHHe HeCTa6nIbHoe n npoxnt. BbInOnHnTe rpy6yio Tpy6o NToCHyIO ToHO hAcTpoNky HAcTObTbI. HmEHTcpaHTOMhBie H3o6paKeHH. BkIIOHITMe MoHITOp 3aHOBO, npeBaPHTeHbO OTKIOUHB BCE akceccyapbl (BndeokabEnb-ydlnHHTeHb N T.D.) - UcTaHOBnTE peKOMeHdyEmbIe 3HaueHnIaP3peUHOuIe CNOC6HOCTN uCACTObl O6HOBnEHnI. 1306paXeHne CnIuKOM CBetJIOe HJN CnIuKOM TEMHOE. PpOBepbTe, HaxoJATcN 3NaHaeHn pa3peaioue cnoc6hOCTn uacToby, yCTAHOBJIeHbIe IINBUNEOJIaTbKOMNbIOtepa, B NOdEpcKIMBaEMOM MOHITOpOM dHaana3OHe. EcnHET, TO nepeyctaHOHTe INCOrnaCHO TEkyuIm DaHHbIM "InHΦopMaUry" B MeHIO MOHITOpA n Ta6nIe 3abOdcKe NaCTPOkN DnCnIe. HecootBETCTBNE UBeTob 3KpaHa. - HactpoTe RaKoCTb N KoHTpact 1306paKeHnA. (Refer to the Brightness, Contrast) Zbeta n3o6paXeHnIckaxKeHbI HactpoTeUBeT,MCnoIb3yraNyHKT"PiNb3oBaT.PeKIMB 66 TEMHBIMNTEHMNI. MENHOHACTPOKINOSD"LBet". Hn3Koe KaueCTBO 6enoro Ubeta. Muraet 3eIeHbI HndkaTOp nHTAHn. - MoHITop B daHHbI MOpHT BbINOHnHET coXpaHeHne N3MeHeHIn yCTaHOBK B nAmrTH OSD. 3KpaH npCT, HndkaTOp nHTAHnnyctOuHBO CBETNC3eNeHbIMcBETOM NIN Mnaet KaxDbIe 0,5nn1 cekyHdy. - MonHToP haxoAnTcBpeXmE 3HeProc6epeKeHnA. - PapeBnHbTeMbIbNnHaxMnte JIObyo KnaBnHy HaKnabnType Komnbhotepa. 3KpaH Nyct H Mepuaet. Ecn nocne hakatna KhoNkMN MENU noBnreTc coocheHne "TEST GOOD", npOBepTe, naEeNo IIOKNoH e Ka6bI Mekdy MOHITOPM IN KOMNbIOTepom. Pp6nemblcBra3AHbIeC3KpaHOMMOHITopa Приимеанно Hnke nepeuncneHb Bo3MOxHbIe npoBneMbI, CBy3aHbIe cayIOcnHnHaAMn, nCnoc6bIux pa3peWenH.Ipo6JIema Cnoc6 pa3peuHn
Het 3Byka PpOeBpTe, HApExHNo Nn noKnHouen ayDnoka6ebNko BxOHOMy ayDnO-nOpTy Ha MOHTope N BbXoHOMy ayDnO-nOpTy Ha 3ByKOBOn nNaTe. (Cm. pa3den PtoKnIOuHne K KomnbItepy) PpOBepeTe ypoBeHrpoMkoCTN. CINUKOM HN3KN ypoBeHb rpOMKoCTH - PpOBeBpeYpOBeHrpOMKocTH. EcnnoeYCTAHOBMMAKCMAMbHOro ypOBHr pOMKOCTByKaNo-PrpexHemy HeOcTaTOHa, POBepTe YCTAHOBKYPOBHR pOMKOTn Ha 3ByKOBoI NaTe KOMbTopea IIN BCOOTBeTCTBHyOeM nporpaMMHom ObecneHm. CINUKOM60JIbwoecoepJAHNE BbICOKNXHINHN3KNXCACTOT. - OtperynpyTe napametpy "BbIcOKne yactoTby" n "Hn3Kne YactoTby"do npneMnEMoro ypOBH. > Ipo6nemblcBra3aHHbIe CnyltomDnctaHOnHOynpaBHeHH Приимechаиме Hnke nepeuncneHb03MOxHbI npo6nemblcBraaHHbI cnyltom ductaunohoro ynpabneHn, n Cnoocobix pa3peeHn.Ipo6JIema CnOco6 pa3peWENH
MonHTop He pearnpyet Ha HaxkTne KhONK nyIbTa dNCTaHnOHnOу npabIe PpOBepeTe nnonpaHocTb 6aTapei (+/-) PpOBeBpTe, He n3pacXoOBoH nn pecypc 6aTapei. - PpOBepbTe, BKNIOUeHO JIN NITaHne. PpOBeBpTe, HAdExKHO nI nOdknKUeH eHyp nITaHn. - PpOeBpTe, HeT JIN B NONE DeIcTBnI pyNbTa IINCTaHIOHOY OynpaBHeHn CneuAnbHbIX pIIOopeCteHTbIX INI HeHOBbIX naMn. BonpocbN OTBtB Bonpoc OTBet Kak MoXHo N3MeHnTb YaCTOу? Yactota n3MeHReTc npTeM n3MeHeHn KOHpypaun BnDEOKapTb. 3aMetbTe,HTO NOdepkKa BnDeoekapTb 3aBNCNT OT BepCN HcnoB3yEmo DpaBepa.(NoDpo6Ho 06 3ToM B B INHCTpyKUHX KOMNbHOtepy NIN K BIDeo.) KaK MoXHO OTperyNIpOBAbTa pa3peLeHne? Windows XP: I3mEnIte pa3pe7aOu7yO cnoc6Hoc7b, Bbl6paB IaHeIb ynpabJIeHHa OΦopMJIeHne I TeMbI 3KpaH IpaMaTePbI. Windows ME/2000: I3MEnHte pa3peWauOuYku CnOco6HoCTb, BbI6paB PaHeJIb ynpabHeHna 3KpaH NapaMeTpbl. ^* C8Rkntecb c u3rTOBHTenEM BUneOkaTbI dnyTOUHeHNI. KaHactpontbФyHK"mIO 3KohOMn3Heprn? Windows XP: Измене паразшалюук сисбость, вьбрав панельупавлени →Оформени « Temы → « Кразн → « Паметрь. I3MeHHTe npaMeTpbypeKIMa 3HePROc6peXeHnBb6paB PAnHeNb ynpaBHeHn-->3KpA H-->3actabKa,nnC nNoMoUbIO MeHO HAcTPOKn npaMeTpoB BIOS (BIOS SETUP) KOMlbOTepa.(PiocMToPTBe BInCTpyKmN K Windows/Computer) Windows ME/2000: I3mehnte pa3pe7aioyio cnooc6noctb, bbl6paB PaHelenb ynpabneHnra 3kpan Pnapemptb. I3mehnte npametpbipexkma3heproc6pejexnna, bbl6paB PaHelenb ynpabneHnra-->3kpan->3actabka, nncn Cnmoouko MeHIO hactpoikn npametpoB BIOS (BIOS SETUP) KOMNbIoTepa.(IocmOtnpe B INHCTpyKunn K Windows/Computer) KakHyxHOnuNCTnTbKOpnyc N PAnenbKKD? OTKIOHHTIe UHPOT ceTN, 3aTe mIpOITe MOHTOp MRAKOJ TKAHbO, NCIOJIb3yra MOIOUIN pACTBOP ININ BODY. He octabnneHa noBepxHocTm MOHTopa OCTaTKOB MOIOeOcpeCTBa nIu capanHH. He donyckaTe nonaAHH BODb BYtpbMOHTopa. © 1995-2008 SAMSUNG. ALL Right Reserved  PapBnIaTexHnKn 6e3onacHcTn BVeIeHne Iopdknloyehne Pa60aC nporpaMMHbIM 06ecneenuem HactpoKa MOHTOPa YctpaHHeHne HEnCnpaBHOCTeI Cneunpkauu 06nne 3KOHOMa3ep Φa6pHnHn HacrpoKn DnCnnner HnΦopMaun PpIIOJKeHneTFT-LCD Monitor
www.samsung.com  BETN BHeuHn BnI3dEINM MOrTy pa3nnHaTbcra 3aBNCIMOCTN OT MOeIN, a XapakTePncNTK IN3dEIN MOrTy N3MeHrTbC863 npEeBapuTeIbHoro yBeDoMneHn C cIeJIy ycOBepWeHCTBOBaHn.Cneunkaun
067ne >067ne 067ne Ha3BaHne Moden SMT-4011 NaHEnbKKD Pa3Mep dnaarOHaJIb 40dIOHMOB (101,6cm) 06nactb n3o6paeHn8 885,168 MM (Top) x 497,664 MM (BepT) Uar nukcen 0,648 MM (Top) x 0,648 MM (Bepr) CnHxpoH3aun Tnropn3oHTan 30\~81K NoBepTnKaann 56\~75 UBETn LBeT DmCnner 16,7M Ubeta Lbeta Pazpeшени OntnmabHoe pa3peuHne 1360x768/1366x768@60TUBaBNCUMOCTOTHCNOJIb3yEMOI rpaΦnueckoK KapTbI MakcmaBhoepaPeWeHne 1366x768@60Tg BxOaunCnHn, npeBaH AHaIorOBbI RGB, cHpOBoR RGB, COBMeTmblc DVI (nHTepaKTHBHe cHpOBoe BJeoo).0,7 Vp-p nookntbhl np7 50m ±10% Pa3dehba CnHxpoH3aunrTop. n Bept. pa3BepTK, KOMnO3HTbI CINXP.SOG,nonoxntenbHbI INN OTPuataTeNbHbI ypoBeHbTTL. MaKcImaMbHaYacToTa 100 MHz 3NeKtpoHa6xehnE ПеременнынТOK 100-240В,(+/-10%),50/60Ф Notpe6nemar Moocctb Ka6eJb 15pin-to-15pin D-sub,cbemHbI Ka6eB DVI-D to DVI-D, cBeMhBn (Onua) UnpoBpa3bem D-sub, BNC, DVI-D, YPbPr, S-VHS, VCR Pa3mepb1(UxDxBx)/Be 971×582×118MM/38.2×22.9×4.6ДIOHMOB(6e3noCTaKN) 971x629,5x223MM/38,2x24,8x8,8HIOHMOB(CnoDCTABKO),23Kr/50,7yHTOB 971 x 629,5 x 228 mm / 38,2 x 24,8 x 9,0 inch (C noctabko n cTeKlOM), 27,7 kg/61,0 lbs HHTeppeicnoctabKN VESA 200 MM x 200 MM (Дпя ИСОЛБЗОВАНЯ CO CсeинальнIM AnnapaTHbIM cpeCTBaMn NOДТаBKM (Дпя рк)) KnMaTnueckne Pa604a TEMnepa:at 10^ 40^ (50^ 104^) BlnkHoctb:10%~80%,HeKoHdeCpUouuHc Temnepa:ot-20°C~45°C(-4°F~113°F) XpaHEnn BlaJxHoctb:5%~95%,HeKoHdeCnpyuOui AydnoxapakTepeNCTnKn AynboXo1 THe3O RCA KpaChbI (I) 6bn (II),0,5B (-9dB) AynobxOJ 2 He3do RCA kpaHbI (I) 6eIbI (I), 0,5B (-9D5) AynobxokomnbpoTepa Ctepeopa3bem 3,5OM,0,5B(-9dB) Yactota Pu:80Γu~15KΓu (npn-3dB) YbCTBNTeHOCtB A/B:80Tg\~20Kf(npn-3dB) CoBMeCTHMOCTb c Plug & Play 3TOT MOHITOP MOKET 6bIbYcTaHOBnHa IIOBOH IN COBMeCTMlbIX c Plug & Play cnCTem. B3aIMoDEiCTBMEkdy MOHITOPOM I KOMMbHTOpOM ObceneuBaet HAnlyuUHe YCIOBnI da PaobToI h NaCTpoIK MOnHITopA. B 60bnHCTBe CnyaEB MOHITOP HAcTpaNBaETcABTOMaTHeCKN,ecn TOnbKO NOnb3OBaTeNb He NoKEnaET bIb6pTa Dpytne napaMeTpbl. DonyctHMoe KOINHcCTBO TOeK B daHHO MOeIN IcnoIb3yETcTO TOnKoJIeHOuHHa KK-naHeB (TFT-LCD), INrOToBnEHHa C npImeHEmm COBpeMeHHoI TexHOONIM NOynPBOoDnIKOB C ToHocTbIO 1 ppm (Oda MnnNIOHNA). HOrDa NIKCebl KPACHO, 3EIEHO, CInHErO u BENOTO cBeTob CTAnOBaTcRA pKIMM nN YepHBIM. 3TO He ABnETCa CnEDCTBnEM mNOXOrO KaueCTBa H e BblBaTaBt HeyDo6CTB B pa6ote. Hanpimep, konuheCTBO cy6-nKceneB DAHNOM n3dennn coCTaBnEeT 3.133.440. MnmeuHne ·BHOCHTbCAI3MeHHeHn6e3npedBapntelbHorOyBeDOMHeHn"KIN3HeHHbIuKn-7Net06opyoBaHne Knaccs B (HnFopmaunohno-KOMMyHKaunOHoe 6opyoBaHne dnn HcnoB3OBAHHB D oMaunHX ycNoBnx)
JaHnbl npOdyKT COOTBETCTBYET Tpe6OBaHNrM DInpeKTHbI 3neKtpOMaHHTHO CoMBecTUMOCtN NO NcIOJIb3OBaHNBO B DOMaUHNX YCNOBnX IN MOKeT IcNoJIb3OBaTbCBA JIObIX NOMEeHINX, BKJIOHAR O6bUHbIe XUNIbe NOMEeHINr. (ObopydoBaHnneKnaccaBn3nyaet MehIe 3neKtpomarHnTHbIX BOnH, Yem obopydoBaHne KnaccA.)3koHOMaH3ep
B 3TOT MOHITOP BCTPOEHa CNTeMaY ynpabneHnra 3NEKTPoNHTaHnem, HAsbBaema 3KOHOMa3ep. 3Ta CNTeMa 3KOHOMIT 3NEKTPO3HePnIO npTeM nepeKnIOUeHnBAWero MOHITOP a H pexm NOHKeHHORo Ntpe6HeHn 3NEKTPuYeCTBa, KOrda OH 6e3JeCTByET B TeEHnne ONpeDeHnHO BPemHn. MoHITOP ABOMATUHeCKn BO3BpaAaetc K HopMaIbHo npBoTe, KOrda Bbl nepeDbIgAeTeMbIs Hn HaxmaeTe Ha Ih6yI KnabNuHa KnaBauType. B CEJx 3KOHOMIN 3NEKTPo3HePnIBbIKIOuayte MOHITOP, KOrda OH He B pa6ote Hn KOrda Bbl OCTaBnIeTe Ero Ha DoJIroe BpEMr. CNTeMa 3KOHOMa3ep pa6oTaET Ha COBMeCTIMoC VESA DPM BIndeokapTe, BCTPOEHNO B BaW kOMNbToep. IcNoIb3yIte nporpamMHyO yTHNHT, INctaIIINpOBaHHyO B BaW KOMNbToep dI na pImMeHHeN 3ToI fynkun.| Соctогнées | Hорmaльна Раобота | Зкohомчны реким петань | Питунées OTКlioуно EPA/ENERGY 2000 | Питунées OTКlioуно |
| Иndikатор Злестоцпатону | 3eн. | 3eнень, Магалош | Жeльный | Черный |
| Пotравлиая мошисть | Мeнee чe 210Вт | Мeнee чe m 1Вт (Bыкл. реким) | Мeнee чe m 1Вт (Kлавиша- выкlioуател) | 0W (Kлавишa- выкlioуател) |
| *eximДистпя | Частota no | Частota Кадров (<") | Частota (q<") | Синхонида"Ия ПолуарноCTN (H/V) | |
| <op Изонтani (K<") | |||||
| IBM, 640 x 350 | 31,469 | 70,086 | 25,175 +/- | ||
| IBM, 640 x 480 | 31,469 | 59,940 | 25,175 | -/- | |
| IBM, 720 x 400 | 31,469 | 70,087 | 28,322 | -/+ | |
| MAC, 640 x 480 | 35,000 | 66,667 | 30,240 | -/- | |
| MAC, 832 x 624 | 49,726 | 74,551 | 57,284 | -/- | |
| VESA, 640 x 480 | 37,861 | 72,809 | 31,500 | -/- | |
| VESA, 640 x 480 | 37,500 | 75,000 | 31,500 | -/- | |
| VESA, 640 x 480 | 43,269 | 85,008 | 36,000 | -/- | |
| VESA, 800 x 600 | 35,156 | 56,250 | 36,000 | +/+ | |
| VESA, 800 x 600 | 37,879 | 60,317 | 40,000 | +/+ | |
| VESA, 800 x 600 | 48,077 | 72,188 | 50,000 | +/+ | |
| VESA, 800 x600 | 46,875 | 75,000 | 49,500 | +/+ | |
| VESA, 800 x600 | 53,674 | 85,000 | 56,250 | +/+ | |
| VESA, 1024 x 768 | 48,363 | 60,004 | 65,000 | -/- | |
| VESA, 1024 x 768 | 56,476 | 70,069 | 75,000 | -/- | |
| VESA, 1024 x 768 | 60,023 | 75,029 | 78,750 | +/+ | |
| VESA, 1024 x 768 | 68,677 | 85,997 | 94,500 | +/+ | |
| VESA, 1360 x 768 | 47,712 | 60,000 | 85,500 | +/+ | |
Yactota no
BpemHa npopncobbA Hne OOnH CTPOKn, CoednHIOe npabn n IeBkpar %Kpana no rOpnoHTaHn, Ha3bBaTcra?OpnoHTaBbHIM!epnoDM,a o6paTHoe?OpnoHTaBHOmy!epnoDy uCNO Ha3bBaTcra YactoToN no?OpnoHTaH. EInHHua N3MpeHmR: K?u.
Yactota no Beptnkaan
Iodobho fnyopeceHTHO namne, %Kpah Don&En Bocpon3Becn OdoHo To e 306pa&ehne MHO&ectBO pa3 B cekyHdy, YTObbl nonb3OBaTeB CMOR erO yBnDEb. Yactota taTKNX NOBtOPB H3bBaetcY AcTota KaDPoB, INN YAcTOTO N6HOJIeHHe. EINHua N3MepeHHe?U.
© 1995-2008 SAMSUNG. ALL Right Reserved

Ppabnna TeHHNK
6e3onacHcTn
BVeIeHne
Iopdknloyehne
Pa6ota c nporppaMMHbIM
06ecneenuem
HactpoKa MOHTOPa
YctpaHHeHne
HEnCnpaBHOCTeI
Cneunpkauu
HnΦopMaun
DnB6Oonee BbICOKoro
KaueCTBa H3o6paXeHn
NHΦOPMALJNRAO5
N3DEENIN
(Ппсдoxраннго ot 3фхekta octatoHoro n3o6paKeHH)
PpIJIoxKeHne
TFT-LCD Monitor
www.samsung.com

LbETN BHeHnBnI N3dEINMAOTy paJIHATcB 3aBNCIMOCTN OT MOnEIN, aXapakTePNCTKN I3dEINMAOTY IN3MeHrTcB6e npedBaPntelbHorO yBeDOMNEHnC LcBky COBepueHCTBOAHIN.
HOpopMaun
Ja60Jee BBICOKO KAeCTBa
n3o6paXeHHN
Дя поуеня ontmanbHoro kaucctBa H36paekhenia B KOHTponbHOn naHEn KOMnbIotepa HAcptpoTe pa3peuhenie n Ko3pfnueent HnKekzim 3kpaHa (hactOty perehepaun) cornacho HnHexeNeyUcIM nyHKTAM nHCTpykUn. CyueCTByET bepoTHocB noLuyenra H36paekhenia HepOBHOro KaeeCTBA, ecn BB He BbIbepeTe dny Baew ToHkonneHouHOn KK-naHEn (TFT-LCD) ontmanbHoe kaucctBO H36paekhenia
-Pa3peeHHe:1360x768
Vertical frequency 60
B D aHHO Moen Hcnoh3yetc ToKoHneHouHa JK-naHEnb (TFT-LCD), nroToBHeHHa c npimeHeHMc COpeMeHHo TExHoHOrn NoIpyPoBoDnIKOB C ToHocTbO 1 ppm (OHa MInIOHHa). HOrda Nkcebl KPACHO, 3EJIeHO, CNHEO u BELIO qBeTOB cTaHOBraTc RpKmMn Hn HepHbIMN.
3TO He AEBTcR CNECTBnEM INOXO KAeCTBa H He Bb3bIaET HeyDo6CTB pa6ote.
Hapmep, konueCTBO cy6-nKceneB daHHOM nndnn coctabnreT 3.133.440.
Дячсн ChapyкMonHToPаианeнHaHecnTe He6oJIbwoe KoJInHeCTBo peKOMeHnyEmoro 电TRE BoeCtBaHa cyxHy mRkyTKaHbN npOTpIte NoBepXHoCTN. He npKnaDbBaIte n3mUHee DabNeHne Ha KK-3kpan, npocTo octopoxHo erO npOTpIte.
PnH3NIMHEm DaBHeHH Bb MoKeTe ero NOBpeDHTb.
BbI CMOKTe NOJYuHTb 60e ee KaHeCTBeHoe M3o6paKeHne, ecJIaKTINBn3IpyTe Ha 3kpaHe onUIO "ABTOHaCTpOka" ("auto adjustment function").
Ecnn noce aBTOHaCTpoKn Bce eue npCyTCTByOT nomexn, nCnoIb3yIe pejkm ToHKoHAcTpoKn (FINE/COARSE).
PnOTo6paKeHm HEnoDnKHO KApTnKn B TeueHHe npOdoNKeTeNbHoro nepNoa BpeMeHn MOryt NOBnTbC8 OCTaOHTbHe N3o6paKeHn Hn Hepe3KoCTb.
EcnBbHe cobpaetecb nCnOlb3OBaTb MOHITOP B TeueHne IInTeIbHoro BpeMeHN, nepeKIOUHTe erO Be peKIM 3heproc6epexehn Hnn AKTINB3Npyte XpaHntelb 3kpaHa, otobpaKaIoUs nOdaNXHOe N306paKeHne.
INHOPMALUNOBN3DEENNN(NpeoopaenneOt3Φfekta
octaToCHoro u3o6paXeHHa
4To TaKoe 3ΦΦeKT OCTaTOUHOrO H3o6paKeHnE?
30000000000000000000000000000000000000000000000000000000000000000000000000000000000000000000000000000

BbIKIOHHe HHTaHnY, yCTaHObKa 3KpaHHo 3AcTaBKn NIIpeXIM 3Heproc&epExeHHN
BbiknoyaTe nHTaHHe Ha 4 caca nocne 20-Yacoboro nCnoIb3OBAHnA.
BbIKIOuayte nHTAHHe Ha 2 yaca nocne 12-yacOBoro nCnonb3OBAHNA.
BbIKIOHaiTe MOHTOP C NOMOUsBO CXEMBI ynpaBneHnI NTAHm B MEHIO CBOINCTB INCNner KOMNtboTePA.
- Ecnn Bo3MOKHO, nCOnb3yTe 3kpanHyIO 3actABky. - PekomeHdyETcNcNoB3ObaTb 3kpaHHyIO 3actABky ODHoro CBeta NIN DBNKUeecr NIO6paKeHne.
PepnoDnueckoe 3MeHeHne HnFopMa"Hn O Bete

PnIMeuaHHe
-нсповьтдураразиньхцьета
KaKdbie 30 MmHyT mMehnTe HOpmauO uBete, nCnoJb3yra 2 pa3NHybix Ubeta.
I36eataHeNCnoJIb3oBaHnRAKOM6HaCnN CnMBOOBnFOHOBOrOzBETAc60nboupa3HnueB
136eatae nnoBbOaHn cepbix cBeTob, T.K. B daHHOM cnUyae 0c0f0KT octatoHoro 136paXeHn MoKet BO3HNKHyb 6bIcTepe.
H36eraIte hCnOJb3OBaHmra CBETOB C 6oBwO pa3HnueB BApKocT (eepbN n 6ebl, cepb).


PepnoDnueckmMeHnTe"BetaCNMBONB
- IcnoIb3yIte HacbIeHHBeIe CHe6oBbOpa3HnEeB RApKocTn
-Bpemr:IM3MeHHeNcUBeTaCNMBONOBuCBeTaΦOHaKaJDbte 30 MNHyT.

KaKdbte 30 MNHTNMEHnTE CMBONbI c NMOOJIbOp nepeMeueHn.

Ha ekpahe nepnoDneckn OTo6paKaeTcB DmNkyUeecra N3o6paKeHHe C norOTINOM.
-BpMa:OTo6paKeHHe DnKxUeROc H3o6paKeHn C norOtnmOB TeueHne 60 cekyhd nocne 4- hacoboro nCnonb3oBAHn.
HaIyHnCnOc 3aunTb MOHOTOP OTOBHNKHOENH 30fKeTAOHTOHO 3o6paKeHn - 3TO BkIOHTb NtAHNE INN YCTaHOBTb DnA KOMbHOtepa INN CNTeMb, eCN OH He IcONb3yOTc, nporpAMMy 3kpanHo 3actABn. TapaHTmHOe 6cnyKBAHne TaKke 6ydet OrpaHnHeO cOrnACHO HnCTpyKuHm PyKOBOCTBa nONbOBATeNa.
Mcnonb3OBaHHe yHK"m Screen Scroll (PpokpyKa kpaHa)
- Icnonb3yIte fhykuuio Screen Scroll (Ipokpytka 3kpana)
- HencpabHoctb: cepna ropn3oHTaJIbHa nonOca nepemaeTcB BBeP x BHN3.

-Bb6epntcncoc6yctpaehnna
PykoOCTBO nonb3OBaTeNA: 3KpaHHOe MeHO -> Set Up (HAcTPOKa) -> Safety Screen (3KpaHBe3oNaocHcTo) -> Screen Scroll (PpokpyTa 3KpaHa)
.Bpemehno INHTepban:1-10 yacob (pekomehdyetcra:1)
BpeMeHHoepnoD:1-5cekyH(peKOMeHNyETcra:5)
PnMmeHne
(Cm.pa3enpykoBODCTBA nonb3oBaTeN KOMnAKT-DnCKa,ncBraeHHbI pYHKuM 3KpaHHOrMeHO. HeKOTOpBie MoEN MOrYT OTCyTcBOBaTb.)
McnoIb3ObaHne cyHK"n Screen Pixel (NkceJn ekpana)
- Icnonb3yTe dyHKuio Screen Pixel (IinKceJn 3kpaHa)
- HenncpabHocb: YepHaT TOka nepemeuaetcBBePx Hn3.

-Bb6epntcncoc6yctpaHeHH
PykoOCTBO nonb3OBATEIA :KpaHHOe MeHIO Set Up (HactpoKa) Safety Screen (KpAH 6e3oNaChOCTn) Pixel (ToKa)
Bpemehno INHTepban:1-10cacobpekomedyetc:1
BpeMeHHo npno:10-50 ckyH (peKoMeHHyETc:50)
IcnojblayteykuuScreenBar(NonocahkaPae)
- HenncpabHocb: Hepn ropn3oHTaBna nn BepnKaIbHa nOloca nepemaeTcB Bepx IN BH3.

-BbIepeCnoc6yCTpaHHeHH
PykoDBCTBO nonb3OBateJRA: 3KpaHHe MeHIO -> Set Up (HaCtpoKa) -> Safety Screen (KpaHBeaONaCHOCTn) -> Bar (Nonoca)
BpeMeHHoHnHTepBaJ:1-10yacOB(peKOMeHdyTeTcA:1)
BpeMeHHo nepno:10-50cekyH(peKoMeHnyetc:50)
PpHmEaHne
(Cm.pa3enpykoBODCTBA nonb3oBaTeIaKOMnAKT-DnCKa,ncBraeHHbIyHKuIM 3kpaHHO MeHO.HeKOTOpBie MoENM MOrY TcYCTBOBaTb.)
MncnoIb3ObaHne yHK"nn Screen Erasing (ydaJIeHHe n3o&paXeHnC 3KpaHa)
- Icnonb3yute fyHKuio Screen Erasing (Ydaene Hne 3o6paekenna c3kpaHa)
- HencnpaBHOCTb: 2 BepTikanbHbX bNoK npemeuauoTc, ydaen n3obpaKeHne c ducnner.

-BbIepeTe cnooc yctpaHnna
PykoBocBO nonb3OBaTeN: 3KpaHHOe MeHO -> Set Up (HactpoKa) -> Safety Screen (3KpaH6e3oNaCHOCTn) -> Eraser (YdaneHeNe H3O6paxEHn)
BpeMeHHoHnHTepBaJ:1-10yacOB(peKOMeHNdyETcA:1)
BpeMeHHo npHoi 10-50 cekyhd (peKOMeHHdyTeTc:50)
Ппмочаиме
(Cm.pa3enpykoBODCTBA nonb30BaTeNaKOMnakT-dNcKa,ncBraeHHbIyHKUIM 3kpaHHO MeHO. HeKOTOpBie MoDenM MOrY TcYCTBOBaTb.)
© 1995-2008 SAMSUNG. ALL Right Reserved

PapBnIaTexHnKn
6e3onacHcTn
BVeIeHne
IopdknloyuHne
Pa60aC nporpaMMHbIM
06ecneenuem
HactpoKa MOHTopa
YctpaHHeHne
HEnCnpaBHOCTeI
Cneunpkauu
Hdopmaun
Appendix
CB83bBaIeTecBc
SAMSUNG no Bcemy Mnpy
TepMHHbI
HOMO
TFT-LCD Monitor
www.samsung.com

BETN BHeuHn BnI3dEINM MOrTy pa3nnHaTbcra 3aBNCIMOCTH OT MOeIN, a XapakTePncTKN IN3dEIN
MoryT H3MeHbTaBc6e3 npdBaPntelbHOrO yBeDOMneHn C cIeJIbO yCOBepWeHCTBOBAHn.
Appendix
CBAIbAIaTecb c SAMSUNG no Bcemy
Mnpy
PnMMeaHne
- Ecn y BAC ecb npednokeHnBONPOcB no npodykTAM Samsung, cBra3baiTecb C
HΦopMaIIOHHbIM ΚeHTpOM Samsung.
North America
U.S.A
1-800-SAMSUNG(726-7864)http://www.samsung.com/us
CANADA
1-800-SAMSUNG(726-7864) http://www.samsung.com/ca
MEXICO
01-800-SAMSUNG(726-7864) http://www.samsung.com/mx
Latin America
ARGENTINE
0800-333-3733 http://www.samsung.com/ar
BRAZIL
0800-124-421
http://www.samsung.com/br
CHILE
800-SAMSUNG(726-7864) http://www.samsung.com/c
COLOMBIA
01-8000112112 http://www.samsung.com.co
COSTARICA
0-800-507-7267 http://www.samsung.com/latin
ECUADOR
1-800-10-7267 http://www.samsung.com/latin
EL SALVADOR
800-6225 http://www.samsung.com/latin
GUATEMALA
1-800-299-0013 http://www.samsung.com/latin
JAMAICA
1-800-234-7267 http://www.samsung.com/latin
PANAMA
800-7267 http://www.samsung.com/latin
PUERTO RICO
1-800-682-3180 http://www.samsung.com/latin
REP. DOMINICA
1-800-751-2676 http://www.samsung.com/latin
TRINIDAD & TOBAGO
1-800-SAMSUNG(726-7864) http://www.samsung.com/latin
VENEZUELA
0-800-100-5303 http://www.samsung.com/latin
Europe
AUSTRIA
0800-SAMSUNG(726-7864)http://www.samsung.com/at
0032 (0)2 201 24 18 http://www.samsung.com/be
BELGIUM
CZECH REPUBLIC 844 000 844 http://www.samsung.com/cz
Distributor pro Českou republika:
Samsung Zrt, Česka organizačné složka Vyskočilova 4,
14000 Praha 4 DENMARK 70 70 19 70 http://www.samsung.com.dk FINLAND 030-6227 515 http://www.samsung.com/Fl FRANCE 3260 SAMSUNG(726-7864)
08 25 08 65 65 (€ 0,15/min) http://www.samsung.com/fr GERMANY 01805-121213 (€ 0,14/Min) http://www.samsung.de HUNGARY 06-80-SAMSUNG(726-7864) http://www.samsung.com/hu ITALIA 800-SAMSUNG(726-7864) http://www.samsung.com/it LUXEMBURG 0035 (0)2 261 03 710 http://www.samsung.com/be NETHERLANDS 0900 20 200 88 (€ 0,10/Min) http://www.samsung.com/nl NORWAY 815-56 480 http://www.samsung.com/no POLAND 0 801 801 881
022-607-93-33 http://www.samsung.com/pl PORTUGAL 80 8 200 128 http://www.samsung.com/pt REPUBLIC OF IRELAND 0818 717 100 http://www.samsung.com/ie SLOVAKIA 0800-SAMSUNG(726-7864) http://www.samsung.com/sk SPAIN 902 10 11 30 http://www.samsung.com/es SWEDEN 0771-400 200 http://www.samsung.com/se SWITZERLAND 0800-SAMSUNG(726-7864) www.samsung.com/ch U.K 0870-SAMSUNG(726-7864) http://www.samsung.com/uk
CIS ESTONIA 800-7267 http://www.samsung.ee LATVIA 800-7267 http://www.samsung.com/lv LITHUANIA 8-800-77777 http://www.samsung.IT KAZAKHSTAN 8-10-800-500-55-500 http://www.samsung.kz KYRGYZSTAN 00-800-500-55-500 RUSSIA 8-800-555-55-55 http://www.samsung.ru UKRAINE 8-800-502-0000 http://www.samsung.ua UZBEKISTAN 8-800-120-0-400 http://www.samsung.uz
Asia Pacific AUSTRALIA 1300 362 603 http://www.samsung.com/au CHINA 800-810-5858, 010- 6475 1880 http://www.samsung.com.cn HONG KONG 3698-4698 http://www.samsung.com/hk INDIA 3030 8282, 1800 110011 http://www.samsung.com/in/ INDONESIA 0800-112-8888 http://www.samsung.com/id JAPAN 0120-327-527 http://www.samsung.com/jp MALAYSIA 1800-88-9999 http://www.samsung.com/my NEW ZEALAND 0800SAMSUNG(726-7864) http://www.samsung.com/nz PHILIPPINES 1800-10-SAMSUNG(726-7864) http://www.samsung.com/ph
SINGAPORE 1800-SAMSUNG(726-7864) http://www.samsung.com/sg THAILAND 1800-29-3232, 02-689-3232 http://www.samsung.com/th TAIWAN 0800-329-999 http://www.samsung.com/tw VIETNAM 1 800 588 889 http://www.samsung.com/vn
Middle East & Africa
SOUTH AFRICA 0860-SAMSUNG(726-7864) http://www.samsung.com/za TURKEY 444 77 11 http://www.samsung.com.tr U.A.E 800-SAMSUNG (726-7864) http://www.samsung.com/MEA 8000-4726
TepMHbI
CnHxpcnHan
CnHxpocirhannmHa3bIaKOTcCTaHdapTHe CnHnbl,Heo6xOIMMbIeDnOTo6paKeHnHa MoHHTope Tpe6yEmbixCBetOB.OHnNoP4a3dEIAKOTcHa CnHnblBepTKaJIbHOI RopINoHTaJIbHOI CNHXPOH3aUIM. 3Tu CnHnblObecneuBAKOT OTo6paKeHHe HOpMaJIbHbIX CBETbX N3OpaKeHn cYCTaHOBNEHHbIM PaapeWauoe cnOCo6HoCTbIO uactOtio OBHOBNeHn.
TnblcHxpcnHaIOB
Рацеловая Зто Метор падуни на монитор одельно Сигналы Вerte Кально синхрони заши. Полный Зто метор БКЮчени Сигналов Вerte Кально синхрони заши вkompoшпунь (полный) телесганл и падуни nx на монитор. Монитор отообраожает zebeta Изobраоженя руtem рацелени Кмpoшпного сигнала на ясхODье zbeToBье сигналы.
3epnctcb
M36paKeHHe Ha MoHHTope cnaeraTcN 3KpaChbIX, 3enebIX IN CNHHX ToeK. TEM BblIe pa3peWHeHne. PaCtOraHHe MEXdy DByMa TOnKaAMn OndHOrO CBeTa H3aBbAeTcR "3epHnCTocb". EInHnua N3MepeHnra: I
Yactota no Beptnkann
3KpaH npenncbIaBaeTc 3aHOBO NO HeckonbKO pa3 B cekyHy, YTO6bI co3daTb N3O6paKeHne, BNDIMoe dnn nONb3OBaTeN. Yactota TAKNX NOBTOPOB B cekyHy ha3bIaBcTc YactOTOn no BePTnKaHn, INN YactOTOn O6HOBNeHn. Yactota TAKNX NOBTOPOB Ha3bIaBcTc Yactota KaPOb, INN YactOTOn O6HOBNeHn. EdnHnca n3MepeHn: T.
Pnmep: Ecnn nn Hnndkatop mraet 60 pa3 B cekny, 3to COOTBETCTBYET 60 Tc.
Yactota no Topn3oHTan
BpMaHa npopncobbAHAe OndHcTPOKn, coednHIOeI npabbl n Iebl Kpa HcpaHa no ropnoHTanm, na3bAeTcra TOpniOHTaBbHM PepnoDM. ObpaTHoe TOpniOHTaBbHOMy PepnoDy NcNo Ha3bBaetc TaCToTo No TOpniOHTaN. EdnHua 3MepeHn: kT.
Metodyepe3ctpoHn He-yepe3cTPOHpa3BepTK
TOKa3 roPHTaBbHx HnHH Ha 3KpaHe B npAke CBepxBy HnH3 HAsbBaETcM MeTOOM He-uepe3ctPOuHO pa3BeptTK, TOrda KaK noka3 no OChepdi ChauHa a HeeTHbX LnHH, a Notom HeeTHbX, HAsbBaETc MToDOM uepe3ctpOHO pa3BePTK. B60bnHCTBe MOHtOpOB NcONb3yEtc MToD He-uepe3ctPOUHO pa3BeptTK, YTO ObecneHBAet YeTkoE h3o6paXeHHe. MeToD uepe3ctPOUHO pa3BeptTK 3TO TO MeTO, KOTOpBI INcOnb3yETcB TeneBn3opax.
Plug & Play (авTomатическая насточа)
3TaФyHKUHOTBeuHaETa HauNlyuWue KaueCTBO 3KpaHaNyTeM OeBcneHeHnA BtOMaTnueckOrO 6MeHa HINFOPMaueH MekDy KOMbIOpEPOm MOHITOpM. 3TO TMOHITOP CJeDyET MekDyHapOnHbIM CTaHApTAM VESA DDC dRyHKUHn Plug & Play (ABtOMaTnuecka HaCtpoKa).
Pazpeшени
KoIueCTBO TOUeK NO rOpH3OHTaII IN BepTtKaIaII, IcNoJIb3yEmOE dIg cO3dHaN H306paKeHn Ha 3kPaHe, Na3bBaETc" pa3peSeHHeM". 3Ta IuPpA nok3bIbaet ToHocB n306paKeHn. BbICOKe pa3peSeHHe XopoIo NIOJb3OBA TbIg KOMPiEckChbIX 3aDaH, NoCKoJIbKO Ha 3kPaHE MoXHO NOKa3aTb BoJIbWe N306paNTeHbHO INHOpMaun.
Плпмер:Есгп рашшени павно 1360X768,to STO OЗначаET,чTOибражени Ha 3кразен COCTONI 1360TOUeK no ropИЗоNTANH (roPИЗоNTANbHoe pa3peшени) n 768 cTPOK no BEPTIKANI (BepITKANbHoe pa3peшени).
Multiple Display Control(MDC)
PporpmaM ynpaBneHn HeckonbKMM MOHTopam (Multiple Display Control; MDC) npdctabn ecoB npnoKeHne, no3BOJHOe pa6oTaB Ha PIK ONDOBpeMeHHO C HeCKoJIbKMM MOHTopam. IIN CB3N MeKdy PI K MOHTOPOM nONb3yETcA TAnDAPThb NOcNEoBaTeNbH INTEppeC RS-232C.
PONHOMOHN
DaHHbIe, codepkauneC B 3tOM DOKymente, MoryT 6bITb N3MeHbI 6e3 npedBapntelbHorO yBeDOMHeHr.
© 2008 Camcyh3neKtpoHkC Ko. JtD. Bce npaba 3aunuehbl.
Bocnpn3BeHne B kakoi 6bl-TO Hn 6blno fOpme 6e3 nncbMeHHoro pa3peHnra ot Samsung Electronics Co., Ltd. cTporo 3anpeHo.
Samsung Electronics Co., Ltd. He HeceT OTBETCEHHOCTn 3a OIN6Kn nnn CnyAHHe DEICTBn Hn nocEnyUOuHne NobpeXeHn, noIyHeHHbE B CBAH C yCTaHOBHeHMem, paBToH nn cNoNb3OBaHmEm daHHoro MaTePnana:
Samsung ABNIOCT3apeHCTPPOBAAHbIMTOPTOBbIMMapKaAMM Samsung Electronics Co., Ltd.; Microsoft, Windows NT ABNIOCT3apeHCTPPOBAAHbIMTOPTOBbIMMapKaAMKopnpaumMaikpocodT; VESA,DPMN DDC ABNIOCT3apeHCTPPOBAAHbIMMTOPTOBbIMMapKaAMAccouaunBndeOJNEKTPOHHK CtaHApT;HaBaHne NORO ENERGY STARABNIOCT3apeHCTPPOBAAHbIMMTOPTOBbIMMapKaAMM AmePKaHcKOReAreHTCTBa 3aunBuOkpykaioe CpeB (EPA).Kaknaphep ENERGY STAR, Camcyhr 3abeepET, YTO TOT MOHITOP COOTBETCTBYET peKOMHeDauimEMENERGY STAR B OTHoWeHm 3ΦΦeKTHBOHO 3HEPRONl30BAHn. Bce octaIbHbe HaBaHnIpoDyKuIN, yOnMAHyTBe B DAHNOM DOKyMeHTe, MOrY ABnTBCr TOPROBIM MapkAMNII 3apeHCTPPOBAAHbIMMTOPTOBbIMMapKaAMN IX yBaJaemBX BnadeJIbcB.

1 TruSurround xt, SRS n CnMBoJ (●) RBAJIOTc TOBapHbIMN 3HaKaMNI KOpnpaun N SRS Labs, Inc.
2 TexHonorra TruSurround XT nCnONb3ObaHa no IInueH3nn KOpnpaun N SRS Labs, Inc.
TFT-LCD MONITOR
Espanol
SMT-4011
Guía de usuario

Instrucciones de seguidad
Simbologia
Encendido
Instalacion
Limpieza
Otros
Introduccion
Conexiones
Uso del software
Ajuste del monitor
Resolución de problemas
Especificaciones
Information
Apendice
TFT-LCD Monitor
www.samsung.com

El aspecto externo y el color del producto pueda variar dependiendo del Modelo; las specifications del producto se puedaCambiar sin previo aviso para la mejora del rendimiento.
Instrucciones de seguridad
Simbologia

Lea atentamente las siguientes instrucciones de seguridad que han sido 创建as para prevenir dfños al producto y al usuario.

Advertencia / Precaución

Negligencia en el cumplimiento de lasindicaciones signaladas por este simbolo podra occasionar daños fisicos o perjuicios al equipo.

Simbolos convenciones

Prohibido Es importante leer yentar en todo momento


Desconectar la clavija del tomacorriente

No tocar Conectar a tierra para prevenir una descarga electrica
Encendido

Cuando no use el computador durante largos periodos de tiempo, ajustelo a DPM. Si usa un protector de pantalla, póngalo al modo de pantalla activa.
La imagenes que se muestran son solo de referencia y no se pueda aplicar en todos los casos (o paises).
Acceso directo a las instrucciones paraatar la persistencia de imagenes

No use un enchufe estropeado o flojo.
- Esto podria originar una descarga electrica o fuego.

No jale del cordón ni toque el tomacorriente con las manos mojadas.
- Esto podrila causar una descarga eletrica o fuego.


Use solamente connectores y receptáculos apropriados para hacer la conexión a tierra.
- Una connexion a tierra inapropiada可以帮助azar una descarga electrica o una avería en el equipo. (Sólo equipo de Clase I.)


Apriete firmamente el enchufe del cable de alimentacion deforma que no se afloje.
- Una conexión Incorrecta podría provocar un incendio.

No doble excessivamente el enchufe ni el cordón, tampoco coloque objetos pesados sobre él, esteoulda occasionar daños.
- El incumplimiento de esta recomendacion podra causar una descarga electrica o fuego.

No connecte muchas extensiones o enchufes a un tomacorriere.
Esto podrla occasionar fuego.

No desconecte el cable de alimentacion cuando esse usingo el monitor.
- Debido a la desconexión se pueda producir un sobrevoltej que dañe el monitor.

No utilise el cable de alimentacion si el conector o el enchufe estan sucios.
- Si el conector o el enchufe está sucios, limpielos con un paño seco.
- Si conecta el cable de alimentacion con el conector o el enchufe sucios se pueda causar un cortocircuito o un incendio.

Para desconectar el aparato de la corriente, deben desenchufar el cable de la toma principal, por lo que el enchufe principalDebe estar tiempoly fácilmente accesible.
- El incumplimiento de esta recomendacion podra causar una descarga electrica o fuego.
Instalación
Póngase en contacto con un centro de servicios专业技术o autorizzato cuando instale el monitor en un lugar expuesto a gran calidad de polvo, temperatas extremas, alto nivel de humedad y produits químicos, y en Lugares donde el producto se vaya a utiliser las 24 del día, como

aeropuertos,estaciones,etc.
El incumplimiento de estas indicaciones pueda causar serios desperfctos en el monitor.

Ponga el monitor en un lugar con poca humedad y un minimo de polvo.
- Podria producirse un corto circuito o fuego en el interior del monitor.

No deje caer el monitor cuando lo mueva.
Esto podria causar dafo al producto o al cuerpo humano.

Instale la base del monitor en una vitrina o un estante de tal mannersque la base no sobresalga.
- Una caía del producto podría dāñar este o causar lesiones fisicas.

No coloque el aparato en una superficiekeepequeia o inestable.
- Coloque el aparato en una superficie lisa y estable, ya que el aparato pueda caer y producir lesiones a algoien que pase bajo aél, especialmente a los niños.

No deje el aparato en el suejo.
- Una persona (especialmente un niño) podra tropezar con él.

Para IMPEDIR QUE EL FUEGO SE PROPAGUE, MANTENGAL LAS VELAS U OTRAS LLAMAS EXPUESTAS SIempre ALEJADAS DE Este PRODUCTO.
- Podria provoc un incendio.

Mantenga el cable de alimentacion alejado de las fuentes de calor.
- Un aislamento fundido pode provocar un incendio o una descarga electrica.

No instale el aparato en lugarares mal ventilados, como por exemple una estanterias, un armario, etc.
- Un aumento de la temperature interna peuvent causar un incendio.

Cologne el monitor cuidadosamente.
- Podria dañarse o romperse.

No asiente el monitor sobre la pantalla.
Se podria dañar la superficie TFT-LCD.

La instalación de un soporte de pared debe hace ser por un instalador profesional calificado.
- La instalacion por parte de personal incompete希望能 dar lugar a lesiones.
- Use siempre el dispositivo de montaje spécifique en el manual del propietario.

Cuando instale el equipo, procure guardar una distancia de mas de 10 cm desde la pared para poder la ventilacion.
- Una ventilación inadequada puede causar un aumento de laTemperatura interna del producto que da como resultado que los componentes tengan una vidautilmasarda yel rendimientosea menor.

Mantenga el embalaje de plastico (bolsa) lejos del alcance de los niños.
- Si jugean con el embalaje de plástico (bolsa) los niños peuvent asfiarse.
Limpieza

Cuando limpie la caja del monitor o la superficie del TFT-LCD, limpie con una tela suave, ligeramente mojada.

No rocie detergente directamente sobre el monitor.
- Puede causar daños, una descarga electrica o un incendio.

Use el detergente recomendado con una tela suave.

Si el conector entre el enchufe y el pin está oxidado o sucio, limpielo apropiamente con una tela seca.
2. Un conector sueio能把caesaruna descarga eletrica o fuego.

No olvide desenchufar el cable de alimentacion antes de limpar el producto.
Podriva provocar un incendio o una descarga electrica.

Desenchufe el cable de alimentacion de la toma de corriente y seque el aparato con un paño suave y seco.
No utilise ningún producto químico como cera, benzol, alcohol, disolventes, insecticida, ambientador de aire, lubricante o detergente.
Otros
IMPORTANTE:
PARA PREVENIR CUALQUIER MAL FUNCIONAMENTO Y EVITAR DANOS, LEA DETALLADAMENTE Este MANUAL DE INSTRUCCIONES ANTES DE CONECTAR Y OPERAR EL APARATO, CONSERVE EL MANUAL PARA FUTURAS REFERENCIAS, GRACIAS. POR FAVOR LEA ESTE MANUAL ANTES DE OPERAR EL APARATO Y GUARDELO PARA REFERENCIAS FUTURAS.

No retire la cubierta (o la tapa posterior).
Esto podria causar una descarga eletrica o fuego.
2. Solicite la revision al personal calificado de reparaciones y mantenimiento.

Si su monitor no funciona normalmente- en particular, si hay algunos sonidos inusuales o sale某个 olor del interiordesconectelo inmediamente ycontactese con un centro de vente autorizzato o un centro de servicios.
Esto podria causar una descarga electrica o fuego.

Mantenga el aparato alejado de lugares expuestos a petróleo, humo o humedad; no lo instale en el interior de un vehiculo.
2 Esteouldacauseunfunacionamentoincorrecto,una descargaeléctricaofuego.
Evite especialmente la Utilizacion del monitor circa del agua o al aire libre donte podria estar expuesto a la nieve o a la lluvia.

Si se cae el monitor o se daña la cubierta, apáguelo y desenchufe el cordón de suministro electrico. A continuación, consulte al Centro de Servicio.
El monitor puede functionar Incorrectamente, provocando una descarga electrica o un fuego.

Mantenga launidad apagada cuando haya truenos y relampagos en el exterior, y no permitta que el monitor deje de utiliserse durante un periodo de tiempo prolongado.
- El monitor puede functionar Incorrectamente, provocando una descarga electrica o un fuego.

No intente mover el monitor tirando solamente del cable o del cable deASN.
- Estoouldracausarunaaveria,descargaeléctricaofuegodebidoal daño del cable.

No nuevo el monitor a la izquierda o a la referencia jalando solamente el cordón o el cable deSEO.
- Estoouldracausarunaaveria,descargaeléctricaofuegodebidoal daño del cable.

No cubrir las rejillas de ventilacion del gabinete del monitor.
- Una mala ventilación podra Causear averías o fuego.

No coloque objetos contenedores de agua, produits químicos oPEGUEOs Objetos de metal sobre el monitor.
- Esto podria causar un funciona incorrecto, una descarga electrica o fuego.
Si un cuerojo extraño en el monitor, desenchufe el cable de alimentacion ypongase en contacto con el Centro de Servicio.

Mantenga el aparato alejado de aerosoles químicos combustibles y sustancias inflamables.
- Esto podria causar una explosión o fuego.

Nunca meta algo metalico en las aberturas del monitor.
- Esto podría Causea una descarga electrica, fuego o lesiones.
No introduzca objetos de metal como la punta de un destornillador, un cable o un taladro, ni objetos inflamables como papel o cerillas en los orificios de ventilacion, conectores de altevoces o puertos

AV.
- Podría provocar un incendio o una descarga electrica. Si se introducen sustancias extrñas o se vierte agua en el aparato, apague este, desenchúfelo ypongase en contacto con un centro de servicios专业技术.


Si el aparato muestra unaImagen fija durante un长大o periodo de tiempo, pueda quedar unaImagen residual o cierta indefinccion.
- Establishzca el modo de ahorro de energia o configure un protector de pantalla con una imagen en movimiento, cuando seanecessaryamente deraj desatendido el monitor durante un长大o periodo de tiempo.

Ajuste laResolution y la fecuencia a los niveles apropriados para el Modelo.
- Los niveles inadequados de resolution y de Frequencia能把 dañar la vista del usuario.
40 pulgadas (101,6 cm) - 1360 X 768

Mirar el monitor continually deqse una corta distancia puede caesar daños en la vista.

Para registrar la tensión del ojo, tome un descanso de al menos cinco Minutes antes de cada hora de uso del monitor.

No instale el producto en una superficie inestable, desigual o que pueda experimentar vibraciones.
- Una caía del producto podra darar este o causar lesiones fisicas. El uso del producto en unaubicaciónque experimente vibracionesuede acortar la vidautil del aparato o provocar un incendio.

Cuando quiera desplazar el monitor, apaguelo y desenchufelo de la toma de corrente. Cerciorese de que todos los cables, incluyendo el cable de la antenna y los cables de conexion con除外 dispositivos, esten desconectados antes de mover el monitor.
- No desconectar correctamente un cable pourrait fazer y provocar un incendio o una descarga electrica.

Traslade el aparato entre dos o mas personas.
- Una caía del aparato pueda darar este o causar lesiones fisicas.

Coloque el aparato fuera del alcance de los niños ya que podrianestropearlo si se suben encima.
- La caía del aparato pueda causar daños fisicos o inclujo la muerte.

Si no va a utiliser el producto durante un periodo de tiempo prolongado, desenchufe el cable de alimentación.
- Podria producir emisiones de calor por la acumulacion de polvo o la disminuccion del aislamento que causaran descargas lectricas o un incendio.

No deposite los objetivos favoritos de los niños (orialquier otro)...
objet que pueda resultarles atractivo) encima del aparato.
- Los niños peuvent intentar subirse al aparato para coger el的对象. El aparato pueda caer y causar lesiones fisicas o incluo la muerte.

Cuando que las pilas del mando a distancia,onga cuidado de noURTARLAS al alcance de los niños, ya que podrian tragarlas. Mantenga las pilas fuera del alcance de los niños.
- En caso de intoxicacion, consulte a un medico inmediatamente.

reemplazar las pilas, colóquelas en la polaridad correcta (+/-) según lo indicado en el compartmentido de las pilas.
- La polaridad Incorrecta puede hacer que una pila se rompa o sufra un derrame del liquido interior, con riesgo de incendio, lesiones, o contaminacion (daños).

Use solo pilas estar degun lo especificado.No use pilas nuevas y usadas juntas.
- pueda hacer que una pila se rompa o sufra un derrame del liquido interior, con risiego de incendio, lesiones, o contaminacion (daños).

Las baterias (y las baterias recargables) no son residuos normales y deben devolverse al lugar adecuado para su reciclaje. El usuario es responsable de devolver las baterias usadas o recargables al lugar adecuado para que se procee a su reciclaje.
- El usuario可以选择 devolver las baterías usadas o recargables al centro municipal de reciclaje más(PRXTO)o a un establishimiento que vendal el mesmo tipo de baterías o de baterías recargables.
© 1995-2008 SAMSUNG. ALL Rights Reserved
Contidente
Instrucciones de seguridad 1
Simbologia 1
Encendido 1
Instalacion 2
Limpieza 4
Otros 5
Introduccion 12
Contenido del paquete 12
Su monitor 13
Disposión mecánica 20
Conexiones 26
Instalacion del kit del soporte 26
Conexión del monitor 27
MDC 33
Ajustedemonitor 53
Entrada 53
Picture [PC/BNC/DVI Modo] 54
Picture [AV / S-Video /Component / DVI-Video Modo]. 56
58
Setup 59
Control multiple 62
62
Resolucion de problemas 65
Comprobación de las functions de autoverficación 65
66
Q&A 68
Especificaciones 70
Generales 70
Ahorro de energia 71
Modos de temporizacion predefinidos 71
Information 73
Para Obtener una Mejor Presentacion 73
INFORMACION de PRODUCTO (Libre de retencion de imagenes) 73
Apéndice 77
Contacte con SAMSUNG WORLDWIDE 77
Téminos 79
Eliminación correcta 80
Autoridad 80
SAMSUNG
Instrucciones de seguidad
Introduccion
Contedio del paquete
Su monitor
Disposition mechanism
Conexiones
Uso del software
Ajuste del monitor
Resolución de problemas
Especificaciones
Information
Apendice
TFT-LCD Monitor
www.samsung.com

El aspecto externo y el color del producto pueda variar dependiendo del modelo; las specifications del producto se puedaCambiar sin previo aviso para la mejor del rendimiento.
Introduccion
Contenido del paquete
Nota
- Compruebe que los siguientes elementos se incluyen con el monitor.
Si falta algo n elemento, contacte se con su proveedor.
Pongase en contacto con un distribuidor local para adquirir los articulos adiconiales.
Nota
- Nouveleaparatoen elsuelo.

Monitor
Manual

Guía de usuario

Documento de garantía
(no esta disponible en todas las
localidades)

Guide de l'utilisateur,
logiciels MDC
Cable

Cable de senal Cordon electrico

Otros


Control remoto Baterias (AAA X 2) Cubierta-tapon

Conector adaptor BNC a RCA.

Soporte temporal
Se vende por separado


Kit de montaje en la pared Juego de altavoces Kit del soporte


Cable DVI Cable BNC
Su monitor
> Parte Delantera


1) MENU
Abre el menu OSD. Internacional se usa para pagar del menu OSD o:volver al menu anterior.
2) Botón Arriba-Abajo
Mueve verticalmente desde un elemento de menu a other oajsta los values del menu seleccionados.
3) Botón Izquierda-Derecha / Botón Volumen
Mueve horizontallymente desde un elemento de menu a other oajusta los values del menu seleccionados.
Tambien ajusta el volumen del audio.
4) ENTER
Bolón Source (Fuenté) Se usa para selección el menu OSD.
5) SOURCE
Cambia desde modo de pantalla PC a modo de pantalla Video.
Cambiar la fuente se permite solamente para los dispositivos externos que estan connectados con el monitor en ese momento.
[PC] [BNC] [DVI] [AV] [S-Video] [Component]
>> Hagaclinicaquilparaveruna secuenciadeanimacion.
6)PIP
Pulse este boton para controlar la ventana PIP.
No se可以选择 solapar más de un PIP en la pantalla, bajo que BNC y el componente utilizes el本身就是 terminal.
>>Haga Cliq aquipara veruna secuencia de animacion.
PC
AV / S-Video / Component Modo
BNC
AV/S-Video Modo
DVI
AV / S-Video / Component Modo
AV/S-Video
PC/BNC/DVI Modo
- Componente
PC/DVI Modo
7) Energia
Use this boton para encender y apagar el monitor.
8) Indicador de encendido
Use this boton para encender y apagar el monitor.
9) Sensor de control remoto
Oriente el control remoto hacía esta zona del monitor.
Nota
- Vea Ahorrode de Energía, descripto en el manual, para mayor información en lo referente a las configuraciones de ahorro de energia. Para ahorroar energia, apague el monitor cuando no lo necesse o cuando no lo use por periodos largos de tiempo.
> Parte Posterior
Nota
- Para más informaciónreferente a las Conexiones de cable, vexe Conexión de cables en Instalación. La disposición trasera del monitor pueda variar levamente dependiendo delmodelo del monitor.


A
1) POWER SW ON [ ] / OFF [O] (Botón de alimentación on/off)
Encendidoyapagadodelmonitor.
2) POWER IN (Toma de corriente)
Cable de alimentacion, Conexiones en el monitor y enchufe de pared.

B
3) RS232C OUT/IN (Puerto serie RS232C) Puerto de programa de MDC (Multiple Display Control, Control de dispositivos multiples)
4) DVI / PC IN [RGB] (Terminal de connexion de video de PC)
Usando el D-SUB de 15 contactos - modo PC (PC Analógico)
5) DVI/PC IN [DVI(HDCP)] (Terminal de conexión de video de PC)
Usando el DVI-D a DVI-D - modo DVI (PC digital)
6) DVI / PC IN [PC/DVI/BNC AUDIO IN] (Terminal de connexion audio (entree) PC/DVI/BNC)

C
7) COMPONENT AUDIO IN [L-AUDIO-R] (Terminal de connexion audio (entree) compuesta)
8) BNC/COMPONENT OUT [R/P R, G/Y, B/PB, H, V] (Terminal de connexion de video de BNC / Terminal de connexion de senal compuesta (salida)) Conexión BNC (PC Analógico): connexion del puerto R, G, B, H, V Conexión de senal compuesta: connexion del puerto PR, Y, PB
9) BNC/COMPONENT IN [R/P R, G/Y, B/PB, H, V] (Terminal de connexion de video de BNC / Terminal de connexion de signal compuesta (entrada))

D
10) AV AUDIO IN [L-AUDIO-R](Terminal de conexión de audio compuesto) (entrada)
11) AV OUT [VIDEO] (Terminal de connexion de Video): Modo de AV (salida)
12) AV IN [VIDEO] (Terminal de connexion de Video) (entrada)
13) AV OUT [S-VIDEO] (Terminal de connexion de S-Video): Modo de S-Video (salida)
14) AV IN [S-VIDEO](Terminal de connexion de S-Video) (entradada)
15)EXT SPEAKER(8Ω)[--L-+,--R-+](Terminal de connexion de altavoz (8))
16) AUDIO OUT [L-AUDIO-R] (Terminal de conexión de audio compuesto) (salida)
Salida del monitor: conexión de PC, DVI y BNC
Nota
- El número de monitores que se pueda conectar con la calidad del bucle pueda variar según el cable, la fuente de la seals, etc. Se pueda conectar diez monitores con un cable si no hay daños en este ni en la fuente de señal.

E
17) Bloqueo Kensington

Nota
El bloqueo Kensington es un dispositivo que se usa para fjar fisicamente el sistemas cuando se usa en un situatorio. (El dispositivo de bloqueo debe adquirirse por separado.)
Si necesita informacion sobre el uso del dispositivo de bloqueo,pongase en contacto con el establishimiento sobre lo haya adquirido.
Nota
- Vea Conexión del Monitor para mayor información en lo referente a las Conexiones de cable.
> Control remoto
- El funciona del mando a distancia可以选择 entrepecdido por un teilevisor oalgun other dispositivo.
electrnoutilizzato cerca del monitor,provocando un funciona incorreto deblado a las
interferencias con la fecuencia.
1. ON/OFF
2. MAGICNET
3.MDC
4.L
5. Botón MagicNet
6.+100--
7.VOL
8. MUTE
9. TTX/MIX
10. MENU
11. EN
12.M/B P.MODE
13.AUTO
14. PRE-CH
15.VCH/P
16. SOURCE
17. INFO
18. EXIT

19. Arriba-abajo Izquierda-derecha
20. S.MODE
21. STILL
22. FM RADIO
23.P.SIZE
24.()SRS
25. H DUAL/MTS
26. PIP
27. SOURCE
28. SWAP
29. 312E
30. REW
31. STOP
32. PLAY/PAUSE
33.FF
1) ON/OFF
Enciende y apaga el monitor.
2) MAGICNET
Botón de Inicio rápido de Magicnet.
-Estamericanoestadisponderableparaeste monitor.
3) MDC
Boton de Inicio rápido de MDC.
4) LOCK
Este boton activar o desactivar todas las teclas de referencia tanto del mando a distancia como del monitor excepto los botones de encendid y LOCK.
5) Botón MagicNet
Use these botones para MagicNet.
- Letras y númeroos: use"These botones para书写ir una direccion de Internet.
- DEL:utilicelo para retroceder.
- SYMBOL:utilicelo para asignR signos.(O-)
- ENTER: utiliser el commando intro.
-EstafunciOnnoestadisponibleparaeste monitor.
6) +100 /--
Pulselo para seleccionar los canales superiores al 100.
Por典型案例, para seleccionar el canal 121 pulse +100 y, a continuacion, pulse 2 y 1
-Estamericano no está disponible para este monitor.
7)-VOL+
Tambienajustaelvolumedelaudio.
8) MUTE
Interrumpe (silencia) la calidad de audio temporalemente.
Aparece en la esquina inferior izquierda de la pantalla.
El audio se reanuda si se pulsa el botón Silencio o El sonido vuelve si se pulsa Mute, +o - en el modo Mute (Silencio).
9) TTX/MIX
Los canales de TV proportionsan servicios informativos他们在线电视。
[TTX/MIX se utilizes principalmente en Europa.]
10) II MENU
Abre el OSD y activa un elemento del menu resultado.
11) ENTER
Activa un elemento del menu resultado.
12) M/B.P.MODE
Cuando se pulsa este boton, el modo actual se visualiza en la parte inferior central de la pantalla.
AV/S-Video/Component Mode:P.MODE
El monitor Tiene quatre configuraciones automaticas de imagen que viennent predefinidas desde fabrica. Pulse el boton或其他 vez para携带 entre los modelos configurados previamente disponibles. (Dinamic Normal Cine Favorito)
PC / DVI Mode : M/B ( MagicBrightTM )
MagicBrightTM es unamerican que proporciona un entorno de visualizacion optimo en funcion del contentido de la imogen que estamirando. Pulse el boton otra vez para携带 entre los modos configurados previamente disponibles. (DiversiOn Internet Texto Favorito)
13) AUTO
Ajusta la visualizacion de la pantalla automatisticamente. (PC)
14) PRE-CH
Este boton se usa para volver al canal正常使用 anteriormente.
-Estafuncionnoestadisponibleparaeste monitor.
15) VCH / PA
En el modo TV, selecciona los canales de TV.
-Estafuncionnoestadisponibleparaeste monitor.
16) SOURCE
Cambia desdemodo de pantaillacap a modo de pantaillavideo.
17) INFO
La informacion actual de la imagen se visualiza en la esquina superior izquierda de la pantalla.
18) EXIT
Sale de o cierra la pantalla del menu.
19) Botones Arriba-Abajo e Izquierda-Derecha
Mueve horizontalmente, verticalmente desde un elemento de menu a othero o ajusta los values del menu seleccionados.
20) S.MODE
Cuando se pulsa este boton, el modo actual se visualiza en la parte inferior central de la pantalla.
Cuando pulse este botón, el modo de audio actual se muestra en la esquina inferior izquierda de la噎.
Pulse el botón other vez para embarir entre los modelos configurados previamente disponibles.
(Normal Música Cine Dílogo Favorito)
21) STILL
Pulse una vez el botón para congelar la pantalla. Pulselo othera vez para descongelar.
22) FM RADIO
Enciende o apaga FM Radio (Radio FM).
En el modo PC/DVI,sole configuratura SOUND (SONIDO) como FM Radio (Radio FM).
En el modo general de Video SOURCE (FUENTE de video), configurara FM RADIO (RADIO FM), apagando la pantalla.
En las zonas donde la seals de bille, peut haber ruido de fondo durante una emisión de FM.
-Estafuncionnoestadisponibleparaeste monitor.
23) P.SIZE
Pulselo para combustir el tamafo de pantalla.
24) (SRS
SRS
25) I-II DUAL/MTS
DUAL-
Utilice el botón DUAL en el mando a distancia para selección Estéreo o Mono cuando el monitor está en el modo TV.
MTS-
Puede seleccionar el modo MTS (Multichannel Television Stereo).
-EstafunciOnnoestadisponibleparaeste monitor.
26) 三PIP
Avance
rápido
27) SOURCE
MagicBright
28) SWAP
Intercambio del Descripción de laImagen PIP y de laImagen principal.
LaImagen de laventanaPIPapreceré en la pantalla principal,ylaImagen de la pantalla principal.
apreceré en la ventana PIP.
29) SIZE
Drag
30) REW
Rebobinar
31) STOP
Parar
32) PLAY/PAUSE
Reproducir/Pausa
33)FF
Avance rápido
© 1995-2008 SAMSUNG. ALL Right Reserved
1. Disposition mecánica

2. Monitor


3. Pie

4. Altavoz

Up
5. Como instalar el soporte VESA
- Cuando instale VESA, asegürese de que cumpla con los estandares VESA internaciones.
- Información para adquirir e instalar el soporte VESA: Póngase en contacto con el distribuidor de Samsung más cercano para realizar el pedido. Una vez realizado el pedido, le visitaran技术和 especializados y le instalarán el soporte.
- Se necesitan al menos 2 personas para mover el monitor LCD.
Samsung no se hace responsable de ningun daño producido al producto ni de las lesiones personales produidas por la instalacion realizada directamente por el cliente.


Para filar el soporte a la pared, utilise unicamente tornillos para metal de 6 mm de diametro y de 8 a 12 mm de longitud.
UP
6. Instalación del soporte mural
- Para la instalación del soporte mural,pongase en contacto con un technician.
Samsung Electronics no se hace responsable de los días causados al producto o al usuario si la instalacion ha efectuado el usuario.
- Este produit está indicado para su instalación en paredes de cemento. Puede que este produit no quede bien sujejo si se instala sobreyeso o madera.

Components
Utilice solo los componentes y accesos entrega con el producto.

Soporte de pared (1)

Bisagra (Izquierda 1, Derecha 1)

Colgador de plástico (4)

Tornillo(A) (11)

Tornillo(B) (4)

Taco (11)

Conjunto del soporte mural
1
Inserte y apriete el tornillo de sujecion en la direction de la flecha.
A continuación, monte el soporte en la pared.
A. Tornillo de sujeción
B. Soporte de pared
C. Bisagra(izquierda)
D. Bisagra(derecha)

Hay dos bisagras izquierda y derecha).Use la adecuada.
2

Antes de praticar los orificios en la pared, compruebe si ladistancia entre los dos orificios de bloqueo de la parte pos-terior del producto es correcta.
Si la distancia es demasiado corta o demasiado larga, aflo-je los 4 tornillos del soporte de pared para ajustarla.
A. Distancia entre los dosorificios de bloqueo
3

Consulte el diagrama de instalacion y marque los+puntos detaladro en la pared. Utilice la broca de 5mm para taladrar orifi-cios de una profundidad superior a los 35~mm
Inserte cada taco en el orificio correspondiente. Alinee cada uno de los orificios del soporte y de la bisagra conel orificio del taco correspondiente y a continuacion inserte yapriete los 11 tornillos A.

Para montar el aparato en el soporte de pared
El aspecto del aparato puede variar según el modelo. (Los juegos de colgadores de plástico y de tornillos son iguales)

1

2

1. Monte el aparato en el soporte de pared y asegürese de quequeda bien sujeto por los colgadores de plástico izquierdo yderecho.
2. Cuando instale el aparato en el soporte,onga cuidado de noatraparse los dedos en los orificios.
3. Asegürese de que el soporte de pared está bien sujeto para QUEEL aparato se mantenga en su situó antes de la instalación.

3

4
Retire los 4 tornillos de la parte posterior del aparato.
Inserte el tornillo Ben el colgador de plástico.
Apriete los 4 tornillos del caso 2 (colgador de plastico +tornillo B) en los orificios posteriores del aparato.
Retire el pasador de seguidad (3) e inserte los 4 soportesdel aparato en los orificios correspondentes del soporte (1).Instale el aparato (2) de mannersque quede bien sujeto alsoporte. Recuerde queDebe volver a insertar y aplutar elasador de seguidad (3) para sutjar firmamente el aparatoal soporte.
A. Monitor
B. Sopporté depared
C. Pared

Ajuste del angulo del soporte de pared
Ajuste el ángulo del soporte a -2°antes de instalarlo en la pared.

1. Acople el aparato al soporte de pared.
2. Sostenga la parte superior del aparato por el centro y empujeloHCIaciadelante (en la direccion de la flecha) para ajustar el angulo.
3. Puede ajustar el ángulo del soporte entre -2°y 15°

Asegürese de ajustar el aparato según el centro dela parte superior, y no según elazo derecho oizquierdo del aparato.


Instrucciones de seguidad
Introduccion
Conexiones
Instalacion del kit del soporte
Conexión del monitor
Uso del software
Ajuste del monitor
Resolución de problemas
Especificaiones
Information
Apendice
TFT-LCD Monitor
www.samsung.com

El aspecto externo y el color del producto pueda variar dependiendo del Modelo; las specifications del producto se puedaCambiar sin previo aviso para la mejora del rendimiento.
Conexiones
Instalacion del kit del
soporte
Nota
- Sólo se deben usar los permos que se incluyen.
Pozor
Samsung Electronics no sera responsable de los dafios causados por la utilizacion de una base distinta de las especialidades.
>Instalacion del Semi-soporte

Ponga la etiqueta "CAUTION" hacía atrás.

1) Para proteger el orificio ubicado en la parte inferior del monitor, alli donde se acoplá el soporte, se usa una cubierta protectora. Aseguèrese de quitar la "cubierta de protección" antes del acoplimiento del Semi-Soporte o del Kit del soporte (vendido por分开ado) y de tapar el orificio usingla cubierta-tapon durante el acoplimiento del it de montaje de pared.
2) Instalacion de los soportes izquierdo y derechocho respectivamente.
3) Ponga el soporte en el agujero situado en la parte inferior del monitor.
Inserte el tornillo en el agujero indicado y apriete. (M4 x L15)

Pozor
Este soporte está diseñado esspecífico. para el ajuste del ángulo de la pantalla. La Empresa no se hace responsable de problema algoo derivado del uso de este soporte. No utilise nunca este soporte para colocar otheros objetivos.
>Instalacion del kit del soporte (Vendido por separado)


1) Para proteger el orificio ubicado en la parte inferior del monitor, alli donde se acoplá el soporte, se usa una cubierta protectora. Asegúrese de quitar la "cubierta de protección" antes del acoplimiento del Semi-Soporte o del Kit del soporte (vendido por分开ado) y de tapar el orificio usingo la cubierta-tapon durante el acoplimiento del it de montaje de pared.
2) Asegürese de colocar las piezas en la direction adequada y en el situ correcto. (M4 × 15)
3) Ponga el soporte en el agujero situado en la parte inferior del monitor.
4) Inserte el tornillo en el agujero indicado y apriete. (M4× 15)
Conexión del monitor
En el caso de un cable de alimentacion con conexion a tierra
Si se produce un fallo, la connexion a tierra peut provocar una descarga electrica. Antes de conectar la alimentacion de CA, debe asegurarde que el cable de connexion a tierra este instalado correctamente. Asimismo, cuando vaya a desconectar el cable de connexion a tierra, no se olvide de desactivar la alimentacion de CA.


- Los dispositivos de entrada de audio y video (AV) como DVD, VCR o Camaras de video, al igual que su computadora, se pueda conectar con el monitor. Para más información sobre是如何 conectar los dispositivos de entrada de audio y video (AV), vease Controles de usuario en Ajuste del monitor.
> Conexión con una computadora

1) Conecte el cordón de suministro electrico del monitor a la toma de corriente de la parte trasera del monitor.
Active el interruptor de alimentacion.
2) Hay 3 formas para conectar el D-sub al monitor.
Seleccionauna de lassiguientes:
2-1) Usando el conductor D-sub (analógico) en la tarjeta de video.
Conecte el cable D-sub al puertoRGB de 15 patillas de la parte posterior del monitor y al puerto D-sub de 15 patillas del ordinador.

2-2) Usando el conductor DVI (digital) en la tarjeta de video.
Conecte el cable DVI al puerto DVI(HDCP) de la parte posterior del monitor y al puerto DVI del ordinador.

2-3) Usando el conector BNC (analogico) en la tarjeta de video.
Conecte el cable BNC al puerto BNC/COMPONENT IN -R, G, B, H, V en la parte posterior del monitor y al puerto D-sub de 15 patillas del ordinador.

3) Conecte un cable qui para recibir el sonido de la tarjeta de sonido de la computadora.
4) Encienda la computadora y el monitor.
Nota
- El cable de DVI o de BNC es optional.
Consulte a un centro de servicei local de Samsung Electronics para comprar los elementospcionales.

> Conexión de un DVD digital
Nota
- Los dispositivos de entrada como el DVD digital está conectados al terminal de DVI IN del monitor mediante el cable DVI.
- Después, incié el DVD con un disco DVD insertado.
- Selezione Digitale mediating el boton SOURCE.
Nota
- El monitor dispone de terminales de connexion de DVI IN para conectar los dispositivos de entrada DVI como un DVD digital.

> Conexión a un VCR
1) Los dispositivos de audio y video como los VCR o Camaras de video se conectan con el terminal AV IN [VIDEO] o AV IN [S-VIDEO] del monitor usingo el cable de S-VHS o de BNC.
2) Conecte los terminales Audio (L) (Audio (I))y Audio (R) (Audio (D)) del aparato de video o de la videocamera a los terminales AV AUDIO IN [L-AUDIO-R] del monitor mediante los cables de audio.
3) SeLECTION AV o S-Video cuando esté conectado un VCR o una CAMERA de video usando el botón Fuente en la parte delantera del monitor.
4) Seguidamente, inicia el VCR o la-camera de video con una cinta.
Nota
- El cable de S-VHS o de BNC es optional
> Conexión con un reproductor DVD

1) Conectar el cableado de audio necessario entre los conectores COMPONENT AUDIO IN [L-AUDIO-R] en el monitor y los conectores AUDIO OUT en el reproductor DVD.
2) Conectar un cable de video entre los conectores BNC/COMPONENT IN - conexión del puerto PR, Y, PB en el monitor y los conectores PR, Y, PB en el reproductor DVD.
3) Selección Componento whene este conectado un DVD using el boton Fuente en la parte delantera del monitor.
4) Seguidamente, inicia el DVD con una cinta.
Nota
- El cable de Component es optional Para más información sobre video de componente, consulte el manual del usuario del reproductor DVD.
> Conexión con una CAMERA de video

1) Localice los conectores de calidad A/V en la webcam de video. Suelen estar ubicados en un lateral o en la parte de atras de la webcam de video.
Conecte el cableado de audio necessario entre los conectores AUDIO OUTPUT en la webcam de video y los conectores AV AUDIO IN [L-AUDIO-R] en el monitor.
2) Conecte un cable de video entre el conector VIDEO OUTPUT de la CAMERA de video y el conector AV IN [VIDEO] en el monitor.
3) Selección AV cuando esté conectado unaámara de video el botón Fuente en la parte delantera del monitor.
4) Seguidamente, inicia la-camera de video con una cinta.
Nota
Los cables de audio y video que se muestran aquie suelenvenir incluidos con la camarara de video.
(Si no fuera asi, consulte a la tienda de electrònica más cercana).
Si la CAMERA de video fuera estereo, seria necessario conectar dos cables.
> Conexión de un decodificador de BCHDTV
Nota
Las conexiones habituales de un decodificador de senal se muestran a continuacion.

1) Conecte un cable de video entre los conectores BNC / COMPONENT IN - conexión del puerto PR, Y, PB en el monitor y los conectores PR, Y, PB en el decodificador digital.
2) Conecte el cableado de audio necessario entre los conectores COMPONENT AUDIO IN [L-AUDIO-R] en el monitor y los conectores AUDIO OUT en el decodificador de serial.
3) SeLECTION Component when este conectado un decodificador de serial DTV el boton Fuente en la parte delantera del monitor.
Nota
- Para mas informacion sobre video de componente, consulte el manual de usuario del decodificador digital.
> Conexión de altavoces

1) Acople el television y los altavoces usingo los tornillos.
* Monte el altavoz sin el pie.

2) Conecte el cable de connexion del altavoz entre el conductor de altavoz en la parte posterior del telesor y el
conector de altovoz en la parte posterior del altovoz.
Nota
- Nouve el televisor que sostiene el altavoz cuando estan conectados el televisor y el altavoz.
Se podra dañar el soporte de altavozdonde se conecta el altavoz del televisor.
> Conexión a un equipo de audio

1) Conecte un Conjunto de cables de audio entre las Telecoms AUX L, R del AUDIO SYSTEM (SISTEMA DE AUDIO) y las Telecoms AUDIO OUT [L-AUDIO-R] (SALIDA AUDIO [I-AUDIO-D]) del monitor.
© 1995-2008 SAMSUNG. ALL Right Reserved
Introduccion

Un MDC (Multiple Display Control) (MDC, Multiple Display Control) es una aplicacion que permite trabajo en un PC con varias pantallas fácil y simultaneamente. RS-232C, un estandar de communicated serial, se usa para la comunicacion entre un PC y una pantalla. Por tanto, es necessario conectar un cable serial entre el puerto serial del PC y el puerto serial de cada pantalla.
Pantalla principal
Haga cli en Start > Program > Samsung > MDC System para inicial el programa.
Selección un jeu para ver su volumen seleccionado con el control deslizante.

1 Iconos principales Botón Select (select har)
2 Remocon
Info Grid (Cuadrícula de información)
3 Safety Lock SeLECTION de pantalla

4 Port Selection Herramentas de control

1. Use los iconos principales para modifier en cada pantalla.
2. Permitte que se active o se desactive la functiOn de recepcion de control remoto de la unidad de la pantalla.
3. Establishe la funciona Lock (seguridad para niños)
4. La configuración para el puerto série del PC pueda cambiar. El valor original es COM1.
5. Hagablick en SeLECTIONAR todo o Borrar para selec tionar o para borrar todas las pantallas.
6. Use Cuadrícula para ver cierta información sobre control de la pantalla selecciónada.
7. Seleectionauna pantalla dentro de la section Selection de pantalla.
8. Use Herramentas de control para controlar las pantallas.
La funciona Activar/Desactivar del control remoto funciona este o no activada la energia, yesto se aplica a todas las pantallas activadas y conectadas con el MDC. Sin embargo, independientelemente del estado en el momento en que está apagado el MDC, la funciona de recepcion de Signals del control remoto de todas las pantallas se inicializa con el estado Enable (activado) cuando se cierra el MDC.
Port Selection

1. El Control de pantallas multiples está configurado originalmente como COM1.
2. Si se utilizes cualquier puertoDistincto de COM1, se pueda selectionar desde COM1 hasta COM4 en el menu de SeLECTION de puertos.
3. Si el nombre de puerto exacto que está conectado al monitor usingo un cable serial no está seleccionado, la comunicacion no sera possible.
4. Le port sélectionné est enregistré dans le programme et également utilisé pour le programme suivant.

Power Control
1. Haga click en el icono Power Control (Control de energia), de entre los iconos principales, y aparecerá la pantalla Power Control (Control de energia).

\* Info Grid muestra informacion bica necessaria para gestionar Control de energia.
1) (Power Status (Estado de energia))
2) Input
3) Image Size
4) On Timer Status
5) Off Timer Status
2. Use el botón Select All (Selecciónar todo) o la casilla de verificacion correspondiente para ajustar las propiedades de pantalla.

Control de energia permite controlar algumas de las funidades de la pantalla seleccionada.
1) Power On/Off
- Activ o desactiva la energia de la pantalla seleccionada.
2) Volume
- Controla el nivel de volumen de la pantalla seleccionada.
Está definido con el valor del volumen de la pantalla seleccióna a partir de los juegos y lo muestra en la barra de desplazimiento.
(Cuando se cancela la selección o se escoge SeLECTIONAR todo, el valor toma la configuracion predeterminada de 10)
3) (Mute On/Off (Activar/desactivar silencio))
- Activ o desactiva el silencio de la pantalla seleccionada On / Off .
Cuando se selección un jeu cada vez, si el juego selecciónado ya está definido como MUTE (Silencio), esnecessarymarcar la pantalla MUTE.
(Si elige deshacer las selecciones o escoge SeLECTIONAR todo, los values vuelven a la configuracion predeterminada).
\* Control de energia se aplica a todas las pantallas.
Las functions volumen y Mute solo está disponible para pantallas bajo el estado de energia está ON (activado).

Input Source
1. Haga cig en Input Source (Fuente de entrada), situada en los iconos principales, y aparecerá la pantalla de control de fuente de entrada.
Haga click en Select All (Selecciónar todo), o utilise la casilla de verificacion, para seleccionar una pantalla con intencion de controlarla.
- TV Mode

PC Mode

\* Info Grid muestra informacion bica cnea necessaria para controlar la fuente de entrada.
1)PC
- Cambia la fuente de entrada de la pantalla selectionada a PC.
2) BNC
- Cambia la fuente de entrada de la pantalla selectionada a BNC.
3) DVI
- Cambia la fuente de entrada de la pantalla seleccionada a DVI.
4) TV
- Cambia la fuente de entrada de la pantalla seleccionada a TV.
5) AV
- Cambia la fuente de entrada de la pantalla seleccionada a AV.
6) S-Video
- Cambia la fuente de entrada de la pantalla seleccionada a S-Video.
7) Component
- Cambia la fuente de entrada de la pantalla selectionada a Component.
8) MagicNet
- La source d'entree de MagicNet ne fonctionne que sur le modele MagicNet.
9) Channel
- La flecha del canal aparece cuando la.option Input Source (Fuente de entrada) es TV.
* La fuente TV se pueda selectionar solo en produits con TV, y el control de los canales únicamente se permite cuando la option Input Source (Fuente de entrada) es TV.
* El control de Fuente de entrada se aplicá sólo está disponible para las pantallas para las cuales está activado (ON) el estado de suministro electrico.

Image Size
PC, BNC, DVI
1. Haga ticn Tamao de imagen, situado en los iconos principales, y aparecerá la pantalla de control de Tamao de imagen.

Info Grid (Cuadrula de informacion) muestra cierta informacion basia necesaria para tener el control Tamanio deImagen.
1) (Power Status (Estado de energia))
- Muestra el estado de energia de la pantalla selectionada.
2) Image Size
- Muestra el的时间里 de imagen actual de la pantalla seleccionada.
3) Input
- Muestra la fuente actual de entrada de la pantalla realizada.
4) Info Grid (Cuadrícula de información) sólo muestra las pantallas cuya Fuente de entrada es PC, BNC, DVI.
5) PC Source - Cuando haga ticn en Tamaño de imagen, aparecen primero las fichas PC, BNC, DVI. El boton Control de Tamaño de imagen controla el Tamaño de imagen disponible para PC,BNC,DVI.
6) Video Source
- Haga tic en la ficha AV, S-VIDEO, Componente para controlar el Tamaño de imagen para la Fuente de entrada respectiva.
La source d'entrée de MagicNet ne fonctionne que sur le modele MagicNet.
* El control Tamanio deImagen solo está disponible para las pantallas para las cuales está activado (ON) el estado de suministro electrico.

Image Size
TV, AV, S-Video, Component, DVI(HDCP)
1. Haga clicked Tamanio de imagen, situado en los iconos principales, y aparecerá la pantalla de control de Tamanio de imagen.

Info Grid (Cuadrula de informacion) muestra cierta informacion basia necessitiesa para entender el control Tamanio deImagen.
1) Haga click en la pestaña (Fuente de video) paraaabrar el tameno de la imagen para TV, AV, S-video, componentes. Haga click en Select All (SeLECTIONAR todo), outilice la casilla de verificacion, para seleccionar una pantalla con intencion de controlarla.
2) Info Grid (Cuadrula de informacion) solo muestra la pantalla queiene TV, AV, S-VIDEO, Componente como fuente de entrada.
3) Cambia aleatoriamente el時間 de imagen de la pantalla seleccionada.
Note: Auto Wide (Ancho automatico), Zoom1 (Zoom1) y Zoom2 (Zoom2) no se pueda seleccionar cuando el tipo de Signals de entrada para componentes y DVI (HDCP) es 720p o 1080i
La source d'entrée de MagicNet ne fonctionne que sur le modele MagicNet.
* El control Tamanio de imagen solo está disponible para las pantallas para las cuales está activado (ON) el estado de suministro electrico.

Time
1. Haga tic en Time (hora), entre los iconos principales, y aparecerá la pantalla Control de Time (hora).

\* Info Grid muestra informacion basia de Time (hora).
1) Current Time
-Selezione la hora actual para la pantalla seleccionada PC Time (hora del PC)
- Para cambiar la hora actual, cambie primero PC Time (hora del PC).
2) On Time Setup
- Define la hora, el minuto, y el valor de AM/PM para On Timer (Temporizador activado) de la pantalla seleccionada.
3) Off Time Setup
- Define la hora, el minuto, y el valor de AM/PM para Off Timer Setup (Configuración de hora desactivada) de lapellata selecciónada.
4) Muesra la configuración de On Timer (Temporizador activado).
5) Muesra la configuración de Off Timer (Temporizador desactivado).
La source d'entrée de MagicNet ne fonctionne que sur le modele MagicNet.
* Control de Time (hora) está disponible solo para las pantallas cuando el estado de energia está ON (activado).
En On Time Setup (Configuracion de hora de apagado), las functions TV Source (Fuente de TV) solo en los modelos con TV.

PIP
PIP Size
1. Hagablick en PIP,entre los iconos principales,y aparecerá lathora Control PIP. Haga click en Select All (SeLECTIONAR todo),o utilise la casilla de verificacion,para seleccionar unathora con intencion de controlarla.

Info Grid (Cuadrula de informacion) muestra cierta informacion basia necesaria para tener el control Tamanio PIP.
1) PIP Size
- Muestra el Tamaño PIP actual de la pantalla realizada.
2) OFF
- Desactiva el modo PIP de la pantalla selectionada.
3) Large
- Activ a modo PIP de la pantalla selectionada y cambia el taman a Large.
4) Small
- Activ el modo PIP de la pantalla seleccionada y cambia el tamanio a Small.
5) Double1
- Activ el modo PIP de la pantalla selectionada y cambia el tamanio a Double 1.
6) Double 2
- Activ el modo PIP de la pantalla selectionada y cambia elullan a Double 2.
7) Double3 (Picture By Picture)
- Activ a modo PIP de la pantalla seleccionada y cambia el taman o a Double 3.

^ 念 La source d'entrée de MagicNet ne fonctionne que sur le modele MagicNet.

El Tamaño PIP se pueda controlar cuando se enciende el monitor.

PIP
PIP Source
1. Haga cig en PIP, entre los iconos principales, y aparecerá la pantalla Control PIP.
- PIP TV Mode

- PIP S-Video Mode

Info Grid (Cuadrula de informacion) muestraCERTa informacionbasica necessitiesa para entender el control Fuente PIP.
1) PIP Source
- La Fuente PIP se pueda controlar cuando se enciende el monitor.
2)PC
- Cambia la Fuente PIP de la pantalla seleccionada a PC.
3) BNC
- Cambia la Fuente PIP de la pantalla seleccionada a BNC.
4)DVI
- Cambia la Fuente PIP de la pantalla seleccionada a DVI.
5) TV
- Cambia la Fuente PIP de la pantalla seleccionada a TV.
6) AV
- Cambia la Fuente PIP de la pantalla seleccionada a AV.
7) S-Video
- Cambia la Fuente PIP de la pantalla selectionada a S-Video.
8) Component
- Cambia la Fuente PIP de la pantalla seleccionada a Component.
9) Channel
-La flecha del canal aparece cuando la option PIP Source (Fuente PIP) es TV.
Nota: Algunas de las fuentes PIP peuvent no estar disponibles dependiendo del tipo de fuente de entrada de la pantalla principal.
\* La source d'entrée de MagicNet ne fonctionne que sur le modele MagicNet.
* La fuente TV se pueda selectionar solo en produits con TV, y el control de los canales únicamente se permite cuando la.option PIP Source (Fuente PIP) es TV.
* La funciona de Control PIPsole está disponible para las pantallasdonde el estado de la energia sea activado (ON) y la funciona PIP está configurada como ON.

Settings
Picture
1. Haga cig en Configuracion , entre los iconos principales, y aparecerá la pantalla Control Brightness (Brillo).

* Info Grid muestra informaciónBsica necessitiesa para Settings Control. Cuando se selecciona cada direccion, el valor definido de la referencia seleccionada se muestra en la diaposita.
Cuando Select All (Seleccionar todo) está seleccionado, vuelle el valor predeterminado de (50).
El cambio de un valor en esta pantalla cambia automatistically el modo a "CUSTOM".
1) Picture
- Disponible solo para TV, AV, S-Video, Component, DVI(HDCP).
2) Contrast
- Ajusta el contraste de la pantalla seleccionada.
3) Brightness
- Ajusta la luminosidad de la pantalla seleccionada.
4) Sharpness
- Ajusta la nitidez de la pantalla selectionada.
5)Color
- Ajusta el color de la pantalla selectionada.
6)Tint
- Ajusta el matiz de la pantalla seleccionada.
7) Color Tone
- Ajusta el tono de color para la pantalla selectionada.
La source d'entrée de MagicNet ne fonctionne que sur le modele MagicNet.
\* Cette fonction est disponible uniquement pour les affichages dont I'alimentation est active.

Settings
Picture PC
1. Haga cig en Configuracion , entre los iconos principales, y aparecerá la pantalla Control Brightness (Brillo).

* Info Grid muestra información-basica necesaria para Settings Control. Cuando se selección cada funciona, el valor definido de la función seleccionada se muestra en la diapositiva.
Cuando Select All (Seleccionar todo) está seleccionado, vuelle el valor predeterminado (50).
El cambio de un valor en esta pantalla cambia automatistically el modo a "CUSTOM".
1) Picture PC
- Disponible solo para PC, BNC, DVI.
2) Contrast
- Ajusta el contraste de la pantalla selectionada.
3) Brightness
- Ajusta la luminosidad de la pantalla selectionada.
4) Red
- Ajusta la Temperatura del color de la pantalla seleccionada.
5) Green
- Ajusta la Temperatura del color de la pantalla selectionada.
6) Blue
- Ajusta la Temperatura del color de la pantalla selectionada.
La source d'entrée de MagicNet ne fonctionne que sur le modele MagicNet.
\* Cette fonction est disponible uniquement pour les affichages dont l'alimentation est active.

Settings
Audio
1. Haga cig en Configuracion , entre los iconos principales, y aparecerá la pantalla Control Brightness (Brillo).

* Info Grid muestra información.baidu necessaria para Settings Control. Cuando se selecciónca造血funció,el valor definido de la functión seleccionada se muestra en la diapositiva.
Cuando Select All (Seleccionar todo) está seleccionado, vuelve el valor predeterminado de (50).
El cambio de un valor en esta pantalla cambia automatistically el modo a "CUSTOM".
1) Audio
- Controla la configuración de audio para todas las fuentes de entrada.
2) Bass
- Ajusta los graves de la pantalla selectionada.
3) Treble
- Ajusta los agudos de la pantalla seleccionada.
4) Balance
- Ajusta el balance de la pantalla seleccionada.
5) SRS TSXT
- Encendido y apagado de Sonido SRS TSXT.
6) Sound Select
- Puede seleccionar Main (Principal) o Sub (Secundario) quando PIP esté activado.
La source d'entrée de MagicNet ne fonctionne que sur le modele MagicNet.
* Cette fonction est disponible uniquement pour les affichages dont l'alimentation est active.

Settings
Image Lock
1. Haga cig en Configuracion , entre los iconos principales, y aparecerá la pantalla Control Brightness (Brillo).

Info Grid muestra informacion basia necesaria para Settings Control.
1) Image Lock
- Disponible solo para PC, BNC.
2) Coarse
- Ajusta la fase de la pantalla Coarse.
3) Fine
- Ajusta la fase de la pantalla Fine.
4) Position
- Ajusta la posicion de la pantalla seleccionada.
5) Auto Adjustment
- Púlselo para que se ajuste automatistically a la seals proveniente del PC.
La source d'entrée de MagicNet ne fonctionne que sur le modele MagicNet.
* Control Brightness (Brillo) está disponible sólo para las pantallas cuando el estado de energia está ON (activado).

Maintenance
Lamp Control
1. Haga clicked en el icono "Maintenance (Mantenimiento)" en la columna Main Icon (Icono principal) para("");
pantalla de mantenimiento.

Aparece una cuadrula de informacion "Info Grid" Blockingando varios elementos basics de datos.
1) Maintenance
- Permitte la direccion Maintenance Control (Control de mantenimiento) para todas las fuentes de entrada.
2) Auto Lamp Control
- Ajusta automatically la luz posterior de la pantalla selectionada a una hora spécifique.
El Manual Lamp Control (Control de lampara manual) se desactiva automatically when el ajuste se realiza con Auto Lamp Control (Control de lampara automatico).
3) Manual Lamp Control
- Le permite ajustar la luz posterior de la pantalla seleccionada sin importar la hora.
La direccion de Control de lampara automatico se desactiva automatistically si se ajusta usingla direccion Control de lampara manual.
* La funciona de Control del mantenimiento solo está disponible para las pantallas para las cuales está activado (ON) el estado de suministro electrico.
\* La source d'entree de MagicNet ne fonctionne que sur le modele MagicNet.

Maintenance
Scroll
1. Hagablick en el icono "Maintenance (Mantenimiento)" en la columna Main Icon (Icono principal) para encontrar la pantalla demantimiento.

1) Safety Screen
- Elimina las imagenes residuales que pueda producirse cuando la pantalla seleccionada está en modo de pausa durante un periodo de tiempo prolongado. Puede usar el temporizador del ciclo de repetitiones seleccionando el periodo "Interval" por hora y las vezes "Second" porsegundo.
Screen Type ( Tipo de pantalla) se pueda configurar como Scroll (Desplazamente), Pixel (Pixel), Bar (Barra) o Eraser (Borrador).
La source d'entrée de MagicNet ne fonctionne que sur le modele MagicNet.
* Configuración de lossegundos:el tipo de desplazamente se pueda configurar como 1,2,3,4,5 y el tipo depixel,barra yborrador como 10,20,30,40,50.
* La funciona de Control del mantenimientosole está disponible para las pantallas para las cuales está activado (ON) el estado de suministro electrico.

Maintenance
Video Wall
1. Haga click en el icono "Maintenance (Mantenimiento)" en la columna Main Icon (Icono principal) para("");
pantalla de mantenimiento.

1) Video Wall
- Un video mural es un Conjunto de pantallas de video conectadas entre si, de manière que cada una pueda estar en una parte de la imagen completa o la mesma imagen repetida en cada pantalla.
2) Video Wall (Screen divider)
- Se puede dividir la pantalla en除外 varias.
Puede seleccionar varias pantallas con una distribuccion differente al dividirlas.
-Selezione un modo en el Divisor de pantalla.
-Selección una pantalla en la Display Selection (Selección de pantalla).
- La ubicacion se configurar pulsando un numero en el modo seleccionado.
- El programa MDC suministrado por Samsung admite hasta 4x4 pantallas LCD.

3) On/Off
- Enciende o apaga la funciona Video Wall (Védo mural) en la pantalla selecciónada.
4) Format
- Se puede selectionar el formatting para ver una pantalla dividida.
Full

Natural
\* La source d'entree de MagicNet ne fonctionne que sur le modele MagicNet.
* La funciona de Control del mantenimientosole está disponible para las pantallas para las cuales está activado (ON) el estado de suministro electrico.
Soluciones de problemas
1. La pantalla que desea controlar no aparece en la cuadrula de informacion de control de energia.
- Compruebe la connexion de RS232C. (Compruebe que esté connectada correctamente con el puerto Com1)
- Compruebe las pantallas por si una de las others Tiene el mesmo ID. Si hay mas de una pantalla con el).(el programa no puee detectarlas correctamente debido a un conflicto de datos.
- Compréue si el ID de jeu de pantalla es un número entre 0 y 16. (ajustelo con el menu Pantalla)
Note: Un ID de juego de pantalla debe tener un valor de entre 0 y 16, Si el valor está fuera del intervalo, el Sistema MDC (Multiple Display Control, MDC (Multiple Display Control)) no pueda controlar la pantalla.
2. La pantalla que se desea controlar no aparece en el resto de cuadrillas de informacion de control.
- Compruebe que la pantalla seleccionada este activada (ON). (Puede comprobarlo en Cuadrula de informacion de control Energia)
- Compréue si se puedaCambiar la fuente de entrada de la pantalla.
3. El cuadro de dialogo aparece en varias occasions.
- Compruebe si la pantalla que desea controlar está seleccionada.
4. Se ha configurado On Timer (Temporizador activado) y Off Timer (Temporizador desactivado) pero muestran una hora diferente.
- Aplique la hora actual para sincronizar los relojes de la pantalla.
5. La funciona remota no funciona correctamente cuando se desactiva la misma, se desconecta el cable RS-232C, o se sale del programa de forma irregular. Vuela a executar el programa y active de nuevo la funciona remota para volver al funciona normal.
Este programa pode functionar Incorrectamente deben a problemas en los circuitos de la communicatedo interferencias de aparatos electricos cercanos.

Pantalla Settings Value (Valor de configuración) en Modo Multiple Display (Pantallas multíples)
* Cuando hay más de una pantalla conectada, los values de la configuración se muestran de esta manière.
1. No hay selección: Muestra el valor predeterminado de fabrica.
2. Una pantalla selectionada: Obtiene y muestra el valor de configuracion para la pantalla seleccionada.
3. SeLECTIONADA una pantalla (ID1) y se anade另外一个 pantalla (ID3): el programa, que mostraba el valor de configuracion de ID 1, obtiene y muestra el valor de ID3.
4. SeLECTIONados todos los juegos using Select All (SeLECTIONAR todo): devuelte el valor predeterminado de fabrica.
Instrucciones de seguidad
Introduccion
Conexiones
Uso del software
Ajuste del monitor
Entrada
Picture
[PC / BNC /DVI Modo]
Picture
[AV/S-Video/
Component / DVI-Video
Modo]
Sonido
Setup
Control multiple
Characteristicas de Control
Directo
Resolución de problemas
Especificaiones
Information
Apendice
TFT-LCD Monitor
www.samsung.com

El aspecto externo y el color del producto pueda variar dependiendo del Modelo; las specifications del producto se puedaCambiar sin previo aviso para la mejora del rendimiento.
Ajuste del monitor
Entrada
Modos disponibles
PC/BNC/DVI
AAV
S S-Video
Componente
D DVI-Video
Fuentes PASCD
[MONTH]→[ENTER]→[ENTER]→[A/V]→[ENTER]
Activa el indicator para reflejar la SERIAL de entrada que se muestraactualmente.
1)PC
2) BNC
3) DVI
4)AV
5) S-Video
6) Componente
[El botón directo en el mando a distancia es el botón 'SOURCE'.]
Nota
- El PIP se apaga si el monitor se conecta a una fuente externa.
PIP PASC
Cuando los dispositivos externos de A/V (audio y video), tales como VCR o DVD, estan conectados con el monitor, PIP permite ver el video de dichos dispositivos en una ventanackaenia superpuesta sobre la senal de video del PC. (Des.
Nota
- (Act.) No se pue de solapar mas de un PIP en la pantalla, bajo que BNC y el componente utilizean el mismo terminal.
1)PIP
[MONTH] [ENTER] [A/V] [ENTER] [ENTER] [A/V] [ENTER]
Act. Activ a desactiva la pantalla PIP
-Des.
-Act.
[El botón directo en el mando a distancia es el botón 'PIP'].
2) Source (Fuente)
[MONTH] [ENTER] [A/V] [ENTER] [A/V] [ENTER] [A/V] [ENTER]
Selección la fuente de entrada para el modo PIP.
-PC:AV/S-Video/Componente Modo
- BNC: AV / S-Video Modo
-DVI:AV/S-Video/ComponenteModo
-AV/S-Video:PC/BNC/DVI Modo
- Componente: PC / DVI Modo
[El botón directo en el mando a distancia es el botón 'SOURCE'.]
3) Fuente
[MONTH] [ENTER] [A/V] [ENTER] [A/V] [ENTER]
Intercambio del Descripción de laImagen PIP y de laImagen principal.
LaImagen de laventanaPIPapareceré en la pantalla principal,ylaImagen de la pantalla principal.
apareceré en la ventana PIP.
[El botón directo en el mando a distancia es el botón 'SWAP'].
4) Tamaño
[ \text{[MENU]} \rightarrow \text{[ENTER]} \rightarrow [\wedge / \vee] \rightarrow \text{[ENTER]} \rightarrow [\wedge / \vee] \rightarrow \text{[ENTER]} \rightarrow [\wedge / \vee] \rightarrow \text{[ENTER]} ]
Permite que el usuario desactive o ajuste al dato de la Pantalla PIP.
[El botón directo en el mando a distancia es el botón 'SIZE'].
5) Posicion
[MONTH] [ENTER] [A/V] [ENTER] [A/V] [ENTER] [A/V] [ENTER]
Cambia la posicón de la ventana PIP.
6) Transparenc.
[MONTH] [ENTER] [A/V] [ENTER] [A/V] [ENTER] [A/V] [ENTER]
Ajusta la transparencia de las ventanas PIP.
- Alto
-Medio
-Bajo
-Opaco
Nota
- Si se selección en Tamaño, Posición y Transparencycia no se desactivar.
Modos disponibles: PIP
Editor name PASCD
[MONTH] [ENTER] [A / V] [ENTER] [A / V] [ENTER] [A / V] [ENTER]
Da nombre al disposito v de entada de informacion conctado con los conectores de entada para hacer la selec tion de fuente de entada mas fácil.
1) PC
2) BNC
3) DVI
4) AV
5) S-Video
6) Componente
Picture [PC / BNC /DVI Modo]
Modos disponibles
PC/BNC/DVI
AAV
S-S-Video
Componente
D VDI-Video
MagicBrightTM
[ \text{[MENU]} \rightarrow [\wedge / \vee] \rightarrow [\text{ENTER} ] \rightarrow [\text{ENTER}] \rightarrow [\wedge / \vee] \rightarrow [\text{ENTER}] ]
MagicBright™ es una nuevo funciona que proportionsca un entorno de visualizacion optimo, de acuerdo con el contenido de la imogen que este vivo.
En laactualidad hay 4 modelos diferentes disponibles: Entertain, Internet, Text y Custom.
Cada modo tiene su propio valor de brillo configurado previamente. Puede selectionar fácilmente una de las 4 configuraciones pulsando el botón 'MagicBrightTM.
1)Ocio
Luminosidad Alta
Para visualización de imagenes en movimiento, como un DVD o un VCD.
2) Internet
Luminosidad Media
Para trabajo con una mezcla visual de texto ygraficos.
3) Texto
Luminosidad Normal
Apropiado para documents o problemas que requiren la visualizacion de grancantidad de texto.
4) Personal
Aúnque los valores se han elegido con minuciosidad por nuestros ingenieros, los valores preconfiguradosSEO.SEOSEOSEOSEOSEOSEOSEOSEOSEOSEOSEOSEOSEOSEOSEOSEOSEOSEOSEOSEOSEOSEOSEOSEOSEOSEOSEOSEOSEOSEOSEOSEOSEOSEOSEOSEOSEOSEOSEOSEOSEOSEOSEOSEOSEOSEOSEOSEOSEOSEOSEOSEOSEOSEOSEOSEOSEOSEOSEOSEOSEOSEOSEOSEOSEOSEOSEOSEOSEOSEOSEOSEOSEOSEOSEOSEOSEOSEOSEOSEOSEOSEOSEOSEOSEOSEOSEOSEOSEOSEOSEOSEOSEOSEOSEOSEOSEOSEOSEOSEO SEO
[El botón directo en el mando a distancia es el botón 'M/B'].
Personal
[ \text{[MENU]} \rightarrow [\wedge / \vee] \rightarrow [\text{ENTER} ] \rightarrow [\wedge / \vee] \rightarrow [\text{ENTER} ] \rightarrow [\text{ENTER} ] \rightarrow [\wedge / \vee] / [< / >] \rightarrow [\text{ENTER}] ]
Puede usar los manos en pantalla para携带 el contraste y la luminosidad según sus preferencias personales.
1) Contraste
Calibre el Contraste.
2)Brillo
Calibre el Luminosidad.
Nota
- Si se ajusta laImagen usingo la func tion Personal, entonces MagicBright cambia al modo Personal.
Tono de color P
[ \text{[MENU]} \rightarrow [\wedge / \vee] \rightarrow [\text{ENTER} ] \rightarrow [\wedge / \vee] \rightarrow [\text{ENTER} ] \rightarrow [\wedge / \vee] \rightarrow [\text{ENTER}] ]
El tono del color se puedaCambiar.
1) Frio
2) Normal
3) Calido
4) Personal
(Disponible solamente en el modo PC/BNC)
Control de color
[ \text{[MENU]} \rightarrow \left[\hat{\Lambda} / \hat{\mathbb{V}}\right] \rightarrow \left[\text{ENTER}\right] \rightarrow \left[\hat{\Lambda} / \hat{\mathbb{V}}\right] \rightarrow \left[\text{ENTER}\right] \rightarrow \left[\text{ENTER}\right] \rightarrow \left[\langle I \rangle\right] \rightarrow \left[\text{ENTER}\right] ]
utilice esta funciona para ajustar ligeramente el color.
(Disponible solamente en el modo PC/BNC)
1) Rojo
2) Verde
3) Azul
Nota
- Si se ajusta laImagen usingo la funcion Control de color, entones Tono de color cambia al modo Personal.
Fijar la Imagen
Fijar laImagen se usa para ajustar y Obtener la mejorImagen quitando las perturbaciones que provocan imagenes inestables con agitaciones y resplandores débiles. Si no se obtienen resultados satisfactorios usingo el Ajuste bajo, use la configuracion Ajuste grueso y, despues, use Ajuste bajo otra vez.
(Disponible solamente en el modo PC/BNC)
1) Grueso
[ \text{[MENU]} \rightarrow [\wedge / \vee] \rightarrow [\text{ENTER} ] \rightarrow [\wedge / \vee] \rightarrow [\text{ENTER} ] \rightarrow [\text{ENTER} ] \rightarrow [< / >] \rightarrow [\text{ENTER}] ]
Suprime las interferencias como las bandas verticas. El ajuste grueso puede mover el area deImagen de la pantalla. Puede volver a ubicarla en el centro mediante el menu Horizontal Control (Control horizontal).
2) Fino
[MONTH] [AIV] [ENTER] [AV] [ENTER] [AV] [ENTER] [<1>] [ENTER]
Quita perturbaciones tales como rayas horizontales. Si persiste la perturbacion incluo despues de Ajuste fino, repitalo afterwards de ajustar la Frequencia (velocidad del reloj).
3) Posición
[ \text{[MENU]} \rightarrow [\text{A} / \text{V}] \rightarrow [\text{ENTER}] \rightarrow [\text{A} / \text{V}] \rightarrow [\text{ENTER}] \rightarrow [\text{A} / \text{V}] \rightarrow [\text{ENTER}] \rightarrow [\text{A} / \text{V}] \rightarrow [\text{ENTER}] ]
Esto ajusta laubicacion de la pantalla horizontalmente y verticalmente.
Ajuste automatico P
[MONTH] [A/V] [ENTER] [A/V] [ENTER]
Los valores de fino, grueso y posicón se ajustan automatistically.
(Disponible solamente en el modo PC/BNC)
[El botón directo en el mando a distancia es el botón 'AUTO'].
Balance de laseaI
Se utilizes para recomponer la SERIAL RGB débil que se ha transmisido a工程技术 de un cable largo de serial.
(Disponible solamente en el modo PC/BNC)
1) Balance de la penal
\[
[\text{MENUR} ]\rightarrow [\text{A} /\text{V} ]\rightarrow [\text{ENTER} ]\rightarrow [\text{A} /\text{V} ]\rightarrow [\text{ENTER} ]\rightarrow [\text{ENTER} ]\rightarrow [\text{A} /\text{V} ]\rightarrow [\text{ENTER} ]
\]
Puede seleccionar que el control de la seals este en Act. o Des.
2) Control de la seals
[ \text{[MENU]} \rightarrow [\wedge / \vee] \rightarrow [\text{ENTER}] \rightarrow [\wedge / \vee] \rightarrow [\text{ENTER}] \rightarrow [\wedge / \vee] \rightarrow [\text{ENTER}] \rightarrow [\wedge / \vee] \rightarrow [\text{ENTER}] \rightarrow [\wedge / \vee] \rightarrow [\text{ENTER}] ]
Puede ajustar manualmente R Phase, G Phase, B Phase, Aumento y Nitidze.
Tamaño P
[ \text{[MENU]} \rightarrow [\wedge / \vee] \rightarrow [\text{ENTER} ] \rightarrow [\wedge / \vee] \rightarrow [\text{ENTER}] \rightarrow [\wedge / \vee] \rightarrow [\text{ENTER}] ]
Puede combustar el tamafo.
1) 16:9
2) 4:3
Imagen PIP
[ \text{[MENU]} \rightarrow [\wedge / \vee] \rightarrow [\text{ENTER}] \rightarrow [\wedge / \vee] \rightarrow [\text{ENTER}] \rightarrow [\wedge / \vee] \rightarrow [\text{ENTER}] \rightarrow [\wedge / \vee] \rightarrow [\text{ENTER}] \rightarrow [\wedge / \vee] \rightarrow [\text{ENTER}] \rightarrow [\wedge / \vee] \rightarrow [\text{ENTER}] \rightarrow [\wedge / \vee] \rightarrow [\text{x} ] \rightarrow [\text{x} ] \rightarrow [\text{x} ] \rightarrow [\text{x} ] \rightarrow [\text{x} ] \rightarrow [\text{x} ] \rightarrow [\text{x} ] \rightarrow [\text{x} ] \rightarrow [\text{x} ] \rightarrow [\text{x} ] \rightarrow [\text{x} ] \rightarrow [\text{x} ] \rightarrow [\text{x} ] \rightarrow [\text{x} ] \rightarrow [\text{x} ] ]
Puedeajustarlosparametrosde laimagenPIP.
1) Contraste
Ajusta el contraste de la ventana PIP en la pantalla.
2)Brillo
Ajusta la Luminosidad (Brightness) de la ventana PIP en la pantalla.
3) Sharpness
Se usa paraaabstar la diferencia entre las areas mas claras y mas oscuras de la ventana PIP.
4) Nitidez
Se usa para ajustar la luminosidad y la oscuridad de la pantalla.
5) Matiz
Agrega un tono natural a la ventana PIP.
Puede ver una imagen desde las fuentes AV, S-Video a trovés de la pantalla PIP en los modelos PC, BNC. Funciona solo si la signaled video es NTSC.
Modos disponibles: PIP
Picture [AV/S-Video/Component/DVI-Video Modo]
Modos disponibles

PC/BNC/DVI

AV

S-Video

Componente

DVI-Video
Modo ASCD
[ \text{[MENU]} \rightarrow [\text{A} / \text{V}] \rightarrow [\text{ENTER}] \rightarrow [\text{ENTER}] \rightarrow [\text{A} / \text{V}] \rightarrow [\text{ENTER}] ]
El monitor Tiene quatre configuraciones automaticas de imagen ("Dinamico", "Estandar", "Pelicula", y
"Personal") que estan establecidas previamente en la fabrica.
Puede activar Dinamico, Estandar, Pelicula, o Personal. Puede seleccionar "Personal" que automatisticamente
establece su configuración deImagen personalizada.
1) Dinámico
2) Estándar
3) Peliculas
4) Personal
[El botón directo en el mando a distancia es el botón 'P.MODE'.]
Personal ASCD
[ \text{[MENU]} \rightarrow [\wedge / \vee] \rightarrow [\text{ENTER}]\rightarrow [\wedge / \vee] \rightarrow [\text{ENTER}]\rightarrow [\wedge / \vee] \rightarrow [\text{ENTER}]\rightarrow [< / >] \rightarrow [\text{ENTER}] ]
Puede usar los manos en pantalla paraCambiar el contraste y la luminosidad segun sus preferencias personales.
1) Contraste
Ajusta el Contraste.
2)Brillo
Ajusta el Luminosidad.
3) Nitidez
Ajusta la nitidez de la imagen.
4) Color
Ajusta el color de laImagen.
5) Matiz
Agrega un tono natural a la pantalla.
Funciona solo en los modos AV y S-Video. Funciona solo si la seals de video es NTSC.
Tono de color ASCD
[ \text{[MENU]} \rightarrow [\wedge / \vee] \rightarrow [\text{ENTER} ] \rightarrow [\wedge / \vee] \rightarrow [\text{ENTER}] \rightarrow [\wedge / \vee] \rightarrow [\text{ENTER}] ]
El tono del color se pueda cambiar.
1) Frio 2
2) Frio 1
3) Normal
4) Calido1
5) Calido2
Tamaño ASCD
[ \text{[MENU]} \rightarrow [\wedge / \vee] \rightarrow [\text{ENTER} ] \rightarrow [\wedge / \vee] \rightarrow [\text{ENTER} ] \rightarrow [\wedge / \vee] \rightarrow [\text{ENTER}] ]
Puedechangiarel tamanode imagen.
1) 16:9
2) Zoom 1
3) Zoom 2
4) 4:3
[ZOOM1, ZOOM2, Panorama no está disponible en 1080i (o más de 720p) de DTV.]
Digital NR (Reducción digital del nivel de ruidos.) ASCD
[ \text{[MENU]} \rightarrow [\text{A} / \text{V}] \rightarrow [\text{ENTER} ] \rightarrow [\text{A} / \text{V}] \rightarrow [\text{ENTER} ] \rightarrow [\text{A} / \text{V}] \rightarrow [\text{ENTER} ] ]
Puede activar y desactivar la caracteristica Eliminacion de ruido (Noise Elimination).
La función Eliminación digital de ruido (Digital Noise Elimination) permite gozar de imagenes más claras y vibrantes.
1) Des.
2) Act.
Modopellicula ASC
[ \text{[MENU]} \rightarrow [\wedge / \vee] \rightarrow [\text{ENTER} ] \rightarrow [\wedge / \vee] \rightarrow [\text{ENTER}] \rightarrow [\wedge / \vee] \rightarrow [\text{ENTER}] ]
Puede activar o desactivar (Des./Act.) el Modo de cine (Film Mode).
La caracteristica Modo de cine (Film Mode) offre una experiencia visual con la calidad de las salas de expectáculos.
(No disponible en el modo DVI-Video)
1) Des.
2) Act.
Imagen PIP ASCD
[ \text{[MENU]} \rightarrow [\wedge / \vee] \rightarrow [\text{ENTER} ] \rightarrow [\wedge / \vee] \rightarrow [\text{ENTER} ] \rightarrow [\wedge / \vee] \rightarrow [\text{ENTER} ] \rightarrow [\wedge / \vee] \rightarrow [\text{ENTER} ] \rightarrow [< / >] \rightarrow [\text{ENTER}] ]
PuedeajustarosparatemetroldaimagenPIP.
1) Contraste
Ajusta el contraste de la ventana PIP en la pantalla.
2)Brillo
Ajusta el brillo de la ventana PIP en la pantalla.
Modos disponibles: PIP
Sonido
Modos disponibles
PC/BNC/DVI
AV
S-S-Video
C Componente
D VDI-Video
Modo PASC
[ \text{[MENU]} \rightarrow [\text{A} / \text{V}] \rightarrow [\text{ENTER} ] \rightarrow [\text{ENTER} ] \rightarrow [\text{A} / \text{V}] \rightarrow [\text{ENTER} ] ]
El monitor tiene un amplificador integrado de audio estéreo de alta fidélidad.
1) Estándar
Selección Normal para volver a la configuración estándar de fibrica.
2) Música
Selezione Música quando esté visualizando videos musicales o conciertos.
3) Peliculas
Selezione Cine quando está visualizando largometrajes.
4) Dálogo
Selección Dálgo when este visualizing Descripciónns ricos en dialgos (por ejemplo, noticias).
5) Favorito
Selección Favorito para volver a la configuración personalizada.
Personal PASCD
[MONTH] [A/√] [ENTER] [A/√] [ENTER] [A/√] [ENTER] [<1>] [ENTER]
La configuración del sonido se pueda ajustar para satisfacer sus preferencias personales.
1) Graves
Intensifica el audio de baja Frequencia.
2) Agudos
Intensifica el audio de alta Frequencia.
3) Balance
Balance de sonido = = > Permite ajustar el balance de sonido entre los altavoces izquierdo y correcho.
[Puede oir sonido awhile el valor del sonido sea 0.]
Nota
- Si ajusta laImagen con la función de Sound Custom (Sonido personal), el Sound Mode (Modo de sonido) cambiará al Custom Mode (Modo personal).
Volumen autom. PASC0
[ \text{[MENU]} \rightarrow [\wedge / \vee] \rightarrow [\text{ENTER} ] \rightarrow [\wedge / \vee] \rightarrow [\text{ENTER}] \rightarrow [\wedge / \vee] \rightarrow [\text{ENTER}] ]
Reduce las diferencias en el nivel del volumen para las distinctas fuentes de emisión.
1) Des.
2) Act.
SRS TS XT PASC0
[ \text{[MENU]} \rightarrow [\text{A} / \text{V}] \rightarrow [\text{ENTER} ] \rightarrow [\text{A} / \text{V}] \rightarrow [\text{ENTER} ] \rightarrow [\text{A} / \text{V}] \rightarrow [\text{ENTER} ] ]
SRS TS XT es una Tecnología SRS patentada que solventa el problema de reproducir contenido multicastanal 5.1 en dos altavoces. TruSurround proportionsa una sensación de sonido virtual convincente a工程技术 de综合素质 de producción con dos altavoces, incluso con los altavoces internos del televisor. Es totalmente compatible con todos los formatos multicastanal.
1) Des.
2) Act.
[El botón directo en el mando a distancia es el botón 'SRS']
Selección de sonido PASC
[ \text{[MENU]} \rightarrow [\wedge / \vee] \rightarrow [\text{ENTER}]\rightarrow [\wedge / \vee] \rightarrow [\text{ENTER}]\rightarrow [\wedge / \vee] \rightarrow [\text{ENTER}] ]
Puede seleccionar entre Principal o Sub cuando PIP este activado (On).
1) Principal
2) Sub
[Modos disponibles: PIP]
Setup
Modos disponibles
PC/BNC/DVI
AAV
S S-Video
C Componente
D DVI-Video
Idioma PASCD
[ \text{[MENU]} \rightarrow [\wedge / \vee] \rightarrow [\text{ENTER} ] \rightarrow [\text{ENTER}] \rightarrow [\wedge / \vee] \rightarrow [\text{ENTER}] ]
Puede escoger uno de los 11 idiomas siguientes.
Nota
- El idioma elegido afecta solo al idioma del OSD.
No afecta en absoluto al software que se ejecta en el equipo.
- English, Deutsch, Espanol, Français, Italiano, Svenska, 日本語, 中国語, Pycckn, 愛國語, Portugues
Hora PAsco
Se usa para seleccionar una apagado.
1) Reloj prog.
[ \text{[MENU]} \rightarrow [\text{A} / \text{V}] \rightarrow [\text{ENTER} ] \rightarrow [\text{A} / \text{V}] \rightarrow [\text{ENTER} ] \rightarrow [\text{ENTER} ] \rightarrow [\text{A} / \text{V}] \rightarrow [\text{ENTER} ] \rightarrow [\text{A} / \text{V}] \rightarrow [\text{ENTER} ] \rightarrow [\text{A} / \text{V}] \rightarrow [\text{ENTER} ] \rightarrow [\text{A} / \text{V}] \rightarrow [\text{ENTER} ] ]
Ajuste de la hora.
2) Temp. de desc.
[ \text{[MENU]} \rightarrow [\wedge / \vee] \rightarrow [\text{ENTER}] \rightarrow [\wedge / \vee] \rightarrow [\text{ENTER}] \rightarrow [\wedge / \vee] \rightarrow [\text{ENTER}] \rightarrow [\wedge / \vee] \rightarrow [\wedge / \vee] \rightarrow [\wedge / \vee] \rightarrow [\wedge / \vee] \rightarrow [\wedge / \vee] \rightarrow [\wedge / \vee] \rightarrow [\wedge / \vee] \rightarrow [\wedge / \vee] \rightarrow [\wedge / \vee] \rightarrow [\wedge / \vee] \rightarrow [\wedge / \vee ] \rightarrow [\wedge / \vee ] \rightarrow [\wedge / \vee ] \rightarrow [\wedge / \vee ] \rightarrow [\wedge / \vee ] \rightarrow [\wedge / \vee ] \rightarrow [\wedge / \vee ] \rightarrow [\wedge / \vee ] \rightarrow [\wedge / \vee ] \rightarrow [\wedge / \vee ] \rightarrow [\wedge / \vee ]] ]
[ENTER]→[]→[A/V]→[ENTER]
Se usa para que el monitor se apague automatistically tras una série de Minutes. (Apagado, 30, 60, 90,
120, 150, 180)
3) Temp. de encen.
[ \text{[MENU]} \rightarrow [\wedge / \vee] \rightarrow [\text{ENTER}] \rightarrow [\wedge / \vee] \rightarrow [\text{ENTER}] \rightarrow [\wedge / \vee] \rightarrow [\text{ENTER}] \rightarrow [< / >] \rightarrow [\wedge / \vee] \rightarrow ]
[ENTER]
Se usa para que el monitor se enciende a una hora determinada.
Se usa para controlar el modo y el niveau de volumen en el momento en que se encienda el monitor
automàcamente.
4) Temp. de apag.
[MONTH] [A/√] [ENTER] [A/V] [ENTER] [A/V] [ENTER] [] [A/V]
[ENTER]
Se usa para ajustar cuando se debe apagar automatamente el monitor, el volumen y el modo.
- Si noiene configurado Reloj prog. y selecciona Si en (Temporizador de encendido) Temp. de encen. o en (Temporizador de apagado) Temp. de apag., aparecerá el mensaje Reloj(Ajustar la hora)"
Transpar. de menus PASC
[ \text{[MENU]} \rightarrow [\text{A} / \text{V}] \rightarrow [\text{ENTER} ] \rightarrow [\text{A} / \text{V}] \rightarrow [\text{ENTER} ] \rightarrow [\text{A} / \text{V}] \rightarrow [\text{ENTER} ] ]
Cambia la opacidad del fondo del OSD.
1) Alto
2) Medio
3) Bajo
4) Opaco
PINbloqueo de seguridad PASC
[ \text{[MENU]} \rightarrow [\wedge / \vee] \rightarrow [\text{ENTER}] \rightarrow [\wedge / \vee] \rightarrow [\text{ENTER}] \rightarrow [0 \sim 9] \rightarrow [0 \sim 9] \rightarrow [0 \sim 9] ]
Puede combustiar la contraseña.
Ahorro energia PASCD
[ \text{[MENU]} \rightarrow [\text{A} / \text{V}] \rightarrow [\text{ENTER} ] \rightarrow [\text{A} / \text{V}] \rightarrow [\text{ENTER} ] \rightarrow [\text{A} / \text{V}] \rightarrow [\text{ENTER} ] \rightarrow [\text{MENU}] ]
Estamericano.
1) Act.
2) Des.
Nota
- Si DEA reducir el consumo eletrico en el modo de esper, ajuste Ahorro energia en Des. Sin embargo, cuando Ahorro energia está en Des, no pueda usar la referencia remota Power On de MDC ni la referencia WOL (Wake On LAN) de MagicNet.
Video Wall PASCD
Un video mural es un Conjunto de pantallas de video conectadas entre sí, de manière que cada una pueda做不到 lo que el imagen不完mente o la misma imagen repetida en cada pantalla.
Si Video Wall está activado se podra ajustar la configuracion de la pantalla Video Wall.
1) Video Wall
[ \text{[MENU]} \rightarrow [\text{A} / \text{V}] \rightarrow [\text{ENTER}] \rightarrow [\text{A} / \text{V}] \rightarrow [\text{ENTER}] \rightarrow [\text{ENTER}] \rightarrow [\text{A} / \text{V}] \rightarrow [\text{ENTER}] ]
Enciende o apaga la funciona Video Wall (Video mural) en la pantalla seleccionada.
- Des.
- Act.
2) Formato
[ \text{[MENU]} \rightarrow [\wedge / \vee] \rightarrow [\text{ENTER} ] \rightarrow [\wedge / \vee] \rightarrow [\text{ENTER} ] \rightarrow [\wedge / \vee] \rightarrow [\text{ENTER} ] \rightarrow [\wedge / \vee] \rightarrow [\text{ENTER}] ]
Se peutesecionar el formatting para ver una pantalla dividida.
- Llena
Proporciona una planta completa sin margenes.
- Natural
Muestra una imagen natural con su relacion de aspecto original intacta.
3) Divisor de pantalla
[ \text{[MENU]} \rightarrow [\text{A} / \text{V}] \rightarrow [\text{ENTER} ] \rightarrow [\text{A} / \text{V}] \rightarrow [\text{ENTER} ] \rightarrow [\text{A} / \text{V}] \rightarrow [\text{ENTER} ] \rightarrow [\text{A} / \text{V}] \rightarrow [\text{ENTER} ] ]
Se peuté dividir la pantalla en autres varias.
Puede seleccionar varias pantallas con una distribuccion differente al dividirlas.
- Selezione un modo en el Divisor de pantalla.
- Selecciona una pantalla en la Display Selection (Seleccion de pantalla).
- La ubicacion se configurar pulsando un numero en el modo selectionado.
-2x2
-3x3
-4×4
-5x5
-1x2
-2x1
-1x5
-5x1
- Cuando Video Wall está en funciona,[1] las unidades PIP, Ajuste automatístico, Bloqueo de Imagen y Tamaño no está disponible. Si se inicia Video Wall cuando PIP está en funciona,[2] la funciona PIP隨著 a Des. Video Wall no funciona en el modo MagicNet.
Pantalla de seguidad PASCD
La función Safety Screen (Pantalla de segundad) se utilizes para evitar que poderanaparecer restos de imagenes en la pantalla cuando se visualiza una imagen fija por un periodo prolongado.
- La funciona Screen Scroll (Desplazamente de pantalla) desplaza la pantalla el tiempo que se haya sido asignado.
-Estamericano no está disponible cuando el aparato está apagado.
1) Pantalla de seguidad
[MENU] [A / V] [ENTER] [A / V] [ENTER] [ENTER] [A / V] [ENTER]
Determine si la direccion Screen Scroll (Desplazamento de pantalla) deben estar Act. o Des.
- Des.
-Act.
2) Intervalo
[MONTH] [A/V] [ENTER] [A/V] [ENTER] [A/V] [ENTER] [A/V] [ENTER]
Determine el intervalo que debe pagar hasta que se execute Screen Scroll (Desplazamente de pantalla).
(1~10 hours)
El tiempo se calcula tomando como base el tiempo de encendido.
De forma predeterminada, el tiempo se establiece en 10 horas.
-1~10 hours
3) Segundos
\[
[\text{MENUR} ]\rightarrow [\wedge \vee ]\rightarrow [\text{ENTER} ]\rightarrow [\wedge \vee ]\rightarrow [\text{ENTER} ]\rightarrow [\wedge \vee ]\rightarrow [\text{ENTER} ]\rightarrow [\wedge \vee ]\rightarrow [\text{ENTER} ]
\]
Determine el periodo que debe pagar hasta que se ejecte Screen Scroll (Desplazamiento de pantalla).
(1~5 segundos)
De forma predelearminada, el tiempo se establece en 5segundos.
- Tipo-Despl.: 1~5 segundos
- Tipo-Pixel, Barra, Borrador: 10~50 segundos
4) Tipo
[MONTH] [A/V] [ENTER] [A/V] [ENTER] [A/V] [ENTER] [A/V] [ENTER]
Se peuteschangierelSafetyScreenType(Tipo de pantalla de seguridad).
- Despl.
- Pixel
- Barra
- Borrador
Selecc.resoluciona

[ \text{[MENU]} \rightarrow [\wedge / \vee] \rightarrow [\text{ENTER} ] \rightarrow [\wedge / \vee] \rightarrow [\text{ENTER} ] \rightarrow [\wedge / \vee] \rightarrow [\text{ENTER}] ]
Si laImagen no aparece correctamente en la pantalla alaabstar la resolucion de la tarjeta grfica del ordinador
a 1024 x 768 a 60 Hz, 1280 x 768 a 60 Hz, 1360 x 768 a 60 Hz o 1366 x 768 a 60 Hz, graties al uso de esta
funciion (Selec. resolucion) pue de seguir que la imagen aparezca en la pantalla del ordinador con la
resoluciónspecificada.
(Disponible solamente en el modo PC/BNC)
1) Des.
2)1024X768
3) 1280 X 768
4) 1360 X 768
5) 1366 X 768
Nota
Solamente se pueda selectionar un menu si los values de la resolution de graficos son 1024 x 768 a 60
Hz, 1280 x 768 a 60 Hz, 1360 x 768 a 60 Hz o 1366 x768 a 60 Hz.
PASCD
[MONTH] [A/V] [ENTER] [A/V] [ENTER] [ENTER] [] [ENTER]
Se usa para ajustar la luz de fondo, con el fin de reducir el consumo de energia.
Ajuste de encendidopASCD
[ \text{[MENU]} \rightarrow [\text{A} / \text{V}] \rightarrow [\text{ENTER} ] \rightarrow [\text{A} / \text{V}] \rightarrow [\text{ENTER} ] \rightarrow [\text{ENTER} ] \rightarrow [\text{A} / \text{V}] \rightarrow [\text{ENTER} ] ]
Ajusta el Power On time (Tiempo de encendido) de la pantalla.
*Precaución: Ajuste el Power On time (Tiempo de encendido) para que sea más largo, a finpreventir las sobrecargas de tension.
Restablecer
Los parámedos de color se sustituyen con los values predeterminados de fabrica.
1) RestablecerImagen P
[ \text{[MENU]} \rightarrow [\wedge / \vee] \rightarrow [\text{ENTER}] \rightarrow [\wedge / \vee] \rightarrow [\text{ENTER}] \rightarrow [\text{ENTER}] \rightarrow [< / >] \rightarrow [\text{ENTER}] ]
(Disponible solamente en el modo PC/BNC)
2) Restablecer color P
[ \text{[MENU]} \rightarrow [\Delta / \mathbb{V}] \rightarrow [\text{ENTER} ] \rightarrow [\Delta / \mathbb{V}] \rightarrow [\text{ENTER} ] \rightarrow [\Delta / \mathbb{V}] \rightarrow [\text{ENTER} ] \rightarrow [< / >] \rightarrow [\text{ENTER}] ]
Control multiple
Modos disponibles
PC/BNC/DVI
AAV
S-Video
Componente
DVI-Video
Control multiple PASCD

[ \text{[MENU]} \rightarrow [\wedge / \vee] \rightarrow [\text{ENTER}] \rightarrow [\wedge / \vee] \rightarrow [\text{ENTER}] \rightarrow [\text{ENTER}] \rightarrow [0 \sim 9] ]
Asigna un ID al aparato.
1) Configuración de ID
Asignacion de ID diferenciadores al aparato.
2) Entrada de ID
Se utilizes para seleccionar las funcciones del transmisor del aparato. Solo se activa el aparato bajo ID se corresponda con el valor del transmisor.
Characteristicas de Control
Directo
Modos disponibles
PC/BNC/DVI
AAV
S-Video
Componente
DVI-Video
MDC PASC0
Vaya a la pantalla OSD de Multi Control.
Bloquear PASCD
Ajuste la funciona Bloqueo de segundad.
1) Activarbloqueo
Se bloqueara.
2) Desactivarbloqueo
Se desbloqueara.
Nota
- Cuando se configura la direccion Lock,sole运营管理 los botones Lock del mando a distancia y del equipo.
La password (contraseña) preestablecida del monitor es "000000".
Nota
- Restablecimiento de la contraseña para lock (bloqueo) de la tecla de funciona.
Pulse MUTE 1 8 6 On. La contraseña se debe restablecer como '0000'. El mando a distancia es NEEDario para restablecer la contraseña.
© 1995~2008 SAMSUNG. ALL Rights Reserved
Instrucciones de seguidad
Introduccion
Conexiones
Uso del software
Ajuste del monitor
Resolución de problemas
Comprobación de las
funciones de
autoverificacion
Lista de chequeo
Q&A
Especificaiones
Information
Apéndice
TFT-LCD Monitor
www.samsung.com

El aspecto externo y el color del producto pueda variar dependiendo del modelo; las specifications del producto se puedaCambiar sin previo aviso para la mejora del rendimiento.
Resolución de problemas
Comprobación de las
funidades de
autoverificacion
Nota
- Compruebe lo siguientes antes de llamar al serviceo tecnico. Consulte con el centro de serviceo acerca de problemas que no pueda SOLUTIONAR por si mismo.
> Comprobación de las functiones de autoverficación
Se provee un dispositivo de autoprueba que permite inspeccionar la functiOn apropiaDe del monitor. Si el monitor y el computador estan connectados apropiadamente pero la pantalla del monitor permanece obscura y el indicator de abastecimiento de energia esta intermitente, execute la autoprueba del monitor, siguiendo los siguientes pasos:
1)Apaguencomputador yel monitor.
2) Desconecte el cable de video de la parte trasera del computador.
3) Prenda el monitor.
La figura que aparece bajo ("Comprobar cable de senal") aparece sobre un segundo plano negro cuando el monitor está en situación de functiónamente normal pero no detecta ninguna senal de video: Mientras está en el modo Autoprueba, el indicator de suministro de energia LEDcede verde y la figura se mueve por la pantalla.

Comprobar el cable de senal.
PC
4) Apague el monitor y vuelva a conectar el cable de video; bajo prenda el computador y el monitor.
Si la pantalla del monitor vigues en blanco afterwards seguir el procedimiento anterior, compruebe el controlador de video y el sistemas de la computadora; el monitor está的功能正好。
> Check Cooling System
Si en la pantalla se muestra el mensaje "Check Cooling System", quiere decir que hay un problema con el ventilador de refrigeracion. Póngase en contacto con un centro de servicios para reparar o reemplazar el ventilador.
> Modo no optimo
Puede ver la pantalla con unaResolution superior a 1360 x 768. No obstarve, ver a mensaje seguiente durante un minuto; durante es timeo, puee cabiar la resolucion de la pantalla o continuar en el modo actual. Si la fecuencia deactualizacion es de mas de 85Hz ver la tableta negra porque el monitor no admite mas de
85Hz.
Mode no optimo Modo recomendado 1360 x 768 60Hz
Nota
- Véase Especificações > Modos de Pantalla Prefijados acerca de las resoluções o frequencias compatibles con el monitor.
> Mantenimiento y Limpieza
1) Mantenimiento de la Caja del monitor
Limpie con un paño suave après de desconectar el cordón de suministro electrico.

- No use benceno, disolvente u other sustancias inflamables, o un paño mojado.
- Se recomienda un produit de limpieza de Samsung para prevenir daños en la pantalla.
2)Mantenimiento de la Pantalla de panel plano.
Limpie con un paño blando (una bayeta de algodón) suavamente.

- Nunca use acetona, benceno o disolvente. (Pueden causar defectos o deformaciones en la superficie de la pantalla).
- El usuario tendrá que pagar los costes y los gastos relacionados por la reparación de los días causados por el o ella.
Sintomas y Acciones recomendadas
Nota
- Un monitor reconstruye señales visuales que recibe del computador. Por lo tanto, si haydle problema con el PC o la tarjeta de video, esta podra causar que el monitor se ponga en blanco, o tenga malos colocores, sonido, Sincronizacion Fuera de Rango, etc. En este caso, primero inspeccione la fuente del problema y bajo pongase en contacto con el centro de service o el distribuidor.
1) Inspeccione si el cordon de suministro de energia esta conectado apropiamente al computador.
2) Inspeccione si el computador emite el sonido "beep" mas de 3 vezes cuando se inicia. (Si es affirmative, Solicite un service deutenimiento para la placa base del computador).
3) Si instalala una nuevo tarjeta de video o si ensambla el PC, inspeccione si la unidad del adaptor (video) o el controlador del monitor está instalado.
4) Compruebe si la fecuencia de exploracion de la pantalla de video está configurada en 50Hz 85Hz (Cuando use la maxima resolution no exceeda 60~Hz ).
5) Si Tiene problemas en la instalacion del controlador del adaptador (video), inceie el computador en el Modo Seguro, remueva el Adaptador de Pantalla en "Panel de Control, Sistema, Dispositivo de Administracion y bajo reiniciar el computador para reinstalar el controlador del adaptador (video).
Lista de chequeo
Nota
La tablasumaque enumerated los posibles problemas y sus soluiones. Antes de llamar al serviceo tcnico, compruebe la informacion de esta section para ver si possible remediar el problema usted mesmo. Si
necesite aplicay, Iame al numero del telfo n de la tarjeta de garantia, el numero de telfono en la seccion Informacion o consulte con su distribuidor.
Problemas relacionados con la instalacion (PC)
Nota
- Los problemas relacionados con la instalacion del monitor y sus soluciones estan en la lista.
Problemas Soluciones
La pantalla del monitor parpadea.
- Compruebe si el cable de senal entre el equipo y el monitor está
conectado y acoplado con firmeza.
(Véase Conexión con una computadora)
Blemas relacionados con la pantalla
Nota
- Los problemas relacionados con la pantalla del monitor y susmericanos estan en la lista.
Problemas Soluciones
La pantalla está en blanco y el indicator de suministro de energia está apagado
- Aseguresede que el cordon de suministro electrico este
conectarod firmamente y el monitor LCD esta encendido.
(Véase Conexión del Monitor)
Mensaje "Check Cable Serial"
- Aseguresede que el cable de senial estedecortado firmamente
con las fuentes de PC o de video.
(Véase Conexión del Monitor)
- Asegürese de que las fuentes de PC o de video estén
activadas.
Mensaje "Modo no optimo".
- Comprue la resoluzione y la Frequencia的最大s del adaptor
de video
Compare these values con los datos del Grafico Modos de
Pantalla Prefijados.
La imagen rueda verticalmente.
- Compruebe si el cable de senal está conectado con seguidad.
Conéctelo或其他方式。
(Véase Conexión con una computadora)
LaImagenoestaclara.La
- Execute el Ajuste de fecuencia Ajuste Grueso y Ajuste Fino.
- Enciendalo或其他方式,比如使用键盘、移动鼠标或用其他方式。
(cable de extension de video, etc)
Establezca la resoluzione y la Frequencia bajo de los rangos
recomendados. Modelo 19 pulgadas(1280 x 768 @ 60Hz)
LaImagenesinstableyvibra.
- Compruebe si la resoluzione y la Frequencia definidos para la
tarjeta de video del equipo está ndro del rango admitido por
el monitor
Si no,whelming a establecerlos segun Informacion en el menu del
monitor y Modos de Pantalla Prefijados.
LaImagenesdemasiadoclara o
- Ajuste la Luminosidad y el Contraste.
(Véase Luminosidad, Contraste)
demasiado oscura.
El color de la pantalla es
inconsistent.
El color de laImagen está
distorsionado con sombras
oscuras.
- Ajuste el color usando Favorito en el menu OSD Color
Adjustment (Ajuste del color OSD).
El color blanco es pobre.
El indicator de suministro de energia parpadea en verde.
- El monitor está guardando los Cambios realizados en la configuración en la memoria de OSD.
La pantalla está en blanco y la luz del indicator de suministro de energia es verde constante o parpadea cada 0,5 o 1segundos
- El monitor está usingo su Sistema de administracion de energia.
- Mueva el ratón del equipo o pulse una tecla del teclado.
- Si aparece el mensaje "TEST GOOD" en pantalla al pulsar el botón MENU, disfruebe la connexion del cable entre el monitor y el equipo informativo para asegurar que el conector está connectado correctamente.
Problemas relacionados con el audio
Nota
- Los problemas relacionados con las señales de audio y sus SOLUTIONES se enumeran a continuación.
Problemas Soluciones
No hay sonido
- Asegúrese de que el cable de audio está correctamente conectado al puerto de entrada de audio del monitor y el puerto de salute de audio de su tarjeta de sonido. (Véase Conexión del Monitor)
- Compruebe el nivel del volumen.
El nivel del sonido es demasiado bajo
- Compruebe el nivel del volumen.
- Si el volumen vigue siendo demasiado bajo afterwardsajustar el control al maximo, compruebe el control del volumen en la tarjeta de sonido del equipo o en el programa de software.
El sonido está demasiado alto o demasiado bajo
- Ajuste Agudo y Grave al nivel apropriado.
Problemas relacionados con el Control remoto
Nota
- Los problemas relacionados con el control remot y susmericanas se enumeran a continuacion.
Problemas Soluciones
Los botones del control remoto no responden.
- Compruebe las polaridades de las baterias (+/-).
- Compruebe si se han agotado las baterias.
- Compruebe si está encendido
- Compruebe si el cordón de suministro electrico está conectado con seguidad.
- Compruebe si hay encendida una lampara fluorescente o de neón en su cercania.
Q&A
Pregunta Respuesta
¿Cóme se puedaonian la fecuencia?
Se peutéckiar la fecuencia reconfigurando la tarjeta de video.
Note que el soporte de la tarjeta de video pueda variar,dependiendo de la version del controlador usado. (Busque detalles en el manual del computador o de la tarjeta de video).
¿Cóme se pueda regular la resolution?
- Windows XP: Restablezca la resolution能做到 en Panel de control
Apariencia y temas Pantalla Configuracion.
Windows ME/2000:
Restablezca la resoluzione hacerly clic en Panel de control Pantalla Configuracion.
* Contáctese con el fabricante de la tarjeta de video para Obtener más detalles.
¿Cóme se puedaponer la función Ahorro de Energía?
Windows XP:
Poner la funciona en Programa de Instalacion-BIOS(sistema Basicsico de entrada -salida) del computador o del protector de pantalla.
Poner la funciona en Programa de Instalacion-BIOS(sistema Basicsico de entrada -salida) del computador o del protector depellantla.Consulte el Manual del Computador/Windows
Windows ME/2000
Set the resolution at the Control Panel Display Screen Saver.
Poner la funciona en Programa de Instalacion-BIOS(sistema Basicsico de entrada -salida) del computador o del protector depellantilla.Consulte el Manual del Computador/Windows
Cóme se pueda limpiar el Tubo deImagen/Panel LCD?
Desconecte el cordón de suministro de energia y bajo limpie el monitor con unaTELa suave,usandounaSolution limpiadora o simplemente agua.
No deje restos de detergente ni raye la caja. No permitted que entre agua en el computador.
© 1995~2008 SAMSUNG. ALL Right Reserved

Instrucciones de seguidad
Introduccion
Conexiones
Uso del software
Ajuste del monitor
Resolución de problemas
Especificaiones
Generales
Ahorro de energia
Modos de temporización
predefinidos
Information
Apendice
TFT-LCD Monitor
www.samsung.com

El aspecto externo y el color del producto pueda variar dependiendo del modelo; las specifications del producto se puedaCambiar sin previo aviso para la mejor del rendimiento.
Especificaciones
Generales
Generales
Generales
Nombre del Modelo SMT-4011
Panel LCD
Tamaño 40 pulgadas de diagonal (101,6 cm)
Area de Presentación 885,168 mm (H) x 497,664 mm (V)
Distancia entre Pixels 0,648 mm (H) x 0,648 mm (V)
Sincronizacion
Horizontal 30 81kHz
Vertical 56 75Hz
Color de Pantalla
Color de Pantalla 16,7 M colocores
Resolución
Analógico
1360 x 768 / 1366 x 768 @ 60 Hz: depende de la tarjeta grafica que se
utilice
Digital 1366 x 768 @ 60 Hz
Señal de entrada, terminado
RGB analogico, RGB digital compatible con DVI (Interfaz visual digital).
0,7 Vp-p positivo a 75 ohmios ±10 % sincronizacion de H/V分开ado, compuesto, SOG, nivel TLI, posicao o negativo.
H/V independiente, nivel TTL, positivo o negativo
100 MHz
Fuente de poder
CA 100-240V\~ (+ - 10%) ,50/60 Hz
Cable de Senal
15pines-a-15pines D-sub cable, desarmable
DVI-D-a-DVI-D connector, desarmable - Opcion
Conector de senal
D-sub, BNC, DVI-D, YPbPr, S-VHS, VCR
Dimensiones (PxAxD) / Peso
971 x 582 x 118 mm / 38,2 x 22,9 x 4,6 inch (Sin soporte)
971 x 629,5 x 223 mm / 38,2 x 24,8 x 8,8 inch (Con soporte), 23 kg/50,7 lbs
971 x 629,5 x 228 mm / 38,2 x 24,8 x 9,0 inch (con soporte y con cristal), 27,7 kg/61,0 lbs
Interfase de Montaje VESA
200 mm x 200 mm (Para uso con hardware de Montaje especial (Brazo))
Consideraciones medioambienteles
Operación
Temperatura: 10^ C 40^ C (50°F ~ 104°F)
Humedad: 10% 80% , no-condensacion
Almacenamento
Temperatura: -20°C ~ 45°C (-4°F ~ 113°F)
Humedad : 5% ~ 95%, no-condensation
Characteristicadelaudio
Entrada de audio 1 Clavija RCA roja (D) blanca (I), 0,5 Vrms (-9 dB)
Entrada de audio 2 Clavija RCA roja (D) blanca (I), 0,5 Vms (-9 dB)
Entrada de audio de PC Clavija estereo de 3,50,0,5 Vrms (-9 dB)
Frecuencia RF:80 Hz 15 kHz (a-3 dB)
Respuesta A/V: 80 Hz ~ 20 kHz (a -3 dB)
Posibiliidad de Plug y Play
Este monitor可以选择 instalarse en cualquier sistemas con Plug & Play compatible. Las Interactiones de los sistemas del monitor y el PC proveen las最好的 conditiones operativas y configuracion del sistema. En la mayoria de los casos, la instalacion del monitor se hara automatamente, a menos que el usuario deseee seleccionar configuraciones alternas.
Punto acceptable
Para este producto se usa la pantalla TFT LCD fabricada con的技术ia avanzada de semiconductores con una precision de 1 ppm (una millionesa). Pero a vezes, los pixeles de color ROJO, VERDE, AZUL y BLANCO parecen estar brillantes o se pueda ver algunos pixeles negros. Esto no es bajo a una mala calidad yastedepuertoconconfianza.
- Por exemple, el número de pixeles secundarios de TFT LCD contentsados en este producto es 3.133.440
Nota
- El diseño y las espécificaciones están susjetos a Cambios sin previo aviso.
Equipo de Clase B (equipo de comunication de informacion para uso domestico)
- Este equipo cumple con las directrices de Compatibility electromagnética para uso dométrico y se pueda usar en todas las areas incluso las zonas residenciales comunes. (El equipo de Clase B irradia menos ondas electromagnéticas que el equipo de Clase A.)
Ahorro de energia
Este monitor tiene un sistema incorporeal de manejo de energia llamado Ahorroder de Energia. Este sistemas por cieo periodo de time. El monitor regresa automaticamente a una operation normal cuando se mueve el mouse del computador o se presiona una tecla del teclado. Para ahorrar energia, apague el monitor cuando no lo necesse, o cuando no lo use durante largos periodos de time. El system del Ahorroder de Energia funciona con un VESA DPM de acuero a la tarjeta de video instalada en el computador. Use un programa de Herramentas instalado en el computador para instalar esta caracteristica.
Estado Operación normal Modo de ahorro energetico Apagado de la Fuente de Alimentación EPA/ENERGY 2000 Apagado de la Fuente de Alimentación Apagado de la Fuente de Alimentación Indicador de Suministro de Energía Verde Verde, intermitente Ambar Negro Consumo de Energía Menos de 210 W Menos de 1 W (Modo Off) Menos de 1 W (Energía) 0 W (Botón de suministro de energia)

ENERGY STAR
Este monitor es compatible con EPA ENERGY STAR y con ENERGY2000 es uso con un computador que está equipado con VESA DPM.
Como socio de NERGY STAR® Partner, SAMSUNG ha determinado que este producto sigue las directrices de ENERGY STAR® sobre eficiencia energetica.
Modos de temporizacion predefinidos
> Modos de temporación predefinidos
Si la signal transferida del computador es laquia a la de los Modos de Pantalla Prefijados seguides, la pantalla se regula automatically. Sin embargo, si la signal difiere, la pantallaoulda ponerse en blanco,mientras el indicator de suministro de energia LED esta prendido.Consulte el manual de la tarjeta de video y
regule la pantalla de lasuma manera.
Modo Pantalla Frecuencia H (kHz) Frecuencia V (Hz) Ancho de Banda (MHz) Polaridad Sync (H/V) IBM, 640 x 350 31,469 70,086 25,175 +/- IBM, 640 x 480 31,469 59,940 25,175 -/- IBM, 720 x 400 31,469 70,087 28,322 -/+ MAC, 640 x 480 35,000 66,667 30,240 -/- MAC, 832 x 624 49,726 74,551 57,284 -/- VESA, 640 x 480 37,861 72,809 31,500 -/- VESA, 640 x 480 37,500 75,000 31,500 -/- VESA, 640 x 480 43,269 85,008 36,000 -/- VESA, 800 x 600 35,156 56,250 36,000 +/+ VESA, 800 x 600 37,879 60,317 40,000 +/+ VESA, 800 x 600 48,077 72,188 50,000 +/+ VESA, 800 x600 46,875 75,000 49,500 +/+ VESA, 800 x600 53,674 85,000 56,250 +/+ VESA, 1024 x 768 48,363 60,004 65,000 -/- VESA, 1024 x 768 56,476 70,069 75,000 -/- VESA, 1024 x 768 60,023 75,029 78,750 +/+ VESA, 1024 x 768 68,677 85,997 94,500 +/+ VESA, 1360 x 768 47,712 60,000 85,500 +/+

Frecuencia H
El tiempo para escanear una linea que conecta horizontally el lado de la planta al lado izquierdo es llamado Ciclo Horizontal y el número inverso del Ciclo Horizontal es llamado Frecuencia H. Unidad: kHz
Frecuencia V
A semejanza de una lámpara fluorescente, la pantalla tiene que repetir la misma imagen muchas vezes porsegundo para做不到 una imagen al usuario. La Frequencia de esta repetition es llama Frecencia V o
Frecuencia de Escaneo. Unidad: Hz
© 1995-2008 SAMSUNG. ALL Right Reserved

Instrucciones de seguidad
Introduccion
Conexiones
Uso del software
Ajuste del monitor
Resolución de problemas
Especificaiones
Information
Para Obtener una Mejor
Presentación
INFORMACION de
PRODUCTO
(Libre de retencion de
imagenes)
Apéndice
TFT-LCD Monitor
www.samsung.com

El aspecto externo y el color del producto pueda variar dependiendo del Modelo; las specifications del producto se puedaCambiar sin previo aviso para la mejora del rendimiento.
Information
Para Obtener una Mejor Presentacion
Ajuste la resolution de la computadora y la velocidad de inyeccion de la pantalla (intervalo deactualizacion) del panel de control de la computadora, como se indica a continuacion, para que disfunte delmejor calidad de imagen. Usted peut tener una calidad irregular de imagen en la pantalla si la mejor calidad de imagen no se provee en TFT-LCD.
- Resolución : 1360 x 768
Frecuencia Vertical (actualizacion) : 60 Hz
Para este produit se usa la pantalla TFT LCD fabricada con的技术ia avanzada de semiconductores con una precision de 1 ppm (una millionesa). Pero a vezes, los pixeles de color ROJO, VERDE, AZUL y BLANCO parecen estar brillantes o se pueda ver algunos pixeles negros.
Esto no es defaulted a una mala calidad y usted pueda usarlo con confianza.
- Por exemple, el número de pixeles secundarios de LCD Contents en este producto es
Cuando limpie el monitor y el panel exterior, por favor aplique con un pafo suave y seco la pequeña cantidad de limpiador que se recomienda, y pulalo. No aplique fuerza al area del LCD sino estregue suavamente.
Si se aplica mucha fuerza, pueda mancharse.
Si no está satisficho con la calidad de la imagen, pueda lograr mejor calidad de imagen allearvaracabo la "funci deajuste automatico" en la pantalla que aparece cuando se presiona el boton de cierre de ventana.
Si hay todas ruido despues del ajuste automatico, use la functiOn de ajuste FINO / GRUESO.
Si el aparato muestra una imagen fija durante un长大o periodo de tiempo, pueda quedar una imagen residual o cierta indefinccion.
Establezca el modo de ahora de energia o configure un protector de pantalla con una imagen en movementio, cuando seanecessary扣除adendido el monitor durante un largo periodo de tiempo.
INFORMACION de PRODUCTO (Libre de retencion de imagenes)
念 Que es la retencion de imagen?
La retencion deImagen no debe producirse cuando un panel LCD functiona en conditiones normales. Estas se defineen como patrones de video que cambian continuamente. Cuando el panel LCD functiona largo tiempo con un patron fijo (más de 12 horas), se produce una liga diferencia de voltaje entre los electrodos que introducen el cristal liquido (LC) en un pixel. Con el tiempo la diferencia de voltaje entre los electrodos se va incrementando, con lo que el cristal liquido se va hacer más delgado. Cuando este sucede, pueda que se vea laImagen anterior si el patron ha comeado. Para impeder this, se debe reduir la diferencia de voltaje acumulado.

Apagar, salvapantallas o modo de ahorro de energia
- Aquare el aparato durante 4 horas tras un periodo de uso de 20 horas.
- Apague el aparato durante 2 horas tras un periodo de uso de 12 horas.
- Configure el monitor para que se apague con el esquema de alimentacion de las propiedades de la pantalla del PC.
- Utilice un salvapantallas si es posible. - Es aconsejable usar un salvapantallas de un color o una imagen en movimiento.
Cambiar la informacion de color periodicamente

Nota
- Use dos colores differentes
Alterne la informacion de color con dos colores differentes cada 30 instantos.
- Evite usar una combinación de caracteres y color de fondo con una gran diferencia de luminancia. No utilise colocores grises, ya que pueda producir fácilmente una retencion deImagen.
Evite: colores con gran diferencia de luminancia (blanco y negro, gris).


Camblar el color de los caracteres periodicamente
- Use colors brillantes conlittle de luminancia Clico: cambie el color de los characteres y del fondo cada 30 minutes

Cada 30 Minutes, cambie los characteres con movimiento.

- LaImagen en mouvemento de toda el area junto con el logo periodicamente.
- Ciclo: Imagen en movimiento de la pantalla+junto con el logo durante 60segundos despues de 4 horas de uso.
- El mejor modo de impeder la retencion deImagen en el monitor es apagar este o configurar el PC o sistemas para que se active un salvapantallas cuando el equipo no se utilise. El servicios de garantía también se limitara de acuerdo con la guía de instructaciones.
Aplicar la functiOn de desplazamente de pantalla en el producto
- Aplique la direccion de desplazamente de pantalla
- Sintoma: la barra horizontal de color negro se mueve arriba y abajo.

-Seleccione el método
. Guia de instrucciones: Menu OSD -> Set Up (Configurar) -> Safety Screen (Pantalla de seguidad)-
> Screen Scroll (Desplazamente de pantalla)
Intervalo de tempo: 1~10 horas (Recomendado: 1)
Periodo de tiempo: 1~5segundos (Recomendado:5)

- (Consulte la guía del usuario del CD en "Función OSD"; en algunos modelos no está disponible)
Aplicar la referencia de pixeles de la pantalla en el producto
- Aplique la direccion de la Pixel de la pantalla
- Sintoma: El punto de color negro se mueve arriba y abajo.

-Seleccionelmetodo
Gula de instrucciones: Menu OSD -> Set Up (Configurar) -> Safety Screen (Pantalla de seguridad)-
>Pixel (Pixel).
Intervalo de tiempo: 1~10 horas (Recomendado: 1)
Periodo de tiempo: 10~50segundos (Recomendado:50)
- Aplique la direccion de la barra de la pantalla
- Sintoma: las barras horizontal y vertical de color negro se mueven arriba y abajo.

-Seleccione el método
. Guia de instrucciones; Menu OSD -> Set Up (Configurar) -> Safety Screen (Pantalla de seguidad)-
> Bar (Barra)
Intervalo de tempo: 1~10 horas (Recomendado: 1)
Periodo de tempo: 10-50 segundos (Recomendado: 50)

- (Consulte la guía del usuario del CD en "Función OSD"; en algunos modelos no está disponible)
Aplicar la direccion de borrado de la pantalla en el producto
- Aplique la direccion de borrado de la pantalla en el producto
- Sintoma: Dos bloques verticales se desplazan cuando se borra la pantalla.

-Selección el método
. Guia de instrucciones: Menu OSD -> Set Up (Configurar) -> Safety Screen (Pantalla de segundad)-
>Eraser (Borrador)
Intervalo de tiempo: 1~10 horas (Recomendado: 1)
Periodo de tempo: 10~50segundos (Recomendado:50)

- (Consulte la guía del usuario del CD en "Función OSD"; en algunos modelos no está disponible)
© 1995-2008 SAMSUNG. ALL Right Reserved
Instrucciones de seguidad
Introduccion
Conexiones
Uso del software
Ajuste del monitor
Resolución de problemas
Especificaciones
Information
Apendice
Contacte con SAMSUNG
WORLDWIDE
Téminos
Eliminación correcta
Autoridad
TFT-LCD Monitor
www.samsung.com

El aspecto externo y el color del producto pueda variar dependiendo del Modelo; las specifications del producto se puedaCambiar sin previo aviso para la mejora del rendimiento.
Apéndice
Contacte con SAMSUNG WORLDWIDE
Nota
- Si Tiene alguna pregunta o commentario referente a nuestros productos, por favor contacte con nosotros. Servicio de Atencion al Cliente
North America
U.S.A 1-800-SAMSUNG(726-7864) http://www.samsung.com/us
CANADA 1-800-SAMSUNG(726-7864) http://www.samsung.com/ca
MEXICO 01-800-SAMSUNG(726-7864) http://www.samsung.com/mx
Latin America
ARGENTINE 0800-333-3733 http://www.samsung.com/ar
BRAZIL 0800-124-421 http://www.samsung.com/br
CHILE 800-SAMSUNG(726-7864) http://www.samsung.com/c/
COLOMBIA 01-8000112112 http://www.samsung.com.co
COSTARICA 0-800-507-7267 http://www.samsung.com/latin
ECUADOR 1-800-10-7267 http://www.samsung.com/latin
EL SALVADOR 800-6225 http://www.samsung.com/latin
GUATEMALA 1-800-299-0013 http://www.samsung.com/latin
JAMAICA 1-800-234-7267 http://www.samsung.com/latin
PANAMA 800-7267 http://www.samsung.com/latin
PUERTO RICO 1-800-682-3180 http://www.samsung.com/latin
REP. DOMINICA 1-800-751-2676 http://www.samsung.com/latin
TRINIDAD & TOBAGO 1-800-SAMSUNG(726-7864) http://www.samsung.com/latin
VENEZUELA 0-800-100-5303 http://www.samsung.com/latin
Europe
AUSTRIA 0800-SAMSUNG(726-7864) http://www.samsung.com/at
BELGIUM 0032 (0)2 201 24 18 http://www.samsung.com/be
CZECH REPUBLIC 844 000 844 http://www.samsung.com/cz Distributor pro Českou republika: Samsung Zrt., Česka organizačné složka Vyskočilova 4, 14000 Praha 4 DENMARK 70 70 19 70 http://www.samsung.com/dk FINLAND 030-6227 515 http://www.samsung.com/fi FRANCE 3260 SAMSUNG(726-7864) http://www.samsung.com/fr 08 25 08 65 65 (€ 0,15/min) GERMANY 01805-121213 (€ 0,14/Min) http://www.samsung.de HUNGARY 06-80-SAMSUNG(726-7864) http://www.samsung.com/hu ITALIA 800-SAMSUNG(726-7864) http://www.samsung.com/it LUXEMBURG 0035 (0)2 261 03 710 http://www.samsung.com/be NETHERLANDS 0900 20 200 88 (€ 0,10/Min) http://www.samsung.com/nl NORWAY 815-56 480 http://www.samsung.com/no POLAND 0 801 801 881 http://www.samsung.com/pl 022-607-93-33 PORTUGAL 80 8 200 128 http://www.samsung.com/pt REPUBLIC OF IRELAND 0818 717 100 http://www.samsung.com/ie SLOVAKIA 0800-SAMSUNG(726-7864) http://www.samsung.com/sk SPAIN 902 10 11 30 http://www.samsung.com/es SWEDEN 0771-400 200 http://www.samsung.com/se SWITZERLAND 0800-SAMSUNG(726-7864) www.samsung.com/ch U.K 0870-SAMSUNG(726-7864) http://www.samsung.com/uk
CIS ESTONIA 800-7267 http://www.samsung.ee LATVIA 800-7267 http://www.samsung.com/lv LITHUANIA 8-800-77777 http://www.samsung.1t KAZAKHSTAN 8-10-800-500-55-500 http://www.samsung.kz KYRGYZSTAN 00-800-500-55-500 RUSSIA 8-800-555-55-55 http://www.samsung.ru UKRAINE 8-800-502-0000 http://www.samsung.ua UZBEKISTAN 8-800-120-0-400 http://www.samsung.uz
Asia Pacific AUSTRALIA 1300 362 603 http://www.samsung.com/au CHINA 800-810-5858, 010-6475 1880 http://www.samsung.com.cn HONG KONG 3698-4698 http://www.samsung.com/hk INDIA 3030 8282, 1800 110011 http://www.samsung.com/in/ INDONESIA 0800-112-8888 http://www.samsung.com/id JAPAN 0120-327-527 http://www.samsung.com/jp MALAYSIA 1800-88-9999 http://www.samsung.com/my NEW ZEALAND 0800SAMSUNG(726-7864) http://www.samsung.com/nz PHILIPPINES 1800-10-SAMSUNG(726-7864) http://www.samsung.com/ph SINGAPORE 1800-SAMSUNG(726-7864) http://www.samsung.com/sg
THAILAND 1800-29-3232, 02-689-3232 http://www.samsung.com/th
TAIWAN 0800-329-999 http://www.samsung.com/tw
VIETNAM 1800588889 http://www.samsung.com/vn
Middle East & Africa
SOUTH AFRICA 0860-SAMSUNG(726-7864) http://www.samsung.com/za
TURKEY 4447711 http://www.samsung.com.tr
800-SAMSUNG (726-7864)
8000-4726
http://www.samsung.com/mea
Téminos
Señal de Sincronización (Sync.)
Las señales de sync (sincronizzato) son las señales estandar necessities para loar los colores deseados en el monitor. Se divid en Señales de sincronizacion Vertical y Horizontal. Estas snales muestran las imagenes de color normales medianta la resoluion y la fecuencia establecidas.
Tipos de senales de synchronization
Separada Este es un esquema de transmisión de señales de sincronización verticales individuales al monitor. Compuesta Este es un esquema de combinación de las señales de sincronización verticales dentro de una SIGNAL compuesta y de transmitirlas al monitor. El monitor mystra las señales del color分开ando la SIGNAL compuesta en las señales del color originales.
Dot Pitch (Ancho de Punto)
LaImagen en el monitor está compuesta de punto de color rojo, verde y azul. Mientras más cercanos estén, mejor sera la nitidez. La distancia entre dos punto del mesmo color es llamada "dot pitch". Unidad: mm
Frecuencia V
La planta de ser dibujada varias vezes en un intervalo de un secondo a fin de crear yETHERuna imagen al usuario. La Frequencia de esta repeticion es llamada Frecuencia Vertical o Tasa de Refresco. Unidad: Hz
Ejempo : Si la mtsma luz se repite 60 vezes por segundo, se considera como de 60Hz
Frecuencia H
El tiempo que toma para escanear una linea que conecta horizontalmente el extremo derecho con el extremo izquierdo de la pantalla es llamado Ciclo Horizontal. Al número inverso del Ciclo Horizontal se le llama Frecuencia Horizontal. Unidad: kHz
Metodos de Entrelazamento y No-Entrelazamento
A la muestra de las lineses horizontales en la pantalla, desde el tope hasta la base,se le llama método de NoEntrelazamiento,mienes que a la muestra de lineas impares y bajo lineas pares alternativamente se le llama método de Enlazamiento. El método de No-Entrelazamiento es uso por la mayoria de monitores para asegurar una imagen clara. El método de Entrelazamiento es el mesmo que se usa en la TV.
Plug & Play (Enchufar y Operar)
Esta es una funciona que otorga al usuario la mejor calidad de pantalla, permitiendo al monitor y al computador intercambiari informacion automatistica. Este monitor cumple con el estandar internacional VESA DDC para la funciona Plug & Play.
Resolución
Al número de punto que se alinean vertical y horizontalmente para formar laImagen se le llama "resolución". Este número muestra la precision de la pantalla. Es buena tener unaResolution alta para realizar tareas multiples ya que se pueda estar mas informacion en la pantalla.
Ejemplo : Si la resolveduon es 1360 X 768, esta significa que la pantalla está compuesta de 1360 puntos horizontales (resolución horizontal) y 768 lineas verticales (resolución vertical).
Un MDC (Multiple Display Control)
Un MDC (Multiple Display Control) es una aplicacion que permiteeworkar en un PC con varias pantallas fácil y simultaneamente. RS-232C, un estandar de comunication serial, se usa para la comunication entre un PC
y una pantalla. Por tanto, esnecessary conectar un cable serial entre el puerto serial del PC y el puerto serial de cada pantalla.
Eliminación correcta
Eliminación correcta de este producto (material electrico y electrónico de descarte) - Europa solamente

(Aplicable en la Unión Europea y en paises europeos con sistemas de recogida selectiva de residuos)
La presencia de estamarca en el producto o en el material informativo que lo accompanies, indica que al finalizar su vidautilnodeferaleliminarasejuntoconotros residuosdomesticos.Paraevitarlosposiblesdañosalmedioambienteoalaludhumanaquerepresenta laeliminacionincontroladaresiduos,separe este producto deoterostiposderesiduos yreciclocorrectamenteparapromover la reutilizacionsosteniblederecursosmaterialia.

Los equipos particulares pueden contactar con el establishimiento donde adquirieron el producto, o con las autoridades locales pertinentes, para informarse sobre como ydondeDICuen levarlo para quesea sometido a un reciclaje ecologico y seguro.
Los)."
con除外s commerciales.
Autoridad
La información de este manual está sujeta a Camblos sin previo avis.
© 2008 Samsung Electronics Co., Ltd. Todos los derechos reservados.
Está estricmente prohibida la reproducción de este manual, por cualquier medio, sin el permiso escrito de Samsung electronics Co., Ltd.
Samsung electronics Co., Ltd. no sera responsable de los erros incurridos aqui o de los daños consequentes o incidentales relacionados con el suministro, interpretacion o uso de este material
El logoloto " Samsung " son MARas registradas de Samsung Electronics Co., Ltd.; " Microsoft ", " Windows " y " Windows NT" son MARas registradas de Microsoft Corporation; " VESA", " DPM " y " DDC " son MARas registradas de Video Electronics Standard Association; el nombre y logoloto " ENERGY STAR " son MARas registradas de la Agencia de Proteccion Ambiental de EE.UU. (APA). Como socio de ENERGY STAR, Samsung Electronics Co., Ltd. ha determinado que este producto cumple con las directrices de ENERGY STAR sobre eficiencia energetica. Todos los demas nombres MentionadosAquí podrián ser MARas commerciales o MARcas registradas de sus respectivos dueños.
SAMSUNG
-MEXICO SOLO -
IMPORTADO POR:
AV.PRESIDENTE MASARIK No.111 INT.701
Col. Chapultepec Morales, DELEGACION MIGUEL HIDALGO
C.P. 11570, MEXICO, DISTRIBUTO FEDERAL
Tel:01(55)5747.5100/01.800.726.7864
Fax:01(55)5747.5202/01.800.849.1743
TFT-LCD MONITOR
SMT-4011
Türkce
Kullanici Kilavuzu


Güvenlik Talimatlari
Isaretleme
AÇık/Kapalı durumu
Kurulum
Temizlik
Diger
Giris
Baolantylar
Yazilimn Kullanilmasi
Monitorun Ayarlanmasi
Sorun Giderme
Özellikler
Bilgiler
Appendix
TFT-LCD Monitor
www.samsung.com

Urun renge ve gorunmu modeline bagl olarak farklik gosterebilir ve performans gelistirmeler nedeniyle urn ozellikleri onceden haber verilmeksizin degistirilebilir.
Güvenlik Talimatlari
isaretleme

Asagidaki givenulik talimatlan urunlerin ve kullanicilarin zarar gormesini onlemek icin hazirlanmistir, lufen okuyun.

Uyari/Dikkat

Bu simgeyle isaretlenmis olan yonergelerin izlenmemesi cihaza fiziksel zarar verebilir vya hasara ugramasina neden olabilir.

isaretler

Yasaktir Her zaman okunmus ve anlasilmis olmasi onemlidir

Parcalina ayirmayin Figt elektrik prisinden cikanr

Dokunmayin Elektrik carpasini engellemek icin topraklama
Açık/Kapalı durumu

Uzunbir sure kullanilmayacaksa,bilgisayariniziGoruntu GucYonetimi Sstemi'ne(DPM)ayarlayin.
Ekran koruyucu kullaniyorsaniz, etkin ekran moduna ayarlayin.
Buradaki görtüller sadece referans amaçldir, tum durumlar (veya ülkeler)icens geleidir.
Gorinti Iz Kalma Onleyici Talimallan'na Kisa Yol

Zarar gormus veya gevsek priz kullanmayin.
- Bu, elektrik carpmasina veya yangina neden olabilir.

Fişi kablosundan tutarak cekmeyin veya elleriniz islakken fisedokunmayin.
- Bu, elektrik carpmasina veya yangina neden olabilir.
#

Yalinzca gerekti gibi topraklanmis fi ve prisleri kullanin.
- Topraklama isleminin duzgün yapilmamasi elektrik carpmasina veya cihazin bozulmasina neden olabilir.(Sadece Sinif Cihazi.)
#

Elektrik fisi, gevsemeyecek sekilde sikica takin.
Duzgün olmayan baglantilar yangina neden olabilir.

Fişi ve kabloyu asiri derecede bukmeyin ve uzerine aigr nesneler koymayin; bunlar hasar gormesine nden olabilir.
- Bu, elektrik carpmasina veya yangina neden olabilir.

Prize cok fazla uzatma kablosu veya fiş baglamayin.
- Bu, yangina neden olabilir.

Monitoru kullairken elektrik kablosunu cikarmayin.
- Čikarma sirasinda dalgalanma meydana gelebilir ve monitore zarar verebilir.

Konektor veya pris tozluyken elektrik kablosunu kullanmayin.
- Elektrik kablosunun prizi veya konektör tozluysa kuru bir bezle iyice temizleyin.
Tozl prizi olan bir elektrik kablosu veya konektfor kullanilmasi, elektrik carpmasina veya yangina neden olabilir.

Cihazin elektrik baglantisini kesmek icin, fisin elektrik prizinden cikarilmasi gerekir ve boylece fis kullanilabilir durumda olur.
- Bu uyarilara uyulmamasielektrik carpmasina veya yangina yol acabilir.
Kurulum
Monitor to zu tozlu yerler, asyuk se ya da uuk sicakiklar maruz kalan yerler, cok nemliyer, kymasal maddelerin kullanildigi yerler vya urun tekrar tekrar uzun sureler kullanildigi havaalanlan ve istasyonlar gibi yerere kurmad an once yetkil bir servis merkeziyle gurun.

Bunun yapilmaması, monitoruzde ciddi hasara neden olabilir.

Monitörunüz az nemli ve az tozlur yere koyun. Monitorin incinde elektrik carpmasi veya yangin olusat

Monitoru ta:sirken yere sert bir sekilde birakmayin. Bu hareket, urune veya size zarar verebilir.

Monitor altigi n vitrine ya da rafa yerlestirken, altigi n ucunun, vitrinden ya da raftan disari tasmamasina dikkat edin. Urunun yere duurulmesi, urune zarar verebilir ya da kisi sel yaralanmalara neden olabilir.

Urun dengesiz ya da yuzey alanikuk yerlere yerlestirmeyin. Urun duup ozellikc colocuklar olmak uzere yanindan yuriyenlere zarar verebileceginden, yalinzca duz ve dengeli bir yuzeye yerlestiin.

Urunu, yere yerlestirmeyin. Ozellikc cocuklar olmak uzere insanlar uzerinden gelebilir.

YANGIN CIKMASINI ONLEMEK ICIN, MUMLARI VEYA DIGER ACIK ALEVLI NESNELERI HER ZAMAN URUNDEN UZAKTA TUTUN. Aksi takdirde yangina yol aqabilir.

Tum istma cihazlarini, elektrik kablosundan uzakta tutun. Eriyen kaplama, elektrik carpmasina ya da yangina neden olabilir.

Uruni, bir raf ya da dolap gibi havalandirmanin yetersiz oldugu yerlere yerlestirmeyin. Ic sicakltaki yukselme, yangina neden olabilir.

Monitoru yerine dikkatle koyun.
Zarar gorebilir veya kirlabilir.

Monitoru yuz iustukoymayin.
- Ekran yüzeyi zarar gorebilir.

Monitorü taban destegi olmadan kullanmayin.
Kotu havalandirma nedeniyle bozulabilir veya yangina neden olabilir.
- Monitor taban destegiyle kullanilmayacaksa, yeterli havalandirma saglamak icin gereken adimlari uygulayin.

Urunu monte ederken, havalandirmanin saglanmasi icin duvarlaarasinda mesafe (10 cm/4 incten fazla) biraktigizdan emin olun.
Havalandirmanin yetersiz olmasi, urunin ic sicakliginda bir artisa, dolayisiyla parca omrunk kisalmasina ve performansin duuk olmasina neden olabilir.

Ambalaj naylonunu cocuklarin ulasamayacagi bir yere koyun.
Cocuklar ambalaj naylonu ile oynarsa bogulma tehlikesi olabilir.
Temizlik

Monitörun kasasini veya ekran yüzeyini hafif nemli, yumusak bir bezle silerek temizleyin.

Deterjani dokrudan monitore piskurtmeyin.
- Bu, hasara, elektrik carpmasina veya yangina neden olabilir.

Önerilen bir deterjani yumusak bir bez kullanarukuygulayin.

Prizle pinarasindaki konektor tozlu veya kirliyse kuru bir bezle iyice temizleyin.
- Kirli bir konektor elektrik carpmasina veya yangina neden olabilir.

Uruni temizlemeden once guc kablosunu cikartiginizdan emin olun.
- Aksi takdirde, bu durum elektrik carpmasina veya yangina neden olabilir.

Elektrik kablosunu prizden Çıkartin ve ürünü yumusak, kuru bir bezle silin.
Balmumu, benzin, alkol, tiner, bocek ilaci, oda spreyi, yaqlayicilar ya da deterjan gibi kimyasal maddeler kullanmayin.
Diger

Kapagi (veya arka kismi) cikarmayin.
- Bu, elektrik carpmasina veya yangina neden olabilir.
- Bakim icin yetkili bir servis personeline basvurun.

Monitorunuz normal calismiyorsa, ozellikle alismadik sesler ckiyor ya da koku gelyorsa hemen fisten cekin ve yetkili saticiya veya servise basvurun.
- Bu, elektrik carpmasina veya yangina neden olabilir.

Urunu, yag, duman ya da neme maruz kalan yerlerden uzakta tutun; bir arabanin icine monte etmeyin.
- Bu, elektrik carpmasina veya yangina neden olabilir.
- Monitoru kar ve yagmurla karsi karsiya kalabilecegi acik havada vya su yakininda calistirmayin.

Monitor duserge veya kasasi zarar gürse, monitoru kapatin ve elektrik kablosunu çiarkin. Bu durumda Service Center (Servis Merkezi) ile iletşim kurun.
- Bu, monitor hatal calismasina, elektrik carpmasina vya yangina neden olabilir.

Firtinalhavalarda veyasimsek caktiginda ya da uzun sureyle kullanilmayacaksamonitorurinfgini prizdencekin.
- Bu uyarilara uyulmaması elektrik Çarpmasina veya yangina yol acabilir.

Monitorélektrik kablosundan veya sinyal kablosundan cekerek hareket ettirmye calismayin.
- Bu, kablonun hasar gormesine, elektrik carpmasina veya yangina neden olabilir.

Yalnizca elektrik veya sinyal kablosundan cekerek monitoru saga veya sola hareket etirmeyin.
- Bu, kablonun hasar gormesine, elektrik carpmasina veya yangina neden olabilir.

Monitor kabinindeki havalandirma noktarini kapatmayin.
Kotu havalandirma anizaya veya yangina neden olabilir.

Monitorun uzerine aigr nesneler koymayin.
- Bu, elektrik carpmasina veya yangina neden olabilir.
- Monitorünione yabanci bir madde kacarsa, elektrik kablosunu cikartin ve Servis Merkezi'yle gürün.

Uruni yanici kimyasal spreylerden ya da yanici maddelerden uzak tutun.
- Bu, patlamaya veya yangina neden olabilir.

Monitorun uzerindeki deliklerden iceri hcbir metal nesne sukmayin.
- Bu, elektrik carpmasina, yangina veya yaralanmaya neden olabilir.

Monitörun havalandirma deliklerinden, kulaklik ya da AV baglanti noktalarindan, bicak, tel, igne gibi metal nesneler ya da kağit, kibrit gibi yanici nesneler sukmayin.
- Bu, elektrik carpmasina veya yangina neden olabilir. Ürünün İncine yabancı madde kacaşa ya da su doküürse, cihazi kapatın, elektrik fişini prizden Çkıntin ve servis merkeziyle进展情况.


Uzun bir sure sabit bir ekran görtüleniyorsa, görtü artigi denen durum veya bulaniklik meydana gelebilir.
Uzun sure monitorden uzak kalacaksaniz, enerji tasarrufu moduna gein veya hareketli goruntuler iceren bir ekran koruyucu ayarlayin.


Modele uygun gezünurluk ve frekans dizeyleri ayarlayin.
Uygun olmayanoczunurluk istemmenyeresim kalitesine neden olabilir.
40 inc (101,6 cm) - 1360 X 768

Monitorun surekli olarak cok yakindan izlenmesi, gozlerde bozulmaya neden olabilir.

Göz yorgunluğunu gidermek icin monitoru kullanırken-SAatte bir en az beş dakika ara verin.

Urunu, dengesiz, dizgün olmayan ya da titresime maruz kalan yerlere yerlestirmeyin.
- Ürünün yere扭矩ilmesi, ürüne zarar verebilir ya da kisisel yaralanmalaraneden olabilir. Ürünün, titresime maruz kalan yerlere yerleştilimesi, ürünün Ömrünün kiskaltbilir ya da yangina neden olabilir.

Monitori taşirken, monitoru duğmesinden kapatin ve elektrik kablosunu prisden*cikann. Monitoru tasmadan once anten kablosu ve diiger cihazlara®, kabolar da dahil, tum kablo®, baglantilarin*, ckardiginizdan emin olun.
Kablonun cikarilmamasi zarar gormesine ve yangina neden yol acabilecegi gibie elektrik carpmasina da neden olabilir.

Urunun, ikiden daha fazla kisiyle tasinmasi gerekmektedir. Urunun yere dinurulmesi, bozulmasina ya da fiziksel olarak zaragormesine neden olabilir.

Uzerinden asilarak zarar verebileceklerinden urunu cocuklarn ulasamayacagi bir yere yerleştin. Yere duşen urun, fiziksel hasara hatta olume neden olabilir.

Urinu uzun bir sure kullanmayacaksiniz elektrik kablosunu prizden gikartin. Aksi takdirde biriken toz isi yayilmasinya da yalitin azalmasin yol acarak elektrik carpmalarina ya da yangina neden olabilir.

Cocuklarin sevdigi nesneleri (ya da cekici gelebilecek herhangi bir seyi), urunun uzerine yerlestirmeyin. Cocuklar, nesneleri almak icin urunun uzerine tirmanmaya calisabillirer. Urun dusebilir ve fiziksel hasara veya olume nden olabilir.

Uzaktan kumananin pillerini cikardiginizda, cocuklarin pilleri yutmamasina dikkat edin. Pilleri cocuklann erisemeyecgi bir yerde saklayin.
- Yutarlarsa, hemen bir doktora gidin.

Pilleri degistirken, +/- uclarini pilleri tutan kismda belirtildigi sekilde dokru konuma yerlestitir.
Uclarin yanlis yerleistirmesi pilin catlamasina veya akmasina neden olarak yangin, yaralanma veya kirtilige (hasar) yol acabilir.

Yalnizca belirtilen standart pilleri kullanin. Yeni ve kullanlms pilleri bir arada kullanmayin.
- Bu pilin Çatlamasina veya akmasina neden olarak yangin, yaralanma veya kirtiligi (hasar) yol acabilir.

Pil (ve sarj edilebilar pil), siradan bir atik degildir ve geri donusume gonderilmelidir. Kullanilmis ya da sarj edilebilar pilin geri donusum amacyla gonderilmesinden, pilin tuketicisi olarak musteri sorumludur.
- Mûsteri, kullaniímís ya da sarj edilebilir pili bulundugu yere yakin bir geridonüsum merkezine ya da benzer turde piller ya da sarj edilebilir pillersatanbir magazaya gotürebilir.
© 1995~2008 SAMSUNG. ALL Rights Reserved
Içindekiler
Güvenlik Talimatlari 1
Isareletleme 1
Açık/Kapalı durumu 1
Kurulum 2
Temizlik 4
Diger. 5
Giris 12
Paket Ycindekiler 12
Monitörunuz 13
Mekanik Duzen 20
Baolantylar 26
Altlik Kitinin Takilmasi 26
Monitörun Baglanmasi 27
MDC 33
Monitor Ayarlanmasi 53
Input 53
Picture [PC/BNC/DVI Mode] 54
Picture [AV / S-Video /Component / DVI-Video Mode]. 56
Sound 58
Setup 59
Multi Control 62
Doigrudan Islevler 62
Sorun Giderme 63
Kendi Kendine Test Ozelligi Kontrolu 63
Denetim Listesi 64
SorveYanit 66
Özellikler 68
Genel 68
PowerSaver 68
Onceden Ayari Zamanlama Modlari 68
Information 71
Daha Iyi Goruntu Elde Etmek Icin 71
URUN BILGILERI (Goruntu Sabitlemesiz) 71
Appendix 75
Dunyanin her yerinden SAMSUNG'a ulasin 75
Koşullar 77
Yetki Bildirimi 78

Güvenlik Talimatlari
Giris
Paket Ycindekiler
Monitorunuz
Mekanik Düzen
Baolantylar
Yazilimin Kullanilmasi
Monitorun Ayarlanmasi
Sorun Giderme
Özellikler
Bilgiler
Appendix
TFT-LCD Monitor

www.samsung.com
Urun renge ve gorunmu modeline bagl olarak farklik gosterebilir ve performans gelistirmeler nedeniyle urn ozellikleri onceden haber verilmeksizin degistirilebilir.
Giris
Paket Ycindekiler
Not
Lüften monitorunüzle birlikte asagidakilerin de geldiginden emin olun.
Eksik parca varsa saticiniza basvurun.
Istege bagli ogeleri satin almak icin bir yerel saticiya basvurun.
Not
- Urūnú, yere yerleştimeyin.

Monitor
Kilavuz

Kullanici Klavuzu

Garanti Karti
(Tum bolgelerde olmayabilir)

Kullanic Kilavuzu,
MDC yazilimi
Kablosu


D-sub kablosuyla Elektrik Kablosu
Diger


Uzaktan Kumanda Piller (AAA X 2) Delik kapagi
BNC - RCA Adaptor Jak

Yarim Altlik
Ayr satiril


Duvara Takma Seti Hoparlor Seti Altik Seti

DVI Kablosu BNC Kablosu
Monitorunuz

On Taraf

1) MENU
Ekran menu sstemini açmak, menu ekranindan Çikmak veya ekran ayar menusūkapatmak icin bu duğmeyi kullanin.
2) Hareket dugmesi (Yukari-Asagi Dugmesi)
Bir menü ögesinden digerine dikey olarak hareket eder veya secilen menu degerlerini ayarlar.
3) Ayarlama dugmesi (Sol-Sag Dugmesi)/ Ses yuksekligi dugmesi
Bir menus ögesinden digerine yatay olarak hareket eder veya seçilen menu degerlerini ayarlar. Ayrica ses duzyeyini de ayarlar.
4) ENTER
OSD menusūnseçmek icin kullanlir.
5) SOURCE
PC modundan Video moduna geirir.
Kaynak degistirme islemine, yalnizca monitore bagli harici aygtilar icin izin veril.
Ekran moduna geçirmek icin
[PC] [BNC] [DVI] [AV] [S-Video] [Component]
>>Animasyon klibini gormek icin burayiklatin.
6)PIP
PIP ekranini açip/kapatmak (On/Off) için PIP duğmesine basir.
BNC ve component ayni terminali kullandiklarindan birden fazia PIP ekranda ust ute acilamaz.
>>Animasyon klibini gormek icin burayiktlatin.
PC
AV / S-Video / Component
BNC
AV/S-Video
DVI
AV / S-Video / Component
AV/S-Video
PC/BNC/DVI
- Component
PC / DVI
7) Guc dugmesi
Bu dugmeyi monitó r acip kapmat kgin kullanin.
8) Güç böstergesiv
Bu isik normal calisma sirasinda yesil yanar ve ayarliniz monitor tarafinda kaydedilirken yesil olarak bir kez yanip soner.
9) Uzaktan Kumanda Algilayicişi
Uzaktan kumandanin yönun Televizyondaki bu noktaya cevir.
Not
- Guc tasarrufu islevleryle ilgili daha fazla bilgi edinemek icin kilavuzda aqiklanan PowerSaver konusuna bakin. Enerji tasarrufu saglamak icin, kullanmaniz gerekmyen zamanlarda veya uzun surek kullanmayacaginiz durumlarda monitorunzü KAPATIN.
>Arka Taraf
Not
Kablo baglantulariya ilgili ayrinti bilgi icin Kurulum altunda Kablolarin Baglanmasi konusuna bakin. Monitur arka duzeni, modeline bagli olarak biraz farkl olabilir.


A
1) POWER SW (Guc A/C/Kapat Düɡmesi):
Monitörü acar ve kapatir.
2) POWER IN (Guc baglanti noktası):
Elektrik kablosu, monitoreve prize takilir.

B
3) RS232C OUT/IN (RS232C Seri Baglanti Noktas)):
MDC(Coklu Aygit Kontrolu) Program Baglanti Noktasi
4) DVI IN(HDCP) (PC Video Baglanti Terminali)
D-Sub Kablo kullanilarak (15 pin D-Sub)-PC mod (Analog PC)
5) DVI / PC IN(HDCP) (PC Video Baglanti Terminali)
DVI Kablo (DVI-D - DVI-D) kullanilarak - DVI modu (Dijital PC)
6) PC/DVI/BNC AUDIO IN (PC/DVI/BNC Audio Baglanti Terminali (Giris))

C
7) COMPONENT AUDIO IN [L-AUDIO-R]
(Komponent Audio Baglanti Terminali (Giris))
8) BNC/COMPONENT OUT [R/P R, G/Y, B/PB, H, V] (BNC/Komponent Baglanti Terminali(Cikis))
BNC (Analog PC) Baglantisi: R, G, B, H, V baglanti noktalarini baglar
- Component Baglantisi: PR, Y, PB baglanti noktalarini baglar
9) BNC/COMPONENT OUT [R/P R, G/Y, B/PB, H, V] (BNC/Komponent Baglanti Terminali (Giris))

D
10) AV AUDIO IN [L-AUDIO-R](Monitor Audio Baglanti Terminali) (Giris)
11) AV OUT [VIDEO](VIDEO Baglanti Terminali): AV modu (Cikis)
12) AV IN [VIDEO](VIDEO Baglanti Terminali) (Giris)
13) AV OUT [S-VIDEO](S-Video Baglanti Terminali): S-Video modu (Cikis)
14) AV IN [S-VIDEO](S-Video Baglanti Terminali) (Giris)
(15)EXT SPEAKER(8Ω)[-L-+,--R-+](HARICI Hoparlor (8Ω))
16) AUDIO OUT [L-AUDIO-R](Audio Baglanti Terminali) (Girig)
-MONITOR CIKI SI:PC, DVI, BNC baglanir
Not
Kablo, sinalay kaynagis vs. gibi durumlarda devreye baglanabilecek monitor sayisi farkli olabilir. Sinyal kaynaginn azalmadibir kablo 1e 10 taneye kadar monitor baglanabilir.

E
18) Kensington Lock

Uzal
Not
Kensington kilidi, TV'yi halka aik bir ortamda kullaniyorsaniz; sistemi fiziksel olarak sabitlemek icin kullanilan bir aygittir. (Kilitleme aygitinin ayrina satin alinmasi gerekmektdir.)
Kilitlteme cihazi kullanmak icin satin aldiginiz yere basvurun.
Not
Kablo baIantlar hakkinda daha fazla bilgi edinmek icin Monitorunuzu BaIlama konusuna bakin.
Uzaktan kumandanin performansi, monitorin yaninda calistiran TV vya baska elektronik aygittar tarafindan etkilenebilir ve frekans girisimi nedeniyle hatali calismasina neden olabilir.
1. ON/OFF
2. MAGICNET
3.MDC
4. LOCK
5. MagicNet Dügmesi
6.+100--
7.VOL
8. MUTE
9. TTX/MIX
10. MENU
11. N
12.M/B P.MODE
13.AUTO
14. PRE-CH
15.VCHP
16. SOURCE
17. INFO
18. EXIT
19. Yukari-Asagi Sol-Sag Dugmesi
20.14 S.MODE
21. STILL

22. FM RADIO
23. P.SIZE
24.()SRS
25. H DUAL/MTS
26.
27. SOURCE
28. SWAP
29.5E
30. REW
31. STOP
32. PLAY/PAUSE
33. FF
1) ON/OFF
Bu duğmeyi monitoru açıp kapatmak icin kullanın.
2) MAGICNET
MagicNet Hizli Bapatma Dugmesi.
-Bu islev, bu monitörde kullanilamaz.
3) MDC
MDC Hizli Başlatma Düğmesi.
4) LOCK
Bu duğme, uzaktan ve monitor üzerindeki Güç ve LOCK dügmeleri disindaki tüm ilev tuşları etkinleştinir ya da kapatır.
5) MagicNet Dügmesi
- MagicNet incn budugmeleri kullanin.
- Alfabe/Numara: Bir web sitesi adresi girerken bu duğmeleri kullanin.
DEL: Bir onceki karakteri siler.
- SYMBOL : Isaret girerken bunu kullanin. (O-)
- ENTER: Giriç icin bunu kullanin.
- Bu islev, bu monitörde kullanlamaz.
6) +100 -/--
100'ün uzerinde kanal sejmek icin basin.
Örneşin, kanal 121'I seçmek icin once "+"100" daha sonra "2" ve son olarak "1" dugmesine basir.
-Bu iglev, bu monitörde kullanilamaz.
7) VOL
Ses duzeyini ayarlar.
8) MUTE
Ses cikisini geci olarak duraklatir (sessizlestirir).
Mute (sessiz) modundayken Mute veya - VOL + dugmesine basildiginda sesli duruma geri donulur.
9) TTX/MIX
TV kanallan teleeks araciligiyla yazil bilgi hizmeti saglar.
[TTX/MIX genellikke Avrupa' da kullanilir.]
10) II MENU
Ekran menu/systemini acmak, menu ekranindan cikmak veya ekran ayar menusinu kapatmak icin bu dugmeyi kullanin.
11) ENTER
Menu ekranindan cikar veya ekran ayar menusun kapatir.
12) M/B.P.MODE
Bu duğmeye bastıgünizda, ekranın alt orta kisminda geleçeri modGORntlülenir.
AV/S-Video/Component Mode : P.MODE( Picture Mode )
Monitor fabrikada onceden ayarlanmis dort otomatik resim ayari vardir.
Önceden yapilandirilmı mevcut modlararasinda dolasm icin dugmeye yeniden basin.
(Dynamic Standard Movie>Custom)
PC/DVI Mode:M/B(MagicBright)
MagicBright™ görtülediginiz resmin icerigine baglı olarak en iyi görtüleme ortamini saglayan yen bil özellktir.
Önceden yapilendirilmigi mevcut modalarasinda dolasmak icin dugmeye yeniden basin.
Entertain Internet Text-Custom)
13) AUTO
Dogrudan erisimi otomatik olarak ayarlamak icin bu duigmeyi kullanin. (PC)
Kontrol panelinde gezūnūrūgū değistirirsiniz, AUTO islevi yūrūtūr.
14) PRE-CH
Bu duğme onceki kanala donmek 参数 kullanlir.
-Bu islev, bu monitörde kullanilamaz.
15) VCH/P A
TV modunda, TV kanallarini secer.
-Bu islev, bu monitörde kullanilamaz.
16) SOURCE
PC modundan Video modunaGPCIR
17) INFO
Geerli resim bilgileri ekranin sol ust kosesinde grotulenir.
18) EXIT
Menu ekranindan gikar.
19) Yukari-Asagi Sol-Sag Dugmesi
Bir menu ögesinden digerine yatay veya dikey olarak hareket eder ya da seçilen menu degerlerini ayarlar.
20) S.MODE
Bu dugmeye bastiginzda, ekranin alt ora kisminda gecerli mod goruntuleinr.
Monitor, yeresik uygunluk duzeyi yuksek stereo amplifikator iceri.
Önceden yapilalandirilmı mevcut modlararasinda dolasmık icin dugmeye yeniden basin.
(Standard Music Movie Speech Custom)
21) STILL
Ekrani dondurmak icin duqmeye bir kere basin. Cozmek icin yeniden basin.
22) FM RADIO
FM Radio'yu acar veya kapatir.
PC/DVI modunda yalnizca SOUND'u FM Radio olarak ayarlar.
Sinyalin zayif oldugu alanlarda, FM RADIO yayin yaparken gurultu olabilir.
Genellike Video SOURCE modunda, ekrani kapatarak FM RADIO olarak ayarlar.
-Bu islev, bu monitörde kullanilamaz.
23) P.SIZE
Zoom1, Zoom2, DTV - 1080i (veya 720p üsti) 参数 mevcut degildir.
24) (SRS
SRS
25) I-DUAL/MTS
DUAL-
STEREO/MONO, DUAL I / DUAL II ve MONO/NICAM MONO/NICAM STEREOyticurine bagli olarak calistirilabilir; bunun icin TV seyrederken uzaktan kummandadaki DUAL dugmesini kullanin.
MTS-
MTS (Multichannel Television Stereo) modunu secebilirsiniz.
Audio Type MTS/S_Mode Default FM Stereo Mono Mono Manual Change Stereo Mono ↔ Stereo SAP Mono ↔ SAP Mono
-Bu iglev, bu monitörde kullanilamaz.
26) 三PIP
PIP ekranimi açip/kapatmak (On/Off) 参数 PIP duğmesine basin.
27) SOURCE
Video kaynagini seger.(PIP)
28) SWAP
PIPveana grotunun iceriklerini degistirir.
PIP penceresindeki görtü ana ekranda, ana ekrandaki görtü PIP penceresinde görtülenir.
29) SIZE
Resim Boyutu'nu degistirebilirsiniz.
30) REW
Geri sar
31) STOP
Stop (Durdur)
32) PLAY/PAUSE
Oynat / Duraklat
33)FF
Hizli ileri
© 1995~2008 SAMSUNG. ALL Right Reserved
1. Mekanik Düzen


2. Monitor Kafasi


3. Altlik

4. Hoparlör

UP
5. VESA Braketinin Takilmasi
VESA taktiginizda, uluslararasi VESA standartlarina tam olarak uyduugunuzdan emin olun.
- VESA Braketini Satin Alma ve Kurulum Bilgileri: Lüften siparis vermek icin en yakin Samsung Distributörune ugrayin. Siparisiniz verildikten sonra kurulum uzmanlari sizi ziyaret edecek ve braketinizi takacaktir.
- LCD Ekranı tasimak icin en az 2 kisi gereklidir.
Samsung, musterin istegine bagl olarak yaplan islemlerde meydana gelebilecek urun hasarlarindan ve kisel yaralanmalardan sorumlu olmayacaktir.

Boyutlar


Braket duvara sabitlemek icin, yalnizca 6 mm capinda ve 8-12 mm uzunlugunda makine vidalarini kullanin.
UP
6. Wall Bracket Installation Duvar Braketi Montaji
Duvar braketini takmak icin bir teknisyenle gorusun.
Samsung Electronics, montaj musteri tarafindan yapildiginda urune ya da musterilere gelecek zararlardan sorumlu degildir.
- Bu urun, cimento duvarlara monte edilmek icindir. Urun, siva ya da ahsap uzerine monte edildiginde yerinde durmayabilir.

Parçalar
Yalinizca urunle birlikte verilen parcalari ve aksesuarlki kullanin.


Duvar Braketi Montaji
1
Tutturma Vidasini, takin ve ok yonunde sik. Islem tamamlandiiginda, duvar braketini duvara takin.
A. Tutturma Vidasi
B. Duvar Braketi
C. Menteş (Sol)
D. Menteş (Sag)

Iki menteşebulunmaktadir(solve sag).Dogrusunu kullanin.
2

Duvari delmeden once, urunun arkasindaki iki kilitleme deligiarasindaki mesafeninogr u oldugunu kontrl edin. Bu mesafe,cok kisa ya da uzuna,ayarlamak icin dubraketinin uzerindeki tum ya da 4 vidayr gevsetin.
A. iki kilitleme deligiarasindaki mesafe
3

Montaj semasinikontrol edin ve matkapla delinecek noktalaru davarda isaretleyin.35 mm'den derin delikleri delmek icin 5,0 mm matkap ucu kullanin.Her dubeli ilgili delige takin. Braketlerin ve menteşdeliklerini, karsilik gelen dubelli deliklerle esleşirin ve 11 viday A takip sikin.

Urūnü duvar braketine takma
Urunun sekli, modeline bagl olarak farklik gosterebilir. (Plastik aski tertibati ve vidalar ayinir)
Plazma monitor arkasindaki 4 vidayi

1
cikartin.

2
Viday B, plastik askiya takin.

1. Üründuvar braketine takin ve sol ve sag plastik askilara dizgün bogimde takildigiindan emin olun.
2. Ürünü brakete takken parmaklarinizi deliklere sikstirmamaya dokkat edin.
3. Duvar braketin duvara sikica takilmis oldugundan emin olun. Aksi takdirde montaj sonrasinda urun yerinde durmayabilir.

3
adimdaki 4 vidayi (plastik aski + vida B), urunun arka deliklerine takin ve sikin.

4
Güvenlik pimini 3 Çıkartin ve 4 Ürün tutucuyu, karsilik gelen braket deliklerini 1 yerleştinir. Ardindan braket sika sabitleneckek sekilde ürün 2 yerleştinir. Ürün bilbraket Güvenl biçimde baglanması-SAğlamak依據 Güvenlik pimini 3 tekrar takmayi ve sikmayi unutmayin.
A. Monitor
B. Duvar Braketi
C.Duvar

Duvar Braketi Açisinin Ayarlanmasi
Duvara takmadan once braket aciin-2"ye ayarlayin.

1. Urunu, duvar braketine tutturun.
2. Urünün üst, orta kismindan tutun ve ileriye dokerek (ok yönunde) acisini ayarlayin.
3. Braket aciisini -2 1le 15'arasinda ayarlayabilirsiniz.

Aciyi ayarlarken urunun sag ya da sol tarafindan degil, ust, orta kismindan tutmaya dikkat edin.


Güvenlik Talimatlari
Giris
Baolantylar
Altlik Kitinin Takilmasi
Monitorin Baglanmasi
Yazilimin Kullanilmasi
Monitorun Ayarlanmasi
Sorun Giderme
Özellikler
Bilgiler
Appendix
TFT-LCD Monitor
www.samsung.com

Urun renge ve gorunmu modeline bagl olarak farklik gosterebilir ve performans gelistirmeler nedeniyle urn ozellikleri onceden haber verilmeksizin degistirilebilir.
Baolantylar
Althik Kitinin Takilmasi

- Yalnizca urunle birlikte verilen civatalar kullanilmaldir.

Dikkat
Samsung Electronics, belirtlen dignda bir alkik kullanlmasindan kaynaklanacak hasarlardan sorumlulmayacaktir.

1. Yarim Altiligin Takilmasi


Dikkat
"CAUTION" etiketini arkaya donukormalak
yerlestitir.


1) Monitor altinda bulunan, atlligin takildigi deligi korumak icin bir 'Kapak Koruyucu kullanilir. Ürunle birlke verilen Yarim Altlik ya da atllik setini (ayrica satilir) taraken 'Kapak Koruyucu'yu Çikartmayi ve duvara takma setini tarkanken 'Delik-Kapaqi nii kullanarak deligi kapatmayi unutmayin.
2) Sirasiyla sol ve sag althiklari takin.
3) Altiigi, monitori altundaki delige yerlestitin. Vidayi, belirilen delige yerlestitin ve sikin. (M4 x L15)

Dikkat
Bu stand, orijinal olarak ekran acisinin ayarlanmasi icin tasarlanmistr. Bu standin herhangi bir kullanimindan kaynaklanabilecek sorunlardan firma sorumlu degildir. Ürün asla üzerine nesneler konan bir sehpə olarak kullanmayin.
2. Altlik Setinin (ayrica satir) Takilmasi


1) Monitörun allinda bulunan, alltin takildigi deligi korumak icin bir 'Kapak Koruyucu' kullanilir. Ürünle birlikte verilen Yarim Altlik ya da alltk setini (ayrica satilir) takken 'Kapak Koruyucu'yu qikartmayi ve duvara takma setini takken Delik-Kapagi nki kullanarak deligi kapatmayi unutmayin.
2) Parcalari dogru yonde ve dogru yere yerlestirdiginizden emin olun. (M4 × L15)
3)Altligi,monitortun altindaki delige yerlestirin.
4) Vidayi, belitilen delige yerlesteirin ve sikin. (M4 × L15)
Monitorin Baglanmasi
Toprakl bir Guc kablosu durumunda
Aiza olmasi durumunda topraklama ucu elektrik carpmasina yol acabilir. AC gucunu fse takmadan once topraklama baglantisini uygun bir sekilde yaptiginizdan emin olun. Ya da, topraklama baglantisini sokmeden once AC gucunu fisten ckardiginizdan emin olun.

Not
DVD'ler, VCR'lar ya da Video kameralar gibi AV grits aygtllarin yani sira bilgisayariniz monitore baglayabilirsiniz. AV grits aygtllarin baglanmasiya ilgili daha ayrintul bilgi icin Monitrorn Ayaranmasi bolumunde Kullanici Kontrolleri konusuna bakin.
1. Bilgisayara Baglama

1) Monitorunuzin guc kablosunu monitorun arkasindaki guc baglanti noktasina takin. Acoma/kapatma dugmesini acik duruma getirin.
2) D-sub kablosunu monitore iç sekilde baglayabilirsiniz. Asagidaki yontemlerden birini segin:
2-1) Video kartindaki D-sub (Analog) konektoru kullanarak. Sinyal kablosunu, monitor arkasindaki 15 pin RGB baglanti noktasa takin.

2-2) Video kartindaki DVI (Dijital) konektoru kullanar.
DVI Kablosunu monitorunuzn arkasindokti DVI(HDCP) baglanti noktasina takin.

2-3) Video kartindaki BNC (Analog) konektör kullanarak.
BNC Kablosunu Monitorūzün arkasindaki BNC/COMPONENT IN -R, G, B, H, V baglantı noktasina baglayarak.

3) Monitorunuzun guc kablosunu monitoru arkasindaki guc baglanti noktasina takin.
4) Bilgisayarinizi ve monitorunuzu acin.
Not
DVI kablosu ya da BNC kablosu iste ge baglidir. Istge bagli ogeleri satin almak icin bolgenizdeki Samsung Electronics servis merkezine basvurun.
> Dijital DVD Baglama

Not
Dijital DVD'ler gibi giris cihazlan, DVI kablosu kullanilarak monitor DVIN terminaline baglanir.
- Ardindan DVD diski takili halde DVD'yi calistirin.
- SOURCE duğmesini kullanarak Digital seksin.
Not
- Monitor DVI in giris cihazlarin dijital DVD'ye baglamak icin DVI baglanti noktalari vardir.
VCR

1) VCR'lar ya da Video Kameralar gibi AV giris aygitlar, S-VHS ya da BNC kabolar kullanilarak monitor IN [VIDEO] ya da AV IN [S-VIDEO] baglanlar.
2) VCR veya Video kameranin Audio (L) ve Audio (R) terminallerini, ses kablolari kullanarak monitorun AV IN [L-AUDIO-R] baglayin.
3) Monitorün onunde ya da uzaktan kumandada yer alan Kaynak dugmesini kullanarak VCR ya da Video kameraya bagl olan AV ya da S-Video'den birini seksin.
4) Ardindan kaset takili halde VCR ya da Video kameray calistirin.
Not
S-VHS ya da BNC kablosi stege baglidir.
DVD
Oynaticiya Baglama

1) Monitor COMPONENT AUDIO IN [L-AUDIO-R] ile DVD oynaticinin AUDIO OUT jaklari arasina bir takim audio kablosu baglayin.
2) Monitor BNC/COMPONENT IN -PR, Y, PB baglanti noktasi ile DVD oynaticin PR, Y, PB jaklan arasa bir Component kablosu baglayin.
3) Monitor on tarafinda ya da uzaktan kumandada bulunan Kaynak dugmesini kullanarak DVD oynaticin bagli oldugu Component kaynagini seksin.
4) Ardindan DVD diski takili halde DVD Oynaticiyi calistirn.
Not
- Component kablosu istege baglidir.
Ko mponent video hakinda daha fazla aciklama icin DVD oynaticinizin kullana kilavuzuna bakin.
Video Kamera Baglama

1) Video kameranin A/V cikis jaklarini bulun. Genellikle video kameranin yan ya da arka tarafinda bulunurlar. Video camera uzerindeki AUDIO OUTPUT jaklarinya monitor AV AUDIO IN [L-AUDIO-R]arasina bir takim ses kablosu takin.
2) Video kameranin VIDEO OUTPUT jaki ile monitor üzerindeki AV IN [VIDEO](AV GIRIS [VIDEO]) arasina bir video kablosu takin.
3) Monitor on tarafinda ya da uzaktan kumandada bulunan Kaynak dugmesini kullanarak Video kameraya bagli AV kaynagini segin.
4) Ardindan kaset takil halde Video kamerayi calistirn.
Not
Burada gosterilen audio-video kabolar genellike Video camera ile birlikte verilir. (Birlikte verilmediyse, bolgenizdeki elektronik urun magazalarina bakabilirsiniz.)
> DTV Set Üstü Kutusunu Baglama
Not
Tipik bir Set Üstü Kutusunun baglantilari aşagida gosterilmistir.

1) Monitor BNC/COMPONENT IN -PR, Y, PB baglanti noktas ile Set Üstü Kutusunun PR, Y, PB jaklanarasina bir Component kablosu baglayin.
2) Monitor COMPONENT AUDIO IN [L-AUDIO-R] ile Set Üstü Kutusunun AUDIO OUT jaklariarasina bir takim audio kablosu baglayin.
3) Monitor on tarafinda ya da uzaktan kumandada bulunan Kaynak dugmesini kullanarak DTV Set Ustu Kutusun bagli oldugu Component kaynagini segin.
Not
- Komponent video hakkinda daha fazla aciklama icin Set Üstü Kutusunn kullanma kilavuzuna bakin.
> Hoparlorlerin Baglanmasi

1) Vidalari kullanarak SETi ve hoparlorleri sikin.
* Hoparlör standsiz hoparlör setini takin.

2) SET in arkasindaki hoparlbor baglanti jaki ile hoparlorun arkasindaki hoparlbor baglanti jaki arasa bir hoparlbor baglanti kablosu baglayin.

Not
- SET hoparlorre baglyken hoparlu tutarak SETi hareket etllmeyin.
SET hoparlorun beghanmasi icin kullanlan hoparfor destegi zarar gorebilir.
> Ses Sistemine Baglama

1) AUDIO SISTMI Uzerindeki AUX L, R jaklariyla Monitörn MONITOR IN [L-AUDIO-R]arasina bir takim audio kablosu takin.
© 1995-2008 SAMSUNG. ALL Right Reserved
Giris

Coklu Ekran Kontrolu (MDC), cesisi ekranlarin kolayce ve aynianda bir bilgisayar uzerinde calistirmasini saglayan bir uygulamadir. Bilgisayar ve ekranarasindaki iletisim icin bir seri iletisim standardi alan RS-232C kullanilr. Bunedenle bilgisayarin seri baglanti noktası ile ekranin seri baglanti noktası arasina bir seri kablo takilmaldir.
Baslangic - Ana Ekran
Programi baslatmak icin Start > Program > Samsung > MDC System ögesini seçin.
Segilen setin ses yuksekligini kaydirmal kontrolde gormek icin bir set segin.

1 Ana Simgeler Segme Düngmesi 5
Remocon Bilgi Tablosu
3 Safety Lock Ekran Seçimi 7
4 Port Selection Kontrol Araçları 8
1. Herbir ekrana gegm icin ana simgeleri kullanin.
2. Ekran biriminin uzaktan kumanda sinyal alim islevini etkinlestirmenizi ya da devre dişi birakmanişi saglar.
3. Kilitleme İslevini ayarlar.
Lock function' (Kilitleme islevi) ayarlarken yalnizca uzaktan kumanda ve set uzerindeki guc ve kilitleme duğmelerini kullanabilirsiniz.
4. PC Seri Baglanti noktas ayarli deigsebilir. Original deger COM1'dir.
5. Tum ekranlari segmek ya da segimleri kaldirmak icin Select all (Tumunu sec) ya da Clear (Temizle) duğmelerini tklatin.
6. Segilen ekranla ilgili kisa bilgeler gormek icin Tabloyu kullanin.
7. Ekran Segimi kismindan bir ekran segin.
8. Ekranlari kontrol etmek icin Kontrol Araçlarini kullanin.
Uzaktan kumanda Etkinlestirme/Kapatma islevi, aygit aik ya da kapali haldeyken calisir ve bu durum, MDC'ye bagli tum ekranlar icin geleerlidir. Ancak MDC kapalyken durum ne olursa olsun, MDC kapandiignda tum ekranlarin uzaktan kumanda sinaly alim islevi Etkin hare getirilir.
Port Selection

1. Coklu Ekran Kontrolü ilk olarak COM1'e ayarlanmşir.
2. COM1 disinda herhangi bir baglanti noktasi kullaildiginda, Port Selection (Baglanti Noktasi Segimi) menusunden COM1-COM4 arasi portlar segilebilir.
3. Seri kablo kullanlarak monitore baglanan tam baiglanti noktas ad sejlmezse, itetigim saqlanamayacaktir.
4. Seçilen böglanti noktas programa kaydedilir ve bir sonraki programda da kullanilir.

Power Control
1. Ana simgelerden Power Control'u (Güç Kontrolü) tklättiginizda Power Control (Güç Kontrolü) ekrani agrilir.

Bilgi Tablosu, Güç Kontrolü—in gerekli bazi temel bilgileri gosterir.
1) (Power Status(Güç Durumu))
2) Input
3) Image Size
4) On Timer
5) Off Timer
2. Kontrol etmek istediginiz ekrani sejmek icin Select All (Tumunu Se) duugmesini ya da Check Box (Kutuyu Isaretle) duugmesini kullanin.

Power Control (Guc Kontrolu), segilen ekranin islevlrinden bazilarinin kontrl edilmesine izin verir.
1) Power On/Off
- Seçilen ekrani acar ya da kapatir.
2) Volume
- Segilen ekranin ses seviyesini kontrol eder.
Setlerde seçilen ekranin ses yüksekligi degerini alir ve kayar kontrolde gosterir.
(Seçimi iptal ederseniz ya da Select All (Tümün Ü Seç) seçerseniz ayar, varsaylan degeri olan 10'a geridöner)
3) Mute On/Off (Sessiz A_C /Kapat)
- Segilen ekranin Mute (Sessiz) ilevini etkinleştinir/kapatir. Her seferinde bir set segildigiinde, segilen set icin Mute (Sessiz) ilsevi etkken Mute (Sessiz) etkindir. Ses seviyesini ayarladiginiza Mute (Sessiz) ilsevi otomatik olarak devre di kalir. (Segimleri kaldirigiiniza ya da "Select All" (Tumunu Seç) sextiginizde ayarlar varsaylan degerlerine geri doner.)
\* Power Control (Guc Kontrolu) iglevi, tum ekranlar icin kullanilir.
* Volume (Ses) Kontrolü ve Mute (Sessiz) ilevleri yalinizca güç durumu ON (AÇIK) GPL ekranlarda kullanilabilir.

Input Source
1. Ana simgelerden Input Source (Girig Kaynag) tilkattiinzda Input Source (Guc Kaynag) ekranı acilir. Kontrol etmek istediğiniz ekrani seçmek icin Select All (Tümunu Sec) duğmesini ya da Check Box (Kutuyu Üsaretle) duğmesini kullanin.
- TV Mode

- MagicNet Mode

Bilgi Tablosu, Input Source (Giris Kaynagi) Kontrolü icin gerekli bazi temel bilgileri gosterir.
1)PC
- Segilen ekranin Giriş Kaynagını PC'yedehyişirir.
2) BNC
- Segilen ekranin Giriş Kaynakın BNC'ye degişirir.
3) DVI
- Segilen ekranin Giriş Kaynagın DVTye degişirir.
4) TV
- Segilen ekranı Girş Kaynakıni TVdehyşirir.
5)AV
- Segilen ekranin Giriş Kaynagıni AV'ye degişirir.
6) S-Video
- Seçilen ekranın Giris Kaynakı S-Video'yadehyigitirir.
7) Component
- Seçilen ekranın Giris Kaynakı Componente (Component)dehyşirir.
8) MagicNet
-MagicNetGirigaynagyalinizcaMagicNetmodelinde calisir.
9) Channel
- Input Source (Girig Kaynag) TV oldugunda, Channel (Kanal) oku görtülenir.
* TV Kaynagi sadece televizyonlu ürünlerde seçilebilir ve kanallari kontrol etme islemine Input Source (Giris Kaynagi) TV ilek izin verilir.
\* Input Source (Giris Kaynag) Kontrolu yalnizca guc durumu ON (ACIK) alan ekranlarda kullanlabilir.

Image Size
PC, BNC, DVI
1. Ana simgelerden Image Size (Göruntü Boyutu) tklattgünizda Image Size (Göruntü Boyutu) ekraniçir.

Bilgi Tablosu, Image Size (Göründü Boyutu)—in gerekli bazı temel bilgileri gosterir.
1) (Power Status(Strömstatus))
- Geçerli ekranın açık veya kapali olduğunu gosterir.
2) Image Size
- Kullanilan ekranin gelerli Image Size (Goruntu Boyutu) degerini gosterir.
3) Input
- Kullanilan ekranin geleçeri Input Source (Girş Kaynagi) değerini gosterir.
4) Bilgi Tablosu, Input Source (Girş Kaynagı) degeri PC, BNC, DVI olan ekranlari gosterir.
5) PC Source -PC Kaynagi Image Source (Goruntu Kaynagi) sekmesini tiklattiginzida goruntuliner.
- Image Size (Görüntü Boyutu) Kontrolü dügmesi, PC, BNC, DVI,—in kullanilaben Image Size (Görüntü Boyutu) degerlerini kontrol eder.
6) Video Source
- Ilgili Input Source (Giriş Kaynagi) ile Image Size (Göruntü Boyutu) degerini kontrol etmek amacyla Video Source (Video Kaynagi) sekmesini tklatin.
\* MagicNet Giris kaynagi yalnizca MagicNet modelinde calisir.
\* Image Size (Goruntu Boyutu) kontrlu yalnizca guc durumu ON (ACIK) olan ekranlar icin kullanilabilir.

Image Size
TV, AV, S-Video, Component, DVI(HDCP)
1. Ana simgelerden Image Size (Göruntü Boyutu) tklattgünizda Image Size (Göruntü Boyutu) ekrani agrilir.

Bilgi Tablosu, Image Size (Göründü Boyutu)—in gerekli bazıtem bilgileri gosterir.
1) TV, AV, S-Video, Component (Component) icin Image Size (Goruntu Boyutu) degerini ayarlamak amacyla Video Source (Video Kaynagi) sekmesini tiklatin. Kontrol etmek istediiginiz ekrani sejmek icin Select All (Tumunu Sec) duugmesini ya da Check Box (Kutuyu Isaretle) duugmesini kulanin.
2) Bilgi Tablosu, giriş kaynagi yalınizca TV,AV, S-Video, Component (Koponent) ya da DVI (HDCP) olan ekranlari goesterir.
3) Segilen ekranin Image Size (Görüntü Boyutu) değerinidehyşirir. Not: Auto Wide (Otomatik Genişlik), Zoom1 (Yakınlaştrma 1) ve Zoom2 (Yakınlaştrma 2) ayarlı, Component (Koponent) ve DVI (HDCP) giris sinyali Türü 720p ya da 1080i olduğunda seçilebilir durumdadehyildir.
MagicNet Giris kaynagi yalnizca MagicNet modelinde calisi.
\* Image Size (Goruntu Boyutu) Kontrolu yalinizca guc durumu ON (ACIK) atan ekranlarda kullanilabilir.

Time
1. Ana simgelerden Time' (Saat) tiklattiginizda Time Control (Saat Kontrolü) ekrani açilir.

Bilgi Tablosu, Time (Saat) Kontrolü icin gerekli bazı temel bilgileri gosterir.
1) Current Time
- Seçilen ekran,—çın)—geçerli)—saati)—belirir (PC Saati).
- Geçerli saati degişirmek,—ün ce PC Saatini degişirin.
2) On Time Setup
- Segilen ekranin Hour (Saat), Minute (Dakika), On Time Setup (Açilis Saati Ayari) AM/PM bilgisini, Status (Durum), Source (Kaynak), Volume (Seis seviyesi) degerini ayarlayin.
3) Off Time Setup
- Segilen ekranin Off Time Setup (Kapanis Saati Ayari) ayari icin Hour (Saat), Minute (Dakika), AM/PM bilgisini, Status (Durum) bilgilerini ayarlayin.
4) On Time (Aglis Saati) ayarlini gosterir.
5) Off Time (Kapanis Saati) ayarlarni gosterir.
\* MagicNet Giris kaynagl yalnizca MagicNet modelinde calisir.
* Time (Saat) kontrlü yalnizca guç durumu ON (AÇİK) alan ekranlar yüz kullanilabilir.
* On Time Setup (Açilis Saati Ayari), TV Source (TV Kaynagī) islevleri yalnizca TV Modelinde calişir.

PIP
PIP Size
1. Ana simgelerden PIP'iklattiginzda PIP Control (PIP Kontrolü) ekrani aclr.
Kontrol etmek istediginiz ekrani segmek icin Select All (Tumunu Sec) duugmesini ya da Check Box (Kutuyu Isaretle) duugmesini kullanin.

Bilgi Tablosu, PIP Size (PIP Boyutu)增長 gerekli bazi temel bilgileri gosterir.
1)PIP Size
- Kullanlan ekranin geleeri PIP Size (PIP Boyutu) degerini gosterir.
2) OFF
- Segilen ekranin PIP'ini kapatir.
3) Large
- Segilen ekranin PIP'ini和地区 boyutu Large (Büyük) degerine getirir.
4) Small
- Segilen ekranin PIP'ini和地区 boyutu Small (Küçük) değerine getirir.
5) Double1
- Segilen ekranin PIP'ini acar ve boyutu Double 1 (Cift 1)degerine getirir.
6) Double2
- Segilen ekranin PIP'ini acar ve boyutu Double 2 (Cift 2)degerine getirr.
7) Double 3 (Resim Yaninda Resim)
Seçilen ekranın PBP'sinicastle boyutu Double 3 (Gift 3) degérine getirir.

MagicNet Giriç kaynagl yalnizca MagicNet modelinde calisir.
PIP Size (PIP Boyutu), monitor açık haldeyken kontrol edilebilir.

PIP
PIP Source
1. Ana simgelenden PIP'ti tiklattiginizda PIP Control (PIP Kontrolü) ekrani açilir.
- PIP TV Mode

- PIP S-Video Mode

Bilgi Tablosu, PIP Source (PIP Kaynagi) Kontrolü icin gerekli bazı temel bilgileri gosterir.
1) PIP Source (PIP Kaynağt)
- PIP Source (PIP Kaynag), monitor agik haldeyken kontrol edilebirir.
2)PC
- Seçilen ekranın PIP kaynakıncı PC'yedehyşistirir.
3) BNC
- Seçilen ekranın PIP kaynakın BNC'yedehyişirir.
4) DVI
- Segilen ekranin PIP kaynagini DVI'ye degistirir.
5) TV
- Segilen ekranin PIP kaynaginci TV'ye degişirir.
6)AV
- Secilen ekranin PIP kaynakıni AV'ye degişirir.
7) S-Video
- Seçilen ekranın PIP kaynakın S-Video'yadehyegristirir.
8) Component
- Segilen ekranin PIP kaynagini Componente (Koponent) degistirir.
9) Channel
- PIP Source (PIP Kaynagi) TV iken Kanal oku görtülenir.
Not: Ana Ekranin giris kaynagi türüne baglı olarak PIP kaynaklarindan bazilari seçilemeyebilir.
\* MagicNet Giri kaynagl yalnizca MagicNet modelinde calisir.
* TV Kaynagi sadece televizyonlu ürünlerde seçilebilir ve kanallari kontrol etme,islemine PIP Source (PIP Kaynagi) TV ileken izin verilir.
* PIP Control (PIP Kontrolü = özelliği yalnizca güç durumu ON (AÇIK) alan ve PIP ilevi ON (AÇIK) halde bulunan ekranlarda kullanilabilir.

Settings
Picture
1. Ana simgelenden Settings' (Ayarlar) tiklattiginizda Settings Control (Ayarlar Kontrolü) ekrani aclrir.


Bilgi Tablosu, Settings (Ayarlar) Kontrolü icin gerekli baz temel bilgileri gosterir.
Her bir islev segildigiinde, segilen islevin ayar degeri kayar kontrlode gosterilir. Select All (Tumunu Se) segildigiinde, varsayilan degere (50) geri donulur. "Select All" (Tumunu Se) segildigiinde, varsaylan deger goruntulenir. Bu ekranda herhangi bir degerin degistirmesi modu otomatik olarak "CUSTOM" (OZEL) yapacaktir.
- Yalnizca TV, AV, S-Video, Component (Component), DVI(HDCP)同胞 kullanilabilir.
1) Picture
2) Contrast
- Seçilen ekranın Contrast (Kontrast) değerini ayarlar.
3) Brightness
- Segilen ekranin Brightness (Parlaklik) degerin ayarlar.
4) Sharpness
- Segilen ekranin Sharpness (Netlik) degerini ayarlar.
5) Color
- Segilen ekranin Color (Renk) degerini ayarlar.
6)Tint
- Segilen ekranin Tint (Ton) degerini ayarlar.
7) Color Tone
- Segilen ekranin Color Tone (Renk Tonu) degerini ayarlar.
MagicNet Giris kaynagl yalnizca MagicNet modelinde calisi.
* Bu Özellik yalınizca güç durumu ON (AÇİK) GPLanlada kullanilabilir. Herhangi bil seksim yapilmazsa fabrika varsayilan degeri gosterilir.

Settings
Picture PC
1. Ana simgelerden Settings' (Ayarlar) tilkattiinizda Settings Control (Ayarlar Kontrolü) ekrani açilir.

Bilgi Tablosu, Settings (Ayarlar) Kontrolü icin gerekli bazim temel bilgileri gosterir. Her bir islev secildigiinde, sejen islevin ayar degeri kayar kontrlde gosterilir.
Select All (Tumunu Seg) seildigiinde, varsaylan degere (50) geri donulur. Bu ekranda herhangi bir degerin degistirmesi modu otomatik okayak "CUSTOM" (OZEL) yapacaktir.
1) Picture PC
- Yalnizca PC, BNC, DVI ijcin kullanilabilir.
2) Contrast
- Segilen ekranı Contrast (Kontrast) degerini ayarlar.
3) Brightness
- Seçilen ekranın Brightness (Parlaklik) degeri ayarlar.
4) Red
- Seçilen ekranın Red (Kirmizi) renk değerini ayarlar.
5) Green
- Segilen ekranin Green (Yeşil) renk değerini ayarlar.
6) Blue
- Segilen ekranin Blue (Mavi) renk degerini ayarlar.
\* MagicNet Giris kaynagl yalnizca MagicNet modelinde calisir.
\* Bu ozellik yalnizca guc durumu ON (AciK) alan ekranlarda kullanilabilir. Herhangi bir sejm yapilmazsa fabrika varsayilan degeri gosterilir.

Settings
Audio
1. Ana simgelerden Settings' (Ayarlar) tklattiginizda Settings Control (Ayarlar Kontrolu) ekranı acilir.

Bilgi Tablosu, Settings (Ayarlar) Kontroli icin gerekli bazim temel bilgileri gosterir. Her bir islev segildigiinde, seilen iglevin ayar degeri kayar kontrolde gosterilir. Select All (Tumunu Se) segildigiinde, varayilan degere (50) geri donulur. Bu ekranda herhangi bir degerin degistirlimesi modu otomatikormal "CUSTOM" (OZEL) yapacaktir.
1) Audio
-Tum giris kaynaklarinin ses ayaralarini kontrl eder.
2) Bass
- Segilen ekranin Bass (Bas) degerini ayarlar.
3) Treble
- Segilen ekranin Treble (Tiz) degerini ayarlar.
4) Balance
- Seçilen ekranin Balance (Denge) değerini ayarlar.
5) SRS TSXT
- Seçilen ekranin SRS TSXT Sound Özigiğinci Aşkık/Kapali hare getirir.
6) Sound Select
- PIP açikken Ana veya Alt ekrani seçebilirsiniz.
\* MagicNet Giris kaynagl yalnizca MagicNet modelinde calisir.
* Bu özellik yalnizca güç durumu ON (AÇİK)olean ekranlarda kullanilabilir. Herhangi bir seçim yapilmazsa fabrika varsayilan değeri Güsterilir.

Settings
Image Lock
1. Ana simgelerden Settings'i (Ayarlar) tiklattiginzda Settings Control (Ayarlar Kontrolü) ekrani acilir.

Bilgi Tablosu, Settings (Ayarlar) Kontrolü—in gerekl bazı temel bilgiler:i Güsterir.
1) Image Lock
- PC, BNC胆固醇 kullantilabilir.
2) Coarse
- Segilen ekranin Coarse (Iri) degerini ayarlar.
3) Fine
- Segilen ekranin Fin (Ince) degerini ayarlar.
4) Position
- Segilen ekranin Position (Konum) degerini ayarlar.
5) Auto Adjustment
- Gelen PC sinyaline gore Kendiliginden ayarlar.
\* MagicNet Giris kaynagl yalnizca MagicNet modelinde calisir.
\* Settings (Ayarlar) kontrlü yalinizca güç durumu ON (AÇİK) alan ekranlar yüz kullanilabilar.

Maintenance
Lamp Control
1. Maintenance (Bakim) ekranini görtülemek icin Ana Simgeler sütununda "Maintenance" (Bakim) simgesini tklatn.

Bir cok temel veri ögesini goisteren "Bilgi Tablosu" görtülenir.
1) Maintenance
-Tum girig kaynaklar icin Maintenance Control (Bakim Kontrolu) iglevine izin verir.
2) Auto Lamp Control
- Secilen ekranin arka isigini, belirtilen zamanda otomatik okayaraylar.
Manual Lamp Control (Manuel Lamba Kontrolü), Auto Lamp Control'u (Otomatik Lamba Kontrolü) kullanarak ayarlama yaptıgünizda otomatik olarak kapanir.
3) Manual Lamp Control
- Saatten bagimsiz olarak seçilen ekranin arka isigini ayarlanamizi saglar.
Auto Lamp Control (Otomatik Lamba Kontrolü), Manual Lamp Control'u (Manuel Lamba Kontrolü) kullanarak ayarlama yaptıgünizda otomatik olarak kapanir.
\* Maintenance Control (Bakim Kontrolu) yalnizca guc durumu ON (AciK) alan ekranlarda kullanilabilir.
\* MagicNet Giris kaynagl yalnizca MagicNet modelinde calisir.

Maintenance
Scroll
1. Maintenance (Bakim) ekranini görtülemek icin Ana Simgeler sütununda "Maintenance" (Bakim) simgesini tklatn.

1) Screen Scroll
- Segilen ekran uzun sure Pause (Duraklatma) modunda kaldiginda ortaya seksabilecek görtü izlerini önler. "Interval" ayarini staat ve "Second" ayarini saniye cinsinden seçerek tekrallama ürelerini ayarlayabilirsiniz. Screen Type (Ekran Türü) ile Scroll (Kaydirma), Pixel (Piksel), Bar (Cubuk) vya Eraser (Silici) olarak ayarlanabilir.
MagicNet Giris kaynagi yalnizca MagicNet modelinde calisir.
\* Second (Saniye) degerini yaplandirrken Scroll (Kaydirma) Turunu 1, 2, 3, 4, 5 degerlerine, Pixel (Piksel), Bar (Cubuk) veya Eraser (Silici) Turunu 10, 20, 30, 40, 50 degerlerine ayarlayabilirsiniz.
\* Maintenance Control (Bakum Kontrolu) yalnizca guc durumu ON (ACIK) alan ekranlarda kullanilabilir.

Maintenance
Video Wall
1. Maintenance (Bakim) ekranini görtülemek icin Ana Simgeler sütununda "Maintenance" (Bakim) simgesini tklatn.

1) Video Wall
- Video duvari, bir dizi video ekraninir birbirine baglanarak, her ekranin resmin bir parcasini gostermesi ya da tum ekranlarda ayni resmin tekrarlanmasidir.
2) Video Wall (Screen divider)
-Ekran bolunebilir.
Bölme sirasinda, farkli sayida ekran seçebilirsiniz.
- Ekran bölcüden bir modSECTION.
- Ekran Seçimi kismindan bir ekran segin.
- Yer, segilen modda bir numaraya basilarak ayarlanacaktir.
Samsung'un sagladiMDC programen fazla 4x4 LCD Ekranlari destekler.

3) On/Off
- Segilen ekranin Video Duvari ilelvini acar/kapatir.
4) Format
-Bicim,bolunmu ekran gosterecek sekilde seclebilir.

\* MagicNet Giris kaynagl yalnizca MagicNet modelinde calisir.
* Maintenance Control (Bakim Kontrolü)yalnizca Güç durumu ON (AÇIK)alan ekranlarda kullanilabilir.
Sorun Giderme
1. Kontrol etmek istediginiz ekran Power Control (Güç Kontrolü) Bilgi Tablosunda görünmyor
- RS232C baglantisini kontrol edin. (Com1 baglanti noktasina dizgün bicimde bagli olup olmadigi kontrl edin)
- Bagli ekranlardan herhangi birinin ayni ID degerine sahip olup olmadigi gormek icin ekranlar kontrol edin. Eger birden fazla ekran ayni ID degerine sahipse, veri cakismasi nedeniyle bu ekranlar program tarafindan dizgün bicomde algilanmaz.
Display Set ID (Ekran Seti ID)情况进行查询,以确定是否可以进行控制。Display (Ekran) menü sunu kullanarak ayarlayin.)
Not: Display Set ID (Ekran Seti ID), 0-16 arasi bir deger olmaldir.
Eger deger, bu deger araligi disindaysa, MDC systemi ekrani kontrl edemez.
2. Kontrol etmek istedigin ekran diiger kontrollerin Bilgi Tablosunda gorunmuyor
Ekranin ON (ACIK) durumda oldugunu kontrol edin. (Bunu, Power Control (Guc Kontrolü) Bilgi Tablosunda gorebilirsiniz)
-Ekranin giris kaynagini degistirip degistiremediinizi kontrl edin.
3. Iletisim kutusu, tekrar tekrar görtüleniyor.
- Kontrol etmek istediiginiz ekranin segili olup olmadigina bakin.
4. Hem On Timer (Açilma Saati) hem de Off Timer (Kapanma Saati) ayarli olmasina kşn farkl bir saat gosteriliyor.
-Ekranlarin saatini ayni degere getirmek icin gecerli saati tum ekranlara uygulayin.
5. Uzaktan kumanda islevini kapattiignizda, RS-232C kablosuno gikarttignizda ya da programdan normal olmayan bir sekilde ciktiignizda uzaktan kumanda duzgün calismayabilir. Normal calismaya geri donmek icin programi yeniden calistirin ve uzaktan kumanda islevini acin.
Bu program, iletigim devrelerindeki sorunlar ya da yakinaldaki elektronik cihazlarin yarattiqi parazitten dolayi dizgün calismayabilir.

Coklu Ekran Modunda Ayar Değerlerinin Gösterilmesi
* Birden fazla ekran baglì oldugunda, ayar degerleri asagidaki gibi görtülenir.
1. Seçim yok: Fabrika Varsaylan Değerini gosterir.
2. Bir ekran segili: Seçilen ekranın ayar değerleri alınir veGORuntulenir.
3. Bir ekran seçili (ID1) ve böcka bir ekran ekleniyor (ID3): ID 1 ayar değerini güisteren program, ID3'ün değerlerini alir ve görtüller.
4. Select All (Tumunu Seg) ile tum setter segili: Fabrika Varsaylan Degerine geri dorer.

Güvenlik Talimatlari
Giris
Baolantylar
Yazilimin Kullanilmasi
Monitor Ayarlanmasi
Input
Picture
[PC / BNC /DVI Mode]
Picture
[AV/S-Video/
Component / DVI-Video
Mode]
Sound
Setup
Multi Control
Dogrudan Istevler
Sorun Giderme
Özellikler
Bilgiler
Appendix
TFT-LCD Monitor
www.samsung.com

Urun renge ve gorunmu modeline bagl olarak farklik gosterebilir ve performans gelistirmeler nedeniyle urn ozellikleri onceden haber verilmeksizin degistirilebilir.
Monitor Ayarlanmasi
Input
Kullanilabilir Modlar

PC/BNC/DVI

S-Video

Component

DVI-Video
Source List PASCD
[MONTH]→[ENTER]→[ENTER]→[A/V]→[ENTER]
Uzaktan kumandadaki dokrudan dugme 'SOURCE' dugmesidir.
Istediginiz ekrani segmek icin kullanin.
1)PC
2) BNC
3) DVI
4)AV
5) S-Video
6) Component
[Uzaktan kumandadaki dokrudan dugme 'SOURCE'dugmesidir.]
Not
- Monitor harici bir kaynaşa geleirildigiinde PIP kapanir.
PIP PASC0
VCR ve DVD gibi harici A/V aygtllari monitore baglidir; PIP, PC Video sinyalinde eklenmis kucuk bir pencerede bu aygtllardan video seyretmenize olanak sag (Off/On)
Not
- BNC ve component ayni terminali kullandiklarindan birden fazla PIP ekranda ust uste aglamaz.
1)PIP
[MONTH]→[ENTER]→[A/V]→[ENTER]→[ENTER]→[A/V]→[ENTER]
PIP Ekranini kapatir veya aça.
-Off
- On
[Uzaktan kumandadaki dokudugradu dugme 'PIP'dugmesidir.]
2) Source
[MONTH] [ENTER] [A/V] [ENTER] [A/V] [ENTER] [A/V] [ENTER]
PIP injin giri kaynagi segin.
-PC:AV/S-Video/Component Mode
-BNC:AV/S-Video Mode
-DVI:AV/S-Video/ComponentMode
-AV/S-Video:PC/BNC/DVI Mode
- Component: PC / DVI Mode
[Uzaktan kumandadaki dokudugdan dugme 'SOURCE' dugmesidir.]
3) Swap
[MONTH] [ENTER] [A/√] [ENTER] [A/√] [ENTER]
PIPveana gortunun iceriklerini degistirir.
PIP penceresindeki görtü ana ekranda, ana ekrandaki görtü PIP penceresinde görtülenir.
[Uzaktan kumandadaki dokudugradu dugme 'SWAP'dugmesidir.]
4) Size
[MONTH] [ENTER] [A/V] [ENTER] [A/V] [ENTER] [A/V] [ENTER]
PIP penceresinin Boyutunu degiştrir.
[Uzaktan kumandadaki dokudan dugme SIZE'dugmesidir.]
5) Position
[MONTH] [ENTER] [A/V] [ENTER] [A/V] [ENTER] [A/V] [ENTER]
PIP penceresinin Konumunu degistirir.
6) Transparency
[MONTH] [ENTER] [A/V] [ENTER] [A/V] [ENTER] [A/V] [ENTER]
PIP pencerelerinin Saydamligi ayarlar.
- High
- Medium
- Low
-Opaque
Not
Size icinde agesini secerseniz, Position ve Transparencycye etkinlemez.
Kullanlabilir Modlar:PIP
Edit Name PASC0
[MENU] [ENTER] [A/V] [ENTER] [A/V] [ENTER] [A/V] [ENTER]
Giris kaynagi seciminizi kolaylasmirk icin giris jaklarina bagli giris cihazini adlandirin.
1)PC
2) BNC
3) DVI
4) AV
5) S-Video
6) Component
Picture [PC / BNC /DVI Mode]
Kullanilabilir Modlar

PC/BNC/DVI

AV

S-Video

Component

DVI-Video
MagicBrightTM
[MENU] [A/V] [ENTER] [ENTER] [A/V] [ENTER]
MagicBright™, görtülediginiz resmin icerigine bagh olarak en iyi görtüleme ortamini saglayan yen bir özelliktir.
Su anda uc farkli moddan biri kullanilabilir: Metin, Internet ve Eglence.
Her modun kendine ozgu onceden yapilandinlmis bir parlaklik degeri vardir. MagicBright TM denetim
duqmelerine basarak bu uc ayardan birin kolayca segebilirsiniz.
1) Entertain
Yuksek Parlaklik
DVD veya VCD gibi filmleri izlemek icin.
2) Internet
Orta Parlaklik
Metin ve grafik gibi karmaGORuntulerin bulundugu calismalar icin.
3) Text
Normal Parlaklik
Buyuk metinler iceren belge veya calismalar icin.
4) Custom
Muhendislerimiz tarafindankatkile seilmis olmasina ragmen onceden ayarlanmis degerler, zevkinize
bagl olarak, gozleriniz icin uygun olmayabilir.
Bu durumda, OSD menusunu kullanarak Parlaklik ve Kontrasti ayarlayin.
[Uzaktan kumandadaki dokudugran duigme M/B'dugmesidir.]
Custom P
[ \text{[MENU]} \rightarrow [\wedge / \vee] \rightarrow [\text{ENTER}] \rightarrow [\wedge / \vee] \rightarrow [\text{ENTER}] \rightarrow [\text{ENTER}] \rightarrow [\wedge / \vee] / [< / >] \rightarrow [\text{ENTER}] ]
Kontrast ve parlakiigi kisel tercihlerinize gore degistirmek icin ekran menulerini kullanabilirsiniz.
1) Contrast
Yesil Rengi ayarla.
2) Brightness
Dogrudan Denetim Ozellikleri

- Resmi Custom islevini kullanarak ayarlarsaniz, MagicBright Custom moduna doner.
Color Tone
[ \text{[MENU]} \rightarrow [\wedge / \vee] \rightarrow [\text{ENTER}]\rightarrow [\wedge / \vee] \rightarrow [\text{ENTER}]\rightarrow [\wedge / \vee] \rightarrow [\text{ENTER}] ]
Renk tonu degiistirilebilir.
1) Cool
2) Normal
3)Warm
4) Custom
(Yalnizca PC/BNC Modunda Kullanilir)
Color Control
[MENU] [A / V] [ENTER] [A / V] [ENTER] [ENTER] [< / > ] [ENTER]
R,G,B renk dengesini ayri ayri ayarlamak icin aagidaki admlari uygalayin.
(Yalnizca PC/BNC Modunda Kullanilir)
1) Red
2) Green
3) Blue
Not
- Resmi Color Control islevini kullanarak ayarlarsaniz, Color Tone Custom moduna doner.
Image Lock
Image Lock (Göruntü Kilitleme), titrek ve pariltili kararısiz görtüntürol olşturan parazitleri kaldirarak ince ayapmak ve en iyi görtüntüyü almak icin kullanı. Fine ayari kullanarak elde edilen sonçlar yeterli degilse, Coarse ayarı ve sonra da yeniden Fine ayarı kullanı.
(Yalnizca PC/BNC Modunda Kullanilir)
1) Coarse
[ \text{[MENU]} \rightarrow [ \land / \lor ] \rightarrow [ \text{ENTER}] \rightarrow [ \land / \lor ] \rightarrow [ \text{ENTER}] \rightarrow [ \text{ENTER}] \rightarrow [ < / > ] \rightarrow [ \text{ENTER}] ]
Dikey cizgiler gibi istenmeyen goruntuleri giderir. Genel ayar, ekran goruntu alanini tasiyabilir. Bu alan
Yatay Kontrol menusun kullanarak yeniden yerine yerleştrebilirsiniz.
2) Fine
[MONTH] [AV] [ENTER] [AV] [ENTER] [AV] [ENTER] [] [ENTER]
Yatay cizgiler gibi istenmeyen görtuntüleri giderir. lstenmeyen görtuntü Ince ayar sonrasinda da
kaybolmadiya, frekansi (saat hizini) ayarladiktan sonra bu islemi tekrarlayin.
3) Position
\[
[\text{MENUR} ]\rightarrow [\text{A} /\text{V} ]\rightarrow [\text{ENTER} ]\rightarrow [\text{A} /\text{V} ]\rightarrow [\text{ENTER} ]\rightarrow [\text{A} /\text{V} ]\rightarrow [\text{ENTER} ]\rightarrow [\text{A} /\text{V} ]\rightarrow
\]
[ENTER]
Ekranin konumunu yatay ve dikey olarak ayarlar.
Auto Adjustment P
[ \text{[MENU]} \rightarrow [\wedge / \vee] \rightarrow [\text{ENTER} ] \rightarrow [\wedge / \vee] \rightarrow [\text{ENTER}] ]
Fine, Coarse ve Position degerleri otomatik olarak ayarlanir.
Kontrol panelinde czūnūrūgū degīstirirseniz, AUTO iševi yūrūtūr.
(Yalnizca PC/BNC Modunda Kullanilir)
[Uzaktan kummandadaki dokrudan dügme 'AUTO' dügmesidir.]
Signal Balance P
Uzun sinyal kablosuyla iliteten zayif RGB sinyalini telafi etmek icin kullanir.
(Yalnizca PC/BNC Modunda Kullanilir)
1) Signal Balance
[ \text{[MENU]} \rightarrow [ \wedge / \vee ] \rightarrow [ \text{ENTER}] \rightarrow [ \wedge / \vee ] \rightarrow [ \text{ENTER}] \rightarrow [ \text{ENTER}] \rightarrow [ \wedge / \vee ] \rightarrow [ \text{ENTER}] ]
Signal control, On ya da Off haldeyken secebilirsiniz.
2) Signal Control
[ \text{[MENU]} \rightarrow [\wedge / \vee] \rightarrow [\text{ENTER}] \rightarrow [\wedge / \vee] \rightarrow [\text{ENTER}] \rightarrow [\wedge / \vee] \rightarrow [\text{ENTER}] \rightarrow [\wedge / \vee] \rightarrow [\wedge / \vee] \rightarrow [\text{ENTER}] \rightarrow [\wedge / \vee] \rightarrow [\text{ENTER}] \rightarrow [\wedge / \vee] \rightarrow [\text{ENTER}] \rightarrow [\wedge / \vee] \rightarrow [\text{ENTER}] \rightarrow [\wedge / \vee] \rightarrow [\text{ENTER}] \rightarrow [\wedge / \vee] \rightarrow [\text{ENTER}] \rightarrow [\wedge / \vee] \rightarrow [\text{T} ] \rightarrow [\text{T} ] \rightarrow [\text{T} ] \rightarrow [\text{T} ] \rightarrow [\text{T} ] \rightarrow [\text{T} ] \rightarrow [\text{T} ] \rightarrow [\text{T} ] \rightarrow [\text{T} ] \rightarrow [\text{T} ] \rightarrow [\text{T} ] \rightarrow [\text{T} ] \rightarrow [\text{T} ] \rightarrow [\text{T} ] \rightarrow [\text{T} ] ]
R Phase, G Phase, B Phase, Gain and Sharpness degerlerini kendiniz ayarlayabilirsiniz.
Size
[ \text{[MENU]} \rightarrow [\text{A} / \text{V}] \rightarrow [\text{ENTER} ] \rightarrow [\text{A} / \text{V}] \rightarrow [\text{ENTER} ] \rightarrow [\text{A} / \text{V}] \rightarrow [\text{ENTER} ] ]
Boyutudegistirebilirsiniz.
1) 16:9
2) 4:3
PIP Picture P
[ \text{[MENU]} \rightarrow [\wedge / \vee] \rightarrow [\text{ENTER}] \rightarrow [\wedge / \vee] \rightarrow [\text{ENTER}] \rightarrow [\wedge / \vee] \rightarrow [\text{ENTER}] \rightarrow [\wedge / \vee] \rightarrow [\text{ENTER}] \rightarrow [\wedge / \vee] \rightarrow [\text{ENTER}] \rightarrow [\wedge / \vee] \rightarrow [\text{ENTER}] \rightarrow [\wedge / \vee] \rightarrow [\text{x} ] \rightarrow [\text{x} ] \rightarrow [\text{x} ] \rightarrow [\text{x} ] \rightarrow [\text{x} ] \rightarrow [\text{x} ] \rightarrow [\text{x} ] \rightarrow [\text{x} ] \rightarrow [\text{x} ] \rightarrow [\text{x} ] \rightarrow [\text{x} ] \rightarrow [\text{x} ] \rightarrow [\text{x} ] \rightarrow [\text{x} ] \rightarrow [\text{x} ] ]
PIP Ekran Ayarlarini ayarlayabilirsiniz.
1) Contrast
Ekranda PIP penceresinin Kontrastini ayarlar.
2) Brightness
Ekranda PIP penceresinin Parlakiigiinyarlar.
3) Sharpness
PIP penceresinin en acik ve en koyu bolgeleriarasindaki farki ayarlamak icin kullanin.
4) Color
PIP penceresinde Renk ayarlar.
5) Tint
PIP penceresine, dogal bir ton katar.
PC, BNC modunda PIP ekrani ile AV, S-Video' den resmi görtüleyebilirsiniz. Yalnizca video sinyali NTSC ise calisir.
Kullanilabilir Modlar: PIP
Picture [AV / S-Video / Component / DVI-Video Mode]
Kullanilabilir Modlar
PC/BNC/DVI
AV
S-Video
Component
D DVI-Video
Mode ASCD
[ \text{[MENU]} \rightarrow [\wedge / \vee] \rightarrow [\text{ENTER} ] \rightarrow [\text{ENTER} ] \rightarrow [\wedge / \vee] \rightarrow [\text{ENTER}] ]
Monitor fabrikada onceden ayarlanmig dort otomatik resim ayari ("Custom", "Dynamic", Standard" ve "Movie") vardir.
Custom, Dynamic, Standard veya Movie ayarindan birini etkinlestirebilirsiniz. Otomatik olarak kisiellestirimis resim ayararinizi caliran " Custom" ayarini seebilirsiniz.
1) Dynamic
2) Standard
3) Movie
4) Custom
[Uzaktan kumandadaki dokrudan dugme 'P.MODE' dugmesidir.]
Custom ASCD
[ \text{[MENU]} \rightarrow [\wedge / \vee] \rightarrow [\text{ENTER} ] \rightarrow [\wedge / \vee] \rightarrow [\text{ENTER} ] \rightarrow [\wedge / \vee] \rightarrow [\text{ENTER} ] \rightarrow [< / >] \rightarrow [\text{ENTER}] ]
Kontrast ve parlakiigi kisesil tercihlerinize gore degistirmek icin ekran menulerini kullanabilirsiniz.
1) Contrast
PIP penceresine dogal bir ton ekler.
2) Brightness
Yesil Rengi ayarla.
3) Sharpness
Göruntünun nettiğinayarlar.
4) Color
Resim renghi ayarlar.
5) Tint
Ekrana, dogal bir ton katar.
Sadece AV ve S-Video modari icin calisir. Yalnizca video sinyali NTSC ise calisir.
Color Tone ASCD
[MENU] [A/√] [ENTER] [A/√] [ENTER] [A/√] [ENTER]
Renk tonu degiistirilebilir. Buna ek olarak renk Componentleri de kullanici tarafindan ozellestirilebilir.
1) Cool 2
2)Cool 1
3) Normal
4)Warm1
5)Warm2
Size ASCD
[MONTH] [A/V] [ENTER] [A/V] [ENTER] [A/V] [ENTER]
Boyutudegiistirebilirsiniz.
1)16:9
2)Zoom 1
3)Zoom 2
4)4:3
[ZOOM1, ZOOM2, DTV - 1080i (veya 720p üsti) ∈in mevcut degildir.]
Digital NR (Dijital Gurultu Azaltma) ASCD
[MONTH] [A/V] [ENTER] [A/V] [ENTER] [A/V] [ENTER]
Gurultu Yoketme ozelligi icin Off/On islemini uygulayin.
Dijital Gurultu Yoketme ozelligi, daha temiz ve net resimlerden zevk almani saglar
1) Off
2) On
Film Mode ASC
[MONTH] [A/ V] [ENTER] [A/ V] [ENTER] [A/ V] [ENTER]
Film Modunu Acp/Kapatabilirsiniz (Film Mode Off/On).
Film Modu özelliigi, tiatro kalitesinde görtunüleme deneyimi sunar.
(DVI-Video Modda KullaniIamaz)
1) Off
2) On
PIP Picture ASCD
[ \text{[MENU]} \rightarrow [\text{A} / \text{V}] \rightarrow [\text{ENTER} ] \rightarrow [\text{A} / \text{V}] \rightarrow [\text{ENTER} ] \rightarrow [\text{A} / \text{V}] \rightarrow [\text{ENTER} ] \rightarrow [\text{A} / \text{V}] \rightarrow [\text{ENTER} ] \rightarrow [\text{A} / \text{V}] \rightarrow [\text{ENTER} ] \rightarrow [\text{A} / \text{V}] \rightarrow [< / >] } ]
PIP Ekran Ayarlarini ayarlayabilirsiniz.
1) Contrast
Ekranda PIP penceresinin Kontrastini ayarlar.
2) Brightness
Ekranda PIP penceresinin Parlakligini ayarlar.
Kullanlabilir Modlar:PIP
Sound
Kullanilabilir Modlar
PC/BNC/DVI
AAV
S S-Video
C Component
D DVI-Video
Mode PASC0
[MONTH] [A/V] [ENTER] [ENTER] [A/V] [ENTER]
Monitor, yerleşik uygunluk dizeyi yüksek stereo amplifakator icerir.
1) Standard
Standard fabrika ayarlari icin Standart segeneğini belirtin.
2) Music
Müzik videoso veya konseri seyrederken Muzik seceneğinci belirtin.
3) Movie
Filim seyrederken Filim seceneğini belirtin.
4) Speech
Dahaçok konusma icerenbir (ormejin,haberler)programseyrederkenKonusma'yi segin.
5) Custom
Ayarli kisesil tercihlere gore ayarlamak isterseniz, Ozel secenegini belirtin.
Custom PASC0
[MONTH] [A/V] [ENTER] [A/V] [ENTER] [A/V] [ENTER] [] [ENTER]
Ses ayarli, kisel tercihlerinize uygun olarak ayarlanabilir.
1) Bass
Ses ayarli, kisesi tercihlerinize uygun olarak ayarlanabilir.
2) Treble
Yuksek frekans sesi vurgular.
3) Balance
Sol ve sag hopartorarasinda ses dengesini ayarlanamizi saglar.
[Se degeri 0'a ayarlanmis olsa bile ses duyabilirsiniz.]
Not
- Resmi Sound islevini kullanarak ayarlarsaniz, Sound Mode Custom moduna doner.
Auto Volume PASCD
[MENUR] [A /V] [ENTER] [A /V] [ENTER] [A /V] [ENTER]
Yayinlayanlararasinda sesduzeyifarkliliikarini azaltir.
1) Off
2) On
SRS TS XT PASCD
[ \text{[MENU]} \rightarrow \left[\frac{\wedge}{\vee}\right] \rightarrow \left[\text{ENTER}\right] \rightarrow \left[\frac{\wedge}{\vee}\right] \rightarrow \left[\text{ENTER}\right] \rightarrow \left[\frac{\wedge}{\vee}\right] \rightarrow \left[\text{ENTER}\right] ]
SRS TS XT, 5.1 cok kanalli iceriigi iki hoparlor uzerinde calma sorununu czen patentli bir SRS teknojisidir.
TruSurround, sanal surround ses deneyimini dahili televizyon hoparlorerini de kapsayacak sekilde tum iki hoparlo calma systemleri uzerinden sunar. Tum cok kanalli bicimlerle tamamen uyumludur.
1) Off
2) On
[Uzaktan kumandadaki dokrudan dugme 'SRS' dugmesidir.]
Sound Select PASC
[MONTH] [A/V] [ENTER] [A/V] [ENTER] [A/V] [ENTER]
PIP açikken Ana veya Alt seçeneğini belirbetbilirsiniz.
1) Main
2) Sub
[Kullanilabilir Modlar: PIP]
Setup
Kullanilabilir Modlar

PC/BNC/DVI

AV

S-Video

Component

DVI-Video
Language PAsCD
[MONTH] [A/V] [ENTER] [ENTER] [A/V] [ENTER]
11 dilden birini secebilirsiniz.

- Segilen dil yalnizca OSD'nin dilini etkiler. Bilgisayarda calisan yazilimlari etkilemez.
- English, Deutsch, Espanol, Français, Italiano, Svenska, 日本語, 中国语, Pycckn, 汉國詞, Portugués
Time PASCD
Monitóru dacika cinsinden beliri bir sure icinde otomatik olarak kapanacak sekilde ayarlamak icin kullanin.
1)Clock Set
\[
\begin{array}{l}
[\text{MEN}]\rightarrow [\text{A}/\text{V}]\rightarrow [\text{ENTER}]\rightarrow [\text{A}/\text{V}]\rightarrow [\text{ENTER}]\rightarrow [\text{ENTER}]\rightarrow [\text{A}/\text{V}]\rightarrow [\text{ENTER}]\rightarrow [\text{A}/\text{V}]\rightarrow [\text{ENTER}]\rightarrow [\text{A}/\text{V}]\rightarrow [\text{ENTER}]\rightarrow [\text{A}/\text{V}]\rightarrow [\text{ENTER}]\rightarrow [\text{A}/\text{V}]\rightarrow [\text{ENTER}]\rightarrow [\text{A}/\text{V}]\rightarrow [\mathrm{enter}] \end{array}
\]
2) Sleep Timer
[ [MENU] \rightarrow [\wedge / \vee] \rightarrow [\text{ENTER}] \rightarrow [\wedge / \vee] \rightarrow [\text{ENTER}] \rightarrow [\wedge / \vee] \rightarrow [\text{ENTER}] \rightarrow [\wedge / \vee] \rightarrow [\text{ENTER}] \rightarrow [\wedge / \vee] \rightarrow [\text{ENTER}] \rightarrow [\wedge / \vee] \rightarrow [\text{ENTER}] \rightarrow [\wedge / \vee] \rightarrow [\text{x} / \vee] \rightarrow [\text{x} / \vee] \rightarrow [\text{x} / \vee] \rightarrow [\text{x} / \vee] \rightarrow [\text{x} / \vee] \rightarrow [\text{x} / \vee] \rightarrow [\text{x} / \vee] \rightarrow [\text{x} / \vee] \rightarrow [\text{x} / \vee] \rightarrow [\text{x} ]]
Dakika cinsinden beliri bir süre sonra Monitörün otomatik olarak kapanmasini saglamak icin kullanin (kapali), 30, 60, 90, 120, 150, 180)
3) On Timer
& [MENU] [ / ] [ENTER] [ / ] [ENTER] [ / ] [ENTER] [ / ] [ / ] [ENTER]\ & [ENTER] Monitorun belirenmis bir saatte otomatik olarak acilmasini ayarlamak icin kullanin. Monitorun otomatik olarak acildigi zaman kullanilacak modu, ses seviyesini kontrol etmek icin kullanin
4) Off Timer
[ \text{[MENU]} \rightarrow [\text{A} / \text{V}] \rightarrow [\text{ENTER}] \rightarrow [\text{A} / \text{V}] \rightarrow [\text{ENTER}] \rightarrow [\text{A} / \text{V}] \rightarrow [\text{ENTER}] \rightarrow [\text{A} / \text{V}] \rightarrow [\text{ENTER}] ]
Monitörun otomatik olarak acldigi zaman kullanilacak modu, ses seviyesini kontrol etmek icin kullanin.

- On Timer'da Yes seçerseniz, Off Timer'da Clock Set ayari yoksa, mesaji görtülenir: "Set the clock first".
Menu Transparency PASCD
[MONTH] [A/V] [ENTER] [A/V] [ENTER] [A/V] [ENTER]
Bilgisayarda calisan yazilmalar etkilemez.
1) High
2) Medium
3) Low
4)Opaque
Safety Lock PIN PASCD
[ \text{[MENU]} \rightarrow [\wedge / \vee] \rightarrow [\text{ENTER}] \rightarrow [\wedge / \vee] \rightarrow [\text{ENTER}] \rightarrow [0 \sim 9] \rightarrow [0 \sim 9] \rightarrow [0 \sim 9] ]
Parolayi degistirebilirsiniz.
Energy Saving PASCD
[MONTH] [A/V] [ENTER] [A/V] [ENTER] [A/V] [ENTER] [MONTH]
Bu ozellik enerji tasarrufu icin unitenin guc tuketimini ayarlar.
1) On
2) Off
Not
Bekleme guc tuketimini azaltmak istiyorsaniz, Energy Saving ogesini On olarak ayarlayin. Ancak, Enerji Tasarrufu nOn Olarak ayarladiinizda, MDC'nin uzaktan Power On islevini ve MagicNefin WOL (Wake On LAN) islevini kullanamazsiniz.
Video Wall PASCD
Video duvari, bir dizi video ekraninin birbirine baglanarak, her ekranin resin bir parcasini gostermesi ya da tum ekranlarda ayni resmin tekrarlanmasidir.
Video Wall açikken, Video Wall ekrani ayarlınülenebilir.
1) Video Wall
[MONTH] [A/V] [ENTER] [A/V] [ENTER] [ENTER] [A/V] [ENTER]
Secilen ekranin Video Duvarı ilelevi açar/kapatir.
-Off
- On
2) Format
\[
[\text{MENUR} ]\rightarrow [\text{AIV} ]\rightarrow [\text{ENTER} ]\rightarrow [\text{AIV} ]\rightarrow [\text{ENTER} ]\rightarrow [\text{AIV} ]\rightarrow [\text{ENTER} ]
\]
Bicim, bolunmug ekran gosterecek sekilde secilebilir.
- Full
Kenar boşluksuz tam ekran görtü saglar.
- Natural
Original en-boy oranini degistirmeden dogal bir görtuntu verir.
3) Screen Divider
[ \text{[MENU]} \rightarrow [\text{A} / \text{V}] \rightarrow [\text{ENTER} ] \rightarrow [\text{A} / \text{V}] \rightarrow [\text{ENTER} ] \rightarrow [\text{A} / \text{V}] \rightarrow [\text{ENTER} ] \rightarrow [\text{A} / \text{V}] \rightarrow [\text{ENTER} ] ]
Ekran bolunebilir.
Bolme sirasinda, farki sayida ekran secebilirsiniz.
- Ekran boluciden bir mod secin.
- Ekran Seçimi kismindan bir ekran seçın.
- Yer, secilen modda bir numaraya basilarak ayarlanacaktir.
-2x2
-3x3
-4×4
-5x5
-1x2
-2x1
-1x5
-5x1

- Video Wall (Video Duvari) calisiyyorken, PIP (Resim icinde Resim), Auto Adjustment (Otomatik Ayarlama), Image Lock (Goruntu Kilidi) ve Size (Boyut) islevleri kullanilamaz. PIP (Resim icinde Resim) calisiyyorken
Video Wall (Video Duvari) szelligin baslatilmasi PIP Off (PIP Kapali) durumuna geçilmesine neden olur.
Video Wall, MagicNet modunda calismaz.
Safety Screen PASC0
Safety Screen islevi, ekranda uzun sure sabit bir görtûgosterildiginde meydana gelebilecek görtû izlerini onlemek icin kullanilmaktadir.
-- Safety Screen islevi, beliri bir sure icin ekrundaki goruntuyu kayirirr.
-Bu islev, guc katpatildiginda kullanilamaz.
1) Safety Screen
[ \text{[MENU]} \rightarrow [\wedge / \vee] \rightarrow [\text{ENTER}] \rightarrow [\wedge / \vee] \rightarrow [\text{ENTER}] \rightarrow [\text{ENTER}] \rightarrow [\wedge / \vee] \rightarrow [\text{ENTER}] ]
Safety Screen islevinin, On (açik) ya da Off (Kapali) olmasini belirler.
-Off
- On
2) Interval
[MONTH] [A/ V] [ENTER] [A/ V] [ENTER] [A/ V] [ENTER] [A/ V] [ENTER]
Safety Screen isleminin calistirilmasi inc gerekli zaman araligi berlir. (1-10 Saat)
Zaman, aik kalma sresine gore hesaplanir.
Varsayilan olarak sure, 10 saate ayarlanmistir.
-1\~10 Saat
3) Second
[ \text{[MENU]} \rightarrow [\wedge / \vee] \rightarrow [\text{ENTER}] \rightarrow [\wedge / \vee] \rightarrow [\text{ENTER}] \rightarrow [\wedge / \vee] \rightarrow [\text{ENTER}] \rightarrow [\wedge / \vee] \rightarrow [\text{ENTER}] ]
Safety Screen isleminin calisturlacagi sureyi belirler. (1~5 Saniye)
Varsaylan olarak sure, 5 saniyeye ayarlanmistir.
Type-Scroll: 1~5 Second
- Type-Pixel, Bar, Eraser: 10~50 Second
4) Type
[MENUR ] [ / ] [ENTER ] [ / ] [ENTER ] [ / ] [ENTER ] [ / ] [ENTER ]
Safety Screen Type (Güvenlik Ekrani Tür) ayaralarıdehyişistire bilirsiniz.
- Scroll
- Pixel
- Bar
Eraser
Resolution Select P
[MONTH] [A/V] [ENTER] [A/V] [ENTER] [A/V] [ENTER]
Grafik kartinin czunurlugunu 1024 x 768 @ 60Hz, 1280 x 768 @ 60Hz, 1360 x 768 @ 60Hz ya da 1366 x768
@ 60Hz'e ayarladiginzda ekrandaki goruntu dizgun olmuyorsa bu islevi kullanarak (Resolution Select)
goruntunun belirtlen ozunurlukte gosterilmesini saglayabilirsiniz.
(Yalnizca PC/BNC Modunda Kullanilir)
1) Off
2) 1024 X 768
3) 1280 X 768
4) 1360 X 768
5)1366X768

- Menūn seīlmesine, yalīnizca grafik czūnūrūgū 1024 x 768 @ 60Hz, 1280 x 768 @ 60Hz, 1360 x 768 @ 60Hz ya da 1366 x768 @ 60Hz olduğunda izin verilir.
PASCD
\[
[\text{MENUR} ]\rightarrow [\text{A} /\text{V} ]\rightarrow [\text{ENTER} ]\rightarrow [\text{A} /\text{V} ]\rightarrow [\text{ENTER} ]\rightarrow [\text{ENTER} ]\rightarrow [< / > ]\rightarrow [\text{ENTER} ]
\]
Enerji tuketimini azaltmak amacyla Arkla 1sigi ayarlamak icin kullanilir.
Power On Adjustment PASCD
[ \text{[MENU]} \rightarrow [\wedge / \vee] \rightarrow [\text{ENTER} ] \rightarrow [\wedge / \vee] \rightarrow [\text{ENTER} ] \rightarrow [\text{ENTER} ] \rightarrow [\wedge / \vee] \rightarrow [\text{ENTER} ] ]
Ekranin Power On time degerini ayarlayin.
*Dikkat: Aşiril voltaj engellemek icin Power On time değerini daha uzun ayarlayin.
Reset
Parlayi degistirebilrsiniz.
1) Image Reset
[ \text{[MENU]} \rightarrow [\wedge / \vee] \rightarrow [\text{ENTER} ] \rightarrow [\wedge / \vee] \rightarrow [\text{ENTER} ] \rightarrow [\text{ENTER} ] \rightarrow [< / >] \rightarrow [\text{ENTER}] ]
(Yalnizca PC/BNC Modunda Kullanilir)
2)Color Reset P
[ \text{[MENU]} \rightarrow [\text{A} / \text{V}] \rightarrow [\text{ENTER} ] \rightarrow [\text{A} / \text{V}] \rightarrow [\text{ENTER} ] \rightarrow [\text{A} / \text{V}] \rightarrow [\text{ENTER} ] \rightarrow [< / >] \rightarrow [\text{ENTER}] ]
Multi Control
Kullanilabilir Modlar
PC/BNC/DVI
AAV
S S-Video
Component
D VDI-Video
Multi Control PASC
[ \text{[MENU]} \rightarrow [\wedge / \vee] \rightarrow [\text{ENTER} ] \rightarrow [\wedge / \vee] \rightarrow [\text{ENTER} ] \rightarrow [\text{ENTER} ] \rightarrow [0 \sim 9] ]
SET'e ayri bir ID atar.
1) ID Setup
SETeayribIDatar.
2) ID Input
Herbir SETin lletici iglevlerini semcik iqin kullan. Yalnizca ID'si lletici ayarina karstik gelen SET
etkinlestrupiril.
Dogrudan islevler
Kullanilabilir Modlar
PC/BNC/DVI
AAV
S S-Video
Component
D DVI-Video
MDC PASCD
Multi Control OSD ekranina gecer.
LOCK PASCD
Safety Lock islevini ayarlayin.
1) Lock On
2) Lock Off
:Kilidi aqiri.
Not
- Lock islevini ayarlfarken yalinizca uzaktan kumanda ve set uzerindeki Lock duğmelerini kullanabilirsiniz.
Monitor uzerinde onceden ayarlanmis password (parola) "0000"dir.
Not
- Lock islev tuşu icin parolayi sifirlama.
MUTE 1 8 6 On dugmesine basin. Parola '0000' olarak sifrlanacaktir. Parolanin sifrlanmasi
için uzak kontrl gereklidir.
Güvenlik Talimatlari
Giris
Baolantylar
Yazilimin Kullanilmasi
Monitor Ayarlanmasi
Sorun Giderme
Kendi Kendine Test Özelliigi
Kontrolu
Denelim Listesi
Sorve Yanit
Özellikler
Bilgiler
Appendix
TFT-LCD Monitor
www.samsung.com

Urun renge ve gorunmu modeline bagl olarak farklikk gosterebilir ve performans gelistirmeler nedeniyle urun ozellikleri onceden haber verilmeksizin degistirilebilir.
Sorun Giderme
Kendi Kendine Test Özelligi
Kontrolü
Not
- Servis cagirmadan once kontrol edin Servis cagirmadan once asaigidaki ogeleri kendiniz kontrol edin. Qzemediginiz sorunlar icin servise danisin.
Kendi Kendine Test Özelliigi Kontrolü
Monitorunzde,duzguncalisp calismadiginkontrol etmenizi saglayan bir kendi kendini sinama ozelligi vardir.
1) Hem bilgisayarinizi hem de monitorunuzi kapatin.
2) Video kablosunu bilgisayarin arkasindan cikarin.
3) Monitor acin.
Monitor video sinyali algilamadi normal calisma durumnda oldugunda siyah bir arka plan uzerinde asagida gosterilen sekil ("Sinyal Kablosunu Kontrol Edin") görtülenir. Kendini Sinama modundayken gug östergesi isigi yesil kalir ve sekil ekranda hareket eder.

Check Signal Cable PC
4) Monitorunzukapatin ve video kablosunu yeniden baglayin; sonra bilgisayarinizi ve monitorunuzu acin.
Önceki yordami uyguladiktan sonra monitorunuz,enkrani karanlik kaldiya, video denetleycisini ve bilgisayar sisteminizi kontrl edin;cunku monitorunuz dizgün calismaktadir.
> Check Cooling System
Ekranda "Check Cooling System" lletisi gosterilire, soogutma faninda bir sorun var demektir. Fani onarmak veya degistirmek icin bir servis merkezine basvurun.
Not Optimum Mode(En Uygun Mod Degil)
Ekranı 1360x768'den daha yuksek Çozunurlükte bile gorebilirsiniz. Ancak, bir dakka boyuncu aşagidaki mesaji görürsunüz. Ekran Çozunurlügün degişirmeyi ya da o sirada bulundugunuz modda kalmayi segebilirsiniz. Çozunurlük 85 Hz'den yuksekse, monitor 85 Hz'den yukseğini desteklemediğinden siyah bir ekran görürsunüz.
Not Optimum Mode
Recommended Mode 1360x768 60Hz
Not
- Monitor des stékledigi czünürkler veya frekanslar ögrenmek icin Belirtimler > Önceden Ayari Zamanlama Modlari konusuna bakir.
> Bakim ve Temizlik
1) Monitor Kasasinin bakim Güç kablosunun baglantisini).(ikardiktan sonra yumusak bir bezle temizleyin.

- Benzin, tiner veya benzeri yanici maddeler veya islak bez kullanmayin.
Ekranin zarar gormesini engellelemek icin Samsung temizlik malzemesi kullanilmasini oneririz.
2) Düz Panelli Göründü Ekrani Bakimi
Yumusak bir bezle (pamuklu) bastirmadan temizleyin.

- Hicbir zaman aseton, benzin veya tiner kullanmayin. (Ekran yizeyinde catlaklarvey abozumlaya neden olabilir.)
Kullanici kendisinin neden oldugu hasarlarin onarimiyla iliskili harcamalar ve maliyetleri odemekle yukumludur.
> Belirtiler ve Onerilen Eylemler
Not
- Monitor PC'den alinan gorsel sinyalleri yeniden olusturur. Bu nedenle, PC'de veya video kartinda sorun olmasi monitork karamasina, renklerin bozulmasina, parazite, Video modunun desteklenmemesine ve benzeri durumlara neden olur. Bu durumda oncelikle sorunun kaynagini kontrol edin, sonra da servis merkezine veya satciniza danisin.
1) Guc kordonunun ve kablosunun bilgisayara dizgun bir sekilde bagli olup olmadigi kontrl edin.
2) Bilgisayarin acilirken 3'len fazla sinyal sesi cikarip cikarmadi gini konrol edin. (Cikariyorsa, bilgisayarin ana karti igin satnsonrasi servis isteyin.)
3) Yeni bir video karli taktysaniz veya PC'yi monte etiyseniz, adaptor (video) sürcusun ve monitor sürcusun takip takmadiginizi kontrol edin.
4) Video ekraninin tarama hizinin 50 Hz -85Hz olarak ayarlanip ayarlanmadigi kontrl edin. (Maksimum gezünurluk kullanirken 60 Hz hizi gezmeyin.)
5) Adaptor (video) surucusunu yuklerken sorunla karilasarsaniz, bilgisayari Gvenli Mod da acin, "Denetim Masasi, Sistem, Aygit Yoneticisi" allndaki Ekran Bagdaustuncisi'm kaldirin ve adaptor (video) surucusunu yeniden yuklemesi icin bilgisayari yeniden baslatin.
Denetim Listesi
Not
- Asagidaki tablo olasorunlar ve czumlerini listeler. Servisi aramadan once soruno czup czemeyecinizi gormek icin bu bolmdekil bilgileri konrol edin. Yardima gereksiniminiz varsa lufen garanti karndaki veya Bilgi bolmundeki Telefon numarasini arayin ya da satiniza danisin.
Yuklemeyle ilgili sorunlar
Not
Sorunlar Czumleri
Monitor ekram titriyor
- Bilgisayar ve monitorarasindaki sinyal kablosunun saglam bir sekilde baglanmis ve sikistirlimis olup olmadigi ini kontrl edin. (Refer to Bilgisayarabgama konusuna bakin)
> Ekrana ilgili sorunlar

- Monitor ekramyla ilgili sorunlar ve gezumleri aşàgida listenmişir.
Sorunlar Czozumleri
Ekran bos ve guc goftergesi kapali
Guc kablosunun sikbir sekilde bagli ve LCD monitorn acik oldugundan emin olun. (Monitorunze Baglama konusuna bakin)
"Check Signal Cable" mesaji
Sinyal kablosunun PC veya video kaynaklarina sik bir sekilde bagloldugundan emin olun. (Monitoruna Bgama konusuna bakin)
- PC veya video kaynaklarinin aqik oldugundan emin olun.
Video adaptörünün seksimum Özūnūluk ve frekansı kontrol edin.
- Bu degerleri Onceden Ayari Zamanlama Modlar Cizelgesindeki veilerle karsilastirin.
Resim dikey olarak salinyor.
- Sinyal kablosunun sağlam bir sekilde bagl olup olmadigi kontrol edin. Sağlam bir sekilde yeniden baglayin. (Refer to Bilgisayara Baglama konusuna bakin)
Göntü net degil. Resim bulanik.
Frekansai iliskin Coarse ve Fine ayaralarini calistirin.
- Tum aksesuarlari cikardiktan sonra yeniden acin (video uzatma kablosu, vb.)
- Czünurluk ve frekansi önerilen aralijklara ayarlayin.
- Bilgisayar video kartinda ayarlanan cüzünurluk ve frekans degerlerinin monitorun destekledigi aralık icinde olup olmadigi kontrl edin. Bu arahika degillerse monitor命数sunn altindaki geleeri Bilgi'ye ve Önceden Ayari Zamanlama Modlari 'na bakarak sifirlayin.
- Brightness ve Contrast degerlerini ayarlayin. (Brightness, Contrast konularina bakun)
Resim görtütsu kararl degil ve titriyor.
Resimde golge goruntuler var.
- OSD Renk Ayari menusunun altindaki Custom secenegini kullanarak rengi ayarlayin.
Göntü cok aik veya cok koyu
Ekran rengi tutarli degil
Renkli görtündu koyu gölgerle bozuluyor.
- Monitor ayarlarda:yapilan degisiklikleri OSD bellegine kaydediyor.
Beyaz renk kalitesi kotu.
Guc Gostergesi yesil olarak yanip sonuyor.
- Monitor Güç yönetimi sistemi kullaniyor.
Bilgisayarin faresini hareket ettirin veya klavyede bir tuasa basin.
Ekran karanlik veGPC goftergesisiurekli yesil yaniyor vya 0,5 vaya1 saniyel arahiklarla yanipsoniyor
Ekran boş ve yanıp.Sinceyor.
- MENU dugmesine bastiginzda "TEST GOOD" mesajini
Ekrana ilgili sorunlar

- Ses sinyalleryle ilgili sorunlar veçozumlere asagida listelenmistir.
Sorunlar Czozumlere
Ses yok
- Ses kablosunun hem monitorunuzdeki ses girisi baglanti noktasina hem de ses kartinizdaki ses cikişi baglanti noktasina sikica bagli oldugundan emin olun. (Monitorunze Baglama konusuna bakin)
- Ses dizeyini kontrol edin.
- Ses duzeyini kontrol edin.
Denetimi en yuksek noktaya cevirdirigin halde ses cok azsa, bilgisayarin ses karindaki veya yazilm programindaki ses denetimini kontrl edin.
Ses duzyeyi cok duiguk.
- Adjust the Treble and Bass to appropriate level.
>Uzaktan Kumandayla ilgili sorunlar

- Uzaktan kumandayla ilgili sorunlar ve gezumlere aşağida listenmişir.
Sorunlar Czumleri
Uzaktan kumanda Dügmeleri yanit vermiyor.
- Pil kutuplarin (+/-) kontrol edin.
- Pillerin bitmis olup olmadigi n kontrl edin.
Cihazin acik olup olmadigi nki konrol edin.
Güç kablosunun-SAğlambir sekilde bagl olup olmadınti kontrl edin.
Etrafta fluoresan veya neon isik olup olmadigi nktrol edin.
Soru ve Yanit
Soru Yanit
Frekansi :(
Frekans, video kart yeniden yapilandirlak degistirilebilir.
Video karti desteginin, kullananan surucunun surumune bagli oldugunu unutmayin. (Ayrintilar icin bilgisayarin veya video kartinin kilavuzuna bakin.)
Czunurlugu nasil ayarlayabilirim?
- Windows XP:
- Özunurlugu Denetim Masasi, Görünüm ve Temalar, Göruntü, Ayarlar seçeneklerini kullanarak ayarlayin.
- Windows ME/2000:
- Özunurlugu Denetim Masasi, Göruntü, Ayarlar seçeneklerini,
kullanar ayarlayin.
- Ayrınlutar ile video kartı üretişine dinmiş.
Guc Tasarrufu islevini nasil ayarlayabilirim?
- Windows XP:
- Özünurlı Denetim Masasi, Gırkıum ve Temalar, Gırkı,
- Ayarlar seçeneklerini kullanarak ayarlayin.
- İslevi bilgisayarin BIOS-SETUP uygulamasindo veya ekran
- koruyucusunda ayarlayin. (Windows/Bilgisayar Kilavuzu'na\
- bakın).
- Windows ME/2000:
Czunurlu Denetim Masasi, Goruntu, Ayarlar seceneklerini kullanarak ayarlayin.
Isevi bilgisayarin BIOS-SETUP uygulamasinda veya ekran koruyucusaanda ayarlayin. (Windows/Bilgisayar Kilavuzu'ha bakin).
Dis kasayi/LCD panelini nasil temizleyebilirim?
Güç kablosunu;cikarin vesulandirlmis temizlik malzesemi veya dokrudan su kullanarak yumusak bir bezle monitör temizleyin.
Kasanin uzerinde deterjan veya k kalmamasina dikkat edin. Monitorn icine su girmemesine ozen gosterin.
© 1995-2008 SAMSUNG. ALL Right Reserved

Güvenlik Talimatlari
Giris
Baolantylar
Yazilim Kullanilmasi
Monitorun Ayarlanmasi
Sorun Giderme
Özellikler
Genel
PowerSaver
Önceden Ayari
Zamanlama Modari
Bilgiler
Appendix
TFT-LCD Monitor
www.samsung.com

Urūn rēngī ve gōrūnūmū modeline bóglī ocak farklilik gōsterebilir ve performans gelistirmeleri nedeniyle urūn özellikleri Ónceden haber verilmeksizin degiştrilebilir.
Özellikler
Genel
> Genel
Genel
Model Adi SMT-4011
LCD Panel
Boyut 40,0 inc (diagonal) (101,6 cm)
Goruntu alan 885,168 mm (H) x 497,664 mm (V)
Piksel Araiigi 0,648 mm (H) x 0,648 mm (V)
Senkronizasyon
Yatay 30 81kHz
Dikey 56 75Hz
Ekran Rengi
Ekran Rengi 16,7 M renkler
Özünurlük
En iy cozunurluk 1360 x 768 / 1366 x 768 @ 60 Hz, kullanan grafik kartina baglidir
Maksimum czunurluk 1366 x 768 @ 60 Hz
Giris Sinyali, Sonlu
RGB Analog, DVI (Dijital Gorsel Arayuz) Uyumlu Dijital RGB.
75U ±%10'da 0,7Vp-p Pozitif Ayri H/V senk, Kompozit senk, SOG, TTL seviyesi, positif ya da negatif.
Maksimum Pikel Hizi
100MHz
Güç Kaynag
AC 100 - 240 V~ (+/- %10), 50/60 Hz
Sinyal Kablosu
15 pin - 15 pin D-sub kablo, cikarilabilir
DVI-D - DVI-D konektoru, cikarilabilir - istege bagli
Sinyal Konektoru
D-sub, BNC, DVI-D, YPbPr, S-VHS, VCR
Boyutlar (AxYxD) / Agirlik
971 x 582 x 118 mm / 38,2 x 22,9 x 4,6 inch (Altiksid)
971 x 629,5 x 223 mm / 38,2 x 24,8 x 8,8 inch (Altikli), 23 kg/50,7 lbs
971 x 629,5 x 228 mm / 38,2 x 24,8 x 9,0 inch (altikli ve caml), 27,7 kg/61,0 lbs
VESA Montaj Arayuzu
200 mm x 200 mm (Specialty(Arm) Montaj donanimiya birlikte kullanilir.)
Ortam kosullan
Calisma
Sicaklig: 10^ 40^ (50F\~104°F)
Nem : %10 ~ %80, yogunlasmayan
Sicaklig: -20^ 45^ (-4^ 113^)
Nem:%5~%95,yogunlaşmayan
Depolama
Ses Ozellikleri
Ses Girisi 1 RCA Jaki Kirmizi(Saç) Beyaz(Sol), 0,5 Vrms (-9 dB)
Ses Girisi 2 RCA Jaki Kirmizi(Sag) Beyaz(Sol), 0,5 Vrms (-9 dB)
PC Ses Girigi 3.5 0 ereo Jak,0,5 Vrms (-9 dB)
Frekans RF: 80 Hz ~ 15 kHz (-3 dB'de)
Tepki A/V: 80 Hz ~ 20 kHz (at -3 dB)
Tak ve Kullan Özelliigi
Bu monitor Tak ve Kullan uyumu sistemiere takilabilir. Monitor ve bilgisayar sistemleriarasindaki etkileşim en iyi calisma kosullarini ve monitor ayarlarini saglar. Cogunlukia, kullanin farki ayarlar seçmek istedigi duruml dirinda monitor kurulumu otomatik olak ilerler.
Kabul Edilebilen Nokta Sayisi
Bu urunde, 1ppm (milyonda bir) oranda duyarlaiga sahip gelismis yari iletken teknojisi kullanilarak uretilen TFT LCD panel kullanilmsti. Ir. Ancak KIRMIZI, YESIL, MAVi ve BEYAZ renk pikseleri arada sirada parlak gurunebilir vya arada bazisi siyah pikseler gorunebilir. Bunun nedeni kaliten dinusuk olmasi degildir, paneli herhangi bir kuskuya kapilmadan kullanabilisiniz.
- Ömeğin, bu uründeki TFT LCD alt piksellerinin sayisi 3.133.440dur.
Not
-Tasarim ve belirtimler onceden belirtilmeden degistirilebilir.
B Sinfi Cihaz (Meskende kullanimi için Bilgi illetisim cihazi)
- Bu urun meskende kullanim icin Elektromanyetik Uyumluk Yonetmelikleri ile uyumludur ve genel yerleşim bølgeleri dahil olmak üzere tum bølgelerde kulla bililir.
(B Sinifi cihazlar A Sinifi cihazlara gore daha az elektromanyetik etkiye sahiptir.)
PowerSaver
Bu monitorde PowerSaver adi verilen yerlegik bir guc yonetim sistemi vardir. Bu system, monitorunuzu, belli bir sure kullanilmadiiginda dusuk erenerj moduna geirerek erenerj tasarrufu saglar. Fareyi hareket ettirdiginizde veya klavyedekir bir taasa bastiginzda monitor otomatik olarak normal calisma durumuna doner. Enerji tasarrufu saglamak icin, kullanmaniz gerekmyen zamanlarda veya uzun sure kullanmayacaginiz durumlarda monitorunuzu KAPATIN. PowerSaver sistemi bilgisayariniza takilan VESA DPM uyumlu bir video kartiyla calisir. Bu ozelligi kurmak icin bilgisayariniza yuklu bir yazilm yardinici programini kullanin.
Durum Normal Caliima
Power saving mode
Mekanik Guc S/W
kapali
EPA/ENERGY 2000
Mekanik Guc S/W kapali
Guc Gostergesi Yesil Yesil Yanip S
Güç Tuketimi 210 W'dan daha az
1 W'dan daha az (Kapali modu)
1 W'dan daha az (Kapali modu)
0W (Guc duğmesi)

Bu monitor VESA DPM islevi alan bir bilgisayarla kullanilrsa EPA ENERGY STAR® ve ENERGY2000 ile uyumludur. SAMSUNG ENERGY STAR® is orte alarak, bu urun ereri verimlligi acisindan ENERGY STAR® yongelerine uygun oldugunu belirlemistir.
Önceden Ayarlı Zamanlama Modlari
> Onceden Ayarli Zamanlama Modlan
Bilgisayardan gonderilen sinyal asagidaki Onceden Ayari Zamanlama Modlari ile ayniya, ekran otomatik olarak ayarlanir. Ancak sinyal farklya saig tsigi yanmaya devem ederken ekran kararabilir. Video kartinin kilavuzuna bakin ve ekran asagidaki gibi ayarlayin.
Ekran Modu Yatay Frekans (kHz) Dikey Frekans (Hz) Pikesel Saati (MHz) Sync Polaritesi (H/V) IBM, 640 x 350 31,469 70,086 25,175 +/- IBM, 640 x 480 31,469 59,940 25,175 -/- IBM, 720 x 400 31,469 70,087 28,322 -/+ MAC, 640 x 480 35,000 66,667 30,240 -/-
MAC,832x624 49,726 74,551 57,284 -/-
VESA,640x48037,86172,80931,500-/-
VESA,640x48037,50075,00031,500
VESA,640x48043,26985,00836,000-/-
VESA,800x60035,15656,25036,000+/+
VESA,800x60037,87960,31740,000+/+
VESA,800x60048,07772,18850,000+/+
VESA,800x60046,87575,00049,500+/-
VESA:800x60053,67485,00056,250+/-
VESA, 1024 x 768 48,363 60,004 65,000 -/
VESA,1024x76856,47670,06975,000-/-
VESA, 1024 x 768 60,023 75,029 78,750 +/-
VESA, 1024 x 768 68,677 85,997 94,500 +/-
VESA,1360x76847,71260,00085,500+

Yatay Frekans
Ekranin sag kenarini sol kenarina baglayan bir satrin yatay olarak taranma suresine Yatay Dongu denir ve Yatay Dongun tersi alinarak elde edilen sayiya da Yatay Frekans ad verilir. Birim: kHz
Dikey Frekans
Ekranda kullanicinngorebilecebirgoruntolusmasisin, floresan lambalara benzer sekilde,ayni goruntunun saniyede pek cok defa yinelenmesi gerekir. Bu yineleme sikligina Dikey Frekans veya Yenileme Hizdenir.Birim:Hz
© 1995-2008 SAMSUNG. ALL Right Reserved

Güvenlik Talimatlari
Giris
Baolantylar
Yazilimin Kullanilmasi
Monitorun Ayarlanmasi
Sorun Giderme
Özellikler
Bilgiler
Daha Iyi Goruntu Elde
Etmek Icin
URUN BILGILERI
(Görüntü Sabitlemesiz)
Appendix
TFT-LCD Monitor
www.samsung.com

Urun renge ve gorunmu modeline bagl olarak farklik gosterebilir ve performans gelistirmeler nedeniyle urn ozellikleri onceden haber verilmeksizin degistirilebilir.
Information
Daha Iyi Goruntu Elde Etmek icin
En iyi goruntu kalitesini elde etmek icin bilgisayarin denetim masasindan bilgisayar cozunurlugunve ekran enjeksiyon hizini (yenileme hizi) aagida agklandigi gibi ayarlayin. TFT-LCD de en iyigortu kalitesi saglanmazsa, ekrandaki goruntun kalitesi dusuk olabilir.
Czunurluk:1360x768
-Dikey frekans (yenileme hizi): 60 Hz
Bu urunde, 1ppm (milyonda bir) oraninda duyarilgha sahip gelismis yari itletken teknojisi kullanilarak uretilen TFT LCD panel kullanimistr. Ancak KIRMIZI, YESIL, MAVi ve BEYAZ renk pikselleri arada sirada parlak gurunibilir veya arada bazi siyah pikseller gurunbilir.
Bunun nedeni kalitenin dusuk olmasi degildir, paneli herhangi bir kuskuya kapilmadan kullanabilirsiniz.
Orneigin, bu urundeki TFT LCD alt piksellerinin sayisi 3.133.440dur.
Monitoru ve dis panel temizlerken luften onerildigi gibi cok az miktarda temizleme maddesyle yumusak ve kuru bir bez kullanin; temizledikten sonra urunu iyice silerek parlatin. LCD alan, uzerine bastirmadan yumusak bir sekilde silimmelidir.
Fazla bastinirsa, uzerinde iz birakilabilir.
Resim kalitesinden memnun degilseniz, pencere kapatma dugmesine bastiginiza ekranda gorunecek olan "otomatik ayar islevini" kullanarak daha iyi bir resim elde edebilirsiniz.
Otomatik ayar sonrasinda da görtünde bozkluklar vara, FINE/COARSE ayar islevini kullanin.
Uzun sure sabit bir ekrani goruntulerseniz, goruntu kalintilari vya bulaniklik olusabilir.
Uzun sure monitörden uzak kalacaksaniz, enerji tasarrufu moduna gecin veya hareketti görtüntüler iceren
bir ekran koruyucu ayarlayin.
URUN BILGILERi (Goruntu Sabitlemesiz)
Görüntü Sabitlemesi nedir?
Bir LCD paneli normal kosullarda calistirildiginda goruntu sabittemesi olugmayibilir. Normal kosullar, surekli olarak degisen desenler olarak tanimlanir. LCD paneli uzun sure sabit bir desende calistirldiginda (12 saatten fazla),bir pikselde svi kristalini (LC) calistiran elektrolararasinda hafif bir voltaj farko olabilir. Elektrolararasindaki voltaj farka zamanla artar ve svi kristalin zayiflamasina neden olur. Bu durum olustugunda, desen deigtiginde bir onceki goruntu gortunebilir. Bunonlemek icin, toplam voltaj farka azaltimaldir.

Güç Kapali, Ekran Koruyucu ya da Enerji Tasarrufu Modu
20 saatlik kullanimin ardindan 4 saat gucu kapali tutun
12 saatlik kullanimin ardindan 2 saat gucu kapali tutun
- Monitor PC Ekran Özelikleri Güç Şeması ile kapanmaya ayarlayin.
Mumkunse bir Ekran Koruyucu kullanin - Tek renkli bir ekran koruyucu ya da hareketli bir gortuniÖnerilir.
Renk Bilgilerini periyodik olarak degistirin

Not
- iki farkli renk kullanin
2 farki renkle Renk Bilgilerini 30 dakikada bir dondurun.
- Buyuk parlaklik farkina sahip karakter ve arka plan rengi kombinasyonlari kullanmaktan seksin.
Kolayca goruntu sabittemesine yol açabilen gri renklerini kullanmaktan kaçınin.
Kacinlmasi gerekenler: Buyuk parlaklik farkina sahip renkler (Siyah ve Beyaz, Gri)


Karakterlerin rengini periyodik olarak degistirin
Kucuk parlaklik farkina sahip parlak renkler kullanin
- Dongü : 30 dakikada bir karakterlerin rengini ve arka plan rengini degişirin.

30 dakikada bir hareketli karakterleri degistirin.

- Tum alan periyodik olarak Logo ile birlikte hareketli görtü görtültler.
- Dongü: 4 saatlik kullanimin ardindan 60 saniye boyunca Logo ile birlikte hareketli görtunj görtunjüter.
- Monitorunüz gürntu sabitlemesinden korumanin en iyi yolu, Güç kapatmak ya da siz
kullanmadiginiz zamanlarda PC'nizin vya Sisteminizin bir Ekran Koruyucu programi calistimasidir.
Ayrica talimat kilavuzuna dayanarak Garanti hizmeti de sinirlanacaktir.
Urune Screen Scroll (Ekran Kayirdma) islevi uygulayin
Screen Scroll (Ekran Kayirdma) islevi uygulayin
-Beliri: Yukari aaga hareket eden Siyah Renkli Yatay Qubuk.

-Yontem segin
. Talimat Kilavuzu : OSD Menu -> Set Up -> Safely Screen -> Screen Scroll (OSD Menu → Ayarlar
→Güvenlik Ekrani -> Ekran Kayirdma)
ZamanAraligi:1\~10saat(Onerilen:1)
. SURE: 1~5 saniye (Onerilen: 5)


(Lüften CD Kullanim Kilavuzunun "OSD İslavi"nde olmasina dikkat edin, bazı modellerde bulunmaz)
Urune Pixel (Piksel) islevi uygulayin
Ekran Pixel (Piksel) islevi uygulayin
-Belirti: Yukari aaga hareket eden Siyah Renkli Nokta.

- Yontem segin
. Talimat Kilavuzu: OSD Menu -> Set Up -> Safety Screen -> Pixel (OSD Menu -> Ayarlar ->
Güvenlik Ekrani -> Pikesel
ZamanAraligi:1\~10saat(Onerilen:1)
. SURE: 10-50 saniye (Onerilen: 50)
Ekran Cubugu islevi uygulayin
-Beliri: Yukari aaga hareket eden Siyah Renkli Yatay / Dikey Cubuk.

-Yontem secin
. Talimat Kilavuzu :OSD Menu Set Up Safety Screen Bar (OSD Menu Ayarlar Güvenlik Ekrami Cubuk)
. Zaman Araligi : 1 ~ 10 saat ( Onerilen : 1 )
. SURE : 10 - 50 saniye ( Onerilen : 50 )

(Lutfen CD Kullanim Kilavuzunun "OSD lsevi"nde olmasina dikkat edin, bazimodellerde bulunmaz)

Urine Ekran Silme Iglevi uygulayin
Ekran Silme islevi uygulayin
-Belirti:2 Dikey blok, ekrani silerek hareket eder

- Yontem segin
. Talimat Kilavuzu : OSD Menu -> Set Up -> Safety Screen -> Eraser (OSD Menu -> Ayarlar -> Güvenlik Ekramı -> Ekran Kayirdma -> Silici)
ZamanAraligi:1\~10saat(Onerilen:1)
. SURE: 10~50 saniye (Onerilen : 50 )

(Lutfen CD Kullanim Kilavuzunun "OSD İslavi"nde olmasina dikkat edin, bazı modellerde bulunmaz)
© 1995-2008 SAMSUNG. ALL Right Reserved
TFT-LCD Monitor

www.samsung.com
Urūn rēngī ve gōrūnūmū modeline bóglī ocakarkfrikik gōsterebilir ve performans gelistirmeleri nedeniyte urūn özellikleri Ónceden haber verilmeksizin degiştrilebilir.
Appendix
Dünyanin her yerinden SAMSUNG' a ulasin
Güvenlik Talimatlari
Giris
Baolantylar
Yazilimin Kullanilmasi
Monitorun Ayarlanmasi
Sorun Giderme
Özellikler
Bilgiler
Appendix
Dunyanin her yerinden
SAMSUNG'alaasin
Kosullar
Yetki Bildirimi
Not
Samsung ürünleri ile ilgili sorulariniz ya da yorumliniz varsa lüften SAMSUNGMusteri hizmetleri merkezi ile temasaGPC.
North America
U.S.A 1-800-SAMSUNG(726-7864) http://www.samsung.com/us CANADA 1-800-SAMSUNG(726-7864) http://www.samsung.com/ca MEXICO 01-800-SAMSUNG(726-7864) http://www.samsung.com/mx
Latin America
ARGENTINE 0800-333-3733 http://www.samsung.com/ar BRAZIL 0800-124-421
4004-0000 http://www.samsung.com/br CHILE 800-SAMSUNG(726-7864) http://www.samsung.com/cl COLOMBIA 01-8000112112 http://www.samsung.com.co COSTA RICA 0-800-507-7267 http://www.samsung.com/latin ECUADOR 1-800-10-7267 http://www.samsung.com/latin EL SALVADOR 800-6225 http://www.samsung.com/latin GUATEMALA 1-800-299-0013 http://www.samsung.com/latin JAMAICA 1-800-234-7267 http://www.samsung.com/latin PANAMA 800-7267 http://www.samsung.com/latin PUERTO RICO 1-800-682-3180 http://www.samsung.com/latin REP. DOMINICA 1-800-751-2676 http://www.samsung.com/latin TRINIDAD & TOBAGO 1-800-SAMSUNG(726-7864) http://www.samsung.com/latin VENEZUELA 0-800-100-5303 http://www.samsung.com/latin
Europe
AUSTRIA 0800-SAMSUNG(726-7864) http://www.samsung.com/at
BELGIUM 0032 (0)2 201 24 18 http://www.samsung.com/be
CZECH REPUBLIC 844 000 844 http://www.samsung.com/cz Distributor pro Českou republika: Samsung Zrt., Česka organizačné složka Vyskočilova 4, 14000 Praha 4 DENMARK 70 70 19 70 http://www.samsung.com.dk FINLAND 030-6227 515 http://www.samsung.com/fi FRANCE 3260 SAMSUNG(726-7864) http://www.samsung.com/fr 08 25 08 65 65 (€ 0,15/min) GERMANY 01805-121213 (€ 0,14/Min) http://www.samsung.de HUNGARY 06-80-SAMSUNG(726-7864) http://www.samsung.com/hu ITALIA 800-SAMSUNG(726-7864) http://www.samsung.com/it LUXEMBURG 0035 (0)2 261 03 710 http://www.samsung.com/be NETHERLANDS 0900 20 200 88 (€ 0,10/Min) http://www.samsung.com/nl NORWAY 815-56 480 http://www.samsung.com/no POLAND 0 801 801 881 http://www.samsung.com/pl 022-607-93-33 PORTUGAL 80 8 200 128 http://www.samsung.com/pt REPUBLIC OF IRELAND 0818 717 100 http://www.samsung.com/ie SLOVAKIA 0800-SAMSUNG(726-7864) http://www.samsung.com/sk SPAIN 902 10 11 30 http://www.samsung.com/es SWEDEN 0771-400 200 http://www.samsung.com/se SWITZERLAND 0800-SAMSUNG(726-7864) www.samsung.com/ch U.K 0870-SAMSUNG(726-7864) http://www.samsung.com/uk
CIS ESTONIA 800-7267 http://www.samsung.ee LATVIA 800-7267 http://www.samsung.com/lv LITHUANIA 8-800-77777 http://www.samsung.IT KAZAKHSTAN 8-10-800-500-55-500 http://www.samsung.kz KYRGYZSTAN 00-800-500-55-500 RUSSIA 8-800-555-55-55 http://www.samsung.ru UKRAINE 8-800-502-0000 http://www.samsung.ua UZBEKISTAN 8-800-120-0-400 http://www.samsung.uz
Asia Pacific AUSTRALIA 1300 362 603 http://www.samsung.com/au CHINA 800-810-5858, 010- 6475 1880 http://www.samsung.com.cn HONG KONG 3698-4698 http://www.samsung.com/hk INDIA 3030 8282, 1800 110011 http://www.samsung.com/in/ INDONESIA 0800-112-8888 http://www.samsung.com/id JAPAN 0120-327-527 http://www.samsung.com/jp MALAYSIA 1800-88-9999 http://www.samsung.com/my NEW ZEALAND 0800SAMSUNG(726-7864) http://www.samsung.com/nz PHILIPPINES 1800-10-SAMSUNG(726-7864) http://www.samsung.com/ph SINGAPORE 1800-SAMSUNG(726-7864) http://www.samsung.com/sg
THAILAND 1800-29-3232, 02-689-3232 http://www.samsung.com/th
TAIWAN 0800-329-999 http://www.samsung.com/tw
VIETNAM 1800588889 http://www.samsung.com/vn
Middle East & Africa
SOUTH AFRICA 0860-SAMSUNG(726-7864) http://www.samsung.com/za
TURKEY 4447711 http://www.samsung.com.tr
800-SAMSUNG (726-7864)
8000-4726
http://www.samsung.com/mea
Kosullar
Senk. Sinyali
Senk. (Senkronize) Sinyaller, monitorde istenen renkleri görtülemek,—çin gereken standart sinyalleri belirrt.
Dikey ve Yatay Senk. Sinyalleri olarak ikiye ayiril. Bu sinyaller ayarlanan gezünurluk ve frekansta normal
renkli görtüller gosterir.
Senk. Sinyali türleri
Ayrı Bu, monitör dikey senk. sinyalleri iletme Şemas,idir. Birleşik Bu, dikey senk. sinyallerin bir birleşik sinalde birleşimi ve monitör iletme Şemas,idir.Monitor Birleşik sinyali Özgün renk sinyalliner ayirarak renk sinyallerin,gürünüler.
NoktaAraligi
Monitördeki görtüntü kirmizi, yesil ve mavi noktalandan olusur. Noktalar birbirine yakinlattachika gezünurluk artar.
Ayni renkteki iki nokta arasindaki uzakliga "Nokta Araiigi" denir. Birim: mm
Dikey Frekans
Gortuyu olusturnak ve kullanciya gostermek icin ekranin saniyede birkac defa yeniden czilmesi gerekir.
Saniyedeki yineleme sikligina Dikey Frekans veya Yenileme Hizi denir. Birim: Hz
Örnek: Ayni,isn kendini saniyede 60 defa yinelerse,bu 60Hz olar kabul edilir.
Yatay Frekans
Ekranin sag kenarini sol kenarina baglayan bir satir yatalak tarama suresine Yatay Dongu denir. Yatay
Döngün lersi alinar edle edilen sayiya Yatay Frekans denir. Birim: kHz
Taramali ve Taramasiz Yontemler
Ekranin en ustunden en alta kadar olan yatay salirlari sirasiyla gostermeye Taramasiz Yontem, tek
numarali satlarla cift numarali satlarl donusumlu olarak gostermeye Taramali yontem denir. Net bir grotu
olusmasini saglamak icin cogu monitor Taramasiz yontemi kullanilir. Taramal yontem televizyonlarda
kullanilan yontemdir.
Tak ve Kullan
Bu islev, bilgisayarla monitor arasinda otomatik bilgi degisimine alanak taniyar kullanciya yuksek kaliteli bir
ekran sunar. Bu monitor Tak ve Kullan islevi icin uluslararasi VESA DDC standardina uygundur.
Czunurluk
Ekran gortusu olusturmak icin kullanan yatay ve dikey noka sayisina "cozunurtuk" denir. Bu sayi ekranin
hassasiyetini gosterir. Yuksek cozunurluk, ekranda daha fazla goruntu bilgisigi gosterilmesine olanak
sagladigindan bircok gorevi gerceklestimeye uygundur.
Örnek: Çozünurlık 1360 X 768 ise, ekran 1360 yatay nokta (yatay Çozünurlık) ve 768 dikey
cizgiden (dikeyoczūnūrūk) olusuyor demektir.
Multiple Display Control (MDC)
Coklu Ekran Kontrolu (MDC), ceseitli ekranlarin kolayca ve aynianda bir bilgisayar uzerinde calistinimasini
saglayan bir uygulamadir. Bilgisayar ve ekranarasindaki iletisim icin bir seri iletisim standardi olan RS-232C
kullanilir.
Bu belgedeki bilgiler onceden belirtilmeden deigistirilebilir.
© 2008 Samsung Electronics Co., Ltd. All rights reserved.
Samsung Electronics Co., Ltd. sirketinin yazili izni olmadan herhangi bir sekilde yeniden uretilmesi kasinlikle yasaktir.
Samsung Electronics Co., Ltd. bu belgedeki hatalardan veya bu malzemenin yapisi, performansi veya kullanimina bagli olarak ortaya cikan veya olusan zararlardan sorumlu tutulamaz.
Samsung, Samsung Electronics Co., Ltd. sirketinin kaytili ticari markasdir; Microsoft, Windows ve Windows NT Microsoft Corporation sirketinin kaytili ticari markalandir; VESA, DPM ve DDC Video Electronics Standard Association'in kaytili ticari markalarir; ENERGY STAR adi ve amblemi U.S. Environmental Protection Agency'nin (EPA) kaytili ticari markasdir. Samsung Electronics Co., Ltd. sirketi ENERGY STAR ı Ortağlıralak, enerji verimiligi açsindan bu urünün ENERGY STAR yonergelerine uygün Oldaguṇu belirlemistir. Burada sozu edilen diger tum urun adlan ilgili sahiplerinin ticari markaları vya kaytili ticari markalandir.
SAMSUNG
Manufacturer:SAMSUNG ELECTRONICS CO.,LTD
12th FL., Samsung Main Bldg., 250, 2-ga, Taepyung-Ro
Seoul, Korea
Tel:+8227277114
LVD: P.O. Box 73 Blindern, N-0314 Oslo, Norway
Tel)47-22-96-03-30,Fax)44-22-96-05-50
EMC: Samsung Electronics Co., Ltd. EMC Test Laboratory
416 Maetan-3 Dong, Yeongtong-gu, Suwon City, Gyeonggi-do,
Korea, 442-742
Tel) 82-31-200-2185, Fax) 82-31-200-2189

TruSurround xt, SRS ve (●) Sembolu SRS Labs, Inc. in ticari markalandir. TruSurround xt teknojisi SRS Labs, Inc. in lisansiyla kullanilmistr.
Yactota no Beptnkaan
Iodobho fnyopeceHTHO namne, %Kpah Don&En Bocpon3Becn OdoHo To e 306pa&ehne MHO&ectBO pa3 B cekyHdy, YTObbl nonb3OBaTeB CMOR erO yBnDEb. Yactota taTKNX NOBtOPB H3bBaetcY AcTota KaDPoB, INN YAcTOTO N6HOJIeHHe. EINHua N3MepeHHe?U. © 1995-2008 SAMSUNG. ALL Right Reserved  Ppabnna TeHHNK 6e3onacHcTn BVeIeHne Iopdknloyehne Pa6ota c nporppaMMHbIM 06ecneenuem HactpoKa MOHTOPa YctpaHHeHne HEnCnpaBHOCTeI Cneunpkauu HnΦopMaun DnB6Oonee BbICOKoro KaueCTBa H3o6paXeHn NHΦOPMALJNRAO5 N3DEENIN (Ппсдoxраннго ot 3фхekta octatoHoro n3o6paKeHH) PpIJIoxKeHneTFT-LCD Monitor
www.samsung.com  LbETN BHeHnBnI N3dEINMAOTy paJIHATcB 3aBNCIMOCTN OT MOnEIN, aXapakTePNCTKN I3dEINMAOTY IN3MeHrTcB6e npedBaPntelbHorO yBeDOMNEHnC LcBky COBepueHCTBOAHIN.HOpopMaun
Ja60Jee BBICOKO KAeCTBa n3o6paXeHHN Дя поуеня ontmanbHoro kaucctBa H36paekhenia B KOHTponbHOn naHEn KOMnbIotepa HAcptpoTe pa3peuhenie n Ko3pfnueent HnKekzim 3kpaHa (hactOty perehepaun) cornacho HnHexeNeyUcIM nyHKTAM nHCTpykUn. CyueCTByET bepoTHocB noLuyenra H36paekhenia HepOBHOro KaeeCTBA, ecn BB He BbIbepeTe dny Baew ToHkonneHouHOn KK-naHEn (TFT-LCD) ontmanbHoe kaucctBO H36paekhenia -Pa3peeHHe:1360x768 Vertical frequency 60 B D aHHO Moen Hcnoh3yetc ToKoHneHouHa JK-naHEnb (TFT-LCD), nroToBHeHHa c npimeHeHMc COpeMeHHo TExHoHOrn NoIpyPoBoDnIKOB C ToHocTbO 1 ppm (OHa MInIOHHa). HOrda Nkcebl KPACHO, 3EJIeHO, CNHEO u BELIO qBeTOB cTaHOBraTc RpKmMn Hn HepHbIMN. 3TO He AEBTcR CNECTBnEM INOXO KAeCTBa H He Bb3bIaET HeyDo6CTB pa6ote. Hapmep, konueCTBO cy6-nKceneB daHHOM nndnn coctabnreT 3.133.440. Дячсн ChapyкMonHToPаианeнHaHecnTe He6oJIbwoe KoJInHeCTBo peKOMeHnyEmoro 电TRE BoeCtBaHa cyxHy mRkyTKaHbN npOTpIte NoBepXHoCTN. He npKnaDbBaIte n3mUHee DabNeHne Ha KK-3kpan, npocTo octopoxHo erO npOTpIte. PnH3NIMHEm DaBHeHH Bb MoKeTe ero NOBpeDHTb. BbI CMOKTe NOJYuHTb 60e ee KaHeCTBeHoe M3o6paKeHne, ecJIaKTINBn3IpyTe Ha 3kpaHe onUIO "ABTOHaCTpOka" ("auto adjustment function"). Ecnn noce aBTOHaCTpoKn Bce eue npCyTCTByOT nomexn, nCnoIb3yIe pejkm ToHKoHAcTpoKn (FINE/COARSE). PnOTo6paKeHm HEnoDnKHO KApTnKn B TeueHHe npOdoNKeTeNbHoro nepNoa BpeMeHn MOryt NOBnTbC8 OCTaOHTbHe N3o6paKeHn Hn Hepe3KoCTb. EcnBbHe cobpaetecb nCnOlb3OBaTb MOHITOP B TeueHne IInTeIbHoro BpeMeHN, nepeKIOUHTe erO Be peKIM 3heproc6epexehn Hnn AKTINB3Npyte XpaHntelb 3kpaHa, otobpaKaIoUs nOdaNXHOe N306paKeHne. INHOPMALUNOBN3DEENNN(NpeoopaenneOt3Φfekta octaToCHoro u3o6paXeHHa4To TaKoe 3ΦΦeKT OCTaTOUHOrO H3o6paKeHnE?
30000000000000000000000000000000000000000000000000000000000000000000000000000000000000000000000000000 BbIKIOHHe HHTaHnY, yCTaHObKa 3KpaHHo 3AcTaBKn NIIpeXIM 3Heproc&epExeHHN
BbiknoyaTe nHTaHHe Ha 4 caca nocne 20-Yacoboro nCnoIb3OBAHnA. BbIKIOuayte nHTAHHe Ha 2 yaca nocne 12-yacOBoro nCnonb3OBAHNA. BbIKIOHaiTe MOHTOP C NOMOUsBO CXEMBI ynpaBneHnI NTAHm B MEHIO CBOINCTB INCNner KOMNtboTePA. - Ecnn Bo3MOKHO, nCOnb3yTe 3kpanHyIO 3actABky. - PekomeHdyETcNcNoB3ObaTb 3kpaHHyIO 3actABky ODHoro CBeta NIN DBNKUeecr NIO6paKeHne.PepnoDnueckoe 3MeHeHne HnFopMa"Hn O Bete
PnIMeuaHHe
-нсповьтдураразиньхцьета KaKdbie 30 MmHyT mMehnTe HOpmauO uBete, nCnoJb3yra 2 pa3NHybix Ubeta. I36eataHeNCnoJIb3oBaHnRAKOM6HaCnN CnMBOOBnFOHOBOrOzBETAc60nboupa3HnueB 136eatae nnoBbOaHn cepbix cBeTob, T.K. B daHHOM cnUyae 0c0f0KT octatoHoro 136paXeHn MoKet BO3HNKHyb 6bIcTepe. H36eraIte hCnOJb3OBaHmra CBETOB C 6oBwO pa3HnueB BApKocT (eepbN n 6ebl, cepb).  PepnoDnueckmMeHnTe"BetaCNMBONB
- IcnoIb3yIte HacbIeHHBeIe CHe6oBbOpa3HnEeB RApKocTn -Bpemr:IM3MeHHeNcUBeTaCNMBONOBuCBeTaΦOHaKaJDbte 30 MNHyT.  KaKdbte 30 MNHTNMEHnTE CMBONbI c NMOOJIbOp nepeMeueHn.  Ha ekpahe nepnoDneckn OTo6paKaeTcB DmNkyUeecra N3o6paKeHHe C norOTINOM. -BpMa:OTo6paKeHHe DnKxUeROc H3o6paKeHn C norOtnmOB TeueHne 60 cekyhd nocne 4- hacoboro nCnonb3oBAHn. HaIyHnCnOc 3aunTb MOHOTOP OTOBHNKHOENH 30fKeTAOHTOHO 3o6paKeHn - 3TO BkIOHTb NtAHNE INN YCTaHOBTb DnA KOMbHOtepa INN CNTeMb, eCN OH He IcONb3yOTc, nporpAMMy 3kpanHo 3actABn. TapaHTmHOe 6cnyKBAHne TaKke 6ydet OrpaHnHeO cOrnACHO HnCTpyKuHm PyKOBOCTBa nONbOBATeNa.Mcnonb3OBaHHe yHK"m Screen Scroll (PpokpyKa kpaHa)
- Icnonb3yIte fhykuuio Screen Scroll (Ipokpytka 3kpana) - HencpabHoctb: cepna ropn3oHTaJIbHa nonOca nepemaeTcB BBeP x BHN3.  -Bb6epntcncoc6yctpaehnna PykoOCTBO nonb3OBaTeNA: 3KpaHHOe MeHO -> Set Up (HAcTPOKa) -> Safety Screen (3KpaHBe3oNaocHcTo) -> Screen Scroll (PpokpyTa 3KpaHa) .Bpemehno INHTepban:1-10 yacob (pekomehdyetcra:1) BpeMeHHoepnoD:1-5cekyH(peKOMeHNyETcra:5)PnMmeHne
(Cm.pa3enpykoBODCTBA nonb3oBaTeN KOMnAKT-DnCKa,ncBraeHHbI pYHKuM 3KpaHHOrMeHO. HeKOTOpBie MoEN MOrYT OTCyTcBOBaTb.)McnoIb3ObaHne cyHK"n Screen Pixel (NkceJn ekpana)
- Icnonb3yTe dyHKuio Screen Pixel (IinKceJn 3kpaHa) - HenncpabHocb: YepHaT TOka nepemeuaetcBBePx Hn3.  -Bb6epntcncoc6yctpaHeHH PykoOCTBO nonb3OBATEIA :KpaHHOe MeHIO Set Up (HactpoKa) Safety Screen (KpAH 6e3oNaChOCTn) Pixel (ToKa) Bpemehno INHTepban:1-10cacobpekomedyetc:1 BpeMeHHo npno:10-50 ckyH (peKoMeHHyETc:50) IcnojblayteykuuScreenBar(NonocahkaPae) - HenncpabHocb: Hepn ropn3oHTaBna nn BepnKaIbHa nOloca nepemaeTcB Bepx IN BH3.  -BbIepeCnoc6yCTpaHHeHH PykoDBCTBO nonb3OBateJRA: 3KpaHHe MeHIO -> Set Up (HaCtpoKa) -> Safety Screen (KpaHBeaONaCHOCTn) -> Bar (Nonoca) BpeMeHHoHnHTepBaJ:1-10yacOB(peKOMeHdyTeTcA:1) BpeMeHHo nepno:10-50cekyH(peKoMeHnyetc:50)PpHmEaHne
(Cm.pa3enpykoBODCTBA nonb3oBaTeIaKOMnAKT-DnCKa,ncBraeHHbIyHKuIM 3kpaHHO MeHO.HeKOTOpBie MoENM MOrY TcYCTBOBaTb.)MncnoIb3ObaHne yHK"nn Screen Erasing (ydaJIeHHe n3o&paXeHnC 3KpaHa)
- Icnonb3yute fyHKuio Screen Erasing (Ydaene Hne 3o6paekenna c3kpaHa) - HencnpaBHOCTb: 2 BepTikanbHbX bNoK npemeuauoTc, ydaen n3obpaKeHne c ducnner.  -BbIepeTe cnooc yctpaHnna PykoBocBO nonb3OBaTeN: 3KpaHHOe MeHO -> Set Up (HactpoKa) -> Safety Screen (3KpaH6e3oNaCHOCTn) -> Eraser (YdaneHeNe H3O6paxEHn) BpeMeHHoHnHTepBaJ:1-10yacOB(peKOMeHNdyETcA:1) BpeMeHHo npHoi 10-50 cekyhd (peKOMeHHdyTeTc:50)Ппмочаиме
(Cm.pa3enpykoBODCTBA nonb30BaTeNaKOMnakT-dNcKa,ncBraeHHbIyHKUIM 3kpaHHO MeHO. HeKOTOpBie MoDenM MOrY TcYCTBOBaTb.) © 1995-2008 SAMSUNG. ALL Right Reserved  PapBnIaTexHnKn 6e3onacHcTn BVeIeHne IopdknloyuHne Pa60aC nporpaMMHbIM 06ecneenuem HactpoKa MOHTopa YctpaHHeHne HEnCnpaBHOCTeI Cneunpkauu Hdopmaun Appendix CB83bBaIeTecBc SAMSUNG no Bcemy Mnpy TepMHHbI HOMOTFT-LCD Monitor
www.samsung.com  BETN BHeuHn BnI3dEINM MOrTy pa3nnHaTbcra 3aBNCIMOCTH OT MOeIN, a XapakTePncTKN IN3dEIN MoryT H3MeHbTaBc6e3 npdBaPntelbHOrO yBeDOMneHn C cIeJIbO yCOBepWeHCTBOBAHn.Appendix
CBAIbAIaTecb c SAMSUNG no Bcemy Mnpy PnMMeaHne - Ecn y BAC ecb npednokeHnBONPOcB no npodykTAM Samsung, cBra3baiTecb C HΦopMaIIOHHbIM ΚeHTpOM Samsung.North America
U.S.A 1-800-SAMSUNG(726-7864)http://www.samsung.com/us CANADA 1-800-SAMSUNG(726-7864) http://www.samsung.com/ca MEXICO 01-800-SAMSUNG(726-7864) http://www.samsung.com/mxLatin America
ARGENTINE 0800-333-3733 http://www.samsung.com/ar BRAZIL 0800-124-421 http://www.samsung.com/br CHILE 800-SAMSUNG(726-7864) http://www.samsung.com/c COLOMBIA 01-8000112112 http://www.samsung.com.co COSTARICA 0-800-507-7267 http://www.samsung.com/latin ECUADOR 1-800-10-7267 http://www.samsung.com/latin EL SALVADOR 800-6225 http://www.samsung.com/latin GUATEMALA 1-800-299-0013 http://www.samsung.com/latin JAMAICA 1-800-234-7267 http://www.samsung.com/latin PANAMA 800-7267 http://www.samsung.com/latin PUERTO RICO 1-800-682-3180 http://www.samsung.com/latin REP. DOMINICA 1-800-751-2676 http://www.samsung.com/latin TRINIDAD & TOBAGO 1-800-SAMSUNG(726-7864) http://www.samsung.com/latin VENEZUELA 0-800-100-5303 http://www.samsung.com/latinEurope
AUSTRIA 0800-SAMSUNG(726-7864)http://www.samsung.com/at 0032 (0)2 201 24 18 http://www.samsung.com/be| BELGIUM CZECH REPUBLIC | 844 000 844 http://www.samsung.com/cz Distributor pro Českou republika: Samsung Zrt, Česka organizačné složka Vyskočilova 4, 14000 Praha 4 |
| DENMARK | 70 70 19 70 http://www.samsung.com.dk |
| FINLAND | 030-6227 515 http://www.samsung.com/Fl |
| FRANCE | 3260 SAMSUNG(726-7864) 08 25 08 65 65 (€ 0,15/min) http://www.samsung.com/fr |
| GERMANY | 01805-121213 (€ 0,14/Min) http://www.samsung.de |
| HUNGARY | 06-80-SAMSUNG(726-7864) http://www.samsung.com/hu |
| ITALIA | 800-SAMSUNG(726-7864) http://www.samsung.com/it |
| LUXEMBURG | 0035 (0)2 261 03 710 http://www.samsung.com/be |
| NETHERLANDS | 0900 20 200 88 (€ 0,10/Min) http://www.samsung.com/nl |
| NORWAY | 815-56 480 http://www.samsung.com/no |
| POLAND | 0 801 801 881 022-607-93-33 http://www.samsung.com/pl |
| PORTUGAL | 80 8 200 128 http://www.samsung.com/pt |
| REPUBLIC OF IRELAND | 0818 717 100 http://www.samsung.com/ie |
| SLOVAKIA | 0800-SAMSUNG(726-7864) http://www.samsung.com/sk |
| SPAIN | 902 10 11 30 http://www.samsung.com/es |
| SWEDEN | 0771-400 200 http://www.samsung.com/se |
| SWITZERLAND | 0800-SAMSUNG(726-7864) www.samsung.com/ch |
| U.K | 0870-SAMSUNG(726-7864) http://www.samsung.com/uk |
| CIS | ||
| ESTONIA | 800-7267 http://www.samsung.ee | |
| LATVIA | 800-7267 http://www.samsung.com/lv | |
| LITHUANIA | 8-800-77777 | http://www.samsung.IT |
| KAZAKHSTAN | 8-10-800-500-55-500 | http://www.samsung.kz |
| KYRGYZSTAN | 00-800-500-55-500 | |
| RUSSIA | 8-800-555-55-55 | http://www.samsung.ru |
| UKRAINE | 8-800-502-0000 | http://www.samsung.ua |
| UZBEKISTAN | 8-800-120-0-400 | http://www.samsung.uz |
| Asia Pacific | ||
| AUSTRALIA | 1300 362 603 | http://www.samsung.com/au |
| CHINA | 800-810-5858, 010- 6475 1880 | http://www.samsung.com.cn |
| HONG KONG | 3698-4698 | http://www.samsung.com/hk |
| INDIA | 3030 8282, 1800 110011 | http://www.samsung.com/in/ |
| INDONESIA | 0800-112-8888 | http://www.samsung.com/id |
| JAPAN | 0120-327-527 http://www.samsung.com/jp | |
| MALAYSIA | 1800-88-9999 http://www.samsung.com/my | |
| NEW ZEALAND | 0800SAMSUNG(726-7864) | http://www.samsung.com/nz |
| PHILIPPINES | 1800-10-SAMSUNG(726-7864) | http://www.samsung.com/ph |
| SINGAPORE | 1800-SAMSUNG(726-7864) http://www.samsung.com/sg |
| THAILAND | 1800-29-3232, 02-689-3232 http://www.samsung.com/th |
| TAIWAN | 0800-329-999 http://www.samsung.com/tw |
| VIETNAM | 1 800 588 889 http://www.samsung.com/vn |
| SOUTH AFRICA | 0860-SAMSUNG(726-7864) http://www.samsung.com/za |
| TURKEY | 444 77 11 http://www.samsung.com.tr |
| U.A.E | 800-SAMSUNG (726-7864) http://www.samsung.com/MEA |
| 8000-4726 |
CnHxpcnHan
CnHxpocirhannmHa3bIaKOTcCTaHdapTHe CnHnbl,Heo6xOIMMbIeDnOTo6paKeHnHa MoHHTope Tpe6yEmbixCBetOB.OHnNoP4a3dEIAKOTcHa CnHnblBepTKaJIbHOI RopINoHTaJIbHOI CNHXPOH3aUIM. 3Tu CnHnblObecneuBAKOT OTo6paKeHHe HOpMaJIbHbIX CBETbX N3OpaKeHn cYCTaHOBNEHHbIM PaapeWauoe cnOCo6HoCTbIO uactOtio OBHOBNeHn. TnblcHxpcnHaIOB| Рацеловая Зто | Метор падуни на монитор одельно Сигналы Вerte Кально синхрони заши. |
| Полный Зто метор | БКЮчени Сигналов Вerte Кально синхрони заши вkompoшпунь (полный) телесганл и падуни nx на монитор. Монитор отообраожает zebeta Изobраоженя руtem рацелени Кмpoшпного сигнала на ясхODье zbeToBье сигналы. |
3epnctcb
M36paKeHHe Ha MoHHTope cnaeraTcN 3KpaChbIX, 3enebIX IN CNHHX ToeK. TEM BblIe pa3peWHeHne. PaCtOraHHe MEXdy DByMa TOnKaAMn OndHOrO CBeTa H3aBbAeTcR "3epHnCTocb". EInHnua N3MepeHnra: IYactota no Beptnkann
3KpaH npenncbIaBaeTc 3aHOBO NO HeckonbKO pa3 B cekyHy, YTO6bI co3daTb N3O6paKeHne, BNDIMoe dnn nONb3OBaTeN. Yactota TAKNX NOBTOPOB B cekyHy ha3bIaBcTc YactOTOn no BePTnKaHn, INN YactOTOn O6HOBNeHn. Yactota TAKNX NOBTOPOB Ha3bIaBcTc Yactota KaPOb, INN YactOTOn O6HOBNeHn. EdnHnca n3MepeHn: T. Pnmep: Ecnn nn Hnndkatop mraet 60 pa3 B cekny, 3to COOTBETCTBYET 60 Tc.Yactota no Topn3oHTan
BpMaHa npopncobbAHAe OndHcTPOKn, coednHIOeI npabbl n Iebl Kpa HcpaHa no ropnoHTanm, na3bAeTcra TOpniOHTaBbHM PepnoDM. ObpaTHoe TOpniOHTaBbHOMy PepnoDy NcNo Ha3bBaetc TaCToTo No TOpniOHTaN. EdnHua 3MepeHn: kT.Metodyepe3ctpoHn He-yepe3cTPOHpa3BepTK
TOKa3 roPHTaBbHx HnHH Ha 3KpaHe B npAke CBepxBy HnH3 HAsbBaETcM MeTOOM He-uepe3ctPOuHO pa3BeptTK, TOrda KaK noka3 no OChepdi ChauHa a HeeTHbX LnHH, a Notom HeeTHbX, HAsbBaETc MToDOM uepe3ctpOHO pa3BePTK. B60bnHCTBe MOHtOpOB NcONb3yEtc MToD He-uepe3ctPOUHO pa3BeptTK, YTO ObecneHBAet YeTkoE h3o6paXeHHe. MeToD uepe3ctPOUHO pa3BeptTK 3TO TO MeTO, KOTOpBI INcOnb3yETcB TeneBn3opax.Plug & Play (авTomатическая насточа)
3TaФyHKUHOTBeuHaETa HauNlyuWue KaueCTBO 3KpaHaNyTeM OeBcneHeHnA BtOMaTnueckOrO 6MeHa HINFOPMaueH MekDy KOMbIOpEPOm MOHITOpM. 3TO TMOHITOP CJeDyET MekDyHapOnHbIM CTaHApTAM VESA DDC dRyHKUHn Plug & Play (ABtOMaTnuecka HaCtpoKa).Pazpeшени
KoIueCTBO TOUeK NO rOpH3OHTaII IN BepTtKaIaII, IcNoJIb3yEmOE dIg cO3dHaN H306paKeHn Ha 3kPaHe, Na3bBaETc" pa3peSeHHeM". 3Ta IuPpA nok3bIbaet ToHocB n306paKeHn. BbICOKe pa3peSeHHe XopoIo NIOJb3OBA TbIg KOMPiEckChbIX 3aDaH, NoCKoJIbKO Ha 3kPaHE MoXHO NOKa3aTb BoJIbWe N306paNTeHbHO INHOpMaun. Плпмер:Есгп рашшени павно 1360X768,to STO OЗначаET,чTOибражени Ha 3кразен COCTONI 1360TOUeK no ropИЗоNTANH (roPИЗоNTANbHoe pa3peшени) n 768 cTPOK no BEPTIKANI (BepITKANbHoe pa3peшени).Multiple Display Control(MDC)
PporpmaM ynpaBneHn HeckonbKMM MOHTopam (Multiple Display Control; MDC) npdctabn ecoB npnoKeHne, no3BOJHOe pa6oTaB Ha PIK ONDOBpeMeHHO C HeCKoJIbKMM MOHTopam. IIN CB3N MeKdy PI K MOHTOPOM nONb3yETcA TAnDAPThb NOcNEoBaTeNbH INTEppeC RS-232C. PONHOMOHNDaHHbIe, codepkauneC B 3tOM DOKymente, MoryT 6bITb N3MeHbI 6e3 npedBapntelbHorO yBeDOMHeHr.
© 2008 Camcyh3neKtpoHkC Ko. JtD. Bce npaba 3aunuehbl. Bocnpn3BeHne B kakoi 6bl-TO Hn 6blno fOpme 6e3 nncbMeHHoro pa3peHnra ot Samsung Electronics Co., Ltd. cTporo 3anpeHo. Samsung Electronics Co., Ltd. He HeceT OTBETCEHHOCTn 3a OIN6Kn nnn CnyAHHe DEICTBn Hn nocEnyUOuHne NobpeXeHn, noIyHeHHbE B CBAH C yCTaHOBHeHMem, paBToH nn cNoNb3OBaHmEm daHHoro MaTePnana: Samsung ABNIOCT3apeHCTPPOBAAHbIMTOPTOBbIMMapKaAMM Samsung Electronics Co., Ltd.; Microsoft, Windows NT ABNIOCT3apeHCTPPOBAAHbIMTOPTOBbIMMapKaAMKopnpaumMaikpocodT; VESA,DPMN DDC ABNIOCT3apeHCTPPOBAAHbIMMTOPTOBbIMMapKaAMAccouaunBndeOJNEKTPOHHK CtaHApT;HaBaHne NORO ENERGY STARABNIOCT3apeHCTPPOBAAHbIMMTOPTOBbIMMapKaAMM AmePKaHcKOReAreHTCTBa 3aunBuOkpykaioe CpeB (EPA).Kaknaphep ENERGY STAR, Camcyhr 3abeepET, YTO TOT MOHITOP COOTBETCTBYET peKOMHeDauimEMENERGY STAR B OTHoWeHm 3ΦΦeKTHBOHO 3HEPRONl30BAHn. Bce octaIbHbe HaBaHnIpoDyKuIN, yOnMAHyTBe B DAHNOM DOKyMeHTe, MOrY ABnTBCr TOPROBIM MapkAMNII 3apeHCTPPOBAAHbIMMTOPTOBbIMMapKaAMN IX yBaJaemBX BnadeJIbcB.  1 TruSurround xt, SRS n CnMBoJ (●) RBAJIOTc TOBapHbIMN 3HaKaMNI KOpnpaun N SRS Labs, Inc. 2 TexHonorra TruSurround XT nCnONb3ObaHa no IInueH3nn KOpnpaun N SRS Labs, Inc.TFT-LCD MONITOR
EspanolSMT-4011
Guía de usuario  Instrucciones de seguidad Simbologia Encendido Instalacion Limpieza Otros Introduccion Conexiones Uso del software Ajuste del monitor Resolución de problemas Especificaciones Information ApendiceTFT-LCD Monitor
www.samsung.com  El aspecto externo y el color del producto pueda variar dependiendo del Modelo; las specifications del producto se puedaCambiar sin previo aviso para la mejora del rendimiento.Instrucciones de seguridad
Simbologia  Lea atentamente las siguientes instrucciones de seguridad que han sido 创建as para prevenir dfños al producto y al usuario. Advertencia / Precaución
 Negligencia en el cumplimiento de lasindicaciones signaladas por este simbolo podra occasionar daños fisicos o perjuicios al equipo. Simbolos convenciones
 Prohibido Es importante leer yentar en todo momento   Desconectar la clavija del tomacorriente  No tocar Conectar a tierra para prevenir una descarga electrica Encendido  Cuando no use el computador durante largos periodos de tiempo, ajustelo a DPM. Si usa un protector de pantalla, póngalo al modo de pantalla activa. La imagenes que se muestran son solo de referencia y no se pueda aplicar en todos los casos (o paises). Acceso directo a las instrucciones paraatar la persistencia de imagenes  No use un enchufe estropeado o flojo. - Esto podria originar una descarga electrica o fuego.  No jale del cordón ni toque el tomacorriente con las manos mojadas. - Esto podrila causar una descarga eletrica o fuego.   Use solamente connectores y receptáculos apropriados para hacer la conexión a tierra. - Una connexion a tierra inapropiada可以帮助azar una descarga electrica o una avería en el equipo. (Sólo equipo de Clase I.)   Apriete firmamente el enchufe del cable de alimentacion deforma que no se afloje. - Una conexión Incorrecta podría provocar un incendio.  No doble excessivamente el enchufe ni el cordón, tampoco coloque objetos pesados sobre él, esteoulda occasionar daños. - El incumplimiento de esta recomendacion podra causar una descarga electrica o fuego.  No connecte muchas extensiones o enchufes a un tomacorriere. Esto podrla occasionar fuego.  No desconecte el cable de alimentacion cuando esse usingo el monitor. - Debido a la desconexión se pueda producir un sobrevoltej que dañe el monitor.  No utilise el cable de alimentacion si el conector o el enchufe estan sucios. - Si el conector o el enchufe está sucios, limpielos con un paño seco. - Si conecta el cable de alimentacion con el conector o el enchufe sucios se pueda causar un cortocircuito o un incendio.  Para desconectar el aparato de la corriente, deben desenchufar el cable de la toma principal, por lo que el enchufe principalDebe estar tiempoly fácilmente accesible. - El incumplimiento de esta recomendacion podra causar una descarga electrica o fuego. Instalación Póngase en contacto con un centro de servicios专业技术o autorizzato cuando instale el monitor en un lugar expuesto a gran calidad de polvo, temperatas extremas, alto nivel de humedad y produits químicos, y en Lugares donde el producto se vaya a utiliser las 24 del día, como  aeropuertos,estaciones,etc. El incumplimiento de estas indicaciones pueda causar serios desperfctos en el monitor.  Ponga el monitor en un lugar con poca humedad y un minimo de polvo. - Podria producirse un corto circuito o fuego en el interior del monitor.  No deje caer el monitor cuando lo mueva. Esto podria causar dafo al producto o al cuerpo humano.  Instale la base del monitor en una vitrina o un estante de tal mannersque la base no sobresalga. - Una caía del producto podría dāñar este o causar lesiones fisicas.  No coloque el aparato en una superficiekeepequeia o inestable. - Coloque el aparato en una superficie lisa y estable, ya que el aparato pueda caer y producir lesiones a algoien que pase bajo aél, especialmente a los niños.  No deje el aparato en el suejo. - Una persona (especialmente un niño) podra tropezar con él.  Para IMPEDIR QUE EL FUEGO SE PROPAGUE, MANTENGAL LAS VELAS U OTRAS LLAMAS EXPUESTAS SIempre ALEJADAS DE Este PRODUCTO. - Podria provoc un incendio.  Mantenga el cable de alimentacion alejado de las fuentes de calor. - Un aislamento fundido pode provocar un incendio o una descarga electrica.  No instale el aparato en lugarares mal ventilados, como por exemple una estanterias, un armario, etc. - Un aumento de la temperature interna peuvent causar un incendio.  Cologne el monitor cuidadosamente. - Podria dañarse o romperse.  No asiente el monitor sobre la pantalla. Se podria dañar la superficie TFT-LCD.  La instalación de un soporte de pared debe hace ser por un instalador profesional calificado. - La instalacion por parte de personal incompete希望能 dar lugar a lesiones. - Use siempre el dispositivo de montaje spécifique en el manual del propietario.  Cuando instale el equipo, procure guardar una distancia de mas de 10 cm desde la pared para poder la ventilacion. - Una ventilación inadequada puede causar un aumento de laTemperatura interna del producto que da como resultado que los componentes tengan una vidautilmasarda yel rendimientosea menor.  Mantenga el embalaje de plastico (bolsa) lejos del alcance de los niños. - Si jugean con el embalaje de plástico (bolsa) los niños peuvent asfiarse. Limpieza  Cuando limpie la caja del monitor o la superficie del TFT-LCD, limpie con una tela suave, ligeramente mojada.  No rocie detergente directamente sobre el monitor. - Puede causar daños, una descarga electrica o un incendio.  Use el detergente recomendado con una tela suave.  Si el conector entre el enchufe y el pin está oxidado o sucio, limpielo apropiamente con una tela seca. 2. Un conector sueio能把caesaruna descarga eletrica o fuego.  No olvide desenchufar el cable de alimentacion antes de limpar el producto. Podriva provocar un incendio o una descarga electrica.  Desenchufe el cable de alimentacion de la toma de corriente y seque el aparato con un paño suave y seco. No utilise ningún producto químico como cera, benzol, alcohol, disolventes, insecticida, ambientador de aire, lubricante o detergente. OtrosIMPORTANTE:
PARA PREVENIR CUALQUIER MAL FUNCIONAMENTO Y EVITAR DANOS, LEA DETALLADAMENTE Este MANUAL DE INSTRUCCIONES ANTES DE CONECTAR Y OPERAR EL APARATO, CONSERVE EL MANUAL PARA FUTURAS REFERENCIAS, GRACIAS. POR FAVOR LEA ESTE MANUAL ANTES DE OPERAR EL APARATO Y GUARDELO PARA REFERENCIAS FUTURAS.  No retire la cubierta (o la tapa posterior). Esto podria causar una descarga eletrica o fuego. 2. Solicite la revision al personal calificado de reparaciones y mantenimiento.  Si su monitor no funciona normalmente- en particular, si hay algunos sonidos inusuales o sale某个 olor del interiordesconectelo inmediamente ycontactese con un centro de vente autorizzato o un centro de servicios. Esto podria causar una descarga electrica o fuego.  Mantenga el aparato alejado de lugares expuestos a petróleo, humo o humedad; no lo instale en el interior de un vehiculo. 2 Esteouldacauseunfunacionamentoincorrecto,una descargaeléctricaofuego. Evite especialmente la Utilizacion del monitor circa del agua o al aire libre donte podria estar expuesto a la nieve o a la lluvia.  Si se cae el monitor o se daña la cubierta, apáguelo y desenchufe el cordón de suministro electrico. A continuación, consulte al Centro de Servicio. El monitor puede functionar Incorrectamente, provocando una descarga electrica o un fuego.  Mantenga launidad apagada cuando haya truenos y relampagos en el exterior, y no permitta que el monitor deje de utiliserse durante un periodo de tiempo prolongado. - El monitor puede functionar Incorrectamente, provocando una descarga electrica o un fuego.  No intente mover el monitor tirando solamente del cable o del cable deASN. - Estoouldracausarunaaveria,descargaeléctricaofuegodebidoal daño del cable.  No nuevo el monitor a la izquierda o a la referencia jalando solamente el cordón o el cable deSEO. - Estoouldracausarunaaveria,descargaeléctricaofuegodebidoal daño del cable.  No cubrir las rejillas de ventilacion del gabinete del monitor. - Una mala ventilación podra Causear averías o fuego.  No coloque objetos contenedores de agua, produits químicos oPEGUEOs Objetos de metal sobre el monitor. - Esto podria causar un funciona incorrecto, una descarga electrica o fuego. Si un cuerojo extraño en el monitor, desenchufe el cable de alimentacion ypongase en contacto con el Centro de Servicio.  Mantenga el aparato alejado de aerosoles químicos combustibles y sustancias inflamables. - Esto podria causar una explosión o fuego.  Nunca meta algo metalico en las aberturas del monitor. - Esto podría Causea una descarga electrica, fuego o lesiones. No introduzca objetos de metal como la punta de un destornillador, un cable o un taladro, ni objetos inflamables como papel o cerillas en los orificios de ventilacion, conectores de altevoces o puertos AV.
- Podría provocar un incendio o una descarga electrica. Si se introducen sustancias extrñas o se vierte agua en el aparato, apague este, desenchúfelo ypongase en contacto con un centro de servicios专业技术.   Si el aparato muestra unaImagen fija durante un长大o periodo de tiempo, pueda quedar unaImagen residual o cierta indefinccion. - Establishzca el modo de ahorro de energia o configure un protector de pantalla con una imagen en movimiento, cuando seanecessaryamente deraj desatendido el monitor durante un长大o periodo de tiempo.  Ajuste laResolution y la fecuencia a los niveles apropriados para el Modelo. - Los niveles inadequados de resolution y de Frequencia能把 dañar la vista del usuario. 40 pulgadas (101,6 cm) - 1360 X 768  Mirar el monitor continually deqse una corta distancia puede caesar daños en la vista.  Para registrar la tensión del ojo, tome un descanso de al menos cinco Minutes antes de cada hora de uso del monitor.  No instale el producto en una superficie inestable, desigual o que pueda experimentar vibraciones. - Una caía del producto podra darar este o causar lesiones fisicas. El uso del producto en unaubicaciónque experimente vibracionesuede acortar la vidautil del aparato o provocar un incendio.  Cuando quiera desplazar el monitor, apaguelo y desenchufelo de la toma de corrente. Cerciorese de que todos los cables, incluyendo el cable de la antenna y los cables de conexion con除外 dispositivos, esten desconectados antes de mover el monitor. - No desconectar correctamente un cable pourrait fazer y provocar un incendio o una descarga electrica.  Traslade el aparato entre dos o mas personas. - Una caía del aparato pueda darar este o causar lesiones fisicas.  Coloque el aparato fuera del alcance de los niños ya que podrianestropearlo si se suben encima. - La caía del aparato pueda causar daños fisicos o inclujo la muerte.  Si no va a utiliser el producto durante un periodo de tiempo prolongado, desenchufe el cable de alimentación. - Podria producir emisiones de calor por la acumulacion de polvo o la disminuccion del aislamento que causaran descargas lectricas o un incendio.  No deposite los objetivos favoritos de los niños (orialquier otro)... objet que pueda resultarles atractivo) encima del aparato. - Los niños peuvent intentar subirse al aparato para coger el的对象. El aparato pueda caer y causar lesiones fisicas o incluo la muerte.  Cuando que las pilas del mando a distancia,onga cuidado de noURTARLAS al alcance de los niños, ya que podrian tragarlas. Mantenga las pilas fuera del alcance de los niños. - En caso de intoxicacion, consulte a un medico inmediatamente.  reemplazar las pilas, colóquelas en la polaridad correcta (+/-) según lo indicado en el compartmentido de las pilas. - La polaridad Incorrecta puede hacer que una pila se rompa o sufra un derrame del liquido interior, con riesgo de incendio, lesiones, o contaminacion (daños).  Use solo pilas estar degun lo especificado.No use pilas nuevas y usadas juntas. - pueda hacer que una pila se rompa o sufra un derrame del liquido interior, con risiego de incendio, lesiones, o contaminacion (daños).  Las baterias (y las baterias recargables) no son residuos normales y deben devolverse al lugar adecuado para su reciclaje. El usuario es responsable de devolver las baterias usadas o recargables al lugar adecuado para que se procee a su reciclaje. - El usuario可以选择 devolver las baterías usadas o recargables al centro municipal de reciclaje más(PRXTO)o a un establishimiento que vendal el mesmo tipo de baterías o de baterías recargables. © 1995-2008 SAMSUNG. ALL Rights ReservedContidente
Instrucciones de seguridad 1
Simbologia 1 Encendido 1 Instalacion 2 Limpieza 4 Otros 5Introduccion 12
Contenido del paquete 12 Su monitor 13 Disposión mecánica 20Conexiones 26
Instalacion del kit del soporte 26 Conexión del monitor 27MDC 33
Ajustedemonitor 53
Entrada 53 Picture [PC/BNC/DVI Modo] 54 Picture [AV / S-Video /Component / DVI-Video Modo]. 56 58Setup 59
Control multiple 62 62Resolucion de problemas 65
Comprobación de las functions de autoverficación 65 66 Q&A 68Especificaciones 70
Generales 70 Ahorro de energia 71 Modos de temporizacion predefinidos 71Information 73
Para Obtener una Mejor Presentacion 73 INFORMACION de PRODUCTO (Libre de retencion de imagenes) 73Apéndice 77
Contacte con SAMSUNG WORLDWIDE 77 Téminos 79 Eliminación correcta 80 Autoridad 80SAMSUNG
Instrucciones de seguidad Introduccion Contedio del paquete Su monitor Disposition mechanism Conexiones Uso del software Ajuste del monitor Resolución de problemas Especificaciones Information ApendiceTFT-LCD Monitor
www.samsung.com  El aspecto externo y el color del producto pueda variar dependiendo del modelo; las specifications del producto se puedaCambiar sin previo aviso para la mejor del rendimiento.Introduccion
Contenido del paqueteNota
- Compruebe que los siguientes elementos se incluyen con el monitor. Si falta algo n elemento, contacte se con su proveedor. Pongase en contacto con un distribuidor local para adquirir los articulos adiconiales.Nota
- Nouveleaparatoen elsuelo.  MonitorManual
 Guía de usuario  Documento de garantía (no esta disponible en todas las localidades)  Guide de l'utilisateur, logiciels MDCCable
 Cable de senal Cordon electrico  Otros    Control remoto Baterias (AAA X 2) Cubierta-tapon  Conector adaptor BNC a RCA.  Soporte temporalSe vende por separado
   Kit de montaje en la pared Juego de altavoces Kit del soporte   Cable DVI Cable BNC Su monitor > Parte Delantera   1) MENU Abre el menu OSD. Internacional se usa para pagar del menu OSD o:volver al menu anterior. 2) Botón Arriba-Abajo Mueve verticalmente desde un elemento de menu a other oajsta los values del menu seleccionados. 3) Botón Izquierda-Derecha / Botón Volumen Mueve horizontallymente desde un elemento de menu a other oajusta los values del menu seleccionados. Tambien ajusta el volumen del audio. 4) ENTER Bolón Source (Fuenté) Se usa para selección el menu OSD. 5) SOURCE Cambia desde modo de pantalla PC a modo de pantalla Video. Cambiar la fuente se permite solamente para los dispositivos externos que estan connectados con el monitor en ese momento. [PC] [BNC] [DVI] [AV] [S-Video] [Component] >> Hagaclinicaquilparaveruna secuenciadeanimacion. 6)PIP Pulse este boton para controlar la ventana PIP. No se可以选择 solapar más de un PIP en la pantalla, bajo que BNC y el componente utilizes el本身就是 terminal. >>Haga Cliq aquipara veruna secuencia de animacion. PC AV / S-Video / Component Modo BNC AV/S-Video Modo DVI AV / S-Video / Component Modo AV/S-Video PC/BNC/DVI Modo - Componente PC/DVI Modo 7) Energia Use this boton para encender y apagar el monitor. 8) Indicador de encendido Use this boton para encender y apagar el monitor. 9) Sensor de control remoto Oriente el control remoto hacía esta zona del monitor. Nota - Vea Ahorrode de Energía, descripto en el manual, para mayor información en lo referente a las configuraciones de ahorro de energia. Para ahorroar energia, apague el monitor cuando no lo necesse o cuando no lo use por periodos largos de tiempo. > Parte Posterior Nota - Para más informaciónreferente a las Conexiones de cable, vexe Conexión de cables en Instalación. La disposición trasera del monitor pueda variar levamente dependiendo delmodelo del monitor.   A 1) POWER SW ON [ ] / OFF [O] (Botón de alimentación on/off) Encendidoyapagadodelmonitor. 2) POWER IN (Toma de corriente) Cable de alimentacion, Conexiones en el monitor y enchufe de pared.  B 3) RS232C OUT/IN (Puerto serie RS232C) Puerto de programa de MDC (Multiple Display Control, Control de dispositivos multiples) 4) DVI / PC IN [RGB] (Terminal de connexion de video de PC) Usando el D-SUB de 15 contactos - modo PC (PC Analógico) 5) DVI/PC IN [DVI(HDCP)] (Terminal de conexión de video de PC) Usando el DVI-D a DVI-D - modo DVI (PC digital) 6) DVI / PC IN [PC/DVI/BNC AUDIO IN] (Terminal de connexion audio (entree) PC/DVI/BNC)  C 7) COMPONENT AUDIO IN [L-AUDIO-R] (Terminal de connexion audio (entree) compuesta) 8) BNC/COMPONENT OUT [R/P R, G/Y, B/PB, H, V] (Terminal de connexion de video de BNC / Terminal de connexion de senal compuesta (salida)) Conexión BNC (PC Analógico): connexion del puerto R, G, B, H, V Conexión de senal compuesta: connexion del puerto PR, Y, PB 9) BNC/COMPONENT IN [R/P R, G/Y, B/PB, H, V] (Terminal de connexion de video de BNC / Terminal de connexion de signal compuesta (entrada))  D 10) AV AUDIO IN [L-AUDIO-R](Terminal de conexión de audio compuesto) (entrada) 11) AV OUT [VIDEO] (Terminal de connexion de Video): Modo de AV (salida) 12) AV IN [VIDEO] (Terminal de connexion de Video) (entrada) 13) AV OUT [S-VIDEO] (Terminal de connexion de S-Video): Modo de S-Video (salida) 14) AV IN [S-VIDEO](Terminal de connexion de S-Video) (entradada) 15)EXT SPEAKER(8Ω)[--L-+,--R-+](Terminal de connexion de altavoz (8)) 16) AUDIO OUT [L-AUDIO-R] (Terminal de conexión de audio compuesto) (salida) Salida del monitor: conexión de PC, DVI y BNC Nota - El número de monitores que se pueda conectar con la calidad del bucle pueda variar según el cable, la fuente de la seals, etc. Se pueda conectar diez monitores con un cable si no hay daños en este ni en la fuente de señal.  E17) Bloqueo Kensington
 Nota El bloqueo Kensington es un dispositivo que se usa para fjar fisicamente el sistemas cuando se usa en un situatorio. (El dispositivo de bloqueo debe adquirirse por separado.) Si necesita informacion sobre el uso del dispositivo de bloqueo,pongase en contacto con el establishimiento sobre lo haya adquirido. Nota - Vea Conexión del Monitor para mayor información en lo referente a las Conexiones de cable.> Control remoto
- El funciona del mando a distancia可以选择 entrepecdido por un teilevisor oalgun other dispositivo. electrnoutilizzato cerca del monitor,provocando un funciona incorreto deblado a las interferencias con la fecuencia. 1. ON/OFF 2. MAGICNET 3.MDC 4.L 5. Botón MagicNet 6.+100-- 7.VOL 8. MUTE 9. TTX/MIX 10. MENU 11. EN 12.M/B P.MODE 13.AUTO 14. PRE-CH 15.VCH/P 16. SOURCE 17. INFO 18. EXIT  19. Arriba-abajo Izquierda-derecha 20. S.MODE 21. STILL 22. FM RADIO 23.P.SIZE 24.()SRS 25. H DUAL/MTS 26. PIP 27. SOURCE 28. SWAP 29. 312E 30. REW 31. STOP 32. PLAY/PAUSE 33.FF 1) ON/OFF Enciende y apaga el monitor. 2) MAGICNET Botón de Inicio rápido de Magicnet. -Estamericanoestadisponderableparaeste monitor. 3) MDC Boton de Inicio rápido de MDC. 4) LOCK Este boton activar o desactivar todas las teclas de referencia tanto del mando a distancia como del monitor excepto los botones de encendid y LOCK. 5) Botón MagicNet Use these botones para MagicNet. - Letras y númeroos: use"These botones para书写ir una direccion de Internet. - DEL:utilicelo para retroceder. - SYMBOL:utilicelo para asignR signos.(O-) - ENTER: utiliser el commando intro. -EstafunciOnnoestadisponibleparaeste monitor. 6) +100 /-- Pulselo para seleccionar los canales superiores al 100. Por典型案例, para seleccionar el canal 121 pulse +100 y, a continuacion, pulse 2 y 1 -Estamericano no está disponible para este monitor. 7)-VOL+ Tambienajustaelvolumedelaudio. 8) MUTE Interrumpe (silencia) la calidad de audio temporalemente. Aparece en la esquina inferior izquierda de la pantalla. El audio se reanuda si se pulsa el botón Silencio o El sonido vuelve si se pulsa Mute, +o - en el modo Mute (Silencio). 9) TTX/MIX Los canales de TV proportionsan servicios informativos他们在线电视。 [TTX/MIX se utilizes principalmente en Europa.] 10) II MENU Abre el OSD y activa un elemento del menu resultado. 11) ENTER Activa un elemento del menu resultado. 12) M/B.P.MODE Cuando se pulsa este boton, el modo actual se visualiza en la parte inferior central de la pantalla. AV/S-Video/Component Mode:P.MODE El monitor Tiene quatre configuraciones automaticas de imagen que viennent predefinidas desde fabrica. Pulse el boton或其他 vez para携带 entre los modelos configurados previamente disponibles. (Dinamic Normal Cine Favorito) PC / DVI Mode : M/B ( MagicBrightTM ) MagicBrightTM es unamerican que proporciona un entorno de visualizacion optimo en funcion del contentido de la imogen que estamirando. Pulse el boton otra vez para携带 entre los modos configurados previamente disponibles. (DiversiOn Internet Texto Favorito) 13) AUTO Ajusta la visualizacion de la pantalla automatisticamente. (PC) 14) PRE-CH Este boton se usa para volver al canal正常使用 anteriormente. -Estafuncionnoestadisponibleparaeste monitor. 15) VCH / PA En el modo TV, selecciona los canales de TV. -Estafuncionnoestadisponibleparaeste monitor. 16) SOURCE Cambia desdemodo de pantaillacap a modo de pantaillavideo. 17) INFO La informacion actual de la imagen se visualiza en la esquina superior izquierda de la pantalla. 18) EXIT Sale de o cierra la pantalla del menu. 19) Botones Arriba-Abajo e Izquierda-Derecha Mueve horizontalmente, verticalmente desde un elemento de menu a othero o ajusta los values del menu seleccionados. 20) S.MODE Cuando se pulsa este boton, el modo actual se visualiza en la parte inferior central de la pantalla. Cuando pulse este botón, el modo de audio actual se muestra en la esquina inferior izquierda de la噎. Pulse el botón other vez para embarir entre los modelos configurados previamente disponibles. (Normal Música Cine Dílogo Favorito) 21) STILL Pulse una vez el botón para congelar la pantalla. Pulselo othera vez para descongelar. 22) FM RADIO Enciende o apaga FM Radio (Radio FM). En el modo PC/DVI,sole configuratura SOUND (SONIDO) como FM Radio (Radio FM). En el modo general de Video SOURCE (FUENTE de video), configurara FM RADIO (RADIO FM), apagando la pantalla. En las zonas donde la seals de bille, peut haber ruido de fondo durante una emisión de FM. -Estafuncionnoestadisponibleparaeste monitor. 23) P.SIZE Pulselo para combustir el tamafo de pantalla. 24) (SRS SRS 25) I-II DUAL/MTS DUAL- Utilice el botón DUAL en el mando a distancia para selección Estéreo o Mono cuando el monitor está en el modo TV. MTS- Puede seleccionar el modo MTS (Multichannel Television Stereo). -EstafunciOnnoestadisponibleparaeste monitor. 26) 三PIP Avance rápido 27) SOURCE MagicBright 28) SWAP Intercambio del Descripción de laImagen PIP y de laImagen principal. LaImagen de laventanaPIPapreceré en la pantalla principal,ylaImagen de la pantalla principal. apreceré en la ventana PIP. 29) SIZE Drag 30) REW Rebobinar 31) STOP Parar 32) PLAY/PAUSE Reproducir/Pausa 33)FF Avance rápido © 1995-2008 SAMSUNG. ALL Right Reserved1. Disposition mecánica
2. Monitor
 3. Pie
4. Altavoz
 Up5. Como instalar el soporte VESA
- Cuando instale VESA, asegürese de que cumpla con los estandares VESA internaciones. - Información para adquirir e instalar el soporte VESA: Póngase en contacto con el distribuidor de Samsung más cercano para realizar el pedido. Una vez realizado el pedido, le visitaran技术和 especializados y le instalarán el soporte. - Se necesitan al menos 2 personas para mover el monitor LCD. Samsung no se hace responsable de ningun daño producido al producto ni de las lesiones personales produidas por la instalacion realizada directamente por el cliente.   Para filar el soporte a la pared, utilise unicamente tornillos para metal de 6 mm de diametro y de 8 a 12 mm de longitud. UP6. Instalación del soporte mural
- Para la instalación del soporte mural,pongase en contacto con un technician. Samsung Electronics no se hace responsable de los días causados al producto o al usuario si la instalacion ha efectuado el usuario. - Este produit está indicado para su instalación en paredes de cemento. Puede que este produit no quede bien sujejo si se instala sobreyeso o madera. Components
Utilice solo los componentes y accesos entrega con el producto.  Soporte de pared (1)  Bisagra (Izquierda 1, Derecha 1)  Colgador de plástico (4)  Tornillo(A) (11)  Tornillo(B) (4)  Taco (11) Conjunto del soporte mural
1 Inserte y apriete el tornillo de sujecion en la direction de la flecha. A continuación, monte el soporte en la pared. A. Tornillo de sujeción B. Soporte de pared C. Bisagra(izquierda) D. Bisagra(derecha)  Hay dos bisagras izquierda y derecha).Use la adecuada.2
 Antes de praticar los orificios en la pared, compruebe si ladistancia entre los dos orificios de bloqueo de la parte pos-terior del producto es correcta. Si la distancia es demasiado corta o demasiado larga, aflo-je los 4 tornillos del soporte de pared para ajustarla. A. Distancia entre los dosorificios de bloqueo3
 Consulte el diagrama de instalacion y marque los+puntos detaladro en la pared. Utilice la broca de 5mm para taladrar orifi-cios de una profundidad superior a los 35~mm Inserte cada taco en el orificio correspondiente. Alinee cada uno de los orificios del soporte y de la bisagra conel orificio del taco correspondiente y a continuacion inserte yapriete los 11 tornillos A. Para montar el aparato en el soporte de pared
El aspecto del aparato puede variar según el modelo. (Los juegos de colgadores de plástico y de tornillos son iguales)  1  2  1. Monte el aparato en el soporte de pared y asegürese de quequeda bien sujeto por los colgadores de plástico izquierdo yderecho. 2. Cuando instale el aparato en el soporte,onga cuidado de noatraparse los dedos en los orificios. 3. Asegürese de que el soporte de pared está bien sujeto para QUEEL aparato se mantenga en su situó antes de la instalación.  3  4 Retire los 4 tornillos de la parte posterior del aparato. Inserte el tornillo Ben el colgador de plástico. Apriete los 4 tornillos del caso 2 (colgador de plastico +tornillo B) en los orificios posteriores del aparato. Retire el pasador de seguidad (3) e inserte los 4 soportesdel aparato en los orificios correspondentes del soporte (1).Instale el aparato (2) de mannersque quede bien sujeto alsoporte. Recuerde queDebe volver a insertar y aplutar elasador de seguidad (3) para sutjar firmamente el aparatoal soporte. A. Monitor B. Sopporté depared C. Pared Ajuste del angulo del soporte de pared
Ajuste el ángulo del soporte a -2°antes de instalarlo en la pared.  1. Acople el aparato al soporte de pared. 2. Sostenga la parte superior del aparato por el centro y empujeloHCIaciadelante (en la direccion de la flecha) para ajustar el angulo. 3. Puede ajustar el ángulo del soporte entre -2°y 15°  Asegürese de ajustar el aparato según el centro dela parte superior, y no según elazo derecho oizquierdo del aparato.   Instrucciones de seguidad Introduccion Conexiones Instalacion del kit del soporte Conexión del monitor Uso del software Ajuste del monitor Resolución de problemas Especificaiones Information ApendiceTFT-LCD Monitor
www.samsung.com  El aspecto externo y el color del producto pueda variar dependiendo del Modelo; las specifications del producto se puedaCambiar sin previo aviso para la mejora del rendimiento.Conexiones
Instalacion del kit del soporte Nota - Sólo se deben usar los permos que se incluyen. Pozor Samsung Electronics no sera responsable de los dafios causados por la utilizacion de una base distinta de las especialidades. >Instalacion del Semi-soporte  Ponga la etiqueta "CAUTION" hacía atrás.  1) Para proteger el orificio ubicado en la parte inferior del monitor, alli donde se acoplá el soporte, se usa una cubierta protectora. Aseguèrese de quitar la "cubierta de protección" antes del acoplimiento del Semi-Soporte o del Kit del soporte (vendido por分开ado) y de tapar el orificio usingla cubierta-tapon durante el acoplimiento del it de montaje de pared. 2) Instalacion de los soportes izquierdo y derechocho respectivamente. 3) Ponga el soporte en el agujero situado en la parte inferior del monitor. Inserte el tornillo en el agujero indicado y apriete. (M4 x L15) Pozor
Este soporte está diseñado esspecífico. para el ajuste del ángulo de la pantalla. La Empresa no se hace responsable de problema algoo derivado del uso de este soporte. No utilise nunca este soporte para colocar otheros objetivos.>Instalacion del kit del soporte (Vendido por separado)
    1) Para proteger el orificio ubicado en la parte inferior del monitor, alli donde se acoplá el soporte, se usa una cubierta protectora. Asegúrese de quitar la "cubierta de protección" antes del acoplimiento del Semi-Soporte o del Kit del soporte (vendido por分开ado) y de tapar el orificio usingo la cubierta-tapon durante el acoplimiento del it de montaje de pared. 2) Asegürese de colocar las piezas en la direction adequada y en el situ correcto. (M4 × 15) 3) Ponga el soporte en el agujero situado en la parte inferior del monitor. 4) Inserte el tornillo en el agujero indicado y apriete. (M4× 15) Conexión del monitorEn el caso de un cable de alimentacion con conexion a tierra
Si se produce un fallo, la connexion a tierra peut provocar una descarga electrica. Antes de conectar la alimentacion de CA, debe asegurarde que el cable de connexion a tierra este instalado correctamente. Asimismo, cuando vaya a desconectar el cable de connexion a tierra, no se olvide de desactivar la alimentacion de CA.   - Los dispositivos de entrada de audio y video (AV) como DVD, VCR o Camaras de video, al igual que su computadora, se pueda conectar con el monitor. Para más información sobre是如何 conectar los dispositivos de entrada de audio y video (AV), vease Controles de usuario en Ajuste del monitor. > Conexión con una computadora  1) Conecte el cordón de suministro electrico del monitor a la toma de corriente de la parte trasera del monitor. Active el interruptor de alimentacion. 2) Hay 3 formas para conectar el D-sub al monitor. Seleccionauna de lassiguientes: 2-1) Usando el conductor D-sub (analógico) en la tarjeta de video. Conecte el cable D-sub al puertoRGB de 15 patillas de la parte posterior del monitor y al puerto D-sub de 15 patillas del ordinador.  2-2) Usando el conductor DVI (digital) en la tarjeta de video. Conecte el cable DVI al puerto DVI(HDCP) de la parte posterior del monitor y al puerto DVI del ordinador.  2-3) Usando el conector BNC (analogico) en la tarjeta de video. Conecte el cable BNC al puerto BNC/COMPONENT IN -R, G, B, H, V en la parte posterior del monitor y al puerto D-sub de 15 patillas del ordinador.  3) Conecte un cable qui para recibir el sonido de la tarjeta de sonido de la computadora. 4) Encienda la computadora y el monitor. Nota - El cable de DVI o de BNC es optional. Consulte a un centro de servicei local de Samsung Electronics para comprar los elementospcionales.  > Conexión de un DVD digitalNota
- Los dispositivos de entrada como el DVD digital está conectados al terminal de DVI IN del monitor mediante el cable DVI. - Después, incié el DVD con un disco DVD insertado. - Selezione Digitale mediating el boton SOURCE.Nota
- El monitor dispone de terminales de connexion de DVI IN para conectar los dispositivos de entrada DVI como un DVD digital.  > Conexión a un VCR 1) Los dispositivos de audio y video como los VCR o Camaras de video se conectan con el terminal AV IN [VIDEO] o AV IN [S-VIDEO] del monitor usingo el cable de S-VHS o de BNC. 2) Conecte los terminales Audio (L) (Audio (I))y Audio (R) (Audio (D)) del aparato de video o de la videocamera a los terminales AV AUDIO IN [L-AUDIO-R] del monitor mediante los cables de audio. 3) SeLECTION AV o S-Video cuando esté conectado un VCR o una CAMERA de video usando el botón Fuente en la parte delantera del monitor. 4) Seguidamente, inicia el VCR o la-camera de video con una cinta.Nota
- El cable de S-VHS o de BNC es optional > Conexión con un reproductor DVD  1) Conectar el cableado de audio necessario entre los conectores COMPONENT AUDIO IN [L-AUDIO-R] en el monitor y los conectores AUDIO OUT en el reproductor DVD. 2) Conectar un cable de video entre los conectores BNC/COMPONENT IN - conexión del puerto PR, Y, PB en el monitor y los conectores PR, Y, PB en el reproductor DVD. 3) Selección Componento whene este conectado un DVD using el boton Fuente en la parte delantera del monitor. 4) Seguidamente, inicia el DVD con una cinta.Nota
- El cable de Component es optional Para más información sobre video de componente, consulte el manual del usuario del reproductor DVD.> Conexión con una CAMERA de video
 1) Localice los conectores de calidad A/V en la webcam de video. Suelen estar ubicados en un lateral o en la parte de atras de la webcam de video. Conecte el cableado de audio necessario entre los conectores AUDIO OUTPUT en la webcam de video y los conectores AV AUDIO IN [L-AUDIO-R] en el monitor. 2) Conecte un cable de video entre el conector VIDEO OUTPUT de la CAMERA de video y el conector AV IN [VIDEO] en el monitor. 3) Selección AV cuando esté conectado unaámara de video el botón Fuente en la parte delantera del monitor. 4) Seguidamente, inicia la-camera de video con una cinta.Nota
Los cables de audio y video que se muestran aquie suelenvenir incluidos con la camarara de video. (Si no fuera asi, consulte a la tienda de electrònica más cercana). Si la CAMERA de video fuera estereo, seria necessario conectar dos cables. > Conexión de un decodificador de BCHDTV Nota Las conexiones habituales de un decodificador de senal se muestran a continuacion.  1) Conecte un cable de video entre los conectores BNC / COMPONENT IN - conexión del puerto PR, Y, PB en el monitor y los conectores PR, Y, PB en el decodificador digital. 2) Conecte el cableado de audio necessario entre los conectores COMPONENT AUDIO IN [L-AUDIO-R] en el monitor y los conectores AUDIO OUT en el decodificador de serial. 3) SeLECTION Component when este conectado un decodificador de serial DTV el boton Fuente en la parte delantera del monitor. Nota - Para mas informacion sobre video de componente, consulte el manual de usuario del decodificador digital. > Conexión de altavoces  1) Acople el television y los altavoces usingo los tornillos. * Monte el altavoz sin el pie.  2) Conecte el cable de connexion del altavoz entre el conductor de altavoz en la parte posterior del telesor y el conector de altovoz en la parte posterior del altovoz. Nota - Nouve el televisor que sostiene el altavoz cuando estan conectados el televisor y el altavoz. Se podra dañar el soporte de altavozdonde se conecta el altavoz del televisor. > Conexión a un equipo de audio  1) Conecte un Conjunto de cables de audio entre las Telecoms AUX L, R del AUDIO SYSTEM (SISTEMA DE AUDIO) y las Telecoms AUDIO OUT [L-AUDIO-R] (SALIDA AUDIO [I-AUDIO-D]) del monitor. © 1995-2008 SAMSUNG. ALL Right ReservedIntroduccion
 Un MDC (Multiple Display Control) (MDC, Multiple Display Control) es una aplicacion que permite trabajo en un PC con varias pantallas fácil y simultaneamente. RS-232C, un estandar de communicated serial, se usa para la comunicacion entre un PC y una pantalla. Por tanto, es necessario conectar un cable serial entre el puerto serial del PC y el puerto serial de cada pantalla.Pantalla principal
Haga cli en Start > Program > Samsung > MDC System para inicial el programa. Selección un jeu para ver su volumen seleccionado con el control deslizante.  1 Iconos principales Botón Select (select har) 2 Remocon Info Grid (Cuadrícula de información) 3 Safety Lock SeLECTION de pantalla  4 Port Selection Herramentas de control  1. Use los iconos principales para modifier en cada pantalla. 2. Permitte que se active o se desactive la functiOn de recepcion de control remoto de la unidad de la pantalla. 3. Establishe la funciona Lock (seguridad para niños) 4. La configuración para el puerto série del PC pueda cambiar. El valor original es COM1. 5. Hagablick en SeLECTIONAR todo o Borrar para selec tionar o para borrar todas las pantallas. 6. Use Cuadrícula para ver cierta información sobre control de la pantalla selecciónada. 7. Seleectionauna pantalla dentro de la section Selection de pantalla. 8. Use Herramentas de control para controlar las pantallas.Port Selection
 1. El Control de pantallas multiples está configurado originalmente como COM1. 2. Si se utilizes cualquier puertoDistincto de COM1, se pueda selectionar desde COM1 hasta COM4 en el menu de SeLECTION de puertos. 3. Si el nombre de puerto exacto que está conectado al monitor usingo un cable serial no está seleccionado, la comunicacion no sera possible. 4. Le port sélectionné est enregistré dans le programme et également utilisé pour le programme suivant. Power Control
1. Haga click en el icono Power Control (Control de energia), de entre los iconos principales, y aparecerá la pantalla Power Control (Control de energia).  \* Info Grid muestra informacion bica necessaria para gestionar Control de energia. 1) (Power Status (Estado de energia)) 2) Input 3) Image Size 4) On Timer Status 5) Off Timer Status 2. Use el botón Select All (Selecciónar todo) o la casilla de verificacion correspondiente para ajustar las propiedades de pantalla.  Control de energia permite controlar algumas de las funidades de la pantalla seleccionada. 1) Power On/Off - Activ o desactiva la energia de la pantalla seleccionada. 2) Volume - Controla el nivel de volumen de la pantalla seleccionada. Está definido con el valor del volumen de la pantalla seleccióna a partir de los juegos y lo muestra en la barra de desplazimiento. (Cuando se cancela la selección o se escoge SeLECTIONAR todo, el valor toma la configuracion predeterminada de 10) 3) (Mute On/Off (Activar/desactivar silencio)) - Activ o desactiva el silencio de la pantalla seleccionada On / Off . Cuando se selección un jeu cada vez, si el juego selecciónado ya está definido como MUTE (Silencio), esnecessarymarcar la pantalla MUTE. (Si elige deshacer las selecciones o escoge SeLECTIONAR todo, los values vuelven a la configuracion predeterminada). \* Control de energia se aplica a todas las pantallas. Las functions volumen y Mute solo está disponible para pantallas bajo el estado de energia está ON (activado). Input Source
1. Haga cig en Input Source (Fuente de entrada), situada en los iconos principales, y aparecerá la pantalla de control de fuente de entrada. Haga click en Select All (Selecciónar todo), o utilise la casilla de verificacion, para seleccionar una pantalla con intencion de controlarla. - TV Mode  PC Mode  \* Info Grid muestra informacion bica cnea necessaria para controlar la fuente de entrada. 1)PC - Cambia la fuente de entrada de la pantalla selectionada a PC. 2) BNC - Cambia la fuente de entrada de la pantalla selectionada a BNC. 3) DVI - Cambia la fuente de entrada de la pantalla seleccionada a DVI. 4) TV - Cambia la fuente de entrada de la pantalla seleccionada a TV. 5) AV - Cambia la fuente de entrada de la pantalla seleccionada a AV. 6) S-Video - Cambia la fuente de entrada de la pantalla seleccionada a S-Video. 7) Component - Cambia la fuente de entrada de la pantalla selectionada a Component. 8) MagicNet - La source d'entree de MagicNet ne fonctionne que sur le modele MagicNet. 9) Channel - La flecha del canal aparece cuando la.option Input Source (Fuente de entrada) es TV. * La fuente TV se pueda selectionar solo en produits con TV, y el control de los canales únicamente se permite cuando la option Input Source (Fuente de entrada) es TV. * El control de Fuente de entrada se aplicá sólo está disponible para las pantallas para las cuales está activado (ON) el estado de suministro electrico. Image Size
PC, BNC, DVI
1. Haga ticn Tamao de imagen, situado en los iconos principales, y aparecerá la pantalla de control de Tamao de imagen.  Info Grid (Cuadrula de informacion) muestra cierta informacion basia necesaria para tener el control Tamanio deImagen. 1) (Power Status (Estado de energia)) - Muestra el estado de energia de la pantalla selectionada. 2) Image Size - Muestra el的时间里 de imagen actual de la pantalla seleccionada. 3) Input - Muestra la fuente actual de entrada de la pantalla realizada. 4) Info Grid (Cuadrícula de información) sólo muestra las pantallas cuya Fuente de entrada es PC, BNC, DVI. 5) PC Source - Cuando haga ticn en Tamaño de imagen, aparecen primero las fichas PC, BNC, DVI. El boton Control de Tamaño de imagen controla el Tamaño de imagen disponible para PC,BNC,DVI. 6) Video Source - Haga tic en la ficha AV, S-VIDEO, Componente para controlar el Tamaño de imagen para la Fuente de entrada respectiva. La source d'entrée de MagicNet ne fonctionne que sur le modele MagicNet. * El control Tamanio deImagen solo está disponible para las pantallas para las cuales está activado (ON) el estado de suministro electrico. Image Size
TV, AV, S-Video, Component, DVI(HDCP)
1. Haga clicked Tamanio de imagen, situado en los iconos principales, y aparecerá la pantalla de control de Tamanio de imagen.  Info Grid (Cuadrula de informacion) muestra cierta informacion basia necessitiesa para entender el control Tamanio deImagen. 1) Haga click en la pestaña (Fuente de video) paraaabrar el tameno de la imagen para TV, AV, S-video, componentes. Haga click en Select All (SeLECTIONAR todo), outilice la casilla de verificacion, para seleccionar una pantalla con intencion de controlarla. 2) Info Grid (Cuadrula de informacion) solo muestra la pantalla queiene TV, AV, S-VIDEO, Componente como fuente de entrada. 3) Cambia aleatoriamente el時間 de imagen de la pantalla seleccionada. Note: Auto Wide (Ancho automatico), Zoom1 (Zoom1) y Zoom2 (Zoom2) no se pueda seleccionar cuando el tipo de Signals de entrada para componentes y DVI (HDCP) es 720p o 1080i La source d'entrée de MagicNet ne fonctionne que sur le modele MagicNet. * El control Tamanio de imagen solo está disponible para las pantallas para las cuales está activado (ON) el estado de suministro electrico. Time
1. Haga tic en Time (hora), entre los iconos principales, y aparecerá la pantalla Control de Time (hora).  \* Info Grid muestra informacion basia de Time (hora). 1) Current Time -Selezione la hora actual para la pantalla seleccionada PC Time (hora del PC) - Para cambiar la hora actual, cambie primero PC Time (hora del PC). 2) On Time Setup - Define la hora, el minuto, y el valor de AM/PM para On Timer (Temporizador activado) de la pantalla seleccionada. 3) Off Time Setup - Define la hora, el minuto, y el valor de AM/PM para Off Timer Setup (Configuración de hora desactivada) de lapellata selecciónada. 4) Muesra la configuración de On Timer (Temporizador activado). 5) Muesra la configuración de Off Timer (Temporizador desactivado). La source d'entrée de MagicNet ne fonctionne que sur le modele MagicNet. * Control de Time (hora) está disponible solo para las pantallas cuando el estado de energia está ON (activado). En On Time Setup (Configuracion de hora de apagado), las functions TV Source (Fuente de TV) solo en los modelos con TV. PIP
PIP Size
1. Hagablick en PIP,entre los iconos principales,y aparecerá lathora Control PIP. Haga click en Select All (SeLECTIONAR todo),o utilise la casilla de verificacion,para seleccionar unathora con intencion de controlarla.  Info Grid (Cuadrula de informacion) muestra cierta informacion basia necesaria para tener el control Tamanio PIP. 1) PIP Size - Muestra el Tamaño PIP actual de la pantalla realizada. 2) OFF - Desactiva el modo PIP de la pantalla selectionada. 3) Large - Activ a modo PIP de la pantalla selectionada y cambia el taman a Large. 4) Small - Activ el modo PIP de la pantalla seleccionada y cambia el tamanio a Small. 5) Double1 - Activ el modo PIP de la pantalla selectionada y cambia el tamanio a Double 1. 6) Double 2 - Activ el modo PIP de la pantalla selectionada y cambia elullan a Double 2. 7) Double3 (Picture By Picture) - Activ a modo PIP de la pantalla seleccionada y cambia el taman o a Double 3.  ^ 念 La source d'entrée de MagicNet ne fonctionne que sur le modele MagicNet.  El Tamaño PIP se pueda controlar cuando se enciende el monitor. PIP
PIP Source
1. Haga cig en PIP, entre los iconos principales, y aparecerá la pantalla Control PIP. - PIP TV Mode  - PIP S-Video Mode  Info Grid (Cuadrula de informacion) muestraCERTa informacionbasica necessitiesa para entender el control Fuente PIP. 1) PIP Source - La Fuente PIP se pueda controlar cuando se enciende el monitor. 2)PC - Cambia la Fuente PIP de la pantalla seleccionada a PC. 3) BNC - Cambia la Fuente PIP de la pantalla seleccionada a BNC. 4)DVI - Cambia la Fuente PIP de la pantalla seleccionada a DVI. 5) TV - Cambia la Fuente PIP de la pantalla seleccionada a TV. 6) AV - Cambia la Fuente PIP de la pantalla seleccionada a AV. 7) S-Video - Cambia la Fuente PIP de la pantalla selectionada a S-Video. 8) Component - Cambia la Fuente PIP de la pantalla seleccionada a Component. 9) Channel -La flecha del canal aparece cuando la option PIP Source (Fuente PIP) es TV. Nota: Algunas de las fuentes PIP peuvent no estar disponibles dependiendo del tipo de fuente de entrada de la pantalla principal. \* La source d'entrée de MagicNet ne fonctionne que sur le modele MagicNet. * La fuente TV se pueda selectionar solo en produits con TV, y el control de los canales únicamente se permite cuando la.option PIP Source (Fuente PIP) es TV. * La funciona de Control PIPsole está disponible para las pantallasdonde el estado de la energia sea activado (ON) y la funciona PIP está configurada como ON. Settings
Picture
1. Haga cig en Configuracion , entre los iconos principales, y aparecerá la pantalla Control Brightness (Brillo).  * Info Grid muestra informaciónBsica necessitiesa para Settings Control. Cuando se selecciona cada direccion, el valor definido de la referencia seleccionada se muestra en la diaposita. Cuando Select All (Seleccionar todo) está seleccionado, vuelle el valor predeterminado de (50). El cambio de un valor en esta pantalla cambia automatistically el modo a "CUSTOM". 1) Picture - Disponible solo para TV, AV, S-Video, Component, DVI(HDCP). 2) Contrast - Ajusta el contraste de la pantalla seleccionada. 3) Brightness - Ajusta la luminosidad de la pantalla seleccionada. 4) Sharpness - Ajusta la nitidez de la pantalla selectionada. 5)Color - Ajusta el color de la pantalla selectionada. 6)Tint - Ajusta el matiz de la pantalla seleccionada. 7) Color Tone - Ajusta el tono de color para la pantalla selectionada. La source d'entrée de MagicNet ne fonctionne que sur le modele MagicNet. \* Cette fonction est disponible uniquement pour les affichages dont I'alimentation est active. Settings
Picture PC
1. Haga cig en Configuracion , entre los iconos principales, y aparecerá la pantalla Control Brightness (Brillo).  * Info Grid muestra información-basica necesaria para Settings Control. Cuando se selección cada funciona, el valor definido de la función seleccionada se muestra en la diapositiva. Cuando Select All (Seleccionar todo) está seleccionado, vuelle el valor predeterminado (50). El cambio de un valor en esta pantalla cambia automatistically el modo a "CUSTOM". 1) Picture PC - Disponible solo para PC, BNC, DVI. 2) Contrast - Ajusta el contraste de la pantalla selectionada. 3) Brightness - Ajusta la luminosidad de la pantalla selectionada. 4) Red - Ajusta la Temperatura del color de la pantalla seleccionada. 5) Green - Ajusta la Temperatura del color de la pantalla selectionada. 6) Blue - Ajusta la Temperatura del color de la pantalla selectionada. La source d'entrée de MagicNet ne fonctionne que sur le modele MagicNet. \* Cette fonction est disponible uniquement pour les affichages dont l'alimentation est active. Settings
Audio
1. Haga cig en Configuracion , entre los iconos principales, y aparecerá la pantalla Control Brightness (Brillo).  * Info Grid muestra información.baidu necessaria para Settings Control. Cuando se selecciónca造血funció,el valor definido de la functión seleccionada se muestra en la diapositiva. Cuando Select All (Seleccionar todo) está seleccionado, vuelve el valor predeterminado de (50). El cambio de un valor en esta pantalla cambia automatistically el modo a "CUSTOM". 1) Audio - Controla la configuración de audio para todas las fuentes de entrada. 2) Bass - Ajusta los graves de la pantalla selectionada. 3) Treble - Ajusta los agudos de la pantalla seleccionada. 4) Balance - Ajusta el balance de la pantalla seleccionada. 5) SRS TSXT - Encendido y apagado de Sonido SRS TSXT. 6) Sound Select - Puede seleccionar Main (Principal) o Sub (Secundario) quando PIP esté activado. La source d'entrée de MagicNet ne fonctionne que sur le modele MagicNet. * Cette fonction est disponible uniquement pour les affichages dont l'alimentation est active. Settings
Image Lock
1. Haga cig en Configuracion , entre los iconos principales, y aparecerá la pantalla Control Brightness (Brillo).  Info Grid muestra informacion basia necesaria para Settings Control. 1) Image Lock - Disponible solo para PC, BNC. 2) Coarse - Ajusta la fase de la pantalla Coarse. 3) Fine - Ajusta la fase de la pantalla Fine. 4) Position - Ajusta la posicion de la pantalla seleccionada. 5) Auto Adjustment - Púlselo para que se ajuste automatistically a la seals proveniente del PC. La source d'entrée de MagicNet ne fonctionne que sur le modele MagicNet. * Control Brightness (Brillo) está disponible sólo para las pantallas cuando el estado de energia está ON (activado). Maintenance
Lamp Control
1. Haga clicked en el icono "Maintenance (Mantenimiento)" en la columna Main Icon (Icono principal) para(""); pantalla de mantenimiento.  Aparece una cuadrula de informacion "Info Grid" Blockingando varios elementos basics de datos. 1) Maintenance - Permitte la direccion Maintenance Control (Control de mantenimiento) para todas las fuentes de entrada. 2) Auto Lamp Control - Ajusta automatically la luz posterior de la pantalla selectionada a una hora spécifique. El Manual Lamp Control (Control de lampara manual) se desactiva automatically when el ajuste se realiza con Auto Lamp Control (Control de lampara automatico). 3) Manual Lamp Control - Le permite ajustar la luz posterior de la pantalla seleccionada sin importar la hora. La direccion de Control de lampara automatico se desactiva automatistically si se ajusta usingla direccion Control de lampara manual. * La funciona de Control del mantenimiento solo está disponible para las pantallas para las cuales está activado (ON) el estado de suministro electrico. \* La source d'entree de MagicNet ne fonctionne que sur le modele MagicNet. Maintenance
Scroll
1. Hagablick en el icono "Maintenance (Mantenimiento)" en la columna Main Icon (Icono principal) para encontrar la pantalla demantimiento.  1) Safety Screen - Elimina las imagenes residuales que pueda producirse cuando la pantalla seleccionada está en modo de pausa durante un periodo de tiempo prolongado. Puede usar el temporizador del ciclo de repetitiones seleccionando el periodo "Interval" por hora y las vezes "Second" porsegundo. Screen Type ( Tipo de pantalla) se pueda configurar como Scroll (Desplazamente), Pixel (Pixel), Bar (Barra) o Eraser (Borrador). La source d'entrée de MagicNet ne fonctionne que sur le modele MagicNet. * Configuración de lossegundos:el tipo de desplazamente se pueda configurar como 1,2,3,4,5 y el tipo depixel,barra yborrador como 10,20,30,40,50. * La funciona de Control del mantenimientosole está disponible para las pantallas para las cuales está activado (ON) el estado de suministro electrico. Maintenance
Video Wall
1. Haga click en el icono "Maintenance (Mantenimiento)" en la columna Main Icon (Icono principal) para(""); pantalla de mantenimiento.  1) Video Wall - Un video mural es un Conjunto de pantallas de video conectadas entre si, de manière que cada una pueda estar en una parte de la imagen completa o la mesma imagen repetida en cada pantalla. 2) Video Wall (Screen divider) - Se puede dividir la pantalla en除外 varias. Puede seleccionar varias pantallas con una distribuccion differente al dividirlas. -Selezione un modo en el Divisor de pantalla. -Selección una pantalla en la Display Selection (Selección de pantalla). - La ubicacion se configurar pulsando un numero en el modo seleccionado. - El programa MDC suministrado por Samsung admite hasta 4x4 pantallas LCD.  3) On/Off - Enciende o apaga la funciona Video Wall (Védo mural) en la pantalla selecciónada. 4) Format - Se puede selectionar el formatting para ver una pantalla dividida. Full  Natural \* La source d'entree de MagicNet ne fonctionne que sur le modele MagicNet. * La funciona de Control del mantenimientosole está disponible para las pantallas para las cuales está activado (ON) el estado de suministro electrico.Soluciones de problemas
1. La pantalla que desea controlar no aparece en la cuadrula de informacion de control de energia. - Compruebe la connexion de RS232C. (Compruebe que esté connectada correctamente con el puerto Com1) - Compruebe las pantallas por si una de las others Tiene el mesmo ID. Si hay mas de una pantalla con el).(el programa no puee detectarlas correctamente debido a un conflicto de datos. - Compréue si el ID de jeu de pantalla es un número entre 0 y 16. (ajustelo con el menu Pantalla) Note: Un ID de juego de pantalla debe tener un valor de entre 0 y 16, Si el valor está fuera del intervalo, el Sistema MDC (Multiple Display Control, MDC (Multiple Display Control)) no pueda controlar la pantalla. 2. La pantalla que se desea controlar no aparece en el resto de cuadrillas de informacion de control. - Compruebe que la pantalla seleccionada este activada (ON). (Puede comprobarlo en Cuadrula de informacion de control Energia) - Compréue si se puedaCambiar la fuente de entrada de la pantalla. 3. El cuadro de dialogo aparece en varias occasions. - Compruebe si la pantalla que desea controlar está seleccionada. 4. Se ha configurado On Timer (Temporizador activado) y Off Timer (Temporizador desactivado) pero muestran una hora diferente. - Aplique la hora actual para sincronizar los relojes de la pantalla. 5. La funciona remota no funciona correctamente cuando se desactiva la misma, se desconecta el cable RS-232C, o se sale del programa de forma irregular. Vuela a executar el programa y active de nuevo la funciona remota para volver al funciona normal.Pantalla Settings Value (Valor de configuración) en Modo Multiple Display (Pantallas multíples)
* Cuando hay más de una pantalla conectada, los values de la configuración se muestran de esta manière. 1. No hay selección: Muestra el valor predeterminado de fabrica. 2. Una pantalla selectionada: Obtiene y muestra el valor de configuracion para la pantalla seleccionada. 3. SeLECTIONADA una pantalla (ID1) y se anade另外一个 pantalla (ID3): el programa, que mostraba el valor de configuracion de ID 1, obtiene y muestra el valor de ID3. 4. SeLECTIONados todos los juegos using Select All (SeLECTIONAR todo): devuelte el valor predeterminado de fabrica. Instrucciones de seguidad Introduccion Conexiones Uso del software Ajuste del monitor Entrada Picture [PC / BNC /DVI Modo] Picture [AV/S-Video/ Component / DVI-Video Modo] Sonido Setup Control multiple Characteristicas de Control Directo Resolución de problemas Especificaiones Information ApendiceTFT-LCD Monitor
www.samsung.com  El aspecto externo y el color del producto pueda variar dependiendo del Modelo; las specifications del producto se puedaCambiar sin previo aviso para la mejora del rendimiento.Ajuste del monitor
Entrada Modos disponibles PC/BNC/DVI AAV S S-Video Componente D DVI-Video Fuentes PASCD [MONTH]→[ENTER]→[ENTER]→[A/V]→[ENTER] Activa el indicator para reflejar la SERIAL de entrada que se muestraactualmente. 1)PC 2) BNC 3) DVI 4)AV 5) S-Video 6) Componente [El botón directo en el mando a distancia es el botón 'SOURCE'.] Nota - El PIP se apaga si el monitor se conecta a una fuente externa.PIP PASC
Cuando los dispositivos externos de A/V (audio y video), tales como VCR o DVD, estan conectados con el monitor, PIP permite ver el video de dichos dispositivos en una ventanackaenia superpuesta sobre la senal de video del PC. (Des. Nota - (Act.) No se pue de solapar mas de un PIP en la pantalla, bajo que BNC y el componente utilizean el mismo terminal. 1)PIP [MONTH] [ENTER] [A/V] [ENTER] [ENTER] [A/V] [ENTER] Act. Activ a desactiva la pantalla PIP -Des. -Act. [El botón directo en el mando a distancia es el botón 'PIP']. 2) Source (Fuente) [MONTH] [ENTER] [A/V] [ENTER] [A/V] [ENTER] [A/V] [ENTER] Selección la fuente de entrada para el modo PIP. -PC:AV/S-Video/Componente Modo - BNC: AV / S-Video Modo -DVI:AV/S-Video/ComponenteModo -AV/S-Video:PC/BNC/DVI Modo - Componente: PC / DVI Modo [El botón directo en el mando a distancia es el botón 'SOURCE'.]3) Fuente
[MONTH] [ENTER] [A/V] [ENTER] [A/V] [ENTER] Intercambio del Descripción de laImagen PIP y de laImagen principal. LaImagen de laventanaPIPapareceré en la pantalla principal,ylaImagen de la pantalla principal. apareceré en la ventana PIP. [El botón directo en el mando a distancia es el botón 'SWAP'].4) Tamaño
[ \text{[MENU]} \rightarrow \text{[ENTER]} \rightarrow [\wedge / \vee] \rightarrow \text{[ENTER]} \rightarrow [\wedge / \vee] \rightarrow \text{[ENTER]} \rightarrow [\wedge / \vee] \rightarrow \text{[ENTER]} ] Permite que el usuario desactive o ajuste al dato de la Pantalla PIP. [El botón directo en el mando a distancia es el botón 'SIZE'].5) Posicion
[MONTH] [ENTER] [A/V] [ENTER] [A/V] [ENTER] [A/V] [ENTER] Cambia la posicón de la ventana PIP.6) Transparenc.
[MONTH] [ENTER] [A/V] [ENTER] [A/V] [ENTER] [A/V] [ENTER] Ajusta la transparencia de las ventanas PIP. - Alto -Medio -Bajo -Opaco Nota - Si se selección en Tamaño, Posición y Transparencycia no se desactivar. Modos disponibles: PIPEditor name PASCD
[MONTH] [ENTER] [A / V] [ENTER] [A / V] [ENTER] [A / V] [ENTER] Da nombre al disposito v de entada de informacion conctado con los conectores de entada para hacer la selec tion de fuente de entada mas fácil. 1) PC 2) BNC 3) DVI 4) AV 5) S-Video 6) Componente Picture [PC / BNC /DVI Modo]Modos disponibles
PC/BNC/DVI AAV S-S-Video Componente D VDI-VideoMagicBrightTM
[ \text{[MENU]} \rightarrow [\wedge / \vee] \rightarrow [\text{ENTER} ] \rightarrow [\text{ENTER}] \rightarrow [\wedge / \vee] \rightarrow [\text{ENTER}] ] MagicBright™ es una nuevo funciona que proportionsca un entorno de visualizacion optimo, de acuerdo con el contenido de la imogen que este vivo. En laactualidad hay 4 modelos diferentes disponibles: Entertain, Internet, Text y Custom. Cada modo tiene su propio valor de brillo configurado previamente. Puede selectionar fácilmente una de las 4 configuraciones pulsando el botón 'MagicBrightTM. 1)Ocio Luminosidad Alta Para visualización de imagenes en movimiento, como un DVD o un VCD. 2) Internet Luminosidad Media Para trabajo con una mezcla visual de texto ygraficos. 3) Texto Luminosidad Normal Apropiado para documents o problemas que requiren la visualizacion de grancantidad de texto. 4) Personal Aúnque los valores se han elegido con minuciosidad por nuestros ingenieros, los valores preconfiguradosSEO.SEOSEOSEOSEOSEOSEOSEOSEOSEOSEOSEOSEOSEOSEOSEOSEOSEOSEOSEOSEOSEOSEOSEOSEOSEOSEOSEOSEOSEOSEOSEOSEOSEOSEOSEOSEOSEOSEOSEOSEOSEOSEOSEOSEOSEOSEOSEOSEOSEOSEOSEOSEOSEOSEOSEOSEOSEOSEOSEOSEOSEOSEOSEOSEOSEOSEOSEOSEOSEOSEOSEOSEOSEOSEOSEOSEOSEOSEOSEOSEOSEOSEOSEOSEOSEOSEOSEOSEOSEOSEOSEOSEOSEOSEOSEOSEOSEOSEOSEOSEO SEO [El botón directo en el mando a distancia es el botón 'M/B'].Personal
[ \text{[MENU]} \rightarrow [\wedge / \vee] \rightarrow [\text{ENTER} ] \rightarrow [\wedge / \vee] \rightarrow [\text{ENTER} ] \rightarrow [\text{ENTER} ] \rightarrow [\wedge / \vee] / [< / >] \rightarrow [\text{ENTER}] ] Puede usar los manos en pantalla para携带 el contraste y la luminosidad según sus preferencias personales. 1) Contraste Calibre el Contraste. 2)Brillo Calibre el Luminosidad. Nota - Si se ajusta laImagen usingo la func tion Personal, entonces MagicBright cambia al modo Personal.Tono de color P
[ \text{[MENU]} \rightarrow [\wedge / \vee] \rightarrow [\text{ENTER} ] \rightarrow [\wedge / \vee] \rightarrow [\text{ENTER} ] \rightarrow [\wedge / \vee] \rightarrow [\text{ENTER}] ] El tono del color se puedaCambiar. 1) Frio 2) Normal 3) Calido 4) Personal (Disponible solamente en el modo PC/BNC)Control de color
[ \text{[MENU]} \rightarrow \left[\hat{\Lambda} / \hat{\mathbb{V}}\right] \rightarrow \left[\text{ENTER}\right] \rightarrow \left[\hat{\Lambda} / \hat{\mathbb{V}}\right] \rightarrow \left[\text{ENTER}\right] \rightarrow \left[\text{ENTER}\right] \rightarrow \left[\langle I \rangle\right] \rightarrow \left[\text{ENTER}\right] ] utilice esta funciona para ajustar ligeramente el color. (Disponible solamente en el modo PC/BNC) 1) Rojo 2) Verde 3) Azul Nota - Si se ajusta laImagen usingo la funcion Control de color, entones Tono de color cambia al modo Personal.Fijar la Imagen
Fijar laImagen se usa para ajustar y Obtener la mejorImagen quitando las perturbaciones que provocan imagenes inestables con agitaciones y resplandores débiles. Si no se obtienen resultados satisfactorios usingo el Ajuste bajo, use la configuracion Ajuste grueso y, despues, use Ajuste bajo otra vez. (Disponible solamente en el modo PC/BNC) 1) Grueso [ \text{[MENU]} \rightarrow [\wedge / \vee] \rightarrow [\text{ENTER} ] \rightarrow [\wedge / \vee] \rightarrow [\text{ENTER} ] \rightarrow [\text{ENTER} ] \rightarrow [< / >] \rightarrow [\text{ENTER}] ] Suprime las interferencias como las bandas verticas. El ajuste grueso puede mover el area deImagen de la pantalla. Puede volver a ubicarla en el centro mediante el menu Horizontal Control (Control horizontal). 2) Fino [MONTH] [AIV] [ENTER] [AV] [ENTER] [AV] [ENTER] [<1>] [ENTER] Quita perturbaciones tales como rayas horizontales. Si persiste la perturbacion incluo despues de Ajuste fino, repitalo afterwards de ajustar la Frequencia (velocidad del reloj). 3) Posición [ \text{[MENU]} \rightarrow [\text{A} / \text{V}] \rightarrow [\text{ENTER}] \rightarrow [\text{A} / \text{V}] \rightarrow [\text{ENTER}] \rightarrow [\text{A} / \text{V}] \rightarrow [\text{ENTER}] \rightarrow [\text{A} / \text{V}] \rightarrow [\text{ENTER}] ] Esto ajusta laubicacion de la pantalla horizontalmente y verticalmente.Ajuste automatico P
[MONTH] [A/V] [ENTER] [A/V] [ENTER] Los valores de fino, grueso y posicón se ajustan automatistically. (Disponible solamente en el modo PC/BNC) [El botón directo en el mando a distancia es el botón 'AUTO'].Balance de laseaI
Se utilizes para recomponer la SERIAL RGB débil que se ha transmisido a工程技术 de un cable largo de serial. (Disponible solamente en el modo PC/BNC) 1) Balance de la penal \[ [\text{MENUR} ]\rightarrow [\text{A} /\text{V} ]\rightarrow [\text{ENTER} ]\rightarrow [\text{A} /\text{V} ]\rightarrow [\text{ENTER} ]\rightarrow [\text{ENTER} ]\rightarrow [\text{A} /\text{V} ]\rightarrow [\text{ENTER} ] \] Puede seleccionar que el control de la seals este en Act. o Des. 2) Control de la seals [ \text{[MENU]} \rightarrow [\wedge / \vee] \rightarrow [\text{ENTER}] \rightarrow [\wedge / \vee] \rightarrow [\text{ENTER}] \rightarrow [\wedge / \vee] \rightarrow [\text{ENTER}] \rightarrow [\wedge / \vee] \rightarrow [\text{ENTER}] \rightarrow [\wedge / \vee] \rightarrow [\text{ENTER}] ] Puede ajustar manualmente R Phase, G Phase, B Phase, Aumento y Nitidze.Tamaño P
[ \text{[MENU]} \rightarrow [\wedge / \vee] \rightarrow [\text{ENTER} ] \rightarrow [\wedge / \vee] \rightarrow [\text{ENTER}] \rightarrow [\wedge / \vee] \rightarrow [\text{ENTER}] ] Puede combustar el tamafo. 1) 16:9 2) 4:3Imagen PIP
[ \text{[MENU]} \rightarrow [\wedge / \vee] \rightarrow [\text{ENTER}] \rightarrow [\wedge / \vee] \rightarrow [\text{ENTER}] \rightarrow [\wedge / \vee] \rightarrow [\text{ENTER}] \rightarrow [\wedge / \vee] \rightarrow [\text{ENTER}] \rightarrow [\wedge / \vee] \rightarrow [\text{ENTER}] \rightarrow [\wedge / \vee] \rightarrow [\text{ENTER}] \rightarrow [\wedge / \vee] \rightarrow [\text{x} ] \rightarrow [\text{x} ] \rightarrow [\text{x} ] \rightarrow [\text{x} ] \rightarrow [\text{x} ] \rightarrow [\text{x} ] \rightarrow [\text{x} ] \rightarrow [\text{x} ] \rightarrow [\text{x} ] \rightarrow [\text{x} ] \rightarrow [\text{x} ] \rightarrow [\text{x} ] \rightarrow [\text{x} ] \rightarrow [\text{x} ] \rightarrow [\text{x} ] ] Puedeajustarlosparametrosde laimagenPIP. 1) Contraste Ajusta el contraste de la ventana PIP en la pantalla. 2)Brillo Ajusta la Luminosidad (Brightness) de la ventana PIP en la pantalla. 3) Sharpness Se usa paraaabstar la diferencia entre las areas mas claras y mas oscuras de la ventana PIP. 4) Nitidez Se usa para ajustar la luminosidad y la oscuridad de la pantalla. 5) Matiz Agrega un tono natural a la ventana PIP. Puede ver una imagen desde las fuentes AV, S-Video a trovés de la pantalla PIP en los modelos PC, BNC. Funciona solo si la signaled video es NTSC. Modos disponibles: PIP Picture [AV/S-Video/Component/DVI-Video Modo]Modos disponibles
 PC/BNC/DVI  AV  S-Video  Componente  DVI-VideoModo ASCD
[ \text{[MENU]} \rightarrow [\text{A} / \text{V}] \rightarrow [\text{ENTER}] \rightarrow [\text{ENTER}] \rightarrow [\text{A} / \text{V}] \rightarrow [\text{ENTER}] ] El monitor Tiene quatre configuraciones automaticas de imagen ("Dinamico", "Estandar", "Pelicula", y "Personal") que estan establecidas previamente en la fabrica. Puede activar Dinamico, Estandar, Pelicula, o Personal. Puede seleccionar "Personal" que automatisticamente establece su configuración deImagen personalizada. 1) Dinámico 2) Estándar 3) Peliculas 4) Personal [El botón directo en el mando a distancia es el botón 'P.MODE'.]Personal ASCD
[ \text{[MENU]} \rightarrow [\wedge / \vee] \rightarrow [\text{ENTER}]\rightarrow [\wedge / \vee] \rightarrow [\text{ENTER}]\rightarrow [\wedge / \vee] \rightarrow [\text{ENTER}]\rightarrow [< / >] \rightarrow [\text{ENTER}] ] Puede usar los manos en pantalla paraCambiar el contraste y la luminosidad segun sus preferencias personales. 1) Contraste Ajusta el Contraste. 2)Brillo Ajusta el Luminosidad. 3) Nitidez Ajusta la nitidez de la imagen. 4) Color Ajusta el color de laImagen. 5) Matiz Agrega un tono natural a la pantalla. Funciona solo en los modos AV y S-Video. Funciona solo si la seals de video es NTSC.Tono de color ASCD
[ \text{[MENU]} \rightarrow [\wedge / \vee] \rightarrow [\text{ENTER} ] \rightarrow [\wedge / \vee] \rightarrow [\text{ENTER}] \rightarrow [\wedge / \vee] \rightarrow [\text{ENTER}] ] El tono del color se pueda cambiar. 1) Frio 2 2) Frio 1 3) Normal 4) Calido1 5) Calido2Tamaño ASCD
[ \text{[MENU]} \rightarrow [\wedge / \vee] \rightarrow [\text{ENTER} ] \rightarrow [\wedge / \vee] \rightarrow [\text{ENTER} ] \rightarrow [\wedge / \vee] \rightarrow [\text{ENTER}] ] Puedechangiarel tamanode imagen. 1) 16:9 2) Zoom 1 3) Zoom 2 4) 4:3 [ZOOM1, ZOOM2, Panorama no está disponible en 1080i (o más de 720p) de DTV.]Digital NR (Reducción digital del nivel de ruidos.) ASCD
[ \text{[MENU]} \rightarrow [\text{A} / \text{V}] \rightarrow [\text{ENTER} ] \rightarrow [\text{A} / \text{V}] \rightarrow [\text{ENTER} ] \rightarrow [\text{A} / \text{V}] \rightarrow [\text{ENTER} ] ] Puede activar y desactivar la caracteristica Eliminacion de ruido (Noise Elimination). La función Eliminación digital de ruido (Digital Noise Elimination) permite gozar de imagenes más claras y vibrantes. 1) Des. 2) Act.Modopellicula ASC
[ \text{[MENU]} \rightarrow [\wedge / \vee] \rightarrow [\text{ENTER} ] \rightarrow [\wedge / \vee] \rightarrow [\text{ENTER}] \rightarrow [\wedge / \vee] \rightarrow [\text{ENTER}] ] Puede activar o desactivar (Des./Act.) el Modo de cine (Film Mode). La caracteristica Modo de cine (Film Mode) offre una experiencia visual con la calidad de las salas de expectáculos. (No disponible en el modo DVI-Video) 1) Des. 2) Act.Imagen PIP ASCD
[ \text{[MENU]} \rightarrow [\wedge / \vee] \rightarrow [\text{ENTER} ] \rightarrow [\wedge / \vee] \rightarrow [\text{ENTER} ] \rightarrow [\wedge / \vee] \rightarrow [\text{ENTER} ] \rightarrow [\wedge / \vee] \rightarrow [\text{ENTER} ] \rightarrow [< / >] \rightarrow [\text{ENTER}] ] PuedeajustarosparatemetroldaimagenPIP. 1) Contraste Ajusta el contraste de la ventana PIP en la pantalla. 2)Brillo Ajusta el brillo de la ventana PIP en la pantalla. Modos disponibles: PIP SonidoModos disponibles
PC/BNC/DVI AV S-S-Video C Componente D VDI-VideoModo PASC
[ \text{[MENU]} \rightarrow [\text{A} / \text{V}] \rightarrow [\text{ENTER} ] \rightarrow [\text{ENTER} ] \rightarrow [\text{A} / \text{V}] \rightarrow [\text{ENTER} ] ] El monitor tiene un amplificador integrado de audio estéreo de alta fidélidad. 1) Estándar Selección Normal para volver a la configuración estándar de fibrica. 2) Música Selezione Música quando esté visualizando videos musicales o conciertos. 3) Peliculas Selezione Cine quando está visualizando largometrajes. 4) Dálogo Selección Dálgo when este visualizing Descripciónns ricos en dialgos (por ejemplo, noticias). 5) Favorito Selección Favorito para volver a la configuración personalizada.Personal PASCD
[MONTH] [A/√] [ENTER] [A/√] [ENTER] [A/√] [ENTER] [<1>] [ENTER] La configuración del sonido se pueda ajustar para satisfacer sus preferencias personales. 1) Graves Intensifica el audio de baja Frequencia. 2) Agudos Intensifica el audio de alta Frequencia. 3) Balance Balance de sonido = = > Permite ajustar el balance de sonido entre los altavoces izquierdo y correcho. [Puede oir sonido awhile el valor del sonido sea 0.] Nota - Si ajusta laImagen con la función de Sound Custom (Sonido personal), el Sound Mode (Modo de sonido) cambiará al Custom Mode (Modo personal).Volumen autom. PASC0
[ \text{[MENU]} \rightarrow [\wedge / \vee] \rightarrow [\text{ENTER} ] \rightarrow [\wedge / \vee] \rightarrow [\text{ENTER}] \rightarrow [\wedge / \vee] \rightarrow [\text{ENTER}] ] Reduce las diferencias en el nivel del volumen para las distinctas fuentes de emisión. 1) Des. 2) Act.SRS TS XT PASC0
[ \text{[MENU]} \rightarrow [\text{A} / \text{V}] \rightarrow [\text{ENTER} ] \rightarrow [\text{A} / \text{V}] \rightarrow [\text{ENTER} ] \rightarrow [\text{A} / \text{V}] \rightarrow [\text{ENTER} ] ] SRS TS XT es una Tecnología SRS patentada que solventa el problema de reproducir contenido multicastanal 5.1 en dos altavoces. TruSurround proportionsa una sensación de sonido virtual convincente a工程技术 de综合素质 de producción con dos altavoces, incluso con los altavoces internos del televisor. Es totalmente compatible con todos los formatos multicastanal. 1) Des. 2) Act. [El botón directo en el mando a distancia es el botón 'SRS']Selección de sonido PASC
[ \text{[MENU]} \rightarrow [\wedge / \vee] \rightarrow [\text{ENTER}]\rightarrow [\wedge / \vee] \rightarrow [\text{ENTER}]\rightarrow [\wedge / \vee] \rightarrow [\text{ENTER}] ] Puede seleccionar entre Principal o Sub cuando PIP este activado (On). 1) Principal 2) Sub [Modos disponibles: PIP] SetupModos disponibles
PC/BNC/DVI AAV S S-Video C Componente D DVI-VideoIdioma PASCD
[ \text{[MENU]} \rightarrow [\wedge / \vee] \rightarrow [\text{ENTER} ] \rightarrow [\text{ENTER}] \rightarrow [\wedge / \vee] \rightarrow [\text{ENTER}] ] Puede escoger uno de los 11 idiomas siguientes. Nota - El idioma elegido afecta solo al idioma del OSD. No afecta en absoluto al software que se ejecta en el equipo. - English, Deutsch, Espanol, Français, Italiano, Svenska, 日本語, 中国語, Pycckn, 愛國語, PortuguesHora PAsco
Se usa para seleccionar una apagado. 1) Reloj prog. [ \text{[MENU]} \rightarrow [\text{A} / \text{V}] \rightarrow [\text{ENTER} ] \rightarrow [\text{A} / \text{V}] \rightarrow [\text{ENTER} ] \rightarrow [\text{ENTER} ] \rightarrow [\text{A} / \text{V}] \rightarrow [\text{ENTER} ] \rightarrow [\text{A} / \text{V}] \rightarrow [\text{ENTER} ] \rightarrow [\text{A} / \text{V}] \rightarrow [\text{ENTER} ] \rightarrow [\text{A} / \text{V}] \rightarrow [\text{ENTER} ] ] Ajuste de la hora. 2) Temp. de desc. [ \text{[MENU]} \rightarrow [\wedge / \vee] \rightarrow [\text{ENTER}] \rightarrow [\wedge / \vee] \rightarrow [\text{ENTER}] \rightarrow [\wedge / \vee] \rightarrow [\text{ENTER}] \rightarrow [\wedge / \vee] \rightarrow [\wedge / \vee] \rightarrow [\wedge / \vee] \rightarrow [\wedge / \vee] \rightarrow [\wedge / \vee] \rightarrow [\wedge / \vee] \rightarrow [\wedge / \vee] \rightarrow [\wedge / \vee] \rightarrow [\wedge / \vee] \rightarrow [\wedge / \vee] \rightarrow [\wedge / \vee ] \rightarrow [\wedge / \vee ] \rightarrow [\wedge / \vee ] \rightarrow [\wedge / \vee ] \rightarrow [\wedge / \vee ] \rightarrow [\wedge / \vee ] \rightarrow [\wedge / \vee ] \rightarrow [\wedge / \vee ] \rightarrow [\wedge / \vee ] \rightarrow [\wedge / \vee ] \rightarrow [\wedge / \vee ]] ] [ENTER]→[]→[A/V]→[ENTER] Se usa para que el monitor se apague automatistically tras una série de Minutes. (Apagado, 30, 60, 90, 120, 150, 180) 3) Temp. de encen. [ \text{[MENU]} \rightarrow [\wedge / \vee] \rightarrow [\text{ENTER}] \rightarrow [\wedge / \vee] \rightarrow [\text{ENTER}] \rightarrow [\wedge / \vee] \rightarrow [\text{ENTER}] \rightarrow [< / >] \rightarrow [\wedge / \vee] \rightarrow ] [ENTER] Se usa para que el monitor se enciende a una hora determinada. Se usa para controlar el modo y el niveau de volumen en el momento en que se encienda el monitor automàcamente. 4) Temp. de apag. [MONTH] [A/√] [ENTER] [A/V] [ENTER] [A/V] [ENTER] [] [A/V] [ENTER] Se usa para ajustar cuando se debe apagar automatamente el monitor, el volumen y el modo. - Si noiene configurado Reloj prog. y selecciona Si en (Temporizador de encendido) Temp. de encen. o en (Temporizador de apagado) Temp. de apag., aparecerá el mensaje Reloj(Ajustar la hora)"Transpar. de menus PASC
[ \text{[MENU]} \rightarrow [\text{A} / \text{V}] \rightarrow [\text{ENTER} ] \rightarrow [\text{A} / \text{V}] \rightarrow [\text{ENTER} ] \rightarrow [\text{A} / \text{V}] \rightarrow [\text{ENTER} ] ] Cambia la opacidad del fondo del OSD. 1) Alto 2) Medio 3) Bajo 4) OpacoPINbloqueo de seguridad PASC
[ \text{[MENU]} \rightarrow [\wedge / \vee] \rightarrow [\text{ENTER}] \rightarrow [\wedge / \vee] \rightarrow [\text{ENTER}] \rightarrow [0 \sim 9] \rightarrow [0 \sim 9] \rightarrow [0 \sim 9] ] Puede combustiar la contraseña.Ahorro energia PASCD
[ \text{[MENU]} \rightarrow [\text{A} / \text{V}] \rightarrow [\text{ENTER} ] \rightarrow [\text{A} / \text{V}] \rightarrow [\text{ENTER} ] \rightarrow [\text{A} / \text{V}] \rightarrow [\text{ENTER} ] \rightarrow [\text{MENU}] ] Estamericano. 1) Act. 2) Des. Nota - Si DEA reducir el consumo eletrico en el modo de esper, ajuste Ahorro energia en Des. Sin embargo, cuando Ahorro energia está en Des, no pueda usar la referencia remota Power On de MDC ni la referencia WOL (Wake On LAN) de MagicNet.Video Wall PASCD
Un video mural es un Conjunto de pantallas de video conectadas entre sí, de manière que cada una pueda做不到 lo que el imagen不完mente o la misma imagen repetida en cada pantalla. Si Video Wall está activado se podra ajustar la configuracion de la pantalla Video Wall. 1) Video Wall [ \text{[MENU]} \rightarrow [\text{A} / \text{V}] \rightarrow [\text{ENTER}] \rightarrow [\text{A} / \text{V}] \rightarrow [\text{ENTER}] \rightarrow [\text{ENTER}] \rightarrow [\text{A} / \text{V}] \rightarrow [\text{ENTER}] ] Enciende o apaga la funciona Video Wall (Video mural) en la pantalla seleccionada. - Des. - Act. 2) Formato [ \text{[MENU]} \rightarrow [\wedge / \vee] \rightarrow [\text{ENTER} ] \rightarrow [\wedge / \vee] \rightarrow [\text{ENTER} ] \rightarrow [\wedge / \vee] \rightarrow [\text{ENTER} ] \rightarrow [\wedge / \vee] \rightarrow [\text{ENTER}] ] Se peutesecionar el formatting para ver una pantalla dividida. - Llena Proporciona una planta completa sin margenes. - Natural Muestra una imagen natural con su relacion de aspecto original intacta. 3) Divisor de pantalla [ \text{[MENU]} \rightarrow [\text{A} / \text{V}] \rightarrow [\text{ENTER} ] \rightarrow [\text{A} / \text{V}] \rightarrow [\text{ENTER} ] \rightarrow [\text{A} / \text{V}] \rightarrow [\text{ENTER} ] \rightarrow [\text{A} / \text{V}] \rightarrow [\text{ENTER} ] ] Se peuté dividir la pantalla en autres varias. Puede seleccionar varias pantallas con una distribuccion differente al dividirlas. - Selezione un modo en el Divisor de pantalla. - Selecciona una pantalla en la Display Selection (Seleccion de pantalla). - La ubicacion se configurar pulsando un numero en el modo selectionado. -2x2 -3x3 -4×4 -5x5 -1x2 -2x1 -1x5 -5x1 - Cuando Video Wall está en funciona,[1] las unidades PIP, Ajuste automatístico, Bloqueo de Imagen y Tamaño no está disponible. Si se inicia Video Wall cuando PIP está en funciona,[2] la funciona PIP隨著 a Des. Video Wall no funciona en el modo MagicNet.Pantalla de seguidad PASCD
La función Safety Screen (Pantalla de segundad) se utilizes para evitar que poderanaparecer restos de imagenes en la pantalla cuando se visualiza una imagen fija por un periodo prolongado. - La funciona Screen Scroll (Desplazamente de pantalla) desplaza la pantalla el tiempo que se haya sido asignado. -Estamericano no está disponible cuando el aparato está apagado.1) Pantalla de seguidad
[MENU] [A / V] [ENTER] [A / V] [ENTER] [ENTER] [A / V] [ENTER] Determine si la direccion Screen Scroll (Desplazamento de pantalla) deben estar Act. o Des. - Des. -Act.2) Intervalo
[MONTH] [A/V] [ENTER] [A/V] [ENTER] [A/V] [ENTER] [A/V] [ENTER] Determine el intervalo que debe pagar hasta que se execute Screen Scroll (Desplazamente de pantalla). (1~10 hours) El tiempo se calcula tomando como base el tiempo de encendido. De forma predeterminada, el tiempo se establiece en 10 horas. -1~10 hours3) Segundos
\[ [\text{MENUR} ]\rightarrow [\wedge \vee ]\rightarrow [\text{ENTER} ]\rightarrow [\wedge \vee ]\rightarrow [\text{ENTER} ]\rightarrow [\wedge \vee ]\rightarrow [\text{ENTER} ]\rightarrow [\wedge \vee ]\rightarrow [\text{ENTER} ] \] Determine el periodo que debe pagar hasta que se ejecte Screen Scroll (Desplazamiento de pantalla). (1~5 segundos) De forma predelearminada, el tiempo se establece en 5segundos. - Tipo-Despl.: 1~5 segundos - Tipo-Pixel, Barra, Borrador: 10~50 segundos4) Tipo
[MONTH] [A/V] [ENTER] [A/V] [ENTER] [A/V] [ENTER] [A/V] [ENTER] Se peuteschangierelSafetyScreenType(Tipo de pantalla de seguridad). - Despl. - Pixel - Barra - BorradorSelecc.resoluciona
 [ \text{[MENU]} \rightarrow [\wedge / \vee] \rightarrow [\text{ENTER} ] \rightarrow [\wedge / \vee] \rightarrow [\text{ENTER} ] \rightarrow [\wedge / \vee] \rightarrow [\text{ENTER}] ] Si laImagen no aparece correctamente en la pantalla alaabstar la resolucion de la tarjeta grfica del ordinador a 1024 x 768 a 60 Hz, 1280 x 768 a 60 Hz, 1360 x 768 a 60 Hz o 1366 x 768 a 60 Hz, graties al uso de esta funciion (Selec. resolucion) pue de seguir que la imagen aparezca en la pantalla del ordinador con la resoluciónspecificada.(Disponible solamente en el modo PC/BNC)
1) Des. 2)1024X768 3) 1280 X 768 4) 1360 X 768 5) 1366 X 768Nota
Solamente se pueda selectionar un menu si los values de la resolution de graficos son 1024 x 768 a 60 Hz, 1280 x 768 a 60 Hz, 1360 x 768 a 60 Hz o 1366 x768 a 60 Hz.PASCD
[MONTH] [A/V] [ENTER] [A/V] [ENTER] [ENTER] [] [ENTER] Se usa para ajustar la luz de fondo, con el fin de reducir el consumo de energia.Ajuste de encendidopASCD
[ \text{[MENU]} \rightarrow [\text{A} / \text{V}] \rightarrow [\text{ENTER} ] \rightarrow [\text{A} / \text{V}] \rightarrow [\text{ENTER} ] \rightarrow [\text{ENTER} ] \rightarrow [\text{A} / \text{V}] \rightarrow [\text{ENTER} ] ] Ajusta el Power On time (Tiempo de encendido) de la pantalla. *Precaución: Ajuste el Power On time (Tiempo de encendido) para que sea más largo, a finpreventir las sobrecargas de tension.Restablecer
Los parámedos de color se sustituyen con los values predeterminados de fabrica. 1) RestablecerImagen P [ \text{[MENU]} \rightarrow [\wedge / \vee] \rightarrow [\text{ENTER}] \rightarrow [\wedge / \vee] \rightarrow [\text{ENTER}] \rightarrow [\text{ENTER}] \rightarrow [< / >] \rightarrow [\text{ENTER}] ] (Disponible solamente en el modo PC/BNC) 2) Restablecer color P [ \text{[MENU]} \rightarrow [\Delta / \mathbb{V}] \rightarrow [\text{ENTER} ] \rightarrow [\Delta / \mathbb{V}] \rightarrow [\text{ENTER} ] \rightarrow [\Delta / \mathbb{V}] \rightarrow [\text{ENTER} ] \rightarrow [< / >] \rightarrow [\text{ENTER}] ] Control multipleModos disponibles
PC/BNC/DVI AAV S-Video Componente DVI-VideoControl multiple PASCD
 [ \text{[MENU]} \rightarrow [\wedge / \vee] \rightarrow [\text{ENTER}] \rightarrow [\wedge / \vee] \rightarrow [\text{ENTER}] \rightarrow [\text{ENTER}] \rightarrow [0 \sim 9] ] Asigna un ID al aparato. 1) Configuración de ID Asignacion de ID diferenciadores al aparato. 2) Entrada de ID Se utilizes para seleccionar las funcciones del transmisor del aparato. Solo se activa el aparato bajo ID se corresponda con el valor del transmisor. Characteristicas de Control DirectoModos disponibles
PC/BNC/DVI AAV S-Video Componente DVI-VideoMDC PASC0
Vaya a la pantalla OSD de Multi Control.Bloquear PASCD
Ajuste la funciona Bloqueo de segundad. 1) Activarbloqueo Se bloqueara. 2) Desactivarbloqueo Se desbloqueara. Nota - Cuando se configura la direccion Lock,sole运营管理 los botones Lock del mando a distancia y del equipo. La password (contraseña) preestablecida del monitor es "000000".Nota
- Restablecimiento de la contraseña para lock (bloqueo) de la tecla de funciona. Pulse MUTE 1 8 6 On. La contraseña se debe restablecer como '0000'. El mando a distancia es NEEDario para restablecer la contraseña. © 1995~2008 SAMSUNG. ALL Rights Reserved Instrucciones de seguidad Introduccion Conexiones Uso del software Ajuste del monitor Resolución de problemas Comprobación de las funciones de autoverificacion Lista de chequeo Q&A Especificaiones Information ApéndiceTFT-LCD Monitor
www.samsung.com  El aspecto externo y el color del producto pueda variar dependiendo del modelo; las specifications del producto se puedaCambiar sin previo aviso para la mejora del rendimiento.Resolución de problemas
Comprobación de las funidades de autoverificacionNota
- Compruebe lo siguientes antes de llamar al serviceo tecnico. Consulte con el centro de serviceo acerca de problemas que no pueda SOLUTIONAR por si mismo. > Comprobación de las functiones de autoverficación Se provee un dispositivo de autoprueba que permite inspeccionar la functiOn apropiaDe del monitor. Si el monitor y el computador estan connectados apropiadamente pero la pantalla del monitor permanece obscura y el indicator de abastecimiento de energia esta intermitente, execute la autoprueba del monitor, siguiendo los siguientes pasos: 1)Apaguencomputador yel monitor. 2) Desconecte el cable de video de la parte trasera del computador. 3) Prenda el monitor. La figura que aparece bajo ("Comprobar cable de senal") aparece sobre un segundo plano negro cuando el monitor está en situación de functiónamente normal pero no detecta ninguna senal de video: Mientras está en el modo Autoprueba, el indicator de suministro de energia LEDcede verde y la figura se mueve por la pantalla. Comprobar el cable de senal.
PC
4) Apague el monitor y vuelva a conectar el cable de video; bajo prenda el computador y el monitor. Si la pantalla del monitor vigues en blanco afterwards seguir el procedimiento anterior, compruebe el controlador de video y el sistemas de la computadora; el monitor está的功能正好。 > Check Cooling System Si en la pantalla se muestra el mensaje "Check Cooling System", quiere decir que hay un problema con el ventilador de refrigeracion. Póngase en contacto con un centro de servicios para reparar o reemplazar el ventilador. > Modo no optimo Puede ver la pantalla con unaResolution superior a 1360 x 768. No obstarve, ver a mensaje seguiente durante un minuto; durante es timeo, puee cabiar la resolucion de la pantalla o continuar en el modo actual. Si la fecuencia deactualizacion es de mas de 85Hz ver la tableta negra porque el monitor no admite mas de 85Hz.Mode no optimo Modo recomendado 1360 x 768 60Hz
Nota
- Véase Especificações > Modos de Pantalla Prefijados acerca de las resoluções o frequencias compatibles con el monitor.> Mantenimiento y Limpieza
1) Mantenimiento de la Caja del monitor Limpie con un paño suave après de desconectar el cordón de suministro electrico.  - No use benceno, disolvente u other sustancias inflamables, o un paño mojado. - Se recomienda un produit de limpieza de Samsung para prevenir daños en la pantalla. 2)Mantenimiento de la Pantalla de panel plano. Limpie con un paño blando (una bayeta de algodón) suavamente.  - Nunca use acetona, benceno o disolvente. (Pueden causar defectos o deformaciones en la superficie de la pantalla). - El usuario tendrá que pagar los costes y los gastos relacionados por la reparación de los días causados por el o ella.Sintomas y Acciones recomendadas
Nota
- Un monitor reconstruye señales visuales que recibe del computador. Por lo tanto, si haydle problema con el PC o la tarjeta de video, esta podra causar que el monitor se ponga en blanco, o tenga malos colocores, sonido, Sincronizacion Fuera de Rango, etc. En este caso, primero inspeccione la fuente del problema y bajo pongase en contacto con el centro de service o el distribuidor. 1) Inspeccione si el cordon de suministro de energia esta conectado apropiamente al computador. 2) Inspeccione si el computador emite el sonido "beep" mas de 3 vezes cuando se inicia. (Si es affirmative, Solicite un service deutenimiento para la placa base del computador). 3) Si instalala una nuevo tarjeta de video o si ensambla el PC, inspeccione si la unidad del adaptor (video) o el controlador del monitor está instalado. 4) Compruebe si la fecuencia de exploracion de la pantalla de video está configurada en 50Hz 85Hz (Cuando use la maxima resolution no exceeda 60~Hz ). 5) Si Tiene problemas en la instalacion del controlador del adaptador (video), inceie el computador en el Modo Seguro, remueva el Adaptador de Pantalla en "Panel de Control, Sistema, Dispositivo de Administracion y bajo reiniciar el computador para reinstalar el controlador del adaptador (video). Lista de chequeoNota
La tablasumaque enumerated los posibles problemas y sus soluiones. Antes de llamar al serviceo tcnico, compruebe la informacion de esta section para ver si possible remediar el problema usted mesmo. Si necesite aplicay, Iame al numero del telfo n de la tarjeta de garantia, el numero de telfono en la seccion Informacion o consulte con su distribuidor.Problemas relacionados con la instalacion (PC)
Nota - Los problemas relacionados con la instalacion del monitor y sus soluciones estan en la lista.Problemas Soluciones
La pantalla del monitor parpadea. - Compruebe si el cable de senal entre el equipo y el monitor está conectado y acoplado con firmeza. (Véase Conexión con una computadora)Blemas relacionados con la pantalla
Nota - Los problemas relacionados con la pantalla del monitor y susmericanos estan en la lista.Problemas Soluciones
La pantalla está en blanco y el indicator de suministro de energia está apagado - Aseguresede que el cordon de suministro electrico este conectarod firmamente y el monitor LCD esta encendido. (Véase Conexión del Monitor) Mensaje "Check Cable Serial" - Aseguresede que el cable de senial estedecortado firmamente con las fuentes de PC o de video. (Véase Conexión del Monitor) - Asegürese de que las fuentes de PC o de video estén activadas. Mensaje "Modo no optimo". - Comprue la resoluzione y la Frequencia的最大s del adaptor de video Compare these values con los datos del Grafico Modos de Pantalla Prefijados. La imagen rueda verticalmente. - Compruebe si el cable de senal está conectado con seguidad. Conéctelo或其他方式。 (Véase Conexión con una computadora) LaImagenoestaclara.La - Execute el Ajuste de fecuencia Ajuste Grueso y Ajuste Fino. - Enciendalo或其他方式,比如使用键盘、移动鼠标或用其他方式。 (cable de extension de video, etc) Establezca la resoluzione y la Frequencia bajo de los rangos recomendados. Modelo 19 pulgadas(1280 x 768 @ 60Hz) LaImagenesinstableyvibra. - Compruebe si la resoluzione y la Frequencia definidos para la tarjeta de video del equipo está ndro del rango admitido por el monitor Si no,whelming a establecerlos segun Informacion en el menu del monitor y Modos de Pantalla Prefijados. LaImagenesdemasiadoclara o - Ajuste la Luminosidad y el Contraste. (Véase Luminosidad, Contraste) demasiado oscura. El color de la pantalla es inconsistent. El color de laImagen está distorsionado con sombras oscuras. - Ajuste el color usando Favorito en el menu OSD Color Adjustment (Ajuste del color OSD). El color blanco es pobre. El indicator de suministro de energia parpadea en verde. - El monitor está guardando los Cambios realizados en la configuración en la memoria de OSD. La pantalla está en blanco y la luz del indicator de suministro de energia es verde constante o parpadea cada 0,5 o 1segundos - El monitor está usingo su Sistema de administracion de energia. - Mueva el ratón del equipo o pulse una tecla del teclado. - Si aparece el mensaje "TEST GOOD" en pantalla al pulsar el botón MENU, disfruebe la connexion del cable entre el monitor y el equipo informativo para asegurar que el conector está connectado correctamente. Problemas relacionados con el audio Nota - Los problemas relacionados con las señales de audio y sus SOLUTIONES se enumeran a continuación.Problemas Soluciones
No hay sonido
- Asegúrese de que el cable de audio está correctamente conectado al puerto de entrada de audio del monitor y el puerto de salute de audio de su tarjeta de sonido. (Véase Conexión del Monitor) - Compruebe el nivel del volumen.El nivel del sonido es demasiado bajo
- Compruebe el nivel del volumen. - Si el volumen vigue siendo demasiado bajo afterwardsajustar el control al maximo, compruebe el control del volumen en la tarjeta de sonido del equipo o en el programa de software.El sonido está demasiado alto o demasiado bajo
- Ajuste Agudo y Grave al nivel apropriado. Problemas relacionados con el Control remoto Nota - Los problemas relacionados con el control remot y susmericanas se enumeran a continuacion.Problemas Soluciones
Los botones del control remoto no responden.
- Compruebe las polaridades de las baterias (+/-). - Compruebe si se han agotado las baterias. - Compruebe si está encendido - Compruebe si el cordón de suministro electrico está conectado con seguidad. - Compruebe si hay encendida una lampara fluorescente o de neón en su cercania. Q&APregunta Respuesta
¿Cóme se puedaonian la fecuencia?
Se peutéckiar la fecuencia reconfigurando la tarjeta de video. Note que el soporte de la tarjeta de video pueda variar,dependiendo de la version del controlador usado. (Busque detalles en el manual del computador o de la tarjeta de video).¿Cóme se pueda regular la resolution?
- Windows XP: Restablezca la resolution能做到 en Panel de control Apariencia y temas Pantalla Configuracion. Windows ME/2000: Restablezca la resoluzione hacerly clic en Panel de control Pantalla Configuracion. * Contáctese con el fabricante de la tarjeta de video para Obtener más detalles. ¿Cóme se puedaponer la función Ahorro de Energía? Windows XP: Poner la funciona en Programa de Instalacion-BIOS(sistema Basicsico de entrada -salida) del computador o del protector de pantalla. Poner la funciona en Programa de Instalacion-BIOS(sistema Basicsico de entrada -salida) del computador o del protector depellantla.Consulte el Manual del Computador/Windows Windows ME/2000 Set the resolution at the Control Panel Display Screen Saver. Poner la funciona en Programa de Instalacion-BIOS(sistema Basicsico de entrada -salida) del computador o del protector depellantilla.Consulte el Manual del Computador/Windows Cóme se pueda limpiar el Tubo deImagen/Panel LCD? Desconecte el cordón de suministro de energia y bajo limpie el monitor con unaTELa suave,usandounaSolution limpiadora o simplemente agua. No deje restos de detergente ni raye la caja. No permitted que entre agua en el computador. © 1995~2008 SAMSUNG. ALL Right Reserved  Instrucciones de seguidad Introduccion Conexiones Uso del software Ajuste del monitor Resolución de problemas Especificaiones Generales Ahorro de energia Modos de temporización predefinidos Information ApendiceTFT-LCD Monitor
www.samsung.com  El aspecto externo y el color del producto pueda variar dependiendo del modelo; las specifications del producto se puedaCambiar sin previo aviso para la mejor del rendimiento.Especificaciones
Generales Generales Generales Nombre del Modelo SMT-4011 Panel LCD Tamaño 40 pulgadas de diagonal (101,6 cm) Area de Presentación 885,168 mm (H) x 497,664 mm (V) Distancia entre Pixels 0,648 mm (H) x 0,648 mm (V) Sincronizacion Horizontal 30 81kHz Vertical 56 75Hz Color de Pantalla Color de Pantalla 16,7 M colocores Resolución Analógico 1360 x 768 / 1366 x 768 @ 60 Hz: depende de la tarjeta grafica que se utilice Digital 1366 x 768 @ 60 Hz Señal de entrada, terminado RGB analogico, RGB digital compatible con DVI (Interfaz visual digital). 0,7 Vp-p positivo a 75 ohmios ±10 % sincronizacion de H/V分开ado, compuesto, SOG, nivel TLI, posicao o negativo. H/V independiente, nivel TTL, positivo o negativo 100 MHz Fuente de poder CA 100-240V\~ (+ - 10%) ,50/60 Hz Cable de Senal 15pines-a-15pines D-sub cable, desarmable DVI-D-a-DVI-D connector, desarmable - Opcion Conector de senal D-sub, BNC, DVI-D, YPbPr, S-VHS, VCR Dimensiones (PxAxD) / Peso 971 x 582 x 118 mm / 38,2 x 22,9 x 4,6 inch (Sin soporte) 971 x 629,5 x 223 mm / 38,2 x 24,8 x 8,8 inch (Con soporte), 23 kg/50,7 lbs 971 x 629,5 x 228 mm / 38,2 x 24,8 x 9,0 inch (con soporte y con cristal), 27,7 kg/61,0 lbs Interfase de Montaje VESA 200 mm x 200 mm (Para uso con hardware de Montaje especial (Brazo)) Consideraciones medioambienteles Operación Temperatura: 10^ C 40^ C (50°F ~ 104°F) Humedad: 10% 80% , no-condensacion Almacenamento Temperatura: -20°C ~ 45°C (-4°F ~ 113°F) Humedad : 5% ~ 95%, no-condensation Characteristicadelaudio Entrada de audio 1 Clavija RCA roja (D) blanca (I), 0,5 Vrms (-9 dB) Entrada de audio 2 Clavija RCA roja (D) blanca (I), 0,5 Vms (-9 dB) Entrada de audio de PC Clavija estereo de 3,50,0,5 Vrms (-9 dB) Frecuencia RF:80 Hz 15 kHz (a-3 dB) Respuesta A/V: 80 Hz ~ 20 kHz (a -3 dB)Posibiliidad de Plug y Play
Este monitor可以选择 instalarse en cualquier sistemas con Plug & Play compatible. Las Interactiones de los sistemas del monitor y el PC proveen las最好的 conditiones operativas y configuracion del sistema. En la mayoria de los casos, la instalacion del monitor se hara automatamente, a menos que el usuario deseee seleccionar configuraciones alternas.Punto acceptable
Para este producto se usa la pantalla TFT LCD fabricada con的技术ia avanzada de semiconductores con una precision de 1 ppm (una millionesa). Pero a vezes, los pixeles de color ROJO, VERDE, AZUL y BLANCO parecen estar brillantes o se pueda ver algunos pixeles negros. Esto no es bajo a una mala calidad yastedepuertoconconfianza. - Por exemple, el número de pixeles secundarios de TFT LCD contentsados en este producto es 3.133.440Nota
- El diseño y las espécificaciones están susjetos a Cambios sin previo aviso.Equipo de Clase B (equipo de comunication de informacion para uso domestico)
- Este equipo cumple con las directrices de Compatibility electromagnética para uso dométrico y se pueda usar en todas las areas incluso las zonas residenciales comunes. (El equipo de Clase B irradia menos ondas electromagnéticas que el equipo de Clase A.)Ahorro de energia
Este monitor tiene un sistema incorporeal de manejo de energia llamado Ahorroder de Energia. Este sistemas por cieo periodo de time. El monitor regresa automaticamente a una operation normal cuando se mueve el mouse del computador o se presiona una tecla del teclado. Para ahorrar energia, apague el monitor cuando no lo necesse, o cuando no lo use durante largos periodos de time. El system del Ahorroder de Energia funciona con un VESA DPM de acuero a la tarjeta de video instalada en el computador. Use un programa de Herramentas instalado en el computador para instalar esta caracteristica.| Estado | Operación normal | Modo de ahorro energetico | Apagado de la Fuente de Alimentación EPA/ENERGY 2000 | Apagado de la Fuente de Alimentación | Apagado de la Fuente de Alimentación |
| Indicador de Suministro de Energía | Verde | Verde, intermitente | Ambar | Negro | |
| Consumo de Energía | Menos de 210 W | Menos de 1 W (Modo Off) | Menos de 1 W (Energía) | 0 W (Botón de suministro de energia) |
Modos de temporizacion predefinidos
> Modos de temporación predefinidos Si la signal transferida del computador es laquia a la de los Modos de Pantalla Prefijados seguides, la pantalla se regula automatically. Sin embargo, si la signal difiere, la pantallaoulda ponerse en blanco,mientras el indicator de suministro de energia LED esta prendido.Consulte el manual de la tarjeta de video y regule la pantalla de lasuma manera.| Modo Pantalla | Frecuencia H (kHz) | Frecuencia V (Hz) | Ancho de Banda (MHz) | Polaridad Sync (H/V) | |
| IBM, 640 x 350 | 31,469 | 70,086 | 25,175 +/- | ||
| IBM, 640 x 480 | 31,469 | 59,940 | 25,175 | -/- | |
| IBM, 720 x 400 | 31,469 | 70,087 | 28,322 | -/+ | |
| MAC, 640 x 480 | 35,000 | 66,667 | 30,240 | -/- | |
| MAC, 832 x 624 | 49,726 | 74,551 | 57,284 | -/- | |
| VESA, 640 x 480 | 37,861 | 72,809 | 31,500 | -/- | |
| VESA, 640 x 480 | 37,500 | 75,000 | 31,500 | -/- | |
| VESA, 640 x 480 | 43,269 | 85,008 | 36,000 | -/- | |
| VESA, 800 x 600 | 35,156 | 56,250 | 36,000 | +/+ | |
| VESA, 800 x 600 | 37,879 | 60,317 | 40,000 | +/+ | |
| VESA, 800 x 600 | 48,077 | 72,188 | 50,000 | +/+ | |
| VESA, 800 x600 | 46,875 | 75,000 | 49,500 | +/+ | |
| VESA, 800 x600 | 53,674 | 85,000 | 56,250 | +/+ | |
| VESA, 1024 x 768 | 48,363 | 60,004 | 65,000 | -/- | |
| VESA, 1024 x 768 | 56,476 | 70,069 | 75,000 | -/- | |
| VESA, 1024 x 768 | 60,023 | 75,029 | 78,750 | +/+ | |
| VESA, 1024 x 768 | 68,677 | 85,997 | 94,500 | +/+ | |
| VESA, 1360 x 768 | 47,712 | 60,000 | 85,500 | +/+ | |
Frecuencia H
El tiempo para escanear una linea que conecta horizontally el lado de la planta al lado izquierdo es llamado Ciclo Horizontal y el número inverso del Ciclo Horizontal es llamado Frecuencia H. Unidad: kHzFrecuencia V
A semejanza de una lámpara fluorescente, la pantalla tiene que repetir la misma imagen muchas vezes porsegundo para做不到 una imagen al usuario. La Frequencia de esta repetition es llama Frecencia V o Frecuencia de Escaneo. Unidad: Hz © 1995-2008 SAMSUNG. ALL Right Reserved  Instrucciones de seguidad Introduccion Conexiones Uso del software Ajuste del monitor Resolución de problemas Especificaiones Information Para Obtener una Mejor Presentación INFORMACION de PRODUCTO (Libre de retencion de imagenes) ApéndiceTFT-LCD Monitor
www.samsung.com  El aspecto externo y el color del producto pueda variar dependiendo del Modelo; las specifications del producto se puedaCambiar sin previo aviso para la mejora del rendimiento.Information
Para Obtener una Mejor Presentacion Ajuste la resolution de la computadora y la velocidad de inyeccion de la pantalla (intervalo deactualizacion) del panel de control de la computadora, como se indica a continuacion, para que disfunte delmejor calidad de imagen. Usted peut tener una calidad irregular de imagen en la pantalla si la mejor calidad de imagen no se provee en TFT-LCD. - Resolución : 1360 x 768 Frecuencia Vertical (actualizacion) : 60 Hz Para este produit se usa la pantalla TFT LCD fabricada con的技术ia avanzada de semiconductores con una precision de 1 ppm (una millionesa). Pero a vezes, los pixeles de color ROJO, VERDE, AZUL y BLANCO parecen estar brillantes o se pueda ver algunos pixeles negros. Esto no es defaulted a una mala calidad y usted pueda usarlo con confianza. - Por exemple, el número de pixeles secundarios de LCD Contents en este producto es Cuando limpie el monitor y el panel exterior, por favor aplique con un pafo suave y seco la pequeña cantidad de limpiador que se recomienda, y pulalo. No aplique fuerza al area del LCD sino estregue suavamente. Si se aplica mucha fuerza, pueda mancharse. Si no está satisficho con la calidad de la imagen, pueda lograr mejor calidad de imagen allearvaracabo la "funci deajuste automatico" en la pantalla que aparece cuando se presiona el boton de cierre de ventana. Si hay todas ruido despues del ajuste automatico, use la functiOn de ajuste FINO / GRUESO. Si el aparato muestra una imagen fija durante un长大o periodo de tiempo, pueda quedar una imagen residual o cierta indefinccion. Establezca el modo de ahora de energia o configure un protector de pantalla con una imagen en movementio, cuando seanecessary扣除adendido el monitor durante un largo periodo de tiempo. INFORMACION de PRODUCTO (Libre de retencion de imagenes)念 Que es la retencion de imagen?
La retencion deImagen no debe producirse cuando un panel LCD functiona en conditiones normales. Estas se defineen como patrones de video que cambian continuamente. Cuando el panel LCD functiona largo tiempo con un patron fijo (más de 12 horas), se produce una liga diferencia de voltaje entre los electrodos que introducen el cristal liquido (LC) en un pixel. Con el tiempo la diferencia de voltaje entre los electrodos se va incrementando, con lo que el cristal liquido se va hacer más delgado. Cuando este sucede, pueda que se vea laImagen anterior si el patron ha comeado. Para impeder this, se debe reduir la diferencia de voltaje acumulado. Apagar, salvapantallas o modo de ahorro de energia
- Aquare el aparato durante 4 horas tras un periodo de uso de 20 horas. - Apague el aparato durante 2 horas tras un periodo de uso de 12 horas. - Configure el monitor para que se apague con el esquema de alimentacion de las propiedades de la pantalla del PC. - Utilice un salvapantallas si es posible. - Es aconsejable usar un salvapantallas de un color o una imagen en movimiento.Cambiar la informacion de color periodicamente
Nota
- Use dos colores differentes Alterne la informacion de color con dos colores differentes cada 30 instantos. - Evite usar una combinación de caracteres y color de fondo con una gran diferencia de luminancia. No utilise colocores grises, ya que pueda producir fácilmente una retencion deImagen. Evite: colores con gran diferencia de luminancia (blanco y negro, gris).  Camblar el color de los caracteres periodicamente
- Use colors brillantes conlittle de luminancia Clico: cambie el color de los characteres y del fondo cada 30 minutes  Cada 30 Minutes, cambie los characteres con movimiento.  - LaImagen en mouvemento de toda el area junto con el logo periodicamente. - Ciclo: Imagen en movimiento de la pantalla+junto con el logo durante 60segundos despues de 4 horas de uso. - El mejor modo de impeder la retencion deImagen en el monitor es apagar este o configurar el PC o sistemas para que se active un salvapantallas cuando el equipo no se utilise. El servicios de garantía también se limitara de acuerdo con la guía de instructaciones.Aplicar la functiOn de desplazamente de pantalla en el producto
- Aplique la direccion de desplazamente de pantalla - Sintoma: la barra horizontal de color negro se mueve arriba y abajo.  -Seleccione el método . Guia de instrucciones: Menu OSD -> Set Up (Configurar) -> Safety Screen (Pantalla de seguidad)- > Screen Scroll (Desplazamente de pantalla) Intervalo de tempo: 1~10 horas (Recomendado: 1) Periodo de tiempo: 1~5segundos (Recomendado:5)  - (Consulte la guía del usuario del CD en "Función OSD"; en algunos modelos no está disponible)Aplicar la referencia de pixeles de la pantalla en el producto
- Aplique la direccion de la Pixel de la pantalla - Sintoma: El punto de color negro se mueve arriba y abajo.  -Seleccionelmetodo Gula de instrucciones: Menu OSD -> Set Up (Configurar) -> Safety Screen (Pantalla de seguridad)- >Pixel (Pixel). Intervalo de tiempo: 1~10 horas (Recomendado: 1) Periodo de tiempo: 10~50segundos (Recomendado:50) - Aplique la direccion de la barra de la pantalla - Sintoma: las barras horizontal y vertical de color negro se mueven arriba y abajo.  -Seleccione el método . Guia de instrucciones; Menu OSD -> Set Up (Configurar) -> Safety Screen (Pantalla de seguidad)- > Bar (Barra) Intervalo de tempo: 1~10 horas (Recomendado: 1) Periodo de tempo: 10-50 segundos (Recomendado: 50)  - (Consulte la guía del usuario del CD en "Función OSD"; en algunos modelos no está disponible)Aplicar la direccion de borrado de la pantalla en el producto
- Aplique la direccion de borrado de la pantalla en el producto - Sintoma: Dos bloques verticales se desplazan cuando se borra la pantalla.  -Selección el método . Guia de instrucciones: Menu OSD -> Set Up (Configurar) -> Safety Screen (Pantalla de segundad)- >Eraser (Borrador) Intervalo de tiempo: 1~10 horas (Recomendado: 1) Periodo de tempo: 10~50segundos (Recomendado:50)  - (Consulte la guía del usuario del CD en "Función OSD"; en algunos modelos no está disponible) © 1995-2008 SAMSUNG. ALL Right Reserved Instrucciones de seguidad Introduccion Conexiones Uso del software Ajuste del monitor Resolución de problemas Especificaciones Information Apendice Contacte con SAMSUNG WORLDWIDE Téminos Eliminación correcta AutoridadTFT-LCD Monitor
www.samsung.com  El aspecto externo y el color del producto pueda variar dependiendo del Modelo; las specifications del producto se puedaCambiar sin previo aviso para la mejora del rendimiento.Apéndice
Contacte con SAMSUNG WORLDWIDE Nota - Si Tiene alguna pregunta o commentario referente a nuestros productos, por favor contacte con nosotros. Servicio de Atencion al ClienteNorth America
U.S.A 1-800-SAMSUNG(726-7864) http://www.samsung.com/us CANADA 1-800-SAMSUNG(726-7864) http://www.samsung.com/ca MEXICO 01-800-SAMSUNG(726-7864) http://www.samsung.com/mxLatin America
ARGENTINE 0800-333-3733 http://www.samsung.com/ar BRAZIL 0800-124-421 http://www.samsung.com/br CHILE 800-SAMSUNG(726-7864) http://www.samsung.com/c/ COLOMBIA 01-8000112112 http://www.samsung.com.co COSTARICA 0-800-507-7267 http://www.samsung.com/latin ECUADOR 1-800-10-7267 http://www.samsung.com/latin EL SALVADOR 800-6225 http://www.samsung.com/latin GUATEMALA 1-800-299-0013 http://www.samsung.com/latin JAMAICA 1-800-234-7267 http://www.samsung.com/latin PANAMA 800-7267 http://www.samsung.com/latin PUERTO RICO 1-800-682-3180 http://www.samsung.com/latin REP. DOMINICA 1-800-751-2676 http://www.samsung.com/latin TRINIDAD & TOBAGO 1-800-SAMSUNG(726-7864) http://www.samsung.com/latin VENEZUELA 0-800-100-5303 http://www.samsung.com/latinEurope
AUSTRIA 0800-SAMSUNG(726-7864) http://www.samsung.com/at BELGIUM 0032 (0)2 201 24 18 http://www.samsung.com/be| CZECH REPUBLIC | 844 000 844 http://www.samsung.com/cz Distributor pro Českou republika: Samsung Zrt., Česka organizačné složka Vyskočilova 4, 14000 Praha 4 |
| DENMARK | 70 70 19 70 http://www.samsung.com/dk |
| FINLAND | 030-6227 515 http://www.samsung.com/fi |
| FRANCE | 3260 SAMSUNG(726-7864) http://www.samsung.com/fr 08 25 08 65 65 (€ 0,15/min) |
| GERMANY | 01805-121213 (€ 0,14/Min) http://www.samsung.de |
| HUNGARY | 06-80-SAMSUNG(726-7864) http://www.samsung.com/hu |
| ITALIA | 800-SAMSUNG(726-7864) http://www.samsung.com/it |
| LUXEMBURG | 0035 (0)2 261 03 710 http://www.samsung.com/be |
| NETHERLANDS | 0900 20 200 88 (€ 0,10/Min) http://www.samsung.com/nl |
| NORWAY | 815-56 480 http://www.samsung.com/no |
| POLAND | 0 801 801 881 http://www.samsung.com/pl |
| 022-607-93-33 | |
| PORTUGAL | 80 8 200 128 http://www.samsung.com/pt |
| REPUBLIC OF IRELAND | 0818 717 100 http://www.samsung.com/ie |
| SLOVAKIA | 0800-SAMSUNG(726-7864) http://www.samsung.com/sk |
| SPAIN | 902 10 11 30 http://www.samsung.com/es |
| SWEDEN | 0771-400 200 http://www.samsung.com/se |
| SWITZERLAND | 0800-SAMSUNG(726-7864) www.samsung.com/ch |
| U.K | 0870-SAMSUNG(726-7864) http://www.samsung.com/uk |
| CIS | ||
| ESTONIA | 800-7267 http://www.samsung.ee | |
| LATVIA | 800-7267 http://www.samsung.com/lv | |
| LITHUANIA | 8-800-77777 | http://www.samsung.1t |
| KAZAKHSTAN | 8-10-800-500-55-500 | http://www.samsung.kz |
| KYRGYZSTAN | 00-800-500-55-500 | |
| RUSSIA | 8-800-555-55-55 | http://www.samsung.ru |
| UKRAINE | 8-800-502-0000 | http://www.samsung.ua |
| UZBEKISTAN | 8-800-120-0-400 | http://www.samsung.uz |
| Asia Pacific | ||
| AUSTRALIA | 1300 362 603 | http://www.samsung.com/au |
| CHINA | 800-810-5858, 010-6475 1880 | http://www.samsung.com.cn |
| HONG KONG | 3698-4698 | http://www.samsung.com/hk |
| INDIA | 3030 8282, 1800 110011 | http://www.samsung.com/in/ |
| INDONESIA | 0800-112-8888 | http://www.samsung.com/id |
| JAPAN | 0120-327-527 http://www.samsung.com/jp | |
| MALAYSIA | 1800-88-9999 http://www.samsung.com/my | |
| NEW ZEALAND | 0800SAMSUNG(726-7864) | http://www.samsung.com/nz |
| PHILIPPINES | 1800-10-SAMSUNG(726-7864) | http://www.samsung.com/ph |
| SINGAPORE | 1800-SAMSUNG(726-7864) http://www.samsung.com/sg | |
Middle East & Africa
SOUTH AFRICA 0860-SAMSUNG(726-7864) http://www.samsung.com/za TURKEY 4447711 http://www.samsung.com.tr 800-SAMSUNG (726-7864) 8000-4726 http://www.samsung.com/meaTéminos
Señal de Sincronización (Sync.)
Las señales de sync (sincronizzato) son las señales estandar necessities para loar los colores deseados en el monitor. Se divid en Señales de sincronizacion Vertical y Horizontal. Estas snales muestran las imagenes de color normales medianta la resoluion y la fecuencia establecidas. Tipos de senales de synchronization| Separada | Este es un esquema de transmisión de señales de sincronización verticales individuales al monitor. |
| Compuesta | Este es un esquema de combinación de las señales de sincronización verticales dentro de una SIGNAL compuesta y de transmitirlas al monitor. El monitor mystra las señales del color分开ando la SIGNAL compuesta en las señales del color originales. |
Dot Pitch (Ancho de Punto)
LaImagen en el monitor está compuesta de punto de color rojo, verde y azul. Mientras más cercanos estén, mejor sera la nitidez. La distancia entre dos punto del mesmo color es llamada "dot pitch". Unidad: mmFrecuencia V
La planta de ser dibujada varias vezes en un intervalo de un secondo a fin de crear yETHERuna imagen al usuario. La Frequencia de esta repeticion es llamada Frecuencia Vertical o Tasa de Refresco. Unidad: Hz Ejempo : Si la mtsma luz se repite 60 vezes por segundo, se considera como de 60HzFrecuencia H
El tiempo que toma para escanear una linea que conecta horizontalmente el extremo derecho con el extremo izquierdo de la pantalla es llamado Ciclo Horizontal. Al número inverso del Ciclo Horizontal se le llama Frecuencia Horizontal. Unidad: kHzMetodos de Entrelazamento y No-Entrelazamento
A la muestra de las lineses horizontales en la pantalla, desde el tope hasta la base,se le llama método de NoEntrelazamiento,mienes que a la muestra de lineas impares y bajo lineas pares alternativamente se le llama método de Enlazamiento. El método de No-Entrelazamiento es uso por la mayoria de monitores para asegurar una imagen clara. El método de Entrelazamiento es el mesmo que se usa en la TV.Plug & Play (Enchufar y Operar)
Esta es una funciona que otorga al usuario la mejor calidad de pantalla, permitiendo al monitor y al computador intercambiari informacion automatistica. Este monitor cumple con el estandar internacional VESA DDC para la funciona Plug & Play.Resolución
Al número de punto que se alinean vertical y horizontalmente para formar laImagen se le llama "resolución". Este número muestra la precision de la pantalla. Es buena tener unaResolution alta para realizar tareas multiples ya que se pueda estar mas informacion en la pantalla.| Ejemplo : | Si la resolveduon es 1360 X 768, esta significa que la pantalla está compuesta de 1360 puntos horizontales (resolución horizontal) y 768 lineas verticales (resolución vertical). |
Un MDC (Multiple Display Control)
Un MDC (Multiple Display Control) es una aplicacion que permiteeworkar en un PC con varias pantallas fácil y simultaneamente. RS-232C, un estandar de comunication serial, se usa para la comunication entre un PC y una pantalla. Por tanto, esnecessary conectar un cable serial entre el puerto serial del PC y el puerto serial de cada pantalla. Eliminación correcta Eliminación correcta de este producto (material electrico y electrónico de descarte) - Europa solamente  (Aplicable en la Unión Europea y en paises europeos con sistemas de recogida selectiva de residuos) La presencia de estamarca en el producto o en el material informativo que lo accompanies, indica que al finalizar su vidautilnodeferaleliminarasejuntoconotros residuosdomesticos.Paraevitarlosposiblesdañosalmedioambienteoalaludhumanaquerepresenta laeliminacionincontroladaresiduos,separe este producto deoterostiposderesiduos yreciclocorrectamenteparapromover la reutilizacionsosteniblederecursosmaterialia.  Los equipos particulares pueden contactar con el establishimiento donde adquirieron el producto, o con las autoridades locales pertinentes, para informarse sobre como ydondeDICuen levarlo para quesea sometido a un reciclaje ecologico y seguro. Los)." con除外s commerciales. Autoridad La información de este manual está sujeta a Camblos sin previo avis. © 2008 Samsung Electronics Co., Ltd. Todos los derechos reservados. Está estricmente prohibida la reproducción de este manual, por cualquier medio, sin el permiso escrito de Samsung electronics Co., Ltd. Samsung electronics Co., Ltd. no sera responsable de los erros incurridos aqui o de los daños consequentes o incidentales relacionados con el suministro, interpretacion o uso de este material El logoloto " Samsung " son MARas registradas de Samsung Electronics Co., Ltd.; " Microsoft ", " Windows " y " Windows NT" son MARas registradas de Microsoft Corporation; " VESA", " DPM " y " DDC " son MARas registradas de Video Electronics Standard Association; el nombre y logoloto " ENERGY STAR " son MARas registradas de la Agencia de Proteccion Ambiental de EE.UU. (APA). Como socio de ENERGY STAR, Samsung Electronics Co., Ltd. ha determinado que este producto cumple con las directrices de ENERGY STAR sobre eficiencia energetica. Todos los demas nombres MentionadosAquí podrián ser MARas commerciales o MARcas registradas de sus respectivos dueños.SAMSUNG
-MEXICO SOLO - IMPORTADO POR: AV.PRESIDENTE MASARIK No.111 INT.701 Col. Chapultepec Morales, DELEGACION MIGUEL HIDALGO C.P. 11570, MEXICO, DISTRIBUTO FEDERAL Tel:01(55)5747.5100/01.800.726.7864 Fax:01(55)5747.5202/01.800.849.1743TFT-LCD MONITOR
SMT-4011
Türkce Kullanici Kilavuzu   Güvenlik Talimatlari Isaretleme AÇık/Kapalı durumu Kurulum Temizlik Diger Giris Baolantylar Yazilimn Kullanilmasi Monitorun Ayarlanmasi Sorun Giderme Özellikler Bilgiler AppendixTFT-LCD Monitor
www.samsung.com  Urun renge ve gorunmu modeline bagl olarak farklik gosterebilir ve performans gelistirmeler nedeniyle urn ozellikleri onceden haber verilmeksizin degistirilebilir.Güvenlik Talimatlari
isaretleme  Asagidaki givenulik talimatlan urunlerin ve kullanicilarin zarar gormesini onlemek icin hazirlanmistir, lufen okuyun.  Uyari/Dikkat  Bu simgeyle isaretlenmis olan yonergelerin izlenmemesi cihaza fiziksel zarar verebilir vya hasara ugramasina neden olabilir.  isaretler  Yasaktir Her zaman okunmus ve anlasilmis olmasi onemlidir  Parcalina ayirmayin Figt elektrik prisinden cikanr  Dokunmayin Elektrik carpasini engellemek icin topraklama Açık/Kapalı durumu  Uzunbir sure kullanilmayacaksa,bilgisayariniziGoruntu GucYonetimi Sstemi'ne(DPM)ayarlayin. Ekran koruyucu kullaniyorsaniz, etkin ekran moduna ayarlayin. Buradaki görtüller sadece referans amaçldir, tum durumlar (veya ülkeler)icens geleidir. Gorinti Iz Kalma Onleyici Talimallan'na Kisa Yol  Zarar gormus veya gevsek priz kullanmayin. - Bu, elektrik carpmasina veya yangina neden olabilir.  Fişi kablosundan tutarak cekmeyin veya elleriniz islakken fisedokunmayin. - Bu, elektrik carpmasina veya yangina neden olabilir. #  Yalinzca gerekti gibi topraklanmis fi ve prisleri kullanin. - Topraklama isleminin duzgün yapilmamasi elektrik carpmasina veya cihazin bozulmasina neden olabilir.(Sadece Sinif Cihazi.) #  Elektrik fisi, gevsemeyecek sekilde sikica takin. Duzgün olmayan baglantilar yangina neden olabilir.  Fişi ve kabloyu asiri derecede bukmeyin ve uzerine aigr nesneler koymayin; bunlar hasar gormesine nden olabilir. - Bu, elektrik carpmasina veya yangina neden olabilir.  Prize cok fazla uzatma kablosu veya fiş baglamayin. - Bu, yangina neden olabilir.  Monitoru kullairken elektrik kablosunu cikarmayin. - Čikarma sirasinda dalgalanma meydana gelebilir ve monitore zarar verebilir.  Konektor veya pris tozluyken elektrik kablosunu kullanmayin. - Elektrik kablosunun prizi veya konektör tozluysa kuru bir bezle iyice temizleyin. Tozl prizi olan bir elektrik kablosu veya konektfor kullanilmasi, elektrik carpmasina veya yangina neden olabilir.  Cihazin elektrik baglantisini kesmek icin, fisin elektrik prizinden cikarilmasi gerekir ve boylece fis kullanilabilir durumda olur. - Bu uyarilara uyulmamasielektrik carpmasina veya yangina yol acabilir. Kurulum Monitor to zu tozlu yerler, asyuk se ya da uuk sicakiklar maruz kalan yerler, cok nemliyer, kymasal maddelerin kullanildigi yerler vya urun tekrar tekrar uzun sureler kullanildigi havaalanlan ve istasyonlar gibi yerere kurmad an once yetkil bir servis merkeziyle gurun.  Bunun yapilmaması, monitoruzde ciddi hasara neden olabilir.  Monitörunüz az nemli ve az tozlur yere koyun. Monitorin incinde elektrik carpmasi veya yangin olusat  Monitoru ta:sirken yere sert bir sekilde birakmayin. Bu hareket, urune veya size zarar verebilir.  Monitor altigi n vitrine ya da rafa yerlestirken, altigi n ucunun, vitrinden ya da raftan disari tasmamasina dikkat edin. Urunun yere duurulmesi, urune zarar verebilir ya da kisi sel yaralanmalara neden olabilir.  Urun dengesiz ya da yuzey alanikuk yerlere yerlestirmeyin. Urun duup ozellikc colocuklar olmak uzere yanindan yuriyenlere zarar verebileceginden, yalinzca duz ve dengeli bir yuzeye yerlestiin.  Urunu, yere yerlestirmeyin. Ozellikc cocuklar olmak uzere insanlar uzerinden gelebilir.  YANGIN CIKMASINI ONLEMEK ICIN, MUMLARI VEYA DIGER ACIK ALEVLI NESNELERI HER ZAMAN URUNDEN UZAKTA TUTUN. Aksi takdirde yangina yol aqabilir.  Tum istma cihazlarini, elektrik kablosundan uzakta tutun. Eriyen kaplama, elektrik carpmasina ya da yangina neden olabilir.  Uruni, bir raf ya da dolap gibi havalandirmanin yetersiz oldugu yerlere yerlestirmeyin. Ic sicakltaki yukselme, yangina neden olabilir.  Monitoru yerine dikkatle koyun. Zarar gorebilir veya kirlabilir.  Monitoru yuz iustukoymayin. - Ekran yüzeyi zarar gorebilir.  Monitorü taban destegi olmadan kullanmayin. Kotu havalandirma nedeniyle bozulabilir veya yangina neden olabilir. - Monitor taban destegiyle kullanilmayacaksa, yeterli havalandirma saglamak icin gereken adimlari uygulayin.  Urunu monte ederken, havalandirmanin saglanmasi icin duvarlaarasinda mesafe (10 cm/4 incten fazla) biraktigizdan emin olun. Havalandirmanin yetersiz olmasi, urunin ic sicakliginda bir artisa, dolayisiyla parca omrunk kisalmasina ve performansin duuk olmasina neden olabilir.  Ambalaj naylonunu cocuklarin ulasamayacagi bir yere koyun. Cocuklar ambalaj naylonu ile oynarsa bogulma tehlikesi olabilir. Temizlik  Monitörun kasasini veya ekran yüzeyini hafif nemli, yumusak bir bezle silerek temizleyin.  Deterjani dokrudan monitore piskurtmeyin. - Bu, hasara, elektrik carpmasina veya yangina neden olabilir.  Önerilen bir deterjani yumusak bir bez kullanarukuygulayin.  Prizle pinarasindaki konektor tozlu veya kirliyse kuru bir bezle iyice temizleyin. - Kirli bir konektor elektrik carpmasina veya yangina neden olabilir.  Uruni temizlemeden once guc kablosunu cikartiginizdan emin olun. - Aksi takdirde, bu durum elektrik carpmasina veya yangina neden olabilir.  Elektrik kablosunu prizden Çıkartin ve ürünü yumusak, kuru bir bezle silin. Balmumu, benzin, alkol, tiner, bocek ilaci, oda spreyi, yaqlayicilar ya da deterjan gibi kimyasal maddeler kullanmayin. Diger  Kapagi (veya arka kismi) cikarmayin. - Bu, elektrik carpmasina veya yangina neden olabilir. - Bakim icin yetkili bir servis personeline basvurun.  Monitorunuz normal calismiyorsa, ozellikle alismadik sesler ckiyor ya da koku gelyorsa hemen fisten cekin ve yetkili saticiya veya servise basvurun. - Bu, elektrik carpmasina veya yangina neden olabilir.  Urunu, yag, duman ya da neme maruz kalan yerlerden uzakta tutun; bir arabanin icine monte etmeyin. - Bu, elektrik carpmasina veya yangina neden olabilir. - Monitoru kar ve yagmurla karsi karsiya kalabilecegi acik havada vya su yakininda calistirmayin.  Monitor duserge veya kasasi zarar gürse, monitoru kapatin ve elektrik kablosunu çiarkin. Bu durumda Service Center (Servis Merkezi) ile iletşim kurun. - Bu, monitor hatal calismasina, elektrik carpmasina vya yangina neden olabilir.  Firtinalhavalarda veyasimsek caktiginda ya da uzun sureyle kullanilmayacaksamonitorurinfgini prizdencekin. - Bu uyarilara uyulmaması elektrik Çarpmasina veya yangina yol acabilir.  Monitorélektrik kablosundan veya sinyal kablosundan cekerek hareket ettirmye calismayin. - Bu, kablonun hasar gormesine, elektrik carpmasina veya yangina neden olabilir.  Yalnizca elektrik veya sinyal kablosundan cekerek monitoru saga veya sola hareket etirmeyin. - Bu, kablonun hasar gormesine, elektrik carpmasina veya yangina neden olabilir.  Monitor kabinindeki havalandirma noktarini kapatmayin. Kotu havalandirma anizaya veya yangina neden olabilir.  Monitorun uzerine aigr nesneler koymayin. - Bu, elektrik carpmasina veya yangina neden olabilir. - Monitorünione yabanci bir madde kacarsa, elektrik kablosunu cikartin ve Servis Merkezi'yle gürün.  Uruni yanici kimyasal spreylerden ya da yanici maddelerden uzak tutun. - Bu, patlamaya veya yangina neden olabilir.  Monitorun uzerindeki deliklerden iceri hcbir metal nesne sukmayin. - Bu, elektrik carpmasina, yangina veya yaralanmaya neden olabilir.  Monitörun havalandirma deliklerinden, kulaklik ya da AV baglanti noktalarindan, bicak, tel, igne gibi metal nesneler ya da kağit, kibrit gibi yanici nesneler sukmayin. - Bu, elektrik carpmasina veya yangina neden olabilir. Ürünün İncine yabancı madde kacaşa ya da su doküürse, cihazi kapatın, elektrik fişini prizden Çkıntin ve servis merkeziyle进展情况.   Uzun bir sure sabit bir ekran görtüleniyorsa, görtü artigi denen durum veya bulaniklik meydana gelebilir. Uzun sure monitorden uzak kalacaksaniz, enerji tasarrufu moduna gein veya hareketli goruntuler iceren bir ekran koruyucu ayarlayin.   Modele uygun gezünurluk ve frekans dizeyleri ayarlayin. Uygun olmayanoczunurluk istemmenyeresim kalitesine neden olabilir. 40 inc (101,6 cm) - 1360 X 768  Monitorun surekli olarak cok yakindan izlenmesi, gozlerde bozulmaya neden olabilir.  Göz yorgunluğunu gidermek icin monitoru kullanırken-SAatte bir en az beş dakika ara verin.  Urunu, dengesiz, dizgün olmayan ya da titresime maruz kalan yerlere yerlestirmeyin. - Ürünün yere扭矩ilmesi, ürüne zarar verebilir ya da kisisel yaralanmalaraneden olabilir. Ürünün, titresime maruz kalan yerlere yerleştilimesi, ürünün Ömrünün kiskaltbilir ya da yangina neden olabilir.  Monitori taşirken, monitoru duğmesinden kapatin ve elektrik kablosunu prisden*cikann. Monitoru tasmadan once anten kablosu ve diiger cihazlara®, kabolar da dahil, tum kablo®, baglantilarin*, ckardiginizdan emin olun. Kablonun cikarilmamasi zarar gormesine ve yangina neden yol acabilecegi gibie elektrik carpmasina da neden olabilir.  Urunun, ikiden daha fazla kisiyle tasinmasi gerekmektedir. Urunun yere dinurulmesi, bozulmasina ya da fiziksel olarak zaragormesine neden olabilir.  Uzerinden asilarak zarar verebileceklerinden urunu cocuklarn ulasamayacagi bir yere yerleştin. Yere duşen urun, fiziksel hasara hatta olume neden olabilir.  Urinu uzun bir sure kullanmayacaksiniz elektrik kablosunu prizden gikartin. Aksi takdirde biriken toz isi yayilmasinya da yalitin azalmasin yol acarak elektrik carpmalarina ya da yangina neden olabilir.  Cocuklarin sevdigi nesneleri (ya da cekici gelebilecek herhangi bir seyi), urunun uzerine yerlestirmeyin. Cocuklar, nesneleri almak icin urunun uzerine tirmanmaya calisabillirer. Urun dusebilir ve fiziksel hasara veya olume nden olabilir.  Uzaktan kumananin pillerini cikardiginizda, cocuklarin pilleri yutmamasina dikkat edin. Pilleri cocuklann erisemeyecgi bir yerde saklayin. - Yutarlarsa, hemen bir doktora gidin.  Pilleri degistirken, +/- uclarini pilleri tutan kismda belirtildigi sekilde dokru konuma yerlestitir. Uclarin yanlis yerleistirmesi pilin catlamasina veya akmasina neden olarak yangin, yaralanma veya kirtilige (hasar) yol acabilir.  Yalnizca belirtilen standart pilleri kullanin. Yeni ve kullanlms pilleri bir arada kullanmayin. - Bu pilin Çatlamasina veya akmasina neden olarak yangin, yaralanma veya kirtiligi (hasar) yol acabilir.  Pil (ve sarj edilebilar pil), siradan bir atik degildir ve geri donusume gonderilmelidir. Kullanilmis ya da sarj edilebilar pilin geri donusum amacyla gonderilmesinden, pilin tuketicisi olarak musteri sorumludur. - Mûsteri, kullaniímís ya da sarj edilebilir pili bulundugu yere yakin bir geridonüsum merkezine ya da benzer turde piller ya da sarj edilebilir pillersatanbir magazaya gotürebilir. © 1995~2008 SAMSUNG. ALL Rights ReservedIçindekiler
Güvenlik Talimatlari 1
Isareletleme 1 Açık/Kapalı durumu 1 Kurulum 2 Temizlik 4 Diger. 5Giris 12
Paket Ycindekiler 12 Monitörunuz 13 Mekanik Duzen 20Baolantylar 26
Altlik Kitinin Takilmasi 26 Monitörun Baglanmasi 27MDC 33
Monitor Ayarlanmasi 53
Input 53 Picture [PC/BNC/DVI Mode] 54 Picture [AV / S-Video /Component / DVI-Video Mode]. 56 Sound 58 Setup 59 Multi Control 62 Doigrudan Islevler 62Sorun Giderme 63
Kendi Kendine Test Ozelligi Kontrolu 63 Denetim Listesi 64 SorveYanit 66Özellikler 68
Genel 68 PowerSaver 68 Onceden Ayari Zamanlama Modlari 68Information 71
Daha Iyi Goruntu Elde Etmek Icin 71 URUN BILGILERI (Goruntu Sabitlemesiz) 71Appendix 75
Dunyanin her yerinden SAMSUNG'a ulasin 75 Koşullar 77 Yetki Bildirimi 78  Güvenlik Talimatlari Giris Paket Ycindekiler Monitorunuz Mekanik Düzen Baolantylar Yazilimin Kullanilmasi Monitorun Ayarlanmasi Sorun Giderme Özellikler Bilgiler AppendixTFT-LCD Monitor
 www.samsung.com Urun renge ve gorunmu modeline bagl olarak farklik gosterebilir ve performans gelistirmeler nedeniyle urn ozellikleri onceden haber verilmeksizin degistirilebilir.Giris
Paket Ycindekiler Not Lüften monitorunüzle birlikte asagidakilerin de geldiginden emin olun. Eksik parca varsa saticiniza basvurun. Istege bagli ogeleri satin almak icin bir yerel saticiya basvurun. Not - Urūnú, yere yerleştimeyin.  MonitorKilavuz
 Kullanici Klavuzu  Garanti Karti (Tum bolgelerde olmayabilir)  Kullanic Kilavuzu, MDC yazilimiKablosu
  D-sub kablosuyla Elektrik Kablosu Diger     Uzaktan Kumanda Piller (AAA X 2) Delik kapagi BNC - RCA Adaptor Jak  Yarim AltlikAyr satiril
    Duvara Takma Seti Hoparlor Seti Altik Seti  DVI Kablosu BNC KablosuMonitorunuz
 On Taraf 1) MENU
Ekran menu sstemini açmak, menu ekranindan Çikmak veya ekran ayar menusūkapatmak icin bu duğmeyi kullanin. 2) Hareket dugmesi (Yukari-Asagi Dugmesi) Bir menü ögesinden digerine dikey olarak hareket eder veya secilen menu degerlerini ayarlar. 3) Ayarlama dugmesi (Sol-Sag Dugmesi)/ Ses yuksekligi dugmesi Bir menus ögesinden digerine yatay olarak hareket eder veya seçilen menu degerlerini ayarlar. Ayrica ses duzyeyini de ayarlar.4) ENTER
OSD menusūnseçmek icin kullanlir.5) SOURCE
PC modundan Video moduna geirir. Kaynak degistirme islemine, yalnizca monitore bagli harici aygtilar icin izin veril. Ekran moduna geçirmek icin [PC] [BNC] [DVI] [AV] [S-Video] [Component] >>Animasyon klibini gormek icin burayiklatin.6)PIP
PIP ekranini açip/kapatmak (On/Off) için PIP duğmesine basir. BNC ve component ayni terminali kullandiklarindan birden fazia PIP ekranda ust ute acilamaz. >>Animasyon klibini gormek icin burayiktlatin. PC AV / S-Video / Component BNC AV/S-Video DVI AV / S-Video / Component AV/S-Video PC/BNC/DVI - Component PC / DVI7) Guc dugmesi
Bu dugmeyi monitó r acip kapmat kgin kullanin.8) Güç böstergesiv
Bu isik normal calisma sirasinda yesil yanar ve ayarliniz monitor tarafinda kaydedilirken yesil olarak bir kez yanip soner.9) Uzaktan Kumanda Algilayicişi
Uzaktan kumandanin yönun Televizyondaki bu noktaya cevir.Not
- Guc tasarrufu islevleryle ilgili daha fazla bilgi edinemek icin kilavuzda aqiklanan PowerSaver konusuna bakin. Enerji tasarrufu saglamak icin, kullanmaniz gerekmyen zamanlarda veya uzun surek kullanmayacaginiz durumlarda monitorunzü KAPATIN.>Arka Taraf
Not
Kablo baglantulariya ilgili ayrinti bilgi icin Kurulum altunda Kablolarin Baglanmasi konusuna bakin. Monitur arka duzeni, modeline bagli olarak biraz farkl olabilir.   A 1) POWER SW (Guc A/C/Kapat Düɡmesi): Monitörü acar ve kapatir. 2) POWER IN (Guc baglanti noktası): Elektrik kablosu, monitoreve prize takilir.  B 3) RS232C OUT/IN (RS232C Seri Baglanti Noktas)): MDC(Coklu Aygit Kontrolu) Program Baglanti Noktasi 4) DVI IN(HDCP) (PC Video Baglanti Terminali) D-Sub Kablo kullanilarak (15 pin D-Sub)-PC mod (Analog PC) 5) DVI / PC IN(HDCP) (PC Video Baglanti Terminali) DVI Kablo (DVI-D - DVI-D) kullanilarak - DVI modu (Dijital PC) 6) PC/DVI/BNC AUDIO IN (PC/DVI/BNC Audio Baglanti Terminali (Giris))  C 7) COMPONENT AUDIO IN [L-AUDIO-R] (Komponent Audio Baglanti Terminali (Giris)) 8) BNC/COMPONENT OUT [R/P R, G/Y, B/PB, H, V] (BNC/Komponent Baglanti Terminali(Cikis)) BNC (Analog PC) Baglantisi: R, G, B, H, V baglanti noktalarini baglar - Component Baglantisi: PR, Y, PB baglanti noktalarini baglar 9) BNC/COMPONENT OUT [R/P R, G/Y, B/PB, H, V] (BNC/Komponent Baglanti Terminali (Giris))  D 10) AV AUDIO IN [L-AUDIO-R](Monitor Audio Baglanti Terminali) (Giris) 11) AV OUT [VIDEO](VIDEO Baglanti Terminali): AV modu (Cikis) 12) AV IN [VIDEO](VIDEO Baglanti Terminali) (Giris) 13) AV OUT [S-VIDEO](S-Video Baglanti Terminali): S-Video modu (Cikis) 14) AV IN [S-VIDEO](S-Video Baglanti Terminali) (Giris) (15)EXT SPEAKER(8Ω)[-L-+,--R-+](HARICI Hoparlor (8Ω)) 16) AUDIO OUT [L-AUDIO-R](Audio Baglanti Terminali) (Girig) -MONITOR CIKI SI:PC, DVI, BNC baglanir Not Kablo, sinalay kaynagis vs. gibi durumlarda devreye baglanabilecek monitor sayisi farkli olabilir. Sinyal kaynaginn azalmadibir kablo 1e 10 taneye kadar monitor baglanabilir.  E18) Kensington Lock
 Uzal Not Kensington kilidi, TV'yi halka aik bir ortamda kullaniyorsaniz; sistemi fiziksel olarak sabitlemek icin kullanilan bir aygittir. (Kilitleme aygitinin ayrina satin alinmasi gerekmektdir.) Kilitlteme cihazi kullanmak icin satin aldiginiz yere basvurun. Not Kablo baIantlar hakkinda daha fazla bilgi edinmek icin Monitorunuzu BaIlama konusuna bakin. Uzaktan kumandanin performansi, monitorin yaninda calistiran TV vya baska elektronik aygittar tarafindan etkilenebilir ve frekans girisimi nedeniyle hatali calismasina neden olabilir. 1. ON/OFF 2. MAGICNET 3.MDC 4. LOCK 5. MagicNet Dügmesi 6.+100-- 7.VOL 8. MUTE 9. TTX/MIX 10. MENU 11. N 12.M/B P.MODE 13.AUTO 14. PRE-CH 15.VCHP 16. SOURCE 17. INFO 18. EXIT 19. Yukari-Asagi Sol-Sag Dugmesi 20.14 S.MODE 21. STILL  22. FM RADIO 23. P.SIZE 24.()SRS 25. H DUAL/MTS 26. 27. SOURCE 28. SWAP 29.5E 30. REW 31. STOP 32. PLAY/PAUSE 33. FF 1) ON/OFF Bu duğmeyi monitoru açıp kapatmak icin kullanın. 2) MAGICNET MagicNet Hizli Bapatma Dugmesi. -Bu islev, bu monitörde kullanilamaz. 3) MDC MDC Hizli Başlatma Düğmesi. 4) LOCK Bu duğme, uzaktan ve monitor üzerindeki Güç ve LOCK dügmeleri disindaki tüm ilev tuşları etkinleştinir ya da kapatır. 5) MagicNet Dügmesi - MagicNet incn budugmeleri kullanin. - Alfabe/Numara: Bir web sitesi adresi girerken bu duğmeleri kullanin. DEL: Bir onceki karakteri siler. - SYMBOL : Isaret girerken bunu kullanin. (O-) - ENTER: Giriç icin bunu kullanin. - Bu islev, bu monitörde kullanlamaz. 6) +100 -/-- 100'ün uzerinde kanal sejmek icin basin. Örneşin, kanal 121'I seçmek icin once "+"100" daha sonra "2" ve son olarak "1" dugmesine basir. -Bu iglev, bu monitörde kullanilamaz. 7) VOL Ses duzeyini ayarlar. 8) MUTE Ses cikisini geci olarak duraklatir (sessizlestirir). Mute (sessiz) modundayken Mute veya - VOL + dugmesine basildiginda sesli duruma geri donulur. 9) TTX/MIX TV kanallan teleeks araciligiyla yazil bilgi hizmeti saglar. [TTX/MIX genellikke Avrupa' da kullanilir.]10) II MENU
Ekran menu/systemini acmak, menu ekranindan cikmak veya ekran ayar menusinu kapatmak icin bu dugmeyi kullanin.11) ENTER
Menu ekranindan cikar veya ekran ayar menusun kapatir.12) M/B.P.MODE
Bu duğmeye bastıgünizda, ekranın alt orta kisminda geleçeri modGORntlülenir. AV/S-Video/Component Mode : P.MODE( Picture Mode ) Monitor fabrikada onceden ayarlanmis dort otomatik resim ayari vardir. Önceden yapilandirilmı mevcut modlararasinda dolasm icin dugmeye yeniden basin. (Dynamic Standard Movie>Custom) PC/DVI Mode:M/B(MagicBright) MagicBright™ görtülediginiz resmin icerigine baglı olarak en iyi görtüleme ortamini saglayan yen bil özellktir. Önceden yapilendirilmigi mevcut modalarasinda dolasmak icin dugmeye yeniden basin. Entertain Internet Text-Custom)13) AUTO
Dogrudan erisimi otomatik olarak ayarlamak icin bu duigmeyi kullanin. (PC) Kontrol panelinde gezūnūrūgū değistirirsiniz, AUTO islevi yūrūtūr.14) PRE-CH
Bu duğme onceki kanala donmek 参数 kullanlir. -Bu islev, bu monitörde kullanilamaz.15) VCH/P A
TV modunda, TV kanallarini secer. -Bu islev, bu monitörde kullanilamaz.16) SOURCE
PC modundan Video modunaGPCIR17) INFO
Geerli resim bilgileri ekranin sol ust kosesinde grotulenir.18) EXIT
Menu ekranindan gikar. 19) Yukari-Asagi Sol-Sag Dugmesi Bir menu ögesinden digerine yatay veya dikey olarak hareket eder ya da seçilen menu degerlerini ayarlar.20) S.MODE
Bu dugmeye bastiginzda, ekranin alt ora kisminda gecerli mod goruntuleinr. Monitor, yeresik uygunluk duzeyi yuksek stereo amplifikator iceri. Önceden yapilalandirilmı mevcut modlararasinda dolasmık icin dugmeye yeniden basin. (Standard Music Movie Speech Custom)21) STILL
Ekrani dondurmak icin duqmeye bir kere basin. Cozmek icin yeniden basin.22) FM RADIO
FM Radio'yu acar veya kapatir. PC/DVI modunda yalnizca SOUND'u FM Radio olarak ayarlar. Sinyalin zayif oldugu alanlarda, FM RADIO yayin yaparken gurultu olabilir. Genellike Video SOURCE modunda, ekrani kapatarak FM RADIO olarak ayarlar. -Bu islev, bu monitörde kullanilamaz.23) P.SIZE
Zoom1, Zoom2, DTV - 1080i (veya 720p üsti) 参数 mevcut degildir.24) (SRS
SRS25) I-DUAL/MTS
DUAL- STEREO/MONO, DUAL I / DUAL II ve MONO/NICAM MONO/NICAM STEREOyticurine bagli olarak calistirilabilir; bunun icin TV seyrederken uzaktan kummandadaki DUAL dugmesini kullanin. MTS- MTS (Multichannel Television Stereo) modunu secebilirsiniz.| Audio Type | MTS/S_Mode | Default | |
| FM Stereo | Mono Mono | Manual Change | |
| Stereo | Mono ↔ Stereo | ||
| SAP | Mono ↔ SAP | Mono | |
1. Mekanik Düzen
     2. Monitor Kafasi
   3. Altlik
4. Hoparlör
 UP5. VESA Braketinin Takilmasi
VESA taktiginizda, uluslararasi VESA standartlarina tam olarak uyduugunuzdan emin olun. - VESA Braketini Satin Alma ve Kurulum Bilgileri: Lüften siparis vermek icin en yakin Samsung Distributörune ugrayin. Siparisiniz verildikten sonra kurulum uzmanlari sizi ziyaret edecek ve braketinizi takacaktir. - LCD Ekranı tasimak icin en az 2 kisi gereklidir. Samsung, musterin istegine bagl olarak yaplan islemlerde meydana gelebilecek urun hasarlarindan ve kisel yaralanmalardan sorumlu olmayacaktir.  Boyutlar   Braket duvara sabitlemek icin, yalnizca 6 mm capinda ve 8-12 mm uzunlugunda makine vidalarini kullanin. UP6. Wall Bracket Installation Duvar Braketi Montaji
Duvar braketini takmak icin bir teknisyenle gorusun. Samsung Electronics, montaj musteri tarafindan yapildiginda urune ya da musterilere gelecek zararlardan sorumlu degildir. - Bu urun, cimento duvarlara monte edilmek icindir. Urun, siva ya da ahsap uzerine monte edildiginde yerinde durmayabilir. Parçalar
Yalinizca urunle birlikte verilen parcalari ve aksesuarlki kullanin.  Duvar Braketi Montaji
1 Tutturma Vidasini, takin ve ok yonunde sik. Islem tamamlandiiginda, duvar braketini duvara takin. A. Tutturma Vidasi B. Duvar Braketi C. Menteş (Sol) D. Menteş (Sag)  Iki menteşebulunmaktadir(solve sag).Dogrusunu kullanin. 2  Duvari delmeden once, urunun arkasindaki iki kilitleme deligiarasindaki mesafeninogr u oldugunu kontrl edin. Bu mesafe,cok kisa ya da uzuna,ayarlamak icin dubraketinin uzerindeki tum ya da 4 vidayr gevsetin. A. iki kilitleme deligiarasindaki mesafe 3  Montaj semasinikontrol edin ve matkapla delinecek noktalaru davarda isaretleyin.35 mm'den derin delikleri delmek icin 5,0 mm matkap ucu kullanin.Her dubeli ilgili delige takin. Braketlerin ve menteşdeliklerini, karsilik gelen dubelli deliklerle esleşirin ve 11 viday A takip sikin. Urūnü duvar braketine takma
Urunun sekli, modeline bagl olarak farklik gosterebilir. (Plastik aski tertibati ve vidalar ayinir) Plazma monitor arkasindaki 4 vidayi  1 cikartin.  2 Viday B, plastik askiya takin.  1. Üründuvar braketine takin ve sol ve sag plastik askilara dizgün bogimde takildigiindan emin olun. 2. Ürünü brakete takken parmaklarinizi deliklere sikstirmamaya dokkat edin. 3. Duvar braketin duvara sikica takilmis oldugundan emin olun. Aksi takdirde montaj sonrasinda urun yerinde durmayabilir.  3 adimdaki 4 vidayi (plastik aski + vida B), urunun arka deliklerine takin ve sikin.  4 Güvenlik pimini 3 Çıkartin ve 4 Ürün tutucuyu, karsilik gelen braket deliklerini 1 yerleştinir. Ardindan braket sika sabitleneckek sekilde ürün 2 yerleştinir. Ürün bilbraket Güvenl biçimde baglanması-SAğlamak依據 Güvenlik pimini 3 tekrar takmayi ve sikmayi unutmayin. A. Monitor B. Duvar Braketi C.Duvar  Duvar Braketi Açisinin Ayarlanmasi Duvara takmadan once braket aciin-2"ye ayarlayin.  1. Urunu, duvar braketine tutturun. 2. Urünün üst, orta kismindan tutun ve ileriye dokerek (ok yönunde) acisini ayarlayin. 3. Braket aciisini -2 1le 15'arasinda ayarlayabilirsiniz.  Aciyi ayarlarken urunun sag ya da sol tarafindan degil, ust, orta kismindan tutmaya dikkat edin.   Güvenlik Talimatlari Giris Baolantylar Altlik Kitinin Takilmasi Monitorin Baglanmasi Yazilimin Kullanilmasi Monitorun Ayarlanmasi Sorun Giderme Özellikler Bilgiler AppendixTFT-LCD Monitor
www.samsung.com  Urun renge ve gorunmu modeline bagl olarak farklik gosterebilir ve performans gelistirmeler nedeniyle urn ozellikleri onceden haber verilmeksizin degistirilebilir.Baolantylar
Althik Kitinin Takilmasi  - Yalnizca urunle birlikte verilen civatalar kullanilmaldir. Dikkat
Samsung Electronics, belirtlen dignda bir alkik kullanlmasindan kaynaklanacak hasarlardan sorumlulmayacaktir.  1. Yarim Altiligin Takilmasi   Dikkat "CAUTION" etiketini arkaya donukormalak yerlestitir.   1) Monitor altinda bulunan, atlligin takildigi deligi korumak icin bir 'Kapak Koruyucu kullanilir. Ürunle birlke verilen Yarim Altlik ya da atllik setini (ayrica satilir) taraken 'Kapak Koruyucu'yu Çikartmayi ve duvara takma setini tarkanken 'Delik-Kapaqi nii kullanarak deligi kapatmayi unutmayin. 2) Sirasiyla sol ve sag althiklari takin. 3) Altiigi, monitori altundaki delige yerlestitin. Vidayi, belirilen delige yerlestitin ve sikin. (M4 x L15) Dikkat
Bu stand, orijinal olarak ekran acisinin ayarlanmasi icin tasarlanmistr. Bu standin herhangi bir kullanimindan kaynaklanabilecek sorunlardan firma sorumlu degildir. Ürün asla üzerine nesneler konan bir sehpə olarak kullanmayin.2. Altlik Setinin (ayrica satir) Takilmasi
   1) Monitörun allinda bulunan, alltin takildigi deligi korumak icin bir 'Kapak Koruyucu' kullanilir. Ürünle birlikte verilen Yarim Altlik ya da alltk setini (ayrica satilir) takken 'Kapak Koruyucu'yu qikartmayi ve duvara takma setini takken Delik-Kapagi nki kullanarak deligi kapatmayi unutmayin. 2) Parcalari dogru yonde ve dogru yere yerlestirdiginizden emin olun. (M4 × L15) 3)Altligi,monitortun altindaki delige yerlestirin. 4) Vidayi, belitilen delige yerlesteirin ve sikin. (M4 × L15) Monitorin BaglanmasiToprakl bir Guc kablosu durumunda
Aiza olmasi durumunda topraklama ucu elektrik carpmasina yol acabilir. AC gucunu fse takmadan once topraklama baglantisini uygun bir sekilde yaptiginizdan emin olun. Ya da, topraklama baglantisini sokmeden once AC gucunu fisten ckardiginizdan emin olun. Not
DVD'ler, VCR'lar ya da Video kameralar gibi AV grits aygtllarin yani sira bilgisayariniz monitore baglayabilirsiniz. AV grits aygtllarin baglanmasiya ilgili daha ayrintul bilgi icin Monitrorn Ayaranmasi bolumunde Kullanici Kontrolleri konusuna bakin.1. Bilgisayara Baglama
 1) Monitorunuzin guc kablosunu monitorun arkasindaki guc baglanti noktasina takin. Acoma/kapatma dugmesini acik duruma getirin. 2) D-sub kablosunu monitore iç sekilde baglayabilirsiniz. Asagidaki yontemlerden birini segin: 2-1) Video kartindaki D-sub (Analog) konektoru kullanarak. Sinyal kablosunu, monitor arkasindaki 15 pin RGB baglanti noktasa takin.  2-2) Video kartindaki DVI (Dijital) konektoru kullanar. DVI Kablosunu monitorunuzn arkasindokti DVI(HDCP) baglanti noktasina takin.  2-3) Video kartindaki BNC (Analog) konektör kullanarak. BNC Kablosunu Monitorūzün arkasindaki BNC/COMPONENT IN -R, G, B, H, V baglantı noktasina baglayarak.  3) Monitorunuzun guc kablosunu monitoru arkasindaki guc baglanti noktasina takin. 4) Bilgisayarinizi ve monitorunuzu acin.Not
DVI kablosu ya da BNC kablosu iste ge baglidir. Istge bagli ogeleri satin almak icin bolgenizdeki Samsung Electronics servis merkezine basvurun.> Dijital DVD Baglama
Not
Dijital DVD'ler gibi giris cihazlan, DVI kablosu kullanilarak monitor DVIN terminaline baglanir. - Ardindan DVD diski takili halde DVD'yi calistirin. - SOURCE duğmesini kullanarak Digital seksin.Not
- Monitor DVI in giris cihazlarin dijital DVD'ye baglamak icin DVI baglanti noktalari vardir.VCR
 1) VCR'lar ya da Video Kameralar gibi AV giris aygitlar, S-VHS ya da BNC kabolar kullanilarak monitor IN [VIDEO] ya da AV IN [S-VIDEO] baglanlar. 2) VCR veya Video kameranin Audio (L) ve Audio (R) terminallerini, ses kablolari kullanarak monitorun AV IN [L-AUDIO-R] baglayin. 3) Monitorün onunde ya da uzaktan kumandada yer alan Kaynak dugmesini kullanarak VCR ya da Video kameraya bagl olan AV ya da S-Video'den birini seksin. 4) Ardindan kaset takili halde VCR ya da Video kameray calistirin.Not
S-VHS ya da BNC kablosi stege baglidir.DVD
Oynaticiya Baglama  1) Monitor COMPONENT AUDIO IN [L-AUDIO-R] ile DVD oynaticinin AUDIO OUT jaklari arasina bir takim audio kablosu baglayin. 2) Monitor BNC/COMPONENT IN -PR, Y, PB baglanti noktasi ile DVD oynaticin PR, Y, PB jaklan arasa bir Component kablosu baglayin. 3) Monitor on tarafinda ya da uzaktan kumandada bulunan Kaynak dugmesini kullanarak DVD oynaticin bagli oldugu Component kaynagini seksin. 4) Ardindan DVD diski takili halde DVD Oynaticiyi calistirn.Not
- Component kablosu istege baglidir. Ko mponent video hakinda daha fazla aciklama icin DVD oynaticinizin kullana kilavuzuna bakin.Video Kamera Baglama
 1) Video kameranin A/V cikis jaklarini bulun. Genellikle video kameranin yan ya da arka tarafinda bulunurlar. Video camera uzerindeki AUDIO OUTPUT jaklarinya monitor AV AUDIO IN [L-AUDIO-R]arasina bir takim ses kablosu takin. 2) Video kameranin VIDEO OUTPUT jaki ile monitor üzerindeki AV IN [VIDEO](AV GIRIS [VIDEO]) arasina bir video kablosu takin. 3) Monitor on tarafinda ya da uzaktan kumandada bulunan Kaynak dugmesini kullanarak Video kameraya bagli AV kaynagini segin. 4) Ardindan kaset takil halde Video kamerayi calistirn.Not
Burada gosterilen audio-video kabolar genellike Video camera ile birlikte verilir. (Birlikte verilmediyse, bolgenizdeki elektronik urun magazalarina bakabilirsiniz.) > DTV Set Üstü Kutusunu Baglama Not Tipik bir Set Üstü Kutusunun baglantilari aşagida gosterilmistir.  1) Monitor BNC/COMPONENT IN -PR, Y, PB baglanti noktas ile Set Üstü Kutusunun PR, Y, PB jaklanarasina bir Component kablosu baglayin. 2) Monitor COMPONENT AUDIO IN [L-AUDIO-R] ile Set Üstü Kutusunun AUDIO OUT jaklariarasina bir takim audio kablosu baglayin. 3) Monitor on tarafinda ya da uzaktan kumandada bulunan Kaynak dugmesini kullanarak DTV Set Ustu Kutusun bagli oldugu Component kaynagini segin. Not - Komponent video hakkinda daha fazla aciklama icin Set Üstü Kutusunn kullanma kilavuzuna bakin. > Hoparlorlerin Baglanmasi  1) Vidalari kullanarak SETi ve hoparlorleri sikin. * Hoparlör standsiz hoparlör setini takin.  2) SET in arkasindaki hoparlbor baglanti jaki ile hoparlorun arkasindaki hoparlbor baglanti jaki arasa bir hoparlbor baglanti kablosu baglayin.  Not - SET hoparlorre baglyken hoparlu tutarak SETi hareket etllmeyin. SET hoparlorun beghanmasi icin kullanlan hoparfor destegi zarar gorebilir. > Ses Sistemine Baglama  1) AUDIO SISTMI Uzerindeki AUX L, R jaklariyla Monitörn MONITOR IN [L-AUDIO-R]arasina bir takim audio kablosu takin. © 1995-2008 SAMSUNG. ALL Right ReservedGiris
 Coklu Ekran Kontrolu (MDC), cesisi ekranlarin kolayce ve aynianda bir bilgisayar uzerinde calistirmasini saglayan bir uygulamadir. Bilgisayar ve ekranarasindaki iletisim icin bir seri iletisim standardi alan RS-232C kullanilr. Bunedenle bilgisayarin seri baglanti noktası ile ekranin seri baglanti noktası arasina bir seri kablo takilmaldir.Baslangic - Ana Ekran
Programi baslatmak icin Start > Program > Samsung > MDC System ögesini seçin. Segilen setin ses yuksekligini kaydirmal kontrolde gormek icin bir set segin.  1 Ana Simgeler Segme Düngmesi 5 Remocon Bilgi Tablosu 3 Safety Lock Ekran Seçimi 7 4 Port Selection Kontrol Araçları 8 1. Herbir ekrana gegm icin ana simgeleri kullanin. 2. Ekran biriminin uzaktan kumanda sinyal alim islevini etkinlestirmenizi ya da devre dişi birakmanişi saglar. 3. Kilitleme İslevini ayarlar. Lock function' (Kilitleme islevi) ayarlarken yalnizca uzaktan kumanda ve set uzerindeki guc ve kilitleme duğmelerini kullanabilirsiniz. 4. PC Seri Baglanti noktas ayarli deigsebilir. Original deger COM1'dir. 5. Tum ekranlari segmek ya da segimleri kaldirmak icin Select all (Tumunu sec) ya da Clear (Temizle) duğmelerini tklatin. 6. Segilen ekranla ilgili kisa bilgeler gormek icin Tabloyu kullanin. 7. Ekran Segimi kismindan bir ekran segin. 8. Ekranlari kontrol etmek icin Kontrol Araçlarini kullanin.Port Selection
 1. Coklu Ekran Kontrolü ilk olarak COM1'e ayarlanmşir. 2. COM1 disinda herhangi bir baglanti noktasi kullaildiginda, Port Selection (Baglanti Noktasi Segimi) menusunden COM1-COM4 arasi portlar segilebilir. 3. Seri kablo kullanlarak monitore baglanan tam baiglanti noktas ad sejlmezse, itetigim saqlanamayacaktir. 4. Seçilen böglanti noktas programa kaydedilir ve bir sonraki programda da kullanilir. Power Control
1. Ana simgelerden Power Control'u (Güç Kontrolü) tklättiginizda Power Control (Güç Kontrolü) ekrani agrilir.  Bilgi Tablosu, Güç Kontrolü—in gerekli bazi temel bilgileri gosterir. 1) (Power Status(Güç Durumu)) 2) Input 3) Image Size 4) On Timer 5) Off Timer 2. Kontrol etmek istediginiz ekrani sejmek icin Select All (Tumunu Se) duugmesini ya da Check Box (Kutuyu Isaretle) duugmesini kullanin.  Power Control (Guc Kontrolu), segilen ekranin islevlrinden bazilarinin kontrl edilmesine izin verir. 1) Power On/Off - Seçilen ekrani acar ya da kapatir. 2) Volume - Segilen ekranin ses seviyesini kontrol eder. Setlerde seçilen ekranin ses yüksekligi degerini alir ve kayar kontrolde gosterir. (Seçimi iptal ederseniz ya da Select All (Tümün Ü Seç) seçerseniz ayar, varsaylan degeri olan 10'a geridöner) 3) Mute On/Off (Sessiz A_C /Kapat) - Segilen ekranin Mute (Sessiz) ilevini etkinleştinir/kapatir. Her seferinde bir set segildigiinde, segilen set icin Mute (Sessiz) ilsevi etkken Mute (Sessiz) etkindir. Ses seviyesini ayarladiginiza Mute (Sessiz) ilsevi otomatik olarak devre di kalir. (Segimleri kaldirigiiniza ya da "Select All" (Tumunu Seç) sextiginizde ayarlar varsaylan degerlerine geri doner.) \* Power Control (Guc Kontrolu) iglevi, tum ekranlar icin kullanilir. * Volume (Ses) Kontrolü ve Mute (Sessiz) ilevleri yalinizca güç durumu ON (AÇIK) GPL ekranlarda kullanilabilir. Input Source
1. Ana simgelerden Input Source (Girig Kaynag) tilkattiinzda Input Source (Guc Kaynag) ekranı acilir. Kontrol etmek istediğiniz ekrani seçmek icin Select All (Tümunu Sec) duğmesini ya da Check Box (Kutuyu Üsaretle) duğmesini kullanin. - TV Mode  - MagicNet Mode  Bilgi Tablosu, Input Source (Giris Kaynagi) Kontrolü icin gerekli bazi temel bilgileri gosterir. 1)PC - Segilen ekranin Giriş Kaynagını PC'yedehyişirir. 2) BNC - Segilen ekranin Giriş Kaynakın BNC'ye degişirir. 3) DVI - Segilen ekranin Giriş Kaynagın DVTye degişirir. 4) TV - Segilen ekranı Girş Kaynakıni TVdehyşirir. 5)AV - Segilen ekranin Giriş Kaynagıni AV'ye degişirir. 6) S-Video - Seçilen ekranın Giris Kaynakı S-Video'yadehyigitirir. 7) Component - Seçilen ekranın Giris Kaynakı Componente (Component)dehyşirir. 8) MagicNet -MagicNetGirigaynagyalinizcaMagicNetmodelinde calisir. 9) Channel - Input Source (Girig Kaynag) TV oldugunda, Channel (Kanal) oku görtülenir. * TV Kaynagi sadece televizyonlu ürünlerde seçilebilir ve kanallari kontrol etme islemine Input Source (Giris Kaynagi) TV ilek izin verilir. \* Input Source (Giris Kaynag) Kontrolu yalnizca guc durumu ON (ACIK) alan ekranlarda kullanlabilir. Image Size
PC, BNC, DVI
1. Ana simgelerden Image Size (Göruntü Boyutu) tklattgünizda Image Size (Göruntü Boyutu) ekraniçir.  Bilgi Tablosu, Image Size (Göründü Boyutu)—in gerekli bazı temel bilgileri gosterir. 1) (Power Status(Strömstatus)) - Geçerli ekranın açık veya kapali olduğunu gosterir. 2) Image Size - Kullanilan ekranin gelerli Image Size (Goruntu Boyutu) degerini gosterir. 3) Input - Kullanilan ekranin geleçeri Input Source (Girş Kaynagi) değerini gosterir. 4) Bilgi Tablosu, Input Source (Girş Kaynagı) degeri PC, BNC, DVI olan ekranlari gosterir. 5) PC Source -PC Kaynagi Image Source (Goruntu Kaynagi) sekmesini tiklattiginzida goruntuliner. - Image Size (Görüntü Boyutu) Kontrolü dügmesi, PC, BNC, DVI,—in kullanilaben Image Size (Görüntü Boyutu) degerlerini kontrol eder. 6) Video Source - Ilgili Input Source (Giriş Kaynagi) ile Image Size (Göruntü Boyutu) degerini kontrol etmek amacyla Video Source (Video Kaynagi) sekmesini tklatin. \* MagicNet Giris kaynagi yalnizca MagicNet modelinde calisir. \* Image Size (Goruntu Boyutu) kontrlu yalnizca guc durumu ON (ACIK) olan ekranlar icin kullanilabilir. Image Size
TV, AV, S-Video, Component, DVI(HDCP)
1. Ana simgelerden Image Size (Göruntü Boyutu) tklattgünizda Image Size (Göruntü Boyutu) ekrani agrilir.  Bilgi Tablosu, Image Size (Göründü Boyutu)—in gerekli bazıtem bilgileri gosterir. 1) TV, AV, S-Video, Component (Component) icin Image Size (Goruntu Boyutu) degerini ayarlamak amacyla Video Source (Video Kaynagi) sekmesini tiklatin. Kontrol etmek istediiginiz ekrani sejmek icin Select All (Tumunu Sec) duugmesini ya da Check Box (Kutuyu Isaretle) duugmesini kulanin. 2) Bilgi Tablosu, giriş kaynagi yalınizca TV,AV, S-Video, Component (Koponent) ya da DVI (HDCP) olan ekranlari goesterir. 3) Segilen ekranin Image Size (Görüntü Boyutu) değerinidehyşirir. Not: Auto Wide (Otomatik Genişlik), Zoom1 (Yakınlaştrma 1) ve Zoom2 (Yakınlaştrma 2) ayarlı, Component (Koponent) ve DVI (HDCP) giris sinyali Türü 720p ya da 1080i olduğunda seçilebilir durumdadehyildir. MagicNet Giris kaynagi yalnizca MagicNet modelinde calisi. \* Image Size (Goruntu Boyutu) Kontrolu yalinizca guc durumu ON (ACIK) atan ekranlarda kullanilabilir. Time
1. Ana simgelerden Time' (Saat) tiklattiginizda Time Control (Saat Kontrolü) ekrani açilir.  Bilgi Tablosu, Time (Saat) Kontrolü icin gerekli bazı temel bilgileri gosterir. 1) Current Time - Seçilen ekran,—çın)—geçerli)—saati)—belirir (PC Saati). - Geçerli saati degişirmek,—ün ce PC Saatini degişirin. 2) On Time Setup - Segilen ekranin Hour (Saat), Minute (Dakika), On Time Setup (Açilis Saati Ayari) AM/PM bilgisini, Status (Durum), Source (Kaynak), Volume (Seis seviyesi) degerini ayarlayin. 3) Off Time Setup - Segilen ekranin Off Time Setup (Kapanis Saati Ayari) ayari icin Hour (Saat), Minute (Dakika), AM/PM bilgisini, Status (Durum) bilgilerini ayarlayin. 4) On Time (Aglis Saati) ayarlini gosterir. 5) Off Time (Kapanis Saati) ayarlarni gosterir. \* MagicNet Giris kaynagl yalnizca MagicNet modelinde calisir. * Time (Saat) kontrlü yalnizca guç durumu ON (AÇİK) alan ekranlar yüz kullanilabilir. * On Time Setup (Açilis Saati Ayari), TV Source (TV Kaynagī) islevleri yalnizca TV Modelinde calişir. PIP
PIP Size
1. Ana simgelerden PIP'iklattiginzda PIP Control (PIP Kontrolü) ekrani aclr. Kontrol etmek istediginiz ekrani segmek icin Select All (Tumunu Sec) duugmesini ya da Check Box (Kutuyu Isaretle) duugmesini kullanin.  Bilgi Tablosu, PIP Size (PIP Boyutu)增長 gerekli bazi temel bilgileri gosterir. 1)PIP Size - Kullanlan ekranin geleeri PIP Size (PIP Boyutu) degerini gosterir. 2) OFF - Segilen ekranin PIP'ini kapatir. 3) Large - Segilen ekranin PIP'ini和地区 boyutu Large (Büyük) degerine getirir. 4) Small - Segilen ekranin PIP'ini和地区 boyutu Small (Küçük) değerine getirir. 5) Double1 - Segilen ekranin PIP'ini acar ve boyutu Double 1 (Cift 1)degerine getirir. 6) Double2 - Segilen ekranin PIP'ini acar ve boyutu Double 2 (Cift 2)degerine getirr. 7) Double 3 (Resim Yaninda Resim) Seçilen ekranın PBP'sinicastle boyutu Double 3 (Gift 3) degérine getirir.  MagicNet Giriç kaynagl yalnizca MagicNet modelinde calisir. PIP Size (PIP Boyutu), monitor açık haldeyken kontrol edilebilir. PIP
PIP Source
1. Ana simgelenden PIP'ti tiklattiginizda PIP Control (PIP Kontrolü) ekrani açilir. - PIP TV Mode  - PIP S-Video Mode  Bilgi Tablosu, PIP Source (PIP Kaynagi) Kontrolü icin gerekli bazı temel bilgileri gosterir. 1) PIP Source (PIP Kaynağt) - PIP Source (PIP Kaynag), monitor agik haldeyken kontrol edilebirir. 2)PC - Seçilen ekranın PIP kaynakıncı PC'yedehyşistirir. 3) BNC - Seçilen ekranın PIP kaynakın BNC'yedehyişirir. 4) DVI - Segilen ekranin PIP kaynagini DVI'ye degistirir. 5) TV - Segilen ekranin PIP kaynaginci TV'ye degişirir. 6)AV - Secilen ekranin PIP kaynakıni AV'ye degişirir. 7) S-Video - Seçilen ekranın PIP kaynakın S-Video'yadehyegristirir. 8) Component - Segilen ekranin PIP kaynagini Componente (Koponent) degistirir. 9) Channel - PIP Source (PIP Kaynagi) TV iken Kanal oku görtülenir. Not: Ana Ekranin giris kaynagi türüne baglı olarak PIP kaynaklarindan bazilari seçilemeyebilir. \* MagicNet Giri kaynagl yalnizca MagicNet modelinde calisir. * TV Kaynagi sadece televizyonlu ürünlerde seçilebilir ve kanallari kontrol etme,islemine PIP Source (PIP Kaynagi) TV ileken izin verilir. * PIP Control (PIP Kontrolü = özelliği yalnizca güç durumu ON (AÇIK) alan ve PIP ilevi ON (AÇIK) halde bulunan ekranlarda kullanilabilir. Settings
Picture
1. Ana simgelenden Settings' (Ayarlar) tiklattiginizda Settings Control (Ayarlar Kontrolü) ekrani aclrir.   Bilgi Tablosu, Settings (Ayarlar) Kontrolü icin gerekli baz temel bilgileri gosterir. Her bir islev segildigiinde, segilen islevin ayar degeri kayar kontrlode gosterilir. Select All (Tumunu Se) segildigiinde, varsayilan degere (50) geri donulur. "Select All" (Tumunu Se) segildigiinde, varsaylan deger goruntulenir. Bu ekranda herhangi bir degerin degistirmesi modu otomatik olarak "CUSTOM" (OZEL) yapacaktir. - Yalnizca TV, AV, S-Video, Component (Component), DVI(HDCP)同胞 kullanilabilir. 1) Picture 2) Contrast - Seçilen ekranın Contrast (Kontrast) değerini ayarlar. 3) Brightness - Segilen ekranin Brightness (Parlaklik) degerin ayarlar. 4) Sharpness - Segilen ekranin Sharpness (Netlik) degerini ayarlar. 5) Color - Segilen ekranin Color (Renk) degerini ayarlar. 6)Tint - Segilen ekranin Tint (Ton) degerini ayarlar. 7) Color Tone - Segilen ekranin Color Tone (Renk Tonu) degerini ayarlar. MagicNet Giris kaynagl yalnizca MagicNet modelinde calisi. * Bu Özellik yalınizca güç durumu ON (AÇİK) GPLanlada kullanilabilir. Herhangi bil seksim yapilmazsa fabrika varsayilan degeri gosterilir. Settings
Picture PC
1. Ana simgelerden Settings' (Ayarlar) tilkattiinizda Settings Control (Ayarlar Kontrolü) ekrani açilir.  Bilgi Tablosu, Settings (Ayarlar) Kontrolü icin gerekli bazim temel bilgileri gosterir. Her bir islev secildigiinde, sejen islevin ayar degeri kayar kontrlde gosterilir. Select All (Tumunu Seg) seildigiinde, varsaylan degere (50) geri donulur. Bu ekranda herhangi bir degerin degistirmesi modu otomatik okayak "CUSTOM" (OZEL) yapacaktir. 1) Picture PC - Yalnizca PC, BNC, DVI ijcin kullanilabilir. 2) Contrast - Segilen ekranı Contrast (Kontrast) degerini ayarlar. 3) Brightness - Seçilen ekranın Brightness (Parlaklik) degeri ayarlar. 4) Red - Seçilen ekranın Red (Kirmizi) renk değerini ayarlar. 5) Green - Segilen ekranin Green (Yeşil) renk değerini ayarlar. 6) Blue - Segilen ekranin Blue (Mavi) renk degerini ayarlar. \* MagicNet Giris kaynagl yalnizca MagicNet modelinde calisir. \* Bu ozellik yalnizca guc durumu ON (AciK) alan ekranlarda kullanilabilir. Herhangi bir sejm yapilmazsa fabrika varsayilan degeri gosterilir. Settings
Audio
1. Ana simgelerden Settings' (Ayarlar) tklattiginizda Settings Control (Ayarlar Kontrolu) ekranı acilir.  Bilgi Tablosu, Settings (Ayarlar) Kontroli icin gerekli bazim temel bilgileri gosterir. Her bir islev segildigiinde, seilen iglevin ayar degeri kayar kontrolde gosterilir. Select All (Tumunu Se) segildigiinde, varayilan degere (50) geri donulur. Bu ekranda herhangi bir degerin degistirlimesi modu otomatikormal "CUSTOM" (OZEL) yapacaktir. 1) Audio -Tum giris kaynaklarinin ses ayaralarini kontrl eder. 2) Bass - Segilen ekranin Bass (Bas) degerini ayarlar. 3) Treble - Segilen ekranin Treble (Tiz) degerini ayarlar. 4) Balance - Seçilen ekranin Balance (Denge) değerini ayarlar. 5) SRS TSXT - Seçilen ekranin SRS TSXT Sound Özigiğinci Aşkık/Kapali hare getirir. 6) Sound Select - PIP açikken Ana veya Alt ekrani seçebilirsiniz. \* MagicNet Giris kaynagl yalnizca MagicNet modelinde calisir. * Bu özellik yalnizca güç durumu ON (AÇİK)olean ekranlarda kullanilabilir. Herhangi bir seçim yapilmazsa fabrika varsayilan değeri Güsterilir. Settings
Image Lock
1. Ana simgelerden Settings'i (Ayarlar) tiklattiginzda Settings Control (Ayarlar Kontrolü) ekrani acilir.  Bilgi Tablosu, Settings (Ayarlar) Kontrolü—in gerekl bazı temel bilgiler:i Güsterir. 1) Image Lock - PC, BNC胆固醇 kullantilabilir. 2) Coarse - Segilen ekranin Coarse (Iri) degerini ayarlar. 3) Fine - Segilen ekranin Fin (Ince) degerini ayarlar. 4) Position - Segilen ekranin Position (Konum) degerini ayarlar. 5) Auto Adjustment - Gelen PC sinyaline gore Kendiliginden ayarlar. \* MagicNet Giris kaynagl yalnizca MagicNet modelinde calisir. \* Settings (Ayarlar) kontrlü yalinizca güç durumu ON (AÇİK) alan ekranlar yüz kullanilabilar. Maintenance
Lamp Control
1. Maintenance (Bakim) ekranini görtülemek icin Ana Simgeler sütununda "Maintenance" (Bakim) simgesini tklatn.  Bir cok temel veri ögesini goisteren "Bilgi Tablosu" görtülenir. 1) Maintenance -Tum girig kaynaklar icin Maintenance Control (Bakim Kontrolu) iglevine izin verir. 2) Auto Lamp Control - Secilen ekranin arka isigini, belirtilen zamanda otomatik okayaraylar. Manual Lamp Control (Manuel Lamba Kontrolü), Auto Lamp Control'u (Otomatik Lamba Kontrolü) kullanarak ayarlama yaptıgünizda otomatik olarak kapanir. 3) Manual Lamp Control - Saatten bagimsiz olarak seçilen ekranin arka isigini ayarlanamizi saglar. Auto Lamp Control (Otomatik Lamba Kontrolü), Manual Lamp Control'u (Manuel Lamba Kontrolü) kullanarak ayarlama yaptıgünizda otomatik olarak kapanir. \* Maintenance Control (Bakim Kontrolu) yalnizca guc durumu ON (AciK) alan ekranlarda kullanilabilir. \* MagicNet Giris kaynagl yalnizca MagicNet modelinde calisir. Maintenance
Scroll
1. Maintenance (Bakim) ekranini görtülemek icin Ana Simgeler sütununda "Maintenance" (Bakim) simgesini tklatn.  1) Screen Scroll - Segilen ekran uzun sure Pause (Duraklatma) modunda kaldiginda ortaya seksabilecek görtü izlerini önler. "Interval" ayarini staat ve "Second" ayarini saniye cinsinden seçerek tekrallama ürelerini ayarlayabilirsiniz. Screen Type (Ekran Türü) ile Scroll (Kaydirma), Pixel (Piksel), Bar (Cubuk) vya Eraser (Silici) olarak ayarlanabilir. MagicNet Giris kaynagi yalnizca MagicNet modelinde calisir. \* Second (Saniye) degerini yaplandirrken Scroll (Kaydirma) Turunu 1, 2, 3, 4, 5 degerlerine, Pixel (Piksel), Bar (Cubuk) veya Eraser (Silici) Turunu 10, 20, 30, 40, 50 degerlerine ayarlayabilirsiniz. \* Maintenance Control (Bakum Kontrolu) yalnizca guc durumu ON (ACIK) alan ekranlarda kullanilabilir. Maintenance
Video Wall
1. Maintenance (Bakim) ekranini görtülemek icin Ana Simgeler sütununda "Maintenance" (Bakim) simgesini tklatn.  1) Video Wall - Video duvari, bir dizi video ekraninir birbirine baglanarak, her ekranin resmin bir parcasini gostermesi ya da tum ekranlarda ayni resmin tekrarlanmasidir. 2) Video Wall (Screen divider) -Ekran bolunebilir. Bölme sirasinda, farkli sayida ekran seçebilirsiniz. - Ekran bölcüden bir modSECTION. - Ekran Seçimi kismindan bir ekran segin. - Yer, segilen modda bir numaraya basilarak ayarlanacaktir. Samsung'un sagladiMDC programen fazla 4x4 LCD Ekranlari destekler.  3) On/Off - Segilen ekranin Video Duvari ilelvini acar/kapatir. 4) Format -Bicim,bolunmu ekran gosterecek sekilde seclebilir.  \* MagicNet Giris kaynagl yalnizca MagicNet modelinde calisir. * Maintenance Control (Bakim Kontrolü)yalnizca Güç durumu ON (AÇIK)alan ekranlarda kullanilabilir.Sorun Giderme
1. Kontrol etmek istediginiz ekran Power Control (Güç Kontrolü) Bilgi Tablosunda görünmyor - RS232C baglantisini kontrol edin. (Com1 baglanti noktasina dizgün bicimde bagli olup olmadigi kontrl edin) - Bagli ekranlardan herhangi birinin ayni ID degerine sahip olup olmadigi gormek icin ekranlar kontrol edin. Eger birden fazla ekran ayni ID degerine sahipse, veri cakismasi nedeniyle bu ekranlar program tarafindan dizgün bicomde algilanmaz. Display Set ID (Ekran Seti ID)情况进行查询,以确定是否可以进行控制。Display (Ekran) menü sunu kullanarak ayarlayin.) Not: Display Set ID (Ekran Seti ID), 0-16 arasi bir deger olmaldir. Eger deger, bu deger araligi disindaysa, MDC systemi ekrani kontrl edemez. 2. Kontrol etmek istedigin ekran diiger kontrollerin Bilgi Tablosunda gorunmuyor Ekranin ON (ACIK) durumda oldugunu kontrol edin. (Bunu, Power Control (Guc Kontrolü) Bilgi Tablosunda gorebilirsiniz) -Ekranin giris kaynagini degistirip degistiremediinizi kontrl edin. 3. Iletisim kutusu, tekrar tekrar görtüleniyor. - Kontrol etmek istediiginiz ekranin segili olup olmadigina bakin. 4. Hem On Timer (Açilma Saati) hem de Off Timer (Kapanma Saati) ayarli olmasina kşn farkl bir saat gosteriliyor. -Ekranlarin saatini ayni degere getirmek icin gecerli saati tum ekranlara uygulayin. 5. Uzaktan kumanda islevini kapattiignizda, RS-232C kablosuno gikarttignizda ya da programdan normal olmayan bir sekilde ciktiignizda uzaktan kumanda duzgün calismayabilir. Normal calismaya geri donmek icin programi yeniden calistirin ve uzaktan kumanda islevini acin.Coklu Ekran Modunda Ayar Değerlerinin Gösterilmesi
* Birden fazla ekran baglì oldugunda, ayar degerleri asagidaki gibi görtülenir. 1. Seçim yok: Fabrika Varsaylan Değerini gosterir. 2. Bir ekran segili: Seçilen ekranın ayar değerleri alınir veGORuntulenir. 3. Bir ekran seçili (ID1) ve böcka bir ekran ekleniyor (ID3): ID 1 ayar değerini güisteren program, ID3'ün değerlerini alir ve görtüller. 4. Select All (Tumunu Seg) ile tum setter segili: Fabrika Varsaylan Degerine geri dorer.  Güvenlik Talimatlari Giris Baolantylar Yazilimin Kullanilmasi Monitor Ayarlanmasi Input Picture [PC / BNC /DVI Mode] Picture [AV/S-Video/ Component / DVI-Video Mode] Sound Setup Multi Control Dogrudan Istevler Sorun Giderme Özellikler Bilgiler AppendixTFT-LCD Monitor
www.samsung.com  Urun renge ve gorunmu modeline bagl olarak farklik gosterebilir ve performans gelistirmeler nedeniyle urn ozellikleri onceden haber verilmeksizin degistirilebilir.Monitor Ayarlanmasi
Input Kullanilabilir Modlar  PC/BNC/DVI  S-Video  Component  DVI-VideoSource List PASCD
[MONTH]→[ENTER]→[ENTER]→[A/V]→[ENTER] Uzaktan kumandadaki dokrudan dugme 'SOURCE' dugmesidir. Istediginiz ekrani segmek icin kullanin. 1)PC 2) BNC 3) DVI 4)AV 5) S-Video 6) Component [Uzaktan kumandadaki dokrudan dugme 'SOURCE'dugmesidir.] Not - Monitor harici bir kaynaşa geleirildigiinde PIP kapanir.PIP PASC0
VCR ve DVD gibi harici A/V aygtllari monitore baglidir; PIP, PC Video sinyalinde eklenmis kucuk bir pencerede bu aygtllardan video seyretmenize olanak sag (Off/On) Not - BNC ve component ayni terminali kullandiklarindan birden fazla PIP ekranda ust uste aglamaz. 1)PIP [MONTH]→[ENTER]→[A/V]→[ENTER]→[ENTER]→[A/V]→[ENTER] PIP Ekranini kapatir veya aça. -Off - On [Uzaktan kumandadaki dokudugradu dugme 'PIP'dugmesidir.] 2) Source [MONTH] [ENTER] [A/V] [ENTER] [A/V] [ENTER] [A/V] [ENTER] PIP injin giri kaynagi segin. -PC:AV/S-Video/Component Mode -BNC:AV/S-Video Mode -DVI:AV/S-Video/ComponentMode -AV/S-Video:PC/BNC/DVI Mode - Component: PC / DVI Mode [Uzaktan kumandadaki dokudugdan dugme 'SOURCE' dugmesidir.] 3) Swap [MONTH] [ENTER] [A/√] [ENTER] [A/√] [ENTER] PIPveana gortunun iceriklerini degistirir. PIP penceresindeki görtü ana ekranda, ana ekrandaki görtü PIP penceresinde görtülenir. [Uzaktan kumandadaki dokudugradu dugme 'SWAP'dugmesidir.] 4) Size [MONTH] [ENTER] [A/V] [ENTER] [A/V] [ENTER] [A/V] [ENTER] PIP penceresinin Boyutunu degiştrir. [Uzaktan kumandadaki dokudan dugme SIZE'dugmesidir.] 5) Position [MONTH] [ENTER] [A/V] [ENTER] [A/V] [ENTER] [A/V] [ENTER] PIP penceresinin Konumunu degistirir. 6) Transparency [MONTH] [ENTER] [A/V] [ENTER] [A/V] [ENTER] [A/V] [ENTER] PIP pencerelerinin Saydamligi ayarlar. - High - Medium - Low -Opaque Not Size icinde agesini secerseniz, Position ve Transparencycye etkinlemez. Kullanlabilir Modlar:PIPEdit Name PASC0
[MENU] [ENTER] [A/V] [ENTER] [A/V] [ENTER] [A/V] [ENTER] Giris kaynagi seciminizi kolaylasmirk icin giris jaklarina bagli giris cihazini adlandirin. 1)PC 2) BNC 3) DVI 4) AV 5) S-Video 6) Component Picture [PC / BNC /DVI Mode] Kullanilabilir Modlar  PC/BNC/DVI  AV  S-Video  Component  DVI-VideoMagicBrightTM
[MENU] [A/V] [ENTER] [ENTER] [A/V] [ENTER] MagicBright™, görtülediginiz resmin icerigine bagh olarak en iyi görtüleme ortamini saglayan yen bir özelliktir. Su anda uc farkli moddan biri kullanilabilir: Metin, Internet ve Eglence. Her modun kendine ozgu onceden yapilandinlmis bir parlaklik degeri vardir. MagicBright TM denetim duqmelerine basarak bu uc ayardan birin kolayca segebilirsiniz. 1) Entertain Yuksek Parlaklik DVD veya VCD gibi filmleri izlemek icin. 2) Internet Orta Parlaklik Metin ve grafik gibi karmaGORuntulerin bulundugu calismalar icin. 3) Text Normal Parlaklik Buyuk metinler iceren belge veya calismalar icin. 4) Custom Muhendislerimiz tarafindankatkile seilmis olmasina ragmen onceden ayarlanmis degerler, zevkinize bagl olarak, gozleriniz icin uygun olmayabilir. Bu durumda, OSD menusunu kullanarak Parlaklik ve Kontrasti ayarlayin. [Uzaktan kumandadaki dokudugran duigme M/B'dugmesidir.]Custom P
[ \text{[MENU]} \rightarrow [\wedge / \vee] \rightarrow [\text{ENTER}] \rightarrow [\wedge / \vee] \rightarrow [\text{ENTER}] \rightarrow [\text{ENTER}] \rightarrow [\wedge / \vee] / [< / >] \rightarrow [\text{ENTER}] ] Kontrast ve parlakiigi kisel tercihlerinize gore degistirmek icin ekran menulerini kullanabilirsiniz. 1) Contrast Yesil Rengi ayarla. 2) Brightness Dogrudan Denetim Ozellikleri  - Resmi Custom islevini kullanarak ayarlarsaniz, MagicBright Custom moduna doner.Color Tone
[ \text{[MENU]} \rightarrow [\wedge / \vee] \rightarrow [\text{ENTER}]\rightarrow [\wedge / \vee] \rightarrow [\text{ENTER}]\rightarrow [\wedge / \vee] \rightarrow [\text{ENTER}] ] Renk tonu degiistirilebilir. 1) Cool 2) Normal 3)Warm 4) Custom (Yalnizca PC/BNC Modunda Kullanilir)Color Control
[MENU] [A / V] [ENTER] [A / V] [ENTER] [ENTER] [< / > ] [ENTER] R,G,B renk dengesini ayri ayri ayarlamak icin aagidaki admlari uygalayin. (Yalnizca PC/BNC Modunda Kullanilir) 1) Red 2) Green 3) Blue Not - Resmi Color Control islevini kullanarak ayarlarsaniz, Color Tone Custom moduna doner.Image Lock
Image Lock (Göruntü Kilitleme), titrek ve pariltili kararısiz görtüntürol olşturan parazitleri kaldirarak ince ayapmak ve en iyi görtüntüyü almak icin kullanı. Fine ayari kullanarak elde edilen sonçlar yeterli degilse, Coarse ayarı ve sonra da yeniden Fine ayarı kullanı.(Yalnizca PC/BNC Modunda Kullanilir)
1) Coarse [ \text{[MENU]} \rightarrow [ \land / \lor ] \rightarrow [ \text{ENTER}] \rightarrow [ \land / \lor ] \rightarrow [ \text{ENTER}] \rightarrow [ \text{ENTER}] \rightarrow [ < / > ] \rightarrow [ \text{ENTER}] ] Dikey cizgiler gibi istenmeyen goruntuleri giderir. Genel ayar, ekran goruntu alanini tasiyabilir. Bu alan Yatay Kontrol menusun kullanarak yeniden yerine yerleştrebilirsiniz. 2) Fine [MONTH] [AV] [ENTER] [AV] [ENTER] [AV] [ENTER] [] [ENTER] Yatay cizgiler gibi istenmeyen görtuntüleri giderir. lstenmeyen görtuntü Ince ayar sonrasinda da kaybolmadiya, frekansi (saat hizini) ayarladiktan sonra bu islemi tekrarlayin. 3) Position \[ [\text{MENUR} ]\rightarrow [\text{A} /\text{V} ]\rightarrow [\text{ENTER} ]\rightarrow [\text{A} /\text{V} ]\rightarrow [\text{ENTER} ]\rightarrow [\text{A} /\text{V} ]\rightarrow [\text{ENTER} ]\rightarrow [\text{A} /\text{V} ]\rightarrow \] [ENTER] Ekranin konumunu yatay ve dikey olarak ayarlar.Auto Adjustment P
[ \text{[MENU]} \rightarrow [\wedge / \vee] \rightarrow [\text{ENTER} ] \rightarrow [\wedge / \vee] \rightarrow [\text{ENTER}] ] Fine, Coarse ve Position degerleri otomatik olarak ayarlanir. Kontrol panelinde czūnūrūgū degīstirirseniz, AUTO iševi yūrūtūr. (Yalnizca PC/BNC Modunda Kullanilir) [Uzaktan kummandadaki dokrudan dügme 'AUTO' dügmesidir.]Signal Balance P
Uzun sinyal kablosuyla iliteten zayif RGB sinyalini telafi etmek icin kullanir. (Yalnizca PC/BNC Modunda Kullanilir) 1) Signal Balance [ \text{[MENU]} \rightarrow [ \wedge / \vee ] \rightarrow [ \text{ENTER}] \rightarrow [ \wedge / \vee ] \rightarrow [ \text{ENTER}] \rightarrow [ \text{ENTER}] \rightarrow [ \wedge / \vee ] \rightarrow [ \text{ENTER}] ] Signal control, On ya da Off haldeyken secebilirsiniz. 2) Signal Control [ \text{[MENU]} \rightarrow [\wedge / \vee] \rightarrow [\text{ENTER}] \rightarrow [\wedge / \vee] \rightarrow [\text{ENTER}] \rightarrow [\wedge / \vee] \rightarrow [\text{ENTER}] \rightarrow [\wedge / \vee] \rightarrow [\wedge / \vee] \rightarrow [\text{ENTER}] \rightarrow [\wedge / \vee] \rightarrow [\text{ENTER}] \rightarrow [\wedge / \vee] \rightarrow [\text{ENTER}] \rightarrow [\wedge / \vee] \rightarrow [\text{ENTER}] \rightarrow [\wedge / \vee] \rightarrow [\text{ENTER}] \rightarrow [\wedge / \vee] \rightarrow [\text{ENTER}] \rightarrow [\wedge / \vee] \rightarrow [\text{T} ] \rightarrow [\text{T} ] \rightarrow [\text{T} ] \rightarrow [\text{T} ] \rightarrow [\text{T} ] \rightarrow [\text{T} ] \rightarrow [\text{T} ] \rightarrow [\text{T} ] \rightarrow [\text{T} ] \rightarrow [\text{T} ] \rightarrow [\text{T} ] \rightarrow [\text{T} ] \rightarrow [\text{T} ] \rightarrow [\text{T} ] \rightarrow [\text{T} ] ] R Phase, G Phase, B Phase, Gain and Sharpness degerlerini kendiniz ayarlayabilirsiniz.Size
[ \text{[MENU]} \rightarrow [\text{A} / \text{V}] \rightarrow [\text{ENTER} ] \rightarrow [\text{A} / \text{V}] \rightarrow [\text{ENTER} ] \rightarrow [\text{A} / \text{V}] \rightarrow [\text{ENTER} ] ] Boyutudegistirebilirsiniz. 1) 16:9 2) 4:3PIP Picture P
[ \text{[MENU]} \rightarrow [\wedge / \vee] \rightarrow [\text{ENTER}] \rightarrow [\wedge / \vee] \rightarrow [\text{ENTER}] \rightarrow [\wedge / \vee] \rightarrow [\text{ENTER}] \rightarrow [\wedge / \vee] \rightarrow [\text{ENTER}] \rightarrow [\wedge / \vee] \rightarrow [\text{ENTER}] \rightarrow [\wedge / \vee] \rightarrow [\text{ENTER}] \rightarrow [\wedge / \vee] \rightarrow [\text{x} ] \rightarrow [\text{x} ] \rightarrow [\text{x} ] \rightarrow [\text{x} ] \rightarrow [\text{x} ] \rightarrow [\text{x} ] \rightarrow [\text{x} ] \rightarrow [\text{x} ] \rightarrow [\text{x} ] \rightarrow [\text{x} ] \rightarrow [\text{x} ] \rightarrow [\text{x} ] \rightarrow [\text{x} ] \rightarrow [\text{x} ] \rightarrow [\text{x} ] ] PIP Ekran Ayarlarini ayarlayabilirsiniz. 1) Contrast Ekranda PIP penceresinin Kontrastini ayarlar. 2) Brightness Ekranda PIP penceresinin Parlakiigiinyarlar. 3) Sharpness PIP penceresinin en acik ve en koyu bolgeleriarasindaki farki ayarlamak icin kullanin. 4) Color PIP penceresinde Renk ayarlar. 5) Tint PIP penceresine, dogal bir ton katar. PC, BNC modunda PIP ekrani ile AV, S-Video' den resmi görtüleyebilirsiniz. Yalnizca video sinyali NTSC ise calisir. Kullanilabilir Modlar: PIP Picture [AV / S-Video / Component / DVI-Video Mode]Kullanilabilir Modlar
PC/BNC/DVI AV S-Video Component D DVI-VideoMode ASCD
[ \text{[MENU]} \rightarrow [\wedge / \vee] \rightarrow [\text{ENTER} ] \rightarrow [\text{ENTER} ] \rightarrow [\wedge / \vee] \rightarrow [\text{ENTER}] ] Monitor fabrikada onceden ayarlanmig dort otomatik resim ayari ("Custom", "Dynamic", Standard" ve "Movie") vardir. Custom, Dynamic, Standard veya Movie ayarindan birini etkinlestirebilirsiniz. Otomatik olarak kisiellestirimis resim ayararinizi caliran " Custom" ayarini seebilirsiniz. 1) Dynamic 2) Standard 3) Movie 4) Custom [Uzaktan kumandadaki dokrudan dugme 'P.MODE' dugmesidir.]Custom ASCD
[ \text{[MENU]} \rightarrow [\wedge / \vee] \rightarrow [\text{ENTER} ] \rightarrow [\wedge / \vee] \rightarrow [\text{ENTER} ] \rightarrow [\wedge / \vee] \rightarrow [\text{ENTER} ] \rightarrow [< / >] \rightarrow [\text{ENTER}] ] Kontrast ve parlakiigi kisesil tercihlerinize gore degistirmek icin ekran menulerini kullanabilirsiniz. 1) Contrast PIP penceresine dogal bir ton ekler. 2) Brightness Yesil Rengi ayarla. 3) Sharpness Göruntünun nettiğinayarlar. 4) Color Resim renghi ayarlar. 5) Tint Ekrana, dogal bir ton katar. Sadece AV ve S-Video modari icin calisir. Yalnizca video sinyali NTSC ise calisir.Color Tone ASCD
[MENU] [A/√] [ENTER] [A/√] [ENTER] [A/√] [ENTER] Renk tonu degiistirilebilir. Buna ek olarak renk Componentleri de kullanici tarafindan ozellestirilebilir. 1) Cool 2 2)Cool 1 3) Normal 4)Warm1 5)Warm2Size ASCD
[MONTH] [A/V] [ENTER] [A/V] [ENTER] [A/V] [ENTER] Boyutudegiistirebilirsiniz. 1)16:9 2)Zoom 1 3)Zoom 2 4)4:3 [ZOOM1, ZOOM2, DTV - 1080i (veya 720p üsti) ∈in mevcut degildir.]Digital NR (Dijital Gurultu Azaltma) ASCD
[MONTH] [A/V] [ENTER] [A/V] [ENTER] [A/V] [ENTER] Gurultu Yoketme ozelligi icin Off/On islemini uygulayin. Dijital Gurultu Yoketme ozelligi, daha temiz ve net resimlerden zevk almani saglar 1) Off 2) OnFilm Mode ASC
[MONTH] [A/ V] [ENTER] [A/ V] [ENTER] [A/ V] [ENTER] Film Modunu Acp/Kapatabilirsiniz (Film Mode Off/On). Film Modu özelliigi, tiatro kalitesinde görtunüleme deneyimi sunar. (DVI-Video Modda KullaniIamaz) 1) Off 2) OnPIP Picture ASCD
[ \text{[MENU]} \rightarrow [\text{A} / \text{V}] \rightarrow [\text{ENTER} ] \rightarrow [\text{A} / \text{V}] \rightarrow [\text{ENTER} ] \rightarrow [\text{A} / \text{V}] \rightarrow [\text{ENTER} ] \rightarrow [\text{A} / \text{V}] \rightarrow [\text{ENTER} ] \rightarrow [\text{A} / \text{V}] \rightarrow [\text{ENTER} ] \rightarrow [\text{A} / \text{V}] \rightarrow [< / >] } ] PIP Ekran Ayarlarini ayarlayabilirsiniz. 1) Contrast Ekranda PIP penceresinin Kontrastini ayarlar. 2) Brightness Ekranda PIP penceresinin Parlakligini ayarlar. Kullanlabilir Modlar:PIP SoundKullanilabilir Modlar
PC/BNC/DVI AAV S S-Video C Component D DVI-VideoMode PASC0
[MONTH] [A/V] [ENTER] [ENTER] [A/V] [ENTER] Monitor, yerleşik uygunluk dizeyi yüksek stereo amplifakator icerir. 1) Standard Standard fabrika ayarlari icin Standart segeneğini belirtin. 2) Music Müzik videoso veya konseri seyrederken Muzik seceneğinci belirtin. 3) Movie Filim seyrederken Filim seceneğini belirtin. 4) Speech Dahaçok konusma icerenbir (ormejin,haberler)programseyrederkenKonusma'yi segin. 5) Custom Ayarli kisesil tercihlere gore ayarlamak isterseniz, Ozel secenegini belirtin.Custom PASC0
[MONTH] [A/V] [ENTER] [A/V] [ENTER] [A/V] [ENTER] [] [ENTER] Ses ayarli, kisel tercihlerinize uygun olarak ayarlanabilir. 1) Bass Ses ayarli, kisesi tercihlerinize uygun olarak ayarlanabilir. 2) Treble Yuksek frekans sesi vurgular. 3) Balance Sol ve sag hopartorarasinda ses dengesini ayarlanamizi saglar. [Se degeri 0'a ayarlanmis olsa bile ses duyabilirsiniz.] Not - Resmi Sound islevini kullanarak ayarlarsaniz, Sound Mode Custom moduna doner.Auto Volume PASCD
[MENUR] [A /V] [ENTER] [A /V] [ENTER] [A /V] [ENTER] Yayinlayanlararasinda sesduzeyifarkliliikarini azaltir. 1) Off 2) OnSRS TS XT PASCD
[ \text{[MENU]} \rightarrow \left[\frac{\wedge}{\vee}\right] \rightarrow \left[\text{ENTER}\right] \rightarrow \left[\frac{\wedge}{\vee}\right] \rightarrow \left[\text{ENTER}\right] \rightarrow \left[\frac{\wedge}{\vee}\right] \rightarrow \left[\text{ENTER}\right] ] SRS TS XT, 5.1 cok kanalli iceriigi iki hoparlor uzerinde calma sorununu czen patentli bir SRS teknojisidir. TruSurround, sanal surround ses deneyimini dahili televizyon hoparlorerini de kapsayacak sekilde tum iki hoparlo calma systemleri uzerinden sunar. Tum cok kanalli bicimlerle tamamen uyumludur. 1) Off 2) On [Uzaktan kumandadaki dokrudan dugme 'SRS' dugmesidir.]Sound Select PASC
[MONTH] [A/V] [ENTER] [A/V] [ENTER] [A/V] [ENTER] PIP açikken Ana veya Alt seçeneğini belirbetbilirsiniz. 1) Main 2) Sub [Kullanilabilir Modlar: PIP] SetupKullanilabilir Modlar
 PC/BNC/DVI  AV  S-Video  Component  DVI-VideoLanguage PAsCD
[MONTH] [A/V] [ENTER] [ENTER] [A/V] [ENTER] 11 dilden birini secebilirsiniz.  - Segilen dil yalnizca OSD'nin dilini etkiler. Bilgisayarda calisan yazilimlari etkilemez. - English, Deutsch, Espanol, Français, Italiano, Svenska, 日本語, 中国语, Pycckn, 汉國詞, PortuguésTime PASCD
Monitóru dacika cinsinden beliri bir sure icinde otomatik olarak kapanacak sekilde ayarlamak icin kullanin. 1)Clock Set \[ \begin{array}{l} [\text{MEN}]\rightarrow [\text{A}/\text{V}]\rightarrow [\text{ENTER}]\rightarrow [\text{A}/\text{V}]\rightarrow [\text{ENTER}]\rightarrow [\text{ENTER}]\rightarrow [\text{A}/\text{V}]\rightarrow [\text{ENTER}]\rightarrow [\text{A}/\text{V}]\rightarrow [\text{ENTER}]\rightarrow [\text{A}/\text{V}]\rightarrow [\text{ENTER}]\rightarrow [\text{A}/\text{V}]\rightarrow [\text{ENTER}]\rightarrow [\text{A}/\text{V}]\rightarrow [\text{ENTER}]\rightarrow [\text{A}/\text{V}]\rightarrow [\mathrm{enter}] \end{array} \] 2) Sleep Timer [ [MENU] \rightarrow [\wedge / \vee] \rightarrow [\text{ENTER}] \rightarrow [\wedge / \vee] \rightarrow [\text{ENTER}] \rightarrow [\wedge / \vee] \rightarrow [\text{ENTER}] \rightarrow [\wedge / \vee] \rightarrow [\text{ENTER}] \rightarrow [\wedge / \vee] \rightarrow [\text{ENTER}] \rightarrow [\wedge / \vee] \rightarrow [\text{ENTER}] \rightarrow [\wedge / \vee] \rightarrow [\text{x} / \vee] \rightarrow [\text{x} / \vee] \rightarrow [\text{x} / \vee] \rightarrow [\text{x} / \vee] \rightarrow [\text{x} / \vee] \rightarrow [\text{x} / \vee] \rightarrow [\text{x} / \vee] \rightarrow [\text{x} / \vee] \rightarrow [\text{x} / \vee] \rightarrow [\text{x} ]] Dakika cinsinden beliri bir süre sonra Monitörün otomatik olarak kapanmasini saglamak icin kullanin (kapali), 30, 60, 90, 120, 150, 180) 3) On Timer & [MENU] [ / ] [ENTER] [ / ] [ENTER] [ / ] [ENTER] [ / ] [ / ] [ENTER]\ & [ENTER] Monitorun belirenmis bir saatte otomatik olarak acilmasini ayarlamak icin kullanin. Monitorun otomatik olarak acildigi zaman kullanilacak modu, ses seviyesini kontrol etmek icin kullanin 4) Off Timer [ \text{[MENU]} \rightarrow [\text{A} / \text{V}] \rightarrow [\text{ENTER}] \rightarrow [\text{A} / \text{V}] \rightarrow [\text{ENTER}] \rightarrow [\text{A} / \text{V}] \rightarrow [\text{ENTER}] \rightarrow [\text{A} / \text{V}] \rightarrow [\text{ENTER}] ] Monitörun otomatik olarak acldigi zaman kullanilacak modu, ses seviyesini kontrol etmek icin kullanin.  - On Timer'da Yes seçerseniz, Off Timer'da Clock Set ayari yoksa, mesaji görtülenir: "Set the clock first".Menu Transparency PASCD
[MONTH] [A/V] [ENTER] [A/V] [ENTER] [A/V] [ENTER] Bilgisayarda calisan yazilmalar etkilemez. 1) High 2) Medium 3) Low 4)OpaqueSafety Lock PIN PASCD
[ \text{[MENU]} \rightarrow [\wedge / \vee] \rightarrow [\text{ENTER}] \rightarrow [\wedge / \vee] \rightarrow [\text{ENTER}] \rightarrow [0 \sim 9] \rightarrow [0 \sim 9] \rightarrow [0 \sim 9] ] Parolayi degistirebilirsiniz.Energy Saving PASCD
[MONTH] [A/V] [ENTER] [A/V] [ENTER] [A/V] [ENTER] [MONTH] Bu ozellik enerji tasarrufu icin unitenin guc tuketimini ayarlar. 1) On 2) Off Not Bekleme guc tuketimini azaltmak istiyorsaniz, Energy Saving ogesini On olarak ayarlayin. Ancak, Enerji Tasarrufu nOn Olarak ayarladiinizda, MDC'nin uzaktan Power On islevini ve MagicNefin WOL (Wake On LAN) islevini kullanamazsiniz.Video Wall PASCD
Video duvari, bir dizi video ekraninin birbirine baglanarak, her ekranin resin bir parcasini gostermesi ya da tum ekranlarda ayni resmin tekrarlanmasidir. Video Wall açikken, Video Wall ekrani ayarlınülenebilir. 1) Video Wall [MONTH] [A/V] [ENTER] [A/V] [ENTER] [ENTER] [A/V] [ENTER] Secilen ekranin Video Duvarı ilelevi açar/kapatir. -Off - On 2) Format \[ [\text{MENUR} ]\rightarrow [\text{AIV} ]\rightarrow [\text{ENTER} ]\rightarrow [\text{AIV} ]\rightarrow [\text{ENTER} ]\rightarrow [\text{AIV} ]\rightarrow [\text{ENTER} ] \] Bicim, bolunmug ekran gosterecek sekilde secilebilir. - Full Kenar boşluksuz tam ekran görtü saglar. - Natural Original en-boy oranini degistirmeden dogal bir görtuntu verir. 3) Screen Divider [ \text{[MENU]} \rightarrow [\text{A} / \text{V}] \rightarrow [\text{ENTER} ] \rightarrow [\text{A} / \text{V}] \rightarrow [\text{ENTER} ] \rightarrow [\text{A} / \text{V}] \rightarrow [\text{ENTER} ] \rightarrow [\text{A} / \text{V}] \rightarrow [\text{ENTER} ] ] Ekran bolunebilir. Bolme sirasinda, farki sayida ekran secebilirsiniz. - Ekran boluciden bir mod secin. - Ekran Seçimi kismindan bir ekran seçın. - Yer, secilen modda bir numaraya basilarak ayarlanacaktir. -2x2 -3x3 -4×4 -5x5 -1x2 -2x1 -1x5 -5x1  - Video Wall (Video Duvari) calisiyyorken, PIP (Resim icinde Resim), Auto Adjustment (Otomatik Ayarlama), Image Lock (Goruntu Kilidi) ve Size (Boyut) islevleri kullanilamaz. PIP (Resim icinde Resim) calisiyyorken Video Wall (Video Duvari) szelligin baslatilmasi PIP Off (PIP Kapali) durumuna geçilmesine neden olur. Video Wall, MagicNet modunda calismaz.Safety Screen PASC0
Safety Screen islevi, ekranda uzun sure sabit bir görtûgosterildiginde meydana gelebilecek görtû izlerini onlemek icin kullanilmaktadir. -- Safety Screen islevi, beliri bir sure icin ekrundaki goruntuyu kayirirr. -Bu islev, guc katpatildiginda kullanilamaz.1) Safety Screen
[ \text{[MENU]} \rightarrow [\wedge / \vee] \rightarrow [\text{ENTER}] \rightarrow [\wedge / \vee] \rightarrow [\text{ENTER}] \rightarrow [\text{ENTER}] \rightarrow [\wedge / \vee] \rightarrow [\text{ENTER}] ] Safety Screen islevinin, On (açik) ya da Off (Kapali) olmasini belirler. -Off - On2) Interval
[MONTH] [A/ V] [ENTER] [A/ V] [ENTER] [A/ V] [ENTER] [A/ V] [ENTER] Safety Screen isleminin calistirilmasi inc gerekli zaman araligi berlir. (1-10 Saat) Zaman, aik kalma sresine gore hesaplanir. Varsayilan olarak sure, 10 saate ayarlanmistir. -1\~10 Saat3) Second
[ \text{[MENU]} \rightarrow [\wedge / \vee] \rightarrow [\text{ENTER}] \rightarrow [\wedge / \vee] \rightarrow [\text{ENTER}] \rightarrow [\wedge / \vee] \rightarrow [\text{ENTER}] \rightarrow [\wedge / \vee] \rightarrow [\text{ENTER}] ] Safety Screen isleminin calisturlacagi sureyi belirler. (1~5 Saniye) Varsaylan olarak sure, 5 saniyeye ayarlanmistir. Type-Scroll: 1~5 Second - Type-Pixel, Bar, Eraser: 10~50 Second4) Type
[MENUR ] [ / ] [ENTER ] [ / ] [ENTER ] [ / ] [ENTER ] [ / ] [ENTER ] Safety Screen Type (Güvenlik Ekrani Tür) ayaralarıdehyişistire bilirsiniz. - Scroll - Pixel - Bar EraserResolution Select P
[MONTH] [A/V] [ENTER] [A/V] [ENTER] [A/V] [ENTER] Grafik kartinin czunurlugunu 1024 x 768 @ 60Hz, 1280 x 768 @ 60Hz, 1360 x 768 @ 60Hz ya da 1366 x768 @ 60Hz'e ayarladiginzda ekrandaki goruntu dizgun olmuyorsa bu islevi kullanarak (Resolution Select) goruntunun belirtlen ozunurlukte gosterilmesini saglayabilirsiniz. (Yalnizca PC/BNC Modunda Kullanilir) 1) Off 2) 1024 X 768 3) 1280 X 768 4) 1360 X 768 5)1366X768  - Menūn seīlmesine, yalīnizca grafik czūnūrūgū 1024 x 768 @ 60Hz, 1280 x 768 @ 60Hz, 1360 x 768 @ 60Hz ya da 1366 x768 @ 60Hz olduğunda izin verilir.PASCD
\[ [\text{MENUR} ]\rightarrow [\text{A} /\text{V} ]\rightarrow [\text{ENTER} ]\rightarrow [\text{A} /\text{V} ]\rightarrow [\text{ENTER} ]\rightarrow [\text{ENTER} ]\rightarrow [< / > ]\rightarrow [\text{ENTER} ] \] Enerji tuketimini azaltmak amacyla Arkla 1sigi ayarlamak icin kullanilir.Power On Adjustment PASCD
[ \text{[MENU]} \rightarrow [\wedge / \vee] \rightarrow [\text{ENTER} ] \rightarrow [\wedge / \vee] \rightarrow [\text{ENTER} ] \rightarrow [\text{ENTER} ] \rightarrow [\wedge / \vee] \rightarrow [\text{ENTER} ] ] Ekranin Power On time degerini ayarlayin. *Dikkat: Aşiril voltaj engellemek icin Power On time değerini daha uzun ayarlayin.Reset
Parlayi degistirebilrsiniz. 1) Image Reset [ \text{[MENU]} \rightarrow [\wedge / \vee] \rightarrow [\text{ENTER} ] \rightarrow [\wedge / \vee] \rightarrow [\text{ENTER} ] \rightarrow [\text{ENTER} ] \rightarrow [< / >] \rightarrow [\text{ENTER}] ] (Yalnizca PC/BNC Modunda Kullanilir) 2)Color Reset P [ \text{[MENU]} \rightarrow [\text{A} / \text{V}] \rightarrow [\text{ENTER} ] \rightarrow [\text{A} / \text{V}] \rightarrow [\text{ENTER} ] \rightarrow [\text{A} / \text{V}] \rightarrow [\text{ENTER} ] \rightarrow [< / >] \rightarrow [\text{ENTER}] ] Multi ControlKullanilabilir Modlar
PC/BNC/DVI AAV S S-Video Component D VDI-VideoMulti Control PASC
[ \text{[MENU]} \rightarrow [\wedge / \vee] \rightarrow [\text{ENTER} ] \rightarrow [\wedge / \vee] \rightarrow [\text{ENTER} ] \rightarrow [\text{ENTER} ] \rightarrow [0 \sim 9] ] SET'e ayri bir ID atar. 1) ID Setup SETeayribIDatar. 2) ID Input Herbir SETin lletici iglevlerini semcik iqin kullan. Yalnizca ID'si lletici ayarina karstik gelen SET etkinlestrupiril. Dogrudan islevlerKullanilabilir Modlar
PC/BNC/DVI AAV S S-Video Component D DVI-VideoMDC PASCD
Multi Control OSD ekranina gecer.LOCK PASCD
Safety Lock islevini ayarlayin. 1) Lock On 2) Lock Off :Kilidi aqiri. Not - Lock islevini ayarlfarken yalinizca uzaktan kumanda ve set uzerindeki Lock duğmelerini kullanabilirsiniz. Monitor uzerinde onceden ayarlanmis password (parola) "0000"dir. Not - Lock islev tuşu icin parolayi sifirlama. MUTE 1 8 6 On dugmesine basin. Parola '0000' olarak sifrlanacaktir. Parolanin sifrlanmasi için uzak kontrl gereklidir. Güvenlik Talimatlari Giris Baolantylar Yazilimin Kullanilmasi Monitor Ayarlanmasi Sorun Giderme Kendi Kendine Test Özelliigi Kontrolu Denelim Listesi Sorve Yanit Özellikler Bilgiler AppendixTFT-LCD Monitor
www.samsung.com  Urun renge ve gorunmu modeline bagl olarak farklikk gosterebilir ve performans gelistirmeler nedeniyle urun ozellikleri onceden haber verilmeksizin degistirilebilir.Sorun Giderme
Kendi Kendine Test Özelligi Kontrolü Not - Servis cagirmadan once kontrol edin Servis cagirmadan once asaigidaki ogeleri kendiniz kontrol edin. Qzemediginiz sorunlar icin servise danisin. Kendi Kendine Test Özelliigi Kontrolü Monitorunzde,duzguncalisp calismadiginkontrol etmenizi saglayan bir kendi kendini sinama ozelligi vardir. 1) Hem bilgisayarinizi hem de monitorunuzi kapatin. 2) Video kablosunu bilgisayarin arkasindan cikarin. 3) Monitor acin. Monitor video sinyali algilamadi normal calisma durumnda oldugunda siyah bir arka plan uzerinde asagida gosterilen sekil ("Sinyal Kablosunu Kontrol Edin") görtülenir. Kendini Sinama modundayken gug östergesi isigi yesil kalir ve sekil ekranda hareket eder. Check Signal Cable PC
4) Monitorunzukapatin ve video kablosunu yeniden baglayin; sonra bilgisayarinizi ve monitorunuzu acin. Önceki yordami uyguladiktan sonra monitorunuz,enkrani karanlik kaldiya, video denetleycisini ve bilgisayar sisteminizi kontrl edin;cunku monitorunuz dizgün calismaktadir. > Check Cooling System Ekranda "Check Cooling System" lletisi gosterilire, soogutma faninda bir sorun var demektir. Fani onarmak veya degistirmek icin bir servis merkezine basvurun. Not Optimum Mode(En Uygun Mod Degil) Ekranı 1360x768'den daha yuksek Çozunurlükte bile gorebilirsiniz. Ancak, bir dakka boyuncu aşagidaki mesaji görürsunüz. Ekran Çozunurlügün degişirmeyi ya da o sirada bulundugunuz modda kalmayi segebilirsiniz. Çozunurlük 85 Hz'den yuksekse, monitor 85 Hz'den yukseğini desteklemediğinden siyah bir ekran görürsunüz. Not Optimum Mode Recommended Mode 1360x768 60HzNot
- Monitor des stékledigi czünürkler veya frekanslar ögrenmek icin Belirtimler > Önceden Ayari Zamanlama Modlari konusuna bakir.> Bakim ve Temizlik
1) Monitor Kasasinin bakim Güç kablosunun baglantisini).(ikardiktan sonra yumusak bir bezle temizleyin.  - Benzin, tiner veya benzeri yanici maddeler veya islak bez kullanmayin. Ekranin zarar gormesini engellelemek icin Samsung temizlik malzemesi kullanilmasini oneririz. 2) Düz Panelli Göründü Ekrani Bakimi Yumusak bir bezle (pamuklu) bastirmadan temizleyin.  - Hicbir zaman aseton, benzin veya tiner kullanmayin. (Ekran yizeyinde catlaklarvey abozumlaya neden olabilir.) Kullanici kendisinin neden oldugu hasarlarin onarimiyla iliskili harcamalar ve maliyetleri odemekle yukumludur.> Belirtiler ve Onerilen Eylemler
Not
- Monitor PC'den alinan gorsel sinyalleri yeniden olusturur. Bu nedenle, PC'de veya video kartinda sorun olmasi monitork karamasina, renklerin bozulmasina, parazite, Video modunun desteklenmemesine ve benzeri durumlara neden olur. Bu durumda oncelikle sorunun kaynagini kontrol edin, sonra da servis merkezine veya satciniza danisin. 1) Guc kordonunun ve kablosunun bilgisayara dizgun bir sekilde bagli olup olmadigi kontrl edin. 2) Bilgisayarin acilirken 3'len fazla sinyal sesi cikarip cikarmadi gini konrol edin. (Cikariyorsa, bilgisayarin ana karti igin satnsonrasi servis isteyin.) 3) Yeni bir video karli taktysaniz veya PC'yi monte etiyseniz, adaptor (video) sürcusun ve monitor sürcusun takip takmadiginizi kontrol edin. 4) Video ekraninin tarama hizinin 50 Hz -85Hz olarak ayarlanip ayarlanmadigi kontrl edin. (Maksimum gezünurluk kullanirken 60 Hz hizi gezmeyin.) 5) Adaptor (video) surucusunu yuklerken sorunla karilasarsaniz, bilgisayari Gvenli Mod da acin, "Denetim Masasi, Sistem, Aygit Yoneticisi" allndaki Ekran Bagdaustuncisi'm kaldirin ve adaptor (video) surucusunu yeniden yuklemesi icin bilgisayari yeniden baslatin. Denetim ListesiNot
- Asagidaki tablo olasorunlar ve czumlerini listeler. Servisi aramadan once soruno czup czemeyecinizi gormek icin bu bolmdekil bilgileri konrol edin. Yardima gereksiniminiz varsa lufen garanti karndaki veya Bilgi bolmundeki Telefon numarasini arayin ya da satiniza danisin. Yuklemeyle ilgili sorunlarNot
Sorunlar Czumleri
Monitor ekram titriyor
- Bilgisayar ve monitorarasindaki sinyal kablosunun saglam bir sekilde baglanmis ve sikistirlimis olup olmadigi ini kontrl edin. (Refer to Bilgisayarabgama konusuna bakin) > Ekrana ilgili sorunlar  - Monitor ekramyla ilgili sorunlar ve gezumleri aşàgida listenmişir.Sorunlar Czozumleri
Ekran bos ve guc goftergesi kapali
Guc kablosunun sikbir sekilde bagli ve LCD monitorn acik oldugundan emin olun. (Monitorunze Baglama konusuna bakin)"Check Signal Cable" mesaji
Sinyal kablosunun PC veya video kaynaklarina sik bir sekilde bagloldugundan emin olun. (Monitoruna Bgama konusuna bakin) - PC veya video kaynaklarinin aqik oldugundan emin olun. Video adaptörünün seksimum Özūnūluk ve frekansı kontrol edin. - Bu degerleri Onceden Ayari Zamanlama Modlar Cizelgesindeki veilerle karsilastirin.Resim dikey olarak salinyor.
- Sinyal kablosunun sağlam bir sekilde bagl olup olmadigi kontrol edin. Sağlam bir sekilde yeniden baglayin. (Refer to Bilgisayara Baglama konusuna bakin)Göntü net degil. Resim bulanik.
Frekansai iliskin Coarse ve Fine ayaralarini calistirin. - Tum aksesuarlari cikardiktan sonra yeniden acin (video uzatma kablosu, vb.) - Czünurluk ve frekansi önerilen aralijklara ayarlayin. - Bilgisayar video kartinda ayarlanan cüzünurluk ve frekans degerlerinin monitorun destekledigi aralık icinde olup olmadigi kontrl edin. Bu arahika degillerse monitor命数sunn altindaki geleeri Bilgi'ye ve Önceden Ayari Zamanlama Modlari 'na bakarak sifirlayin. - Brightness ve Contrast degerlerini ayarlayin. (Brightness, Contrast konularina bakun)Resim görtütsu kararl degil ve titriyor.
Resimde golge goruntuler var.
- OSD Renk Ayari menusunun altindaki Custom secenegini kullanarak rengi ayarlayin.Göntü cok aik veya cok koyu
Ekran rengi tutarli degil
Renkli görtündu koyu gölgerle bozuluyor.
- Monitor ayarlarda:yapilan degisiklikleri OSD bellegine kaydediyor.Beyaz renk kalitesi kotu.
Guc Gostergesi yesil olarak yanip sonuyor.
- Monitor Güç yönetimi sistemi kullaniyor. Bilgisayarin faresini hareket ettirin veya klavyede bir tuasa basin.Ekran karanlik veGPC goftergesisiurekli yesil yaniyor vya 0,5 vaya1 saniyel arahiklarla yanipsoniyor
Ekran boş ve yanıp.Sinceyor.
- MENU dugmesine bastiginzda "TEST GOOD" mesajini Ekrana ilgili sorunlar  - Ses sinyalleryle ilgili sorunlar veçozumlere asagida listelenmistir.Sorunlar Czozumlere
Ses yok
- Ses kablosunun hem monitorunuzdeki ses girisi baglanti noktasina hem de ses kartinizdaki ses cikişi baglanti noktasina sikica bagli oldugundan emin olun. (Monitorunze Baglama konusuna bakin) - Ses dizeyini kontrol edin. - Ses duzeyini kontrol edin. Denetimi en yuksek noktaya cevirdirigin halde ses cok azsa, bilgisayarin ses karindaki veya yazilm programindaki ses denetimini kontrl edin. Ses duzyeyi cok duiguk. - Adjust the Treble and Bass to appropriate level. >Uzaktan Kumandayla ilgili sorunlar  - Uzaktan kumandayla ilgili sorunlar ve gezumlere aşağida listenmişir.Sorunlar Czumleri
Uzaktan kumanda Dügmeleri yanit vermiyor.
- Pil kutuplarin (+/-) kontrol edin. - Pillerin bitmis olup olmadigi n kontrl edin. Cihazin acik olup olmadigi nki konrol edin. Güç kablosunun-SAğlambir sekilde bagl olup olmadınti kontrl edin. Etrafta fluoresan veya neon isik olup olmadigi nktrol edin.Soru ve Yanit
Soru Yanit
Frekansi :(
Frekans, video kart yeniden yapilandirlak degistirilebilir. Video karti desteginin, kullananan surucunun surumune bagli oldugunu unutmayin. (Ayrintilar icin bilgisayarin veya video kartinin kilavuzuna bakin.)Czunurlugu nasil ayarlayabilirim?
- Windows XP: - Özunurlugu Denetim Masasi, Görünüm ve Temalar, Göruntü, Ayarlar seçeneklerini kullanarak ayarlayin. - Windows ME/2000: - Özunurlugu Denetim Masasi, Göruntü, Ayarlar seçeneklerini, kullanar ayarlayin. - Ayrınlutar ile video kartı üretişine dinmiş.Guc Tasarrufu islevini nasil ayarlayabilirim?
- Windows XP: - Özünurlı Denetim Masasi, Gırkıum ve Temalar, Gırkı, - Ayarlar seçeneklerini kullanarak ayarlayin. - İslevi bilgisayarin BIOS-SETUP uygulamasindo veya ekran - koruyucusunda ayarlayin. (Windows/Bilgisayar Kilavuzu'na\ - bakın). - Windows ME/2000: Czunurlu Denetim Masasi, Goruntu, Ayarlar seceneklerini kullanarak ayarlayin. Isevi bilgisayarin BIOS-SETUP uygulamasinda veya ekran koruyucusaanda ayarlayin. (Windows/Bilgisayar Kilavuzu'ha bakin). Dis kasayi/LCD panelini nasil temizleyebilirim? Güç kablosunu;cikarin vesulandirlmis temizlik malzesemi veya dokrudan su kullanarak yumusak bir bezle monitör temizleyin. Kasanin uzerinde deterjan veya k kalmamasina dikkat edin. Monitorn icine su girmemesine ozen gosterin. © 1995-2008 SAMSUNG. ALL Right Reserved  Güvenlik Talimatlari Giris Baolantylar Yazilim Kullanilmasi Monitorun Ayarlanmasi Sorun Giderme Özellikler Genel PowerSaver Önceden Ayari Zamanlama Modari Bilgiler AppendixTFT-LCD Monitor
www.samsung.com  Urūn rēngī ve gōrūnūmū modeline bóglī ocak farklilik gōsterebilir ve performans gelistirmeleri nedeniyle urūn özellikleri Ónceden haber verilmeksizin degiştrilebilir.Özellikler
Genel > Genel Genel Model Adi SMT-4011 LCD Panel Boyut 40,0 inc (diagonal) (101,6 cm) Goruntu alan 885,168 mm (H) x 497,664 mm (V) Piksel Araiigi 0,648 mm (H) x 0,648 mm (V) Senkronizasyon Yatay 30 81kHz Dikey 56 75Hz Ekran Rengi Ekran Rengi 16,7 M renkler Özünurlük En iy cozunurluk 1360 x 768 / 1366 x 768 @ 60 Hz, kullanan grafik kartina baglidir Maksimum czunurluk 1366 x 768 @ 60 Hz Giris Sinyali, Sonlu RGB Analog, DVI (Dijital Gorsel Arayuz) Uyumlu Dijital RGB. 75U ±%10'da 0,7Vp-p Pozitif Ayri H/V senk, Kompozit senk, SOG, TTL seviyesi, positif ya da negatif. Maksimum Pikel Hizi 100MHz Güç Kaynag AC 100 - 240 V~ (+/- %10), 50/60 Hz Sinyal Kablosu 15 pin - 15 pin D-sub kablo, cikarilabilir DVI-D - DVI-D konektoru, cikarilabilir - istege bagli Sinyal Konektoru D-sub, BNC, DVI-D, YPbPr, S-VHS, VCR Boyutlar (AxYxD) / Agirlik 971 x 582 x 118 mm / 38,2 x 22,9 x 4,6 inch (Altiksid) 971 x 629,5 x 223 mm / 38,2 x 24,8 x 8,8 inch (Altikli), 23 kg/50,7 lbs 971 x 629,5 x 228 mm / 38,2 x 24,8 x 9,0 inch (altikli ve caml), 27,7 kg/61,0 lbs VESA Montaj Arayuzu 200 mm x 200 mm (Specialty(Arm) Montaj donanimiya birlikte kullanilir.) Ortam kosullan Calisma Sicaklig: 10^ 40^ (50F\~104°F) Nem : %10 ~ %80, yogunlasmayan Sicaklig: -20^ 45^ (-4^ 113^) Nem:%5~%95,yogunlaşmayan Depolama Ses Ozellikleri Ses Girisi 1 RCA Jaki Kirmizi(Saç) Beyaz(Sol), 0,5 Vrms (-9 dB) Ses Girisi 2 RCA Jaki Kirmizi(Sag) Beyaz(Sol), 0,5 Vrms (-9 dB) PC Ses Girigi 3.5 0 ereo Jak,0,5 Vrms (-9 dB) Frekans RF: 80 Hz ~ 15 kHz (-3 dB'de) Tepki A/V: 80 Hz ~ 20 kHz (at -3 dB)Tak ve Kullan Özelliigi
Bu monitor Tak ve Kullan uyumu sistemiere takilabilir. Monitor ve bilgisayar sistemleriarasindaki etkileşim en iyi calisma kosullarini ve monitor ayarlarini saglar. Cogunlukia, kullanin farki ayarlar seçmek istedigi duruml dirinda monitor kurulumu otomatik olak ilerler.Kabul Edilebilen Nokta Sayisi
Bu urunde, 1ppm (milyonda bir) oranda duyarlaiga sahip gelismis yari iletken teknojisi kullanilarak uretilen TFT LCD panel kullanilmsti. Ir. Ancak KIRMIZI, YESIL, MAVi ve BEYAZ renk pikseleri arada sirada parlak gurunebilir vya arada bazisi siyah pikseler gorunebilir. Bunun nedeni kaliten dinusuk olmasi degildir, paneli herhangi bir kuskuya kapilmadan kullanabilisiniz. - Ömeğin, bu uründeki TFT LCD alt piksellerinin sayisi 3.133.440dur.Not
-Tasarim ve belirtimler onceden belirtilmeden degistirilebilir.B Sinfi Cihaz (Meskende kullanimi için Bilgi illetisim cihazi)
- Bu urun meskende kullanim icin Elektromanyetik Uyumluk Yonetmelikleri ile uyumludur ve genel yerleşim bølgeleri dahil olmak üzere tum bølgelerde kulla bililir. (B Sinifi cihazlar A Sinifi cihazlara gore daha az elektromanyetik etkiye sahiptir.)PowerSaver
Bu monitorde PowerSaver adi verilen yerlegik bir guc yonetim sistemi vardir. Bu system, monitorunuzu, belli bir sure kullanilmadiiginda dusuk erenerj moduna geirerek erenerj tasarrufu saglar. Fareyi hareket ettirdiginizde veya klavyedekir bir taasa bastiginzda monitor otomatik olarak normal calisma durumuna doner. Enerji tasarrufu saglamak icin, kullanmaniz gerekmyen zamanlarda veya uzun sure kullanmayacaginiz durumlarda monitorunuzu KAPATIN. PowerSaver sistemi bilgisayariniza takilan VESA DPM uyumlu bir video kartiyla calisir. Bu ozelligi kurmak icin bilgisayariniza yuklu bir yazilm yardinici programini kullanin.Durum Normal Caliima
Power saving mode Mekanik Guc S/W kapali EPA/ENERGY 2000 Mekanik Guc S/W kapali Guc Gostergesi Yesil Yesil Yanip S Güç Tuketimi 210 W'dan daha az 1 W'dan daha az (Kapali modu) 1 W'dan daha az (Kapali modu) 0W (Guc duğmesi)  Bu monitor VESA DPM islevi alan bir bilgisayarla kullanilrsa EPA ENERGY STAR® ve ENERGY2000 ile uyumludur. SAMSUNG ENERGY STAR® is orte alarak, bu urun ereri verimlligi acisindan ENERGY STAR® yongelerine uygun oldugunu belirlemistir.Önceden Ayarlı Zamanlama Modlari
> Onceden Ayarli Zamanlama Modlan
Bilgisayardan gonderilen sinyal asagidaki Onceden Ayari Zamanlama Modlari ile ayniya, ekran otomatik olarak ayarlanir. Ancak sinyal farklya saig tsigi yanmaya devem ederken ekran kararabilir. Video kartinin kilavuzuna bakin ve ekran asagidaki gibi ayarlayin.| Ekran Modu Yatay Frekans (kHz) Dikey Frekans (Hz) Pikesel Saati (MHz) Sync Polaritesi (H/V) | ||||
| IBM, 640 x 350 | 31,469 | 70,086 | 25,175 | +/- |
| IBM, 640 x 480 | 31,469 | 59,940 | 25,175 | -/- |
| IBM, 720 x 400 | 31,469 | 70,087 | 28,322 | -/+ |
| MAC, 640 x 480 | 35,000 | 66,667 | 30,240 | -/- |
Yatay Frekans
Ekranin sag kenarini sol kenarina baglayan bir satrin yatay olarak taranma suresine Yatay Dongu denir ve Yatay Dongun tersi alinarak elde edilen sayiya da Yatay Frekans ad verilir. Birim: kHzDikey Frekans
Ekranda kullanicinngorebilecebirgoruntolusmasisin, floresan lambalara benzer sekilde,ayni goruntunun saniyede pek cok defa yinelenmesi gerekir. Bu yineleme sikligina Dikey Frekans veya Yenileme Hizdenir.Birim:Hz © 1995-2008 SAMSUNG. ALL Right Reserved  Güvenlik Talimatlari Giris Baolantylar Yazilimin Kullanilmasi Monitorun Ayarlanmasi Sorun Giderme Özellikler Bilgiler Daha Iyi Goruntu Elde Etmek Icin URUN BILGILERI (Görüntü Sabitlemesiz) AppendixTFT-LCD Monitor
www.samsung.com  Urun renge ve gorunmu modeline bagl olarak farklik gosterebilir ve performans gelistirmeler nedeniyle urn ozellikleri onceden haber verilmeksizin degistirilebilir.Information
Daha Iyi Goruntu Elde Etmek icin En iyi goruntu kalitesini elde etmek icin bilgisayarin denetim masasindan bilgisayar cozunurlugunve ekran enjeksiyon hizini (yenileme hizi) aagida agklandigi gibi ayarlayin. TFT-LCD de en iyigortu kalitesi saglanmazsa, ekrandaki goruntun kalitesi dusuk olabilir. Czunurluk:1360x768 -Dikey frekans (yenileme hizi): 60 Hz Bu urunde, 1ppm (milyonda bir) oraninda duyarilgha sahip gelismis yari itletken teknojisi kullanilarak uretilen TFT LCD panel kullanimistr. Ancak KIRMIZI, YESIL, MAVi ve BEYAZ renk pikselleri arada sirada parlak gurunibilir veya arada bazi siyah pikseller gurunbilir. Bunun nedeni kalitenin dusuk olmasi degildir, paneli herhangi bir kuskuya kapilmadan kullanabilirsiniz. Orneigin, bu urundeki TFT LCD alt piksellerinin sayisi 3.133.440dur. Monitoru ve dis panel temizlerken luften onerildigi gibi cok az miktarda temizleme maddesyle yumusak ve kuru bir bez kullanin; temizledikten sonra urunu iyice silerek parlatin. LCD alan, uzerine bastirmadan yumusak bir sekilde silimmelidir. Fazla bastinirsa, uzerinde iz birakilabilir. Resim kalitesinden memnun degilseniz, pencere kapatma dugmesine bastiginiza ekranda gorunecek olan "otomatik ayar islevini" kullanarak daha iyi bir resim elde edebilirsiniz. Otomatik ayar sonrasinda da görtünde bozkluklar vara, FINE/COARSE ayar islevini kullanin. Uzun sure sabit bir ekrani goruntulerseniz, goruntu kalintilari vya bulaniklik olusabilir. Uzun sure monitörden uzak kalacaksaniz, enerji tasarrufu moduna gecin veya hareketti görtüntüler iceren bir ekran koruyucu ayarlayin. URUN BILGILERi (Goruntu Sabitlemesiz)Görüntü Sabitlemesi nedir?
Bir LCD paneli normal kosullarda calistirildiginda goruntu sabittemesi olugmayibilir. Normal kosullar, surekli olarak degisen desenler olarak tanimlanir. LCD paneli uzun sure sabit bir desende calistirldiginda (12 saatten fazla),bir pikselde svi kristalini (LC) calistiran elektrolararasinda hafif bir voltaj farko olabilir. Elektrolararasindaki voltaj farka zamanla artar ve svi kristalin zayiflamasina neden olur. Bu durum olustugunda, desen deigtiginde bir onceki goruntu gortunebilir. Bunonlemek icin, toplam voltaj farka azaltimaldir. Güç Kapali, Ekran Koruyucu ya da Enerji Tasarrufu Modu
20 saatlik kullanimin ardindan 4 saat gucu kapali tutun 12 saatlik kullanimin ardindan 2 saat gucu kapali tutun - Monitor PC Ekran Özelikleri Güç Şeması ile kapanmaya ayarlayin. Mumkunse bir Ekran Koruyucu kullanin - Tek renkli bir ekran koruyucu ya da hareketli bir gortuniÖnerilir.Renk Bilgilerini periyodik olarak degistirin
Not
- iki farkli renk kullanin 2 farki renkle Renk Bilgilerini 30 dakikada bir dondurun. - Buyuk parlaklik farkina sahip karakter ve arka plan rengi kombinasyonlari kullanmaktan seksin. Kolayca goruntu sabittemesine yol açabilen gri renklerini kullanmaktan kaçınin. Kacinlmasi gerekenler: Buyuk parlaklik farkina sahip renkler (Siyah ve Beyaz, Gri)  Karakterlerin rengini periyodik olarak degistirin
Kucuk parlaklik farkina sahip parlak renkler kullanin - Dongü : 30 dakikada bir karakterlerin rengini ve arka plan rengini degişirin.  30 dakikada bir hareketli karakterleri degistirin.  - Tum alan periyodik olarak Logo ile birlikte hareketli görtü görtültler. - Dongü: 4 saatlik kullanimin ardindan 60 saniye boyunca Logo ile birlikte hareketli görtunj görtunjüter. - Monitorunüz gürntu sabitlemesinden korumanin en iyi yolu, Güç kapatmak ya da siz kullanmadiginiz zamanlarda PC'nizin vya Sisteminizin bir Ekran Koruyucu programi calistimasidir. Ayrica talimat kilavuzuna dayanarak Garanti hizmeti de sinirlanacaktir.Urune Screen Scroll (Ekran Kayirdma) islevi uygulayin
Screen Scroll (Ekran Kayirdma) islevi uygulayin -Beliri: Yukari aaga hareket eden Siyah Renkli Yatay Qubuk.  -Yontem segin . Talimat Kilavuzu : OSD Menu -> Set Up -> Safely Screen -> Screen Scroll (OSD Menu → Ayarlar →Güvenlik Ekrani -> Ekran Kayirdma) ZamanAraligi:1\~10saat(Onerilen:1) . SURE: 1~5 saniye (Onerilen: 5)   (Lüften CD Kullanim Kilavuzunun "OSD İslavi"nde olmasina dikkat edin, bazı modellerde bulunmaz)Urune Pixel (Piksel) islevi uygulayin
Ekran Pixel (Piksel) islevi uygulayin -Belirti: Yukari aaga hareket eden Siyah Renkli Nokta.  - Yontem segin . Talimat Kilavuzu: OSD Menu -> Set Up -> Safety Screen -> Pixel (OSD Menu -> Ayarlar -> Güvenlik Ekrani -> Pikesel ZamanAraligi:1\~10saat(Onerilen:1) . SURE: 10-50 saniye (Onerilen: 50) Ekran Cubugu islevi uygulayin -Beliri: Yukari aaga hareket eden Siyah Renkli Yatay / Dikey Cubuk.  -Yontem secin . Talimat Kilavuzu :OSD Menu Set Up Safety Screen Bar (OSD Menu Ayarlar Güvenlik Ekrami Cubuk) . Zaman Araligi : 1 ~ 10 saat ( Onerilen : 1 ) . SURE : 10 - 50 saniye ( Onerilen : 50 )  (Lutfen CD Kullanim Kilavuzunun "OSD lsevi"nde olmasina dikkat edin, bazimodellerde bulunmaz) Urine Ekran Silme Iglevi uygulayin
Ekran Silme islevi uygulayin -Belirti:2 Dikey blok, ekrani silerek hareket eder  - Yontem segin . Talimat Kilavuzu : OSD Menu -> Set Up -> Safety Screen -> Eraser (OSD Menu -> Ayarlar -> Güvenlik Ekramı -> Ekran Kayirdma -> Silici) ZamanAraligi:1\~10saat(Onerilen:1) . SURE: 10~50 saniye (Onerilen : 50 )  (Lutfen CD Kullanim Kilavuzunun "OSD İslavi"nde olmasina dikkat edin, bazı modellerde bulunmaz) © 1995-2008 SAMSUNG. ALL Right ReservedTFT-LCD Monitor
 www.samsung.com Urūn rēngī ve gōrūnūmū modeline bóglī ocakarkfrikik gōsterebilir ve performans gelistirmeleri nedeniyte urūn özellikleri Ónceden haber verilmeksizin degiştrilebilir.Appendix
Dünyanin her yerinden SAMSUNG' a ulasin Güvenlik Talimatlari Giris Baolantylar Yazilimin Kullanilmasi Monitorun Ayarlanmasi Sorun Giderme Özellikler Bilgiler Appendix Dunyanin her yerinden SAMSUNG'alaasin Kosullar Yetki Bildirimi Not Samsung ürünleri ile ilgili sorulariniz ya da yorumliniz varsa lüften SAMSUNGMusteri hizmetleri merkezi ile temasaGPC. North America| U.S.A | 1-800-SAMSUNG(726-7864) http://www.samsung.com/us |
| CANADA | 1-800-SAMSUNG(726-7864) http://www.samsung.com/ca |
| MEXICO | 01-800-SAMSUNG(726-7864) http://www.samsung.com/mx |
| ARGENTINE | 0800-333-3733 http://www.samsung.com/ar |
| BRAZIL | 0800-124-421 4004-0000 http://www.samsung.com/br |
| CHILE | 800-SAMSUNG(726-7864) http://www.samsung.com/cl |
| COLOMBIA | 01-8000112112 http://www.samsung.com.co |
| COSTA RICA | 0-800-507-7267 http://www.samsung.com/latin |
| ECUADOR | 1-800-10-7267 http://www.samsung.com/latin |
| EL SALVADOR | 800-6225 http://www.samsung.com/latin |
| GUATEMALA | 1-800-299-0013 http://www.samsung.com/latin |
| JAMAICA | 1-800-234-7267 http://www.samsung.com/latin |
| PANAMA | 800-7267 http://www.samsung.com/latin |
| PUERTO RICO | 1-800-682-3180 http://www.samsung.com/latin |
| REP. DOMINICA | 1-800-751-2676 http://www.samsung.com/latin |
| TRINIDAD & TOBAGO | 1-800-SAMSUNG(726-7864) http://www.samsung.com/latin |
| VENEZUELA | 0-800-100-5303 http://www.samsung.com/latin |
Europe
AUSTRIA 0800-SAMSUNG(726-7864) http://www.samsung.com/at BELGIUM 0032 (0)2 201 24 18 http://www.samsung.com/be| CZECH REPUBLIC | 844 000 844 http://www.samsung.com/cz Distributor pro Českou republika: Samsung Zrt., Česka organizačné složka Vyskočilova 4, 14000 Praha 4 |
| DENMARK | 70 70 19 70 http://www.samsung.com.dk |
| FINLAND | 030-6227 515 http://www.samsung.com/fi |
| FRANCE | 3260 SAMSUNG(726-7864) http://www.samsung.com/fr 08 25 08 65 65 (€ 0,15/min) |
| GERMANY | 01805-121213 (€ 0,14/Min) http://www.samsung.de |
| HUNGARY | 06-80-SAMSUNG(726-7864) http://www.samsung.com/hu |
| ITALIA | 800-SAMSUNG(726-7864) http://www.samsung.com/it |
| LUXEMBURG | 0035 (0)2 261 03 710 http://www.samsung.com/be |
| NETHERLANDS | 0900 20 200 88 (€ 0,10/Min) http://www.samsung.com/nl |
| NORWAY | 815-56 480 http://www.samsung.com/no |
| POLAND | 0 801 801 881 http://www.samsung.com/pl |
| 022-607-93-33 | |
| PORTUGAL | 80 8 200 128 http://www.samsung.com/pt |
| REPUBLIC OF IRELAND | 0818 717 100 http://www.samsung.com/ie |
| SLOVAKIA | 0800-SAMSUNG(726-7864) http://www.samsung.com/sk |
| SPAIN | 902 10 11 30 http://www.samsung.com/es |
| SWEDEN | 0771-400 200 http://www.samsung.com/se |
| SWITZERLAND | 0800-SAMSUNG(726-7864) www.samsung.com/ch |
| U.K | 0870-SAMSUNG(726-7864) http://www.samsung.com/uk |
| CIS | ||
| ESTONIA | 800-7267 http://www.samsung.ee | |
| LATVIA | 800-7267 http://www.samsung.com/lv | |
| LITHUANIA | 8-800-77777 | http://www.samsung.IT |
| KAZAKHSTAN | 8-10-800-500-55-500 | http://www.samsung.kz |
| KYRGYZSTAN | 00-800-500-55-500 | |
| RUSSIA | 8-800-555-55-55 | http://www.samsung.ru |
| UKRAINE | 8-800-502-0000 | http://www.samsung.ua |
| UZBEKISTAN | 8-800-120-0-400 | http://www.samsung.uz |
| Asia Pacific | ||
| AUSTRALIA | 1300 362 603 | http://www.samsung.com/au |
| CHINA | 800-810-5858, 010- 6475 1880 | http://www.samsung.com.cn |
| HONG KONG | 3698-4698 | http://www.samsung.com/hk |
| INDIA | 3030 8282, 1800 110011 | http://www.samsung.com/in/ |
| INDONESIA | 0800-112-8888 | http://www.samsung.com/id |
| JAPAN | 0120-327-527 http://www.samsung.com/jp | |
| MALAYSIA | 1800-88-9999 http://www.samsung.com/my | |
| NEW ZEALAND | 0800SAMSUNG(726-7864) | http://www.samsung.com/nz |
| PHILIPPINES | 1800-10-SAMSUNG(726-7864) | http://www.samsung.com/ph |
| SINGAPORE | 1800-SAMSUNG(726-7864) http://www.samsung.com/sg | |
Middle East & Africa
SOUTH AFRICA 0860-SAMSUNG(726-7864) http://www.samsung.com/za TURKEY 4447711 http://www.samsung.com.tr 800-SAMSUNG (726-7864) 8000-4726 http://www.samsung.com/meaKosullar
Senk. Sinyali
Senk. (Senkronize) Sinyaller, monitorde istenen renkleri görtülemek,—çin gereken standart sinyalleri belirrt. Dikey ve Yatay Senk. Sinyalleri olarak ikiye ayiril. Bu sinyaller ayarlanan gezünurluk ve frekansta normal renkli görtüller gosterir.Senk. Sinyali türleri
| Ayrı Bu, monitör dikey senk. sinyalleri iletme Şemas,idir. | |
| Birleşik | Bu, dikey senk. sinyallerin bir birleşik sinalde birleşimi ve monitör iletme Şemas,idir.Monitor Birleşik sinyali Özgün renk sinyalliner ayirarak renk sinyallerin,gürünüler. |