
Combi 50 SQ DAE - Lawn mower STIGA - Free user manual and instructions
Find the device manual for free Combi 50 SQ DAE STIGA in PDF.

| Product Type | Walk-behind Lawn Mower |
| Brand | Stiga |
| Model | Combi 50 SQ DAE |
| Power Source | Lithium-ion battery (cordless) |
| Cutting Width | 50 cm |
| Cutting Height | Multi-level manual adjustment via button |
| Drive Speed | Variable from 2.5 to 5 km/h (6 speeds) |
| Cutting System | Rotary Blade |
| Grass Catcher Capacity | Grass catcher (volume not stated) |
| Main Functions | Mowing, collecting, mulching (optional kit), side discharge (optional) |
| Motor Type | Brushless electric motor |
| Battery | Two batteries recommended for optimal runtime |
| ECO Function | Yes, to save energy and optimize battery life |
| Safety | Operator presence lever, safety key, discharge guards |
| Maintenance | Regular cleaning, washable air filter, replaceable blade |
Frequently Asked Questions - Combi 50 SQ DAE STIGA
User questions about Combi 50 SQ DAE STIGA
0 question about this device. Answer the ones you know or ask your own.
Ask a new question about this device
Download the instructions for your Lawn mower in PDF format for free! Find your manual Combi 50 SQ DAE - STIGA and take your electronic device back in hand. On this page are published all the documents necessary for the use of your device. Combi 50 SQ DAE by STIGA.
USER MANUAL Combi 50 SQ DAE STIGA
MP1 500 Li D48 series
MP1 550 Li D48 series
IT Tosaerba a batteria con conducente a piedi MANUALE DI ISTRUZIONI
ATTENZIONE: prima di usare la macchina, leggere attentamente il presente libretto.
BG Акумулаторна косачка с изправен водач УПЪТВАНЕ ЗА УПОТРЕБА
ВНИМАНИЕ: преди да използвате машината прочетете внимателно настоящата книжка.
BS Kosilica na bateriju na guranje
UPUTSTVO ZA UPOTREBU
PAŽNJA: prije nego što koristite ovu mašinu, pažljivo pročitajte priručnik s uputama.
CS Akumulátorová šekačka se stojící obsluhou
NÁVOD K POUŽITI
UPOZORNĚNÍ: před použitím stroje si pozorně přečtěte tento návod k použití.
DA Batteridreven plæneklipper betjent af gående personer BRUGSANVISNING
ADVARSEL: læs instruktionsbogen omhyggeligt igennem, før du tager denne maskine i brug.
DE Handgeführter batteriebetriebener Rasenmäher GEBRAUCHSANWEISUNG
ACHTUNG: vor Inbetriebnahme des geräts die gebrauchsanleitung aufmerksam lesen.
EL Χλοοκοπτική μηχανή μπαταρίας με όρθιο χειριστή
ΟΔΗΓΙΕΣ ΧΡΗΣΠΣ
ΠΡΟΣΟΧΗ: πριν χρησιμοποιησετε το μηχανημα, διαβαστε προσεκτικα το παρον εγχειριδιο.
EN Pedestrian-controlled walk-behind battery powered lawn mower OPERATOR'S MANUAL
WARNING: read thoroughly the instruction booklet before using the machine.
ES Cortadora de pasto por batería con operador de pie MANUAL DE INSTRUCCIONES
ATENCIÓN: antes de utilizar la máquina, leer atentamente el presente manual.
ET Seisva juhiga akutoitega muruniitja KASUTUSJUHEND
TÄHELEPANU: enne masina kasutamist lugeda tähelepanelikult antud kasutusjuhendit.
FI Kävellen ohjattava akkukäyttöinen ruohonleikkuri
KÄYTTÖOHJEET
VAROITUS: lue käyttöopas huolellisesti ennen koneen käyttöä
FR Tondeuse à gazon alimentée par batterie et à conducteur à pied
MANUEL D'UTILISATION
ATTENTION: lire attentivement le manuel avant d'utiliser cette machine.
HR Baterijska ručno upravljana kosilica trave PRIRUČNIK ZA UPORABU
POZOR: prije uporabe stroja, pažljivo pročitajte ovaj priručnik.
HU Gyalogvezetésű akkumulátoros fúnyírógép HASZNÁLATI UTASÍTÁS
FIGYELEM! a gép használata előtt olvassa el figyelmesen a jelen kézikönyvet.
LT Pėsčio operatoriaus valdoma akumuliatorinė vejapjovė NAUDOJIMO INSTRUKCIJOS
DĖMESIO: prieš naudojant [rengin], atidžlal perskaltytl š] naudotojo vadovą.
LV Ar bateriju darbināma no aizmugures ejot vadāma zāliena plaujmašina LIETOŠANAS INSTRUKCIJA
UZMANĪBU: pirms aparāta lietošanai rūpīgi izlasiet doto instrukciju.
MK Тревокосачка на батерии со оператор на нозе УПАТСТВА ЗА УПОТРЕБА
ВНИМАНИЕ: прочитајте го внимателно ова упатство пред да ја користите машината.
NL Lopend bediende grasmaaier met batterij GEBRUIKERSHANDLEIDING
LET OP: vooraleer de machine te gebruiken, dient men deze handleiding aandachtig te lezen.
NO Håndført batteridrevet gressklipper INSTRUKSJONSBOK
ADVARSEL: les denne bruksanvisningen nøye før du bruker maskinen.


natural_image
Technical line drawing of a mechanical component with arrows indicating motion or assembly (no text or symbols)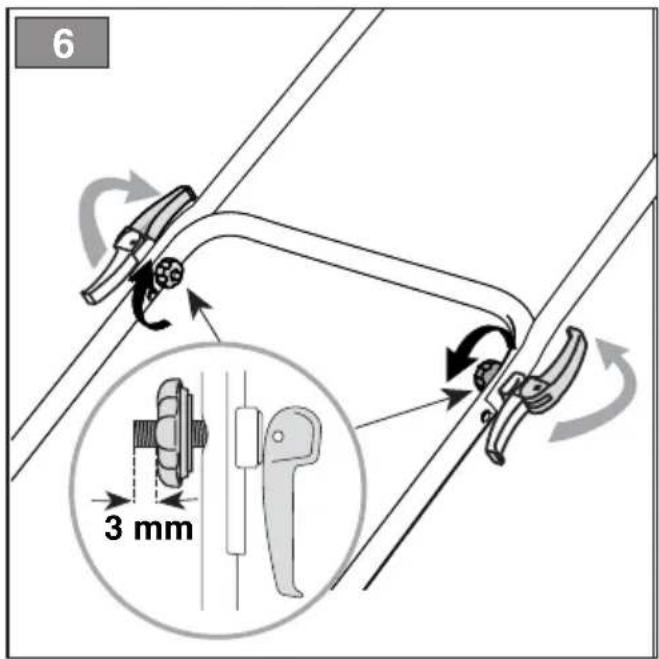
natural_image
Line drawing of a lawn mower with a cross mark on the base (no text or symbols)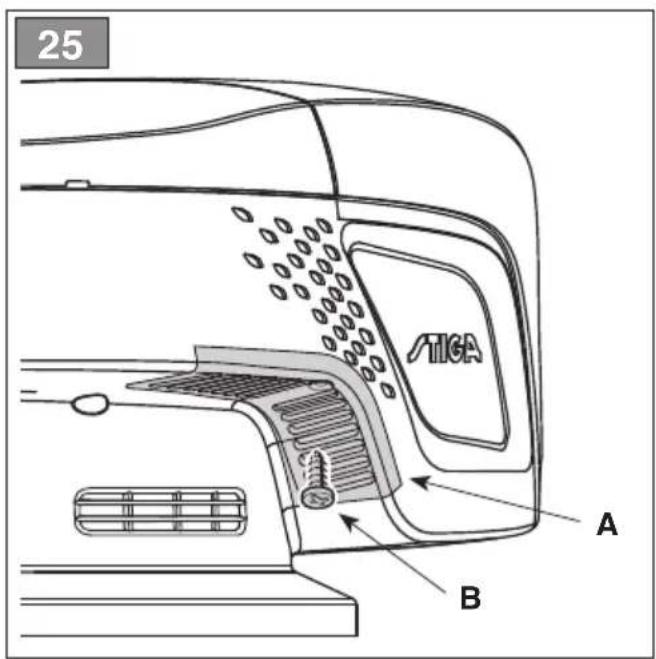

natural_image
Technical line drawing of a mechanical component with a flanged base and mounting bracket (no text or symbols)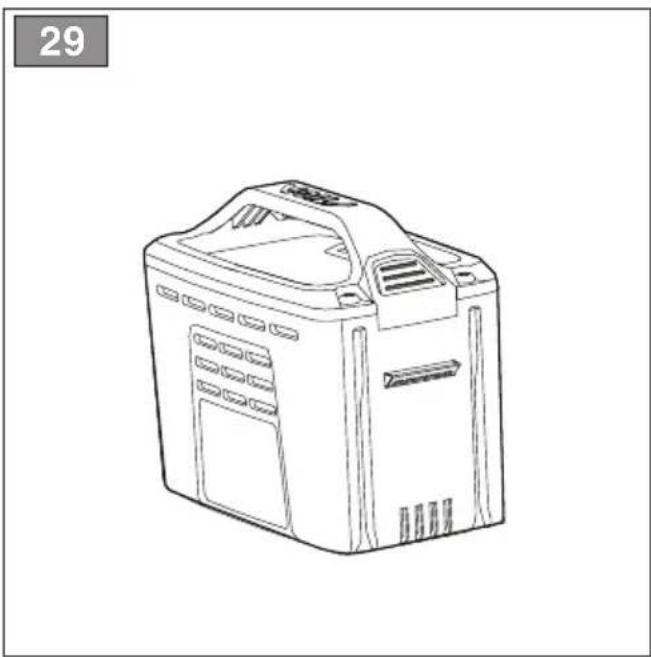
natural_image
Line drawing of a portable electronic device with ventilation slots and control panel (no text or symbols)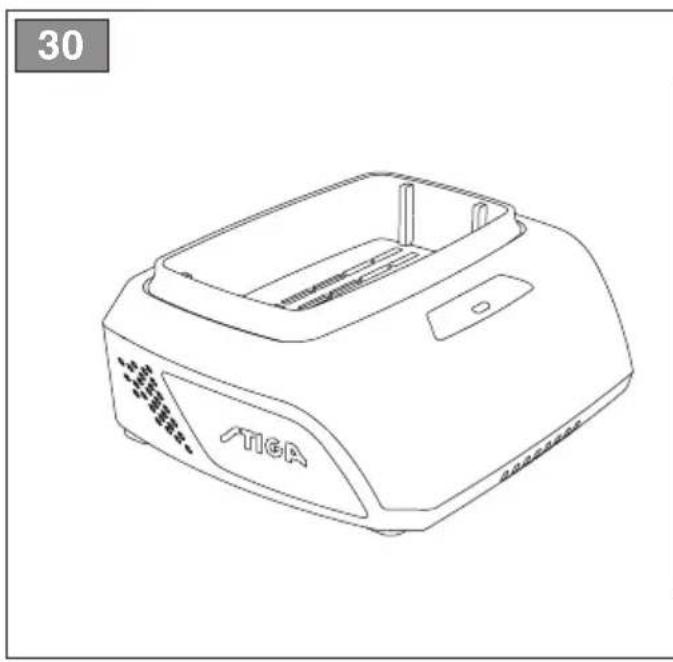
natural_image
Line drawing of a TIGA device with no visible text or symbols on the body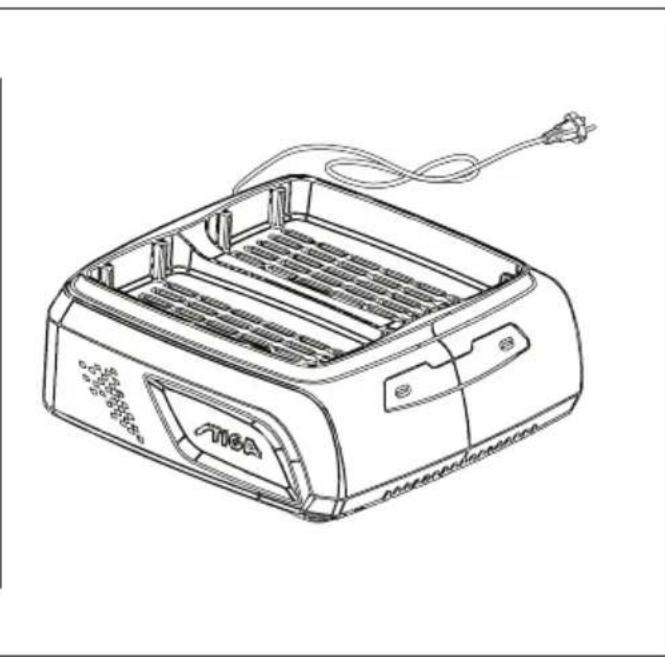
natural_image
Line drawing of a toaster with a cord and power cord (no text or symbols)- CONOSCERE LA MACCHINA....3
- USO DELLA MACCHINA 6
6. USO DELLA MACCHINA

15.1 KIT PER MULCHING
6.4 PRACOVNÍ ČINNOST
The Ground Truth image displays a single, solid horizontal line. According to Rule 2 (UNDERSCORE & LINE RULES), this is a stylistic or background line, not a placeholder underscore. Therefore, the OCR result must ignore it and output nothing or only meaningful text. The provided OCR content is "____", which consists of four underscores. This is an incorrect interpretation of the line as a placeholder, violating the rule that stylistic lines must be ignored. The OCR has hallucinated underscores where none should exist based on the GT's visual context. Hence, the OCR result is inconsistent with the Ground Truth.
15.1 KIT TIL "MULTICLIP"
- XEIPISTHPIA EΛΕΓΧΟΥ 5
1.1 How to read the manual 1
1.2 References....1
- SAFETY REGULATIONS....1
2.1 Training....1
2.2 Preliminary procedures....2
2.3 During operation 2
2.4 Maintenance, storage 3
2.5 Battery / battery charger 3
2.6 Environmental protection....3
- GETTING TO KNOW THE MACHINE...... 3
3.1 Description of the machine and planned use ..... 3
3.2 Safety signs....4
3.3 Identification label 4
3.4 Main components 5
- ASSEMBLY....5
4.1 Assembly components 5
4.2 Grass catcher assembly 5
4.3 Handle assembly 5
- CONTROLS....5
5.1 Safety key (Deactivation device) 5
5.2 Operator presence lever 5
5.3 Power button 6
5.4 Drive ON lever 6
5.5 "ECO" button 6
5.6 Cutting height adjustment....6
- USING THE MACHINE....6
6.1 Preparation....6
6.2 Safety checks....7
6.3 Startup....8
6.4 Operation 8
6.5 Stop 9
6.6 After operation....9
- ROUTINE MAINTENANCE....9
7.1 General information 9
7.2 Battery....9
7.3 Cleaning 10
7.4 Nuts and bolts 10
7.5 Cleaning the air filter 10
8.1 Cutting means....11
- STORAGE....11
9.1 Storing the machine .....11
9.2 Storing the battery....11
- HANDLING AND TRANSPORTATION .....11
- ASSISTANCE AND REPAIRS....11
-
WARRANTY COVERAGE.... 12
-
Maintenance table.... 12
-
Problem identification 13
-
OPTIONAL ACCESSORIES.... 15
15.1 Mulching kit 15
15.2 Batteries.... 15
15.3 Battery charger 15
1. GENERAL INFORMATION
1.1 HOW TO READ THE MANUAL
Some paragraphs in the manual contain important information regarding safety and operation and are emphasised in this manner:
NOTE OR IMPORTANT these give details or further information on what has already been said, and aim to prevent damage to the machine.
This symbol highlights danger. Failure to observe the warning can lead to possible personal and/or third party injury and/or damage.
- The paragraphs highlighted in a square with grey spots indicate the optional characteristics not on all models documented in this manual. Check if the characteristics are available on this model.
Whenever reference is made to a position on the machine "front", "back", "left" or "right" hand side, this refers to the operator's working position.
1.2 REFERENCES
1.2.1 Figures
The figures in these instructions for use are numbered 1, 2, 3, etc.
The components indicated in the figures are identified with letters A, B, C, and so on.
Reference to component C in figure 2 is indicated with the wording: "See fig. 2.C" or simply "(Fig. 2.C)".
The figures are given as a guide only. The actual pieces can differ from those illustrated in this document.
1.2.2 Titles
The manual is divided into chapters and paragraphs. The title of paragraph "2.1 Training" is a sub-title of "2. Safety regulations".
References to titles or paragraphs are marked with the abbreviation chap. or par. and the relevant number. Example: "chap. 2" or "par. 2.1"
2. SAFETY REGULATIONS
2.1 TRAINING

Become acquainted with the controls and the proper use of the machine. Learn how to stop the motor quickly. Failure to follow the warnings and instructions may result in fire and/or serious injury.
- Never allow children or persons unfamiliar with these instructions to use the machine. Local laws may establish a minimum age for users.
- This appliance can be used by children aged from 8 years and above and persons with reduced physical, sensory or mental capabilities or lack of experience and knowledge if they have been given supervision or instructions concerning use of the appliance in a safe way and understand the hazards involved. Children shall not play with the appliance. Cleaning and user maintenance shall not be made by children without supervision.
- Never use the machine if the user is tired or unwell, or has taken medicine, drugs, alcohol or any substances which may slow their reflexes and compromise his judgement.
- Do not allow children or other passengers to ride on the machine.
- Bear in mind that the operator or user is responsible for accidents or unexpected events occurring to other people or their property. It is the user's responsibility to assess the potential risk of the area where work is to be carried out and to take all the necessary precautions to ensure his own safety and that of others, particularly on slopes or rough, slippery and unstable ground.
- If the machine is sold or lent to others, make sure that the operator reads the user instructions contained in this manual.
2.2 PRELIMINARY PROCEDURES
Personal Protective Equipment (PPE)
- Always wear suitable work attire, hard-wearing safety footwear with non-slip soles and long trousers. Do not operate the machine barefoot or wearing open sandals. Wear hearing protection devices.
- Use of hearing protections can reduce the ability to hear any warnings (shouting or alarms). Be careful of what occurs around you in the work area.
- Wear protective gloves whenever your hands are at risk.
- Never wear scarves, shirts, necklaces, bracelets, loose flowing clothing, laces or ties or any hanging or flapping accessory that could catch in the machine or in any objects or materials in the work area.
- Tie your hair back if it is long.
Work area/Machine
- Thoroughly inspect the entire work area and remove anything that could be thrown by the machine or damage the cutting means/rotating units (stones, branches, iron wire, bones, etc.).
2.3 DURING OPERATION
Work Area
- Do not use the machine in environments at risk of explosion, in the presence of flammable liquids, gas or powder. Power tools create sparks which may ignite the dust or fumes.
• Work only in daylight or with good artificial light in good visibility conditions. - Keep persons, children and animals away from the working area. Children must be supervised by another adult.
-
Avoid working with wet grass, in the rain and when there is a risk of a thunderstorm, especially lightening.
-
Do not expose the machine to rain or wet environments. Water entering a power tool will increase the risk of electric shock.
- Pay careful attention to uneven ground (hills, dips), slopes, hidden hazards and obstacles that could limit visibility.
- Be very careful near ravines, ditches or embankments. The machine could overturn if a wheel slides over the edge or if the earth gives way.
- Always mow across a slope and never up and down it, being very careful when changing direction, making sure you have firm footage and that the wheels do not hit any obstacles (such as stones, branches, roots, etc.) that may cause the machine to slide sideways or make you lose control of it.
- Look out for traffic when using the machine near the road.
Behaviour
- Exercise caution when reversing or moving backwards. Look behind you to make sure there are no obstacles before and during operations in reverse gear.
- Never run, always walk.
- Do not allow the lawnmower to pull you along.
- Always keep hands and feet away from the cutting means, when starting and when using the machine.
- Attention: the cutting means will continue to rotate for a few seconds after disengagement or after you have switched off the motor.
- Keep away from the discharge opening.
If something breaks or an accident occurs during mowing, turn off the motor immediately and move the machine away to prevent further damage; if an accident occurs with injuries or third parties are injured, carry out the first aid measures most suitable for the situation immediately and contact the medical authorities for any necessary health care. Carefully remove any debris which could cause damage or injury to persons or animals if ignored.
Use limitations
- Never operate the machine with guards damaged, missing or incorrectly assembled (grass catcher, side discharge guards, rear discharge guards).
- Don't use the machine if the attachments/tools are not installed in their seats.
- Never disengage, deactivate, remove or tamper with the safety systems/micro switches installed.
- Do not strain the machine too much and do not use a small machine for heavy-duty work; if you use the right machine, you will reduce the risk of hazards and improve the quality of your work.
Ensure regular maintenance and correct storage to maintain machine safety and high performance levels.
Maintenance
- Never use the machine with worn or damaged parts. Faulty or worn-out parts must always be replaced and never repaired.
- Be careful during adjustment of the machine to prevent entrapment of the fingers between moving parts of the cutting means and fixed parts of the machine.
The noise and vibration levels shown in these instructions are the maximum levels for use of the machine. The use of an unbalanced cutting element, the excessive speed of movement, or the absence of maintenance have a significant influence on noise emissions and vibrations. Consequently, it is necessary to take preventive steps to eliminate possible damage due to high levels of noise and stress from vibration; Maintain the machine well, wear ear protection devices, and take breaks while working.
Storage
- To reduce fire risks, do not leave containers with debris inside a room.
2.5 BATTERY / BATTERY CHARGER
IMPORTANT The following safety instructions are in addition to the safety requirements provided in the specific battery and battery charger manual delivered with this machine.
- Only use battery chargers recommended by the manufacturer to recharge batteries. An inadequate battery charger may cause electric shock, overheating or corrosive liquid to leak from the battery.
- Use only batteries specifically designed for your power tool. The use of other batteries may cause injuries and fire risks.
- Make sure that the machine is switched off before inserting the battery. Inserting a battery in a machine which is switched on can cause a fire.
- Keep all unused batteries at a distance from paper clips, coins, keys, nails, screws or other small metal objects as contact with the same can cause short circuits. Short circuits between battery contacts can lead to explosion or fires.
- Never use the battery charger in environments in the presence of vapours, flammable substances or on easily flammable surfaces such as paper, fabric, etc. The battery charger heats up during recharging and may cause a fire.
- When transporting accumulators, make sure the contacts never come into contact with each other and never use metal containers to transport them.
2.6 ENVIRONMENTAL PROTECTION
Safeguarding the environment must be a relevant and priority aspect of machine use, of benefit to the community and the environment we live in.
- Avoid being a disturbance to the neighbourhood. Use this machine at reasonable times of the day only (not early morning or late evening when the noise could cause disturbance).
- Comply with local regulations for the disposal of packaging, deteriorated parts or any elements with a strong environmental impact; this waste must not be disposed of with regular waste, but must be separated and taken to collection centres, who will recycle the materials.
- Comply with local regulations for the disposal of waste materials.
- When the machine is withdrawn from service, do not dispose of it in the environment, but take it to a waste disposal facility in accordance with the local regulations in force.
Do not throw electrical equipment away with domestic waste. According to the European Directive 2012/19/EU on electrical and electronic equipment waste and its implementation in compliance with national standards, old
electrical equipment must be collected separately, for eco-compatible recycling. If electrical equipment is disposed of in dumps or in landfills, hazardous substances can leak into the groundwater and contaminate the food chain, damaging your health and well-being. For further information on the disposal of this product, contact your dealer or a domestic waste collection service.
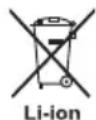
At the end of their working life, dispose of batteries paying due attention to the environment. Batteries contain material classified as hazardous for you and the environment. They must be removed and disposed of separately at
a facility that accepts lithium-ion batteries.

Separate waste collection of the products and packaging used allows the materials to be recycled and reused. Reuse of recycled materials help to prevent environmental pollution and reduces the demand for raw materials.
3. GETTING TO KNOW THE MACHINE
3.1 DESCRIPTION OF THE MACHINE AND PLANNED USE
This machine is pedestrian-controlled lawnmower.
The machine is essentially composed of a motor which drives a cutting means enclosed in a casing, equipped with wheels and a handle.
The operator is able to operate the machine and use the main controls, always staying behind the handle at a safe distance from the rotating cutting means. If the operator leaves the machine, the motor and cutting means will stop within a few seconds.
3.1.1 Intended use
This machine is designed and built to cut (and collect) grass in gardens and grassy areas, with a height according to its cutting capacity, driven by an operator walking behind it.
Generally speaking this machine can:
- Mow the grass and collect it in the grass catcher bag.
- Mow the grass and discharge it on the ground through the rear part.
- Mow the grass and discharge it on the ground laterally (if available).
- Mow the grass, chop it and discharge it on the ground (mulching effect - if available).
The use of special attachments provided for by the Manufacturer as original equipment or which may be purchased separately, allows this work to be done in various operating modes, illustrated in this manual or the instructions that accompany the single attachments.
3.1.2 Improper use
Any other usage not in keeping with the aforementioned ones may be hazardous and harm persons and/or damage things.
Examples of improper use may include, but are not limited to:
- Allowing children, animals or other passengers to ride on the machine as they could fall off and injure themselves or compromise safe driving by the operator.
- Letting oneself be transported by the machine.
- Using the machine to tow or push loads.
- Using the cutting means on surfaces other than grass.
- Use the machine for leaf or debris collection.
- Using the machine to trim hedges, or for cutting vegetation other than grass.
- Use of the machine by more than one person.
IMPORTANT Improper use of the machine will invalidate the warranty, relieve the Manufacturer from all liabilities, and the user will consequently be liable for all and any damage or injury to himself or others.
3.1.3 User types
This machine is intended for use by consumers, i.e. non-professional operators. It is intended for "DIY" use only.
IMPORTANT The machine must be used by one operator.
3.2 SAFETY SIGNS
The machine has various symbols on it (Fig.2.0).
Their function is to remind the operator of the correct conduct for use, with due care and caution. Meaning of symbols:


Warning. Read the instructions before operating the machine.


Danger! Risk of thrown objects.
Keep all persons away from the work area whilst working.


Only for lawn mowers with thermal engine.


Only for electric lawn mowers with mains power supply.


Only for electric lawn mowers with mains power supply.


Danger! Danger of cutting yourself.
Cutting means in motion. Do not put hands or feet near or under the opening of the cutting means.


Be careful when using the sharp cutting means. Do not put hands or feet near or under the opening of the cutting means. The cutting means continues to turn even after the motor has been switched off. Remove the safety key (deactivation device) before any maintenance is carried out.
IMPORTANT Any damaged or illegible decals must be replaced. Order replacement decals from an Authorised Service Centre.
3.3 IDENTIFICATION LABEL
The identification label holds the following data (Fig.1.0).
- Sound power level.
- CE conformity marking.
- Year of manufacture.
- Type of machine.
- Serial number.
- Name and address of Manufacturer.
- Article code.
- Max. motor operation speed.
- Weight in kg.
- Power voltage and frequency.
- Electrical protection rating.
- Nominal power.
Write the identification data of the machine in the specific space on the label on the back of the cover page.
IMPORTANT Quote the information on the product identification label whenever you contact an Authorised Service Centre.
IMPORTANT The example of the Declaration of Conformity is provided on the last pages of the manual.
3.4 MAIN COMPONENTS
The machine is composed of a series of main components that have the following functions (Fig.1.0):
A. Chassis: this is the casing that houses the rotating cutting means.
B. The engine: drives both the cutting means and the wheel traction (if available).
C. Cutting means: the element designed to cut the grass.
D. Rear discharge guard: it is a safety device which prevents objects collected by the cutting means from being projected away from the machine.
E. Side discharge guard (if available): it is a safety device which prevents objects collected by the cutting means from being projected away from the machine.
F. Side discharge chute (if available): apart from discharging the grass on the ground laterally, it also constitutes a safety element, preventing any objects collected by the cutting means from being projected away from the machine.
G. Grass catcher: apart from collecting the mown grass, the grass catcher also constitutes a safety element, preventing any objects collected by the cutting means from being projected away from the machine.
H. Handle: this is the operator's work station. It is long enough to ensure the operator remains at a safe distance from the rotary cutting means whilst working.
I. Battery (if it is not supplied with the machine, see chapter 15 "attachments on request"): provides the energy for starting the motor; its specifications and regulations for use are described in a specific manual.
J. Operator presence lever: this lever enables the cutting means and drive to be operated. The motor stops when both levers are released.
K. Drive engagement lever: this lever engages the drive to the wheels and allows the machine to move forward.
L. Hatch for accessing the battery compartment
M. Safety key (Deactivation device): The key enables / disables the machine electric circuit.
N. Battery charger (if it is not supplied with the machine, see chapter 15 "attachments on request"): device used to recharge the battery.
4. ASSEMBLY
The safety regulations to follow are described in chap. 2. Strictly comply with these instructions to avoid serious risks or dangers.
For storage and transport purposes, some components of the machine are not installed in the factory and have to be assembled after unpacking. Follow the instructions below.
Unpacking and completing the assembly should be done on a flat and stable surface, with enough space for moving the machine and its packaging, always making use of suitable equipment. Do not use the machine until all the instructions provided in the "ASSEMBLY" section have been carried out.
4.1 ASSEMBLY COMPONENTS
The packaging includes assembly components.
4.1.1 Unpacking
- Carefully open the packaging, paying attention not to lose components.
- Consult the documentation in the box, including these instructions.
- Remove all the unassembled parts from the box.
- Dispose of the box and packaging in compliance with local regulations.
Before assembling, make sure the safety key is not inserted into its housing.
4.2 GRASS CATCHER ASSEMBLY
Follow the instructions provided in the instructions sheet accompanying the grass catcher.
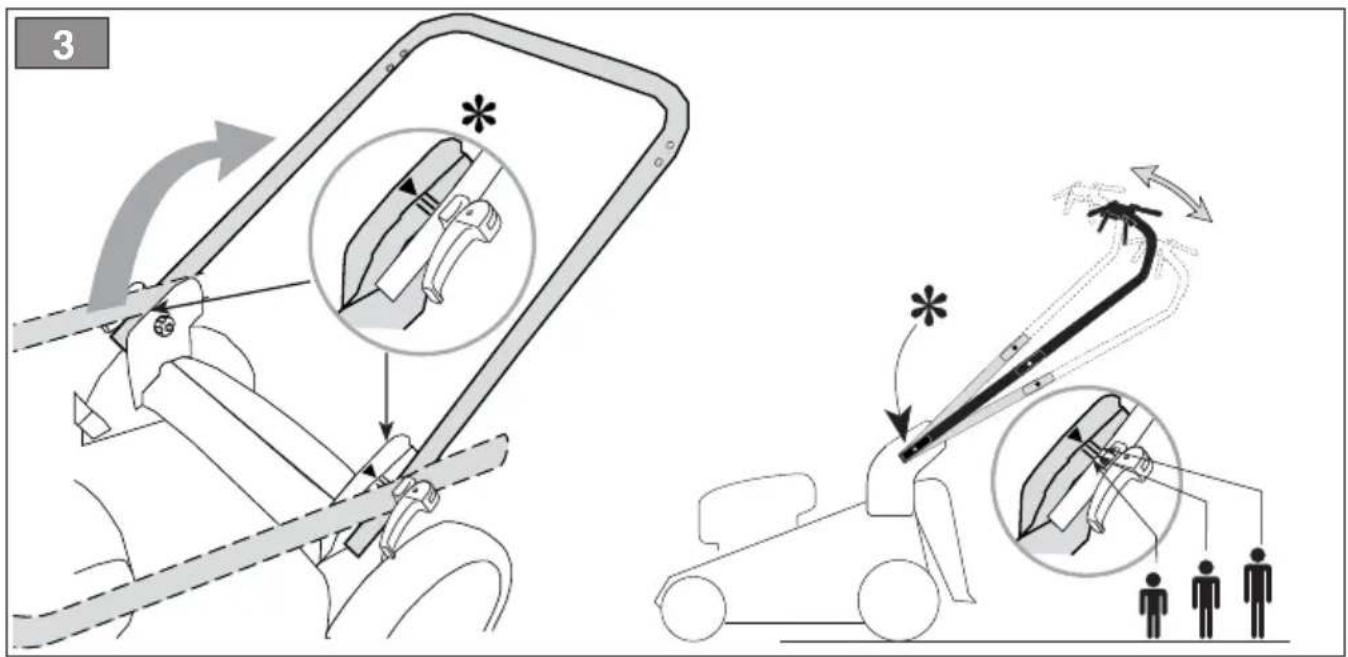
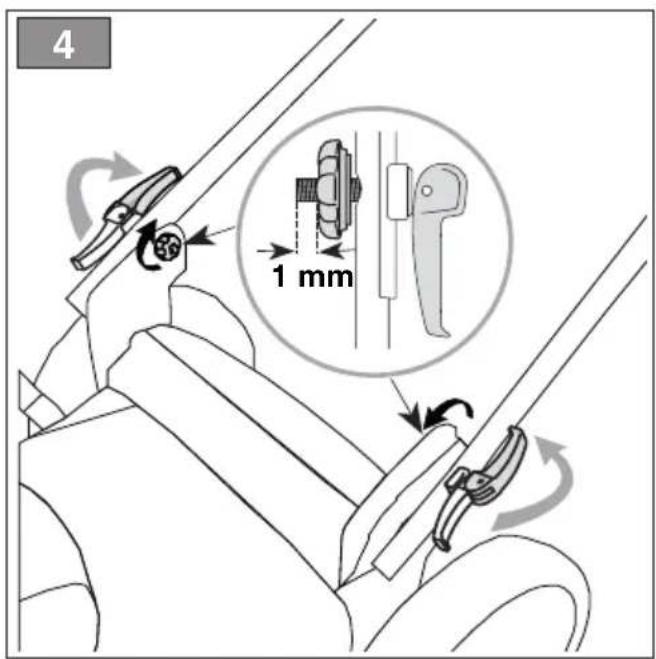
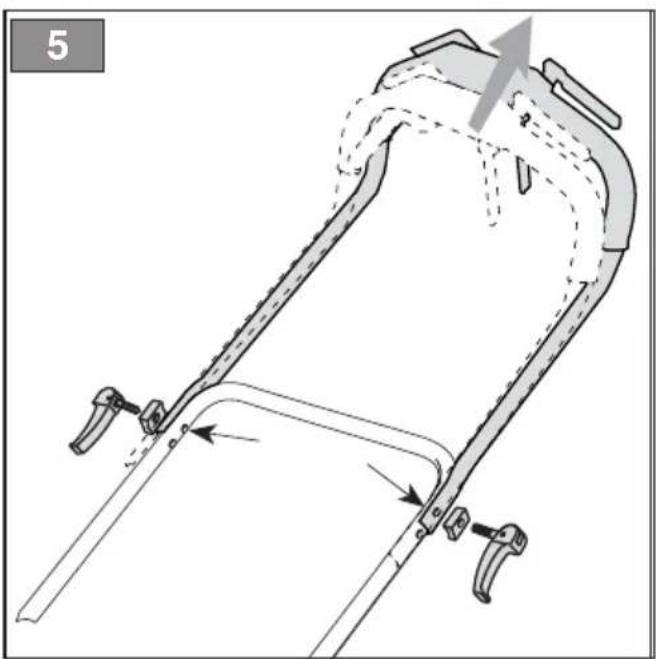
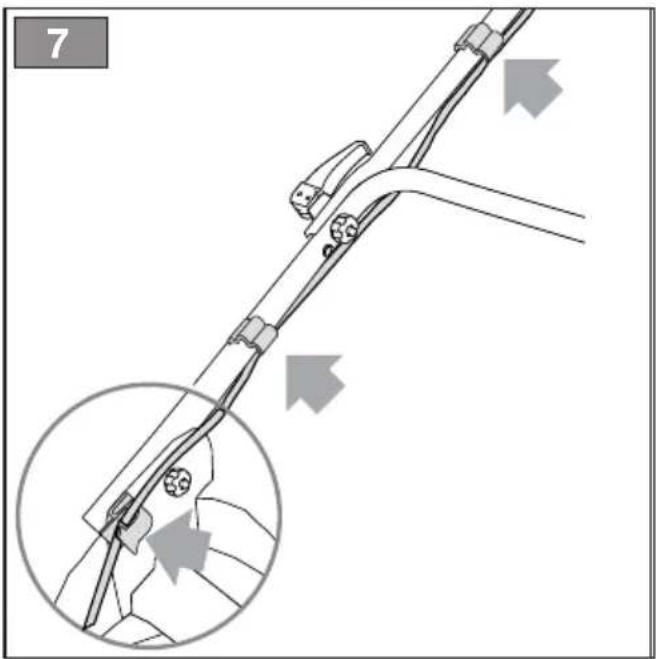
4.3 HANDLE ASSEMBLY
Assemble the handle according to the indications in (Fig.3) (Fig.7).
5. CONTROLS
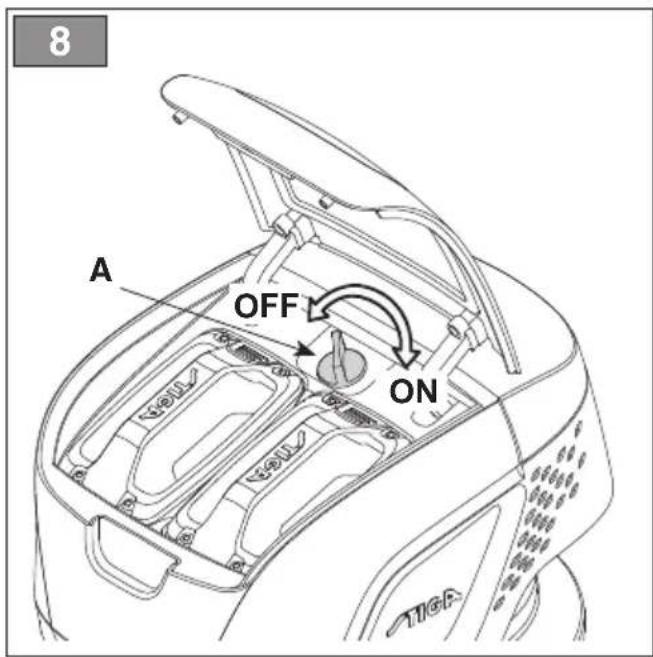
5.1 SAFETY KEY (DEACTIVATION DEVICE)
The key (Fig.8.A) is located inside the battery compartment.
Turning the key to "ON", the electric circuit of the machine is activated, thus starting the machine. Turning the key to "OFF", the electric circuit of the machine is completely deactivated, to prevent any uncontrolled use of the machine.
IMPORTANT Remove the safety key whenever the machine is unused or left unattended.
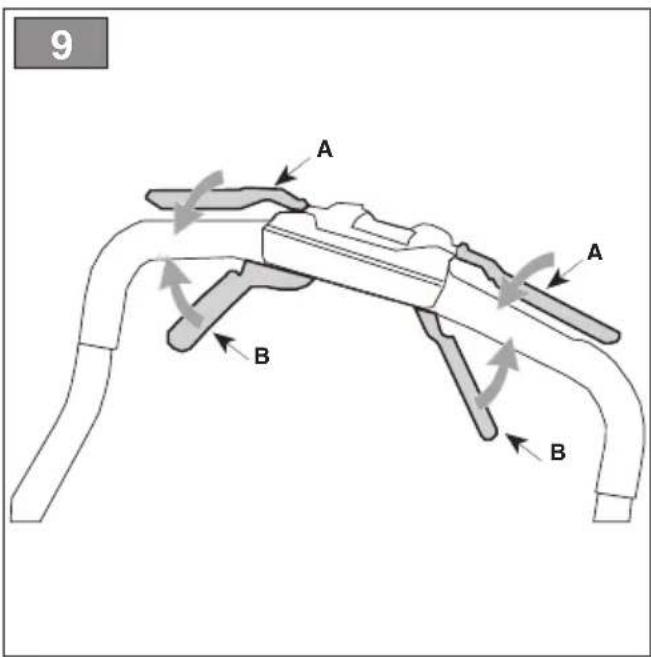
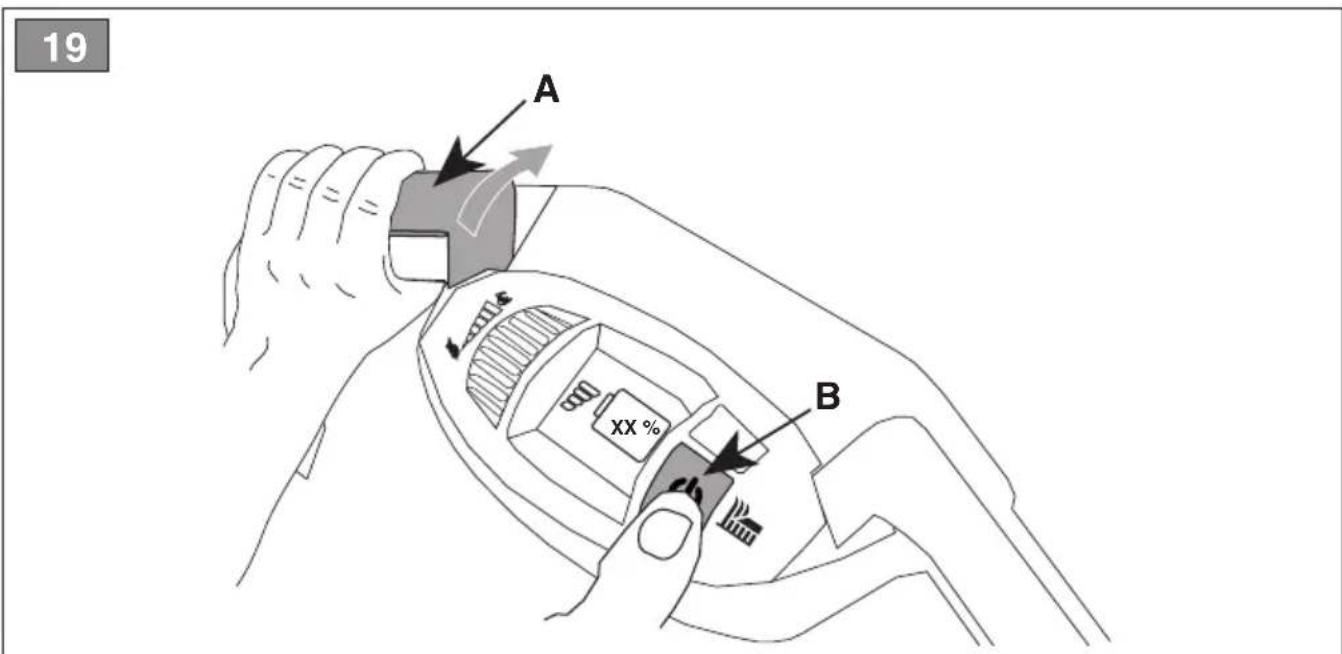
The operator presence lever (Fig.9.A) enables the cutting means and drive engagement.
Press one of the two levers (Fig.9.A) against the handle to enable the cutting means and drive engagement functions. When both levers are released, the motor automatically stops and all functions are disabled.
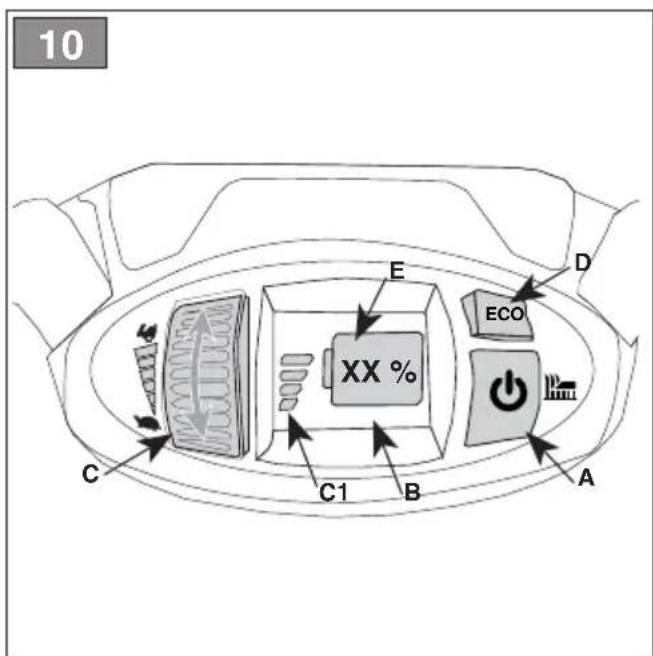
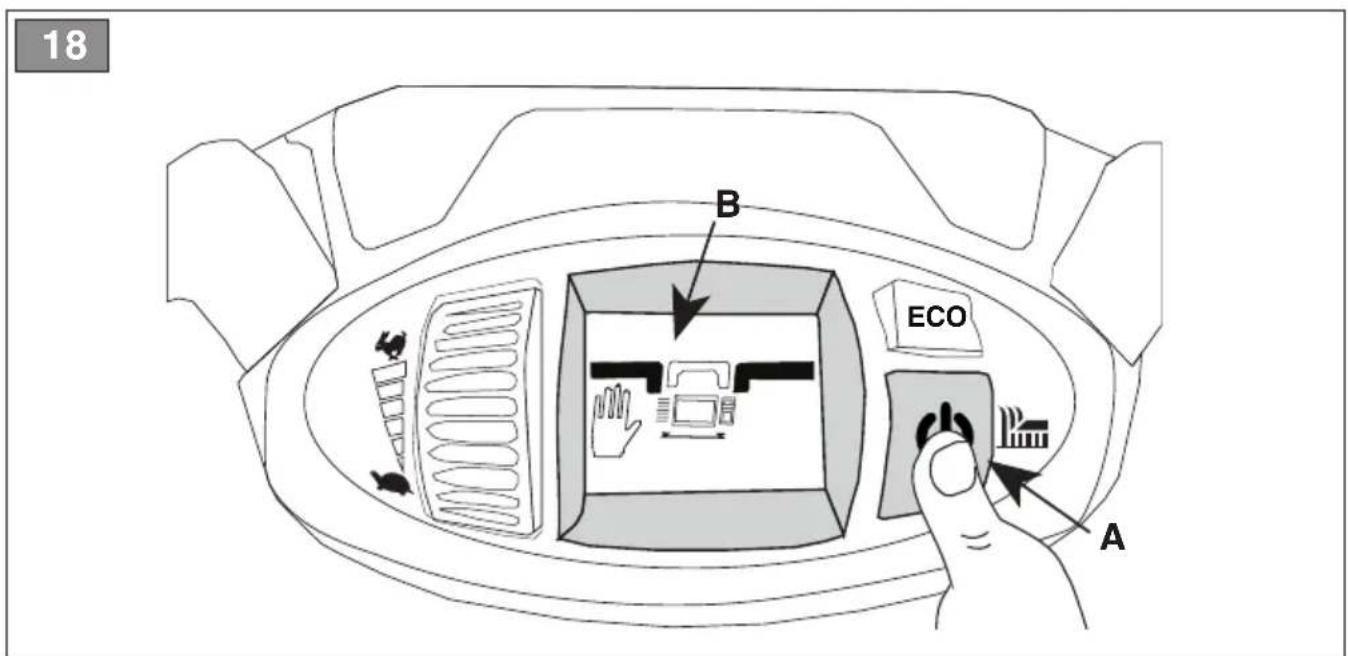
5.3 POWER BUTTON
The power button (Fig.10.A) is used to:

- Machine power-on. By pressing the button (Fig.10.A) the display (Fig.10.B) switches on and the machine is ready for use.
NOTE The machine can be switched on only if the operator presence lever and the drive lever are released.
NOTE In case the machine is not operated, the display turns off after 15 seconds and the above-mentioned operation must be carried out again.

- Cutting means engagement.
NOTE The cutting means engagement is possible only by pressing the operator presence lever against the handle (see par. 6.3).
- Cutting means disengagement. With the cutting means engaged, press the power button (Fig.10.A); the cutting means stops whilst keeping the machine powered on.
5.4 DRIVE ON LEVER
This engages the wheel drive and allows the machine to move forward.

Traction engaged.
To make the machine moving forward:
a. Press one of the two operator presence levers (Fig.9.A) against the handle.
b. Press one of the two drive engagement levers (Fig.9.B) against the handle.
Forward speed adjustment is possible through the selection knob (Fig.10.C).
You can select 6 different levels of speed.

- Maximum speed (about 5 Km/h).

- Minimum speed (about 2.5 Km/h).
Every two “clicks” of the selection knob (Fig.10.C) cause a forward speed level change, displayed by a bar indicator (Fig.10.C1).
NOTE The last speed level selected remains set after the machine is turned off.
IMPORTANT To prevent damage to the transmission, do not pull the machine backwards with the drive engaged.
5.5 "ECO" BUTTON
The “ECO” mode allows to save energy when cutting the grass, optimising the battery life. Press the button (Fig.10.D) to enable or disable “ECO” mode.
When the traction is active, the display shows the indication "E". This mode automatically turns off when the operator presence levers are released.
NOTE It is not recommended to use the "ECO" function in heavy grass cutting conditions (cutting of dense, high, humid grass).
5.6 CUTTING HEIGHT ADJUSTMENT
Lower or raise the chassis to cut the grass at different heights.

Do this when the cutting means is stationary.
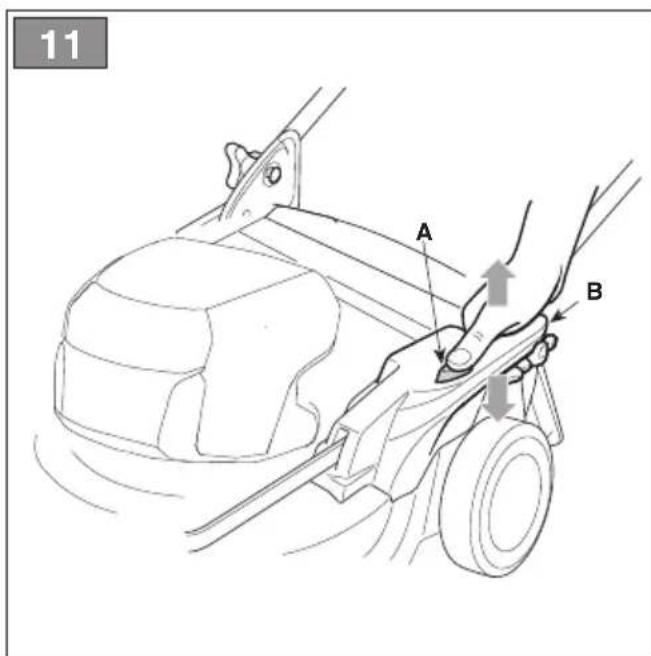
- To adjust the cutting height, press the button (Fig.11.A) and lift or lower the chassis using the hand grip (Fig.11.B), until the desired position is reached.
6. USING THE MACHINE

The safety regulations to follow are described in 2. Strictly comply with these instructions to avoid us risks or dangers.
6.1 PRELIMINARY PROCEDURES
Before starting work, it is necessary to carry out several checks and operations to ensure you can work efficiently and in maximum safety: Make sure that the safety key is not inserted in its slot. Place the machine in a stable horizontal position on the ground.
6.1.1 Checking the battery
Before using the machine for the first time after purchase, fully charge the battery following the instructions in the battery booklet. Before every use of the machine, check the battery charge status according to the instructions in the battery booklet.
6.1.2 Preparing the machine before starting work
NOTE This machine can be used to mow lawns in various ways; before starting, prepare the machine based on how the lawn is to be mowed.
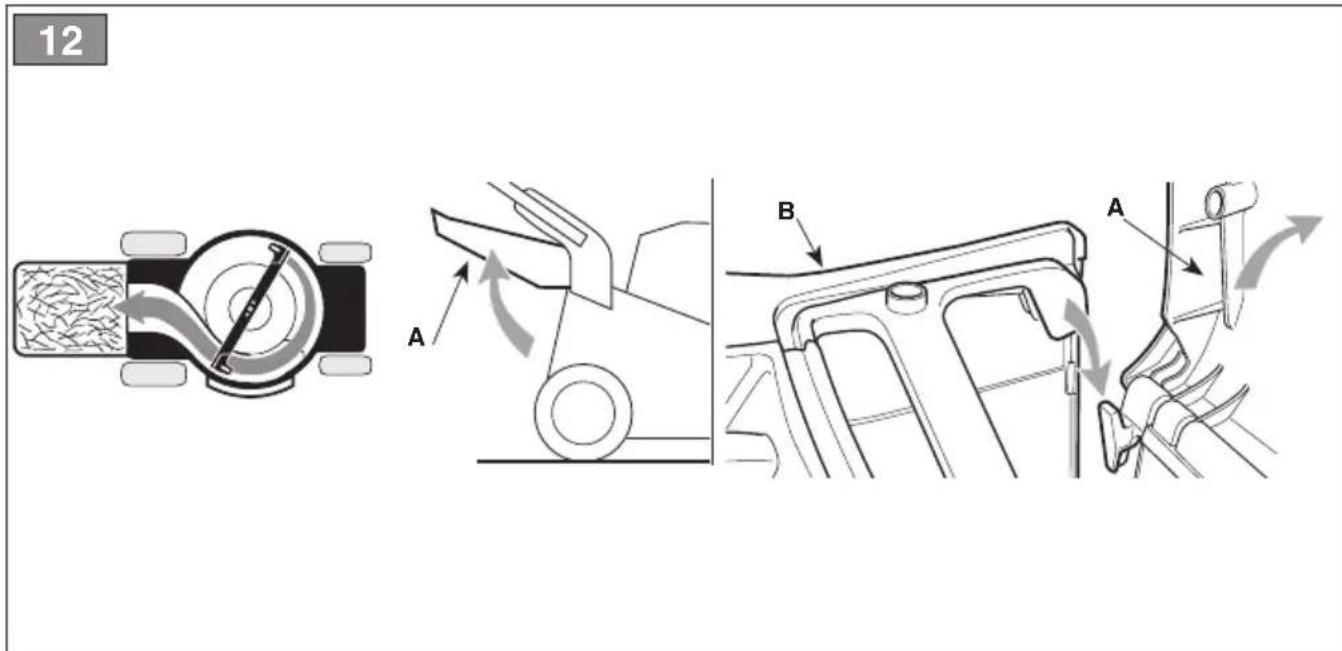
a. Preparation for grass cutting and collection in the grass catcher:
- Lift the rear discharge guard (Fig.12.A) and hook the grass catcher (Fig.12.B) correctly, as indicated in the figure.
- For models with side discharge: make sure that the side discharge guard (Fig.13.B) is lowered.
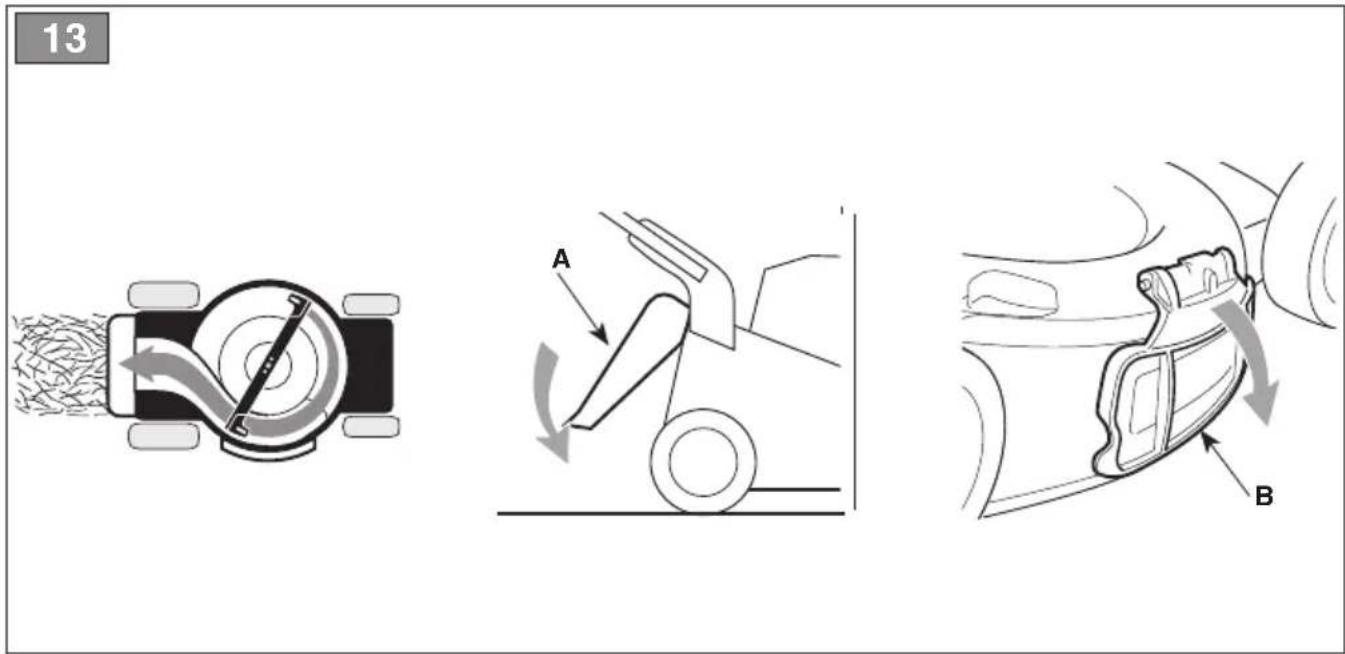
b. Preparation for grass cutting and rear grass discharge on the ground:
- Remove the grass catcher and make sure that the rear discharge guard (Fig.13.A) is stable in lowered position.
- For models with side discharge: make sure that the side discharge guard (Fig.13.B) is lowered.
c. Preparation for grass mowing and chopping (mulching function):
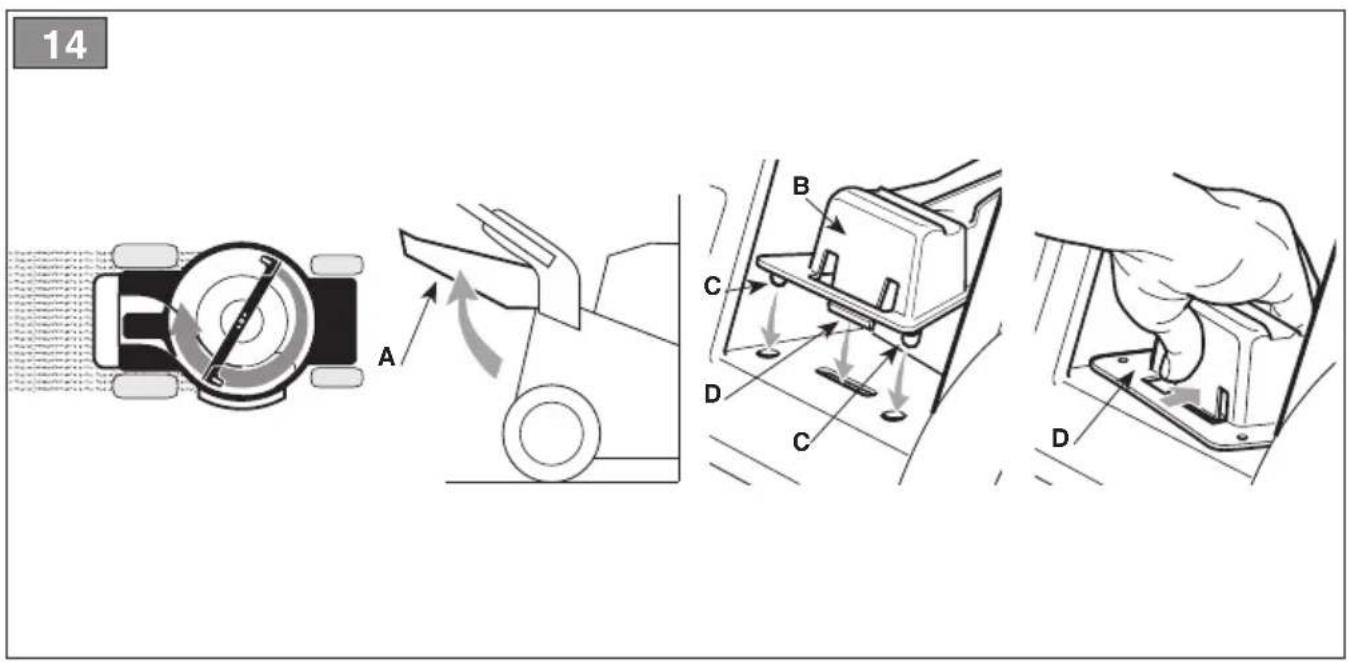
- Lift the rear discharge guard (Fig.14.A) and insert the chute plug (Fig.14.B) in the discharge opening, keeping it slightly tilted to the right.
- Fasten it by inserting the two pins (Fig.14.C) in the specific holes until the hook claw engages (Fig.14.D).
- For models with side discharge: make sure that the side discharge guard (Fig.13.B) is lowered.
• To remove the chute plug:
•1. Lift the rear discharge guard (Fig.14.A).
2. Press on the centre to release the claw (Fig.14.D).
d. Preparation for grass cutting and side discharge on the ground:
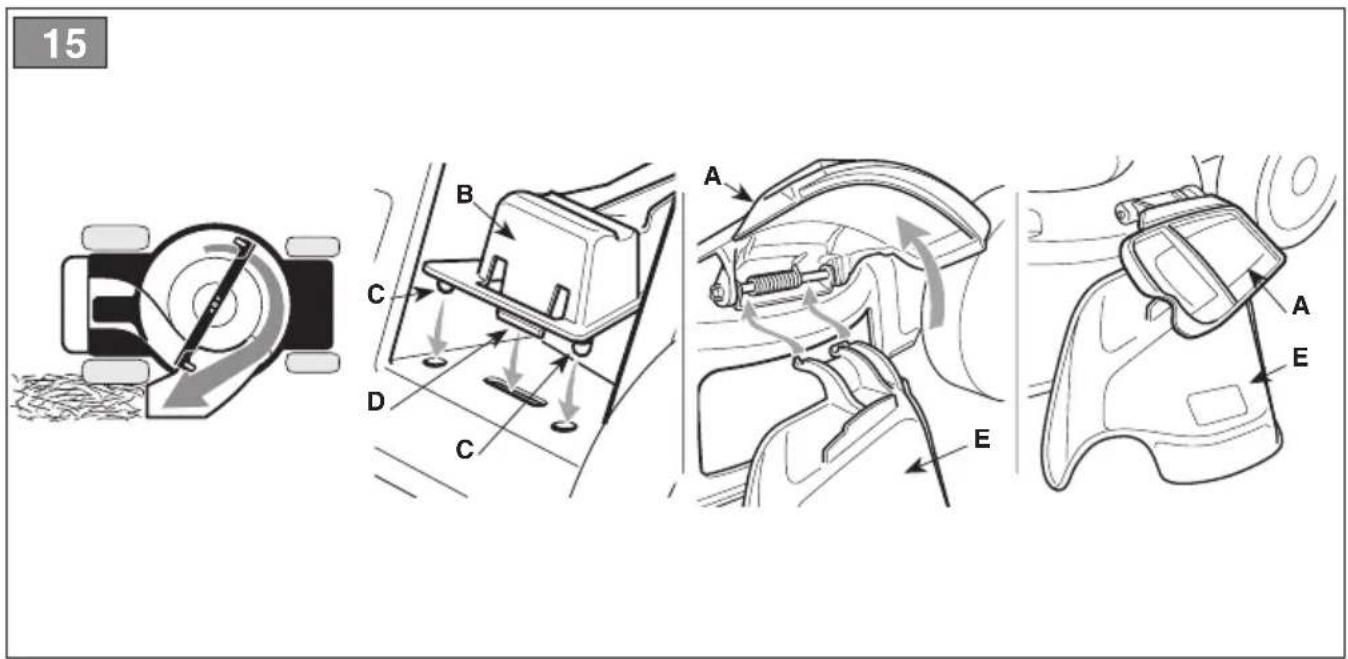
- Lift the rear discharge guard (Fig.14.A) and insert the chute plug (Fig.15.B) in the discharge opening, keeping it slightly tilted to the right.
- Fasten it by inserting the two pins (Fig.15.C) in the specific holes until the hook claw engages (Fig.15.D).
•3. Lift the side discharge guard (Fig.15.A). - Insert the side discharge chute (Fig.15.E).
- Close the side discharge guard (Fig.15.A) so as to lock the side discharge chute (Fig.15.E).
• To remove the chute plug:
•1. Lift the rear discharge guard (Fig.14.A).
2. Press on the centre to release the claw (Fig.14.D).
6.1.3 Cutting height adjustment
Adjust the cutting height as indicated in (par. 5.6).
6.2 SAFETY CHECKS
Run the following safety checks and check that the results correspond to those outlined on the tables.

Always carry out the safety checks before use.
6.2.1 General safety check
| Object Result | |
| Grips Clean, dry. | |
| Handle Fixed firmly to the machine. | |
| Cutting means Clean, not damaged or worn. | |
| Rear discharge guard; grass catcher | Good condition. No damage. Properly installed. |
| Side discharge guard; side discharge chute | Good condition. No damage. Properly installed |
| Switch command Operator presence lever Drive ON lever | The lever must move freely, it must not need forcing and should return automatically and rapidly back to the neutral position. |
| Battery No damage to the casing, no liquid leakage. | |
| Screws/nuts on the machine and on the cutting means | Correctly tightened (not loose). |
| Cooling air ducts Not clogged. | |
| Machine | No signs of damage or wear. |
6.2.2 Machine operating test
| Action | Result |
| 1. Start the machine (par. 6.3).2. Enable the cutting means (par.6.3).3. Release both operator presence levers (Fig.21.A). | 1. The display turns off and the machine is ready for use.2. The cutting means should move.3. The levers should return automatically and rapidly to the neutral position, the motor must switch off and the cutting means must stop within a few seconds. |
| 1. Start the machine (par. 6.3).2. Operate the drive lever (para 5.4).3. Disengage the drive lever. | 1. The display turns off and the machine is ready for use.2. The wheels should move the machine forward.3. The wheels should stop and the machine stops moving forward. |
| Test driving | No abnormal vibrations.No abnormal sound. |
⚠️ If any of the results fail to match the indications provided in the tables, do not use the machine! Contact an Authorised Service Centre to have it checked and repaired if necessary.
6.3 START-UP
NOTE Start up the machine on a flat surface without obstacles or high grass.
NOTE Check if the battery combination is correct, following the instructions supplied in the "Technical data" table.
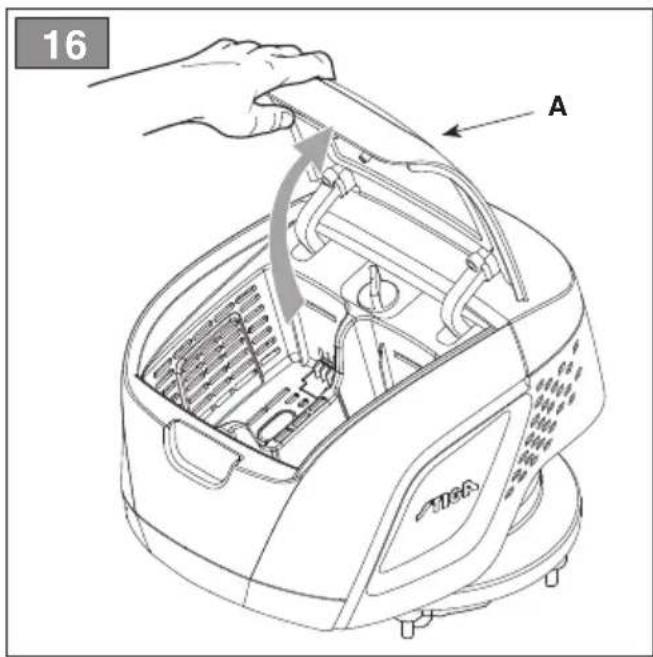
- Open the hatch for accessing the battery compartment (Fig.16.A).
- Insert the batteries correctly in their housing (par. 7.2.3).
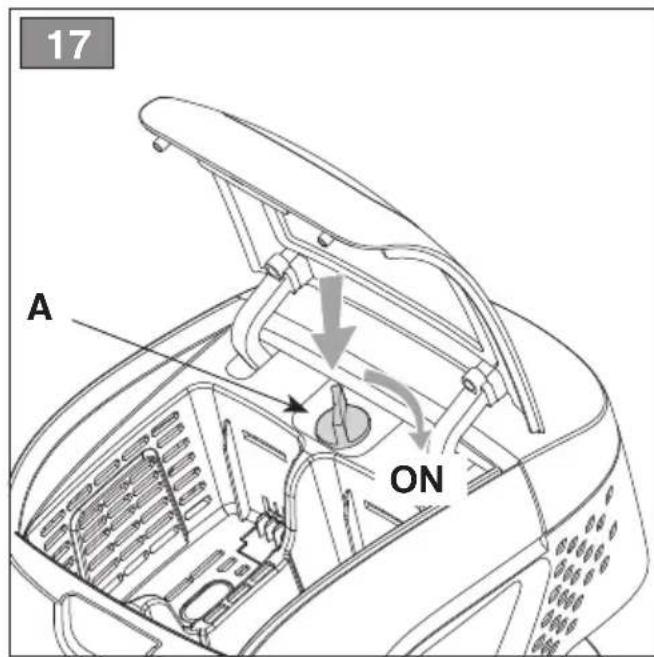
- Insert the safety key (Fig.17.B) completely and turn it to "ON" position.
- Press the power button (Fig.18.A).
- Engage the cutting means by pressing one of the two operator presence levers (Fig.19.A) against the handle and then the button (Fig.19.B).
6.4 OPERATION
IMPORTANT When working, always keep a safe distance from the cutting means, given by the length of the handle.
IMPORTANT To guarantee optimal machine operation, it is recommended to use two batteries at the same time.
The battery power reserve (and therefore the lawn surface to be mown before recharging) depends on many factors, described in (par. 7.2.1). During use, the charge status of the batteries is displayed (remaining charge percentage) (Fig.10.E).
IMPORTANT If the motor stops because it is overheated whilst mowing, you must wait approximately 5 minutes before restarting it.
6.4.1 Grass cutting
- Start moving forward and mowing the grass area.
- Adjust speed and cutting height (para 5.6) in relation to lawn conditions (grass height, density and humidity) and the amount of grass to be cut.
- For traction models (par. 5.4): It is recommended to avoid mowing on slopes with a degree higher than 15^ .
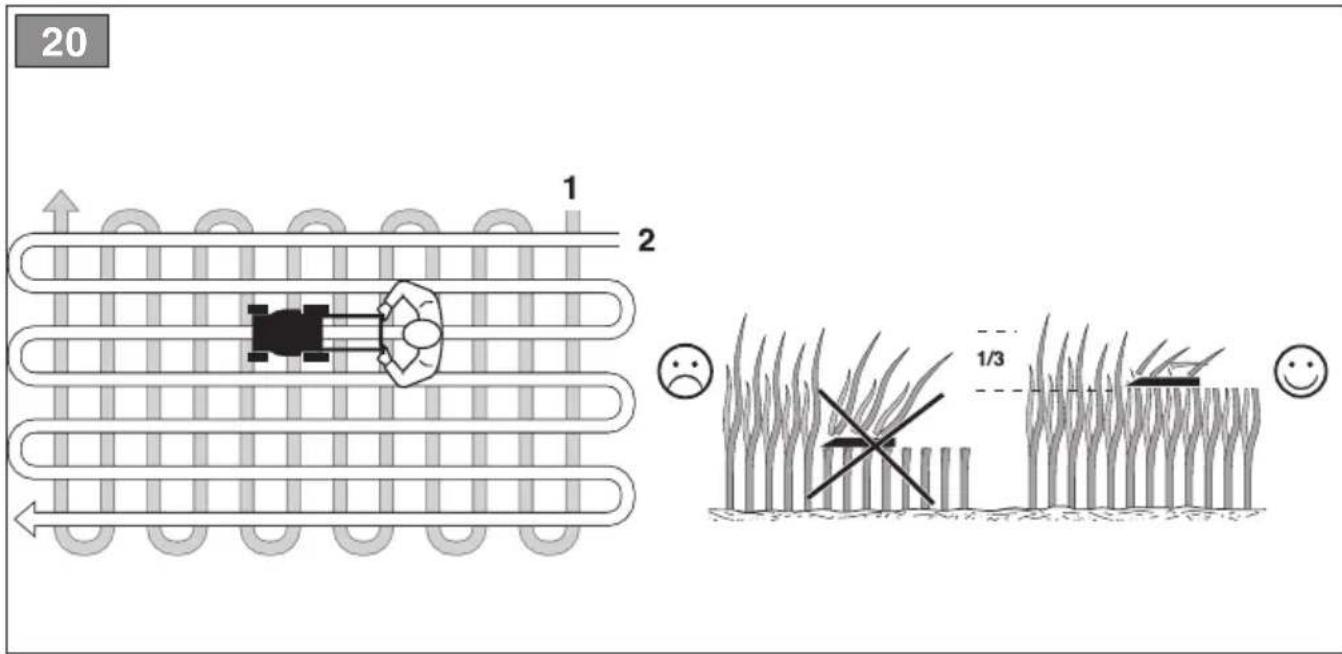
- The appearance of the lawn will improve if you alternate cutting in both directions at the same height (Fig.20).
For side discharge: it is recommended to follow a path so as to avoid discharging the cut grass from the part of the lawn that is yet to be mown.
For mulching or rear grass discharge:
- Always avoid removing a large quantity of grass. Never cut more than one third of the total grass height per single pass (Fig.20).
- Keep the chassis clean (par. 7.3.1).
6.4.2 Suggestions for maintaining your lawn
- To keep a lawn lush and green, it should be cut regularly. A lawn can be composed of different types of grass. If the lawn is cut frequently, grass and roots grow more vigorously, forming a solid grassy bed; if the lawn is cut is less frequently, higher grass and weeds start growing (clover and daisies, etc.). The frequency of mowing should be in relation to the rate of growth of the grass, which should not be left to grow too much between one cut and the next.
- The best height of grass on a well-kept lawn is approx. 4-5cm. With one mow, you do not need to remove more than a third of the total height. If the grass is very tall, it should be cut twice in a twenty-four hour period; The first time with the cutting means at maximum cutting height and the second cut at the height desired.
- Cutting too low tears and uproots the grass, giving it a "spotted" appearance.
- During hot and dry periods, the grass should be cut a little higher to prevent the ground from drying out.
- It is always better to cut the grass when it is dry. Do not cut wet grass; this could reduce cutting means efficiency due to sticky grass and tear the lawn.
- The cutting means must be in good condition and well sharpened so that the grass is cut straight without a ragged edge that leads to yellowing at the ends.
6.4.3 Grass catcher emptying
When the grass catcher (Fig.1.G) becomes too full, the grass collection is no longer efficient and the lawn mower noise changes.
For grass catcher with contents indicator device:

- Lifted = empty.

- Lowered = full.
During operation, when the cutting means is moving, the indicator stays lifted as long as the grass catcher can collect the cut grass; when it is lowered, it means that the grass catcher is full and must be emptied.
To remove and empty the grass catcher:
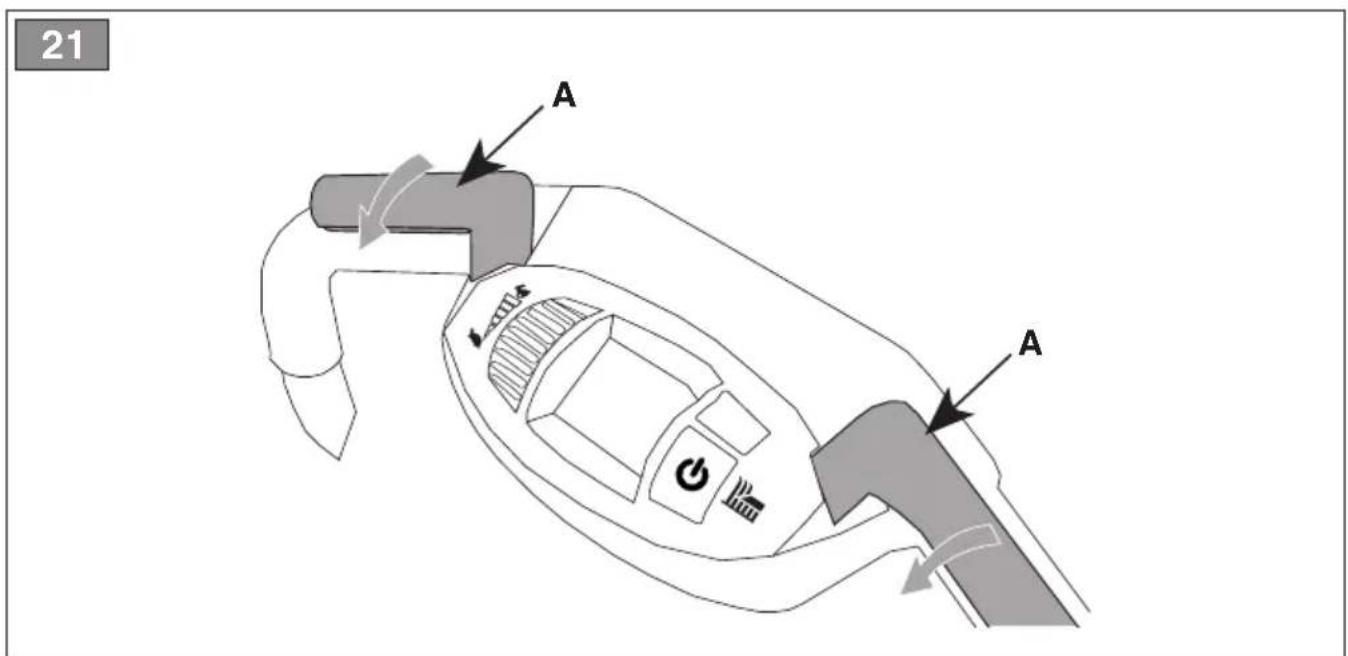
1 Release both levers (Fig.21.A).
-
Wait until the cutting means stops.
-
Lift the rear discharge guard (Fig.12.A), grab the handle and remove the grass catcher, keeping it in upright position.
6.5 STOPPING THE MACHINE
To stop the machine:
1 Release both levers (Fig.21.A).
- Wait until the cutting means stops.

When you have stopped the machine, it will take a seconds for the cutting means to stop.
IMPORTANT Always stop the machine.
- When moving between work areas.
- When driving on grass free surfaces.
- Every time it is necessary to overcome an obstacle.
- Before adjusting the cutting height.
- Any time the grass catcher is removed or refitted.
- Any time the side discharge chute (if available) is removed or refitted.
6.6 AFTER OPERATION
- Stop the machine (par. 6.5).
- Open the hatch and remove the safety key.
- Remove the batteries from their housing and recharge them (par 7.2.2).
- Allow the motor to cool before storing in an enclosed space.
- Clean (par. 7.3).
- Check there are no loose or damaged components. If necessary, replace the damaged components and tighten any screws and loose bolts or contact the authorised service centre.
IMPORTANT Remove the safe key whenever the machine is unused or left unattended.
7. ROUTINE MAINTENANCE
7.1 GENERAL INFORMATION

The safety regulations to follow are described in chap. 2. Strictly comply with these instructions to avoid serious risks or dangers.

Before commencing any inspections, cleaning or maintenance/adjustments on the machine:
- Stop the machine.
- Remove the safety key, (never leave the key inserted or within the reach of children or unauthorised persons).
- Make sure that all moving parts have come to a complete stop.
-
Allow the motor to cool before storing in an enclosed space.
-
Read the relevant instructions.
- Use suitable clothing, protective gloves and goggles.
- The frequency and types of maintenance are summarised in the "Maintenance Table". The table will help you maintain your machine's safety and performance. It summarises the main interventions to be made and the frequency applicable to each of them. Carry out the relevant task as soon as it is scheduled to be performed.
– The use of non-genuine and/or incorrectly assembled spare parts and attachments could adversely affect machine operation and safety. The manufacturer shall decline all liability in the event of injuries or damages caused by such parts.
– Genuine spare parts are supplied by Authorised Assistance Centres and Dealers.
IMPORTANT Any maintenance and adjustment operations not described in this manual must be carried out by your Authorised Service Centre.
7.2 BATTERY
7.2.1 Battery power reserve
Battery power reserve (and therefore the lawn surface that can be mown before recharging is required) mainly depends on:
a. Environmental factors that cause higher energy requirements:
– Mowing dense, high and/or wet grass.
b. Machine cutting width: wider settings involve higher energy consumption.
c. Operator behaviour that should be avoided:
– Switching the machine on and off frequently whilst working.
- Setting a cutting height that is too low for the lawn conditions.
- Working at a speed that is too high in relation to the amount of grass to be removed.
NOTE During use, the battery is protected against total drainage with a protective device that switches off the machine and stops it from working.
To optimise battery power reserve it is always recommended to:
– Cut the grass when the lawn is dry.
- Cut the grass frequently so that it doesn't grow too tall.
- Set a higher cutting height when the grass is very tall, then set a lower height and cut the lawn again.
- Do not use the machine in "mulching" mode with very high grass.
- Use of the "ECO" mode (par. 5.5).
If the need arises to use the machine for sessions which exceed the capability of standard batteries, it is possible to:
– Purchase additional batteries, to immediately replace the exhausted batteries, without compromising the use continuity.
– Purchase batteries with an extended power reserve compared to the standard version (par. 15.2).
7.2.2 Battery removal and recharging
- Open the battery compartment access hatch and remove the safety key.
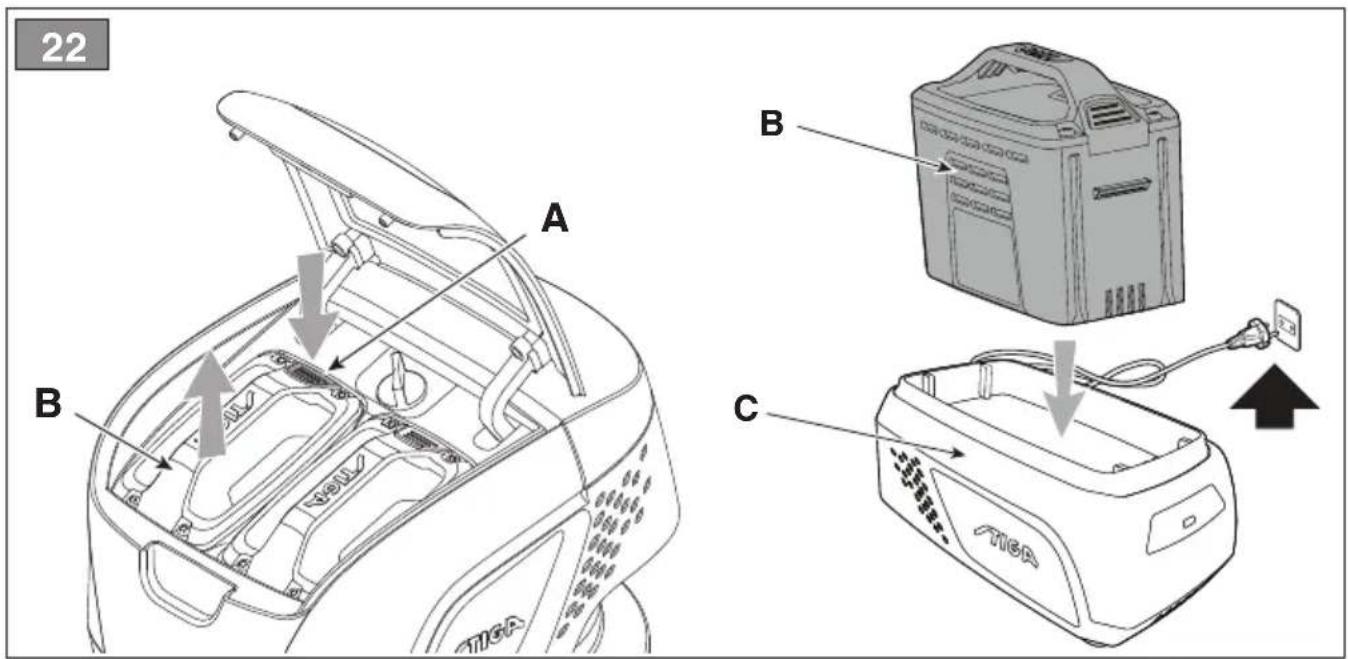
- Press the button on the battery (Fig.22.A) and remove the battery (Fig.22.B).
- Insert the battery (Fig.22.B) in its housing in the battery charger (Fig.22.C).
- Connect the battery charger to a power socket with the voltage indicated on the rating plate.
- Fully charge the battery according to the instructions in the battery/battery charger booklet.
NOTE The battery is equipped with a guard that inhibits recharging if the environmental temperature is not between 0 and +45 °C.
NOTE The battery can be recharged at any time, even partially, with no risk of damaging it.
7.2.3 Refitting the battery on the machine
When recharging is completed:
- Remove the battery from the housing in the battery charger (do not keep recharging when recharging is completed).
- Disconnect the battery charger from the mains power supply.
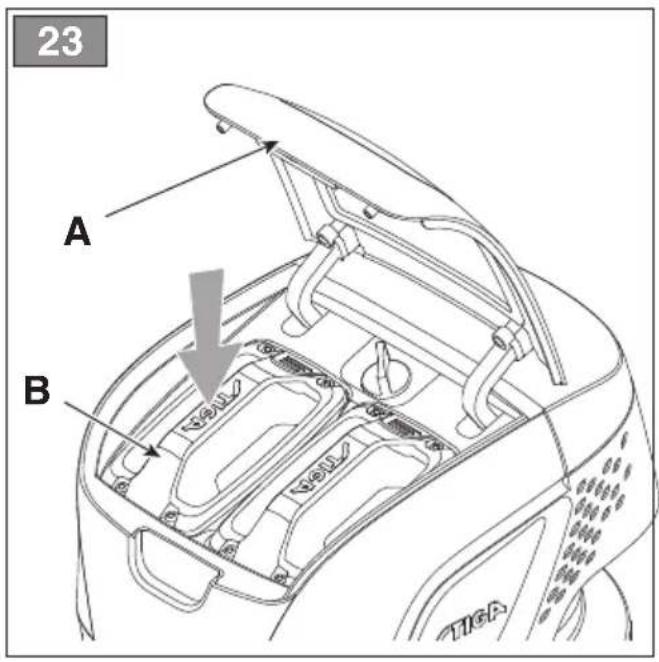
- Open the battery housing hatch (Fig.23.A), insert the battery (Fig.23.B) into its housing pressing down until you hear it click firmly into position and check the electrical contact.
- Completely close the hatch again.
7.3 CLEANING
Clean thoroughly following the instructions below every time it is used.
7.3.1 Cleaning the machine
• Always make sure the air intakes are free of debris.
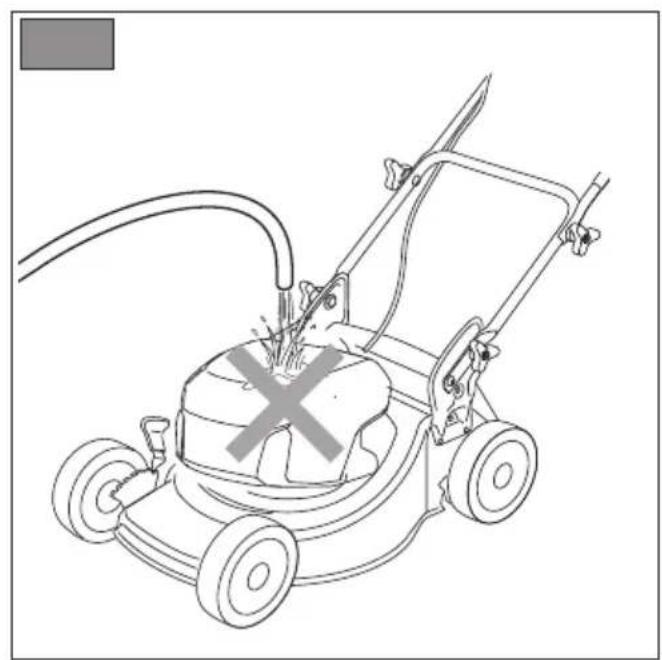
- Do not spray water onto the motor and electrical components, prevent them from getting wet (Fig.24.0).
- Do not use aggressive liquids to clean the chassis.
- To reduce fire hazards, keep the lawnmower and, in particular, the motor free of grass, leaves, or excessive grease.
- Always keep the levers, display and buttons free of debris.
7.3.2 Cleaning the cutting means assembly
Remove grass debris and mud accumulated in the chassis to prevent it from drying and causing problems the next time the lawnmower is used. Tilt the machine laterally and make sure that it is stable before starting any work.
For side discharge: remove the discharge chute (if mounted - par. 6.1.2d.).
The paintwork of the internal part of the chassis may crack off over time due to the abrasive action of the cut
grass; In this case, take immediate action by retouching the paintwork with rust-preventive paint, to prevent the formation of rust which may corrode the metal.
7.3.3 Cleaning the grass catcher
- Empty the grass catcher.
- Shake it to remove grass cuttings and soil residue.
- Wash it, rinse it and fit it back so as to facilitate quick drying.
7.4 NUTS AND BOLTS
Keep all nuts, bolts and screws tight to be sure the equipment is in a safe working condition.
7.5 CLEANING THE AIR FILTER
The filter element must always be kept perfectly clean and must be replaced if it is broken or damaged. Proceed as follows:
- Clean around the air filter grid.
- Unscrew the screw(Fig.25.B) to remove the grid (Fig.25.A).
- Remove the filter element (Fig.26.A).
- Blow on the filter to remove dust and debris. If the filter is still dirty, wash the filter (Fig.26.A) with water and dry it with a clean cloth.
IMPORTANT Do not use petrol, detergents or any other products to clean the filter element.
- Clean the outside of the filter housing eliminating dust, debris or dirt.
- Fit the filter element (Fig.26.A) into its housing (making sure it is completely dry).
- Refit the grid (Fig.25.A) and tighten the screw (Fig.25.B).
8. OCCASIONAL MAINTENANCE
Before commencing any inspections, cleaning or maintenance/adjustments on the machine:
- Stop the machine.
- Remove the safety key, (never leave the key inserted or within the reach of children or unauthorised persons).
- Make sure that all moving parts have come to a complete stop.
- Allow the motor to cool before storing in an enclosed space.
- Read the relevant instructions.
- Use suitable clothing, protective gloves and goggles.
8.1 CUTTING MEANS
A badly sharpened cutting means pulls at the grass and causes the lawn to turn yellow.
Do not touch the cutting means until the key has been removed and the cutting means is completely stationary.
All work on the cutting means (disassembly, sharpening, balancing, repairing, reassembly and/or replacing) are demanding jobs that require special skills as well as special tools; For safety reasons, these jobs are best carried out at a Authorised Service Centre.
Make sure damaged, misshapen or worn cutting means are replaced, together with the securing screws to preserve balance.
IMPORTANT Always use original cutting means bearing the code indicated in the "Technical Data".
Given product evolution, the cutting means listed in the "Technical Data" table may be replaced in time with others having similar interchangeable and operating safety features.
9. STORAGE
9.1 STORING THE MACHINE
When the machine is to be stored away:
-
Wait for the motor to cool.
-
Remove the safety key.
-
Clean (par. 7.3).
-
Check there are no loose or damaged components. If necessary, replace the damaged components and tighten any screws and loose bolts or contact the authorised service centre.
-
Store the machine:
-
In a dry place.
- Protected from inclement weather.
• Covered with a sheet where possible.
• In a place where children cannot get to it. - Making sure that keys or tools used for maintenance are removed.
9.2 STORING THE BATTERY
The battery must be kept in a cool, shaded place without humidity.
NOTE If case of prolonged periods of inactivity, recharge the battery every two months to prolong its service life.
10. HANDLING AND TRANSPORTATION
Whenever the machine is to be handled, raised, transported or tilted you must:
- Stop the machine (par. 6.5).
- Remove the safety key.
- Make sure that all moving parts have come to a complete stop.
- Wear heavy work gloves.
- Hold the machine in the points offering a safe grip, taking into account the weight and its division.
- Use an appropriate number of people for the weight of the machine and the characteristics of the vehicle or the place where it must be placed or collected.
- Make sure that machine movements do not cause damage or injuries.
When transporting the machine on a vehicle or trailer, always:
- Use an access ramp of suitable strength, width and length.
- Load the machine with the motor switched off and pushed by an adequate number of people.
– Lower the cutting means assembly. - Position it so that it cannot cause a hazard for anybody.
- Fasten firmly to the means of transport using ropes or chains to prevent it from tipping over.
11. ASSISTANCE AND REPAIRS
This manual provides all the necessary information to run the machine and for correct basic maintenance operations which can be performed by the user. Any regulations and maintenance operations not described herein must be carried out by your Dealer or Authorised Service Centre, which have the necessary knowledge and equipment to ensure that the work is carried out correctly, maintaining the correct degree of safety and the original operating conditions of the machine.
Any operations performed in unauthorised centres or by unqualified persons will totally invalidate the Warranty and all obligations and responsibilities of the Manufacturer.
- Only Authorised Service Centres can carry out guaranteed repairs and maintenance.
- The Authorised Service Centres only use genuine spare parts. Genuine spare parts and attachments have been designed specifically for machines.
- Non-original parts and attachments are not approved; use of non-original spare parts and attachments will jeopardise the safety of the machine and relieve the Manufacturer from all obligations or liabilities.
12. WARRANTY COVERAGE
The warranty conditions are intended for consumers only, i.e. non-professional operators.
The warranty covers all material quality and manufacturing defects recognised during the warranty period by your Dealer or Authorised Service Centre.
The warranty is restricted to the repair or replacement of components recognised as faulty.
It is advisable to send your machine once a year to an Authorised Service Centre for servicing, assistance and safety device inspection.
The warranty only applies to machines subjected to regular maintenance.
The user must follow all the instructions provided in the accompanying documentation.
The warranty does not cover damages resulting from:
- Failure to become familiar with the documentation accompanying the machine (Owner's manual).
• Professional use. - Carelessness, negligence.
-
External causes (lightning, impact, presence of foreign bodies inside the machine) or incidents.
-
Incorrect use or assembly or prohibited by the manufacturer.
- Poor maintenance.
- Modification to the machine.
- Use of non-genuine spare parts (adaptable parts).
- Use of accessories not supplied or approved by the manufacturer.
The warranty does not cover:
- The routine/occasional maintenance operations (described in the owner's manual).
- Normal wear and tear of consumables such as the drive belt, cutting means, headlights, wheels, safety bolts and wiring.
• Normal wear and tear. - Deterioration in the appearance of the machine due to use.
• Cutting means supports. - Any ancillary expenses related to the enforcement of the warranty, such as costs incurred to travel to the user's location, transfer of the machine to the Dealer, rental of replacement equipment or calling of independent enterprises to perform maintenance work.
The user is protected by his or her own national legislation.
The user's rights under the national laws or his or her own country are not in any way restricted by this warranty.
13. MAINTENANCE TABLE
| Intervention Frequency Notes | ||
| MACHINE | ||
| Check all fasteners Before each | use par. 7.4 | |
| Safety checks/check controls Before each use par. 6.2 | ||
| Check the rear/lateral discharge guards. | Before each use par. 6.2.1 | |
| Check the grass catcher bag and lateral discharge chute. | Before each use par. 6.2.1 | |
| Check the cutting means Before each use par. 6.2.1 | ||
| Check the battery charge status | Before each use * | |
| Recharge the battery After each use par. 7.2.2 * | ||
| General cleaning and inspection | After each use par. 7.3 | |
| Checking for any damage to the machine. If necessary, contact the authorised service centre. | After each use | - |
| Cleaning the air filter | Once a month | par. 7.5 |
| Replacing the cutting means | - | par. 8.1 *** |
* Refer to the battery/battery charger manual.
** The operation must be carried out by your Dealer or a specialised Authorised Service Centre
*** Operation to be performed at the first signs of any malfunction
14. PROBLEM IDENTIFICATION
| If problems persist after having performed the above operations, contact your dealer. | ||
| PROBLEM PROBABLE CAUSE SOLUTION | ||
| 1. After pressing the starter button, the display does not come ON. | Safety key is not inserted or is inserted incorrectly. | Insert the key (par. 6.3). |
| The safety key is not in "OFF" position. Turn the safety key to "ON" position (par. 6.3). | ||
| Battery is not inserted or is inserted incorrectly. | Open the hatch and check that the battery is fitted in its housing correctly (par. 7.2.3). | |
| Low battery. Check the battery status and recharge if necessary (par. 7.2.2). | ||
| Incorrect battery combination. | Check if the battery combination is correct, following the instructions supplied in the "Technical data" table. | |
| 2. After pressing the starter button, the display does not come ON and the machine sets off a buzzer. | Internal motor anomaly. Remove the safety key and contact your Dealer or the Authorised Service Centre for checks, replacements or repairs. | |
| 3. The motor shuts down whilst working. | Battery is not inserted correctly. Open the hatch and check that the battery is fitted in its housing correctly (par. 7.2.3). | |
| Low battery. Check the battery status and recharge if necessary (par. 7.2.2). | ||
| Obstructions that prevent rotation of the cutting means. | Remove the safety key, wear work gloves and remove grass or debris from the lower part of the machine and/or from the discharge chute. | |
| 4. The display shows ER3 (Fig.27.B). | The thermal protection has tripped due to overheating of the motor. | Wait for at least 5 minutes and restart the machine. |
| 5. The display alternates between: ER1 + OPC (Fig.27.B). | Thermal protection has tripped due to excessive current absorption caused by: Excessively high grass cutting. Obstructions that prevent rotation of the cutting means. Too much grass debris accumulated inside the chassis and discharge chute. | Set a higher cutting height when the grass is very tall, then set a lower height and cut the lawn again (par. 6.4.2). Remove the obstructions (par. 7.3.2). Clean the machine (par. 7.3.1) Wait for at least 5 minutes and restart the machine. |
| 6. The display shows ER1 (Fig.27.B). | Drive motor over current for heavy working conditions (drive under stress). | -Make sure that the wheels are not blocked. Clean as needed. -Check the slope of the land you are working on (par. 6.4.1). |
| 7. The display alternates between: 100% + ER3 (Fig.27.B). | Anomaly in the electrical connection of battery and motor. | Remove the safety key and contact your Dealer or the Authorised Service Centre for checks, replacements or repairs. |
| 8. The display shows ER2 (Fig.27.B). | Cutting means blocked. Turn the machine off, remove the safety key and wear work gloves. Check and eventually remove any obstructions in the machine lower side (par. 7.3.2) that prevent rotation of the cutting means. If the problem continues, contact the Authorised Service Centre for checks, replacements or repairs (par. 8.1). | |
| 9. The cut grass is no longer collected in the grass catcher. | The cutting means hit a foreign object. Immediately turn off the motor and remove the safety key.Check if there is any damage and contact a Service centre to replace the cutting means if necessary (par. 8.1). | |
| The inner part of the chassis is soiled. Clean the inner part of the chassis to facilitate the evacuation of the grass toward the grass catcher (par. 7.3.2). | ||
| 10. Mowing is difficult. The cutting means is not in good condition. | Contact the Authorised Service Centre for the sharpening or replacement of the cutting means. | |
| 11. Excessive noise and/or vibration is experienced whilst working. | Cutting means fittings are loose or the cutting means is damaged. | Immediately turn off the motor and remove the safety key.Contact the Authorised Service Centre for checks, replacements or repairs (par. 8.1). |
| 12. Battery power reserve is low. | Severe working conditions requiring greater current absorption. | Optimise operations (par. 7.2.1). |
| Battery is insufficient for operating requirements. | Use additional batteries or batteries with extended power reserve (par. 15.2). | |
| 13. The battery charger is not charging the battery. | Battery is not correctly inserted in the battery charger. | Check it is correctly inserted (par. 7.2.3). |
| Unsuitable environmental conditions. Recharge the battery in places with suitable temperatures (see battery/battery charger instruction manual). | ||
| Dirty contacts. Clean the contacts. | ||
| The battery charger is not energised. Check it is plugged in and the power socket is energised. | ||
| Faulty battery charger. Replace with an original spare part. | ||
| If the problem persists, refer to the battery/battery charger manual. | ||
15. OPTIONAL ATTACHMENTS
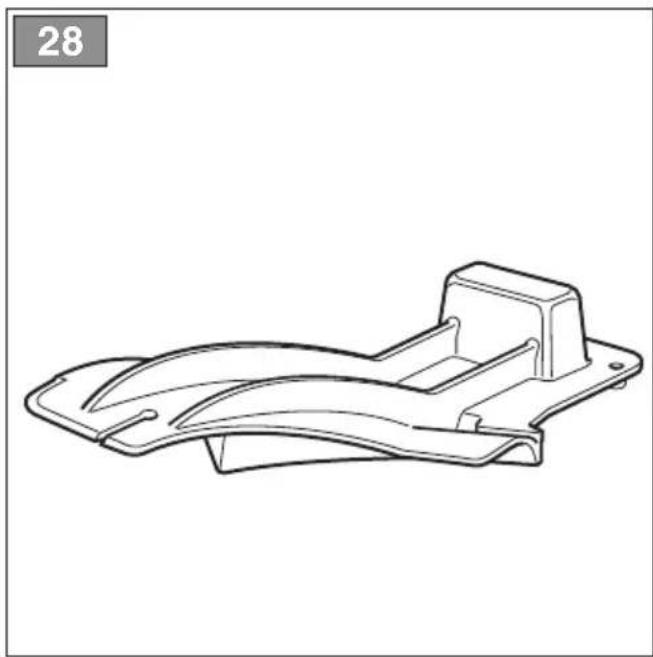
15.1 "MULCHING" KIT
Finely chops the cut grass and leaves it on the lawn, instead of collecting it in the grass catcher (for machines equipped with it) (Fig.28).
15.2 BATTERIES
Different capacity batteries are available to suit specific operating requirements (Fig.29). The list of approved batteries for this machine is found in the "Technical Data" table.
15.3 BATTERY CHARGER
Device used to recharge the battery (Fig.30).
ÍNDICE
15.1 KIT PARA "MULCHING"
1.1 KUIDAS KASUTUSJUHENDIT LUGEDA
- SÄÄNNÖLLINEN HUOLTO....9
7.1 Yleistä....9
7.2 Akku....9
7.3 Puhdistus....10
- YLIMÄÄRÄINEN HUOLTO....10
10. MANUTENTION ET TRANSPORT
- SIGURNOSNE UPUTE....1
2.1 Osposobljavanje....1
2.2 Pripremne radnje.... 2
- PLĀNOTĀ TEHNISKĀ APKOPE 9
7. PLĀNOTĀ TEHNISKĀ APKOPE
7.1 VISPĀRĒJA INFORMĀCIJA

2.5 ACCU / ACCULADER
2.6 BESCHERMING VAN DE OMGEVING
7.4 MOEREN EN SCHROEVEN VOOR BEVESTIGING
15.1 KIT VOOR "MULCHING"
- SIKKERHETSBESTEMMELSER....1
- BLI KJENT MED MASKINEN 3
- ORDINÆRT VEDLIKEHOLD....9
- EKSTRAORDINÄERT VEDLIKEHOLD 10
8.1 Klippeinnretning....11
- OPPBEVARING....11
2.4 VEDLIKEHOLD, LAGRING
3. BLI KJENT MED MASKINEN
3.1 BESKRIVELSE AV MASKINEN OG BEREGNET BRUK
5.4 SPAK FOR INNKOBLING AV TREKKRAFT
7. ORDINÆRT VEDLIKEHOLD
7.1 GENERELT

13. VEDLIKEHOLDSTABELL
6.1 CZYNNOŚCI WSTĘPNE
1 Solte as duas alavancas (Fig.21.A).
Solte as duas alavancas (Fig.21.A).
15.1 KIT PARA "MULCHING"
15.1 KIT PENTRU MULCI
6.4 PRACOVNÁ ČINNOSŤ
- SIGURNOSNA PRAVILA 1
2.1 Obuka....1
2.2 Pripremne radnje.... 2
2.3 Za vreme upotrebe....2
INNEHÅLLSFÖRTECKNING
- ALLMÄN INFORMATION .... 1
5.4 SPAK FÖR INKOPPLING AV DRAGKRAFT
15.1 SATS FÖR "MULCHING"
• D. Lgs. 262/2002, ANNEX VI, proc. 1 (Italy)
Sr. VP Product Technical Division
Maurizio Tursini
$$ \Lambda_ {l i} $$
• D. Lgs. 262/2002, ANNEX VI, proc. 1 (Italy)
Sr. VP Product Technical Division
Maurizio Tursini
$$ \Lambda_ {l i} $$
| FR | Introduction de la notice orificaleDéclaration CE de ConformitéOfrechnie Machines 2006/42/CE, Annex II, partie A)1. La Société2. Déclare sous sa propre responsabilité que la machine : Tandouse à gazon à conducteur à piéd / coupe du gazon3. Extorsème aux prescriptions des directives ;e Série4. Moucur: batterie5. État enolème aux prescriptions des directives ;e Organisme de certificationf. Examen CE du Type4. Renov et Normes harmonisées5. Niveau de pulissance sonore maximé5. Niveau de pulissance sonore garantii5. Largeur de coupe6. Parsonnne habilitée à réalir le Dossier Technique ;e Lieu et Date | EN | Transformation of the original instruction| EC Declaration of Conformity (Machine Directive 2006/42/CE, Annex II, partie A)1. The Company2. Declarations under its own responsibility that the machine: Pedestrian-controlled town mower / gasse cuttinga) Type / Base Modelb) Monot / Year of manufacturec) Serial numberd) Motor: battery-operated3. Confirms to directive specifications:a) Building bodyf) EC examination of Type4. Reference to harmonised Standardsg) Sound power level measuredh) Sound power level guaranteedi) Range of cutm) Person authorised to create the Technical Folder;e) Place and Date | DE | Utilisierung der Original bilatikumschäft | EG-Konfortmärksterkänung (Maschinenkontlinite 2006/42/EG, Anhang II, Teli A)1. Die Gesellschaft2. Entfällt auf eigene Verantwortung, dass die Maschine: Handelsplöter Resenmühler / responschnitta) Typ / Buregdalb) Monot / Buregdalc) Seriennummerd) Motor: Batteri4. Optypter kravene i direktivene;e Sertifikierungsorganf) EF typischer Annulit organg) EF typischekmande4. Referens till harmonisede standarderg) Malt hydrofiktrivaf) Garantert hydrofiktrivaf) Klippebedronei) Person som har fullmakt till a uifertige teknik dokumentiertone;e Sted og data | NO (Overseptive au original busrassening)EF- Samverserksörung (Maskindrektiv 2006/42/EG, Vedlogg II, del A)1. Finneat2. Enlertet par egel anerat al maskinen:Handfört gressklippert/ gressklippinga) Type / Modellb) Männö / Byggärlc) Seriennummerd) Motor: batteri3. Oppypter kravene i direktivene;e Sertifikierungsorganf) EF typischer Annulit organg) EF typischekmande4. Referens till harmonisede standarderg) Uppremitt (Tilberkinsatz) Garantert hydrofiktrivaf) Skärbeeddn) Antsücksend person für upprattendet av den tekniska dokumentationan;e Ort och datum | EV | Oversättung ausstandarstung | Original|EG-Forschrän om överensstämmelse (Maskindrektiv 2006/42/EG, bilag II, de la)1. Forderage2. Forwards par egel anerat, at maskinen: Fördarteld gräsklippare / gräsklippingea) Typ / Buremdellb) Männö / Tilberkinsatzg) Seriennummerd) Motor: batteri3. Overensstämmer mod förskistherna i direktiveli) Integunder Annuill organg) EF typischekmande4. Referens till harmonisede standarderg) Uppremitt (Tilberkinsatz) Garantert hydrofiktrivaf) Skärbeeddn) Antsücksend person für upprattendet av den tekniska dokumentationan;e Ort och datum | DA Oversatzerse el an originale ongrandering;EF-overensstemmelsenterkörung(Maskindrektiv 2006/42/EG, bilag II, del A)1. Finneat2. Enlertet par egel anerat, at maskinen: Planoelltpper belittent af glende personer / sligmine af oreasact8) Typ / Modellb) Manned / Konstruktionserc) Seriennummerd) Motor: batteri3. Et r overensstemmelse med specifizionema latige direkte norme;e Certifikierungsorganf) EF typischekmande4. Lienning till harmonisede standarderg) Malt hydrofiktrivaf) Garantert hydrofiktrivaf) Skärbeeddn) Antsücksend person für upprattendet av den tekniska dokumentationan;e Ort och datum |
| NL (Volarizing commercial e geführungsverpf)EG-veräußer von overgengevning(Friedlän Machines 2006/42/CE, Biopage II, deel A)1. Tie bednet2. Verkauss und zijn eigen veransitzend/keldheid dat de machine: Lupend bedwiedere harmonisder / graemasiera) Type / Busdomodelb) Maard / Bouvierder5. Eftom eracei6. Voldet dan de specifizierkes van de rengijperske5. Parsonne instituts6. ED-underzoek van het Type4. Verzügeling naar de Gehammonisende normen6. Metaten niveau van geldadoverungen6. Geverandend niveau van geldadoverungen6. Snijpreechte6. Beveoged person voor het opstellen van het Technisch Dossier6. Plate en Datum | ES | Produktion de Manuel Ding mit|Declaración de Conformité DE (Directores Maquines 2006/42/CE, Annex II, parte A)1. La Empress2. Declera bajo su proprie responsabilidad que la máquina: Cortadora de pasta con operador de plc / corte hiérbaa) Typ / Modelo Baseb) Max / Alco de tebraccione3. Matrículola4. Meter: batteria5. Cumpie con las especificaciones de las directives;e Enita certificadorf) Examen CE del Tipo4. Referencia a las Normas armonizadasg) Nivel de potencia sonore medidah) Nivel de potencia sonora garantizadof) Ampulfad de cortei) Person autorizada a realizar al Manuel Tecnolioa) Luge y Faeda | PT | Totação do married origine|Declaração DE de Conformidade(Directores Maquines 2006/42/CE, Annex II, parte A)1. La Empress2. Declara após a proprie responsabilidade que a máquina: Corta-relava para operador ap PARO da relvaa) Typ / Modelo Baseb) Max / Alco de tebraccione3. Matrículola4. Meter: Batteria5. Cumpie con las especificaciones de las directives;e Enita certificadorf) Examen CE del Tipo4. Referencia a las Normas harmonizadasg) Nivel medido de potência sonorah) Nivel garantida de potência sonorai) Amplitude de cortei) Pesso autorizada a elaborar o Caderno Tecnoloa) Loco e Dota | FI | Alapazionario o jedekan koridinici|EV-VASI MUSTINUMNIKASIKISAVAKUUTUS (Konstedriktiv 2006/42/EY, Lille II, osa A)1. Yrjaya2. Valada emata oraita vestuistain, otto koro: Körlanden objektiva nozhornelikkuvi nohonelikkuva3) Typpyl / Peresmelli4) Kuudkemi Nahmatukovzoli5) Saranumura6) Mobitor i skku7. On yihendemukulines asztavaszen direktivizen secuimeten vastimuten kanone;e Sertifikirhafivaf) EF-cryptikaraktaus8. Viutus harmonisduhih standardeshgi Mituti dantielhatso9) Teletu stambishave10. Leikakuvayce11. Tekintien elektrijkjen belittimenen valhautela beridulo;e Pateka ja pahlvatnaha | CS | Flüssel bezustebuho nevohtak i podževni|ES - Probieteni o seltke(Smirinlice o Strechnich zaričenich 2006/42/ES, Philha I, Cest A)1. Sprorcinio2. Probietaje na vlasitni odpovedinut, ze stroj. Sekracha se aglozi obshobu / sakracha na travaa) Typ / Zlokindi modelb) Naic / Rok vrycyb4) Motor: akkulatord) Motor: akkulatord3. Je ve ahole a ražinžini amničina;e Cerkaliclaci organf) ES škala dišky4) Ockory na Harmonianovni normyb) Noměřeni urovel akustického vykuhn/a Zarodena groven akustického vykuhn/a Širka Rezanib) Osoba autorovanja pro vytvořeniTechnického aplor;e Kina i Daturn | PL (Turcanze inodukoj ovynidnej)Delkanja zgodnotań WE(Dynnykový maszynovsk 2006/42/WE, Zařejcznik II, czech A)1. Šitka2. Ovídlačná na svákuč odspovedilnámáci, za marzycne: Kosinkra przemecolora przez operatora prezogo i cípice travya) Typ / Model podatouwýb) Hévesć proš producji3) Numel serzyjáb) Silnik: akumulator3. Spektna podatouwá uwmogi nastepugých dyskinyčav.b) Jedničnice certifikápięza4. Badratie type WE4. Odrientete do Norm zhammonizovreryh8. Zrászony porion mocy skutdycejni9. Gwarantikany poziom mocy skutdyzné9. Szarckošć stejle9. Osoba autorovanja do zredningania Dokumenterb technicznej;a Miljacowské i data |
| EL (Atropologie de manutenzione, sus evitatskiy juzkis)EK-Anklaus smupănjangcnc(Ödegyes Megravay 2006/42/CE, Ipeperțmpa II, tippo, AfEupia3) Zavlosne uvedihany en puglyey;Maksomini jorgelyi je pugly e uvedihyi / zanji tipp, AfTopur; Tomor / Borso Mortheta4) Mújyes / Eras komosuayi5) Aplyves j prunov4) Knurtipor; Pruplume4) Aplicijs je prunov5) Knurtipor; Pruplume4) Aplicijs je prunov6) Aplicijs je prunov7) Aplicijs je prunov8) Aplicijs je prunov9) Aplicijs je prunov10) Aplicijs je prunov11) Aplicijs je prunov12) Aplicijs je prunov13) Aplicijs je prunov14) Aplicijs je prunov15) Aplicijs je prunov16) Aplicijs je prunov17) Aplicijs je prunov18) Aplicijs je prunov19) Aplicijs je prunov20) Aplicijs je prunov21) Aplicijs je prunov22) Aplicijs je prunov23) Aplicijs je prunov24) Aplicijs je prunov25) Aplicijs je prunov26) Aplicijs je prunov27) Aplicijs je prunov28) Aplicijs je prunov29) Aplicijs je prunov30) Aplicijs je prunov31) Aplicijs je prunov32) Aplicijs je prunov33) Aplicijs je prunov34) Aplicijs je prunov35) Aplicijs je prunov36) Aplicijs je prunov37) Aplicijs je prunov38) Aplicijs je prunov39) Aplicijs je prunov40) Aplicijs je prunov41) Aplicijs je prunov42) Aplicijs je prunov43) Aplicijs je prunov44) Aplicijs je prunov45) Aplicijs je prunov46) Aplicijs je prunov47) Aplicijs je prunov48) Aplicijs je prunov49) Aplicijs je prunov50) Aplicijs je prunov51) Aplicijs je prunov52) Aplicijs je prunov53) Aplicijs je prunov54) Aplicijs je prunov55) Aplicijs je prunov56) Aplicijs je prunov57) Aplicijs je prunov58) Aplicijs je prunov59) Aplicijs je prunov60) Aplicijs je prunov61) Aplicijs je prunov62) Aplicijs je prunov63) Aplicijs je prunov64) Aplicijs je prunov65) Aplicijs je prunov66) Aplicijs je prunov67) Aplicijs je prunov68) Aplicijs je prunov69) Aplicijs je prunov70) Aplicijs je prunov71) Aplicijs je prunov72) Aplicijs je prunov73) Aplicijs je prunov74) Aplicijs je prunov75) Aplicijs je prunov76) Aplicijs je prunov77) Aplicijs je prunov78) Aplicijs je prunov79) Aplicijs je prunov80) Aplicijs je prunov81) Aplicijs je prunov82) Aplicijs je prunov83) Aplicijs je prunov84) Aplicijs je prunov85) Aplicijs je prunov86) Aplicijs je prunov87) Aplicijs je prunov88) Aplicijs je prunov89) Aplicijs je prunov90) Aplicijs je prunov91) Aplicijs je prunov92) Aplicijs je prunov93) Aplicijs je prunov94) Aplicijs je prunov95) Aplicijs je prunov96) Aplicijs je prunov97) Aplicijs je prunov98) Aplicijs je prunov99) Aplicijs je prunov100) Aplicijs je prunov101) Aplicijs je prunov102) Aplicijs je prunov103) Aplicijs je prunov104) Aplicijs je prunov105) Aplicijs je prunov106) Aplicijs je prunov107) Aplicijs je prunov108) Aplicijs je prunov109) Aplicijs je prunov110) Aplicijs je prunov111) Aplicijs je prunov112) Aplicijs je prunov113) Aplicijs je prunov114) Aplicijs je prunov115) Aplicijs je prunov116) Aplicijs je prunov117) Aplicijs je prunov118) Aplicijs je prunov119) Aplicijs je prunov120) Aplicijs je prunov121) Aplicijs je prunov122) Aplicijs je prunov123) Aplicijs je prunov124) Aplicijs je prunov125) Aplicijs je prunov126) Aplicijs je prunov127) Aplicijs je prunov128) Aplicijs je prunov129) Aplicijs je prunov130) Aplicijs je prunov131) Aplicijs je prunov132) Aplicijs je prunov133) Aplicijs je prunov134) Aplicijs je prunov135) Aplicijs je prunov136) Aplicijs je prunov137) Aplicijs je prunov138) Aplicijs je prunov139) Aplicijs je prunov140) Aplicijs je prunov141) Aplicijs je prunov142) Aplicijs je prunov143) Aplicijs je prunov144) Aplicijs je prunov145) Aplicijs je prunov146) Aplicijs je prunov147) Aplicijs je prunov148) Aplicijs je prunov149) Aplicijs je prunov150) Aplicijs je prunov151) Aplicijs je prunov152) Aplicijs je prunov153) Aplicijs je prunov154) Aplicijs je prunov155) Aplicijs je prunov156) Aplicijs je prunov157) Aplicijs je prunov158) Aplicijs je prunov159) Aplicijs je prunov160) Aplicijs je prunov161) Aplicijs je prunov162) Aplicijs je prunov163) Aplicijs je prunov164) Aplicijs je prunov165) Aplicijs je prunov166) Aplicijs je prunov167) Aplicijs je prunov168) Aplicijs je prunov169) Aplicijs je prunov170) Aplicijs je prunov171) Aplicijs je prunov172) Aplicijs je prunov173) Aplicijs je prunov174) Aplicijs je prunov175) Aplicijs je prunov176) Aplicijs je prunov177) Aplicijs je prunov178) Aplicijs je prunov179) Aplicijs je prunov180) Aplicijs je prunov181) Aplicijs je prunov182) Aplicijs je prunov183) Aplicijs je prunov184) Aplicijs je prunov185) Aplicijs je prunov186) Aplicijs je prunov187) Aplicijs je prunov188) Aplicijs je prunov189) Aplicijs je prunov190) Aplicijs je prunov191) Aplicijs je prunov192) Aplicijs je prunov193) Aplicijs je prunov194) Aplicijs je prunov195) Aplicijs je prunov196) Aplicijs je prunov197) Aplicijs je prunov198) Aplicijs je prunov199) Aplicijs je prunov200) Aplicijs je prunov201) Aplicijs je prunov202) Aplicijs je prunov203) Aplicijs je prunov204) Aplicijs je prunov205) Aplicijs je prunov206) Aplicijs je prunov207) Aplicijs je prunov208) Aplicijs je prunov209) Aplicijs je prunov210) Aplicijs je prunov211) Aplicijs je prunov212) Aplicijs je prunov213) Aplicijs je prunov214) Aplicijs je prunov215) Aplicijs je prunov216) Aplicijs je prunov217) Aplicijs je prunov218) Aplicijs je prunov219) Aplicijs je prunov220) Aplicijs je prunov221) Aplicijs je prunov222) Aplicijs je prunov223) Aplicijs je prunov224) Aplicijs je prunov225) Aplicijs je prunov226) Aplicijs je prunov227) Aplicijs je prunov228) Aplicijs je prunov229) Aplicijs je prunov230) Aplicijs je prunov231) Aplicijs je prunov232) Aplicijs je prunov233) Aplicijs je prunov234) Aplicijs je prunov235) Aplicijs je prunov236) Aplicijs je prunov237) Aplicijs je prunov238) Aplicijs je prunov239) Aplicijs je prunov240) Aplicijs je prunov241) Aplicijs je prunov242) Aplicijs je prunov243) Aplicijs je prunov244) Aplicijs je prunov245) Aplicijs je prunov246) Aplicijs je prunov247) Aplicijs je prunov248) Aplicijs je prunov249) Aplicijs je prunov250) Aplicijs je prunov251) Aplicijs je prunov252) Aplicijs je prunov253) Aplicijs je prunov254) Aplicijs je prunov255) Aplicijs je prunov256) Aplicijs je prunov257) Aplicijs je prunov258) Aplicijs je prunov259) Aplicijs je prunov260) Aplicijs je prunov261) Aplicijs je prunov262) Aplicijs je prunov263) Aplicijs je prunov264) Aplicijs je prunov265) Aplicijs je prunov266) Aplicijs je prunov267) Aplicijs je prunov268) Aplicijs je prunov269) Aplicijs je prunov270) Aplicijs je prunov271) Aplicijs je prunov272) Aplicijs je prunov273) Aplicijs je prunov274) Aplicijs je prunov275) Aplicijs je prunov276) Aplicijs je prunov277) Aplicijs je prunov278) Aplicijs je prunov279) Aplicijs je prunov280) Aplicijs je prunov281) Aplicijs je prunov282) Aplicijs je prunov283) Aplicijs je prunov284) Aplicijs je prunov285) Aplicijs je prunov286) Aplicijs je prunov287) Aplicijs je prunov288) Aplicijs je prunov289) Aplicijs je prunov290) Aplicijs je prunov291) Aplicijs je prunov292) Aplicijs je prunov293) Aplicijs je prunov294) Aplicijs je prunov295) Aplicijs je prunov296) Aplicijs je prunov297) Aplicijs je prunov298) Aplicijs je prunov299) Aplicijs je prunov299.9.1.1.1.1.1.1.1.1.1.1.1.1.1.1.1.1.1.1.1.1.1.1.1.1.1.1.1.1.1.1.1.1.1.1.1.1.1.1.1.1.1.1.1.1.1.1.1.1.1.1.2.1.1.1.1.1.1.1.1.1.1.1.1.1.1.1.1.1.1.1.1.1.1.1.1.1.1.1.1.1.1.1.1.1.1.1.1.1.1.1.1.1.1.1.1.1.1.1.1.1.3.1.1.1.1.1.1.1.1.1.1.1.1.1.1.1.1.1.1.1.1.1.1.1.1.1.1.1.1.1.1.1.1.1.1.1.1.1.1.1.1.1.1.1.1.1.1.1.1.1.4.1.1.1.1.1.1.1.1.1.1.1.1.1.1.1.1.1.1.1.1.1.1 |
| SL Proced Ekm n'obecnati | BE I'jrtjodnajdn'li'pulna | BK Preocid obovno'ne n'ovodu na poziitki | ||
| ES izgava a skladnosti(Direktiva 2006/42/EB, pricluge II, del A)1. Dredba2. pod latino ogovomostja izgavla, da je stroj.Košinlka za stojotoga detorvo / košnja travaa) Tip i osnovni modela) Tijrločný robo3. Sertifikáčno šetivka4. Motor: baterija5. Škodan je z odočitili direkty:1. Uzcanova, ml tida potriloE ES prejed tipa4. Šultovanje na uskladene predorzejo (gimieržní vno zvolne moti)J Agatovaničnáho zestavuje tehněne impíltice:o) Okrá in datum | EZ izgava a skladnosté(Direktiva o măratima 2006/42/EZ, Prilog II, deo AI1. Ríma2. Daje izgavno pod vlastnom odgovomostu da je măratu: Košinla je gurarea / Košnja travao) Tipi/Proveni modela) B Moseci Godina prožvodnja3. Sertifikáčno brojo4. Motor: akumulator3. uskladna s oursenlim zahejovima direktrva: a) Certifikaciona tiyloE ZŠ izpitlanje tipa4. Poživanja na uskladene na mie6. Ummeniční nivo zvolne snage) G Garantovani nivo zvolne snage) Sirtna klasnja7. Ostrila oskladnega za turaču technikce brosurn: e) Mycel i datum | ES vyhlásenie o zhede(Esmorica o Strájvych zarladeniash 2006/42/EB,Prilog II, čast A)1. Spolčnost2. Vyhlásuje na vlastní zařevopecnost, se stroj.Košnica se stojedno obstahu / koskina ne tojuoa) Tip / Základy modab) Maslac / Rak výrody2. Výrobné číslo4. Piotova II, čast A)3. Je v zlochod a naraderjeni amernici: a) Certifikacný orgon) Búglíka tipo ESB4. Dížlava na hormozuženama nemy9. Nomerand groveň akustického výkonu1) Zerubanić drovaní akustickelva výkonu2) Sirtna komasie3) Oseba autorizovaná na vývorencie Technickelho spitou;4) Miosto i Datum | ||
| RO Traduncenia monatná (not seritáli)CE-Declarité de Conformátate(Direktiva Majini 2006/42/E, Anace II, portas A)1. Societiasis2. Declarité propria raspundere na magina:Majini de turs bará da concubator pedanru / tarii baráa) i Tip / Mycel je braja(i) Tipi/Anul deletracije) Numar de materie; Motor: basněc3. Esta in conformitate cu specifizajiile direktor: o Organism de certificnare j Emantirama CE de Tipi4. Referanta si Standardise amonizate6. Nivel de putera sonora masauti7. Nivel de putera sonora gamauti8. Lapines de latere9. Personana autorizana al Intocenaveči Dosnerul Technic o Locali sl Data | LT (Orijý výk, notadný jevi mea)EB atritkles deklarocija(Mašiny chakryya 2006/42/E, Plekias II, deta A)1. Bandrova2. Pristetina sarkomymb, kad jrengiya: Pecio operatorius valdorna vejajlová Žotla plovniesa) Tipes / Bazinia Modelia) B Perun / Pageminnimo metai3. Sertifikáčno brojo4. Varlikle: baterija5. Athlitka drekynosve patelitna specifikacijsa: a) Sertifikáčno jatiga6) CL tipo zymena7. Kucrodia i sudarkitins Normosa8. Kamutatona garso gallos lygis1. Uzkiririnamo garso gallos lygis2. Porvimo plata3. Autorizanota namiu sadariyi Techniog Dokumentarija;e) Viela ir Data | LV (Fatsučnja i.kojmen na oričně vodná)EK atritifikas deklarocija(Direktiva 2006/42/EK par măzimeln, platkuma II, deta A)1. Uprzumsa2. Uzemorales por sa pištu atzlišbu, pazdyo, ka mărasa: Pecio operationius valdorna vejajlová/ zate plașmasa) Tipi/Anul deletracije9. Nemesis / Pečionanara gode3. Srlžija numura4. Motone akumulatora3. Altinita zeda deklaridru primitam: a) Sertifikáčno kostidei1) CE izvrada parbauda2. Azorou se funkonziem standartiem8. Izoličda atapus internačkina GrovisiG Garantislava atapus internačkina limeriai1) Plasmanas pisumasn) Plasmanas deklarinka, kasa sagatavuje teknikos dokumentarije:n) Viela un datum | ||
| SR (Pocstal n'ogodnih upoditel)CE deklaracija u nasgeplnosti(Direktiva o măratima 2006/42/EC, Pilog II, deo A)1. Predazade2. Daje i spaj pod vlastnom odgovomostu da je mătja: Kosotovni na guranje / užanje travaa) Tip / Onovni modeli) Mesac Khadina pravlodnje3. Sertifikáčno brojo4. Motor: katerija3. u skladne o conamorni zastavuje direktiva: e) Sertifikaciono teloE IS laptihanje tipa4. Pararmie je uskladene norma5. Izmerani nivo zvolne snage6. Garantovani nivo zvolne snage7. Sirna komasie9. Oseba ovlobčena za sastavuje teknikce brosureo) Mestoi datum | BG [I'prejučna opru msnoviću i norsupruje:] EDO adeklarjana na sotretivstme(Direktiva Mašanina 2006/42/E, Prilognične II, tast A)1. Druseštentra2. Na nečišnana ottočonomost aktivjerava, cha măchinata: Kosotiva ektravjerama koudr / riszine na trapa3) Bod / Baszianu mirdan4) Nevali / portrava na prostrokovstvo5) Osparen roskor6) Motor: muskynatur3. E.B. u sotretivstme sčb steličnifiksta na darokrivnosti: o Serpina marjiriću orpiniE EO volsledane na eviđa4. Baziarano na adzoroviniziranite norma6) Naču na imparlerna musktenna muktori#7) Agrantovina lape na akustinna mojostot8) Silporcinna na koscine9) Ikučn, yvšenzenmiedno da sčstavna Techničkostra Dokumentarija:n) Ivicto ir data | ET (Akupionne oco-Lojupnić di obje)EU vastanov deklaristionen (Mipradnikov 2006/42/EU, Lila I, osa A)1. Fims2. Knittab omsi vastukuri, et masin: Setiva juhige manušlige temanujlijea) Tinpi / Pichimodeli4) Ku zega / Todimisasta3) Mietickel4) Kostor aksi5) Vastanov belstvidke ocoutele:6) Kaminlav asnutaminei1) EU toubhindamine4. Vide ultrustatud standarditee4) Klodmetud belstirmusse taseg3) Gaatzelebud belstirmusse tasei1) Lõltelälusn) Teknilas Lebe autorlawnihud konstaje:9) Kohl ja Raupov | ||
EN • The content and images in this User Manual were produced expressly for STIGA S.p.A. and are protected by copyright – any unauthorised reproduction or modification to the document, either partially or in full, is prohibited.
Type: