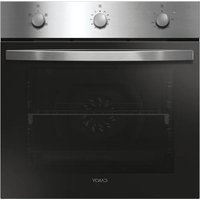
CEHOPK60XE - Built-in oven CANDY - Free user manual and instructions
Find the device manual for free CEHOPK60XE CANDY in PDF.
| Product type | Built-in oven |
| Brand | Candy |
| Model | CEHOPK60XE |
| Dimensions (W x H x D) | Approx. 595 x 595 x 550 mm |
| Net weight | Approx. 35 kg |
| Power supply | 220-240 V ~ 50/60 Hz |
| Total power | Varies by setting (max 7.2 kW) |
| Energy class | A |
| Capacity | 70 L |
| Main functions | Conventional cooking, fan-assisted, grill, forced hot air |
| Control type | Touch screen |
| Child lock | Yes (key lock) |
| Timer | Yes, programmable up to 99 minutes |
| Display | Digital display |
| Cleaning and maintenance | Clean with specific ceramic glass cleaners |
| Finish | Ceramic glass |
| Color | Black |
| Repairability | Spare parts available via after-sales service |
| Warranty | 2 years |
Frequently Asked Questions - CEHOPK60XE CANDY
User questions about CEHOPK60XE CANDY
0 question about this device. Answer the ones you know or ask your own.
Ask a new question about this device
Download the instructions for your Built-in oven in PDF format for free! Find your manual CEHOPK60XE - CANDY and take your electronic device back in hand. On this page are published all the documents necessary for the use of your device. CEHOPK60XE by CANDY.
USER MANUAL CEHOPK60XE CANDY
- General warnings 05
- Protection of the environment 05
3.Installation. 05 - Electrical connection 06
5.Hob cookware advice 08
6.Use 08 - Cleaning and maintenance 10
- Problem solving 10
- Aftercare 10
INDICE
IT
We recommend you keep the instructions for installation and use for later reference, and before installing the hob, note its serial number in case you need to get help from the after sales service. WARNING: the appliance and its accessible parts become hot during use. Care should be taken to avoid touching heating elements. Children under 8 years of age must be kept away from the appliance unless they are continuously supervised.
WARNING: use only hob guards designed by the Manufacturer of the cooking appliance or indicated by the Manufacturer of the appliance in the instructions for use as suitable or hob guards incorporated in the appliance. The use of inappropriate guards can cause accidents.
WARNING: unattended cooking on a hob with fat or oil can be dangerous and may result in fire. NEVER try to extinguish a fire with water, but switch off the appliance and then cover flame e.g. with a lid or a fire blanket.
WARNING: danger of fire: do not store items on the cooking surfaces.
WARNING: if the surface is cracked, do not touch the glass and switch off the appliance to avoid the possibility of electric shock.
This appliance can be used by children aged from 8 years and above and people with reduced physical, sensory or mental capabilities or lack of experience and knowledge if they have been given supervision or instruction concerning use of the appliance in a safe way and understand the hazards involved. Children should be supervised to ensure that they do not play with the appliance. Cleaning and user maintenance shall not be made by children without supervision.
CAUTION: the cooking process must be supervised. A short term cooking process has to be supervised continuously.
It is strongly recommended to keep children away from the cooking zones while they are in operation or when they are switched off, so long as the residual heat indicator is on, in order to prevent the risks of serious burns.
This appliance is not intended to be operated by means of an external timer or separate remote control system.
If present do not to stare into halogen lamp hobelements.
Connect a plug to the supply cable that is able to bear the voltage, current and load indicated on the tag and having the earth contact. The socket must be suitable for the load indicated on the tag and must be having the earth contact connected and in operation. The earth conductor is yellow-green in color. This operation should be carried out by a
suitably qualified professional. In case of incompatibility between the socket and the appliance plug, ask a qualified electrician to substitute the socket with another suitable type. The plug and the socket must be conformed to the current norms of the installation country. Connection to the power source can also be made by placing an omnipolar breaker between the appliance and the power source that can bear the maximum connected load and that is in line with current legislation.
The yellow-green earth cable should not be interrupted by the breaker. The socket or omnipolar breaker used for the connection should be easily accessible when the appliance is installed.
The disconnection may be achieved by having the plug accessible or by incorporating a switch in the fixed wiring in accordance with the wiring rules.
If the supply cord is damaged, it must be replaced by Manufacturer, its service agent or similarly qualified people in order to avoid a hazard. The earth conductor (yellow-green) must be longer than 10mm on the terminal block side. The internal conductors section should be appropriate to the power absorbed by the hob (indicated on the tag). The type of power cable must be HO5V2V2-F.
Do not put metallic objects such as knives, forks, spoons or lids on the hob. They could heat up. Aluminum foil and plastic pans must not be placed on heating zones.
After every use, some cleaning of the hob is necessary to prevent the build-up of dirt and grease. If left, this is recooked when the hob is used and burns giving off smoke and unpleasant smells, not to mention the risks of fire propagation.
Never use a steam or high pressure spray to clean the appliance.
Do not touch the heat zones during operation or for a while after use.
Never cook food directly on the glass ceramic hob.
Always use the appropriate cookware. Always place the pan in the center of the unit that you are cooking on.
Do not place anything on control panel.
Do not use the hob as a working surface.
Do not use the surface as a cutting board.
Do not store heavy items above the hob. If they drop onto the hob, they may cause damage.
Do not use the hob for storage of any items.
Do not slide cookware across the hob.
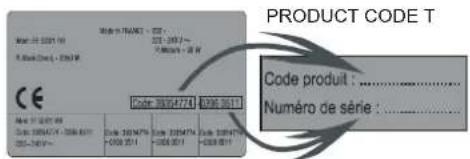
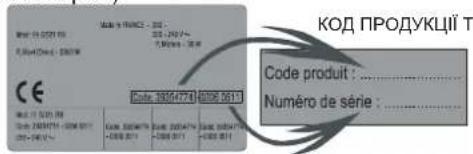
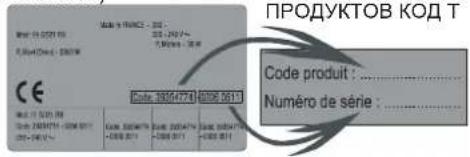
Identification Plate (located under the hob's bottom casing)
1. GENERAL WARNINGS
By placing the mark on this appliance we are assuring compliance to all European Safety, Health and Environment requirements which are applicable for this product category.
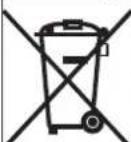
2. PROTECTION OF THE ENVIRONMENT
This appliance is marked according to European Directive 2012/19/EU on Waste Electrical and Electronic Equipment (WEEE).
WEEE contains both polluting substances (which can cause negative consequences for the environment) and basic components which can be reused. It is important to have WEEE subjected to specific treatments, in order to remove and dispose properly all pollutants and recover and recycle all materials.
Individuals can play an important role in ensuring that the WEEE does not become an environmental issue; it is essential to follow some basic rules:
- WEEE shall not be threatened as household waste.
- WEEE shall be handled over to the relevant collection points managed by the municipality or by registered companies. In many Countries, for large WEEE, home collection could be present.
- In many Countries, when you buy a new appliance, the old one may be returned to the retailer who has to collect it free of charge on a one-to-one basis, as long as the appliance is of equivalent typology and has the same functions as the supplied one.
3. INSTALLATION
Installing a domestic appliance it is a complicated operation which, if not carried out correctly, can seriously have impact on safety of goods, properties or people. For this reason, it should be carried out by a professionally qualified person in accordance with technical regulations.
In the event that this advice it is ignored and installation is carried out by an unqualified person, the Manufacturer declines all responsibility for any technical failure of the appliance whether or not it results in damage of goods or properties or in injury of people or animals.
After having removed the packaging please be sure that the appliance it is not damaged, otherwise contact the Retailer or Manufacturer After Sales Service.
Make sure that the furniture in which the appliance will be fitted and all other furniture in the nearby are made with materials which can withstand high temperatures (min 100^ ).
In addition, all decorative laminates should be fixed with high-resistance glue.
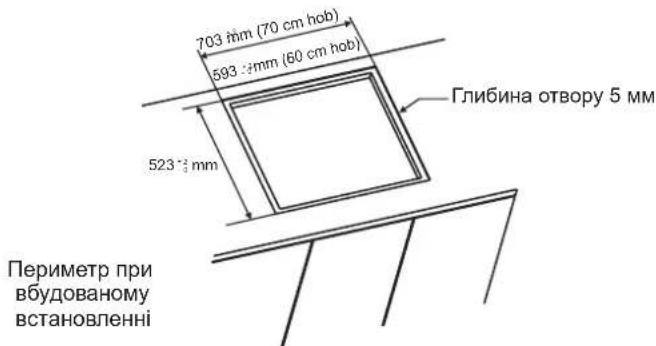
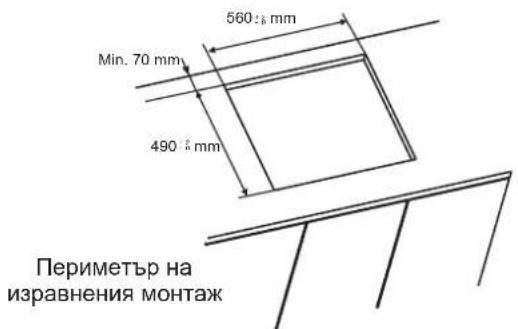
Appliance can be installed in a Built-in furniture in "Standard" or "Flush" mode.
Worktop thickness should be between 25 and 45mm
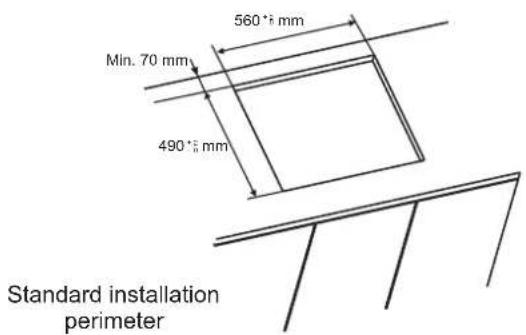
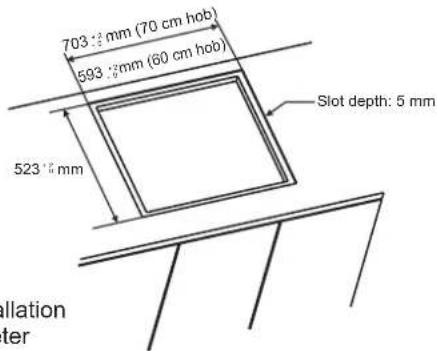
Flush installation perimeter
Note: Inner perimeter dimensions are same with standard installation
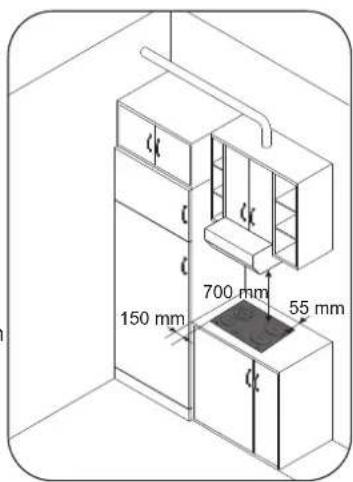
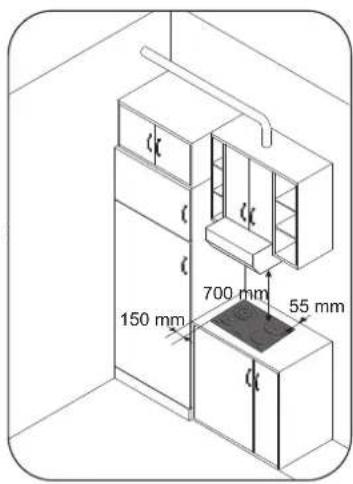
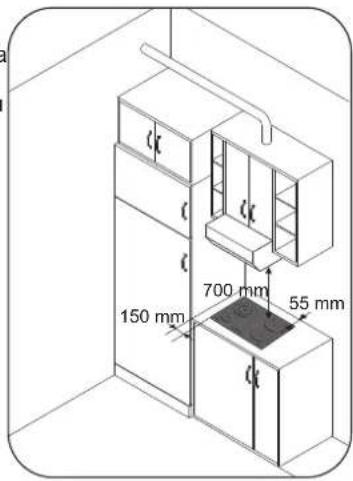
Leave a distance of at least 55 mm between the hob and the back wall and of at least 150 mm between the hob and the vertical furniture or walls in the lateral side. If a furniture is installed above the hob, the minimum distance required is 700 mm.
When installing a hood above the hob, please consult the installation requirements specified for the hood but, in any case, the distance between the hob and the hood must not be lower than 700mm
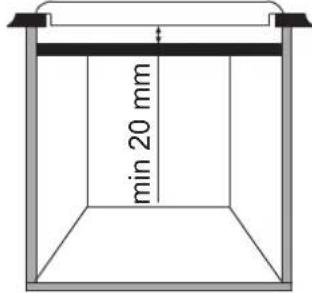
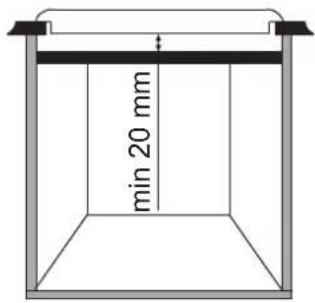
If the bottom part of the hob is adjacent to an area normally accessible for handling or cleaning operations, a separator it must be put 20mm below the bottom part of the hob.
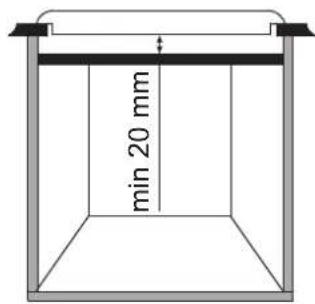
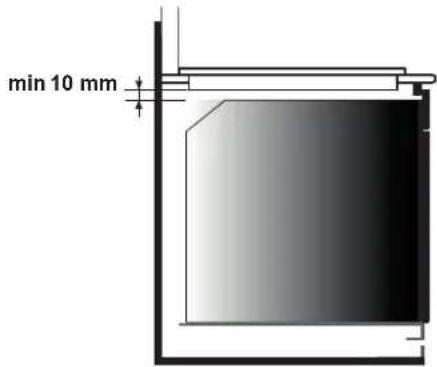
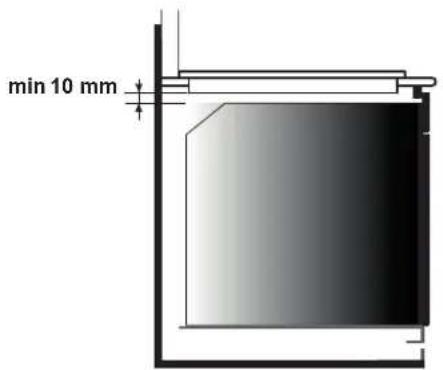
When installing an oven under the hob, separator must not be put and the minimum distance between the bottom part of the hob and the oven must not be lower than 10mm . Do not install not cooled oven under this hob and install the oven following its own installation requirements.

A watertight seal gasket is supplied with the hob. Fit the seal gasket around the bottom hob as described and make sure that it is properly fitted to avoid any leakage into the supporting furniture.
4. ELECTRICAL CONNECTION
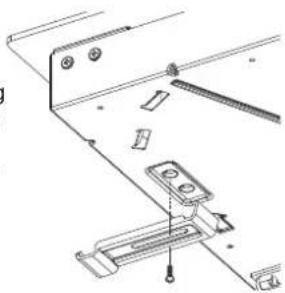
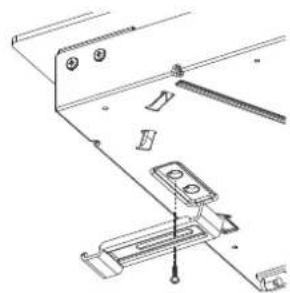
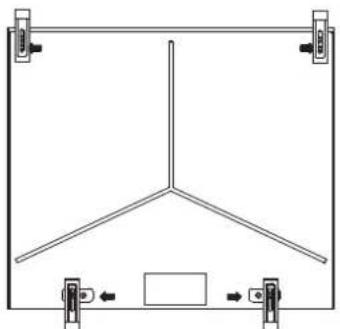
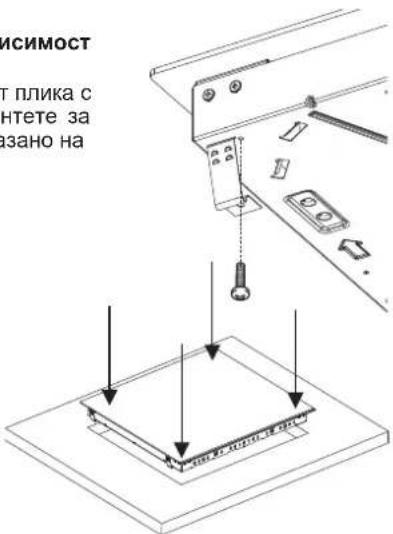
Normal Fixing:
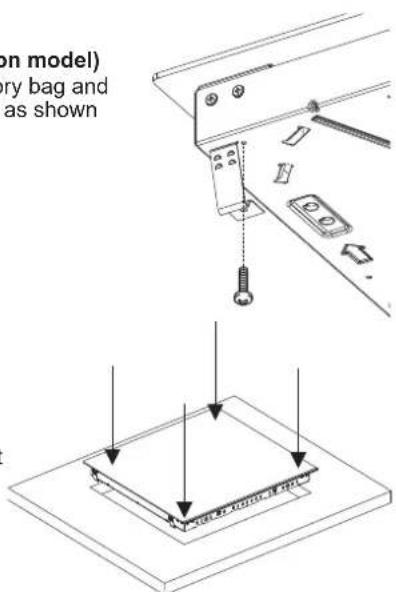
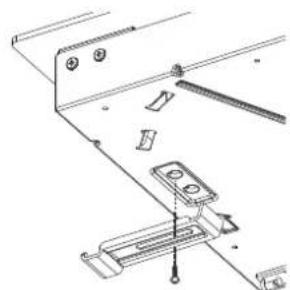
- Get the fixing clips from accessory bag and screw them into the position shown on bottom box. (Do not tighten the screws to block clips, they should move freely)
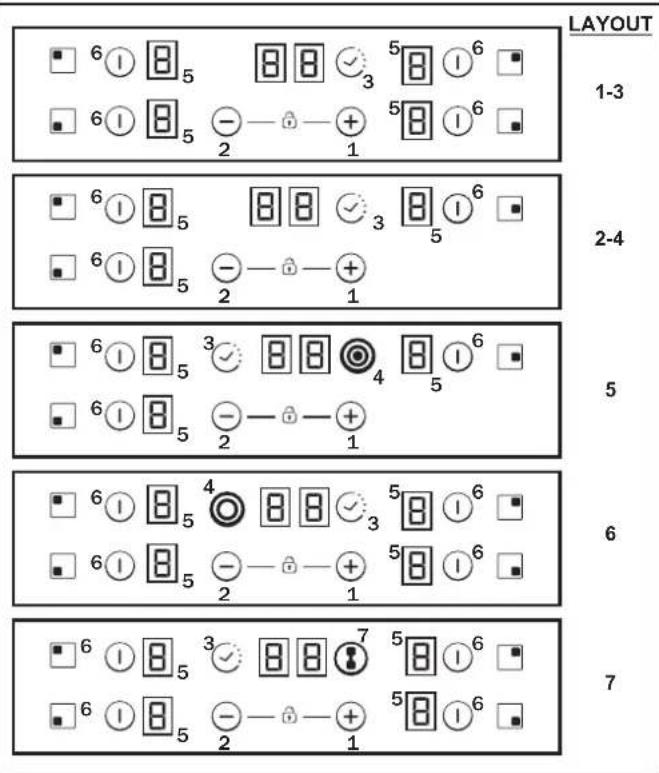
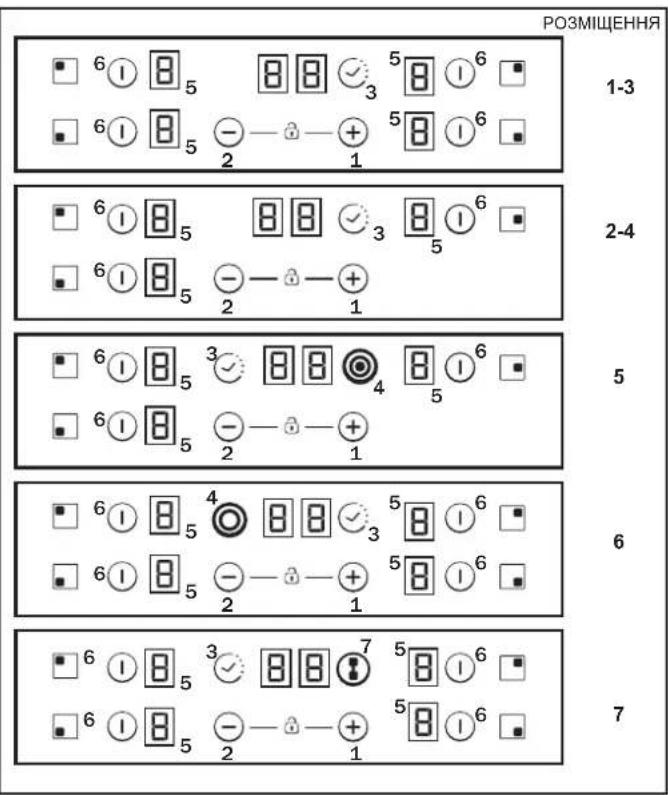
LAYOUT 5
LAYOUT 6
LAYOUT7
- Insert the hob in center position of cut out.
- Turn the clips and tighten them fully.
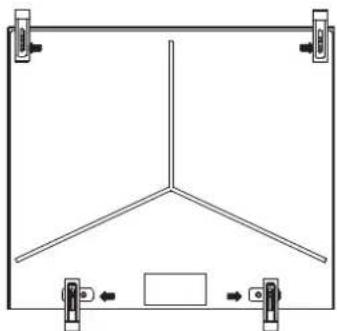
Quick Fixing: (Depending on model) Get four springs form accesory bag and screw them onto bottom box as shown in figure.
Center and insert the hob. Press the sides of hob until it is supported around its entire perimeter.
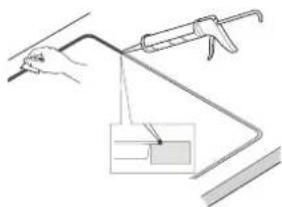
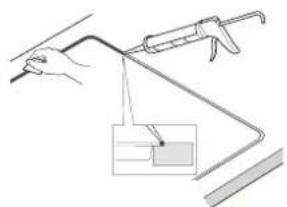
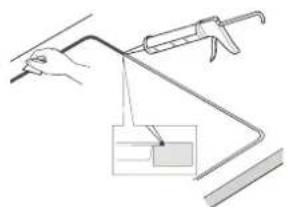
FLUSH INSTALLATION
After checking that the position of the hob is correct fill the gap between the worktop and the hob with silicone adhesive. Flatten the silicone layer with a scraper or with wet finger damped with water and soap before it forms. Do not use the hob until the silicone layer it is completely dry.
According to model
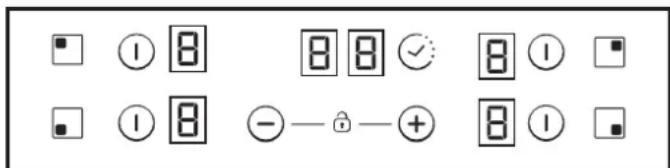
- " + "
- " -"
- TIMER
- Additional cooking zone led
- Cooking zone programming indicator
- Selection of the zone
- Bridge
"Installation must conform to the standards & directives." Manufacturer declines all responsibility for any damage that might be caused by unsuitable or unreasonable use.
WARNING: Manufacturer cannot be held responsible for any incident or its consequences that may arise during the use of an appliance not linked to the earth, or linked to an earth whose continuity is defective.
Before any electrical operation, please check the supply tension shown on the electricity meter, the adjustment of the circuit-breaker, the continuity of the connection to earth to the installation and that the fuse is suitable.
The electrical connection to the installation should be made according to the rated power of the Appliance; this should be made via an Omni pole cut-out switch.
If the appliance has a socket outlet, it must be installed so that the socket outlet is accessible.
The yellow/green wire of the power supply cable must be connected to the earth of both power supply and appliance terminals.
For any questions regarding power supply cord refer to After Sales Service or a qualified technician.
If the hob is fitted with power supply cord, this shall be connected only to a power supply of 220 - 240V between phase and neutral.
It is however possible to connect the hob to:
Three Phase 220-240 V3
Three Phase 380-415 V2N
To proceed to the new connection, please follow below instructions: Before making the connection, make sure that the installation is protected by a suitable fuse, and that it is fitted with wires of a large enough section to supply the appliance normally.
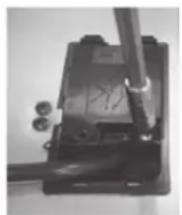
Turn over the hob, glass side against the working top, taking care to protect the glass.
Open the cover in the following sequence:
1
2
三
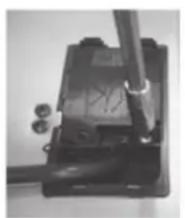
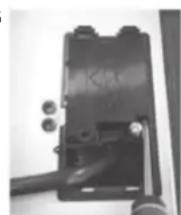
- unscrew the cable clamp "1";
- find the two tabs located on the sides;
- put the blade of a flat screw-driver in front of each tab "2" e
"3", push in and press; - remove the cover.
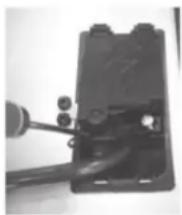
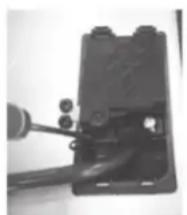
To release the power supply cord:
- Remove the screws retaining the terminal block which
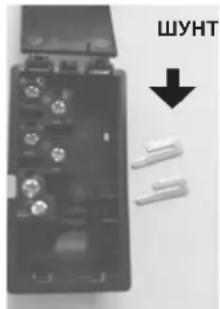
contains the shunt bars and the conductors of the supply cord; - Pull out the supply cord.
Operations to be carried out to make a new connection:
- Choose the power supply cable in accordance with the
recommendations in the table;
Pass the power supply cable into the clamp - Strip the end of each conductor of the supply cord on a 10mm length, by taking in account the requested length of the cord for the connection to the terminal block:
- According to the installation and with the help of shunt bars which you should have recovered in the first operation, fix the conductor as shown on the chart;
Fix the cover; - Screw the cable clamp.
Note: make sure the terminal board screws are tight.
Operations to be carried out to make a new connection:
-
Choose the power supply cable in accordance with the recommendations in the table;
-
Pass the power supply cable into the clamp;
- Strip the end of each conductor of the supply cord on a 10mm length, by taking in account the requested length of the cord for the connection to the terminal block;
- According to the installation and with the help of shunt bars which you should have recovered in the first operation, fix the conductor as shown on the chart:
Fix the cover;
- Screw the cable clamp.
ATTENTION:
If it should be necessary to replace the power supply cord, connect the wire in accordance with following colors/codes:
| BLUE | Neutral | (N) |
| BROWN | Live | (L) |
| YELLOW- GREEN | Earth | (▲) |
Connection to the terminals on the terminal block
| LAY OUT "1-6" | LAY OUT "7" | |
| MONOPHASE or TWO PHASES 220-240 V~ | ||
| Cable HO5V2V2F | 3x2,5 mm² | 3x4 mm² |
| THREE PHASES 220-240 V3~ | ||
| Cable HO5V2V2F | 4x1,5 mm² | 4x1,5 mm² |
| THREE PHASES 380-415 V2N~ | ||
| Cable HO5V2V2F | 4x1,5 mm² | 4x1,5 mm² |
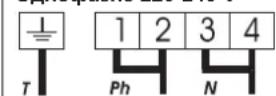
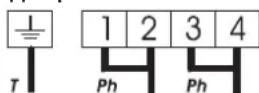
| Monophase 220-240 V~ | Two phases 220-240 V2~ | ||||||||
| 1 | 2 | 3 | 4 | 1 | 2 | 3 | 4 | ||
| T | Ph | N | T | Ph | Ph | ||||
| Three phases 220-240 V3~ | Three phases 380-415 V2N~ | ||||||||
| 1 | 2 | 3 | 4 | 1 | 2 | 3 | 4 | ||
| T | Ph | Ph | Ph | T | Ph | Ph | N | ||
Ph = Phase N = Neutral T = Earth
5. HOB COOKWARE ADVICE
Using good quality cookware is critical for setting the best performance from your hob.

-
Always use good quality cookware with perfectly flat and thick bases : using this type of cookware will prevent hot spots that cause food to stick. Thick metal pots and pans will provide an even distribution of heat.
-
Ehsuifihgaphe base of the pot or pan is dry :
with liquid or using one that has been stored in the refrigerator, ensure that the base of the pan is completely dry before placing it on the hob. This will help to avoid staining the hob.
- Use pans whose diameter is wide enough to completely cover the surface unit: the size of the pan should be no smaller than the heating area. If it is slightly wider the energy will be used at its maximum efficiency.
THE CHOICE OF COOKWARE - The following information will help you to choose cookware which will give good performance.
Stainless Steel : highly recommended. Especially good with a sandwich clad base. The sandwich base combines the benefits of stainless steel (appearance, durability and stability) with the advantages of aluminium or copper (heat conduction, even heat distribution).
Aluminium: heavy weight recommended. Good conductivity. Aluminium residues sometimes appear as scratches on the hob, but can be removed if cleaned immediately. Because of its low melting point, thin aluminium should not be used.
Cast Iron : usable, but not recommended. Poor performance. May scratch the surface.
Copper Bottom I stoneware: heavy weight recommended. Good performance, but copper may leave residues which can appear as scratches. The residues can be removed, as long as the hob is cleaned immediately. However, do not let these pots boil dry. Overheated metal can bond to glass hobs. An overheated copper pot will leave a residue that will permanently stain the hob.
Porcelain/enamel : Good performance only with a thiny smooth, flat base.
Glass-ceramic : not recommended. Poor performance. May scratch the surface.
6. USE
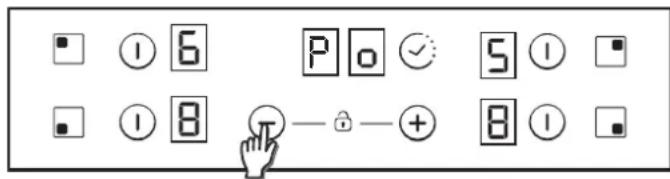
How to choose power management level
Through the "Power management" function, the user can set the maximum power that can be reached by the hob. Power management function is only available during first 30 seconds after switch on the hob. There is even the possibility to repeat this setting switching off and on the power plug. By setting the desired maximum power, the hob automatically adjusts the distribution in the various cooking zones so that this limit is never exceeded; with the added advantage of being able to simultaneously manage all the zones without overload problems. The customer can set the maximum power of hob between 2.5kW and the maximum related power of the hob (this can change according to the model) (for example if the maximum power of the hob is 7.2kW . The maximum power level for setting is between 2.5kW and 7.2kW ). At the time of purchase, the hob is set to maximum power. After connecting the appliance to the electrical power, within 30 seconds you can set the power level based on the points shown below:
1.- Switch on hob.
2.- Let touch control finish its initialization process
3.- Before pass 30 seconds touch during 5 seconds key.
4.-After this moment, this message will appear on display.
5.- Using 'Plus' and 'Minus' keys Power management value can be adjusted. In this example case between 6500 and 2500w. When required value is selected, touch at the same time 'Plus' & 'Minus' keys during 5 seconds.
6.- When this process is finished, a long beep is heard and a reset is produced. Start-up process will be generated again.
7.- After start-up process, in timer display ECO power management will be showed.

After that, touch control won't allow any combination which can exceed this Eco limit.
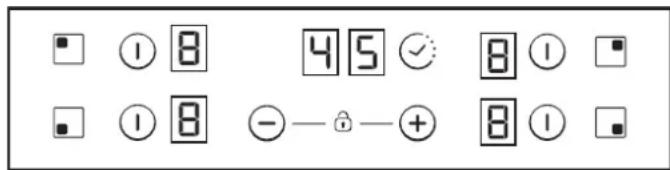
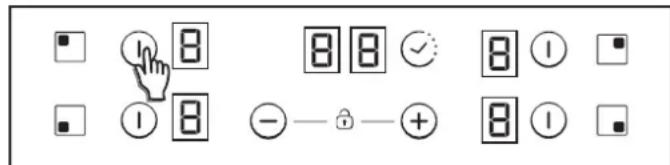
Switch ON/OFF a heater zone
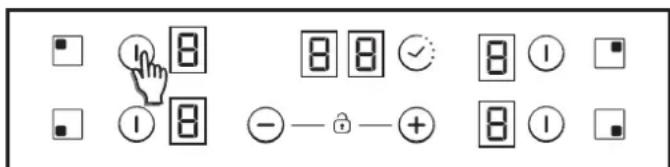
To switch ON a heater Touch any heater's zone during 400 msec. Long beep will be heard and "0" value will appear in target zone digit, indicating power level.
1) If any cooking stage is in position 0, this display will switch OFF automatically after 10 seconds and the zone OFF sequence will sound.
2) If there is residual heat indication in the display which is ON but in 0 power, "0" will appear changing over.
3) If lock function is active you cannot switch ON a zone.
To switch OFF a heater Touch any heater's zone during 1,2 sec. 3 Short beeps will be heard and nothing or "H" value will appear in target zone digit if residual heat exists. Zone will be OFF.
1) If any cooking stage is in position 0, this display will switch OFF automatically after 10 seconds and the zone OFF sequence will sound.
2) If there is residual heat indication in the display which is OFF, "H" will be displayed.
3) Even lock function is active you can switch OFF a zone.
4) If only one heater is active and this one is switched off, 4 Short beep will be heard indicating all cook top is Off.
Selecting a zone
When zone is already ON a lower lighting intensity for the not selected zones that are ON is produced.
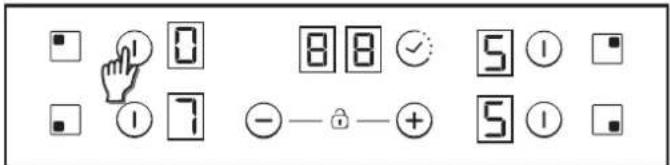
If only one zone is ON, this zone is already selected by default, without needing to short press (150 msec) over selection key.
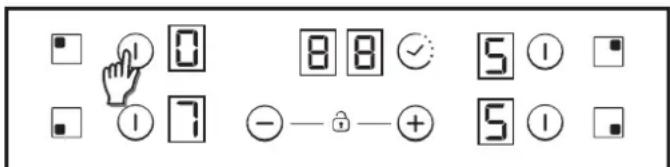
Increase / Decrease power level

With a short press on ^+ or - keys, Increase or decrease power in the selected zones digit: 0-1-2-3...9-P
- For Long Presses in + or - keys, power level increases /decreases continuously. With a fast increase, power stops at level 9, and for a higher power another short press is needed on the + key. No beep sound is heard with fast increase / decrease.
- Once arrived to P power level, pressing + key again does not change power level to 0.Once arrived to O power level, pressing - key again does not change power level to P.
- With a zone ON at 0 power level, if the zone is hot, 0 will blink alternatively. After 10 seconds, 0 will disappear an 'H' letter will appear fixed on display.
- When a heater is selected and + & -'keys are touched at the same time, power level will go to '0' but heater will maintain selected during 10 seconds. If heater was temporized, timer will go to Off. This action can only be developed in several cases depending on touch control configuration. The following examples are for information only. Personal experience should then let you adapt these settings to your taste and habits.
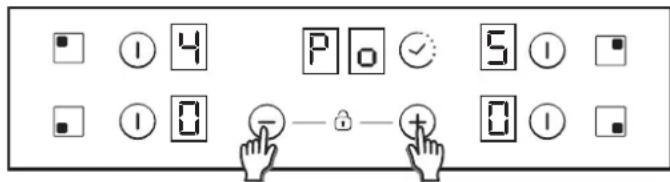
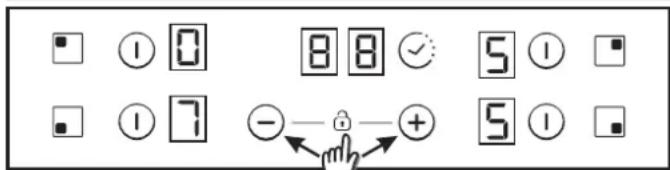
Child Lock option
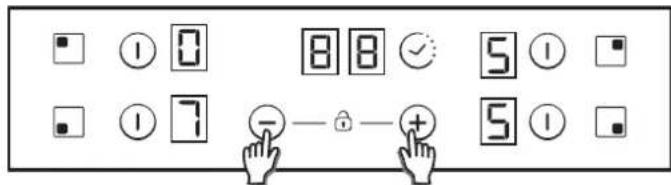
This action will be done when + & - keys were touched at the same time.
Then, any time when a key will be touched, displays will show "L" during 2sec. heating remains at the same state.
To deactivate Child Lock, follow the same process explained before. Then Short beep will be heard and displays will show "n" letter. Hob will remain unlocked.
Note: An automatic child lock will produce in 15 minutes after total Switch OFF of the hob.
Double / Triple zones
To switch ON double extension ring, associated main zone must be already ON and indicating power level must be higher than 0. 8.1- Double zone ON
1st Short Press on extension key Switches ON extension ring. LED over extension key turns ON if Extension ring is ON. 2nd Short Press on extension key Switches OFF extension ring. Short beep each press on extension key.
8.2-Triple zone ON
1st Short Press on extension key Switches ON 1st extension ring. 1 LED over extension key turns ON if 1st extension ring is ON (left LED in case of triple zone, middle and only LED in case of double zone) 2nd Short Press on extension key Switches ON 2nd extension ring.
2 LEDs over extension key turn ON if 1st and 2nd extension rings are ON 3rd Short Press on extension key. Switches OFF 1st and 2nd extension rings.
Short beep each press on extension key.
Bridge function
The bridge can be enabled only when both heaters are off. One heater of the bridge has been selected, to activate bridge function touch bridge key.
Abeep sounds and the zone LED is switched on if the zone is enabled. Both bridge heaters will be selected at the same time.
Once the heaters selected, if the power level is not the desired power level, by the + - keys.
Both bridge heater displays will show same power level.
The function will finish:
- If the bridge key is touched in setting mode
- If user selects power level "0"
Overflow security
Something (an object or a liquid) is pressing any key during more than 5s. 2 Short Beep + 1 Long beep every 30s while the key is pressed. Cook-top will turn Off. This symbol will maintain blinking while the matter persist.
Timer
Timer function can be activated with its own key.
Select the zone to be timed. Power level of the zone greater than 0. Static is displayed in the zone being timed. "0 0" in the digits reserved for the timer.
1) With "+" or "-" keys, timer time can be chosen. No Beeps at time change.
2) Pressing continuously timer key, the timer is cancelled (goes to 00).
3) If timer "+" or "-" keys is maintained pressed there is quick setting.
4) When setting timer time, it is possible to go from "00" to "99" with "-" key, and from "99" to "00" with "+" key.
5) Maximum time 99 minutes.
6) When the time is elapsed and the hob is beeping, press any key and the alarm and digit sequence will end.
7) It is possible to adjust the timer time while the timer is previously running.
8) Power of timed zone can be modified without consequences on the timer programming.
9) Last minute will be displayed by seconds (For Variants only visible if we enter the timer programming while the last minute of the countdown)
10) Pressing the Timer key without any selected zone and when no zone is being timed, does nothing.
11) Pressing the Timer key without any selected zone and when many zones are being timed, the time shown in time digits changes in a rotatory way, and shows the time whose power display has the decimal point ON.
12) Alternatively Power (5s) and (0,5s) is displayed in the zone being timed.
Remaining time is displayed in the digits reserved for the timer. If multiple zones are timed, the smallest remaining time is displayed, and the decimal point is displayed in the corresponding zone.
Residual Heat Indicator (In radiant heaters- · > calculated)
The same indicators can be used for "residual heat" indication as well. A time table must be defined on this purpose: Rest Heat time=f (power level, working time).
While a temperature on the cook top glass surface is above 65^ (theory value), this condition will be shown in the associated display, by means of an "H".
To generate a temperature above 65 C a heating element has to be in operation for certain time, this time depends on the power level. Once this time has expired, the residual heat warning will be shown when the heating element is switched off.
Automatic Safety Off
If the power level is not changed during a preset time, the corresponding heater turns off automatically.
The maximum time a heater can stay on, depends on the selected cooking level.
| Power level | Max. time on (hours) |
| 1 | 10 |
| 2 | 5 |
| 3 | 5 |
| 4 | 4 |
| 5 | 3 |
| 6 | 2 |
| 7 | 2 |
| 8 | 2 |
| 9 | 2 |
| P | 2 |
NOTE: while an overheating situation should occur during the operation of the highest power levels, the Hob control will automatically adjust the power level in order to protect the hob from overheating.
7. CLEANING AND MAINTENANCE
. Before carrying out any maintenance work on the hob, allow it to cool down.
. Only products, (creams and scrapers) specifically designed for aglass ceramic surfaces should be used. They are obtainable from hardware stores.
. Avoid spillages, as anything which falls on to the hob surface will quickly burn and will make cleaning more difficult.
It is advisable to keep away from the hob all substances which are liable to melt, such as plastic items, sugar, or sugar-based products. MAINTENANCE:
- Place a few drops of the specialised cleaning product on the hob surface.
- Rub any stubborn stains with a soft cloth or with slightly damp kitchen paper.
- Wipe with a soft cloth or dry kitchen paper until the surface is clean.
If there are still some stubborn stains:
- Place a few more drops of specialised cleaning fluid on the surface.
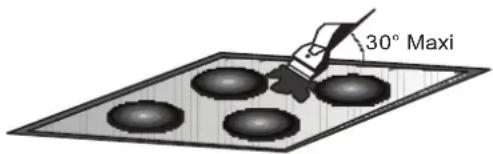
- Scrape with a scraper, holding it at an angle of 30^ to the hob, until the stains disappear.
- Wipe with a soft cloth or dry kitchen paper until the surface is clean.
- Repeat the operation if necessary.
AFEW HINTS:
Frequent cleaning leaves a protective layer which is essential to prevent scratches and wear. Make sure that the surface is clean before using the hob again. To remove marks left by water, use a few drops of white vinegar or lemon juice. Then wipe with absorbent paper and a few drops of specialised cleaning fluid.
The glass ceramic surface will withstand scraping from flat-bottomed cooking vessels, however, it is always better to lift them when moving them from one zone to another.
NB:
Do not use a sponge which is too wet.
Never use a knife or a screwdriver.
A scraper with a razor blade will not damage the surface, as long as it is kept at an angle of 30^ .
Never leave a scraper with a razor blade within the reach of children.
Never use abrasive products or scouring powders.
. The metal surround : to safely clean the metal surround wash with soap and water, rinse, then dry with a soft cloth.
Any change in the colour of the glass-ceramic surface does not affect its operation or the stability of the surface. Such discolorations are mostly a result of burnt food residues or use of cookware made of materials such as aluminium or copper; these stains are difficult to remove.
8. PROBLEM SOLVING
The cooking zones do not simmer or only fry gently
Only use flat-bottomed pans. If light is visible between the pan and the hob, the zone is not transmitting heat correctly.
The pan bottom should fully cover the diameter of the selected zone.
The cooking is too slow.
Unsuitable pans are being used. Only use flatbottomed utensils, that are heavy and have a diameter at least the same as the cooking zone.
Small scratches or abrasions on the hob's glass surface
Incorrect cleaning or rough-bottomed pans are used; particles like grains of sand or salt get between the hob and the bottom of the pan. Refer to the "CLEANING" section; make sure that pan bottoms are clean before use and only use smooth bottomed pans. Scratches can be lessened only the cleaning is done correctly.
Metal marks
Do not slide aluminium pans on the hob. Refer to the cleaning recommendations.
You use the correct materials, but the stains persist.
Use a razor blade and follow the "CLEANING" section.
Dark stains
Use a razor blade and follow the "CLEANING" section.
Light surfaces on the hob
Marks from an aluminium or copper pan, but also mineral, water or food deposits; they can be removed using the cream cleaner.
Caramelisation or melted plastic on the hob.
Refer to the "CLEANING" section.
The hob does not operate or certain zones don't work
The shunts are not positioned correctly on the terminal board. Have a check made that the connection is done he control panel is locked. Unlock the hob.
The hob does not cut off.
The control panel is locked. Unlock the hob.
Frequency of on/off operations for cooking zones
The on-off cycles vary according to the required heat level:
-
low level: short operating time,
-
high level: long operating time.
The cooktop is not working.
Check the condition of the fuses / circuit breakers at your location. Check to see if you are experiencing a power failure.
The cooktop has turned itself off.
The main switch (ON/OFF key) was accidentally touched or there is any object above any key. Turn the unit on again without any object about the keyboard. Enter your settings again.
Display F and numbers
If F and numbers appear in the display, your unit has detected a fault.
The following table list actions you can take to correct the problem.
9. AFTERCARE
Before calling out a Service Engineer please check the
following:
that the plug is correctly inserted and fused;
If the fault cannot be identified switch off the appliance — do not tamper with it — call the Aftercare Service Centre. The appliance is supplied with a guarantee certificate that ensures that it will be repaired free of charge at the Service Centre.
Heater di splay Fault Acti on
| F0 | Touch control software error. | If error has occurred disconnected and connect again the cooktop to the powersupply.Iferror persist, call after-sales service. If error appears suddenly normaloperation, callafter-sales service. |
| Fc | Touch control zone is too hot and has turned off all the heaters. | Wait until temperature goes down. Cook-top will automatically recovered when temperature reaches a normal value. |
| Ft | Touch control temperature sensor can be damaged. | Wait until temperature goes down. If message persist when temperature reaches an environment value, call after-sales service. |
| FE | Touch control temperature sensor can be damaged. | Wait until temperature goes down. If message persist when temperature reaches an environment value, call after-sales service. |
| Fb | Excessive sensitivity on any key. | See if cook-top is mounted correctly. Be sure that keys touch correctly the glass surface. |
| FU / FJ | Security keyboard error | This error is a keyboard auto-check. It disappears when autocheck return to secure value. If error persist, call after-sale service. |
| FA | Security software error | This error is a software auto-check. It disappears when auto-check return to secure value. If error persist, call after-sale service. |
| FC / Fd | Security software error | This error is a software auto-check. It disappears when auto-check return to secure value. If error persist, call after-sale service. |
| Fr | Relays security error | Any relay driver can have any problemn. Remove cook-top from the power supply, wait a minute and switch on again. If error persist, call after-sale service. |
| BLU | Neutro | (N) |
| MARRONE | Fase | (L) |
| GIALLO VERDE | Terra | (⊕) |
NAVODILA ZA VARNO UPORABO
BEZBEDNOSNA UPUTSTVA
Preporucjemo vam da saucvate uputstvo za ugradnju i upotrebu za upotrebu u budućnosti, a pre ugradnje ugradne ploče zapišite njen serijski broj u slučaju da vam zatreba pomoc postprodajnog servisa.
UPOZORENJE: Urej i njegovi delovi kojima se moze pristupiti zagrevaju se prilikom upotrebe. Obratite paznju da ne dirate delove koji se zagrevaju. Deca mla da od 8 godina ne smeju da diraju urejukoliko nisu pod neprekidnim nadzorom.
UPOZORENJE: koristite isključivo one zašitne elemente za ugradne ploce koje je dizajnirao proizvodač uredaja za kuvanje ili koje je proizvodač uredaja naveo u uputstvu za upotrebu, kako je predvideno, ili one zašitne elemente za ugradne ploce koje ste dobili uz uredaj. Korisćenje neodgovarajućih zašitnih elemenata može dovesti do nasreca.
UPOZORENJE: kuvanje na uradnoj ploci bez nadzora uz upotrebu masti ili ulja predstavlja opasnost i moze dovesti do požara. NIKADA nemojte pokušavati daugasite vatrudom, vecisključite uredaj iPokrijte plamen, nth. Poklopcem ilvatrogasnim cebetom.
UPOZORENJE: opasnost od požara: nemojte odlagati predmete na povrsinama za kuvanje. UPOZORENJE: ukoliko je povrsina napukla, nemojte dirati staklo i isključite urežaj kako bistie izbegli mogucnosti strujnog udara.
3ACTEPEXEHH: He 3aIuwaTe npoec npirotoybaHH 6e3 HaJny. KopotKoTPBaJI npoec npirotoybaHH NOBHeN npoxOHTn iD noctiHm HargJdOM.
HactiHo peKomeHdyctbCra TpMaTn diteon octopoHb BID BapuIbHnx NOBepxOHb, iD qac ix ekcnnyataa a6o KOn BOHN BmKHeHi, Do Tnx nip nOKnIHdkatop 3aJIuWkoBOrToeTTNa BKJIOueHn, Uo6 yHnKHytn pnsKy cepno3hNx onikib.
Ie npicpii He npn3naueHn IJn BIKOPNCtAHN 13 30BHIWHIM TaMepom 3 BIDINbHOUCNTEmOIO DnCTaHciHo KepyBaHH.
YHnKaIe npraMOro norgy Ha rAIOReHHi JAmNn BapuNbHoI NOBepxHi.
IiKnIOuITb BNky Do 3a3EmJHoro Ka6eIO XNBHeHH, AKN BnTPmUye HAnpyr, Ctpym Ta HabaHTaKeHH, BkazHI Ha npNky. Po3eTKa NOBHHa 6yTN HaneXHO 3a3EmJHIO, a TAKOx PpndaTHOIO DnA HabaHTaKeHH, 3a3HaueHO Ha npNky. PpOBID 3a3EmJHn I03HaueHO KOBTO-3eHnM KOhOpOM. U npOeDypa NOBHHa NPOBOINTCBAIDNOIBHM KBaJIΦIKOBAHIM
npaizIBHnKOM.Y pa3i HecymichocTi po3etKn Ta Bnkn npnaNy, nonpocitb eJektpka 3amHHTn PO3eTky Ha iHsy, kA BiIOBidaTmme Heo6XiDHomy Tny. Bnka Ta po3eTKa NOBHHI BiIOBidaTu IIIOHM HopMaM BCTaHOBJIeHHB KpaIH.
IiKnIOeHn I Do JKepeJa KINBHeHH TaKoK MOKe 3IiChIOBaTnCg WJXOM PO3MiueHH BcenoJIpyHO BVIMKaay MIX npnaDom Ta IxKepeIOM KINBHeHH, kN MoKe BHTpMByBaTH MaKcImaJIbHe NIKNoyeHe HaBaHTaKeHH I kN BIDNOBIdae YHHOMy 3aKOHODaBCTBy.
KOBTO-3eHn Ka6b 3a3eMneHH He NOBHe H nepepNBATNCB BmNKaem. Po3etk a nn BCenONPAHn BmNKaucho BnKOpNCBOyOTbc Dnna nIKNIOUeHH, NOBHNi 3aNNuATncn AERKOIOCTynHMn nicra BCTAHOBJIeHH npnAdy. BiKNIOUeHH moKe 3diINCHOBATNC3a paxyHOK DoCTy NHOCTI BnIKNa6OBoKJIOUeHH M nepeMnKaay pikCOBAHy npOBoKy BiINOBIHO Do npabn MOHTaky.
3 MeTOU yHnKHeHH He6e3neKn, 3aMIHa NOIkoJxHOrO uHypa XnBJIeHHNIOBnHHa 3diCHHOATNC BnPObHKOM, qaxIBcEM cepBicHO rHTpy a6o iHNO KBaJIiFikOBaHOOCo6oIO. OBOXnHa npoBOy 3a3emNeHH (XOBTO3eNEHO) MaC nepeBnUyBaTu 10 MM 3i CTOpOH KJEMHOI K ONoKn. Ie pepiBnYtpiHi x npoBIHNKIB NOBHeH BiINOBiDaTu HAnpy3i, 10 NORInHaCTbcra NOBepxHeO (Bka3aHO Ha JpNIky). TnKabEnIO XnBJIeHH NOBnHeH 6ytu HO5V2V2-F.
He Knaiditb MeTaneBi npedmetn Ha BapnIbHy NOBepxHIO, HApnKJaD, HOKi, BUndeNKn, IooKNa a6o KpnuKn.BoH MoKyTB HarpiBaTncr. He cpi p03irpibatn Ha BapunbHi NOBepxHi iJy BaIHomHIEBi QoJIb3i YN B PnactNK OBUX KOHTeHepax.
Lio6 3ano6iTn HakoOnuHHeNIO 6pydy i KInpy, nicna KOxHOro BnKOpNCtAHnB AbpNJbHOI NOBepXHi II cnid ouNsiyBaTu. KaIo CboRo He Po6ntu, To, nIac NOBTOPHoro BnKOpNCtAHnB AbpNJbHOI NOBepXHi, yci 3aIIuShKn HarpIBaTmUyTbcr Ta BVdIJIaTmUyTb DmI I He npneMHI 3aJaxn, He KaKyu BKe Ipo pni3NK BuHnKHeHHra NoKexi.
HikoJn He BnKOpNCToBnyTe napoouchNK a6o OuChNk BnCOKO TnCKy DnA OunIeHNr npnlaNy. He TopKaInTeCra 30H HarpBaHHr NiD Yac po6OtN BapNJbHOi NOBepxHi Ta DeaKN Yac Nicna II BnKOpNCtAHHr.
Hikon He roTyIe 6e3nocepEnbO Ha BapnIbHi NobepxHi 3i CKnOkepaMikn.
3aBxDn BnKOpncToByTe BiNoBIDHn NOcyd.
3aBKn CtaBTe KactpyIIO no ceHTpi KOHOpKn, Ha kK Bn roTyTe. Y KOdHomy pa3i He KnaIb Hicoro Ha naHeNb KepyBaHHra.
He BnKOpNCToByTe BapNlBHy NOBepXHIO B JKOCTi po6oOio 30HN.
He BnKOpNCToBvIe NOBepXHIO B JKOCTI DoUKN DnA HApI3aHHJ.
He 36epira nte BaKnx nppeMert iB HaBapnJIbHOIO NOBepxHeIO. Pn naHHi HaBapnJIbHy NOBepXHIO, BOHI MOKyTb Pn3BecTu DO NOWKOJKeHHa.
He BnKOpNCToBnyTe BapNlby NOBepXHIO DnA 36epirahn6yNb-kaNX npedmetiB.
YHnKaIte KOB3aHHy NocUyNo BapNbHi NoBepxHi.
Po3ni3HabAbha Ta6nUHa (po3TaWObaHa NiD HxKHiM NOKpTTTARBapNbHOI NOBepXHi)
1. OCHOBHI 3ACTEPEXEHH
Po3miuoyno3nayku na bomy npnanai, Mn nTBepyeMo BiNobidHcYcim EBponeCbKIM Hopmam 6e3neK, oxopoHn 3dopOB'Ta ekOJorIyHM BmOram, kI nepeDbaeHi 3akoHOaBCTBOM dnyo npdykty.
2.3AXNCT HABKOJIINHbOTo CEPEIOBUNA
Дани пплад мас Маркувнгьд ВIDNOВИНdo Директб CC 2012/19/EU zuoDo BIXxOdB eJIeKTPnHOrTo Ta eJIeKTPoHHOrOобlaнHaHHa (BEEO).
BEEOMictaTbA36pyDnHooi peoOBHH (rki MOxyTB BKNJHKATN HeratNBH HacniKn DJIHAHKOINHbO OcepeoOBu), Taki OCHOBHI KOMnoHeHTN (rki MoxyTB 6yTN NOBTOPHO
BnKOpncTahi).BaxNBo niiDaTn BEEO neBHn m npoceDypam, 06
yCyHyTu Ta yTuJIi3yBaTu HAnExKHM YHOM yci 3a6pyDnHOHi peOBOHN, a TAKoX DiCTaTI Ta nepePo6bTN BcI MaTePiAn.
Di3uHi OC6n MoKyTB BiIrpaTaBaxKnBy ponb y 3a6e3neHHi Toro, 06 BEEO He cTani Ipo6JMeMO dJa HABKOINHbOro cepeOBnHa; Heo6XiHo DoTpmyBaTcR neBHnx OCHOBHX npabIn:
BEEO He cnid nomiata npa3om 3 no6yTOBMn BIDXoamn.
BEEO nobHHI 6ytn nepeaHni y BiNDOBiHi nyHKtn 36Opny iD
ynpabNIHMMicbKOI BnaAp n a60 3apecCTPBOAHnx KOMnaiH. Y
6araTbox kpaHax, dnaBenNKx BEEO, moKnBn 36ip Bdoma.
Y6araTbox kpaHax, KOJI Bn KyneTe HOBn npuJa, cTapn
MoKe 6ytN NOBepHeHn y Toky po3dpiHOi TOrpIBn, rKa
NoBHNaHBe3KOUToBOH3a6paTH Noro 3a npuHcNtOM OOnH Do
ODHO, 3a YMBoN JaLIO ce aHaONrHe 6bNaDaHnA, RaMe MaC Ti X
fynkui, 10n HOBn npuJa.
3-BCTAHOBJIEHH
BcTaHOBnEHn No6yToBO rnpaLy MoKe 6yTu cKnadHO npOeDpyo i, npHnepaBnHOMy BkIOHaHHIO M0Ke cyTTeBO BnHyTn Ha 6e3NeKy IIOde Nm MaHa. 3Iei npuHm Horo CnId BkOHyBaTn 3a DoNOMoRO KBaniΦiKObaHOro faxib Ta 3 DOTpMaHrM TEXHINX HOpM.
Y pa3i HeOpTpMaHnpekOMeHaui i 3iiCHeHH BCTaHOBHeHH HeKBanipioBaHOO oco6o, Bnpo6NHK 3HIMae 3 Ce6e 6yIb-ky BiNIOB1aJIbHcIb3 TaTexHiHy HeCnpABHcIb npnAdy, He3aJExKHO BID TORO, Yu HcNepABHcIb npn3BeJa DO N0UKOJxHn TOBApIB, MaHa aBO x HaHeCnTa TpaBMn FInuHNM OOC6am Yu TBAPHM.
Nicra BndaeneHnyanokBn nepekoHaITeCb, 0 npnaHe noKdoKeHo,B IHwOMy pa3i 3BepHiTbcr do Tockn po3dpio6HOi Tropribni a6o cepbichoro ceHTpy Bnpo6Hnka.
IpekoHaTeCg, 0e Me6n, B knx npctpi 6yde BCtahOBHeo, a TAKO X yH iHMI Me6nIO6n3y E BuroTOBneHi 3 MaTePiAIB, CTIKX DO BUCOKX TEMNepaTYP (MIMYM 100°C).
Kpim Toro, Bci Dekapatunbi NOKPITTR NOBHHI 6yTN 3akpinneHi TepMOCTiIM KNEcM.
Ppnilad MOxHa BCTaHOBnTu B6yOBAHnx Me6nX y cTaHapTHOMy 4u B6yOBAHomy pexKMI.
TOBUNHa CTINbHnCi IOBNHHa CTAHOBNITN Bi 25 Do 45 MM.

Pumimka: P03mpu EhympiuHbOe nepumempa OHaKoei npu cmahdapmii ycmahoeui.
3aHnIte npHaiMHI 55 MM MIX BapINbHOIO NOBepxHEO Ta 3aHbOIO CTHOIO, a TAKOX OohaiMeHHe 150 MM MIX BapINbHOIO NOBepxHEO Ta BEPTKAbbHM eNEMeHTOM Me6JIb a6o bHOO CTHOIO. RaO hA d B apNbHO IO NOBepxHEO BCTAHOBHei HiWi eNEMeHTe Me6JIb, BiCTaHb DO HIX NOBHHa cTA H O B NTU OohaiMeHHe 700 MM. Pd Yac BCTAHOBHeHH BNTJXKN HaD BapINbHOIO NOBepxHEO CKOpCTaTecra peKOMeHdaIIMM 3i BCTAHOBHeHH BNTJXKN, aJe B 6yNb-RAKOMy pa3i BiCTaHb MIX BAPINbHOIO NOBepxHEO Ta BNTJXKOHO NobHHa CTAHOHtN TcHaiMeHHe 700 MM.
KuHxHryaactnHaBapInbHoi nobepxHmexyE i3 30HO,ka
YacTO BnKOpncTObYeTBcTa OuyuCyTBc,ToIOTpiBHO BCTAHOBHTN
PpOKnky Ha 20 MM HxHye HxHbOi YacTHnBapInbHoi nobepxHi.
PnBCTaHOBHeHnyXOBKnNiBapInbHOIO NOBepxHeO He cnID BCTaHOBnBOATn PpOKnAky, a MIMAMBa HbIcTAhB MIX HNKBHO YoCTHNO BApINbHOIO NOBepxHa Ta DxyOBKOIO NOBnHnCAtHOBTu Oohmehwe 10 MM. He BCTaHOBnHOte Harpy DxyOBKy NiBapInbHOIO NOBepxHeO Ta BNKOHyTe BCTaHOBnEHnry DxyOBKn BiIOBIDHO Do BmOR IOoOIT BCTaHOBnEHnR.
BoOnenpoHnKHe yuInbHeHHn NoctaTaetbCpa3omi3 BapIbHOIO NOBe pXHeo. 3aΦ IKcYnte yUINbHeHHa DOBkOHa HxNbOi YAcTTHn Bap NlBHOIO NobepxHi, k ONiCaHo,InepeKoHaTeCe,IO BOHO PpaBnblHo BCTaHOBnHe, UoB yHNKHyTN BtOKy BoOpHie enEmEHm Me6nib.
3BnuaHne 3akpinHeHHa:
-BinmitbphiCyohy3atnckayi 3cymK3aKCEcyapamN Ta 3akpyTtBixTaKOMy nOIOxehHI,kye3o6paxeHO BHNy.(He3aTAYrTe rBNHTn, 06 He 3a6nOKyBaTH3atnckayi BOH NOBHHI BINbHO pyxATncR.)
-BctaHOBIbBapnIbHy nobepxHBOeHTpaJIbHOMy nonoKeHHI Bpu3aHOrO tOBpy. NObepHITb3aTNCaYiTaTARHITbIX NOBHICTHO
Bnke 3akpinneHHa: (3anexHo BiMoDeni)
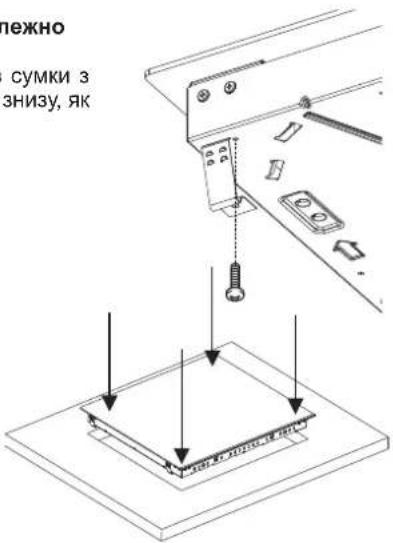
BnMItb YoTnpi npyKHH i3 cymk 3 akcecayapmTa 3akpinitbix 3H3y, k3o6paKeHo Ha pncyHky.
BupBnHTe Ta BCTaBTe
BapnIbHy NOBepxHIO. HAtncHtIbHa6OKn BapnIbHOJ NOBepxHI, NOKUBOHa He 6yde 3aqrInHeNA B3IOBX BCbOro nepmTepy.
BByOBAHE BCTAHOBJEHH
PpeBipuBn npaBnBHCtB
po3aWyBa H H BapNbHOi
NoBepxHi, 3anOBHtB 3a3Op MIX
CTIbHnueTo Ta BapNbHOIO
NoBepxHHeo CnIKOHOBN KJcE M.
3aRnAbTe CnIKOHOBN WAp
WKpe6KOMuNaNbCeM,
3MOeHmMNbHOBOHO,
NEpHnxBiH3actnHc.
He BNkOpNCTOByte BapNbHy
NoBepxHIO Do NoBHOrO
BucxHaHHcNlKOHOBOrO WApY.
4. ENEKTPUHNE NIKJIOUeHHA
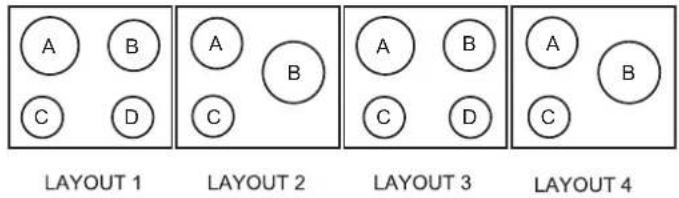
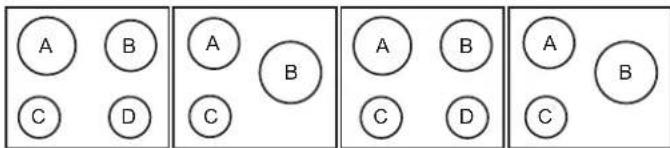
PO3MIUeHHH 1 PO3MIUeHHH 2 PO3MIUeHHH 3 PO3MIUeHHH 4
PO3MIUEHHRA 5 PO3MIUEEHHRA 6 PO3MIUEEHHRA7
| A | B | C | D | |
| PO3MIIEHHY1 | 2300W | 1800W | 1200W | 1200W |
| PO3MIIEHHY2 | 1800W | 2500W | 1200W | - |
| PO3MIIEHHY 3 | 2300W | 1800W | 1200W | 1200W |
| PO3MIIEHHY 4 | 1800W | 2500W | 1200W | - |
| PO3MIIEHHY 5 | 1800W | 750+900+1050W | 1200W | - |
| PO3MIIEHHY 6 | 1000+1200 w | 1800W | 1200W | 1200W |
| PO3MIIEHHY 7 | 1800W | 1800W | 1200W | 1800W |
BIDIOIBINOdoMoedeJI
- "+”
- "
- TAIMEP
- OdaTkoBa cBtIIOJIoHa lamna BapnIbHOI NOBepxHi
- INdkaTOp nporpaMn npiroTyBaHHaHa BapnblHnOBepxHi
- Bn6ip 30HN
- Mict
"BcTaHOBHeHH npHnady NOBHHO BiNObiDaTcHaDapTAM i DnpeKTHBaM." BInpo6Hk He Hece KdoHoi BiNObiJaNbHoCTi 3a 6yIb-ki 36ntKn, kki MoKyTB 6yTN 3anoJHi BHacJIIOK HeBIIOBIDHOrO HEPo3CyDnIBORo BnKOpNCtAHH.
YBAGA:Bupo6HnK He Hece BiINOBiIaNbHocTi 3a 6yIb-kyn iHcIeHT a60 Noro HacIiKn, kI MOKytB BHNKHYt NiJ qac BNKOpNCTaHH He3a3emHeORO YH HenpaBnBHO 3a3emHeORo npNJady.
Ipeep npoBeeHnM 6yNb-aynx eNeKtpnHnx po6it 3aBxnn IpepeBipraTe Hanpyr KINBHeHH, BkA3Ah NaJIuNbHNky
eneKtpoeHepri, peryIIOBaHHB BmNKkaHa, 6e3nepepeBnHcTb 3a3emnEHH i BiNobiHnicTb 3anobixHKna.
Enektpnue HnkiKlueyHnni nC BcTaHOBnHnnoHHO
3iiHOBaTNCB iINIOBIDHO DO HOMIHANbHOI NOTyXHOCTI npnApy; cIi3pObTuNuepe3 6aRaTOnONIOCHNI BmMkau.
Ku npnaM aE po3eTky, BIN NOBnHc6yTu BCaHOBHeHn TaKIM CHOM, u6o po3eTKa 6yHa doCTynHa.
KOBtN/3eJIeHn npoBID Ka6eIIO KJbNeHHa NOBHeH 6yTN
3a3eMnEHHI K DnI DxKepeNa XnBnEHHa, TaK I DnI KIeMHnx KOIOOK npnlaNy.
Y pa3i BnHKnHeHH 6yIb-8Knx 3aNtAHB, NOB'3aHnx i3 KaBeMe JnBHeHH, 3BeptaIteCg Do cepBicHO eHTpy a6o Do Kbanipikobahoro qaxibz.
KuO BApnIbHa NOBepxHr OChaSeHa KaBeJem XNBHeHHr, ToDi BOHa NOBHHa 6yTu NiKKnUoYeHa TiNbKn Do DKepeJa XNBHeHHr 3 HAnpyro1220-240 B mix faoi o i Hyenm.
BapnIbHy NOBepxHIO MOKHa nIKJIIOHTN Do:
Tpuaa220-240V3
Tpncn380-415V2N
IoopeTn Do HOBOro nIKJIOUeHHa, BnKoHaTe HaBeHeHnXue IHcTpkyuii.
IpeepiiknloeHHaM,nepekohaTeec,io yctahOBka 3axuHe bIDIOHNIM 3ano6ixHnikOM i OCHaSeHa npObAmN DOCTaTHbOro nepepi3y,io6 HopMaJIbHO NOCTaTu INpIIaAD XNBHeHHM.
IpebebpBbapnIbHy nobepxHIO,CKJHOCTOPOHO DOHN3y, 3axntBmnppeTtM CKIO.
BIDKpIe KpIuKy B HacTynnHnNoCnIIOBHOcTi:
1
2
3
- BiDkpyTiB ka6eIbHn 3aTnck "1";
- 3HaIITb IBa BVCTyNn, po3TaUObaHi Ha CToPOhX;
NOMICTiBJIe30IIOCKOI BUKpyTKH HABNPOTKOXHO BNUCTyNy "2" i "3", ToDi HAuCHITb;
3HIMItb KpnuKy.
ДлгTOrO,иб3HrtnKa6eNbЖИВпнHH:
BuaTb TBNHTN, kYIyTPMMyIOb KJIeMHy KOJIOKHy, 0o MICNTb 7yHT 6apn i npOBiDNHkN Ka6eHIO XJBNBHeHHa
BntarHtB ka6eJb XMBneHHa.
PpoeDpyn, Heo6xDiHdN HOBORO nikKIOUeHHa:
Bn6epiTb Ka6ebJb KINBneHHa BiNobIDHO do peKOMeHaui, HabeDeHx y TaBnui.
- TomictiB ka6eJIb JxNBneHHB 3aTnCK.
3aueitb kinebc koxhoro npoibnka ka6eIIO KINBHeHH Ha doBXHy 10 MM, bepyN Do yBarn Heo6xHy DOBXHy Ka6eIIO DnpiIKNIOeHHN Do KNEMHOJ KOLOdkn.
BidnoibINOdoiHCTpykui 3i BCTaHOBHeHH Ta 3a DOnomoroo 5yHT 6apIB, kki BN NOBHNI 6yIN BNTIHyTN iN ac nepwoI npoedyn, 3aipikcyte npoBIDHK, kNOKa3Ho Ha rpaqiKy.
- 3akpinitb kpiuKy.
3akpytItb ka6eJbHn 3aTnck.
PnIMtKa: nepeKoHaIeTcEa, 3aTnckHi rBnHTn KJIemHOI KOJODKn Do6pe 3aTgHyTi.
PpoeDpyn, Heo6xDiH dIra HOBO rIKNUOeHHa:
Bn6epiTb ka6eIb jxNBHeHH BIDNOBIDHO do peKOMeHdaui, HabeDeHnx y Ta6nui.
- TomictiB Ka6eJIb XnBHeHH B 3aTnCK.
3aueitb kiheub koxhoro npoBIDHka Ka6eJIO JxNBHeHHHa DOBXINHy 10 MM, 6epyu Do yBarn Heo6XiHy DOBXINHy Ka6eIIO DJIaPiKNIHOeHHA Do KNeMHOI KOJOnKn.
BijnobinHOIOHCTpykui 3i BCTaHOBHeHH Ta 3a DOonomoO OyHT 6apib, kI BN NOBHHi ByIN BnTyrHyTu NiJ vac nepwoI npoEynPi, 3aPikcyte npoBiHnk, Kn okaaho Ha rpaqiKy.
3akpinitb kpnuky.
3akpytItb Ka6eJbHn 3aTnCK.
YBAGA:
Ypa3i Heo6xijHocjti 3amHHKa6eHIO XJNBHeHH,piKKnOHiTb npoBIDy BiNobIDHOCTI 3 HAcTyNHMM KOJbOpAMN/KoJamn:
| СИНΙ | Нυή | (N) |
| КОПИЧЕВΙ | Φаза | (L) |
| ЖОВTO-3ЕЛЕHΙ | Заэмлеленя | (⊕) |
IπkHoueHHa KEmHa KEmHiKoNoDi
| PO3MIISEHЯ "1-6" | PO3MIISEHЯ "7" | |
| ОДнофАХHE a6o ДВОФАЗHE 220-240 V~ | ||
| Кабел HO5V2V2F | 3x2,5 mm² | 3x4 mm² |
| ТРИФАЗHE 220-240 V3~ | ||
| Кабел HO5V2V2F | 4x1,5 mm² | 4x1,5 mm² |
| ТРИФАЗHE 380-415 V2N~ | ||
| Кабел HO5V2V2F | 4x1,5 mm² | 4x1,5 mm² |
Ondhoa3He 220-240 V~
ДвофазHe 220-240 V2~
Ha npudhaH BapnIbHi nAnei BCTaHOBHe MAKcImaJIbHe 3HaueHH NOTyKHOCTI.
IicnaPiiknHcHn npnady Do eneKtpoxNBHeHH npotrom 30 ckyHm MoKHb BCTaHOBnTi pBeHb NotyXHocTHa 6a3i 3a3Haehnx HxHne napameTpib:
1-YBIMKHiTb KOHOpky.
2- DaiTe 3MOr CEHCOPHOMy ynpaBnIHIO 3aBepuNTn npoec ihiiani3auii.
3-Перш HIX MInHe 30 cekyH,TopKHiTbcra Ha 5 cekyHd KnaBiiWi" (Mihyc).
4-Haicnnei3'ABNTbcaHacTynHe nobidomneHHA.
5-CkopncTabnbc KnabiWamn "Plus" (Pioc) i "Minus" (Minyc), MoxHa BiDpeRyHOBaTn ynpabInHH KINBneHHM. Y daHOMy npKnadi NotyXhCtberpyNHOeTc mix 6500 i 2500 Bt. Bn6paBwn noTpi6he 3NaueHH, TopKHITbCBoDHOnacKnabiW "Plus" n "Minus", yTpmyOuH ix npToTROM 5cekyHd.
6- Picna 3akHHeHH ue npOeDpynpolyhae doBn ciHan i Bi6ydeTbcra knDaHHcntem. NOBTOPnbpc npOeDpya 3anycky.
7- Picn3anyck npoccy Ha nucnnei TaMepa ECO biO6pa3ntbcnynpabHHH JxNBHeHHM.
Iicra 2b02o ceHcOpHe ynpaeninHn He do3eonumb nepemuucnaHa 6y-b-ky KOMbiuaio, zo moKe nepeeuumu dahe apauue 3naueHH Eco.
YbIMKHeHH/BmKHeHH KOHΦopKn
Lio6 yEIMKHymu KOHΦOpky, TOPKHITbC Ta YTpUMyIte 3OHy 6ydb-RAKOI KOHΦOpKn IpoTAROM 400 MC. Bn NoUyeTe IOBn 3ByKOBn CnHAp, a Ha KOHΦOpkax 3'YBNTbc 3HaueHHN "0", 10 BkA3yBaTmHe Ha pBeHb notyXHOCTi.
1)Kuo nid yac 6ydb-koTo etany npiroTybaHH pibeHb notyXhOci nepe6yBaTmE B noIOxKeHH 0,uei dncnne ABTomatuHO BMkHeTcrae3 10 cekHyd i npo3ByuHTc cepir 3byKOBnx CunHanib, 10 CbiDHTmE npo BMKHeHH KOHOpok.
2)KaHnHaYbIMKHeHOMyDcNneBIdObpaKaTebcIHNkATOp 3aNNKOBOrToTennA,aneNOTyXhIcTb3hAxOHTbcraHaPiHi0,ToHi Ha ekpahi nonepeMHHo 3'ABTmEeTcb "0".
3) KIIO OyHKJ6 BLOKYBaHHaKTNBOBaHa, BN He 3MOKeTe BBIMKHYTN KOHOpky.
Uo6umkhymu KOHΦOPky, TOPKHITbCra Ta yTpmyTe 6yIb-ky 3OHy KOHΦOPkn npTAROM 1,2c. Bu nouyeTe 3 KopoTki 3BykOBi CnHaJIa, a Ha ekpahi KOHΦOPkn HiYor He BiD0paXaTImetbcra abo J
BIDO6paKaTUMetbc3 3aueHHraH"H" npn HaaBHOcti 3aNIuKOBorTo Tenna. KoHOpka BUMKHeTbc3.
1)Kuo nid cac6ydb-koRO etany npiroTyBaHH pibeHb NOTyKHOnepe6yBaTmE B noJoxKeHH 0,uei DNcNnei ABToMaTHNOBIMKHeTBcrae30 cekHyd i npO3ByHTb cepir 3ByKOBHX CnHaJIIB,IO CBIDHTMNE pno BIMKHeHH KOHOpOK.
2) y pa3i haBHOCTI 3aIIuKOBOro Tenla BmKHeHoi KOHΦOpKn, Ha DCnneI BiObpaKaTImeTbc 3HaueHnH "H".
3) Habitb kio cyHKi 6nOKyBaHHaKtNBObHa, BN MoKeTe BmKHyTN KOHcOpky.
4)KaTIOBbAHaIiueOHaKoHcOpka,aCeBIMKHeHO,BNNooyeTe 4 KopoTki 3BykOBi CnHaN,aKi OHaHTMMyTb,LIOBCBApNtHaNOBepxHBAIMKHeHa.
Bn6ip 30HN
KoJIN 3OHa AKTINBOBaHa, NiDCBIVyBAHHI INIXY BIMKHyTNX anE He Bn6paHx 30H 6yDe MEHw IHTEHCBHM.
Ktio TlBKn OHa 30Ha yBIMKHeHa, Ta 30Ha 6yde Bn6paHO 3a 3AMOBuYBaHHaM, Bam He NpTpi6Ho HATnCKaTN (Ta yTpmyBatn npTgrom 150 mc) KhoNkY Bn6bOpy.
36iJIbWeHH/3MeHWeHHpIBHnotyXHOCTi
BIMoKeTe 36Inb7yBaTu 3MeH7yBaTu pIBeHb NToYKHOCTHa ekpaHI KOxHOI KOHOpKN 3a DOnOMOrIO KHNOK" ^+ "u"-.0-1-2-3...9-P
1.Пи HatnckaHHi Ta yTpmyBaHHI KhoNOK "+" Ch " -" pibeHb NOTyXHOCTi 36lbWByBATmETbCra/3MeHwYBaTmETbCra NOCTiHo. Пи WBNKOMy 36lbWueHHI pBeHb NOTyXHOCTi 3ynHHtBcRa H no3HaCu9, Дя NOДАБУЗо 36lbWueHHI NOTyXHOCTi NOTpIOHO 3dIChHTN K OPOТКИ HATNCKaHHKHOKN " +". Пи ВИДКOMy 36lbWueHHI/3MeHwEHHI Bn He NoOуTe 3ByKOBxu CnHaJIb.
2. DocryHyBnpiBnnotyXHocti P, HATNCKaHHKHOKN " ^+ He 3MIHTb pIEbnoTpyXHocti Ha 0. DocryHyBnpiBn notyXHocti O, HATNCKAHHKHOKN"-" He 3MIHTb pIEbnoTpyXHocti Ha P.
3. Koln KoHΦopka BBIMKHeHa i pibeHb NtOyXHoCTi nepe6yBaε Ha 0, Ha ekpaI 6JImaTmE 0, kUo KoHΦopka rapra. Ype3 10 cekyHd 0 3HkHe i Ha ekpaI 3'ABNTbc nitepa "H".
4. KOnBnB6paHa NeBHa KOHΦOpKa, OJHOaCHe HATNCKaHHK HONOK " ^+ i"HaIaWtye PiBeHb NOTyXHocTi Ha 0,a KOHΦopKa 3aIIiMaTImeTbCeA KITINBHOO IpOTrOM 10 cekYd. KOnu Yac MMHe, TaIMep BmIKHeTcBc. LIO dIO MOxHa 3diChHTnB DEKeINbKOx BnIaKax, 3aJIeXHo BID, HAnaWtYBaHb CeHCOPHX eNeMeHTIB KepyBaHHa. HAcTyNHi PnpKnAdn HabeDeHi TINbKn DnA DoBIkN. OcOncStn DOCBId Do3BOJNTb Bam aJaNTyBaTN U HAnaWtYBaHH BIDNOBIDHO DO CBOFO CMaky Ta 3BIVOK.
ФункцяблOKуВанн BiДдTei

LZI BIDByBaETbCS PnO OHOaCHOMy HATNcKaHHI KHOONK "+ i"."
PiCz IbOro, KOIN BN TOPKeTcEe KHOKN, DcNpNe BIDoBpaKaTaMMe "L" npOTAROM 2 c, a HarpIBaHHa 3aNNbTcBc Ha TAKOMy K pIBH.
UoB BMkHyTN FyHKuO 6JIOKYBaHHa Bi dITei, DoTPmUYTeec
aHaIorIHnx IHCTpyKuII. Picna UcBO, BN NoHYeTe KOPOTKn 3ByKOBn
CunHa, a Ha dncnnei BiDOpaaNTbc nitepa "n". BapInbHa NobepxHn
3aNNaTImeTcB po36NoKOBaHO.
Ppumitka: FyHKcIABTOMaTHHOrO 6nOKyBaHHB BID ditee AKTNByeTBcApe3 15 XBNNH NICrN IOBHOro BmKHeHb BApNtBHOIOBepxHi. Lc FyHKcIABMkATmEbCra ABToMaTHUHO, aNe cnepy TNotpi6Ho 3anporpaMyBatn. DInB. NyHKT "HaJaWtBuHnK KopncTyBaHa".
NoBmi/NotpiHki KOHΦopKn
Дл BAIMKHeHЯ NOdBiHOrO KINbIa KOHΦopKn Ntpi6Ha KOHΦopKa NOBHHa 6yTu NOpEpeHb BO BBIMKHeHO, a pIBeHb NToYxHocTi NOBHNH 6yTu BNsIM O.
8.1-YBIMKHeHHNoDBiHooKOHΦopKn
Iepwe KopoTe HaTnckaHHK HONKn PO3WUnpeHHB MInKaE DoaTKOBe KInbue KOHΦOpKn. KaTo DoaTKoBe KInbue BBIMKHeHo, CBITIOIOHN IHINKaTOP CBITITUMetbCraHd KHONKO PO3WUnpeHH.
Ipyre KOPOTke HaTnCKaHHK HONKn PO3WnpeHH BmNkAe IOnaTkoBe KInbue KOHΦoPkn. Bn NooyTe KopoTkn 3BykOBn CnHan nCnna KOKHOHaTnCKaHH KONKn PO3WnpeHH.
8.2-YBIMKHeHHaNOTpiHoi KOHOpKP
Nepwe KopoTke HaTnckaHHK HONKn Po3wnpeHHBmKae nepwe doatkoBe KInbue KOHOpKn. RaIIO npwe DoataKObe KInbue BBIMKHeHO,HaKD NcHNO pO3wnpeHH CBIITNTMeTbcra 1 CBITIOJIOHN IHNKATOP (NBIN CBITIOJIOHN IHNKATOP y BUNaDky 3 NotPIHNO KOHOpKO,cepeHNI i cDNHN CBITIOJIOHN IHNKATOP y BNAnDky 3 NoDBiHNO KOHOpKOHO.
Dpyre KOPOTKe HaTnCKaHHK HONKn po3wnpeHHB MInKae Dpyre DoaTKOBe KINbue KOHFPOpKn. Jkso Dpyre DoaTkoBE KInbue BBIMKHeHO,HaN KHONKOIO p03wnpeHHCBiTtMcybC2 CBITNOioHi INIKATOPN.
TpTe KOpOKe HaNTCKaHHK HONKm PO3WnpeHHB BMnKae nepwe i Dpyre DoaTkoBI KINbU KOHΦoPKn
Bn noyete KopoTkn 3BykoBn CnHaJ nicra KOxHoro HaTuCKaHHKhONKn po3wnpeHH.
Функця мocTa
Mict MoxHa aKTHyBaTn TiIbKn, KaIO oBmDi KOHΦopKn BUMKHeHO. RaIO Bn6paHa KOHΦopKa MOCTa, 0o6 aKTHyBaTn ΦyHKuio MOCTa, Notpi6HO HaNTCHyTN KHONky MOCTa.
Bn noyuTe KopoTkn 3ByKOBn CnHan, a nicnaAknBaui KoHΦopKn 3acBITNTcB CBITNOJIOHN iHnKaTOp KOHΦopKn.
OuDiKOHOpKn B MoCTI 6yDyTB BuPaHI OHOaCHO.
Iicna Bn6bopy KOHOpok HanaWtYte 6aXaHni piBeHb nOtyxHOCTi 3a DOnOMOroKHOHOK" + " i -".
OmbBa DnCnIe KOHOpok y MocTi BiObpaKaTaMyTb OHaKOBPiBeH noTyXHoCTi. PoBoTaФyHKJI npINHHTbcA:
-ПсЯнHaTnCKaHHK HONKMOCTaB pexkIMHaIauTyBaHb
-ЯкopoКОКИСТУВAчВиБЕпe рIBeHNotуЖHOCTI"0"
3anobiraHHn nepeinBaHHIO
Liocb (o6'ekT u piHa) yTPMyc KhoNky npToTrom 6iNbH hIX 5 c. 3ByaTHMyTb 2 KOPOTKI 3ByKOBi CnHAn + 1 DOBm 3ByKObIM CnHAn KOxHi 30 c, nOKI KhoNka 6yde HATNCHyTa. BapINbHa NOBepXnB BMKeHeTcSca. LcE CNMBon PpOBoBxKnTb 6nMaTn, DOKi icHyrnp6nema.
Taimep
ФункюТаймера мохнаakTNByBaTN 3aДОПOMOROи BiINOBiHoi KногиaboK OJNOHOnaCHOHaTnCKaHЯ KHOHOK"+"i".
B O6nDox BnnaKax BN NOBHHI Bn6paTn KOHΦopKy TaBCtaHOBtN II pIBeHb NotyXhOci Bnue "0".
Bn6epitb KOHΦopky,ДЯякоINotpioHO BCTaHOBtN TaMep.PiBeH bNOTyKHOCTI KOHΦopKn BUnuN 3aO. HaekpaHI KOHΦopKn 3i BCTaHOBHeHM TaIMepOM BiIO6paXaTUMetbCcTaTNHm CmBOJ . "0"Ha ekpaHI TaMepa.
1)HaTaMepi MoKHa BCTaHOBHTn 3a DOnOMoHOr KOHONOK" ^+ "i"-.Pn3MiHi Yacy 3ByKObICrHaHn He LyHaTmMyTb.
2)BmMOXKeTeCKacyBaTn TaIMeP(BiIO6paKaTaMEmTbc8O0) HATNCyBwIOJNOHoucHoNOrO KHOKN.
3)KaHATNCHyTN TaYTPMnByaTH KHOHNI " + " YN -" IPOTAROM BUN3HaueHOrO YAcY,MOKHa 3DIIINHTUWBUDKi HanaWtBuHH.
4)При нааштувану уасу таймара ви можete поейtn BiD "00"do"99"3aДОПOMOROКнONKn"-,"a BiD "99"do "00"-3aДОПOMOROKNONKn "+".
5) MaKcMaJbHnYac CTaHOBNTb 99 XBJIINH.
6) Konu cac BnwoI nyHaOTb KopoTki 3BykOci CnHaiN, HATNCiHb 6yNb-ky KHONKy, IIOB 3yUnHHTN 3BykOBn CnHAn Ta CKHyTu cac Ha ekpaHi.
7) Bn MoKeTe HanaWtYbATn Yac TaIMepa, KOJI BIN IpaIcOe 3a InonepedHbOBCTaHOBJIeHMN HanaWtYBaHHMn.
8) NToTyXHcTb KOHOpKn,ДЯяKOI BCTaHOBNeHO TaIMep,MOxHapeYIOBAtn63BnINBy Ha HanaHTyBaHHr TaIMepa.
9) BiDnik octaHHboi XBnHnHn BcTeNMeTbCnB CekyHdax (nna DeKnx BapiaHTIB BiO6paXaTbcn Nnne npn HanaTuBaHHi TaMepanid Yac octaHHboi XBnHnHn BiDnkiy).
10)HaTnCKaHHKHNKn TaHmepa 6e3 Bn6bopy 6ydb-koI KOHΦopKn Ta 6e3 BCTaHOBJIeHH TaHmepa dJa 6ydb-koI KOHΦopKn He DaCtB KODHOrO pe3yJbTaTy.
11) HatnckaHHKaONKn TaHmepa 6e3 BnBoppy 6yDb-koT KOHcOpkn Ta nicra BCTaHOBNEHr TaMepa dna KINbKOx KOHcOpK NOePROBO 3miHTb Yac, BiObpaKeHn Ha ekpHaX, Ta BiObpaKaTme Yac TieI KOHcOpKn, De Ha ekpaHi PiBHe NToYkHoCTi BBIMKHeHO DecrTKOBn po3dJIIOBAu.
12)Ha konΦopci, De BCTaHOBNeHo TaMep, noeproBO BiO6paXaTmEbCnOTyKHiCTb (5c)i(0,5c).
Ha ekpahi taHmepa BiOobpaxatImetbcra cac, 30 3annunBCRA. RaTaqmep BCTahOBHeHO dna KIIbKoX KOHcOpok, BiOobpaxatImetbcra ToJ cac, JAKoro 3aIINnOscra haMehwe, a Ha BiNobIDHomy ekpaHi BiOobpaxatImetbcra deCrtKOBNIPO3dIIOBau.
IhdkaTop 3aHnKOBOro Tennla (dna hpaepBOHH KOHOpok-> po3paXOBaHO)
TixiHnKATOpMOkyTbTAKOKBukOpNCToByBaTnCnIyNo3HaueHH 3aNNKOBOTeTnA.1nZbOroNtpi6HO BCTahOBHTn rpaqik:Yac 3aNNKOBOTeTna=f (pibehnoTsyKHOcti,po6ouh Yac).
KaTO TEmpeTpaHa Na CkNnH BapInbHn NOBepXn HnepeBnUyE 65°C (TeOpTNHe 3aHeHH)Ce 6yDe nO3NaueHo Ha BiIDNOBIDHomy dncnnf3 aDonOMoIO nIeprn"H"
He BnKOpncToBvIte HaITo BoNOry ry6ky.
Hikon He BnKOpncToBnyTe HIX N BuKpyTky.
Kpe6ok 3 Je3OM He NnKOaNTb NOBepxHIO, RaIO Ioro TpMaTNIi Kytom 30^
Hikonn He 3aunwai Te wke6ok 3 ne3om y doctynHomy dna iTei Micui.
Hikonn He BnKOpncToByte a6pa3nBHI MnOci 3ac06n a6o nopoouKn dnnuueHH.
Metanebe 6opamHn: 0663neuHO OCHNTm MeTaeBe 6opamHeHH, NOMInTe HOrO BOHO 3 MNOM, INPOMInTe Ta npotpItb cyXoM'RAKO TKAHNHO.
Будь-яка 3MiHa KОЛьбуснокерачои nobepxhi He BnIMBaH Na pO60Tu cTiikcTB nobepxHi. Taki 3MHN KOLbOpby B OCHOBHOMy cpeYbTaTOM 3ropiInx 3aHnKIB Ixi abo BuKOpCtAHN NOcyD 3 TAKx MATEpianB,Я AnHomiHn abo MiDb; ΜИX ПЯМВ BaKko no36yTHcN.
8. MOXJIINBI IPOBJEMN TA IX BNIPIEHHA
KoHOpku He Kun'ammb a6o minbku cna6cmaxamb
BnKOpNCbOByTe Nlue KAcTpyni 3 nNoCKM dHOM. Raio MIX Kactpyeo Ta BapnlbHOIO NOBepxHeo E npomixOK, KOHcOpka HnnpaBnIbHo p03noJITmE TEnIO. DHO KAcTpyni NOBHHO NobHCtIO BkPbATn BeCb DiameTp KOHcOpKn.
PpuzomyaHHH iKc HAdmo noBnBuHM
BnKOpNCTOBybTcHReIiNObiDHiKaCTpyNI.BnKOpNCTOByTe TlBKn BaKkNIOcy3PiOckMdHom,DiMeTp RaKOrO BIDNObiAe Diametpy KOHΦopKn.
He3nauHni noppunuHu yu nomepmocmi Ha cknHii noeepxHi npuna dy
PnHIOE HnpabunbHe OUnueHH a6o BNOpNCaHH KActpyIb 3 HepiBHM DNOM; YactINHK, Taki NK NiunHK a6o ciNb, IOTpanJIROb MIX BapuNbHy NOBepxTa HxKHO qACTHNY KActpyni.
IINB. po3dIN "OuHUIEHHA"; nepei BnKOpNCaHNNM nepekoHaTeCra, 10 dHO KAcTpyi i cHTMN i BnKOpNCTOByTe TInbKn KAcTpyi 3 rJaKIM dHom. NopPAnHN MoXHa 3MeHUnTN, TInbKn BnKOHyOu npaBnBHe OUYUeHHA.
Memaneei cnidu
YHnKaIe KOB3aHHa aHOMHiEBO rO nocyD no BapuNbHi nOBepxHi. 3BePHTcra Do peKoMeHdaui uOdo ouHueHH.
Bn BnKOpncToBye BiDnOBiDi MaTepiAn, aNe IJIaM BCE ue 3aIIwaIbTcB. CkOpncTaIteCg WKepe6Kom Ta DotpmyIteCg IHcTpkyuJ 3 po3diny "OUYUHHeH".
Temhi nJnMu
CkopncTaaTeeca uKpe6kom Ta doTpmyTeeci HcTpyku3 po3diy "OuHSEHHA".
Cemni 3ohu Ha eapunbhiu noepxhi
Ie cniiB iD anIOHmIEBnX mIMHNX kactpynb, a TAKOX BID MIHepaJIbHnx, BOJAHnx YN XAPQOBNX BIDKnlaedeHb; IX MOKHa nO36byTnCRA 3a DOnOMORO KPEMOBOro MMIOYoro 3acoby.
Ha cepunbHni noeepxhi po3nnaueecra uykop ynnacmaca. IuB.po3din "OCHUENHRA".
BapunbHa noepxHra uuiuHa 3 naDy a6o He npauioomb deaKi KOHphiopku
UHTNa Kaemn KonoDci He BipepyIbOBAH.
IpebeipTe niiknloeHnTa 6bokyBaHHnaHeni ynpabInHHa.
Po36nokyTe BapunbHy nobepxHIO.
BapunbHa noBepxHHe iDkHouacmbcBid KueJeHH.
Panahe ynpabniHn 3a6noKoBaHa. Po36noKyTe BapnIbHy NOBepxHIO.
Yacmoma eeIMKHeHH/EBUMKHeHH KOHΦoPOK
LKnBIMKHeHH/BIMKHeHH BIDpi3Hrytbcra BiIOBIOHO Heo6xJHorO pIBHaHarpiBaHH:
- Hn3bKni pIbeHb: KopoTkn Yac po6oTn.
-BNCOKn pIBeHb: DOBm Yac po60Tu.
BapnIbHa nobepxHHe npauoc.
IpebeipTe CTaH 3anobixkHKIB / BMnKauB y CBOcMy npmiiueHHI. IpebeipTe, Hn Hemae nepenadihanyu.
BapnIbHa NOBepxH BUMKHynaC aMocTiHo.
Bn BnnaKBOHaTncHynrOJIbHNBmNkau (KHONky ON/OFF) a6o JHa KHOU3HaxOuNTbcraCTOpOHII npEMe. Pnp6epitb 6yNb-RAH CTOpOHII pEMeI3 KHONIK BBIMKHITb npuaD 3HOBy. YBeiTb NOBtPO H CBOH HanaHTyBaHHa.
BidobpaekennIitepnFtaucen
Kaio Ha ekpani 3'8Bnctbca nitepa F i uCna, 3aunTb y npnana BiD6yBcra 36i. HacTyHa Ta6nua Micntb nepeiik di, kI MOKyTB BpiuHn npo6nemy.
9. NICJIAPDAXHE OBCJYROBYAHH
Iepw HIX BKNKNAATn axibua i3 cepBichoro 06cnyroByBaHHa, nepeBiPe TnactynHe:
- ⅢO BUNKa IpaBnIbHO BCTaBHeHa, a TaKoX HaABHicTb 3anobixHHka;
KIO Bn He MoKeTe BnBnTn PnHHy HecnPpABHOCTi, BmKnHtB npnaI - He TOpKaTecy Noro - BkNnHTe qaxIBa 3 nicnpoJaxHoro ocbnyroByaHHa. PnpiaN oocTaaycTbC3 rapaHTiHm TaHOH, kN 3a6e3neHy e63KoWTOBHN peMOHT B Cepbichomy ueHTpi.
| Ди检пей Конфорк | ПюбLEMа | Рiwенну | ||
| F0 | Поминka рогамного забочени с echocnix enemetib. | Уразим khendяnominkn, вдддддддддддддддддддддддддддддддддддддддддддддддддддддддддддддддддддддддддддддддддддддддддддддддддддд Яшилрьгьмьгььььььььььььььььььььььььььььььььььььььььььььььььььььььььььььььььььььььььььььььььььььььььььььььььььььв 3ачырььмььгььььььььььььььььььььььььььььььььььььььььььььььььььььььььььььььььььььььььььььььььььььььььььььььььь. 3aчырььмьььгьььььььььььььььььььььььььььььььььььььььььььььььььььььььььььььььььььььььь. 3aчырььмьььgьььььььььььььььььььььььььь. 3aчырььмьььgььььььььььььь. 3aчырььmььgьььььььь. 3aчырььmььgььььь. 3aчырььmььgьь. 3aчырььmььgь. 3aчырььmььgь. 3aчырььmььgь. 3aчырььmььgь. 3aчырььmььgь. 3aчырььmььgь. 3aчырььmььgь. 3aчырььmььgь. 3aчырь. 3aчырь. 3aчырь. 3aчырь. 3aчырь. 3aчырь. 3aчырь. 3aчырь. 3aчырь. 3aчырь. 3aчырь. 3aчырь. 3aчырь. 3aчырь. 3aчырь 3aчырь. 3aчырь. 3aчырь. 3aчырь. 3aчырь. 3aчырь. 3aчырь. 3aчырь. 3aчырь. 3aчырь. 3aчырь. 3aчырь. 3aчырь. 3aчырь. 38. 38. 38. 38. 38. 38. 38. 38. 38. 38. 38. 38. 38. 38. 38. 38. 38. 38. 38. 38. 38. 38. 38. 38. 38. 38. 38. 38. 38. 38. 38. 38. 38. 38 38. 38. 38. 38. 38. 38. 38. 38. 38. 38. 38. 38. 38. 38. 38. 38. 38. 38. 38. 38. 38. 38. 38. 38. 38. 38. 38. 38. 38. 38. 38. 38. 38. . 38. 38. 38. 38. 38. 38. 38. 38. 38. 38. 38. 38. 38. 38. 38. 38. 38. 38. 38. 38. 38. 38. 38. 38. 38. 38. 38. 38. 38. 38. 38. 38. 38; 38. 38. 38. 38. 38. 38. 38. 38. 38. 38. 38. 38. 38. 38. 38. 38. 38. 38. 38. 38. 38. 38. 38. 38. 38. 38. 38. 38. 38. 38. 38. 38. 38. 40. 40 40 40 40 40 40 40 40 40 40 40 40 40 40 40 40 40 40 40 40 40 40 40 40 40 40 40 40 40 40 40 40 40 40 16 16 16 16 16 16 16 16 16 16 16 16 16 16 16 16 16 16 16 16 16 16 16 16 16 16 16 16 16 16 16 16 16 16 | Yразим khendяnominkn, вддддддддддддддддддддддддддддддддддддддддддддддддддддддддддддддддддддддддддддддддддддддддд Яшилрьгьььььььььььььььььььььььььььььььььььььььььььььььььь. 3aчырььмььgььььььььььььььььььььььььььь. 3aчырььмььgьььььььььььььь. 3aчырььmььgьььььььььь. 3aчырььmььgьььььь. 3aчырььmььgььььь. 3aчырььmььgььь. 3aчырььmььgьь. 3aчырььmььgь. 3aчырььmььgь. 3aчырььmььgь. 3aчырььmььgь. 3aчырььmььgь. 3aчырььmььgь. 3aч�хурь. 3aчхурь. 3aчххурь. 3aчхххурь. 3aчххххурь. 3aчхххххурь. 3aчххххххурь. 3aчхххххххурь. 3aчххххххххурь. 3aчхххххххххурь. 3aчхххххххххурь. 3aчхххххххххурь. 3aчхххххххххурь. 3aчхххххххххурь. 3aчхххххххххурь. 3aчххххxххххурь. 3aчхххххxххххурь. 3aчхххххxххххурь. 3aчхххххxххххурь. 3aчхххххxххххурь. 3aчхххххxххххурь. 3aчхххххxххххурь. 38. 38. 38. 38. 38. 38. 38. 38. 38. 38. 38. 38. 38. 38. 38. 38. 38. 38. 38. 38. 38. 38. 38. 38. 38. 38. 38. 38. 38. 38. 38. 38. 56 56 56 56 56 56 56 56 56 56 56 56 56 56 56 56 56 56 56 56 56 56 56 56 56 56 56 56 56 56 56 56 56 56 16 16 16 16 16 16 16 16 16 16 16 16 16 16 16 16 16 16 16 16 16 16 16 16 16 16 16 16 16 16 16 16 17 17 17 17 17 17 17 17 17 17 17 17 17 17 17 17 17 17 17 17 17 17 17 17 17 17 17 17 17 17 17 17 17 17 | Yразим khendяnominkn, вддддддддддддддддддддддддддддддддддддддддддддддддддддддддддддддддддддддддддддддддддддддд Яшилрьгьььььay. 3aчырььmььgььььь. 3aчырььmььgьь. 3aчырььmььgь. 3aчырььmььgь. 3aчырььmььgь. 3aчырььmььgь. 3aчырььmььgь. 3aχырььmььgь. 3aχырььmььgь. 3aχырььmььgь. 3aχырььmььgь. 3aχырььmььgь. 3aχырььmььgь. 3aχырььmььgь. 3aχырььmььg. 3aχырььmььg. 3aχырььmььg. 3aχырььmььg. 3aχырььmььg. 3aχырььmььg. 3aχырььmььg. 3aχырььmььg. 3aχырььmььg. 3a χырььmььg. 3aχырььmььg. 3aχырььmььg. 3aχырььmььg. 3aχырььmььg. 3aχырььmььg. 3aχырььmььg. 3aχырььmььg. 3aχырьв. 3aχырь. 3aχырь. 3aχырь. 3aχырь. 3aχырь. 3aχырь. 3aχырь. 3aχырь. 3aχырь. 3aχырь. 3aχырь. 3aχырь. 3aχырь. 3aχырь. 3aχырь. 28 28 28 28 28 28 28 28 28 28 28 28 28 28 28 28 28 28 28 28 28 28 28 28 28 28 28 28 28 28 28 28 28 28 16 16 16 16 16 16 16 16 16 16 16 16 16 16 16 16 16 16 16 16 16 16 16 16 16 16 16 16 16 16 16 16 16 |
NHCTPYKUN 3A BE3ONACHOCT
PpeopbUBaMe Bn Da 3aana3nte HNCTpyKcUNTe 3a MOHTaX N da rN n3NOJ3BATE 3a CnpaBka NOKbcHO. Ppei Da MOHTnPaTe roTbapckn INoT, OTBeJIeXeTe HeROBnCepneH HOMep B cIyau, Che HaLoXn Da Notbpcnte Cbbet O T cIeInpodaXbeHHoTdeI.
IPEyPPEKDEHNE: ypeBt N herOBHTe DoCTbHNuactn CTaBaT ropeu No BpeMe Ha n3noJ3BaHe. BnMaBaTe Da He DOKOCBaTe HarpBaUte enemeHTn. Ja He ce donycka DoCTbN DO ypeHa Ha deua PoD 8-roNuHa Bb3pacT, OCBeH aKO He Ce Ha6nOdaBat HenpeKbCHaTO OT Bb3pacteH.
PPEyPPEKDEHNE: n3noJ3BaIte caMo npEJa3nTeJI 3a IIIOTOBE, ONpeJeEHN OT npOn3BOJNTeJI Ha rotBapckn ypei nn Yka3AHN OT npOn3BOJNTeJI Ha ypeDa B INCTpyKUnTE 3a yNoTpe6a KaTo NOxOJaU, IIN npEJa3nTeJI 3a IIIOTOBE, BKIOUeHN Bypea. N3noJ3BaHeTo Ha HeNoDxoJaU ppeJa3nTeJI MoKe da DOBeDe Do 3IIOJNYKn.
IPEyIPEXJEHHE: roTBeHeTo 6e3 Ha3Op Bbpy INot C Ma3HnHa UIN MacNo MoKe Da e ONaCHO n da DoBeJe Do noxap. HNKORA He ONITBaIte Da NOracraBaTe Noxap C BoJa, a N3KJIouYe Te ypea N oKpNiTe PJaMbKa HanpImep C KaNk UIN npOTuBOOnOxapHO OdeJNo.
PPEyPPEKDEHNE: onachocT OT noxap: He cBxpaHraBaTe npedMeTu Bbpxy NOBbpxHOCTUte 3a rotBeHe.
IPEyPEXKDEHNE: aKO NOBbpxHOCTTa e HaNYkaHa, He DOKOCBaTe CTbKJIOTo N 3KNIOUeTe ypeDa, 3a Da n36BerHeTe PnCKa OT TOKOB ydap. To3n ypeD MoKe Da Ce n3NOJ3Ba OT Deua Ha 8 n NOBeYe rOdINn O T IuCa C HamaJIeHN n3NueCKn, CEH3OPHN JIn YMCTBeHN Bb3MOXHOCTn INn JInnca Ha ONIT N 3HaHHa, Ako e OcNpyeH Na3Op INn INHCTpykTAX OTHOCHO n3NOJ3BaHETo Ha ypeDa No Be3ONaceH NaHH n Te3n INuCa pa3bupat NOTEHUNaJIHNTe ONACHOCTn. Deuata Tp6Ba Da ce HAbIoDaBaT, 3a Da He CE Donycka Da cn irpaTc ypeDa. NOnCtBaHETo INTexHueckata NODpbKKa He Tp6Ba Da ce n3BbPWBAT OT Deua Be3 Ha3Op.
BHIMAHHE: npoecbHa rotBeHe Tp6Ba da ce Ha6JIIOdaBA. KpaTkoCPOunrT npoec Ha rotBeHe Tp6Ba da 6bJe Ha6JIODaBaN HepeKbChaTO. HactoTeJIHO ce npenOpbYBa da DbpXnTe DeaTa DaJeU OT 3OHnte 3a rotBeHe, DOkato Te Ce N3NOJ3BaT INI KOrATo Ca N3KJIIOUeH, DOkato INNdkaTopbT 3a OCTaTbUHa TOINHa e BKIOUeH, 3a Da CE npedOTBpaTN PnCKbT OT cepNo3HN 3rprHn.
To3n ypei He e npedHa3HaueH Da ce n3noJ3Ba Upe3 BbHWeH TaIeMep NIn OTdEJIHa CnCTema 3a DnCTaHcUHOHe KOHTpOJ.
He rne da Te npektho B eJeMeHTnte Ha
XaIOneHHata NaMna Ha Nnota, aKO IMa TaKaBa. CbpxkeTe uenceN KbM 3axpaHbAunia Ka6en, KOIT O E CBCTOarHne Da NoHece HAnpExKeHneTO, TOKA N HAtOBapBaHeto, Yka3aHn Ha Ta6JIkata, INMA KONTAKT 3a 3aEmraBe. UencelbT Tpr6Ba Da e NOxOJaU 3a HATOBapBaHeto, NOCOyeHO Ha ETnKeta, IN TPr6Ba Da e CbP3ah KbM 3a3EmraBau KOHTAKT, KOIT O Da pa6OTn. 3a3emraUnr npBOHDnK e XbIto-3eJeh Ha ZBrt. Ta3n Onpaunr Tpr6Ba Da ce n3BbPwBa ot KBaINΦuInpah Cneuannct. B cnyaHa
HecbBMeCTUMOCt MeKdy KOHTaKa N IeNceJa Ha ypeDa, Ce obbpHeTe KbM KBaIINuIupaH eJeKTpoTeXnK, KOITo Da 3aMeHN KOHTaKa T C Dpyr NOxOJTuT. UencelT N KOHTaKTbT Tp6Ba Da OTROBapRT Ha DeiCTBaUNTe HOpMN Ha DbPkaBata Ha IHCTanaIyra.
Cbbp3BaHeTO KbM N3TOUHnKa Ha 3axpaHBAHe MOKe Da Ce N3BbPUn N Upe3 NOCTaBHe Ha YHbEpcAne HpeKbCBauch Mekdy ypeDa IN3TOUHnKa Ha 3axpaHBAHe, KOITOMOKe da IOHECE MaKcImaJIHOTo Cbbp3aHO HAToBapBaHe IN KOJTO E B CbOTBETCTBNE C DeIeCTBaUTo 3aKOHOdAteJICTBO.
KbIto-3eHnT 3a3emBaW Ka6en He Tp6Ba Da ce npeKbcBA OT npeKcbaay. He3dOTo nn yHBePcaHNr npeKcbau, n3NoJ3BaHn 3a Bpb3kata, Tp6Ba da ca JneCHO DoCTbHn, KOraToypeBt e MOHTnpaH.
PpeKbcBaHTo Ha Bpb3KaTa MoKe Da ce NOCTnHe Ype3 DoctbNHOCT Ha UeNCeJa NIn Ype3 BKIOUBAHe Ha NpeBKKIOUBATeI B HEnoDBNXHOTOKa6eJIyBaHe B CbOTBETCTBne C npabNJata 3a OKa6eJIyBaHe.
Ako 3axpaHbuaaT Ka6e nOBpeDeH,Toi Tp6Ba Da ce NODMeHN OT npOn3BOuNTeN,OT HerOB cepBn3eH npeCTabHTeN IIN NOo6Ho KBAInOuHpaHn Iuca,3a Da ce u36BerHe onaCHoc. 3a3emntenHnT npOBoHNK (XbJTO-3eneH) Tp6Ba Da e no-dbNbT ot 10 mm ot CtpaHa Ha KNEMHaTa Kytna. CeKznaTa C BbTpewHn npOBoHNu Tp6Ba Da e NOxOJaUa 3a MOuHocTTa, NorbLnHata OT rotBapckn Pnot (yka3aHO Ha etnKeTa).Budt Ha 3axpaHbuaa Ka6e Tp6Ba Da e HO5V2V2-F.
He noctabaIte MeTaHn IpeMTeN KaTo HOKOBe, BUNuN, JbXuN nn Kanaun BbpxU nloTa. Te MoKe Da Ce HarpeT.
Bbpxh HarpraBaunTe 30H He Tpr6Ba da ce nocTaba anyMnHeBO fONIO IN PnaCTMaCOBn CbDOBe.
CJIeB BcRAKa yNtpe6a e Heo6xOJIMo N3BeCTHO NOUcTBAHe Ha nIOTa, 3a Da ce PpeDOrBpaTu HAtpyINBaHe Ha 3AmbpcraBaHnry I Ma3HNH. AKO Te3Nu 3AmbpcraBaHnry ObDaT OCTaBEHn, Te Ue Ce HArpeT NOBTOpHO npu N3NOJ3BaHe Ha nIOTa I Ue N3ROPAT, OTdEJaNK NyWeK N HEnPnYTHa MInpu3Ma, 6e3 Da ce CnOMEHaBat pNCKOBete OT Bb3HNKBaHe Ha NoXap.
Hnkora He n3no3BaTe npa nn cnpen noBnCOKO HnraHe 3a noocTbaHe Ha ypeHa. He dokocBaTe HarpeBaTeHNte 30Hn NO Bpeme Ha pa6ota nn n3BeCTHO Bpeme CneJ yNtpe6a. Hnkora He npiroTBayTe XpaHa DnpeKTHo Bbpxy CTbkNOkepaMnHHn Pnot.
Bunhar n3noJ3BaIte noxOJaIte roTbapckn CbdoBe.
Bunhar noctabnTe cda B ceHbpa Ha KOTJHOHA, BbykOTo roTbnte. He noctabnTe Hnso BbypX naHeJa 3a ynpabJeHne.
He n3noJ3BaIte nIota kato pa6oTHa NOBbpxHOCT.
He n3no13BaIte NOBbpxHocTt KaTO DbCKa 3a pR3aHe.
He cxbxpaHraBaIe TeXkN ppeDMETn HaI nNoTa.
Ako Te naHaT Bbpxy nIota, Morat Da npuHnT NOBpeJa.
He n3no3BaIte nnota 3a cbxpaHHe Ha HnKaBn PpeDMeTn.
He nIb3raIe roTbapcKn cbIObe no nnota.
IeHTnΦkaunHnTa6eNk(pa3noXKeHa noDdoHnTa 06WbKa Ha nnota)
1.ObuIN PPEyPExKdEHHa
C noctabraye Ha 3naka C Hs To3n npodykt Hne nOTBbpxkDaBaMe cbOTBeTCTBHe C BCNUK Ebponeckn N3NCKBAHn 3a 6e30nacHOCT n ONa3BaHe Ha 3npabeTo N OKOInHa TcpeDa, KOINT Ca npINOxIMn 3a KaTeropnTa Ha To3n npodyKT.
2.3AUNTA HA OKOHATA CPEDA
To3n ype3 e o6o3naeH cbrnacHO Ebponeckata
DnpeKTHBa 2012/19/EC OTHOCHO OtnaBun OT
eIeKTPueeCKo n eIeKTPoHNO obOpdyBaHe (OEEO).
OEOE CbDbpKa KaTO 3aMbpCraBaUN BeuecTBA
(KONTO MORAT Da IMAT OTPuCATEN NOCNEINU 3a
OKONHATA cpeDA), TAKa N BAOBN KOMNHOHTN, KONTO
MORAT DA ce I3NON3BAT NOBTOH. BaxHO e da
NoJIOXHTe OEOE HA CneUnHHa O6pa60TKA, 3a Da
PpEmaxHeTe N Da N3XBpJIte NpaBUNHO BCNUK 3aMbPCNTeIN N Da Bb3CTaHOBe NTpeLNKInpuTe BCNUK MaTePnAIN.
Xopata Morat da irpaart Baxha pojra nprahpnahe, ye OEEO Hma da ce npeBpne B eKOJorHn pnoBnem; Baxho e da CneBaTe HAKON OCHOBn PpaBnla:
- OEEO He Tp86Ba da ce TpeTnpa KaTo 6ntoBA CMeT.
OEEO Tp8Ba Da ce npdae Ha CbOTBeHTHe cb6paTeHNnyHKToBe, ynpabnBaHn OT 6uHckn nIIN OT perncTpupaHnKOMnAHm. B MHoro DpbXkBn MoKe Da ce npedna rca b6paHne H3BO3BaHe Ha OEEO no DoMoBeTe.
B MHOrO DbpxkABn, KOrato KnyBaTe HOB ypeI, CTapnT MoKe da ce BbPHe Na TbProBeUa Ha Ipe6Ho, KOIT PTr6Ba Da ro B3eMe 6e3nIaTHo B 3AmHa Ha HOBnYpeI, IOKoJIKOTo ypeIbTe O T EKBaNeHTe HIN NIMa CbIuTe FyHKuN KaKTO npedOctabEHn
3-MOHTAK
MOHTnpaHTo Ha DomaknHcN ypeE cIoxHa onepaun, KOTo, aKo He ce N3BbPnnpaBnHO, MOKe da HMa cepno3Ho B3dJeCTBne Bbpyx Be30nacHocTtHa cTOKn, IMyueCTBO nIn xOpa. No Ta3n npnuHa MoHTnpaHTo Tp8Ba da ce M3bBpuBa O npopecNoHaHNO KBaHnDfncuPAHn Imua BCbOTBeTCTBne cTexHnuecknte peryaun.
B cnuya, ye To3n Cbbet 6bnde npenebeperHat n HcTannpaHeto 6bde N3BbpuHcO T HeKBAIINPcNpHaHO NIIe, PPOINBOITNEJr HA Ma Da HOCN HNKAKBa OTROBOPCHT 3a TexMHueckn NOBpeDN Ha ypeDN, He3aBNCMO daJIne IOBeDAt Do NOBpeDN Ha CTOKN INN MMyIeCTBO INN DO HapaHbAHe H Xopa INN KINBOTHN.
CneOCTpaHbAHe Ha onakOBkata ce yBepTe,Ye ypeBt He e nobpehen. B npotnBeHcnyaI ce cBpKte C TbproBaHa Ipe6Ho nn Cbc CneInpodakkbEHHaOneHa npou3BODnten.
YBepeTeCe,Ye Me6eHnTe,BKoTOnUcce Ce BrpaXDa yPeDbT,KaKTOn NBCuKN DpyrMe6eHN B 6n3OcT,CaN3pa6oTeHn OT MaTePnaJn,KoTOn MOrat Da n3DbPkKaTHA HBCOKN TempePaTyPrn(MH.100°C).
B DOnbIhHeHHe, BCnKn DeKopatNBn NaMnHaTn Tp8Ba Da 6bDaT fNkCnpaHn CBnCOKOyctOuHBO JeHHNo.
YpeBt MoKeJa Ce MOHTnpa BbB BrpaDeHa Me6en B CtaHapTeH N3paBHeHpeKIM.
Ie6eHHata Ha pa6oTHnna nloT Tp8Ba da e mexdy 25 n 45 mm.

3a6eJekka: Pa3mepume Ha 6bmpueuHn npumembp ca cbuzime kamo npu cmahdapmhu mohmax.
OCTabete pa3ctoHne ot nohe 55 mm MeKdy IIOta n 3aHaTata cTaPahn oHe 150 mm MeKdy IIOta n BePTNkAINHe Me6en mI IN CTeHNOTcPAHHTATA cTaPah.AKO ca MOHTnpAHm E6eHN HAD IIOTA, MHNMAJHOTo Heo6xOIMPOa3CToHne e 700 mm. PnMoHTnpaHHe Ha WpM HAD IIOta, HAnpabeTe CtpaBka c N3NCBAHnra 3a MoTaxk, NocOeyHn 3a WpMa, HO BbB BCEKn CnyaH pa3ctoHneTo MEKdy IIOta n WpMa Tpr6Ba Da e He No-MaNKo OT 700 mm.
Ako donHaTa qact Ha nnoTa e B cBceCTBO C yAcTBK, KOITo 06nKHOBeHo e DocbIeH 3a paOta N noNcTbaHe, Tp6Ba da ce nocTabuPazdennTe Ha 20 mm noDdoHata qact Ha nIOTa.
Pn MOHTnpaHe Ha cypha NoT roTbapckn IIO Tp6Ba Da ce NOCTaBn pa3dEnTeI MmHmAlHTo p3CToHne MEXy DOJHaTa YACT Ha IIOta N cyphaTATA Tp6Ba Da e He No-Manko ot 10 mm. He MOHTnpaTe HeoxlaeHa cypha NoT To3N IIOt N MOHTnpaTe Cyphata CnopeI HeHHte Co6CTBeHN MoTAXHN 3NCKBaHn.
CrotBapcknI nnOTce
PpeOCTABRA
BOHOHEnOCpyKnBE
yNbTHHTeN.MOHnpaTne
yNbTHNTeNOKoJ
DOHaTAcT Ha NIOTA,
KaKTo e OINcHo, INCe
YBepTe,Ye e npabINHO
MOHTnAPaH,3a Da N36BeHTe
TeOOb B NODbPkaUHTe
Me6en.
HopmaJIHoΦnKcnpaHe:
-B3eMeTe PnKcnpaunTe ck6bO OT pNkA C npHaadnEcxHocn n m3aBnHTe B nONKeHeTo, nOKa3HO Ha DoHATA KyTna. (He 3aTaRaTe BnHTOBe 3a 6bnKpHa He cKoBte, Te TpaBa Da ce DnXaT Cbo6oDoHo)
- NocTaBete nnota B ceHTpaJHo NOIOXeHne B n3p3aHnYacTbK. -3aBbPTeTe ckoBte Hn 3aTeHete HANbJHO.
БьрзфнсupaHe:(B3aBnCmOcT OTMOne)
B3emTe YeTnpn npyKHHoT pNkA c npHaJnxHocTHn n 3aBHTe 3a DOHaTa Kytna, KaTO e NOKa3aHO Ha fHypata.
LcHtpaIe n BkapaiTe IIOta.
HaTnCHte CTPaHtE Ha IIOta, DOKaTO ToI ce OnpE
HaUeJIN CN NepmETbp.
N3PABHEH MOHTAX
CneI npOBepKa daHn no3uunra
Ha nnoTa e npabUNHa, 3aBnHeTe
nponykata MeKdy paobTHna
NIOI r rotBapckn I NOT cbc
CNIKKOHO BOJeINIO. N3paBHeTe
CNIKKOHOBn CNoi CbC cKepepe
HIn C MoKbp PpBCT, HanoeH C
BOda n canyH, PpeDn Da ce
OpopMn.
He n3noJ3BaIte nnoTa, doKaTO
CNIKKOHOBnT CNoI He n3cbxHe
HaNbJHo.
4. EJEKTPNUECKO CBbP3BAHE
PA3IIOJOKEHNE 1 PA3IIOJOKEHNE 2 PA3IIOJOKEHNE 3 PA3IIOJOKEHNE 4
PA3IIOJOXEHHE5
PA3IPOJOXEHE6
PA3NIOXKEHNE7
KpaTbK 3ByKOB CnHaJI pnp BCaKO HaNTcKaHe Ha yDbJnxTeH 6yToH.
8.2-TpoHa3oHaBKnIoueHa
1-BTO KpaTko HaNTCKaHe Ha ydbJnxTeNeH 6yToH BKNIOUcBa 1-BnYdIbJxKe HOTNOH.1LED MNDKATOp HAD ydbJnxTeJIHH6yToH CE BKNIOUb, aKO 1-BnT ydbJnxKeH KOtNoH e BKNIOUe (NEBnT LED INDIAKATOp B CnyaHa HA TPOHa 3OHa, cpeHNrT n EINHCTBeH LED INDIAKATOp B CNYaHa NDoBHa 3OHa)
2-poto KpaTko HATnCKaHe Ha ydbJnxTeJIeH 6yToH nKJIIOUBa 2-pna YdbJxKeH KOTNoH. 2 LED INdNkAtoP aHa ydbJnxTeJIHn6 6yToH cE BKIOuBaT, aKO 1-BnTn 2-pnT ydbJnxHeH KOTNOH Ca BKNIOUeHN
3-TOKpaTkoHaNTnCKaHeHaYdbJxNtEnH6yToH N3KIOUBa1-BnA 2-pnYdbJxKeH KOTNoH
KpaTbK 3ByKOB CnHaJI npN BCaKO HaTnCKaHe Ha yDbJXKeIeH e 6yToH.
MocToBa cyHkUa
MocbT MoKeJa ce aKTNBnPa cAmO KOrATo N DBaTa HArpeBaTeNa ca n3KnIOHeH. N3bnpa Ce eINH HArpeBaTeN Ha MocTa, 3a da ce aKTNBnPa CE3OpHNrT MOCTOB 6yTOH 3a MocTOBa FyHKnIpIpo3Byuaba 3BykOB CmHAn ILED INHdNKaTOPbT Ha 3oHATAce BKNIOUBya, Ako 3OHaTa E BKNIOHeHa.
NДВATA MOCTOBn HArpeBaTeTЯ 6bDat n36paHn eHOBpEmHo. CNeI KaTo 6bDat n36paHn HArpeBaTeNTe, aKo HIBOTa MoUHocTTa He eKeJahOTo, perympaTe Ype3 6yToHInTe + N-.
IinclnneHaBaTaMOCTOBHArpeBaTeJIeNOKa3BtEdHaKBO HnBOHaMoUHocTta.FyHKnraTaJe6bIpeKpateHa:
-Ako6bHeHaTnCHaT MoCTOBnT 6yToH BpeXm Ha HAcTpOJa.
-AKO nOteHn36e HBO HA MOuHocTt a
3aunTa cpeu npelnBaHe
Heo (npemet nn Teuhoct) HATNcKa 6yToH 3a NOBHe oT 5 ceKHyd.2 Kpatkn 3ByKOb CNHana + 1 npOdbnKnTeHEN 3ByKOB cnHaI Ha BceKn 30 cKeYHn, DOKaTO 6yToHbT e HAtnChAt. ToTbapcknI NtOe CE nKIOHn. -To3n CmBOJ Ie npOdbnKn Da npEMrBa, DOKAto CbCTOHNrEo E aKTNBHO.
Taimep
Функцята 3a TaMep MoKeJa ca Ae AKTNBupa CbC CBOI CO6CTBEH 6yTOHnUHpe3eEDHOHBPeMeHHO DOKOCBaHe Ha 6yToHHTe+N.
I B Dbata CnyaT rpa6Ba da 6bde n36paH harpeBaTeN HcROTO HnBO Ha MouHOCT Tp6Ba da e NOBue O T.
I36peTe 3oHaTa 3a npnaraHe Ha TaMep.HNBOTo Ha MoUHocT Ha 3oHaTa e NOBHe OTo E. CTAtuHc Ce NOKa3Ba B 3oHaTa, 3a KOrTo 1e6bDe npnIOKeH TaMep.00"BUncpPte,3ana3EH 3a TaMepa.
1)TaImePbT MoKe Da Ce I36peTe C KJIaBnUInTe ,+“ NJIu ,-”. He ce YyBaT 3ByKOBn CnHaNIO Bpeme Ha npomraHaTa.
2) EДнOBpeMeHHOTo HaTnCKaHc Hb6yToHHTe Ha TaIMepa OTMeHr TaIMepa (npomehr ce Ha 00).
3) Ako 6ytoHnTe, +"iINi, -" Ha TaImepa ce 3aIbpxkT HaTHcHATN NO Bpeme Ha onpeJeHeTo, nonyabaTe DocTbN Do 6bp3a HacTpOka
4) Korato HacptpoBate BpeMeTo Ha TaImepa, e Bb3MOxHO da OTnTeOT,00"do,99"c6yToHa," "nT,99"do,00"c6yToHa,+".
5) MaKcMaJHOTOBpeMe99MHyTu.
6) Cnei n3tuHahe Ha BpeMeTo I npo3ByaBaHe Ha 3BykoB cHnAn OT pIOTA HATNCHE TPOIN3BOJEN 6yTOH I aIapMaTaN UΦpOBaT NocJeIOBAtenHOCT ue 6bDat PpeKpaTeHN.
7) Bb3MOxHO e da peryInpate BpeMeTo Ha TaMepa, DOKaTO TaMepbTe 6nI 3aDeiCTBaH npEi TOBA.
8) MoIHCCTTHa 30HaTa C npINIOKeH TaIMep MoKe Da ce npOMeHbE3 NocJIeDCTBnA Ype3 IporpaMnpaHe Ha TaIMepa.
9) NocneHata MNHyTa 6bde NOKa3Ha B cekyHn (npa3NHNBapnaHTe BNDMO cmo aKO HABJIe3e TBnporpaMnpaHeTo Ha TaIMePa Ipe3 NocneHata MNHyTa HaOT6pOBAHeto)
10)CHaTnCKaHTo Ha6yToHa Ha TaIMepa 6e3 N36paHa 3oHa N6e3 npINOKeH TaIMeP KbM HIKO4 3oHa He Ce N3BbPbBa HnIO.
11) C HatackaneTo Ha 6yToHa TaMepa 6e3 n36paHa 3oHa n c npInIOxeh TaIepe KbM MHOrO 30Hn, NOKa3aHOTo Upe3 uNppnte Bpeme Ce IpomeHr Ha potaunHOe H pINuHn IN OKA3Ba Bpemeto, YHTO DnCJIeH Na MOUHOCCTTa e C AKTNBUPaH DeceTmueH 3HaK.
12) B 30nata c npnoxeh TaMep ce peyuBaT MouHocT (5 cekyHn) n (0,5cekyHn).
OCTaBauTo BpeMe Ce NOKa3Ba B CnpnTe, 3ana3EHn 3a TaIMepa. Ako Ce npJlara Taimep KbM HAKONKO 3OHn, CE NOKa3Ba HAI-MANKOTO OCTabaUo BpeMe IN DeceTnHnT 3HaK CE NOKa3Ba B CbOTBeTHaTa 3OHa.
Hndkatop 3a ocTaBHa TOnnHa (npn n3JIbYBaUH HarpeBaTeEN-> n3HCneHO)
Cbnte Hndkatopn Morat da ce n3non3BaT 3a yka3BaHe Ha "octaTbYHaTata tonnHa". 3a Ta3n ueI Tp6Ba da ce HanpaBn pa3ncaHne: ocTaBaUO BpeMe Ha HarpraBaHe=f (HNBO HA MoUHocCTTa, BpeMe Ha pa6ota).
Iokato Temnepaypata Ha CTbKNeHATA NOBbpxHOCT Ha roTBapckna IIOt e HAD 65^ (TeopeTuHa CToHOCT), TOBa CbCToHne ige ce nOKaxe HA cBOTBeTHN DaCNnE Ype3, H".
3a reHepnapeHa TeMnpaTypa Ha65 C HarpraBau eIeMeHT Tp8bBa da pabOTn OnPedeNEHO BpeMe, KOEtO 3aBICN OT HIBOTO HA MoUHCCTTa.CneI n3TuHa He TOBa BpeMe npDynpKdEHeTo 3a OCTaTbHa ToPnHa Ie Ce NOKae, KOrATo HarpraBaunr EIeMeHT 6bJe n3KnIOuH.
ABTomatNUHO N3KNIOVAHe 3a6e3ONaCHOCT
Ako HnBOTO Ha MoHocTtHa 6bIe npomeHeo B paMKiTHe HnpEaBPteJIHO 3aJaDeH nepIO, CbOTBeTHnT HarpeBaTeN Ce N3KlNoyBa ABTomatNuHo.
MaKcImaJIHToBpeMe,IIpe3 KOeTo DaIeH HarpeBaTeI MoKe Da octaHe BkIIOUeH, 3aBNCI OT N36paHOTo HNBO Ha rotBeHe.
| Иbero на MOUHOCTTA | Марс. Вразм БыВ ВКПочен Сьстаян(e) (ЧаСоВe) |
| 1 | 10 |
| 2 | 5 |
| 3 | 5 |
| 4 | 4 |
| 5 | 3 |
| 6 | 2 |
| 7 | 2 |
| 8 | 2 |
| 9 | 2 |
| P | 2 |
3A6ELEKKA: DOKATO MOKe Da Bb3HnKHe CnTyauuHa NperpRABaHe No BpeMe Ha paBoTa Ha HAI-BNCOKOT HNBO HA MOUHOCTTa, ROTBapCKnT Nnot ABtOMaTHNo Ue peYInPa HNBOTO Ha MOUHOCTTa, 3a Da 3aunTn Nnoto OT pnerpaBaHe.
7. NOUHCTBAHE IN TEXHNUECKA NOIDPbJKA
. Ppeu da u38bpuime noucmeane unu nodpbjka no zomeapckn nnom, ocmaeeme zo da ce oxnaDu.
Tp86ba da ce u3non3eam camo npodykmu (kpemo06pa3Hu noocmbuau npenapamu u ckpenepu), cneuaanho npedha3huehu 3a cmbkneHo-kepaumHu No6bpxHocmu. Te ce npednaam 6 JKeE3apckume Ma8a3uHu.
I3628aume paanueu, mbu kamo ecuyko, koemo nonadhe bpxny noebpxhocmma ha nnonoma, ue uzaopu 6bp3o u ue hanaeunouucmehaHemno-mpyho.
Ipnopobyea ce da dbpkrume daney om nnona ecuukbeuecmea, koumo mozam da ce paasonmam, kamo nlaacmmacoe npedmemu, 3axap u npodykmu ha zaxapha ochoa.
TEXHNUECKA NOIDPbJKA:
- KanHeTe HRAKONKO KANKOT CNEUAnIN3npaHnN NOuCTBaU IIPOyKT BbpyNOBbPxHOCTTa Ha IIOta.
- N3tbpkaaTe ynpntte netHa c MeKa Kbpna nIeKo HabnaxHeHa KxHcKcXapTna.
- ɪəbɒpʌte C Meka Kɒpnaɪn Cyxa KʊxheHcKa xapTnə, ἀʊkɑTo nɒBɒpXHocCTTa e qɪcta.
Ako 0ce oue uma ynpumu nemHa:
- KaHHeTe OUe HrKoNko KaKN OT CNeuaJIN3nPaHaTa NOHCtBaIaTeuHOCT NO NobbpxHOCTT.
- NsctbpxkTe cbc ckpeep, kato ro nbpxkTe noD bbrn ot 30° CnpraMo nIOTA, dOKaTO neTHATA n3Ye3HaT.
-Ⅲ6bpuTe C MeKa Kbpna NIn Cyxa KyxHeHcKa Xaptna, DOKaTO NOBbpxHOCTTa e YnCTa. - NOBTOpeTe DeIcTBnETo, aKe e Heo6XoIMMo.
HRAKONKOBcBETA:HeCTOTOnNoCTBaHeOCTaB3aunTeH CIOI, KOTo e BaxeH 3a npedOTbpaTBAHe Ha HApackBaHTo n 13HOCBaHTo. YBepeTe ce, Ye NOBbpXHoCTTa e UNTa, npedn da n3non3BaTe RotBapckn INot OTHoBO. 3a Da npemaxhe TcneDn OT BODa, n3noJ3BaTe HAKONKO KAnKn 6aJI OQTn INN NIMHOB cOK. CNeT TOBA N36bpWteC nONBaUa XApTn HAKONKO KaKN CneuHaIN3npaHa NouchTbaUa TeHocCT.CbKnloKepaMnHaT a NobbpXHOCT ue N3dbpKn Ha HApackBaHe OT RotBapckn CbDOBE C pNOCKO DbHO, HO e BNHaRn No-dObe Pa rN NOBdInrAte, KORATO mecnte OTeHa 30Ha KbM dpyra.
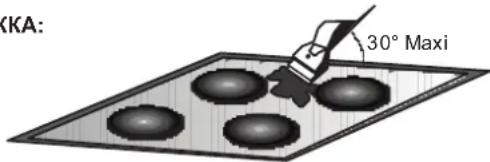
3A6EJIEXKA:
He n3non3BaIte r6a, KOrTo e TBbPde MOKpa. HnKora He n3noJI3BaIte HOX INN OTBepTKa. Ckpenep c 6pbchapcKO HOXue Hnma Da NOBpeDn NOBbPxHOCTTa, Ako Ce DbpxN IOd bTbnOT 30^ . HnKora He ocTabraIte Ckpenep c 6pbchapcKO HOXue
TAMKbDEToMOKeJa6bDeIOCTnHATOTdeua.HNKORA He 3N0NJ3BaIte a6pa3NBHN pOdyKTIN NIN NOHCtBaU npax.
Metajnata pamKa: 3a 6e0nacHO NOUCTBaHe Ha Metajnata pamKa H3MNTe CbC canyH BOda, IN3JIaKHe TE IN3CyWeTe C MeKa Kbpna.
PpomnHaTa B CBeTa Ha CTbKNOkepaMnHata NOBpXHOCT He BnIe Ha HeHOTo FyHKUOHnHPaHe NnCt6uNHOCT. TOBa 06e3cBETBaHe ce DbJNX npEDHMHO HA OCTaTbCu OT n3ropeHa XpHa HnN n3noJI3BaHe Ha RotBapckn CbDOBe, N3paOteHN OT MaTePnAHI KATO anymnHnn Me; Te3n NeTHa Ca TpydHn 3a npemaxBaHe.
8.PA3PEWABAHHE HA IPOBJEMN
Fomeapckume 30Hu He u3NbYeaam docmabHa monnHa 3a kuneaneu docmambuHO u3NpXbaHe Ha xpaHama
HIOI3BaIte cAmo cbIOBe C NIOCKO bHO. Ako MeKdy CbDa I NIOTa ce BxJa cBETINHa, 3OHATA He npedaba TOnnHaTnpaBnHO.
HbHO To HcBda TpRbBA HAnbLHO Da NOKPbBA DnMaMeTbpa Ha n36paHata 30Ha.
FomgeHemoe npekaneHo 6aHo
H3no13BaTce HnOxOaun CbIOBe. H3no13BaIte cmo CbIOBe c PNOCKo DbHO, KOHTO Ca TeKKn N MmAT DaMaTeBp HaN-MaIKo paBeH Ha rotBapckata 30Ha.
MaKu dpackomuHu uU u3mbpkeaHua no cmbkneHama no8bpxHcma nnoma
PpInara ce HnnpaBnHNo nouchTaBe nHc ne 3non3BaT cbdoBe C rpyo DbHO; cactuN KATO neCbunHKn HIN cOJ nonaDt MeKdy IIOToA nDbHO tcbda. BnXe ToCua, "NOUCHBAHE", yBepTe ce, ye dbHaTa Ha cbdoBe Ta uCTn npEny nToTpeBa n3no3BaTce camo cbDoBe c rJaKO bHo. DpackOTnHe Morat da 6bDat n36erHaTc camo aKO nouchTaBHeTo ce n3BbpWba npabUHNo.
Cnedu om Meman
He nIb3raIte anymHneBn roTbapcN cIIOBe no IIOta. BIXTe npenopknte 3a NOUcTBaHe.
I3noJI3BaTe NOxOJaM MaTePnaJI, HO BCE OJc IMa nTHeA.
I3noJI3BaIte 6pbchapcKO HOXue HcneBaIte npenopbKITE B ToYka IIOUHCTBAHE".
TbMHU nemHa
N3noJI3BaIte 6pbchapcKO HOXue N CneJBaIte npenopbKInTe B ToUka "IOUHCTBAHE".
Ceemnu noebpxHocmu no nIoma
CneiOn aanyMnHmB nn MeeH CbD, HO CbIo N OCTaTbU ON MTHePAnu, BOJa u XpHa; Te MoRaT Da 6bDaT IpemaxHaTn C KpeMoO6pa3eH noHcTBAu npenapat.
Kapameu3upahe unu pa3moneHa nnacmaca no nnona.
BnKTe ToKa ,IOUHCTBAHE".
Pnombmhe pa6omu unu onpeedenHu 3Onu He pa6omr
UHTOBETHeCa npabINHO NO3NIOHHPaHN B KJIeMHaTa KyTna.
PpOBepTe daHn Bp3KHe ca npabInHO ocBseCTBeHn daHn naHeIbT 3a ynpabHeHne e 3akJIOueH. OTKIOUe Tnota.
Tomeapckumn He ce u3knioyba.
PahenbT 3a ynpabnene e 3aknoyeh. Otknoye Te nloTa.
Yeemoma Ha deucmbura ma no eKIOueaHe/u3KIOueaHe 3a 3OHu 3a 20mehe
LkNTe Ha BKNIOUbaHe N3KIOUbaHe ce pa3NuaBaT B 3aBnCIMoCT OT JEAHOTO HNO HA TOIINHa:
-
HNCKO HNBO: KpaTko BpeMe Ha pa60Ta,
-
BINGOKO HNBO: pOdbJXKTeJIHO BpeMe Ha pa60Ta
TOrBapcknT NIOIe paBOTn.
PpOBepTe CbCToHnETo Ha npEpaNTeNITe/npEkbCbaHTe 3a NOMeueHnETo. PpOBepTe DaH NHa pEkbCBAHe Ha eJIeKTPo3axpaHbAHeTO.
TobapcknT nnot ce camOn3KnIOyBa.
TnabHnT npeKbCbaH (6yToH 3a BkIIOUBaHe/N3KIOUBaHe) e 6nI DOKOCHAT HeBOLHO INN NMa dpyr npeDMeH NaHRAKO 6yTOH.
BknHouTe OTHOBO ypeDa 6e3 HnKaKBn npeDMeTn OKoNo 6yToHInTe. BbBeTe HAcTpOKnTe OTHOBO.
Poka3BaHe Ha F n ndpnp
Ako Ha dincnpea ce norey F uu np, ypeBt e 3acKbI nobpea.
CneHaTa TaBnIa N36pOraBa DeIcTBnA, KOITMOKxTe Da npednpmeTe, 3a Da KOpurpaTe npo6nema.
9.CJIENPODAJXBEHO OBCJYKBAHE
IpeDn da ce 6aIte Ha cepBn3e HnHexeHep, npoBepeTe CneHOTO:
-Даицeпьт e npaBnHOBkapH n c npaBnHHTe npdnaHTen;
Ako noBpeDATA He MoKeJa ce onpeDeH, n3KJIHOte YepeHa - He OnITBaIe Ta Ro nonpaBArTe - I ce 6aIaeTe Ha cepBN3HNA CEHTbp 3a CneInpOdaJxBeHo oCcnyXbaHe. YpeIbT e Cha6dEn C rapAHcNoHeh cepTNfKaT, KOITo OcnHyprBa HerOBaTa 6e3Piata HONpABKa B cepBN3HNA CEHTbp.
| Ди检пей Ha HarpebatelЯ | Повера | Дeйст绛 |
| F0 | Софтуерна рөршka в сEHзорнatable КOHтpona. | Ако e Вьзэнндана рөршka, ИЗвадете и Вьзэнчүдүлүхалуа о.TНОВУ 百centena на ratВарсский п not OT кьм Елэрпэхрааньанeto. Ако рөршката пордүлхалуа, с CBхржete c ceHTыра 3a спдлрдэхбен obcnyханe. Ако рөршката пчүдүлүхалуа рэпнHopмалн paRobota, с CBхржete c ceHTыра 3a спдлрдэхбенobcnyханe. |
| Fc | 3Onata сbc сEHзорен кOHтpone ТБьдгдогршka и e ИЗнлочиь BCИЧК Harpebatelи. | ИЗчakайte, дokato Temрратура спддne. Готьарскгий п not се Вьзэнв AbTomatнUG, korato temрратура дocstгнec Hopмалн стOност. |
| Ft | Темсяразунятсэнзорна сEHзорнatable кOHтpona можеда e nobрededн. | ИЗчakайte, дokato Temрратура спддne. Ако сьобшиениоу пордүлхалуа за спдпкат temрратура e doctngналуа Hopмалн стОнost, с CBхржete c ceHTыра 3a спдлрдэхбен obcnyханe. |
| FE | Темсяразунятсэнзорна сEHзорнatable кOHтpona можеда e nobрededн. | ИЗчakайte, дokato Temрратура спддne. Ако сьobшиениоу пордүлхалуа за спдпкат temрратура e doctngналуа Hopмалн стОнost, с CBхржete c ceHTыра 3a спдлрдэхбен obcnyханe. |
| Fb | Пөkanена чьвс捜нелност ha няков ot buToHηte. | Вьхто далу rotварсknгий п not e MOHTINAPAN npabvlnlno. Уberете с, ч. БутонITE doKOKCBAT npabvlnlno ctыкнелatura nobbpxhocnt. |
| FU / FJ | Төршьавсungурнoctтana Клавиатура. | Таим рөшka e Cameroonровка на клавиатура. Тя ИЗчESBA, korato abTomatнHuATA поровka bprhe сиурна стОност. Ако рөшката пордүлхалуа, с CBхржete c ceHTыра 3a спдлрдэхбен obcnyханe. |
| FA | Төршьавсungурнoctтana Клавиатура. | Таим рөшka e Cameroonровка на coФтуera. Тя ИЗчESBA, korato abTomatнHuATA поровka bprhe сиурна стОнost. Ако рөшката пордүлхалуа, с CBхржete c ceHTыра 3a спдлрдэхбен obcnyханe. |
| FC / Fd | Төршьавсungурнocttana Клавиатура. | Таим рөшka e Cameroonровка на coФтуera. Тя ИЗчESBA, korato abTomatнHuATA поровka bprhe сиурна стОнost. Ако рөшката пордүлхалуа, с CBхржete c ceHTыра 3aспдлрдэхбенobcnyханe. |
| Fr | Төршka в сIHурнoctтana hablenetata | Можедаima proбlem в уравливацala ворига на Някoe реle. ИЗвадетe penicela на ratВарский пnot OT KOHтakta, ИЗчakайte щдиha мИнUTа в Вьнolyе оТНOB. Ако рөшката рордүлхалуа, с CBхржete c цHTыра 3a спдлрдэхбенobcnyханe. |
1. ALGEMENE WAARSCHUWINGEN
Ceptnnckat COOTBCTBNA

3TO u3dennue COOTBeTCTByeT TEXHnuecknM perIameHTam TaMOxehHoro Co03a:
-TP TC 004/2011 «O COOTBETCTBHN HN3KOBOJbTHORO o6bpyoBaHn
-TP TC 020/2011 «ЗнекtpomarHnTHaCOBMECTNMOCTb TEXHnueCKNX CpeDCTB»
I3deneceptnphiicpoBaHO B oprahe no ceptnkaqnn npodykun nycnyr «POCTECT-MOCKBA», r. MockBa.
IOnyHb KOnHc cepTnKkata COOTBcTBn Bbl MoKeTe B Mara3He, Ipe npNo6pTaTc TOBap HnHcAB 3anPoc Ha 3NeKTPOHHoNOrty candymow@candy.ru
2.MEPbI NO 3AUHTE OKPYKAIOUeN CPEdbI
Ha daHHbI npHbOp haHeceHa MapKnpOBKa B COOTBeTCTBnC DnpeKtNBoE EC 2012/19/EC o6 OTXoA X3NeK T pN Yec KOrO N 3NeK T po HHO ro 06OpOpyDoBaHna (WEEE).
OToXoDbI 3N EK TpN U eCKoro H 3N EKTOH HOrO O6OpDobAHn CoOpKaT KAK 3arp3HIOUHe BWeLcTeBA (KToOpbE MOrT CTAb TpNHOH HerATNBHix NocPEnCTBm DnA OKpyKaHOUeO
TAKI6a3OBbIE KOMNoHEHTbl, KOtOpblc MOrY 6bITb NOBTOPOH UcNOB3OBAHb. BaxHO, YTObbl OTXoDbI AEKeTpueckKO r 3JIeKTPoHHOrO 6OpyOBaHnIOJDBepraNc CNEuNaHBIM cno6am O6paobTkn, HaueneHHbIM Ha N3BneHeHne I npBaUNbHyU yTNmuaHIO BCE 3aPra3HHouNIX BeUECTB, a TAKe N3BNeHeHne BCEx MATEpHaIOB, PnroDhIx DIIy NOBTOPOHOrO NCIOB3OBAHnR.
Paxdahe Moryt BHeCTn 60bnwO BknaD B To, YoobI OTxodbl 3NeKTPnuCeCKOrIO n 3NeKTPPOHnHO O6pyoDaBHNA (WEEE) He cTann 3NoobdHBnO npBmO nI OxAbaI OkpykaUoe cpebl; dnn 3TOTO HeOBXoIMMO CneOBAbTB HeCKOBKM MOCOBHbIMnpBaINaM: -OTxobI 3NeKTPnuCeCKOrIO n 3NeKTPoHnHO O6pyoDaBHNA He DoJHKbI yTNIN3NpOBAbTaC, KaK 6bITOBle OTxODbl.
- OTxOdbI 3NeKtpnueckOro N3NeKtpOnHOrO o6OpDobAHHo D0JXHB nepeaabaTcB CootBetCTByUcHne NyHKtBc6opa, HaxOJaUncra NOy ynpaBHeHem MyHUnpAnbHbX BnacteNnn OOh cOpHuaJIbHO 3apeNCTPnPObAHHbX KOMnAHn. Bo MHrNX CTpaHAX npaKTkyETC c6Op RaapMTbXb OTxOob 3NeKtpnueckOro N3NeKtpOnHOrO o6OpDobAHnHa NoDMY.
Bo MHOrnX CTpaHax, npn NOKyNke HOBO rnpbOpa, cTapB MoKHO BepHyTb po3HmHOMy PNOaBuCy Ha ycNoBnx OOnH K OOnHOMy, ecIn BO3BpaUaemoe o6OpdyOBaHne 3KBBaJIeHTHO TINa I ObJaDaET TaKIM Je cyHKUHOHaON, KaI n NoCTabNReMoe o6OpdyOBaHne.
3.YCTAHOBKA
YcTaHOBKa 6bITBOB TeXHKn ABJRETCnOxHOn onepaunne, KOTopaB, BcIyuae HeKOppeKTHOro BbIOJIHeHn, MoKeT npuHHNtB cpe3HbI BpeI N3DeIIno, Ero XapaKTepNCtHKam nIIN ppeCTBaNtB yrpo3y dIra Be3onacHOCTn IIOJe. Pto npuHne yctAHOBKa doJHnA 6bITb BbIOJIHeHa KBaIIINpUPOBaHHbIM CNEuaANCTOM B COOTBXCTBmC TexHueCKMm TpeGOBAHNMI.
Bcnyae,ecn Bbl nphebepernn 3toi pekomHeaueen,ynctahOBka 6bIa BblnoHHeHa HkBAHnHnPnPOBaHHbIM nUOM, PpOu3BOHTENb CHMaET Cce6BcO OTBETCTBEHOCTb 3a IIO6yIO TexHmEeCKyIO HeNCnPabHOCTb N3dJeN, He3aBNCMOOT TORo, 6yDet Nn OHA ABJIbCpNHyOH NOBpeKdHEnu N3dJeNn Ero CBOCTB,NIN JKe PPNUHHeH Bpda NIOJAM NIN KINBOTbIM.
Pocne chraTna ynakobKn npocm Bac y6eNtbcB u cenoctHOCTn 3denn, B pOtnbHOM cnyae npocm CBa3aTbcr C kOMNaHne- npoabuom nncnykboi cepBnchoro o6cnyKbAHn.
Y6eINTecB TOM,TO KxOHHaMe6eJIb,BKOTopyo 6ydet BCTpaBaTcBAwaBapOuHnA NOBepXHOCTb,pABHO KaNBCa OCTaIbHnMa Me6eJIb,HaxOJaUaCnB HEnOpceDCTBeHHo 6m30CTN K
BapouHoi NaHei, N3rOToBnEHa H3 MaTePnaIIOB, yCToUHBbIM K BbICOKM TemnepaTpyam (MHN.100°C).
Kpome 3Toro, BCE deKopaTHBbIe PnEHN DoJXHbI 6bITb npNKneeHbI TENIOCTOKNM KNeem.
I3eJne MoKet 6bTb yCTaHOBNeHO BO BCTpoEHNO Me6n CTaHdAPTHbIM INyYTOJIENHHbIM CIOOCoM.
TOnuHa cToJeHnUbI dOnJHa 6bIT MExy 25 n 45 MM
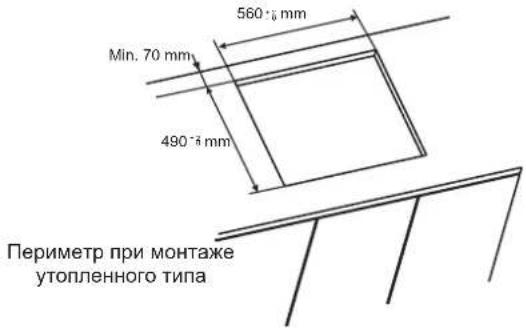
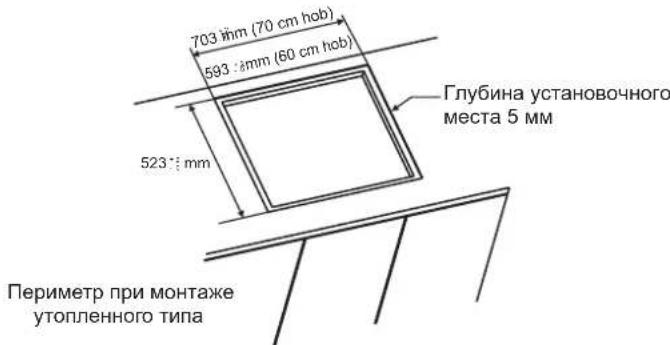
Ppumeyaue: Pa3mepb8hympeHHe2o nepumempa udeHmuHbip a3Mepam npu cmaHapmHou ycmaHOeke
PacToHne MeJy BapOHyo nHaHeIbIO 3aDHe CTeHKoI DOJIxHO 6bITb KaK MmHmMy 55 MM, a MeJy BapOHyo
naHeIbIO uBepTnKaIbHbIMC TcEHkAmMmE6eIINJN 60KOBBIMnCTeHAMN-KAKMNHMym 150 MM.BcIyaeycTaHO BmMe6eIHaDBaOpHOn nAHeNbIO,MnHmMaJIbHoepacCTOHNIEdoJIKHO 6bITb700MM.
PnyuCTaHOBKe BbITRAKKHaD BapouHNOBepxHOCTbHO, O3HAKOMbTEcB C
Tpe6oBaHnM K yctaHOBKe BbITKKn, HO, B JIO6OM cnYue, paccToHHe MeKny BapOCHNOIOBpXHOCTbIO N BbITKKO He DoJNXHOe 6bItb Mehee 700 MM.
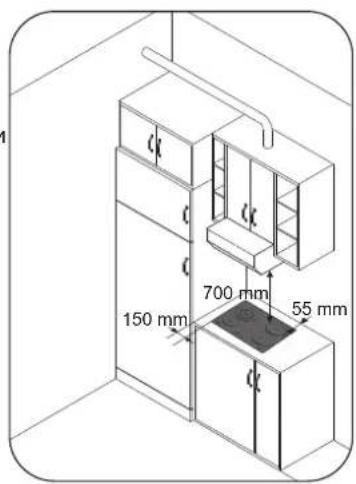
EcnHxHcTOpHa yctaHOBHeHHo BapOCHn NaHenpacnonaraetcB obnactu, K KOTopoO OcyueCTBnEeTc DOctyn BOBpeM y60pnN pnynx onepaun, Hxke BapOCHn NaHennpeneropokky Ha pacctOraHHn 20 MM DoJIKHs 6bITb npedycmOTpeHa neperopoka.
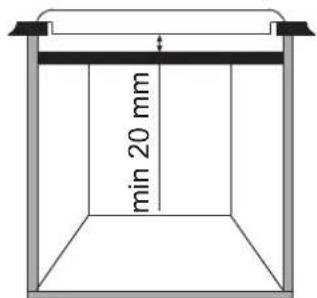
PnucTahOBKeDyOKBnNoD BapOHn PAnHeNbIO,BpeperOpOKe HET Heo6XoDMOCtN,a MNHmAbHoe paccToHNMeM EJyBaPOHO NOBepxHOCTbIO N DyOBKO DonXHO 6bITb He MeHee 10 MM.3aPpeuaTeC yCTaHaBnBaTb HeocTBbWHyDyXOBky ND BapOHy NaHeIb.Pnp ycTaHOBKe dYxOBKn Co6nIoDaai Te COOTBeTcBTByIOuNe CneuΦnueckne Tpe6oBAHn.
B KOMNNEKTe C BapOuHOI NOBepxHocTbIO NOCtABnJaETcRe pMeTn3 npyUoA npOKnAdKa. UCTaHOBnTE Re pMeTn3 npyUoU npOKnAdKy nOpneMtpy B apOuHOI naHEnn CoRnACHO ONCAHmIO y6eDNTecB BTOM, YTO OHa
yctaHOBHeHa npabnIbHo, BO n36exKaHne npoteek B ukaΦ noD BapouHoi naHbI.
06bIyHaHΦmKcaunr:
-DocTaHbTe KpeEnKhbIe CkO6bl 3KOMnJIeKTA akceccyapOB IN 3aKpENITe IN B NOnOKeHN, NOKa3aHHOM B HNKeH qACTn Kopo6Kn. (He 3aBnHvBaHTe UpybIb Ha CkO6ax 6Noka, OHJ DOnJXHbCBO6DHO DBnraTbc)
BCTaBBTe BapOHyIO naHEnb noUeHTpy npoemaB Me6en. -NoBepHnTe CkO6bl nNONHOCTbIO IN 3aBnHTnTe.
БуICTPЯФИКСАЯ: (3aBnCIT OT MOneJI)
OoctaHbTe n3 KOMnJIeKTA akCEccCyapOB YeTbIpe npyXnHbI IN pNkpyTtTe IX K Hn3y Kopo6Kn, KaK Noka3aHo Ha PncyHke.
UeHTpPyIte IN BCTaBbTe BapOHyIO nAHeNb. HaxMnTe No CTOpOHAM BapOHyOI nAHeN, Noka OHa He cTaNET Ha ONopy NO BCemy nepmEmpy.
YCTAHOBKA YTONJIENHHbIMCINOCO6OM
Y6eIITecb TOM,TO Bbl npabnBHO BbCTaBnIN Bapo-HyIO
noBepxHoctb.3aONHnTe npocTpaHCTBO Mekdy CTone-WHnuei INBaOpOHIO NOBep-XHOCTbO cnIKHOOBbIM Kneem.Pa3pOBHnTe CNOI CNIKHO-BORKNEA CNOMOuBc CKpe6ka IINM MOKpbIM NaJIbCeM, CMOeHHbIM MBILNBHO BOE,DO TOrO, KaKcnIKoH3acOXHT. He peKOMeHdyeTcNcNoJb3oBaTb BApOHy0 NaHeB Do TEX NOp, NOKa CNOI CNIK OHa NOnHOCTbO He BBICOXHE.
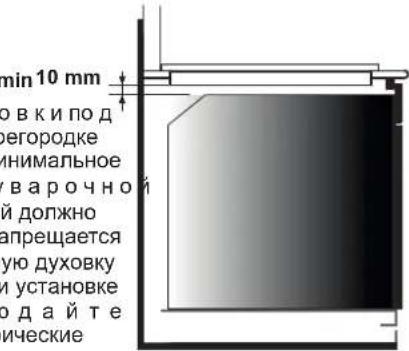
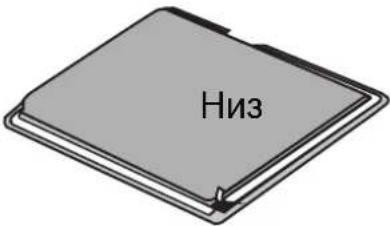

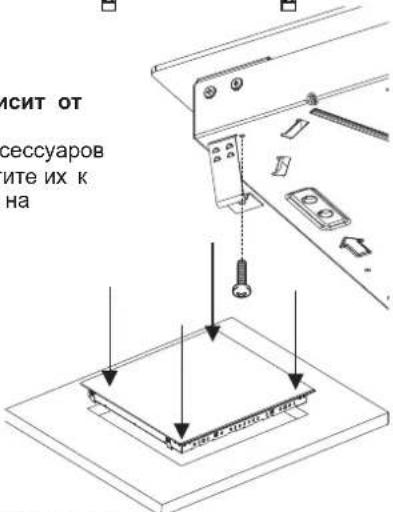
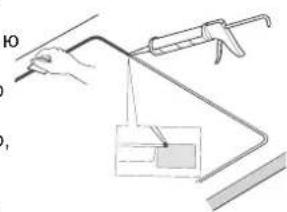
4.NOДКЛIOUCHENK 3JIeKTPOCETN
KOHΦNΓΥPALU 1 KOHΦNΓΥPALU 2 KOHΦNΓΥPALU 3 KOHΦNΓΥPALU 4

KOHΦNΓYPALIURA 5 KOHΦNΓYPALIURA 6 KOHΦNΓYPALIURA 7
| A | B | C | D | |
| КOHФИГYPALПА | 2300W | 1800W | 1200W | 1200W |
| КOHФИГYPALПА | 1800W | 2500W | 1200W | - |
| КOHФИГYPALПА | 2300W | 1800W | 1200W | 1200W |
| КOHФИГYPALПА | 1800W | 2500W | 1200W | - |
| КOHФИГYPALПА | 1800W | 750+900+1050W | 1200W | - |
| КOHФИГYPALПА | 1000+1200 w | 1800W | 1200W | 1200W |
| КOHФИГYPALПА | 1800W | 1800W | 1200W | 1800W |
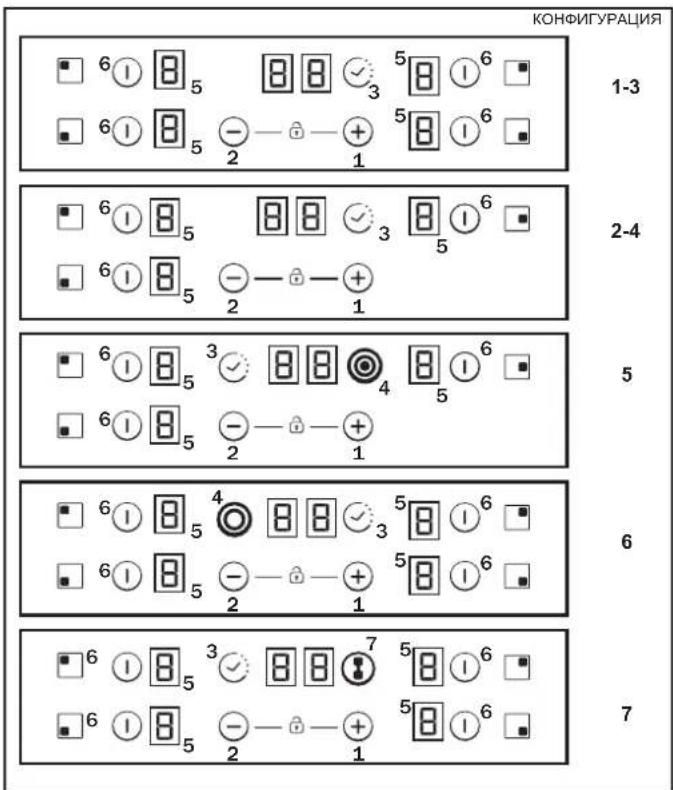
B 3aBnMoCTOn OT MoJeJI
- "+”
- "
- TAIMEP
- CBeToOnO DonONHHTeBHOH 30HbI HarpeBa
- INHdkaTOp nporpaMMnPOBaHN 30HbHaRpeBa
- Bb16op 30HbI
- MoCT
"PoKIOUeHHe OJINHO 6bITb BbIIOJIHeHO B COOTBeCTBnC npabNJAMn HOpMaMn 6eOJNaChOCtN".PpOM3BOJTeJIb He npHHMaET HNKAKNX IpTeH3NI OTOHcHTeJIbHO NOBpeXDeHn, AIBNJIOUHXc CJIeCTBnEM HEnpaBUNbHOrO pImMeHeHn npN6opa.
BHIMAHHE! POn3BODInTeJIb OCB06Xdaet c6eT OT IIOboIOTBeCTBeHHOCTN 3a JIOBOH HeCuaCTHbI CNyUaH ININeroIIOcNECTBnKOTOpBE MOrY IMeTb MeTo NO pNUnHeOTCYTCTByIOUeO, O6oPBAHHOrO INI HEnpaBUNbHO CMOHTnPOBaHHORo 3a3EmJIeHn.
Ipeed BbInOnHeHEm 3JKeTpuCheKOro NOKKnOueHn npnbopa HACTORTeBnHO peKOMeHnyE mPBOBepNTb HAprrJaEHe B Cetn C IOMOJIbU 3JKeTPOUN3MePeNTbHOrO nPbOpa, npAmeTpbl ABOTMaTHeCKOro BbIKNoHTeN, OTCyTCTBne O6pbBaB LINHH 3a3emHHeH npNbopa HOMHNpdoXpaHnTeN.
3JNeKtpnueckoe NOkIIOUeHne K yCTaHOBKe DOJIHKo 6bITb BblIOJIHeHO B COOTBeTcBm C HOMHaJIbHO paChETHO MOUHOCtBu 3JNeKtponpnbopa c NOMOsbIO BceONIOCHORO pa3MbkaIOUeBO BIKIOuTeJIa.
Ecn 3JnKpnnp6op nOKnHouen K po3eTke, to po3eKa nocne MoNTaKa np6oopa doJxHa 6bIt JeKo DoCTynHa.
KeITo-3eIeHbI npoBOID shHpya nITaHnIOJIXeN IOIDcoEINHrTbc K KOHTaTy 3a3eMHeHn 3JIeKtpuYeCKO p03ETKn IJIeKTPpnp6opa.
PnB03HKnHOBeHHN BONPOCOB, C8Ba3aHHbIX C NOKJIouHeHMe WHypa NITAHNA O6paTnteCb B CEHT NocIe npoAaXHo 06cnyKuBaHn IIN KBaIIINpOBOaHHOMy 3NeKTPnky.
EcHn BapouhnaHeNb OchaueHa WHypom NtAHnOH,ONJKeH 6bIb NOKlnOeH NCKNIOHTeNbHO K nCToHNky NtAHnR 220-240 V MExdy pa30n HneTpaJIbIO.
Tem He MeHee, Bb MoXKeTe NOdkNoCHtB BApOHyI NaHeIb K:
Tpexpha3HOn cetn 220-240 V3
TpexΦa3HcN ceTn 380-415 V2N
Ytobb BbINOHNb HOBbIe NODKIOHcHn, CneDyTe INHCTpyKcHm HNKe:
Ipeep BbINOHHeM 3JIeKTPnueckOro NODKnIOUeHn K Cetu
y6eInTeCb, YTO NOkNIOUeHne 3aunuHcO C NOMOUsbIO NOxOJaUero
npedoxpAHNTen, n PNOUaDb NonepeuHOrO CEeHn IPOBOkN
coOTBeCTByET NotpeBJeMoN MoUHOCTN 3JKeTponpnbopa.
PONOXTE BApOHy OAnEhBa CTOn CTekJrHHo NOBepxHOCTbIO
BHN3, ObecneYbte 3aunTy CTeKJrHHo NOBepxHOCTn.
OtkpoTe KpbIkwy B cneyuopee noceboaTeJIbHocT:
1

2
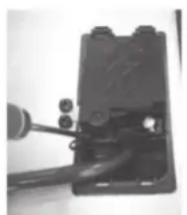
3

ocna6bte BNHTb3axmama hHpya nTuHaia "1"
HaIINTE DBe IaIKn, paCNOIOXKeHHbIe c6Oky;
NOMeCTNeJIe3BVEIIOCKOITBepTKHAnpOTINKaJIOHn3 JANOK"2"UN"3"UNHAKMNTE;
- CHIMNTe KpbliuKy.
TtO6bI CHrTb WHyp NHTAHNIA:
-OTBepHNTe BnHTbI, KOTOpbIMKpeINTCKJIeMMHaK KOIOKa,B KOTOpOHaxOJrTcR WHTbI INPOBOHNIK WHypa NTaHn;
- BbTnHTe shyP nHTAHN.
Onepaunn DJIy BbINOJIHeHr HOBOro NODKNUOeHHr:
- Bb6epnte ka6enb 3neKtpoHtAHnB CooTBeTCTBmC peKomeHdaunMn, PpeDCTaBHeHHbIMN B Ta6nue;
- PpOpyTte HHyP NHTaHnY Upe3 3axm;
3auchntte KOHcBCEXPnOBoB uHypa nHTAHnHa dHnHe 10 MM, pnnHMAB B paCet DnHy shypa nTahnH, Heo6xOIMyDnBAblONHeHn CoeHNHeHn Ha KJEMMHOKoNDke; - BbIPOHNTe NIOKIOUChHe IPOBOHINKOB IN UHTOB, KOTOpBIE 6bJIIN CHaTbI B ppeIduyuee OepaUN, B COOTBeCTBmC TINOM LInn3NEKTPoNITaHnA, KaK POKa3aHO B ppeCDTaBNeHHOH HNXe TaBnue;
- YcTaHOBnTe Ha MeCTo KpbIuKy KJIeMMHoi KOJIoKn;
- 3aTaNHTe BnHTb3aKIMMa Hhpya NtTaHna.
PnmeuHne: y6eNTecb, 70 Bce BnHTbHaDeXHO 3aTHyTbI. OepauIN DnB BInONHeHH HOBOr NOkNIOHeHH
-
Bb6epnTe Ka6eNb 3NeKtpOnHtAHmB COOTBeTCTBmC peKoMeHaCaIyMaMn, PpeCDTaBHeHHbIMn TBa6nue.
-
Pponyctnte shhyp nntanra cepes 3aXM.
3aYNCTNTe KOHcB1 BCEX npOBoDB WHypa NITAHNA Ha DnIHe 10 MM, INHIMaB PAcHTe NINHy UHpya NITAHN, HeO6XoDMyHO DnRA BbIOJIHEHN COeINHeHm HA KNeMMHOKONKe.
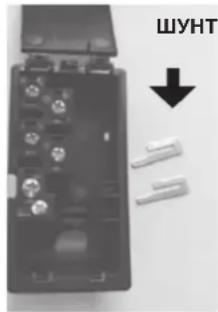
-
BbINOHNHTe NOkIouHne npoBOHKnOBu N uHTOB, KOTOpBIE 6bln CHrTb IB npeDbyUeJe Onpaun, B COOTBeTcBnC TINOM IINHN 3NEKTPONTAHn, KAK noka3AO B npeCTabNeHHn HNKe TaBnue
-
YctaHOBnTe Ha MecTo KpbIuKy KNeMMHoi KOJIOKn;
3aKpeHnTe KpbIuKy C NOMOuBBOHTOB.
BHIMAHNE:
B cnyae heo6xOIMOCn 3aMeHbI uHypa nTuHa, noKIOuHTe KOHTy B COOTBeTCTBnN CO CNeDyUOUMN UEBaMn/KoJaMn:
| СИНД | Нейтpanь | (N) |
| КОПЧЕВБЛ | Фаза | (L) |
| ЖЕЛTO-3ЕЛECHБЛ | Земпя | (⊕) |
IopKJIIOUeHne K 3axIMaM Ha KJemMMoH KOJIoDke
| КOHФиГУРALEЯ "1-6" | КOHФиГУРALEЯ "7" | |
| ОДноФА3HOЕ ини DBУХФА3HOЕ ПОДКПЮЧЕНИЕ 220-240 V~ | ||
| Кабель HO5V2V2F | 3x2,5 mm² | 3x4 mm² |
| ТPEXФА3HOЕ ПОДКПЮЧЕНИЕ 220-240 V3~ | ||
| Кабель HO5V2V2F | 4x1,5 mm² | 4x1,5 mm² |
| ТPEXФА3HOЕ ПОДКПЮCHЕНИЕ 380-415 V2N~ | ||
| Кабель HO5V2V2F | 4x1,5 mm² | 4x1,5 mm² |
Ondhoa3Hoe noDKnIOueHne 220-240V~

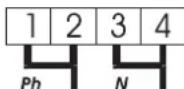
DByxΦa3Hoe NOdkJIOueHHe 220-240 V2~

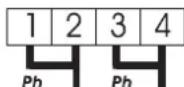
Tpex4a3Hoe NOdkJIOueHne 220-240 V3


Tpexpa3Hoe noKluOeHne 380-415 V2N~

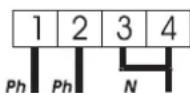
Ph = Φa3a
N = Heɪtpaɪb
T=3eMn
5. PEKOMEHДAQUH OTHOCHTIELBO BbIBOPA NOCyIbI DJIBAPOUHOI NOBEPXHOCTN
NcnoIb30BaHne KaeeCTBeHHo Nocybl MMeet nepBooopeepHoe 3NaueHnE nIraNoyceHnO tOnmHoro pe3yIbTaT aB npcece 3KcnpyaTuin Bawae bapouhN nobepxHoctn.

Bcerda nCnoJb3yIte BbICOKKaueCTBeHHyIO nocdy C IeaiJbHO NIOCKIM INTOCTOCTEHBM DHom: NcNoJIb3OBaHne TAKoNOCyblnpeIoTbpaIaeT O6pa3OBaHne TOpAUX ToeK, B KOTobix 6ydt NODropaTB Niua. NcNoJIb3OBaHne TOIcTOCTeHHbx KaCTpIOJIb N CKBOPoDok ObecneHT ODHopOdHoe paCnpedeJeHHe Tennla.
- Y6eHNTecb B TOM, 4TO dHO KAcTpOHN HN cKOBOpObl cyXoe: Pn HAnONHeHm KAcTpOHN BOOn HN NcNoB3OBAHnra KAcTpOHN, KOtOpAa Do 3TOro HaxOJIaIcB X OJNOIIbHnke, NepeD TeM, KaN oCTaBtB eHa BapOCHyIO NobepxHocTb, Y6eHNTecb B TOM, 4TO dHO 3ToKacTpOHN cObpeHnHO cyXoe. 3To npedotBpataN 06pa3OBAHne nTeH Ha BapOCHN IOBepxHocTn.
Ponb3yntcB nocdyo, dAmetp KOtOp0 No3BOJnEeT NOHOCTBIO 3aKpbIbTb 3OHy HarpeBa: pa3Mep Nocdyb DOJNKeH 6bITb He MeHbWe 3ObHi HarpeBa. Ecn DnaMeTp Nocdyb HEMHO 6BoJIbe DNAMeTp 3ObHi HarpeBa, To 3Heprn8 6yDet NCNoJIb3OBaTbcr C MAKCImaJIbHOH 3ΦΦEKTNBHOCTbIO.
BbIbOP KxOHHO Nocybl: PnBedeHna HNKe INHcpMaun noMoKet Bam Bb6paTb KxOHHyo nocSy c XopoUIMN 3KcPnyatauOnHHbIMXapAKTePNCTIKaMNI.
HepkaBeIOUaCtJIb:HaemoeIbHO peKOMeHOyEmc.
Oc6eHHO xopoIIOxOHT KxOHnA NOcya C MHOrOCNoHBIM HOM TINA «C3HDBM», KOTope 06BeHNHReT B Ce6e npEnMyIeCTBA HeKxAbeHOeCTaII (npBLeKeATEJbHbN BHeUHn BnD, DIOJIROeHOCtB INpOHHoT) INpENMyIeCTBA aIIOMHn IIN Mei (BbICOKa TeIIOIpOBIoHocTb, paBHOMepHo pacnPepdeneHne TemnepaTpybl).
AnomnH: peKOMeHdyemc uonnb3oabmb mKeynyno nocdy. BbICOKa TENNONPOBOIDHOCTb.AIOMHNHEBA NOyDA HOrda ocTabnE H aBapOH naHEn cnebl, noXokne Ha capanHHb. Ho 3TN CNEbl NEKO ydaJIOTc, ecN YCTKa BapOHO naHEn BbINONHReTc HEmdJeHHO NocJnx O6pa3OBAHNI.
H3-3a H3KoTEmpeatpybI nIaBneHnAJIOMMHnHe NcNoIb3yTe TOHKoCTeHHyO aHOMMHnEByIO Nocdy.
UryH:MOxHO UcNoIb3o6aMb, Ho He peKOMeHyemc. Hn3Kne 3KcPnIyatauOnHHbe XapakTepructKn. MoXe npNBecTn K 06pa3OBAHIO capanHH Ha nobepxHOCTN.
Nocya c MeHbIM dHomKepaMnka: peKOMeHdyemcra UcNoIb30eamMb mKeJyIO nocdy. XopoWne 3KnpyatauOnHHbIe xapaKTEpNCNI, HO MeB MoKTe OCTABJIb Ha NOBepxHOCTn BapOCHo IaHEN CnEbl, NoXoxNe Ha capanHIb. 3TN CnEbl MOryt 6bl T ydaJeHb, ECIN YCTKa BapOCHo IaHEN BbINONHETCn HEmdJIeHNO NocNe ObaOHn 3THx CnEOB. B JIObOM Cnyae, He DONYCKaTIpeNcyTbN PyCTOn NocdybHa paBoTaIOUeI BapOCHo NOBEPxHOCTN. PePerpetbM MetaII MoKet pnpropeTB K CTekNIOkePAmueckO NobEPxHOCTN. PePerpeta Nocya c MedhBM dHOM MOKTe OCTaBHTb Ha CTekNIOkePAmueckO NobEPxHOCTN CnEbl, KOtOpbl EHeBO3MOXHO bYdET YdaJIbTb.
Φapφopobār/əmʌnnpoBaHHa nocyda: Xopoʊnne 3KcπnyatauONHbIe XapaKTepNC TIOJIbKO IJIy NOCyDbI C TOHKIM, rIaNKM, PLOCKM IHOm.
CTeKnlokepaMnuecka nocya: He peKomeHoyemc. Hn3KeN 3KcnNyatauOnHHbIe XapakTepeNtKm. MoXe npBecTn K 6oBa3OBAHnU capanHH Ha nobepxHocTn.
6.3KcNpyATAUINPNUBOPA
Kak BBi6paTb ypoBeHb ynpaBHeHHnTaHHeM.
C nOmoIbI OyHKUIN «YnpaBJIeHne NITaHHeM» NOJb3OBaTeNb MOKeT 3aJaTB MaKcIMaJIbHbI yPoBeHb MoUHOCn IIN BapOuHOI NaHEII.
Функцу ynpaBHeHnI nITaHnEM DocTyHa TOnbko B TeYeHne nepBbIX 30cekyH nocJe BKnOeHnBaOpOH naHeJI.
3Tu HactpoKy MoXHO N3MeHHTb CHOBA,OTCOEINHNB BUNKy Ka6eIaNtAHNA OT 3NeKTPocETn N eUe pa3 NOkTNHOHB ee
Pn ycTaHOBHeHNH 3HaHeHN MaKcMnAHLoMooHCTn BApOHHa
NaHeB abTOMaTHueCKn pacnPpeJenReT MOuHOCtB MeKdy
KOHΦOpKaMn,YTO6bI 3OT NpeJEN He 6bl npeBbIiHe;
6JIaOdaP3TOMyMOXHO OJHOBpeMeHHO ynpaBnTb BCEMN KOHOpKaMn, He cTaJIKBaBc C npOBeMaMn neperpy3Kn.
IOnb3oBaTeJIb MoKET 3aJaTb MaKcImaJIbHbIy yPoBeHb MoUHocTn dIaBapOuHOH naHeNt O T2,5 KBT Do 3HaueHnaMaKcImaJIbHOH OTHCIOteJIbHO HO MOUHOCTn BApOCHNO NaHeNl (3TO 3HaueHne 3aBNCNT OT MOneJN yCTpoiCTBa) (HaPmEpe,ecNI MaKcImaJIbHraMoUHOCTb BApOCHNO NaHeNl CoCTabIeT 7,2KBT MaKcImaJIbHbIy yPoBeHb MOUHOCTn dIa HAcTpOko6yDet ImeTb 3HaueHne O T 2,5 KBT Do 7,2 KBT).
Ha npno6peTeHHoB apoHoi naHeiN yCTaHO BHeHO MaKcImaJIbHOe 3NaueHne MoUHocTn.
Iocne noKIOHcHn yCTpOCTBa K 3JeKTPoCtB N TeUeHne 30 ckyHm MOKHO 3aDaTb yPOBeHb MoUHOCTu Ha OCHOBAHn Yka3aHHbIX HnKe npaMeTpOB:
1-BkIIOUHTe KOHOpky.
2-DAIteBpeMceHCOPHMyynpaBHeHHo,3ABePHTb npOeCC HnHnnaHn3aHnn.
3-ДоиTeueHЯ 30 ceKHyI KocHnTEcB,Ha5ceKHyI KnaBnIu «()(MInHyc).
4-Ha nncnnee noBntc sJeynuuee coo6eHne.
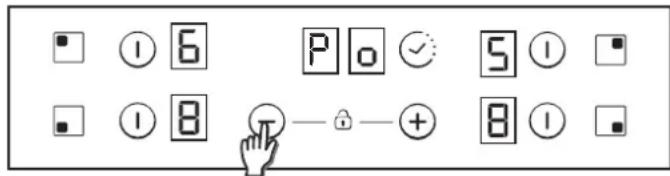
5-BocnoB3OBaBnCb KnaBnAmn «Plus» n «Minus», moxho oTperynnpoBaT ynpaBneHne nHTaHem. B daHOM npimepe MoUHocTb perynpyeTc Mekdy 3haeHnAMyn 6500 BT n 2500 BT. BbypaB hyxHoe 3haeHne, KOCHNTecb OndHOBpeMeHHO KnaBnIg «Plus» n «Minus», ydepKnBaNxA B TeueHne 5 cekyHd.
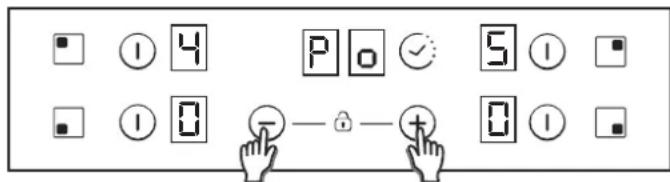
6-NoOKOHuaHm3ToI npOeUpybI npO3ByuHT dINHHbI CNrHaJn I npOn3oJeT c6poc CnCTembl. NOBTOPITc npOeUpa 3aNycka.
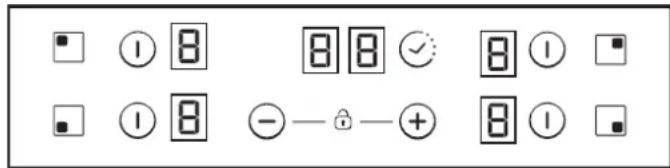
7-ПоссеЗаусяпоцеса на диспee таймepa ECO oTo6pa3ntcayypapBHeHne pHTaHnEM.
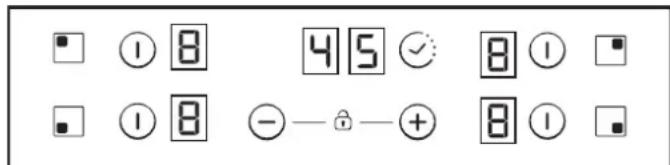
Iocne 3mo2o cehcnpoe ynpaeneHue He no3e0um nepeknouamcbra Ha kaoe-nu6o coemaHue, Komopoe moKem npeebcumb daHHoe npedeBhoe 3haueHue Eco.
BknIOueHne/BbIKNIOueHne 3OHBi HarpeBa
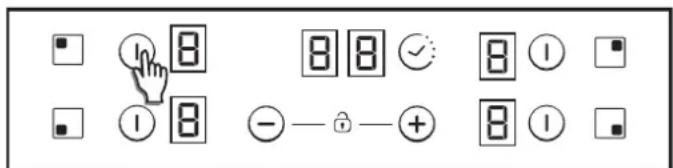
ДяВКЛIOUCHEN3OнБИHARpeBa ydepxnBaIte KHOKNy BKJIIOUChENB TeueHne 400 MCEK. Bby yCblIuTe DnHHbI 3ByKOBoI CnHaJ, a B 3OHAx HArpeBa BbICBeTITcR 3HaueHne "0", yKa3bIBaIOoee Ha MOUHOCtB HArpeBa.
1) Ecni nctaia npirotoBneHn HaxoNTcB nnoxKeHHN 0, dncnn e oKIOHTcABTOMaTueckn uee3 10 ckyHn, n6ydet IOnaH 3ByKOBo CnHaJ O 3aBepWeHHn Ipouceca.
2) B cnyuae npncyTcBnO ocTaOnHOro Tenna,Ha BKJIOueHHOM DnCnnee npn HnyeBO MOUHOCTn HarpeBa,BbICBeNTTCr MmraioiN CMBOJ "0".
3)PnakTbBPOBaHHoΦ
ДЯ ВьКИОЧЕЗны HarpeBa DoTpoHbTeCb Do IIOбо 3OнБI HarpeBa B TeChEne 1,2 Cek. Bb yCnblUIne 3 KOpOTKnx 3BYKOBbIX CnHana. Ha NcNnee 3aDeiCTBOBaHHo 3OHi HnEro He BvICBeTITcR INI BvICBeTITcR CmBOn "H" B cIyuae nPcYcTCTBnR OCTaTOHOro TENla. NocNe Yero 3OHa HarpeBa BvIKJIOuHTcR.
1)EcnnCTaIINpNroTOBHeHn HaxoHTcB NnoJoxHn0, DnCnnneOTKIOUHTcABTOMaTHeCKnYepe3 10 ckyH, n6ydet Noan 3ByKOBo CnHaJ O 3aBePWeHNn Ipouceca.
2)Bcnyae npncyTCTBnO OCTaTOHOro TEnJa,Ha BbIKIOUeHHOM ducnnee noBHTcra CMBON "H".
3) BbIKHouTb 30Hy HArpeBa MoKHO dAxe npn AKTNBnPoBaHHo ΦyHKuIN 6JOKnPOBKn.
4) B cnyuae cncn anktnubpoaba 6bdt ToNbKO Onda 30Ha HarpeBa, n OHa 6bdt BbIKIOHe, YeIbpe KOpOTKINX 3BkyOBbIX CnIHnA N3BcTeT O TOM, TCO BzBaOpHna NaehJI BbIKIOHe.
Bb6op 30HbHarpeBa
Pnye BkHIOeHHo3OHe HArpeBa, 30HbI HarpeBa, KOtOpBie 6ydyT BkHIOeHbI, HO pN 3OM He 6yDyT BbIbpaHbI, 6yDyTNMeMb MeHbWIO CTeneHb OCBeueHn.
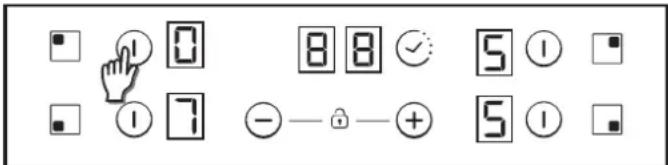
Bb6paHa No yMOJTuHaHnO, 6e3 Heo6xOuMoCTn KopoTkoHO HaKaTna (150 MceK) Ha KNOpKy Bb6opa.
YBeJIyHeH/ymeHbIeHHeMoUHcOHTnHaPeBa
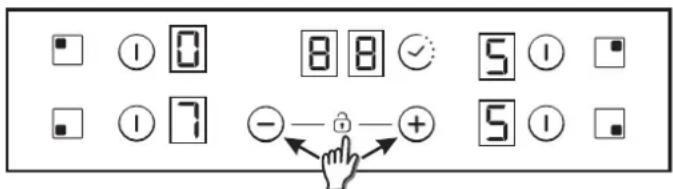
BbICtpbIM HaxaTneM KHOHOK +' uINu - ' BBI MOKeTe yBeINuHTb uINu yMeHbWNTb MOUHOCt b HarpeBa BB6paHHbIX 30H HarpeBa B dInana3OHe: 0-1-2-3...9-P
1.ПиДпnteьнOM HaxKaTIN KHOnOK '+''ИлN' yPoBeHb HarpeBa 6ydt NOCToRrHNO yBEnuNbBaTcBcry /ymeHbWaTaBcR.ПиБicTpOM yBENueHn ypoBeHb HarpeBa OCTaHOBNTcRa Ha ypOBHe 9,дя[euple BoIbIwero yPoBnHa rPeBa 6bIcTpO HaxMnte Ha KhONky +'.5bIcTpoe yBENueHne /chIXKeHne yPoBnHa HarpeBa He copPOBXdaETcR 3ByKObbl CInHaNoM.
2.Пи дocTNKeHmMoHOCnHaRpeBa yOBoH P,пр nOBtOpHm HaxaTmN KHOJIKN '+ yPOBeHb MoUHOCn He BepHeTcK 0.Пи 3NaYeHm yPOBnMoUHOCn O, NOBtOpHoe HaxaTne KHOKn' -' He 3MeHHT yPOBeHb MoUHOCn Do 3NaYeHnP
3.ПиВКПИЧЕНСОнHARpeBa,IMEJOUeYPOBEHB HArpeBa 0,ecIN3OHa HArpeBa OCTaETcR TOpRAe,CIMBOJ06yDetMIRATb.Ype310CEKHyD CIMBOJ0NCHe3Het,NaДиCnJIe eOTo6paNTcnoCTOHHB CIMBOJ'H'.
PnBb6paHHo3OHe HarpBa N ODHOBpeMeHHOM HaKaTIN KHOHOK ^+ IN',yPoBeHb HarpBa CtaHET0',pNtOm 3OHa HarpBa 6yDet octabatcBb6paHHo B TeueHne 10 CekyH. EcIn 3OHa HarpBa 6blna 3anporpamMnpoBa Hno BpeMeH, TaMep BBKIOHTc. 3Ta onepaMQeT MeMtB MecTo TOnkBo H HeckOJIbKIN CNYAIX B 3aBNCIMOCTN OT KOHfNpyaPcn CEHCOPHOrO ynpabJeHn.
OncnHbIe Hxke npimepbl npBedeHb ToJbKO nJa cnpaBKn. Co BpeMeHem Bby Hayntecb npaBnBHO No6upaTb ycTaHOBKn HarpeBa B COOTBeTcTBm CO CBOIMN BKyCamn N pInBbUckamn.
ФункцяблOKнрOBК OТдTeN
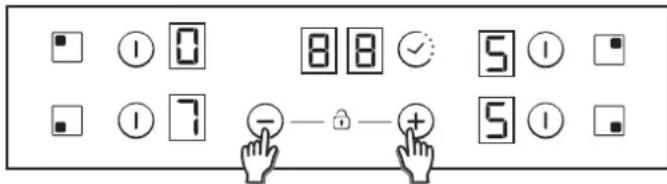
OCTHraeTcOJHOBpeMeHHbIM HaxKaTHm KHOJOK+I
3aTeM, KaKbIpa3 npn HaxaTn KhoKn Ha dncnnee 6yDet OTo6paKaTbCn INnKAtop "L" B TeHeHne 2 cek. YpOBeHb HarpeBa 6yDet OCTaBaTbCn B 3tOM Xe CoCToRHN.
Ipy De3akTbauqn FyHKuBn BLOKpOBKn OT DeTe, CneDyTe npoueccy, OncaHHomy Bblwe. Nocne yero Bbl ycblwnte KopoTkn 3ByKOBoN CnHaJI N Ha DnCnPee BBcBETnC TnHnDKaTOp "n".
Bapouha naheIb 6ydt pa36JoknpoBaHa.
PpMMeaHHe: PpMMeaHHe: aBtOMaTneckA 6nOKnpOBKa OT DeTei 6yDet NmEt b MeCTo Yepe3 15 MHyT NocE NOnHOro BbIKIoueHn BapOCHo NaHEn. 3Ta FyHKuN 6yDet cpa6aTBbTaB bABtOMaTneCKn, Ho nHaayabHo e HxKyHO zAnporpaMMIpOBaTb. CmTpnte pa3dJe IOnb3ObaTeJIbckMe HeAChToKn.
BONHbI /TPOINHbI 30HbI
IЯakTbauqunDOnOJHHTeBHO30HbHarpeBa,3aJeCTBOBaHHa OCHOBHAR30Ha HarpeBa DoJXHa 6bItyXe BKIOUeHa,a MOUHOCTb HarpeBa,OTobpaXaemHa HINDKKaTope,DOJXHa 6bItbBbIwe0.
8.1-BKIOUEHNE DOnONHITeHbHO30HbHarpeBa(DBe 30Hb)
PepBoe 6bICptoe HaxaTne KHNKn DOnONHITeHbHO30HbHarpeBa
AKTNBnpyET DOnONHITeHbHyO6bIacTb HarpeBa.3aropaeTc
CBetOnIOd NaKD KHONKO DonONHITeHbHO30HbHarpeBa.
Btopoe 6bictpeo haxatne KhoNn DOnonHnteHoh 30hbl HarpBa BbIKNoaet DOnonHnteHbHyO oIactb HarpBa KaXIOe HaxaTne KHOKN DOnonHnteHoh 30hbl HarpBa COpOBOxJaETcK OPOTKIM 3ByKObIM CINHaIOM.
8.2-BKIIIOUEHNE DoonHHTeNbHO3ObHaRpeBa(Tpu 3Obbl)
NepBoe 6bICTpoe HaxaTne KhoNn DOnONHnTeBHO3ObHArpeBa aKTHBnpyET nepByo DOonONHnTeBHyIO oBnactb HarpeBa. PnBkNoUeHm NepBoo DOnONHnTeBHO ObNaCTn HarpEba 3aRopaeTc7 CBeTONDnAD KhoNkoDOnONHnTeBHO 3ObH HarpeBa (BCnyAe HAnuHr Tpex 30H 30 ByET CBeToNDnCNEBA, B CnyAe DByX 30H 30 ByET CBeToNDnOncopePnHe INI eINHCTBeHHbCBeToNDn) Btopoe 6bICTpoe HaxaTne KhoNkn DOnONHnTeBHO 3ObH HarpeBa BkNoUaET Btopy DOonONHnTeBHyIO oBnactb HarpeBa. PnBkNoUeHm NepBoo n BtopoN DOnONHnTeBHyIX ObNaCTeH NaKhoNko DOnONHnTeBHO 3ObH HarpeBa 3aRopaoTc2 CBeToNDna.
TpeBe 6bictpoe HaxaTne KHOKNI DOnONHInTeJIbHO30HbHaRpeBa
BbIKIOaet NepByIO IN BTOpyIO DOnONHITeJIbHbIe O6NaCTn HarpeBa.
Kazdoe HaxaTne KhoNkDOnoHHTelbHo30HbHarpeBa
CONPOBOXdaeTcKOPOTKIM 3BYKOBBIM CnHaIOM.
Функць Bridge (MocT)
Функця Bridge moKet 6bIb aKtNbIpObaHa TOnIbko B TOM Clyuae, ecIn oBe 30HbI HarpeBa BbIKIOHeHb.IЯ aKtNbAUmФункцin bridge BbIbepnte OdHy 3OHy HarpeBa N HaxMnTe KhONky bridge
O6 akTbAunm 3OHbI HarpBa Bbl 6ydeTe n3BcUeHb KopoTkHM 3ByKOBbIM CNrHaON I BKJIIOHeHMe CBToDnOda daHHoN 3OHbI HarpBa.
OndOBpeMeHHoMoryT 6bITb BbIpaHbI oBe 30HbI HArpeBa c cyHKnue bridge.
Iocne TOrO, KAK 30HbHaRpeBa 6yDyT Bb6paHbI, C NOMoUcIIO KHONOK + - yCTaHOBnTe JKeJaEMyIO MoUHOCtB HaPeBa.
06e 30hI HarpeBa c yHKUne bridge 6yUT IMt b OmHaKOBbl ypOBeHb HarpeBa. IJIa De3aKTnBaUN yHKUIN:
-BpeKmE yctAHOBKn HaKMnTe KhoNkY bridge
-Пиустановке уровьн Ha rpeBa Na 3haueHn "0"
ФункцязцntbOT npOINBa
Cpa6aBbAe npn DeIcTBn KaKOro-Jn6o npeMeta nnXnKIOCTNa IIO6yIO IN3 KHOJOK 6OJeE 5 cek.2 KopoTKnX 3ByKOBbIX CnHana +1 D0JIIN 3ByKOBOI CNHAI 6yUyt IMetb MeTO KaKdIe 30 cek, noka 3aDeiCTBOBaHHA KHONKa 6yDet Haxata. BapOuHaN paHeIb
ABTOMATNuecknOTKNIHOUHTC. INHINKaTOp 6yET npOJNKaTb MIRatb, NOKa DAHHAR CNTYALNA 6yET COXPAHrTBcR.
Taimep
Функия Таймера akTNBPyETCЯ NOcpeCTBOM CO6CTBeHHOJ KHOJIK Tаймера UNI ODNHOBpeMeHHbIM HAXaTneM KHOHOK+IN-'.
B 060nx cnyyaX dOJxHa 6bITb BbIbpaHa 30Ha HarpBa, a ee MOUHocTb dOJxHa 6bITb 6oJIbwe "0".
Bb6epnte3ohyHaPeba, BpemKaKOTopoB BBykEnaTe 3anporpaMnpoBaTb. MoHocTb 30hbl HArpeBa 60nbue "0". B 3oHe HarpeBa, BpemKaTOPOBdoNtHO 6bIt yCTaHOBeHO, 6yDet NOCTOHHo BbICBeHbAaCBc CmBON. BpemBa 6yDet OTo6paKeHO Ha UΦpOBOM Dncnnee "0 0".
1)YCTaHOBtBe Bpem TaMepa C NOMOsbKHOKONK +" HIN "。PnT 3TOM YCTaHOBKa He 6ydt COpOBQDaTbC3ByKOBBIM CNHAIOM.
2) PnOdHOBpeMeHHOM HaxKaTIN KHOtOK TaMepa, NocJeHNi 6yTe TOKIOUeH (pepeIeT Ha3NaueHne 00).
3)Быстая устаяховka доститагетс ятум удөрхань кнорok Tаймера "+" Илли "-" В түйсөнү REKOТОРО Врemeи NO yCMOTpeHIN OпьзOBaTeЯ.
4)Пиуctановке Времени Таймера сnomоью кноги"-" yctahabnbaioTc3haueHЯ OT "00"do "99",a cnomoью кноги "+" - 3haueHЯ OT "99"do "00".
5) MaKcHMaJIbHoE BpEma, Ha KOtOpoe MoKeT 6bITb 3aIporpaMMnpoBaH TaIMeP, coCTaBnAeT 99 MmHyT.
6) NcTeueHn 3aHaHHoro BpeMeH BapOHa nHaHeN HaHHeT n3DaBaTb 3ByKOBoi CnHnA, HxKMITE IIOyIO KHOKnY dIra c6pOca abApnn nPpeKaPeHnI pOecca OTCyeTa BpeMeH.
7)EcnT TaIeMep npedBapntbHo 6bl yctAHOBneH, Bbl MOKeTe COKpeKTIpOBAbErHO HCTPOIKN.
8)ИзменинMuOHHoHcTHHarpeBa30HbI,ДЯKOTopoB6blYcTaHOBHe TaMep, He npuBeTeK HapUSeHnIO 3aDaHHO pIporpaMMbI TaMepa.
9) PocneHnMyMHyTa 6yDet BbICBeuHbTaBcR BcekyHdx (B HeKOTopbx BapnaHTax 6yDet OTo6paKaTbCra TOnbKO B MeHIO npOrpamMPOBaHn TaMepa B TeeHHe NocJeHHe MHyTb OTYeTa)
10) Haxatne KhoNk TaHmepa 6e3 BbIbopa 3oHbI HarpeBa a TAKKe ecn TaMep He 6bl yCTaHOBJeH NdIa ODN HoN 3OH, 6ydet npOHnpPOBaHO CNTEmo.
11) Haxatne KhoKn TaHmepa 6e3 Bb6opa 30Hb HarpeBa Cnyae
ecnn TaHmep 6bl yctAHOBNEH JnHECKONkX 3OH HArpeBa, npBBeT K
tomy, YTO Bpemr, OToBpaKaemoe Ha DnCnEe, NaHET MeHrtCbR,
YepeDycb, N BbCBeTnCTB PEmr, Ha HdNKaTope KOtOporo
AKTNBupoBaHa FyHKnJ DecaTnHbIX Dpo6e.
12)IpeMeHHaMoHocb5ceKn0,5ceKBcBueBaetcB3oHe, BpEmKOTOpOdoJnxHO6bTbYCTAHOBHe.
OCTaBueeC BpemBaBcBeyuBaTc HpaHnHnKaTope TaMepe B Cnyae yctaOBK TaMEpe nra HeckonbKnx 3OH, BbcBceuBAeTCa HAmeHbWe eocBtAuee Bpem, ptn 3OM B COOTBeTCTByIOUeM OKoUke BbcBceuBAIOTc DEcrtNCHbe 3HAKn.
Hndkatop octaToHoro HarpeBa (B paHaHTHO 30He HarpeBa->paccHTbIbAeTc)
3TN JIHNKATOpBIMORYNCHONb3OBaTcBdINHINKaUNOCTaTOHOro HArpeBa.YCTAHOBITE BpEmr dNcEduOeUeEN:OCTaTochBnHarpeBf(ypoBeHMOuHocTn,BpEmraPbOtbl).KordaTeMnepaty03HOHARpeBa npeB1w aet65oC(TeopeHTueckarBeHHuHa),HaDCnIeepnoBnAETcHINDKaTOp"H.ⅡnDoCTNHeNemTnepeAtpybBlWe 65oC,HarpBeTaIbHbⅢAnEMtdoJKeH6blTBKNIQUeHHbIM HeKOTOpoe BpEm,KOTOpoe3ABNCNTOTYPOBHRMOuHocTn.PocNeToro,KAK3TOTIpOMeKytOKBpEmH3ABepWntTCnHarpBeTaIbHbⅢAnEMtOTKJIOnHTcB,BICBTNTcnpdynpexJeHneocTeTOHORoHarpBa.
ABTomatnueeckoe npdooxpaHntbHoe BblKIOUeHne
B cnyae ecn ypoBeHb MOUHOCTn He 6bl n3MeHeH B TeueHH npedyctaHOBHeHoro BpeMeHN, COOTBeTcTBYIOua 30Ha HArpeBa BBkIIOHTcABTOMATueCKN.
MaKcImaIbHoe Bpem, B TeueHne KToTopo 30Ha HArpeBa 6yDet OCTaBaTbCBA KJIIOUeHHOH, 3aBNCIT OT Bbl6paHHOr yPoBHn HarpeBa.
HIO KxOHHO NOCyDbI DOnJH0 NOnHOCTbIO NOKpbIBaT Bbl6paHHyo 3OHy HArpeBa.
Tua zomobumc cnuukom MedneHNO
IcnoJb3yETcH enoDxOJaA KxOHNa Nocya. IOnb3yITecb ToJbKO TJeNoi KyXOHHO NocDo C NIOCKM DHom, DaMaTeP KOtOpO Ro He MeHSe DNAmETpa 30Hb HarpeBa.
He6oJIbUue uapauHbI Uu nomepmocMu Ha noeepxHocMu cmeKnokepamueeckou
apouho naheu
NcnoIb3yIOCTe HenoOxOJaUe YnCTAUIne CpeCDTBA nIN HeNOxOJaUa KxOHnag Nocya c WepoxOBaTbIM dHOM. MeJdy NOBepxHOCTbBO BApOHHa NHeu IN dHOM Nocybl NpAnNN KpynnHKn INn qactnKn conn. CmOpntpe pa3den "OCHNTKA"; nepeNcNoIb3oBaHNem Nocybl y6eDnTEcB bTom, UTO OHa IMeET YnCToe DHO. NcnoIb3yUte Nocdy TOnbKO c TnAdkm dHOM. LapanHB MoXHO yMeHbUnTbToLbKO pnp npABInbHOM BblONJIHeHm OChCTKn.
Memannuueckue omneyamku
He nepeBnraIte aHOMnHnEByIO nocydy no BapOCHo NOBepxHOCTN. CmOTnPte peKOMeHdaaUN IO OHTcKe.
B cnyae ecnn npn nCOnb3ObaHn KoprpeKTHbIX MaTePnaNoB pTHa octaOTc. BocnoIb3yItecbJe3Bnem n CneDyIe pekomeHaQaYm, 13IOKeHHbIM B pa3dene "OCHCTKA".
Temhbie narnHa
BocnoIb3yntecb ne3Bnem n cneynTe pekomehdaunm, nIOKeHHbIM bpa3dene "OCHCTKA".
Cemblbe obnacmu ha noeepxhcmu eapouho naHenu
CneblOT aIOMMHNEBOH mMeHNO Nocybla, a TaKKe MMHepaJIbHbIe OTIOKEHNA, PAHTA OTO BObI INNIU. 3TN PRTHa MOXHO ydaNTb C NOMOuBIO UcCTaUero CpeDCTBa.
CnebJxKHeHO z caxapa uu pacnnaeHHO nacmu Ka naopepXHocmu.
CMOTPte pa3dien "OCHCTKA".
Bapouhna noeepxnocbu nlu nekomopbte 3ohbl haapeba bapouhou noeepxnocmu he paobomam
HenpaBnIbHo yCTaHOBnEhbl WHTbI Ha KneMMHO KOJOnKe.
Y6eIntecbTOM,TOIOKnIOHeBbINOJIHeO,a naHeb ynpaBneHn3abNOKIpOBaHa.Pa3bNOKpyTeBaOpHyo naHeb.
Bapouha naHb He ebiklouaemc.
KoHTpObHnA naHeIb 3a6noknpoBaHa. Pa36nokpyTe BapouHyo naHeIb.
Yacmoma zuknoe bknouehn/6biknlouehura 30H Hapeba Yactota zuknoB BKIOUeHna /BbIKIOUeHna 3aBNCIT OT yCTaHOBki npOBHa HarpeBa:
HN3KIN yPOBeHb HArpeBa-KopoTKeB BpeMa pa60TbI,
BbICOKn ypoBeHb HarpBa-ДЛNTeIbHoe BpempaBoTbI.
3oHa HarpeBa Hepa6oTaet.
PpOeBpTe COCToHHe pNaBkNx PpeOxoPaHntEn / pa3MbkaTeen B Dome. Y6eNTecbBTOM, yTO HETpepe6oBnOdaue 3NEKTPo3Heprnn
3oha HarpeBa cAmOCTeJIbHOBBIKIIOUaTeCra.
HeuahHoe HaxaTne rnaBHoro BbIKIOUaTeTn (KhONKa BKN./BbIKN.) NnHa KhONKe JEXNT KaKo-NI6o PpeDMeT. Y6epnte PpeDMeT C KhONKn I NOBTOPO HbKNIOHTe Pn6Op. BBeINte HAcToPkn IOBTOPOHO.
BbCBeuBaetcF CmBoN uΦpbl
B cnyuae korgda BbICBeuHbAeTc HnDnKaTOp F nUncpbl, BaW np6op 0hapuykn Own6ky. B Ta6nue HnKe n3NoKeHb DeIctBn, KOtOpbI Heo6xOIMO npEaPnHrTb IpypeHnnp6nEmbl.
9. NOCJIENPOJADXHOE OBCNJXUBAHNE
IpeepTeM KAK Bb3BaTc CnueaJIncta No TEXHueckomy 06cnyKBAHnIO,npocm y6eINTbcR B TOM,
YTO BUNIka 3JKeKTPoINITaHn IpaBnIbHO BCTaBNeHa B 3JKeTpUneckyIOPO3EtKy, IN PpeOxpaHNTeNb BKIOueH;
EcIn BbI He MoXeTe cAmOCToRteMbHO OnpeDeHINb IpNHy HEnCnpaBnOCTn, BbIKNoHTe 3NeKTPoPnB6Op IN He NbITaTcScb OTPMOHTPOBaTB eO cAmOCToRteNBHO. PO3BOHIne B ceHTp nocIepoDaxHoro 06cnyKBaHN. 3NeKTPoPnB6Op IMeET rapaHTIO 6ydt OTPMOHTPOBaH B cepBnCHOM 9eHTpe 6ecnnatHo.
| Ди检пел 30нbl harpeBa | Ошнбka | Демстпve |
| F0 | Ошни бал рогамно об ec neу се и се ho улравлия. | В сныае зтой ошни варочую паненьи и nobotropно подклочite ee к Злесгчесу питанно.Есни ошни octается, обатITEСь в ceHTP послраджного осклужиня.Есни ошни bo3нikuот bVE3ANHO BO ВЕРМАльно ГО ФУКИОПOVABAHA, обатITEСь в ceHTP послраджного obcnykubлия. |
| Fc | Зona сенисогorno улравлия слишkom ораяс, Се 30нbl harpeBa sbiNs BlyKIIQUChybl. | Плождnte, поа тмлратура не син3ITСЯ.Вароча паненья AVTomatчесу BO3O6HOBNT pa60ы, кorda temлратураюдостиггет Hopмально 3начени. Плождnte, поа тмлратура не син3ITСЯ.Есни abаря OCTaETCЯ поспг.TORO, кас тмлрату doctuHETypOBH RA TmPepATpyb B NOMeUHIN, obpaTInTeB C zuHTP noCspIePDAxJHoro o6cnykubлия. |
| Ft | Поведен датчic сенисогorno улравлия Tempepatур. | Плождnte, поа тмлратура не син3ITСЯ.Есни abаря OCTaETCЯ поспг.TORO, кас тмлрату doctuHETypOBH RA TmPepATpyb B NOMeUHIN, obpaTInTeB C zuHTP noCspIePDAxJHoro o8cnykubлия. |
| FE | Поведен датчic се NC op HOу ynp abel ENY tempepatур. | Плождnte, поа тмлратура не син3ITСЯ.Есни abаря OCTaETCЯ поспг.TORO, кас тмлрату doctuHETypOBH RA TmPepATpyb B NOMeUHIN, obpaTInTeB C zuHTP noCspIePdaXJHoro o6cnykubлия. |
| Fb | Изшиня чьвstвileьность ВсexнOLOK. | Убдитсь в TOM, ChTo BAVOCHNЯ паненья CBMOHTPBOVAHA korректHo. Y6eDITeB v Tom, ChTo KhoTNK korpeKTHO KacaoTcSTCTEKJIHNH OOBEXHOCSt. |
| FU / FJ | Ошни сбабз�ност# Кн орочи панени улравлия. | Даннay ошни подз兵 ATCOMTUNESKO ДИАГНСТКИ КоррамMHbIM OБECSECHENEM.Ошни ИСЗэаet, Кorda ATCOMTUNESKO DWARHOTSCNA BO3BpAuaETCЯ 6beZONACHOMY 3начени.Есни ошни oc7aETcR, obpaTInTeB C zuHTP noCspIePDAxJHoro o6cnykubлия. |
| FA | Ошни сбабз�нost# Кн орочи панени улравлия. | Даннay ошни подз兵 ATCOMTUNESKO DWARHOTSCNA КоррамMHbIM OБECSECHENEM.Ошни ИСЗэаet, Кorda ATCOMTUNESKO DWARHOTSCNA BO3BpAuaETCЯ 6beZONACHOMY 3начени.Есни ошни oc7aETcR, obpaTInTeB C zuHTP noCspIePDAxJHoro O8cNYkUBлия. |
| FC / Fd | Ошни сбабз�нost# Кн орочи панени улравлия. | Даннay ошни подз兵 ATCOMTUNESKO DWARHOTSCNA КоррамMHbIM OБECSECHENEM.Ошни ИСЗэаet, Кorda ATCOMTUNESKO DWARHOTSCNA BO3BpAAETCЯ 6beZONACHOMY 3начени.Есни ошни oc7aETcR, obpaTInTeB C zuHTP noCspIePDAxJHoro o6cnykubлия. |
| Fr | Ошнбka 6bezonachocstn pene | ВOSTMOЖнаглбема в оюн ИЗ уразвл�ьоцх цeп рepe.ОТКЛЮЧITE BAVOCHNY паненьь OT SCTOHнika питаня, Вьждпte МИHTY, посLE сero ChObвь BKlOUHITE.Есни ошни octaETCя obpaTInTeB C zuHTP noCspIePDAxJHoro o6cNYkUBлия. |
O△HΓIEΣAΣΦΑΛΕΙΑΣ
Zac ouviotoue va qualectetic onyiec Eykataoataonkai xphong yia eAlovtikn avapopa kai piv atto nTv Eykataaotaon tnc Eotiac va onneiwoete tov apioo oepac ts os Pepittwn Tou xpeiaoteite UTOOTnpiE anto Tnv UTnPoeia metayopaoTIKns Extnpentno.
NPOEIADONIOIH: n ouokun kai ta npooaiauma tnuata tnc 0epuaivovtai nou kata tn diapkeia tnc xponc. Oa npetie va divetai npooxwnote va aTNOeuvetaT oayiymuTwv 0epauvtikwv stoiexiw, Paidia naikiacatw twv 8 etuw npetie va Tnapaevouv maKpia atto tn ouokun ektoc eav Bpiokovtai uto ouvexn etiBAAwn.
IPOEIOIHsH: xnoiouoitemuov IPOOTATEUTIKA EOTIW TIOOxEOIAQOVTAI aTTOV KAATAKEUAOTn TCS OUKEUNG MAVEIPeAUc n TIOU UTIDEKUVOTAI aTTOV KATAOKUEAUOTn TCS OUKEUNG OTIG ONYIEC XPHONCS WCGATAALNA H TA IPOOTATEUTIKA EOTIW TIOEVIVAI EVOWATWUEVA OTN OUKEUN. H xponaKataaALNAW V IPOOTATEUTIKWv MTOPEI VA TPOKALEOSI atuxnuata.
NPOEIOIHsH: to ayepma xwpi c tioe n oia eotia me iiooc n adoi mtopei va evai eIKivuvo kai mtopei va tpokaolei TUPkayia. NOTE myn pooTnOeTE va oBnoTe ia qwtia me vepo, aaaa aTnevepyoToinote tn oukeun kai OTn ouvexia, kaUyTE tn foya TT.x. me eva kaTaki n mioubetapta Tupoosc
IPOEIAOIOIH:Kivduoc TUPkayiac:unv aTOnkkeuTe avTKeIeva OTIC ETTiPavEIEc uayieipueaTOC.
HPOEIOHOIH2H: eav n eTIPaVEA εiva payiouevn, mny ayyizεTe to yuaλi kai aTVEpyoioInote Tn ouokεuπPOKeμEvou va aTPOEUXθein TIIaovtntaNkTpoTTAnξiaC.
Autn n ouokueun mTnpoei va xpnoiuotointhetai anto
Taiaia naiiaac 8 etuw n neyautepa kai aTIO atoua
e ueiwueves oomegaatikec, ao0ntnpiakec n
biavontikec ikavotntec n eaaiewn eptieipiackai
yvwoc evivai utno eTTBaeyn n touc exouv
dothe oonyie c avapopika e Tn xpion Tns
ouakeunc me aovpaaon tpotto kai exouv katavonoei
touc kiovuvouc Tnou evxovtaI. Ta iaiia th
tpettei va eTTBentovtaI wote va diaoepalizetai otI
dev taiouv me tn ouokueun. O kaapiouckai n
ouvtnponan atto tv npotsn dev th npettei va
vivetai an taiaia xwpic eTTBaeyn.
PPOSOXH: n diabikacia (\mu) ayepaeato (\pi p\epsilon \pi \epsilon) va (\pi p a y u a t o t o i e i t a i u n o \varepsilon \pi i \beta \lambda \epsilon \psi \eta . M i a \sigma u v t o u n (\text{品}) diabikacia (\mu) ayepaeato (\pi p\epsilon \pi \epsilon) va (\varepsilon \pi i \beta \lambda \epsilon \pi \epsilon) taiouvexwc.
Zuviotatai 1iaitepa va Kpatate Ta Taaia pakia aTIO TIC WvEs MayeipepaTOEw autc Eivai Oe Aetoupyia n otav eivai oBnoteC, yia ooo xpov oivai avamevn n Evoeiug NToAeiIOuEvns
OepoTntac TTPOKEIeVou va aTIOpeUYETAI O
Kivduvo TpokAnos Ooapaw EykaumatWv.
Autn n ouokun npoopiceta iia I oupyia meow e p i k o u xpoovodaikottn n p i o t o u ountmuoctnaexepiou.
Mny koitae aeneuethia cota otoixia tnc eotiae aantc aoyovou, ev utapxouv.
Suvdeote eva oTo kaawio Tpooooia c Tou eivai kataaanny ia tnv taon, to peuca kai to optio Tou avaypaovtai otnv etiketa kai to otio diaheTei eTnapn yeiwoan. Hpiiz a npetie va eivai kataaanny ia to optio Tou avaypaeotai OTNV Etiketa kai npeTne i vexi Tnv eTnapn yeiwoan ouvdeevn kai oe leitoupyia. O aywoos
yeiwnc exei ktpivo-tnpaoivo xpwa.Autn n
epyaia o npetie va ektealeitai aTIO TOTTOINUEO EAYEAuaia. ZE TEPITTNOWAN
aouubatotntac meatau TNC Tpiac kai Tou pIC TNC
Tpiac TNC OUKKUNC, ZNTNOE aTIO EVAV
TIOTTOINUEO NAKTPAOYO VA AVTKATAOTNAEI
TNV Tpiic aueia aALN KAATAALNau tUTOU.To qic
kai n Tpiic npETIEVA OUMOPPovovrAe Touc
IOXuovTEc KAVOEc TNC Xwapc EYkataaTaONc.
H ouvOeON OTNV TPOPOOoi AOXUOC MTOpeI
ETIANC VA YIVEI TOIOETWVTAC EVAV TLOAULOKO
aQPAeIOBIAKOITTN MEtAEU TNC OUKKEUNG KAI TNC
TPOPOOOIAC IOXUC, O OTIOIC VA MTOpei VA
avTEeI To eviato uovdeEveo qoptio kai va evai
OUMOVOC U TYXUOUA VMOEoiA.
To KITPIVO-ITpaoivo KaWIO yEiwOnc Dv TpeTTIva DIAKOTETAI aTTOV aOgAIAIOBIAKOITTN. H TpiCa n o TOnuTolAIKOS aOgAIAIOBIAKOITTNS Tou XpOoiOtioIEiTAY iA Tn OuvoEON 0a TpeTTeVA Eivai EUKOLA TPOOBAIOIoc OTAV ExEi TOnoTeN0Ei N SuOKeun tN 0eON TNC.
H aiooovdean mtopei va einteuxthetaixovtac
TPOaon oTo qic n evomegaatwovtac evav
diaokottn otnv otaepn kaawoiwan ouqowva
touc kavoeC kaawoiwnc.
Eav exi pokknte i znmu a to kaawio tropoooiac, pente va avikataaota eai tov kataokeuaotn, tov eoouioobotnevo texviiko tou n atopaue xei otoiooohntote kivuoc. O aywoyos yiewong (kitpvou-tpaoivou xpawatoc) pente va evai meyalutepos afo 10 mm otnv PLEUPA TOU mloak akpodektwv. H eowtepi kn biatoun wv aywyovipetie va evai katalnn yia tyn ivxu TPOA TTOV ETIKETA).O TUIOCTOU KAWBIou IOXuOS PPETIE VA EVAI HO5V2V2-F. Mny tototheite mtaaikac vtikeieva otwns maayia, ipouvia, koutalia n kaTAKIA OTNV EOTIA.Eoexetai va themuavouv.
PPeTIvaTOnoETouvtai pUAAa aauouviou KAI TAAOTIKA OKEU EN TAVW OTIC WVEc EepuavonC Meta aTIO KAe XpO, aTAAITEaia KaApaiooc Twv eTiwE Toi wote va aTPOEUYETAI n OuaoWpeun PUTW KAI AITouc. EAv Tapaueiv, auto ETTavaePmuivaiotav xnpoiotoiuvtaoi EOTIEc KAI KAYETAI TAPAYOVtac KATVIO KAI DUAPAEOTc MUPOWIEc, ia va uyn avapepoue Touk Kovouc OIAOOnc TTUPKayiac.
Note unxpoioieTe aTNO n 1EkaoMo e uynan Tneon ia va kaqapioeTe tn ouokceun. Mny ayyicTe Tc zwves 0epmuavong katn V diapkeia Tng aeitoupyiaac n aedeow 0et aTn xpon. Note uny mayeipueute qaynto ateuthetaiae ETTAW oTo Tcaji Tns Kepaikncs otia.
Na xpoioioite Tavta to kaalnlo paeyepiko okeuoc.
Na toTIOthetaite navTa to okeuoc oTo keVtpo TnO movadac eTTAVW OTNV OTIOIA yapepeueTe. Mny toTIOthetaite tINota OTOV TIVAKA EeYxou.
Mny xnpoiotoiite Tnv eotia wc etipaveia epyaocic.
MnyxnpoiooiieTnvEpiavia oav gulo KOTINc.
Mny aantoNkEUE Tapi avikeiEv a Tnavw ao Tny EOTia.Eav Teouv ETVAVOW OTNV EOTIA, EvexTaVa TTPOKAeouv Znmuia.
Mny xngoiopoTioiTe Tnv eTia yia aTOnKeuon OTIOUONTOE AVTIKEIeVuv.
Mny oepveTe Ta mayeipika okeun eTavw otnv 6tia.
Nivakda avaywipionc (pioKetai kawto kaw TepiAnua TnC
1. TENIK'E Σ NPOEIΔONIOIHTHEEIZ
Me n anavon t othetai ae auto Tpoiov, emiiebaowtea i n oumbatotnta ie 6es tic xetikcs Eupwntaikcs aattnoeia aopaleiac, uyeias kai Tepiabalovtociouxouuv ia autytnk katnyopia npoiovtwv.
a a a a a a a a a a a a a a a a a a
Jb
aTg
jie 1
aaii jia jia jia jia jia jia jia jia jia
gall jil gail gil c y
y j 1 1 1
"abai" 10000000000000000000000000000000000000000000000000
gall gll gll gll gll gll gll
:
gall gale 1
Jue 1
Aaii piia 10000000000000000000000000000000000000000
aallll
a
1 304jgljbsall
Aaii iia aie 1
jI Lusuua aal 0a J Si
J 1
aannnnn nnnnnn nnne nnnnnn
j 1 j 1
i 1
LED T 15
a joll aebial 8e yedj
aed T. aill 1i jie i jie jie jie jie jie jie jie jie jie jie jie jie jie
a 1 1 1 1 1 1 1 1 1 1 1 1 1 1 1 1 1 1 1 1 1 1 1 1 1 1 LED
Aaill 1yll lgl 1yll jy 0
yaii jie 15

S_ OBC = S_ COD + S_ BOC
a 1
@
Aaiai 1
y
y
y
:
"0" aalall gaaaiaa
a
5 5
- jaiu 111al 1e bai 111 111 111 111 30 54y jai y jai 1 + jai y jai
ailllll llll jaa jai jia
□
· = 0
" + " jj jie lai hahh "00" 99
99 5
TgjIg jie biaol kay cai jll Jd
J 1
jua jie cajl Jec Tui jai jia jao
L 8
1111 1111 1111 1111 1111
(2)
yioiciaiaiaiaiaiaiaiaiaiaiaiaiaiaiaiaiaiaiaiaiaiaiaiaiaiaiaiaiaiaiaiaiaiaiaiaiaiaiaiaiaiaiaiaiaiaiaiaiaiaiaiaiaiaiaiaiaiaiaiaiaiaiaiaiaiaiaiaiaia
a# 1
a 1
aaii aiee eae eae eae eae eae eae eae
aaiai jai jai
aaiiaai (a5.0), (a5.5)sai jc
gaiid cajgaiiaie cagai aaaal aaijll gaii i
a aallll al l 1
Caaill T gail all agis Jaaie iue Jaae Jaaill aaiil ciS 13
.8152


aallll 1000000000000000000000000000000000000000
-
-
-
-
-
-
-
-
-
-
-
-
-
-
-
-
-
-
-
-
-
-
-
-
-
-
-
-
-
-
- 1.
-
-
-
-
-
-
-
-
-
-
-
-
-
-
-
-
-
-
-
-
-
-
-
-
-
-
-
-
-
aill 5 jiu 10j


"++ 1
P-9...r-1-..""s
"j" + "gillall iie ay jao jai bai wail ie jaiyai kai ai gai yai jai jai 1
a 1000
jssssy 1000000000000000000000000000000000000000
.
aBll s jssj+jjlaii jip. aill jss
-1j 10
P
a aaa aaa aaa aaa aaa aaa aaa
y
T 1
111 1
a 1
1 1
y
jell jell jell jell jell j
aaii i 1
J 1
a 1
,
Lal gall
1
(V2N) 10.7
aill 1
a a a a a a a a a a a a a a
a
i j g a
Aas1a^ a^ a1
paiaa aegall yilac binaial
JalSly JyJy JyBg
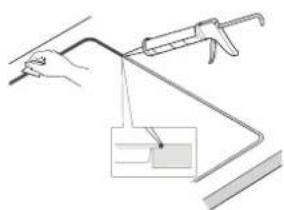
C
0
y
j511sall sll jgal, jgaii ci
Jaaa aie jie Jaei
ailllll lalldj alaaas jss
Aldi J. jolal, Tull
aee
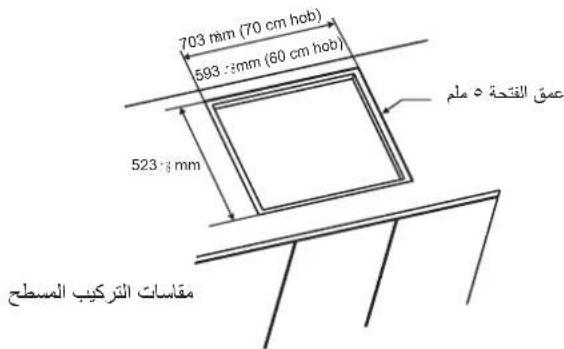
aaii 1
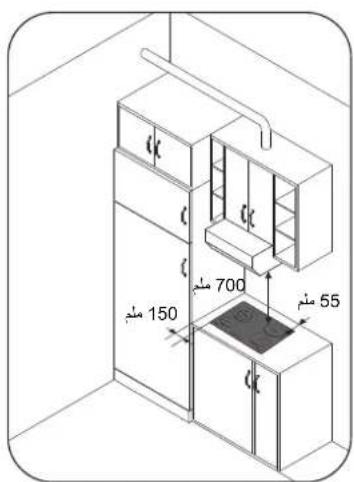
1000 2jY 8i j
- g jlll jll lgl
a111 1c log a111
1
1
Lai
aegall aie 105
1.1.1.1.2.
ai a ai all i = 1,2,3,4,5,6,7,8,
aalal alalalalalalalalalal
Aa aalal 1 jllj jil lalal

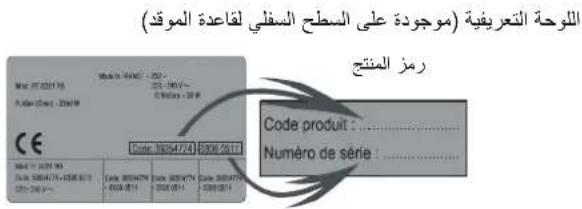
ale ci jiazi.1
a 1
2.

Jg 11/9/EU
.(WEEE)
()()
aallll lglg aagaae pssssse y aee aee
y (WEEE)
g j 1
aessssssssssssssssssssssssssssssssssssssssssssssssssssssss
y
a a a a a a a a a a a a a a a a a a a a a a a a a
y
"Jalalil" j"jgllll"gaiy gaiy aiaa jaiy jaiy jay
10 10
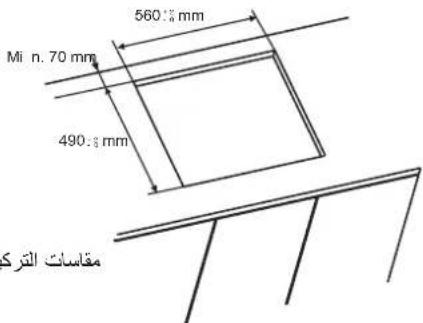
Jglll jy pla 12
JgI gI gI gI gI gI gI gI gI gI gI gI gI gI gI gI gI gI gI gI gI gI gI gI gI gI gI gI gI gI gI gI gI gI gI gI gI gI gI gI gI gI gI gI gI gI gI gI gI gI gI 1
JgILgILgILgILgILgILgILgILgILgILgILgILgILgILgILgILgILgILgILgILgILgILgILgILgILgILgILgILgILgILgILgILgILgILgILgILgILgILgILgILgILgILgILgILgILgILgILgILgILgILg
J 11111111111111111111111111111111111111111111111111111111111111111111111111111 2022222222222222222222222222222222222222222222222222222222222222222222222222222222222 3555555555555555555555555555555555555555555555555555555555555555555555555555555555555555 3766666666666666666666666666666666666666666666666666666666666666 400000000000000000000000000000000000000000000000000000000000 43888888888888888888888888888888888888888888 4799999999999999999999999999999999999999999999999999999999999 477777777777777777777777777777777777777777 433333333333333333333333333333333333333333333333333 4444444444444444444444444444444444444444444 4444444444444444444444444444444 444444444444444444444444444 444444444444444444444444 4333333333333333333333333 433333333333333333333 433333333333333 43. 8888888888888888 888888888888 88 8 8 8 8 8 8 8 8 8 8 8 8 8 8 8 8 8 8 8 8 8 8 8 8 8 8 8 8 8 8 8 8 8 8 8 8 8 8 8 8 8 8 8 8 8 8 8 8 8 8
AR
#
- 0aale 11
- 0ii1i
- 18 gall go aodinall gell gil gauai ayai .05
-
- 11 C\$JAA8
- 11aui ayiui 99


AR
GB
The manufacturer will not be responsible for any inaccuracy resulting from printing or transcript errors contained in this brochure. We reserve the right to carry out modifications to products as required, including the interests of con sumption, without prejudice to the characteri stics relating to safety or function.