
OVM834MAT - Oven Pelgrim - Free user manual and instructions
Find the device manual for free OVM834MAT Pelgrim in PDF.

| Product type | Built-in electric oven |
| Brand | Pelgrim |
| Model | OVM834MAT |
| Category | Oven |
| Cooking modes | Top and bottom heat, top heat, bottom heat, small grill, large grill, large grill + fan, hot air + bottom heat, hot air, eco hot air, bottom heat + fan, roasting |
| Automatic programs | Yes (Auto and Pro) |
| Control display | Yes, with digital display and rotary knob |
| Child lock | Yes, key lock |
| Cleaning | Aqua Clean (steam program) |
| Interior lighting | Yes, replaceable halogen bulb |
| Temperature probe | Yes, on some models |
| Telescopic runners | Yes, removable |
| Soft closing door | Yes, soft open and close on some models |
| Additional functions | Defrosting, keeping warm, plate warming, Shabbat |
| Timer | Cooking duration, delayed start, step cooking |
| Number of shelf levels | 4 levels |
| Installation type | Built-in |
| Included accessories | Grill, glass roasting dish, baking tray, deep multipurpose dish, tray handle, probe (according to model) |
Frequently Asked Questions - OVM834MAT Pelgrim
User questions about OVM834MAT Pelgrim
0 question about this device. Answer the ones you know or ask your own.
Ask a new question about this device
Download the instructions for your Oven in PDF format for free! Find your manual OVM834MAT - Pelgrim and take your electronic device back in hand. On this page are published all the documents necessary for the use of your device. OVM834MAT by Pelgrim.
USER MANUAL OVM834MAT Pelgrim
AQUA CLEAN SCHOOLMAAKPROGRAMMA
Instructions for use Oven
We thank you for your
trust in purchasing our appliance.
This detailed instruction manual is supplied to allow you to learn about your new appliance as quickly as possible.
Make sure you have received an undamaged appliance.
Should you notice any transport damage, please notify your dealer or regional warehouse where your appliance was supplied from.
The telephone number can be found on the invoice or on the delivery note.
Instructions for installation and connection are supplied separately.
IMPORTANT SAFETY INSTRUCTIONS

Instructions for safety are supplied separately.
CAREFULLY READ THE INSTRUCTIONS AND SAVE THEM
FOR FUTURE REFERENCE.

Important information
Tip, note
CONTENTS
| 2 | IMPORTANT SAFETY INSTRUCTIONS | WARNINGS |
| 4 | Before connecting the appliance | |
| 5 | THE ELECTRIC OVEN | INTRODUCTION |
| 8 | Control unit | |
| 10 | Information on the appliance - data plate (depending on the model) | |
| 11 | BEFORE THE FIRST USE | INITIAL PREPARATION OF THE APPLIANCE |
| 12 | FIRST USE | |
| 13 | SELECTING THE MAIN MENUS FOR BAKING | SETTINGS AND BAKING |
| 14 | A) baking by selecting the type of food (auto) | |
| 16 | B) baking by selecting an oven system (pro mode) | |
| 22 | C) storing your own program (my mode) | |
| 23 | START OF BAKING | |
| 23 | END OF BAKING AND OVEN SHUT-OFF | |
| 24 | SELECTING ADDITIONAL FEATURES | |
| 26 | SELECTING GENERAL SETTINGS | |
| 30 | MAINTENANCE & CLEANING | CLEANING AND MAINTENANCE |
| 31 | Conventional oven cleaning | |
| 32 | Aqua clean cleaning program | |
| 33 | Removing and cleaning wire and telescopic extendible guides | |
| 34 | Removing and inserting the oven door | |
| 36 | Removing and inserting the oven door glass pane | |
| 37 | Replacing the bulb | |
| 38 | TROUBLESHOOTING TABLE | PROBLEM SOLVING |
| 39 | DISPOSAL |
BEFORE CONNECTING THE APPLIANCE

Carefully read the instructions for use before connecting the appliance. Repair or any warranty claim resulting from incorrect connection or use of the appliance shall not be covered by the warranty.
THE ELECTRIC OVEN
(DESCRIPTION OF THE OVEN AND ACCESSORIES - DEPENDING ON THE MODEL)
The figure represents one of the built-in appliance models. Since the appliances for which these instructions were drawn up may have different equipment, some functions or equipment may be described in the manual that may not be present in your appliances.
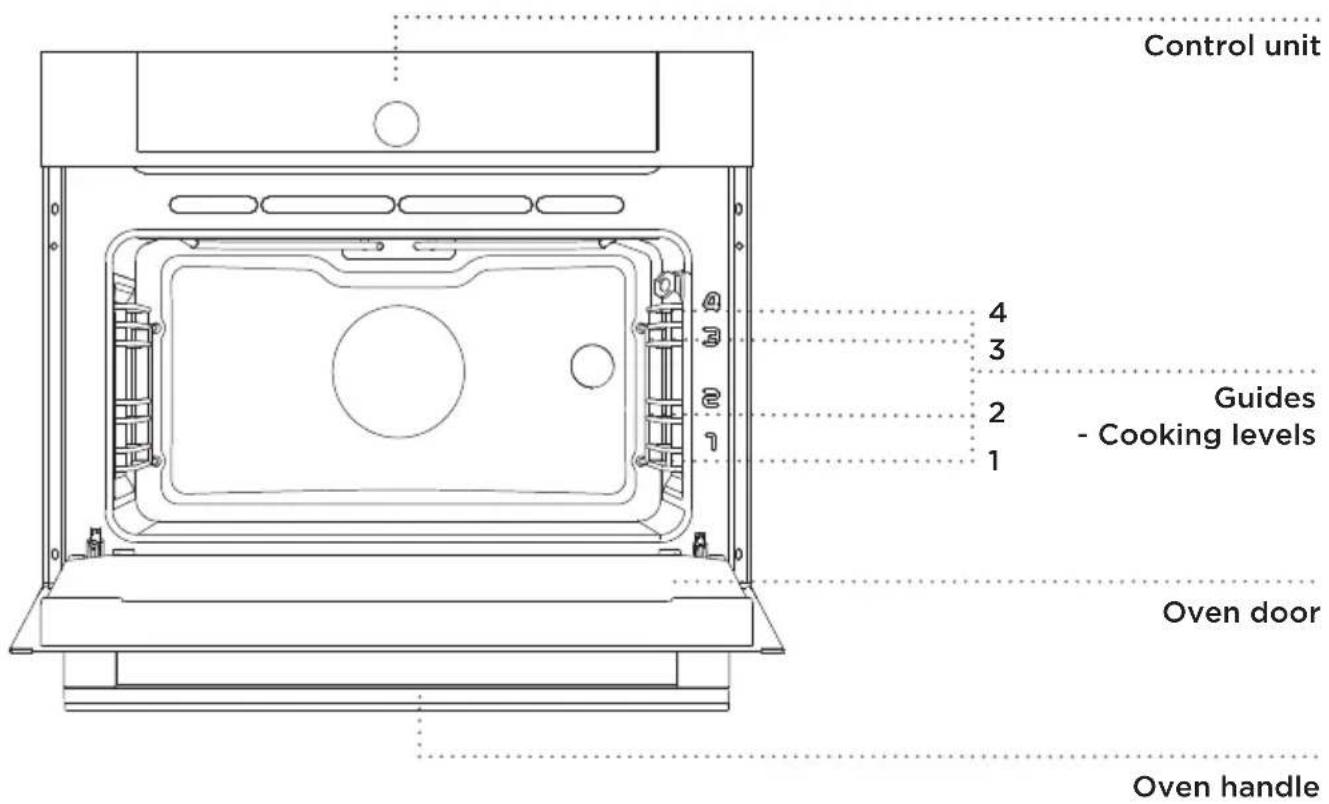
WIREGUIDES
The wire guides allow preparation of the food on 4 levels (please note that the levels/guides are counted from the bottom up).
Guides 3 and 4 are intended for grilling.
TELESCOPIC PULL-OUT GUIDES
Telescopic pull-out guides can be installed on the 2nd and 3th level. Pull-out guides can be partially or completely extractable.
OVENDOOR SWITCH
The switches deactivate oven heating and the fan when the oven door is opened during the cooking process. When the door is closed, the switches turn the heaters back on.
COOLING FAN
The appliance is fitted with a cooling fan that cools the housing and the appliance control panel.
After the oven is switched off, the cooling fan continues to operate for a short while in order to cool the oven. (Extended cooling fan operation depends on the temperature in the center of the oven).
ACCESSIONS (depending on the model)
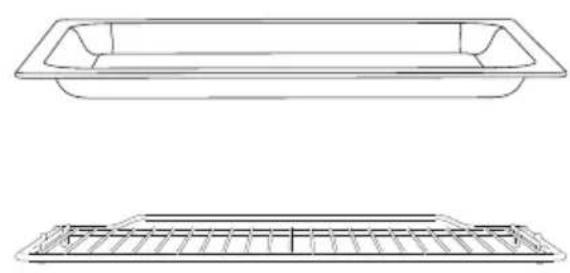
GLASS BAKING DISH is used for cooking with all oven systems. It can also be used as a serving tray.
The GRID is used for grilling or as support for a pan, baking tray or baking dish with the food.
There is a safety latch on the grid. Therefore, lift the grid slightly at the front when pulling it out from the oven.
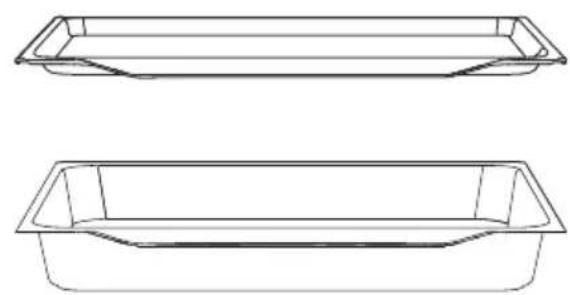
The SHALLOW BAKING TRAY is used for baking pastry and cakes.
The DEEP BAKING TRAY is used for roasting meat and baking moist pastry. It can also be used as a drip tray.
Never place the deep baking tray in the first guide during the cooking process, except when grilling and you are only using the deep tray as a drip tray.

As baking accessories heat up, their n may change. This does not affect r functionality and their original form be restored when they cool down.
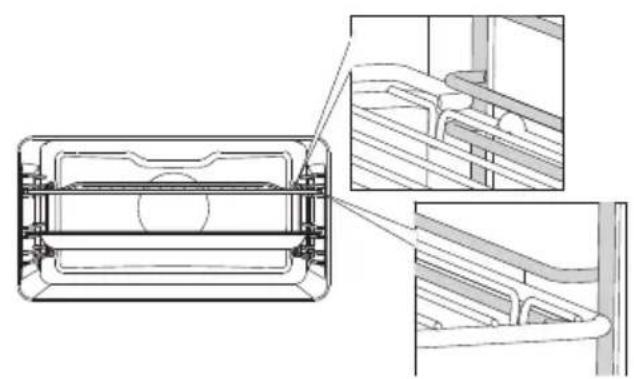
The grid or the tray should always be inserted into the groove between the two wire profiles.
With telescopic extendible guides, first pull out the guides of one level and place the grid or the baking tray onto them. Then, push them in with your hand as far as they will go.

Close the oven door when the scopic guides are retracted all the way to the oven.
BAKING TRAY HOLDER makes it easier to remove hot baking trays from the oven after baking.
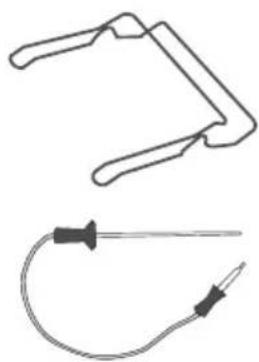
Meat temperature probe

The appliance and some of the accessible parts tend to heat up during cooking. Use oven mitts.
1 ON/OFF KEY
4 KNOB for SELECTION and CONFIRMATION
Touch briefly to return to previous menu.
Select the setting by rotating the knob.
Touch and hold to return to main menu.
Confirm your selection by pressing the knob.

5 KITCHEN TIMER
6 CHILD LOCK KEY
7 START/STOP KEY
8 DISPLAY
Touch: START
Touch during
operation: PAUSE/
STOP
NOTE:
The keys will respond better if you touch them with a larger area of your fingertip. Each time you touch a key, this will be acknowledged by a short acoustic signal.
INFORMATION ON THE APPLIANCE - DATA PLATE (DEPENDING ON THE MODEL)

A Serial number
B Code
C Type
D Brand
E Model
F Technical data
G Compliance symbols
The rating plate indicating the basic information about the appliance is located at the edge of the oven and it is visible when the oven door is opened.
BEFORE THE FIRST USE
Before the first use, remove all components, including any transport equipment, from the oven. Clean all accessories and utensils with warm water and regular detergent. Do not use any abrasive cleaners.
Before using the oven the first time, heat it without any food, in the system "Bottom and top heat", at the temperature of 200^ for approximately one hour. The characteristic smell of a "new appliance" will be emitted. Ventilate the room thoroughly during the first use.
LANGUAGE SELECTION
Upon the first connection of the appliance to the power supply or after a prolonged period of being disconnected, please set the desired language. The default language is English.

Confirm each setting by pressing the KNOB.

Turn the KNOB and select the desired language. Confirm your selection.
SETTING THE DATE

By pressing the KNOB and turning the knob, set the DAY, MONTH and YEAR. Turn the knob and confirm your selection with a check mark.
SETTING THE CLOCK

Turn the KNOB and set the CLOCK. Confirm your selection with a check mark.

The oven also operates if you do not set the time of day, but in this case it is not sible to set the timer features (see chapter SELECTING TIMER FEATURES).
After a few minutes of inactivity, the appliance goes into Standby mode.
CHANGING CLOCK SETTINGS
You can change the time of day when no timer function is activated (see chapter SELECTING GENERAL SETTINGS).
SELECTING THE MAIN MENUS FOR BAKING
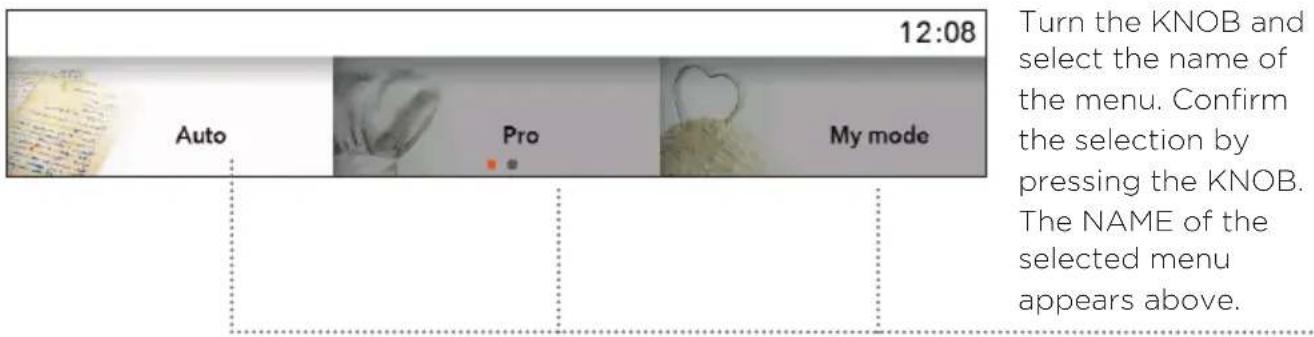

Confirm each setting by pressing the KNOB.
A) Auto
In this mode, first select the type of dish and then the selected food with automatic setting of the quantity, level of doneness and end of operation.
The program offers a variety of pre-set recipes, tested by chefs and nutrition experts.
B) Pro
This mode offers a selection of functions with factory pre-set values, which you can modify.
C) My mode
This mode allows you to prepare dishes according to your wishes, each time using the same steps and settings. You can save your settings in the oven's memory and recall them the next time you want to use them.
A) BAKING BY SELECTING THE TYPE OF FOOD (auto)

Confirm each setting by pressing the KNOB.

Turn the KNOB and select Auto. Confirm your selection by pressing the KNOB.

Select the type of dish and the selected food. Confirm your selection.
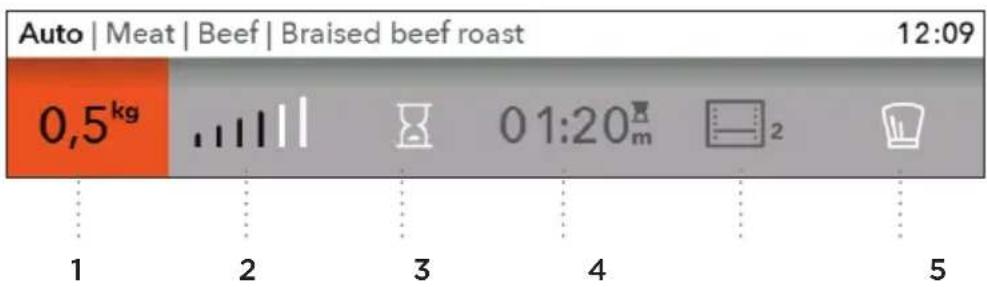
The pre-set values are shown. You can change the quantity, level of doneness and delayed start (end of baking).
1 Quantity
2 Level of doneness
3 Delayed start
4 Duration of baking
5 Baking system and recommended level
6 Professional (Pro) mode

If in the Auto mode the symbol is selected, the program switches to Pro mode (the chapter BAKING BY SELECTING THE MODE).
Touch the START/STOP key to start the baking process. The display shows all the selected settings.
PREHEATING
Cooking procedures for some dishes in the Auto mode also include the preheat function. When you select the food, the following notification will appear: "Selected program includes preheat function." (Confirm your selection with the KNOB.) "Preheating started." Do not insert the food yet. Actual and set temperature will alternate on the display.
When the selected temperature is reached, the preheating process stops and an acoustic signal is emitted. The following notification will appear on the display: "Preheating complete." Open the door and insert the food. The program then resumes the cooking process with selected settings.

When the preheat function is set, delayed start function cannot be used.
B) BAKING BY SELECTING AN OVEN SYSTEM (pro mode)

Confirm each setting by pressing the KNOB.

Turn the KNOB and select Pro. Confirm your selection.
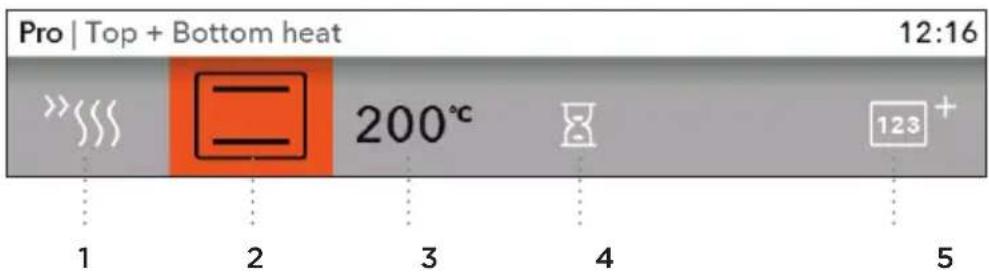
Select your own basic settings.
BASIC SETTINGS
1 Pre-heating
2 System (see table OVEN SYSTEMS)
3 Temperature in the oven
ADDITIONAL SETTINGS
4 Duration of baking (see chapter TIMER FUNCTIONS)
5 Multiphase cooking (see chapter Multiphase cooking)
PREHEATING
Use the preheat function if you wish to heat the oven to the desired temperature as quickly as possible. When this symbol is selected, the preheat function will be activated and a notification will appear: "Preheating started." Do not insert the food yet. Actual and set temperature will alternate on the display.
When the selected temperature is reached, the preheating process stops and an acoustic signal is emitted.
The following notification will appear on the display: "Preheating complete." Open the door and insert the food. The program then resumes the cooking process with selected settings.

When the preheat function is set, delayed start function cannot be used.
OVEN SYSTEMS (depending on the model)
| DESCRIPTION OVEN SYSTEMS | PRESET TEMPERATURE (°C) | MIN-MAX TEMPERATURE (°C) | |
| TOP + BOTTOM HEAT The heaters in the bottom and in the ceiling of the oven cavity will radiate heat evenly into the oven interior. Pastry or meat can only be baked/roasted at a single height level. | 200 30 - 275 | ||
| TOP HEAT Only the heater on the oven cavity ceiling will radiate heat. Use this heater to brown the upper side of the dish. | 150 30 - 235 | ||
| BOTTOM HEAT Only the heater on the bottom of the oven cavity will radiate heat. Use this heater to brown the lower side of the dish. | 160 30 - 235 | ||
| SMALL GRILL Only grill heater, a part of the large grill set, will operate. Use this heater to grill a few open sandwiches or beer sausages, or for toasting bread. | 240 30 - 275 | ||
| LARGE GRILL The upper heater and the grill heater will operate. The heat is radiated directly by the grill heater installed in the oven ceiling. To boost the heating effect, the upper heater is activated as well. This system is used for grilling a smaller amount of open sandwiches or beer sausages, and for toasting bread. | 240 30 - 275 | ||
| LARGE GRILL + FAN Grill heater and the fan will operate. This combination is used to grill meat and to roast larger chunks of meat or poultry at a single height level. It is also appropriate for dishes au gratin and for browning to a crispy crust. | 170 30 - 275 | ||
| HOT AIR + BOTTOM HEAT Bottom heater, round heater, and the fan will operate. This is used to bake pizza, moist pastry, fruitcakes, leavened dough and shortcrust on several levels simultaneously. | 200 30 - 275 | ||
| HOT AIR Round heater and the fan will operate. The fan installed in the back wall of the oven cavity makes sure the hot air constantly circulates around the roast or pastry. This mode is used for roasting meat and baking pastry at several levels simultaneously. | 180 30 - 275 | ||
| ECO HOT AIR In this mode, power consumption during the cooking process is optimized. This mode is used for roasting meat and baking pastry. | 180 120 - 275 | ||
| B | BOTTOM HEAT + FAN This is used for baking leavened but low-rising pastry and for preserving fruit and vegetables. | 180 30 - 230 | |
| A | ROASTING In the Auto Roast mode/system, the upper heater will operate in combination with the grill heater and the round heater. It is used for roasting all types of meat. | 180 30 - 240 | |
1 It is used for determining the energy efficiency class pursuant to the EN 60350-1 standard.
In this mode, the actual temperature in the oven is not displayed due to a special appliance operation algorithm and use of residual heat.
Touch the START/STOP key to start the baking process.
The display shows all the selected settings.

The symbol ^ C flashes on the display until the set temperature is reached. A sound nal beeps.
TIMER FUNCTIONS
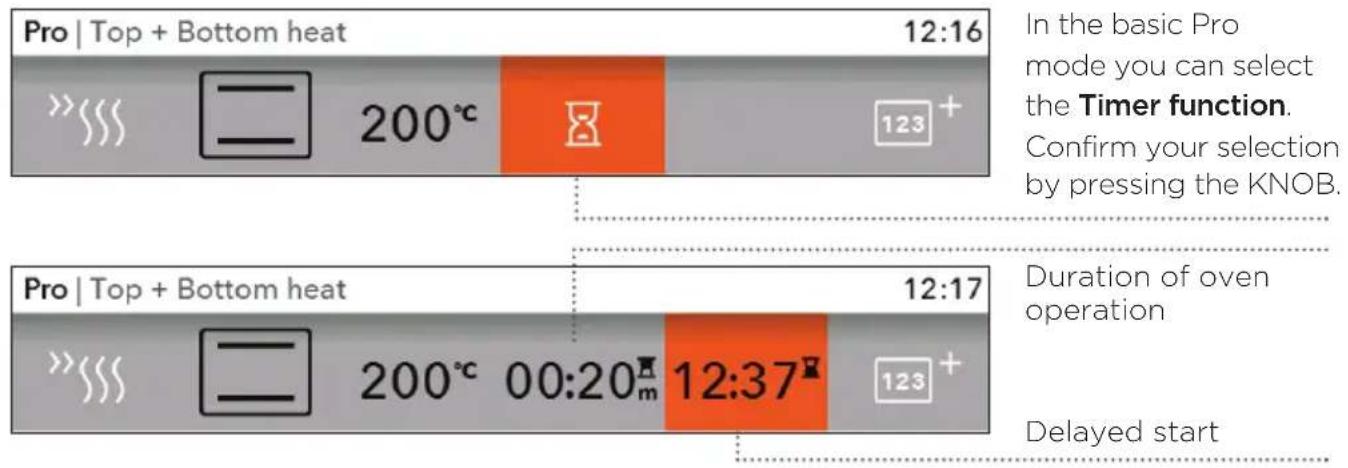

Setting the cooking time
In this mode, you can define the duration of oven operation. Set the desired cooking time and confirm the selection (max. cooking time is 10 hours). The displayed end time is adjusted accordingly. Press START to start the cooking process. The display shows all the selected settings. Turn off all timer functions by setting the selected time to 0.

Setting the delayed start
Delayed switch-on is not possible on the systems small grill, large grill, and grill with fan.
In this mode, you may specify the duration of the cooking process (cooking time) and the time when you wish the cooking process to stop (end time). The delay can be set for max.24 hours.
Make sure the clock is accurately set to current time.
Example:
Current time: 12:00
Cooking time: 2 hours
End of cooking: 18:00
First, set the COOKING TIME (2 hours). The sum of the current time and cooking time is automatically displayed (14:00). Then select END TIME and set the timer (18:00).
Press START to start the cooking process. The timer will wait for the time to start the cooking process. The display shows the message:
"Start delayed. Cooking will start at 16:00."
When the set time expires, the oven will automatically stop operating.
When the set time expires, the oven will automatically stop operating (end of cooking). A short acoustic signal will be emitted and the Finish menu will appear.
After a few minutes of inactivity, the appliance goes into Standby mode.
MULTIPHASE COOKING
This mode allows you to combine three consequent different manners of food preparation in one baking process.
By selecting different settings you can prepare dishes exactly as you wish.

In the basic Pro mode you can select the Multiphase cooking.
Confirm your selection by pressing the KNOB.

Select: step 1,step 2,step 3. Confirm your settings by pressing the KNOB.

Step 1 is already selected if you have set the Timer functions beforehand.

Set the system, temperature and time. Confirm your selection with a CHECK MARK by pressing the KNOB.

End time
Temperature and duration of the selected step
Progress of the current step
By touching the START key, the oven first starts operating according to step 1. (The progress bar on the bottom of the display indicates the current step of the baking process). When a certain time expires, step 2 is activated and then step 3 if it was selected.


If you want to cancel any of the steps during the operation, turn the KNOB, select the top and cancel it by confirming with a CROSS MARK. You can only do this with the steps that haven't been initiated yet.
C) STORING YOUR OWN PROGRAM (MY MODE)
When the cooking process is complete, the "Finish" menu will appear. Select the symbol to store your settings into the oven memory.


Turn the knob and select a field with asterisks for which you will select a new recipe name.

You can store up to 12 recipes in the memory.

Rotate the KNOB and confirm respective characters to enter the name. If required, delete a character with the arrow; store the name with the check mark.

You can retrieve your favourite recipes by choosing My mode in the main menu. Confirm your selection with the KNOB.

The pre-set values are shown and you can change them if necessary.
When the program is complete, the Finish menu will appear. If you have made any changes, you can store them by selecting the symbol. Select a recipe with the same name. The sign "The program will be overwritten" appears on the display.
-
Confirm the selection to store the recipe under the same or a new name.
-
You may also cancel your selection. A display will appear on which you can select a new field and store the new recipe.

Before the beginning of baking, the START/STOP key flashes. Start the baking process by briefly touching the START/STOP key. If you want to change the current settings during baking, turn the KNOB and select the setting or value. Confirm your selection.
If the door is opened during the baking process, baking stops and continues once the door is closed again. This must be done within 3 minutes, otherwise the baking process is terminated and the word Finish is displayed on the screen.
You can pause or end the baking process by touching the START/STOP key. "Program paused. Would you like to stop?" After a pause, cancel the message by confirming with a CROSS MARK. To stop, confirm with a CHECK MARK; the Finish menu appears.
END OF BAKING AND OVEN SHUT-OFF
When the baking process is complete, the menu Finish appears.

Finish
Select the icon and end the baking process. The display shows the main menu.

Add duration
You can extend the duration of baking by selecting the icon.
Au gratin
Choose this symbol to brown the upper layer of the dish after cooking.

Add to favourites
You can store the selected settings in the oven memory and use them again the next time.
After the use of the oven, some water may be left in the condensate channel (underneath the door). Wipe the channel with a sponge or a cloth.
SELECTING ADDITIONAL FEATURES
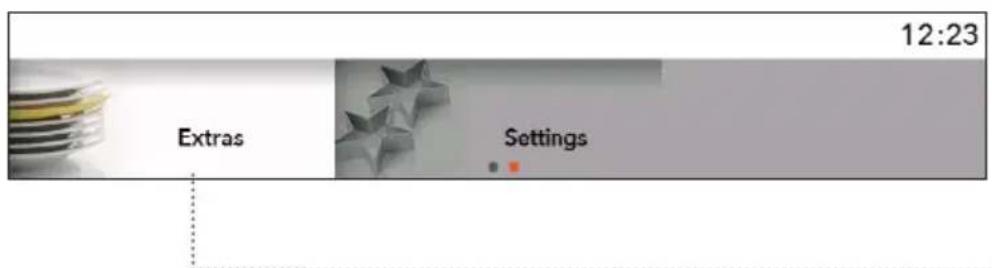
Turn the KNOB and select Extras in the main menu. Confirm your selection. The additional functions menu is displayed.

Some functions are not available with some systems; an acoustic signal sounds in such cases.
Cleaning /Aquaclean
This program makes it easier to remove any stains from inside the oven. (See chapter CLEANING AND MAINTENANCE.)
Defrost
In this mode, the air circulates without any heaters operating.
Only the fan is operating.
It is used for slow defrosting of frozen food (cakes, pastry, bread and rolls, and deep-frozen fruit).
Halfway through the defrost time, the pieces should be turned over, stirred and separated if they were frozen together.
Warming
Use this function to keep the prepared dishes at the desired temperature. You can set the temperature and the time.
Plate warmer
Use this function to pre-heat your dinnerware (plates, cups) before serving food in it to keep the food warm longer. You can set the temperature and the time.
Rapid pre-heat
Use this function if you wish to heat the oven to the desired temperature as quickly as possible. Not appropriate for cooking food. When the oven heats up to the set temperature, the heating process is completed and the oven is ready for operation in the selected program.
Shabbat
In this mode, set the temperature between 85 and 180^ and the time (up to 74 hours) of Sabbath duration. Press START to start the countdown. A light will be lit in the oven. All sounds and operation, except for the ON/OFF key, will be deactivated. When the process is complete, the settings can be stored.

In the case of power outage, Shabbat mode is cancelled and then goes back in the start position.

Warning: producer is not responsible for improper use of Shabbat mode.
SELECTING GENERAL SETTINGS

Turn the KNOB and select Settings in the main menu. Confirm your selection.

By turning the KNOB you can select a topic. Confirm each selection by pressing the KNOB.
General
Language - select the language in which you want the text to be displayed.
Time - time of day must be set when you connect the appliance to the power mains for the first time or if the appliance has been disconnected from the power mains for a longer period of time (more than one week). Set the CLOCK - time. In the Time field you can also select digital or analogue clock display.
Date - set the date when connecting the appliance to the power mains for the first time or if the appliance has been disconnected from the power mains for a longer period of time (more than one week). Set the day, month and year.
Sound - the volume of the sound signal can be set only when no time feature is activated (only the time of day is shown).
Volume - you can choose three different levels of volume.
Sound of key- you can activate or deactivate it.
Sound on start/stop - you can activate or deactivate it.
Display
In this menu you can set:
Brigthness - you can set three different levels.
Night mode - set the timeframe when you want the display to be dimmed.
Appliance to stand-by mode - the display automatically switches off after 1 hour.
Cooking settings
Default program intensity
System
Appliance information
Factory settings
Oven light during operation - illumination is turned off when you open the door during the baking process.
Oven illumination
The oven illumination is activated automatically when you open the door or turn on the oven. When the baking process is finished, the light stays on for about 1 minute. You can turn the light on or off by pressing the oven lighting key.

CHILD LOCK
It is activated by touching the CHILD LOCK key. The message "Child lock activated" is displayed. Touch the key again to deactivate the child lock.

If the child lock is activated with no timer function engaged (only clock is displayed), the oven will not operate. If the child lock is activated after a timer function has been set, the oven will operate normally; however, it will not be possible to change the settings. When the child lock is activated, systems or additional functions cannot be changed. The only possible change is to end the cooking process. Child lock will remain active after the oven is switched off. To select a new system, the child lock must first be deactivated.

SETTING THE KITCHEN TIMER
The kitchen timer can be used separately, independently of the oven operation. It is activated by pressing the key. The maximum setting is 24 hours. When the set time expires, an acoustic signal sounds, which can be turned off by pressing any key.

After a power outage or after the appliance is switched off, all additional settings will remain stored.
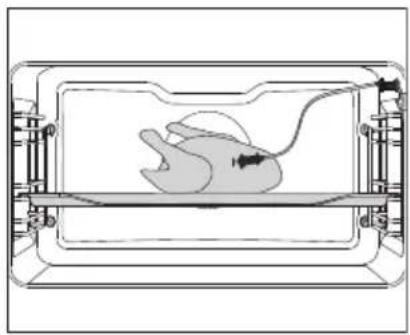
Roasting with a meat probe (depending on the model)
In this mode, set the desired temperature of the food core. The oven operates until the food core reaches the set temperature. Temperature core is measured by the temperature probe.
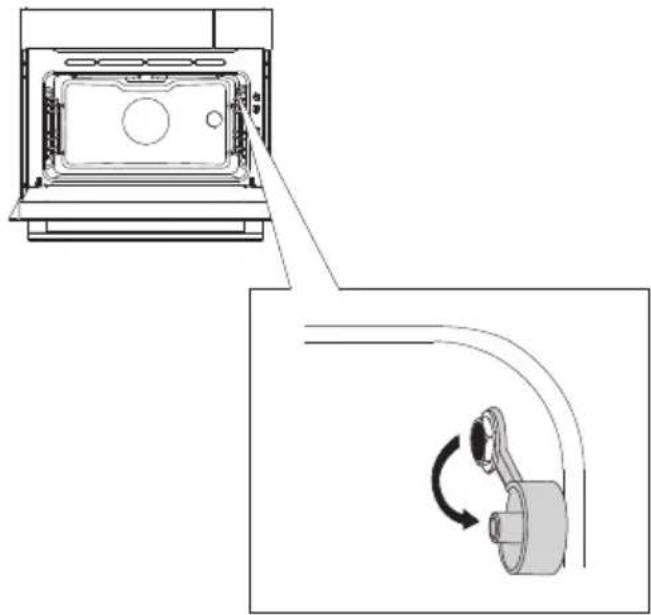
1 Remove the cap (the socket is in the front upper corner of the oven right wall).
2 Connect the meat probe plug to the socket and stick the probe into the food. (If any timer settings were activated, they will be cancelled.)


180^ C
30^ A
Select the system (example: hot air).
Preset temperature and probe temperature will be displayed. Set the cooking system and temperature, and the final temperature of the dish.
Touch the START key.

During cooking, the rising temperature of the core will be displayed (the desired core temperature may be adjusted during the cooking process).
When the set core temperature is reached, the cooking process will stop.
An acoustic signal will be heard which you may turn off by touching any key. After one minute, the acoustic signal will be switched off automatically. Clock will appear on the display.
After the cooking process, replace the cap of the meat probe socket.

Only use the probe intended for use with your oven.
Make sure the probe does not touch the heater during cooking.
After the cooking process, the probe will be very hot. Take care to prevent burning.

Before you start cleaning the appliance, disconnect it from the power mains and let it cool down.
Cleaning and maintenance of the appliance should not be performed by children without appropriate supervision!
Aluminium surfaces
Aluminium surfaces should be cleaned with non-abrasive liquid detergents intended for such materials.
Apply the detergent on a wet cloth, clean the surface and rinse with water.
Do not apply the cleaner directly on the surface.
Do not use abrasive cleaners or abrasive sponges.
Note: The surface should not come into contact with oven cleaning sprays; this may cause visible and permanent damage.
Stainless steel front panels
Depending on the model)
Clean the surface with a mild cleaner (soapsuds) and a soft non-abrasive sponge.
To avoid damages to the surface, do not use abrasive or solvent-based cleaners.
Lacquer-coated and plastic surfaces
Depending on the model)
Never use abrasive cleaners and sponges, alcohol-based cleaners or pure alcohol to clean the knobs, door handles, labels and the rating plate.
Remove the stains immediately using a soft cloth and liquid detergents. You may also use the cleaners made especially for this type of surfaces; in this case, follow the manufacturer's instructions.

The aluminium surfaces should never come into contact with oven cleaning sprays, as use will cause visible and permanent damage.
CONVENTIONAL OVEN CLEANING
You may use the standard cleaning procedure to clean stubborn dirt in the oven (using cleaners or an oven spray). After such cleaning, rinse the cleaner residues thoroughly.
Clean the oven and the accessories after each use to prevent the dirt from burning into the surface. The easiest way to remove grease is by using warm soapsuds while the oven is still warm.
With stubborn dirt and grime, use conventional oven cleaners. Rinse the oven thoroughly with clean water to remove all cleaner residue. Never use aggressive cleaners, abrasive cleaners, abrasive sponges, stain and rust removers etc.
Clean the accessories (baking trays, grids etc.) with hot water and detergent. The oven, the oven cavity and the baking trays are lined with a special enamel coating for a smooth and resistant surface. This special coating makes cleaning at room temperature easier.
AQUA CLEAN CLEANING PROGRAM
Before running the cleaning program, remove all large chunks of dirt and food residues from the oven cavity.
Pour 0.6 l of warm water into the deep baking tray and place it in the second guide. Select the oven cleaning program.

In the main menu, select Extra and Cleaning. Confirm your selection by pressing the KNOB.

Press the START key.
When the program is complete, wait for the oven to cool down sufficiently so that you can wipe the oven interior safely.
After the 30-minute program, the stains on the oven enamel walls will soften, which allows easier cleaning. Wipe the stains with a damp cloth.
If the cleaning process is not successful (in case of particularly stubborn dirt), repeat it.

Use the cleaning program after the oven has fully cooled down.
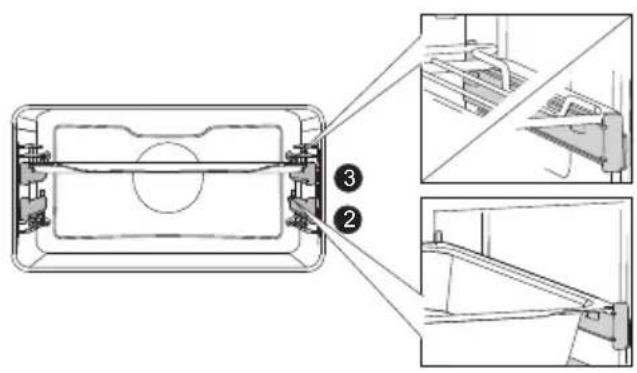
REMOVING AND CLEANING WIRE AND TELESCOPIC EXTENDIBLE GUIDES
Only use conventional cleaners to clean the guides.
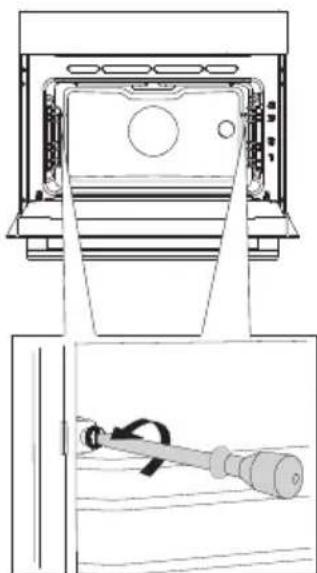

1 Undo the screw.
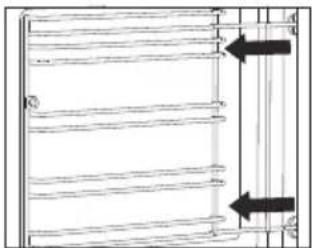
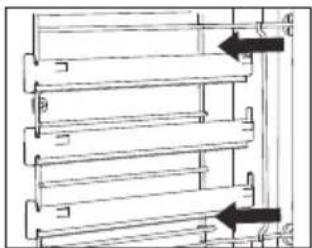
2 Remove the guides from the holes in the back wall.

After cleaning, re-tighten the screws on the guides with a screwdriver.
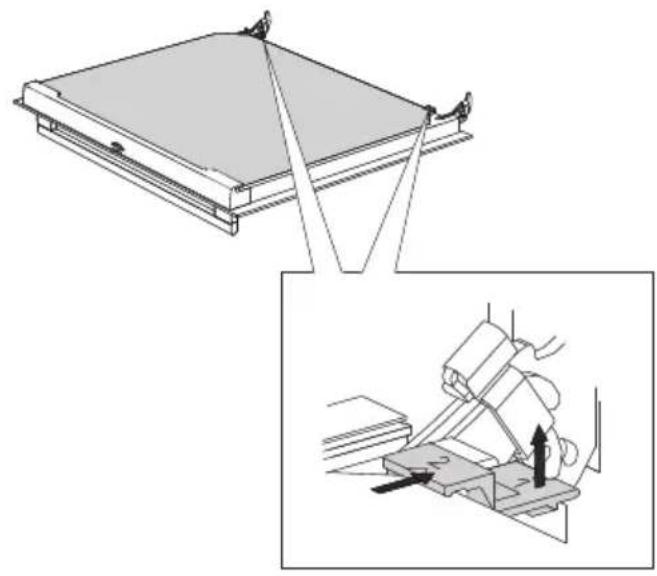
REMOVING AND INSERTING THE OVEN DOOR
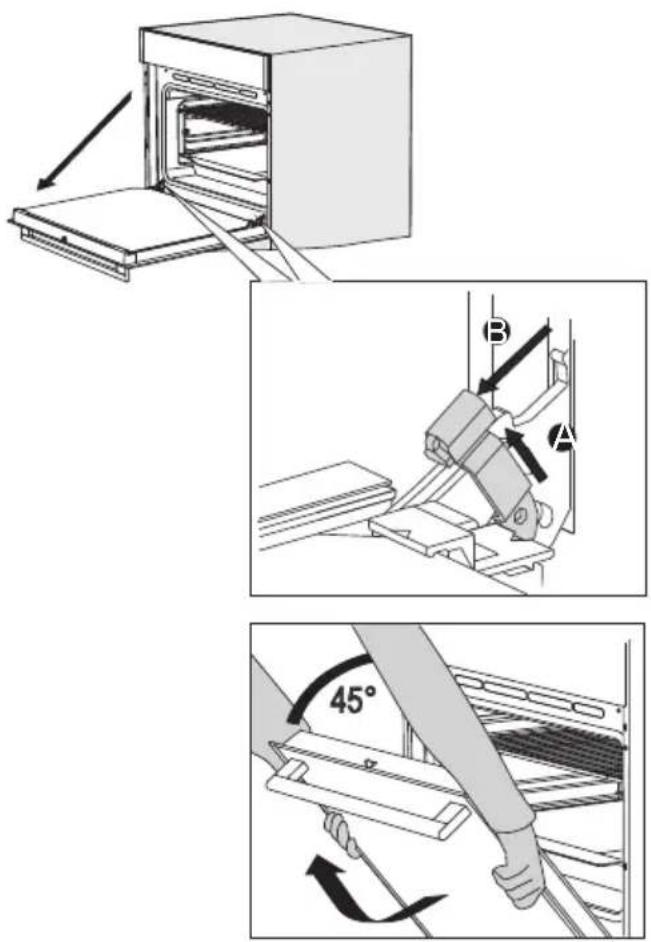
1 Open the door to the fully open position.
2 Lift both hinge latches (A) and pull them towards the oven door (B).
3 Gently close the door until it reaches a 45^ angle. Slightly lift the door and pull it out from both hinge slots on the appliance.
To replace the door, repeat these actions in reverse. If the door does not open or close properly, make sure the hinges are positioned correctly in their slots.

Keep your fingers away from the hinges of the oven door. The hinges are spring loaded and can cause injury. Make sure that he hinge latches are applied correctly to lock the hinges.
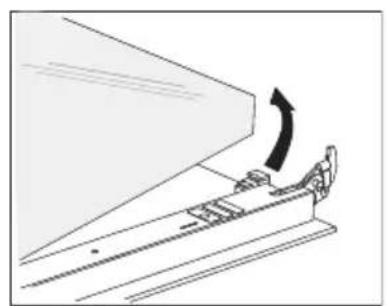
SOFT DOOR OPENING (depending on the model)
The oven door is fitted with a system that dampens the door opening force, starting at the 75-degree angle.
SOFT DOOR CLOSING (depending on the model)
The oven door is fitted with a system that dampens the door closing force, starting at the 75-degree angle. It allows simple, quiet, and smooth closing of the door. A gentle push (to a 15-degree angle relative to the closed door position) is enough for the door to close automatically and softly.

If the force applied to close the door is too strong, the effect of the system is reduced or the system will be bypassed for safety.
REMOVING AND INSERTING THE OVEN DOOR GLASS PANE
Oven door glass pane can be cleaned from the inside, but the door must be removed first. Remove the oven door (see chapter REMOVING AND REPLACING THE OVEN DOOR).
1 Slightly lift the brackets on the left and right side of the door upwards (to marker 1 on the bracket) and pull this away from the glass slightly (to marker 2 on the bracket).
2 Grasp the glass at the bottom and gently lift this upwards to remove it from the support.
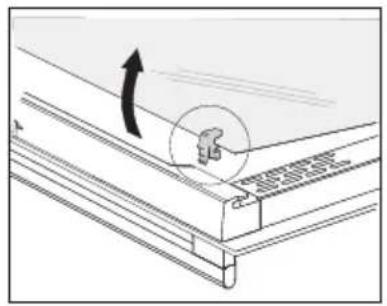
3 The inner third glass (depending on the model) can be removed by lifting this carefully and removing it. Also remove the rubber seals around the glass.
To replace the glass pane, observe the reverse order. The markings (semicircle) on the door and the glass pane should overlap.
REPLACING THE BULB
The lamp in this household appliance is only suitable for illumination of this appliance. The lamp is not suitable for household room illumination.
The lamp is a consumer item and therefore not covered by warranty. Replace the defective lamp with a lamp of the same type.
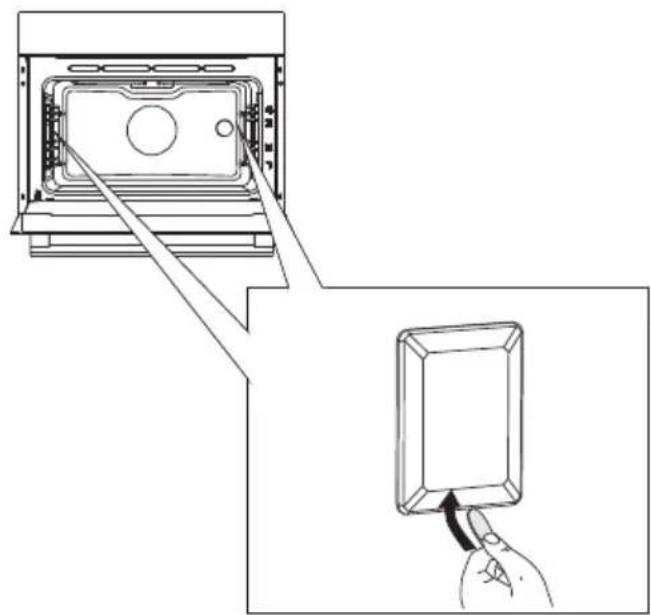
1 Use a flat screwdriver to release the bulb cover and remove it.
NOTE: Make sure not to damage the enamel.
2 Remove the bulb and install a new one.
Please note: the light bulb can be very hot! Use protection to remove the bulb.
TROUBLESHOOTING TABLE
| Problem/error Solution | |
| There is no response of the sensors; the display is frozen. | Disconnect the appliance from the power mains for a few minutes (undo the fuse or switch off the main switch); then, reconnect the appliance and switch it on. |
| The main fuse in your home trips often. | Call a service technician. |
| The oven lighting does not work. | The process of changing the light bulb is described in the chapter Cleaning and Maintenance. |
| The pastry is underdone. Did you choose the right temperature and heating system? Is the oven door closed? | |
| Error code is displayed: ERRXX ...* XX denotes the number/code of the error. | There is an error in the electronic module operation.Disconnect the appliance from the power mains for a few minutes. Then,reconnect it and set the time of day.If the error is still indicated, call a service technician. |
If the problems persist despite observing the advice above, call an authorized service technician. Repair or any warranty claim resulting from incorrect connection or use of the appliance shall not be covered by the warranty. In this case, the user will cover the cost of repair.

Before the repair, disconnect the appliance from the power mains (by removing the fuse or by removing the plug from the wall outlet).
Packaging is made of environmentally friendly materials that can be recycled, disposed of, or destroyed without any hazard to the environment. To this end, packaging materials are labelled appropriately.
The symbol on the product or its packaging indicates that the product should not be treated as normal household waste. The product should be taken to an authorized collection center for waste electric and electronic equipment processing.
Correct disposal of the product will help prevent any negative effects on the environment and health of people which could occur in case of incorrect product removal. For detailed information on removal and processing of the product, please contact the relevant municipal body in charge of waste management, your waste disposal service, or the store where you bought the product.

Declaration of conformity
We hereby declare that our products comply with the relevant European directives, standards and regulations as well as all requirements referred to in the standards.
We reserve the right to any changes and errors in the instructions for use.

The appliance rating label is located on the inside of the appliance.
When contacting the service department, have the complete type number to hand.
You will find the addresses and phone numbers of the service organisation on the guarantee card.

Pelgrim
en (O7-21)