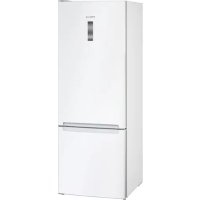
BD3056WFVN - Refrigerator Profilo - Free user manual and instructions
Find the device manual for free BD3056WFVN Profilo in PDF.



| Product Type | Fridge-freezer combination |
| Brand | Profilo |
| Model | BD3056WFVN |
| Dimensions (H x W x D) | Approximately 177 x 56 x 55 cm (estimated) |
| Weight | Approximately 65 kg (estimated) |
| Power supply | 220-240 V, 50 Hz |
| Climate class | SN-T (from 10 °C to 43 °C) |
| Refrigerator capacity | Approximately 200 L (estimated) |
| Freezer capacity | Approximately 100 L (estimated) |
| Number of freezer stars | 4 stars |
| Defrost type | Automatic (No Frost) |
| Lighting | LED, repairable by a professional |
| Shelf material | Tempered glass |
| Spare parts available | Door gasket, handle, hinges, shelves, bins, LED lighting |
| Repairability | Designed to be user-repairable for certain parts (gaskets, shelves, etc.); electrical components require a professional |
| Noise level | Approximately 38 dB (estimated) |
| Energy consumption | Approximately 250 kWh/year (estimated) |
| Energy class | E (estimated according to old standards) |
Frequently Asked Questions - BD3056WFVN Profilo
User questions about BD3056WFVN Profilo
0 question about this device. Answer the ones you know or ask your own.
Ask a new question about this device
Download the instructions for your Refrigerator in PDF format for free! Find your manual BD3056WFVN - Profilo and take your electronic device back in hand. On this page are published all the documents necessary for the use of your device. BD3056WFVN by Profilo.
USER MANUAL BD3056WFVN Profilo
4.14.1 CbAHe Ha LED cnot nAmnata 24
4.14.2 MoHTpaHe Ha LED cnot lamnata 24
4.15 CMHa Ha LED oCBetJneHneto otrope 25
4.15.1 CbAHe Ha LED ocBeTneHHeTo 25
4.15.2 MoHTpaHe Ha LED ocBETneHMeTo OTrope 26
4.16 CMHa HA LED CBeTInHaTa Ha cTpAnuHaTa neHa 27
4.16.1 CbAJIHe Ha LED cbETnHaTa Ha cTpaHnHaTa JeHTa 27
4.16.2 MoHTnpaHe Ha LED CBeTnHaTa Ha CTpaHnHaTa JeHTa 28
4.17 CmHa Ha LED cnot narnata 29
4.17.1 CbAHe Ha LED cnot lamnata 29
4.17.2 MoHTnpaHe Ha LED cnot nAmnata 30
4.18 CMraHa HA LED Moyna Ha 3axpaHbAHeTo 31
4.18.1 OTcTaPaHbAHe Ha LED MoDyNa Ha 3axpaHbAHeTo... 31
4.18.2 MoHTupaHe Ha LED moDyHa Ha 3axpaHbHeTo 33
OTHOCHO To3n DokyMeHT
1.1 Baxha nHΦopMaζη
1.1.1 Uen
TeHc cBbETn 3a pEmOH T NOMarat Ha Ntpe6nTEnla DpemOHtnpa Cam ypeiB C bOeTBeTcBne C pernameHTa 3a ekONOrocBo6paHO npoeKtnpaHe Ha ypeiNe (OT 03.2021 r.).
Te cbdpkataHfOpmaIaKaJa cMaHeTpeOnpeIeHn pe3epBn qactN, BKNCHI-TeINHO pnpynpeJedHn n PNCKOB.
Ako IMATE HRAKAKB N BNPOCIO,MOJIa CbPKeTe Ce c HAUNO OTDeN 3a OBCNYBAHe Ha KIMENTH. Hne HocnM OTBOPOHOCT 3a UETH, CAMO AKO CbBeNTe 3a peMOHT ca cna3eHN npabInHO.
1.2 06aCHeHne Ha cHMBOJInTe
1.2.1 HnBa Ha onaCHOCT
IpeynpeintenHnBaCe cBcTOrT OT CmMBoN nCnHaHnHa Dyma.CnHaHnHata yMa nok3Ba cepno3HOCTTa Ha onaCHOCTTA.
| Ниво на п dedурждени 3начени | |
| ОПАСHОCT | Есnasbaанeto на п dedурждени до сMbт ипсерноши Нараняваим. |
| ПРEDУРPEЖДЕНЕ | Есnasbaанeto на п dedурждени до сMbт ипсерноши Нараняваим. |
| ВИМATEЛНО | Есnasbaанeto на п dedурждени до сMbт ипсерноши Нараняваим. |
| ВИМAHINEI | Есnasbaанeto на п dedурждени до сMbт ипсерноши Нараняваим. |
Tabnua 1: Hua Ha onachocm
1.2.2 Cnmbon3a onachoct
CIMBOHTE3aONACHOCTCa CIMBOHNUH N3o6paXeHNA, KOHTO DaBaT INDINKAUHA 3a BnDa ONACHOCT.
BTo3n DOKyMeHCTe H3N013BaT CNEdHInTe CMBOIN 3a OnaCHOCT:
| Симboл за опасост 3начени | Овци поедуридатello сбобчине |
| Опасост от[eilektprucecco наржени | |
| Риск ot[eckллозия | |
| Опасost от[nорязвени |
OTHOCHO To3n DokyMeHT
| Симbol 3a onachoct 3начени | |
| Опachoct OT пемаразио | |
| Опachoct OT посяши поль的操作ио | |
| Опachoct OT симлно магнисто поліе | |
| Опachoct OT найонидаць льчени |
Ta5nuu2: CumbOnu 3a onachocm
1.2.3 CtpyKtpa Ha npéDynpexkdeHnra
PepynpexdHnraT BTO3N DOKMeHT MMAT CTAHapTN3nPAH BbHwEN BID NCTaHdAPTN3nPAH CTpykTypa.


ONACHOCT
BnHn3ToyHKn Ha onaCHOCTTla!
Bb3mOHHnocpeuHOnOTnHnOpupaHeHaonachocTt/npedynpexdHeHne
Mepkn 3a6paHn 3a npDoTbpaTbaHe Ha onaChocTta.
CneHnIy nPmep NOKaBA npEynpEKeHHe, KoTo yBcOMaBA 3a TOKOB Yapd, npEeIN3BnKAn OH tAcTn NoD HanpeKeHHe. CnOmeHabe Ce MApkata 3a N36RbAbe Ha onacHOCTA.


ONACHOCT
Pnck OT TokOB yap nopadn qactn noHanpekeHne!
CmbptOT TOKOB ynap
KJNIOHUYe ypeDte OENKTPOUeCKOTO 3aXpaHbAne NOE 60 CEyHnnpdE 3aONuBaHe naPEMOHa.
1.2.4 06uCNMBOJI
BTO3NIOKYMENTceH3NON3BATcNEdHNTeO6UINCNMBONI:
MoHTnpaTeB o6paTeH peI.

PemOH
4.3 CmHa Ha rohata naHt ha BpataTa
Cneunannn HNCTpyMeHTN:
HakpaHHK Torx TX20 6,3 MM (1/4") [00340865]

PENEUPPEXDEHNE
Teekn, o6emncTuypeu!
MoHTnpaIteB06paTeHpeI.

PemOH
4.4 CmHa Ha rohata naHTa Ha BpaTata (BpTa c dncnnei)
CneuaJIHHHHTpymeHTn:
HakpaHHK Torx TX20 6,3 MM (1/4") [00340865]

PPEyPExJEHNE
Teekn, o6emncTuypeu!
4.4.2 MoHTnpaHe Ha roPHaTa nAHTa Ha BpaTaTa
MoHTnpaTBeBobpaTeHpe.
IobpeHa HpyrHuactn Ha ypeHa NmB Doma Ha KHeHTa, HAp. DbHO
TO.
3akpenete KOMnoHEHTa, Taka Ye Da He naHe.
N3nCKBaHe:
YpeDbTe N3KJIIOueHOT 3aXpaHbHaHeTo.
BbtpseHHTEΦHTHnHa ypeDa ca oTcTaHeHN.
Toghata nHaTa HbPaTaTa e cBaNeHa.
4.5.1 CbanyHe Ha cpeHata naHTa Ha BpTaTata
1.CBaIeTe BpaTaHa XnaDnHToO TdJIeHeN (1).
2. Pa3BnIte DBaTa BnHTa (2).
3.CbaneTe cpeHata naHa (3).
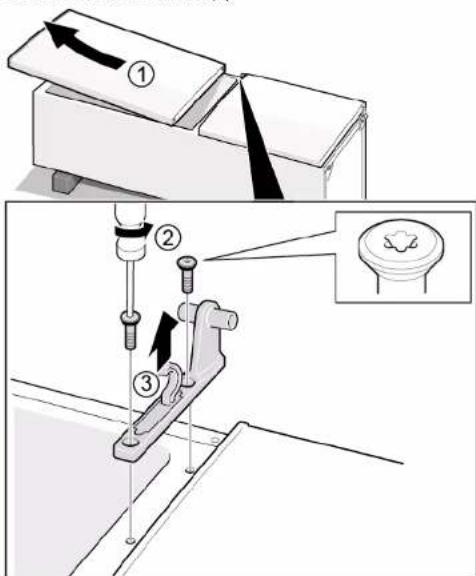
CpeHata nHaTa e cBaIeHa.
4.5.2 MoHTnpaHe Ha cpeHnTa nHa HbpaTa
MoHTnpaIteB06paTeHpeI.

PemOH
4.6 CmHa Ha donHaTa naHTa Ha BpaTaTa
Cneunannn HNCTpyMeHTN:
HakpaHHK Torx TX20 6,3 MM (1/4") [00340865]
A PENEYUNPEXDEHNE
TeKKn, o6emnctuypei!
PobpeHa Hpyu Yactn Ha ypeHa HnB DOMa Ha KIneHTa, Hap. bHo
TO.
3akpeeneKOMnoHeHTa,TakaYe Da He NaHe.
N3nCKBaHe:
YpeBt en3KIOueHOT 3axpaHbHeTo.
BbtpseHHTEΦHTHnHa ypeDa ca oTcTaHeHN.
TogHata nHaTa e CbaneHa.

4.6.2 MoHTnpaHe Ha DoJIHaTa NaHTa Ha BpaTaTa
MoHTnpaIteB06paTeHpeI.

PemOH
4.7 CmHa Ha paPta
N3nCKBaHe:
BpaTaTa e oTbopeHa.
4.7.1 N3BaXdAne Ha paΦTa
H3dbpnaTepaTa.
PaftbtecbaneH.
4.7.2 MoThupaHe Ha paΦTa
MoHTnpaIteB06paTeHpeI.

PemOH
4.8 CmHa Ha Ta6nKaTa 3a 6yTnIKN
M3nCKBaHe:
BpaTaTa e oTBopeHa.
4.8.1 CbAhe Ha Ta6nukata 3a 6ytnkn
H3dbpnaTe Ta5nHkata 3a 6ytnkn.
Ta5nukata3a6ytnknecbaneHa.
4.8.2 MoThiPaHe Ha Ta6JnUkata 3a 6yTnIkn
MoHTnpaIeB06paTeHpeI.

PemOH
4.9 CMraHa Ha cTeJaXa Ha BpaTaTa
M3nCKBaHe:
Bpatae oTbopeha.
4.9.1 N3Baxdahe Ha CTenaxa Ha BpaTata
NobHHTeCTeJaxaHaBpTaTaHarope.

CTenakbTaHaBpaTaTaeCBaneH.
4.9.2 MoNTupaHe Ha cTeJaXa Ha BpaTaTa
MoHTnpaTBe 06paTeH peI.

PemOH
4.10 CmHa Ha perynpemynna cTeJax Ha BpaTaTa
M3nCKBaHe:
Bpatae oTbopeha.
4.10.1 CbAHe Ha perynpyemn cTeaX Ha BpaTaT
PpeMeCTe peRpynpyEmrNo BnCOuHbCTenax Ha BpaTata Harope,doKATOce OCBO6oOn OT dbpkaa.
PernynpemyntCTeJaxHaBpataeCbaJeH
4.10.2 MoHTnpaHe Ha perynpyemn cTeJax Ha Bpata
MOHTnpaTBeB o6paTeH peA.

PemOH
4.11 CMHa Ha KOHTeHepa 3a 3ampa3EHn XpaHHTeHH npOdykTN
N3nCKBaHe:
BpaTaTa e oTbopeHa.
4.11.1 3BaXdaHe Ha KOHTeHepa 3a 3aMPa3eHN XpaHHTeHN npOdyKTH
- 13abpnaTe DOKpaKoHTeHepa 3a 3aMPa3eHN XpaHNTENH npOdyKTn (1). 2. 2BaTe KOHTeHepa 3a XpaHNTENH npOdyKTn (2).
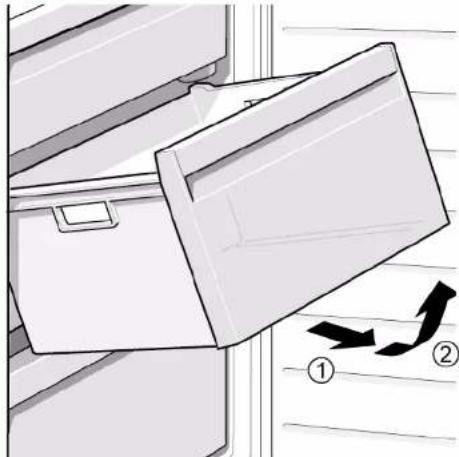
KoHTeHepb3a 3aMPa3EHn XpaHHTeHn npOpykTN e N3BaJeH.
4.11.2 MoHTnpaHe Ha KOHTeHepa 3a 3ampa3eHxpaHHTeHn npOdykTn
MOnTnpaTae Bo6paTeH peJ.
4.14 CMHa Ha LED cnot JAmnata
CneuaJIHHnHCTpymeHTn:

CneuaJIeH INHCTpyMeHT [00342180]

BauTpyedcHabcnLEDocBeTneHHeKToHeN3CKBaNo
Toba OCBETNeHMe MOKe Da 6bDe peMOHTnpaHO cMoO t CneuaJIuCTn
OT cnIyKbata 3a 06cnIyXBaHe Ha KIneHTn INN ONT KBaINΦuPaHn Tex
HNUI!


ONACHOCT
Pnck OT TokOB ydap npaH nuH anpeXeHne!
Onachoc3a KIBOTA OT TOKOB ynap B cnyaHa HnnpabnnepeMOHT
Eeektpnckte Taactn Tp6Ba da ce pemohnpat ot kbaanhphiunpan h enekptexn.
CnepeMOHTa Tp8Ba Da ce N3BbPn npOBepka 3a be30NaCHOCT
cbrnacHO VDE 0701 nnn B cbOTBETCTBNE cbc CneuHHTe 3a


ONACHOCT
PnCK OT TOKOB ydap npaH nuacn noH anpeXeHne!
CmbptOT TOKOB ydap
N3knHouTe ypeDnTe OT eNEKTPuYeCKOTO 3axpaHBAHe nohe 60 ce
KyHINIpeDN3aONOVAHeHa pemOHTa.

BHIMATEENHO
Octpn pb6oBe!
HapaHaBaHmO Tnpa3BaHe
Hocete npednaHpKaBnU
N3nCKBaHe:
YpeBbTe n3KIOueHOT 3aXpaHbHaHeTo.
Bpaatae oTBopeHa.
4.14.1 CbānHa He LED cNOT JAmNaTa
- INON3BAIte CneunaneHnHCTpyMeHT, 3a da n3BaIte LED cnot lamnata (1).
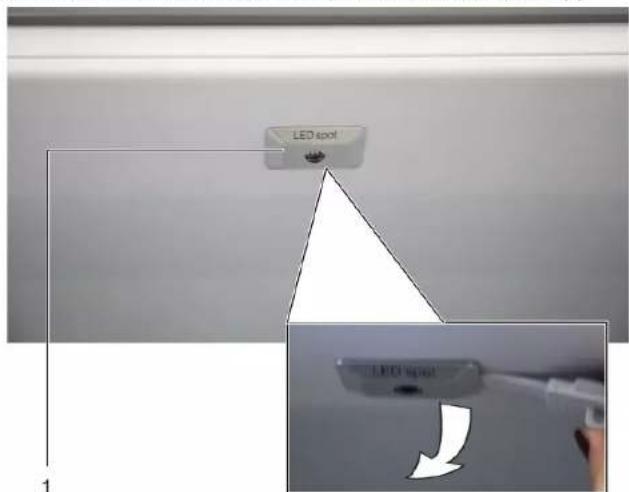
2.ИЗкпунеTe eNEKtpuYeCKNTe Bp63KN Ha LED cNOTЯmntaT.
LED cnot lamnatae cbanha.
4.14.2 MoHTnpaHe Ha LED cnot lamnata
MoHTnpaTBeBpaTeHpe.

PemOH
4.15 CMraHa HA LED oCBetneHneTo otrope
CneuaJIHHHnCTpymeHTN:
NnockaOTBeptKaBpbx2,4MMX0,4MMX60MM,B KOMPnEeTa[00341820]

Baunat ype n cnae Hc LED ocBtneHme, KoTe He n3uKbNa oIdpbKka. Toba ocBtneHme MoKe da 6bJe peMOHTnpaHO cAmO t CneuaHnCTU ot cnykbaTa 3a 0cbnykBaHe Ha KInENT Hn NOn t KbAnFncnPapHaN TeHHn!


ONACHOCT
Pmck ot TKOB yub npoprna tactn noanHanpexkHe!
OnAnOHCT 3a KWBOTA ot TKOB yub aB city n HENPBAP
EeKtPrVcKeTteAactn TpRbBa da ce pEmOHnpaT OT KBaIMnHnPnHnPAHn EeKToTeXHnU.
CnepemoHTA Tp8Ba 1a Ce n3BbpHn npOBepKa 3a 6e30NaCHOCTcRlachO VDE 0701 mnn B cBtBTcTbHe Cbc CneunHnHnTe 3a cTpaHATA paope6m.


ONACHOCT
PnCK OT TOKOB ydap npaHn qactn noHanpeXeHHe!
CmbptOT TOKOB ydap
N3KNUOYE ypeIne O t eEKNPTHcNEKT0 3aXPAHbAHe nOe 60 ceKHyn npEn 3aONBaHa He pMeOTHa.


BHIMATEJIHO
Octpn pb6oBe!
HapaHbHaMnO Tnpa3BaHe
Hocete npedna3n pbkauu.
N3nCKBaHe:
YpeBt e N3KIOUeHOT 3axpaHbAHeTO.
BpaTata e OTbopeha
TopHnTe BbTpewHn pHTnHr Ce oTcpaHBA.
4.15.1 CbajnHe Ha LED ocBtJeHneTo
- Ppemectete LED oCBETneHneto HnABO.
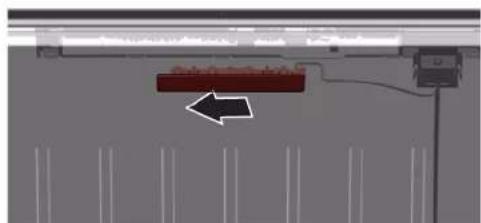
Cbbp3aHETo KbM eEeKtpnHeCKaT MaPeka Ha LED OCBETneHnTo e npeKbHato.
2.Ocbo6oTeKyKnTe HaLEDocBeTneHMeTo.
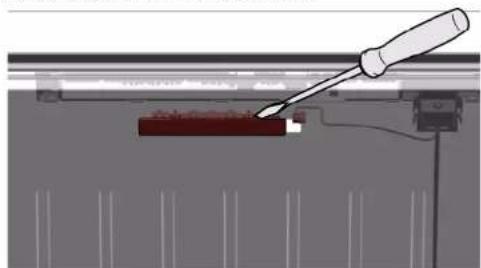

PemOH
3.CBaIeTE LEOBOCBETNEHHeIO,PNDMBKBaIKnHO Hanpei.
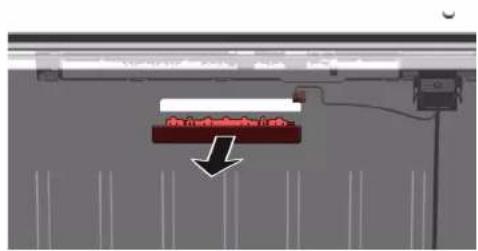
LEDocBETneHMeToeCBaneHO.
4.15.2 MoHTnpaHe Ha LED ocBETneHnEto OTrope
MOHTnpaTBeB0bpaTeHpeI.

PemOH
4.16 CMnHa Ha LED cbEtnnHata Ha cTpaHnHata JeHtA
CneuaJIHHHHTpymeHTn:
CmykateHnHa yaa 05Mm [00342224]

Bawrrype en CLEDocBeTneHKeTo He n3nckBa noi
Dpbkka.
ToBa OcbTneHnme MoKe Da 6bDe peMoHTnpaHO CaMO OT CNeuaJIuCTTu
OTcnyk6ata 3a 06cnykbahe Ha KIneHTN INI ON KBaINuPauHn TE Hnui!


ONACHOCT
Pnck OT TokOB yap nopadn qactn noHanpeXeHne!
OnachocT 3a KINBota OT TOKOB ynap B cnuyaHa HnnpabnneH peMOHT
Eeektpnckte Taee Tp86Ba da ce pemohnpat ot kbaanHnHnnpan HnekeptexHHn.
CnEi pemOHa TpRbBaJa Ce n3BbpHn npOBepKa 3a Be3ONaCHOT cbrIacHO VDE 0701 mN B Cb0TBeCTBHe CbC cneunHnHTe 3a cTpaHATA paanope6M.


ONACHOCT
PnCK OT TOKOB ydap npaH nuacn noH anpeXeHne!
CmbptOT TOKOB ynap
N3knHouTe ypeDnTe OT eNEKTPuYeCKOTo 3axpaHBAHe nohe 60 ce
KyHINIpeDN3aONOVAHeHa pemOHTa.

BHIMATEENHO
Octpnpb60Be!
HapaHaBaHmO Tnpa3BaHe
HocTe npedna3n pbKaBn.
N3nCKBaHe:
YpeBt E n3KIOUeH O T 3aXpaHbHaHeTo.
Bpatatae oTbopeha
PaptoBete Ha xnaHnHTo OToJeHeHne ca 3BaHeH.
4.16.1 CbAha He LED cbTnHa H a ctpaHnHaTa JeHTa
- Noctabete CmykatenHATA qhaa Bbpxy ropHATA pTeA HA LED cBETNIHATA ha CTPAHINHATA NEHTA.
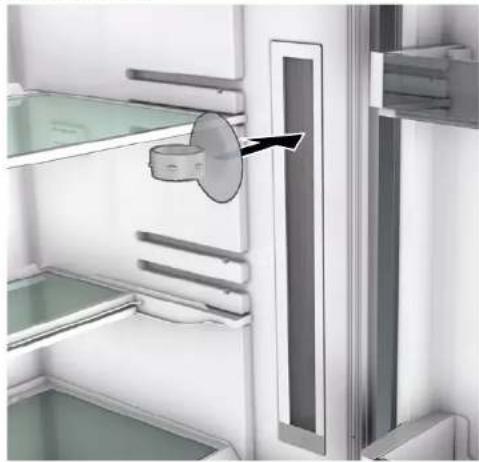

PemOH
2.ИБьрайе cmykateннata YAwa c npdeHATA LED CBETNHa Ha CTpaHnHataJIeHTA C eEOHO BbPTeMBO DBMKeHne.
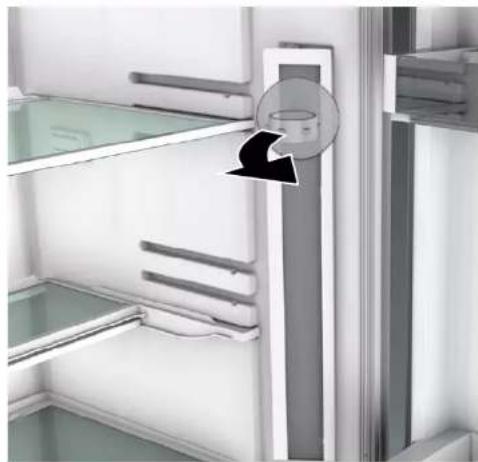
- 3nKIOeTe eNKeTpuNecKa Ta Bp3ka HA LED CBeTIHATA Ha cTaPAHHTA nEHTA. LED CBeTIHMA Ha cTaPAHHTA nEHTA eCBANEHa.
4.16.2 MoHTnpaHc Ha LED cBeTnHaTa Ha cTpaHnHaTa IeHTa
1.Cbpxte enektpueckata Bpb3ka HA LED cbetnhata Ha ctpaanhata nehta.
2.ФИКСИРАТЕ LED CBETNIMATA на CTРANHATA LAHNTA Na HENHOTO MRCTO HA CTENHATA na OTDENEHNETO (KYKITE UPKAPT).
LED cbETnHaTt ha CtpaHHTa TneHTa e MoHTnpaHa.

PemOH
KOMnneKaTa [00341820]

Baumiat ype n e cha6eH c LEOB oCteJIeHne, KOeTo H 3nCKBa noI- npKxHa.
Toba OCBETJENHE MOXe Da 6bJe peMOHTIpaHO cAmO CTcEuaJIHCTNOT CNYKbata 3a 0cbNyKBaHe Ha KmENTn HnNt KbANuPapAH TExHHN!


ONACHOCT
PnCK OT TOKOB ydap npaui yactn noHanpeXeHne!
Onachoc3a KIBOTA OT TOKOB ynap B cnhyaHa Hnnpabuineh peMOHT
Eekrtpnckteaactnptba da ce pemOHnpat ot kBaIIMPHpAHN eneKPTPOTeXHIN.
Cnep pemohTa Tp6Ba Da Ce N3BbpN PPOBepKa 3a 6e3oNaHcOCT cbrIacHO VDE0701 mN B CbOTBeTCTBHe CbCneMnHnHTe 3a cTpaHATA paanopeD6


ONACHOCT
Puck ot Tokob yap npaui actn noi Hanpexehne!
CmbptOT TOKOB ydap
M3NkhOte ypeHTe OTE enEeKTHueCKTo 3aXpaHbAne HO6 ceKHyndnpDc3aONBaHae HApMeOHa.

BHIMATEJIHO
Octpn pb6oBe!
HapaHbAHmO Tnp3BaHe
HocTe npedna3HN pkbKaBnU.
N3nCKBaHe:
YpeBt n3KIOueHOT 3axpaHBAHeTo.
Bpaatae oTbopeha
PaTOBeHa xnaHnHOTo OTdeneHne ca n3BaDeHn.
4.17.1 Cbānha He LED cnot JAmnata
1.Ocbo6oTeKaIbphaHaLED cnot lamnata.
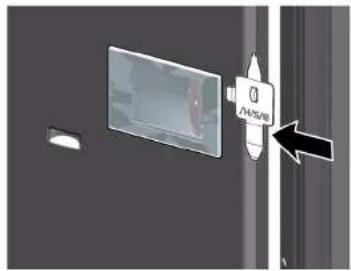
2.Издьрпайе калбфа Ha LED cnot lamnata habbtpe n eHOBpeMeHHO c HATHC-HETe Hanpei.
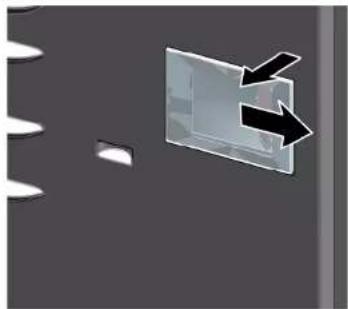

PemOH
- OTeDenTe moyna Ha LED cnot narnnata.
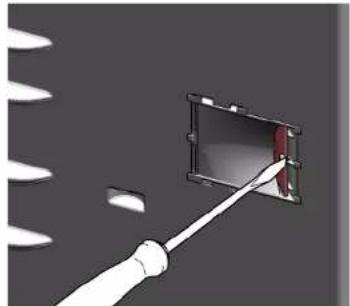
- Ⅳ3KIOUeTe eNEKtpnHeckata Bpb3ka Ha LED cnot JAmnata.
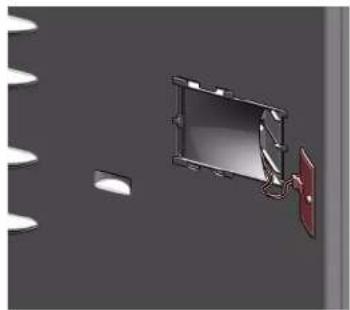
LED cnot narnata e cbaneHa.
4.17.2 MoHTnpaHc Ha LED cNOT JAMnata
MoHTnpaTBe Bo6paTeH peJ.
4.18 CMHa Ha LED Moyla Ha 3axpaHbHeTo
CneuaJIHHHHTpymeHTn:
HakpainHK Torx TX20 6,3 MM (1/4") [00340865]
PnockaOTBepkA Bpbx2,4MMX0,4MMX60MM,B
KOMnNeKaT [00341820]
KoHTeHep MInH. BmecTnMoCT 200 ml
Baxn 3a BapnaHTn Ha ypeDa C KaMepa B XlaadnnHnka (CIF).

EnkpoHmMoynMoraTda6bDaTpeMOHTnpaHcmoOTcneua
INCTNOTCNYKBaTa 3a 06CnYKBaHe Ha KIneHTN INIOT KBaJIINHINPAH NTEXHNI!
ONACHOCT
Pnck OT TKOB yap npaH cyactn noHanpeXeHne!
Onachoc3a KINBota OT TOKOB ynap B cnyuHa HnnpaBnneH peMOHT
EJektpnHecknte Yactn Tp8bDa da ce peMOHTnpaT OT KBaJIuΦnU
paHn eneKtpoTeXHnU.
Cnepemonta Tpa6ba da ce n3Bbpun npOBepka 3a 6e0anachocT
c7paHaoVDE0701INBcB0TBeCTBMEcBcCneuFmHnTe3a
ONACHOCT
Pnck OT TokOB ydap nopadn hactn noHanpeXeHne!
CMPTOTOKOByap
N3KIOHcTe ypeDnTe ot eNEKTPnueCKTo 3axpaHbAne noHe 60 ce
KyHINIpeDN3aONuBaHeHapeMOHTA.
BHMMATEJIHO
Octpn pb6oBe!
HapaHbAHnO TnpaBaHe
Hocete npedna3n pbkabu.
N3nCKBaHe:
YpeIbTe N3KIOUeHOT 3aXpaHbHeTo.
3aHaTa cTpaHa Ha ypeHtE e DocbHa.
4.18.1 OTeTpaHbAHe Ha LED Moyla Ha 3axpaHbAHeTo
1.
BHIMAHVIE!
OnachocT OT NOBpea!

PaaIraBaBpyxEneKtpoHHTe KOMNOHeHTN N Bp3KHTe H A KOMPecopa paaMpa3eHa BOa MoKe Da nobpeDn EneKtpoHHTe KOMNOHeHTN Ha ypeDa.
No Bpeme HA oTcPahBaHe Ha Mapkya 3a nToOBAhe Ce yBepTe, He paMaPaeHaTa BOHa HMa A ce pa3Jee Bbpy ENEKTPoHn KOMIOHEHTn.
- Pa3kayeTe Mapkyua 3a n3TOyBaHe OT n3XoDa 3a n3TOyBaHe Ha BOda (1).
- NaeneIte pa3Mpa3eHaTa B0Da B KOHeHep.
- Pa3kaueTe Mapkya 3a n3TOyBaHe OT TaBata 3a B0da OT n3napraBaHe (2)

PemOH
- PAsBnTe BnHTa.
KoHdENHaTOp3b 3a CTAPnAbe HA KOMPecopca H KyTnra Ha 3axpaHauBaunLED MOyuna 3a xapHauBaHe ce Ocbo6OxDaBaat.
3.Ocbo6oJeTe DBeTe KyKn.
KoHdEn3aTOpB 3a cTAPnHa He KOMIPecOHa NAKbKTb KaYTNrTa HaaXpaBaAunuLED Moynya 3a XaphaBAAe He cOB60kDaBAT.
4.18.2 MoHTnpaHc Ha LED MoUJa Ha 3axpaHaHeTo
MoHTnpaIteB06paTeHpeI.
Sorg for at sikre apparater mod at glide.


PAS PAI
Fare for nedfaldende deleg pga. Iosnedeskruer!
ronskade pga. nedfaldende dele
Sorg for at sikre componenten mod at falde ned.

BEM/ERK!
Fare for nedfaldende dele pga. Iosnede skruer!
Sorg for at sikre componenten mod at falde ned.
Preindstilling:
Sorg for at sikre apparater mod at glide.

PAS PAI
Fare for nedfaldende dele pga. Iosnede skruer!
rsonskade pga. nedfaldende dele
Sorg for at sikre componenten mod at falde ned.
BEM/ERK!
Fare for nedfaldende dele pga. Iosnedeskruer!
Sarg for at sikre componenten mod at falde ned.

FARE
Sorg for at sikre apparater mod at glide.
PAS PAI
Fare for nedfaldende dele pga. Iosnede skruer!
ronskade pga. nedfaldende dele
Sorg for at sikre componenten mod at falde ned.
BEMERKI
Fare for nedfaldende dele pga. Iosnede skruer!
Sorg for at sikre componenten mod at falde ned.
Preindstilling:
Sorg for at sikre apparater mod at glide.

Fare for nedfaldende dele pga. Iosnede skruer!
ronskade pga. nedfaldende dele
Sorg for at sikre componenten mod at falde ned.

Fare for nedfaldende dele pga. Iosnede skruer!
Sarg for at sikre componenten mod at falde ned.
Preindstilling:
4.14 Udskifting at LED-spotlampe
Nodvendig voektoj:
Specialvarktj [00342180]

4.17 Udskifting at LED-spotlampe
Nodvendig voektoj:
Specialvarkort0j [00342180]
Kaervskruetraekker Blad 2,4 mm x 0,4 mm x 60 mm i saettet [00341820]

4.17.2 Montering at LED-spotlampe
Apparaat is losgekoppeld is van de stroomvoorziening.
Deur is open.
Repair hints - Fridge-freezer
1 Concerning this document. 163
1.1 Important information 163
1.1.1 Purpose 163
1.2 Explanation of symbols 163
1.2.1 Danger levels.. 163
1.2.2 Hazard symbols 163
1.2.3 Structure of the warnings.. 164
1.2.4 General symbols 164
Safety. 165
2.1 General Safety instructions 165
2.1.1 All domestic appliances 165
Tools and aids. 166
Repair 167
4.4 Replacing door upper hinge (door with display) 173
4.8 Replacing bottle tray 178
4.8.1 Removing bottle tray 178
4.8.2 Installing bottle tray. 178
4.9 Replacing door rack 179
4.14 Replacing LED spot light 184
4.14.1 Removing LED spot light 184
4.14.2 Installing LED spot light 184
4.15 Replacing LED top light 185
4.15.1 Removing LED light. 185
4.15.2 Installing top LED light 186
4.16 Replacing LED side bar light 187
4.16.1 Removing LED side bar light 187
4.16.2 Installing LED side bar light 188
4.17 Replacing LED spot light 189
4.17.1 Removing LED spot light 189
4.17.2 Installing LED spot light 190
4.18 Replacing LED power supply module 191
4.18.1 Removing LED power supply module 191
4.18.2 Installing LED power supply module 193
Concerning this document
1.1 Important information
1.1.1 Purpose
These repair hints support consumer to repair appliances by himself according to the applicable eco-design regulation (as of 03/2021).
They contain information how to exchange defined spare parts including warnings and risks.
In case of questions, please contact our customer service. We will only be liable for damages if the repair hints have been followed properly.
1.2 Explanation of symbols
1.2.1 Danger levels
The warning levels consist of a symbol and a signal word. The signal word indicates the severity of the danger.
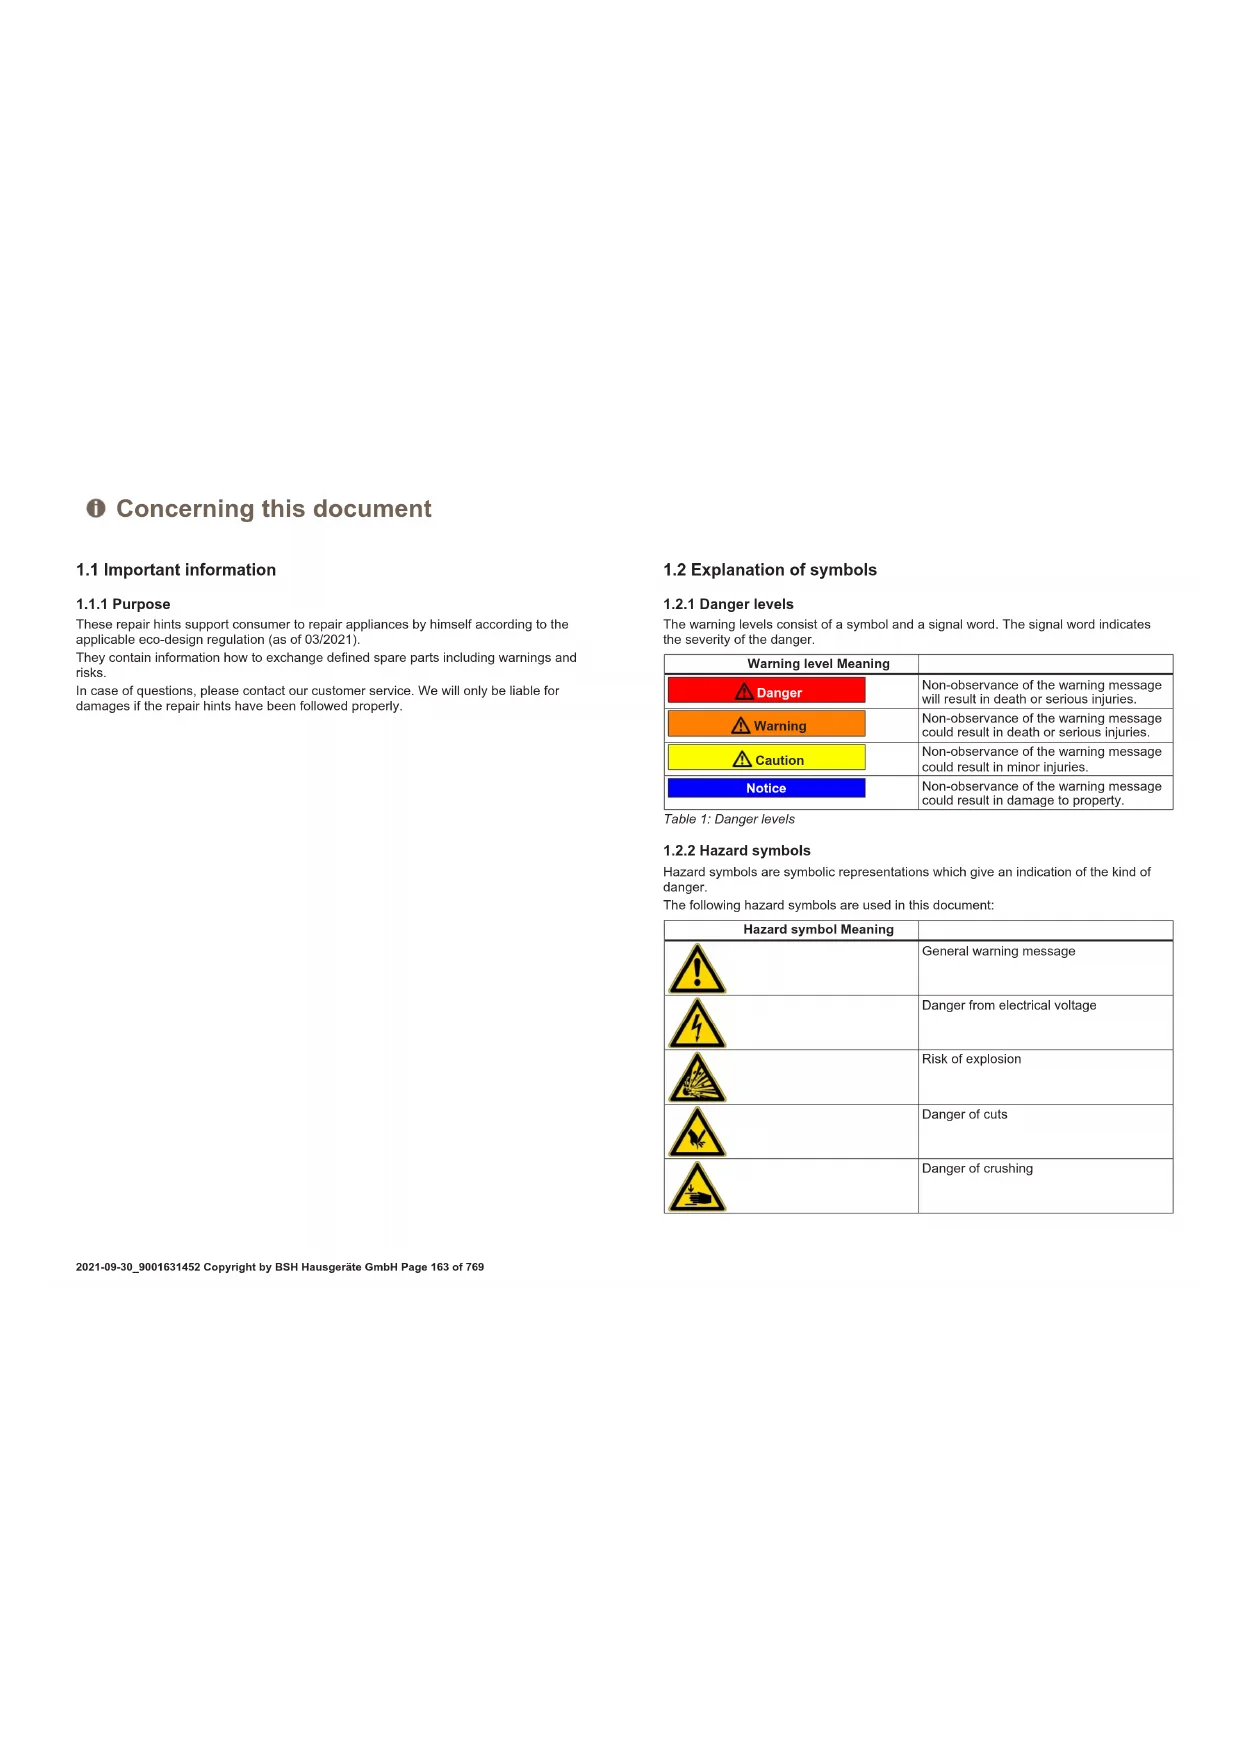
| Warning level Meaning | |
| Danger | Non-observation of the warning message will result in death or serious injuries. |
| Warning | Non-observation of the warning message could result in death or serious injuries. |
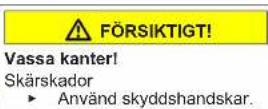
| Caution | Non-observation of the warning message could result in minor injuries. |
| Notice | Non-observation of the warning message could result in damage to property. |
Table 1: Danger levels
1.2.2 Hazard symbols
Hazard symbols are symbolic representations which give an indication of the kind of danger.
The following hazard symbols are used in this document:
| Hazard symbol Meaning | |
| ! | General warning message |
| Danger from electrical voltage | |
| Risk of explosion | |
| Danger of cuts | |
| Danger of crushing |
Concerning this document
| Hazard symbol Meaning | |
| Danger from hot surfaces | |
| Danger from strong magnetic field | |
| Danger from non-ionizing radiation |
Table 2: Hazard symbols
1.2.3 Structure of the warnings
Warnings in this document have a standardised appearance and a standardised structure.

Danger
Type and source of danger!
Possible consequences of ignoring the danger / warning.
Measures and prohibitions for preventing the danger.
The following example shows a warning that warns against electric shock due to live parts. The measure for avoiding the danger is mentioned.

Danger
Risk of electric shock due to live parts!
Death by electrocution
- Disconnect appliances from electrical supply at least 60 seconds before starting repairs.
1.2.4 General symbols
The following general symbols are used in this document:
| Gen. symbol Meaning | |
| i | Identification of a special tip (text and/or graphic) |
| j | Identification of a simple tip (only text) |
| Identification of a link to a video tutorial |
Table 3: General symbols
| Gen. symbol Meaning | |
| Identification of required tools | |
| Identification of required preconditions | |
| Identification of a condition (if ..., then ...) | |
| Identification of a result | |
| [Start] Identification of a key or button | |
| [00123456] Identification of a material number | |
| Status Identification of displayed text / window(in the appliance's display) | |
Safety
2.1 General Safety instructions
2.1.1 All domestic appliances
Risk of electric shock due to live parts!
Errors by repairs involving electrical components can lead to electrical shock!
- Disconnect the appliance from the mains for at least 60 seconds before starting work.
After the repair have a safety test according VDE 0701 or country-specific regulations performed.
Risk of injury from sharp edges!
Wear protective gloves.
Risk of crushing during repair, maintenance, troubleshooting and service due to heavy and moving components
Wear protective shoes.
- Secure heavy components from falling down.
- Do not stick body parts into moving components.
Risk to the appliance's safety / function!
Only use original spare parts.
Risk of damage to electrostatically sensitive components (ESDs)!
- Do not touch the modules, including connections and conductor paths.

Tools and aids
| Designation Details Images | ||
| Protection cloth [00342013] | 60 cm x 50 cm | ### |
| Slotted screwdriver | Blade 2.4 mm x 0.4 mm x 60 mm, in the kit [00341820] | Φ |
| Special tool [00342180] | ||
| Suction cup [00342224] | ∅50 mm | |
| Torx Bit TX20 [00340865] | 6.3 mm (1/4") | Φ |
| Slotted screwdriver | Blade 10 mm x 1.6 mm x 200 mm | Φ |
Prerequisite:
Door is open.
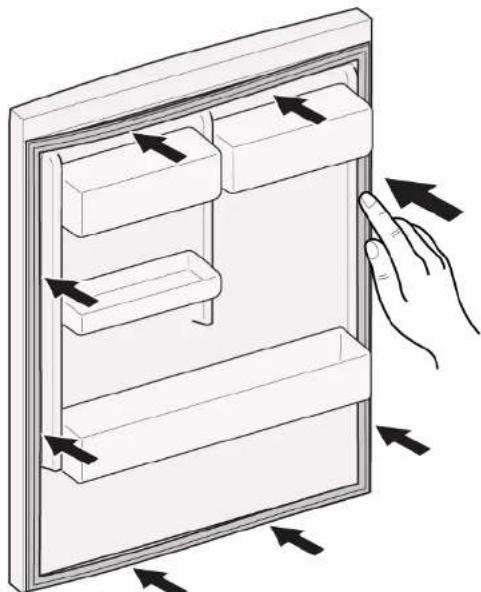
- Release door gasket from the groove on right and left corner.
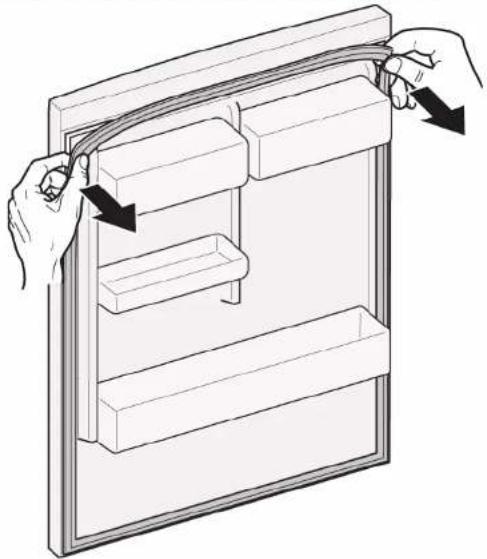
- Pull out door gasket from groove.
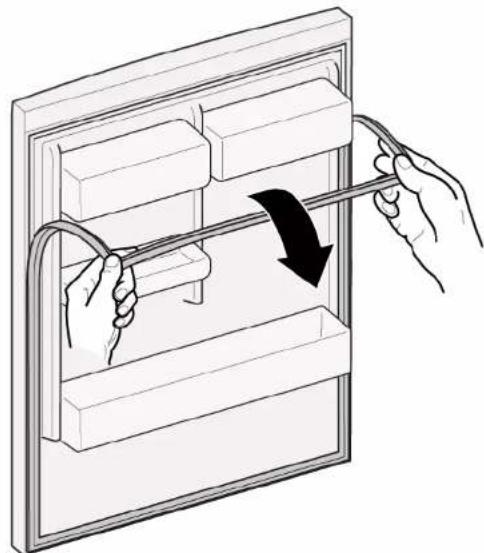

Door gasket is removed.
| i | Thickness of new door gasket may deviate slightly from thickness of old door gasket. This will not affect closing behavior and long-term function. |
| i | If your appliance has adjustable hinges or hinge attachments, you can optimize the closing behavior subsequently. |
| i | Small side holes in door gasket are functional (required for ventilation). These are not production faults. |

Repair
- Check groove for gasket for damage.
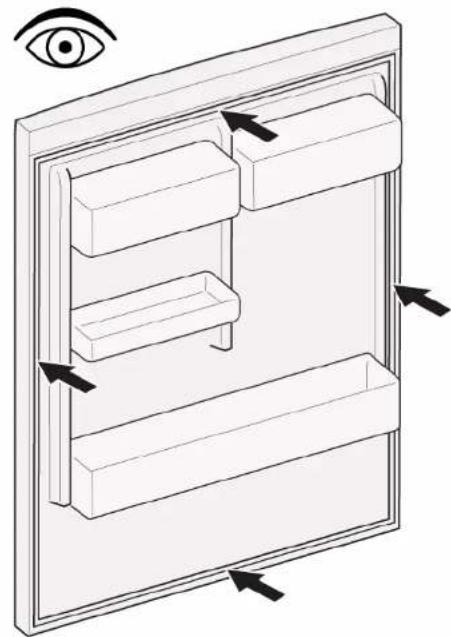
- If groove for gasket is it is damaged.
- Contact customer service.
- Slight deformation of door gasket is normal and does not affect its function. It is recommended to straighten door gasket before inserting it into appliance.
Heat door gasket with a hair dryer or hot water and manually reshape it.
- Push corners of gasket at the top and bottom to the groove.
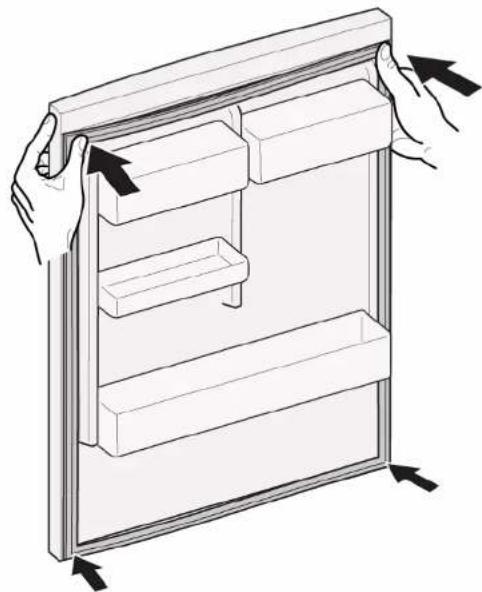

Repair
- Press whole gasket step by step into the groove.
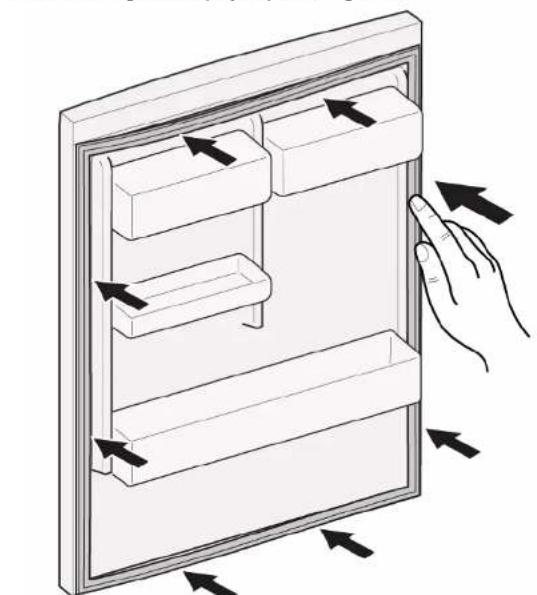

Door gasket is installed.
Slotted screwdriver Blade 10 mm x 1.6 mm x 200 mm
Prerequisite:
Appliance is disconnected from power supply.
Door is open.
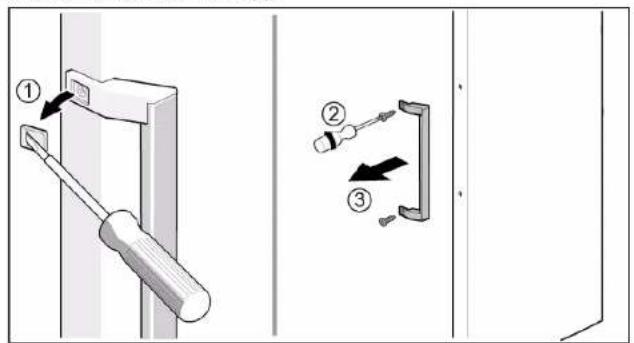
4.2.1 Removing door handle
-
Remove two screw caps (1).
-
Unscrew two screws (2).
- Remove door handle (3).
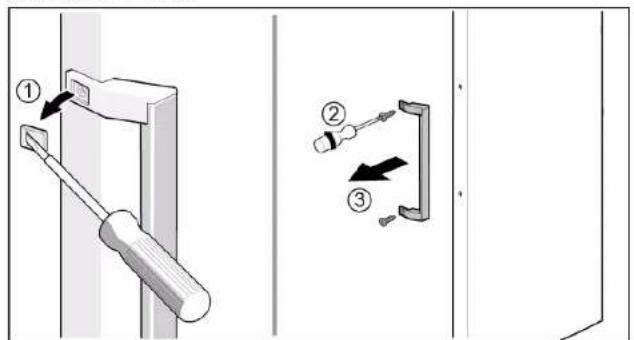

Door handle is removed.

Door handle for the second door can be removed in the same manner.
Install in reverse order.

Repair
Appliance is disconnected from power supply.
Appliance interior fittings are removed.
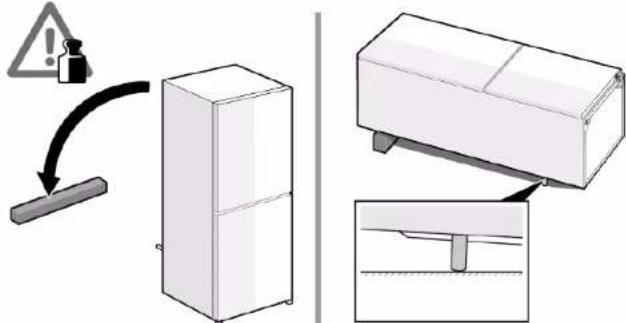
- Place appliance on the back side.
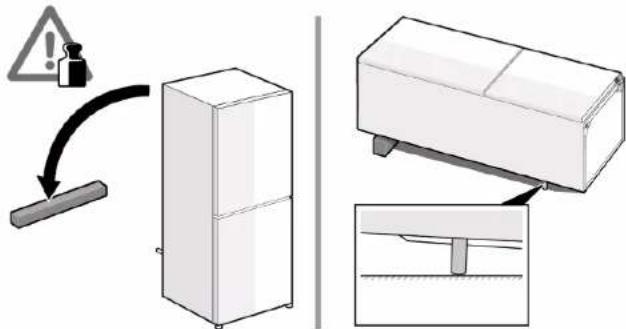

Repair
2.1. Press upper hinge cover on both sides (1).
- Move out upper hinge cover (2).
- Rotate hinge cover (3).
- Remove upper hinge cover (4).
- Unscrew two screws (5).
- Remove upper hinge (6)
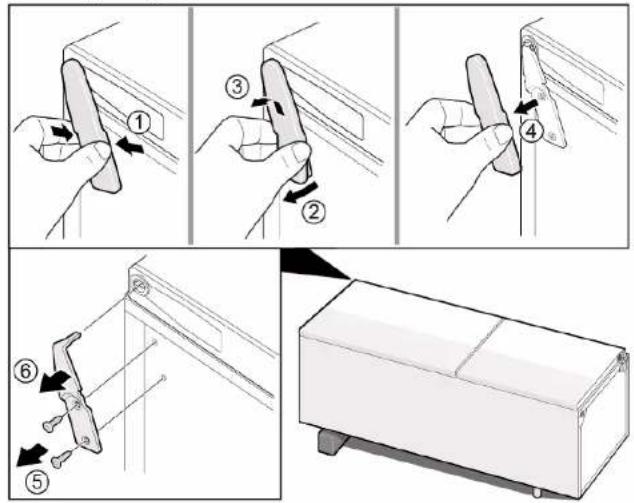

Upper hinge is removed.
Install in reverse order.

Repair
4.4 Replacing door upper hinge (door with display)
Required tools:
Torx Bit TX20 6,3 mm (1/4") [00340865]




Prerequisite:
Appliance is disconnected from power supply.
Appliance interior fittings are removed.
- Place appliance on the back side.

Repair
-
- Remove upper hinge cover (1).
-
Remove cable box cover (2).
- Disconnect electrical connection (3)
- Unscrew ground connection screw (4).
- Remove cable protection (5).
- Unscrew the screw (6)
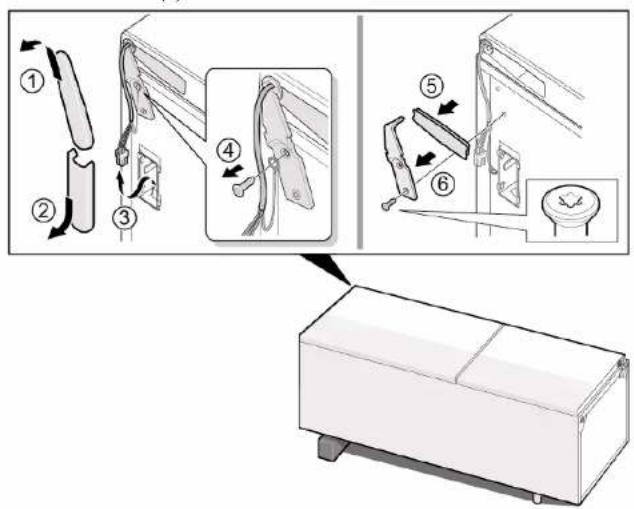

Upper hinge is removed.
Install in reverse order.

Repair
4.5 Replacing door middle hinge
Required tools:
Torx Bit TX20 6,3 mm (1/4") [00340865]

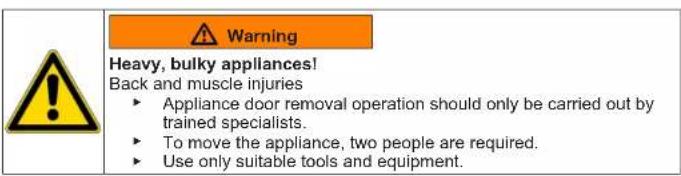
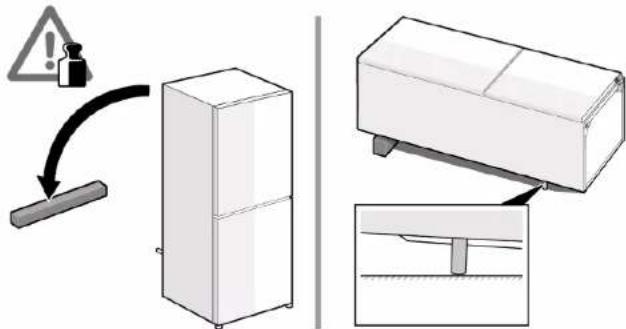
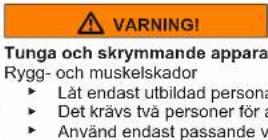
Heavy, bulky appliances!
Back and muscle injuries
Appliance door removal operation should only be carried out by
trained specialists.
To move the appliance, two people are required.
Use only suitable tools and equipment.

Sharp edges!
Cut injuries
Wear protective gloves.

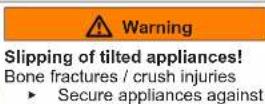
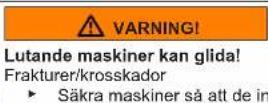
Slipping of tilted appliances!
Bone fractures / crush injuries
Secure appliances against slipping

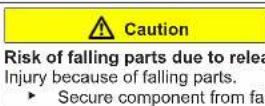
Risk of falling parts due to released screws!
ury because of falling parts.
- Secure component from falling down.

Risk of falling parts due to released screws!
Damage to other parts of the appliance or at customers home e.g. bot
tom.
- Secure component from falling down.
Prerequisite:
Appliance is disconnected from power supply.
Appliance interior fittings are removed.
Door upper hinge is removed.
4.5.1 Removing door middle hinge
- Remove fridge compartment door (1).
- Unscrew two screws (2).
- Remove middle hinge (3).
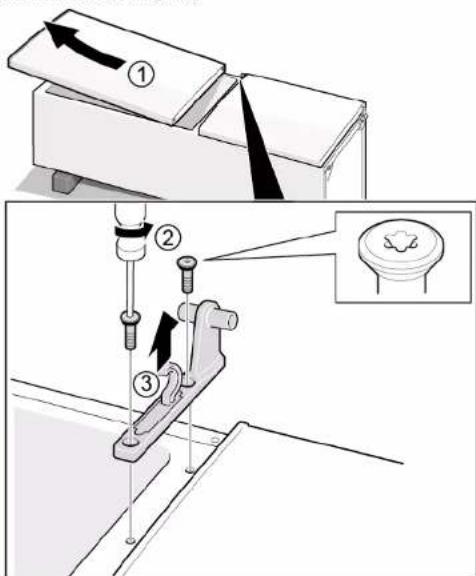
Middle hinge is removed.
4.5.2 Installing door middle hinge
Install in reverse order.

Repair
4.6 Replacing door lower hinge
Required tools:
Torx Bit TX20 6,3 mm (1/4") [00340865]
Prerequisite:
Appliance is disconnected from power supply.
Appliance interior fittings are removed.
Upper hinge is removed.

Middle hinge is removed.
4.6.1 Removing door lower hinge
- Remove freezer compartment door (1).
- Unscrew the screw (2).
- Turn lower hinge out (3).
- Remove lower hinge (4).
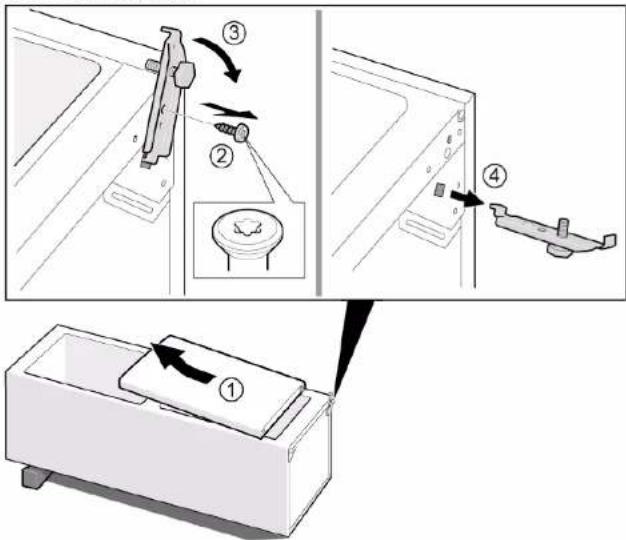

Door lower hinge is removed.
Install in reverse order.

Repair
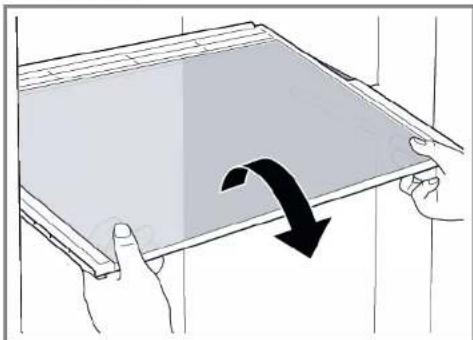
4.7 Replacing shelf
Prerequisite:
Door is open.
4.7.1 Removing shelf
Pull out shelf.
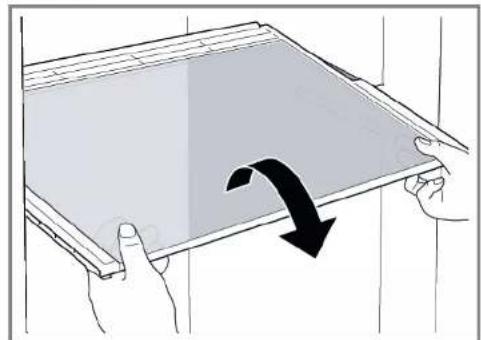

Shelf is removed.
4.7.2 Installing shelf
Install in reverse order.

Repair
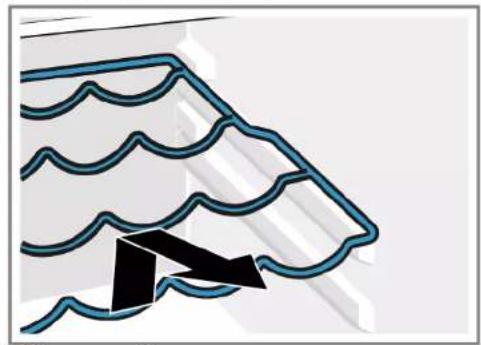
4.8 Replacing bottle tray
Prerequisite:
Door is open.
4.8.1 Removing bottle tray
Pull out bottle tray.
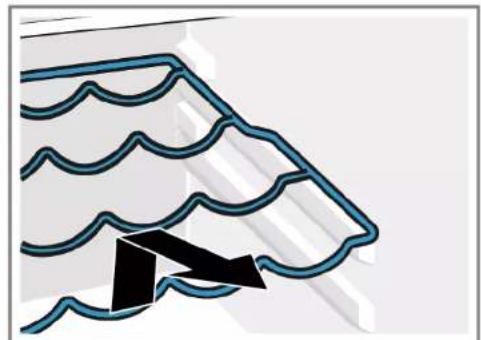
Bottle tray is removed.
4.8.2 Installing bottle tray
Install in reverse order.

Repair
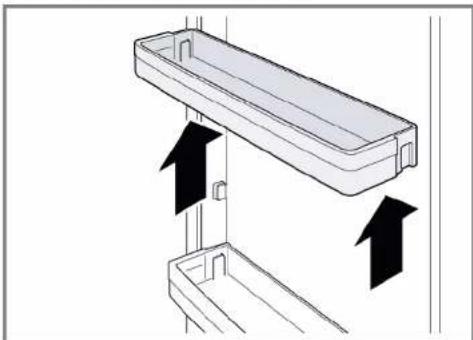
4.9 Replacing door rack
Prerequisite:
Door is open.
- Lift door rack upwards.
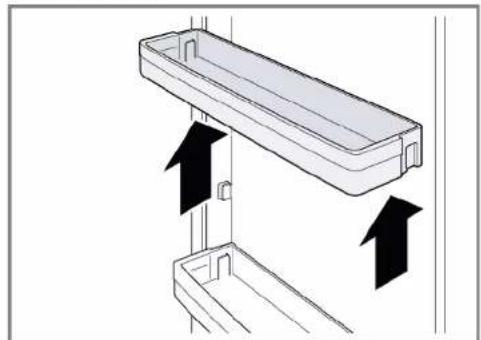
Door rack is removed.
Install in reverse order.

Repair
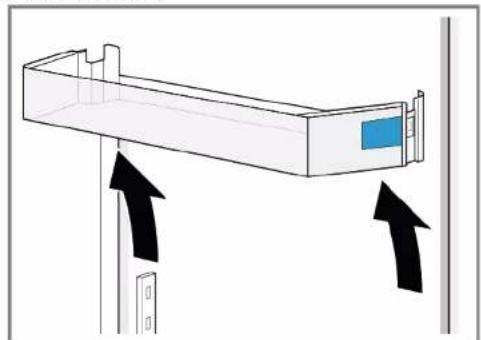
4.10 Replacing adjustable door rack
Prerequisite:
Door is open.
4.10.1 Removing adjustable door rack
- Move high-adjustable door rack upwards until the door rack is released from the holder.
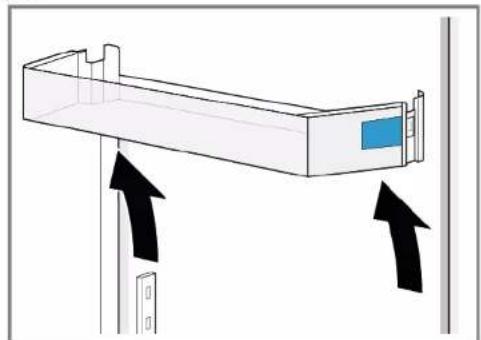

Adjustable door rack is removed.
4.10.2 Installing adjustable door rack
Install in reverse order.

Repair
4.11 Replacing frozen food container
Prerequisite:
Door is open.
4.11.1 Removing frozen food container
- Pull out frozen food container all the way (1). 2. Remove food container (2).
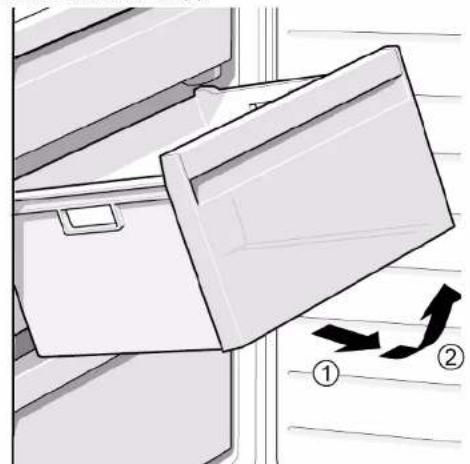
Frozen food container is removed.
4.11.2 Installing frozen food container
Install in reverse order.

Repair
4.12 Replacing container
Prerequisite:
Door is open.
4.12.1 Removing container
- Move out lower fridge container (1).
- Move out upper fridge container (2).
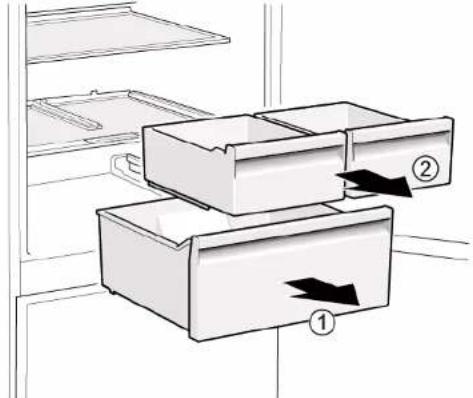

Containers are removed.
4.12.2 Installing container
Install in reverse order.

Repair
4.13 Replacing extendable container
Prerequisite:
Door is open.
4.13.1 Removing extendable container
1.Pull extendable container out all the way (1).
2. Remove extendable container (2).
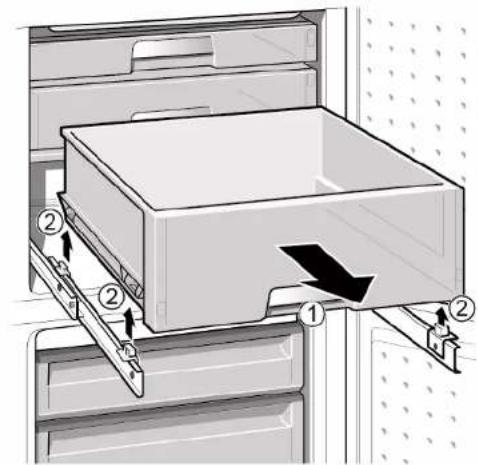

Extendable container is removed.
4.13.2 Installing extendable container
Install in reverse order.

Repair
4.14 Replacing LED spot light
Required tools:
Special tool [00342180]

Your appliance features a maintenance-free LED light
These lights may be repaired by customer service or authorised technicians only!

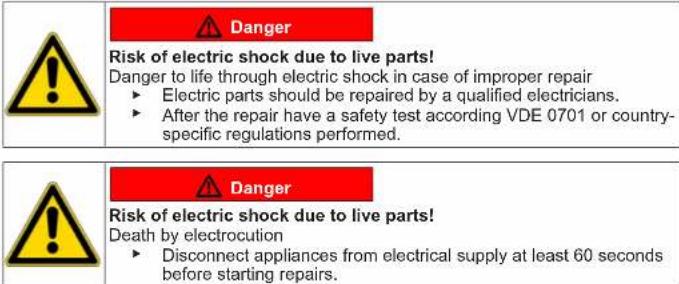
Risk of electric shock due to live parts!
Danger to life through electric shock in case of improper repair
Electric parts should be repaired by a qualified electricians.
After the repair have a safety test according VDE 0701 or country-specific regulations performed.

Risk of electric shock due to live parts!
Death by electrocution
Disconnect appliances from electrical supply at least 60 seconds before starting repairs.

Sharp edges!
Cut injuries
Wear protective gloves.
Prerequisite:
Appliance is disconnected from power supply.
Door is open.
4.14.1 Removing LED spot light
- Use special tool to pull out LED spot light (1).
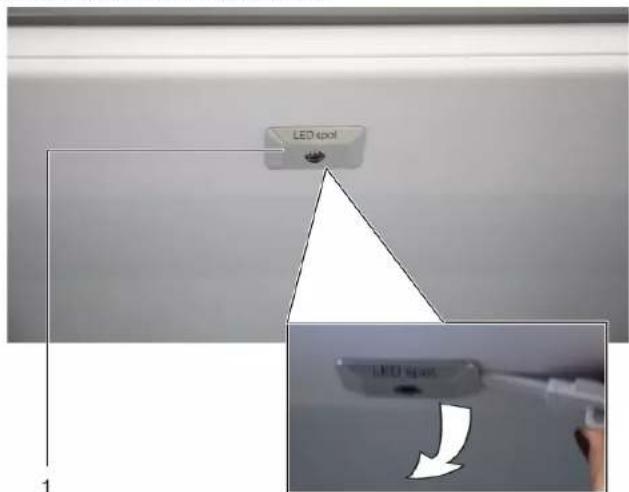
- Unplug electrical connections of LED spot light.
LED spot light is removed.
4.14.2 Installing LED spot light
Install in reverse order.

Repair
4.15 Replacing LED top light
Required tools:
Slotted screwdriver Blade 2.4 mm x 0.4 mm x 60 mm, in the kit [00341820]

Your appliance features a maintenance-free LB
These lights may be repaired by customer service or authorised technicians only!


Danger
Risk of electric shock due to live parts!
Danger to life through electric shock in case of improper repair
Electric parts should be repaired by a qualified electricians.
After the repair have a safety test according VDE 0701 or country-specific regulations performed.


Danger
Risk of electric shock due to live parts!
Death by electrocution
- Disconnect appliances from electrical supply at least 60 seconds before starting repairs.


Caution
Sharp edges!
Cut injuries
Wear protective gloves.
Prerequisite:
Appliance is disconnected from power supply.
Door is open.
Upper interior fittings are removed.
4.15.1 Removing LED light
- Move the LED light to the left side.
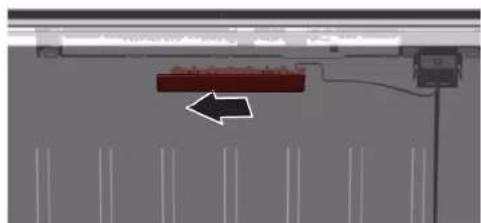
LED light electrical connection is disconnected.
- Release LED light hooks.
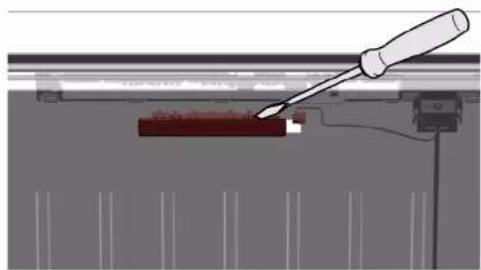

Repair
- Remove LED light moving it forward.
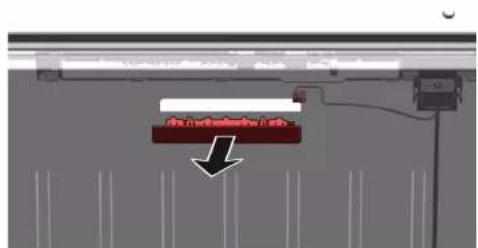
LED light is removed.
4.15.2 Installing top LED light
Install in reverse order.

Repair
4.16 Replacing LED side bar light
Required tools:
Suction cup 050 mm [00342224]

Your appliance features a maintenance-free LED light. These lights may be repaired by customer service or authorised technicians only!
Danger to life through electric shock in case of improper repair
Electric parts should be repaired by a qualified electricians.
After the repair have a safety test according VDE 0701 or country-specific regulations performed.
Disconnect appliances from electrical supply at least 60 seconds before starting repairs.


Sharp edges!
Cut injuries
Wear protective gloves.
Prerequisite:
Appliance is disconnected from power supply.
Door is open.
Fridge compartment shelves are removed.
4.16.1 Removing LED side bar light
- Stick the suction cup on the upper third of LED side bar light.
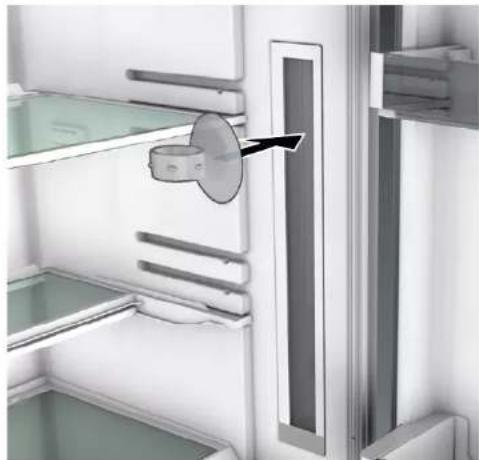

Repair
- Pull suction cup with forward LED side bar light in one rotary movement.
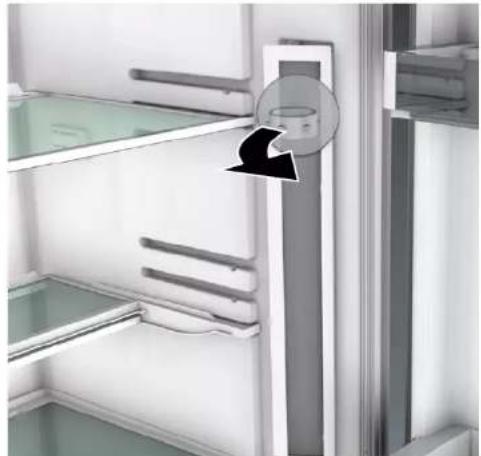
- Disconnect electrical connection of LED side bar light.
LED side bar light is removed.
4.16.2 Installing LED side bar light
- Connect electrical connection of LED side bar light.
- Fix LED side bar light into it's location on compartment wall (hooks click).
LED side bar light is installed.

Repair
4.17 Replacing LED spot light
Required tools:
Special tool [00342180]
Slotted screwdriver Blade 2.4 mm x 0.4 mm x 60 mm, in the kit [00341820]

Your appliance features a maintenance-free LED light. These lights may be repaired by customer service or authorised technicians only!
Danger
Risk of electric shock due to live parts!
Danger to life through electric shock in case of improper repair
Electric parts should be repaired by a qualified electricians.
After the repair have a safety test according VDE 0701 or country-specific regulations performed.

Danger
Risk of electric shock due to live parts!
Death by electrocution
- Disconnect appliances from electrical supply at least 60 seconds before starting repairs.
A Caution
Sharp edges!
Cut injuries
Wear protective gloves.
Prerequisite:
Appliance is disconnected from power supply.
Door is open.
Fridge compartment shelves are removed.
4.17.1 Removing LED spot light
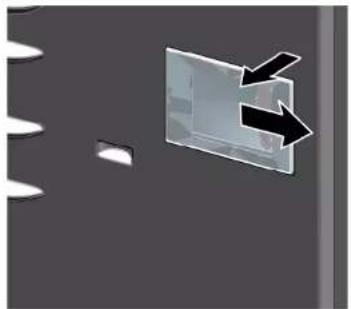
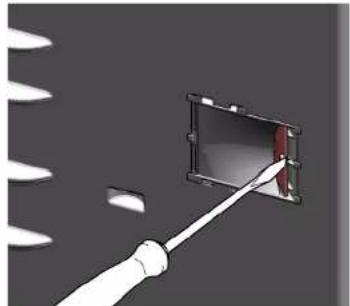
- Release LED spot light cover.
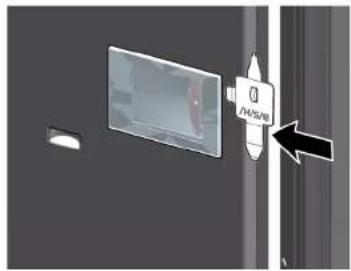
- Pull LED spot light cover inwards and simultaneously push forwards.
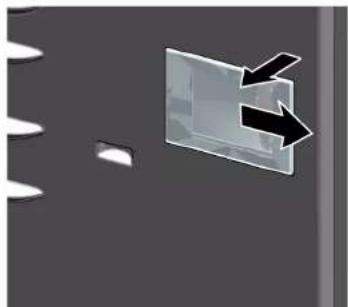

Repair
- Detach LED spot light module.
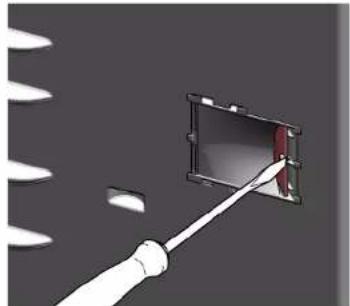
- Disconnect LED spot light electrical connection.
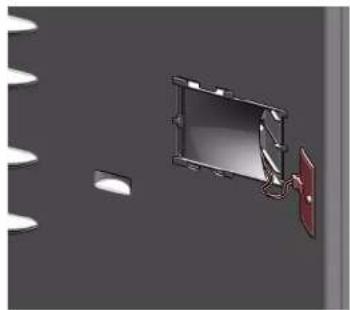
LED spot light is removed.
4.17.2 Installing LED spot light
Install in reverse order.

Repair
4.18 Replacing LED power supply module
Required tools:
Torx Bit TX20 6,3 mm (1/4") [00340865]
Slotted screwdriver Blade 2.4 mm x 0.4 mm x 60 mm, in the kit [00341820]
Container min. 200 ml capacity
Valid for appliance variants with Camera in Fridge (CIF).

Electronic modules may be repaired by customer service or authorised technicians only!

Risk of electric shock due to live parts!
Danger to life through electric shock in case of improper repair
Electric parts should be repaired by a qualified electricians.
After the repair have a safety test according VDE 0701 or country-specific regulations performed.

Risk of electric shock due to live parts!
Death by electrocution
- Disconnect appliances from electrical supply at least 60 seconds before starting repairs.

Sharp edges!
Cut injuries
Wear protective gloves.
Prerequisite:

Appliance is disconnected from power supply.

Back side of appliances is accessible.
4.18.1 Removing LED power supply module
1.
Notice
Risk of damage
Defrost water being spilled on the compressor's electronics and connections may damage appliance electronics.
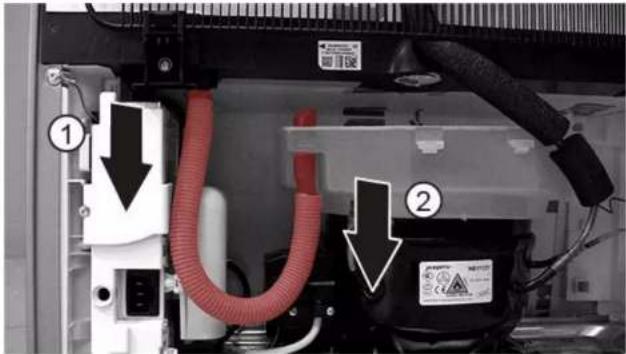
During removal of drainage hose ensure that defrost water will not be spilled on electronic components.
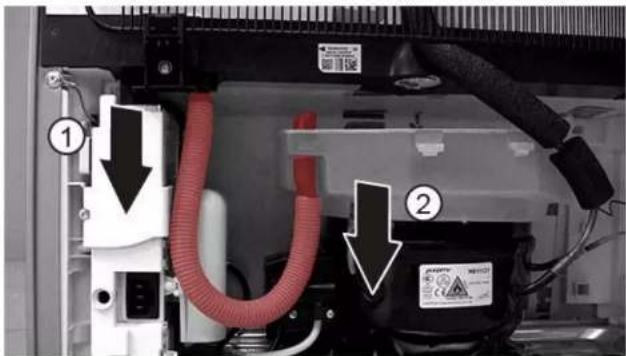
- Disconnect drainage hose from water drain outlet (1).
- Pour defrost water into the container.
- Disconnect drainage hose from water evaporation tray (2).

Repair
- Unscrew the screw.
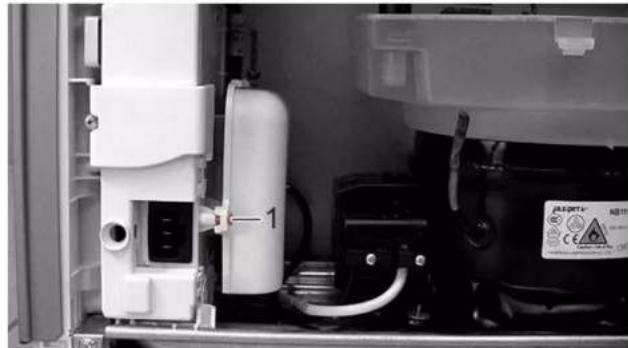
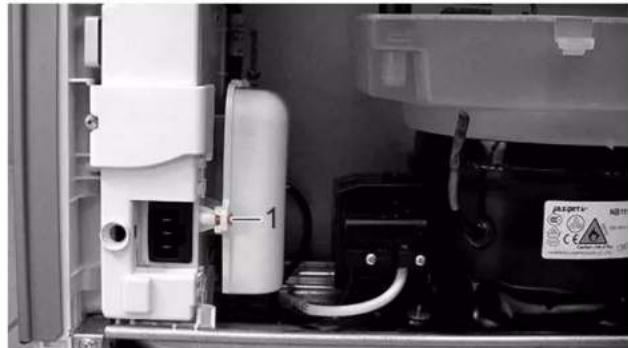
Compressor starting capacitor and LED power supply module box is released.
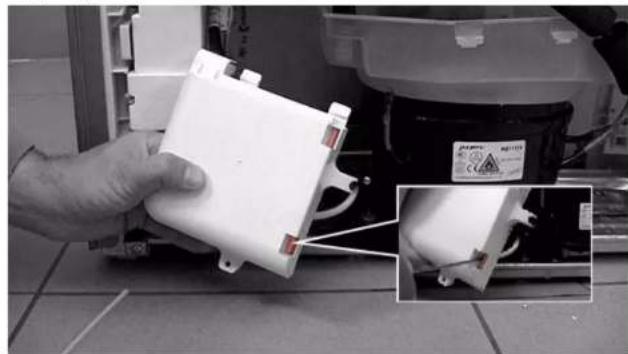
- Release two hooks.
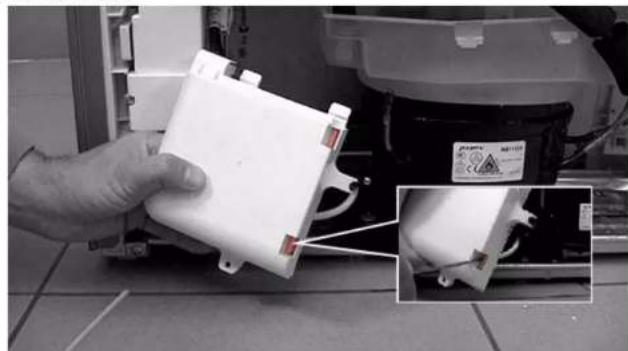
Compressor starting capacitor and LED power supply module box cover is released.
- Release four hooks.
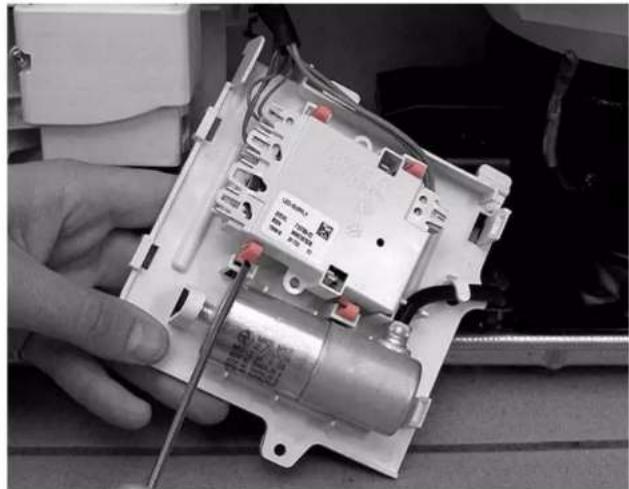
LED power supply module is released.
- Disconnect LED power supply module electrical connections (1) and (2).
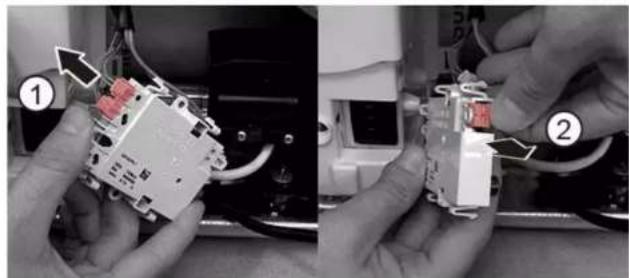
LED power supply module is removed.

Repair
4.18.2 Installing LED power supply module
Install in reverse order.
Remonditeave - Kombikülmik
1 Selle dokumendiga seoses 195
1.1 Tahtis teave 195
1.1.1 Eesmärk 195
1.2 Sumbolite selgitus 195
1.2.1 Ohutased 195
1.2.2 Ohusumbolid 195
1.2.3 Hoiatuste struktuur 196
1.2.4 Üldised sumbolid 196
Ohutus. 197
2.1 Uldised ohutusjuhised 197
2.1.1 Koki kodumasinad 197
Tabel 1: Ohutasedmed
1.2.2 Ohusumbolid
Ohusumbolid on sumboolsed kujutised, mis viytavad ohu laadile. Selles dokumendis kasutatakse alljargnevoid ohusumboleid.
Eritorist [00342180]

1.1 Informations important 259
1.1.1 Objectif 259
Outil special [00342180]


∴ m = 3/11
Mun Torx TX20 6.3 mm (1/4") [00340865]
PnakkeKaataaβiAeTIIa10mmx1,6mmx200mm
PouTo6eOg:
Houokekunivataoosuvdeevn anTnynapoxnpofooogla
H npota elva aoivxtn.
4.2.1 Aqaipeoan aBnns tropras
1.Apaipote ta duo muapa biac(1).
2. 三εβδωστε δύο βιδες (2).
3. ApaipoeTe nAaBn Tns npopac (3).

HaaanTnTPOtaeExaapapeB

HaaBn npTc yia Tn 8eutepn npTa mtopei va apaiepeei eiovio tpoTO.
4.2.2 ToTobetnnon λ aBns tropas
Eykaataotne 1y nV aVfTeN oipd.

EMIOKEUN
4.3 Avikataoan Eavw MeveoTtOptas
EiikαβonθηrKaμεσa:
Mun Torx TX20 6,3 mm (1/4") [00340865]
A IPOEIAOIOIH
Bapie,oykwdeis oukeuec
Tpaunpatiogoi eonkaipuwv
Hdiakiaqa apaipeoNt TnTropaTnOuKEunPepTei va
EKTAEITAI MVO aTTO ETTAOIEUVEOVG EIOIKOUC
Hetakivnon tsoukeun ts peTie va ekteelai aTdo du atopa.
XpnoiopoioieTcmoVKaataaAaaepyaleiaKai eOanlouo
A IPOESOXH
Aixunpeaekes!
Tpaunpoaianto kmt
Opate Ippoataeutikayavtia.
PPOEIAOIOIHSH
Oia0nKeKaipevovoukeuov!
Katayupaata ootaw/tpaupanapoiouvtheiun
AopaaIATE Tc oukeuec aTIO aIaon.
A IPOESOXH
Kivduvoi ano mwn npw v faia c hao apw biov!
auatipos eanias mwns tmuwv.
Aoaiote ta eapntmuata ano Twnon.
PPOZOXHI
Kivuvwv ano Twnn eapntmuw vgaia xalapwBidw!
Znuae aaaa aepn ts ouokueu n otyn oikia tou Taeatn, x. datteo
AopaaioTe ta eapntmuataaTO TTOWn.
Pounto8eon:
Houkeunéivai aonouvdeevn ano mnpox npopodooiac.
ApaipouviT a eowtepiKa eapntmuata oukeunc.
4.3.1 AqaipeoN ETrawu MeVTeE TOpTAs
- TOnoBcHnTne n ouKeun otyn niow nIeupa.

EMIOKEUN
Eiokoεpyaλeio[00342180]

Houkeun diabeet eva quc LED tou dev xpeiaetai auvtnpan. Auta ta qwta mtropov vaetaekauotov mvo ato tvn egutnpen Tneatuv n ao ecuaioodtmevovx
KINAYNOI Kiyuyoc nAekpOAnjic Aovu
Kivvoc via n 0n aio kntponiAige o nepittwnakataAan
Ta naekpikae npiniptei va eithoeauovta tto ektaeouveoq Taekpokyooc.
MetaTnEvETIOKEUnTTpayuatoTOIOInoteEeVyoAoPaeIacOUPUVA μEto VDE 0701 nKavovioouc tsouykepiEvns xpaas.
KINAYNOI Kivouoc nAekptpAnlqac Aoyu Oavato nAekctpAnlqia
ATUOUVOEETI GUCNEAE CTO TIV TTAPOHY NAEKTHIOK OELJUACOT OUAOXJOTOV 60 DEUTEPDAETTA TIPV EKVEIOCTE TIG IETHEOKEAE.
PPOOXH Axunopcakf!
Aigipnepiag
ΦopáTE TPOOATEUKÁ yáVTIA.
Pouot6e0n:
H oukeun eivai aotouuvdeepv anTnV npox npoobocia
H nóptα ενα ανοχή.
- ATTEAEUeepwote TO kALUmuA spot wTIOuOLED.

- TpaBnTe To kALuMa spot ownou LED npoc ta meo Kaia tautoxpova anpwei TPOs Ta eptpoc.

ETIOKEUN
3.AmaqaaiaTe moyoda spot qwniou LED.
- ATOOUVDEEOTN V NAEKPIKn OUVEDeON spot wTIOPOU LED.
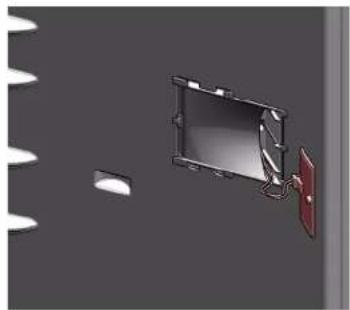
To spot ωτµσµ LED aepieeKc.
4.17.2 ToTOnTeTnON spot wTIOu LED
EykaataoTne e nny avriBtneipa.
Mun Torx TX20 6,3 mm (1/4") [00340865]
IIaekKaatogaiiAeTlida2,4mmx0.4mmx60mm
Otxeio eaxxwnptkotn200ml
Ioxueiia napaaayes ouakeuwyeKaepa oTo uyeyio (CIF).

Oi naektpovikke tsaketec mtopoov va tnekeuaotov mvo ato Tny eutinptenon nelaow n ao ecouoidotnevous texvikouc!

Kivvoc nAekptponanngia c Aoyw nAektpopopow eepov!
Kivvoc via n Tzwn atio nkekptionla oe tpiinwn akataaanang EITIOKEUc
Ta naekpikaepontpetieVAeIOKEUaovtaiTOEKTAIEEUEVOUC naekpokaoyoouc.
Meta tvn tniokneu TpayatatoiOnite EeXyo aopdaiae oupovva me To VDE 0701 n Kavoviaou ts Nsukpekiyncxwapac.

Kivouoc nAekptroAnlaic Aoyu nAekptopopov hepov! Ovatoac otn aNkotpania
AtouovdeTE TcOKEues ATIO IVIAPOX NAEKPIKOU PeuJATOUAXIOV 60 DEUTEPOLETTTIPV GekivnoTe Tc EITIOKEUES.

Tpaaiatoi oio kotti
Φaoge tropoataeutika yadvia.
PouToBεση:
H oukeun eivai aioouvdeepevn aTPO TAPoXn TpoPooiaac
H Tioa Taeup Taov oukeuwv elvai TpoaBaoiŋ.
∴ m = 3/11 ;

PERIGO
Risco deCHOque eltrico devidao a partes sob tensao!
Cap torx TX20 6.3 mm (1/4") [00340865]
Surubelinita platá Lamá de 10 mm x 1,6 mm x 200 mm
Cerintă:
Cap torx TX20 6.3 mm (1/4") [00340865]

AVERTISMENT
Aparate grele, masive!
Accidentarea spatelui si leziuni musculare
Cap torx TX20 6.3 mm (1/4") [00340865]

AVERTISMENT
Aparate grele, masive!
Accidentarea spatelui si leziuni musculare
Cap torx TX20 6.3 mm (1/4") [00340865]

AVERTISMENT
Aparate grele, masive!
Accidentarea spatelui si leziuni musculare
Cap torx TX20 6.3 mm (1/4") [00340865]

AVERTISMENT
Aparate grele, masive!
Accidentarea spatelui si leziuni musculare
Instrument special [00342180]

Aparatul dumneavoastré este echipat cu o lampa LED care nu necessita Intretinere.
Aceste lampi pot fi nlocuite numai de câtre département du service pentruclienti saudecalctehnicieni autorizatl!


PERICOL
- Tryck in hela packningen i sparet bit for bit.

Torbits TX20 6.3 mm (1/4") [00340865]
Forutsattning:
Apparaten ar bortkopplad fran stromforsorjning.
Tillbehör inuti apparaten har tagits bort.
- Lossa LED-spotlightens elanslutning.
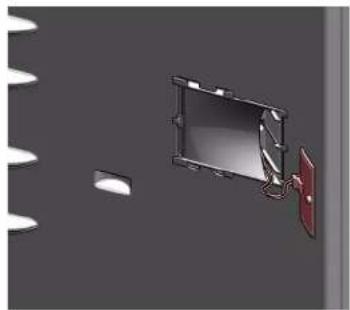
LED-spotlighten har tagits bort.
4.17.2 Montera LED-spotlight
Special tool [00342180]

- OTHOCHO TO3N DOKYMEHT
- 1.1 BAXHA NHΦOPMAΖΗ
- 1.1.1 UEN
- 1.2 06ACHEHNE HA CHMBOJINTE
- 1.2.1 HNBA HA ONACHOCT
- 1.2.2 CNMBON3A ONACHOCT
- 1.2.3 CTPYKTPA HA NPÉDYNPEXKDEHNRA
- ONACHOCT
- 1.2.4 06UCNMBOJI
- PEMOH
- 4.3 CMHA HA ROHATA NAHT HA BPATATA
- PENEUPPEXDEHNE
- 4.4 CMHA HA ROHATA NAHTA HA BPATATA (BPTA C DNCNNEI)
- PPEYPEXJEHNE
- 4.4.2 MOHTNPAHE HA ROPHATA NAHTA HA BPATATA
- 4.5.1 CBANYHE HA CPEHATA NAHTA HA BPTATATA
- 4.5.2 MOHTNPAHE HA CPEHNTA NHA HBPATA
- 4.6 CMHA HA DONHATA NAHTA HA BPATATA
- A PENEYUNPEXDEHNE
- 4.6.2 MOHTNPAHE HA DOJIHATA NAHTA HA BPATATA
- 4.7 CMHA HA PAPTA
- 4.7.1 N3BAXDANE HA PAΦTA
- 4.7.2 MOTHUPAHE HA PAΦTA
- 4.8 CMHA HA TA6NKATA 3A 6YTNIKN
- 4.8.1 CBAHE HA TA6NUKATA 3A 6YTNKN
- 4.8.2 MOTHIPAHE HA TA6JNUKATA 3A 6YTNIKN
- 4.9 CMRAHA HA CTEJAXA HA BPATATA
- 4.9.1 N3BAXDAHE HA CTENAXA HA BPATATA
- 4.9.2 MONTUPAHE HA CTEJAXA HA BPATATA
- 4.10 CMHA HA PERYNPEMYNNA CTEJAX HA BPATATA
- 4.10.1 CBAHE HA PERYNPYEMN CTEAX HA BPATAT
- 4.10.2 MOHTNPAHE HA PERYNPYEMN CTEJAX HA BPATA
- 4.11 CMHA HA KOHTEHEPA 3A 3AMPA3EHN XPAHHTEHH NPODYKTN
- 4.11.1 3BAXDAHE HA KOHTEHEPA 3A 3AMPA3EHN XPAHHTEHN NPODYKTH
- 4.11.2 MOHTNPAHE HA KOHTEHEPA 3A 3AMPA3EHXPAHHTEHN NPODYKTN
- 4.14 CMHA HA LED CNOT JAMNATA
- BHIMATEENHO
- 4.14.1 CBĀNHA HE LED CNOT JAMNATA
- 4.14.2 MOHTNPAHE HA LED CNOT LAMNATA
- 4.15 CMRAHA HA LED OCBETNEHNETO OTROPE
- BHIMATEJIHO
- 4.15.1 CBAJNHE HA LED OCBTJEHNETO
- 4.16 CMNHA HA LED CBETNNHATA HA CTPAHNHATA JEHTA
- 4.16.1 CBAHA HE LED CBTNHA H A CTPAHNHATA JEHTA
- 4.16.2 MOHTNPAHC HA LED CBETNHATA HA CTPAHNHATA IEHTA
- 4.17.1 CBĀNHA HE LED CNOT JAMNATA
- 4.18 CMHA HA LED MOYLA HA 3AXPAHBHETO
- BHMMATEJIHO
- 4.18.1 OTETPAHBAHE HA LED MOYLA HA 3AXPAHBAHETO
- BHIMAHVIE
- 4.18.2 MOHTNPAHC HA LED MOUJA HA 3AXPAHAHETO
- PAS PAI
- BEM/ERK
- FARE
- BEMERKI
- PREINDSTILLING
- 4.14 UDSKIFTING AT LED-SPOTLAMPE
- 4.17 UDSKIFTING AT LED-SPOTLAMPE
- REPAIR HINTS - FRIDGE-FREEZER
- CONCERNING THIS DOCUMENT
- 1.1 IMPORTANT INFORMATION
- 1.1.1 PURPOSE
- 1.2 EXPLANATION OF SYMBOLS
- 1.2.1 DANGER LEVELS
- 1.2.2 HAZARD SYMBOLS
- 1.2.3 STRUCTURE OF THE WARNINGS
- DANGER
- 1.2.4 GENERAL SYMBOLS
- SAFETY
- 2.1 GENERAL SAFETY INSTRUCTIONS
- 2.1.1 ALL DOMESTIC APPLIANCES
- TOOLS AND AIDS
- REPAIR
- 4.2.1 REMOVING DOOR HANDLE
- 4.4 REPLACING DOOR UPPER HINGE (DOOR WITH DISPLAY)
- 4.5 REPLACING DOOR MIDDLE HINGE
- 4.5.1 REMOVING DOOR MIDDLE HINGE
- 4.5.2 INSTALLING DOOR MIDDLE HINGE
- 4.6 REPLACING DOOR LOWER HINGE
- 4.6.1 REMOVING DOOR LOWER HINGE
- 4.7 REPLACING SHELF
- 4.7.1 REMOVING SHELF
- 4.7.2 INSTALLING SHELF
- 4.8 REPLACING BOTTLE TRAY
- 4.8.1 REMOVING BOTTLE TRAY
- 4.8.2 INSTALLING BOTTLE TRAY
- 4.9 REPLACING DOOR RACK
- 4.10 REPLACING ADJUSTABLE DOOR RACK
- 4.10.1 REMOVING ADJUSTABLE DOOR RACK
- 4.10.2 INSTALLING ADJUSTABLE DOOR RACK
- 4.11 REPLACING FROZEN FOOD CONTAINER
- 4.11.1 REMOVING FROZEN FOOD CONTAINER
- 4.11.2 INSTALLING FROZEN FOOD CONTAINER
- 4.12 REPLACING CONTAINER
- 4.12.1 REMOVING CONTAINER
- 4.12.2 INSTALLING CONTAINER
- 4.13 REPLACING EXTENDABLE CONTAINER
- 4.13.1 REMOVING EXTENDABLE CONTAINER
- 4.13.2 INSTALLING EXTENDABLE CONTAINER
- 4.14 REPLACING LED SPOT LIGHT
- 4.14.1 REMOVING LED SPOT LIGHT
- 4.14.2 INSTALLING LED SPOT LIGHT
- 4.15 REPLACING LED TOP LIGHT
- CAUTION
- 4.15.1 REMOVING LED LIGHT
- 4.15.2 INSTALLING TOP LED LIGHT
- 4.16 REPLACING LED SIDE BAR LIGHT
- 4.16.1 REMOVING LED SIDE BAR LIGHT
- 4.16.2 INSTALLING LED SIDE BAR LIGHT
- 4.17 REPLACING LED SPOT LIGHT
- A CAUTION
- 4.17.1 REMOVING LED SPOT LIGHT
- 4.18 REPLACING LED POWER SUPPLY MODULE
- 4.18.1 REMOVING LED POWER SUPPLY MODULE
- NOTICE
- 4.18.2 INSTALLING LED POWER SUPPLY MODULE
- REMONDITEAVE - KOMBIKÜLMIK
- 1.2.2 OHUSUMBOLID
- ∴ M = 3/11
- 4.2.1 AQAIPEOAN ABNNS TROPRAS
- 4.2.2 TOTOBETNNON Λ ABNS TROPAS
- EMIOKEUN
- 4.3 AVIKATAOAN EAVW MEVEOTTOPTAS
- A IPOEIAOIOIH
- A IPOESOXH
- PPOEIAOIOIHSH
- PPOZOXHI
- 4.3.1 AQAIPEON ETRAWU MEVTEE TOPTAS
- KINAYNOI KIYUYOC NAEKPOANJIC AOVU
- KINAYNOI KIVOUOC NAEKPTPANLQAC AOYU OAVATO NAEKCTPANLQIA
- PPOOXH AXUNOPCAKF
- ETIOKEUN
- AVERTISMENT
- PERICOL
Brand : Profilo
Model : BD3056WFVN
Category : Refrigerator