USER MANUAL BCMW3336 BLACK & DECKER
BCMW3318
BCMW3336




Intended use
Your BLACK+DECKER BCMW3318, BCMW3336 lawn mowers have been designed for mowing grass. These appliances are intended for consumer use only.
Safety instructions
Warning! When using cordless appliances, basic safety precautions, including the following, should always be followed to reduce the risk of fire, electric shock, personal injury and material damage.
Warning! When using the machine the safety rules must be followed.
For your own safety and bystanders please read these instructions before operating the machine. Please keep the instructions safe for later use.
- Read all of this manual carefully before operating the appliance.
- The intended use is described in this manual. The use of any accessory or attachment or the performance of any operation with this appliance other than those recommended in this instruction manual may present a risk of personal injury.
natural_image
Technical line drawing of a mechanical clamp or vise assembly (no text or symbols)
- Retain this manual for future reference.
Using your appliance
Always take care when using the appli-
ance.
- This appliance is not intended for use by young or infirm persons without supervision.
- The appliance is not to be used as a toy.
- Do not allow children or animals to come near the work area or touch the appliance or power supply cord.
- Close supervision is necessary when the appliance is used near children.
- Use in a dry location only. Do not allow the appliance to become wet. Do not immerse the appliance in water.
- Do not open body casing. There are no user serviceable parts inside.
-
Do not operate the appliance in explosive atmospheres, such as in the presence of flammable liquids, gases or dust.
-
To reduce the risk of damage to plugs and cords never pull the cable to remove the plug from a socket.
- Before using, always visually inspect to see that the blades, blade bolts and cutter assembly are not worn or damaged.
Replace worn or damaged blades and bolts in sets to preserve balance.
- In order to avoid a hazard due to inadvertent resetting of the thermal cut-out, this appliance must not be supplied through an external switching device, such as a timer, or connected to a circuit that is regularly switched on and off by the utility.
- Never operate the machine while people, especially children, or pets are nearby.
- Keep in mind that the operator or user is responsible for accidents or hazards occurring to other people or their property.
Before use
- While operating the machine always wear substantial footwear and long trousers. Do not operate the machine when barefoot or wearing open sandals. Avoid wearing clothing that is loose fitting or that has hanging cords or ties.
- Thoroughly inspect the area where the machine is to be used and remove all objects which can be thrown by the machine.
- Before using, always visually inspect to see that the blade, blade bolt and the blade assembly are not worn or damaged. Replace worn or damaged components in sets to preserve balance. Replace damaged or unreadable labels.
After use
- When not in use, the appliance should be stored in a dry, well ventilated place out of the reach of children.
- Children should not have access to stored appliances.
- When the appliance is stored or transported in a vehicle it should be placed in the boot or restrained to prevent movement following sudden changes in speed or direction.
Inspection and repairs
- Before use, check the appliance for damaged or defective parts. Check for breakage of parts, damage to switches and any other conditions that may affect its operation.
- Do not use the appliance if any part is damaged or defective.
- Have any damaged or defective parts repaired or replaced by an authorised repair agent.
- Never attempt to remove or replace any parts other than those specified in this manual.
- Be careful during adjustment of the mower to prevent entrapment of the fingers between moving blades/parts and fixed parts of the machine.
- When servicing the blades be aware that, even though the power source is switched off, the blades can still be moved.
Additional safety instructions for lawn mowers
- Do not transport the machine while the power source is running
- Firmly grip handle with both hands when operating the lawn mower.
- If at any time it is felt necessary to tilt the lawn mower, make sure that both hands remain in the operating position while the lawn mower is tilted. Keep both hands in the operating position until the lawn mower is returned to rest correctly on the ground.
- Never wear radio or music headphones while operating the lawn mower.
- Never attempt to make a wheel height adjustment while the motor is running or while the safety key is in the switch housing.
- If the lawn mower stalls, release bail bar to turn mower off, wait for blade to stop, before attempting to unclog the chute or remove anything from under the deck.
- Keep hands and feet away from cutting area.
- Keep blades sharp. Always use protective gloves when handling the lawn mower blade.
- If you are using the grass collector, check it frequently for wear and deterioration.
If excessively worn, replace with a new grass collector for your safety.
- Use extreme caution when reversing or pulling the lawn mower towards you.
- Do not put hands or feet near or under the lawn mower.
Keep clear of the discharger opening at all times.
- Clear the area where the lawn mower is to be used of objects such as rocks, sticks, wire, toys, bones etc., which could be thrown by the blade.
Objects struck by the blade can cause severe injury to persons. Stay behind the handle when the motor is running.
- Do not operate the lawn mower barefooted or while wearing sandals. Always wear substantial footwear.
- Do not pull lawn mower backward unless absolutely necessary. Always look down and behind before and while moving backward.
- Never direct discharged material toward anyone. Avoid discharging material against a wall or obstruction. Material may ricochet back toward the operator. Release the bail bar to turn the lawn mower off and stop the blade when crossing gravel surfaces.
- Do not operate the lawn mower without the entire grass collector, discharge guard, rear guard, or other safety protective devices in place and working. Periodically check all guards and safety protective devices to ensure they are in good working order and will operate properly and perform their intended function.
Replace a damaged guard or other safety device before further use.
- Never leave a running lawn mower unattended.
- Always release the bail bar to stop the motor and wait until the blade comes to a complete stop before cleaning the lawn mower, removing the grass bag, unclogging the discharge guard, when leaving the lawn mower, or before making any adjustments, repairs or inspections.
- Operate lawn mower only in daylight or good artificial light when objects in the path of the blade are clearly visible from the operating area of the lawn mower.
- Do not operate the lawn mower while under the influence of alcohol or drugs, or when your are tired or ill. Always stay alert, watch what you are doing, and use common sense.
- Avoid dangerous environments. Never operate the lawn mower in damp or wet grass, never use lawn mower in the rain. Always be sure of your footing, walk, never run.
- If the lawn mower should start to vibrate abnormally, release the bail bar, wait for the blade to stop and then check for the cause immediately. Vibration is generally a warning of trouble, see the troubleshooting guide for advise in the case of abnormal vibration.
- Always wear proper eye and respiratory protection when operating the lawn mower.
- The use of any accessory or attachment not recommended for use with this lawn mower could be hazardous. Only use accessories approved by BLACK+DECKER.
- Never overreach while operating the lawn mower. Always be sure to keep proper footing and balance at all times while operating the lawn mower.
- Mow across the face of slopes, never up and down. Exercise extreme caution when changing direction on slopes.
- Watch for holes, ruts, bumps, rocks or other hidden objects. Uneven terrain could cause a slip and fall accident. Tall grass can hide obstacles.
- Do not mow on wet grass or excessively steep slopes. Poor footing could cause a slip and fall accident.
- Do not mow near drop-offs, ditches, or embankments.
You could lose your footing or balance
- Always allow the mower to cool down before storing.
Pull the plug from the socket and pull the battery pack from the machine. Make sure that all moving parts have come to a complete stop:
- Whenever you leave the machine;
- Before clearing a blockage;
- Before checking, cleaning or working on the appliance.
Safety of others
- This appliance is not intended for use by persons (including children) with reduced physical, sensory or mental capabilities, or lack of experience and knowledge, unless they have been given supervision or instruction concerning use of the appliance by a person responsible for their safety.
- Children must be supervised to ensure that they do not play with the appliance.
- After striking a foreign object. Inspect the appliance for damage and make repairs as necessary;
Residual risks.
Additional residual risks may arise when using the tool which may not be included in the enclosed safety warnings. These risks can arise from misuse, prolonged use etc.
Even with the application of the relevant safety regulations and the implementation of safety devices, certain residual risks can not be avoided. These include:
Warning symbols
The following warning symbols are found on the appliance along with the date code:

Warning! Read the manual prior to operation.

Do not expose the appliance to rain or high humidity.

Beware of sharp blades.
Blades continue to rotate after the motor is switched off – Remove disabling device before maintenance or if cord is damaged.

Beware of flying objects. Keep bystanders away from the cutting area.

Wear eye protection

The blades will continue to rotate after the machine is switched off.

Directive 2000/14/EC guaranteed sound power.
Additional safety instructions for batteries and chargers
Batteries
- Never attempt to open for any reason.
- Do not expose the battery to water.
- Do not expose the battery to heat.
- Do not store in locations where the temperature may exceed 40 °C.
- Charge only at ambient temperatures between 10 °C and 40 °C.
- Charge only using the charger provided with the appliance/tool. Using the wrong charger could result in an electric shock or overheating of the battery.
- When disposing of batteries, follow the instructions given in the section "Protecting the environment".
- Do not damage/deform the battery pack either by puncture or impact, as this may create a risk of injury and fire.
- Do not charge damaged batteries.
- Under extreme conditions, battery leakage may occur. When you notice liquid on the batteries carefully wipe the liquid off using a cloth. Avoid skin contact.
- In case of skin or eye contact, follow the instructions below.
Warning! The battery fluid may cause personal injury or damage to property. In case of skin contact, immediately rinse with water.
If redness, pain or irritation occurs seek medical attention. In case of eye contact, rinse immediately with clean water and seek medical attention.

Do not attempt to charge damaged batteries
Charger
Your charger has been designed for a specific voltage.
Always check that the mains voltage corresponds to the voltage on the rating plate.
Warning! Never attempt to replace the charger unit with a regular mains plug.
- Use your Black & Decker charger only to charge the battery in the appliance/tool with which it was supplied. Other batteries could burst, causing personal injury and damage.
- Never attempt to charge non-rechargeable batteries.
- If the supply cord is damaged, it must be replaced by the manufacturer or an authorised Black & Decker Service Centre in order to avoid a hazard.
- Do not expose the charger to water.
- Do not open the charger.
- Do not probe the charger.
- The appliance/tool/battery must be placed in a well ventilated area when charging.

The charger is intended for indoor use only.

Read the instruction manual before use.
Electrical safety

Your charger is double insulated; erefore no earth wire is
required.
Always check that the mains voltage corresponds to the voltage on the rating plate. Never attempt to replace the charger
unit with a regular mains plug.
- If the supply cord is damaged, it must be replaced by the manufacturer or an authorised Black & Decker Service Centre in order to avoid a hazard.
Features
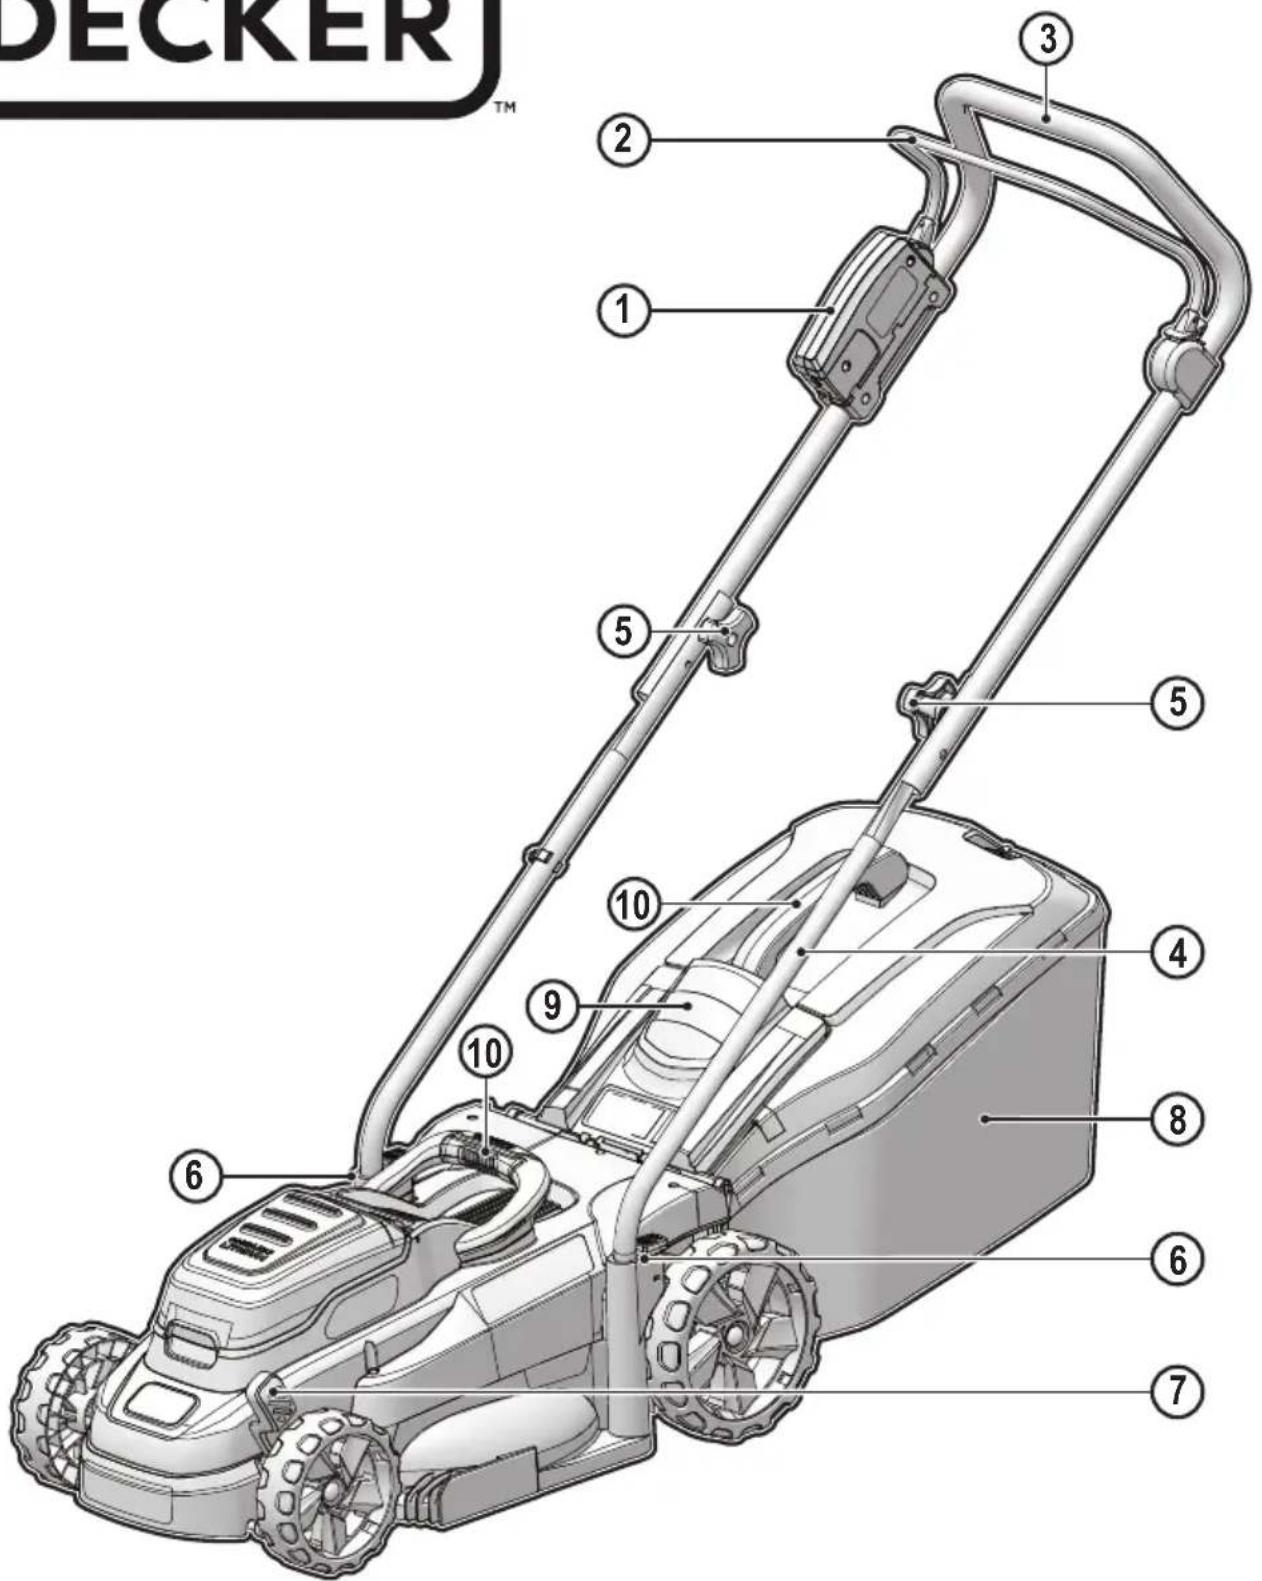
This appliance includes some or all of the following features.
- Switch box
- Bail handle
- Upper-handle
- Lower-handle
- Upper-handle attachment knobs (2)
- Lower-handle attachment port (2)
- Cut height adjust lever
- Grass collection bag
- Rear door cover
- Carrying handles
Charging procedure
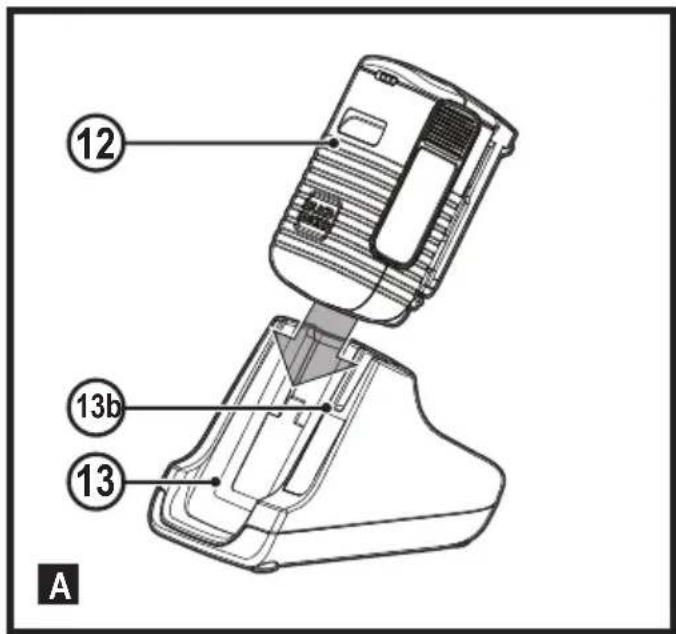
BLACK+DECKER chargers are designed to charge BLACK+DECKER battery packs.
◆ Plug the charger into an appropriate outlet before inserting the battery pack.
◆ Insert the battery pack into the charger.

The green LED will flash indicating that the battery is being charged
The completion of charge is indicated by the green LED remaining on continuously. The pack is fully charged and may be used at this time or left on the charger
Warning! Recharge discharged batteries as soon as possible after use or battery life may be greatly diminished.
Charger diagnostics
This charger is designed to detect certain problems that can arise with the battery packs or the power source. Problems are indicated by one LED flashing in different patterns.
Bad battery

arger can detect a weak or damaged battery.
The red LED flashes in the pattern indicated on the label. If you see this bad battery blink pattern, do not continue to charge the battery.
Return it to a service center or a collection site for recycling
Hot/cold pack delay

the charger detects a battery that is excessively hot or excessively cold, it automatically starts a Hot/Cold Pack Delay, suspending charging until the battery has normalized.
After this happens, the charger automatically switches to the Pack Charging mode. This feature ensures maximum battery life. The red LED flashes in the pattern indicated on the label when the hot / cold pack delay is detected
Important charging notes
◆ Longest life and best performance can be obtained if the battery pack is charged when the air temperature is between 60^ F and 80^ F ( 16^-27^ C).
DO NOT charge the battery pack in an air temperature below +40°F (+4.5°C), or above +105°F (+40.5°C). This is important and will prevent serious damage to the battery pack.
- The charger and battery pack may become warm to touch while charging. This is a normal condition, and does not indicate a problem. To facilitate the cooling of the battery pack after use, avoid placing the charger or battery pack in a warm environment such as in a metal shed, or an uninsulated trailer.
◆ If the battery pack does not charge properly:
◆ Check current at receptacle by plugging in a lamp or other appliance
◆ Check to see if receptacle is connected to a light switch which turns power off when you turn out the lights.
- Move charger and battery pack to a location where the surrounding air temperature is approximately 60°F - 80°F (16° - 27°C).
- If charging problems persist, take the tool, battery pack and charger to your local service center.
- The battery pack should be recharged when it fails to produce sufficient power on jobs which were easily done previously. DO NOT CONTINUE to use under these conditions. Follow the charging procedure. You may also charge a partially used pack whenever you desire with no adverse effect on the battery pack.
◆ Foreign materials of a conductive nature such as, but not limited to, steel wool, aluminium foil, or any buildup of metallic particles should be kept away from charger cavities.
Always unplug the charger from the power supply when there is no battery pack in the cavity. Unplug charger before attempting to clean.
- Do not freeze or immerse charger in water or any other liquid.
Warning! Do not allow any liquid to get inside charger. NEVER ATTEMPT TO OPEN THE BATTERY PACK FOR ANY REASON. IF THE PLASTIC HOUSING OF THE BATTERY PACK BREAKS OR CRACKS, RETURN TO A SERVICE CENTER FOR RECYCLING.
Battery state of charge indicator
The battery is equipped with a state of charge indicator. This can be used to display the current level of charge in the battery while in the mower and during charging. It does not indicate tool functionality and is subject to variation based on product components, temperature and end-user application.
Checking state of charge:
◆ Press the state of charge indicator button (12a).
- The three LEDs (12b) will illuminate indicating the percent of charge in the battery. See chart in figure B.
◆ If LED light does not illuminate, charge battery.
To install battery packs (fig. C, C1)
◆ Lift the battery port cover (14) up to expose the battery port.
◆ Slide the battery (12) into the battery port until it is fully seated and an audible click is heard (figure C).
Make sure battery pack is fully seated and fully latched into position. The BCMW3318 unit has two battery ports as shown in Figure C1.
◆ Close the battery port cover. Ensure the cover is fully latched before starting mower.
To remove battery packs:
◆ Open the battery port cover (14) as described above.
◆ Depress the battery release button on the battery pack and pull battery pack out of tool.
Assembly
Warning! Before assembly, make sure the bail handle is released.
Attaching lower handle
◆ Push the button (4a) on the lower handle attachment port (6) and insert the lower handle (4). Adjust the height to your requirement.
Note! Ensure each side of the lower handle is set at the same Height.
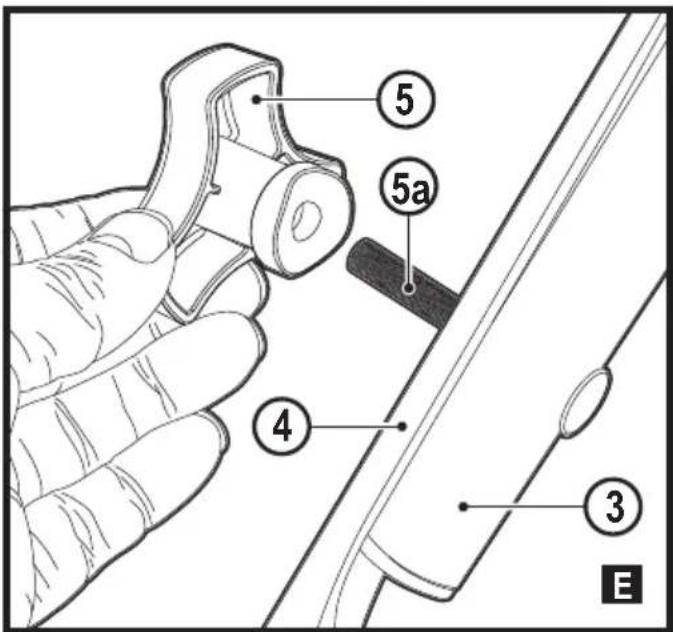
Attaching upper handle (fig. H)
The upper handle has two different mounting position holes to adjust length of the handle from deck. The first set of holes near the bottom of the upper handle tube allows for maximum handle length. Using the top mounting position will shorten handle length
◆ Remove the upper-handle attachment knobs (5) and bolt (5a) from the upper handle.
◆ Line up the holes on the bottom of the upper handle (3) with the holes on the top of the lower handle (4).
◆ From the outside of the upper handle (3), slide the bolt through the holes.
◆ Rotate the upper handle into its operating position.
◆ Tighten the upper handle attachment knobs (5).
Securing the motor cable (fig. I)
Warning: Attach cable so that it does not become stretched or pinched in the joints of the handles during use or folding. This can cause damage to the cord.
The motor cable has to be fixed to the handles using the cable restraints that are already attached to the handle.
To clip the cable to the handle:
◆ Place the handles in operating position, see “Attaching lower handle” section.
◆ Run the cable up the front of the lower and upper handles.
◆ Pull back the cable restraint.
◆ Slide the motor cable under the clip and ensure it is fully held in place by the restraint.
Mulching
Warning! Remove key and Battery packs before removing Side discharge attachment and Collection bag, and when Installing mulching insert.
- Ensure the side discharge attachment and the collection bag are not attached.
- Lift the rear door cover (9) and slide the mulching insert fully into the mower
- Ensure the rear door cover fully closes before turning mower on.
Operation
Read this instruction manual before operating your mower. See "Features" to familiarize yourself with the location of various controls and adjustments. Save this manual for future reference.
Warning! Let the mower work at its own pace. Do not overload.
Warning! Sharp moving blade. Do not operate the mower in side discharge or mulching mode if the rear door is not closed under spring tension as serious injury could result. Take your mower to the nearest service center for repair.
Adjusting mower height
The height of cut is adjusted by the cut height adjust lever.
Note: If you are not sure which height to cut, begin mowing with the height adjustment lever (7) in the right position.
Adjust the height down as needed.
Fitting the grass collection bag (fig. F, G)
◆ Lift the rear door cover (9) as shown in figure (F).
- Place the grass collection bag (8) onto the mower so the bag hooks (8a) rest on the lugs (8b) as shown in figure (G). Then lower the rear door.
Starting mower (fig. H)
Warning! Sharp moving blade. Never attempt to override the operation of this switch box as serious injury could result.
Note: Mower is operational when battery or batteries are installed.
- Your mower is equipped with a special on-off switch box. To operate the mower, push the button (1a) on the switch box (1), then pull the bail handle (2) to the handlebar as shown in figure H. Once the mower starts you can release the button.
◆ To turn the mower off, just release the bail handle.
Warning! Never attempt to lock a switch or bail handle (2) in the on position.
Note: Once the bail handle has returned to the original position it will activate the "Automatic Braking Mechanism". The motor is electrically braked and the mower blade will stop rotating in 3 seconds or less.
Mower overload
To prevent damage due to overload conditions, do not try to remove too much grass at one time. Slow down your cutting pace, or raise the cut height.
Storage
Warning! Rotating blade can cause serious injury.
Release bail handle (2) to turn mower off, remove battery before lifting, transporting, or storing the mower. Store in a dry place.
Warning! To avoid being pinched, keep fingers away from area between handles when folding down handles.
Warning! Make sure cord does not become stretched or pinched in the joints of the handles during folding. This can cause damage to the cord.
The handle of the mower can be easily folded down for quick and convenient storage.
Carrying the mower
- The mower can be carried using the convenient carry handles (10). DO NOT attempt to lift the mower by grasping the upper handle (3) or lower handle (4).
Mowing tips
Warning! Always inspect area where mower is to be used and remove all stones, sticks, wire, bones, and other debris which might be thrown by the rotating blade.
Warning! Mow across the face of slopes, never up-and-down. Exercise extreme caution when changing direction on slopes. Do not mow excessively steep slopes. Always maintain good footing.
◆ Release bail handle to turn mower "Off" when crossing any gravel area (stones can be thrown by the blade).
- Set mower at highest cutting height when mowing in rough ground or in tall weeds. Removing too much grass at one time can cause the motor to be overloaded and to stop. Refer to troubleshooting guide.
If a grass collection bag (8) is used during the fast growing season, the grass may tend to clog up at the discharge opening. Release bail handle to turn mower off and remove the safety key. Remove the catcher and shake the grass down to the back end of the bag. Also clean out any grass or debris which may be packed around the discharge opening. Replace the grass catcher.
If mower should start to vibrate abnormally, release bail handle to turn mower off and remove safety key. Check immediately for cause. Vibration is a warning of trouble. Do not operate mower until a service check has been made.
Refer to troubleshooting guide in manual.
◆ Always release bail handle to turn mower off when leaving it unattended even for a short period of time.
- Slow down in areas where the grass is especially long or thick.
- Avoid mowing when the grass is wet from rain or dew-soaked.
◆ Cut your lawn frequently, especially during high growth periods.
Note: It is recommended that your mower be recharged after use to prolong the battery life.
Frequent charging will not harm your battery, and will ensure that the battery is fully charged and ready for its next use.
Storing battery not fully charged will shorten battery life.
Removing and installing blade
Warning! When reassembling the blade system, ensure each part is reinstalled correctly, as described below.
Improper assembly of the blade or other parts of the blade system may cause serious injury.
Warning! Release bail handle to turn mower off, wait for the blade to stop, and unplug mower.
◆ Cut a piece of 2x4 wood (14) (about 610 mm) to keep blade from turning while removing bolt (13).
◆ Wear gloves and proper eye protection.
- Turn the mower on its side. Be careful of sharp edges of blade. Position wood and unscrew bolt with 13mm wrench
(36) as shown in figure I.
Note the orientation of each part as you remove it. Remove bolt (15) and washer (16). Pull off blade (17) as shown in Figure J. Examine all pieces for damage and replace if necessary.
- The blade can only be attached to the fan (20) in one direction. To reassemble, line up the D-shaped hole of the blade with the D-shaped post of the fan, ensuring the writing on the blade faces out away from the mower.
- To tighten, position the piece of wood as shown in Figure K to keep the blade from turning. Slide the bolt through the washer and tighten the bolt clockwise into place with a 13mm wrench (13) as shown in Figure K.
Blade sharpening
Keep blade sharp for best mower performance. A dull blade does not cut grass cleanly. Use proper eye protection while removing, sharpening, and installing blade. Ensure that safety key and battery pack is removed.
Sharpening the blade twice during a mowing season is usually sufficient under normal circumstances.
Sand causes the blade to dull quickly. If your lawn has sandy soil, more frequent sharpening may be required.
Note: Replace bent or damaged blade immediately.
When sharpening the blade:
◆ Make sure blade remains balanced.
◆ Sharpen blade at the original cutting angle.
◆ Sharpen cutting edges on both ends of blade, removing equal amounts of material from both ends.
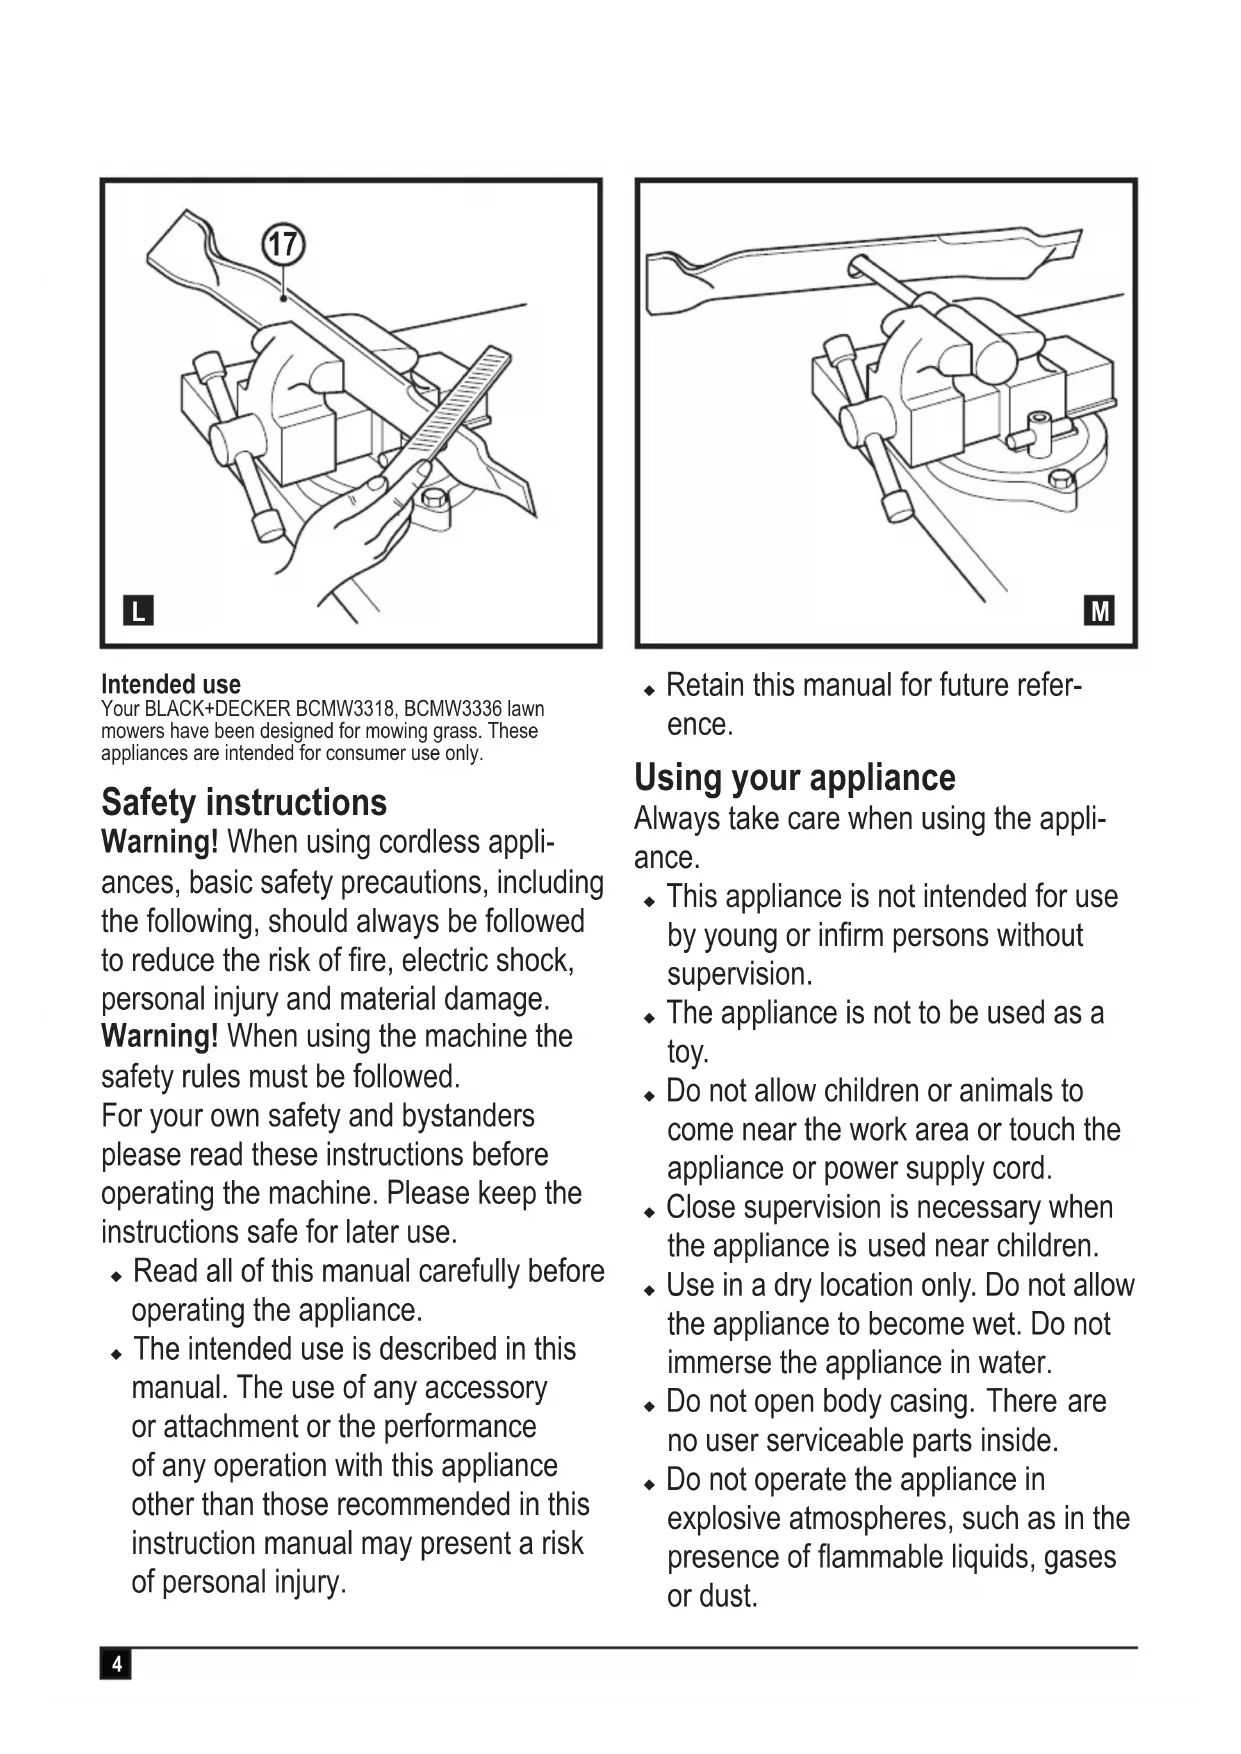
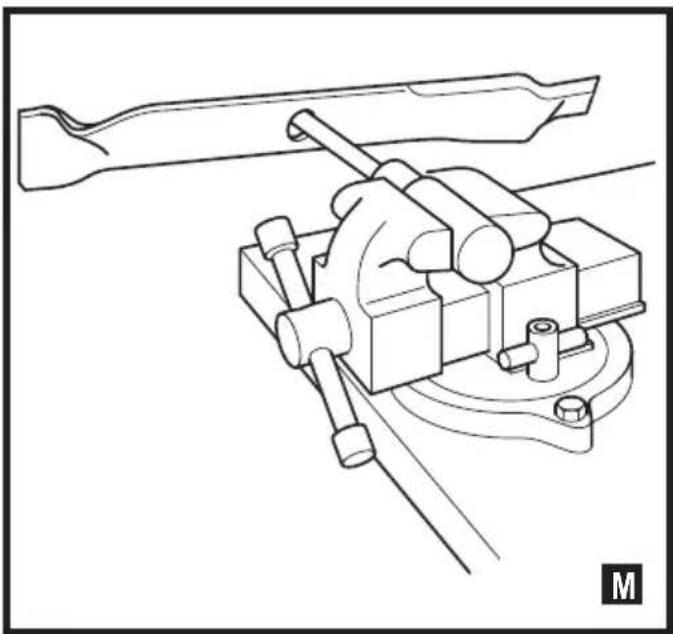
To sharpen blade in a vice (fig. L)
- Be sure the bail handle is released, the blade has stopped and the mower is unplugged before removing the blade.
- Remove blade from mower. See instructions for removing and installing blade.
◆ Secure blade (17) in a vice.
- Wear proper eye protection and gloves and be careful not to cut yourself.
Carefully file the cutting edges of the blade with a fine tooth file or sharpening stone, maintaining the angle of the original cutting edge.
Check balance of blade. See instructions for blade balancing.
◆ Replace blade on mower and tighten securely.
Blade balancing
Check balance of the blade (17) by placing centre hole in the blade over a nail or round shank screwdriver, clamped horizontally in a vice. If either end of the blade rotates downward, file along the sharp edge of that dropping end. Blade is properly balanced when neither end drops.
Lubrication
No lubrication is necessary. Do not oil the wheels. They have plastic bearing surfaces which require no lubrication.
Cleaning
Release bail handle (2) to turn mower off, let the blade come to a stop. Use only mild soap and a damp cloth to clean the mower. Clean out any clippings which may have accumulated on the underside of the deck. After several uses, check all exposed fasteners for tightness.
Preventing corrosion
Fertilizers and other garden chemicals contain agents which greatly accelerate the corrosion of metals. If you mow in areas where fertilizers or chemicals have been used, the mower should be cleaned immediately afterward as follows: Release bail handle (2) to turn mower off and unplug mower. Wipe all exposed parts with a damp cloth.
Maintenance
Your BLACK+DECKER corded/cordless appliance/tool has been designed to operate over a long period of time with a minimum of maintenance. Continuous satisfactory operation depends upon proper tool/appliance care and regular cleaning.
Warning! Before performing any maintenance on corded/cordless power tools:
◆ Switch off and unplug the appliance/tool.
- Or run the battery down completely if it is integral and then switch off.
◆ Unplug the charger before cleaning it. Your charger does not require any maintenance apart from regular cleaning.
◆ Regularly clean the ventilation slots in your tool/appliance and charger using a soft brush or dry cloth.
◆ Regularly clean the motor housing using a damp cloth. Do not use any abrasive or solvent-based cleaner.
◆ Regularly use a blunt scraper to remove grass and dirt from the underneath of the guard.
Troubleshooting
If your appliance seems not to operate properly, follow the instructions below.
If this does not solve the problem, please contact your local BLACK+DECKER repair agent.
Warning! Before proceeding, release the bail bar to turn mower off and wait for the blade to stop.
| Problem Possible solution |
| Mower doesn't run when bail handle is activated. | Check to make sure mower is properly plugged in and that the button on switch box is being completely depressed before pulling the bail handle. |
| Release bail handle to turn mower off. Remove battery pack, turn mower over and check that blade is free to turn. |
| Check that the battery cavity is free of debris and is connected properly. |
| Has battery been fully charged? Press state of charge button. |
| Motor stops while mowing. | Release bail handle to turn mower off. Remove battery pack Turn mower over and check that blade is free to turn. |
| Raise cutting height of wheels to highest position and start mower. |
| Check that the battery cavity is free of debris and is connected properly |
| Has battery been fully charged? Press state of charge button |
| Avoid overloading the mower. Slow down the cutting pace, or raise the cut height. |
| Mower runs but cutting performance is unsatisfactory, | Release bail handle to turn mower off. Unplug mower. Turn mower over and check:◆ Blade for sharpness - Keep blade sharp.◆ Deck and discharge chute for clogging. |
| Wheel height adjustment may be set too low for grass condition. Raise cutting height. |
| Mower is too hard to push. | Release bail handle to turn mower off. Unplug mower. Raise cutting height to reduce deck drag on grass. Check each wheel for free rotation |
| Mower is abnormally noisy and vibrates. | Release bail handle to turn mower off. remove battery pack. Turn mower on side and check blade to ensure it has not been bent or damaged. If blade is damaged, replace with a BLACK+DECKER replacement blade. If the underside of the deck is damaged, return mower to a BLACK+DECKER Authorized service center. |
| If there is no visible damage to the blade and the mower still vibrates:◆ Release bail handle to turn mower off.◆ Remove battery pack.◆ Disassemble entire blade assembly as described in the “Removing and installing blade” section.◆ Remove any debris and clean each piece.◆ Replace each piece as described in the “Removing and installing blade” section. |
| If mower still vibrates, return the mower to an authorized BLACK+DECKER authorized service center. |
| Battery charger LEDs not on. | Check plug connection. |
| Replace charger. |
| Mower not picking up clippings with bag. | Chute clogged. Release bail handle to turn mower off. Remove battery pack. Clear chute of grass clippings. |
| Raise cutting height of wheels to shorten length of the cut. |
| Bag full. Empty bag more often. |
Protecting the environment

Separate collection. Products and batteries marked with this symbol must not be disposed of with normal household waste.
Products and batteries contain materials that can be recovered or recycled, reducing demand for raw materials. Please recycle electrical products and batteries according to local provisions. Further information is available at www.2helpU.com
Technical data
| | BCMW3318 BCMW3336 |
| Voltage | Vdc 18V | 36V | |
| No-Load Speed | min ^-1 | 3800RPM 3800RPM | |
| Weight | kg | 15 15 | |
| Blade length | cm 33 | 33 | |
| Batteries Chargers (minutes) |
| Cat# Vdc Ah | Weight Kg | | | Cat# | 90590287* | N517388* | BDC1A | BDC2A | BDC2A36 |
| Amps | 400mA | 1A | 1A | 2A | 1,35A |
| BL1518 | 18 | 1.5 | 0.38 | BL1518 | 225 | 90 | 90 | 45 | X |
| BL1518ST | 18 | 1.5 | 0.38 | BL1518ST | 225 | 90 | 90 | 45 | X |
| BL2018 | 18 | 2.0 | 0.39 | BL2018 | 300 | 120 | 120 | 60 | X |
| BL2018ST | 18 | 2.0 | 0.39 | BL2018ST | 300 | 120 | 120 | 60 | X |
| BL2518 | 18 | 2.5 | 0.43 | BL2518 | 380 | 150 | 150 | 75 | X |
| BL4018 | 18 | 4.0 | 0.54 | BL4018 | 500 | 240 | 240 | 120 | X |
| BL5018 | 18 | 5.0 | 0.7 | BL5018 | 750 | 300 | 300 | 135 | X |
| BL20362 | 36 | 2.0 | 0.64 | BL20362 | X | X | X | X | 90 |
| BL2536 | 36 | 2.5 | 0.98 | BL2536 | X | X | X | X | 110 |
| BL1554 | 18/54 | 1.5 | 1.08 | BL1554 | 225 | 90 | 90 | 45 | X |
| BL2554 | 18/54 | 2.5 | 1.2 | BL2554 | 380 | 150 | 150 | 75 | X |
Hand/arm weighted vibration value: = < 2.5m / s^2 , uncertainty (K) = 1.5m / s^2 .
L_w (sound pressure) 74.5 dB(A)
uncertainty (K) = 2.5 dB(A) L_WA (sound power) 86 dB(A)
uncertainty (K) = 1.5 dB(A)

BCMW3318, BCMW3336 lawn mower
Black & Decker declares that these products described under "technical data" are in compliance with: 2006/42/EC, EN 60335-1:2012 + A11:2014, EN 60335-2-77:2010
ENGLISH
(Original instructions)
2000/14/EC, Lawn Mower, L < 50cm, Annex VI, DEKRA Certification B.V. Meander 1051 / P.O. Box 5185 6825 MJ ARNHEM / 6802 ED ARNHEM, Netherlands Notified Body ID No.: 0344
Level of acoustic power according to 2000/14/EC (Article 12, Annex III, L<50cm):
L_ (measured sound power) 86 dB(A)
uncertainty (K) = 1.5 dB(A)
L_xx (guaranteed sound power) 96 dB(A)
These products also comply with directive 2014/30/EU, 2011/65/EU. For more information, please contact Black & Decker at the following address or refer to the back of the manual.
The undersigned is responsible for compilation of the technical file and makes this declaration on behalf of Black & Decker.
Becky Cotsworth
Director – Outdoor Products Group
Black & Decker Europe, 270 Bath Road, Slough,
Berkshire, SL1 4DX
United Kingdom
11/10/2019
Guarantee
Black & Decker is confident of the quality of its products and offers consumers a 24 month guarantee from the date of purchase. This guarantee75 is in addition to and in no way prejudices your statutory rights. The guarantee is valid within the territories of the Member States of the European Union and the European Free Trade Area.
To claim on the guarantee, the claim must be in accordance with Black&Decker Terms and Conditions and you will need to submit proof of purchase to the seller or an authorised repair agent. Terms and conditions of the Black&Decker 2 year guarantee and the location of your nearest authorised repair agent can be obtained on the Internet at www.2helpU.com, or by contacting your local Black & Decker office at the address indicated in this manual.
Please visit our website www.blackanddecker.co.uk to register your new Black & Decker product and receive updates on new products and special offers.
Director – Outdoor Products Group
Black & Decker Europe, 270 Bath Road, Slough,
Berkshire, SL1 4DX
Black & Decker Europe, 270 Bath Road, Slough,
Berkshire, SL1 4DX
Royaume-Uni
11/10/2019
Garantie
Rasaerba BCMW3318, BCMW3336
(Articolo 12, Allegato III, L ≤ 50cm):
L_ma (pressione sonora misurata) 86 dB(A)
Black & Decker Europe, 270 Bath Road, Slough,
Berkshire, SL1 4DX
Regno Unito
11/10/2019
Garanzia
Director – Outdoor Products Group
Black & Decker Europe, 270 Bath Road, Slough,
Berkshire, SL1 4DX
Verenigd Koninkrijk
11/10/2019
Garantie
Black & Decker Europa, 270 Bath Road, Slough,
Berkshire, SL1 4DX
Reino Unido
11/10/2019
Garantía
Retirar as baterias:
Black & Decker Europe, 270 Bath Road, Slough,
Berkshire, SL1 4DX
Reino Unido
11/10/2019
Garantia
Director – Outdoor Products Group
Black & Decker Europe, 270 Bath Road, Slough,
Berkshire, SL1 4DX
Storbritannien
11/10/2019
Garanti
Black & Decker Europe, 270 Bath Road, Slough,
Berkshire, SL1 4DX
Storbritannia
11/10/2019
Garanti
Black & Decker Europe, 270 Bath Road, Slough,
Berkshire, SL1 4DX
Storbritannien
11/10/2019
Garanti
Black & Decker Europe, 270 Bath Road, Slough,
Berkshire, SL1 4DX
Iso-Britannia
11/10/2019
Takuu
Black & Decker Europe, 270 Bath Road, Slough,
Berkshire, SL1 4DX