XSF527B - Speaker JVC - Free user manual and instructions
Find the device manual for free XSF527B JVC in PDF.
| Product Type | Portable Bluetooth speaker |
| Brand | JVC |
| Model | XS-F527B |
| Output Power | 30 W × 2 |
| Bluetooth Version | 2.1 + EDR |
| Bluetooth Range | 10 m (without obstacles) |
| FM Frequencies | 87.5 - 108 MHz |
| AUX Input | 3.5 mm |
| Microphone Jack | 6.3 mm |
| Battery Type | Rechargeable lead-acid built-in 4000 mAh / 12 V |
| Battery Life | Up to 7 hours |
| Charging Time | Approximately 7 hours |
| Supported USB Formats | MP3 (32 MB to 32 GB) |
| Display | LCD |
| LED Lighting | 5 disco LED modes, 3 decorative LED modes |
| Equalizer | Neutral, Classical, Rock, Pop, Jazz |
| Power Supply | 100-240 V ~ 50/60 Hz |
| Included Accessories | Manual, power cable, microphone |
| Repairability | Not user-repairable, consult a professional |
| Maintenance | Dry cloth only |
Frequently Asked Questions - XSF527B JVC
User questions about XSF527B JVC
0 question about this device. Answer the ones you know or ask your own.
Ask a new question about this device
Download the instructions for your Speaker in PDF format for free! Find your manual XSF527B - JVC and take your electronic device back in hand. On this page are published all the documents necessary for the use of your device. XSF527B by JVC.
USER MANUAL XSF527B JVC
Specifications techniques
GÉNÉRALES
Alimentation CA 100-240 V~60/50 Hz
Puisance absorbee 33 W
Hotline Darty France
VEILIGHEIDSINFORMATIE EN WAARSCHUWINGEN. 2
OVERZICHT VAN HET APPARAAT 7
AAN DE SLAG. 18
WERKING. 8
WERKING VAN RADIO 9
USB-WERKING 10
BLUETOOTH WERKING 11
AUX-IN WERKING. 11
WERKING VAN MICROFOONAANSLUITING. 11
FM frequenie FM 87,5-108 MHz
Darty Holdings SAS © 14 routed'Aulnay 93140 Bondy, France 23 / 05 / 2017
6. CONSIDERACOs RELATIVAs A ELIMINACAO
MEMORIZACAO MANUAL DA SINTONIZACAO
Read this booklet thoroughly before using and save it for future reference
Unit must be fully charged before use
WARNING 2
SAFETY INFORMATION AND WARNINGS 2
GUIDE TO THE APPLIANCE 7
LETTING STARTED 8
This apparatus is in conformance with the valid European directives and standards regarding electromagnetic compatibility and electrical safety.
European representative of the manufacturer is: Darty Holdings SAS © 14 route d'Aulnay 93140 Bondy, France
Warnings
This appliance is intended for domestic household use only and should not be used for any other purpose or in any other application, such as for non domestic use or in a commercial environment.
Ventilation
Allow at least a 10 cm gap all around the product.
The ventilation should not be impeded by covering the ventilation openings with items, such as newspapers, table-cloths, curtains, etc.
No naked flame sources, such as lighted candles, should be placed on the apparatus.
Attention should be drawn to the environmental aspects of battery disposal. Don't throw used batteries in dustbin. Please contact your retailer in order to protect the environment.
This apparatus is not suitable for use in a tropical climate.
The apparatus shall not be exposed to dripping or splashing and that no objects filled with liquids, such as vases, shall be placed on the apparatus.
To protect the environment, use local recycling facilities for battery disposal.
Batteries (battery pack or batteries installed) shall not be exposed to excessive heat such as sunshine, fire or the like.
Safety information andWarnings
CAUTION
Symbol Definitions
DANGER- Indicates an imminently hazardous situation, which, if not avoided, will result in death or serious injury. This symbol appears only in the most extreme situations.
WARNING - Indicates a potentially hazardous situation which could result in death or serious injury.
CAUTION- indicates a potentially hazardous situation, which, if not avoided, may result in minor/moderate injury or product/property/damage. It also warns against unsafe practices
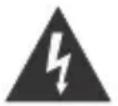
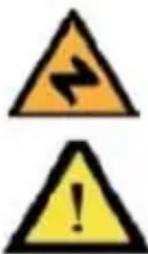
The lightning flash with arrowhead symbol, within an equilateral triangle is intended to alert the user to the presence of insulated 'dangerous voltage' within the product's enclosure that may be of sufficient magnitude to constitute a risk of electric shock to
persons.
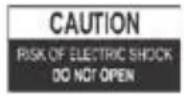
WARNING: TO REDUCE THE RISK OF ELECTRIC SHOCK DO NOT REMOVE COVER (OR BACK), NO USER SERVICEABLE PARTS INSIDE REFER SERVICING TO QUALIFIED SERVICE PERSONNEL

The exclamation point within an equilateral triangle is intended to alert the user to the presence of important operating and maintenance (servicing) instructions in the literature accompanying the appliance.
READ ALL INSTRUCTIONS BEFORE USE

Always follow basic safety precautions when using this Bluetooth speaker system with Microphone, especially when children are present.
SAFETY INSTRUCTIONS
1) Read this Instruction Manual before you attempt to connect or operate the appliance.
2) Keep these instructions in good condition. Heed all warnings. Follow all instructions.
3) Save this Instruction Manual for future reference.
4) Children should be supervised to ensure that they do not play with the appliance.
5) Ventilation should not be impeded by covering the ventilation openings.
6) Ensure that the unit is plugged into an AC 100-240V~60/50Hz power outlet. Using higher voltage may cause the unit to malfunction or even fire catching. Turn off the unit before unplugging it from power source to completely switch it off.
7) Do not plug/ unplug the power plug into/from an electrical outlet with wet hands.
8) If the power plug does not fit into your outlet, do not force the plug into an electrical socket if it does not fit.
9) Use replacement parts, which are specified by the manufacturer.
10) Install the unit in accordance with the manufacturer's instructions.
11) Place the unit where there is good ventilation. Place the system on a flat, hard and stable surface. Do not expose to temperatures above 40^ . Allow at least 30 cm clearance from the rear and the top of the unit and 5 cm from each side.
12) Press the buttons of the unit gently. Pressing them too hard can damage the unit.
13) Dispose of used batteries in an environmental-responsible manner.
14) Always ensure that the product is unplugged from the electrical outlet before moving or cleaning. Clean it with dry cloth only.
15) Unplug the product during lightning, storms or when it will not be used for long periods of time.
16) This product has no user-serviceable parts. Do not attempt to repair this product yourself. Only qualified service personnel should perform servicing. Take the product to the electronics repair shop of your choice for inspection and repair.
17) NEVER let anyone, especially children, push anything into holes, slots or any other openings in the unit's casing as this could result in a fatal electric shock.
18) D on't mount this product on a wall or ceiling.
19) Do not place the unit near TVs, speakers and other objects that generate strong magnetic fields.
20) Do not leave the unit unattended when it is in use.
NOTE: To disconnect the system completely if it not to be used for a long time, remove the AC power plug from the wall outlet.
Illegal operation may cause personal injury, which could be fatal.
Illegal operation may cause damage to property.
Built-in Battery Care
Please observe the following if the product contains a battery:
- Your product is powered by a built-in rechargeable battery.
- The battery can be charged and discharged hundreds of times, but will eventually wear out.
- Unplug the charger from the electrical plug and the product when not in use.
- Donotleave a fully charged battery connected to a charger, since overcharging may shorten its lifetime.
- Ifleftunused,afullychargedbatterywill loseitscharge overtime.
- Leaving the productin hot or cold places, such as in a closed car in the summer and winter conditions, will reduce the capacity and life time of the battery.
Always try to keep your device in a cool, moisture-free environment that's less than 32^
A product with a hot or cold battery may not work temporarily, even when the battery is fully charged. Battery performance is particularly limited in temperatures well below freezing.
If you plan to store your device for longer than six months, fully charge the battery every six months
to keep it fresh.
- The unit should be fully recharged after using the device each time. This will keep the health of the battery.
Battery warning!
- The battery used in this product may present a risk of fire or chemical bum if mistreated.
- Donot attempt to open the product or replace the battery. It is built-in andnot changeable..
Use of other batteries may present a risk of fire or explosion and the warranty will be terminated.
- Disposef batteries according to local regulations. Pleaserecycle whenpossible. Do not dispose as household wasteorin afire as they may explode.
-
Batteries may explode if damaged.
-
Charging the battery using supplied charger or underthe charging conditionsspecified in instruction manual. Charging the battery under any other conditions maycause thebattery tooverhead, emit hydrogen gas,leak, ignite or burst.
Caution!
1. Important safety considerations
- When charging the battery take note of the charging conditions specified as below.
- Recharge in uprightonly.
- Do not incinerate.
-
Do not use other than the attached AC adapter.
-
To prevent deterioration or damage to the battery
-
Do not drop or subject to strong physical shock.
-
To ensure long battery life
-
The unit should be fully recharged after using each time.
- Fully charge the battery every six months if you pain to store the device for longer than six months.
- If the unit is stored for more than six months without any recharging activity, the battery in the unit will be over discharged, please contact our authorized service center to replace the battery, using over discharged battery will lead toleak, ignite or explode
- Do not discharge completely.
- Shutdown the main switch after usage, otherwise an overdischarge state may occur.
1. Lead-Acid Battery Safety and Handling Guides
Lead-Acid rechargeable batteries require routine maintenance and care in their use and handling. Read and follow the guidelines in this document to safely use
1.0YERYIEW
Batteries not handled and used correctly can be a danger, read the instructions in full prior to carrying out any work on the battery. Batteries are heavy; take care for lifting and carrying. Please read and follow carefully all the instructions in this document, on the battery and in the product handbook. Keep the battery upright to prevent spillage.
2. MAINTENANCE.
Replace a battery with new one within the time period specified in the instruction manual or equipment. Contact authorized service centre if any unclear regarding battery checking and replacement.
3, FIRST-AID MEASURES
If acid is ingested seek immediate professional medical attention. Do not induce vomiting and drink a lot of water. In the event of contact with skin or eyes wash immediately with copious amounts of water for several minutes. Seek immediate medical attention for eyes. For spillages again wash immediately with water or soapy water or acid neutralizer.
4. CHARGING(usingchar_ging devices).
Chargingthebattery usingsuppliedchargerorunderthechargingconditionsspecified in instructionmanual. Chargingthebatteryunderanyotherconditionsmaycauseethebatteryto overhead. emit hydrogen gas, leak, ignitorburst. Don't charge thebattery intheverted position. Overchargingintheinvertedposition maycausebatteryleakagefromthesafety value.
- Recharge lead acid batteries after each use to prevent sulfation. Do not store on low charge.
- Do not allow alead acid to freeze. An empty battery freessooner
than one that is fully charged. Never charge a frozen battery. Avoid charging at temperatures above 49^ (120°F).
Batteries are filled with acid and should be kept upright at all times. Store in a cool dry well ventilated place. Exclude storage where sparks may be generated. If the battery is stored for year or longer without being charged, itsservicefemaybeshortened. Store the battery after fully charging it. Otherwise it may be shortened.
6. DISPOSAL CONSIDERATIONS
Old batteries should be recycled through a registered scheme. The supplier of the new battery will have access to such a scheme. We advise that this is the best way to correctly dispose of failed batteries WARRANTY. Products are warranted against faulty workmanship and/or material according to applicable law only. Proof of purchase is required to claim. Warranty does not cover incorrect fitment, inadequate charging, accidental damage or faults on other forms of abuse. A battery replaced under warranty is only warranted to the end of the original battery warranty period. Batteries left for long periods out of use will fail owing to neglect.
7. REPLACEMENT BATTERIES
Replacement batteries should be of the same type, size, manufacturer and model number, if possible. The replacement battery should be charged to a range of 90 to 95 percent of rated capacity. Capacity will rise to rated value after several charge discharge cycles or after a period of float operation.
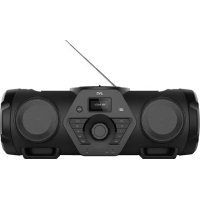
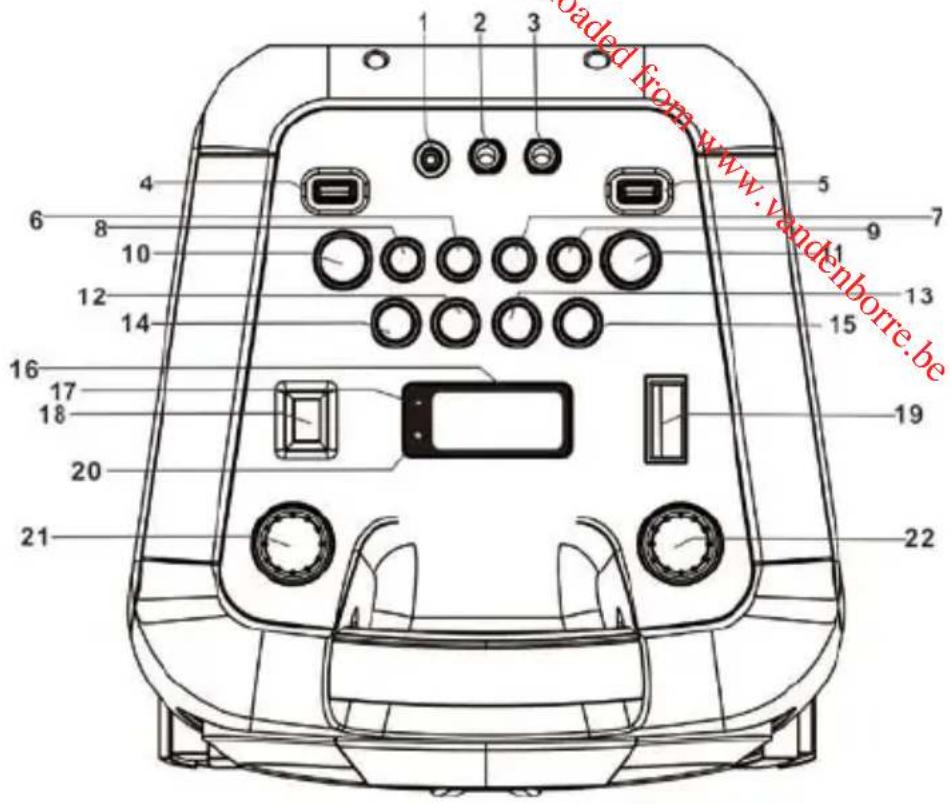
Guide to the Appliance
Top View
1.3.5mm AUX IN JACK
2. 6.3mm MIC JACK 1
3. 6.3mm MIC JACK 2
4. USB PORT 1
5. USB PORT 2
10/M./
6.FOLD. ③ BUTTON
7.LIGHT BUTTON
10/M.FOLD.BUTTONG
9. ECHO BUTTON
10.EQ BUTTON
11. FUNCTION/按钮
12. TUN. BUTTON
13. TUN. BUTTON
14. P-MODE/M-BUCTION
15. 11/3/SCAN BUTTON
16. LCD DISPLAY
17. PAIR INDICATOR
18. SUPER BASS BUTTON
19. POWER ON/OFF BUTTON
20. CHARGE INDICATOR
21.MIC VOL.CONTROL
22.VOLUME CONTROL
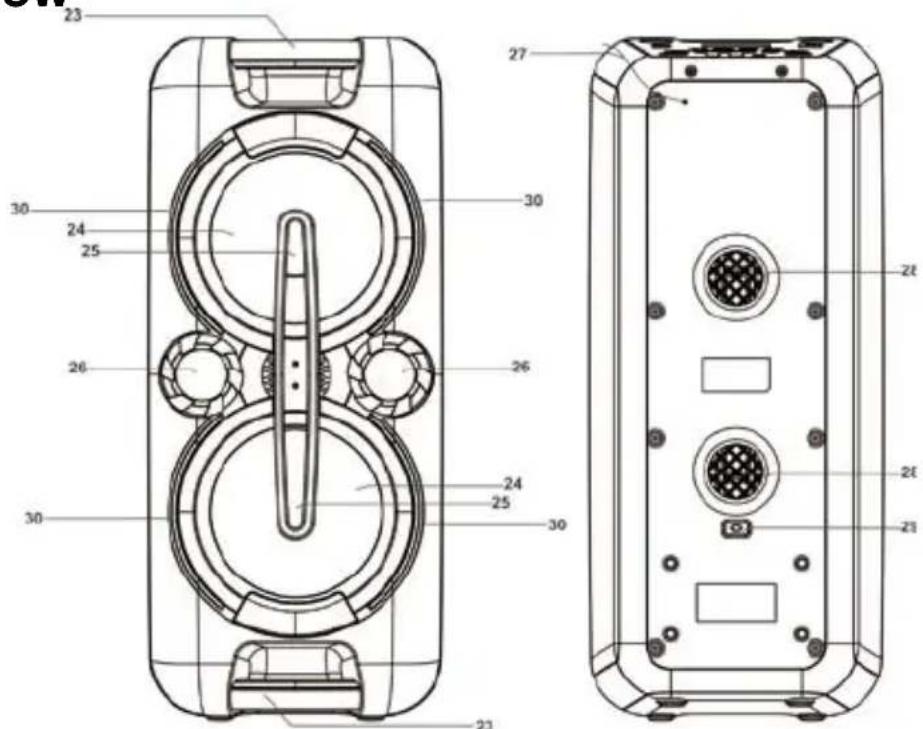
Front and Back view
- HANDLE
- SPEAKERS
- DISCO LED LIGHT
- TWEETERS
- FM ANTENNA
- VENTILATION HOLES
- AC SOCKET
- DECORATION LEDs
EN-7
Getting Started
POWER SOURCE
This unit works with rechargeable lead-acid battery (the battery capacity 4000mAh). Fully charge the unit (around 7 hours) before using the product for the first time. The playback time is up to 7 hours after full charging depending on the volume and music genre. Unplug the AC Power cord from the AC socket to work on the battery pack after fully charged. Plugging the AC Power cord while the battery pack is attached initiates the charging of this battery, the charge LED indicator lights red during charging, when the battery is fully charged the indicator will turn to green. When the unit is with low battery, the LED indicator will flash in red.
Warning: Do not change the battery, only high-qualified personnel can perform this operation.
Press the power ON/OFF button to switch the unit on/off.
NOTE: In USB/Bluetooth/AUX mode, when the unit is not providing the main function for around
15 minutes, the unit will automatically switch into standby mode. Press FUNCTION/ to turn on the unit again.
Please note that low volume setting in the audio source may be recognized as "no audio signal", this will affect the capability of signal detection from the device and can also originate an automatic switch into standby mode. If this happens please reactivate the audio signal transmission or increase the volume setting on the audio source player in order to resume playback.
Electrostatic Discharge hints - The unit may reset or may not reset to normal operation mode due to electrostatic discharge, just switch it off and reconnect again.
SETTING THE FUNCTION MODE
To change the function modes, repeatedly press to choose USB1/USB2/BLUETOOTH/AUX/RADIO function.
ADJUSTING THE VOLUME
- Rotate the volume control knobto increase or decrease the music volume.
- Rotate the MIC VOL. control knob to increase or decrease the microphone volume.
BASS ADJUSTMENT
Press to increase the bass effect.
This unit has a built-in equalizer system, Press EQ to select a setting that best matches the music style: FLAT, CLASSIC, ROCK, POP and JAZZ.
MICROPHONE ECHO ADJUSTMENT
Press ECHO to turn on or off the microphone echo effect.
FLASHING LIGHT
There are 5 modes for the DISCO LED lighting. Press LIGHT to choose the light modes. To deactivate this function, repeatedly press LIGHT until "OFF" is displayed.
L-1: By default mode, blue LED will be on constantly when it is selected.
L-2: Blue LED will be on flashing mode.
L-3: Red LED will be on constantly.
L-4: Red LED will be on flashing mode.
L-5: 7 colors LED will be on flashing mode.
There are 3 modes for the decoration LED lighting around the speakers. Press and hold LIGHT to choose the light modes. To deactivate this function, press and hold LIGHT until "OFF" is displayed.
E-1: By default mode, blue LED will be on constantly when it is selected.
E-2: Red LED will be on constantly.
E-3: Blue and red LED flashing alternatively.
RADIO OPERATION
Listen to FM radio broadcasts. Repeatedly press FUNCTION/ until the display reads FM and the radio frequency.
Note: In order to get the best reception, extend the FM ANT. on the rear of the unit before use to its full length.
TUNING TO A RADIO STATION
If you know the station frequency that you want to tune to directly:
- Tune to a station by repeatedly pressing or repeatedly. The station frequency is shown on the display.
AUTO PRESET MEMORY / SCAN
To scan for stations within reception range and save them to preset memory automatically, press and hold /SCAN. After the unit is finished scanning, the unit will automatically tune to preset number 1 (P01). To tune to a preset station:
- To tune to the next preset station, press
- To tune to the previous preset, press
Choose which stations to save in preset memory instead of scanning automatically.
-
Repeatedly press or to tune to the station that you want to save as a preset (e.g., 93.1).
-
Press P-MODE/M. . "P01" will flash on the display to indicate that you are saving the station as Preset Memory 01. (To change the preset memory number, press 10/M. FOLD. 10/M. FOLD.
- Press P-MODE/M. to finish saving the station (e.g., P01 is now set to 93.1).
- To save another station, repeat steps 1 to 3. You may save up to 30 FM stations:
USB OPERATION
This unit provides two USB ports for music playback.
- Repeatedly press FUNCTION/ to select "USB1" or "USB2" mode.
- Plug the USB memory stick to the USB porton top of theunit. Playback will start automatically from Track 1.
- To pause playback, press /scan. The playing time will flash on the display.
- To resume playback, press I1/3/SCAN again.
- To select a desired track, press or during playing until the desired track appears on the display. The unit will start play automatically.
- To search for a particular passage during playback, press and hold press TUN. to scan the current playing track at high speed until desired point (passage) appears, then release the button for normal playback mode.
- To select a song which track number exceeds 10, press FOLD. or each time to skip forward/backward 10 tracks, then press TUN. or to select desired track.
- To select a desired folder (if the USB contains more than one folder), press and hold the 10/M. FOLD. or each time to skip forward/backward a folder, then press TUN. or to select desired track.
Important: The USB port is intended for data transfer only, other devices cannot be used with this USB connection. The use of USB extension cords is not recommended. Don't plug the USB from the unit when playing or reading the USB device.
REPEAT PLAY
You can play one track or all tracks on the USB repeatedly.
To Repeat a Single Track
- Press P-MODE/M. during play, the display will show "C" and the current track will be played over and over again.
2.To cancel repeat play, repeatedly press P-MODE/M. until disappears from the display.
To repeat all the Tracks
- Repeatedly press P-MODE/M. until the “C-” shows steadily on the display, all tracks on the USB will be played over and over again.
2.To cancel repeat play, repeatedly press P-MODE/M. until "C ” disappears from the display.
To repeat the folder (only for USBwhich contains more than one folder)
- Repeatedly press P-MODE/M. until “C FOLDER” shows steadily on the display, the current folder will be repeated over and over again.
- To cancel repeat play, repeatedly press P-MODE/M. until "FOLDER"disappears from the display.
RANDOM PLAY
Repeatedly press P-MODE/M. in play mode till the "RAND" shows steadily on the display, the random play will start from next track automatically. Repeatedly press P-MODE/M again until the "RAND" disappears from the display to cancel.
BLUETOOTH OPERATION
- Press FUNCTION/ to switch to BLUETOOTH function, the LCD will display "bt" and the pair indicator will flash at high speed.
- Turn on the Bluetooth function on the device, scan the unit "XS-F527B" and connect, then input the password 0000 if required, the pair indicator keep light up to indicate connection done, and the display will show "bt" steadily. Press Play to start playback.
- Rotate the volume control knob or adjust the volume on the external device to increase or decrease the music volume to your desired level.
- Press and hold I / / SCAN to disconnect Bluetooth.
Note: The Bluetooth works best within 10 meters in open air.
AUX-IN OPERATION
- Repeatedly press FUNCTION to select the "AUX" mode.
- Connect your audio device to the AUX IN jack on the top panel of the unit with an AUX IN cable.(audio cable is not included)
- Rotate the VOLUME control knob or adjust the volume on the external device to increase or decrease the music volume to your desired level.
- Control the playback with your audio device.
MIC JACK OPERATION
Microphone input is available in all modes.
- Connect your microphone to the 6.3mm MIC JACK on the top panel of the unit.
- Rotate the MIC VOL. controlknob to increase or decrease the microphone volume.
- Press ECHO to turn on or off the echo effect of the microphone.
Technical Specifications
GENERAL
Power Requirements AC100-240V~60/50Hz
Battery type
Built-in rechargeable battery,
4000mAh/12V, lead-acid
Power consumption 33W
Power output 30W X 2
FM frequency
FM 87.5-108 MHz
AUX in jack
3.5mm
Microphone jack
6.3mm
Working temperature
5^ +40^
USB memory section
Playback format
MP3
Memory
32MB to 32GB
Bluetooth
Communication system Bluetooth Standard version 2.1+EDR
Reception Range 10 meter (line-of-sight distance)
Compatible Bluetooth profiles Advanced Audio Distribution Profile (A2DP)
Frequency range: 2.4GHz-2.480GHz
Transmitting power: 4dBm
ACCESSIONS
Instruction Manual x 1pc
AC Cord x 1pc
MICROPHONE x 1pc
Note: Specifications are subject to change for continuous improvement without prior notice.

Bluetooth
The Bluetooth word mark and logos are registered trademarks owned by Bluetooth SIG, Inc. and any use of such marks by KING PROFIT TRADING LIMITED is under license.
DISPOSAL


As a responsible company we care about the environment.
As such we urge you to follow the correct disposal procedure for the product, packaging materials and if applicable, accessories and batteries. This will help conserve natural resources and ensure that the materials are recycled in a manner that protects health and the environment.
You must follow laws and regulations about disposal. Waste electrical products and batteries must be disposed of separately from household waste when the product reaches the end of its life.
Contact the store where you bought the product and your local authority to learn about disposal and recycling.
The batteries must be disposed of at your local recycling point.
We apologise for any inconvenience caused by minor inconsistencies in these instructions, which may occur as a result of product improvement and development.
Darty Holdings SAS © 14 route d'Aulnay 93140 Bondy, France 23 / 05 / 2017
This product is manufactured, distributed, serviced and warranted exclusively by Etablissement DARTY et Fils.
"JVC" is the trademark of JVC KENWOOD Corporation, used by Etablissement DARTY et Fils under license.
EU Declaration of Conformity
Product Description -
We declare that the above product has been evaluated and deemed to comply with the requirements of the listed European Directives and standards:
RoHS 2 Directive (2011/65/EU) - Directive RoHS 2 (2011/65/UE)
RoHS-2 richtlijn (2011/65/EU) Directa RoHS 2 (2011/65/UE)
EN 55032:2015, Class B
EN 61000-3-2:2014
EN 61000-3-3:2013
EN 55020:2007+A12:2016
Draft EN 301 489-1 V2.2.0 (2017-03)
Final draft EN 301 489-3 V2.1.1 (2017-03)
Draft EN 301489-17 V3.2.0 (2017-03)
Final Draft EN 303 345 V1.1.7 (2017-03)
EN 300 328 V2.1.1 (2016-11)
EN 62479:2010
EN 60065:2014
Notified Body: Bureau Veritas
Organisme Notifié
The person responsible for this declaration is:
Position - Poste: General Manager Direct Sourcing
Signature - Signature:
Date:7th July,2017