
Vira MOD22 - Vacuum Cleaner MPM - Free user manual and instructions
Find the device manual for free Vira MOD22 MPM in PDF.
| Brand | MPM |
| Model | Vira MOD22 |
| Category | Vacuum cleaner with water filter |
| Type | Dry and wet vacuum with washing function |
| Power supply | 220-240 V, 50/60 Hz |
| Power cord length | 6 meters |
| Maximum noise level | 81 dB(A) |
| Water tank capacity (dry vacuuming) | 2 liters (max) |
| Dirty water tank capacity (wet vacuuming) | 8.5 liters (float cut-off) |
| Detergent tank capacity | Level indicator (C4) |
| Main filter | HEPA 13 filter (washable) |
| Secondary filter | Foam and sponge filter for water filter |
| Washing pump | Yes, with automatic overheat protection |
| Safety system | Automatic float shut-off, pump protection |
| Included accessories | Floor and carpet head, crevice nozzle, turbo brush, integrated brush, hard floor accessory, soft cleaning nozzle |
| Use | Household use only |
| Housing material | Plastic |
| Maintenance | Regular filter cleaning, emptying and drying of tanks |
| Repairability | Authorized service center for repairs |
Frequently Asked Questions - Vira MOD22 MPM
User questions about Vira MOD22 MPM
0 question about this device. Answer the ones you know or ask your own.
Ask a new question about this device
Download the instructions for your Vacuum Cleaner in PDF format for free! Find your manual Vira MOD22 - MPM and take your electronic device back in hand. On this page are published all the documents necessary for the use of your device. Vira MOD22 by MPM.
USER MANUAL Vira MOD22 MPM
Pieczatka sklearnpu/ Stamp shop
JAK POSTEPOWAC W PRZYPADKU REKLAMACJI
1. ZADZWON
Read the manual carefully before use
Always take a plug from a socket when you are not using the device or before you start any cleaning activities
Before the first use check if mains is suitable for the vacuum cleaner
- Do not hang the wire on sharp edges and do not let it touch hot surfaces
- Never draw the wire in order to disconnect the vacuum cleaner from mains.
Never leave a device in operation without supervision
Take special precautions if there are children nearby
Do not let the vacuum cleaner to move on the wire as it can cause the damage of isolation cover of the wire
The vacuum cleaner must not be used without a water filter in case of dry cleaning!
- Broken device must not be used, also if the wire or plug is damaged – in such case have the device repaired in an authorised service point
Do not use the device if it has been dropped or if any of its parts has been broken. Have it repaired in an authorised service point.
Do not use the device if you suspect any technical damages.
- The use of accessories not recommended by the manufacturer may cause the device damage, body injuries or fire.
Take special precautions when you hoover the stairs.
If you notice that a liquid leaks from a water filter container, the device must be switched off immediately
Do not put the device, the wire or the plug into water or other liquids – the wire and the plug must be dry at all times
Do not use the vacuum cleaner to remove flammable and corrosive liquids, dusts that are hazardous to people health, solvents, matches, ash, cigarettes butts, sharp objects and objects whose temperature is higher than 60^ , because it may cause a danger of explosion or fire
-
Do not hoover if there are flammable liquids or substances nearby.
-
With regard to vacuum cleaner's case made from artificial materials, keep the device far from all sources of warmth (radiators, heaters etc.)
-
Do not block inlets or outlets of the vacuum cleaner
-
After each use the container should be emptied, cleaned and dried. To dry the interior of tubes and hose, the device should suck in dry air for a while. This allows avoiding an unpleasant smell and scent.
-
When dry vacuum cleaning with the water filter head, do not use the vacuum cleaner without water.
Do not vacuum people or pets, and take particular care not to bring the nozzle close to your eyes or ears.
Do not vacuum without filters or if they are damaged.
Do not hold or connect the device with wet hands.
-
Check the suction hose, pipes and nozzles - remove debris inside.
-
Move the vacuum cleaner carefully over thresholds and other uneven surfaces so as not to cause excessive movement of the water in the tank. This could cause a small amount of water to be ejected outside the unit.
Do not allow the vacuum cleaner to overturn or flood with water during operation.
- Always ensure that all parts of the appliance are correctly fitted before starting work.
Do not use the device for purposes other than those for which it was intended.
-
Switch off the vacuum cleaner before replacing equipment.
-
The equipment is not designed to operate using external timers or a separate remote control.
Do not use the pump when the liquid tank is empty or when you are not using the wash or wet cleaning functions. This may result in its aeration. If the pump is switched on without water, it will start to heat up, the automatic safety system will cut off the power supply to the pump. The pump will not be able to start until it has cooled down.
The vacuum cleaner is designed for home use only.
Do not use the appliance outdoors.
This appliance is not intended for use by children under 8 years of age and individuals with reduced physical, sensory or mental capabilities, or lack of experience and knowledge, unless they have been given supervision or instruction concerning use of the appliance in a safe way and if they understand the hazards involved. Cleaning and user maintenance shall not be carried out by children without supervision.
- Store the appliance and its cord out of reach of children under 8 years of age.
In order to ensure your children's safety, please keep all packaging (plastic bags, boxes, polystyrene etc.) out of their reach.
Ensure that children do not play with the appliance.
WARNING! Do not allow small children to play with the foil as there is a danger of suffocation!
Make sure that all materials and surfaces are suitable for wet cleaning or washing. Especially in case of delicate, hand-woven carpets you should make a trial on a small area.
Use only a shampoo recommended by a producer.
- If liquid container is empty or if you do not use washing or wet cleaning function, do not use the pomp. If the pomp is switched on without water, it will get warmer and warmer and an automatic safety system will cut off the pomp from electricity. The pomp will not start until it gets cooler.
ELECTROSTATICS
Vacuuming certain surfaces in low humidity conditions may cause the unit to become slightly electrified. This is a natural phenomenon, which does not damage the device and is not a defect. In order to minimise this phenomenon, it is recommended to: discharge the device by frequently touching metal objects in the room with the pipe, increase the air humidity in the room, use generally available anti-electrostatic agents.

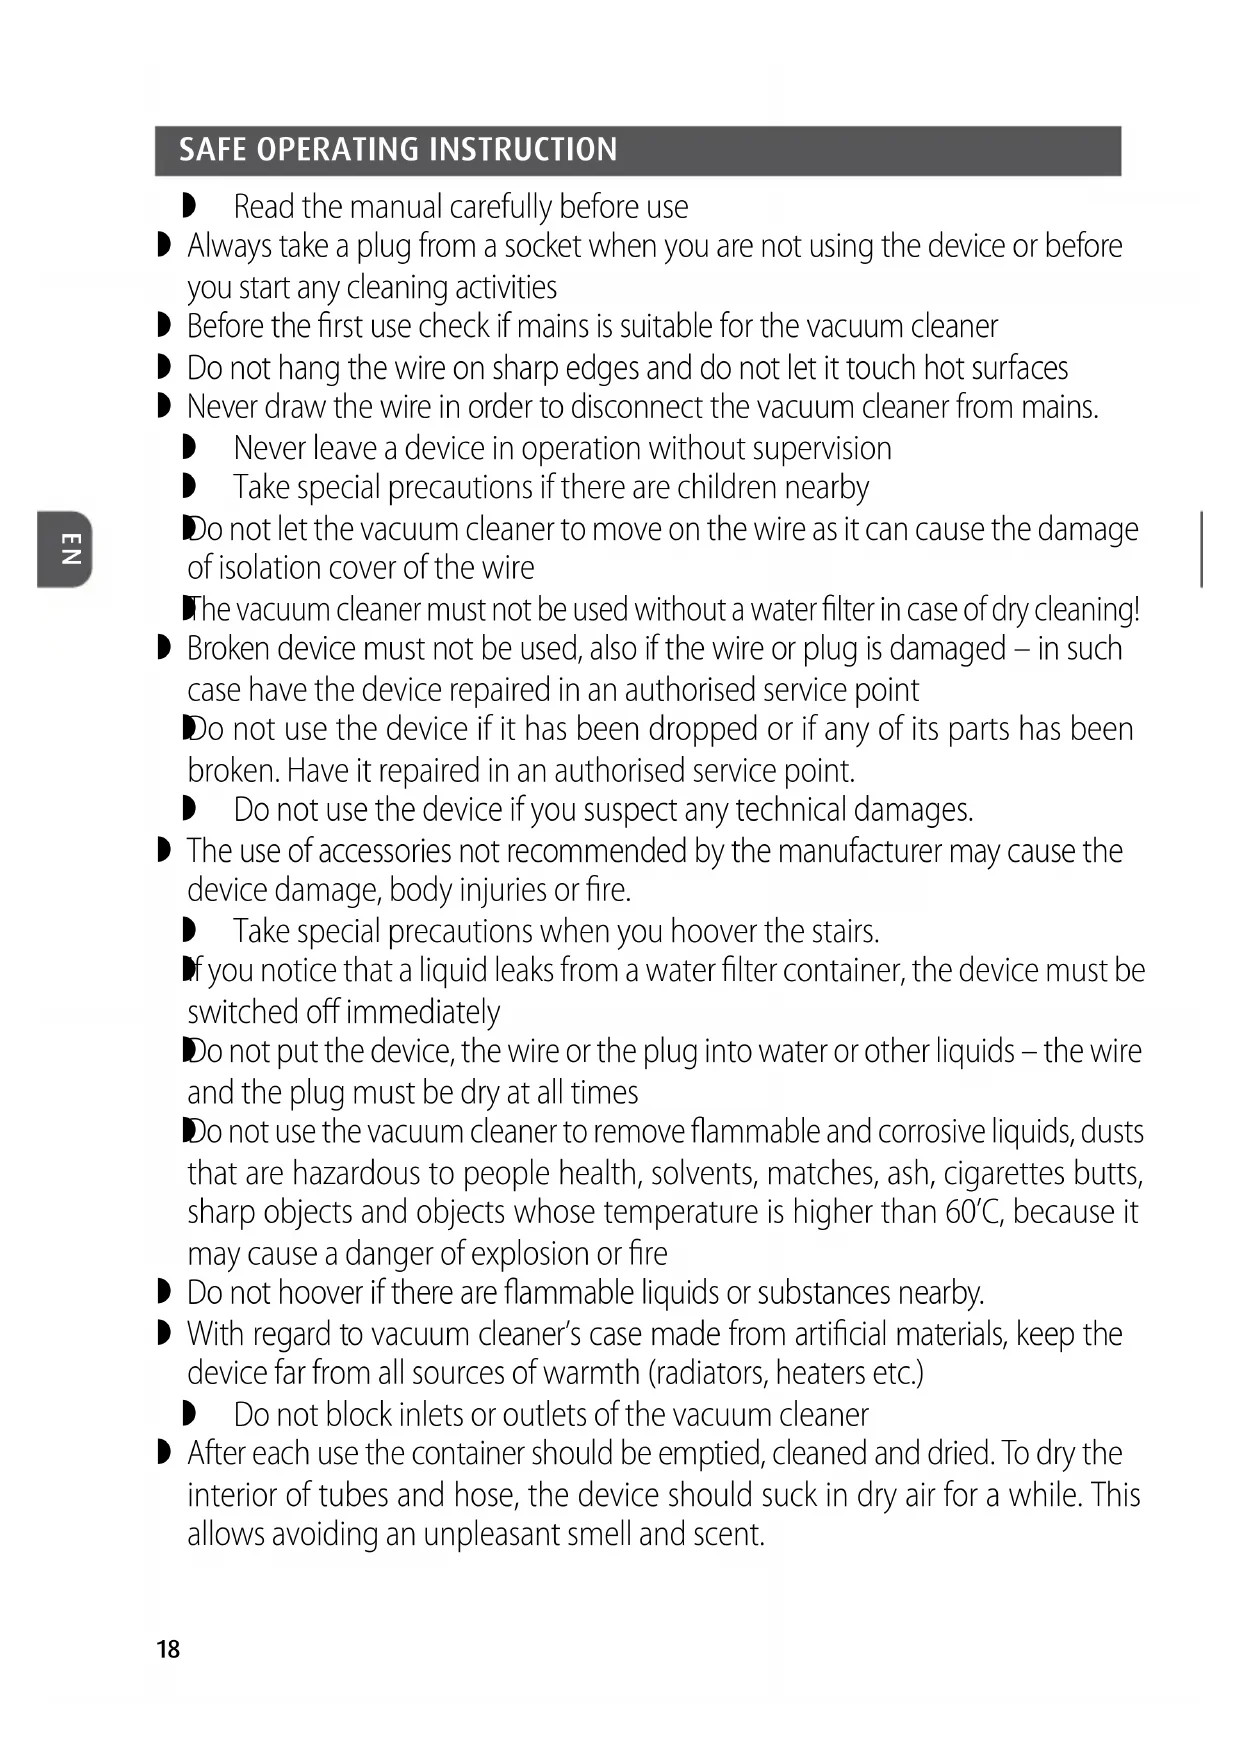
A. Engine's set. This section includes an engine, a switch and operating elements. Upper part of this section constitutes HEPA filter used to filter out dust and other small parts from the air that is blown out. Under a foam filter there is a big, plastic float which, as the container fills up, raises and cuts off vacuum at the same time informing about a necessity to empty the container.
A1-Pump switch
A2-Hoover switch
A3 - Connector for a washing liquid hose
A4 - HEPA filter socket
A5-HEPA filter
A6 - Cover of HEPA filter case
A7 - Float chamber
A8 - Foam filter
A9 - Docking station socket
A10-Carrying handle
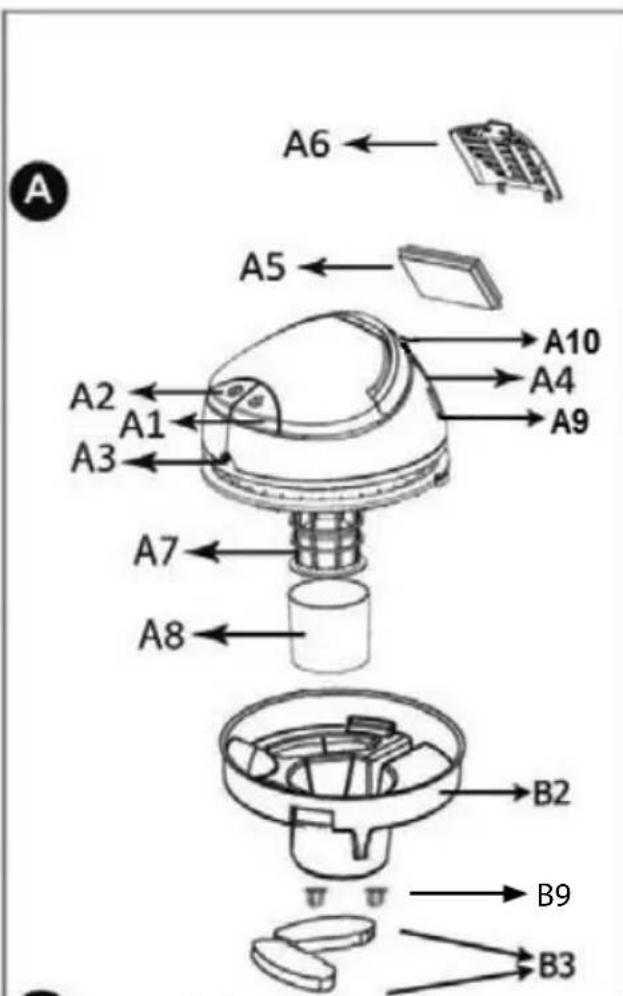
B. Container. The container section is a middle part of a vacuum cleaner, used as a container to collect dust and dirty water. This section is attached to engine's set with clamps. A container for a shampoo and clean water (washing liquid) is located under the water filter container.
B1-Container
B2 - Water filter element
B3 - Water filter sponge
B4 - Water filter tube
B5 - Rubber gasket
B6 - Clamps
B7-Locks sockets
B8 - Sucking inlet
B9 - Rubber caps for the water filter head
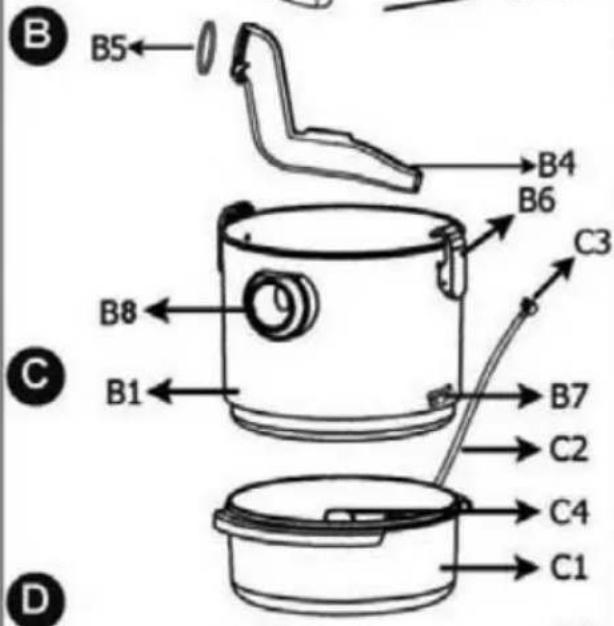
C. Washing liquid container. Washing liquid container has a shampoo and clean water. When the pump works, shampoo and water are taken from the tank. Liquid going from the container through a hose is sprayed. Liquid container is situated between a water filter container and a base with wheels.
C1-Washing liquid container
C2 - Short washing hose
C3 - Short washing hose connector
C4 - Indicator of water level
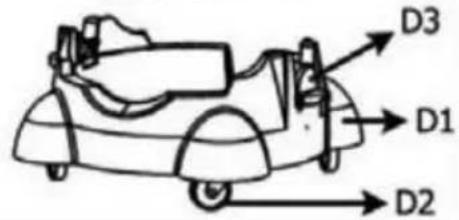
D. A base with wheels.
D1-Base
D2-Wheels
D3-Lock
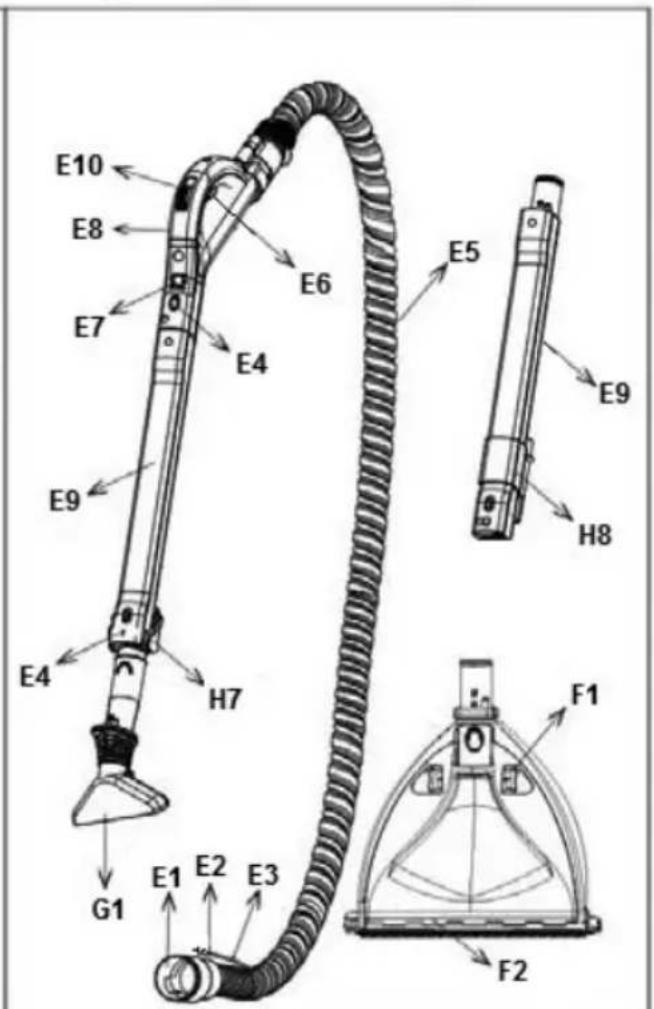
E. Hose. This section includes a sucking hose with a handle and sucking tubes. Sucking attachments connected with container's set through putting the hose into sucking inlet. Sucking tubes are jointed with each other and then connected to a handle. The handle has washing liquid feeder and sucking power regulation. The hose can be put on engine's set with the use of hanger.
E1 - Element fixing a sucking hose
E2 - Element fixing a washing hose
E3 - Washing liquid hose
E4 - Lock the pipe
E5 - Sucking hose
E6 - Liquid feeder lever
E7 - Sucking power regulation
E8- Handle
E9 - Sucking tubes (2)
E10 - Slider lock lever dispenser
F. Washing tip. It is used for sucking liquids from carpets, rugs and floors. This attachment also sprays a washing liquid. In case of hard floor surfaces the washing tip must be used together with an attachment.
F1 - Washing tip.
F2 - Attachment for hard surfaces.
G. Tip for delicate wet washing. This tip is suitable for cleaning furniture upholstery, curtains etc. and for sucking liquid from narrow areas.
G1 - Tip
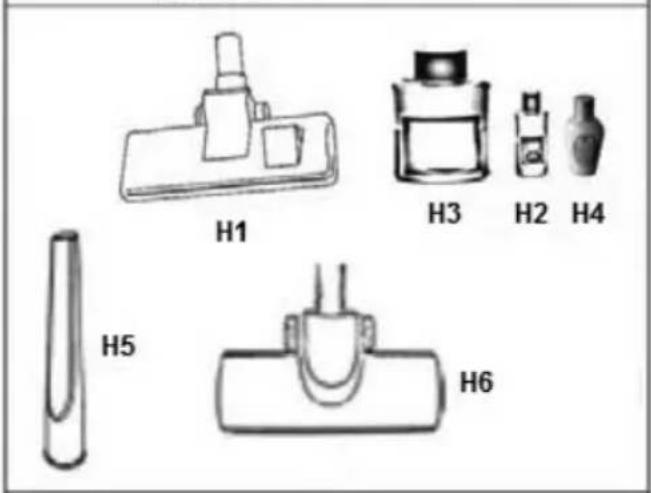
H. Additional accessories.
H1 - Carpet and floor hand
H2 - Air refresher
H3 - Shampoo
H4 - Anti-foaming agent
H5 - Narrow attachment
H6 - Turbo brush
H7 - Integrated brush
H8 - Crevice tool handle / docking station clip
BEFORE FIRST USE
- Remove the appliance from the box. Remove all plastic sheets, bags and styrofoam inserts.
- During unpacking check if there are all parts and if they are not damaged.
- Make sure that your mains power supply corresponds to the voltage stated on the rating plate.
APPLIANCE ASSEMBLY
| 1 | 2 |
| 3 | 4 |
| 5 | |
| 6 | 7 |
| 8 |
9
10
11
12
13
14

15
16

17
18
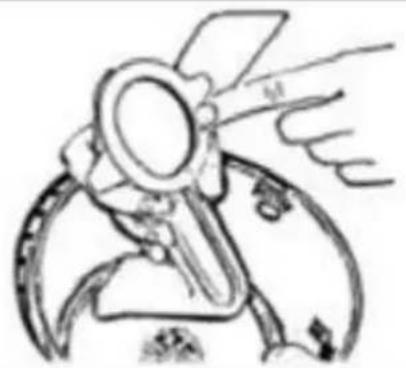
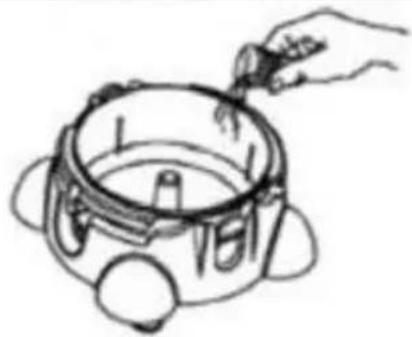
- Disconnect a short washing hose (C2), located between washing liquid container (C1) and engine's set and carefully take it from the connector (PIC.1,2).
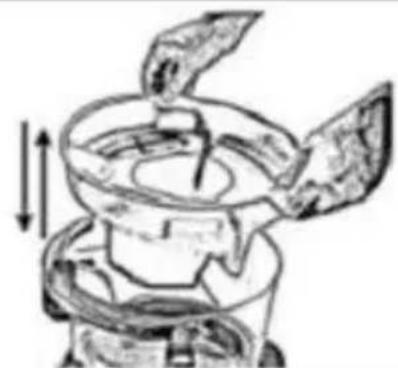
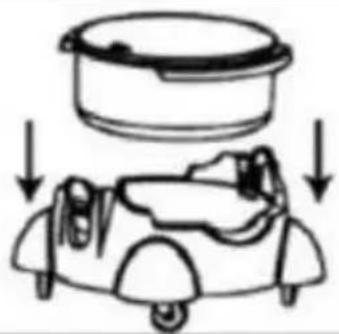
- Disengage the clamps (B6) (PIC.3). Lift an engine's set with the use of fixed handle and take water filter element off (B2).
- Release locks (D3) from the base and lift water filter container (B1) and washing liquid tank (C1) (PIC3).
- Mount the wheels (D2) on the underside of the base (D1) if they have not been mounted already.
- Make sure that a foam filter (A8) is fixed in a float chamber (A7) (PIC.4).
- Fix a water filter tube (B4) (PIC. 8), through a rubber gasket (B5) (PIC.9).
- Put washing liquid tank (C1) on a base (D1), fix the water filter container (B1) and block the locks (D3).
- Within the head (B2), install the water filter sponges (B3) and 2 pieces of rubber plugs (B9) on the tabs with holes, on the lower part of the water body (B2) fig.18.
- Next put the water filter tank (B2) on the water container (B1) (PIC.11).
- Put engine's set on the container and fix using clamps (B6).
- To fix the sucking hose (E5), put a fastening element (E1) to sucking inlet (B8).
USING THE APPLIANCE
To ensure the highest comfort and safety a vacuum cleaner has been equipped with a water filter. It is a specially designed device whose role is to absorb the tiniest particles of dust and dust mites with the use of physical properties of water. Principle of water filter operation is that the air sucked into the vacuum cleaner goes through a water container, leaving all dust and dust mites in it.
DRY CLEANING (WITH WATER FILTER HEAD)
- Make sure that the device is disconnected from mains.
- Disengage the clamps (D6) and lift an engine's set using a handle.
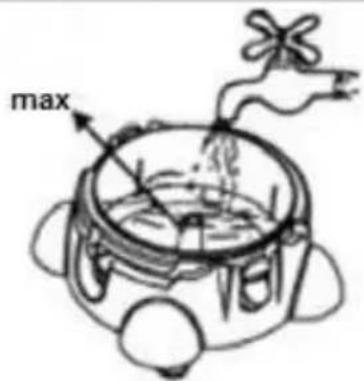
- Take a water filter element (B2) off (PIC.10) and fill it with clean water (max. 2l).
- Put a water filter element (B2).
- Put an engine's set back on the device and lock the clamps.
- Connect a sucking hose (E5) (PIC.5), using a fixing element (E1) to sucking inlet of the vacuum cleaner (B8).
- Additional accessories can be connected to sucking tube (E9) or directly to a handle (E8) depending on what you are going to do.
- Connect the device to the mains.
- Use a switch (A2) to switch a vacuum cleaner on.
- If the vacuum cleaner sucks in a substance that will foam the water in the water filter, immediately turn off the vacuum cleaner, unplug the power cord and add 2 or 3 drops of the defoamer (H4) to the water in the water bin. Resume vacuuming. If foaming persists, change the water in the water bin.
CAUTION! For a fresh scent in the vacuumed room, sprinkle the HEPA 13 filter with a little air freshener (H2).
WARNING! If liquid container is empty or if you do not use washing or wet cleaning function, do not use the pomp.
WARNING! Do not ever vacuum wet floors with your vacuum cleaner (in dry cleansing mode)
Using the equipment described above you can clean:
Floor and carpet head (H1) - used to remove dust from carpets, rugs and hard floor surfaces. It is equipped with rings allowing easier handling and a button. After pressing the button you can adjust the head for hoovering hard surfaces, for example floors, parquets.
- Narrow attachment (H5) - used to clean places that are not easily accessible.
Turbo brush (H6) - for cleaning carpets, fitted carpets.
- integrated brush (H7) - thanks to its position on the suction pipe, it is instantly accessible and saves time. To use it, remove the current equipment from the end of the tube and rotate the brush 180^ until the lock engages.
CAUTION! To disconnect the suction pipes and equipment, press the pipe lock button (E4) located on the suction pipe and/or handle.
WET WASHING AND CLEANING
- Make sure that the device is disconnected from mains.
- Lift an engine's set above the container. Make sure that a filter (A8) is mounted.
- Lift water filter element (B2) and container (B1).
- Remove the water filter tube (B4), as its presence during wet vacuuming can cause foaming. Put the rubber stoppers (B9) on the tabs with holes, on the lower part of the water body (B2) fig.18.
- Pour clean water into the washing liquid container (in order to check its level use the indicator of water level (C4) and shampoo (quantity of a shampoo has been given on a bottle).
ATTENTION! When using a function of surface washing do not put water into the water filter container (B1).
- Reinstall the container (B1) so that the suction inlet (B8) is on the opposite side to the short washing hose socket in the washing liquid tank. Then lock the locks (D3), install the body (B2) in the container (B1). Fit the motor unit and lock the locks (B6).
- Connect a short washing hose (C2) to washing liquid tank (C1) (PIC. 15) and to the connector at the back of engine's set (PIC.14).
- Connect sucking hose (E5) to sucking inlet (B8) and sucking tubes (E9).
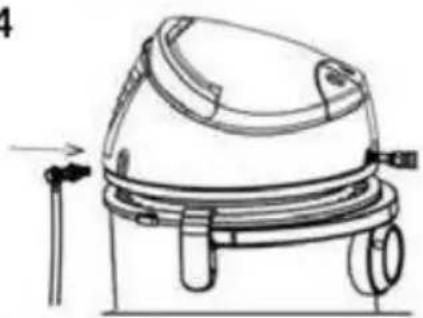
- Connect fixing element (E2) to connector for a washing liquid hose (A3)
- Connect washing tip (F1) to sucking tubes or directly to the handle. A tip for delicate cleaning (G1) can be connected only to the handle. To wash carpets, rugs and to wash a floor use a normal tip. To wash armchairs, sofas, curtains, car upholstery etc. use a tip for delicate wet cleaning, attaching it directly to the handle.
- Connect the device to the mains.
- In order to switch on a pump press a pump switch (A1).
- Press liquid feeder lever (E6). Water and shampoo (washing liquid) are pumped from a liquid container with a pump and sprayed on cleaned surface with a tip. The liquid gets into fibres and dissolve even permanent dirt. Wait at least three minutes to let shampoo to be absorbed.
- Switch off the pump with a switch (A1).
-
Press a vacuum cleaner switch (A2) in order to start sucking function and move the tip on the floor surface. When washing upholstery, suction of dirty water and spraying of a liquid mixture may take place at the same time.
-
If foam starts flowing from the container (B1) switch off the device immediately and empty the container from dirty water. Also, check a quantity of washing liquid in a liquid container (C1). To reduce the foaming add to the container (B1) a few drops of antifoam (H4).
WARNING! Never add antifoam agent to container (C1)
- When the container is full of dirty water, the float will automatically block suction and the engine will start to work louder. In such case, switch off the vacuum cleaner and the pump immediately, take a plug from a socket, take a sucking hose (E5) from a handle (B8), and washing liquid hose (E3). Take an engine's set off and empty the container.
- If you want to clean hard floors, for example covered with tiles, marble etc put hard floors attachment (F2) on a washing tip (F1). With the use of tip (F1) you can suck for example water which has leaked from a dishwasher or washing machine or water left after fridge or freezer defrosting.
ATTENTION! Use of the vacuum cleaner that will be not-compliant with the instructions above, may cause production of too big quantity of froth, which will overflow through HEPA filter. If such thing happens, switch the device off, take the plug from a socket, empty the water container, clean water filter tank and dry it. Next take also HEPA filter out and dry it. Wash a foam filter located in float section and leave it to dry. Wait about 2 hours to let froth from the engine dry off.
CLEANING AND MAINTENANCE
- Before each cleaning, make sure that the device is disconnected from mains.
- After every use, empty the water in the transparent water tank and clean and dry the tank. Do not ever leave your vacuum cleaner with liquid and dirt in it for hygienic purposes and extending the life of your vacuum cleaner.
- Pull and remove the water filter body. It can be washed with warm and soapy water or under tap water. Let filter dry before replacing it.
- Filter (A8) and (B3) can be washed in warm water with some soap or in running water. It should be dried properly before it is put on float chamber again.
ATTENTION! Filters must not be cleaned in hot water or washed in a washing machine.
- Check if a valve in float chamber can be moved easily. If necessary, clean it. In order to check if the float works properly lift the engine's set and shake it.
- The cleanness of HEPA 13 filter should be checked periodically. It should be replaced after a certain time of usage when it looses its qualities.
- You can dock the assembled suction tube and accessories on the hoover by placing the docking clip (H8) in the docking slot (A9). You can place the slot attachment at the other end of the clip (H8).
The technical parameters are given on the data plate of the product
Maximum noise level: L_WA = 81 dB
Power cord lenght: 6m
IPX4


NOTE! MPM agd S.A. reserves its right to modify the technical data.
PROPER DISPOSAL OF THE PRODUCT (waste electrical and electronic equipment)
Marking on the product indicates that after the service-life of the product expires, it should not be disposed with other type of municipal waste. Used equipment may have a negative impact on the environment and health of people due to potentially containing hazardous substances, mixtures and components. Mixing electric waste with other types of waste or disassembling those in an unprofessional manner may cause
a release of substances that are hazardous to the environment and health. Used equipment should be handed-over to a point for collection of electric waste. In order to obtain detailed information regarding the electric waste collection points, the user should contact the municipal point of electric waste collection or used equipment processing department.
YKA3AHNЯ NO TEXHnKE B30PACHOCTN PIMHEHnYCTPOICTBA
Ipeed npimehennem Heo6xOIMOBHnMaTeIbHO npOHTaTb HaCTOuyIO HNCTpyKcIIO NO 06CJyXnBaHIO.
Bcerda BbHMaITe 7TeNcBHyIO BnIKy I3 rHe3Da 3JIeKTPoNTaHnIa, KOrda He pOJIb3yeTecb IIIEcOCOM nII INpeD hauALOM KaKOJ-ll60 pa6OTbl, CBraHHoI C TexHnueCKIM yXODOM nII uNCTKOJ IIIEcOCa.
Ipeed nepBbIM npimHeHnem npOBepbTe, COOTBeTCTByet IIN nbIeCocy HapraJxHne B ceTeBOi PO3eTke.
He Bewaite npoBoda Ha octpbix KpaXn He N03BOJnTe, YTO6bI OH Kacalcra TOpaynx NOBepxHocTei.
HnKOrda He TAHnte 3a CeTeBOI npOBoI, UTO6bl OTKnIOuHTb yCTPOiCTBO OITcOuHnka 3JIeKTpUueCKoro NITaHnI.
HnkOrda He octabnIte BkIoueHHoro nbIneocca 6e3 Ha30pa.
CobIouaIte ocO6yIO OCTOpOXHOCb, KOrDa B6n3n nbIeCoCa HaxoJATcA DeTn.
He no3BOJnTe, uTO6bI nbileCoc npeBnraIcR NO npOBOy 3JIeKtpueCKoTo nITaHn, NockoJbKy 3TO MOKeT npIBecrN K IOBpeXdEHNm I3OJIauHOHOn OboJouKn npOBoJa.
Пылесoca Heьзя пименятб6e3 BODHOrO ФильТра!
He noIb3yIteCb NOBpeJdeHbIM yCTpoiCTBOM, a TaKxe TOrda KOrda NOBpeJdeH cTeBOi KaHaJI NII IITeNcEJIbHa BnJIka - B TaKOM Clyuae OTdaiTe yCTpoiCTBO Ha peMOHT B aBTOpIN3OBAHHbI pyHKT cepBnCHOrO 6CbnyJKBaHnI.
He noIb3yIteCb yCTPOIcTBOM, ecn OHO 6blIO ypoHEo, a KaKaJ-ll6O n3 erO. qacteBbIa NOBpeKdEHa. OTdaIte yCTPOIcTBo Ha peMOHT B aBTOpN3OBaHbIyHKT cepBnCHOrO 06CJIyJxINBaHnI.
He nbItaTeCb nOJIb3OBaTbCЯ nbIeCOCOM B Clyuae BO3HnKHOBeHnRA NOO3peHn O KaKOM-JI6O TexHnueCKOM NOBpeJdeHn.
IprimeHne IIOJIHnTeBbIX akceccyapOB, KOtOpbie He 6bln peKOMeHOBaHbI IN3rOToBHTeMe, MoXeT npINBeCTN K NOBpeXdEHNIO yCTpOJCTBa, NOBpeXdEHNIAm TeLa II IN K BO3HnKHOBHeHNIO nOxapa.
CobniopaTe Oco6eHHyIO OCTOPOXHOCTb BO BpeMpa6OTbIC nbIneCOCOM HaJIecTHNcE.
B cnyuae o6hapxkeHn BbITEeKn KndKOCTn n3 emKOCTN BOHOrO fNJIbTp a, Heo6xoJIMO yCTPOJCTBO TOTcAc Xe BBIKIIOHTb.
BanpeuetaTcIogyKaTb yCTpOiCTBO, npOBoJJIeKTPnueCKOTo nITaHn IIN 7TeNceJIbHyIO BnIKy B BOy IIN B DpyrHe JnIDKOCTn CeTeBOJ npOBoI n 7TeNceJIbHaB BnIka DoJIxHbI BCeIda 6bITb CyXIMN.
BanpeuetaeTc npimehaTb bInecoc dna co6npaHnaJeKOBOCnIaMeHJUxxCn Koppo3nHbIX XndKOCTei, PbIN C yrpo3amN dny 3dOpOBbY, paCTBOPHTeNe, cniueK, nePNa, OkypKB CnIapeT, Macen, OCTpbix npeDMeTOB, a TaKKe TaKnx, TemnepaTypa KOtOpBX npeBbIaet 600C, nockOJIbKy 3TO MOXET npNBecTN K cepBe3HOy rpo3e B3pBa nII K Ioojapy.
Pn cyxoy6opKe C nCnoIb3OBaHneM Kopnyca BOJHO FOJIbTpa HeJIb3Y nCNoIb3OBaTb Pblncoc 6e3 BOJbl.
He nbinecocte nbinecocom IIOdei nn XNBOTbIX 6ydbTe OCO6eHNO OCTOpXHbI, He npnbJxaiTe BCacbIBaIOuIne HaKOHeuHKn K Tla3am N yShaM.
He nbinecocte 6e3 nIbtpoB nIc noBpeKdEHHbIMn fNlbTpamn.
He depknte n He noKlouaTe yctpoiCTBO K cetn MOKpbIM pyKaMn.
- Поберяп Te BCaBbAIOUm I ShaHr, TpybI n HacdKn - HaxOJaUmCn BHyTpM MyCop ydaInte.
Hepe3 nporH n dpyrne HepOBHOCTn NOla nbIeCoc CJeDyET nepeBO3NTb OCTopOxHo, UTO6bl N36EkaTb N3JIuSheRo BOJIHeHra BOJb B EMKoCTn. 3TO MOrI0 6bl CTaTB npuHHoB bI6poca He6OJbUoro KOJIueCTBa BOJb Hapjxu.
BoBpeMa pa6Otbl He nepeBopauNbAtb nbIeCoc n He 3aJIiBaTb BODy.
Ipeed hauanom pa6oTbI Bcerda npOBepaIte, uTO6bI BCE 3JIeMeHTbI yCTPOJCTBa 6bln npabNlbHO yCTaHOBJIeHbl.
He nCnoIb3yIte yCTpoIcTBO dIra cIeIe, IJI KOTOpbIX OHO He npEHa3NaueHo.
Ipeed 3aMeHoi npHaJekHOCTe CJeNyET BbIKIOHTb PbJIeCOC.
IprnoBop He npedHa3NaueH dJa pa6OTbIC BHeuHM BpeMeHHbIM BbIKIOUaTeJeM IIN OTdJIbHOJ CNCTeMOJ DnCTaHcNOHHOrO ynpabNeHnA.
He nCnoJb3yIte HAcOC, eCNI pe3epByap IJIa JnKIOCTN NcyT, INI KOrDa Bbl He noJIb3yeTeCb 0yHKUeN CTnPK NII INBlaXHOY6OpKn. 2TO MOKeT BblBaTb IOnaHaHne BO3dUxA B Hero. EcNI BKIOHTb HAcOC 6e3 BoDbl, OH NaHET HaPeBaTbCS, aBTOMaTHueCKa CnCTema 6e3ONaCHOCTN OTKIOHT PNTAHne HAcOCA. HAcOC He 3aNyCTITcR, NOKa HE OCTbIHET.
He noIb3yIteCb nbIeCOCOM NO6n3OCTN IeKOBOCnIaMeHЯIoXcra XnIkoCTeN BeIeCTB.
BvIy TOrO, UTo KOpNyc NbJIeOCa I3rOTOBJeH C PnlaCTMaCCOBbIX MaTePnaJIOB, Heo6xOJIMo DepeKaTb yCTPOiCTBO BdaJIIn OT BCaKnx IVCTouHnKOB TeIIa (paIaIaTOPOB, KaIopnΦepOB, NeueK n T. n.).
He 3aKynopnBaIte BXoHbIX N BbIXoHbIX OTBepCTNI PbIeOca.
Kajdny pa3 nocne npimHeHn yCTpoiCTBa, ero Heo6xOJIMO OCBO6OHTb OT cO6paHHOrO Mycopa, OunchTb N OCyUHTb EMKoCTb. TTo6bl OcyUHTb BHy- TpeHHOCtB Tpy6 N ShlaHra, YCTPOICTBO DoJIxHO B KaKOJ-TO MOMENT BpeMeHN BCaCbIBaTB CyXoi BO3dyX. 3TO P03BOJAEr I36eXaTb HEnpNIArTHOrO BO3HNIKHOBeHn 3aPaxa N 3IOBOHn.
Пылесoc педназнayен nckлючтьно дя DOMaшноуnotpe6lenia.
UcTpoIcTBo npeHa3NaueHO TOnbKO dJa DomaShero yNtpe6JeHnA.
XpaHnte yCTpoiCtBO n erO npOBd B MeCTe, HeNoctyHOM dIa deteN do 8 neT.
He no3boJnTe dETaM nIgpaTb np6Opom.
JaHbIM OOBpyoDBaHnEM MOyT PONb3OBaTbCJ DeTN B BO3paCTe CTapSe 8 let N IIOi C OgrpAHueHHbIMN FIn3NueCKnMn N yMCTBeHHbIMN BO3MOxHOCTaMn, a TAKKe IIOi 6e3 OByTA N 3HaHnY OOBpyoDBaHnY, NOI PrncmOTpOM NII N C HCTpyKtAxeM No 6e3OpanChOMy INcNoB3OBaHnIO OOBpyoDBaHnY TaK, YTO6bl yrPo3bl, CBa3aHhble C 3TmM, 6bln POHAThbl. JeTI 6e3 PrncmOTpa He DOJIxHbI PPOBOdntb OunchkU n yXoD NO OOBpyoDBaHnU.
DCTOPOXHO! He pa3pewaite deTЯm nrgaTb c pIeHko. Onacnoctb yduyb!
Korda 6aOK dIJI JIKIOCTN ABJAEcTcnyCTOIN KOrda He NOLb3yeTeCb cyHKnnei CTnPK INI YNCTKN MOKpbIM CnOCOBOM, He npimHeYte Hacoca. EcnHacoc 6ydt BkIouen 6e3 BObl, To NaHET HaRpeBaTbcra, ABTOMATnuecka CnCTema 6e3OnaCHoCTN ObecToHT nITaHne Hacoca. HAcoc He CMOXeT 3aNyCTNTbcra B DeICTBVE DO MOMENTa OCTbIBAHnia.
Y6eIITecb B TOM, YTO BCE TKAHNI NOBepxHOCTN FOJrTcA DJIa YNCTKM MOKpbIM CnOCo6OM HIN CTnPKN. Oco6eHHO B Cnyuae HeXhblkOBPOB, TKAHbIX BpyHyIO, BBINOHNTE np06y Ha He6OJIbShoN IOBepxHOCTN.
PpimHeTToIbKO 7aMnyHb, KOtOpBippeKOMeHdyETc npOn3BOIDTeJIem.
3NEKTKPOCTATNKA
y6opka nblncocom HeKOTOpbIX NOBepxHOCTe B yCIOBnIX Hn3KOH BnaXHOCTM MoKeT npNBeCTN K He3NaHTeNbHOMy HAKONJIeHNO CTaTNueCKOro 3JeKTPnueCTBa B yCTpoIcTBe. ToecTeCTBeHHoe ABLeHne, He NobpeJdaet YCTPOIcTBO, N He ABnETCra ERO DeΦeKTOM. TTo6bl CBecTI K MInHMMy 3TO ABLeHne, peKOMeHNdyeTcRA: pa3pJxAaTb yCTPOIcTBO, qACTo pPnKaCaAcb Tpy60i K MeTaNlHuEckm PpeMMeTAM B NOMEuHn, NOBbIaTaB BnaXHOCTb BO3dYxA B NOMEuHn, INCNoB3OBAtB O6UeIOCTynHble aHTNCaTnKN.


A. Motophtb arperat. 3Ta ceKzra BkIouaet B c68 dBirataJIb, BblKIOUaTeJIb n pa6OHe 3IeMeHbI. BepxHIOU qactb 3ToI ceKznn npedctabnreT co60f hIEPA, KOtOpbI clyKHT dJa OTfNlBTPOBKn nbIN n Dpyrnx MeKnx qactnC CBiyBaEMoR O Bo3dyxa. Iod neHHbIM fNlbTpom pacnoJoxKeH 6oJIbwo nnactMaccobBn nonlaBOK, KOTOpbI, B Mepy HApONHeHnE mKocTN, POnHMaeTcN n OTceKaET BaKyUMMeTpnueeCKoe DaBNeHne, TeM caMbIM npedynpeJxJaO Heo6XODIMOCTN ONOPOXHeHn EMKoCTN.
A1-BkIouaTeJIb Haocca
A2-BkIIOuATEbIbIeOcA
A3-CoeHHTeBHyI 3IeMeHT UHaHra IJr CTnpaBHOJ XIKKOCTN
A4-KopnycΦnIbTpαHEPA
A5-ΦnubtpHEPA
A6-KpbuIkaΦnIbTpαHEPA
A7 -ПОПЛавковая камра
A8-ПeHHbI ΦnIbTp
A9 - Геобдя napкови
A10-Держateьдяпepehockn
B. Emkocb. Cekuio emkocn o6pa3OBbIbAet ceHtpaIbHa aactb nbilecoca, cnykaaia nHaKoJIeHn Iblnn n rprzHO BODbl. 3Ta cekua npikpeHnKa MOTOPHomy arperaTy npiNocepndBe 3aXIMOB. BaQOK dIy IamNHy n YIcToB OBObl (CTnpaIbHa XnIDKOCTb) paCnoJooKeH NOd emkoctbIO BODHO Tpa.
B1-Pe3epByapIJIa BOJbl
B2-KopnycBoDHOOΦnIbTpA
B3 - Гбка Ворного Фильста
B4-Tpy6Ka BOdHOro 0nIbTp
B5-Pe3nHOBa npoknaKa
B6-3aXnMbbl
B7-ΓHe3a3aMKOB
B8 - BcacbIbAloUoiN Bnyck
B9-Pe3nHObIe 3aRnyuKIN KOpnyCa BOJyHOrO fNlbTpA
C. Baoy Ka TnpaBHyo XnKocTb. Baoy K JnXnKocTn CoepKHT Wamnyh N YnCTyIO Bovy. Korda Hacoc pa6oTaET, WAMNYb N BOa 6epyTcN 3 6aayka. XnKocTb, KOtopa NoctyNaet n3 6aayka cKB03b WnAHR, PaCnblraTeC. Baoy K JnXnKocTn HaxOJTcN Mexky EMKOCTbIO BOHOrO fNtpa N OCHOBaHHeM C KOJecNKaMn.
C1-Baouk dna cTnpaIbHOJ KNDKOCTN
C2-KopotKn cTnpaHbHn 7naHr
C3-CoeHHTeBHyI ΞJEMENT KOPOTKORO CTIPAbHORO WJaHra
C4-Yka3aTeIb ypoBHa BOIbl
D.OchOBaHne c KOJecNKaMn.
D1-OchOBaHne
D2-KoJecnKn
D3-3amok
E. UaHr. 3Ta ceKuB KJIouaet B Ce6a BCaCbBaIOUuN IuaHr C 3axBaTOM, CTnpaIbHbI IuaHr N BCaCbBaIOUe Tpy6Kn. BCaCbBaIOUuN IuaHr CoednHaTeC C ceKuNe eMKoCTn npn no
CpeDCTBe BVeDeHnAaHaRa K BCacbIbAIOUeMy BnyScy. BcacbIbAOUne Tpy6Kn CoednHareTcMexdy CO6o, a 3aTeM C 3aXBaTOM.
E1 - ΝnemeHT, KpeneBn BCaCbBAoUoi n shaHr
E2-3nemeHT, Kpeyui CTnpaHbI WJaHr
E3-ⅢaHdIaTpaJbHOJxNdkOcTu
E4-3aMOKtpy6bl
E5 - BcacbBaUoHm UaHr
E6-PbUarI03aTopaKnDkoCTn
E7-PerylTop cnblB cacbBaHn
E8-Pyka
E9 - Bcacbibaoune Tpy6kn (2 wT.)
E10-3amoknoJ3yHnncpeHcep
F. CtnpaBbHbI HaKoHeuHK. CtnpaBbHbI HaKOHeuHK nCnOJb3YeTcR dIra BCaCbIBaHna JxNkOCTe I3 KOBoP, DopoxKe, noIOB. C nOMoUb 3TOrO HaKOHeuHK paCnblraTe cTaK-Ke CtnpaBbHa JxNkOcTb. B clyae TBepdbix nOIOB HaKOHeuHK nCnOJb3YeTcR BMeCTe C npunctaBkoI.
F1 - CtnpaBbHn HaKoHeuHK
F2-Ппставka Дягвердьх NOВ
G. HakoheuHK dIy MmKo YnCTKn MOKpbim CnocO6om. 3TOT HaKOHeuHK COOTBeTCTByET dIy YnCTKn O6NBKn Me6eJI, UTOP N T.I., a TaKKe IJRA BCaCbIBaHna XnIKOCTN C y3KNX NOBepxHOCTeI.
G1-HaKoHeuHnK
H.Дононтельhoe ochaшиe.
H1-HanolbHo-KOBpOBAra roIobKa
H2-OcbexKnteB Bo3nyxa
H3 - LlAmnyHb
H4-PenhoracnteJIb
H5 - Μεπεναν πριστανκα
H6-Typ6oueTka
H7 - BcTpoeHHa 电Tka
H8-Держательшениевприставки/зацентсяпарковки
IPEPENPBbIM NcNoJIb3OBAHHeM
BVKOPNUCTAHHIIPINCTPOIO
ДяЗа6e3neueHЯ MaKcMaJIbHOrO KOMΦOpTy, YIcTOTn Ta 6e3NeKn BVKOpNCTaHHЯ, NINOOC Ochauhe O akBaΦIbTpom. Ye cneiaJIbHo po3pO6NeHn npIcTpi, kKn npI3NaueHn dny UNoBIOBaHHa HainDiPio6HiuX 3a6pydHIOUOx peOBoH i KIIiCiB y nobITpi, 0o 3diINCHIOETbcra 3aBDAKN φI3NUHM BnaCTNbOcTREM BoH. PpIHcIn pO6Ot N BoJHO rO φIbTp a NoJaRaE B Tomy, 10 NOBITpr, BCMOKtYBaHe NINOOCOM, npoxoIHT bpe3 6ak 3 BoDOU, 3aIIuAouH n Hi I6pyd i KIIiCiB.
CYXE PPNBUPAHHRA (3 KOPNYCOM BOJARHOO FJIbTPA)
- NepekoHaItecA, 0o npicTpi BIDKIIueHOb BID DxKepeNa KINBHeHHa.
- 3BilbHItb 3aTnCKaChi (B6) iPiHimiItb MOTOpHm 6Iok 3a pyKy.
- 3himiTb Kopnyc BODaHoro fInbTpTa (B2) (pnc.10) i HanOBnItb pe3epByap (B1) uNCTOIO BDOIO (MaKc. 2 nItpu). IHNkAToP MaKcMmaBHoro pIBHra BODn niJ vac cyxoro npi6npaHHra po3-taWoBaHn y HnXHi qactnHi Tpy6Kn BODaHoro fInbTpTa (B4). HeIoCTaTHra KInbkicTB BoIN MoKe npn3BeCTn Do WbUdIwOrO 3acmueHHra fInbTpBi.
- BctaHObitb Kopnyc akBaΦijbtpa Ha Noro Micce (B2)
- BctahOBiB MOTOpHn 6nOK y npucpi i 3aphiKyTe 3aTnckaui.
6.Пд'еданTe BCMOKTuBaJIbHnшlaHr (E5) (pnc.5) 3a donomoroIo φikcaTopa (E1)do BCMOKTuBaJIbHOrO OTBOpy ПИLOcoCa (B8).Пд'EDhaIte BCMOKTuBaJIbHi Tpy6Kn (E9) - KomnneKtyuoyi akcecyapn moxHa n'd'edHaTn do BCMOKTyBaIbHOI Tpy6n (E9) a6o 6e3nocepEnbOdo pyuKn (E8), 3aJexKHO BiD Tnny npn6npaHn, IKe Bn 6yndeBnKOHyBaTn. Akcecyapn aBTOMaTHUHO 3aikCyIOtbcra, 106 3anO6rTN BnnaKDOBomy Bi'd'EDHaHHIO.
8.ПдкючышурЖиВленнDoМержебоipo3eTKn, - YbIMKHTb nIIOOC KHONKO (A2)
10.Якwo niz yac npn6npanH B nIIOOC notpauNTb peOBOHa,ka cnpuHne CNIHOBaHH BODy BOJAHOMy fIbTpi, heraHNo npnHInHbPo6OtY, Bi'edHaHTe nIIOOC BID eNEKTPomepeXi Ta dOaIte y BDOy 2-3 KpanPi niHoracnka (H4).PpOdoXTe npn6puHn. RaQo NiHa He 3NkHe, 3amHITb BDOy B pe3epByapi.
YBATA! 3a6e3neuTn CBiKn apomat y KIMHati, B kii BN npnbpaTe, Haneitb Ha pInbTp HEPA 13 HeBENky KINbKiCTb OCbIXyBaHa nobITp (H2).
YB4A! HikonHe BcMOKtUte BDOy npn cyxomy npn6upaHHi. He6e3neKa nepenOBHeHHpe3epByapa dna BODi, kHaCNIIDOK, nowkOJKeHHNnlocoCa i HabITb ypaKeHH eNEKtpuHMM CTpyMOM.
YBARA! He BMUKaIe Haoc npn cyxomy npn6npaHHi. Pn3NK noXkoJKeHH naNoocca. He BnKOpncToByTe npn-ctpi 6e3 BCTaHOBHeHOro nopOnoHOBOrO fInbTpa.
Ipu cyxomy npubupanhi bukopucmobyume biodoibdi akcecyapu, kki donomoxymb bam ompumamu 6axahu pezylbam:
- ⅢITka DnI niDnOr Ta KInmib (H1) - BnKOpNCTOByeTbcra IJRA BnJaJIeHHa Nnly 3 KInmib, KInmOBnx Dopixok i TBepdx NIOrOBnx NOBepxOHb. BOHa OcHaueHa KOIIaTKamn DnI 3pyuHOCTi BnKOpNCtAHNr Ta KHONKOIO, HATnCKaHHa MKOIMoXHa BiDperyIIOBaTn ⅢITky dnn np6npaHHra TBepdx NOBepxOHb, HAnpNKnaI, nIIOr, napKeTy.
- ⅢINHHa HacJa (H5) - O3BOInTb DiCTaTnCra Do BaXKOIOCTynHnx Micu, np6nPaHHaIKNX BUMarae TOHOCti.
Typ6ouitka (H6) - 03BOLa€ peTeIbHO BnJaTn IepeCTb Domaunix TBapnH, 36npaETbcra Ha KInImax, a TAKOx BOLOcc, i CtaHe B HaroDi BCIOuN, De 3BnuaHi uitKn He cnpabJIOtbcra 3 NOCTaBJIeHIMM 3aDaayamN
iTerpoBaHa 3itKa (H7)-3aBjaKn II PO3TaUyBaHHIO Ha BCMOKTyBaIbHi Tpy6i, BOHa 3aBxN iD pykoIO, 3aBJaKN YOMy eKOHOMITb Yac. Iio6 cKOpNCtAtncH HeIO, 3HIMITb HAAhI akceCyapn 3tpy6Kn i O6epHITb 3itKy Ha 180^ do fikcaui 3amka.
YBAGA! Ⅲo6 BiD'εДнATN BCMOKTyBaJIbHI Tpy6KN Ta aKCEcyapn, HaTnCHiTB KhoNky 6IOKyBaHHa Tpy6KN (E4) Na BCMOKTyBaJIbHi Tpy6ci Ta/a60 ha pyuci.
YHJENHJABOJTEIPIBUPAHN
- IpekeohaiTeca, 0 npicpi BIDKIOueHO BID DKepeNa JINBHeHHa.
- Bi'edhaite Ta nHimitb motopn 6nok had pe3epByapom dna BOn Ta nepekoHaTeC, 1o npOioHOBn fInbTp (A8) BCTaHOBneHo.
3.Пидимить корпс Ворянофйтpa(B2),а NotIM KOHTeHep(B1). - 3HimiTb Tpy6ky akBaΦijbTp a (B4), ockiIbKn iid yac BOJorO np6npaHHa BOHa moKe npu3BeCTn do yTBOpEHn NiH. BcTaHOBITb rymoBi 3aRnyuKn (B9) Ha BVCTyIn 3 OTbOPaMn Ha dHi Kopnycy akBaΦijbTp a (B2) pnc.18.
- HanuTe uNCTy Body B emHicTb dIy MmHoro po3unHy (C1) (BukOpncTOByTe iHnKaTOp pIBn H BOni (C4) (pnc.11), 06 nepeBipnti piBeHb 3anOBHeHH) i amnyh (pnc.12). RaKo Ha nlauCi waMnyHIO He 3a3HaueHO IHse, HanuTe OIN KOBNaQOK waMnyHIO.
YB4A!Пд чс ВнКористань Функцчни чишени He habиваite Bodyв контейнер akbaфытpa B1!Чeпэр Byap 6уde потуноBO HanOBHIOBAtncBa BodOю пд чсни.
- BCTaHOBiB Ha Micce KoHTeHep (B1) TaK, 0o6 BCMOKTyBaIbHn OTBip (B8) 3haxOdBcra Ha npOTnJIexHi CTOpOHi BiD rHI3da KOpOTKOro MmHOrO 7HaHra B 6aky dny MMnHOrO po3uHy.
Iotim 3a6nokyute 3amkn (D3) i BcTaHOBITb KOpnyc (B2) B KOHTeHep (B1). BcTaHOBITb MOTOpHn 6nOK ta 3aΦikCyute 3amkn (B6).
- Пд'энгову короткий минийшианг (C2) до koHTeHepa дя миного розуну (C1) (pnc.15) i do po3'emy ha npabiiсторhi fiNbTpa HEPA (A5) (pnc.14).
8.Пд'едаи Te BCMOKTuBaIbHnшlaHr (E5) (pnc.5) 3a DoNOMOIO KpiIeHHa (E1)do BCMOKTuBaIbHoro OTBOPy nIIococa (B8).Пд'EDhaIte BCMOKTuBaIbHi Tpy6kn.
9.Пд' endaHne KpInneneHnaHra IJy uHHeHg (E2)do rHi3da(A3)HaMOTOpHomy BiDcIky.3'endHann 3dInCHIOETbcra WJnxOM BtncHeHHeJeMeMaTb RHI3do i nlaBHorO o6epTaHHry Noro npabOpuy (pnc.7). - 3aKpinitb HacaIky dnyuIeHnry (F1) Ha BCMOKTyBaIbHnx Tpy6kax a6o 6e3nocepEnhbo Ha pyuCi. HacaIky dny deIikaTHoro uIeHnry (G1) moXHa npIkpInITn IuWe do puKn. BkuOpNCTOByIte 3BnuaiHy HacaIky dnyuIeHnry KJIIMIB, KJIIMMOBx DopIXOK iPiJIoRn. DnyuIeHHa KpiceI, nBuHIB, uTOp, o6NBKn ABTomO6iJa TOIO BkuOpNCTOByIte HacaIKy dny deIikaTHoro BOIorO rUeHHra, npIkpINNBUn ii 6e3nocepENhbo Do puKn.
- Bi'ειηλητη Πριστρίν Bi επεκτρομερεχι.
- Ybimkhitb Hacoc 3a donomoroio nepemikkaa (A1).
- Μιοδ ὅνησει Σωμπύγήν ὅνηβερχήου, ὅτηςηθήν Σωμπύγήν ὅνηβερχήου Σωμπύγήν Σωμπύγήν Σωμπύγήν Σωμπύγήν Σωμπύγήν Σωμπύγήν Σωμπύγήν Σωμπύγήν Σωμπύγήν Σωμπύγήν Σωμπύγήν Σωμπύγήν 3 Σωμπύγήν Σωμπύγήν Σωμπύγήν Σωμπύγήν Σωμπύγήν Σωμπύγήν Σωμπύγήν Σωμπύγήν Σωμπύγήν Σωμπύγήν Σωμπύγήν
- BumkhItb Hacoc 3a donomoro kHonkn (A1).
- Hatachitb nepemikau nnilococa (A2), 06 aKTHByBaTHn 0yHKciIO BCMOKTyBaHH, i nepecyBaTe hacaKy no nobepxHi. Ppr uHsEHHi 06NBKN MOKe OJHOaCHO BiD6yBaTcR BCMOK-TyBaHH 6pydHOI BOHN Ta PO3NJIeHHMNIHO PO3HHy.
- Koln pe3epByap (B1) HanOBHntbca nioHO, HeraHNO BmKHiTb npncpti Ta BnInTe 3 HbOro 6pydHy BOy. Ppru cboMy nepeBiPe Tc KInbKiCTb MmHOro po3UnHy y BiNobiHOMy pe3epBya pi (C1). 3MeHNr NiHOyTBopeHHra, MoXHa DoaTa N KInbKa Kpaenb HeITpani3atopapinH (H4) B emHicTb (B1).
YB4A! B kOJHOMy pa3i He eoJaBaIe nIHorachNK do MmHoro po3uHy.
YBATA! Nicra Koxhoro np6npaHna Ha Kibka cekynd 3aHnTe nHocc ybIMKHeHM, 06 BIn BCMOKTyBaCyxe nobitpy. TaK BN npoBipnte i BucyHte BCIO CnCTeMy BCMOKTyBaHH, 0do3BOJNTb 3anObirn YTBOpEHNO HnepnEMHx 3anaxiB.
- Koln emhictb 3anOBHITbc6pydHm PO3HnHOM, nonnaBeueb aBtOMaTnUHO 3a6IOkye fynKcIIO BCMOKTyBaHHa, i DBuRyN NOUHe npaIOBAtn rOLOChiJe. Y cboMy BnuaDky HeraiHo BIMKHITb NlIOOC i Haoc, BHTaRHiTB BNJKy 3 PO3ETKn, BnIMiTB BCMOKTyBaHn WJHaR (E5) 3 BnyckHoro OTbOpY (B8), a TAKoX ShaHr DnA MInHoro PO3UnHy (E3). 3HimItb MOTOpHn 6loKa Ta CnpoXHITb KOtheHep. MakcunMaJIbHa KINbKiCTb BCMOKTyBaHOi PiINHn PpN CnpaCBOByBaHHi 3axNcTy cTAHOBHTb 6n3bKO 8,5 nItpiB. He3anOBHeHn B 6aKy o6'Em Ha 1,5 nItpi E 30HO 6e3neKn dIra DBnuHa.
YBAG!pepeTm, kB iD'EDHaTn 6ydb-aki Tpy6Kn 3 MmHm p03uHOM, cKHHbTe HaJIMKOBn TnCK y CnCTeMi, HATNCHyBUn Ha KInbKa cekynd nepemukaydo3aTopapidHn, BHTaRhyBUn npuCbomy wTeencenb 3 p03eTKn.
18.Дя чишени Тьердix пidlorobux порпгов,наррклад,плntки,марму.Toц.Пркpinib utky дя Тьердix nobepxohb (F2)do Hacadkn dny BOLOROчшени (F1).ВИКористовуочи насдку (F1),BNMOKTe npi6paTn,HanprknaD,Body,poIHTy 3 nocydommhoi Ch npalbHOI MaunHn a6o nicra po3MOPoxyBaHHa XONODINbHnka Ch MOp03NlbHOI KaMepn.
YBAGA! BnKOpNCTaHn nnococa 3 HeDoTpMaHnHa HabeDeHNX BnSe iHcTpyKci MoKe npn3BeCt n do yTbOpeHHaHdMipHOi KInbKOcTI niH, HaNlNsOK kOo MoKe BnHTu Chee3 BnXidHn fInbTp. Jkso BnHnKla TaKa CHTyaCi, BnMKHiTb npcTpi, BnIMtB BNky 3 p03eTKn, cnopoKHiTb pe3epByap dJa BODn, ouhctiTb Kopnyc BOJrHorO fInbTpTa BnCywiT b Noro. Iotim BnIMtB Takox KfInbTp HEPA i BucywiT b Noro. IpomnTe noponoHOBni fInbTp y nonNaBKObi cekii Ta daIte Nomy BnCOxHyTu. 3aIIuSTE np6nn3Ho Ha 2 roDHH, uo6 niHa B DnRhyi BnCOxHa.
OuHcEHHaI OOrJa
- Перед поатkom 6удь-яких onepaцi 3doğлamy abo ouhiueHHBIMKHiTb npictpi i BmMiTb BnIky 3po3eTKN.
- Pered BuaaeneHm 6pyu Ta 3a6pydneHOi piHNn Bi'EDHaIe BCMOKTyBaIbHn IaHr, po36NoKyTe 3aTnCKaHi Ta NiHIMtB MOTOpHn BiDcIK.
- CnpoxhItb, noocitb i Bucyitb 6ak dJa MmHoro pozunHy ta pe3epByap dJa BOHN.
- Perioiunno npommbaite npoohOBn fIbtp (A8) i ry6kn akBaphiIbtra (B3) MnIbHm po3- y nlooc. He mnte ci fIbtpn B rapui Bodi i He nepitb ix y npalbi Maunhi. Y pa3i no- shkoJKeHHa miHiTb fIbTpni Ha HOBI.
- Npebipte, uB bno pyxaetbcn Klanah y nonnaKBoBi kamepi. y pa3i Heo6xioHocti, ouNctitb noro (pnc. 16). Uo6 nepebipntu po60Tu nonlaBua, iHIMITb MOTOpHn 6Iok i ctpycitb Hm.
- Peryla npnepebipnTe uHCTOy fIbtpa HEPA 13. Ibtp MoXHa MHTn iD npOTouHO BOIO. Picra TpBaIoro BnKOpncTaHHa IbTp BtpaAe CBOI BnactuBOcTi. 3 orJny Ha ue noro cnid 3amHHTN HOBm.
- 3i6paHI BCMOKTyBaIbHi Tpy6n Ta akcecyapn MoXHa 3aKpInTu Ha nllococi, npNKpInBUn napKyBaIbHn raYok (H8) y napKyBaJIbHe rHi3do (A9). TaKoX MoXHa po3MiCTTu 1iJINHHn aadTep Ha iHOMy KINi raUka (H8).
TexhihnapaMeTpnaBeJeHoHa
3aBODcBi Ta6nuci Bnpo6y.
MaKcMaJIbHn pIBeHb uMy: LwA = 81 d5
IobxHa Ka6eJIO XnBneHHa: 6M
IPX4 C E

YBAGA!ΦipMa MPM agd S.A.3aIIuIe 3a co6oIO npaBO BVocHTN TexHiCyHI 3MiHN.
IPABINbHA YTNlI3AUJIA PPOyK TY (biXoJn eJeKtpuHoro Ta eJeKtpoHoro 06naHaHHa)
MapkybaHH, po3miuehe Ha Bnpo6i, Bka3ye Ha Te, 10 Bnpi6 He cnid BnKndaTn pa3om 3 iHmMn no6yTOBmN BiXODAMN nCJRA 3akInHeHH TepmiHy Ioro EKCnnyaTaui. BnKOpNCtane 6nlaHaHH MoKe MaTH HeaTMBHn BnINb HA HABKOnuHHe cepEOBunse Ta 3DopOB'AnJepe3 NoteHnHn BMicT He6e3neHnX peOBN, cyMiwe Ta KOMNoHEnTB. 3MiUyBaHH eEeKtpuHnx BiXoDiB 3 iHmMn BiXoJamn a60 ix enpofeciHne pO3bupAHn MOKe npn3BeCTn Do BnIeHHpeOBN, WkIDNBx DnA 3DopOB' Ta HABKO
nHbOre cepeobu. Bkopctann npictpi Heo6xio 3aTn Ha nyKt 360py BiXoDIB eektpunHoro Ta eektpoHoro oBnaHaHH. O6 OTPmuATn DeTalHy iHopmaio npo Micpe nobepHeHH eektpunHix Ta eektpoHHx BiXoDIB, KopcTyBaevi Heo6xio 3BepHTncrdo NyKt y 360py KOMyHaNbHoro obnaHaHH a60 3aBody 3 nepepObeHH BIXODIB.
We wish you satisfaction from using the product and invite you to check a wide range of other MPM appliances
Xenaem noIyumb ydoobolbcmbue om ucnolb3oBaHua Haueo npodykma u npuznaaem BocnoIb3oBambcra uupokum KOMMepueckum npedloxKeHuem KOMnauu MPM
- JAK POSTEPOWAC W PRZYPADKU REKLAMACJI
- ZADZWON
- ELECTROSTATICS
- A base with wheels.
- Additional accessories.
- BEFORE FIRST USE
- APPLIANCE ASSEMBLY
- USING THE APPLIANCE
- DRY CLEANING (WITH WATER FILTER HEAD)
- Using the equipment described above you can clean:
- WET WASHING AND CLEANING
- ATTENTION! When using a function of surface washing do not put water into the water filter container (B1).
- WARNING! Never add antifoam agent to container (C1)
- CLEANING AND MAINTENANCE
- ATTENTION! Filters must not be cleaned in hot water or washed in a washing machine.
- PROPER DISPOSAL OF THE PRODUCT (waste electrical and electronic equipment)
- YKA3AHNЯ NO TEXHnKE B30PACHOCTN PIMHEHnYCTPOICTBA
- DCTOPOXHO! He pa3pewaite deTЯm nrgaTb c pIeHko. Onacnoctb yduyb!
- 3NEKTKPOCTATNKA
- D.OchOBaHne c KOJecNKaMn.
- IPEPENPBbIM NcNoJIb3OBAHHeM
- BVKOPNUCTAHHIIPINCTPOIO
- CYXE PPNBUPAHHRA (3 KOPNYCOM BOJARHOO FJIbTPA)
- YHJENHJABOJTEIPIBUPAHN
- OuHcEHHaI OOrJa
- IPABINbHA YTNlI3AUJIA PPOyK TY (biXoJn eJeKtpuHoro Ta eJeKtpoHoro 06naHaHHa)
Brand : MPM
Model : Vira MOD22
Category : Vacuum Cleaner