SRR 3 A1 - Shaver SILVERCREST - Free user manual and instructions
Find the device manual for free SRR 3 A1 SILVERCREST in PDF.
| Product type | Rotary shaver |
| Brand | SilverCrest |
| Model | SRR 3 A1 |
| Dimensions (L x H x D) | 53 x 140 x 59 mm |
| Weight | 173 g |
| Power supply | 220-240 V ~ 50 Hz, 4 W |
| Battery type | Integrated rechargeable NiMH |
| Charging time | 60 minutes |
| Cutting system | 3 rotary heads with double ring |
| Blade material | Stainless steel |
| Integrated trimmer | Yes, pop-up |
| Usage | Dry shaving only |
| Protection | Class II |
| Waterproof | No, do not use in shower |
| Operating temperature | 0 °C to +40 °C |
| Cleaning | Cleaning brush included; washable heads under water |
| Head replacement | Every 2 years recommended |
| Included accessories | Protective cap, power cable, travel pouch, cleaning brush |
| Warranty | 3 years |
| Manufacturer | TARGA GmbH, Germany |
Frequently Asked Questions - SRR 3 A1 SILVERCREST
User questions about SRR 3 A1 SILVERCREST
0 question about this device. Answer the ones you know or ask your own.
Ask a new question about this device
Download the instructions for your Shaver in PDF format for free! Find your manual SRR 3 A1 - SILVERCREST and take your electronic device back in hand. On this page are published all the documents necessary for the use of your device. SRR 3 A1 by SILVERCREST.
USER MANUAL SRR 3 A1 SILVERCREST
Last Information Update:
01/2013-Ident-No.:SRR 3 A1 012013-1
DE AT CH
User manual and service information
IAN 89083
IAN 89083
DE AT
CH NL
Deutsch 2
Français....23
Italiano 44
Nederlands 65
English......86
Inhalt
Einleitung....3
natural_image
Diagram of a brush applying material to a mechanical component (no text or symbols visible)natural_image
Cross-sectional diagram of a mechanical assembly with no visible text or symbolsnatural_image
Diagram showing a device with internal components before and after assembly (no text or symbols)natural_image
Technical line drawing of a mechanical assembly with no visible text or symbolsnatural_image
Mechanical assembly diagram showing a gear-like component transforming into a multi-cylinder assembly (no text or labels)natural_image
Mechanical assembly diagram showing three circular components with a directional arrow (no text or labels)natural_image
Illustration of hands holding a small object with an arrow indicating direction (no text or symbols)natural_image
Diagram of a mechanical component with a rotating arrow indicating motion (no text or symbols)natural_image
Diagram showing a mechanical component with a top view and a cross-section view (no text or symbols)natural_image
Mechanical assembly diagram showing three circular components with a directional arrow indicating motion (no text or symbols present)natural_image
Mechanical assembly diagram showing a gear-like component before and after transformation (no text or labels)natural_image
Diagram showing a device with internal components before and after assembly, no text or symbols presentnatural_image
Cross-sectional diagram of a mechanical or electrical component with internal components and an arrow indicating direction (no text or symbols)natural_image
Mechanical assembly diagram showing a multi-tiered gear mechanism transforming into a multi-ring component (no text or labels)natural_image
Mechanical assembly diagram showing three circular components mounted on a base with an arrow pointing to one (no text or symbols present)natural_image
Mechanical assembly diagram showing three circular components with a directional arrow (no text or labels)natural_image
Mechanical assembly diagram showing a gear-like component before and after transformation (no text or labels)natural_image
Diagram showing a device with internal components before and after assembly, no text or symbols presentnatural_image
Symbol of a trash bin crossed with no text or numbers, representing environmental restriction (no text present)natural_image
Line drawing of a handheld device with a dial and two black arrows pointing to the handle (no text or symbols)natural_image
Technical diagram of a device interior showing internal components and directional arrows (no text or labels)natural_image
Diagram of a hand using a brush to press or adjust a small object on a mechanical component (no text or symbols present)natural_image
Cross-sectional diagram of a mechanical or electrical component with internal components and an arrow indicating direction (no text or symbols)natural_image
Diagram showing a mechanical assembly before and after transformation, with no visible text or symbols.natural_image
Cross-sectional diagram of a mechanical or electrical component with internal components and an arrow indicating direction (no text or symbols)natural_image
Mechanical assembly diagram showing a three-tiered mechanical component transforming into a multi-layered circular component (no text or symbols present)natural_image
Mechanical assembly diagram showing three circular components with a pointer indicating direction (no text or labels)natural_image
Illustration of hands holding a small object with an arrow indicating direction (no text or symbols)natural_image
Diagram of a mechanical component with a rotating arrow indicating motion (no text or symbols)natural_image
Diagram showing a mechanical component with a top view and a cross-section view (no text or symbols)natural_image
Mechanical assembly diagram showing three circular components with a magnified inset (no text or labels)natural_image
Diagram showing a mechanical assembly before and after transformation, with no visible text or symbols.natural_image
Diagram showing a mechanical assembly before and after transformation, with no visible text or symbols.natural_image
Cross-sectional diagram of a mechanical or electrical component with internal components and an arrow indicating direction (no text or symbols)natural_image
Diagram showing a mechanical assembly transforming into a multi-ring component (no text or symbols present)natural_image
Mechanical assembly diagram showing three circular components with a directional arrow pointing to one (no text or symbols present)natural_image
Mechanical assembly diagram showing three circular components with a directional arrow indicating motion (no text or labels)natural_image
Diagram showing a mechanical assembly transformation from a circular component to a multi-cylinder assembly (no text or labels)natural_image
Diagram showing a device interior with three circular components, one being rotated and the other tilted (no text or symbols)natural_image
Symbol of a trash bin crossed with no text or numbers, representing waste sorting or disposal (no text present)natural_image
Line drawing of a handheld device with a central button and two black arrows pointing to the ports (no text or symbols)natural_image
Technical diagram of a mechanical device with internal components and directional arrows indicating movement (no text or symbols)natural_image
Diagram of a hand using a brush to press down three circular components on a base, with arrows indicating motion (no text or symbols)natural_image
Technical line drawing of a mechanical assembly with internal components and an arrow indicating direction (no text or symbols)natural_image
Diagram showing a device with internal components before and after assembly (no text or symbols)natural_image
Technical line drawing of a mechanical assembly with no visible text or symbolsnatural_image
Mechanical assembly diagram showing a three-cylinder engine with internal components and a multi-cylinder engine (no text or labels)natural_image
Mechanical assembly diagram showing three circular components with a directional arrow (no text or labels)natural_image
Illustration of hands holding a small object with an arrow indicating direction (no text or symbols)natural_image
Illustration of a hand holding a textured object with a curved arrow indicating motion (no text or symbols)natural_image
Diagram showing a mechanical component with a top view and a cross-section view (no text or symbols)natural_image
Mechanical assembly diagram showing three circular components with a directional arrow indicating motion (no text or symbols)natural_image
Mechanical assembly diagram showing a gear-like component before and after transformation (no text or labels)natural_image
Diagram showing a device with internal components before and after assembly, no text or symbols presentnatural_image
Technical line drawing of a mechanical assembly with no visible text or symbolsnatural_image
Mechanical assembly diagram showing a cross-section of a bearing housing and its internal components (no text or labels)natural_image
Mechanical assembly diagram showing three circular components mounted on a base with an arrow pointing to one (no text or symbols present)natural_image
Mechanical assembly diagram showing three circular components mounted on a base, with an arrow pointing to one component (no text or symbols present)natural_image
Diagram showing a mechanical assembly transforming into a multi-layered structure (no text or symbols present)natural_image
Diagram showing a device interior with a top view and its side view, no text or symbols present.natural_image
Symbol of a trash bin crossed with no text or numbers, representing waste sorting or disposal (no text present)natural_image
Line drawing of a handheld device with a dial and control buttons (no text or symbols)natural_image
Technical diagram of a device's internal components with arrows indicating assembly or movement (no text or symbols present)natural_image
Diagram of a hand using a brush to press or install a small object on a mechanical base (no text or symbols visible)natural_image
Cross-sectional diagram of a mechanical or electrical component with internal components and an arrow indicating direction (no text or symbols)natural_image
Diagram showing a mechanical assembly before and after transformation, with no visible text or symbols.natural_image
Cross-sectional diagram of a mechanical or electronic component with internal components and an arrow indicating direction (no text or symbols)natural_image
Mechanical assembly diagram showing a three-tiered mechanical component transforming into a multi-layered circular assembly (no text or symbols)natural_image
Mechanical assembly diagram showing three circular components with a pointer indicating direction (no text or labels)natural_image
Illustration of hands holding a small object with an arrow indicating direction (no text or symbols)natural_image
Diagram of a mechanical component with a rotating arrow indicating motion (no text or symbols)natural_image
Diagram showing a mechanical component with a top view and a cross-section view (no text or symbols)natural_image
Mechanical assembly diagram showing three circular components with a magnified inset (no text or labels)natural_image
Diagram showing a mechanical assembly before and after transformation, with no visible text or symbols.natural_image
Diagram showing a mechanical assembly before and after transformation, with no visible text or symbols.natural_image
Cross-sectional diagram of a mechanical device with internal components and an arrow indicating direction (no text or symbols)natural_image
Diagram showing a mechanical assembly transforming into a multi-ring component (no text or symbols present)natural_image
Mechanical assembly diagram showing three circular components with a directional arrow pointing to one (no text or symbols present)natural_image
Mechanical assembly diagram showing three circular components with a directional arrow pointing to one (no text or labels)natural_image
Diagram showing a mechanical assembly transforming into a complex mechanical component (no text or symbols present)natural_image
Diagram showing a mechanical assembly before and after transformation, with no visible text or symbols.natural_image
Symbol of a trash bin crossed with a diagonal line, representing no waste or discharge (no text or numbers present)
natural_image
Line drawing of a handheld device with a central button and two black arrows pointing to the ports (no text or symbols)natural_image
Technical diagram of a device interior with labeled components and arrows indicating movement or assembly (no readable text or symbols)Safety instructions 89
Copyright 92
Prior to use....93
Charging the battery 93
First use 94
Cleaning / maintenance....95
Cleaning 95
Cleaning after each use 95
Cleaning every two months 96
Maintenance....99
Environmental and disposal information ....101
Removing the battery.... 101
Conformity information 103
Troubleshooting 104
Warranty and servicing advice....105
Introduction
Thank you for purchasing a SilverCrest product.
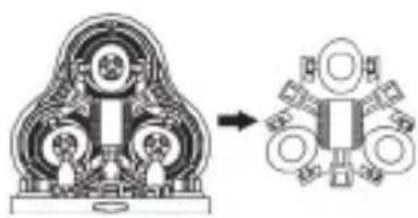
The SilverCrest SRR 3 A1 rotary shaver, referred to below as shaver, has a triple-head shaving system with contour adjustment and double ring system. The stainless steel precision blade system thus ensures optimal shaving results. The integrated trimmer enables the trimming of long facial hair or sideburns.
Intended use
The shaver may only be used privately and not for industrial or commercial purposes. Furthermore, the shaver may not be used outdoors. This shaver meets all relevant norms and standards in conjunction with CE conformity. In the event of any modification to the shaver that was not approved by the manufacturer, compliance with these standards is no longer guaranteed. The manufacturer does not accept any liability for any resulting damage or faults in such cases.
Please observe the regulations and laws in the country of use.
Supplied items
- Shaver
- Protective cover
- Mains cable
- Travel case
- Cleaning brush
• These instructions
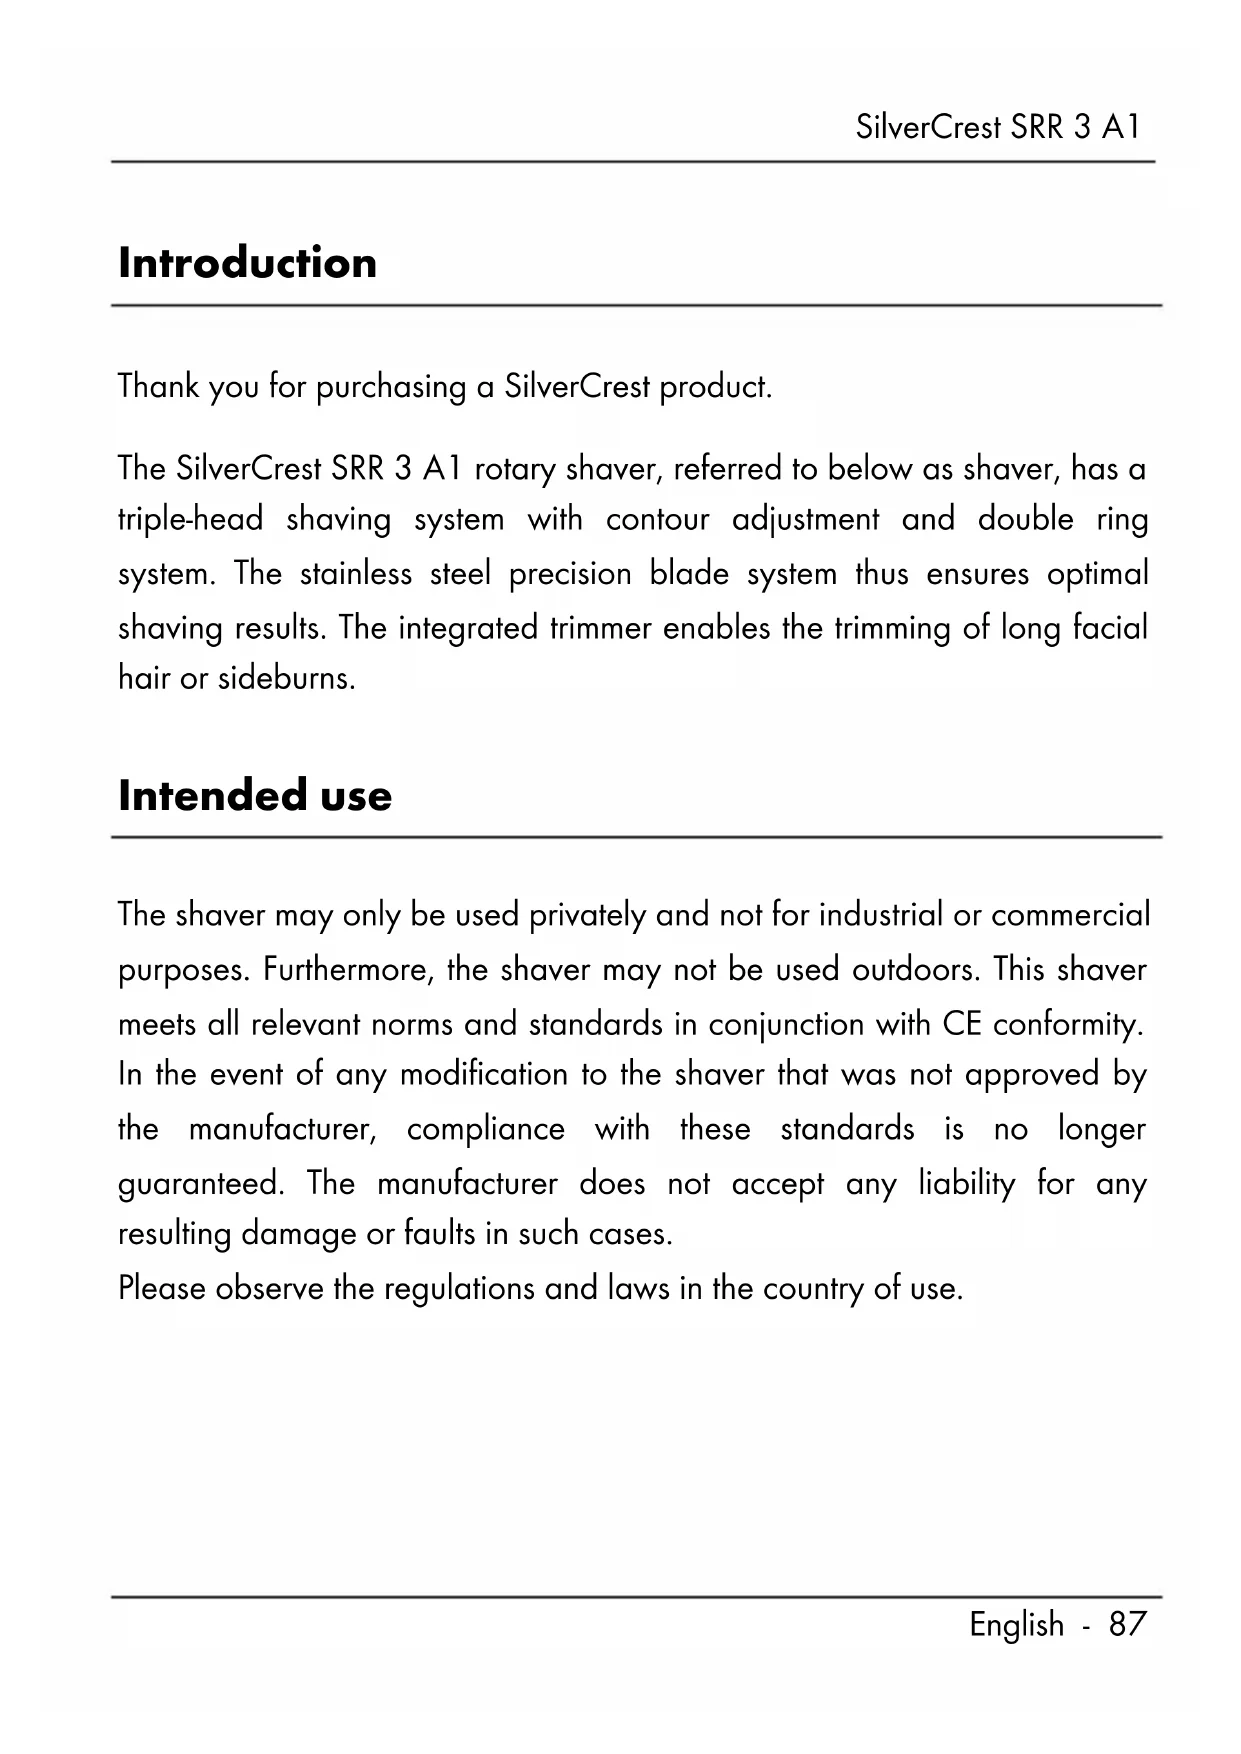
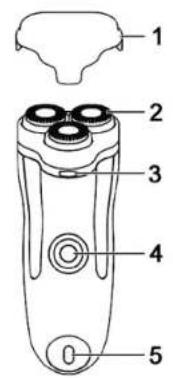
These instructions have a fold-out cover. The shaver is illustrated with a numbering system on the inside of the cover. The numbers indicate the following:
1 Protective cover
2 Shaving system
3 Release button
4 On/off switch
5 Charging indicator
6 Trimmer
7 Mains connection
Technical data
| Operating voltage 220-240V | ~ 50Hz |
| Power consumption 4W | |
| Protection class II | |
| Charging time 60 minutes | |
| Dimensions | approx. 53 x 140 x 59 mm(W x H x D) |
| Weight approx. 173 g | |
| Operating temperature 0 °C to +40 °C | |
Safety instructions
Before using the shaver for the first time, please read the following instructions carefully and take note of the safety warnings, even if you are familiar with the use of electronic devices. Store these instructions in a safe place for future reference. If you sell the shaver or pass it on, always include these instructions.

This symbol indicates important information for safe operation of the shaver and the safety of the user.

This symbol indicates that the shaver is not watertight and may not be used in the shower or bath.

This symbol indicates other important information on the topic.

This shaver is not intended for use by persons (including children) with limited physical, sensory or mental abilities or for those lacking experience and/or knowledge unless they are supervised by a person responsible for their safety or if this person has instructed them on how to use the shaver correctly. Children should always be supervised to ensure that they do not play with the shaver.

Small parts can be fatal if swallowed. Also note that there is a risk of suffocation if air passages are blocked by the plastic packaging.

Keep the shaver out of the reach of children.

CAUTION! Keep the shaver dry.
The shaver is not watertight and may never be used in the shower or bath. Furthermore, the shaver may never be completely immersed in water. It poses an electric shock risk!

If the shaver falls into water, first unplug the mains cable from the socket as there is a risk of an electric shock otherwise!

If you notice any smoke, unusual noises or strange odours, switch off the shaver immediately and unplug the mains plug from the socket. In these cases, the shaver should not be used until it has been inspected by authorised service personnel. Never inhale smoke from a potential device fire. If you have inhaled smoke, however, consult a doctor. The inhalation of smoke can be harmful.

The shaver may not be damaged in order to avoid hazards.

Ensure that no fire sources (e.g. burning candles) are placed on or near the shaver. It poses a fire hazard!

The shaver may not be exposed to any direct heat sources (e.g. heating) or any direct sunlight or artificial light. Also ensure that the shaver is not exposed to any excessive shocks or vibrations. Furthermore, no foreign objects may penetrate the shaver. Otherwise, the shaver could be damaged.

The shaver may not be exposed to extreme temperature fluctuations as this could result in condensation and electrical short circuits.
Cables

Never touch the mains cable with wet hands as this may cause a short circuit or an electric shock.

A damaged mains cable can cause a fire or an electric shock. Inspect the mains cable from time to time. Do not use adapter plugs or extension cables that do not comply with applicable safety standards, and do not make any alterations to the mains cable!

Never place furniture or other heavy objects on the mains cable and take care that the cable is not kinked, especially near the plug and connection socket. Ensure that the mains cable is neither clamped nor in contact with hot surfaces. Never tie a knot in the mains cable and do not tie cables together. Ensure that all cables are placed so that no one can trip over them and they do not cause an obstruction.

Always handle the mains cable by the connector and do not pull on the cable itself.
Copyright
All information contained in these instructions is subject to copyright and is provided for information purposes only.
It is only permitted to copy or duplicate data and information w express and written consent of the author. This also includes commercial use of the content and data.
The text and illustrations are based on the state of the art at the time of printing.
Prior to use
Remove the shaver and the accessories from the packaging.
Check the shaver for signs of damage. If damaged, the shaver may not be used.
The shaver can be operated via a battery or mains supply.
Charging the battery
The shaver is equipped with an integrated environmentally friendly NiMH high-performance battery. You can charge it with the supplied mains cable.

To extend the built-in battery life, we recommend that you discharge the battery fully before recharging it. The charging indicator [5] flashes red when the battery is fully discharged.
To charge the battery, connect the mains cable to the mains connection [7]. Then plug the other end of the mains cable into a mains socket. The charging indicator [5] lights up red while charging. A full charge cycle takes approximately 60 minutes. If charging is complete, the charging indicator [5] flashes green. Then unplug the cable from the mains socket to save energy.
First use

Only use the shaver for dry shaving.
Remove the protective cover [1]. Press the on/off switch [4] to switch on the shaver. The switch frame lights up red during operation. Move the shaver over your skin in circular motions while exercising slight pressure. Always hold the shaver at a right angle to the skin. You can also hold the skin taut with your other hand to raise your facial hair.

Please note that there may be a slight redness or irritation of the skin after shaving. This is quite normal because your skin must first get used to this manner of shaving. It may take two to three weeks for your skin to get used to the shaver.
You can trim long facial hair or sideburns using the trimmer [6]. Pull out the trimmer [6] to use it and push it back after use.
Switch off the shaver after shaving by pressing the on/off switch [4] off again. After using the shaver, put the protective cover [1] back on the shaving system [2] . Clean the shaver as described in the following section.
Cleaning / maintenance
Cleaning
Unplug the shaver from the mains power supply before cleaning as there is a risk of an electric shock!
Switch off the shaver before cleaning it in order to avoid hazards.
Never immerse the shaver in water or other liquids. Otherwise, liquid will penetrate it because the casing is not watertight.
Do not use compressed air, scouring pads or corrosive cleaning agents to clean the shaver.
It is recommended that the shaver is cleaned after each use to achieve optimal shaving results.
Cleaning after each use
natural_image
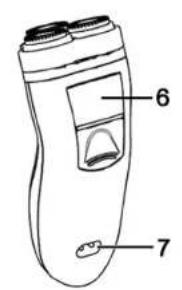
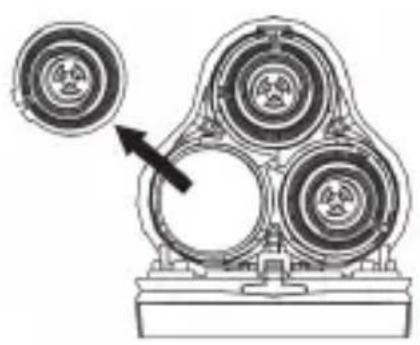
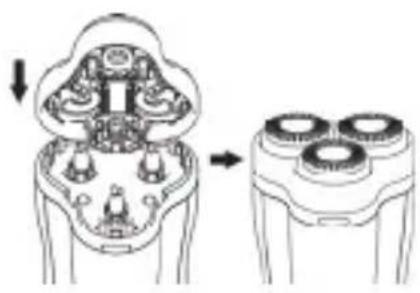
Diagram of a hand using a brush to press down a cylindrical object on a base, with arrows indicating motion (no text or symbols present)Remove the protective cover [1]. Then clean the shaving heads of the shaving system [2] with the enclosed cleaning brush.
natural_image
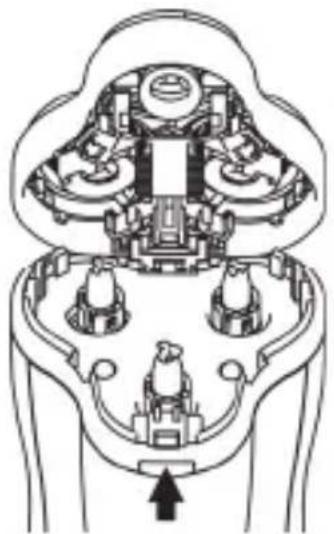
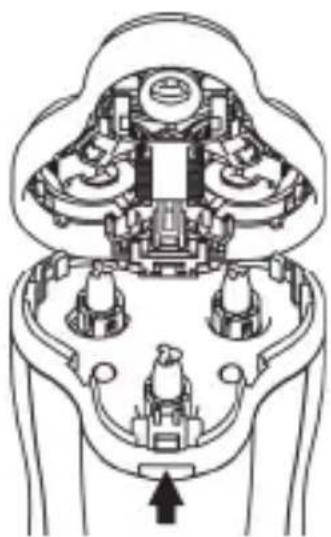
Cross-sectional diagram of a mechanical or electrical component with internal components and an arrow indicating direction (no text or symbols)Press the release button [3] to open the shaving system. Then clean the inside of the shaving system [2] and the collection chamber with the enclosed cleaning brush.
natural_image
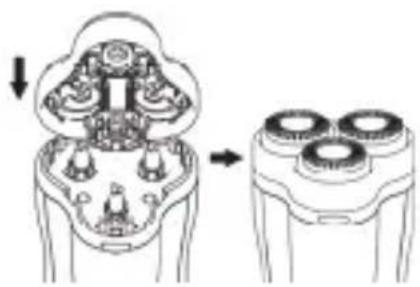
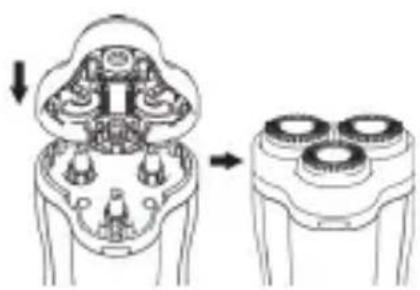
Diagram showing a device with internal components before and after assembly (no text or symbols)After cleaning, close the shaving system [2] again until it audibly engages. Put the protective cover [1] on again.
Cleaning every two months
natural_image
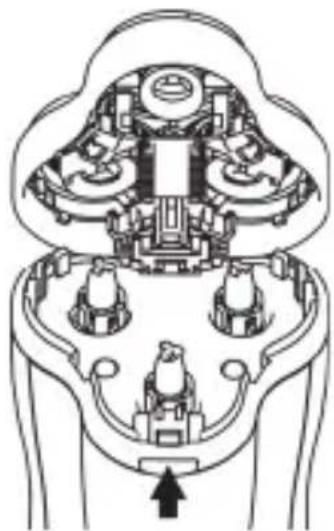
Technical line drawing of a mechanical assembly with no visible text or symbolsRemove the protective cover [1]. Press the release button [3] to open the shaving system.
natural_image
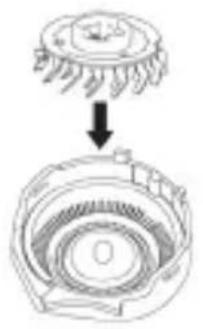
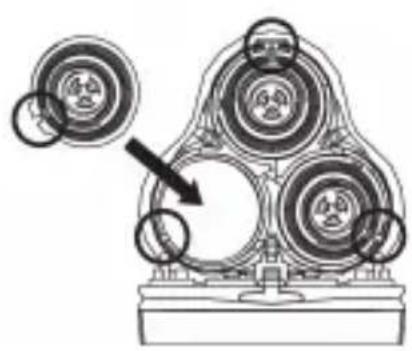
Mechanical assembly diagram showing a cross-section of a gear-like component before and after assembly (no text or labels)By pulling, you prise the shaving head holder from its locking mechanism. Then remove the shaving head holder.
natural_image
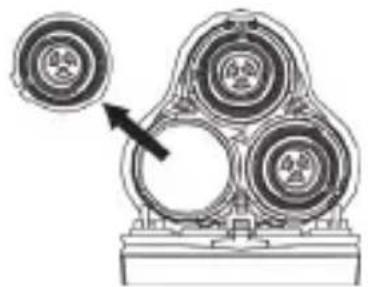
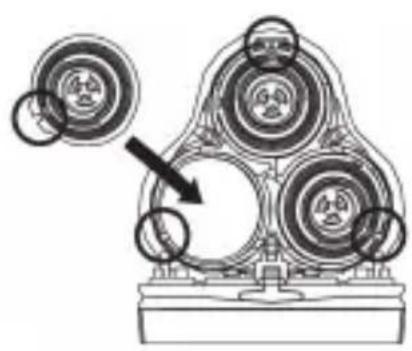
Mechanical assembly diagram showing three circular components mounted on a base, with an arrow pointing to one component (no text or symbols present)Remove the shaving heads. A shaving head consists of a guard and a razor blade.

Always clean a guard with the corresponding razor blade because they work together when the shaver is in use. The shaving results may deteriorate if the guards and razor blades are interchanged.

Alternatively, you can rinse the shaving heads under running water. Let the shaving heads dry completely before installing them.
natural_image
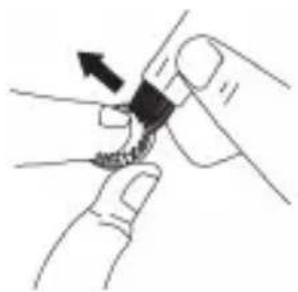
Illustration of a hand holding a small object with an arrow indicating direction (no text or symbols)Remove the razor blade from the guard. Then clean the razor blade carefully with the enclosed cleaning brush.
natural_image
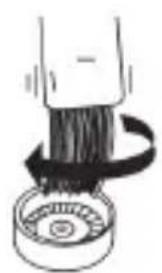
Illustration of a mechanical component with a rotating arrow indicating motion (no text or symbols)Clean the guard with the enclosed cleaning brush.
natural_image
Diagram showing a mechanical component with a top view and a cross-section view (no text or symbols)Re-insert the razor blade in the guard.
natural_image
Mechanical assembly diagram showing three circular components with a directional arrow indicating motion (no text or symbols present)Re-insert the clean shaving heads in the shaving unit. Make sure that the slot in the shaving head lies in the channel of the shaving unit.
natural_image
Mechanical assembly diagram showing a cross-section of a mechanical component before and after assembly (no text or labels)Re-insert the shaving head holder in the shaving unit. Press the centre of the shaving head holder until it audibly engages.
natural_image
Diagram showing a device interior with internal components and a separate view of a three-cylinder head (no text or symbols present)After cleaning, close the shaving system [2] again until it audibly engages. Put the protective cover [1] on again.
Maintenance
Replace the shaving heads every two years to consistently achieve optimal shaving results.
You can obtain information on spare parts via our service hotline (see page 106).

Unplug the shaver from the mains power supply before maintenance as there is a risk of an electric shock!

Switch off the shaver before maintenance in order to avoid hazards.
Proceed as follows to replace the shaving heads:
natural_image
Cross-sectional diagram of a mechanical or electrical component with no visible text or symbolsRemove the protective cover [1]. Press the release button [3] to open the shaving system.
natural_image
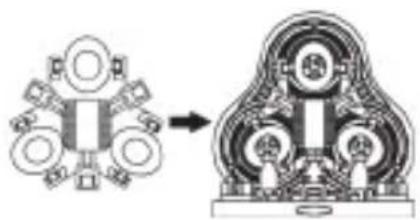
Mechanical assembly diagram showing a three-cylinder assembly transforming into a multi-ring device (no text or symbols present)By pulling, you prise the shaving head holder from its locking mechanism. Then remove the shaving head holder.
natural_image
Mechanical assembly diagram showing three circular components with a pointer indicating direction (no text or labels)Remove the shaving heads. A shaving head consists of a guard and a razor blade.
natural_image
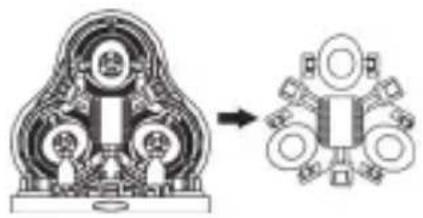
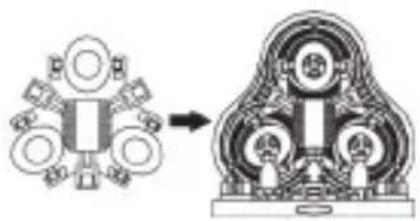
Mechanical assembly diagram showing three circular components mounted on a base, with an arrow pointing to one component (no text or symbols present)Re-insert the new shaving heads in the shaving unit. Make sure that the slot in the shaving head lies in the channel of the shaving unit.
natural_image
Mechanical assembly diagram showing a piston-like component transforming into a multi-cylinder engine (no text or labels)Re-insert the shaving head holder in the shaving unit. Press the centre of the shaving head holder until it audibly engages.
natural_image
Diagram showing a device with internal components before and after disassembly, no text or symbols presentClose the shaving system [2] again until it audibly engages. Put the protective cover [1] on again.
Environmental and disposal information
natural_image
Symbol of a trash bin crossed with two crossed lines, no text or numbers presentWhen this symbol appears on a product, this indicates that the product is subject to the European Directive 2002/96/EC. All electrical and electronic devices must be disposed of separately from household waste at designated disposal points. Disposal of old devices in this manner will prevent harm to the environment and human health hazards. For further information regarding disposal of old devices in accordance with the directive, contact your local government office or the retailer where you purchased the device.
Dispose of the packaging in an environmentally compatible manner. Cardboard can be put out for municipal paper collections or brought to public collection points for recycling. Films and plastic used for packaging the device are collected by your local disposal services and disposed of in an environmentally compatible manner.
Removing the battery
This shaver contains a built-in battery. Remove the battery before you dispose of the shaver.

Unplug the shaver from the mains power supply before removing the battery as there is a risk of an electric shock!

CAUTION! RISK OF INJURY!
Switch off the shaver before removing the battery.

Warning! The shaver is destroyed when the battery is removed.
natural_image
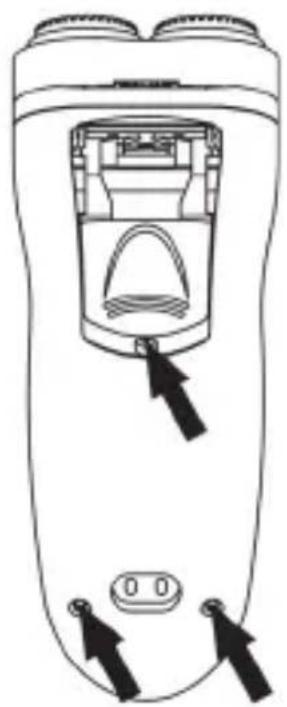
Line drawing of a handheld device with a central button and two black arrows pointing to the ports (no text or symbols)Pull out the trimmer [6]. Remove the three screws and open the casing.
natural_image
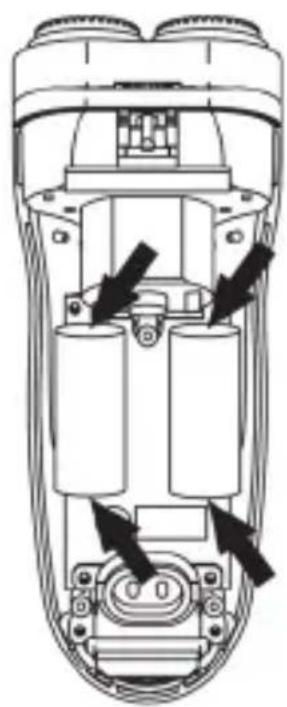
Technical diagram of a handheld device showing internal components and directional arrows (no text or symbols)Remove the battery (two rechargeable batteries) from the board by severing the connections with a wire cutter.
Separate the battery and shaver for appropriate disposal.
Remember to protect the environment. Used batteries should not be disposed of in household waste. They must be taken to a collection point for old batteries. Please note that only discharged batteries may be deposited in battery recycling bins. Care must be taken to ensure that batteries that are not fully discharged do not short circuit.
Conformity information
CE
This device meets the basic requirements and other relevant regulations of the EMC Directive 2004/108/EC, the Low Voltage Directive 2006/95/EC, the RoHS Directive 2011/65/EU and the ErP Directive 2009/125/EC. The Declaration of Conformity can be found at the end of this manual.
Troubleshooting
| Problem Possible cause Solution | |
| The shaver does not shave as well as usual. | The shaving heads are dirty or are blocked by long hair. Clean the shaving heads (refer to the section "Cleaning every two months"). |
| The are damaged or worn. Reshaving the shaving heads (refer to the section "Maintenance"). | |
| The shaver is not working. | The battery is empty. Charge the battery (refer to the section "Charging the battery") or use the shaver via the mains. |
Warranty and servicing advice
Warranty of TARGA GmbH
This device is sold with three years warranty from the date of Please keep the original receipt in a safe place as proof of purchase. Before using your product for the first time, please read the enclosed documentation or online help. Should any problems arise which cannot be solved in this way, please call our hotline. Please have the article number and, if available, the serial number to hand for all enquiries. If it is not possible to solve the problem on the phone, our hotline support staff will initiate further servicing procedures depending on the fault. Within the warranty period the product will be repaired or replaced free of charge as we deem appropriate. No new warranty period commences if the product is repaired or replaced. Consumables such as batteries, rechargeable batteries and lamps are not covered by the warranty.
Your statutory rights towards the seller are not affected or restricted by this warranty.

Service

Phone: 0207 - 36 50 744
E-Mail: service.GB@targa-online.com

Phone: 01 - 242 15 83
E-Mail: service.IE@targa-online.com

Phone: 800 - 62 175
E-Mail: service.MT@targa-online.com

Phone: 800 - 92 496
E-Mail: service.CY@targa-online.com
IAN: 89083
Manufacturer
TARGA
GmbH
Coesterweg 45
59494 SOEST
GERMANY
CE
EU Declaration of Conformity
Address: Targa GmbH Coesterweg 45 59494 Soest, Germany
Product: Rechargeable Shaver Model: Silvercrest SRR 3 A1 Identification number: IAN 89083
The product complies with the requirements of the following European directives:
2006/95/EC Low Voltage Directive (LVD)
2004/108/EC Electromagnetic Compatibility
2011/65/EU Restriction of the use of certain hazardous Substances in electrical and electronic equipment
2009/125/EC Energy Relating Products
Compliance was proved by the application of the following standards:
LVD: EN 60335-1: 2002 + A1: 2004 + A2: 2006 + A11: 2004 + A12: 2006 + A13: 2008 + A14: 2010 + A15: 2011 EN 60335-2-8: 2003 + A1: 2005 + A2: 2008 EN 02203: 2000
EMC: EN 55014-1: 2006 + A1: 2009 + A2: 2011 EN 55014-2: 1997 + A1: 2001 + A2: 2008 EN 61000-3-2: 2006 + A1: 2009 + A2: 2009 EN 61000-3-3: 2008
RoHS: EN 62321: 2009
ErP: Regulation 1275/2008
Year of CE marking: 2013
Soest, 19 ^th July 2013 Matthias Klauke, Managing Director