HP Digital - Helmet MELICONI - Free user manual and instructions
Find the device manual for free HP Digital MELICONI in PDF.
User questions about HP Digital MELICONI
0 question about this device. Answer the ones you know or ask your own.
Ask a new question about this device
Download the instructions for your Helmet in PDF format for free! Find your manual HP Digital - MELICONI and take your electronic device back in hand. On this page are published all the documents necessary for the use of your device. HP Digital by MELICONI.
USER MANUAL HP Digital MELICONI
2.4GHz WIRELESS DIGITAL HEADSET
CUFFIE TV WIRELESS DIGITALI CON INGRESSO AUDIO OTTICO DIGITALE E BASE DI RICARICA DIGITAL WIRELESS HEADPHONES WITH AUDIO OPTICAL INPUT AND RECHARGING BASE
IT Istruzioni d'uso 1
FR Mode d'emploi 5
ES Instrucciones de uso ....9
BASE (transmisor) Fig.3 y Fig.4
Thank you for purchasing a Meliconi product.
The HP Digital Meliconi wireless stereo headphone system uses 2.4GHz digital wireless audio transmission technology, allowing you to hear quality stereo sound from the most common audio playback devices up to a range of 30 metres (in free field), thus giving you maximum freedom of movement. The transmitter can be connected to the TV or to any other audio source, such as DVD and Blu-ray devices, CD players, Hi-Fi or radio systems, PCs or notebooks. The system comes with a special Toslink optical cable, enabling use of the headphones with any of the latest devices equipped with digital audio outputs. This unit is also compatible with traditional analogue stereo audio signals by means of the 3.5-mm jack cable (included in the package).
Safety warnings
- Do not use this product outdoors or in damp or humid environments, and do not expose it to drops or splashes of water.
- Do not expose the product to excessive heat sources, for example direct sunlight, fire or the like.
- The product contains a lithium battery that cannot be replaced by the user. If you need to dispose of the product, or when it reaches the end of its life, please refer to the following section: "Disposing of the product".
- Do not install the product in an enclosed space and always make sure the surrounding area is adequately ventilated. To allow the product to be easily disconnected from the power supply, the AC adapter the product is connected to must always be kept in a readily accessible position.
- Before connecting, unplug the appliances from the power supply. To avoid electric shocks, do not tamper with the product or attempt to open it. Any repair work should only be carried out by qualified technicians. If the AC adapter is faulty, disconnect it immediately from the socket.

To avoid possible damage to hearing, do not use the headphones at high volume for prolonged periods of time.
Disposal of the product and batteries
The symbol indicates that the product complies with Community Directive 2012/19/EU. The product must be disposed of separately from other waste at end-of-life. When no longer in use, it must be taken to an appropriate waste recycling collection centre or given to the retailer. This method of separate disposal helps to prevent possible negative impact upon the environment and on health, whilst encouraging the re-use and/or recycling of materials. Unlawful disposal of the product is subject to legal sanctions.
This symbol indicates that the product contains a built-in rechargeable battery that is subject to European Directive 2006/66/EC + 2013/56/EU and cannot therefore be disposed of together with normal waste.
The product must be taken to an appropriate separated waste collection centre or returned to the retailer.
WARNING: Do not dispose of the battery in the environment, disassemble it or throw it into the fire. Improper use may cause damage to the environment and to health. The crossed-out bin symbol indicates that the battery (together with the product) must be disposed of in compliance with the regulations in force.
Package contents
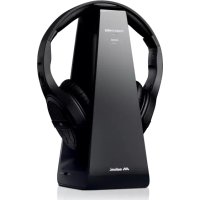
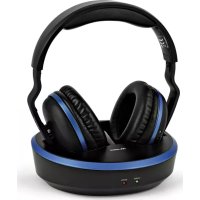
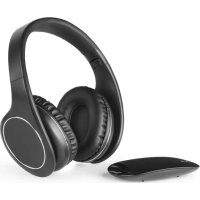
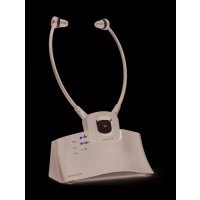
- HEADPHONES (receiver) - Fig.1 and Fig.2
- Charging dock (transmitter) - Fig.3 and Fig.4
- AC power adapter for 5V 1000mA output (micro USB)
- Digital optical audio cable (toslink)
- Analogue audio cable (3.5mm jack)
- Instruction booklet
Installation
HEADPHONES (Receiver) Fig.1 and Fig.2
Headphone details:
A. On-off button
B. Volume adjustment buttons
C. Sound equalisation adjustment button (Audio Mode)
D. Recharge contacts
E. LED light
F. Micro-USB recharging socket
G. 3.5mm jack input
CHARGING DOCK (Transmitter) Fig.3 and Fig.4
Charging dock details:
H. Recharge contacts for the headphones
I. "Power/Charge" LED light
L. "Audio Mode" LED light
M. Audio input selector OPTICAL / RCA or 3.5mm
N. Stereo audio input for 3.5mm jack cable
O. Audio RCA (L-R) input
P. Digital optical audio input (Toslink)
Q. Digital optical audio output (Toslink)
R. AC power supply input
S. Pairing button
Connect the AC adapter cable to the connector "R" on the back of the charging dock.
Connect the AC adapter to the power outlet.
The green "I" (POWER/CHARGE) LED light on the base will come on for a second.
CONNECTION OF THE BASE TO THE AUDIO SOURCE (after recharging the HEADPHONES)
Remove the headphones from the charging dock.
Before making any connections, ensure that the source device is switched off.
Depending on the type of audio output available on your device, connect the charging dock to the preferred audio source using the appropriate cable. If the base is connected using the Toslink optical table, move the "M" selector on the side of the base to "Optical". Remove the silicone protections at the two ends of the optical cable provided, and insert one of the two ends into the "P" (OPTICAL) input on the back of the base. If the analogue cable with 3.5mm jack (also included in the pack) or the RCA connector (not included) is used, move the "M" selector to "RCA/3.5 mm" and insert the end of the cable into the pertinent input: "N" for audio cable with 3.5mm jack, "O" for RCA cable. Now connect the other end of the audio cable to the source device (e.g. TV or Decoder)
Switch on the audio source (e.g. TV) Remaining near the base, switch on the headphones (receiver), holding the "A" button down for about 3 seconds, until the blue "E" LED light comes on. After a few moments, the green "I" (POWER/CHARGE) LED light on the base will flash twice; three audio tones in the headphones and the permanent switching on of the green "I" (POWER/CHARGE) LED light will confirm the completion of pairing between the base and the headphones.
Note: If the "I" LED indicator flashes continually, this indicates that the base and the headphones have not been paired properly.
Put on the headphones and use the buttons "B" to increase or decrease the volume and obtain proper sound reproduction.
If the headphones fail to reproduce the sound, or if there is audio interference, please consult the "TROUBLESHOOTING" section.
Press the "C" Audio Mode adjustment button twice to select the desired sound equalisation from the three available:
Normal audio reproduction ("L" LED light off)
Audio in MUSIC mode ("L" LED light on, colour orange)
Audio in FILM mode ("L" LED light on, colour blue)
Use
To use the product normally, it is sufficient to switch the headphones on and off exclusively by using button "A" (press for 3 seconds to switch on, press for 5 seconds to switch off)
When the headphones are not in use, it is advisable to switch them off, to avoid completely draining the battery, then place them correctly on the base (see the paragraph "Charging the batteries"), so that the battery will be charged the next time you use them.
In the absence of an incoming audio signal, the charging dock automatically switches off after around 5 minutes (the green indicator light "I" goes out).
If the headphones are not being used for a long period of time, it is advisable to disconnect the AC power adapter from the power outlet.
Recharging the battery
Position the headphones (receiver) on the recharge contacts of the base (transmitter) to recharge the internal battery; N.B.: the headphones may be placed on the base facing in any direction.
The red "l" (POWER/CHARGE) LED light will come on to confirm the headphones are correctly positioned on the base; the light will switch off when the headphones are fully charged.
The initial charge will take at least 4-5 hours.
Notes
Another audio device with an optical digital input (for example another transmitter base or a soundbar) can be connected to the base of the HP Digital. This device will also be serially connected, together with the HP Digital, to the main audio source (e.g. the TV). This may be useful if the TV has a single optical input and you wish to reproduce sound through the HP Digital and from another device.
To allow the audio signal to also reach the other device, connect it to the "O" (OPTICAL OUT) output on the base of the HP Digital, using a second optical digital audio cable (as shown in figure 5).
Technical Specifications
| Transmission mode: Digital Hopping System | Digital Hopping System |
| Range of frequencies: 2403MHz – 2478MHz | 2403MHz – 2478MHz |
| RF output Power: < 10 mW e.r.p. | < 10 mW e.r.p. |
| Transmitter power supply: DC 5V – 1A | DC 5V – 1A |
| Frequency response: 20 Hz – 20 KHz stereo | 20 Hz – 20 KHz stereo |
| Distortion: 0.5% | 0.5% |
| Signal/noise ratio: 85dB | 85dB |
| Maximum transmission distance: 30 metres (in free field) | 30 metres (in free field) |
| Headphone charging time: about 1.5-2 hours | about 1.5-2 hours |
| Integrated lithium battery: 3,7V – 400mAh | 3,7V – 400mAh |
| Operating time of the headphones: | about 8 hours with a fully charged battery at ambient volume |
| Operating temperature: 0°C-40°C | 0°C-40°C |
Troubleshooting
If the headphones do not produce any sound or if the audio signal is disturbed or is presumed to come from other undesirable sources, carry out the following steps:
Check that all the connections are correct and that the device is operating as described in the handbook.
Make sure the connectors of the audio cable used for connection are inserted correctly (and sufficiently deeply) into the pertinent sockets.
If the audio feed has been connected using a digital optical cable (Toslink), move the "M" selector - on the side of the base - to "Optical", and check that the audio output of your appliance (e.g. TV or decoder) is set to "PCM" or "LPCM". To do this correctly, consult the instruction manual of your TV or decoder.
If the audio feed has been connected using a traditional aux audio cable (3.5 mm jack), try turning up the volume of the audio source and make sure the "M" selector is at "RCA/3.5 mm".
Switch off the headphones (receiver) using button "C", move closer to the base (transmitter), switch it back on and check that the green "I" (POWER/CHARGE) LED light comes on.
Help line
If you have any queries regarding HP DIGITAL:
- read this instruction manual carefully, as it will help you solve most problems.
- visit our website: www.meliconi.com
For any questions/problems, you can write to us at info@meliconi.com
Simplified EU Declaration of Conformity
The manufacturer, Meliconi S.p.A., declares that the type of radio equipment marketed as HP Digital Headphones is compliant with Directive 2014/53/EU (RED).
The full text of the EU Declaration of Conformity is available at the following web address:
http://www.meliconi.com/doc/hpdigital.