Alma Papa - Baby bed Bloom - Free user manual and instructions
Find the device manual for free Alma Papa Bloom in PDF.
| Product type | Convertible baby crib (cradle to junior bed) |
| Brand | Bloom |
| Model | Alma Papa (ref. 10322) |
| Recommended age | From birth to 4 years |
| Main material | Wood (plywood or fiberboard) |
| Color | Not specified (white or natural depending on availability) |
| Mattress support heights | 2 positions: high (birth to ~6 months) and low (from 6 months) |
| Folding system | Single fold for easy storage (no small removable parts) |
| Casters | 4 casters with brakes included (optional use) |
| Recommended mattress dimensions | Length: 120 cm, width: 60 cm, maximum thickness: 10 cm |
| Maximum supported weight (child) | Until the child can get out alone (approx. 15-20 kg, not specified) |
| Number of parts supplied | 10 pieces (head, foot, side panels, mattress support, pegs, reinforcement bar, key, hardware, casters) |
| Assembly | Requires an adult; tool provided (key) |
| Certified safety | Complies with current safety standards |
| Maintenance and cleaning | Clean with a mild detergent and a damp cloth; avoid abrasive products |
| After-sales service | Email: service@bloombaby.com; website: bloombaby.com |
| Warranty | Not specified; contact Bloom for information |
Frequently Asked Questions - Alma Papa Bloom
User questions about Alma Papa Bloom
0 question about this device. Answer the ones you know or ask your own.
Ask a new question about this device
Download the instructions for your Baby bed in PDF format for free! Find your manual Alma Papa - Bloom and take your electronic device back in hand. On this page are published all the documents necessary for the use of your device. Alma Papa by Bloom.
USER MANUAL Alma Papa Bloom
natural_image
Abstract orange logo design resembling a stylized letter 'b' on a gray background (no text or symbols)alma popa ^TM
crib
berceau / cuna / kinderbett / lettino / wieg
user guide

text_image
bloom®bloom®
bloombaby.com

natural_image
Abstract logo design with a stylized lowercase 'b' on an orange background (no text or symbols)alma papa™
Contents
Part List & Illustrations 3-8
Instructions - eng 9-14
Instructions - fr 15-21
natural_image
Technical line drawing of a rectangular plate with multiple holes and mounting holes (no text or symbols)03 - base board
natural_image
Technical line drawing of a metal enclosure with vertical panels and mounting feet (no text or symbols)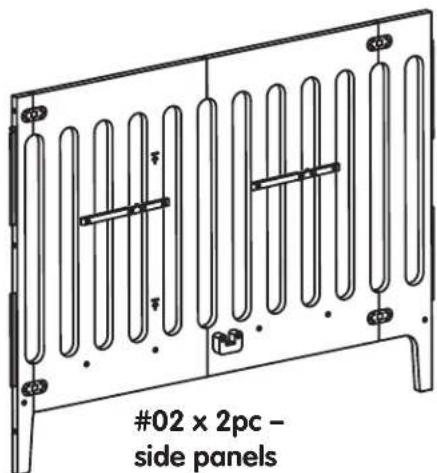
natural_image
Technical line drawing of a side panel with vertical slots and mounting holes (no text or symbols)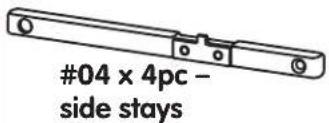
text_image
#04 x 4pc - side stays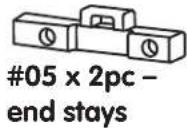
text_image
#06 - cross bar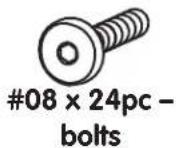

text_image
#07 - tool (hex key)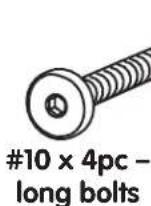
09 x 4pc - castors
natural_image
Technical line drawing of a laboratory apparatus with two views: top shows a vertical tube structure, bottom shows a multi-compartment rack with test tubes (no text or labels)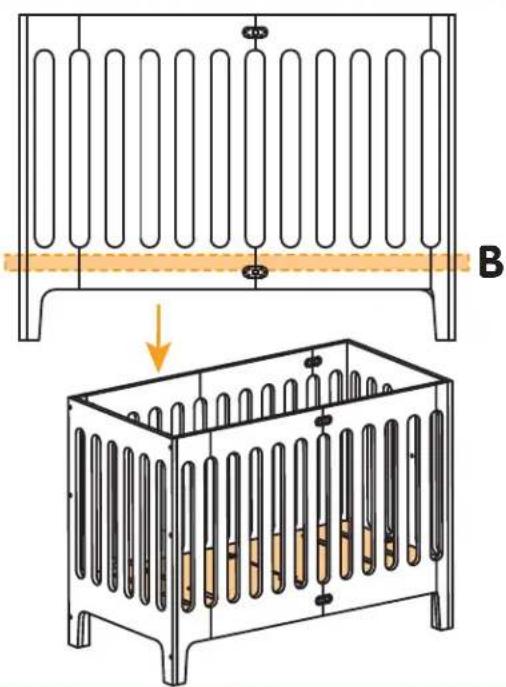
text_image
Diagram showing a filtration setup with test tubes and a labeled component B, illustrating the process from initial measurement to final concentration.crib set up
text_image
Technical diagram showing a door frame installation with labeled components and a magnified inset illustrating the mechanism of rotation.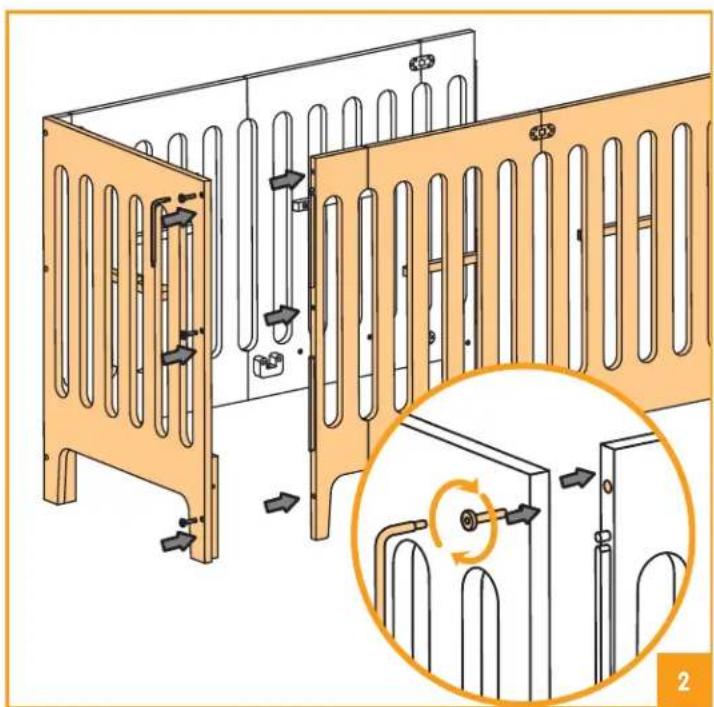
natural_image
Diagram of a modular heating or cooling system with vertical panels and heat exchangers, showing mechanical components and a magnified inset of the assembly (no text or symbols present)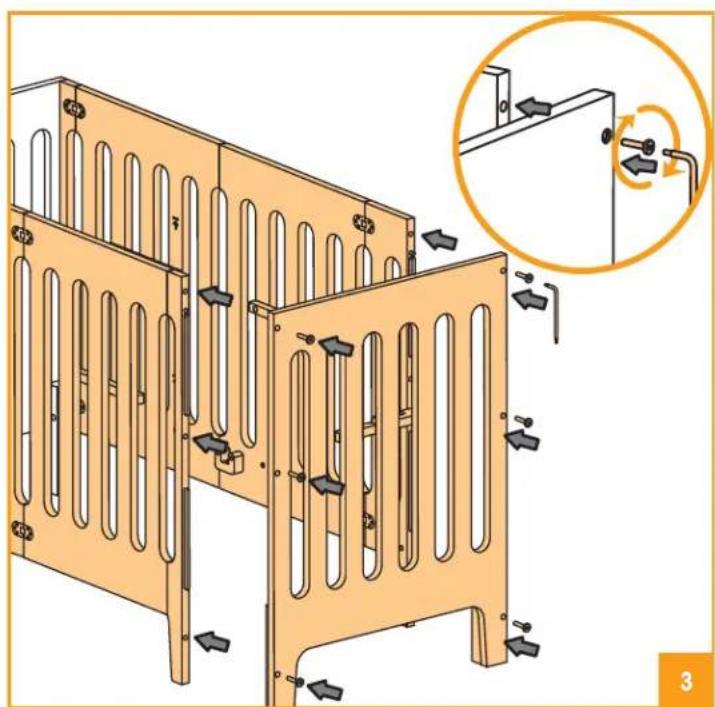
natural_image
Illustration of a wooden fence structure with mounting brackets and directional arrows, showing a close-up inset of the connection between two vertical supports (no text or symbols present)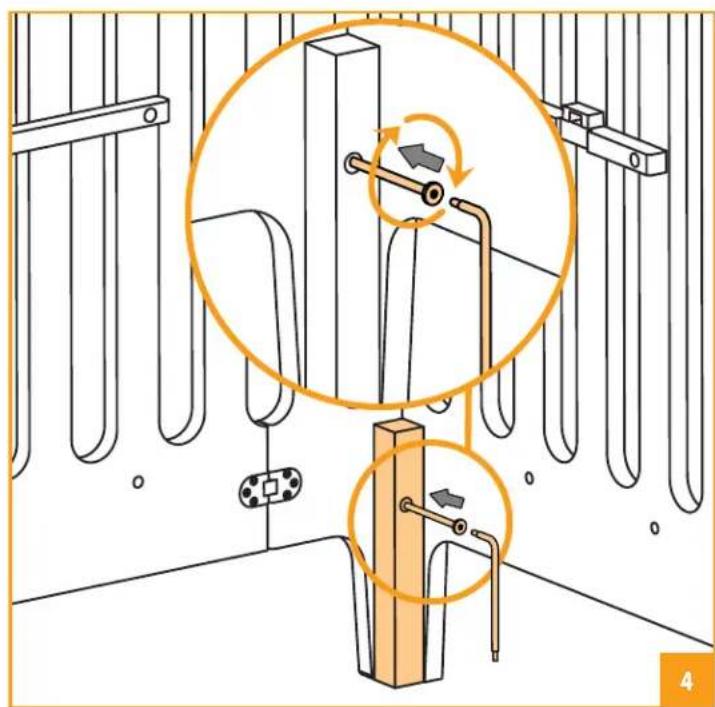
text_image
Technical diagram showing mechanical assembly with rotating components and directional arrows indicating motion or movement.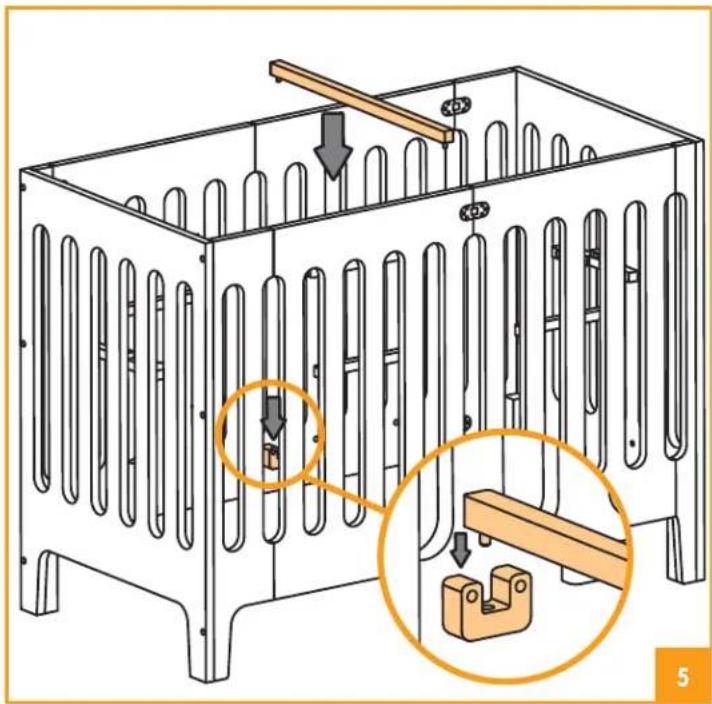
text_image
Technical diagram of a heating element box with labeled components and structural changes, including a magnified inset showing detail views.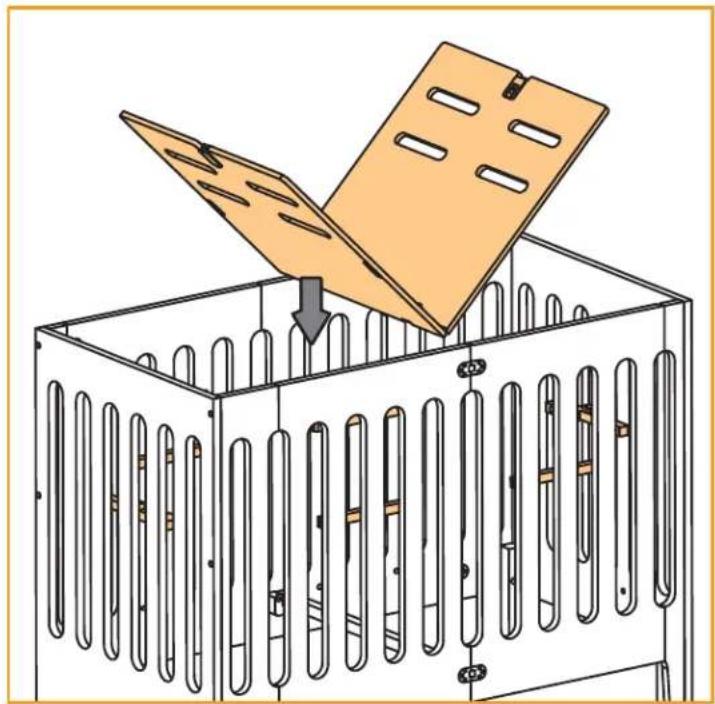
natural_image
Diagram of a metal enclosure with a wooden panel being lifted by an arrow, showing internal vertical supports (no text or symbols)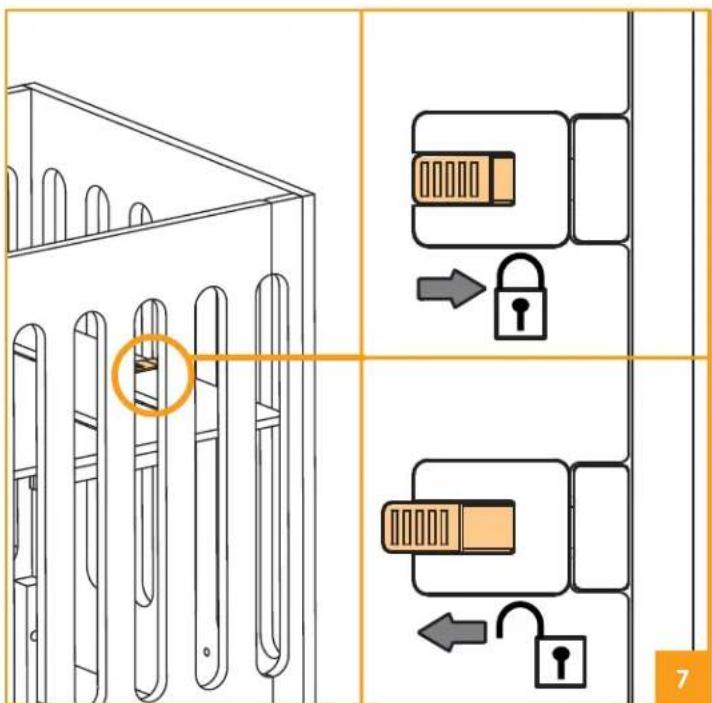
text_image
Diagram showing a device panel with lock and padlock icons, highlighting a specific component in the first panel.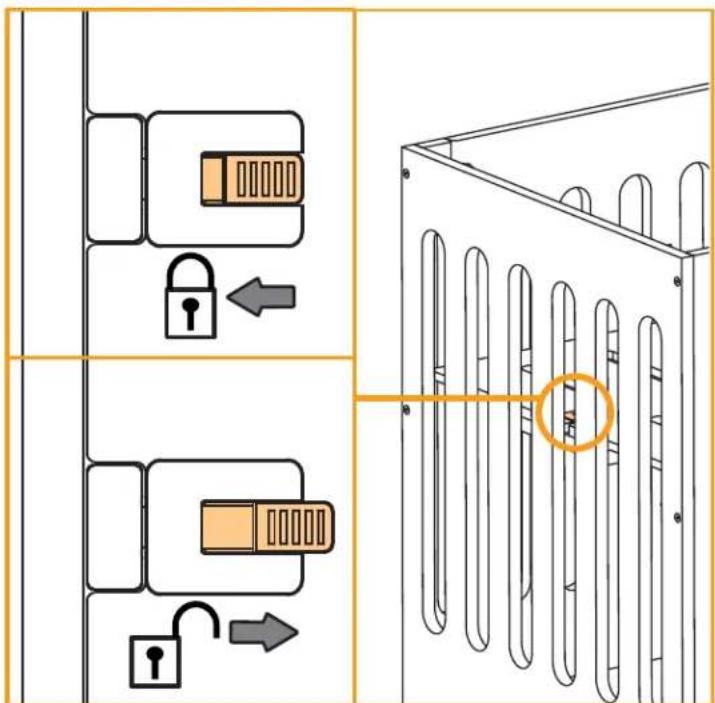
text_image
Diagram illustrating door lock and lock mechanism with directional arrows and a highlighted circular component in a container-like structure.5
natural_image
Diagram of a laboratory apparatus with test tubes and a wooden box, showing internal components (no text or labels)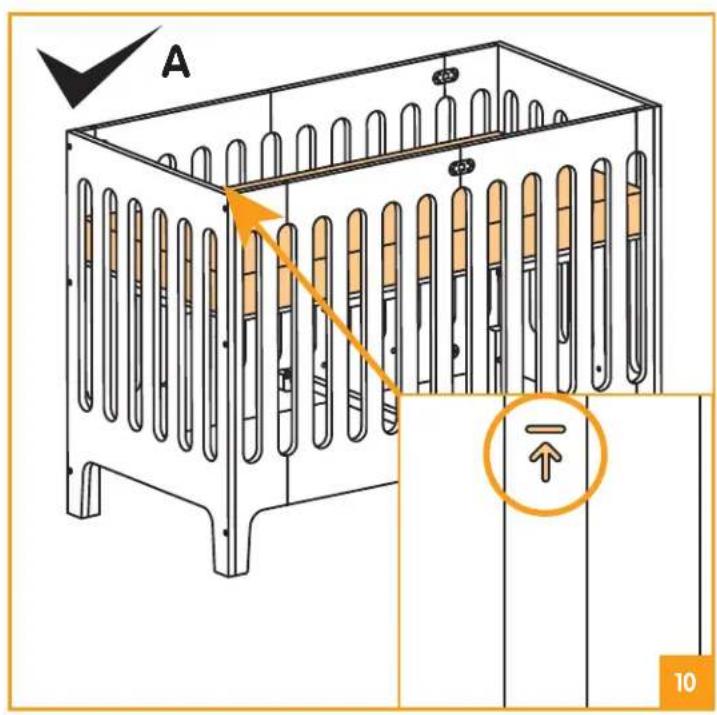
text_image
A 10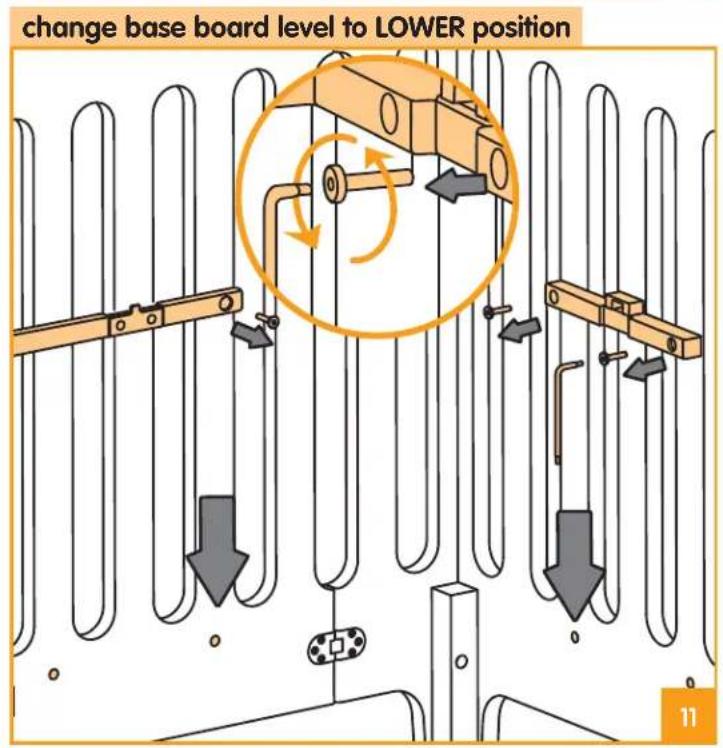
text_image
change base board level to LOWER position 11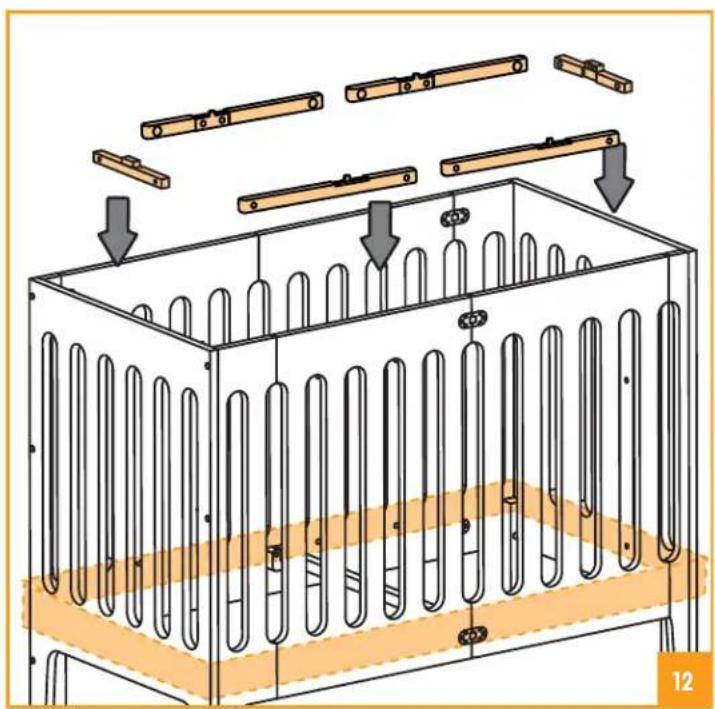
natural_image
Diagram of a coiled heating element with cooling fins and heat exchangers, showing structural assembly (no text or labels)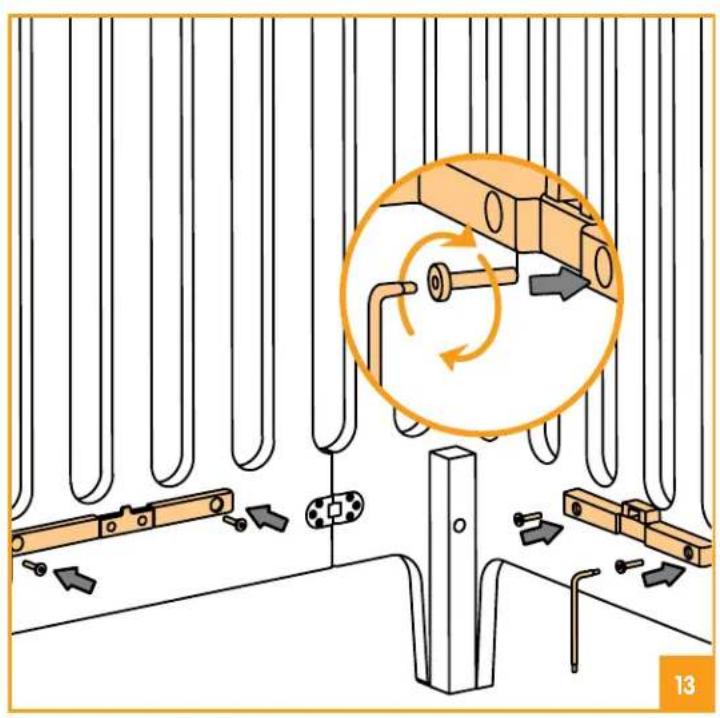
text_image
Diagram illustrating mechanical assembly or cleaning process with labeled components and directional arrows
text_image
Technical diagram showing mechanical assembly steps with highlighted components and directional arrows, labeled with number 14.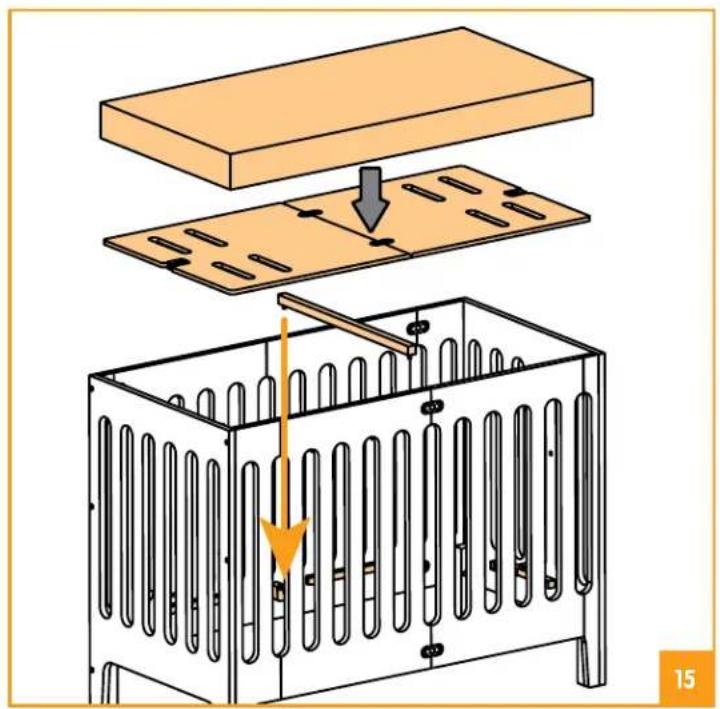
natural_image
Diagram of a mechanical assembly with a wooden box, panel, and metal frame (no text or symbols)
text_image
Diagram illustrating a test tube setup with labeled components and directional arrows, including a warning symbol and label 'B'castor assembly
natural_image
Technical illustration of a mechanical pulley system with an inset showing the connection to a bolt (no text or symbols present)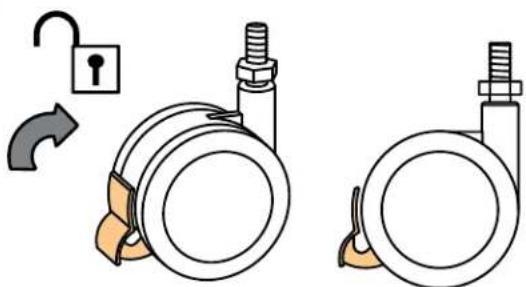
text_image
Diagram illustrating lock mechanism and valve assembly with labeled components and directional arrow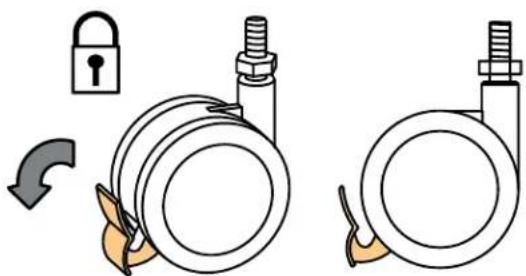
natural_image
Illustration of a mechanical switch mechanism with no text or symbolsstorage
natural_image
Diagram of a mechanical assembly with a wooden box, metal frame, and internal slots (no text or symbols)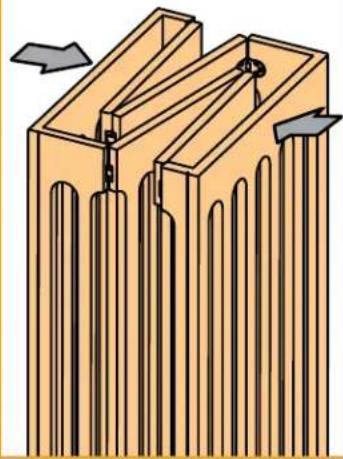
natural_image
Diagram of a mechanical or structural assembly with directional arrows indicating movement (no text or symbols present)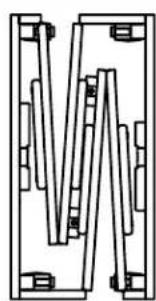
natural_image
Pure mechanical assembly diagram without any text, numbers, or symbols
natural_image
Pure technical line drawing of a mechanical assembly without any text, numbers, or symbols
8
text_image
Diagram illustrating mechanical locking mechanism with labeled parts and directional arrows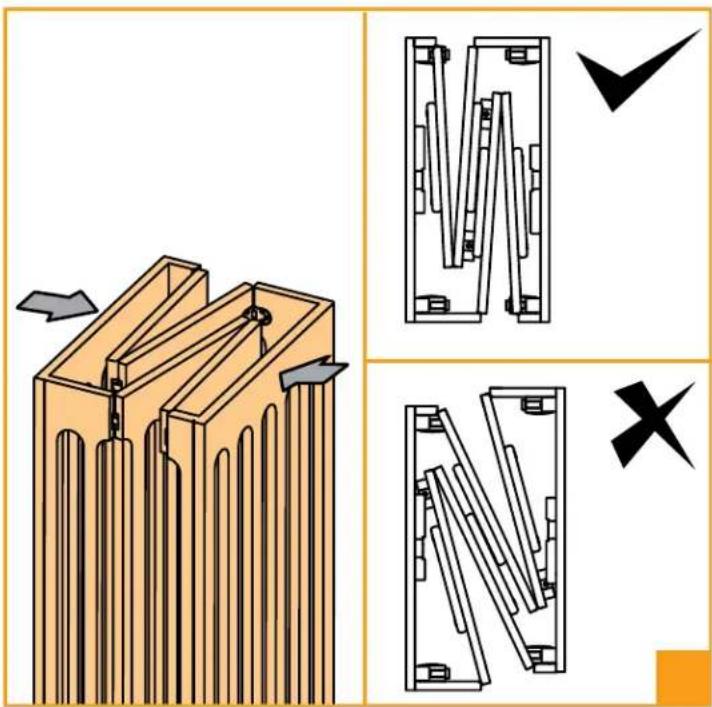
text_image
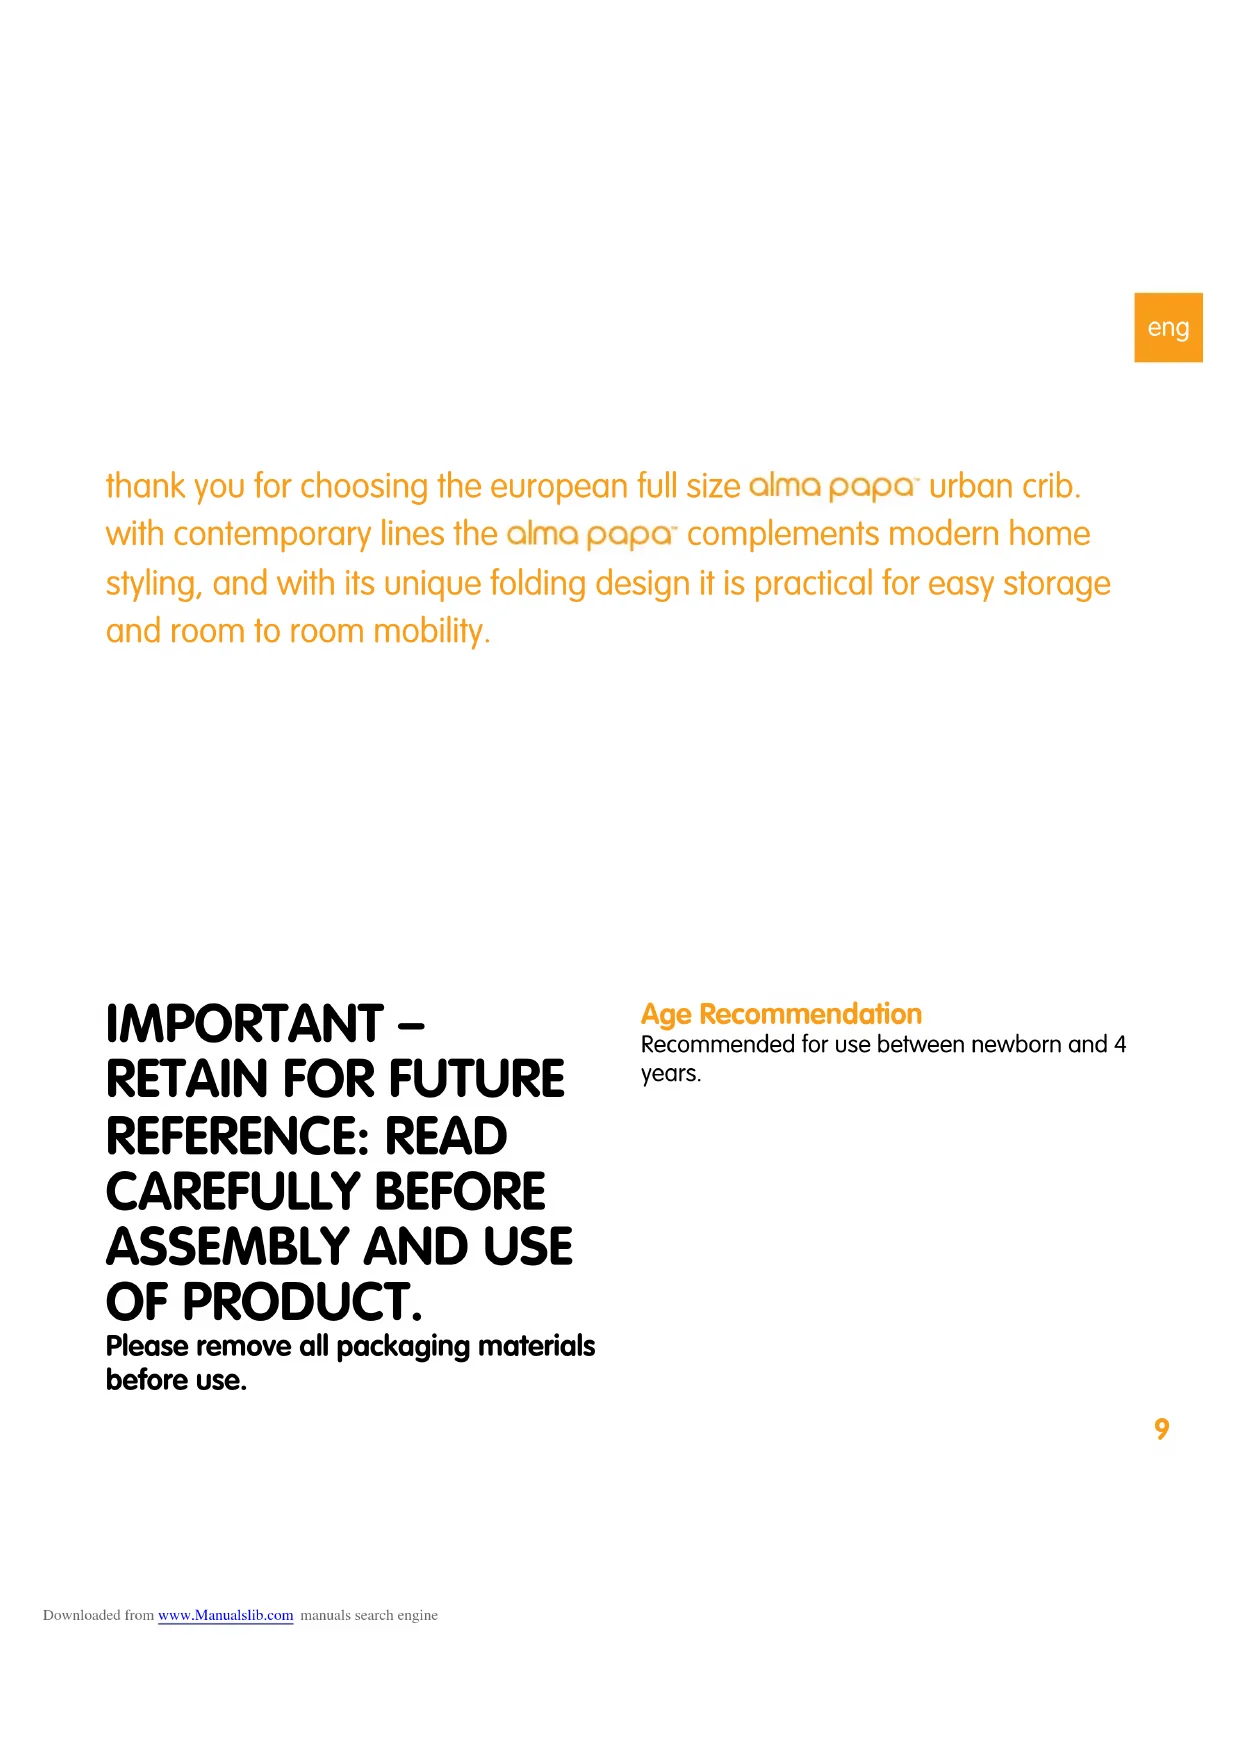
Technical diagram showing mechanical assembly steps with labeled components and directional arrowsthank you for choosing the european full size alma papa urban crib. with contemporary lines the alma papa complements modern home styling, and with its unique folding design it is practical for easy storage and room to room mobility.
IMPORTANT – RETAIN FOR FUTURE REFERENCE: READ CAREFULLY BEFORE ASSEMBLY AND USE OF PRODUCT.
Please remove all packaging materials before use.
Age Recommendation
Recommended for use between newborn and 4 years.
Product Information
This crib has been designed and tested to ensure compliance with the latest relevant safety standards.
- Newborn to school-age convertibility – from crib to toddler bed
- Folding design for easy storage – no small parts to lose
- 2 different mattress platform heights for easy access to newborn baby
• Contemporary design
• 4 lockable castors included
Model No.: 10322
Patents Pending
Colour & contents may vary
NOTE: Adult assembly required.
Instructions For Safe Use – Please read carefully and keep for future reference
The correct use and maintenance of your baby crib bed will ensure it gives long and trouble-free use. When somebody else is using your crib bed please ensure they also know how to use it, how to adjust it and the necessary safety precautions. The safety of your child is your responsibility.
Select base board level
The base board can be set at different heights. Currently the base board stays are pre-assembled onto the opromps on the UPPER position. This position should ONLY be used for babies from new born to approximately 6 months old or until can sit up unaided.
WARNING
TO PREVENT FALLS, THE MATTRESS BASE OF THIS Crib SHOULD BE ADJUSTED TO THE LOWEST POSITION BEFORE THE CHILD CAN SIT UP.
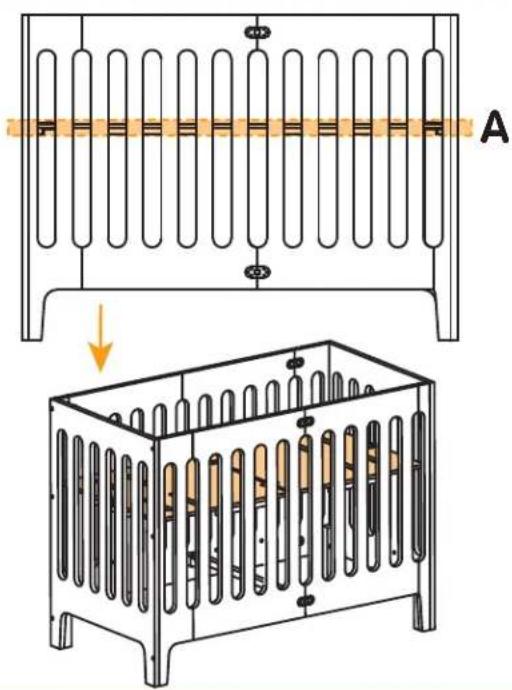
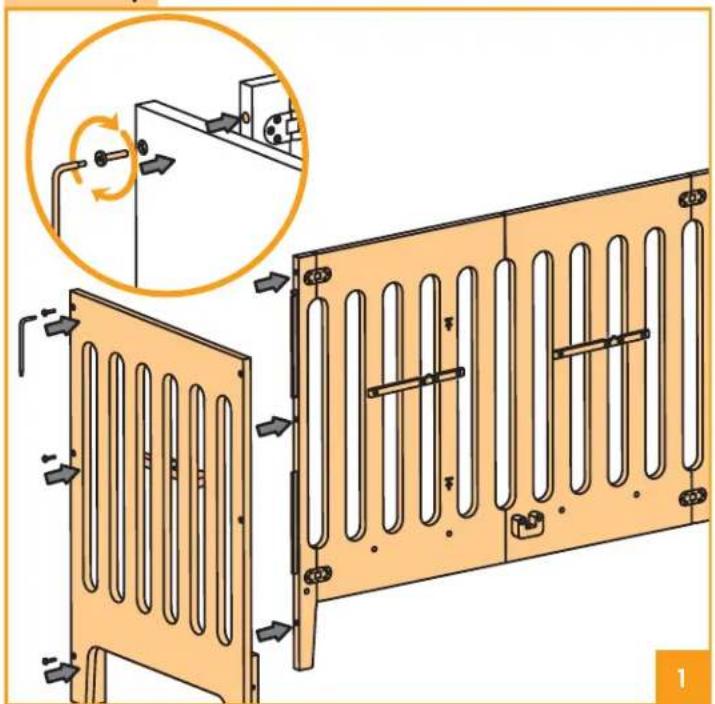
1 - 10 Crib Set Up
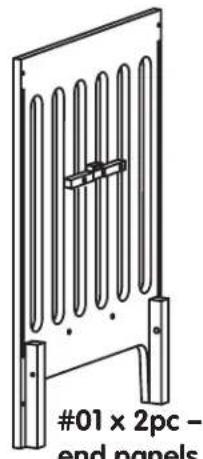
- (#01 end panel, #02 side panels, #07 tool – hex key, #08 bolts) Join two side panels to one of the end panel by tightening the bolts with tool included (hex key). You will find the hex key enclosed with the castors. Make sure the sides with stays assembled faces to the inside of the crib. (refer to illustration 1 & 2)
-
Assemble the other end panel by tightening the bolts with tool included (hex key). (refer to illustration 3)
-
(#07 tool – hex key, #10 long bolts) Tightening the end panels' posts using the long bolts with tool included (hex key). (refer to illustration 4)
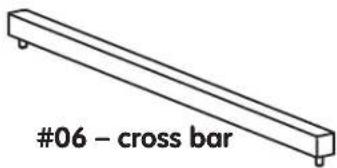
- (#06 cross bar) Place the cross bar onto the troughs that are located at the bottom of side panels. Make sure tips of on cross bar should be go downward into the troughs. (refer to illustration 5)
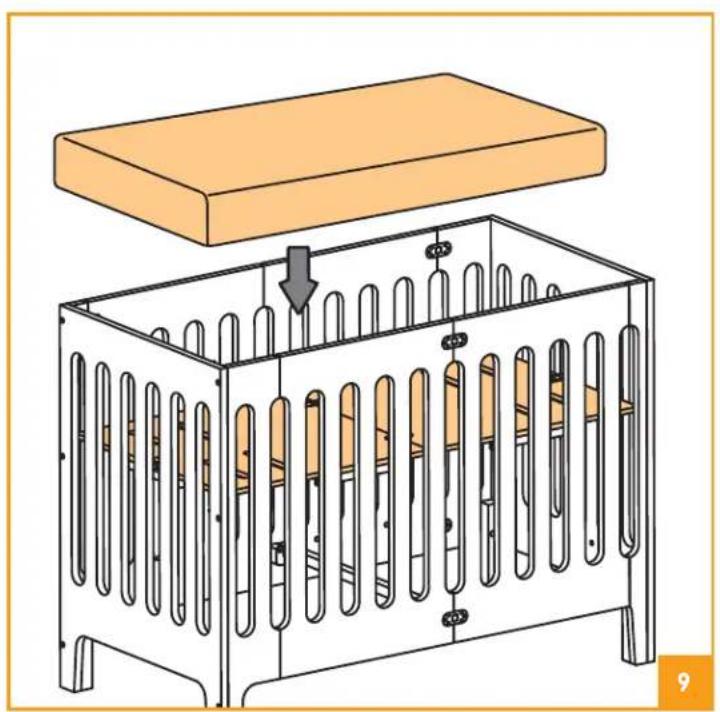
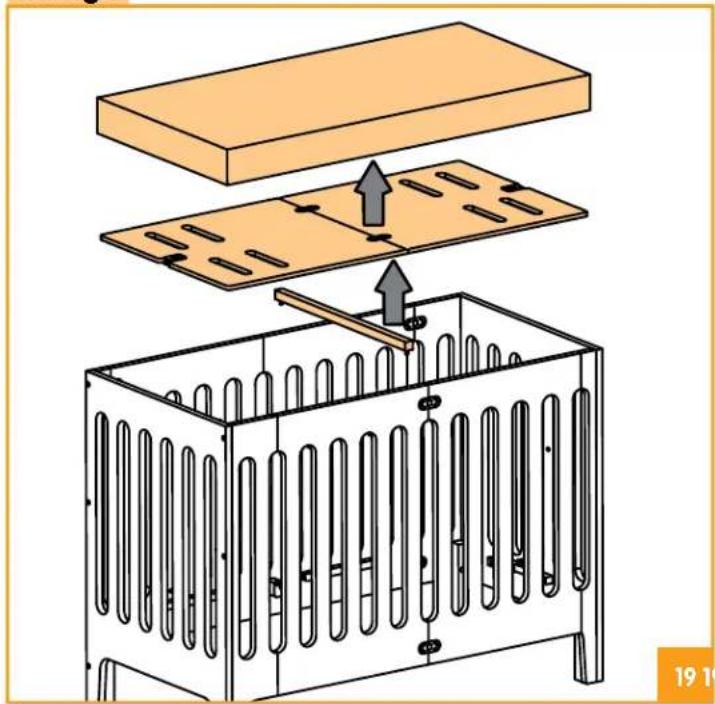
- (#03 base board) Place the base board within the crib, onto the stays. Make sure correct side up – the side with labels is the top side of base board.
- Lock the clasps on both ends of the base board, check the clasps are firmly locked and the base board should be both secure and perfectly flat.
- Please store the tool (hex key) in safe place for future use.
- The crib assembly is now complete.
11 - 16 To change base board level to LOWER position
- (#04 side stays, #05 end stays) Remove all 6 base board stays from the frame (side stays x 4 + end stays x 2) by loosening the bolts with tool included (hex key).
- Assemble the 6 base board stays to your desired base board level. Secure by tightening the bolts with tool included (hex key). Make sure the end stays are assembled correct side up. (refer to illustration 14)
WARNING
To prevent injury from falls, the crib shall no
longer be used if child is able to climb out of crib.
Consider converting to toddler bed mode with the optional bed.
Toddler Bed Set Up
Optional bed rail is available as accessory. Please check with your retailer or bloombaby.com for more details.
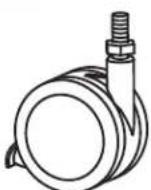
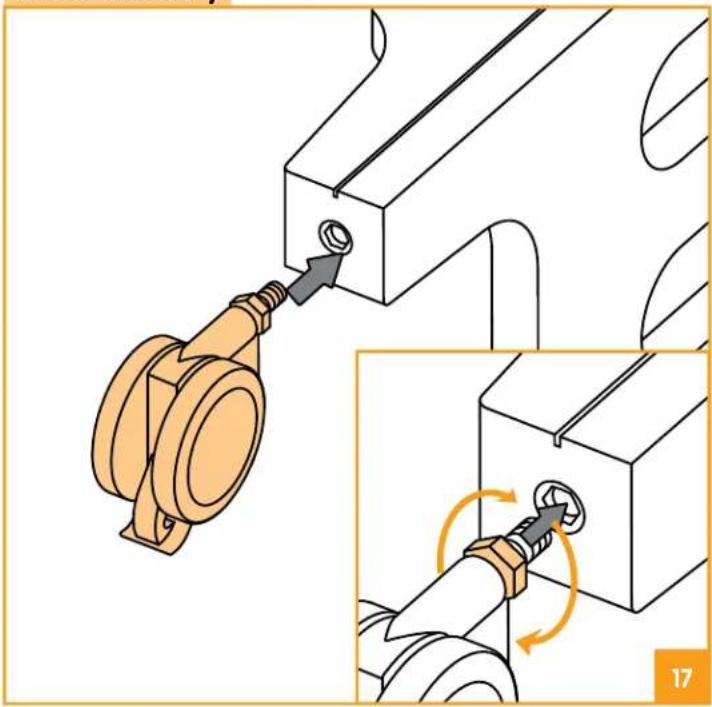
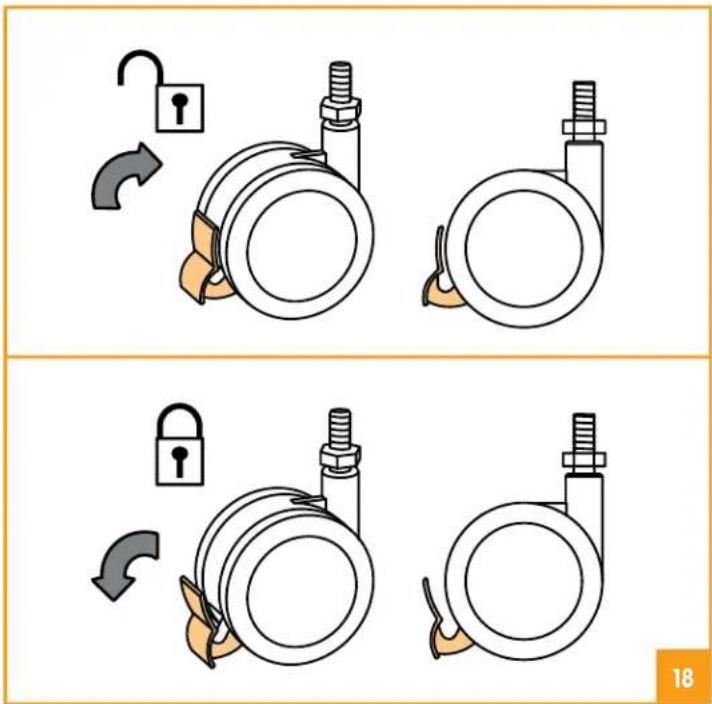
17 - 18 Castors Assembly
- 4 lockable castors are included. The use of these is optional.
- If you choose to use castors with your crib, always lock the brakes of the castors whenever the crib is in use.
- (#09 castors) Attach the castors by screwing them into the threaded holes by turning the hex blot until tight.
- To lock castors, push down on the locking levers on each castor.
- To unlock, lift up the levers on each castor.
- To remove castors, turn hex blot to unscrew loose.
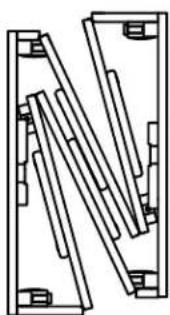
19 - 20 Storage
- To fold away you alma papa crib for storage, first remove mattress.
- Remove base board from frame – unlock the clasps on both ends of the base board by sliding buttons inward.
- Fold side panels inwards and push end panels in together. Make sure the panels are folded in the correct direction. (refer to illustration 20)
Mattress
- Mattress is not included with the crib. This can be purchased separately. Always use a mattress with your crib.
- Minimum size of mattress to be used with the alma papa crib should be 120cm / 47 ^1/2 " x 60cm / 23 ^1/2 ", and the gap between the mattress and the sides and ends must not exceed 3cm / 1 ^1/4 ".
- Mattress thickness shall not exceed the level marks "↑" indicated on the inner facing of the side panel for both base board heights (refer to illustration 10 & 16). Thickness of the mattress shall be such that the internal height (surface of the mattress to the upper edge of the crib frame) is at least 50cm / 19 ^3/4 " in the lowest position of the crib base and at least 20cm / 7 ^3/4 " in the highest position of the crib base.
- Using the wrong size mattress may create hazardous gaps that could result in suffocation or could reduce the side height of the crib which may result in your child falling out from the crib.

WARNINGS:
-
If you use the crib with a changing unit: ⚠WARNING: Strangulation Hazard: Always attach the provided 2 straps securely when using on play yard/full/non-full size crib. If either of the 2 straps is not secure, a child in play yard or crib can lift or shift the tray and get neck trapped between the tray and the frame.
-
WARNING: Be aware of the risk of open fire and other sources of strong heat, such as electric bar fires, gas fires, etc. in the near vicinity of the crib.
- ⚠WARNING: Do not use the crib if any part is broken, torn or missing and use only spare parts approved by the manufacturer.
- ⚠WARNING: Do not leave anything in the crib or place the crib close to another product, which could provide a foothold or present a danger of suffocation or strangulation, e.g. strings, blind/curtain cords, etc.
- ⚠️WARNING: Do not use more than one mattress in the crib.
- Check carefully that the locking mechanisms are fully engaged before using the folding crib.
- The lowest position is the safest and that the base should always be used in that position as soon as the baby is old enough to sit up.
- All assembly fittings should always be tightened properly and that fittings should be checked regularly and retightened as necessary.
- To prevent injury from falls that when the child is able to climb out of the crib, the crib shall no longer be used for that child.
- ⚠WARNING: Failure to follow these warnings and instructions could result in serious injury or death.
- ⚠WARNING:
Infants can suffocate
- In gaps between a mattress too small or too thick and product sides.
- On soft bedding:
NEVER add a mattress, pillow, comforter, or padding.
- CAUTION: Any mattress used in this crib must be at least 120cm / 47 ^1/4 " long by 60cm / 23 ^1/2 " wide and not more than 10cm / 4" thick.
- ⚠️WARNING: Make sure latches are secure.
- ⚠WARNING: Strings can cause strangulation! DO NOT place items with a string around a child's neck such as hood strings or pacifier cords. DO NOT suspend strings over product or attach strings to toys.
- ⚠WARNING: Discontinue use of the product when child is able to climb out or reaches the height of 89cm / 35".
- ⚠WARNING: When child is able to pull to standing position, set mattress/base to lowest adjustment position and remove bumper pads, large toys, and other objects that could serve as steps for climbing out.
- ⚠WARNING: The product, including side rails, should be fully erected prior to use.
- ⚠WARNING: Never place product near a window where cords from blinds or drapes can strangle a child.
- ⚠WARNING: Use ONLY mattress/pad provided by manufacturer (which must be at least 120cm / 47 ^1/4 " long by 60cm / 23 ^1/2 "
wide and not more than 10cm / 4" thick.
- ⚠WARNING: Always provide the supervision necessary for the continued safety of your child. When used for playing, never leave child unattended.
- ⚠WARNING: To reduce the risk of SIDS, pediatricians recommended healthy infants be placed on their back to sleep, unless otherwise advised by your physician.
- ⚠WARNING: Never use this product if there are any loose or missing fasteners, loose joints or broken parts. Check before assembly and periodically during use. Contact bloom for replacement parts. Never substitute parts.
- ⚠WARNING: Never use plastic shipping bags or other plastic film as mattress covers not sold and intended for that purpose. They can cause suffocation.
- Never use a water mattress with this product.
IMPORTANT!
- Before assembling this crib read and understand the instructions. Incorrect assembly may make the crib unsafe.
- Do not use this crib if any part is broken, torn or missing.
- To prevent falls, the crib with the base board in the upper position should not be used once a child can sit up.
- Do not leave anything in the crib (such as toys) that provide a foothold.
- Do not use the crib near naked heat sources,
eng
bar heaters, open fires or exposed flames.
- Keep the crib clear of trailing cables and hanging cords.
- Keep medication, and small items that a child could choke on away from the crib.
- DO NOT placalma papa crib on an elevated surface.
- When castors are used, make sure the castors are locked when a child is unsupervised in it.
- If refinish, use a non-toxic finish specified for children's products.
Care & Maintenance
- When cleaning your crib, use a non-toxic, non-abrasive cleaner. Mix a solution of water with a small amount of a mild, non-toxic, detergent. Apply to crib surface with a damp cloth.
- When moving crib without castors assembled, always lift the unit. Do not push or drag it to avoid damaging the legs.
- It is important that the humidity levels in the room be controlled from extremes of too much humidity or too little. Crib should not be placed to air-conditioning outlets, fire places, radiators, space heaters, humidifiers or dehumidifiers. Exposure to extreme variations of temperature and humidity can damage wood.
- Keep the crib out of direct sunlight. UV rays may fade colors and in some cases darken them. It can cause crazing or hair line cracks in the finish. White finished will yellow naturally over time and exposure to direct sunlight will hasten this natural process along with some woods darkening naturally over time; this is not considered to be a quality defect.
- If you need to put your crib in storage for any period of time do not store them in a damp or hot environment. Allow air flow around the furniture and do not stack anything on it.
Check List
- The crib is ready for use only when the locking mechanisms are engaged. Please check carefully that they are fully engaged before using the folding crib.
- Always check the frame is free from damage before use. Do not use product if any fracture is present.
- Regularly check that all assembly fittings are always tightened properly and retighten as necessary.
After Sales Service
When you receive your bloom product, if you need assistance, spare parts or if you have any comments with respect to any aspect of the goods please contact bloom by email at service@bloombaby.com. Our trained advisors will be able to help. You can also visit our website at bloombaby.com for latest product information.
Your feedback and input enables bloom to continue to make improvements. Please send your comments regarding this product to service@bloombaby.com.
bloom, ste 8a, 433 west 21st street, new york, ny 10011, usa
bloom, 28a, shepherd market, flat 2, w1j7qs london, uk
copyright © bloom 2010, all rights reserved