Nano - High chair Bloom - Free user manual and instructions
Find the device manual for free Nano Bloom in PDF.
| Product type | High chair |
| Brand | Bloom |
| Model | Nano |
| Recommended age | 6 months to 3 years |
| Maximum weight capacity | Approximately 15 kg |
| Seat material | Leatherette |
| Harness | 5-point, height-adjustable shoulder straps |
| Tray | Removable, 3 adjustable positions, dishwasher safe |
| Footrest | 2 adjustable positions |
| Folding | Ultra compact |
| Textile seat maintenance | Hand wash only |
| Tray cleaning | Dishwasher |
| Plastic parts cleaning | Damp sponge, no solvents |
| Safety | Harness required, never leave unattended |
| Standards | Complies with current safety standards |
| Product reference | 10502 |
| After-sales service | service@bloombaby.com |
| Assembly | By an adult, no tools required |
| Usage | Indoor, flat surface |
Frequently Asked Questions - Nano Bloom
User questions about Nano Bloom
0 question about this device. Answer the ones you know or ask your own.
Ask a new question about this device
Download the instructions for your High chair in PDF format for free! Find your manual Nano - Bloom and take your electronic device back in hand. On this page are published all the documents necessary for the use of your device. Nano by Bloom.
USER MANUAL Nano Bloom
text_image
urban highchair chaise haute pliable / silla alta plegable / kindersitz nano / seggiolone nano / flexstoel user guide bloom® www.bloombaby.com
natural_image
Abstract logo design with a stylized lowercase 'b' on an orange background (no text or symbols)nano™
Contents
Part List & Illustrations 2-7
Instructions - eng 8-12
Instructions - fr 13-18
text_image
Diagram illustrating the step-by-step assembly of a manual tool, showing how to press or adjust a component with directional arrows.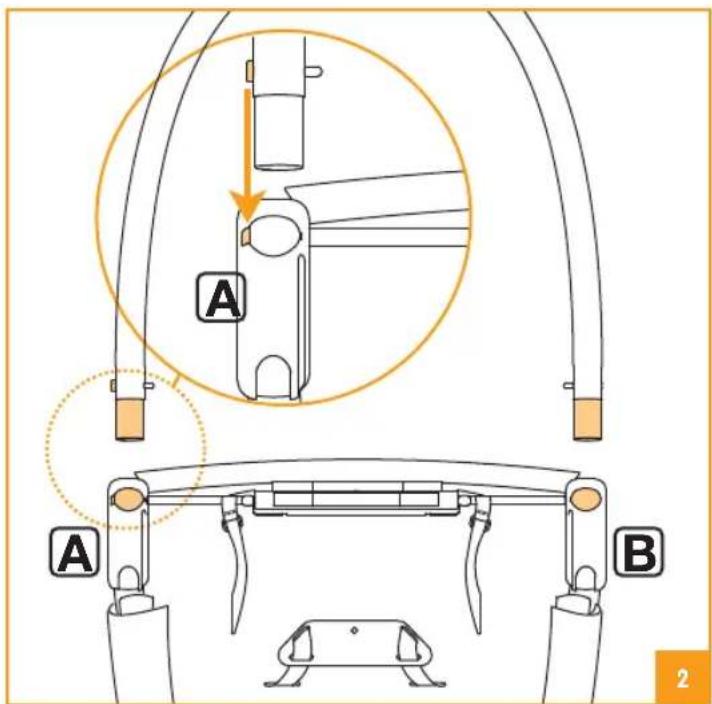
text_image
A A B 2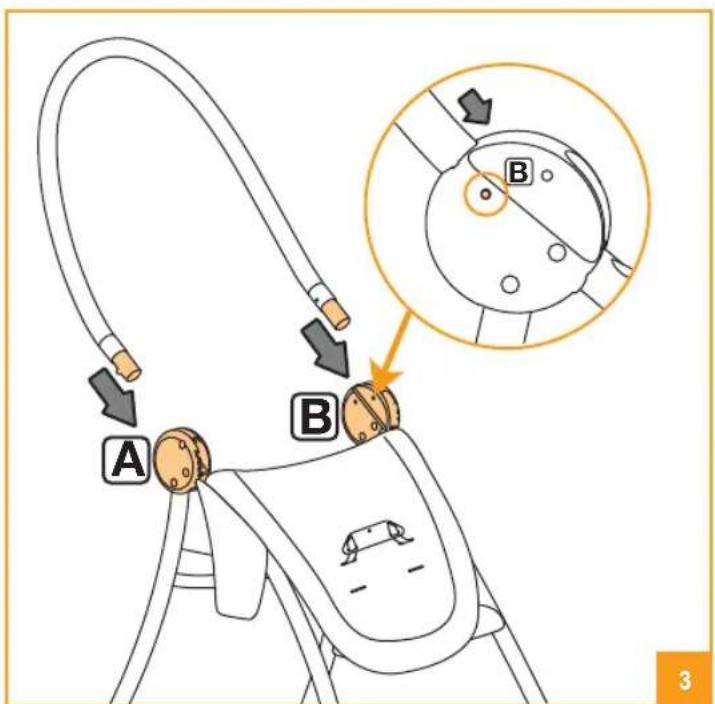
text_image
A B B 3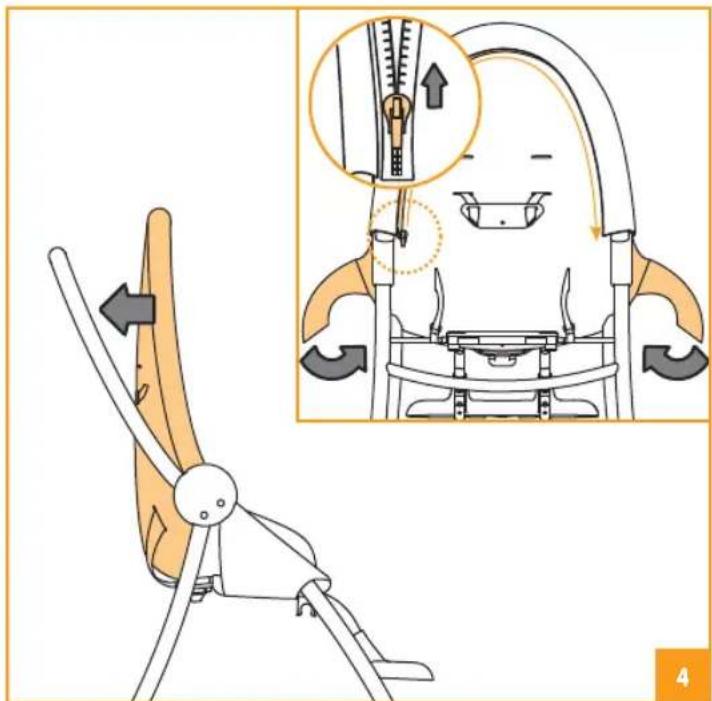
text_image
Diagram illustrating the use of a seatbelt device, showing a left-side chair and a close-up of the seatbelt with arrows indicating movement.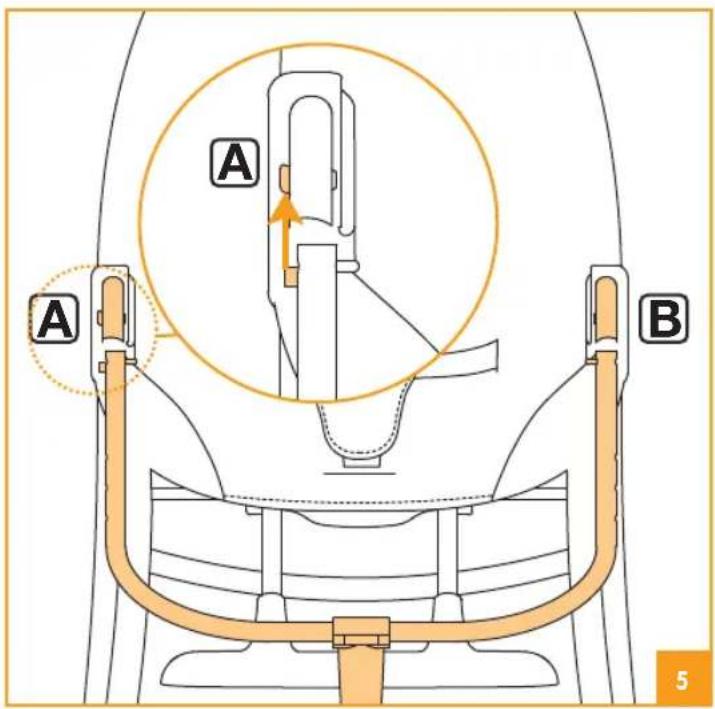
text_image
A A B 5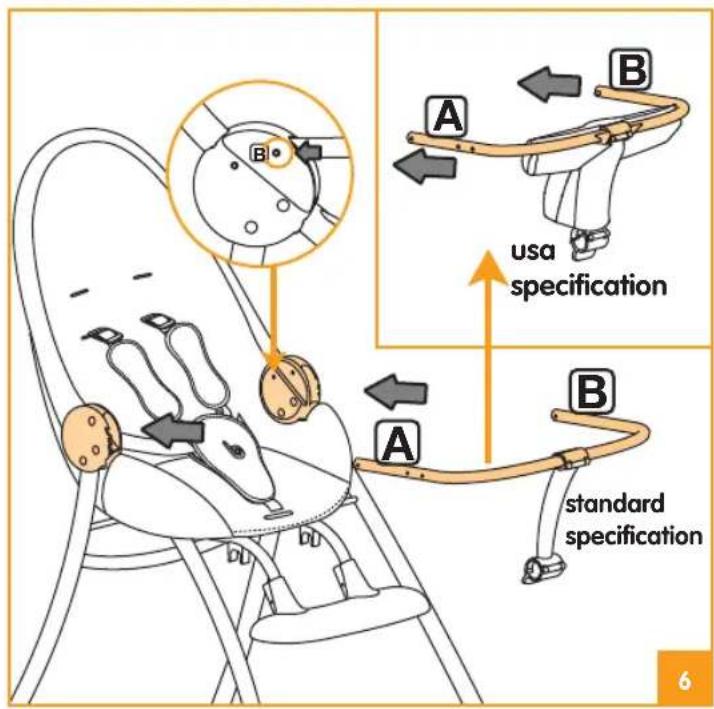
text_image
A B usa specification A B standard specification 6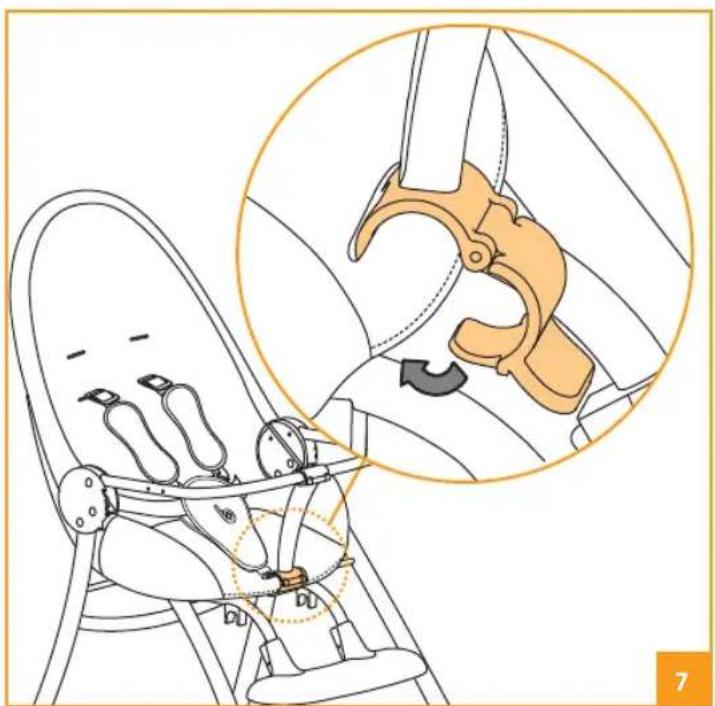
natural_image
Illustration of a baby seat with a magnified inset showing the clamping mechanism (no text or symbols present)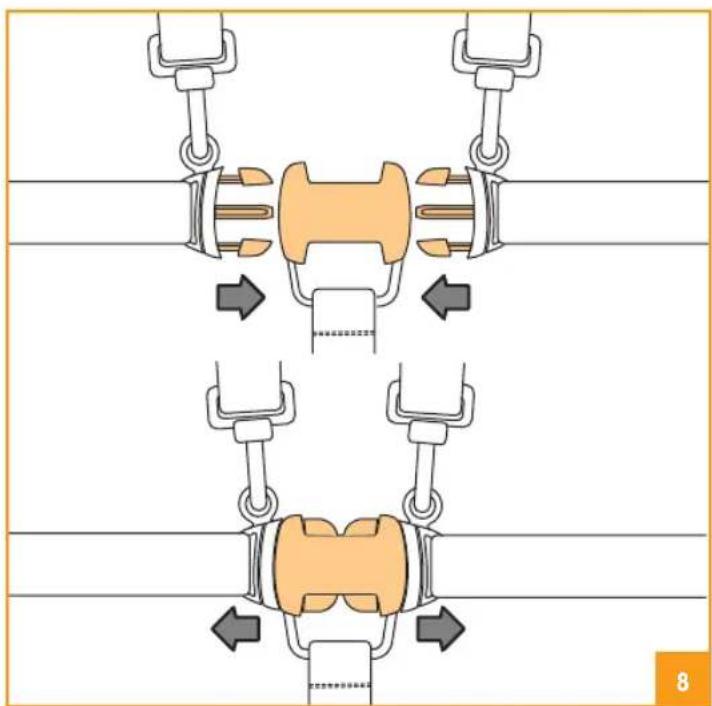
text_image
Diagram illustrating mechanical assembly steps with labeled arrows and numbered section 8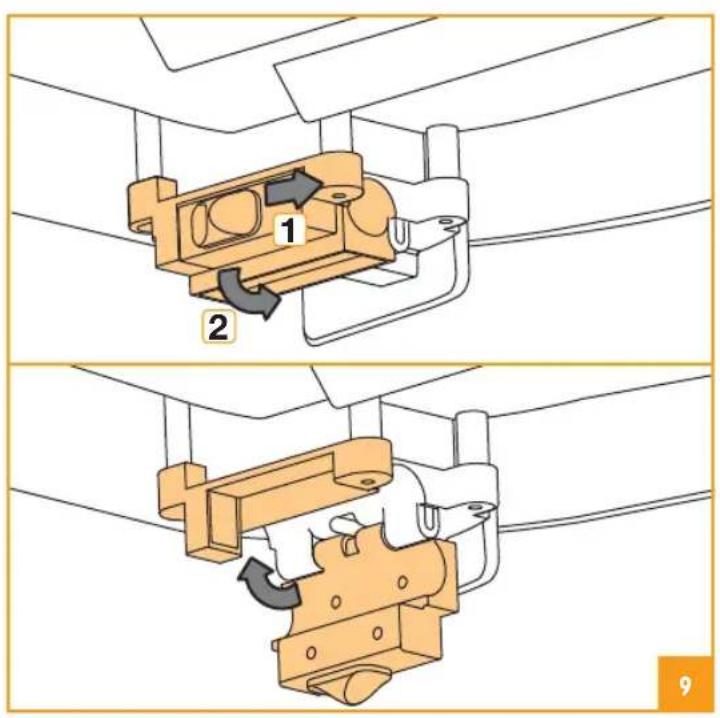
text_image
Technical diagram showing mechanical assembly steps with numbered components and directional arrows indicating motion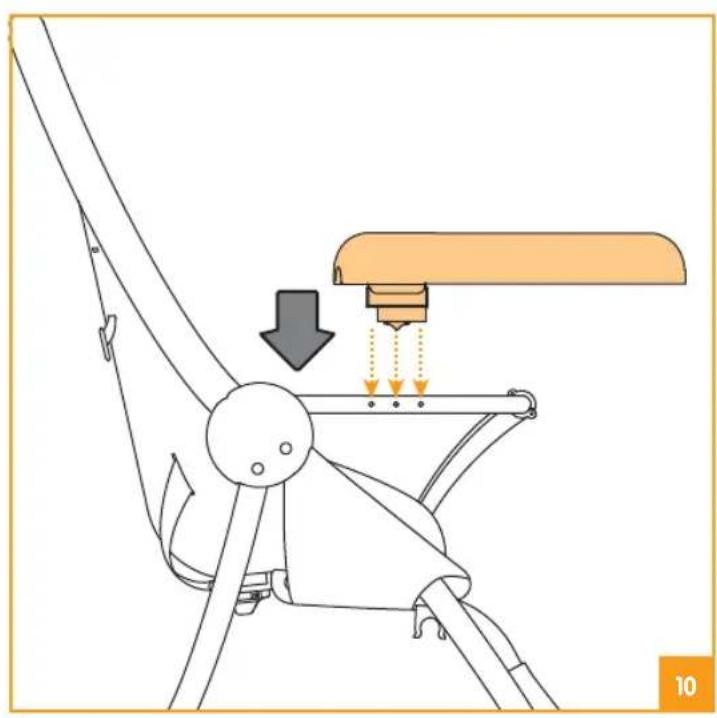
natural_image
Diagram of a chair seat assembly with a downward arrow indicating compression or disassembly (no text or symbols present)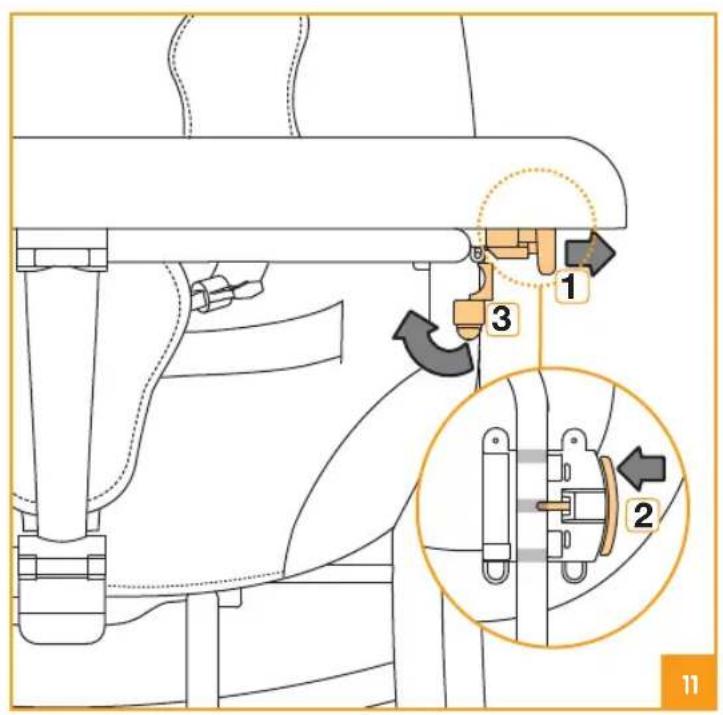
text_image
Technical diagram showing mechanical assembly with numbered components and directional arrows indicating motion or movement.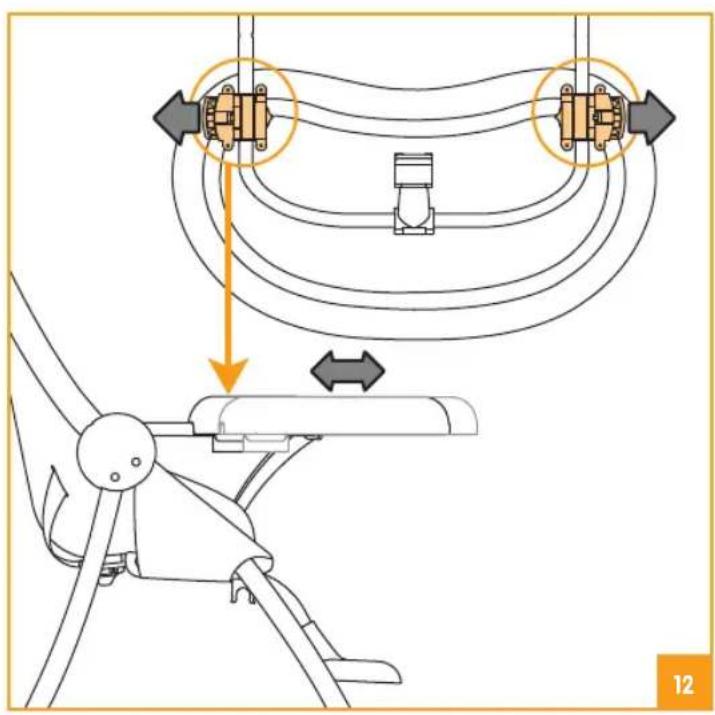
text_image
Diagram illustrating cable routing and lifting mechanism for a chair, showing rope routing and component placement.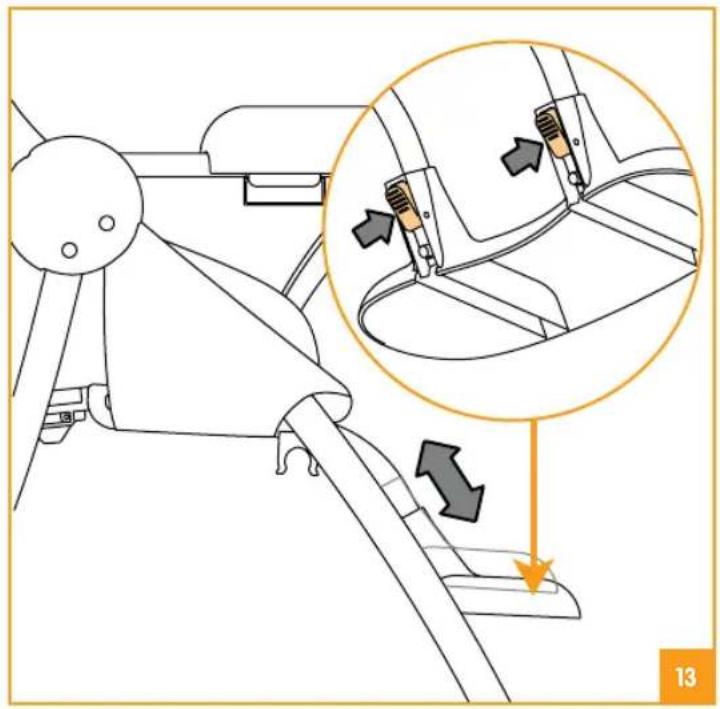
natural_image
Diagram of a car seatbelt mechanism showing adjustment of the seatbelt with arrows indicating movement (no text or symbols present)
natural_image
Illustration of a chair seatbelt mechanism with an inset showing the clamping mechanism (no text or symbols present)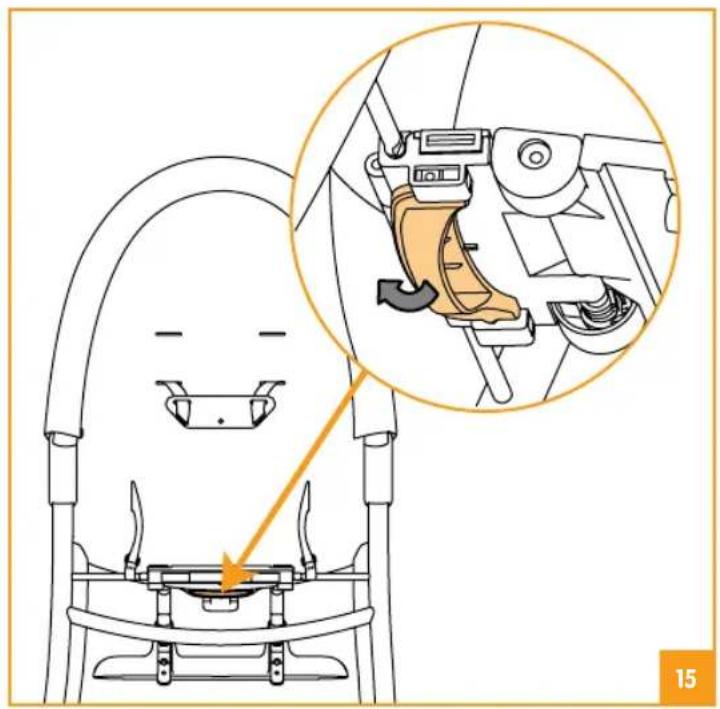
natural_image
Diagram of a car seatbelt switch mechanism with magnified inset showing internal components (no text or symbols)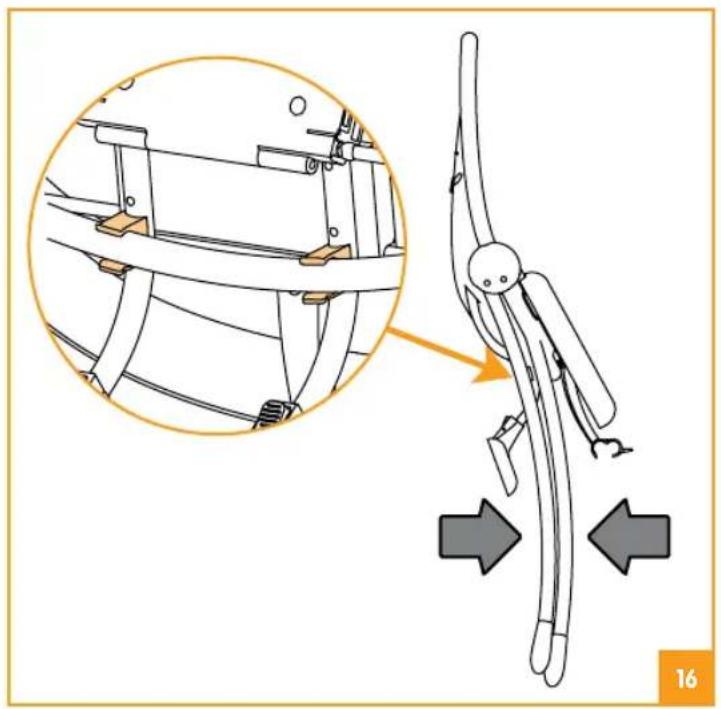
natural_image
Diagram of a mechanical linkage assembly with an inset showing a close-up of the component (no text or symbols present)dear customer,
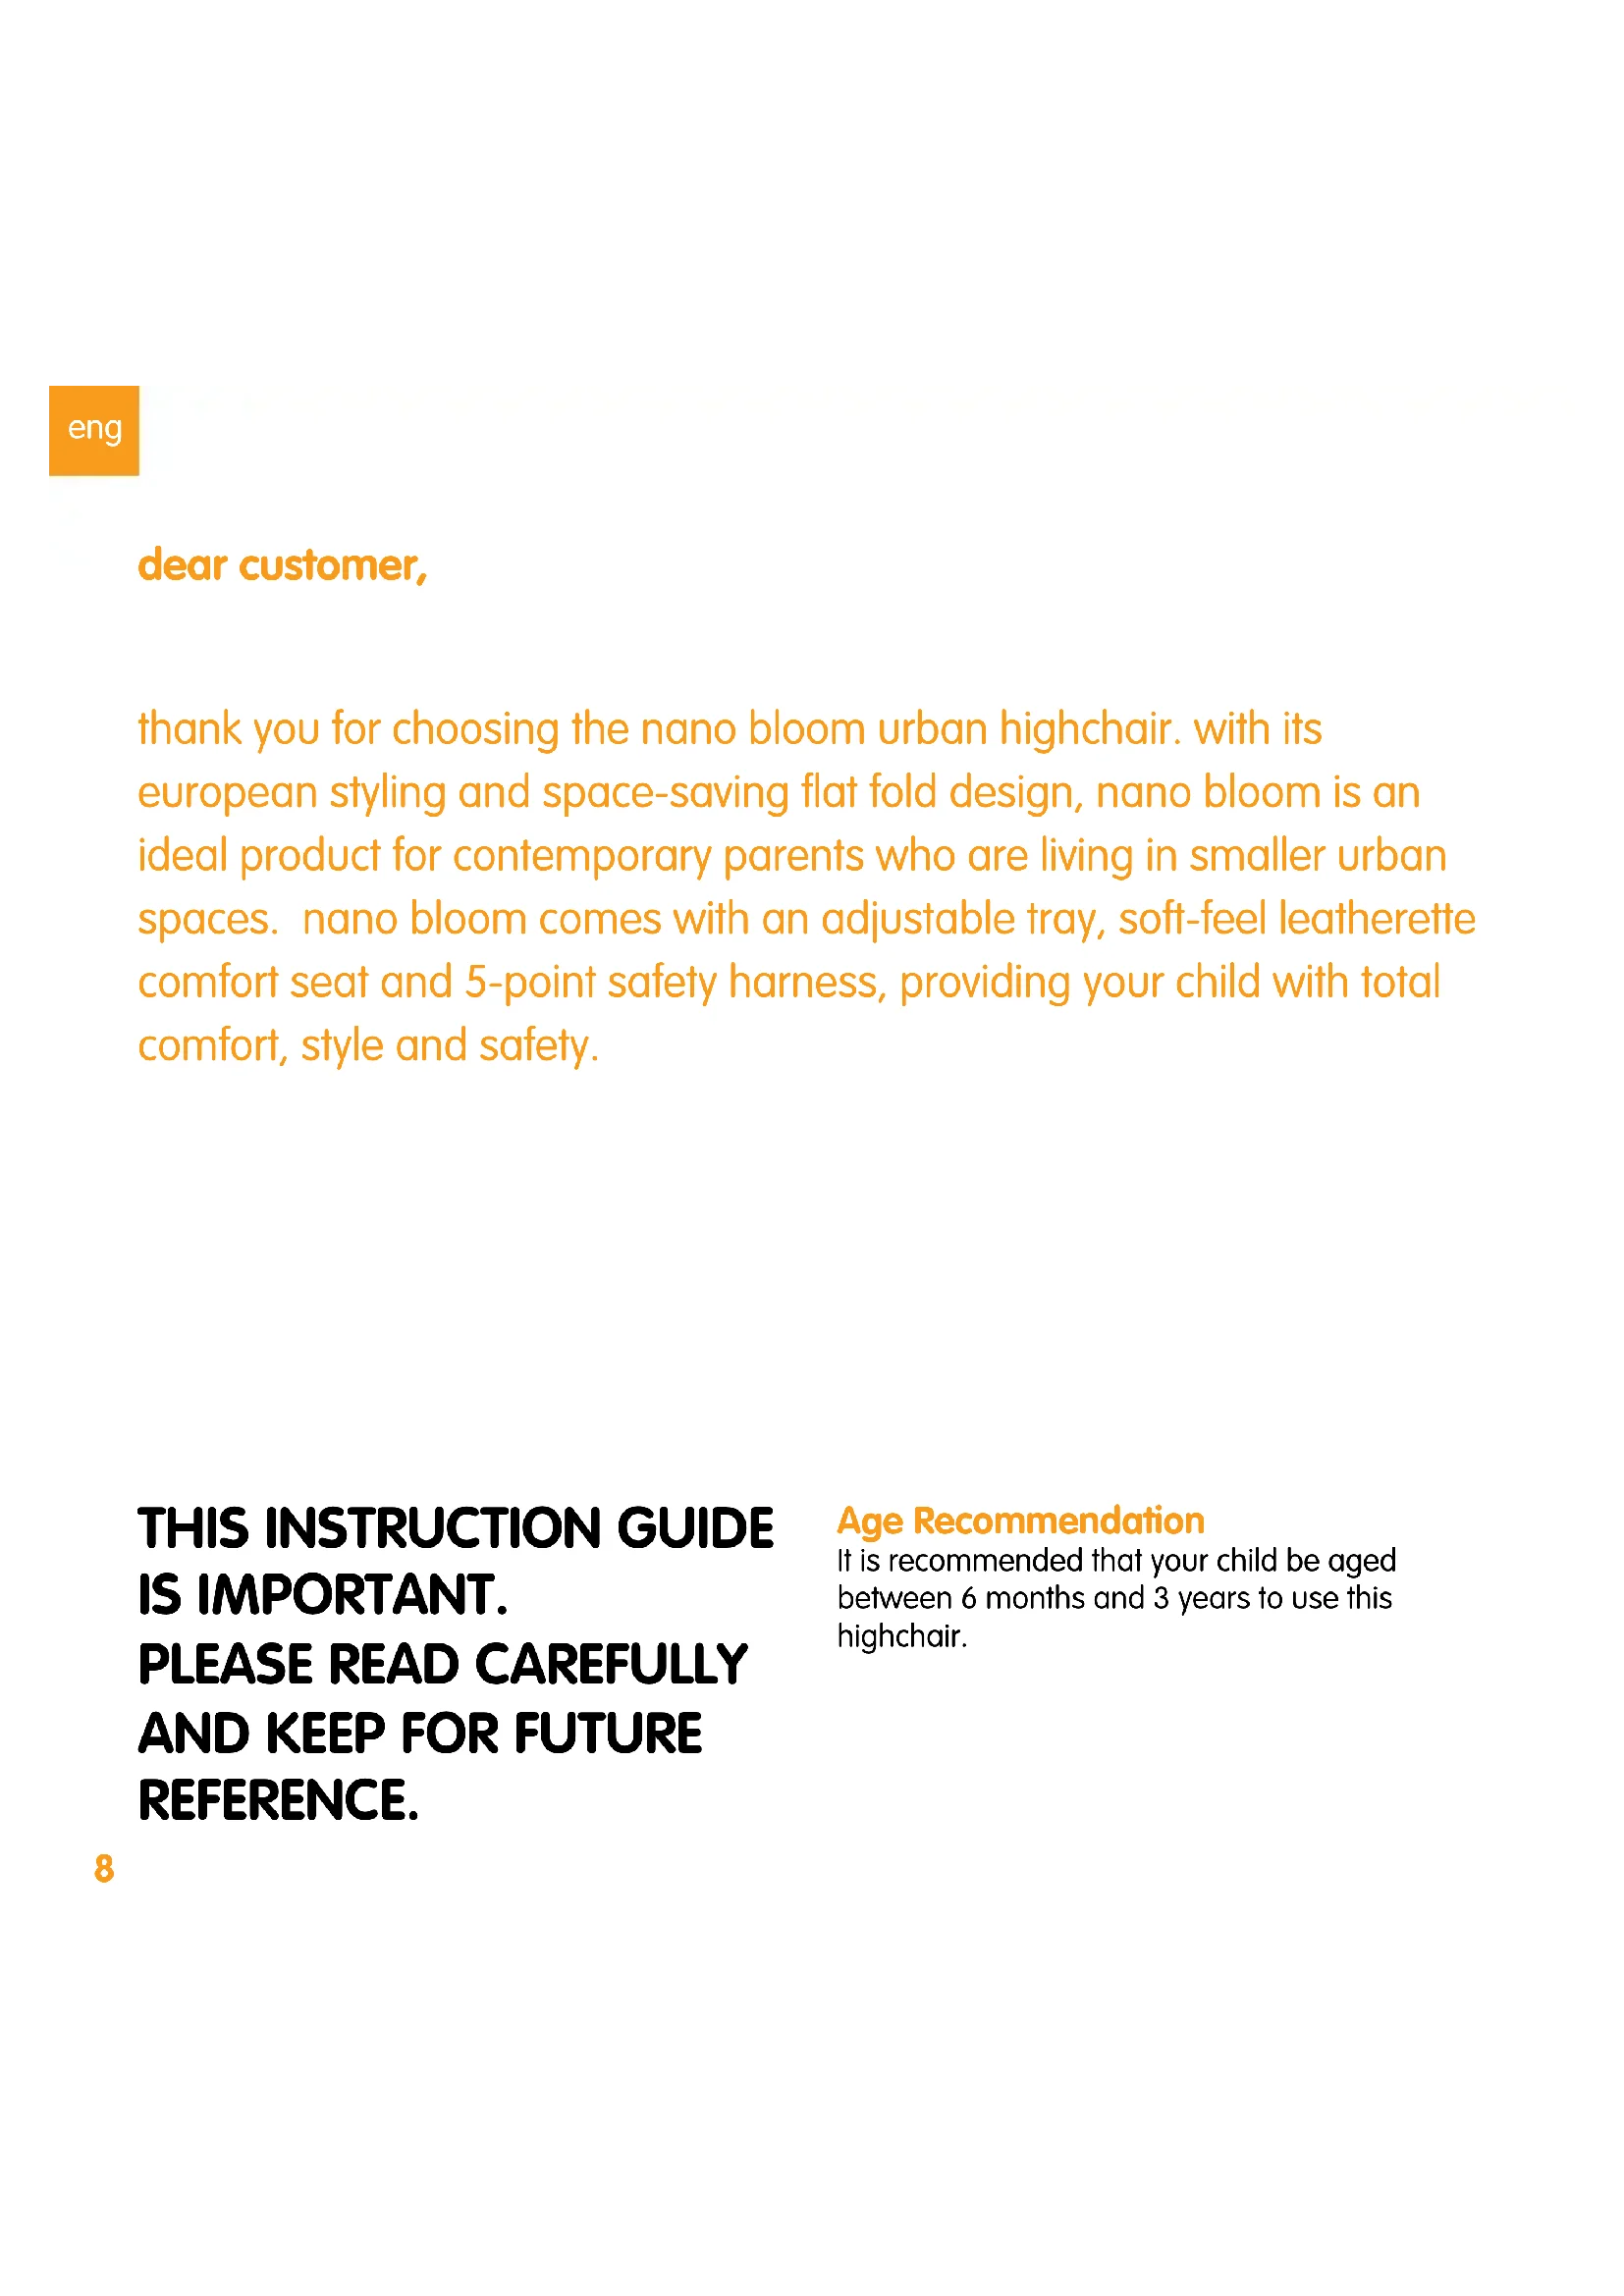
thank you for choosing the nano bloom urban highchair. with its european styling and space-saving flat fold design, nano bloom is an ideal product for contemporary parents who are living in smaller urban spaces. nano bloom comes with an adjustable tray, soft-feel leatherette comfort seat and 5-point safety harness, providing your child with total comfort, style and safety.
THIS INSTRUCTION GUIDE IS IMPORTANT. PLEASE READ CAREFULLY AND KEEP FOR FUTURE REFERENCE.
Age Recommendation
It is recommended that your child be aged between 6 months and 3 years to use this highchair.
Product Information
This highchair has been designed and tested to ensure compliance with the latest relevant safety standards.
- Designed for children aged between 6 months and 3 years
• Space-saving flat-fold mechanism - 'Up-to-the-table' and traditional (tray) feeding modes
- Super sized adjustable tray (3 positions) with deep lip to prevent spills – removable and dishwasher safe
- 5-point safety harness with height adjustable shoulder straps
- Leatherette seat upholstery for comfort and easy clean in contemporary colours
• 2-position adjustable footrest - Iconic and minimalist design
Model No.: 10502
Patents Pending
Colour & contents may vary
NOTE: Adult assembly required.
Instructions For Safe Use - Please read carefully and keep for future reference
The correct use and maintenance of your highchair will ensure it gives long and trouble-free use. When somebody else is using your highchair please ensure they also know how to use it, how to adjust it and the necessary safety precautions.
Basic Assembly (refer to Section a of Illustrations)
1 - 3 Frame Assembly
- (base #02) Unfold the base frame by pulling front and rear legs apart. Press down on seat base until you hear audible click to ensure frame is fully open and secure.
- Do not remove the protective foam on the backrest tube, this is part of the product.
- Insert backrest tube into the plastic round joints on either side of the highchair frame (see engraved A & B), by fitting the end of backrest tube with a nub into joint A, and the other end with no nub into joint B. You will hear audible clicks. Pull to ensure it is secure.
4 Upholstery Assembly
- Wrap backrest part of upholstery over the backrest tube. From behind the highchair, close zipper to secure.
- Wrap the side flap on both sides of upholstery over the front leg tubing and secure onto velcro.
eng
- To remove the upholstery & safety harness for cleaning, follow the instructions given in the care & maintenance section of this user guide.
5 - 7 Safety Bar Assembly
- Insert safety bar into the plastic round joints on either side of the highchair frame (you will see engraved A & B) by fitting the end of safety bar with a nub into joint A, and the other end with no nub into joint B. You will hear audible clicks. Pull to ensure secure.
- Slot part of the crotch bar clamp through slit on seat pad to position it onto the upholstery and metal tubing.
- Secure the crotch bar by closing the clamp over the upholstery and metal tubing. You will hear an audible click. Pull to ensure it is secure.
- The USA safety bar design is slightly different due to USA specific standard requirements. Assembly is performed in the same manner as above. Warning: Do not disassemble the USA crotch bar.
Safety Bar Removal
- Unlock the crotch bar by opening the clamp on the end.
- Use a pen to press the small pin in the round joints on either side of the frame, pull and remove safety bar.
8 Using and adjusting the safety harness
Locking the safety harness:
(safety harness #04) lock the harness by pushing the tongues on the ends of the waist straps, connected with the ends of the shoulder straps, into the buckle on the crotch strap.
The harness will lock when the tongues are fully pushed in. You will hear audible clicks.
Unlocking the safety harness:
Squeeze the ends of the tongues together and slide them out of the buckle. Your child can now be removed from the highchair.
Adjusting the harness
All five harness straps are length adjustable. As your child grows you will need to alter the height of the shoulder straps. The time to do this is when the child's shoulders are above the slits on the upholstery, where the shoulder straps pass through.
9 - 12 Food Tray Assembly
- Open the two latches under food tray by sliding button whilst rotate latch outwards.
- 11- (1) Pull the two side triggers under the tray to retract the locking pins, whilst place the food tray on the safety bar.
- 11- (2) Release the side triggers to fit the locking pins into desired position, you will hear audible clicks. To ensure the pins are in place, slide the tray along the safety bar.
- 11- (3) Close the latches to secure tray. You will hear audible clicks.
- To adjust tray position, pull the side triggers under the tray whilst sliding the tray forwards or backwards. Release triggers at the desired setting. You will hear audible clicks. Pull to
check the food tray is locked in place.
- The food tray can lock in three positions.
- To remove the food tray, reverse the order of assembly steps.
Note: Always check the tray is securely locked in place by attempting to pull it free of the highchair.
13 Footrest Adjustment
- The footrest has two height positions. Press and hold both triggers at the back of footrest, whilst sliding the footrest up or down to your desired position.
- Release both triggers and you will hear audible clicks when the footrest is locked into position. Check footrest is secured by pulling it downwards.
14 - 16 Folding/Unfolding highchair
- Unlock the crotch bar by opening the center post clamp on the end.
- Rotate the crotch bar inwards, and let the safety bar and food tray lie flat against the frame.
- Tilt the highchair forward lifting the rear legs off the ground.
- Pull trigger on the rear end under the seat base fully and the highchair will fold automatically.
- Push rear leg frame into fold locks to secure.
- To unfold the highchair, reverse the folding steps.
WARNING:
Prevent serious injury or death from falls or sliding out:
• Always use the safety harness.
• Always keep child in view while in high chair.
- Do not leave your child unattended.
- A child's safety is your responsibility.
- Do not use the highchair until child can sit up unaided.
- Do not use highchair if any part is broken, torn or missing.
- Keep the highchair away from open fire, heaters and other sources of strong heat.
- Do not use the highchair unless all components are correctly fitted and adjusted.
- Make sure harness is correctly fitted before use.
- Always ensure the highchair is on a level, stable surface before use.
- Always be sure your child is clear of the highchair's moving parts before making adjustments.
- Do not adjust your highchair whilst your child is in the seat.
WARNING:
The child should be secured in the high chair at all times by the restraint system.
To remove the upholstery & safety harness for cleaning, follow the instructions given in the care & maintenance section of this instruction guide.
Note: Every time you place your child in the highchair always check that the harness is
eng
correctly fitted and adjusted using the shoulder and waist strap buckles. Tighten the harness until it fits snugly around your child.
Care & Maintenance
Removing the Upholstery #01:
- Unzip the zipper at the back and unwrap side flaps from both sides of seat.
- Untie the straps under the seat base.
Removing the safety harness #04:
- Unlock the safety harness and pull all harness straps free from upholstery and frame.
The upholstery and highchair frame can be cleaned following the instructions given below.
- Exposed edges of seat pad are often the first to wear and fray. Remember this when storing or transporting your highchair.
- Light soiling to the seat pad can be removed with a damp sponge and a mild detergent. Hang dry. Do not tumble dry.
- For heavier staining, remove the upholstery and wash with detergent and water.
- Fabric care:
- Hand wash only
- Do not bleach
- Do not tumble dry
- Do not iron
- Do not wring
-
Do not dry clean
-
The food tray is dishwasher safe.
- Clean the plastic parts of the highchair with a damp cloth, do not use abrasives or bleach.
Check List
- Always check the frame is free from damage before use. Do not use product if any fracture is present.
- Regularly check that the safety harness is correctly fitted and that the webbing has not become frayed or damaged. If the harness is damaged, we recommend that a new one is fitted.
- Regularly check that all locking devices are clean and functioning properly.
After Sales Service
When you receive your bloom product, if you need assistance, spare parts or if you have any comments with respect to any aspect of the goods please contact bloom by email at service@bloombaby.com. Our trained advisors will be able to help. You can also visit our website at www.bloombaby.com for latest product information.
Your feedback and input enables bloom to continue to make improvements. Please send your comments regarding this product to service@bloombaby.com.