USER MANUAL Fresco Bloom
illustration contents
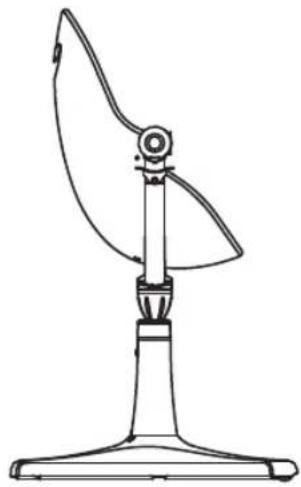
Part List & Illustrations 1
Listedespieces&Illustrations
Cradle Mode: suitable for 0-6 months i5-i7
Highchair mode - suitable for 6-36 months i8-i 11
Comfort nest Installation 12-i 14
Toddler Chair Mode - suitable for 36 months to 36kg /79lbs i15-i 16
3 in 1 grow-with-child mode
cradle mode 0 - 6months
highchair mode: 6 - 36 months (with comfort nest)

sately bar play tray food tray
toddler chair mode: 36 months to 36kgs / 79lbs
a
- Basic Assembly
- Assemblage rapide
- Armado Basics
-Basis-Montage
- Montaggio di base
-Basismontage
a basic assembly
b
- Cradle Mode: suitable for 0 - 6 months
- Configuration transat - De la naissance jusqu'à 6 mois
- Modo Cuna - Apropiado de 0 a 6 mezes
- Wiegenstellung - geeignet für 0 - 6 Monate
- Modalità Culla - adatto a bambini da 0 a 6 mesi
- Babystand - geschikt van 0 - 6 maanden
b cradle mode 0 - 6months

C
- Highchair mode - suitable for 6 - 36 months
- ConfigurationCHAISE haute -utilisation de 6 à 36 mois
- Modo de silla alta - Para 6 a 36征求意见
-Hochstuhl-Modus Geeignet fur 6 bis 36 Monate
- Modalità seggiolone - adatto dai 6 ai 36 mesi
- Peuterstand - geschikt van ca. 6 tot 36 maanden
c highchair mode: 6 - 36 months

d
d comfort nest installation


e
- Toddler Chair Mode - suitable for 36 months to 36kg / 79lbs
- Configuration fauteuil - destinée aux enfants de 36 mois jusqu'à 36Kgs
- Mode de Silla para niño - para niños de 36\
meses a 36kg / 79lbs
- Kleinkind Stuhl-Modus - Geeignet für 36 Monate bis 36kg / 79lbs
- Modalità sedia per bambini – adatto dai 36 mesi ai 36kg / 79lbs
- Kinderstand - geschikt voor kinderen van 36 maanden tot 36kg / 79lbs
e toddler chair mode: 36 months - 36kg / 79lbs

contents
Instructions - eng 1-9
Instructions - fr 10-19
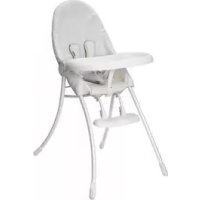
Thank you for choosing the fresco chrome as your baby chair – the chrome is bloom's next generation contemporary chair.
IMPORTANT! RETAIN FOR FUTURE REFERENCE: READ CAREFULLY BEFORE ASSEMBLY AND USE OF PRODUCT.
Please remove all packaging materials before use.
Age Recommendation
Recommended for use between newborn & 36kg / 79lbs.
eng
eng
This baby chair has been designed and tested to ensure compliance with the latest relevant global safety standards.
This baby chair is designed with multiple configurations of use for babies and toddlers from newborn to 36kg / 79lbs:
- cradle mode: from 0 to 6 months
- highchair mode: from 6 months
- toddler chair mode: from 36 months to 36kg / 79lbs
Model No.: 10515
PATENT PENDING
Colour & contents may vary
Instructions for safe use-read carefully and keep for future reference
The correct use and maintenance of your baby chair will ensure trouble-free use. When somebody else is using your baby chair ensure they also know how to use it, how to adjust it and the necessary safety precautions. The safety of your child is your responsibility.
NOTE: Adult assembly required.
IMPORTANT!
Store away from natural light - exposure to sunlight for prolonged periods will fade colors and hasten aging process.
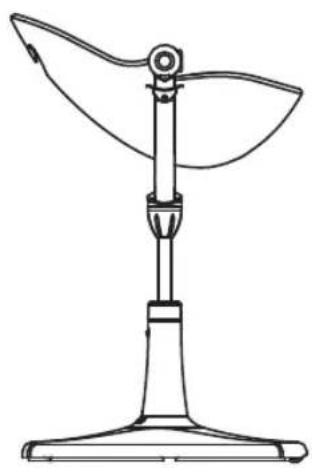
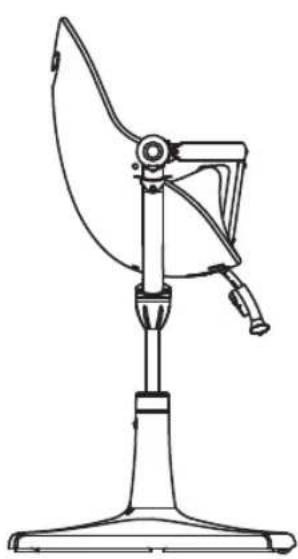
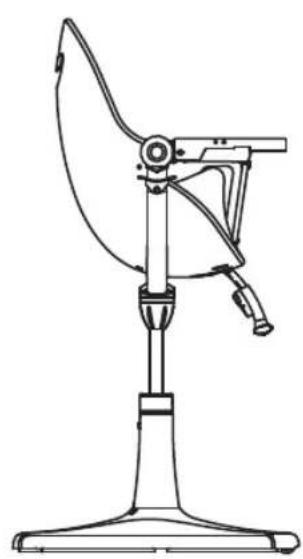
Section A: Basic Assembly (refer to illustrations section a)
Swivel/Height Resistor
IMPORTANT!
The resistor is designed to prevent inadvertent or free spinning, however with adult force it is still possible to rotate the seat unit.
To engage
Press metal lever inwards, until it sits flush with the plastic housing. Check the device is engaged by turning the seat unit.
To disengage
Pull the metal lever outwards fully. Check the device is disengaged by turning the seat unit.
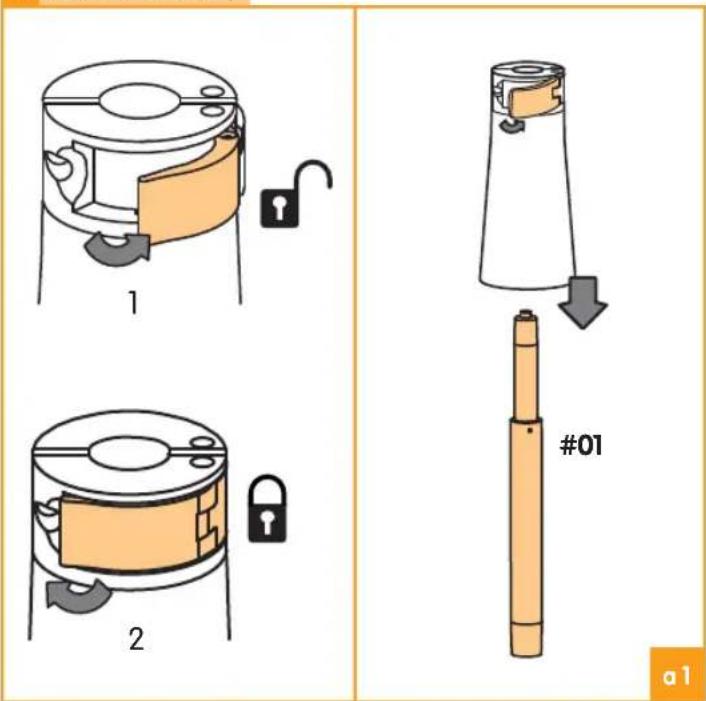
(#01 swivel shaft, #02 swivel shaft housing) Insert the swivel shaft all the way into the swivel shaft housing (make sure swivel resistor is disengaged). Engage swivel resistor. (refer to illustration a1)
Base and Seat Assembly
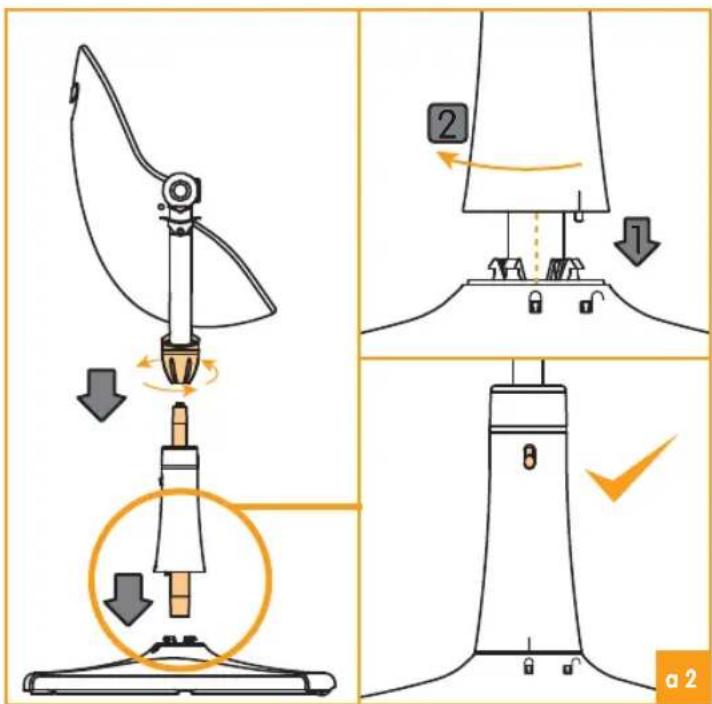
(#01 swivel shaft, #03 base, #02 swivel shaft housing) Insert the swivel shaft to base by aligning the 'unlock' icon marking on the base to the indication line marked on the swivel shaft. Turn until locked into position. You will hear an audible click. In locked position the indication line should point to the 'lock' icon. Check the swivel shaft is securely locked by lifting upwards. Press shaft button to raise swivel shaft.
To disassemble, lift the slide button on side of swivel shaft whilst turning to align the 'unlock' icon to indication line. Pull to remove.
(#04 seat unit) Insert the seat unit onto swivel shaft and tighten fastening cap clockwise. Check seat unit is secured by pulling seat unit upwards. (refer to illustration a2)
Swivel and Height Adjustment
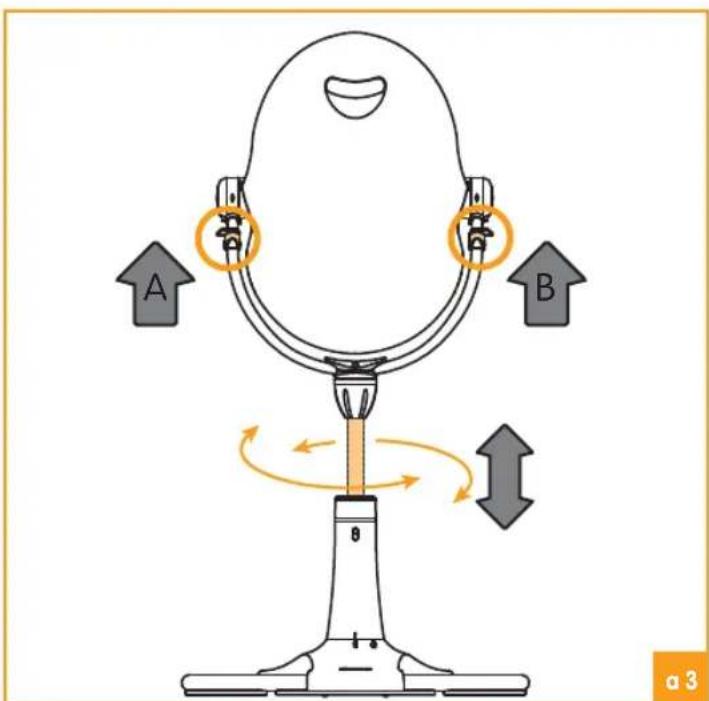
To rotate the seat unit, disengage the swivel/height resistor, and then turn the seat unit sideways to desired position.
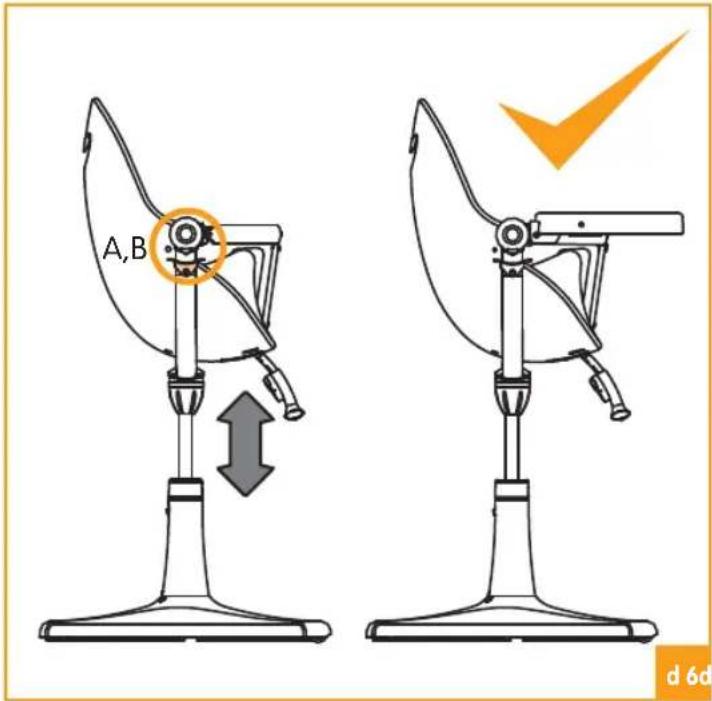
To adjust seat height, disengage the swivel/height resistor. Lift both A & B trigger simultaneously, whilst pushing downwards or pulling upwards to desired height, then release
the triggers. (refer to illustration a3)
IMPORTANT!
Ensure the seat unit is firmly inserted onto the swivel shaft before use. Check the seat unit is assembled properly by trying the height adjustment function, following the instructions in this user guide. If the height adjustment fails to work, this means the seat unit is not properly assembled, please re-try and press seat unit downwards on the swivel shaft firmly in order to properly engage the height adjustment mechanisms.
Lift & Glide - Easy Glide Wheels
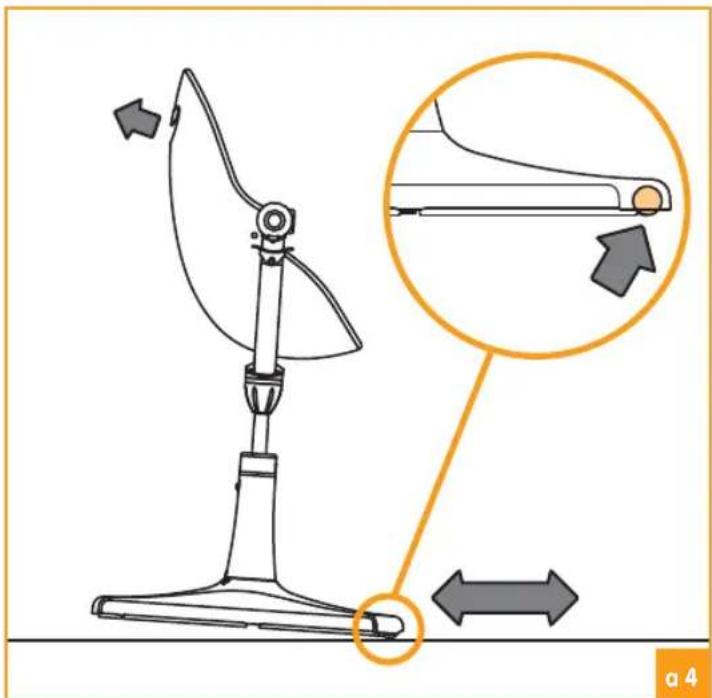
To move the baby chair across floor, first rotate the seat unit so it is front facing, then engage swivel resistor. Tilt the baby chair forward by lifting in the handle area located on the rear of the seat unit, and then glide the highchair across floor using the castor wheels, which are located under the front end of the base. (refer to illustration a4)
WARNING:
- Continue to assemble the baby chair according to the configuration suitable for your child. Follow the corresponding instructions carefully.
- A child's safety is your responsibility.
WARNING:
- Prevent serious injury or death from falls or sliding out.
eng
Always secure child in the restraint.
- Never leave child unattended.
Section B: Cradle Mode - suitable for 0 - 6 months (refer to illustrations section b)
WARNING:
- Not recommended for children who can sit up by themselves (6 months approximately).
- Never leave the child unattended when the baby chair is in cradle mode.
- The child should be secured in the baby chair at all times by the 5-point safety harness in the reclining position.
It is dangerous to put this cradle on an elevated surface.
- Keep the product away from open fire, heaters and other sources of strong heat.
- Do not use the product unless all components are correctly fitted and adjusted.
- Make sure harness is correctly fitted before use.
- This reclined cradle is not intended for prolonged periods of sleeping.
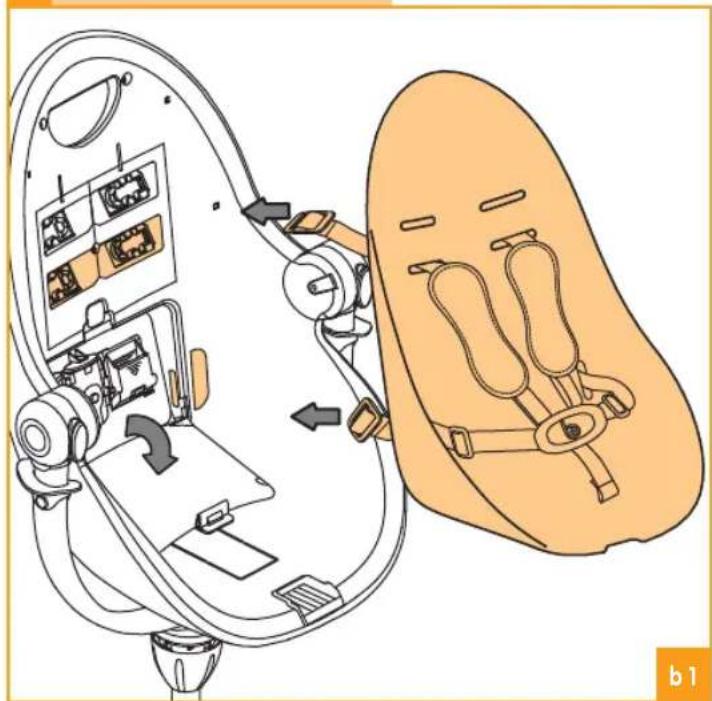
To install Seat Pad & Safety Harness Assembly
- (#07 seat pad, #09 safety harness) Put shoulder straps through the seat pad slits at the lower height setting.
Put waist straps through the seat pad slits.
-
Place seat pad onto the seat unit; secure onto velcro. (refer to illustration b1)
-
(#04 seat unit) Behind the seat pad, slide the buckle on the end of the shoulder straps into the buckle slots located on the inner face of seat unit. Check the straps are secured by pulling on the straps. (refer to illustration b2)
- (#12 storage compartment) Behind the seat pad, pull open storage compartment door located on the inner face of seat unit. Slide the buckle on the end of the waist straps into the buckle slots on either side of the storage compartment. Check the straps are secured by pulling on the straps.
- (#13 bar attachment caps, #14 crotch cover) From storage compartment, take out the two bar attachment caps and the crotch strap cover. Close the compartment door.
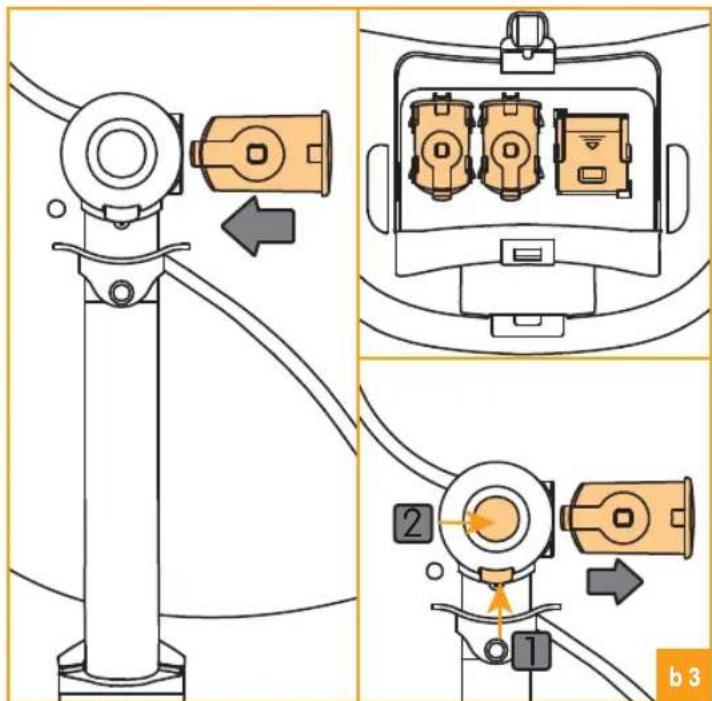
- Insert the bar attachment caps on either side of the seat unit; you will hear an audible click.
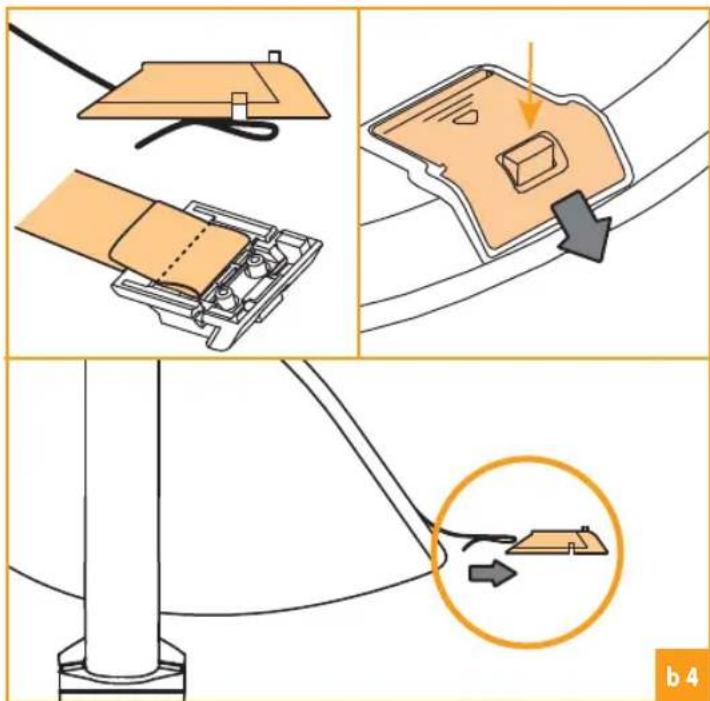
- Insert the loop on the end of the crotch strap through the upper hole of the crotch strap cover, and then put the loose end under the crotch strap cover. Then slide the crotch strap cover into the seat unit. The strap and buckle must not be twisted or inverted. This will ensure correct locking of the harness. (refer to illustration b4)
- To remove the bar attachment caps, press and hold the button under the two side domes, and then press the side button on dome cap to disengage the lock. And then press the button on the crotch cover and remove from the seat unit. (refer to illustration b3)
WARNING:
Always use the safety harness.
To remove the seat pad & safety harness for cleaning, follow the instructions given in the care & maintenance section of this user guide.
Using and Adjusting the Safety Harness
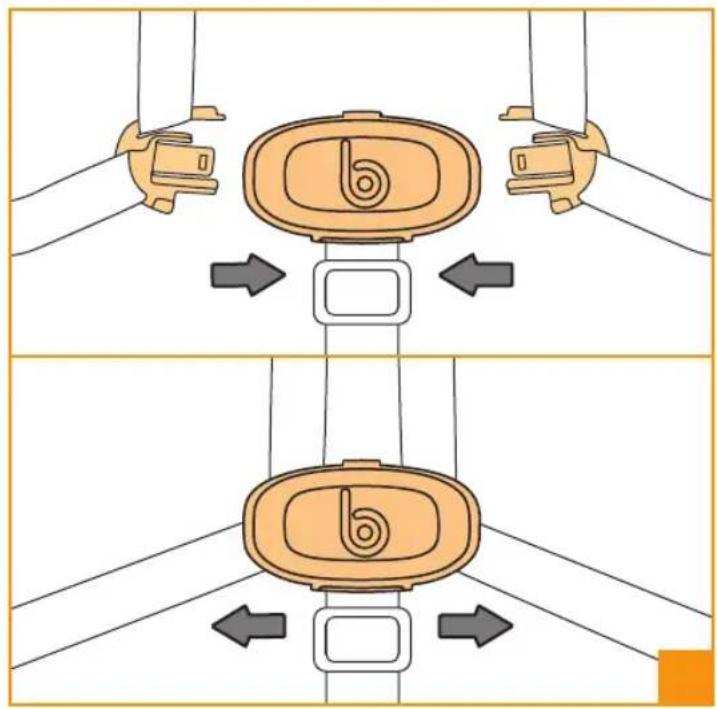
- To lock harness, push the tongues on ends of waist straps, connected with the ends of shoulder straps, into the buckle on crotch strap.
- To unlock harness, press the central button. (refer to illustration b5)
- Adjust the length of the harness straps until it fits firmly around your child.
NOTE: Every time you place your child in the baby chair or whenever you alter the position of the seat always check that the harness is correctly fitted. Tighten the harness until it fits snugly around your child.
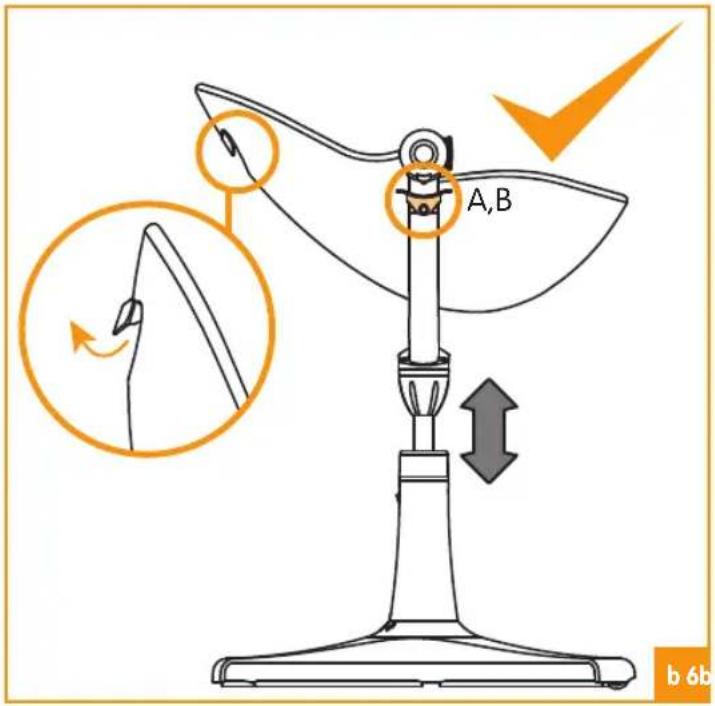
Seat Unit Height/ Seat Unit Recline
To adjust seat height, disengage the swivel/height resistor. Lift both A & B trigger simultaneously, whilst pushing downwards or pulling upwards to desired height, then release the triggers.
Adjust the seat unit to cradle position by pulling the handle on the rear of the seat unit, then recline the seat to the lowest position, and release the handle. You will hear an audible
click. Check the seat unit is locked in position by moving it. Ensure the seat unit is reclined to the lowest cradle position for children from newborn to approximately 6 months of age, until child can sit up unaided. (refer to illustration b6)
WARNING:
Children who can not sit up unaided can only use the cradle mode of this baby chair. Seat unit must be reclined to lowest cradle position. Always use the safety harness.
Always be sure your child is clear of moving parts before making any adjustments.
Section C: Highchair mode - suitable for 6 - 36 months (refer to illustrations section c)
WARNINGS:
- A CHILD'S SAFETY IS YOUR RESPONSIBILITY.
DO NOT LEAVE YOUR CHILD UNATTENDED.
DO NOT USE THE HIGHCHAIR UNTIL THE CHILD CAN SIT UP UNAIDED.
DO NOT USE PRODUCT IF ANY PART IS BROKEN, TORN OR MISSING.
- Highchair mode is designed for children from approximately 6 months (must be able to sit up unaided) to 36 months only. Always use the safety harness.
- The child should be secured in the baby chair at all times by the 5-point safety harness in the upright position.
- Keep the highchair away from open fire,
eng
heaters and other sources of strong heat.
- Do not use the highchair unless all components are correctly fitted and adjusted.
Always use the safety harness.
- Make sure harness is correctly fitted before use.
Always ensure the highchair is on a level, stable surface before use.
- Always be sure your child is clear of the highchair's moving parts before making adjustments.
- Check the highchair regularly for damage and to ensure that the harness is secure and performs correctly. No lubrication is necessary.
- Always check the tray is securely locked in place by attempting to pull it free of the highchair.
- IMPORTANT: Every time you place your child in the highchair or whenever you alter the position of the seat, always check that the harness is correctly fitted. Tighten the harness until it fits snugly around your child.
DO NOT use footrest as a step.
- Suitable for use up to 24 months.
-
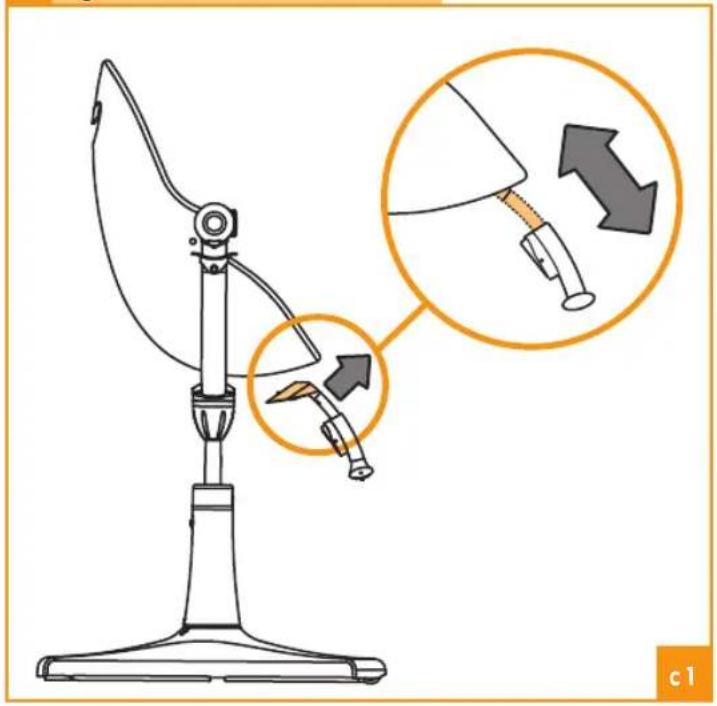
(#11 footrest) Slide in footrest until you hear an audible click Check footrest is secured by pulling it downwards.
-
To remove footrest, press button located on the end of the footrest attached to the seat unit, whilst sliding the footrest out of seat unit.
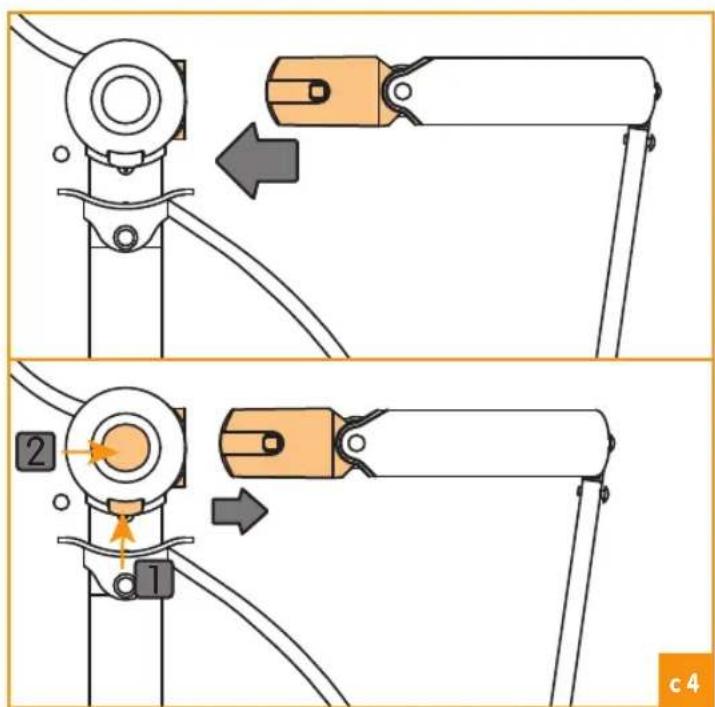
- The footrest has three height positions. Press the button on the back of the footrest, whilst sliding footrest up or down to your desired position. The footrest is locked into position when you hear an audible click. Check footrest is secured by pulling it downwards. (refer to illustration c1)
To install seat pad
- follow "To install seat pad & Safety Harness Assembly" in section B.
- Adjust the length of the harness straps until it fits firmly around your child.
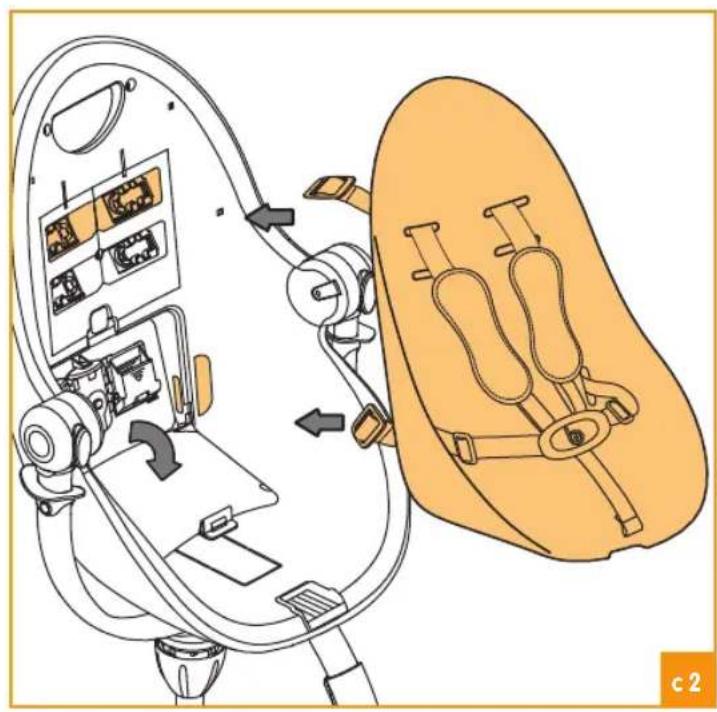
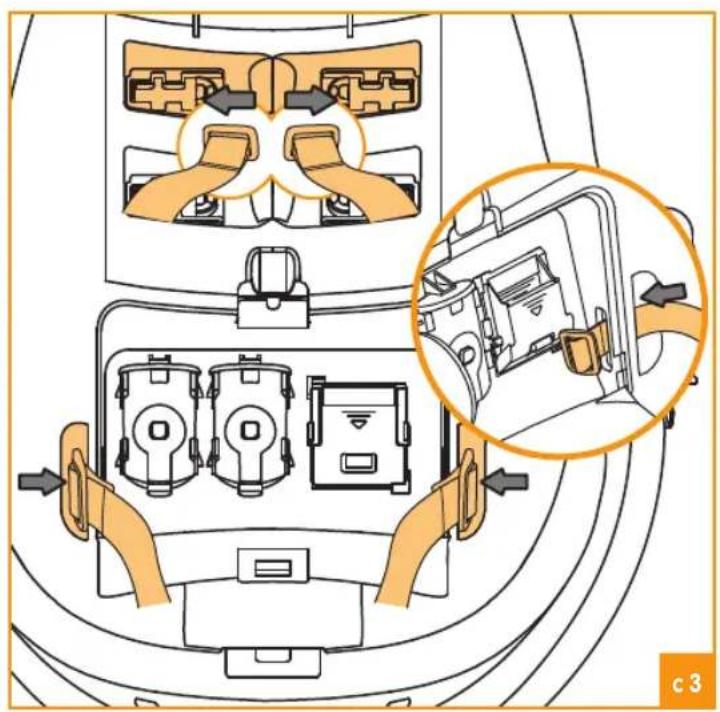
To install Safety Bar, Seat Pad & Safety Harness Assembly
- (#10 safety bar) Insert the both end of the safety bar into the slot locate on both side of seat unit. You will hear an audible click. (refer to illustration c4)
- Insert the loop on the end of the crotch strap through the upper hole of the crotch strap cover at the end of crotch bar, and then put the loose end under the crotch strap cover. Then slide the crotch strap cover into the seat unit. The strap and buckle must not be twisted or inverted. This will ensure correct locking of the harness. (refer to illustration c5)
- The seat can be reclined in three positions by pulling the handle located at the back of seat. (refer to illustration c6)
- To remove the safety bar, press and hold
the button under the two side domes, and then press the side button on dome cap to disengage the lock. And then press the button on the crotch cover and remove from the seat unit. (refer to illustration c4)
Mini Tray Assembly
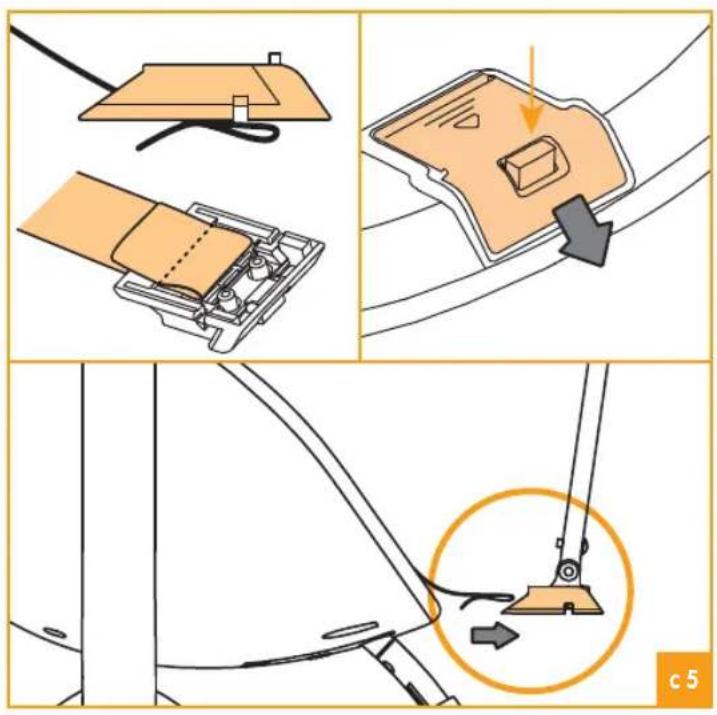
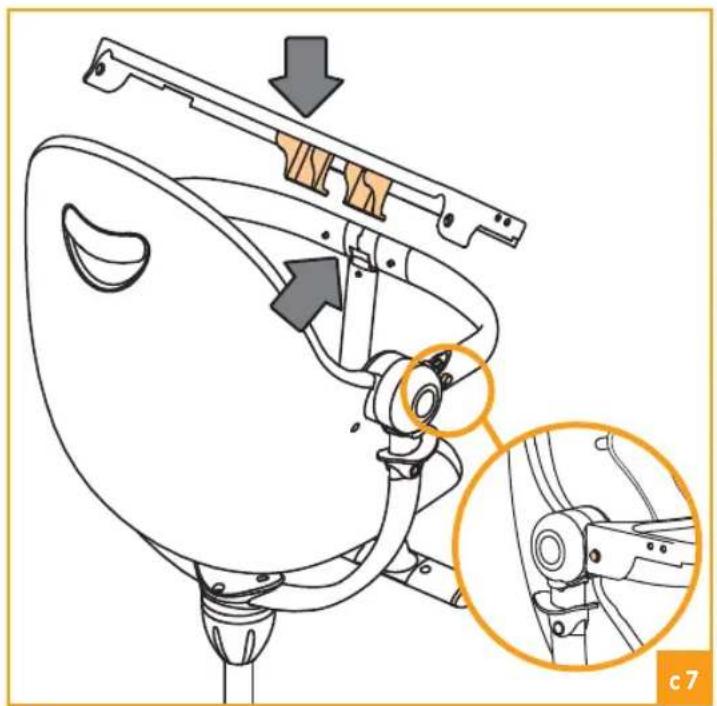
- (#05 mini tray) Latch the hook located on the bottom of the mini tray onto the safety bar whilst rotating the tray downwards.
- Lock the mini tray into position by pressing down on the left and right arm of the tray. You will hear an audible click. (refer to illustration c7)
- To remove the mini tray, reverse the order of assembly steps.
- The mini tray is dishwasher safe, and is made of FDA compliant food contact grade plastic.
Food Tray Assembly
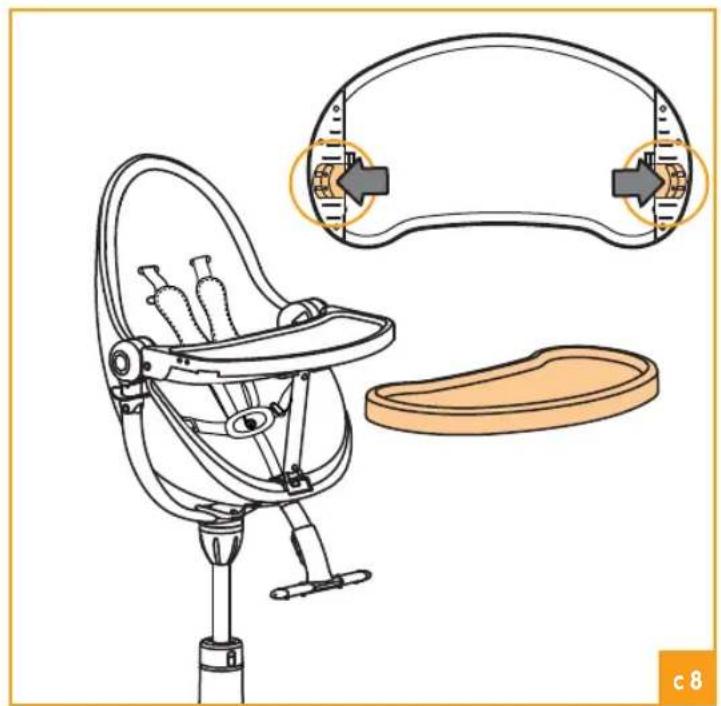
- (#06 food tray) Squeeze the left and right trigger located under food tray simultaneously, whilst sliding the food tray onto the mini tray, then release triggers at your desired setting. You will hear an audible click. Check the food tray is locked in place by attempting to pull it free of the highchair. (refer to illustration c8)
- The food tray can be locked in two positions.
- To adjust the tray, pull the left and right side triggers located under the tray simultaneously whilst sliding the tray forwards or backwards. Release triggers at the desired setting. You will hear an audible click. Check the food tray is locked in place by attempting to pull it free
of the highchair.
- To remove the food tray, reverse the order of assembly steps.
- The food tray is dishwasher safe, and is made of FDA compliant food contact grade plastic and stainless steel.
NOTE: Always check the tray is securely locked in place by attempting to pull it free of the highchair.
WARNING:
The tray is not designed to hold the child in the chair.
Seat unit height and Seat unit recline
- To adjust seat height, disengage the swivel/height resistor. Lift both A & B trigger simultaneously, whilst pushing downwards or pulling upwards to desired height, then release the triggers.
- In highchair mode the seat unit shall always be adjusted to the vertical upright position.
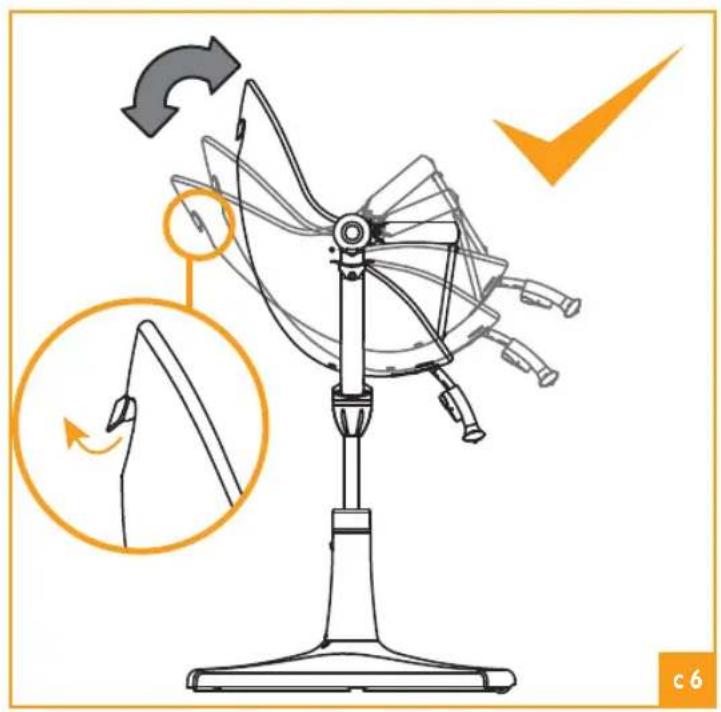
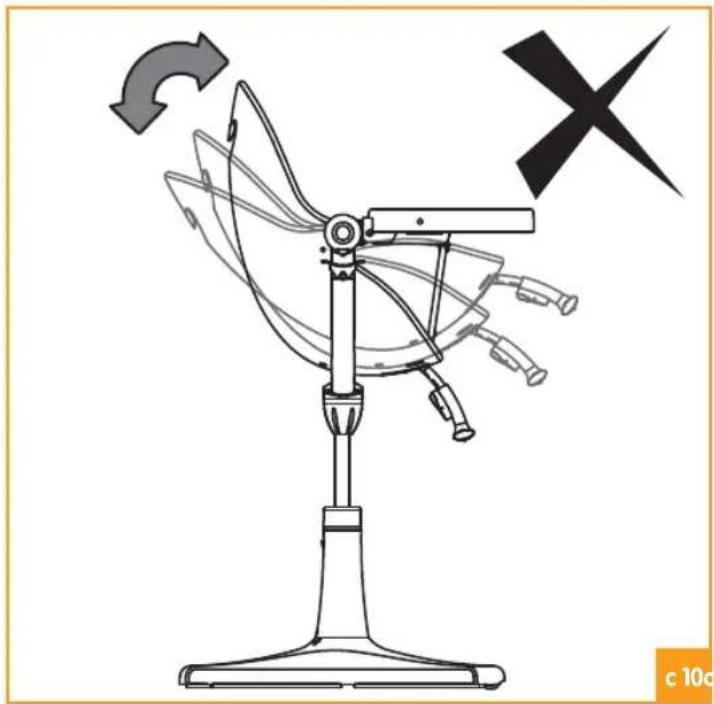
- Adjust the seat unit to the vertical upright position by pulling the handle on the rear of the seat unit outward, then raise the seat upwards to the highest position, then release the handle. You will hear an audible click. Check the seat unit is locked in position by moving it. (refer to illustration c9)
NOTE: The seat unit can only be in most upright position with the play tray or food tray installed. (refer to illustration c10)
Section D: Comfort nest Installation
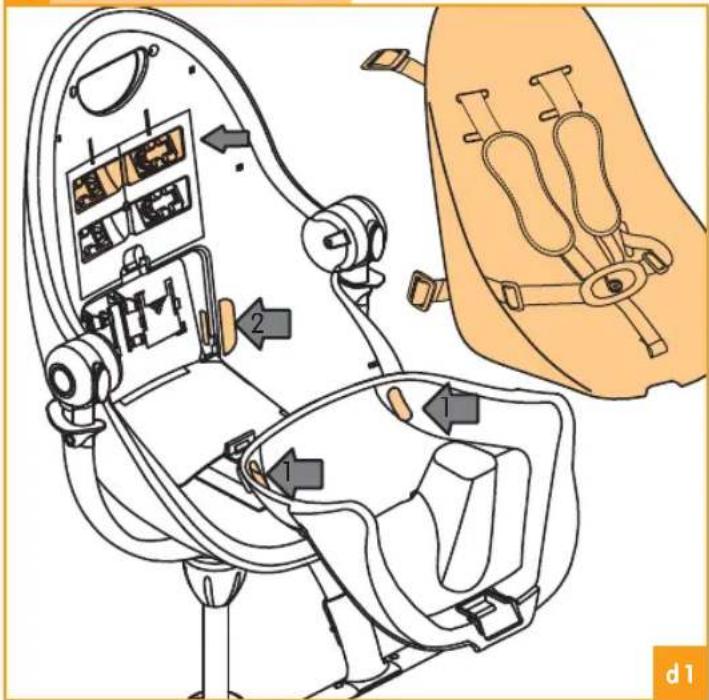
- (#09 safety harness, #08 nest pad) Put shoulder straps through the nest pad slits at the desired height setting.
Put waist straps through the nest pad side slits.
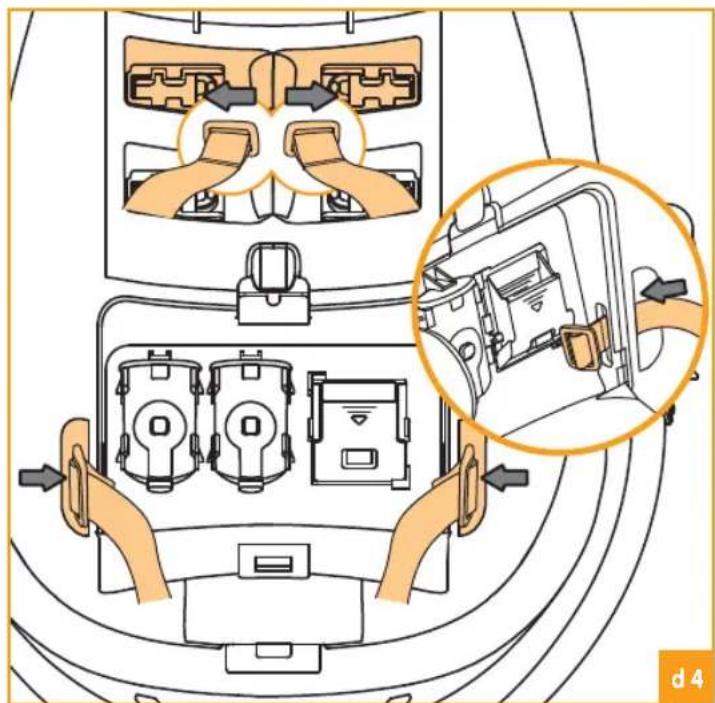
(#04 seat unit, #12 storage compartment) Behind the nest pad, slide the buckle on the end of the shoulder straps into the buckle slots located on the inner face of seat unit. (refer to illustration d1)
- Thread the crotch strap through upper opening to the lower opening of the comfort nest. When removing the crotch strap from comfort nest, beware of the loose end of the strap to stick under the comfort nest. (refer to illustration d2)
- Behind the seat pad, pull open storage compartment door located on the inner face of seat unit. Slide the buckle on the end of the waist straps into the buckle slots on either side of the storage compartment. Check the straps are secured by pulling on the straps. (refer to illustration d4)
- Close the compartment door.
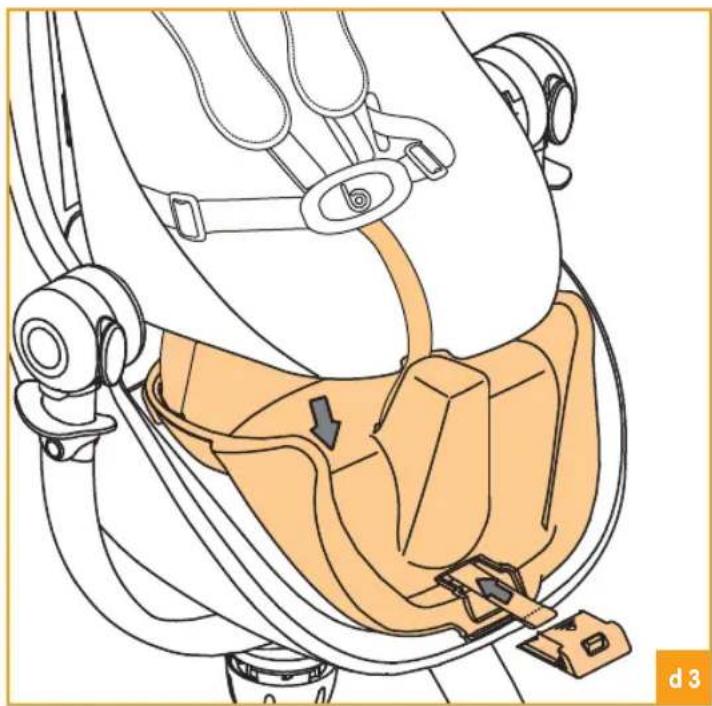
- (Without safety bar) put the loose end of the crotch strap under the crotch strap cover, and then into the buckle slots of the seat unit. Check the straps are secured by pulling on the straps. (refer to illustration d3)
- (With safety bar) Insert the loop on the end of the crotch strap through the upper hole of the crotch strap cover, and then put the loose end under the base of the crotch bar. Then slide
the base of the crotch bar into the seat unit. The strap and buckle must not be twisted or inverted. This will ensure correct locking of the harness. (refer to illustration d5)
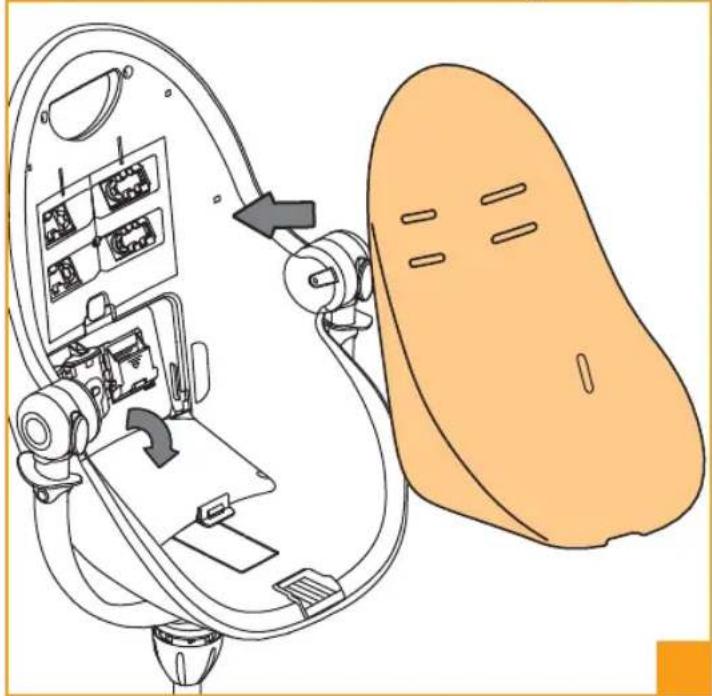
- Place the comfort nest into the seat unit, and then press in towards the backrest.
- Check the straps are secured by pulling on the straps.
- Adjust the length of the harness straps until it fits snugly around your child.
WARNING:
Always use the safety harness.
Section E: Toddler Chair Mode – suitable for 36 months to 36kg / 79lbs (refer to illustrations section e)
Seat Pad Assembly
- (#12 storage compartment) Behind the seat pad, pull open storage compartment door located on the inner face of seat unit.
- (#13 Bar attachment caps, #14 crotch cover) From storage compartment, take out the two bar attachment caps and the crotch strap cover. Close the compartment door.
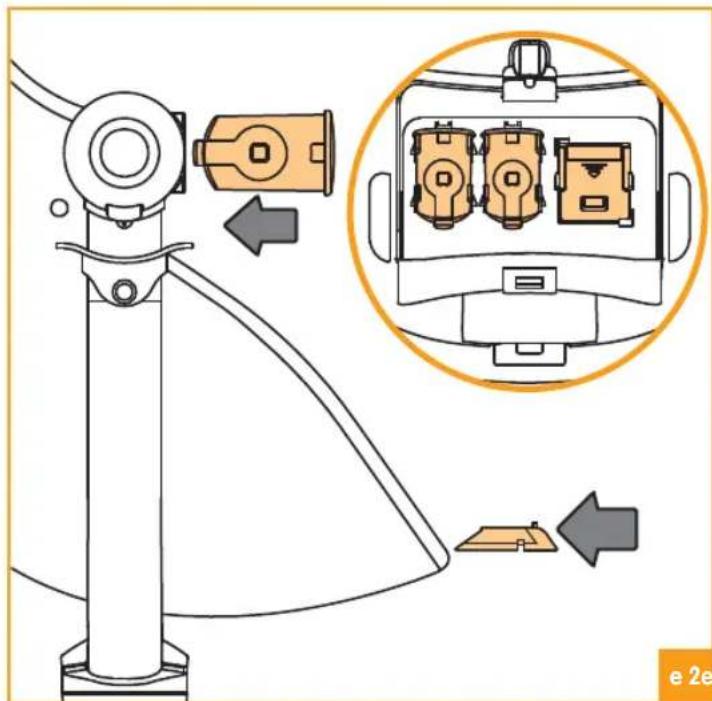
- (#07 seat pad) Place seat pad onto the seat unit: secure onto velcro. (refer to illustration e1)
- Snap the Bar attachment caps on either side of the seat unit; you will hear an audible click.
- Slide the crotch strap cover into the seat unit. (refer to illustration e2)
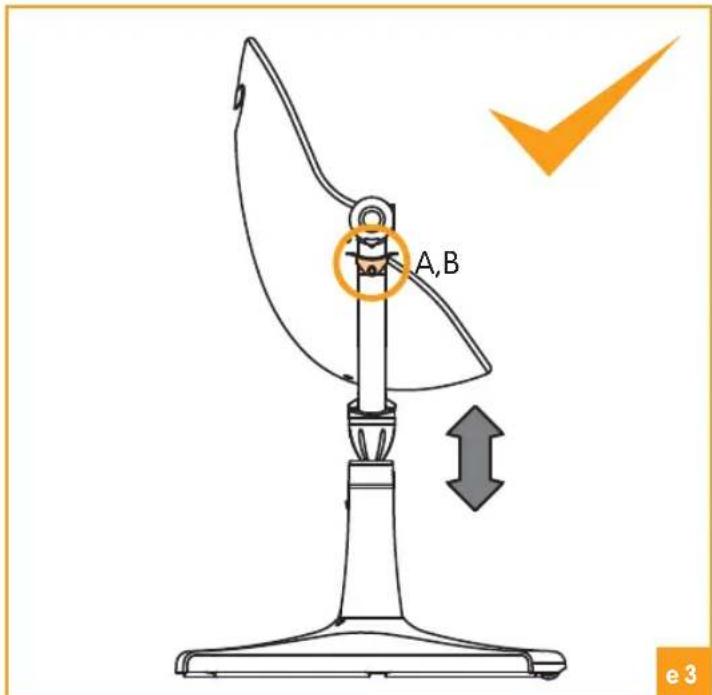
Seat Unit Height
To adjust seat height, disengage the swivel/height resistor. Lift both A & B trigger simultaneously, whilst pushing downwards or pulling upwards to desired height, then release the triggers. (refer to illustration e3)
Care & Maintenance
Removing the baby chair seat pad/nest pad
- Remove the shoulder and waist straps from the seat unit. Pull the straps through the seat slits until they are free of the seat pad/nest pad.
- Remove the baby chair seat pad/ nest seat pad.
- To remove the entire safety harness, free crotch strap by sliding the crotch bar base out of the seat unit.
The seat pad/nest pad and baby chair frame can now be cleaned following the instructions on the care label of seat pad.
WARNING:
Using an effective disinfectant, for examples cleaners with alcohol or chlorine content, may cause bleaching and discoloration, it is recommended to use cleaners specifically designed for colored fabrics to spot clean the fresco seat pad.
Note:
- Exposed edges of seat pad /nest pad are often the first to wear and fray. Remember this when storing or transporting your baby chair.
- Light soiling of seat pad / nest pad can be removed with a damp sponge and a mild
detergent. Hang dry. Do not tumble dry.
- Both mini tray and food tray is dishwasher safe.
- clean the plastic parts of the highchair with a damp cloth; do not use abrasives or bleach.
- Do not expose the baby chair to direct sunlight for prolonged periods of time.
Check List
- Regularly check that the safety harness is correctly fitted and that the webbing has not become frayed or damaged. If the harness is damaged, we recommend that a new one is fitted. For more information contact us by email at service@bloombergaby.com.
- Regularly check that all locking devices are clean and functioning properly.
After Sales Service
When you receive your bloom product, if you need assistance, spare parts or if you are unsatisfied with any aspect of the goods please contact bloom by email at service@bloomberg.com. Our trained advisors will be able to help. You can also visit our website at bloombaby.com for the latest product information. Your feedback and input enables bloom to continue to make improvements. Please send your comments regarding this product to service@bloomberg baby.com.

12 compartment rangement
13 caches lateraux
copyright © bloom 2012, all rights reserved