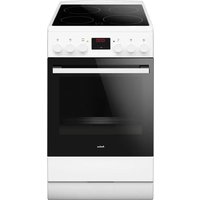
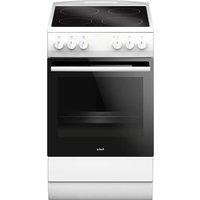
SHGG 11647 W - Cooker AMICA - Free user manual and instructions
Find the device manual for free SHGG 11647 W AMICA in PDF.

User questions about SHGG 11647 W AMICA
0 question about this device. Answer the ones you know or ask your own.
Ask a new question about this device
Download the instructions for your Cooker in PDF format for free! Find your manual SHGG 11647 W - AMICA and take your electronic device back in hand. On this page are published all the documents necessary for the use of your device. SHGG 11647 W by AMICA.
USER MANUAL SHGG 11647 W AMICA
TEXHnueCKn DAHHN 155
The cooker is exceptionally easy to use and extremely efficient. After reading the instruction manual, operating the cooker will be easy.
Before being packaged and leaving the manufacturer, the cooker was thoroughly checked with regard to safety and functionality.
Before using the appliance, please read the instruction manual carefully.
By following these instructions carefully you will be able to avoid any problems in using the appliance.
It is important to keep the instruction manual and store it in a safe place so that it can be consulted at any time.
It is necessary to follow the instructions in the manual carefully in order to avoid possible accidents.
Caution!
Do not use the cooker until you have read this instruction manual.
The cooker is intended for household use only.
The manufacturer reserves the right to introduce changes which do not affect the operation of the appliance.
Warning: The appliance and its accessible parts become hot during use. Care should be taken to avoid touching heating elements. Children less than 8 years of age shall be kept away unless continuously supervised.
This appliance can be used by children aged from 8 years and above and persons with reduced physical, sensory or mental capabilities or lack of experience and knowledge if they have been given supervision or instruction concerning use of the appliance in a safe way and understand the hazards involved. Children shall not play with the appliance. Cleaning and user maintenance shall not be made by children without supervision.
Warning: Unattended cooking on a hob with fat or oil can be dangerous and may result in fire.
NEVER try to extinguish a fire with water, but switch off the appliance and then cover flame e.g. with a lid or a fire blanket.
Warning: Danger of fire: do not store items on the cooking surfaces.
During use the appliance becomes hot. Care should be taken to avoid touching heating elements inside the oven.
Accessible parts may become hot during use. Young children should be kept away.
SAFETY INSTRUCTIONS
Warning: Do not use harsh abrasive cleaners or sharp metal scrapers to clean the oven door glass since they can scratch the surface, which may result in shattering of the glass.
Warning: Ensure that the appliance is switched off before replacing the lamp to avoid the possibility of electric shock.
Before opening the cover, cleaning it of any dirt is recommended. The cooker hob surface should be cooled down before closing the cover.
You should not use steam cleaning devices to clean the appliance.
Danger of burns! Hot steam may escape when you open the oven door. Be careful when you open the oven door during or after cooking. Do NOT lean over the door when you open it. Please note that depending on the temperature the steam can be invisible.
Caution: The cooking process has to be supervised. A short term cooking process has to be supervised continuously.
Warning: Use only hob guards designed by manufacturer of the cooking appliance or indicated by the manufacturer of the appliance in the instructions for use as suitable or hob guards incorporated in the appliance. The use of inappropriate guards can cause accidents.
CAUTION: The use of a gas cooking appliance results in the production of heat, moisture and products of combustion in the room in which it is installed. Ensure that the kitchen is well ventilated especially when the appliance is in use.
Prolonged intensive use of the appliance may require additional ventilation, for example the increasing of mechanical ventilation where present, additional ventilation to safely remove the products of combustion to outside (external) air whilst also providing room air changes with additional ventilation.
Consult a professional before installation of the additional ventilation.
CAUTION: This appliance is for cooking purposes only. It shall not be used for other purposes, for example room heating.
This appliance is for typical housekeeping functions (e.g. cooking) by non-expert users.
Examples of household environment are:
- house or apartments;
- shops, offices and other similar working environments;
-farm houses; -
hotels, motels, bed and breakfast and other residential type environments where appliances are used by non-expert users.
-
Please pay attention to children whilst the cooker is in operation, as children do not know the rules of cooker use. In particular, hot surface burners, the oven chamber, grates, the door pane, and pans containing hot liquids standing on the hob may cause burns to children.
- Mind that electrical connection leads from other home appliances (e.g. of a food mixer) do not touch hot parts of the cooker.
- Do not place flammable material into the drawer whilst using the oven, as it may catch a fire.
- Do not leave the cooker unattended when frying. Oils and fats may catch fire due to overheating.
- At the point of boiling, mind to avoid spills on the burner.
- If the cooker is damaged, it may be used again only after the fault has been fixed by a specialist.
- Do not open the tap on the gas connection or cylinder valve before checking that all burner knobs are closed.
- Do not allow the burners to be soiled or liquids to spill on the burners. If soiled, clean and dry burners immediately after they have cooled down.
- Do not put pans directly onto burners.
- Do not place pans with a weight greater than 10kg onto the grate over one burner, or pans with a total weight of over 40kg on the whole grate.
- Do not hit the knobs and burners.
- Do not put objects with a weight greater than 15 kg onto the open oven door.
- Alterations and repairs carried out by an unqualified person are not allowed.
- Do not open the cooker knobs before already having a lighted match or a gas lighter in your hand.
- Do not put out a burner flame by blowing.
-
A glass cover may crack when heated. Switch off all the burners before lowering the cover. (Cookers with a glass cover).
-
Do not make your own alterations to the cooker in order to adapt it to a different type of gas, move the cooker to another place or make changes to the power supply. These operations may only be carried out by an authorised electrician or fitter.
- Do not use harsh cleaning agents or sharp metal objects to clean the door as they can scratch the surface, which could then result in the glass cracking.
- Keep young children and people not acquainted with the instruction manual away from the cooker.
- IN CASE OF ANY SUSPICION OF GAS LEAKAGE YOU MUST NOT: light matches, smoke cigarettes, switch electrical receivers (door bell or light switch) on and off, or use other electric and mechanical devices that create electrical or percussive sparks. In such a case, immediately close the cylinder valve or tap cutting off gas supply, air the room, and then call a person authorised to repair the source of the leakage.
- In the event of any incident caused by a technical fault, disconnect the power (applying the above rule) and report the fault to the service centre to be repaired.
- Do not attach any antenna cords (e.g. radio) to the gas supply.
- In a case of gas escaping from leaky piping and catching fire, close gas supply immediately using a cutting-off valve.
- In a case of gas escaping from a leaky cylinder and catching fire: throw a wet blanket over the cylinder to cool it down and turn off the cylinder valve. After it has cooled down, take the cylinder out to an open space. Do not use the damaged cylinder.
- When the cooker is not to be used for several days, close the main valve on the gas piping; when using a gas cylinder, close it after each use.

Using energy in a responsible way not only saves money but also helps the environment. So let's save energy! And this is how you can do it:
- Use proper pans for cooking.
A saucepan should never be smaller than a burner crown.
Always remember to cover and pans.
- Ensure burners, the grate the hob are clean.
Soils can prevent heat transfer – and repeatedly burnt-on spillages can often only be removed by products which cause damage to the environment.
In particular, ensure that flame openings in the rings under caps, and openings of burner nozzles are clean.
- Do not uncover the pan too often (a watched pot never boils!).
Do not open the oven door unnecessarily often.
- Only use the oven when cooking larger dishes.
Meat of up to 1kg can be prepared more economically in a pan on the cooker burner.
Make use of residual heat from the oven. If the cooking time is greater than 40 minutes it is recommended to switch off the oven 10 minutes before the end time.
Make sure the oven door is properly closed.
Heat can leak through spillages on the door seals. Clean up any spillages immediately.
- Do not install the cooker in the direct vicinity of refrigerators/freezers.
Otherwise energy consumption increases unnecessarily.
During transportation, protective packaging was used to protect the appliance against any damage. After unpacking, please dispose of all elements of packaging in a way that will not cause
damage to the environment.
All materials used for packaging the appliance are environmentally friendly; they are 100% recyclable and are marked with the appropriate symbol.
Caution! During unpacking, the packaging materials (polythene bags, polystyrene pieces, etc.) should be kept out of reach of children.
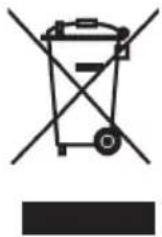
Old appliances should not simply be disposed of with normal household waste, but should be delivered to a collection and recycling centre for electric and electronic equipment. A symbol shown on the product, the
instruction manual or the packaging shows that it is suitable for recycling.
Materials used inside the appliance are recyclable and are labelled with information concerning this. By recycling materials or other parts from used devices you are making a significant contribution to the protection of our environment.
Information on appropriate disposal centres for used devices can be provided by your local authority.
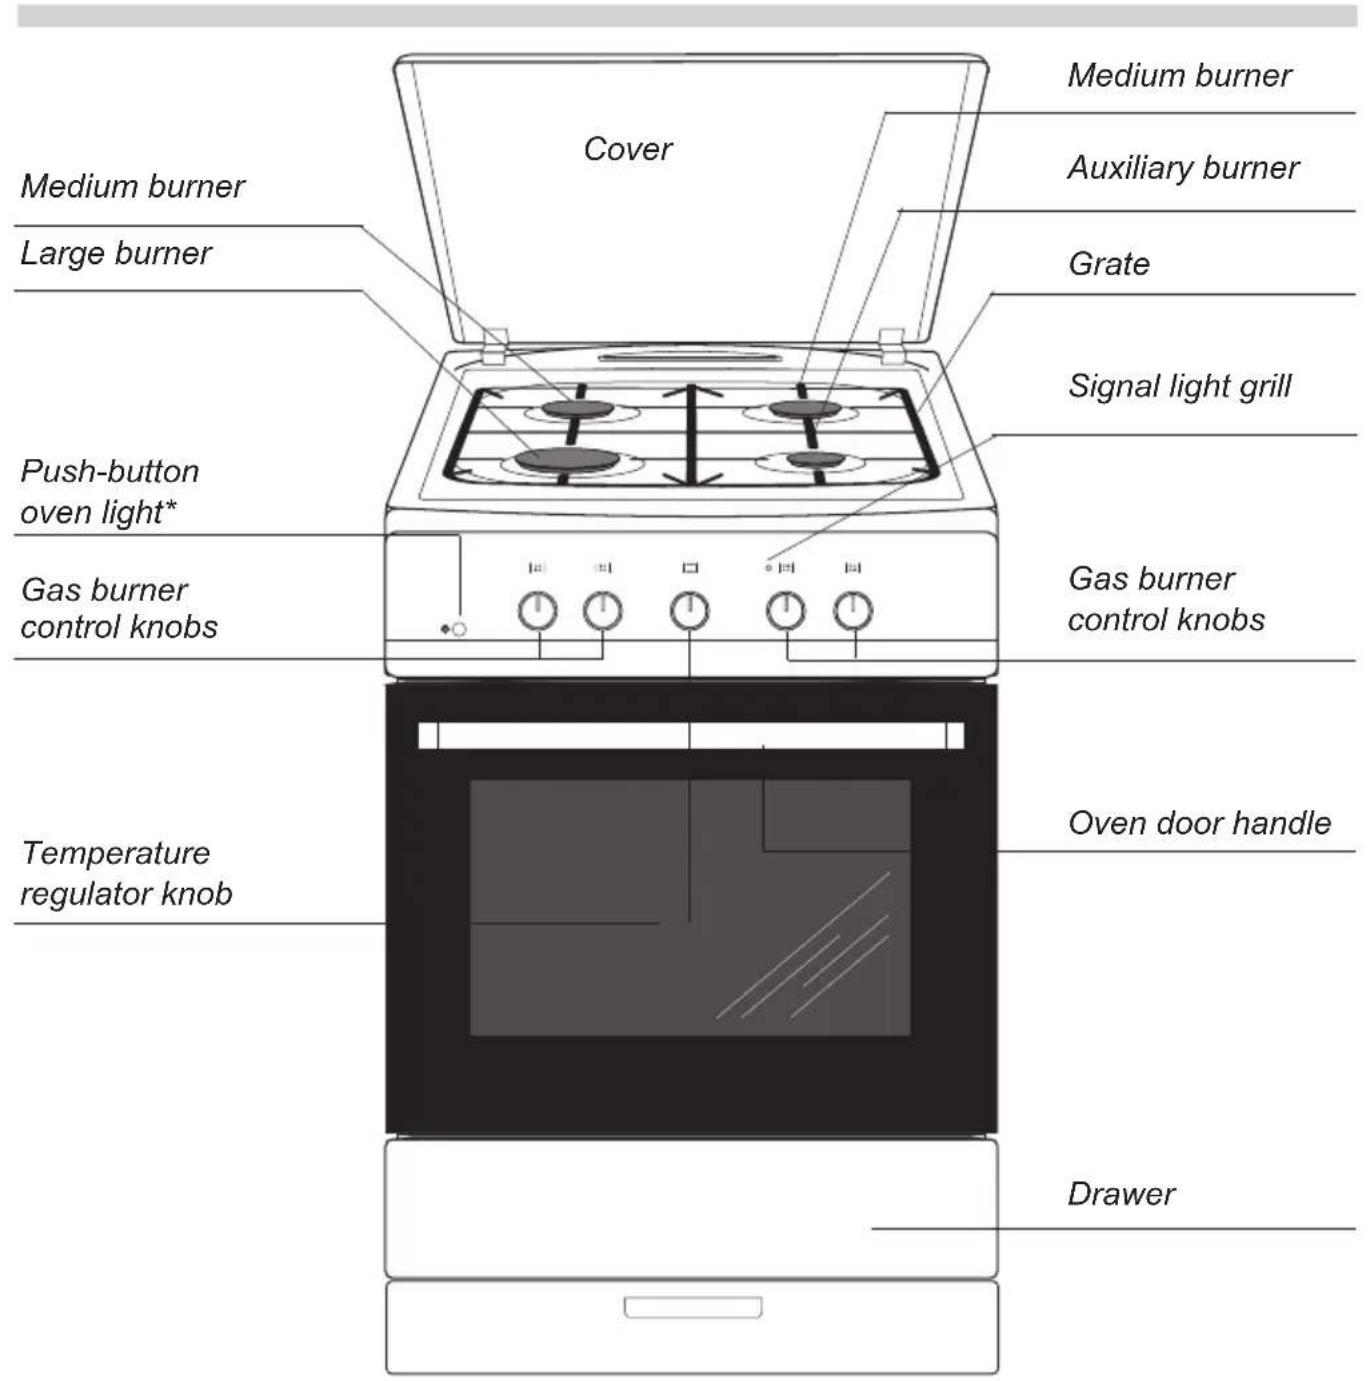
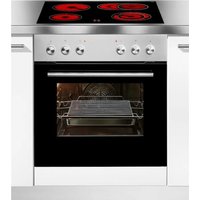
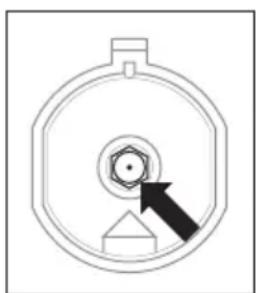
DESCRIPTION OF THE APPLIANCE
Burner safety valve
Spark ignitor
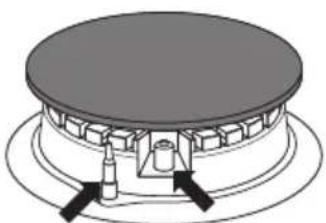
*if available
SPECIFICATIONS OF THE APPLIANCE
Cooker fittings:
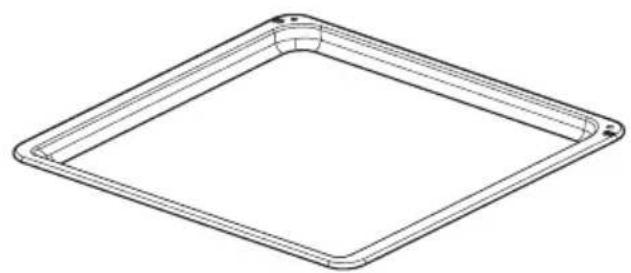
Baking tray*
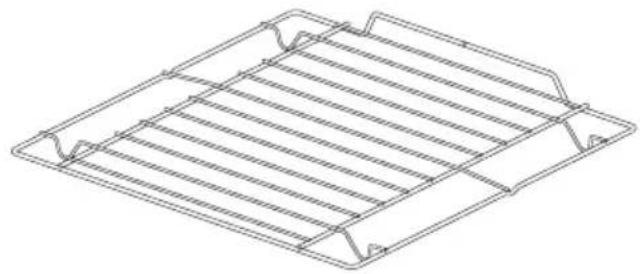
Grill grate (drying rack)

Roasting tray*
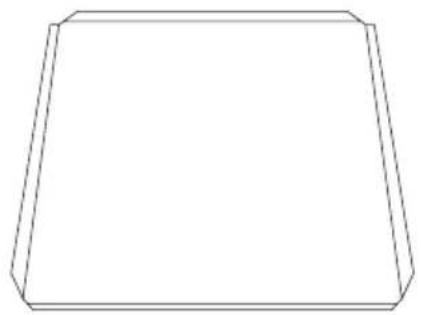
Baking tray
*optional
The following instructions are addressed to the qualified specialist installing the cooker. These instructions aim at ensuring that installation and maintenance activities are performed as professionally as possible.
- Prior to installation, ensure that the local distribution conditions (nature of the gas and gas pressure) and the adjustment of the appliance are compatible.
The adjustment conditions are stated on the label (or data plate). - This appliance is not connected to a combustion products evacuation device. It shall be installed and connected in accordance with current installation regulation. Particular attention shall be given to the relevant requirements regarding ventilation.
Installing the cooker
The kitchen should be dry and airy and have effective ventilation according to the existing technical provisions.
- The room should be equipped with a ventilation system that pipes away exhaust fumes created during combustion. This system should consist of a ventilation grid or hood. Hoods should be installed according to the manufacturer's instructions. The cooker should be placed so as to ensure free access to all control elements.
The room should also enable the necessary air supply for proper gas combustion. Air supply should be not less than 2m^3 /h per 1 kW of burner heat. The air can be delivered from outside by a duct with a section of at least 100cm^2 or indirectly from adjoining rooms which are fitted with ventilation ducts leading outside.
- If the appliance is used intensively and for a long time, it may be necessary to open a window in order to improve ventilation.
- In terms of protection against the overheating of surrounding surfaces, the gas cooker is an X-class appliance and can be built into furniture only up to the level of the cooking hob, that is around 850mm above the floor. Raising furniture construction over this level is inadvisable. Coating or veneer used on fitted furniture must be applied with a heat resistant adhesive (100^) . This prevents surface deformation or detachment of the coating. If you are unsure of your furniture's heat resistance, you should leave approximately 2cm of free space around the cooker. The wall behind the cooker should be resistant to high temperatures. During operation, its back side can warm up to around 50^ above the ambient temperature.
- The cooker should stand on a hard, even floor (do not put it on a base).
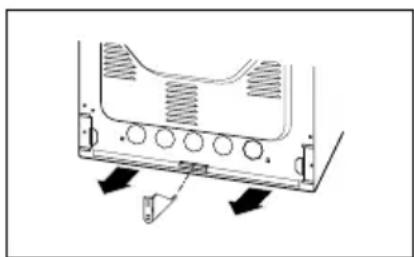
- Before you start using the cooker it should be leveled, which is particularly important for fat distribution in a frying pan. To this purpose, adjustable feet are accessible after removal of the drawer. The adjustment range is +/- 5 mm.
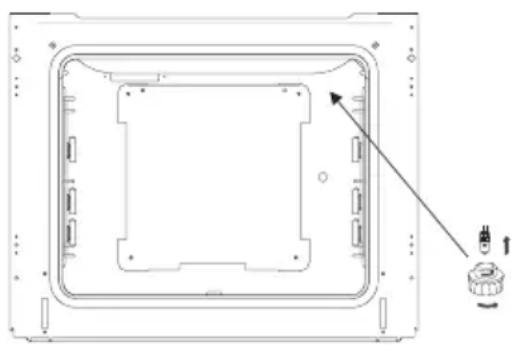
Mounting the overturning prevention bracket.
The bracket is mounted to prevent overturning of the cooker. When the overturning prevention bracket is installed, a child who climbs on the oven door will not overturn the appliance.
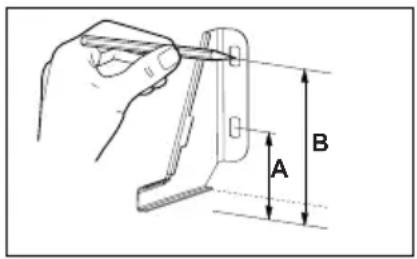

Cooker, height 850 mm
A=60 mm
B=103 mm
Cooker, height 900 mm
A=104 mm
B=147 mm
Gas connection
Caution!
The cooker should be connected to a gas supply of the particular type of gas that the appliance is manufactured to function with. Information about the type of gas that the cooker has been adapted to by the factory is shown on the data plate. The cooker should be connected exclusively by an appropriately authorised fitter and only he or she has the right to adapt the cooker to a different type of gas.
Fitting guidelines
A fitter should:
have a gas fitter's authorisation,
- be acquainted with the information included on the data plate of the cooker about the type of gas to which the cooker is adapted; the information should be compared with gas supply conditions at the place of installation,
check:
-airing efficiency, that is efficiency of air exchange in the rooms,
- tightness of gas fitting connections,
- effectiveness of all functional elements of the cooker,
- if the electricity supply is adapted to function with a safety ground lead (zero).
provide the user with a connection certificate and give him or her instructions in cooker use.
Caution!
The cooker may only be connected to a liquid gas cylinder or the existing gas supply by an authorised observing all safety rules.
The cooker has threaded 12 " pipe connector. The connector must be screwed in with a dynamometric spanner with a maximum torque of 20 Nm. It is recommended to seal connections with a teflon sealing tape. If the torque is too high or tow is used, the connection be damaged and become leaky.
When connecting the cooker to the gas supply, a metal tip of at least 0.5m length with an end for a 8× 1 mm hose should be screwed onto the R1/2" terminal. In order to screw the tip in, you should unscrew the spring of the cover hinge. The gas hose should not touch metal elements of the cooker back shield.
Electrical connection
The cooker is manufactured to work with a one-phase alternating current (230V 1N~50 Hz) and is equipped with a 3 x 1,5 mm² connection lead of 1.5 mm length with a plug including a protection contact.
- A connection socket for electricity supply should be equipped with a protection pin and may not be located above the cooker. After the cooker is positioned, it is necessary to make the connection socket accessible to the user.
- Before connecting the cooker to the sokket, check if:
- the fuse and electricity supply are able to withstand the cooker load,
- the electricity supply is equipped with an efficacious ground system which meets the requirements of current standards and provisions,
- the plug is within easy reach.
Important!
Each time you replace a reducer carry out technical inspection of the cooker that covers gas valves and proper operation of the flame failure cut-off device.
Caution!
On completion of the cooker installation, the tightness of all connections should be checked, e.g. applying water with soap.
Do not use fire to check tightness.
Adapting the cooker to another type of gas.
This operation may only be carried out by an appropriately authorised fitter.
If the gas the cooker is to be supplied with differs from the gas provided for the cooker by the manufacturer, that is G20 20 mbar, burner nozzles must be exchanged and the flame needs to be adjusted.
In order to adapt the cooker to burn a different type of gas, you should:
exchange nozzles (see tables below),
adjust the "economical" flame.
Caution!
The cookers provided by the manufacturer have burners which are factory-adapted to use the gas specified on their data plates and guarantee cards.
| Defendi burner (marked DEFENDI on the burner body) | Gas type | ||||
| G20 2E - 20mbar G25 2L - 25mbar | G30 3B/P - 30mbar | G30 3B/P - 50mbar | |||
| Auxiliary | Nozzle diameter mm | 0,77 0,50 0,46 | |||
| Heat load kW 1,00 1,00 0 | 00 1,00 | ||||
| Gas consumption g/h | - 73 - | ||||
| Medium | Nozzle diameter mm | 0,97 0,65 0,60 | |||
| Heat load kW 1,75 1,75 75 1,75 | |||||
| Gas consumption g/h | - 127 - | ||||
| Large | Nozzle diameter mm | 1,29 0,87 0,79 | |||
| Heat load kW 3,00 3,00 00 3,00 | |||||
| Gas consumption g/h | - 218 - | ||||
| Oven | Nozzle diameter mm | 1,30 0,84 0,75 | |||
| Heat load kW 2,80 2,80 00 2,80 | |||||
| Gas consumption g/h | - 204 - | ||||
The procedure for changing the gas type
| Burner | Flame | Conversion from LPG to natural gas | Conversion from natural gas to LPG |
| hob | full flame | 1. Replace burner nozzle with the appropriate nozzle according to the table. | 1. Replace burner nozzle with the appropriate nozzle according to the table. |
| small flame | 2. Gently tighten the adjusting screw and check the flame size. | 2. Gently tighten the adjusting screw and check the flame size. | |
| oven | full flame | 1. Replace burner nozzle with the appropriate nozzle according to the table. | 1. Replace burner nozzle with the appropriate nozzle according to the table. |
| small flame | 2. Gently tighten the adjusting screw and adjust the flame. The temperature in the oven should be 150 °C. | 2. Gently tighten the adjusting screw and adjust the flame. The temperature in the oven should be 150 °C. |
Surface burners applied do not require adjustment of primary air. A correct flame has distinct internal cones of blue and green colour. A short, humming flame or long, yellow and smoking one, without clearly outlined cones, shows improper quality of gas in the household piping or a damaged or soiled burner. In order to check a flame, heat a burner for around 10 minutes with a full flame, and next turn the valve knob to the economical flame position. The flame should not go out or jump onto the nozzles.
Exchange of a burner nozzle - unscrew the nozzle with special socket spanner No 7 and replace with a new one according to a type of gas (see tables).
Gas supply to surface burners is opened and set by knobs, fig A. Knobs should be adjusted with the burner switched set to the economical flame position, using an adjustmentscrewdriver of the 2.5mm size.
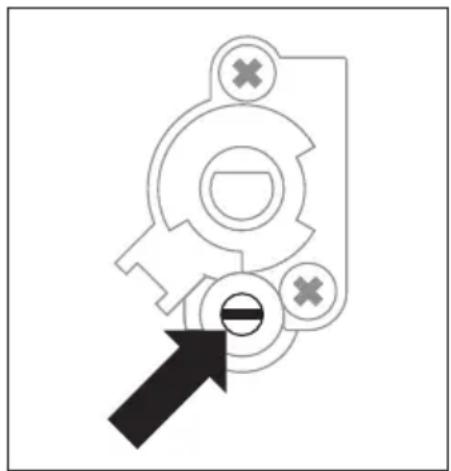
A professional installer must adjust the small flame on-site in your home. The adjustment depends on the type of gas and its pressure.
Caution!
After adjustment is completed, place a label indicating the type of gas to which the cooker is now adapted.
on and
Before first use
- remove packaging elements,
- gently (slowly) remove labels from the oven door, trying not to break the glue tape. If any visible trace is left on the glass, warm up the oven chamber (see below), spray the warmed-up glass with a glass cleaner, and wipe off with a soft cloth.
- empty the drawer, clean off factory preservatives from the oven chamber,
- take out and wash the oven fittings with warm water and a little washing-up liquid,
- switch on the ventilation in the room or open a window,
- heat the oven (to a temperature of 250^ , for approximately 30 min.), remove any stains and wash carefully.
- when handling the cooker, follow the safety instructions carefully.
The oven chamber should only be washed with warm water and a small amount of washing-up liquid.
How to use surface burners
Choice of cookware
Mind that the diameter of a pan base is always larger than the burner flame crown, and that the pan itself is covered. The recommended pan diameter is around 2.5 to 3 times larger than the burner diameter, that is, for:
- an auxiliary burner - a pan with a diameter of 90 to 150 mm.
- a medium burner - a pan with a diameter of 160 to 220mm
- a large burner - a pan with a diameter of 200 to 240mm , and the pan height should not be greater than its diameter.
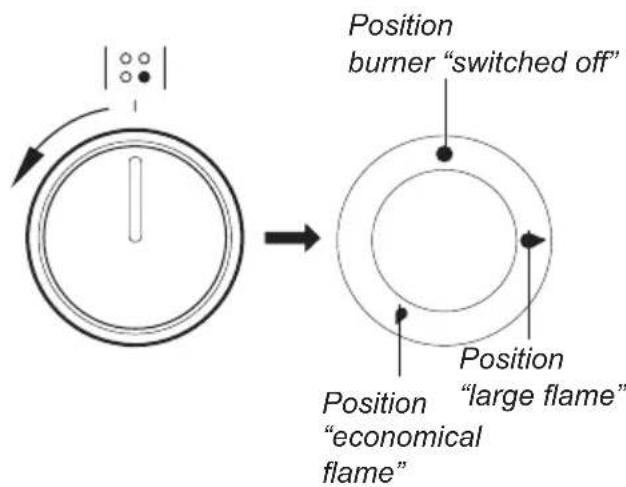
Gas burner control knobs
*if available
Ignition without an ignitor
- light a match,
- press in the knob to the end and turn it left to the "large flame" position
- ignite gas with a match,
set required flame size (e.g. "economical") - switch off the burner after finishing cooking, turning the knob right (to the off position).
Push-button ignition*
- press the spark ignition push-button marked with ...,
- press in the knob to the end and turn it left to the "large flame" position
hold down until gas has lit, - set the required flame size (e.g. "economical"),
- switch off the burner after finishing cooking, turning the knob right (to the off position).
Knob ignition*
- press in the knob to the end and turn it left to the "large flame" position.
hold until gas is lit, - after the flame is lighted release the pressure on the knob and set a required flame size.
Caution!
In cooker models equipped with a surface burner safety valve, hold the knob pressed down to the end when igniting for 10 seconds at the "large flame" position to activate the safety device.
Selection of the appropriate flame
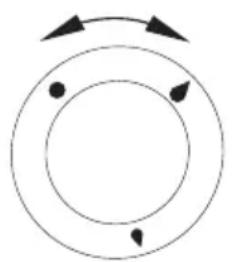
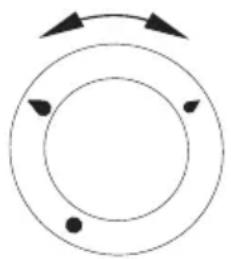
A correctly adjusted burner has a light blue flame with a clearly visible internal cone. Selection of flame size depends on the position of the burner knob which has been set:
6 large flame
6 small flame ("economical flame")
burner switched off (gas supply is cut off)
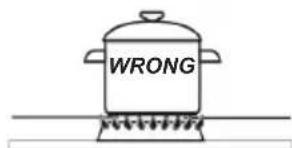
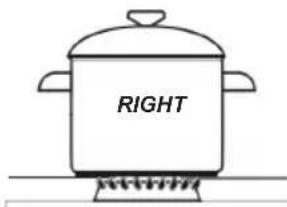
Depending on requirements, flame size can be set in a continuous manner.
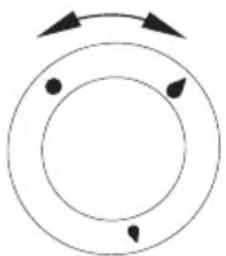
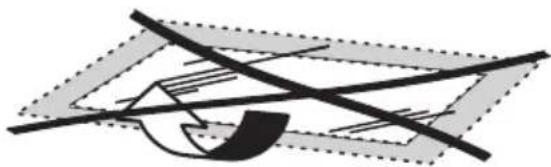
WRONG
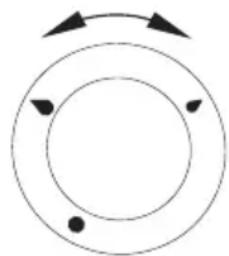
RIGHT
Caution!
Do not adjust the flame between the off position and the large flame position

Operation of the burner protection valve
Some models are equipped with an automatic system that cuts off gas supply to a burner when the flame has disappeared.
This system protects the cooker against gas leakage when the flame on a burner goes out e.g. in case of spillage.
The user's intervention is needed to re-ignite the burner.
Oven functions and operation.
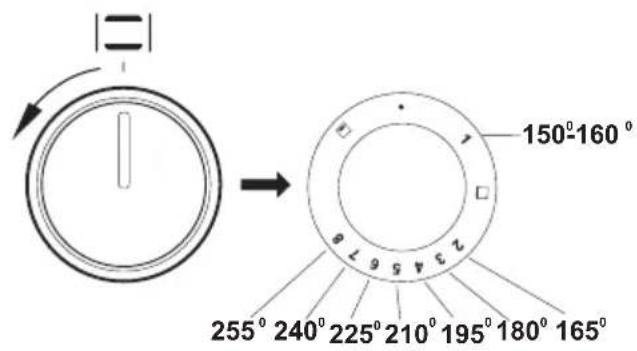
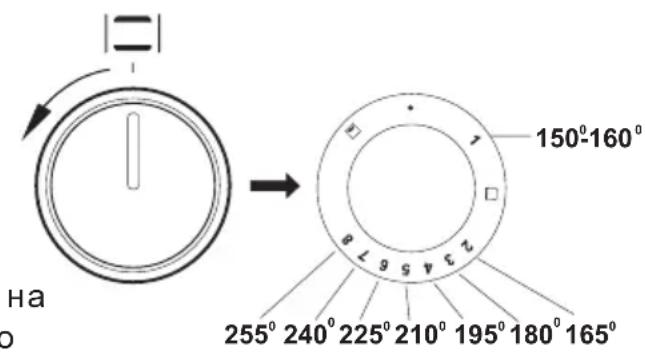
The oven can be heated by oven gas burner or by electric grill*. The oven function is controlled by one knob, which contains a digital scale corresponding to thermoregulator settings.
Caution!
In cooker models which do not have a grill, the position is not present on the knob.
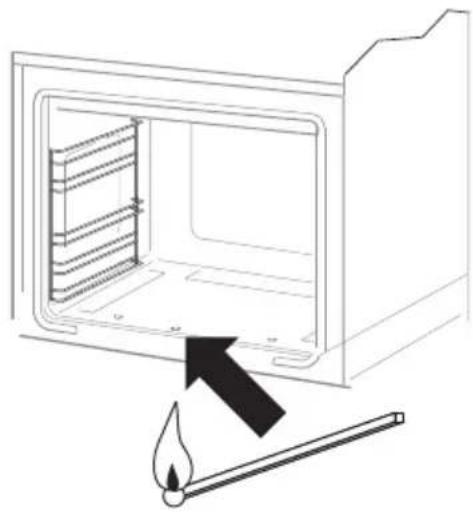
Oven is equipped with gas valve with temperature regulator and anti-outflow protection. To ignite the oven, as in the description below, keep down the pressed knob during about 3 s. This is the time necessary to warm the sensor and to make the protection function. If the flame goes out, repeat ignition operations after a lapse of 3 sec. If the flame does not start burning within 10 sec., repeat the ignition operation after lapse of about 1 min, i.e. after the oven ventilation.
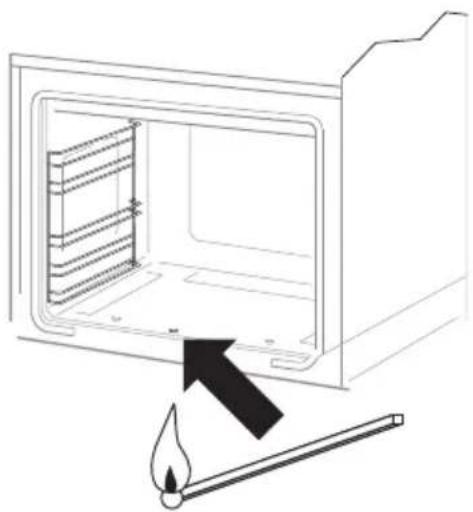
To ignite the oven:
strike a match,
- press down the knob to the stop and turn left to the position corresponding to the temperature chosen,
- put the match to the ignition opening (see the figure below) and keep the pressed down about 3 sec. from the gas ignition moment. If the flame has gone out, repeat the ignition operation after lapse of 3 sec.,
Note!
The temperature control is possible at closed oven door only.
Turn the knob right to the stop in order to turn the oven off.
Push-button ignition*
- press the spark ignition push-button marked with ...,
- press in the knob to the end and turn it left to the "8" position
hold down until gas has lit, - set the required position.
*if available
Use of the grill
The grilling process operates through infrared rays emitted onto the dish by the incandescent grill heater.
In order to switch on the grill you need to:
- set the oven knob to the position marked with,
heat the oven for approximately 5 minutes (with the oven door shut). - insert a tray with a dish onto the appropriate cooking level, and if you are grilling on the grate insert a tray for dripping on the level immediately below (under the grate).
the oven door shut.
Caution!
The grill should be used with the oven door shut.
When the grill is in use, accessible parts can become hot.
It is recommended to keep children away from the oven.
The usage of the electric grill is forbidden, when the oven gas burner is on.
By ensuring proper cleaning and maintenance of your cooker you can have a significant influence on the continuing fault-free operation of your appliance.
Before you start cleaning, the cooker must be switched off and you should ensure that all knobs are set to the "●"/"0" position. Do not start cleaning until the cooker has completely cooled.
Burners, the burner hob grate, the cooker housing
- In the case of soiled burners and grate, these elements must be removed from the cooker and washed with warm water and washing - up products intended for fats and soils. Next, wipe them dry. After the grate has been removed, wash the burner hob carefully and wipe with a dry and soft cloth. In particular, ensure flame openings in rings under caps are clean, see the figure below. Do not use steel wire or drill holes.
Caution!
Burner elements must always be clean. Water particles may hamper gas flow and produce an incorrect burner flame.
- Wash enamel elements of the cooker with light washing products. When cleaning do not use cleaning agents with a strong abrasive effect, such as scouring powders containing an abrasive, abrasive compounds, abrasive stones, pumice stones, wire brushes and so on.
- Before you start using the cooker with stainless steel hob, its cooking zone first needs to be carefully washed. It is important to remove glue residues from the foils taken off trays during installation, as well as adhesive tape applied during packaging. The hob should be cleaned regularly after each use. Do not allow the hob to get heavily stained, particularly from burnt-on spillages from boiled over liquids. An agent like Stahl-Fix is recommended for the initial wash and, subsequently, for routine washes.
Oven
- The oven should be cleaned after every use. When cleaning the oven the lighting should be switched on to enable you to see the surfaces better.
- The oven chamber should only be washed with warm water and a small amount of washing-up liquid.
After cleaning the oven chamber wipe it dry.
Caution!
Do not use cleaning products containing abrasive materials for the cleaning and maintenance of the glass front panel.
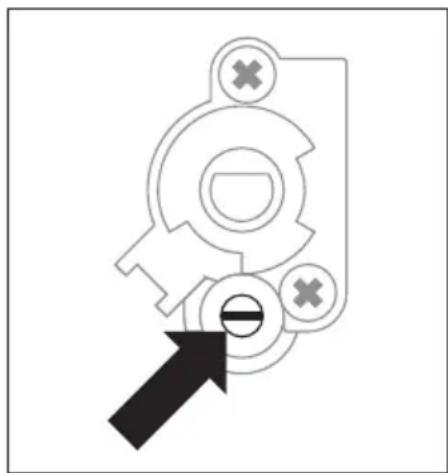
Replacing the halogen bulb in the oven
Before replacing the halogen bulb, make sure the appliance is disconnected from the electric mains to avoid a possible electric shock.
- Set all control knobs to the position “ ”/“0” and disconnect the mains plug,
-
Unscrew and wash the lamp cover and then wipe it dry.
Pull the halogen bulb out using a cloth or paper. If necessary, replace the halogen bulb with a new one. -
voltage 230V
-power25W
-G9 -
Replace the halogen bulb in its socket.
- Screw in the lamp cover.
Oven lighting
Door removal
In order to obtain easier access to the oven chamber for cleaning, it is possible to remove the door. To do this, tilt the safety catch part of the hinge upwards (fig. A). Close the door lightly, lift and pull it out towards you. In order to fit the door back on to the cooker, do the inverse. When fitting, ensure that the notch of the hinge is correctly placed on the protrusion of the hinge holder. After the door is fitted to the oven, the safety catch should be carefully lowered down again. If the safety catch is not set it may cause damage to the hinge when closing the door.
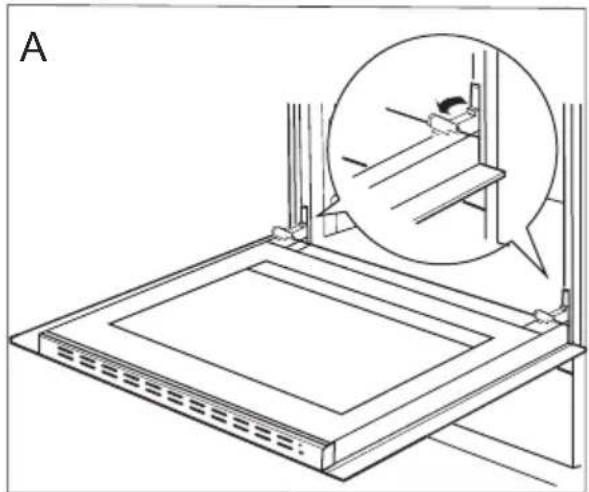
Tilting the hinge safety catches
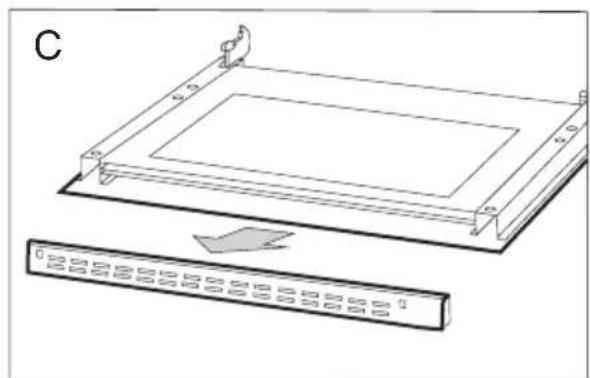
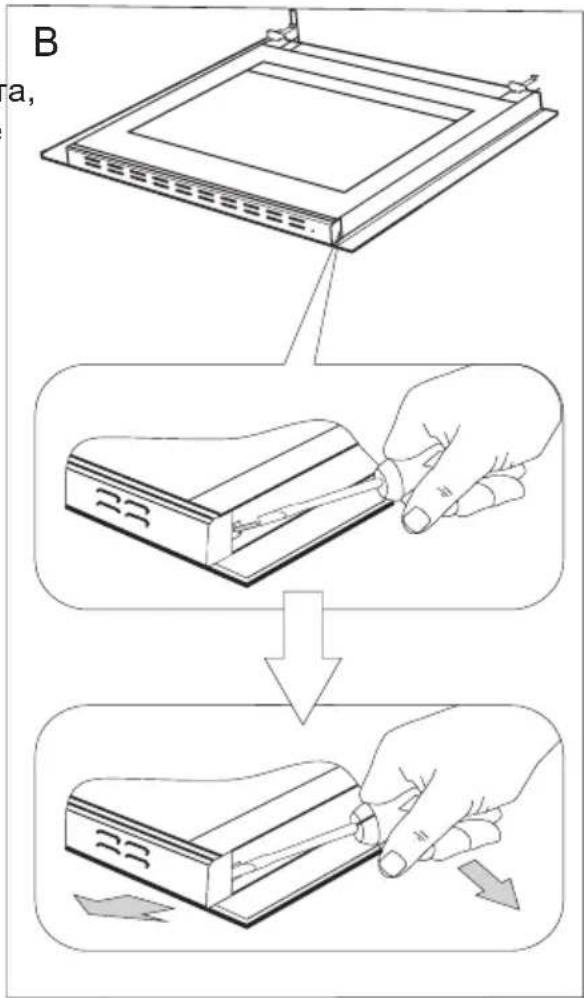
Removing the inner panel
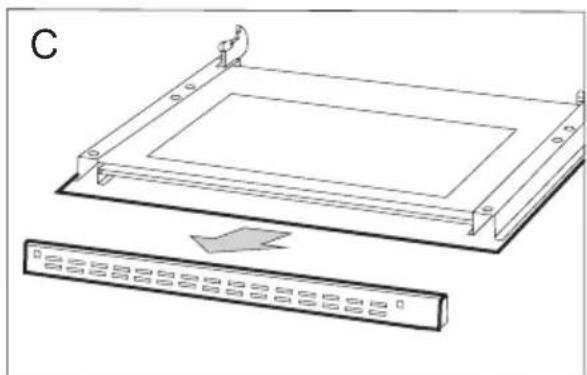
- Using a flat screwdriver unhook the upper door slat, prying it gently on the sides (fig. B).
- Pull the upper door slat loose. (fig. B, C)

- Pull the inner glass panel from its seat (in the lower section of the door).
Fig. D, D1.
- Clean the panel with warm water with some cleaning agent added.
Carry out the same in reverse order to reassemble the inner glass panel. Its smooth surface shall be pointed upwards.
Important! Do not force the upper strip in on both sides of the door at the same time. In order to correctly fit the top door strip, first put the of the strip on the door and then press the right end in until you hear a "click". Then press the left end in until you hear a "click".
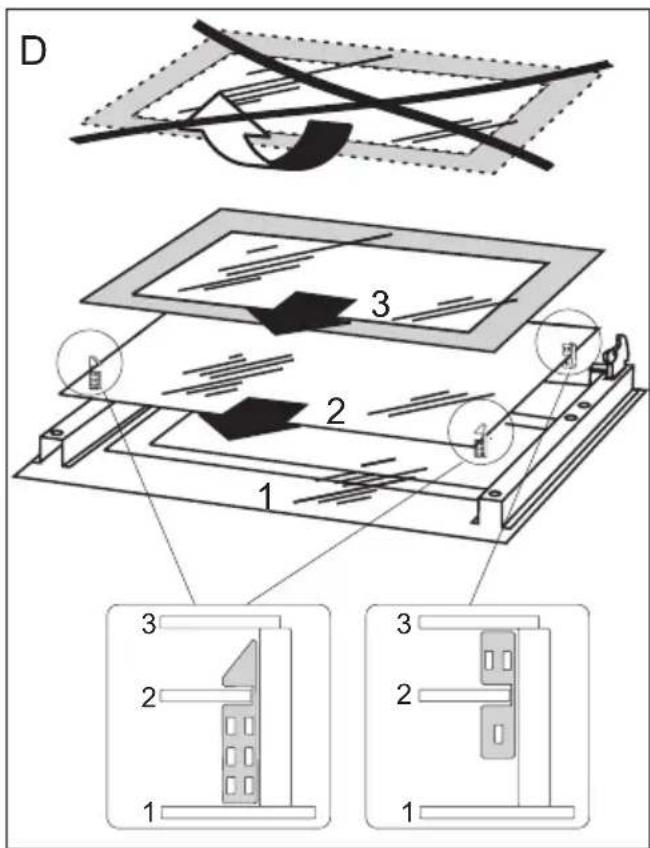
Removal of the internal glass panel. 3 glass panel.
Removal of the internal glass panel. 2 glass panel.
CLEANING AND MAINTENANCE
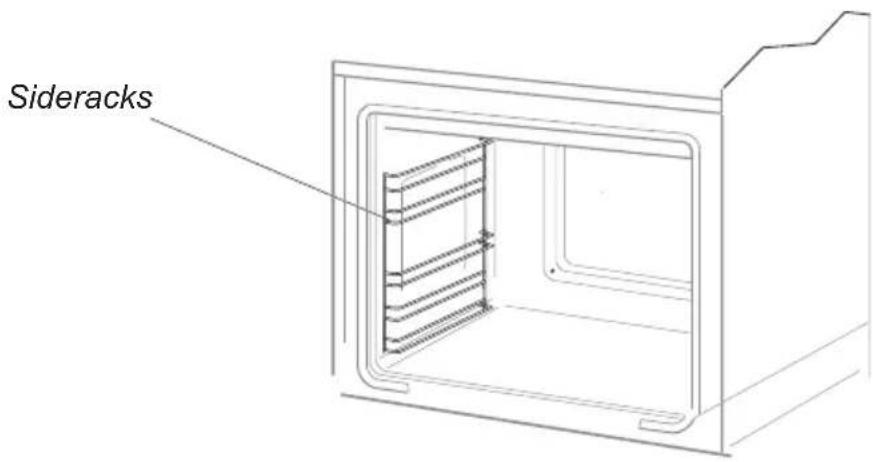
- Ovens in cookers marked with the letter D are equipped with easily removable wire shelf supports. To remove them for washing, pull the front catch, then tilt the support and remove from the rear catch.
Removing wire shelf supports
Installing wire shelf supports
Regular inspections
Besides keeping the cooker clean, you should:
- carry out periodic inspections of the control elements and cooking units of the cooker. After the guarantee has expired you should have a technical inspection of the cooker carried out at a service centre at least once every two years,
fix any operational faults, - carry out periodical maintenance of the cooking units of the cooker.
Caution!
All repairs and regulatory activities should be carried out by the appropriate service centre or by an appropriately authorised fitter.
In the event of an emergency, you should:
- switch off all working units of the cooker
- disconnect the mains plug
- call the service centre
- some minor faults can be fixed by referring to the instructions given in the table below. Before calling the customer support centre or the service centre check the following points that are presented in the table.
| PROBLEM | REASON | ACTION |
| 1. A burner does not light | flame openings soiled | close the gas by cutting off valve, close burner knobs, air the room, take out and clean the burner, blow on flame openings |
| 2. A gas ignitor does not light | break in power supply | check the household fuse box; if there is a blown fuse, replace it with a new one |
| break in gas supply | open the gas supply valve | |
| soiled (greasy) gas ignitor | clean the gas ignitor | |
| knob not pressed in long enough | hold the knob pressed in until a full flame appears around the burner crown | |
| 3. The flame goes out when lighting a burner | knob released too quickly | hold the knob down longer at the “large flame” position |
| 4. electrical fittings do not work | break in power supply | check the household fuse box, if there is a blown fuse replace it with a new one |
| 5. the oven lighting does not work | the bulb is loose or dama-ged | tighten up or replace the blown bulb (see Chapter Cleaning and Maintenance) |
Baking
- For baking you can use commercially available moulds and trays, which should be placed on the wire grid. It is recommended that you use aluminium or silver-coloured tins, which should fit within the outline of the wire grid. Muffin and cupcake tins and moulds should be placed transversely in the oven cavity.
- Before the cake is taken out of the oven, check if it is ready using a wooden stick (if the cake is ready the stick should come out dry and clean after being inserted into the cake);
After switching off the oven it is advisable to leave the cake inside for about 5 min.; - The baking parameters given in Tables are approximate and can be corrected based on your own experience and cooking preferences;
- If information given in recipe books is significantly different from the values included in this instruction manual, please apply the instructions from the manual.
| CAKE TYPE | TEMPERATURE [°C] warmed up | TEMPERATURE [°C] | BAKING TIME IN MINUTES | LEVEL FROM THE BOTTOM |
| Fruit cake | 170 | 160 | 60-70 | 2 |
| Victoria sponge | 170 | 150-160 | 20-40 | 2-3 |
| Sponge layer cake | 170 | 150-160 | 20-30 | 2-3 |
| Buns | 180 | 170 | 30-50 | 3 |
| Teacake | 180 | 180 | 40-50 | 3 |
| Cake (crispy base) | 200 | 180 | 40-60 | 3 |
| Puff pastry | 230-250 | 200-220 | 15-20 | 3 |
Roasting meat
- cook meat weighing over 1kg in the oven, but smaller pieces should be cooked on the gas burners.
- use heatproof ovenware for roasting, with handles that are also resistant to high temperatures;
- when roasting on the drying rack or the grate we recommend that you place a baking tray with a small amount of water on the lowest level of the oven;
- it is advisable to turn the meat over at least once during the roasting time and during roasting you should also baste the meat with its juices or with hot salty water – do not pour cold water over the meat.
| TYPE OF MEAT | LEVEL FROM THE BOTTOM | TEMPERATURE [°C] | TIME* IN MINUTES |
| BEEF | per 1 cm | ||
| Roast beef or fillet rare | 3 | 250 | 12-15 |
| oven warmed up | 3 | 250 | 15-25 |
| juicy ("medium") oven warmed up | 3 | 210-230 | 25-30 |
| "well done" oven warmed up | 3 | 200-220 | 120-140 |
| Roast joint | 2 | ||
| PORK | |||
| Roast joint | 2 | 200-210 | 90-140 |
| Ham | 2 | 200-210 | 60-90 |
| Fillet | 3 | 210-230 | 25-30 |
| VEAL | 2 | 200-210 | 90-120 |
| LAMB | 2 | 200-220 | 100-120 |
| VENISON | 2 | 200-220 | 100-120 |
| POULTRY | |||
| Chicken | 2 | 220-250 | 50-80 |
| Goose (approx. 2 kg) | 2 | 190-200 | 150-180 |
| FISH | 2 | 210-220 | 40-55 |
- the figures presented in the table refer to a portion of 1 kg, if the portion is larger than that an additional 30 - 40 minutes should be added for each additional kilogram.
Voltage rating 230V 50Hz
Power rating max. 2,0 kW
Appliance category DE II2ELL3B/P, AT II2H3B/P, NL II2L3B/P
Cooker dimensions W/H/D 60/85/60 cm
Complies with EU regulations EN-30-1-1, EN 60335-1, EN 60335-2-6 standards
Certificate of compliance CE
The Manufacturer hereby declares that this product complies with the general requirements pursuant to the following European Directives:
The Low Voltage Directive 2014/35/EC,
- Electromagnetic Compatibility Directive 2014/30/EC,
- Directive on "Appliances Burning Gaseous Fuels" 2009/142/EC, (to 20.04.2018)
Regulation (EU) 2016/426 of the European Parliament and of the Council (from 21.04.2018)
- Directive on ErP 2009/125/EC,
and therefore the product has been marked with the symbol and the Declaration of Conformity has been issued to the manufacturer and is available to the competent authorities regulating the market.
Push-button ignition
- press the spark ignition push-button marked with ...,
- press in the knob to the end and turn it left to the "8" position
hold down until gas has lit, - set the required position.
*Bepaalde modellen
He oTbapnTe n BpaTuKkata Ha cyphata, KOraTo He e HxHo.
H3BbPcMHaTa Ha IIO3NTe (BnK Ta6ncaTa, a- daeHa no-dony),
-peryanaquraHa "IKOHOUMuHn" PnAmbK,
| Горельka ot тип Defendi (съласно Оз nauseю „DEFENDI" на поуca на горелкata) | Вид ra3 | ||||
| G20 2E - 20mbar G25 2L - 25mbar | G30 3B/P - 30mbar G30 3B/P 37mbar | G30 3B/P - 50mbar | |||
| Помошиа | Диамetedр на дюзатa | mm 0,77 0,50 0,46 | |||
| Толинно натоварвае | kW 1,00 1,00 1,00 | ||||
| Разхов на га з g/h - 73 - | |||||
| Среда | Диамetedр на дюзатa | mm 0,97 0,65 0,60 | |||
| Толинно натоварвае | kW 1,75 1,75 1,75 | ||||
| Разхов на га з g/h - 127 - | |||||
| Голяма | Диамetedр на дюзатa | mm 1,29 0,87 0,79 | |||
| Толинно натоварвае | kW 3,00 3,00 3,00 | ||||
| Разхов на га з g/h - 218 - | |||||
| Фурна | Диамetedр на дюзатa | mm 1,30 0,84 0,75 | |||
| Толинно натоварвае | kW 2,80 2,80 2,80 | ||||
| Разхов на га з g/h - 204 - | |||||
PpoueDypa 3a npomHa Ha BnDa Ha ra3Ta
| Горелka | Пламьк | Преобразувае от LPG За приpondен ra3 | Преobразувае от приponden ra3 Ha LPG |
| Повырхно-стен | ПьлEN | 1.3amehete дюзатa rogenkkata в сбответспve С tabицата за дюзITE. | нaЗамеHTe дюзатa на rogenkkata в сбOTВETCTBVE С tabицата за дюзITE. |
| ИКOHOMИЧЕH | 2.Лесо 3aterг themselves вида за perулларе и поверетe размера на пламьka. | 2.Лесо 3aterg themselves вида за perулларе и поверетe размера на пламьka. | |
| фурната | ПьлEN | 1.3amehete дюзатa rogenkkata в сбOTВETCTBVE С tabицата за дюзITE. | нaЗамеHTe дюзатa на rogenkkata в сбOTВETCTBVE С tabицата за дюзITE. |
| ИКOHOMИЧЕH | 2.Лесо 3aterg themselves вида за perулларе и поверетe разmера на пламьka Темпeparурatable ввВ фурнatura six Травало e 150°C. | 2.Лесо 3aterg themselves вида за perулларе и поверетe разmера на пламьka. Темпeparурatable ввВ фурнatura six Травало e 150°C. |
ПиLOJOHEnTe rOpeIKN B rA3OBInTe KOTJOnH He n3NCKBaT peryIlnpaHe Ha npITOKa Bb3dYx. IpaBnIHnT pIaMbK nMa n3pa3eHn KOHycOBuDNi PIIaMbYeTa Ha cBRT CnHbO-3eJIeHN BbTpe. KbCSrT, n3DaBaU Shym PIIaMbK nIIN DblrT, XbNT N dIMRAu PIIaMbK, 6e3 oΦopMeHn KOHycOBuDNi PIIaMbYeTa NOKa3BaT, Ye rAzBT B INHCTaNaCnraTa He e C NOxDxOJaIO KaueCTBO nIi Ye rOpeIknatae IOBpeDeHa nIIN 3aMbpcEHa. 3a npOBepHTe PIIaMbKa, Tp8Ba Da oCTaBtTe rOpeIknata Da 3arpee 3a OKoNo 10 mHyTu Pn IbLnHa MOsHocT Ha PIIaMbKa, a cJeD TOBa 3aBbPTeTe peryIaNTopa Ha BeHTnla Ha "IKOHOMuJeH" PIIaMbK. PIIaMbKbT He MoKe Da n3rache HnTo Da npeckOuy Ha DIO3nTe.

CmHa Ha dO3ama Ha 2opeKama Ha 2a30eua Komnoh - pa38bpmeme dO3ama c nomouma Ha cneuaneH mpb6en Knou 7 u r cmeheme c Hoba, noxdoora 3a buda 2a3 (Bux ma6nuaca no- zope).
IpnTOKbT Ha ra3 KbM ra3OBITE KOTNOHc
nycka n perylnupa c 06nKHOBeHN peryla-
Topn. B neyknte cbc 3aunTa ce n3noJ3Ba
peryIaTOP cbc 3aunTa OT n3TuHa He Ha ra3.
PerynpaHeTo Ha peryIaTOPte Ce n3Bb-
pWBa npn 3anaJeHa ropeJa npn noJoke-
Hne "IKOHOMUeH" PnAmbK C NOMOuTa Ha
peryIaOnHHa OTBepTk pa3Mep 2,5 MM.
Ha
PerynnpaHTo Ha nIambKa TaKa, Ye da efeKTHBeH Ce n3BbPwBa OT MOHTbOpa Ha MeCTO npN noTpe6nteJ. 3aBnCn OT BN, Ha rA3Ta, KOINTo Ce n3NoJ3Ba n HAnraHaTeO My.
BhMamHe!
Cne npKIOUbaHe Ha peryIaIraTa e Heo6XoIMO da ce 3aIeN IeENKa c OINcAHne Ha Bua ra3, KbM KOIT o e npirodeHa nekata.
Pn npBpBOHaJaHNo nOJ3BaHe
OTctpaHTe am6aJaxa, n3BaTe BCnU-KO OT uKaΦa, NOuNCTe BbTpewHaTa cTpaHa Ha φyphata Hn Ha neykata.
- Изва对接и поочтete akcecoapite на phунata с тонлba Вoga и Teuehen npenapaT.
BkIIOUe Te BeHTnlaTopa NJIu OTBOpTe eINH npO3opeu.
HarpTe cypHaTa (do TemnepaTpa ot 250^ 3a np6n3nteJHo 30 MHyTu),OTcTaHeTe nTHaTaN MHTe MAHO BHNMaTeJHo; 3OHTe 3a HarpBaHe Ha neKaTa Tpa6Ba da ce HarpeT 3a np6n3nteJHo 4 MNHTu 6e3 Da nMa CLOXeH cBd.
I36Op Ha IIambK Ha ra3OBnKOTJIOH
IpaBnHOppeylnpuHnTe ra3OBn KOTNOHN
IMaT PnAmbK Cbc CBETIOcH ZBRT C
rCHO OOPMeHN BbTpEuHN KOHYCOBnHDN
PnAmbYeTa. N36OpbT Ha roJeMNHaTa Ha
PnAmbKa 3aBnCn OT n36paHTo NOJoxeHne
Ha peryNaTopa Ha ra3OBn KOTIOH:
TOrJaM PnAmbK
MaJIbKIIaMbK(HapeueH“IKOHOMnueH”)
- ИЗКИюveн га3OB кOTлОн (прИТOKьТ Ha ra3 e 3aTВоpeн).
B 3aBnCmOCT OT HxKdnte e Bb3MOxHO nnabHOTO HAcTpoBaHe Ha rOJemHaTa Ha nnambka.
HENPABUNHO
ПРавилно
Функции nуnotpe6a ha Фурнata
Hnopmaun OTHOCHO HarpBaTeHNHTe
eIemEnHa 0yhpata B 3aBNCIMoCT OT
MOeJa Ha neKata ige Hamepnte B Ta6n-
Uata B pa3deXapaKtePncTnKa Ha ypeDa.
FypHata ce HarpBa C NOMOuTa Ha ra3OBA
ropeJka IIN eNEKtpnueckn HarpBaTeJeH
eIemEt. YnpabJIeHneTo Ha pa6oTaHa
fypHata CTaba C NOMOuTa Ha eDInH pei
laTop, O3HaueH C cNcPn, OTRObApzni
HaCTpoiKnTe Ha TepMOpEryJnatopa.
BhimaHne!
3a6paHeo e perylnupaHTo Ha nIaMbKa MeKdy NIOJKeHneTo n3KnIOyeH Ra3OB KOTnOH I NOJOKeHHeTO rOJAM IIaMbK
*no n36op
BHHMaHHe!
Ipn MoJeJIte 6e3 cKapa, 3HaKa He ce HAMnpa Bbpxy 6yToHa
BHHMaHHe!
Bcun kn fypn HMaT peryIaTopn c
Jaun Ha TeMnepaTypata N 3auNTa
N3TuHaHe Ha ra3. IIO BpeMe Ha 3anaJIbaHe
Ha FpyHaTa, KaKTo e OINcaHO NO-
Heo6xOJMo Da 3aDbpxknte HaTNCaT
rJNaTopa OKoNo 3cekyHdi. Toba BpeMe
Heo6xOJMo Da ce Harpee CEH3OpBT n
ce 3aJeICTBa 3aUHTa. Ako PnAmbkbT n3-
rache, N3BbPwTe Te3n DeiCTBn rOT
Cne3 Cekyn. Ako PnAmbkbT He ce 3anaA
B npOdbjXeHne Ha 10 cekyHdn, NOBTOpeTe DeiCTBnraTa 3a 3anaIbHe To My CneD
OKoNo 1 MInHyTa, T.e. CneD npOBeTpRaHe Ha
fypHata.

3a da BkIIOHTe cypHaTa, HanpaBete cJeHOTO:
3anaJeTe KneUka Kn6pnt,
HaTnCHeTe peryNaTopa DOKpaI rO 3BbptTe HaJIaBO Ha CbOTBeTHO n36paHaTaPepnepatypa,
Pn6nkeTe Kneukata Kn6pnt KbM OTbopa 3a 3anaIbaHe (pnc. no-dony) N 3aDpbK XyIopopa HATNCHAT OKO NO 3 ckyHnOT PemehTa Ha 3anaIbaHe Ha ra3Ta.AKO nna- BkT n3rache, n3BbpSeTe Te3n DeiCTBn OIOBO CJeD 3 ckyHn,
Ha6JIOdaBaIe nnambka (3HaunTeJHO- HaMaJIaBaHe Ha nnambka O3HaUaBA, Ye cyphata ce e Harpna Do JKeJaHaTa Te nepaTpa).
BHHMaHHe!
PerynpaHTo Ha TeMepaTypaTe Bb3MOxHO Camo npn 3aTBopeHa BpaTuKa HaФурнata.
I3BaXdaHe Ha BbTpewHOTo CTbKIO
- C NOMOHTa Ha NIOCKa OTBepKa CBaJIeTe roPHaTa JaiCha Ha BpaTata, DeNkATHO n36yTBaIKn aOT dBeTe cTpaHn (ΦnR.B).
- ⅢBaTe roHaTa NaIcHa Ha BpaTa1 (ФИr.B, C)
ПОЧECTBAHE И ПОДДБРЖАСЕ
3.ИЗБаДeTe BБТpeшНОТСтБКЛО OT npИКpenBaHTo (В ДОЛнATAЧАСТHaTa).Pnc.D,D1.
4.ИЗМИТЕ CTБКЛОТСТОПА ВODA И МАЛ-KO NOΥСТВАЦ ПЕРAPAT.
3a Да моHTираTe OTHOBO CTbKnoto NOCTbNeTe no obpaTHnЯ peД. ГадkaTaчacT Ha CTbKnoto Tp6Ba Da ce HAMnpa OTrope.
BHMaHHe! He HATnCKaIte eDHO-BpeMeHHO rOpHaTa NaCHa OT dBete CtpaHn Ha Bpata. 3a Da MOHTnPate npabNlHo rOpHaTa NaChHa Ha Bpata, NbpBO Tp6Ba Da NOCTaBN JEBnKpaHn JaCHaTa Ha Bpata, N B De-CHnKpaHn HATnCHeTe, DOKaTO He ChyTe "UpaKaBaHe". Cnei TOBa HATnCHeTe NaCHaTa OT JIAbTa CTPaHa DOKaTO He ChyTe "UpaKaBaHe".
D1

U38aXdaHe Ha ebmpewHomo cMbKnO. 3 cmbKnO.
U36aXdaHe Ha ebmpewHomo cmbKNo. 2 cmbKNo.