DHKI 752 800 C - Cooker AMICA - Free user manual and instructions
Find the device manual for free DHKI 752 800 C AMICA in PDF.

User questions about DHKI 752 800 C AMICA
0 question about this device. Answer the ones you know or ask your own.
Ask a new question about this device
Download the instructions for your Cooker in PDF format for free! Find your manual DHKI 752 800 C - AMICA and take your electronic device back in hand. On this page are published all the documents necessary for the use of your device. DHKI 752 800 C by AMICA.
USER MANUAL DHKI 752 800 C AMICA
EN- Table of contents
SAFETY INSTRUCTIONS FOR USE 11
UNPACKING
DISPOSAL OF OLD APPLIANCE 16
TIPS ON SAVING ELECTRICITY 17
BASIC INFORMATION ABOUT YOUR APPLIANCE 18
OPERATE YOUR INDUCTION HOB 18
COOKWARE CHARACTERISTICS 18
RESIDUAL HEAT INDICATOR "H" 21
BEFORE USING THE APPLIANCE FOR THE FIRST TIME 21
EXAMPLES OF POWER SETTINGS 21
AIR EXTRACTION MODE IN WHICH THE AIR IS EXPELLED OUTSIDE THROUGH THE
VENTILATION DUCT. 22
AIR RECIRCULATION MODE WITH ACTIVATED CARBON FILTER 22
BEFORE INSTALLING 23
INSTALL THE APPLIANCE 24
DIMENSIONS OF THE APPLIANCE 24
PACKAGE CONTENTS 25
MAKE THE WORKTOP RECESS 25
INSTALLATION IN AIR RECIRCULATION MODE 27
INSTALLATION IN AIR EXTRACTION MODE IN WHICH THE AIR IS EXPELLED OUTSIDE
THROUGH THE VENTILATION DUCT. 31
ELECTRICAL DIAGRAM
PIPE SET FOR INDUCTION HOB WITH EXTRACTOR 36
OPERATION 38
CLEANING AND CARE 43
TROUBLESHOOTING 44
TECHNICAL SPECIFICATION 45
WARRANTY AND AFTER SALES SERVICE 46
WARRANTY 46
GARANTIE, NACHVERKAUF-SERVICE 86
GARANTIE 86
CS- Obsah
POKNY K BEZPECNÉMU POUZIVÁNÍ 88
ROZBALENI 93
LIKVIDACEPOUZITYCHZARIZENI 93
JAK SETRIT ENERGII 94
ZÁKLADNI INFORMACE O ZARIZENİ 95
ZASADA FUNGOVANI INDUKCNI DESKY 95
CHARAKTERISTIKA NADOBI 95
UKAZATEL ZBYTKOVEHO TEPLA "H" 98
PRED PRVNIM ZAPNUTIM VARNE DESKY 98
PRIKLAD NASTAVENI VYKONU QHRIVANI 98
PROVOZNI REZIM DIGESTORE 99
REZIM ODTAHU (ODVADENI VZDUCHU DO VENTILACNIHO KANALU) 99
REZIM POHLCQVACE (RECIRKULACE VZDUCHU) 99
INFORMACE PRED INSTALACI 100
INSTALACE A MONTAZ 101
ROZMÉRY ZARÍZENI 101
OBSAH BALENI 102
PRIPRAVA DESKY NABYTKU DO VESTAVENI VARNE DESKY 102
INSTALACE V REZIMU POHLCOVACE (RECIRKULACE VZDUCHU) 104
INSTALACE V REZIMU ODSAVANI (ODSAVANI VZDUCHU DO VENTILACNIHO POTRUBI)
108
ELEKTRICKÉ SCHEME
SADA POTRUBI PRO INDUKCNI VARNOU DESKU S ODSAVAÇEM
OBSLUHA
CISTENI A UDRZBA
RESENI PROBLEMU
SPECIFIKACE
ZÁRUKA, POPRODEJNÍ SERVIS
ZARUKA 123
SK- Obsah
POKNY TYKAJUCE SA BEZPECNEHOPOUZIVANIA 125
ROZBALENIE
LIKVIDÁCIA POUZITYCH ZARIADENÍ 130
AKO USETRIT ENERGIU 131
ZAKLADNE INFORMACIE O ZARIADENI 132
PRINCIP FUNGOVANIA INDUKCNEJ VARNEJ DOSKY 132
CHARACTERISTIKA RIADU 132
UKAZOVATEL ZVYSKOVÉHO TEPLA "H" 135
PRED PRVYM POUZITIM 135
PRIKLAD NASTAVENIA TEPLOTY 135
PREVÄDZKOVY REZIM DIGESTORA 136
REZIM ODSAVACA (ODVADZANIE VZDUCHU DO VETRACIEHO KANÁLA) 136
REZIM ABSORPCIE (RECIRKULACIA VZDUCHU) 136
INFORMACIE PRED INSTALACIOU 137
INSTALACIA A MONTAZ 138
ROZMERY ZARIADENIA 138
OBSAH BALENIA 139
PRIPRAVA KUCHYNSKEJ DOSKY NA VSTAVANIE VARNEJ DOSKY 139
INSTALÁCIA V REZIME ABSORBÉRA (RECIRKULÁCIA VZDUCHU) 141
INSTALÁCIA V REŽIME ODSAVANIA (ODVÁDZANIE DO POTRUBIA) 145
ELEKTRICKA SCHEMA
SADA POTRUBIA PRE INDUKCNU VARNU DOSKU S ODSAVACOM
POUZIVANIE
CISTENIE A UDRZBA
RIESENIE PROBLEMOV
SPECIFIKACIA
ZÁRUKA, POPREDAJNY SERVIS
ZARUKA 160
RESTWARMTE-INDICATOR "H" 213
VOOR HET EERSTE GEBRUIK VAN DE KOOKPLAAT 213
VOORBEELDEN VAN DE INSTELLINGEN VOOR DE WARMTEAFGIFTE 213
WERKMODUS VAN DE AFZUIGKAP 214
AFZUIGMODUS (LUCHTAFVOER NAAR VENTILATIEKANAAL) 214
ABSORBERSTAND (LUCHTRECIRCULATIE) 214
INFORMATIE VOORAFGAAND AAN DE INSTALLATIE 215
INSTALLATIE EN MONTAGE 216
AFMETINGEN VAN HET APPARAAT 216
INHOUD VAN DE VERPAKKING 217
VOORBEREIDING VAN HET WERKBLAD VOOR INBOUW VAN DE KOOKPLAAT 217
INSTALLATIE IN ABSORBERSTAND (LUCHTRECIRCULATIE) 219
INSTALLATIE IN DE AFZUIGSTAND (LUCHTAFVOER IN HET VENTILATIEKANAAL) 223
ELEKTRISCH SCHEMA
BUIZENSET VOOR INDUCTIEKOOKPLAAT MET AFZUIGER
BEDIENING
REINIGING EN ONDERHOUD
HET OPLOSSEN VAN PROBLEMEN
SPECIFICATIE
GARANTIE, SERVICE
GARANTIE 240
HR- Kazalo
INFORMACIJE O SIGURNOSTI 242
UKLANJANE PAKIRANJA 247
ZBRINJAVANJE POTROSENIH UREDAJA 247
KAKO STEDJETI ENERGIJU 248
OSNOVNE INFORMACIJE O UREDAJU 249
PRINCIP RADA INDUKCIJSKE PLOCE 249
SPECIFIKACIJA POSUDA 249
POKAZATELJ PREOSTALE TOPLINE "H" 252
PRIJE PRVOG UKLJUCIVANJA PLOCE 252
PRIMJER POSTAVKI SNAGE GRIJANJA 252
MOD RADA 253
MOD IZVLACENJA (IZVLACENJE ZRAKA U VENTILACIJSKI KANAL) 253
REZIMAPSORBERA (RECIRKULACIJA ZRAKA) 253
INFORMACIJE PRIJE INSTALLACIJE
INSTALACIJA I MONTAZA
DIMENZije UREDAJA 255
SADRZAJ PAKETA 256
PRIPREMANJE PULTA KUHINJSKOG ELEMENTA ZA UGRADNJU UREDAJA 256
INSTALACIJA U REZIMU APSORBERA (RECIRKULACIJA ZRAKA) 258
INSTALACIJA U SLUÇAJU REZIMA IZVLACENJA ZRAKA (IZVLACENJE ZRAKA U VENTILACIJSKI
KANAL) 262
ELEKTRICNA SHEMA
SET CIJEVI ZA INDUKCIJSKU PLOCU S ISPUSNIM SUSTAVOM 267
UPORABA
CISCENJE I ODRZAVANJE 274
RJESAVANJE PROBLEMA 275
SPECIFIKACIJA 276
JAMSTVO, POSLIJEPRODAJNE AKTIVNOSTI 277
JAMSTVO 277
SL- Sadržaj
NAVODILA ZA ZAGOTAVLJANJE VARNOSTI UPORABE 279
RAZPAKIRANJE
ODSTRANJEVANJE IZRABLJENIH NAPRAV 284
KAKO VARCEVATI Z ENERGIJO 285
OSNOVNE INFORMACije O NAPRAVI 286
PRINCIPI DELOVANJA INDUKCIJSKE PLOŠCE 286
ZNACILNOSTI POSOD 286
INDIKATOR PREOSTALE TOPLETE "H" 289
PRED PRVIM VKLOPOM PLOSCE 289
PRIMERI NASTAVITEV MOCI GRETJA 289
NACIN DELOVANJA NAPE 290
ODVODNI NACIN (ODVOD ZRAKA V PREZRACEVALNI KANAL) 290
NACIN ABSORPCIJE (RECIRKULACIJA ZRAKA) 290
INFORMACIJE PRED NAMESTITVIJO 291
INSTALACIJA IN NAMESTITEV 292
MERE NAPRAVE 292
VSEBINA EMBALAZE 293
PRIPRAVA POHISTVENEGA PULTA ZA VGRADNJO PLOSCE 293
NAMESTITEV V NACINU ABSORPCIJE (RECIRKULACIJA ZRAKA) 295
VGRADNJAVODVDNEMNACINUIZPUSTVPREZRACEVALNI KANAL) 299
ELEKTRICNI DIAGRAM:
KOMPLET CEVI ZA INDUKCIJSKO KUHALNO PLOSCO Z IZVLECNIKOM
UPQRABA
CISCENJE IN VZDRZEVENJE 311
RESEVANJE PROBLEMOV 312
SPECIFIKACIJA 313
GARANCIJA,POPRODAJNE STORITVE 314
314
Dear customer,
From now on, your daily housework will be easier than ever before. Your appliance Air-conditionally easy to use and extremely efficient. After reading these Operating Instructions, operating the appliance will be easy.
Before being packaged and leaving the manufacturer, the appliance was thoroughly checked with regard to safety and functionality.
Before using the appliance, please carefully read these Operating Instructions. By following these instructions carefully you will be able to avoid any problems in using the appliance. It is important to keep these Operating Instructions and store them in a safe place so that they can be consulted at any time.
Follow these instructions carefully in order to avoid possible accidents.
Sincerely,
Amica
SAFETY INSTRUCTIONS FOR USE
- Before using the appliance for the first time, carefully read its Operating Instructions. This will ensure user safety and prevent damage to the appliance.
NOTE: Never leave cooking unattended. - This appliance is designed for household use only.
- When operating the induction hob in close proximity to a radio, television, or other radio-frequency emitting device, verify the proper operation of the hob's touch sensor controls.
- The hob must be installed by a qualified professional.
- Do not install the appliance near a refrigerator.
- During use, the appliance and its heating elements may become hot. Exercise caution to avoid accidental contact with hot surfaces. Children less than 8 years of age shall be kept away from the appliance unless continuously supervised.
- This appliance is intended for use by persons aged 8 years and over, as well as those with reduced physical, sensory, or mental capabilities or a lack of experience and knowledge, provided they are supervised or have received instruction regarding safe operation. Supervision by a responsible person is required during the use of this appliance. Ensure that children do not play with the appliance. Children must not clean or maintain the appliance without supervision.
-
Never leave cooking fats or oils unattended as they can easily catch fire. If grease catches fire, DO NOT use water - immediately turn off the appliance and cover the flames with a lid or fire blanket.
-
Note! Keep the heating surface clear and do not allow objects to accumulate on the heating surface, as this could cause a fire.
- If the hob surface cracks, immediately disconnect the appliance from the power supply to prevent electric shock.
- Placing metal objects such as knives, forks, spoons, lids, and aluminium foil on the hob surface can cause them to become extremely hot and cause severe burns when touched.
- After cooking, turn off the hob using its controls.
- Do not operate the appliance using external timers or stand-alone remote control systems.
- Do not use steam-generating appliances to clean the hob.
- The furniture in which the hob is installed must be resistant to temperatures up to 100^ . This temperature resistance requirement applies to all furniture components in the vicinity of the hob, including veneers, edges, plastic surfaces, adhesives, and paints.
- The appliance may only be used once fitted in kitchen furniture.
- Repairs to electrical appliances may only be conducted by specialists. Improper repairs can be dangerous to the user.
- The appliance is only disconnected from the mains by switching off the safety circuit breaker.
Children shall not play with the appliance. - People with implanted medical devices (such as pacemakers, insulin pumps, or hearing aids) should take precautions to ensure their devices are not affected by the electromagnetic field generated by this induction hob (20-50 kHz) - consult your physician if you have any concerns.
-
Disconnecting the power resets all appliance settings and indicators. Caution should be exercised when electric power to the appliance is restored.
-
Built-in residual heat indicator can be used to determine if the appliance is on and if it is still hot.
- Do not use plastic containers and aluminium foil. They melt at high temperature and may damage the cooking surface.
- Only use cookware designed for induction hobs.
- Do not allow sugar (solid or liquid), citric acid, salt, or plastic to spill onto the hot cooking surface.
- If sugar or plastic accidentally fall on the hot cooking zone, turn off the hob and wearing oven mitts or heat-resistant gloves, use a scraper designed for ceramic or glass surfaces to immediately and carefully remove the spill from the surface. Protect your hands from burns and injuries.
- When cooking on induction hob only use pots and pans with a flat base having no sharp edges or burrs as these can permanently scratch the cooking surface.
- The induction hob's cooking surface is durable and resistant to thermal shock. It can withstand cold or hot temperature.
- Avoid dropping objects on the cooking surface. Impact from pointed objects, such as spice bottles, may result in cracking or chipping of the cooking surface.
- In the event of a cracked hob surface, immediately disconnect the appliance from the power supply to avoid the risk of electric shock. Spilled liquids may penetrate the damaged areas and come into contact with live electrical components.
- Do not use the cooking surface as a cutting board or work table.
- When the hob is installed in the worktop, metal objects in a cabinet or drawer below can become heated by the airflow from the hob's cooling fan.
- It is important to follow the care and cleaning instructions for the ceramic surface. The warranty
may be voided in the event of misuse or mishandling of the ceramic surface.
- If the power cord is damaged it must be replaced by a specialised service centre.
- Do not use this appliance outdoors or in damp/wet conditions.
- The manufacturer reserves the right to make design and specification changes that do not materially affect the appliance's functionality.
- A hob-integrated downdraft extractor is designed to remove cooking odours. Do not use the appliance for other purposes.
- Connect the downdraft extractor operating in extraction mode to a suitable ventilation duct - do NOT connect the appliance to smoke or flue gas ducts, which are in use.
- Downdraft extractor operating in air recirculation mode requires the installation of an activated charcoal filter.
- Always unplug the appliance before cleaning, replacing the filter, or performing any maintenance.
- Clean the downdraft extractor grease filter at least monthly because grease buildup is flammable and poses a fire hazard.
- Ensure adequate ventilation (fresh air intake) if other equipment, such as liquid fuel stoves or heaters, is operated in the room along with the downdraft extractor to prevent a buildup of combustion byproducts. When the downdraft extractor is operated concurrently with fossil fuel burning appliances that require room air for proper combustion, their safe operation is contingent upon maintaining a maximum underpressure of 0.004 mbar in the vicinity of these appliances - this condition does not apply when the downdraft extractor operates in air recirculation mode.
- Clean the downdraft extractor inside and out at least monthly, following the maintenance in
structions in this manual.Neglecting to clean the downdraft extractor and replace filters regularly increases the risk of fire.
- When installing a downdraft extractor with external venting, we recommend a backdraft damper at the external outlet. You can purchase a backdraft damper from installer stores.
- The appliance must be easily disconnected from the power supply by switching off a circuit breaker.
- Make sure voltage indicated on the nameplate corresponds to the local mains supply voltage.
- Before use, extend and straighten the power cord.
- For your safety, ensure the power cord is properly installed before connecting the appliance to the mains. Do not connect the appliance to the mains until installation is complete.
- Do NOT operate the downdraft extractor without the grease filter installed.
- Always strictly adhere to regulations issued by the competent local authorities regarding the technical and safety requirements for fume extraction.
- Failing to tighten bolts and fasteners in accordance with these instructions may endanger life and health.
NOTE! Failure to install bolts and fasteners in accordance with the instructions may result in electrical hazards. - The manufacturer shall not be liable for any damage or fire caused by the appliance resulting from failure to follow instructions in this manual.
UNPACKING

During transportation, protective packaging was used to protect the appliance against any damage. After unpacking, dispose of all packaging materials responsibly to minimise environmental impact.
All materials used for packaging the appliance are 100% recyclable and are marked with the appropriate symbol.
Note! Packaging materials, including bags, polyethylene, and polystyrene, present a choking hazard
and should be kept away from children at all times during and following unpacking.
DISPOSAL OF OLD APPLIANCE

In accordance with European Directive 2012/19/EU and Polish law on waste electrical and electronic equipment, this appliance is marked with the crossed-out waste bin symbol. This symbol indicates that the appliance must not be disposed of with household waste after use.
The user is obligated to dispose of this appliance at an authorised collection point for waste electrical and electronic equipment. Local collection points, shops, and local authority departments together provide a recycling scheme.
Properly disposing of old electrical and electronic equipment prevents environmental and health risks caused by hazardous components and improper handling.
TIPS ON SAVING ELECTRICITY

- Using energy in a responsible way not only saves money but also helps the environment. So let's save energy! And this is how you can do it:
- Use the correct cookware.
- Pans with thick, flat bases can save up to 1/3 on electric energy. Remember to cover pans if possible otherwise you will use a lot more energy!
- Always keep the cooking zones and cookware bases clean.
- Soiled surface can prevent heat transfer - and
repeatedly burnt-on spillages can often only be removed by products which cause damage to the environment.
- When cooking on induction hob only use pots and pans with a flat base having no sharp edges or burrs as these can permanently scratch the cooking surface.
- Do not install the hob in the immediate vicinity of refrigerator / freezer. Heat radiating from cooking can increase the energy consumption of these appliances.
BASIC INFORMATION ABOUT YOUR APPLIANCE
Operate your induction hob
Under the surface glass, there are induction coils that produce pulsing magnetic field. This electromagnetic field penetrates cookware placed on the hob surface causing the cookware to heat up. It is important to use cookware with a suitable base.

Depending on the cookware used and heat setting during cooking, the appliance produces a distinctive whiz. This is normal and does not constitute grounds for a complaint.
Cookware characteristics
- To check that the cookware is suitable for your induction hob, make sure that a magnet strongly attracts its base. The greater the attraction force, the better the cookware.
- Always use high-quality cookware with a perfectly flat base. The use of this kind of cookware prevents hot spots that may result in food sticking to the pot. Pots and pans with thick steel walls provide superior heat distribution. The concave base or deep embossed logo of the manufacturer interfere with the temperature induction control module and can cause overheating of the pot or pan.
- Do not use damaged cookware such as cookware with deformed base due to excessive heat.
- When you use large ferromagnetic base cookware, whose diameter is less than the total diameter of the cookware, only the ferromagnetic base heats up. This results in a situation where it is not possible to uniformly distribute the heat in the cookware. If the ferromagnetic area is reduced due to inclusion of aluminium parts then the effective heated area can be reduced. Problems with the detection of the cookware could arise or cookware may not be detected at all. To achieve optimum cooking results, the diameter of the ferromagnetic base should match that of the cooking zone. If cookware is not detected in a given cooking zone, it is advisable to try it in a smaller cooking zone.

The high-quality cookware is essential for efficient induction cooking.

It is not recommended to use external induction adapters.
-
For induction cooking use only ferromagnetic base materials such as:
-
enamelled steel
- cast iron
- special stainless steel cookware designed for induction cooking.
| Kitchen cookware marking | Check for marking indicating that the cookware is suitable for induction cooking. |
| Stainless Steel | Cookware is not detected With the exception of the ferromagnetic steel cookware |
| Aluminium Cookware is not detected | |
| Cast iron | High efficiency Note: cookware can scratch the hob surface |
| Enamelled steel | High efficiency Cookware with a flat, thick and smooth base is recommended |
| Glass Cookware is not detected | |
| Porcelain Cookware is not detected | |
| Cookware with copper base | Cookware is not detected |
- Lid prevents heat from escaping and thus reduces heating time and lowers energy consumption.
- Make sure that cookware base is dry. When filling cookware or when using cookware taken out of the refrigerator make sure its base is completely dry before placing it on the cooking zone. This is to avoid soiling the surface of the hob.
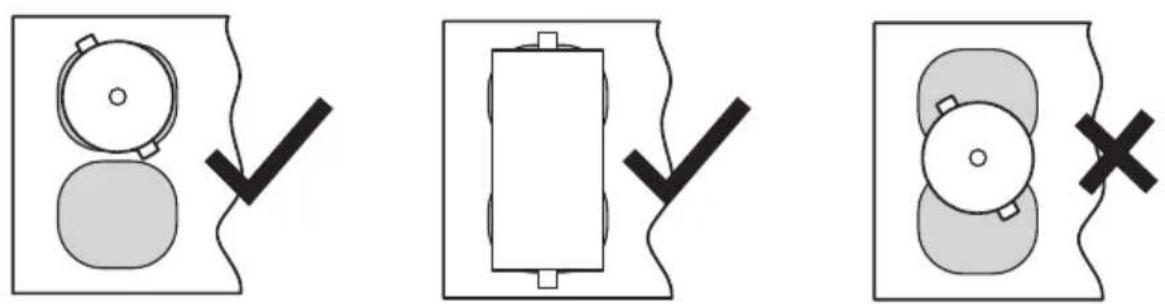
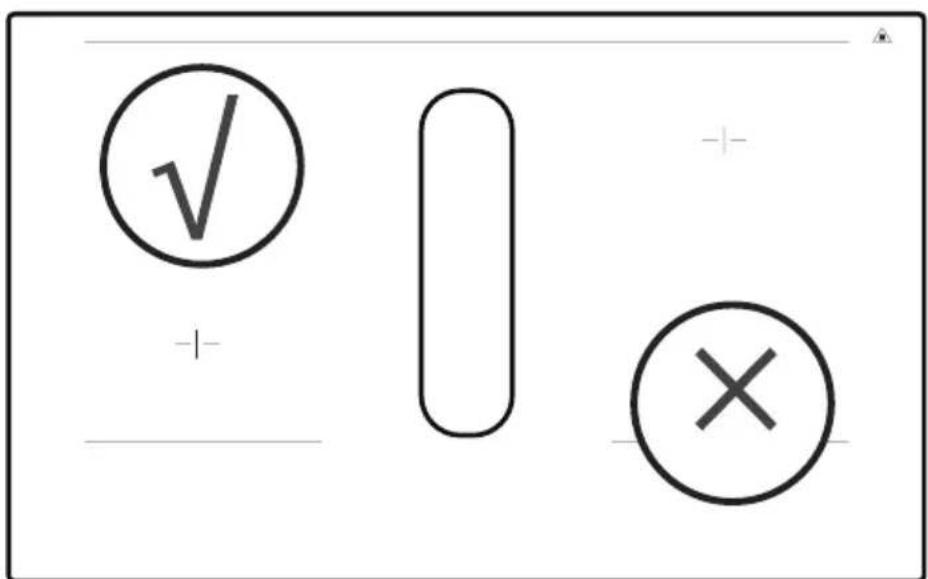
- Ensure the cookware base is smooth, flat against the glass, and the same size as the cooking zone. Select cookware with a diameter corresponding to the graphic outline on the chosen cooking zone. Using cookware that fully covers the cooking zone graphic outline ensures maximum energy transfer and heating efficiency. If you use a smaller cookware, the performance may be lower than expected. A cookware
with a diameter smaller than 140~mm may not be detected by the hob. Always place the cookware in the centre of the cooking zone.
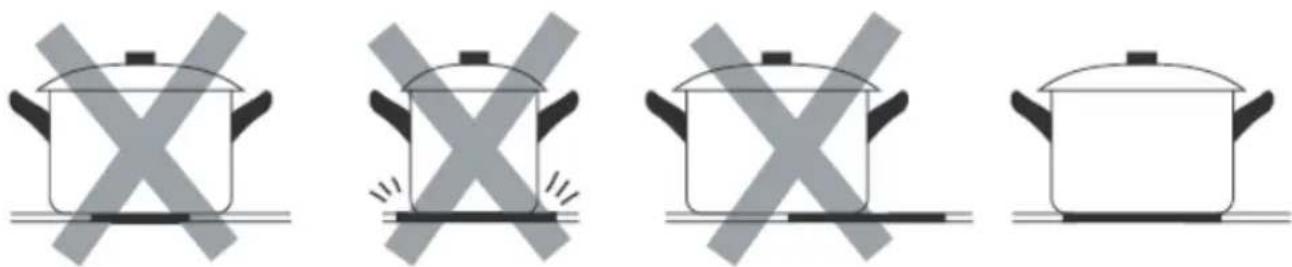
- To prevent scratches, always lift cookware when removing it from the induction hob, never slide it.
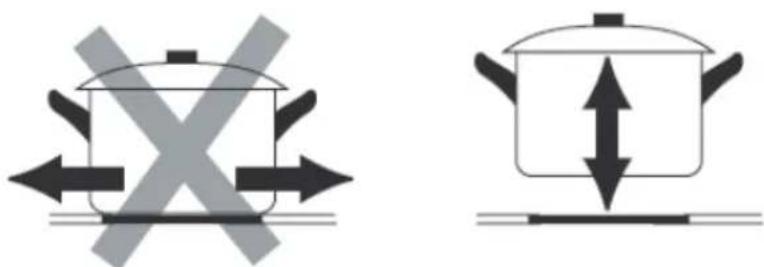
- When using the appliance, please refer to the illustration below to properly place the cookware. Do not place the cookware between cooking zones. The cookware should be placed at the location printed on the glass.
Residual heat indicator "H"
When you have finished cooking, the induction hob glass within the cooking zone is still hot, this is called residual heat.
If the glass surface is hot, the "H" is shown on the cooking zone display.


When residual heat indicator is on, do not touch the cooking zone as there is a risk of burns and do not place on it any items sensitive to heat!

The "H" residual heat indicator is not displayed during a power outage. However, cooking zones may still be hot!
Before using the appliance for the first time
- Thoroughly clean the induction hob. The hob has a glass surface, therefore handle it with care.
- Odours may be released when you first start your appliance. If this happens, turn on exhaust hood or open the window in the room. Emission of odour is temporary.
Examples of power settings
The following settings are guidelines only. You will see to adjust the setting based on the cookware you are using and the amount of food you are cooking. Experiment with your induction hob to find the settings that best suit your needs.
| Setting Use | |
| 1-2 | Gently heat small amounts of foodMelt chocolate, butter and other products that burn easilyGentle cookingSlow heating |
| 3-4 | ReheatingSimmeringCook rice |
| 5-6 Fry | pancakes |
| 7-8 | FryingCook pasta |
| P | Boil waterBring soup to a boilDeep Frying |
HOOD OPERATING MODE
This appliance can operate in either air recirculation mode with activated carbon filter or air extraction mode, where the air is expelled through a ventilation duct.
Air extraction mode in which the air is expelled outside through the ventilation duct.
Operation in air extraction mode: When your appliance operates in air extraction mode, the air is expelled outside through the ventilation duct. In order to operate the appliance in air extraction mode you need to remove the activated carbon filter. In this operation mode your appliance is connected via ductwork to the main ventilation duct in the chimney. The appliance should be installed by a qualified installer.
Air recirculation mode with activated carbon filter
In air recirculation mode, the air is drawn from the room into the appliance, filtered, and then returned back into the room through the air outlets. To ensure the effective operation of the appliance in air recirculation mode, you need to install the activated carbon filter, which neutralises odours. For optimal efficiency, the installation of pipe set for an induction hob with extractor is also recommended to enhance air circulation and the distribution of purified air within the room.
Note!
- The optional pipe set for an induction hob with extractor is not included with the appliance and must be purchased separately (PSD 100 DOWNAIR SET). See the "Pipe set for induction hob with extractor" section for illustrations of the kit components and the connection diagram.
- For detailed instructions on replacing the activated carbon filter, please refer to the "Cleaning and care" section.
BEFORE INSTALLING
Before installing the hob, make sure that:
- The work surface must be level and free from any obstructions that could interfere with appliance placement.
- The working surface is made of insulated and heat-resistant material.
- A disconnect switch must be installed in the domestic electrical panel, in accordance with local electrical regulations, to provide complete disconnection from the mains supply.
- To ensure safe disconnection, the disconnect switch must be with a minimum 3mm isolation break in all poles (or active conductors, where local regulations allow).
- For safety, the disconnect switch must remain easily accessible after the hob is installed to allow for immediate power shutoff.
- If you have any questions about installation procedures or local building codes, contact your local building authorities
- The walls around the hob should be made of heat-resistant materials and easily to clean (e.g. ceramic tiles).
After installing the hob, make sure that:
- Check that the power cord does not interfere with the opening or closing of cabinet doors and drawers.
- Ensure adequate airflow for proper ventilation and cooling to prevent overheating.
Warning
- This hob must be installed by a qualified specialist to ensure safe and correct installation. Do not attempt to install this appliance yourself - professional installation is required.
- To prevent damage to the hob's electronics do not install the hob directly above appliances that generate moisture, such as dishwashers, refrigerators, freezers, washing machines or dryers.
- The hob must be installed to allow efficient heat dissipation, which prevents overheating and prolongs the appliance lifespan.
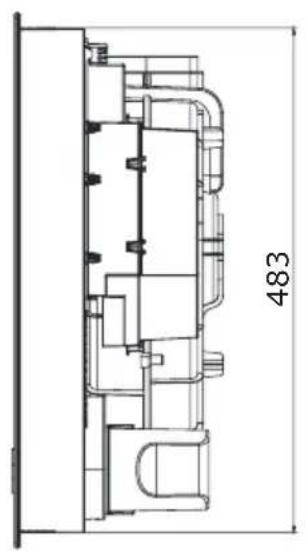
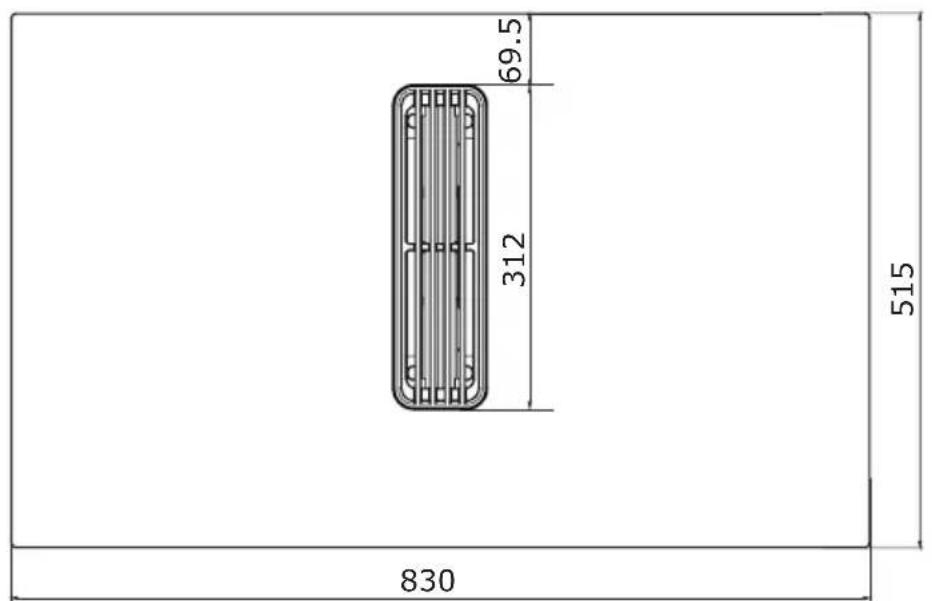
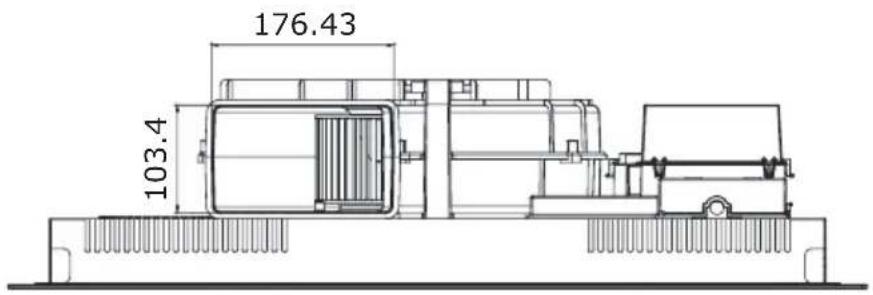
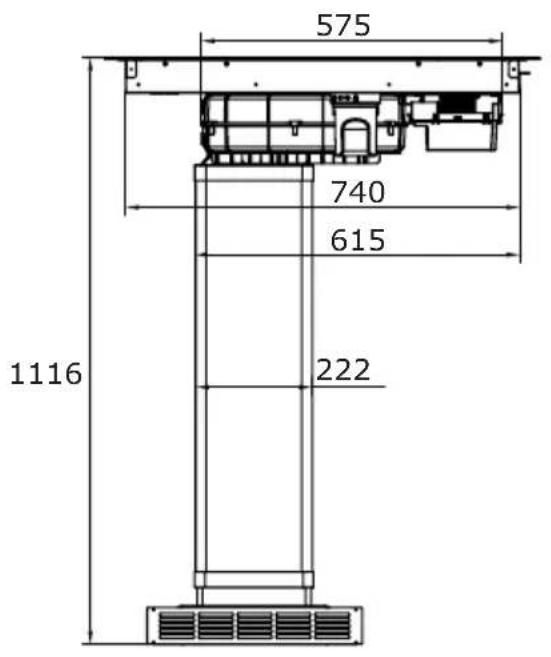
INSTALL THE APPLIANCE
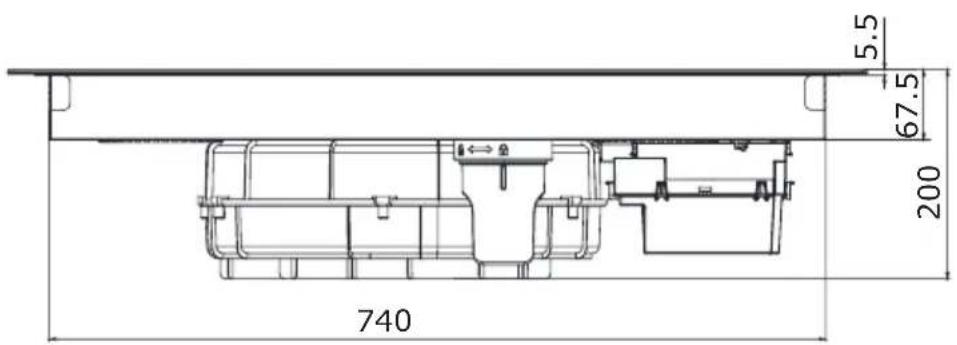
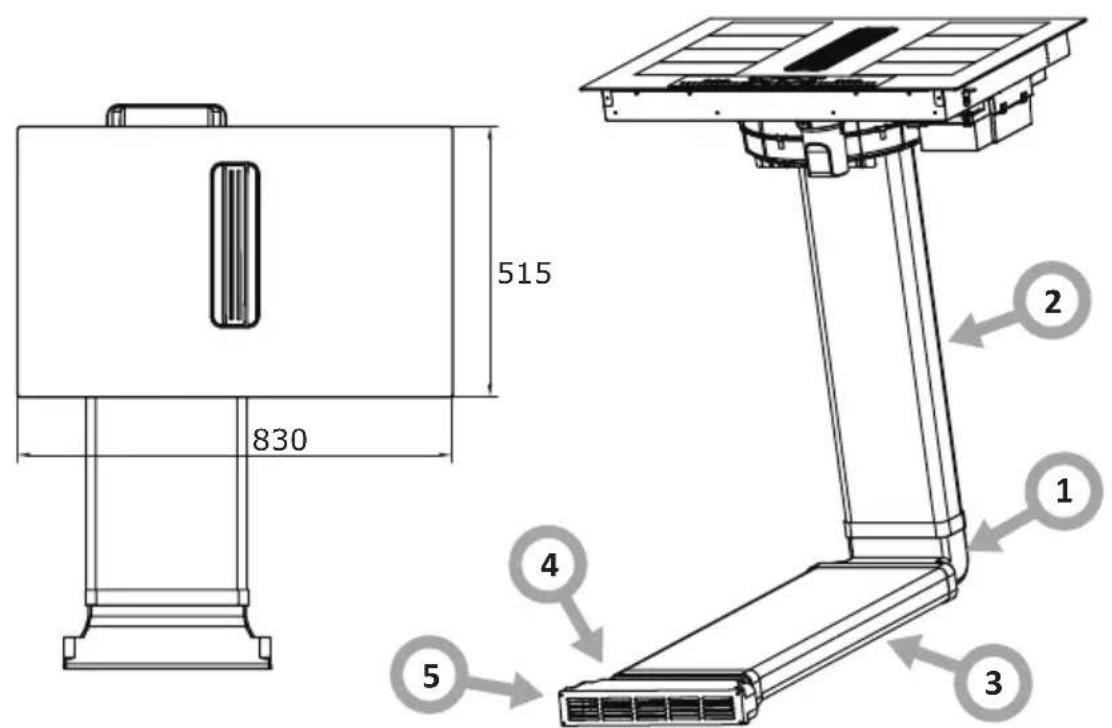
Dimensions of the appliance
Package contents
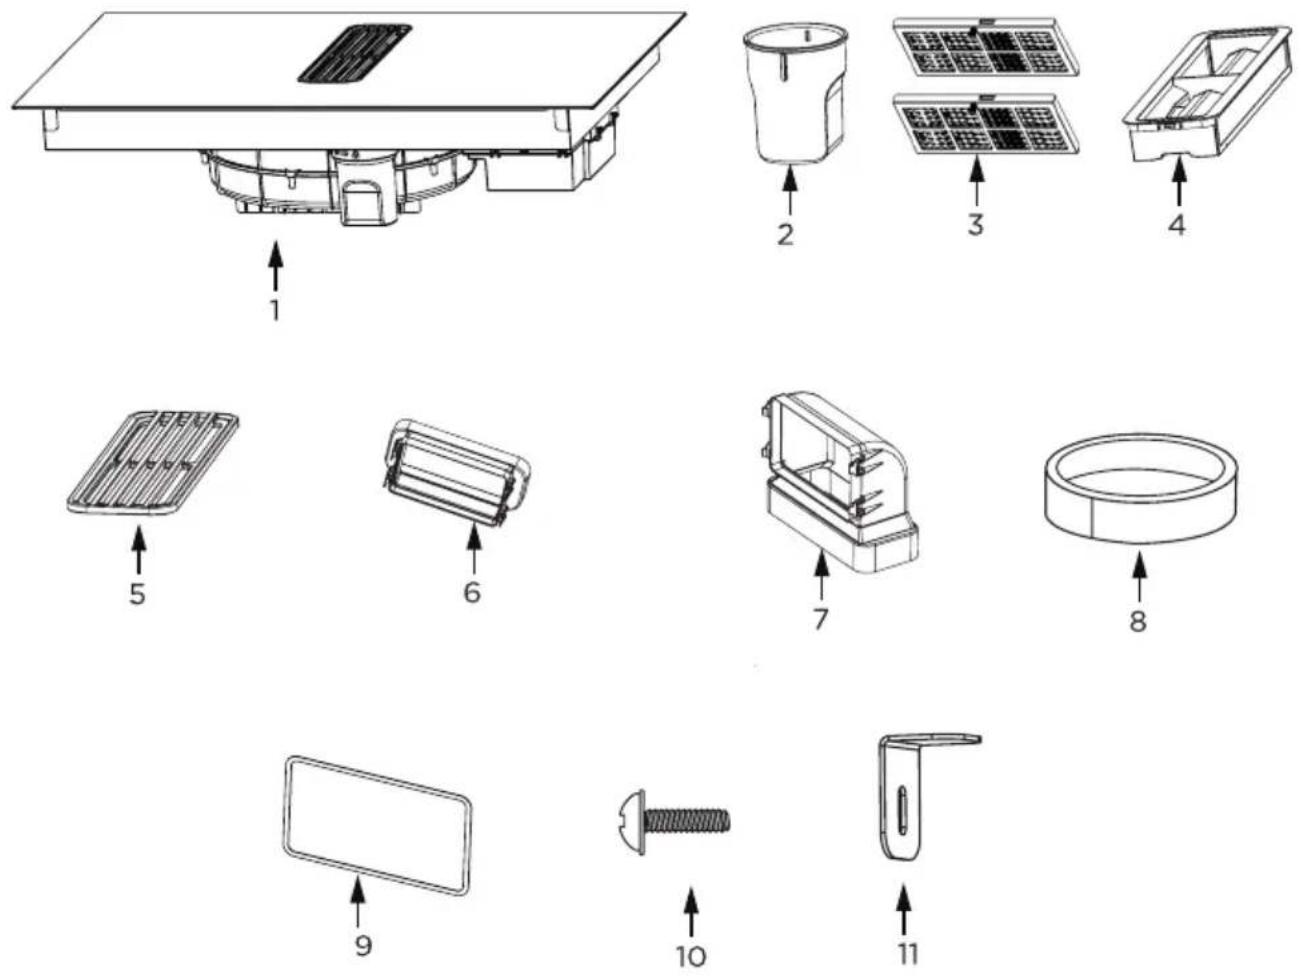
- Induction hob with extractor
- Water container
- Activated charcoal filter
- Grease filter
-
Grille
-
Adapter
- 90^ adapter
- Sealing tape
- Seal
- M4*10 screw (x4)
- Mounting bracket (x4)
Note!
The optional pipe set for induction hob with extractor is not included with the appliance and must be purchased separately (PSD 100 DOWNAIR SET). See the "Pipe set for induction hob with extractor" section for illustrations of the kit components and the connection diagram.
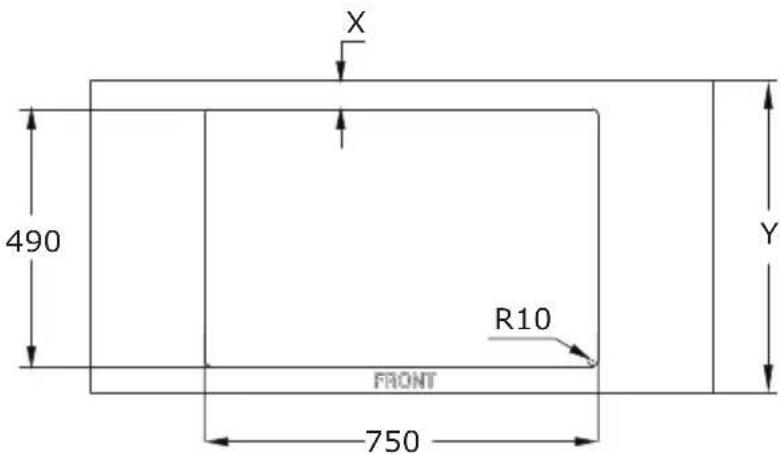
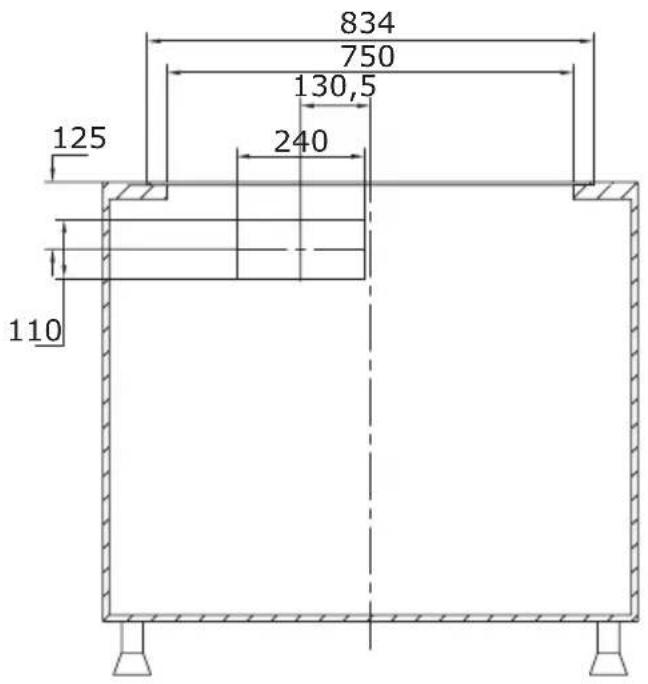
Make the worktop recess
- The worktop must be flat and level. Edge of the worktop near the wall must be sealed to prevent ingress of water or other liquids.
- Worktop must be made of materials, including veneer and adhesives, resistant to a temperature of 100^ . Otherwise, veneer could come off or surface of the worktop become deformed.
- Edge of the opening should be sealed with suitable materials to prevent ingress of water.
- Worktop opening must be cut to dimensions as shown on figure below (measurement unit [mm]):
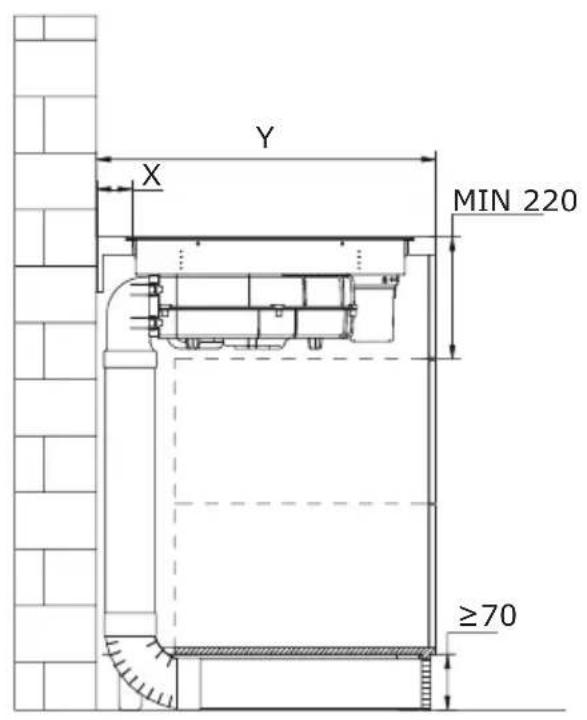
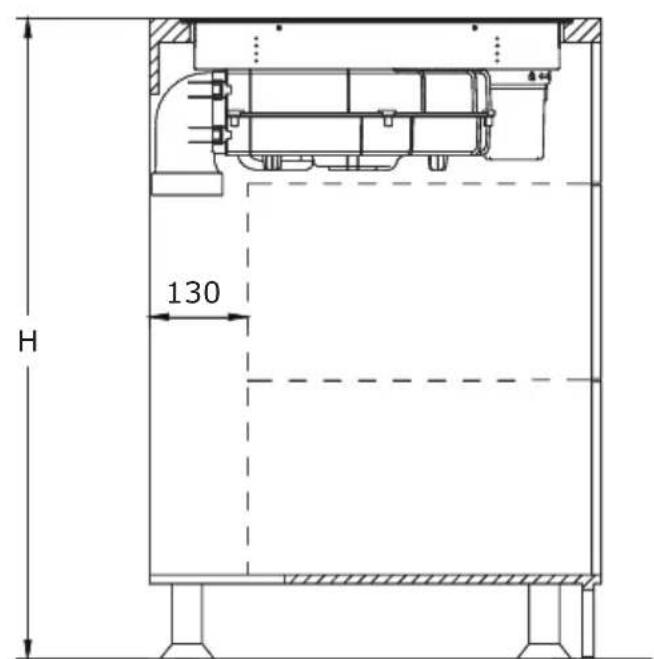
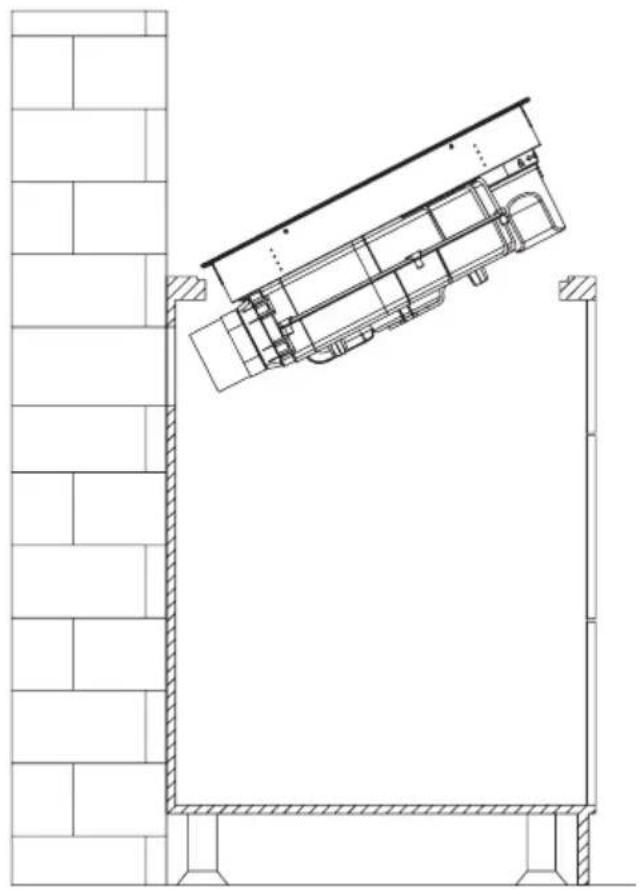
Install your downdraft extractor flush with the worktop
In this solution, the induction hob integrated with an extractor is recessed into the kitchen countertop so that its surface is flush with the countertop.
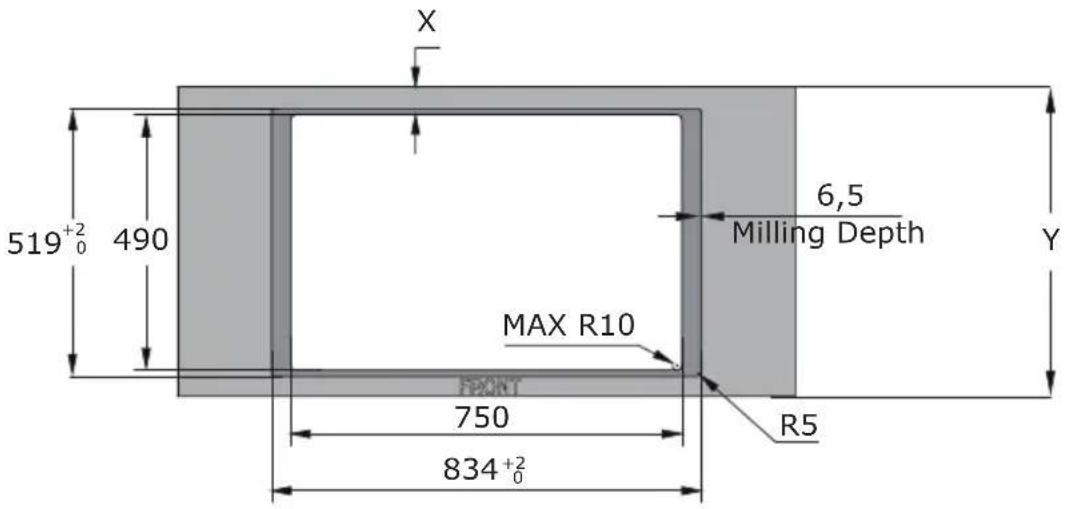
Standard installation
In standard installation, the induction hob with an integrated extractor is mounted on the countertop, with its edges protruding above the surface of the countertop.
| Worktop depth (Y) X | |
| 600-650 mm 54 mm | |
| ≥650 mm 65 mm | |

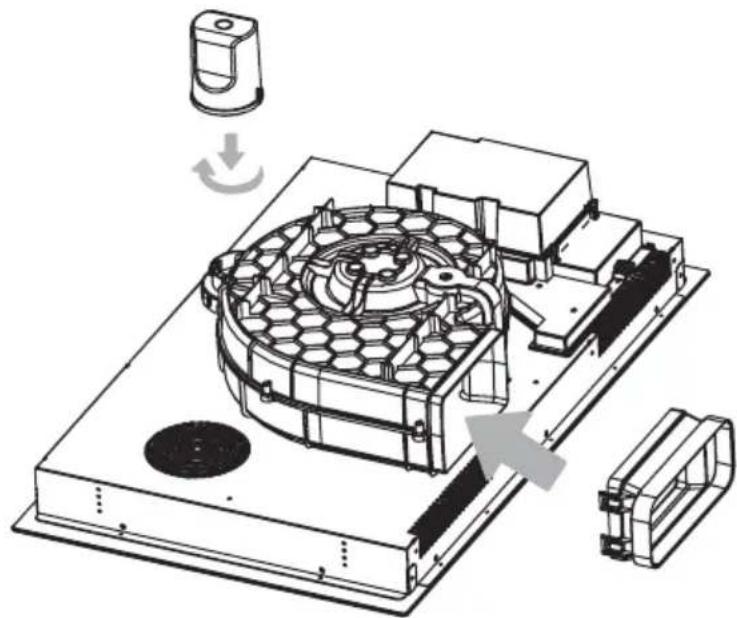
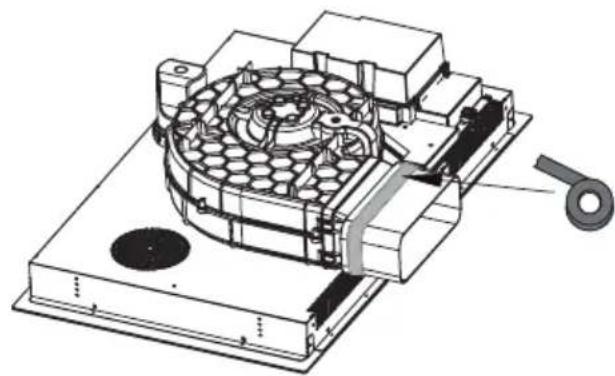
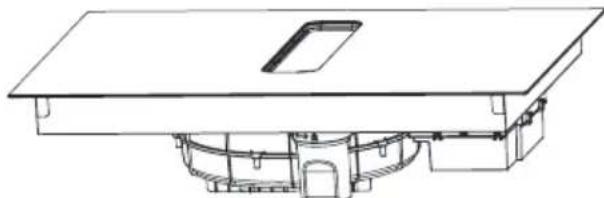
Installation in air recirculation mode
Install the water container by turning it in the direction of the arrow. Then, place the included rubber seal as shown by the arrow in the diagram below. Finally, install the 90^ adapter into the designated aperture as illustrated, making sure it fits correctly.
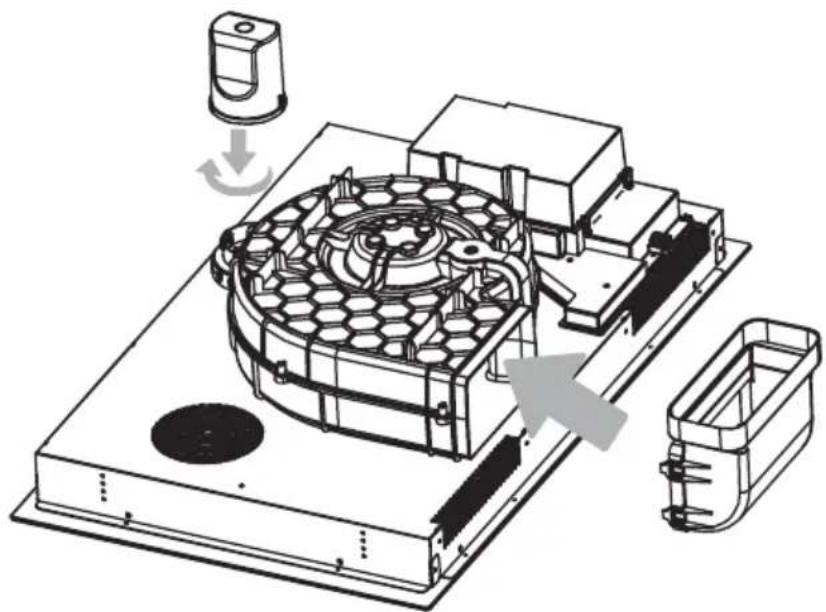
Place the downdraft extractor on the worktop and align it properly.
For efficient recirculation, we recommend installing a pipe set for an induction hob with an extractor. This can be purchased separately under the name PSD 100 DOWNAIR SET. Below is an overview of the individual components included. The corresponding dimensions can be found in the "Pipe set for induction hob with extractor" chapter.
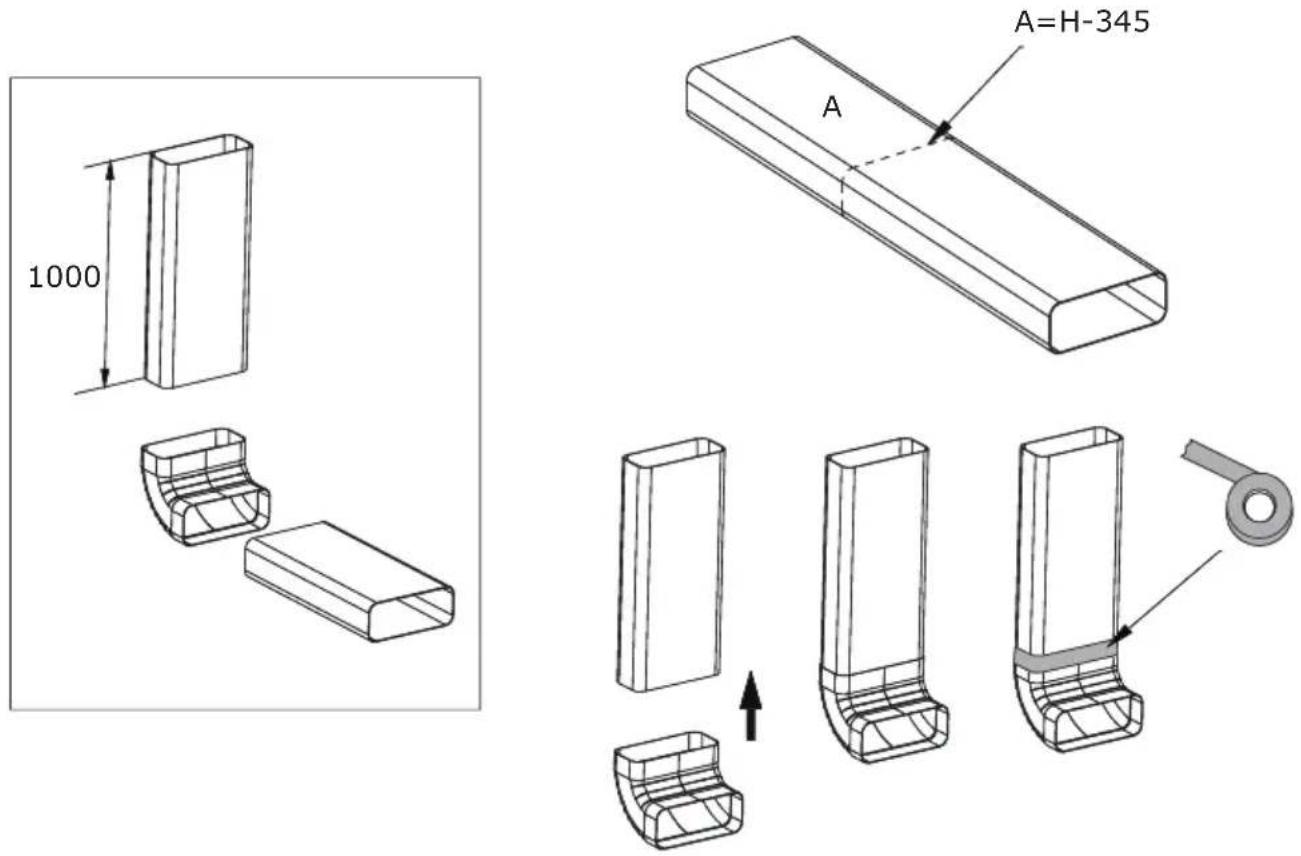
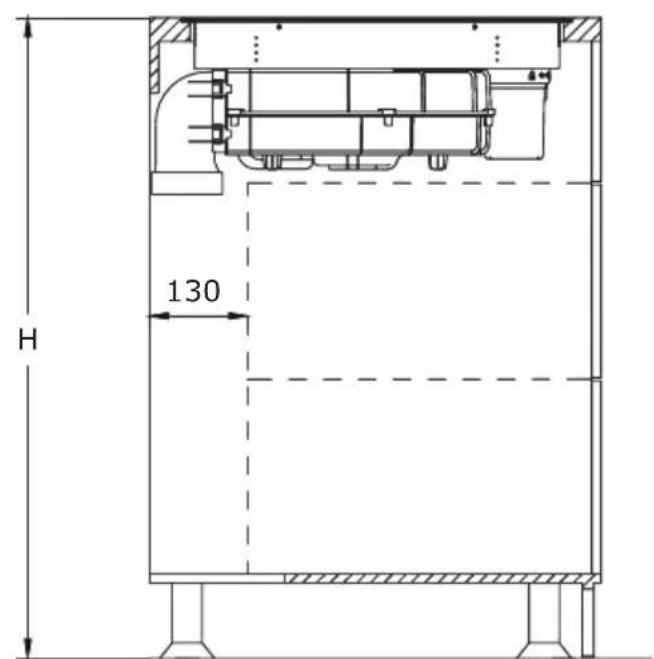
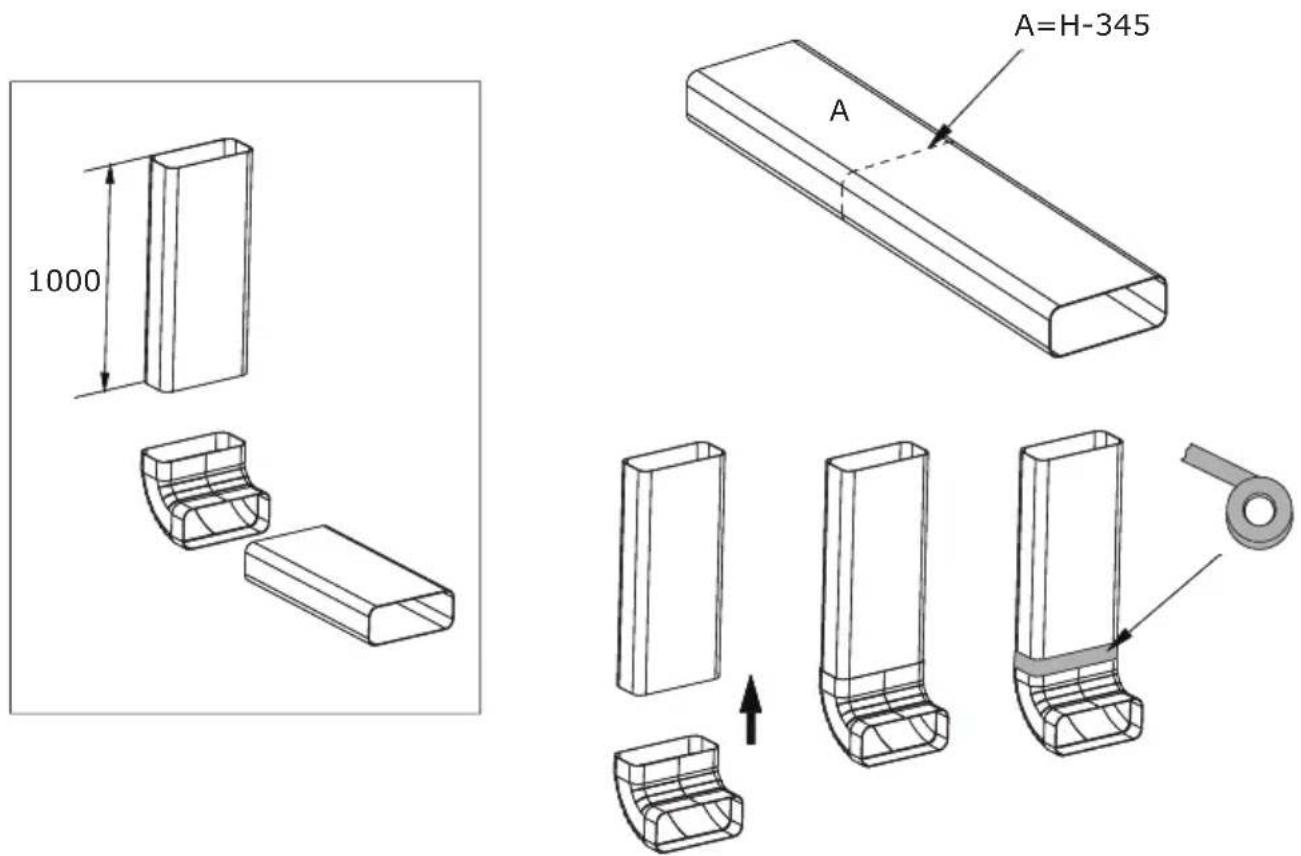
Installation of a pipe set for induction hob with extractor
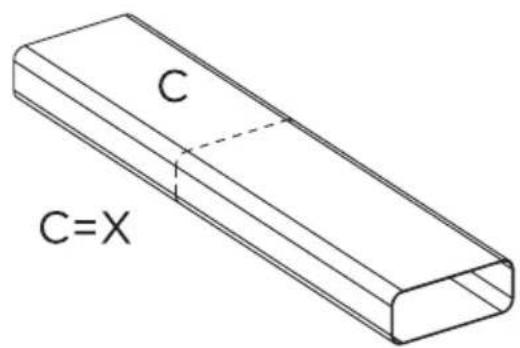
Using a saw, cut the duct to the required length.
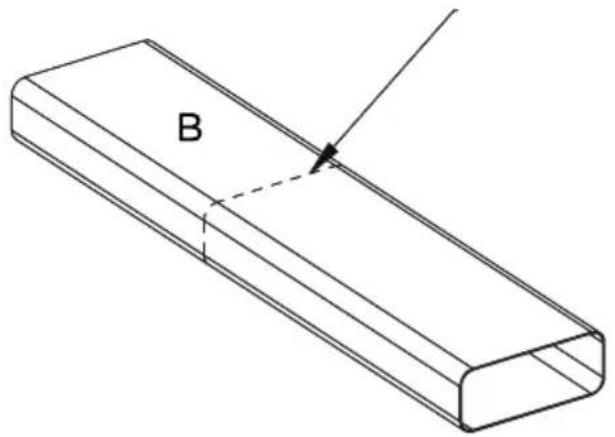
Apply the supplied sealing tape to all joints as shown in the illustrations.
Finally, attach the connector and the ventilation grille. The exact dimensions of the ventilation grille and the other components of the set can be found in the "Pipe set for induction hob with extractor" section.

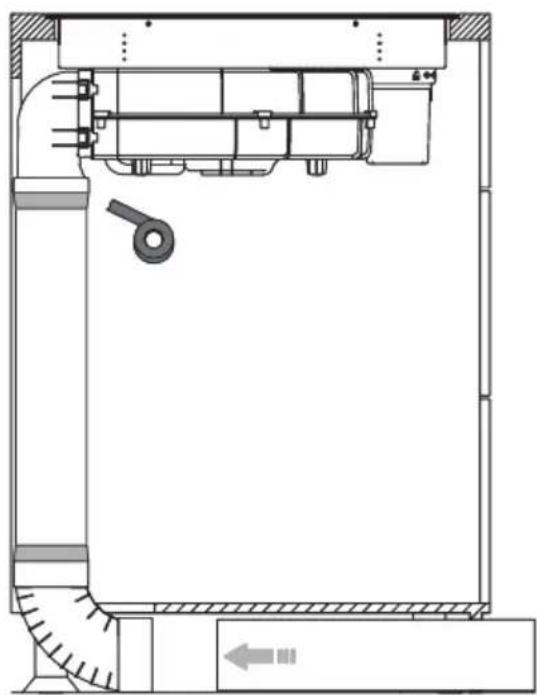
Installation in air extraction mode in which the air is expelled outside through the ventilation duct.
Method 1
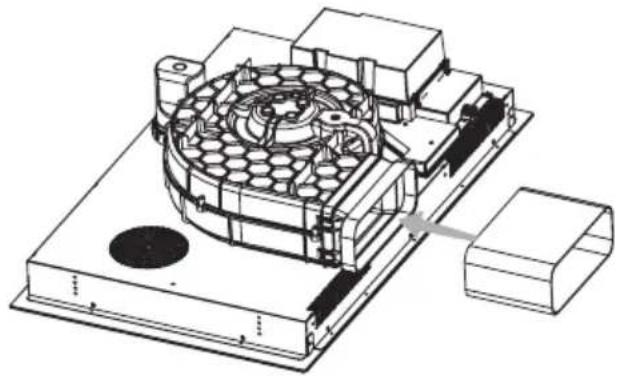
Install the water container by turning it in the direction of the arrow. Then, place the included rubber seal as shown by the arrow in the diagram below. Finally, install the 90^ adapter into the designated aperture as illustrated, making sure it fits correctly.
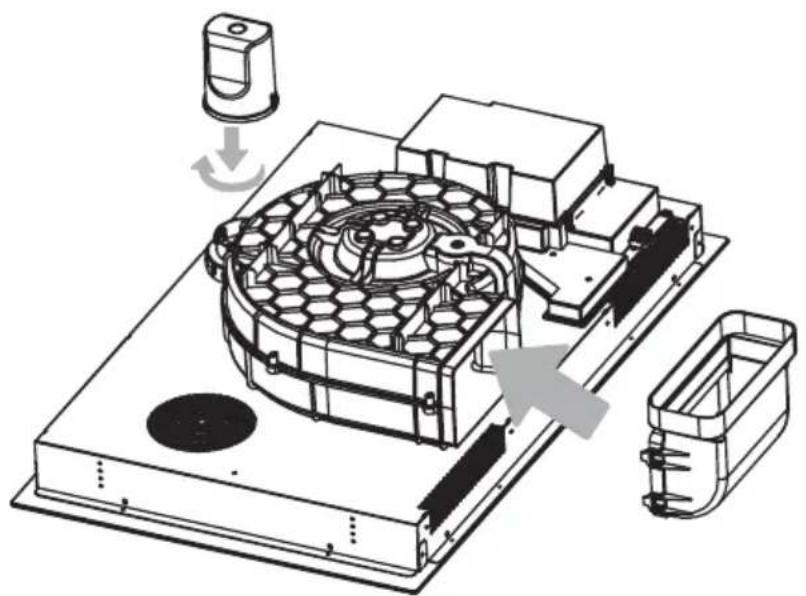
Place the downdraft extractor on the worktop and align it properly.

To do this, use the components from the PSD 100 DOWNAIR SET pipe set for an induction hob with an extractor, which must be purchased separately.
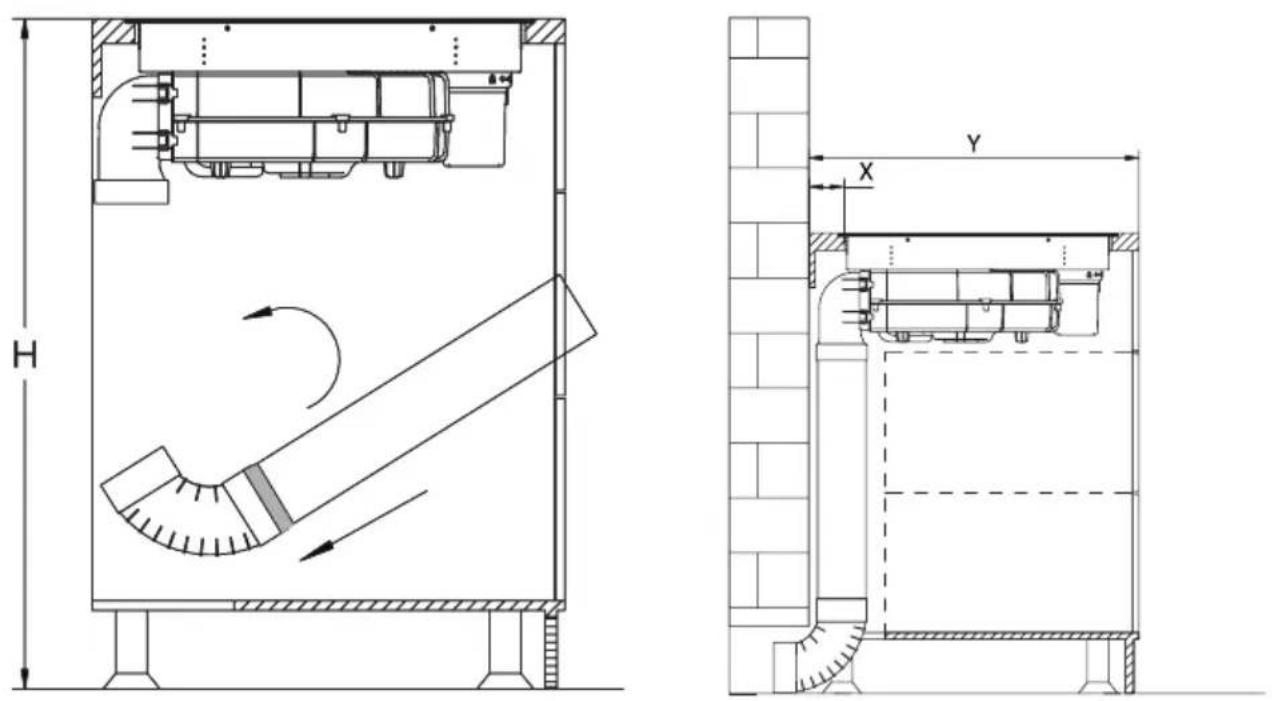
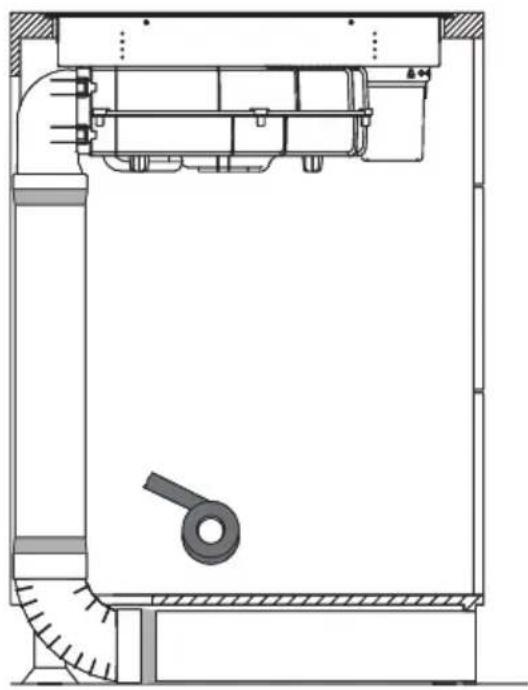
Method 2
Install the water container by turning it in the direction of the arrow. Then, place the included rubber seal as shown by the arrow in the diagram below. Finally, install the adapter into the designated aperture as illustrated.
Cut the duct to the correct length with a saw, then attach it to the connector and seal it with tape as shown.


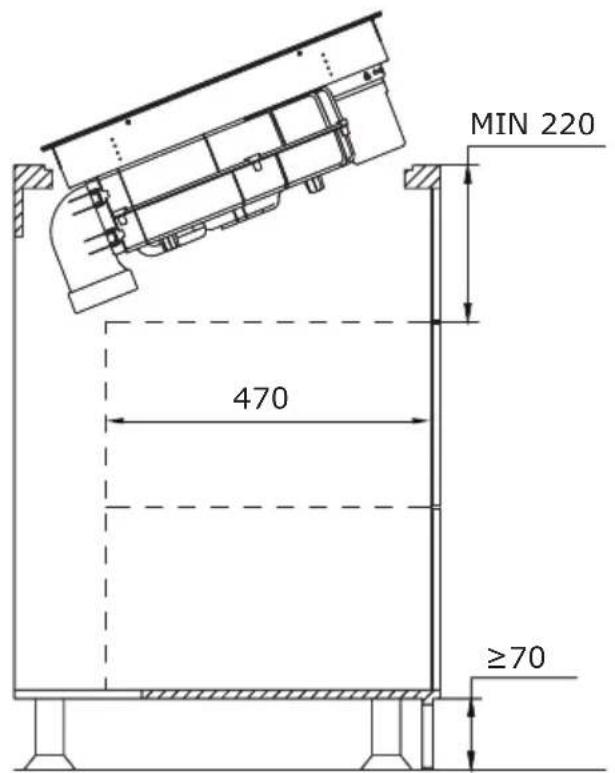
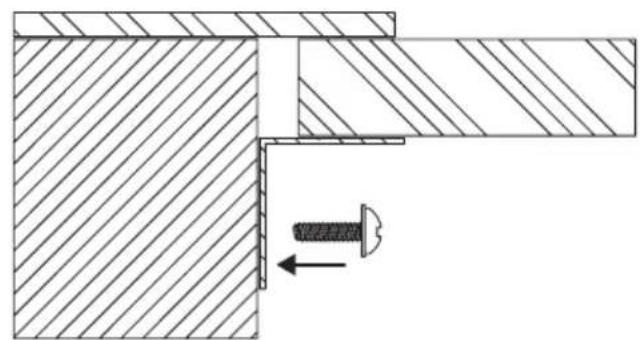
Note!
After installing the downdraft extractor, install the four brackets on both sides of it to ensure stability.
ELECTRICAL DIAGRAM
Supply voltage AC220-240V 50/60 Hz AC380-415V Total power: 7.38kW
3N
50/60Hz
Electrical diagram:
| Voltage: Electrical connection | Connection diagram | Power cord | |
| 220-240V~ | L2 BN N2 BU PE GN/YE GY L1 B L1+ 220-240V | L N ± | 5G 2.5mm2 H07RN-F L1:BK L2:BN N1:GY N2:BU PE:GN/YE |
| 380-415V~ | L2 BN N2 BU PE GN/YE GY L1+ 220-240V | L1L2N ± | 5G2.5mm2 H07RN-F L1:BK L2:BN N1:GY N2:BU PE:GN/YE |
| L1, L2 = Phase N1, N2 = Neutral PE = Protective Earth | |||
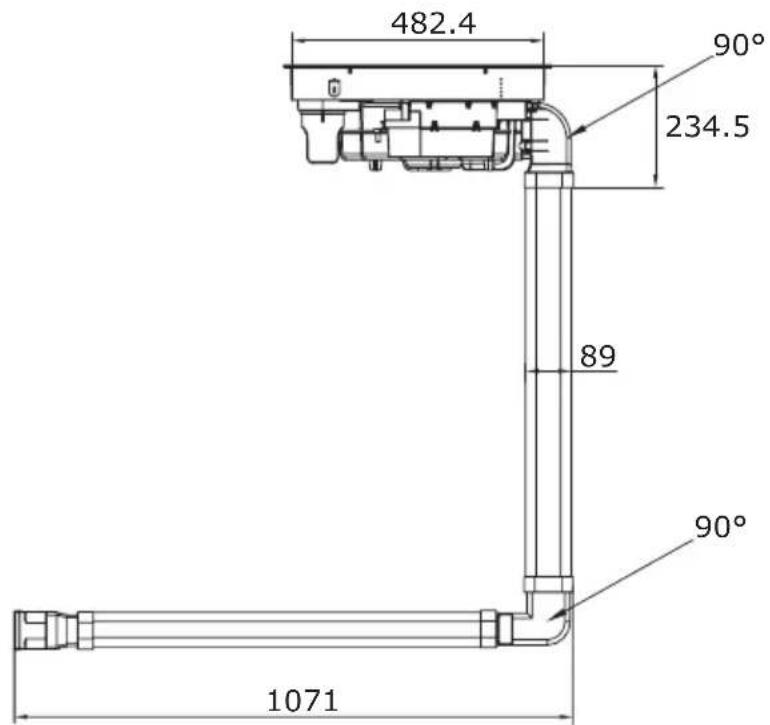
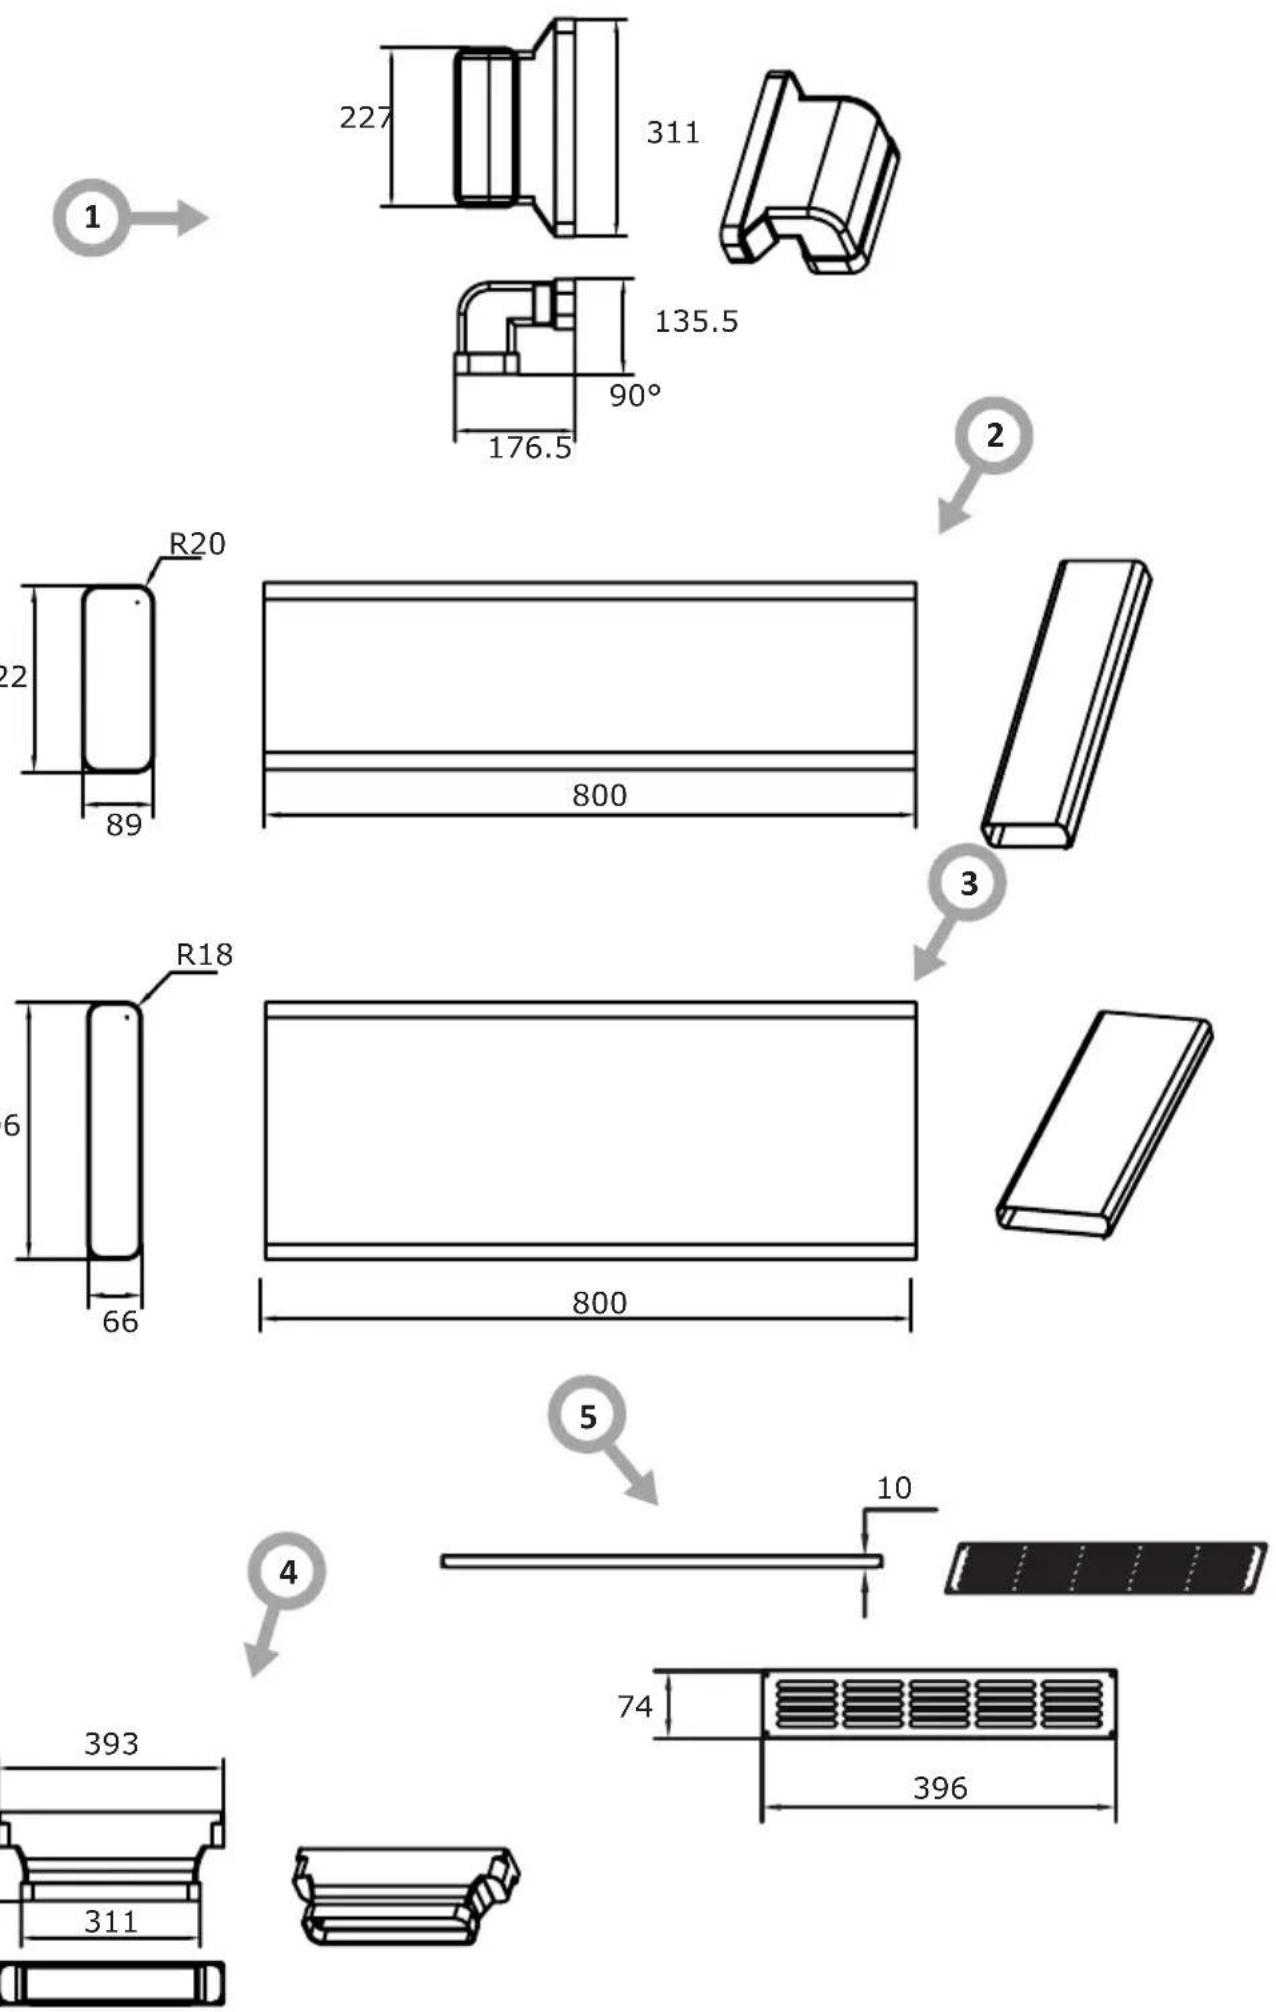
PIPE SET FOR INDUCTION HOB WITH EXTRACTOR
The optional pipe set for an induction hob with extractor (PSD 100 DOWNAIR SET), which is available for separate purchase, includes the mounting elements illustrated in the accompanying drawings.
- 90^ connector
- Straight duct (222*89)
-
Straight duct (306*66)
-
Connector
- Ventilation grille
- Sealing tape (x2)
OPERATION
Your appliance
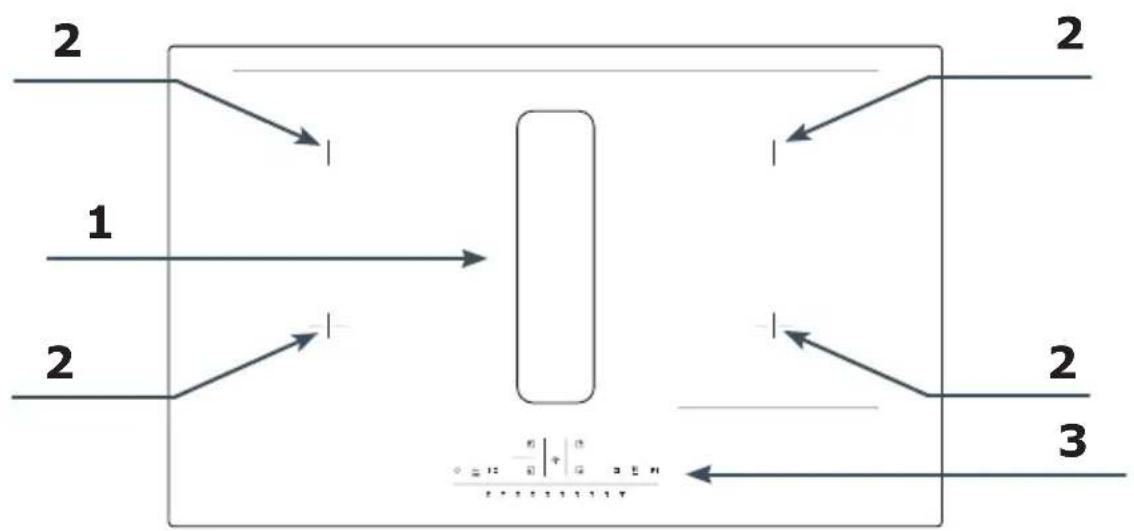
- Downdraft extractor inlet
- Booster induction cooking zone
- Touch control panel
Control Panel

Your appliance features a touch control panel:
- To ensure proper touch control function, keep the surface clean and dry, and remove any objects (e.g., dishes or cloths) that may be covering it. Even a small droplet of water can make touch controls
respond erratically and difficult to operate.
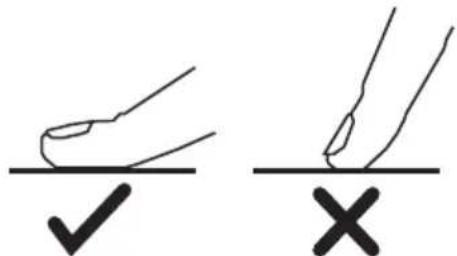
- The appliance utilizes touch-sensitive controls that do not require the application of pressure.
Each time a touch is detected, you will hear a beep. - Use the pad of your finger, not the tip.
| Sensor Function Description | ||
| ① | Sensor ON/OFF | Hold the sensor to turn on the appliance. During normal operation of the hob and downdraft extractor (not in timed mode), pressing and holding the sensor will deactivate all cooking zones and initiate the downdraft extractor's timed operation. Touch and hold the sensor again to turn the appliance off completely. When the hob is on but the downdraft extractor is off, hold the sensor to turn off the hob completely. |
| 3 SEC | Child Lock | The Child Lock function disables all hob controls for cleaning or to prevent children from using the appliance. Touch and hold the Child Lock sensor to activate the Child Lock function. A Child Lock indicator will come on. Touch and hold the Child Lock sensor again to deactivate the Child Lock function. |
| 1111 | Cooking Zone Bridge | The Cooking Zone Bridge function allows you to control two vertically oriented cooking zones together. With the Cooking Zone Bridge function activated, the two zones operate with identical temperature and power settings, which can be modified by sliding a finger across power control sensor. Briefly touch the Cooking Zone Bridge sensor on the left side to activate bridge mode. The indicator lights up, and the two left-side cooking zones are now controlled together. Press the Cooking Zone Bridge sensor again to deactivate the bridge function. The Cooking Zone Bridge function operates identically for both the left and right cooking zones. To activate the Cooking Zone Bridge function, simply touch the dedicated sensor on the right side of the hob. |
| SSS | Keeping warm | The keep-warm function maintains a low, constant temperature on the cooking zone, ideal for keeping cooked food warm at serving temperature. Simply touch the keep-warm sensor to activate the function and the indicator light will illuminate to show that the function is active. Touching any other sensor deactivates the keep-warm function and returns the cooking zone to its previous setting. The keep-warm function can only be activated when the cooking zone is already on. |
| Upper left cooking zone selection sensor | Select the upper left cooking zone to set its power or cooking duration. A flashing indicator on the left signifies that the information currently displayed pertains to the corresponding cooking zone. After selecting a cooking zone, the digital display flashes for 3 seconds to indicate it's ready for power or cooking duration settings. To adjust the cooking power or cooking duration, simply slide your finger across the power adjustment sensor. | |
| Lower left cooking zone selection sensor | Select the lower left cooking zone to set its power or cooking duration. A flashing indicator on the left signifies that the information currently displayed pertains to the corresponding cooking zone. After selecting a cooking zone, the digital display flashes for 3 seconds to indicate it's ready for power or cooking duration settings. To adjust the cooking power or cooking duration, simply slide your finger across the power adjustment sensor. | |
| Upper right cooking zone selection sensor | Select the upper right cooking zone to set its power or cooking duration. A flashing indicator on the right signifies that the information currently displayed pertains to the corresponding cooking zone. After selecting a cooking zone, the digital display flashes for 3 seconds to indicate it's ready for power or cooking duration settings. To adjust the cooking power or cooking duration, simply slide your finger across the power adjustment sensor. | |
| Lower right cooking zone selection sensor | Select the lower right cooking zone to set its power or cooking duration. A flashing indicator on the right signifies that the information currently displayed pertains to the corresponding cooking zone. After selecting a cooking zone, the digital display flashes for 3 seconds to indicate it's ready for power or cooking duration settings. To adjust the cooking power or cooking duration, simply slide your finger across the power adjustment sensor. | |
| L | Cooking Duration Timer | You can use the Cooking Duration Timer to set cooking time from 0 to 99 minutes on the selected cooking zone. To set cooking duration for a cooking specific zone, touch the Cooking Duration Timer sensor when the cooking zone is active. You can set the cooking duration in two steps: 1. To set the tens of minutes, slide your finger across the power control sensor until the desired value is displayed. Then wait 3 seconds or touch the Cooking Duration Timer sensor again to set the minutes. 2. To set the single minutes, slide your finger across the power control sensor until the desired value is displayed. Upon completion of the programmed cooking duration, the cooking zone will automatically deactivate, and the appliance will emit six beeps. If you want to cancel the countdown, simply touch the Cooking Duration Timer sensor again. |
| Downdraft extractor fan sensor | Touch the downdraft extractor fan sensor to turn on the fan. Use the power control sensor to adjust the fan speed from 1 to 8, with "P" (Power Boost) as the maximum setting. Following 5 minutes of operation at the "P" (Power Boost) setting, the fan speed will automatically decrease to level 8. The current fan speed is indicated on the display. Touch the fan sensor again to activate a 1-minute off mode, indicated by a flashing indicator, while touching it again will immediately turn off the downdraft extractor fan. | |
| (●) | Automatic fan control | The downdraft extractor fan starts 3 seconds after a cooking zone is activated. This function automatically adjusts the downdraft extractor fan speed to match the cooking intensity. Once all cooking zones have been turned off, the downdraft extractor will automatically go into delayed off mode. The appliance will automatically turn off after approximately 1 minute. The automatic fan control is enabled by default and the appliance remembers the previous setting each time it is turned on. To cancel the automatic fan control, simply touch and hold the fan sensor for 3 seconds. Touch the sensor again to activate the automatic fan control back on, which is indicated by a lit indicator. |
| 8 | Single digit display | The display shows the current cooking zone power level or the downdraft extractor fan speed in the range 1-8. The "P" symbol indicates the cooking zone "Power boost" or the highest downdraft extractor fan speed. The "u" unknown symbol means no cookware was detected on the cooking zone. The "H" symbol indicates high residual temperature of the cooking zone. The "0" symbol indicates that a cooking zone is turned off. The "E" symbol indicates a failure or malfunction of the cooking zones or fan. |
| 88 | Dual digit display | The display shows the timer range: 00-99 minutes In the event of a failure, the current error code is displayed. "8" indicates standby mode. |
| --- | Slider power control sensor | The cooking zone power level, fan speed and timer duration can be set by sliding your finger left or right across the slider sensor. Upon deactivation of a cooking zone or fan, the system sequentially monitors cooking zones 1 through 4 and the fan before transferring control to any active cooking zone or fan. |
Other information
Power Limit Management
The combined power of two cooking zones on the same side must not exceed 3600 W. If the user adjusts cooking zone power so that the combined power of two cooking zones on the same side would exceed 3600 W, the appliance will automatically throttle the other cooking zone to prioritize the user's desired power setting and ensure that the combined power remains under the limit of 3600 W.
- Set the power limit
To set the power limit, touch and hold down the Child Lock 3s and the lower left cooking zone sensor. You can now set the power limit: Touch the left Cooking Zone Bridge sensor to reduce the power limit. Touch the right Cooking Zone Bridge sensor to increase the power limit. There are 5 power limits available: 2800 W, 3600 W, 4600 W, 5800 W, 7200 W. Touch ON/OFF to confirm the selected power limit or simply wait 30 seconds.
Cookware Detection Calibration
In standby condition, within 1 minute of power on, touch and hold the Child Lock sensor and timer sensor |tb|enter the Cookware Detection Calibration mode. "CALI" will appear on the display. Then touch the Cooking Zone Bridge sensor to start Cookware Detection Calibration During calibration, no cookware must be present on the hob. The display will show a 5 second countdown. Once the countdown has completed, the relevant cooking zone display will show "P" if calibration has been successful. Otherwise, "F" will appear. If all calibrations are successful, "P" will be displayed. Otherwise, "F" will appear.
Cooking zone power:
| Setting 0 | 1 2 3 | 4 5 6 7 | 8 P | |||||||
| Power(W) | 0 1 | 00 200 | 240 370 | 630 900 | 1250 1 | 550 250 | 0 |
Bridged cooking zone power:
| Setting 0 | 1 2 3 | 4 5 6 7 | 8 P | |||||||
| Power(W) | 0 2 | 00 420 | 480 750 | 1100 16 | 00 2200 | 3000 3 | 600 |
Downdraft extractor fan speed:
| Speed setting | 0 | 1 | 2 | 3 | 4 | 5 | 6 | 7 | 8 | P |
| Air volume [m3/h] | 0 | 300 | 320 | 340 | 360 | 400 | 420 | 480 | 510 | 620 |
| Operating time [min] | No limit | 5 | ||||||||
CLEANING AND CARE
Proper routine maintenance and cleaning of the appliance can significantly extend its trouble-free operation. Clean the induction hob with extractor after each use.
Clean the glass surface
Clean the induction hob's glass surface regularly with a soft, damp cloth. Avoid using abrasive cleaning agents or sponges with rough surfaces that may scratch the glass surface. During cleaning and care prevent water from entering the kitchen hood ventilation opening.
Clean the grille
Remove the grille and clean it using a cloth and mild liquid detergent. Avoid using products containing abrasives.
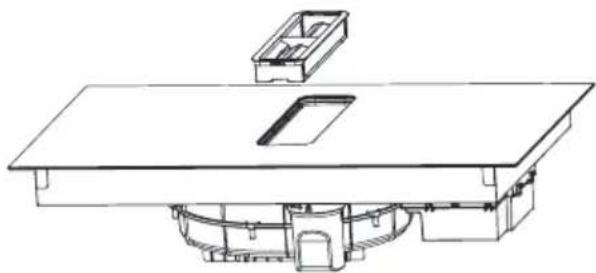
Cleaning the Grease Filter
Carefully withdraw the filter holder, maintaining a horizontal orientation. Empty the collected grease and wash the grease filter by hand or in a dishwasher.
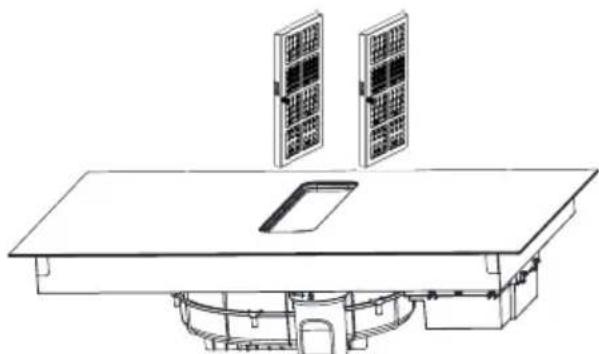
Replace the activated carbon filter
To replace the filter, remove the existing filter from the holder and install a new filter. The filter should be replaced after 300 hours of operation.
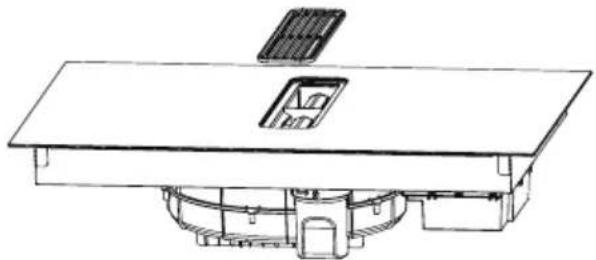
Clean the water container
Rotate the water container as indicated by the arrow to release and remove it. Then empty the collected water and clean the container. Reinstall the water container by turning it in the opposite direction. It is recommended to empty the water container daily or less frequently, depending on usage.
TROUBLESHOOTING
| Problem Possible reason Solution | ||
| The appliance won't turn on | No power Verify that the induction hob is properly connected to the power supply and activated. Check if other lights or appliances in your home are working - if not, check with your neighbours to see if there is a power outage in the neighbourhood. If the problem continues, professional assistance from a qualified technician is required. | |
| Touch controls do not respond | Child Lock function is activated. | Deactivate the Child Lock function See the "Operation" section in the manual for details. |
| Touch sensors respond erratically of are difficult to use | The touch sensors may not function correctly if there is moisture present on their surface or if they are touched with only a fingertip. | For reliable sensor operation, ensure the control panel is dry and touch the sensors with the flat of your finger. |
| The glass surface is scratched | You used cookware with rough base surface. | Use cookware with a flat, smooth bottom. See the section "Basic information about your appliance." |
| The induction hob or cooking zone has turned off, an error code is displayed. | Technical fault Make a note of the error code, unplug the induction hob and contact a qualified technician. | |
| The cookware does not heat up | The hob may not detect the cookware if it is not centred on the cooking zone, is too small, or is not designed for induction cooking. | Use cookware suitable for induction cooking. See the section "Basic information about your appliance." Centre the cookware and make sure its bottom matches the size of the cooking zone. |
| Fan noise emitted by induction hob | The induction hob's cooling fan operates automatically to prevent overheating of the electronics. The cooling fan may continue to operate for a short period after the induction hob is deactivated. | This is normal and there is no cause for concern. Do not disconnect the hob from the power supply until the cooling fan has stopped running. |
| Some cookware makes crackling or clicking sounds during cooking | The crackling or clicking sounds can occur because cookware with multiple metal layers expands at different rates when heated. | This is a normal characteristic of cookware and does not warrant concern. |
TECHNICAL SPECIFICATION
| TECHNICAL SPECIFICATION | |
| Model DHKI 752 800 C | |
| Supply voltage 220-240 V~ / 380-415 V 3N~ | |
| Frequency 50/60 Hz | |
| Power 7380 W | |
| Total power of the hob 7200 W | |
| Total power of the hood 180 W | |
| Dimensions (WxDxH) 830x515x200 mm | |
| Package dimensions 965x650x325 mm | |
| Installation dimensions 750x490 mm | |
| Appliance weight 20.3 kg | |
| Surface material Ceramic glass | |
| Power Levels 1-8, P | |
| Power levels in recirculation mode 1-8, P | |
| Power of cooking zones | |
| Maximum power of the rear cooking zone 1550 W | |
| Rear cooking zone power boost | 2500 W |
| Front cooking zone maximum power | 1550 W |
| Frony cooking zone power boost | 2500 W |
Detailed technical specifications can be found in the device's product card.
The product meets the requirements of European standards EN 60335-1; EN 60335-2-6; EN 60335-2-31.
WARRANTY AND AFTER SALES SERVICE
Warranty
The manufacturer shall not be held liable for any damage caused by improper use of the product.
Service
- The manufacturer recommends that all repairs and adjustments be carried out by the Factory Service Technician or the Manufacturer's Authorized Service Point. For safety reasons, repairs should be referred to professionals.
- Repairs carried out by unqualified persons may seriously endanger the appliance user.
The minimum warranty period for the appliance offered by the manufacturer, importer or authorized representative is given in the warranty card. - The warranty shall be void if you make any independent adaptations or alterations, tamper with seals or other appliance safety devices or its parts or interfere with the appliance contrary to operating instructions.
In the event of appliance malfunction, request assistance or repair.
If your appliance needs repair, please contact the service centre. Please see website for address and contact details of our service centre. Before contacting us, please have ready the appliance serial number, which can be found on the identification sticker: For your convenience, please write it down below:

Certificate of compliance CE and UKCA
The Manufacturer hereby declares that this product complies with the general requirements pursuant to the following European Directives and analogous UK requirements:
- The Low Voltage Directive 2014/35/EC / Electrical Equipment (Safety) Regulations 2016.
- Electromagnetic Compatibility Directive 2014/30/EC / Electromagnetic Compatibility Regulations 2016.
ErP Directive 2009/125/EC / The Ecodesign for Energy-related Products Regulations 2010 (as amended) for the applicable implementing measures which apply in Great Britain and Northern Ireland, respectively.
and therefore the product has been marked with C and symbols and the Declaration of Conformity, the Manufacturer has drawn up the declaration and is available to the competent authorities regulating the market.