
RMA 443 C - Lawn mower STIHL - Free user manual and instructions
Find the device manual for free RMA 443 C STIHL in PDF.
| Product type | Battery-powered lawn mower |
| Brand | STIHL |
| Model | RMA 443 C |
| Dimensions (L × W × H) | 138 × 49 × 108 cm |
| Weight (without battery) | 21 kg |
| Power source | STIHL AP 36 V lithium-ion battery |
| Power consumption | 600 W |
| Cutting width | 41 cm |
| Cutting height | 25 – 75 mm (6 levels) |
| Grass bag capacity | 55 L |
| Blade speed (normal) | 3150 rpm |
| Blade speed (eco mode) | 2800 rpm |
| Eco mode | Yes (switch in battery compartment) |
| Handle | Comfort single handle, height adjustable (2 positions) |
| Safety device | Safety switch, engine cut-off bar, two-hand operation |
| Blade brake | Blade stops in < 3 seconds |
| Guaranteed sound level | 92 dB(A) |
| Sound pressure at operator position | 78 dB(A) |
| Hand-arm vibration | 1.40 m/s² (uncertainty 0.70 m/s²) |
| Cutting blade (ref.) | 6338 702 0130 |
| Blade fixing screw (ref.) | 9007 319 9024 |
| Lock washer (ref.) | 0000 702 6600 |
| Routine maintenance | Clean after each use, check blade wear, sharpen if necessary |
| Warranty and repairs | Annual service recommended at authorized STIHL dealer |
Frequently Asked Questions - RMA 443 C STIHL
User questions about RMA 443 C STIHL
0 question about this device. Answer the ones you know or ask your own.
Ask a new question about this device
Download the instructions for your Lawn mower in PDF format for free! Find your manual RMA 443 C - STIHL and take your electronic device back in hand. On this page are published all the documents necessary for the use of your device. RMA 443 C by STIHL.
USER MANUAL RMA 443 C STIHL
STIHL RMA 443, RMA 443 C, RMA 443 PC RMA 443 TC, RMA 448 PC, RMA 448 TC
STIHL
natural_image
Exterior view of a Stilu lawn mower (no text or symbols visible)RMA 443.0 RMA 443.0 C RMA 443.0 PC RMA 443.0 TC RMA 448.0 PC RMA 448.0 TC
C
INT 1


RMA 443
natural_image
Line drawing of a lawn mower with labeled parts (no text or symbols present)RMA 443 C, RMA 443 PC, RMA 443 TC, RMA 448 PC, RMA 448 TC
natural_image
Technical line drawing of a lawn mower with labeled component A (no text or symbols beyond label)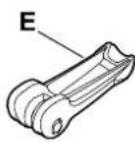


B
natural_image
Technical line drawing of a mechanical component with no visible text or symbols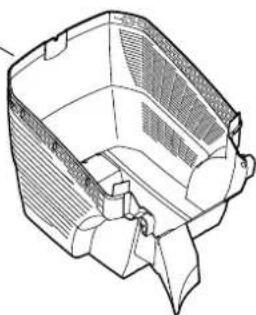
natural_image
Line drawing of a 3D-printed container with internal mesh structure (no text or symbols)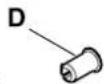


28


Austatud klient!
RMA 443.0, RMA 443.0 C,
RMA 443.0 PC, RMA 443.0 TC,
RMA 448.0 PC, RMA 448.0 TC
Typ EC-Motor
Spannung 36 V
Schutzklasse III
Schutzart IPX 1
natural_image
Simple line drawing of a mechanical component with a cylindrical top and rectangular base (no text or symbols)Nächster Service
Datum: ____ ____ ____ ____ ____
Thank you for choosing STIHL. We develop and manufacture our quality products to meet our customers' requirements. The products are designed for reliability even under extreme conditions.
STIHL also stands for premium service quality. Our specialist dealers guarantee competent advice and instruction as well as comprehensive service support.
We thank you for your confidence in us and hope you will enjoy working with your STIHL product.

Dr. Nikolas Stihl
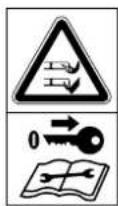
IMPORTANT: READ BEFORE USE AND KEEP IN A SAFE PLACE.
1. Table of contents
Notes on the instruction manual 40
General 40
Instructions for reading the
instruction manual 40
Country-specific versions 41
Machine overview 41
For your safety 41
General 41
Clothing and equipment 42
Battery 42
Charger 43
Charging 44
Transporting the machine 44
Transporting the battery 44
Before operation 45
Working with your machine 45
Maintenance, cleaning, repairs and storage 47
Storage for prolonged periods without operation 47
Disposal 48
Description of symbols 48
Standard equipment 48
Preparing the machine for operation 49
General points 49
Installing the mono comfort
handlebar (RMA 443 C,
RMA 443 PC, RMA 443 TC,
RMA 448 PC, RMA 448 TC) 49
Installing dual handlebar
(RMA 443) 49
Assembling the grass catcher box 49
Battery and charger 50
General 50
Connecting charger to the mains 50
Removing/inserting the battery 50
Recharging the battery 50
LEDs on the battery 51
LED on the charger 51
Controls 51
Safety plug 51
Eco mode switch 52
Grass catcher box 52
Adjusting the mono comfort
handlebar (RMA 443 C,
RMA 443 PC, RMA 443 TC,
RMA 448 PC, RMA 448 TC) 52
Folding down dual handlebar
(RMA 443) 52
Central cutting height adjustment 52
Level indicator 53
Notes on working with the
machine 53
General 53
Cutting performance 53
Working area for operator 53
Correct motor load 53
If the mowing blade blocks 53
Thermal motor overload protection 54
Safety devices 54
Safety plug 54
Safety devices 54
Two-hand operation 54
Motor run-down brake 54
Operating the machine 54
Preparatory measures 54
Switching the lawnmower on 54
Switching the lawn mower off 54
Self-propulsion (RMA 443 TC,
RMA 448 TC) 55
Emptying the grass catcher box 55
Maintenance 55
General 55
Cleaning the machine 55
Electric motor and wheels 56
Battery 56
Charger 56
Checking blade wear 56
Removing and installing mowing blade 56
Sharpening the mowing blade 57
Storage (winter break) 57
Transport 57
Carrying and securing lawn mower 57
Transporting the battery 58
Minimising wear and preventing damage 58
Environmental protection 59
Standard spare parts 59
EU - Declaration of conformity 59
Lawn mower, manually operated and battery-powered (STIHL RMA) 59
Technical specifications 60
STIHL AP battery 62
REACH 62
Troubleshooting 62
Service schedule 64
Handover confirmation 64
Service confirmation 64
2. Notes on the instruction manual
2.1 General
This instruction manual constitutes original manufacturer's instructions in the sense of EC Directive 2006/42/EC.
STIHL is continually striving to further develop its range of products; we therefore reserve the right to make alterations to the form, technical specifications and equipment level of our standard equipment.
For this reason, the information and illustrations in this manual are subject to alterations.
This instruction manual may describe models that are not available in all countries.
This instruction manual is protected by copyright. All rights reserved, especially the right of reproduction, translation and processing using electronic systems.
2.2 Instructions for reading the instruction manual
Illustrations and texts describe specific operating steps.
All symbols which are affixed to the machine are explained in this instruction manual.
Viewing direction:
Viewing direction when "left" and "right" are used in the instruction manual: the user is standing behind the machine and is looking forwards in the direction of travel.
Section reference:
References to relevant sections and subsections for further descriptions are made using arrows. The following example shows a reference to a section: (⇔ 3.)
Designation of text passages:
The instructions described can be identified as in the following examples. Operating steps which require intervention on the part of the user:
- Release bolt (1) using a screwdriver, operate lever (2)...
General lists:
– Use of the product for sporting or competitive events
Texts with added significance:
Text passages with added significance are identified using the symbols described below in order to especially emphasise them in the instruction manual:

Danger
Risk of accident and severe injury to persons. A certain type of behaviour is necessary or must be avoided.

Warning
Risk of injury to persons. A certain type of behaviour prevents possible or probable injuries.

Caution
Minor injuries or material damage can be prevented by a certain type of behaviour.

Note
Information for better use of the machine and in order to avoid possible operating errors.
Texts relating to illustrations:
Illustrations relating to use of the machine can be found in the front of this instruction manual.
The camera symbol serves to link the figures on the illustration pages with the corresponding text passages in the instruction manual.

2.3 Country-specific versions
STIHL supplies chargers with different plugs and switches, depending on the country of sale.
Chargers with European plugs are shown in the illustrations. Chargers with other types of plug are connected to the mains in a similar way.
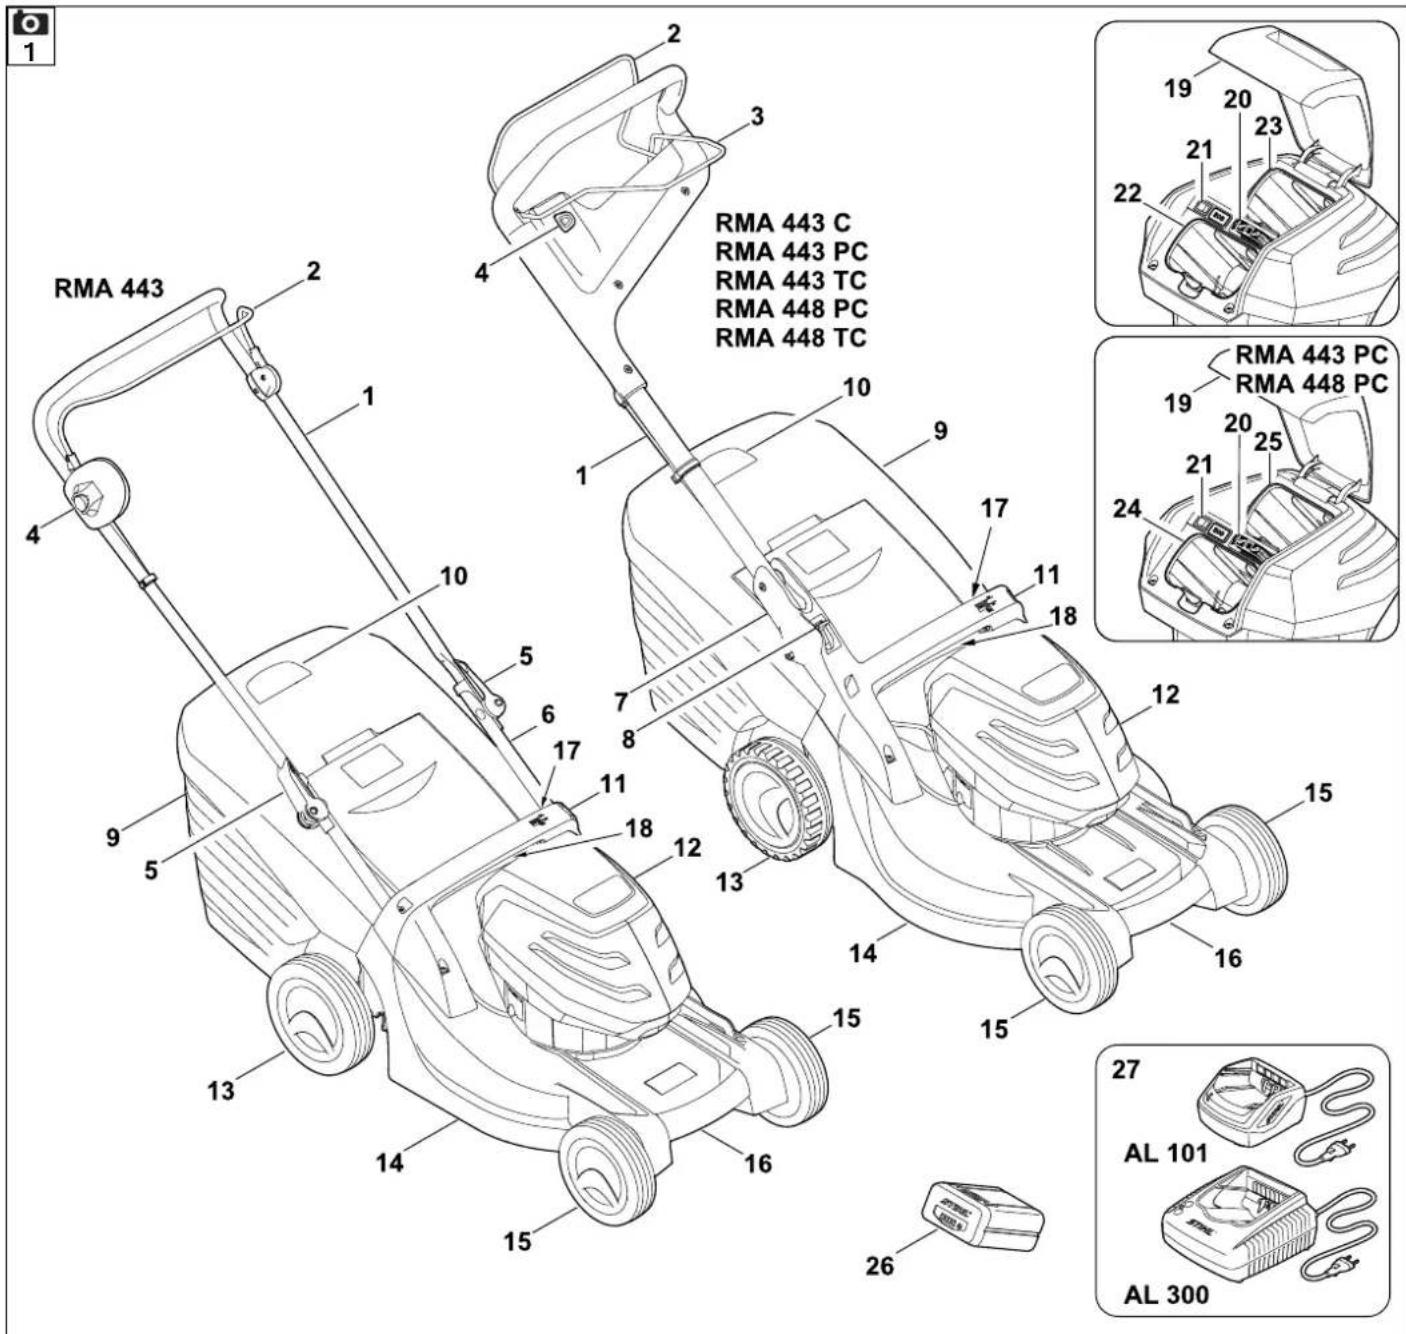
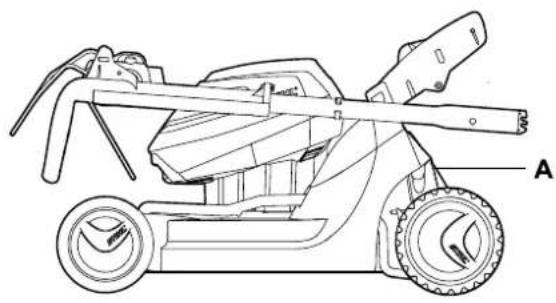
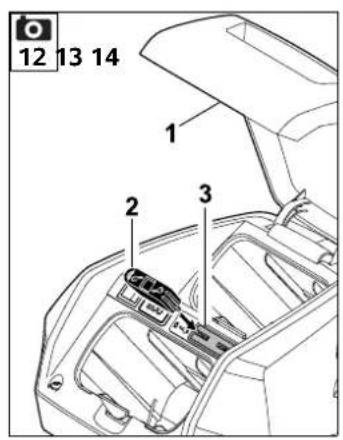
3. Machine overview

1 Upper handlebar
2 Motorstop lever
3 Self-propulsion lever (RMA 443 TC, RMA 448 TC)
4 ON button
5 Quick-clamping device (RMA 443)
6 Lower handlebar (RMA 443)
7 Handlebar bracket (RMA 443 C, RMA 443 PC, RMA 443 TC, RMA 448 PC, RMA 448 TC)
8 Handlebar detent lever (RMA 443 C, RMA 443 PC, RMA 443 TC, RMA 448 PC, RMA 448 TC)
9 Grass catcher box
10 Level indicator
11 Handle, rear
12 Motor unit/battery
13 Rear wheel
14 Housing
15 Front wheel
16 Handle, front
17 Cutting height adjustment lever
18 Rating plate with machine number
19 Battery compartment cover
20 Safety plug
21 Eco mode switch
22 Battery compartment
23 Transport compartment
24 Battery compartment 1
25 Battery compartment 2
26 Battery
27 Charger
(Type depends on sales variant. Some illustrations in this instruction manual only show the STIHL AL 300 for simplicity)
4. For your safety
4.1 General

These safety regulations must be observed when working with the machine.

Read the entire instruction manual before using the machine for the first time. Keep the instruction manual in a safe
place for future reference.
These safety precautions are essential for your safety, however the list is not exhaustive. Always use the machine in a reasonable and responsible manner and be aware that the user is responsible for accidents involving third parties or their property.
Make sure that you are familiar with the controls and use of the machine.
The machine must only be used by persons who have read the instruction manual and are familiar with operation of the machine. The user should seek expert
and practical instruction prior to initial operation. The user must receive instruction on safe use of the machine from the vendor or another expert.
During this instruction, the user should be made aware that the utmost care and concentration are required for working with the machine.
Residual risks persist even if you operate this machine according to the instructions.

Risk of death from suffocation! Packaging material is not a toy - danger of suffocation! Keep packaging material away from children.
Only give or lend the machine, including any accessories, to persons who are familiar with this model and how to operate it. The instruction manual forms part of the machine and must always be provided to persons borrowing it.
Make sure that the user is physically, sensorily and mentally capable of operating the machine and working with it. If the user is physically, sensorily or mentally impaired, the machine must only be used under supervision or following instruction by a responsible person.
Make sure that the user is of legal age or being trained under supervision in a profession in accordance with national regulations.
The machine must only be operated by persons who are well rested and in good physical and mental condition. If your health is impaired, you should consult your doctor to determine whether working with the machine is possible. The machine should not be operated after the consumption of alcohol, drugs or medications which impair reactions.
The machine is intended for private use.
Caution – risk of accident:
The machine is only intended for mowing lawns. Its use for other purposes is not permitted and may be dangerous or result in damage to the machine.
Due to the physical danger to the user, the machine must not be used for the following applications (incomplete list):
– for trimming bushes, hedges and shrubs,
– for cutting creepers,
– for the care of lawn roofs and balcony boxes,
– for shredding or chopping tree or hedge cuttings,
– for clearing paths (vacuuming, blowing),
– for levelling earth mounds, e.g. mole hills,
- for transporting clippings, except in the grass catcher box intended for this purpose.
For safety reasons, any modification to the machine, except the proper installation of accessories approved by STIHL, is forbidden and results in voiding of the warranty cover. Information regarding approved accessories can be obtained from your STIHL specialist dealer.
In particular, any tampering with the machine which increases the power output or speed of the engine or motor is forbidden.
It is not permissible to make any modifications to the machine that could lead to increased noise emissions.
It is not permitted to transport objects, animals or persons, particularly children, on the machine.
Particular care is required during use in public green spaces, parks, sports fields, along roads and in agricultural and forestry businesses.

Caution! Danger to health due to vibrations. Excessive exposure to vibrations can result in damage to the
cardiovascular or nervous system, particularly in persons with cardiovascular problems. Please consult a physician if you experience symptoms that may have been caused by vibrational loads.
Symptoms of this kind principally affect the fingers, hands or wrists and include (incomplete list):
- numbness,
- pain,
- muscular weakness,
- skin discolouration,
– unpleasant tingling sensation.
Hold the handlebar tightly, but not tensed, with both hands in the designated locations during operation.
Plan your working times so that more severe physical strains over a longer period are avoided.
4.2 Clothing and equipment

Always wear sturdy footwear with high-grip soles when working. Never work barefoot
or, for example, in sandals.

Also always wear sturdy gloves and tie up and secure long hair (headscarf, cap, etc.) when performing maintenance and
cleaning work or when transporting the machine.

Wear suitable safety glasses when sharpening the mowing blade.
Always wear long trousers and tight-fitting clothing when operating the machine.
Never wear loose clothes which may become caught on moving parts (control levers) – do not wear jewellery, ties or scarves.

STIHL recommends always wearing hearing protection when working. If the sound pressure level at the workplace
exceeds 80 dB(A), hearing protection should always be worn.
4.3 Battery
Children cannot recognise or evaluate the dangers posed by batteries. There is a risk of serious injury to children.
- Keep children away.
- Keep the battery out of the reach of children.
The battery is not protected against all ambient conditions. If exposed to certain ambient conditions, the battery may catch fire or explode. Persons may be injured or property damaged.
- Protect the battery from heat and fire.
- Do not throw the battery into a fire.

- Observe the permissible temperature range for the battery. ( 19.)
- Keep the battery away from metallic objects.
- Protect the battery from rain and moisture. Do not immerse in liquids.
- Do not expose the battery to high pressure.
- Do not expose the battery to microwaves.
- Protect the battery from chemicals and salts.
- Do not drop the battery.
- Keep the battery clean and dry.
- Store the battery in a locked room.
- Store the battery separately from the lawn mower and charger.
- Store the battery in electrically non-conductive packaging.
- Store the battery within the permissible temperature range. (⇒ 19.1)
The battery is in good operating condition when the following conditions are met:
– The battery is not damaged.
– The battery is clean and dry.
– The battery is working and has not been modified.
The battery cannot function safely if it is not in good operating condition. There is a risk of serious injury to persons.
- Do not work with a damaged or defective battery.


- Do not charge a damaged or defective battery.
- If the battery is dirty or wet: clean the battery and allow it to dry.
- Do not modify the battery.
- Do not insert any objects into the apertures in the battery.
- Never connect the battery terminals to metallic objects and cause a short circuit.
- Do not open the battery.
Fluid may leak from a damaged battery. If the fluid contacts the skin or eyes, this may cause irritation.
- Avoid contact with the fluid.
- In the event of contact with the skin: Wash the affected areas with plenty of soap and water.
- In the event of contact with the eyes: Rinse the eyes with plenty of water for at least 15 minutes and seek medical attention.
A damaged or defective battery may emit an unusual odour, smoke or catch fire. Persons may be seriously or fatally injured and property may be damaged.
- If the battery emits an unusual odour or smoke: Do not use the battery and keep it away from flammable materials.
- If the battery catches fire: extinguish the battery using a fire extinguisher or water.
4.4 Charger
Children cannot recognise or evaluate the dangers posed by the charger or by electrical current. There is a risk of serious injury to children.
- Keep children away.
- Keep the charger out of the reach of children.
The charger is not protected against all ambient conditions. If exposed to certain ambient conditions, the charger may catch fire or explode. Persons could be injured or property damaged.
- Do not operate the charger in a highly flammable or explosive environment.
- Do not operate the charger on a highly flammable surface.
- Observe the permissible temperature range for the charger.
- Operate the charger in a dry and locked room.
- Store the charger away from the lawn mower and from the battery.
- Allow the charger to cool down before putting it into storage.
- Keep the charger clean and dry.
- Store the charger in a locked, room.
The charger is in good operating condition when the following conditions are met:
– The charger is not damaged.
– The charger is clean and dry.
- The charger is operative and has not been modified.
If not in good operating condition, components can no longer operate correctly and safety devices may be disabled. There is a risk of serious injury to persons.
- Do not use a damaged or defective charger. Dispose of the charger.
- If the charger is dirty or wet: clean the charger and allow it to dry.
- Do not modify the charger.
- Do not insert any objects into the apertures in the charger.
- Never connect the charger terminals with metallic objects and cause a short circuit.
- Do not open the charger.
The electric cable is not intended for carrying or suspending the charger. The electric cable and the charger could become damaged.
- Pick up and hold the charger by the housing. A recessed grip is provided on the housing for easy lifting of the charger.
- Store the charger on the wall bracket.
4.5 Charging
Contact with live components can result from the following causes:
– The electric cable is damaged.
– The mains plug is damaged.
– The socket is incorrectly installed.
Contact with live components can result in an electric shock. The user could be seriously or fatally injured.
- The mains plug and electric cable are particularly important when it comes to electrical safety.
- Insert the mains plug in a correctly installed socket.
An incorrect mains voltage or an incorrect mains frequency during charging may lead to overvoltage in the charger. The charger could become damaged.
- Ensure that the mains voltage and the mains frequency of the power supply correspond to the information contained in the rating plate on the charger.
A damaged or defective charger may emit a strange odour or smoke. Persons could be injured or property damaged.
- Remove mains plug from socket.
In the case of insufficient heat dissipation, the charger could overheat, causing a fire. Persons could be seriously or fatally injured and property may be damaged.
- Do not cover the charger.
- Store the charger on the wall bracket.
If several chargers are connected to a socket, electrical wires could become overloaded during charging. The electrical wires could heat up and cause a fire. Persons could be seriously or fatally injured and property may be damaged.
- Only connect one charger to a socket.
- Do not connect a charger to multiple sockets.
4.6 Transporting the machine
Always wear gloves in order to prevent injuries due to sharp-edged and hot components.
Switch off the machine prior to transport, allow the blade to come to a standstill and remove the safety plug.
Only transport the machine once the motor has cooled down.
Take the weight of the machine into account and use suitable loading aids (loading ramps, lifters) if necessary.
Secure the machine and any machine components being transported (e.g. grass catcher box) on the load floor using fastening material of adequate size (belts, ropes, etc.).
Avoid contact with the mowing blade when lifting and carrying the machine.
Observe the information in the section "Transport". It describes how to lift and lash the machine. ( 14.)
When transporting the machine, always observe regional legislation, especially regarding load security and the transport of objects on load floors.
4.7 Transporting the battery
The battery is not protected against all ambient conditions. If exposed to certain ambient conditions, the battery may become damaged and property may be damaged
- Do not transport a damaged battery.
- Transport the battery in the machine, in electrically non-conductive packaging or in an electrically non-conductive transport container.
During transport outside of the machine, the battery could tip over or move. Persons could be injured or property damaged.
- Pack the battery in the packaging or transport container in such a way that it cannot move.
- Secure the packaging or transport container so that the packaging or transport container cannot move.
Do not leave the battery inside a vehicle and never expose it to direct sunlight.
Lithium-ion batteries must be treated with special care during transport. In particular, it must be ensured that short circuits are prevented during transport of the batteries. For this reason, keep the original cardboard packaging of the battery and always transport STIHL batteries either in the undamaged original packaging or in the lawn mower.
4.8 Before operation
Make sure that only persons who are familiar with the instruction manual are permitted to use the machine.
Observe the local regulations regarding permitted operating times for gardening power tools with electric motors.
Carefully inspect the complete area on which the machine is to be used and remove any stones, sticks, wires, bones and other foreign objects which could be thrown up by the machine. Obstacles (e.g. tree stumps, roots) can be easily overlooked in long grass.
For this reason, mark all foreign objects (obstacles) which are hidden in the lawn and cannot be removed before commencing work with the machine.
All faulty, worn or damaged parts must be replaced before using the machine. Replace any illegible or damaged danger signs and warnings on the machine. Your
STIHL specialist has a supply of replacement stickers and all the other spare parts.
The machine must only be used in good operating condition. Before each use, check whether:
– The machine is properly assembled.
- The cutting tool and the entire cutting unit (mowing blade, fastening elements, mowing deck housing) are in good condition. In particular check for secure fastening, damage (notches or cracks) and wear.
- The safety devices (e.g. discharge flap, housing, handlebar, motorstop lever) are in good condition and working properly.
- The grass catcher box is undamaged and correctly installed; a damaged grass catcher box must not be used.
- The run-down brake of the electric motor is functioning.
Carry out any necessary work or consult a specialist dealer. STIHL recommends STIHL specialist dealers.
Never switch the motor on without a correctly installed blade. Risk of motor overheating.
Follow the instructions in the "Battery" ( 4.3) and "Charger" ( 4.4) sections.
4.9 Working with your machine

Never work when animals or persons, particularly children, are in the danger area.
Do not work at ambient temperatures below +5°C (41°F).
Only work during the day or with good artificial light.
Do not operate the machine in the rain or during thunder storms, particularly when there is a risk of lightning strike.

Caution – risk of injury! Never put hands or feet on or underneath rotating parts. Never touch the rotating blade.
Always keep away from the discharge opening.
Always observe the safety distance provided by the handlebar. The handlebar must always be installed correctly and must not be modified. Never operate the machine with the handlebar folded down.
The switch and safety devices installed in the machine must not be removed or bypassed. In particular, never secure the motorstop lever to the handlebar (e.g. by tying it).
Never attach any objects to the handlebar (e.g. work clothing).
The risk of accidents is higher if the ground is damp due to increased danger of slipping.
Particular caution should be exercised during working in order to prevent slipping. If possible, avoid using the machine when the ground is damp.
Do not leave the machine in the rain.
Always keep the battery compartment closed during operation.
Switching on the machine:
Exercise care when switching on the machine and observe the instructions in the section "Initial operation of the machine". ( 12.)
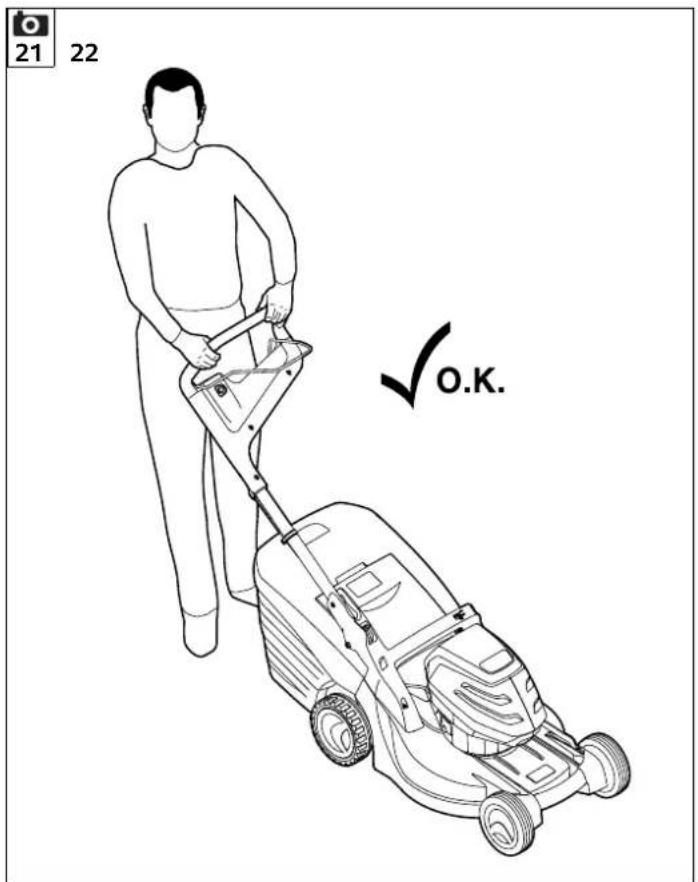
Keep your feet a safe distance from the cutting tool.
Place the machine on an even surface before switching it on.
The machine must not be tilted before it is switched on or during switching-on.
Do not switch on the motor if the discharge chute is not covered by the discharge flap or the grass catcher box.
Avoid switching the machine on repeatedly within a short period of time; in particular avoid "playing" with the ON button. Risk of motor overheating.
Working on slopes:
Always work across and back on slopes, never up and down.
If the user loses control when mowing up and down, there is a risk of being run over by the machine.
Be particularly careful when changing direction on a slope.
Always ensure good stability on slopes and avoid mowing on excessively steep slopes.
For safety reasons, the machine must not be used on slopes with an inclination of more than 25^ (46.6%). Risk of injury! A slope inclination of 25^ corresponds to a vertical height increase of 46.6 cm for a 100 cm horizontal distance.

Working:

Caution – risk of injury! Never put hands or feet on or underneath rotating parts. Never touch the rotating blade.
Always keep away from the discharge opening. Always observe the safety distance provided by the handlebar.

Do not try to examine the blade while the machine is operating. Never open the discharge flap
and/or remove the grass catcher box when the mowing blade is running. Rotating blades can cause injury.
Only operate the machine at walking speed – never run when working with the machine. Working quickly with the machine increases the risk of injury due to stumbling, slipping, etc.
Be particularly careful when turning the machine around or pulling it towards you.
Risk of stumbling!
Use the machine with great care when working near slopes, terraces, ditches and embankments. In particular, ensure that you maintain sufficient distance to such danger areas.
Objects hidden in the turf (lawn sprinkler systems, posts, water valves, foundations, electrical wires, etc.) must be avoided. Never run over any such foreign objects.
If the cutting tool or the machine hits an obstacle or a foreign object, the motor must be switched off, the safety plug disconnected and an inspection performed by a specialist.

Beware of the cutting tool running on for several seconds before coming to a standstill.
Switch off the motor,
- if tilting of the machine is necessary when transporting over surfaces other than grass,
- when pushing the machine to and from mowing areas,
– before removing the grass catcher box,
– before adjusting the cutting height.

Switch off the motor, disconnect the safety plug and ensure that using tool has come to a complete
– before removing the battery;
– before leaving the machine unattended;
– before transporting, lifting, or carrying the machine;
– before remedying blockages, including those in the discharge chute;
– before you check, clean or carry out work on the machine (e.g. folding down or adjusting the handlebar);
- if the cutting tool has hit a foreign object. The cutting tool needs to be checked for possible damage. The machine must not be operated with a damaged or bent blade shaft or motor shaft. Risk of injury through defective parts!
- if the machine begins to vibrate excessively. In this case, the complete machine, in particular the cutting tool, must be checked for possible damage and loose parts. Damaged parts must be replaced prior to further use, loose parts must be fastened/tightened.

Risk of injury!
Strong vibration is normally an indication of a fault. In particular, the machine must not be operated with a damaged or bent blade shaft or mowing blade. If you do not have the appropriate expertise, have the necessary repairs carried out by a specialist dealer (STIHL recommends STIHL specialist dealers).
4.10 Maintenance, cleaning, repairs and storage
Before performing work on the machine, before adjusting or cleaning
- Switch off the motor
- Remove the safety plug
- Remove the battery if necessary

Allow the machine to fully cool down before storing it in enclosed places, performing maintenance on it or cleaning it.
Cleaning:
The complete machine must be cleaned thoroughly following use. ( 13.2)
Remove accumulated clipping deposits using a stick. Clean the underside of the mower with water and a brush.
Never use high-pressure cleaners and do not clean the machine under running water (e.g. using a garden hose).
Do not use aggressive cleaning agents. These can damage plastics and metals, impairing the safe operation of your STIHL machine.
In order to prevent overheating and fire hazards, keep the areas around the air vents on the motor and the air ducts on the bottom of the machine free from dirt (e.g. grass, straw, moss, leaves or leaking grease).
Maintenance operations:
Only maintenance operations described in this instruction manual may be carried out. Have all other work performed by a specialist dealer.
If you do not have the necessary expertise or auxiliary equipment, please always contact a specialist dealer.
STIHL recommends that you have maintenance operations and repairs performed exclusively by a STIHL specialist dealer.
STIHL specialist dealers regularly attend training courses and are provided with technical information.
Only use tools, accessories or attachments approved for this machine by STIHL or technically identical parts.
Otherwise, there may be a risk of accidents resulting in personal injury or damage to the machine. If you have any questions, please consult a specialist dealer.
The characteristics of original STIHL tools, accessories and spare parts are optimally adapted to the machine and the user's requirements. Genuine STIHL spare parts can be recognised by the STIHL spare parts number, by the STIHL lettering and, if present, by the STIHL spare parts symbol. On smaller parts, only the symbol may be present.
Always keep warning and information stickers clean and readable. Damaged or missing stickers must be replaced by new, original plates from your STIHL specialist dealer. If a component is replaced with a new component, ensure that the new component is provided with the same stickers.
Regularly check that the mowing blade is securely fastened and is not damaged or worn.
Only perform work on the cutting unit when wearing thick work gloves and exercising extreme care.
Ensure that all nuts, pins and screws (in particular the blade fastening screw) are securely tightened so that the machine is in a safe operating condition.
Check the complete machine and the grass catcher box for wear or damage on a regular basis, particularly before extended periods when the machine is not in use (e.g. over winter). For safety reasons, worn or damaged parts must be replaced immediately to ensure that the machine is always in a safe operating condition.
Components or guards that are removed for maintenance operations must be properly reinstalled immediately.
4.11 Storage for prolonged periods without operation
Store the cooled machine, the battery and the safety plug separately from each other in a dry and locked room that is inaccessible to children.
Ensure that the machine is protected from unauthorised use (e.g. by children).
Thoroughly clean the machine before storage (e.g. winter break).
Store the machine in good operational condition.
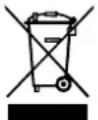
4.12 Disposal
Ensure that old machines (lawn mower, battery, charger, accessories) are properly disposed of. Render the lawn mower unusable prior to disposal. In order to prevent accidents, ensure that you remove the safety plug and the electric cable from the switch to the motor.
Risk of injury due to the cutting tool! Always store an old machine in a safe place prior to scrapping. Ensure that the machine and the cutting tool are kept out of the reach of children.
Batteries must be disposed of separately from the machine. Ensure that batteries are discharged prior to disposal (e.g. by running the motor) and that they are disposed of safely and in an environmentally friendly manner.
5. Description of symbols

Caution!
Read the instruction manual before initial use.

Risk of injury!
Keep other persons out of the danger area.
Caution – sharp cutting blades!
The cutting blades run on after the motor has been switched off. Remove the locking device (safety plug) before performing maintenance work.

RMA 443:
Switch on the motor.
RMA 443 C, RMA 443 PC, RMA 443 TC, RMA 448 PC, RMA 448 TC:
Switch the motor on.
Switch the motor off.
RMA 443 TC, RMA 448 TC: Switch self-propulsion on.
Remove the locking device (safety plug) before performing any work on the machine.
Battery is overheated. Charging starts after the cooling-down period or the battery can only be used after the cooling-down period.
The battery is faulty and must be replaced.
6. Standard equipment

Item Designation Qty.
| A Basic unit 1 | |
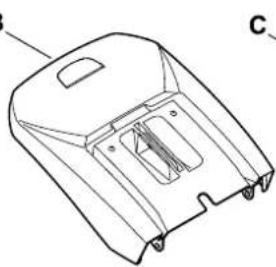
| B Upper part of grass catcher box | 1 |
| C Lower part of grass catcher box | 1 |
| D Stud 2 | |
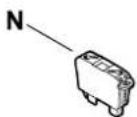
| N Safety plug 1 | |
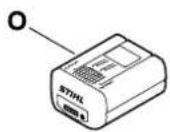
| O Battery | |
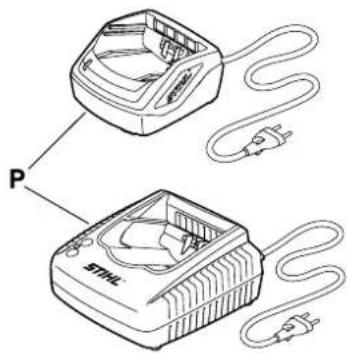
| P Charger | |
| – Instruction manual 1 | |
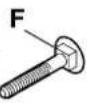
RMA 443:
| E Quick-clamping device 2 | |
| F Bolt 2 | |
| G Cable guide | 1 |
| H Cable clip | 1 |
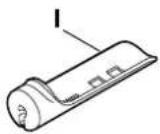
| I Protective sleeves | 2 |
RMA 443 C, RMA 443 PC, RMA 443 TC, RMA 448 PC, RMA 448 TC:
| J Sleeve | 1 |
| K Bolt 1 | |
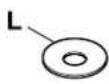
| L Washer | 2 |
| M Nut | 1 |

The standard equipment (battery, charger, etc.) may vary depending on the country and version type.
7. Preparing the machine for operation
7.1 General points

Risk of injury.
Observe the safety instructions in the section "For your safety" ( 4.).

Remove the safety plug, particularly before
performing any work on the lawn mower ( 9.1).
- Place the machine on level, firm ground when performing all the operations described.

The batteries are charged to approx. 30% on delivery. They must be therefore be charged before being used for the first time.
- Charging the battery ( 8.).
7.2 Installing the mono comfort handlebar (RMA 443 C,
RMA 443 PC, RMA 443 TC, RMA 448 PC, RMA 448 TC)

- Insert the sleeve (J) into the bore on the handlebar (1).
- 2 Fit the two washers (L) with the convex side facing inwards onto the sleeve.
- 3 Hold the sleeve (J) and washers (L) and insert together with the handlebar (1) into the handlebar bracket (2).
-
4 Insert the nut (M) into the handlebar bracket as shown.
-
5 Insert the bolt (K) from the outside inwards through the bores in the handlebar (1) and in the handlebar bracket (2).
• 6 Tighten the bolt. Tightening torque: 18 - 22 Nm
Installing the electric cable and linkage:
- Press the electric cable (3) and the linkage (4 - RMA 443 TC, RMA 448 TC) into the holders on the handlebar bracket and on the handlebar (5,6) as shown and fix to the handlebar with the cable clip (7).
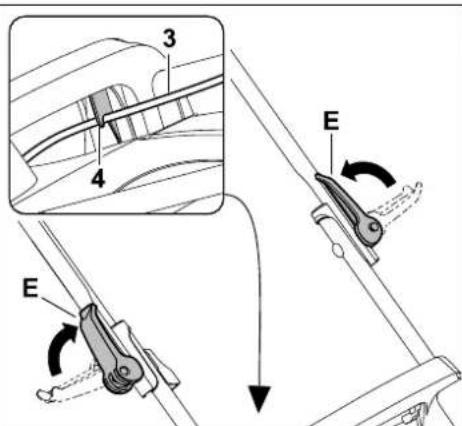
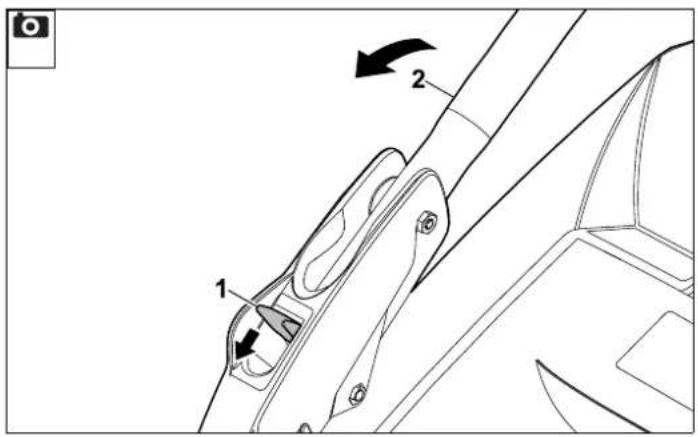
7.3 Installing dual handlebar (RMA 443)
- Fit the protective sleeves (1) onto the lower handlebars (1).
- Insert the screw (F) through the bore in the cable guide (G).
- Fit the upper handlebar (2) onto the lower handlebar sections (1).
- Attach the cable guide (G) to the electric cable (3) and insert the screw (F) through the bore from the inside outwards.
- On the opposite side, insert the screw (F) from the inside outwards through the bores.
- Screw the quick clamping devices (E) onto the screws (F) (the screw should project by about one screw thread turn) and fold upwards.

- Check correct assembly: The quick-clamping devices (E) must be sufficiently tightened so that they are pressed tightly against the handlebar and the upper handlebar is firmly connected to the lower handlebar. If the handlebar is not firmly installed or the quick-clamping devices are not correctly located, open the quick-clamping devices and turn them until they are securely fastened.
- Insert the electric cable (3) into the holder (4) of the handlebar console as shown.
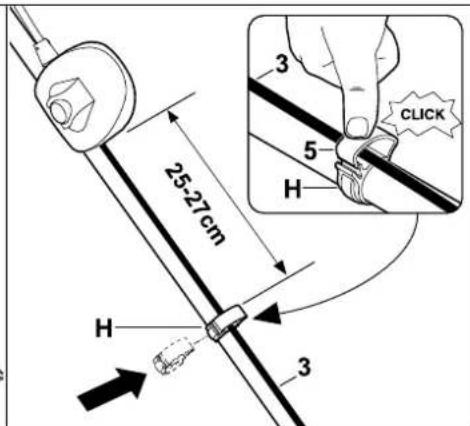
Installing the cable clip:
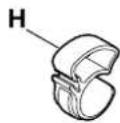
- Press the cable clip (H) onto the upper handlebar. Distance between the cable clip and switch:
Insert the electric cable (3) into the cable clip (H) as shown, close the tab (5) and allow it to engage.
25 - 27 cm
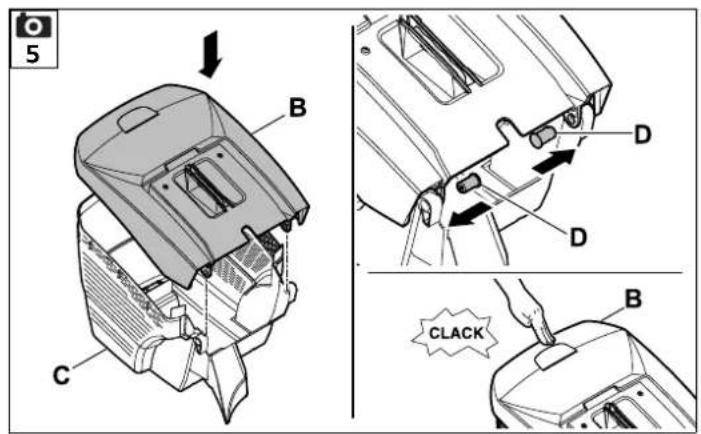
7.4 Assembling the grass catcher box
- Fit the upper part of the grass catcher box (B) onto the lower part of the grass catcher box (C). Ensure correct location in the guides.
- Push pin (D) through the bores provided from inside.
- Allow the upper part of the grass catcher box (B) to engage in the lower part of the grass catcher box using slight pressure.
- Attach the grass catcher box (⇒ 9.3).

8. Battery and charger
8.1 General
RMA 443, RMA 443 C, RMA 443 PC, RMA 443 TC, RMA 448 PC and RMA 448 TC lawn mowers are operated with rechargeable STIHL type AP lithium ion batteries only.
The batteries supplied are optimally adapted to the intended purpose. However, any type AP battery can be used.
The lawn mower electronics exchange data with the installed battery and adapt the power of the electric motor to the relevant capacity.
8.2 Connecting charger to the mains

- Insert mains plug (1) in socket (2).
- After connection of the charger to the power supply, a self-test is performed. During this process, the LED (3) on the charger illuminates green for approx. 1 second, then red, and then extinguishes again ( 8.6).
8.3 Removing/inserting the battery

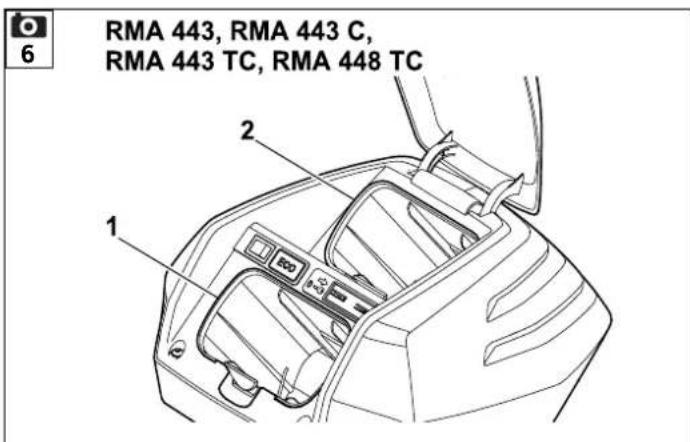
RMA 443, RMA 443 C, RMA 443 TC, RMA 448 TC:
The RMA 443, RMA 443 C, RMA 443 TC, RMA 448 TC lawn mower can only be operated with one battery. The battery can only be inserted in the battery
compartment (1). The transport compartment (2) is only used to transport the battery.
Function:
As soon as the battery in the battery compartment (1) is discharged, the battery must be removed and charged.
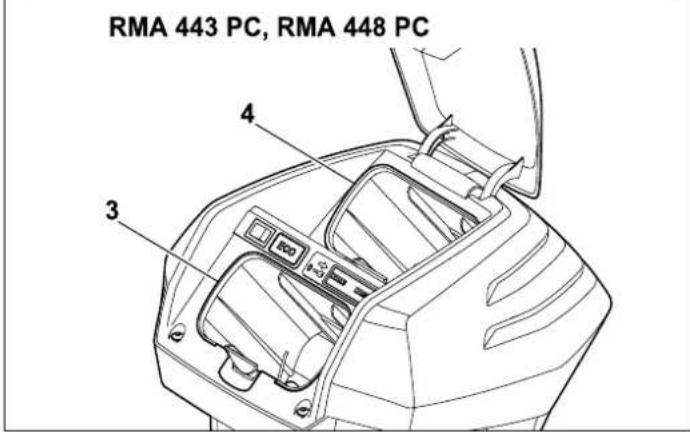
RMA 443 PC, RMA 448 PC:
The RMA 443 PC, RMA 448 PC lawn mowers can be operated with two batteries. Batteries are inserted in the battery compartment 1 (3) and in the battery compartment 2 (4).
Function:
As soon as the battery voltage in the battery compartment 1 falls below a certain value, the machine automatically switches to the battery in the second battery compartment. There must always be a battery in the battery compartment 1 when working; the battery compartment 2 can remain empty if necessary. The battery compartment 1 must not be removed, even after the battery has discharged.

Switching from the battery compartment 1 to the battery compartment 2 may be discernible by a brief drop in speed.
RMA 443, RMA 443 C, RMA 443 PC, RMA 443 TC, RMA 448 PC, RMA 448 TC:
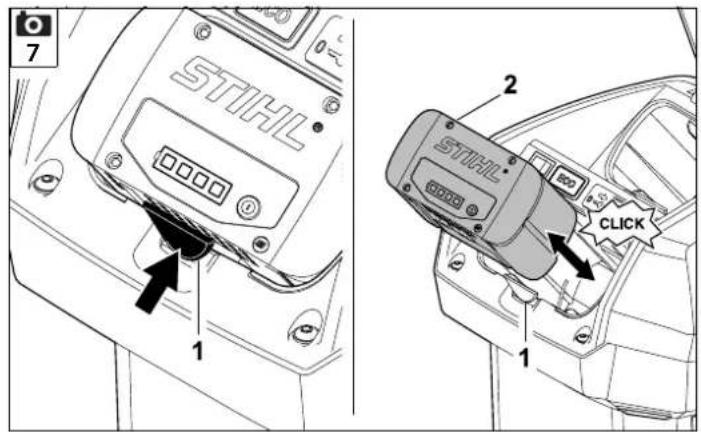
- Remove the safety plug ( 9.1) and hold the battery compartment cover in the open position.


Removing the battery:
- Push the locking lever (1) towards the battery and remove the battery (2) upwards.
Inserting the battery:
- Insert the battery (2) as shown into the battery compartment as far as it will go applying slight pressure – a clicking sound will be heard.

With the RMA 443 PC and RMA 448 PC, the batteries in both battery compartments are removed and inserted in the same way.
8.4 Recharging the battery

The charging time depends on various influencing factors such as e.g. the temperature of the battery and the ambient temperature. The actual charging time may differ from the specified charging time. Please refer to www.stihl.com/charging-times for charging times.

Once the battery has been inserted in the charger, charging starts automatically. When the battery is fully charged, the charger switches off automatically.
The battery and the charger heat up during charging.
- Remove the battery from the battery compartment. ( 8.3)
-
Connecting the charger to the mains ( 8.2)
-
Insert the battery (1) into the guides on the charger (2) and push it to the stop. The LED on the charger (3) illuminates green.
The LEDs on the battery (4) illuminate green to indicate the charge state. - When the LED on the charger (3) and the LEDs on the battery (4) no longer illuminate, remove the mains plug from the socket.
The battery is fully charged. - Remove battery from charger and insert it in the battery compartment. ( 8.3)
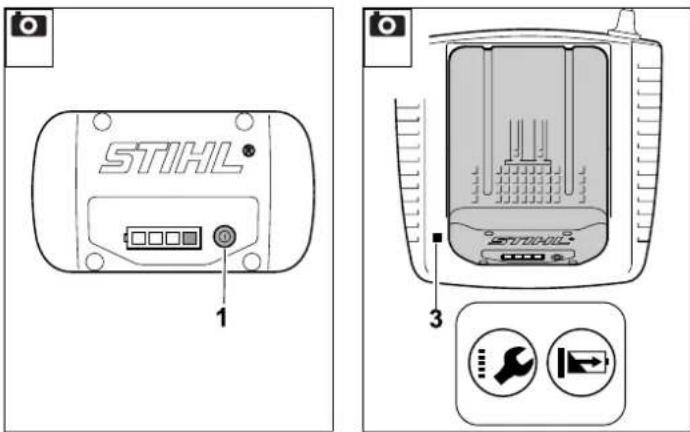
8.5 LEDs on the battery

Displaying charge state:
- Press the button (1). The LEDs illuminate green for approx. 5 seconds to indicate the charge state.
- If the right LED flashes green, charge the battery. ( 8.4)
LED displays:
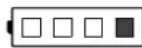
The LEDs can illuminate or flash green or red.
☐ LED illuminates green.
LED flashes green.
■ LED illuminates red.
LED flashes red.
Green LEDs indicate normal operation, red LEDs indicate a malfunction.
During charging:
Illumination and flashing of the LEDs indicate the charging status.
During charging, the momentary charge capacity is indicated by a green flashing LED.
When charging is complete, the LEDs extinguish automatically.
Faults
One LED illuminates red
During charging:
Battery is too hot or too cold for the charging process to start. Once the battery has cooled down or warmed up, the charging procedure starts automatically.
During operation:
Battery is overheated. Machine switches off – remove the battery from the lawn mower and allow to cool for a few minutes.
Four LEDs flash red
The battery is defective and must be replaced.

Three LEDs illuminate red
The lawn mower is overheated – allow it to cool down.
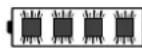

Three LEDs flash red
The lawn mower is defective and must be checked by a specialist dealer. STIHL recommends STIHL specialist dealers.

8.6 LED on the charger
The LED (3) indicates the charger status. It can illuminate green or flash red.

The LED illuminates green and the LEDs on the battery illuminate or flash green: The battery is charging.
The LED flashes red: There is no electrical contact between the battery and the charger, or there is a fault in the battery or in the charger.

If the LED illuminates green and 1 LED on the battery illuminates red, the battery is too warm or too cold.
- Remedy the faults. (⇒ 20.)
9. Controls
9.1 Safety plug
The lawn mower can only be operated when the safety plug is inserted in the socket behind the battery compartment.


Risk of injury!
The safety plug must be removed prior to performing any work on a machine, particularly before transport, maintenance of work, as well as before it is the machine. ( 4.)


The cover of the battery compartment is held in the closed position by two magnets.
- Lift up the battery compartment cover (1) and hold in the open position.
- Removing:
Remove the safety plug (2) from the socket (3) and keep separately from lawn mower.
Press the safety plug (2) as far as it will go into the socket (3). - Close the battery compartment cover (1).
Inserting:
9.2 Eco mode switch

The eco mode switch that increases battery running time is located in the battery compartment. ( 10.2)
Switching on eco mode:
- Move switch to position I.
- Move switch to position 0.
Switching off eco mode:
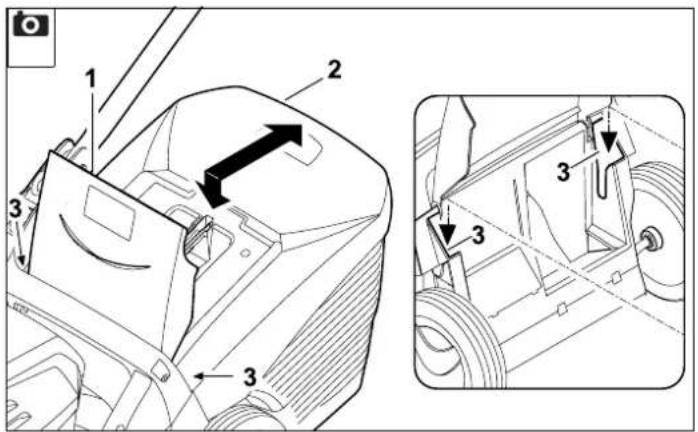
9.3 Grass catcher box

Attaching:
- Open the discharge flap (1) and hold it open.
- Attach the grass catcher box (2) to the mountings (3) on the rear of machine by means of the locating lugs.
- Close the discharge flap (1).
Detaching:
- Open the discharge flap (1) and hold it open.
- Lift the grass catcher box (2) and remove it rearwards.
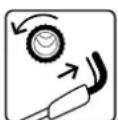
- Close the discharge flap (1).
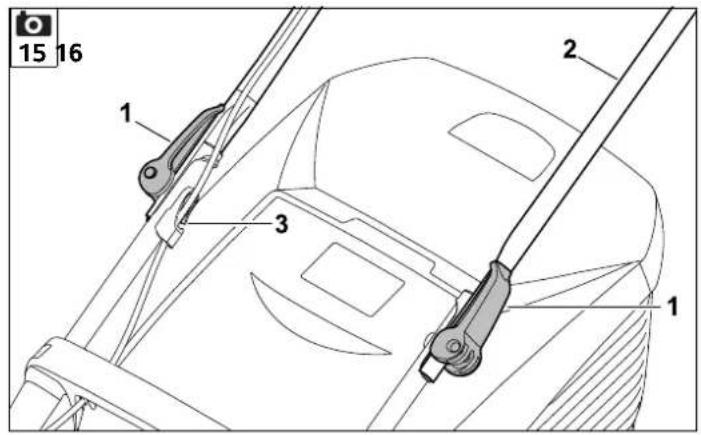
9.4 Adjusting the mono comfort handlebar (RMA 443 C, RMA 443 PC, RMA 443 TC, RMA 448 PC, RMA 448 TC)


Danger of pinching!
When operating the detent lever, always hold the upper handlebar at its highest point with one hand. Never place your fingers between the handlebar and bracket (above and below the detent lever).
Folding down the handlebar:
Transport position (for cleaning, for space-saving transport and for storage of the machine):
- Hold upper handlebar (2) at its highest point with one hand and lift (relieve load) slightly.
- Press detent lever (1) downwards and hold.
- Fold handlebar (2) down forwards, ensuring that the electric cable is not damaged.
Working position (to push machine):
- Fold handlebar (2) up rearwards and ensure that the handlebar is fully engaged.
Height adjustment:
The height of the mono comfort handlebar can be adjusted to 2 levels:
- Hold upper handlebar (2) at its highest point with one hand and lift (relieve load) slightly.
- Press detent lever (1) downwards and hold.
- Move handlebar (2) into the required position.
- Release detent lever (1) and ensure that the handlebar is again fully engaged.
9.5 Folding down dual handlebar (RMA 443)


Danger of pinching!
The upper handlebar can be folded down when the rotary handles are released. Therefore hold the upper handlebar with one hand at its highest point when unscrewing the rotary handles.
Transport position (for cleaning, for space-saving transport and for storage of the machine):
- Loosen rotary handles (1) until they turn freely.
- Fold down upper handlebar (2) forwards.
Working position (to push machine):
- Fold up upper handlebar (2) rearwards and hold with one hand.
- Tighten rotary handles (1). Make sure that cable guide (3) is positioned correctly.
9.6 Central cutting height adjustment

Six different cutting heights can be set.
Level 1 = 25 mm
Level 6 = 75 mm
Setting the cutting height:
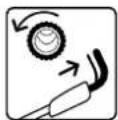
- Hold the handle (1), pull the lever (2) upwards and hold.
- Set the required cutting height by moving the machine upwards and downwards. The current cutting height can be read off at the cutting height indicator (3) by means of the marking (4).
- Release the detent lever (2) and allow it to engage.
9.7 Level indicator

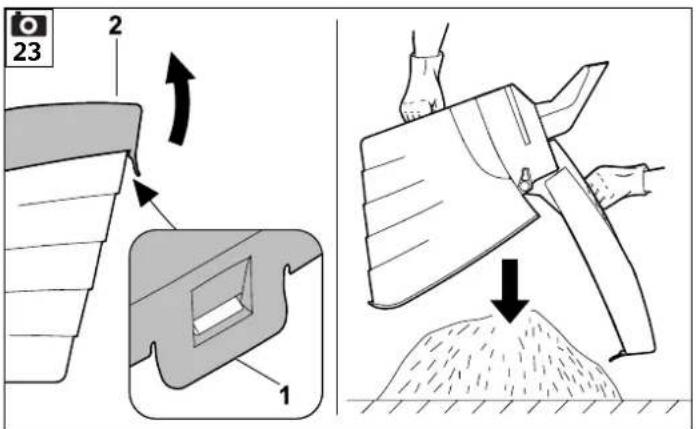
The flow of air generated by the blade raises level indicator (1). The flow of air stops when the grass catcher box is full. If the flow of air is too low, level indicator (1) returns to its resting state. This is a prompt to empty the grass catcher box.
The functionality of the level indicator is restricted if the flow of air is impaired. External influences such as wet, dense or high grass, low cutting levels, contamination or the like can impair the flow of air and the functionality of the level indicator.
A Grass catcher box is being filled
B Grass catcher box is filled
- Empty the filled grass catcher box ( 12.5).
10. Notes on working with the machine
10.1 General
To ensure a perfect, thick lawn, mow regularly and keep the grass short.
Do not cut the lawn too short in hot, dry conditions as it will dry out or burn in the sun and become unsightly.
The cutting pattern will be better with a sharp blade than with a blunt one; the blade should therefore be sharpened regularly (STIHL specialist dealer).
10.2 Cutting performance
The cutting performance (battery running time) depends on the quality of the grass and the selected cutting height. The cutting performance is enhanced by the following measures:
– Mowing the lawn more frequently
- Increasing the cutting height
– Reducing speed of propulsion
- Allowing the lawn to dry before mowing.
If required, additional STIHL lithium ion batteries can be purchased (special accessories).
Eco mode:
The lawn mower features an eco mode, which improves its energy efficiency and therefore its cutting performance.
Eco mode can be switched on and off using the switch in the battery compartment. ( 9.2)
ECO
Function:
The speed of the motor is reduced automatically when less power is required. If more power is required, the speed is increased again within a fraction of a second.
10.3 Working area for operator

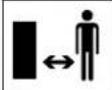
- For safety reasons, the operator must stay within the working area behind the handlebar when the motor is running. Always observe the safety distance provided by the handlebar.
- The lawn mower must only be operated by one person. Other persons must keep out of the danger area. ( 4.)
10.4 Correct motor load
Do not switch the lawn mower on in tall grass. Select a higher cutting height setting if the motor is difficult to start.
The lawn mower load must never cause the motor speed to drop significantly.
If the speed drops when mowing tall grass, select a higher cutting height setting and/or reduce the speed of propulsion.

When eco mode is switched on, the speed is reduced automatically when less power is required.
(⇒ 10.2)
10.5 If the mowing blade blocks
Switch off the motor immediately and disconnect the safety plug. Then eliminate the cause of the fault.
10.6 Thermal motor overload protection
The electronics switch off the motor if it becomes overloaded during operation. Three red LEDs in the battery illuminate if a thermal overload occurs. ( 8.5)
Causes for an overload:
- blunt mowing blade
- mowing excessively high grass or cutting height adjusted too low
– excessive rate of feed
– inadequate cleaning of the cooling air guide (inlet slots)
Recommencing operation
Resume normal operation of the machine following a cooling period of up to 10 min (depending on the ambient temperature). ( 12.)
11. Safety devices
The machine is equipped with several safety devices for safe operation and for the prevention of improper use.

Risk of injury!
If a safety device is found to be defective, the machine must not be operated. Consult a specialist dealer; STIHL recommends STIHL specialist dealers.
11.1 Safety plug
The motor can only be switched on when the safety plug is inserted ( 9.1).
11.2 Safety devices
The lawn mower is equipped with safety devices, which prevent inadvertent contact with the mowing blade and with ejected clippings.
These include the housing, discharge flap, grass catcher box and correctly installed handlebar.
11.3 Two-hand operation
The motor can only be switched on by pressing and holding the ON button with the right hand and then pulling the motorstop lever to the handlebar with the left hand.
11.4 Motor run-down brake
When the motorstop lever is released, the mowing blade comes to a standstill in less than three seconds.
An integrated motor run-down brake shortens the run-down time until the blade stops.
Measuring run-down time
Following motor start-up, the blade rotates and a wind noise is audible. The run-down time corresponds to the duration of the wind noise after the motor stops. This can be measured using a stopwatch.
12. Operating the machine
12.1 Preparatory measures

Risk of injury!
Observe the safety instructions in the section "For your safety". ( 4.)
- Charge the battery and insert it into the battery compartment. ( 8.4)
- Insert the safety plug. (⇒ 9.1)
12.2 Switching the lawnmower on


Do not switch the lawn mower on in tall grass. Select a higher cutting height setting if the motor is difficult to start.
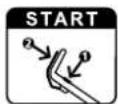
- 1 Press and hold the ON button (1). 2 Pull the motorstop lever (2) to the handlebar and hold.
- The ON button (1) can be released once the motorstop lever (2) is actuated.
12.3 Switching the lawn mower off

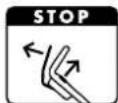
- Release the motorstop lever (1). Motor and mowing blade come to a stop after a short run-down time.
12.4 Self-propulsion
(RMA 443 TC, RMA 448 TC)


Note
The RMA 443 TC and RMA 448 TC lawnmowers have rear-wheel drive.
1 Switching on self-propulsion
• Start the motor ( 12.2)
- Pull self-propulsion lever (1) to the handlebar and hold.
Self-propulsion is activated and the lawn mower moves forwards.
2 Switching off self-propulsion
- Release self-propulsion lever (1).
Self-propulsion is deactivated and the lawn mower comes to a standstill.
The motor and blade continue to run.
12.5 Emptying the grass catcher box


Risk of injury!
The motor must be stopped for safety reasons before removing the grass catcher box.
- Detach the grass catcher box. (⇒ 9.3)
- Open the grass catcher box at the tab (1). Fold up the upper part of the grass catcher box (2) and hold. Fold the grass catcher box rearwards and empty the clippings.
- Close the grass catcher box.
- Attach the grass catcher box. (→ 9.3)
13. Maintenance
13.1 General

Risk of injury!
Observe the safety instructions in the section "For your safety" ( 4.).
Remove the safety plug, particularly before performing any work on the lawn mower ( 9.1).
Annual service by the specialist dealer:
The lawn mower should be inspected once annually by a specialist dealer. STIHL recommends STIHL specialist dealers.
13.2 Cleaning the machine
Maintenance interval:
After each use
Treating the machine carefully will protect it against damage and extend its service life.
- Remove the battery ( 8.3)
- Detach the grass catcher box ( 9.3)

Risk of injury!
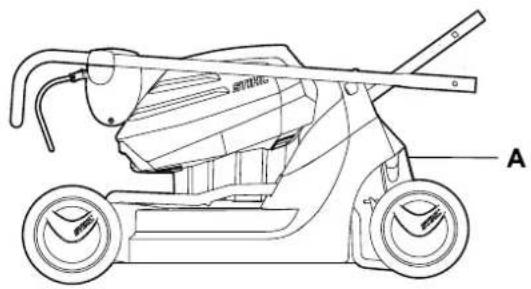
Before tilting the mower, place it on firm, level, flat ground. The machine may tip over when working on it in the cleaning position. Always stand to the side of the machine. Never work in front of or behind the mower.
Cleaning position RMA 443 C,
RMA443PC, RMA443TC, RMA448PC, RMA448TC:
- Stand to the right of the machine to tilt it upwards.
- Move the upper handlebar (1) to the lowest position (as far as the stop, the detent lever does not engage in this position). ( 9.4)
- Open the discharge flap (2) with your right hand and hold it open.
- Hold the bracket with your left hand as shown and hold the discharge flap open. At the same time, press the detent lever (3) with your thumb and hold it down.
- Hold the machine with your right hand on the front handle and tilt it rearwards slowly until the handlebar is in contact with the ground as shown.
- Release the discharge flap (2) and the detent lever (3) and check that the machine is stable.
Cleaning position RMA 443:
- Hold the upper handlebar (1) and open the quick-clamping devices – fold downwards.
- Set down the upper handlebar (1) rearwards.
- Open the discharge flap (2) and hold it open.
- Lift the lawn mower up at the front and place it in the cleaning position as shown. Check that the machine is stable.
Notes on cleaning:
- Clean off dirt using little water, with a brush or with a cloth. In particular, also clean the mowing blade. Never spray water on motor components, seals, bearing points or electrical components such as batteries or switches.
- First, remove accumulated clippings using a stick.
- Remove dirt from the air slots on the motor and the air ducts on the bottom of the machine to ensure that the motor is adequately cooled.
- If necessary, use a special cleaner (e.g. STIHL special cleaner).
13.3 Electric motor and wheels
The electric motor is maintenance-free. The wheel bearings are maintenance-free.
13.4 Battery
Maintenance interval: Before each use
- Clean the battery with a damp cloth.
- Visually check that the battery is undamaged. Batteries with identifiable damage (e.g. cracks or escaping fluid), must not be used.
13.5 Charger
Maintenance interval: Before each use
Check electric cable for damage and ensure that cooling air slots are free of dirt.
13.6 Checking blade wear
Maintenance interval: Before each use


Risk of injury!
Blades are subjected to differing degrees of wear depending on the location and duration of use. If you use the machine on sandy ground or use it frequently under dry conditions, the blade will be subjected to greater loads and will wear more quickly than average. A worn blade may break off and cause serious injuries. The instructions for blade maintenance must therefore always be observed.
- Set the lawn mower onto its back into cleaning position. ( 13.2)
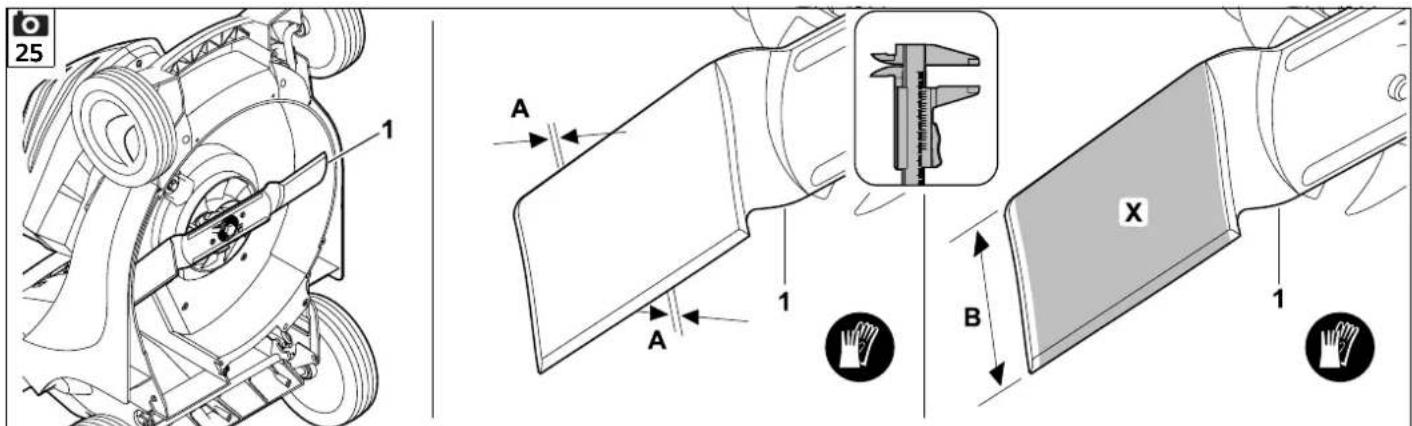
- Clean the mowing blade (1).
- Use a slide calliper to measure the blade thickness Ⓐ at 5 points at least. In particular, minimum thickness must also be ensured in the area of the blade wings.
- Check the blade width Ⓑ in the area marked in grey ⒕ at least 3 points using a slide calliper.
Wear limits:
Blade thickness A: > 2 mm
Blade width B: > 55 mm
The blade must be replaced,
- if it is damaged (notches, cracks),
- if the measured values are achieved at one or more points or are outside the permissible limits.
13.7 Removing and installing mowing blade


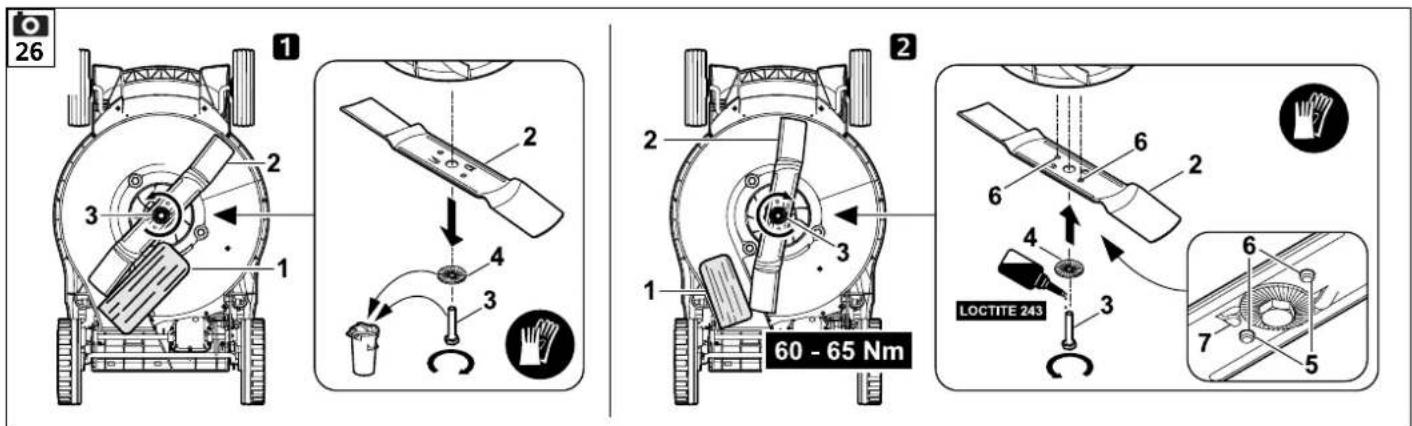
In order to prevent damage to the blade fastening screw, use a suitable socket (22 mm) for loosening and tightening.
1 Removing:
- Use a suitable wooden block (1) to hold the mowing blade (2) in place.
- Unscrew blade fastening screw (3) and remove mowing blade (2).
2 Installing:

Risk of injury.
The mowing blade must only be installed as shown, in particular tabs (7) must point downwards. Retaining washer (4) must be replaced each time a blade is installed. The blade fastening screw (3) must be replaced each time the blade is replaced. The specified torque when tightening the blade fastening screw must be strictly observed, as the secure attachment of the cutting tool depends on this.
- Clean the blade contact surface and blade bushing.
- Place mowing blade (2) on the blade bushing as shown. Locating lugs (5) must be located in recesses (6) of mowing blade.
- Use a suitable wooden block (1) to hold the mowing blade (2) in place.
-
Apply Loctite 243 to thread of blade fastening screw (3).
-
Place retaining washer (4) with the convex side facing the blade and tighten with the blade fastening screw (3).
Tightening torque:
60 - 65 Nm
13.8 Sharpening the mowing blade
If you do not have the necessary expertise or auxiliary equipment, you should have the blade sharpened by a specialist dealer (STIHL recommends STIHL specialist dealers).
Operation of the machine is impaired in the case of an incorrectly sharpened mowing blade (incorrect sharpening angle, imbalance, etc.), the cutting performance (battery running time) may be reduced and the noise emissions increased.
Sharpening instructions
- Remove the mowing blade. (⇒ 13.7)
- Cool the mowing blade during sharpening, e.g. with water. The blade must not be allowed to display blue colouring, as this would reduce its cutting quality.
- Sharpen blades evenly to prevent vibration due to imbalance.
- Observe a sharpening angle of 30^ .
- Observe the wear limits. (⇒ 13.6)
13.9 Storage (winter break)
Storing the lawn mower:

Remove the safety plug and the battery.
Store the safety plug separately from the lawn mower and out of reach of unauthorised persons, particularly children.
Store the lawn mower in a dry locked place that is free of dust. Ensure that it is protected from unauthorised use (e.g. by children).
Only store the lawn mower in a good operating condition. Fold the handlebar down if necessary.
Keep all nuts, pins and screws tightly fastened, replace danger signs and warnings on the machine that have become illegible and check the entire machine for wear or damage. Replace all worn or damaged parts.
Any machine faults must be completely remedied prior to storage.
Note the following points when storing the lawn mower for long periods (winter break):
- Clean all external parts of the machine with care.
- Thoroughly lubricate/grease all moving parts.
Storing the battery:
- Remove battery from the battery compartment or out of the charger.
- Clean the battery.
- Store the battery in a dry locked place that is generally free of dust in electrically non-conductive packaging. Ensure that batteries are protected from unauthorised use (e.g. by children).
- Do not store spare batteries unused – use batteries alternately.
- For optimum battery service life, observe the permissible temperature range ( 19.1) and store the battery at a charge state between 20% and 40% (2 LEDs illuminated green).
Storing the charger:
- Remove the battery and remove the mains plug from the socket.
- Clean the charger.
- Store the charger separately from the battery in a dry, locked and dust-free room. Ensure that it is protected from unauthorised use (e.g. by children). Do not suspend the charger from the electric cable.
14. Transport
14.1 Carrying and securing lawn mower


Risk of injury.
Observe the safety instructions in the section "For your safety" ( 4.).
Remove the safety plug, particularly before performing any work on the lawn mower ( 9.1).
Always wear suitable safety clothing when carrying the machine (safety shoes, thick gloves).
Exercise special care when transporting lithium ion batteries ( 4.3).
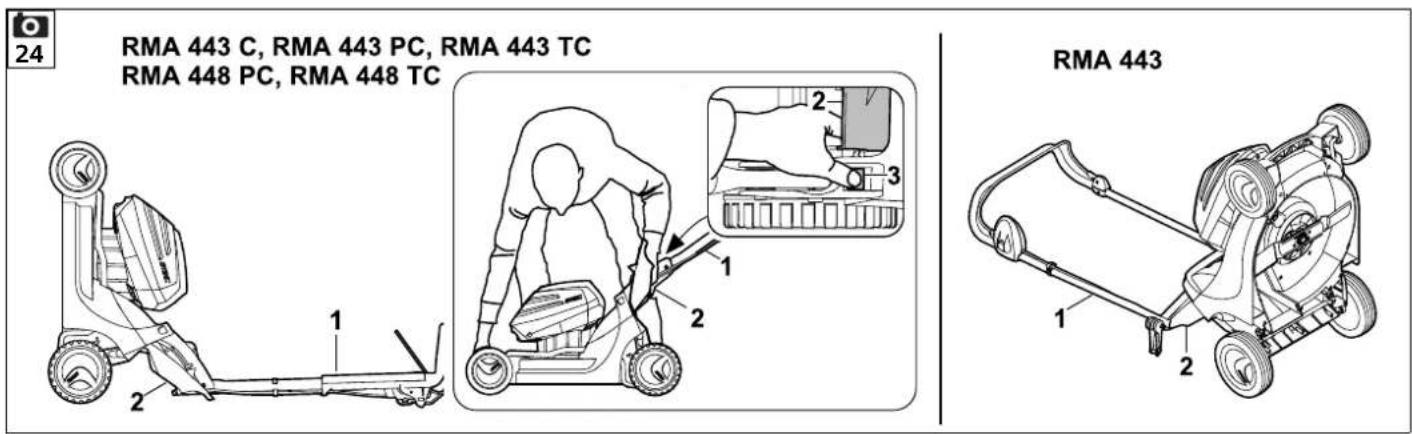
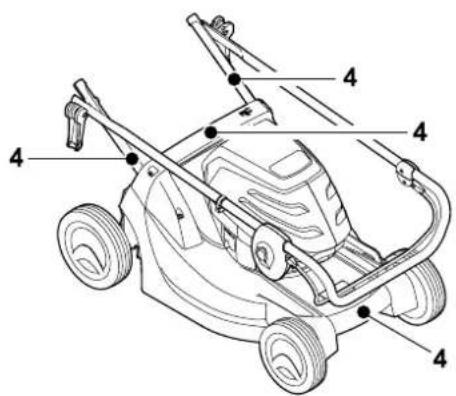
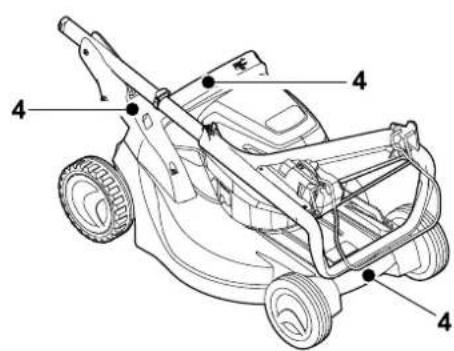
Carrying the machine:
- Two persons: Only lift the machine by the front handle (1) and by the handlebar (3). Always ensure sufficient distance between the mowing blade and your body, particularly your feet and legs.
- One person: Lift and carry the machine with one hand in the middle of the upper transport handle (2) and the other hand on the lower transport handle (1).
Lashing the machine:

- Only transport the machine on a clean, flat load floor on all 4 wheels and secure using suitable fastening materials.
- Attach ropes or straps at the marked points (4).
14.2 Transporting the battery
- Before transport, it must be ensured that the battery is in good operating condition. ( 4.3)
- Transport the battery either in the machine or in appropriate safe packaging.
- Observe the instructions in the "For your Safety – Transporting the battery". (⇒ 4.7)
The battery is subject to the requirements for transporting hazardous goods. The battery is classed as a UN 3480 (lithium-ion battery) and has been tested in accordance with the UN Manual of Tests and Criteria, Part III, subsection 38.3.
Please refer to www.stihl.com/safety-data-sheets for transport instructions.
15. Minimising wear and preventing damage
Important information on maintenance and care of the product group
Lawn mower, manually operated and battery-powered (STIHL RMA)
STIHL assumes no liability for material or personal damage caused by the non-observance of information contained in the operating instructions, in particular with regard to safety, operation and maintenance, or which arise through the use of unauthorised attachment or spare parts.
Please always observe the following important information for the prevention of damage or excessive wear to your STIHL machine:
1. Wearing parts
Some parts of the STIHL machine are subject to normal wear even when used properly and must be replaced in due time depending on type and duration of use.
These include:
- Blade
- Grass catcher box
- Battery
2. Compliance with the information in this instruction manual
The STIHL machine must be used, maintained and stored with the care described in this instruction manual. Any damage caused by non-compliance with the safety, operating and maintenance instructions is the sole responsibility of the user.
This applies in particular to:
- Incorrect electrical connection (voltage).
– Product modifications not approved by STIHL. - The use of tools or accessories which are not approved or suitable for the machine, or are of inferior quality.
- Improper use of the product.
– Use of the product for sporting or competitive events. - Resultant damage due to continued use of the product with defective components.
3. Maintenance operations
All operations listed in the section "Maintenance" must be performed regularly.
If these maintenance operations cannot be carried out by the user, a specialist dealer must be commissioned to perform them.
STIHL recommends that you have maintenance operations and repairs performed exclusively by a STIHL specialist dealer.
STIHL specialist dealers regularly attend training courses and are provided with technical information.
If these operations are neglected, faults may arise which are the responsibility of the user.
These include:
– damage to the drive motor as a result of inadequate cleaning of the cooling air guide (inlet slots),
– corrosive and other resultant damage caused by incorrect storage,
– damage to the machine through the use of inferior-quality spare parts,
– damage due to untimely or inadequate maintenance or damage due to maintenance or repair work not performed in the workshops of specialist dealers.
16. Environmental protection
Lawn clippings should be composted and not disposed of in household waste.
The machine, its packaging and accessories are all produced
from recyclable materials and must be disposed of accordingly.
By disposing of materials separately, and in an environmentally friendly manner, valuable resources can be re-used. For this reason, the machine should be disposed of for recycling at the end of its useful life. Pay particular attention to the information in the "Disposal" section during disposal ( 4.12).
Consult your recycling centre or your specialist dealer for information on the proper disposal of waste products.

Li-Ion
Always dispose of batteries properly – observe local regulations. Do not dispose of batteries with domestic waste, but hand it in to a specialist
dealer or at a hazardous waste collection point.
17. Standard spare parts
Mowing blade for RMA 443, RMA 443 C, RMA 443 PC, RMA 443 TC: 6338 702 0130
Mowing blade for RMA 448 PC, RMA 448 TC: 6358 702 0115
Blade fastening screw for RMA 443, RMA 443 C, RMA 443 PC, RMA 443 TC: 9007 319 9024
Blade fastening screw for RMA 448 PC, RMA 448 TC: 9007 319 9024
Retaining washer: 0000 702 6600

The blade fastening screw and retaining washer must be replaced when replacing or installing the blade. Spare parts are available from a STIHL specialist dealer.
18. EU - Declaration of conformity
18.1 Lawn mower, manually operated and battery-powered (STIHL RMA)
declares under our sole responsibility that the machine
lawn mower, manually operated and battery-powered (STIHL RMA)
manufacturer's mark
STIHL
serial number 6338 type RMA 443.0
RMA 443.0 C
RMA 443.0 PC
RMA 443.0 TC
manufacturer's mark
STIHL
serial number 6358 type RMA 448.0 PC
RMA 448.0 TC
conforms to the following EC directives: 2000/14/EC, 2014/30/EU, 2006/42/EC, 2006/66/EC, 2011/65/EU
The products have been developed in compliance with the following standards: EN 60335-1, EN 60335-2-29, EN 60335-2-77, EN 55014-1, EN 55014-2
The versions of the standards valid on the production date apply to development and production of the products.
Applicable conformity assessment procedure: Appendix VIII (2000/14/EC)
Name and address of relevant, named location:
The year of manufacture and machine number appear on the rating plate of the machine.
RMA 443.0:
Measured sound power level: 91,2 dB(A)
Guaranteed sound power level: 92 dB(A)
RMA 443.0 C:
Measured sound power level: 91,2 dB(A)
Guaranteed sound power level: 92 dB(A)
RMA 443.0 PC:
Measured sound power level: 91,2 dB(A)
Guaranteed sound power level: 92 dB(A)
RMA 443.0 TC:
Measured sound power level: 91,2 dB(A)
Guaranteed sound power level: 92 dB(A)
RMA 448.0 PC:
Measured sound power level: 95,2 dB(A)
Guaranteed sound power level: 96 dB(A)
RMA 448.0 TC:
Measured sound power level: 95,2 dB(A)
Guaranteed sound power level: 96 dB(A)
Langkampfen, 2020-01-02 (YYYY-MM-DD)
STIHL Tirol GmbH
p.p.

Matthias Fleischer, Research and Development Division Manager
p.p.

Sven Zimmermann, Quality Division Manager
19. Technical specifications
RMA 443.0, RMA 443.0 C, RMA 443.0 PC, RMA 443.0 TC, RMA 448.0 PC, RMA 448.0 TC
Type EC motor
Voltage 36 V
Protection class III
Type of protection IPX 1
Cutting device Cutter bars
Speed of cutting
device 3150 rpm
Speed of cutting
device in eco mode 2800 rpm
Cutter bar drive Permanent
RMA 443.0, RMA 443.0 C, RMA 443.0 PC, RMA 443.0 TC, RMA 448.0 PC, RMA 448.0 TC
Blade fastening
screw tightening
torque 60 - 65 Nm
Cutting height 25 - 75 mm
Grass catcher box 55 l
Wheel diameter
(front) 180 mm
Wheel diameter
(rear) 200 mm
RMA 443.0
| Serial number | 6338 |
| Motor unit/battery | MVP 600 |
| Power input | 600 W |
| Length | 144 cm |
| Width | 48 cm |
| Height 109 cm | |
| Weight (without battery) | 20 kg |
| Cutting width | 41 cm |
Sound emissions:
In accordance with Directive 2000/14/EC:
Guaranteed sound
power level L_WAd 92 dB(A)
In accordance with Directive 2006/42/EC:
Sound pressure level
at workplace L_pA 78 dB(A)
Uncertainty K_pA 2 dB(A)
Hand-arm vibrations:
Specified vibration characteristic in accordance with EN 12096:
Measured value a_hw 1,80 m/sec ^2
Uncertainty K_hw 0,90 m/sec ^2
Measurement in accordance with EN 20643
RMA 443.0 C
Serial number 6338
In accordance with Directive 2000/14/EC:
Guaranteed sound
power level L_WAd 92 dB(A)
In accordance with Directive 2006/42/EC:
Sound pressure level
at workplace L_pA 78 dB(A)
Uncertainty K_pA 2 dB(A)
Hand-arm vibrations:
Specified vibration characteristic in
accordance with EN 12096:
Measured value a_hw 1,40 m/sec ^2
Uncertainty K_hw 0,70 m/sec ^2
Measurement in accordance with
EN 20643
RMA 443.0 PC
Serial number 6338
In accordance with Directive 2000/14/EC:
RMA 443.0 PC
Guaranteed sound
power level L_WAd 92 dB(A)
In accordance with Directive 2006/42/EC:
Sound pressure level
at workplace L_pA 78 dB(A)
Uncertainty K_pA 2 dB(A)
Hand-arm vibrations:
Specified vibration characteristic in
accordance with EN 12096:
Measured value a_hw 1,40 m/sec²
Uncertainty K_hw 0,70 m/sec ^2
Measurement in accordance with
EN 20643
RMA 443.0 TC
Serial number 6338
Self-propulsion 1 gear
Drive speed 3,5 km/h
Sound emissions:
In accordance with Directive 2000/14/EC:
Guaranteed sound
power level L_WAd 92 dB(A)
In accordance with Directive 2006/42/EC:
Sound pressure level
at workplace L_pA 78 dB(A)
Uncertainty K_pA 2 dB(A)
Hand-arm vibrations:
Specified vibration characteristic in
accordance with EN 12096:
RMA 443.0 TC
Measured value a_hw 1,40 m/sec ^2
Uncertainty K_hw 0,70 m/sec ^2
Measurement in accordance with
EN 20643
RMA 448.0 PC
Serial number 6358
In accordance with Directive 2000/14/EC:
Guaranteed sound
power level L_WAd 96 dB(A)
In accordance with Directive 2006/42/EC:
Sound pressure level
at workplace L_pA 83 dB(A)
Uncertainty K_pA 2 dB(A)
Hand-arm vibrations:
Specified vibration characteristic in
accordance with EN 12096:
Measured value a_hw 1,40 m/sec ^2
Uncertainty K_hw 0,70 m/sec ^2
Measurement in accordance with
EN 20643
RMA 448.0 TC
Serial number 6358
Self-propulsion 1 gear
Drive speed 3,5 km/h
Sound emissions:
In accordance with Directive 2000/14/EC:
Guaranteed sound
power level L_WAd 96 dB(A)
In accordance with Directive 2006/42/EC:
Sound pressure level
at workplace L_pA 83 dB(A)
Uncertainty K_pA 2 dB(A)
Hand-arm vibrations:
Specified vibration characteristic in accordance with EN 12096:
Measured value a_hw 1,40 m/sec ^2
Uncertainty K_hw 0,70 m/sec ^2
Measurement in accordance with EN 20643
19.1 STIHL AP battery
Battery technology Lithium ion
Voltage 36 V
Capacity in Ah See rating plate
Energy content in
Wh See rating plate
Weight in kg See rating plate
Permissible tempera-
ture range -10^ to +50^
This symbol indicates the number of cells and the energy content according to the cell
manufacturer's specifications. The available energy content is lower in practice.
19.2 REACH
REACH is an EC Directive for the registration, evaluation, authorisation and restriction of chemicals.
Information on compliance with the REACH Directive (EC) No. 1907/2006 is available from www.stihl.com/reach.
20. Troubleshooting
✗ If necessary, contact a specialist dealer; STIHL recommends STIHL specialist dealers.
Fault:
Motor not starting
Possible cause:
- Battery charge state too low - 1 LED flashes green on battery
- Battery too cold/too warm - 1 LED illuminates red on battery
- Battery fault - 4 LEDs flash red on battery
– RMA 443 PC, RMA 448 PC: No battery inserted in battery compartment 1
– Lawn mower too warm – 3 LEDs illuminate red on battery
– Lawn mower fault – 3 LEDs flash red on battery
- ON button not pressed
– Safety plug not inserted
– Electrical connection interrupted between lawn mower and battery
- Motor overloaded because the grass is too tall or too wet
– Humidity in machine and/or battery
- Mower housing blocked
– Fuse in safety plug defective
Remedy:
- Recharge battery ( 8.4)
– Warm up battery or allow it to cool down - Remove and re-insert battery; consult specialist dealer if necessary (✗)
- RMA 443 PC, RMA 448 PC: Insert battery in battery compartment 1
- Allow lawn mower to cool down
- Clean electric contacts in battery compartment (⇒ 13.2); consult specialist dealer if necessary (✗)
- Press ON button (⇒ 12.2)
- Insert safety plug (⇔ 9.1)
- Insert battery correctly ( 8.3); clean electric contacts in battery compartment ( 13.2)
- Do not switch on motor in high grass, adapt cutting height ( 9.6)
- Remove battery and dry; clean and/or dry battery compartment ( 8.3)
– Clean mower housing (⇔ 13.2) - Replace safety plug (✗)
Fault:
Motor stops during operation
Possible cause:
- lawn mower overheated - 3 LEDs illuminate red on battery
- Electrical fault
– Safety plug incorrectly inserted - Machine overloaded due to mowing grass that is too long or too wet
- Lawn mower fault
Remedy:
- Allow lawn mower to cool down
- Remove and re-insert battery (⇒ 8.3)
- Insert safety plug (⇔ 9.1)
- Adapt cutting height and mowing speed to mowing conditions ( 9.6)
- Repair lawn mower (✗)
Fault:
Excessive vibration during operation
Possible cause:
- Blade fastening screw is loose
- Blade is not balanced
Remedy:
- Tighten blade fastening screw ( 13.7)
- Re-sharpen (balance) or replace blade (⇒ 13.8)
Fault:
Poor cut, lawn turning yellow
Possible cause:
– Mowing blade is blunt or worn,
– Rate of feed is too high in relation to the cutting height
Remedy:
- Re-sharpen or replace mowing blade (⇒ 13.8)
- Reduce rate of feed and/or select correct cutting height ( 9.6)
Fault:
Problems switching machine on or deteriorating motor power.
Possible cause:
- Battery discharged
– Mowing grass that is too long or too wet
– Mower housing is blocked
– Mowing blades are blunt or worn
Remedy:
- Recharge battery ( 8.4)
- Adapt cutting height and mowing speed to mowing conditions ( 9.6)
– Clean mower housing (⇒ 13.2)
- Re-sharpen or replace mowing blade (⇒ 13.8)
Fault:
Discharge chute blocked
Possible cause:
- Mowing blade is worn
- Mowing grass which is too long or too wet
Remedy:
- Replace mowing blade (⇒ 13.8)
- Adapt cutting height and mowing speed to mowing conditions ( 9.6)
Fault:
Operating time too short
Possible cause:
– Battery not fully charged
– RMA 443 PC, RMA 448 PC: No battery or discharged battery inserted in battery compartment 2
- Mowing grass which is too long or too wet
- Mower housing is blocked
– Mowing blades are blunt or worn
– Battery has exceeded service life
Remedy:
- Recharge battery (⇒ 8.4)
- RMA 443 PC, RMA 448 PC: Insert charged battery in battery compartment 2
- Adapt cutting height and mowing speed to mowing conditions ( 9.6)
– Clean mower housing (⇒ 13.2)
- Re-sharpen or replace mowing blade (⇒ 13.8)
- Replace battery (✗)
Fault:
Battery gets stuck when inserting into battery compartment
Possible cause:
– Guides or electric contacts in battery compartment dirty
Remedy:
– Clean guides and/or electric contacts in battery compartment ( 13.2)
Fault:
Battery is not charged although the green LED on the charger illuminates green
Possible cause:
- Battery too cold or overheated (one red LED illuminates on battery)
Remedy:
- Warm up or cool down the battery (⇒ 8.4). Store the charger in a closed, dry place at a temperature of between +5°C and +40°C.
Fault:
Charging fails to start after inserting battery into charger
Possible cause:
- Battery too cold/too warm - 1 LED illuminates red on battery
- No electrical contact between charger and battery
– Charger power supply faulty
Remedy:
- Leave battery inserted in charger Charging starts automatically as soon as permissible temperature range is reached.
- Remove and re-insert battery (⇒ 8.3)
- Connect charger to mains (⇒ 8.2)
– Check mains power supply
- Check charger, replace if necessary (✗)
Fault:
Battery is not charged, no LED illuminates
Possible cause:
- No electrical contact between charger and battery
- Charger power supply faulty
Remedy:
- Remove battery from battery compartment and reinsert ( 8.3)
- Connect charger to the mains (⇒ 8.2)
- Check mains power supply
- Check charger, replace if necessary (✗)
Fault:
LED on charger flashes red
Possible cause:
- No electrical contact between charger and battery
- Battery defective (4 LEDs on the battery flash red for approx. 5 seconds)
- Charger defective
Remedy:
- Remove battery from battery compartment and reinsert ( 8.3)
- Check battery, replace if necessary (✗)
- Check charger, replace if necessary (✗)
21. Service schedule
21.1 Handover confirmation
Model:
Serial number:

Date: ____ ____ ____ ____ ____ ____
natural_image
Simple line drawing of a mechanical component with a cylindrical top and rectangular base (no text or symbols)Next service
Date: ____ ____ ____ ____ ____ ____
21.2 Service confirmation
Please hand this instruction manual to your STIHL specialist dealer in the case of maintenance operations. He will confirm the service operations performed in the pre-printed boxes.
Service performed on
Next service date

Chère cliente, cher client,
RMA 443.0, RMA 443.0 C,
RMA 443.0 PC, RMA 443.0 TC,
RMA 448.0 PC, RMA 448.0 TC
Type Moteur EC
Tension 36 V
Classe de protection III
Type de protection IPX 1
RMA 443.0, RMA 443.0 C,
RMA 443.0 PC, RMA 443.0 TC,
RMA 448.0 PC, RMA 448.0 TC
natural_image
Simple line drawing of a mechanical component with a cylindrical top and rectangular base (no text or symbols)Prochain entretien
Date: ____ ____ ____ ____ ____
RMA 443.0, RMA 443.0 C, RMA 443.0 PC, RMA 443.0 TC, RMA 448.0 PC, RMA 448.0 TC
Type EC-motor
Spanning 36 V
Beschermklasse III
Beschermtype IPX 1
Snijsysteem Mesbalk
Toerental van het
snijsysteem 3150 omw./min.
RMA 443.0, RMA 443.0 C,
RMA 443.0 PC, RMA 443.0 TC, RMA 448.0 PC, RMA 448.0 TC
Aandraaimoment
mesbout 60 - 65 Nm
Meting conform EN 20643
RMA 443.0 C
Serienummer 6338
Accu-motoreenheid MVP 600
RMA 443.0 C
Opvangvermogen 600 W
Lengte 138 cm
Breedte 49 cm
Hoogte 108 cm
Gewicht (zonder
accu) 21 kg
Snijbreedte 41 cm
Geluidsemissie:
Meting conform EN 20643
RMA 443.0 PC
Serienummer 6338
Accu-motoreenheid MVP 850 S
Opvangvermogen 850 W
Lengte 138 cm
Breedte 49 cm
Hoogte 108 cm
Gewicht (zonder
accu) 21 kg
Snijbreedte 41 cm
Geluidsemissie:
Meting conform EN 20643
RMA 443.0 TC
Serienummer 6338
Accu-motoreenheid MVP 850
Opvangvermogen 850 W
Lengte 138 cm
Breedte 49 cm
Hoogte 108 cm
Gewicht (zonder
accu) 23 kg
Snijbreedte 41 cm
Meting conform EN 20643
RMA 448.0 PC
Serienummer 6358
Accu-motoreenheid MVP 850 S
Opvangvermogen 850 W
Lengte 147 cm
Breedte 50 cm
Hoogte 113 cm
Gewicht (zonder
accu) 24 kg
Snijbreedte 46 cm
Geluidsemissie:
Meting conform EN 20643
RMA 448.0 TC
Serienummer 6358
Accu-motoreenheid MVP 850
Opvangvermogen 850 W
Lengte 147 cm
Breedte 50 cm
Hoogte 113 cm
RMA 448.0 TC
Gewicht (zonder
accu) 24 kg
Snijbreedte 46 cm
Meting conform EN 20643
19.1 Accu STIHL AP
Accutechnologie Lithium-ion
Spanning 36 V
natural_image
Simple line drawing of a mechanical component with a cylindrical top and rectangular base (no text or symbols)RMA 443.0, RMA 443.0 C,
RMA 443.0 PC, RMA 443.0 TC,
RMA 448.0 PC, RMA 448.0 TC
Tipo Motore CE
Tensione 36 V
19.1 Accumulatore STIHL AP
Tecnologia
natural_image
Simple line drawing of a mechanical component with a cylindrical top and rectangular base (no text or symbols)Prossima revisione
Data:
RMA 443.0, RMA 443.0 C, RMA 443.0 PC, RMA 443.0 TC, RMA 448.0 PC, RMA 448.0 TC
Tipo Motor EC
Tensión 36 V
natural_image
Simple line drawing of a mechanical component with a cylindrical top and rectangular base (no text or symbols)Próxima revisión
Fecha: ____ ____ ____ ____ ____
RMA 443.0, RMA 443.0 C, RMA 443.0 PC, RMA 443.0 TC, RMA 448.0 PC, RMA 448.0 TC
Tipo Motor EC
Tensão 36 V
natural_image
Simple line drawing of a mechanical component with a cylindrical top and rectangular base (no text or symbols)1 Koble inn fremdriften
- Start den elektriske motoren. (⇒ 12.2)
- Trykk fremdriftsbøylen (1) mot styret, og hold den der.
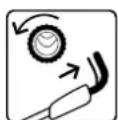
RMA 443.0 C RMA 443.0 PC RMA 443.0 TC
RMA 443.0, RMA 443.0 C,
RMA 443.0 PC, RMA 443.0 TC,
RMA 448.0 PC, RMA 448.0 TC
Type EC-motor
Spenning 36 V
RMA 443.0, RMA 443.0 C, RMA 443.0 PC, RMA 443.0 TC, RMA 448.0 PC, RMA 448.0 TC
Tiltrekkingsmoment
knivskrue 60 - 65 Nm
natural_image
Simple line drawing of a mechanical component with a cylindrical top and rectangular base (no text or symbols)Neste service

RMA 443.0 C RMA 443.0 PC RMA 443.0 TC
Modellnummer 6358 Typ RMA 448.0 PC
RMA 448.0 TC
RMA 443.0, RMA 443.0 C,
RMA 443.0 PC, RMA 443.0 TC,
RMA 448.0 PC, RMA 448.0 TC
Typ EC-motor
Spänning 36 V
Skyddsklass III
Skyddstyp IPX 1
natural_image
Simple line drawing of a mechanical component with a cylindrical top and rectangular base (no text or symbols)Nästa service
Datum:
21.2 Servicebekräftelse
RMA 443.0, RMA 443.0 C,
RMA 443.0 PC, RMA 443.0 TC,
RMA 448.0 PC, RMA 448.0 TC
Tyyppi EC-moottori
Jännite 36 V
Suojausluokka III
Suojauslaji IPX 1
natural_image
Simple line drawing of a mechanical component with a cylindrical top and rectangular base (no text or symbols)Seuraava huolto

21.2 Huoltotodistus
Risiko for at snuble!
| Type | RMA 443.0 |
| RMA 443.0 C | |
| RMA 443.0 PC | |
| RMA 443.0 TC |
| Serienummer | 6358 |
| Type | RMA 448.0 PC |
| RMA 448.0 TC |
RMA 443.0, RMA 443.0 C,
RMA 443.0 PC, RMA 443.0 TC,
RMA 448.0 PC, RMA 448.0 TC
Type EC-motor
Spænding 36 V
RMA 443.0, RMA 443.0 C,
RMA 443.0 PC, RMA 443.0 TC,
RMA 448.0 PC, RMA 448.0 TC
Tilspændingsmo-
natural_image
Simple line drawing of a mechanical component with a cylindrical top and rectangular base (no text or symbols)Næste service
Dato:
RMA443PC, RMA443TC, RMA448PC, RMA448TC)
RMA 443.0 C RMA 443.0 PC RMA 443.0 TC
RMA 443.0, RMA 443.0 C, RMA 443.0 PC, RMA 443.0 TC, RMA 448.0 PC, RMA 448.0 TC
Τύπος Κινητήρας EC
Táση 36 V
RMA 443.0, RMA 443.0 C,
RMA 443.0 PC, RMA 443.0 TC,
RMA 448.0 PC, RMA 448.0 TC
Тип Электродвига-
тель
ПОСТОЯННОГО
тока
Напряжение 36 В
Класс защиты III
Вид защиты IPX 1
natural_image
Simple line drawing of a mechanical component with a cylindrical top and rectangular base (no text or symbols)Следующий техосмотр
Дата: ____ ____ ____ ____ ____
natural_image
Exterior view of a lawn mower (no text or symbols visible)C
INT 1

0478 131 9940 C
- STIHL RMA 443, RMA 443 C, RMA 443 PC RMA 443 TC, RMA 448 PC, RMA 448 TC
- STIHL
- Austatud klient!
- IMPORTANT: READ BEFORE USE AND KEEP IN A SAFE PLACE.
- Table of contents
- Notes on the instruction manual 40
- Machine overview 41
- For your safety 41
- Description of symbols 48
- Standard equipment 48
- Preparing the machine for operation 49
- Battery and charger 50
- Controls 51
- Notes on working with the
- machine 53
- Safety devices 54
- Operating the machine 54
- Maintenance 55
- Transport 57
- Notes on the instruction manual
- General
- Instructions for reading the instruction manual
- Viewing direction:
- Section reference:
- Designation of text passages:
- Texts with added significance:
- Danger
- Warning
- Caution
- Note
- Texts relating to illustrations:
- Country-specific versions
- Machine overview
- For your safety
- General
- Caution – risk of accident:
- Clothing and equipment
- Battery
- Charger
- Charging
- Transporting the machine
- Transporting the battery
- Before operation
- Working with your machine
- Switching on the machine:
- Working on slopes:
- Working:
- Risk of stumbling!
- Risk of injury!
- Maintenance, cleaning, repairs and storage
- Cleaning:
- Maintenance operations:
- Storage for prolonged periods without operation
- Disposal
- Description of symbols
- Standard equipment
- Preparing the machine for operation
- General points
- Installing the mono comfort handlebar (RMA 443 C,
- Installing the electric cable and linkage:
- Installing dual handlebar (RMA 443)
- Installing the cable clip:
- - 27 cm
- Assembling the grass catcher box
- Battery and charger
- General
- Connecting charger to the mains
- Removing/inserting the battery
- Function:
- RMA 443 PC, RMA 448 PC:
- RMA 443, RMA 443 C, RMA 443 PC, RMA 443 TC, RMA 448 PC, RMA 448 TC:
- Removing the battery:
- Inserting the battery:
- Recharging the battery
- LEDs on the battery
- Displaying charge state:
- LED displays:
- During charging:
- Faults
- One LED illuminates red
- During operation:
- Four LEDs flash red
- Three LEDs illuminate red
- Three LEDs flash red
- LED on the charger
- Controls
- Safety plug
- Inserting:
- Eco mode switch
- Switching on eco mode:
- Switching off eco mode:
- Grass catcher box
- Attaching:
- Detaching:
- Adjusting the mono comfort handlebar (RMA 443 C, RMA 443 PC, RMA 443 TC, RMA 448 PC, RMA 448 TC)
- Danger of pinching!
- Folding down the handlebar:
- Working position (to push machine):
- Height adjustment:
- Folding down dual handlebar (RMA 443)
- Central cutting height adjustment
- Setting the cutting height:
- Level indicator
- Notes on working with the machine
- General
- Cutting performance
- Eco mode:
- ECO
- Working area for operator
- Correct motor load
- If the mowing blade blocks
- Thermal motor overload protection
- Recommencing operation
- Safety devices
- Safety plug
- Safety devices
- Two-hand operation
- Motor run-down brake
- Measuring run-down time
- Operating the machine
- Preparatory measures
- Switching the lawnmower on
- Switching the lawn mower off
- Switching on self-propulsion
- Switching off self-propulsion
- Emptying the grass catcher box
- Maintenance
- General
- Annual service by the specialist dealer:
- Cleaning the machine
- Maintenance interval:
- After each use
- Cleaning position RMA 443:
- Notes on cleaning:
- Electric motor and wheels
- Battery
- Maintenance interval: Before each use
- Charger
- Checking blade wear
- Wear limits:
- Removing and installing mowing blade
- Removing:
- Installing:
- Risk of injury.
- Sharpening the mowing blade
- Sharpening instructions
- Storage (winter break)
- Storing the lawn mower:
- Storing the battery:
- Storing the charger:
- Transport
- Carrying and securing lawn mower
- Carrying the machine:
- Lashing the machine:
- Transporting the battery
- Minimising wear and preventing damage
- Important information on maintenance and care of the product group
- Lawn mower, manually operated and battery-powered (STIHL RMA)
- Wearing parts
- Compliance with the information in this instruction manual
- Maintenance operations
- Environmental protection
- Standard spare parts
- EU - Declaration of conformity
- Lawn mower, manually operated and battery-powered (STIHL RMA)
- RMA 443.0:
- RMA 443.0 C:
- RMA 443.0 PC:
- RMA 443.0 TC:
- RMA 448.0 PC:
- RMA 448.0 TC:
- Technical specifications
- Sound emissions:
- Hand-arm vibrations:
- RMA 443.0 C
- RMA 443.0 PC
- RMA 443.0 TC
- RMA 448.0 PC
- RMA 448.0 TC
- STIHL AP battery
- REACH
- Troubleshooting
- Fault:
- Possible cause:
- Remedy:
- Service schedule
- Handover confirmation
- Service confirmation
- Chère cliente, cher client,
- Geluidsemissie:
- Accu STIHL AP
- Accumulatore STIHL AP
- Koble inn fremdriften
- RMA 443.0, RMA 443.0 C, RMA 443.0 PC, RMA 443.0 TC, RMA 448.0 PC, RMA 448.0 TC
- Servicebekräftelse
- Huoltotodistus
- Risiko for at snuble!
Brand : STIHL
Model : RMA 443 C
Category : Lawn mower