
TrendS - Electric bike Bremshey - Free user manual and instructions
Find the device manual for free TrendS Bremshey in PDF.
| Product type | Exercise bike |
| Brand | Bremshey |
| Model | TrendS |
| Dimensions (L x W x H) | 128 x 57 x 168 cm |
| Weight | 49 kg |
| Max user weight | 135 kg |
| Power supply | 2 AA 1.5 V batteries (for the display unit) |
| Operating temperature range | 10 °C to 35 °C |
| Storage temperature range | -15 °C to 40 °C |
| Maximum humidity | 90% |
| Adjustable resistance | Yes, by knob (1-16 levels) |
| Heart rate measurement | Hand sensors, ear clip, or wireless chest strap |
| Training programs | Quick Start, Time, Distance, Calories, Age, Recovery |
| User memory | 9 profiles (P1 to P9) |
| Display | Time, RPM, Calories, Distance, Heart rate, % max HR |
| Transport | Transport wheels at the rear |
| Maintenance | Clean with a damp cloth, no detergent; check screws |
| Spare parts | Available from the seller (list at the end of the manual) |
| Warranty | 24 months for domestic use |
| Standards | CE, EN-957, EMC directive 89/336/EEC |
Frequently Asked Questions - TrendS Bremshey
User questions about TrendS Bremshey
0 question about this device. Answer the ones you know or ask your own.
Ask a new question about this device
Download the instructions for your Electric bike in PDF format for free! Find your manual TrendS - Bremshey and take your electronic device back in hand. On this page are published all the documents necessary for the use of your device. TrendS by Bremshey.
USER MANUAL TrendS Bremshey
OWNER'S MANUAL P. 2-10
MANUALE D'USO P. 40-48
MANUAL DEL USUARIO P. 49-57
BRUKSANVISNING S.
KÄYTTÖOHJE S.
CONTENTS
ASSEMBLY 3
EXERCISING 6
HEART RATE 6
CONSOLE 8
TRAINING 9
TRANSPORT AND STORAGE 9
MAINTENANCE 9
MALFUNCTIONS 10
TECHNICAL SPECIFICATIONS 10
IMPORTANT SAFETY INSTRUCTIONS
Read this guide through carefully before assembling, using or servicing your fitness equipment. Please keep the guide somewhere safe; it will provide you now and in the future with the information you need to use and maintain your equipment. Always follow these instructions with care. Please note that the warranty does not cover damage due to shipping or negligence of adjustment or maintenance instructions described in this manual.
NOTE ABOUT YOUR HEALTH
- Before you start any training, consult a physician to check your state of health.
- If you experience nausea, dizziness or other abnormal symptoms while exercising, stop your workout at once and consult a physician.
- To avoid muscular pain and strain, begin each workout by warming up and end it by cooling down (slow pedaling at low resistance). Don't forget to stretch at the end of the workout.
NOTE ABOUT THE EXERCISING ENVIRONMENT
- The equipment is not to be used outdoors.
- Place the equipment on a firm, level surface. Place the equipment on a
protective base to avoid any damages to the floor beneath the equipment.
- Make sure that the exercising environment has adequate ventilation. To avoid catching cold, do not exercise in a draughty place.
- In training, the equipment tolerates an environment measuring +10^ to +35^ . The equipment can be stored in temperatures ranging between -15^ and +40^ . Air humidity in the training or storage environment must never exceed 90% .
NOTE ABOUT USING THE EQUIPMENT
- If children are allowed to use the equipment, they should be supervised and taught to use the equipment properly, keeping in mind the child's physical and mental development and their personality. Also make sure that pet animals keep a safe distance to the product when it is transporting or used for training.
- Before you start using the equipment, make sure that it functions correctly in every way. Do not use a faulty equipment.
- Press the keys with the tip of the finger; your nails may damage the key membrane.
- Never lean on the meter.
- Never remove the side covers. Do not step on the frame casing.
- Only one person may use the equipment at a time.
- Hold the stationary handlebar for support when getting on or off the equipment.
- Wear appropriate clothing and shoes when exercising.
- Protect the meter from sunlight and always dry the surface of the meter if there are any drops of sweat on it.
-
The equipment must not be used by persons weighing over 135kg .
-
The equipment has been designed for home use. The Tunturi warranty applies only to faults and malfunctions in home use (24 months). Further information on warranty terms can be found in the warranty booklet included with the product.
- Do not attempt any servicing or adjustments other than those described in this guide. Everything else must be left to someone familiar with the maintenance of electromechanical equipments and authorised under the laws of the country in question to carry out maintenance and repair work.
- This product has a speed-dependent braking system.
SAVE THIS INSTRUCTION MANUAL
WELCOME TO THE WORLD OF TUNTURI
EXERCISING!
Your choice shows that you really want to invest in your well being and condition; it also shows you really value high quality and style. With Tunturi Fitness Equipment, you've chosen a high quality, safe and motivating product as your training partner - whatever your goal in training! You'll find information about using your exercise equipment and what makes for efficient training at Tunturi's website at www.TUNTURI.COM.
ASSEMBLY
Start by unpacking the equipment. Two people are needed for the assembly. Check that you have the following parts:
- Frame
- Front support
- Rear support
- Front frame tube
- Handles (2)
- Pedal cranks (2)
- Footrests (2)
8.Meter - Stationary handlebar
- Resistance adjustment knob
- Assembly kit (contents marked with * in the spare part list): keep the assembly tools, as you may need them e.g. for adjusting the equipment
If necessary, please contact your dealer with the model, equipment serial no. and spare part no. of the missing part. You'll find a spare part list at the back of this guide. The packaging includes a
silicate bag for absorbing moisture during storage and transportation. Please dispose of the bag once you have unpacked the equipment. The directions left, right, front and back are defined as seen from the exercising position. Allow at least 100 cm of clearance around the equipment. We also recommend opening the package and assembling the product on a protective base.
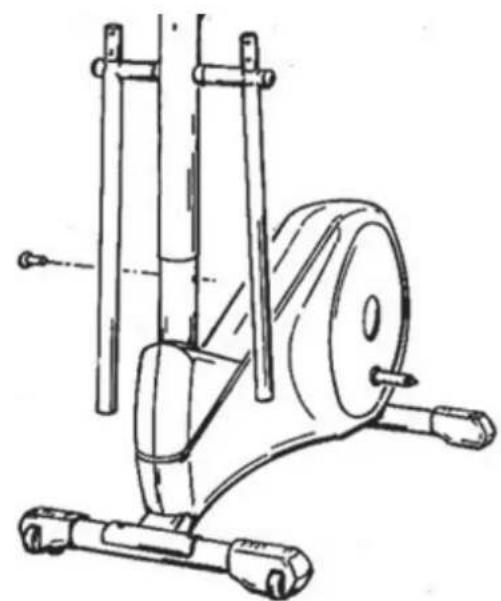
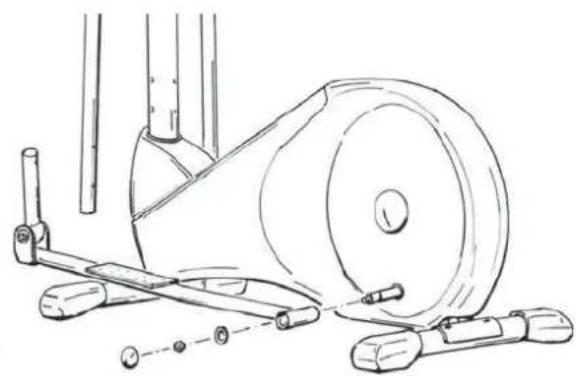
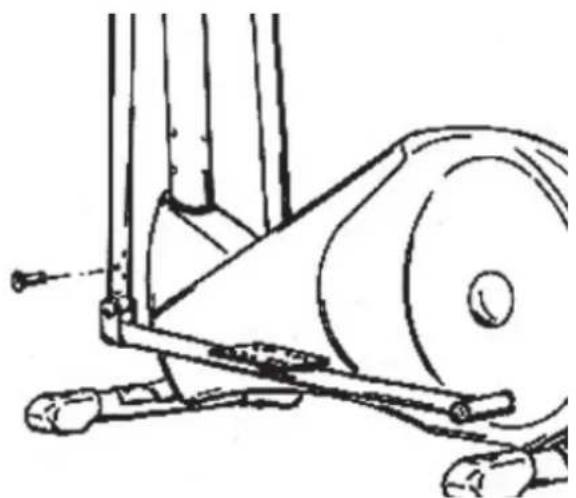
REAR AND FRONT SUPPORT
Attach the rear support to the frame with two bolts, washers and locking nuts.
Attach the front support with transportation wheels to the frame with two bolts, washers and locking sleeves.
FRONT TUBE
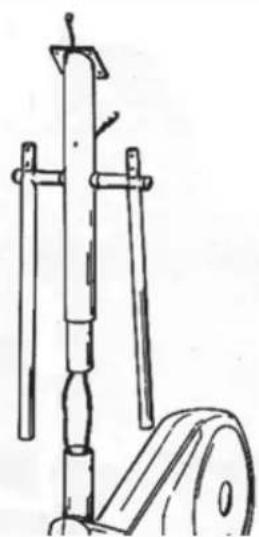
Thread the brake wire and the console cable into the front tube so that both go behind the lateral tube inside front tube. Lead the brake wire out of the opening for the resistance adjustment knob and the console wire from the upper end of the front tube. Push the front tube inside the frame tube: beware not to damage the console cable! Attach the front tube with six screws tight.
RESISTANCE ADJUSTMENT KNOB
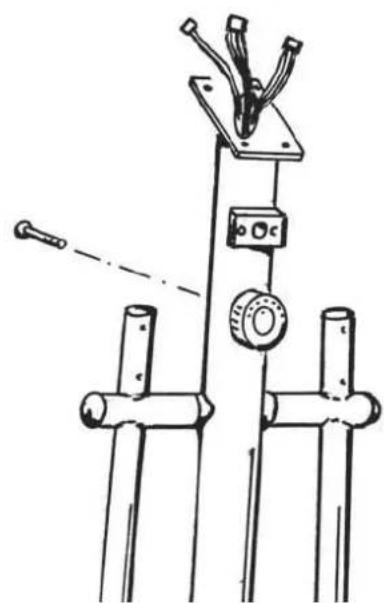
Turn the resistance adjustment knob clockwise to the extreme position. Thread the flat labels of the adjustment knob into the front tube and pull them out through the top of the front tube. Place the resistance adjustment knob on its place and attach it to the front tube with a screw from the other side of the front tube.
PEDAL CRANKS
Place the rear end of the left pedal crank on the left rear shaft. Next place the washer and locking nut on the shaft. Tighten the locking nut fingertight. Repeat the procedure on the right side.
Push the front end of the left pedal crank inside the lower end of the left handle. Attach the crank to the handle with four screws fingertight. Repeat the procedure on the right side.
Tighten all cranks locking nuts and screws well and push the plastic end caps on the nuts and screws.
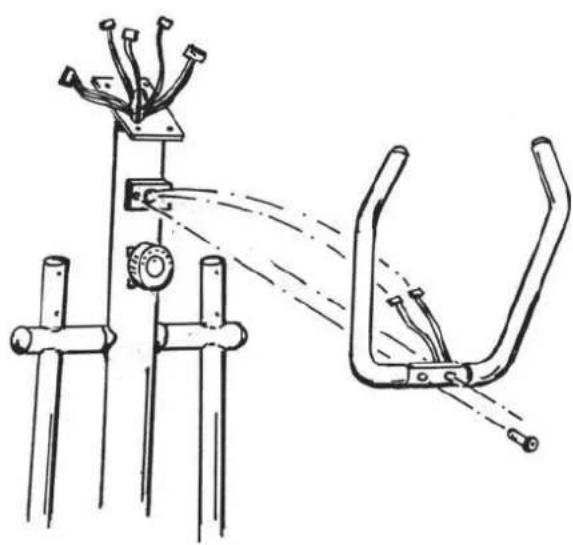
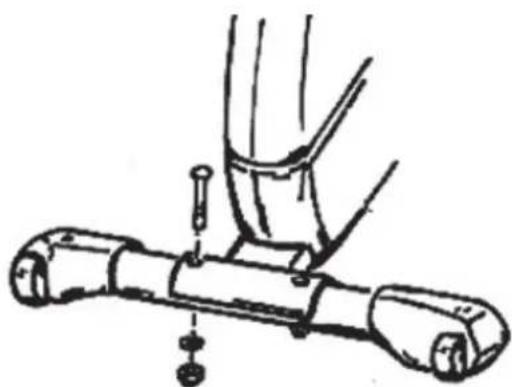
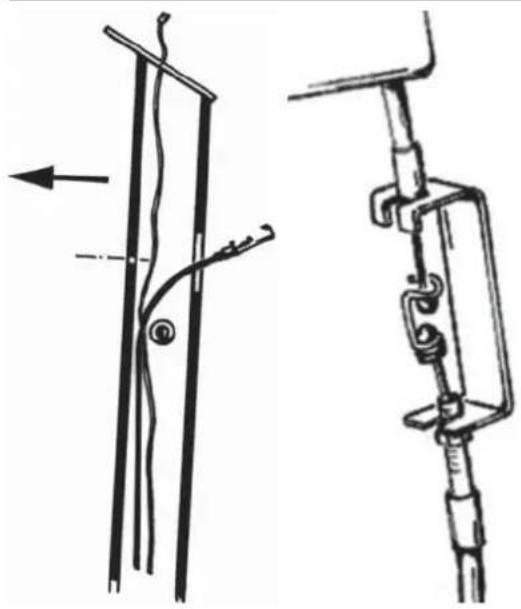
STATIONARY HANDLEBAR
Thread the handgrip pulse cables inside the front tube and pull them out through the top end of the tube. Attach the stationary handlebar with two screws. NOTE! Beware not to damage the cables!
Place the cover parts over the handlebar attachment point and tighten with a screw.
HANDLES
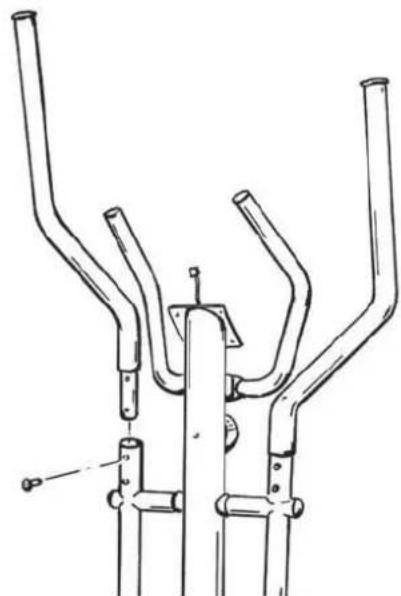
Place the handles on their places and tighten each with two screws. Push the plastic end caps on the screws.
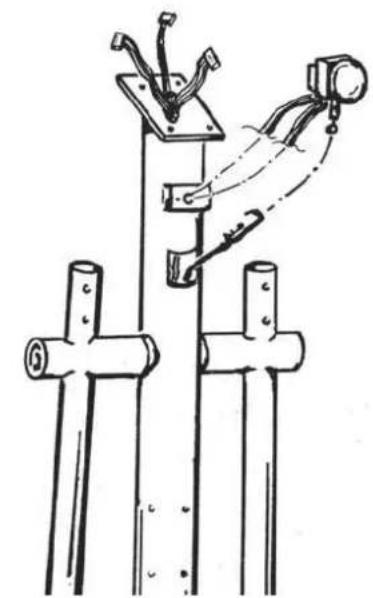
CONSOLE
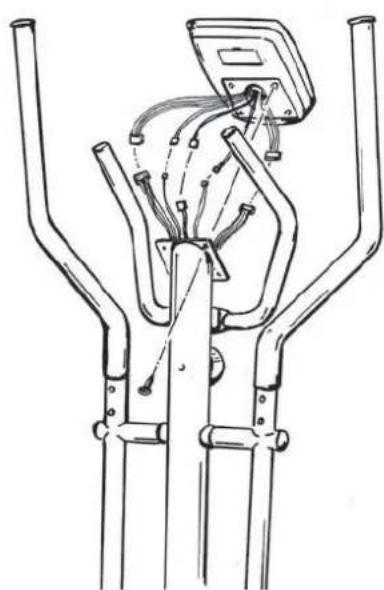
Connect the cables from the front tube and console. Push the connected cables inside the front tube and place the console on top of the front tube. NOTE! Beware not to damage the cables! Attach the console with four screws. Remove the protective films from the console display.
Detach the lid of the battery casing at the back of the meter and place batteries (2 x 1.5 V AA) in the retainer. IMPORTANT! Note the + and - signs! Push the battery casing lid back into place.
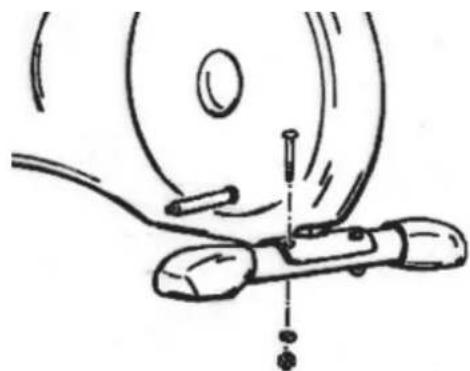
FOOT BOARD
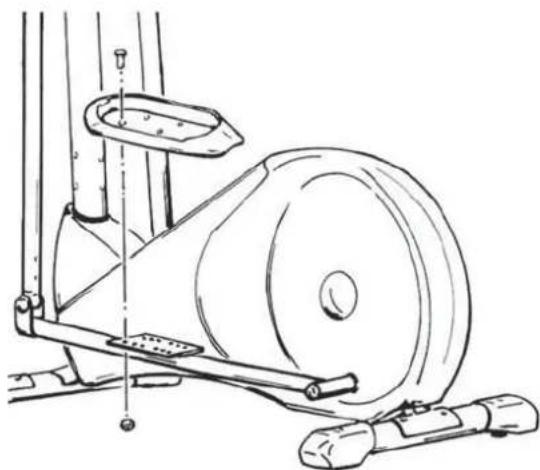
Attach the footboards to the desired place on the pedal cranks with four screws and locking nuts. Tighten the nuts with the tool shown in the picture.
DRINK BOTTLE
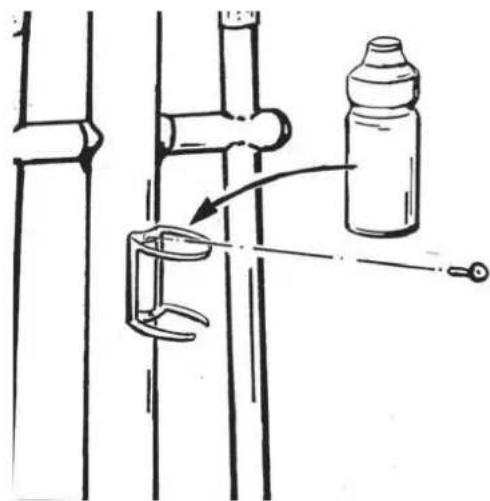
Secure the drink bottle rack with a screw.
EXERCISING
If the product is not stable, adjust the stabilizing screws under the rear support appropriately. If you feel sideways play in the pedal cranks, tighten the front end shaft nuts until the play disappears.
You can increase or decrease the resistance by turning the adjustment knob in the front tube. Turning clockwise (+ direction) increases, turning anti-clockwise (-) direction) decreases the resistance. Console display will show the selected resistance setting (scale 1-16).
EXERCISE LEVEL
Working out using a crosstrainer is excellent aerobic exercise, the principle being that the exercise should be suitably light, but of long duration. Aerobic exercise is based on improving the body's maximum oxygen uptake, which in turn improves endurance and fitness. The ability of the body to burn fat as a fuel is directly dependent on its oxygen uptake capacity. Aerobic exercise should above all be pleasant. You should perspire, but you should not get out of breath during the workout. You must, for example, be able to speak and not just pant while exercising. You should exercise at least three times a week, 30 minutes at a time, to reach a basic fitness level. Maintaining this level requires a few exercise sessions each week. Once the basic condition has been reached, it is easily improved, simply by increasing the number of exercise sessions. Exercise is always rewarding for weight loss, because it is the only way of increasing the energy spent by the body. This is why it is always worthwhile to combine regular exercise with a healthy diet. A dieter should exercise daily - at first 30 minutes or less at a time, gradually increasing the daily workout time to one hour.
Start your workout with slow tempo and low resistance. Gradually increase tempo and resistance according to your own condition. Keep your head up and neck long in order to avoid stress on your neck, shoulders and back. Keep also your back straight. Make sure that your feet are centered on the foot pedals and that your hips, knees, ankles and toes are facing forward. Keep your body weight centered over your lower body regardless of whether you lean forward or stand upright. Stop your workout by gradually decreasing tempo and resistance.
If you wish to strengthen your upper body muscles, lean slightly forward and focus on working with your arms. Grab the handles somewhat higher than normally to enhance the movement, but avoid getting your shoulders sore. For dual training, set the resistance sufficiently high and focus on actively using upper and lower body muscles simultaneously. You should feel the effects of training in whole body.
HEART RATE
No matter what your goal, you'll get the best results by training at the right level of effort, and the best measure is your own heart rate.
First find your maximum heart rate i.e. where the rate doesn't increase with added effort. If you don't know your maximum heart rate, please use the following formula as a guide:
220-AGE
The maximum varies from person to person. The maximum heart-rate diminishes on average by one point per year. If you belong to a risk group, ask a doctor to measure your maximum heart rate for you.
We have defined three different heart-rate zones to help you with targeted training.
BEGINNER 50 - 60% of maximum heart-rate.
Also suitable for weight-watchers, convalescents and those who haven't exercised for a long time. Three sessions a week of at least a half-hour each is recommended. Regular exercise considerably improves beginners' respiratory and circulatory performance and you will quickly feel your improvement.
TRAINER 60 - 70% of maximum heart-rate.
Perfect for improving and maintaining fitness. Even reasonable effort develops the heart and lungs effectively, training for a minimum of 30 minutes at least three times a week. To improve your condition still further, increase either frequency or effort, but not both at the same time!
ACTIVE TRAINER 70 - 80% of maximum heart-rate.
Exercise at this level suits only the fittest and presupposes long-endurance workouts.
MEASURING PULSE WITH HAND SENSORS
Explorer measures pulse with sensors which are located in the hand supports and which measure the pulse each time the user touches both sensors simultaneously.
For reliable pulse measurement, the skin must be in continuous contact with the sensors and the skin in contact with the sensors should be slightly moist. Too dry or too moist skin will impair hand pulse measurement. Please note also that active use of the upper body muscles during exercise may interfere with hand pulse measurement: active muscles transmit similar electronic signals as the heart muscle. Therefore, we recommend that arms be kept relaxed during pulse measurement.
EAR PULSE MEASUREMENT
-
Fit the car sensor wire plug into the connecting point of the meter.
-
Attach the ear sensor to the carlobe.
If the sensor does not immediately start measuring your pulse or if the earlobe is cold, rub the
earlobe with the fingers to speed up circulation. Physiological differences between different people may also cause disturbances in pulse measurement. In these cases, try measuring on the inside surface of the ear or on the tip of your finger. If measuring disturbances appear while training, test the functioning of the sensor while stationary. Strong, unintentional swaying while training may also disturb measurement. If pulse values rise above 150 beats/min., earlobe measurement may be affected by the speeding up of circulation. Sometimes a strong light source, e.g. a fluorescent tube, in the immediate vicinity of the user may cause disturbances in pulse measurement. In this case, test the functioning of the sensor by turning the ear sensor the other way round on the earlobe. Pulse reading can also be affected, if the battery power of the meter is too low. Clean the ear sensor after use with a damp cloth.
TELEMETRIC HEART RATE MEASUREMENT
This equipment has a built in pulse receiver, which is compatible with a telemetric Bremshey Pro Check pulse transmitter.
NOTE! If you are fitted with a pacemaker, please consult a physician before using a wireless heart rate monitor.
If you want to measure your heart rate this way during your workout, moisten the grooved electrodes on the transmitter belt with water. Fasten the transmitter just below the chest with the elastic belt, firmly enough so that the electrodes remain in contact with the skin while training, but not so tight that normal breathing is prevented. If you wear the transmitter and belt over a light shirt, moisten the shirt slightly at the points where the electrodes touch the shirt. The transmitter automatically transmits the heart-rate reading to the meter up to a distance of about 1 meter. The heart-rate value is displayed in the meter. Follow your heart rate during the training.
REMARKS ON TELEMETRIC MEASUREMENT
If the electrode surfaces are not moist, the heart rate reading will not appear on the display. If the electrodes are dry, they must be moistened again. Allow the electrodes to warm up properly to ensure accurate heart-rate measurement. If there are several telemetric heart rate measurement equipments next to each other, the distance between them should be at least 1,5m . Similarly, if there is only one receiver and several transmitters in use, only one person with a transmitter should be within transmission range. The transmitter is switched to an active state only when it is being used for measurement. Sweat and other moisture can, however, keep the transmitter in an active state
and waste battery energy. Therefore it is important to dry the electrodes carefully after use. When selecting training attire, please note that some fibers used in clothes (e.g. polyester, polyamide) create static electricity, which may prevent reliable heart rate measurement.
Please note that a mobile phone, television and other electrical appliances form an electro-magnetic field around them, which will cause problems in heart rate measurement.
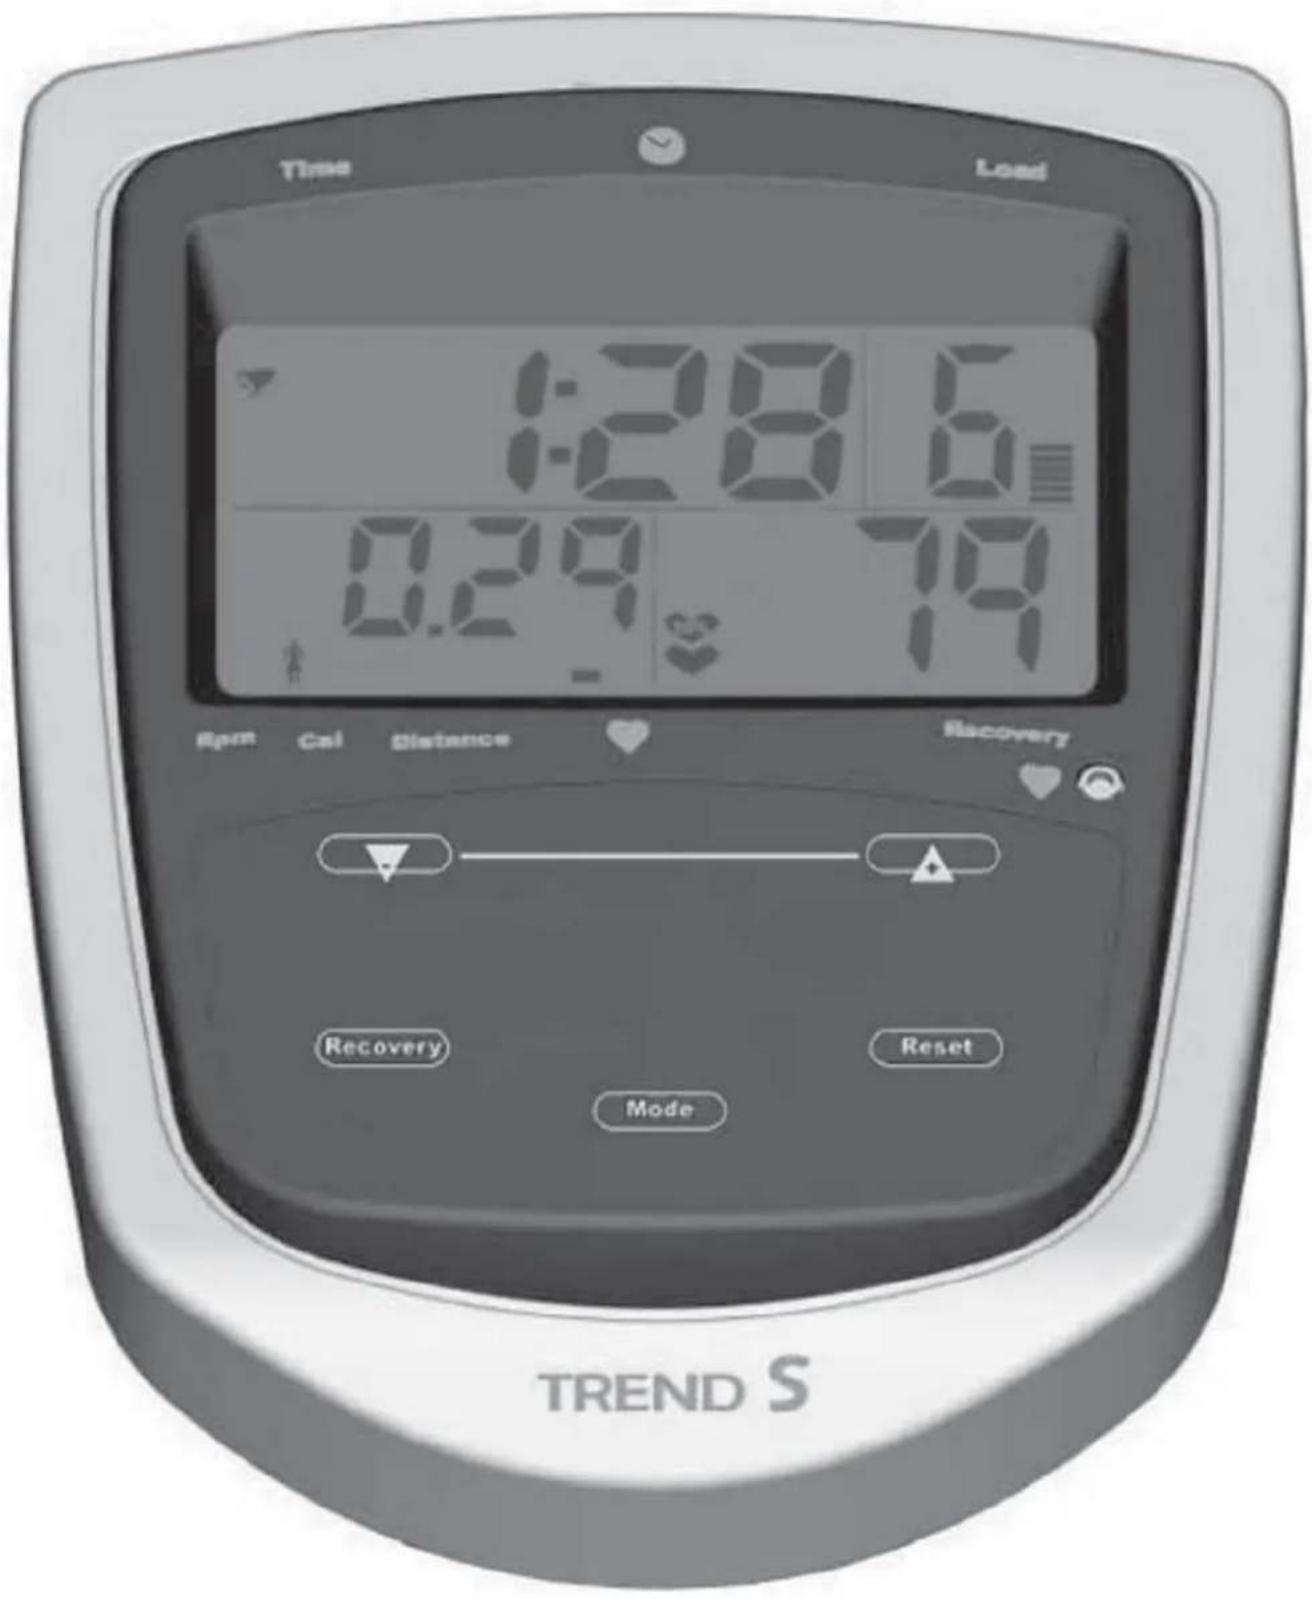
CONSOLE
The console switches on automatically after you insert the batteries. At other times, you can switch on the console by pressing any key. You can now start entering the data for you workout.
If the unit is not used for a period of time, the console automatically switches mode to display the time and the temperature.
KEY FUNCTIONS
+AND-KEYS
To adjust individual values
MODE
If you press this key once briefly, the console switches to the next function. If you press and hold down the key, the console skips the previous functions and switches directly to the user memory. P1 - P9 appear in the display.
RECOVERY
To enable or disable recovery heart rate measurement (fitness index).
RESET
If you press this key once briefly, the current function is deleted.
If you press and hold down the key, all functions are deleted. The data in the user memory is retained.
NOTE: If the batteries are removed, all data is deleted, including memory data and the time.
FOLLOW THESE STEPS:
Press and hold the Reset key until all values are deleted and the hour starts flashing. There is an audible signal. If necessary use the + / - keys to set the hour (1-24). Press the Mode key and adjust the minutes if necessary. Press the Mode key. "ALM", short for alarm, starts flashing in the display. Use the + / - key to enable/disable the alarm. If the alarm is enabled, a bell appears in the display. Press the Mode key. You can change the alarm time as
described above. Press the Mode key.
P1, short for Person 1, appears in the display. Use the + / - keys to select user 1-9. Press the Mode key.
Use the + / - keys to choose male or female (gender). Press the Mode key. Use the + / - keys to select the user's age. Press the Mode key. Now enter the user's weight. If you now press the Mode key, the values are saved.
To enter data for other users, you can access the user memory directly by pressing and holding down the Mode key for five seconds. This skips the time input and "4P" appears in the display. Now follow the steps described above. When you have entered the user's weight, confirm by pressing Mode. The display now switches to workout mode.
If you now start your workout immediately, timing starts and the current countup values appear in the display.
To exercise in training mode while counting down (towards zero) the time, calories or distance, do not start your workout after entering the weight, but press the Mode key twice instead.
The time field starts flashing in the display, and the bottom left of the display alternates between RPM (revolutions per minute), CAL (calories) and Distance. The rectangular bar indicates the function currently being displayed). Usc the + / - keys to enter the workout time. Select the other functions as required in the same way.
If more than one countdown function is used, the audible signal is sounded for the function that reaches zero first. If you carry on with the workout, the relevant counter automatically starts counting up again from zero.
To display heart rate ranges during the workout, press the Mode key again after the "Distance" function. The display shows the age entered for the selected user program P1 - P9.
Without altering the user memory, you can use the +/- keys to change the age, and therefore also the age-based heart rate.
Start your workout without pressing any other keys. The time starts to count down/up and the current heart rate is displayed.
NOTE: The console needs to calculate for about 10 seconds before it can display the current heart rate or heart rate ranges.
The console determines a suitable maximum heart rate on the basis of the age.
You can now start training without pressing any other keys. When you start your workout, the display switches from the predefined heart rate to the current heart rate. Next to the current heart rate, a percentage indicates how close you are to the maximum heart rate while exercising. Example: If you want to train at 75% , but the current heart rate percentage is lower or higher than this, you need increase or decrease the amount of effort in order to increase or reduce your heart rate. To do this, either change the resistance or the RPM. To change the resistance, use the adjustment knob on the handlebar support.
If you want to use reference values other than the preset values, watch your current heart rate and not the percentage value.
TRAINING
QUICK START
You can start training without any pre-selections. Start training, the console will be automatically activated. Adjust the resistance level during training with adjustment knob. The console will continually follow your training progress.
TRAINING WITH TARGET VALUES
You can set target values for your training. Press MODE when the console is in training mode to enter the target value setting. The selected value will blink on the display.
TIME = set the desired training duration
KCAL = set the desired energy consumption value
DISTANCE = set the desired training distance
AGE = set your age and the meter will give your calculated maximum pulse. You can use this information to adjust the exercise resistance level. If you have set the user information, the meter uses that age information. If you measure heartbeat rate during exercise, the meter will compare this value to the set maximum pulse value and will give your exercise pulse range as 55% 75% and 90% (of the maximum pulse level). TAG screen indicates that your exercise pulse has reached the saved maximum pulse level.
Set the desired value with the + / - keys.
Confirm the set value and move to the next setting with MODE.
After having set the desired target/s, start training. Adjust the resistance if needed. The target value/s will start counting down. The console blinks the set training value and gives an audio sign when the
target is reached. You can continue the training, the values will now start cumulating.
You can end the training and reset the display with RESET.
RECOVERY PULSE MEASUREMENT
Measure your recovery pulse after training. The measurement can only be started if the pulse measurement is activated and the pulse value is shown on the display.
- Start the recovery pulse measurement by pressing RECOVERY.
- The measurement takes 60 seconds.
- After the measurement is finished, the display shows the result F1-F6 (F1 = best result). Please note that your results are in a relation to the pulse level in the beginning of the measurement, and that your results are personal and cannot directly be compared with any other person's results. In order to improve the reliability of recovery pulse measurement, always try to standardize the measurement situation as accurately as possible; start measuring at the same heart rate level as precisely as possible.
- To switch back to the main display by pressing RECOVERY.
TRANSPORT AND STORAGE
Please follow these instructions when carrying and moving the equipment about, because lifting it incorrectly may strain your back or risk other accidents:
The device is easy to move by pushing along on the integrated transport wheels. Tilt the device from the front and push along the floor on the wheels at the front support. We recommend that you use a protective base when transporting the equipment.
To prevent the equipment malfunctioning, store in a dry place with as little temperature variation as possible and protected from dust.
MAINTENANCE
The equipment requires very little maintenance. Check, however, from time-to-time that all screws and nuts are tight.
After exercising, clean the equipment with a soft, absorbent cloth. Do not use solvents. Sweat may cause corrosion: we recommend therefore that you protect all metal surfaces outside the plastic covers with teflon.
- Never remove the equipment's protective casing.
- If the equipment is not used for a period of time, the transmission belt may become
temporarily distorted. This can lead to a sensation of slightly uneven pedaling. However, after a few minutes of use the effect disappears as the belt returns to its original form.
CHANGING BATTERIES
If the console display fades or disappears, change the batteries. Detach the lid of the battery casing at the back of the meter and remove the old batteries. Place the new batteries in the holder (2× 1.5V AA) and push the battery casing lid back into place.
MALFUNCTIONS
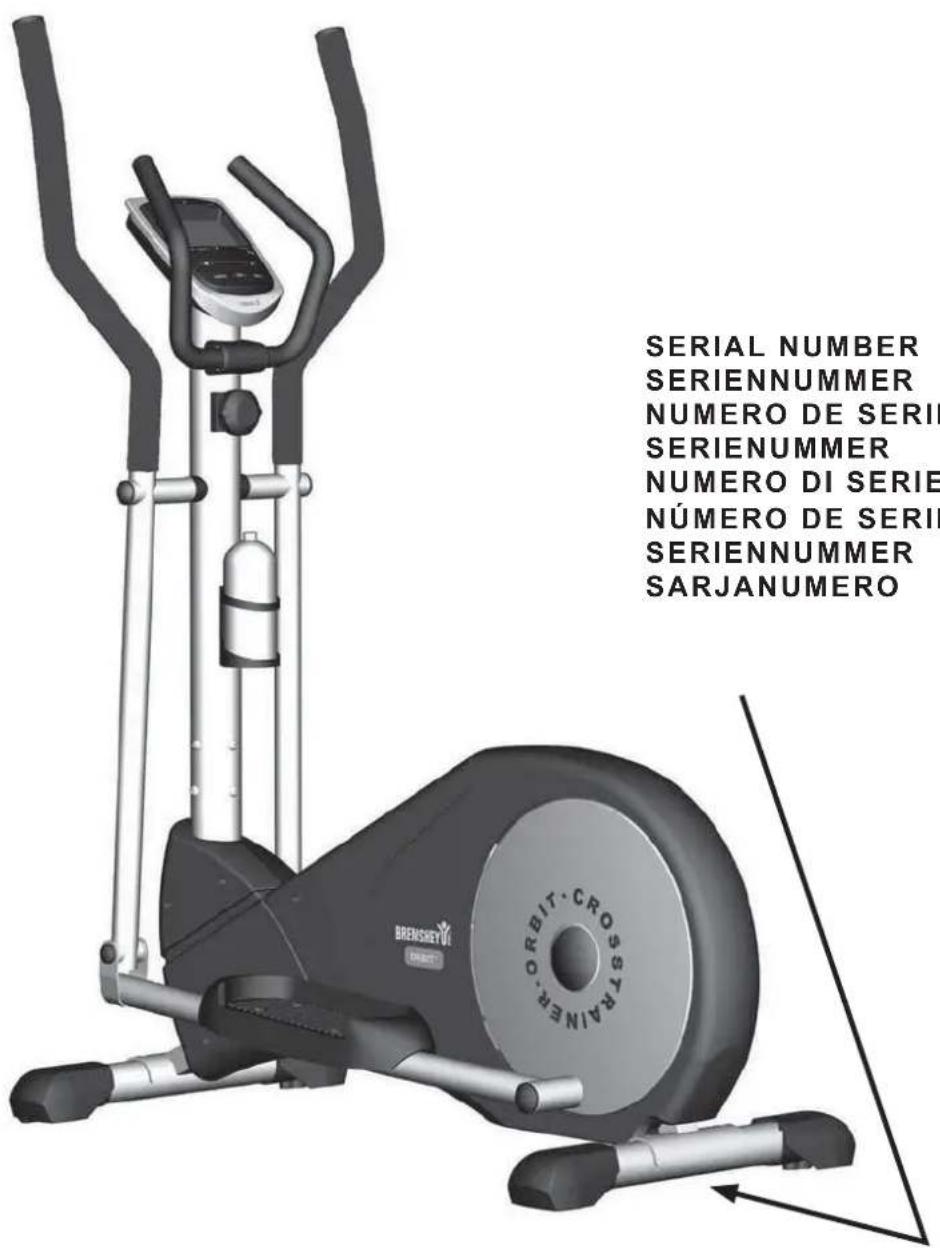
NOTE! Despite continuous quality control, defects and malfunctions caused by individual components may occur in the equipment. In most cases it's unnecessary to take the whole device in for repair, as it's usually sufficient to replace the defective part. Always give the model, serial number of your equipment and in case of malfunctions also conditions of use, nature of malfunction and any error code.
When you encounter unusual behavior from the device, contact your local Tunturi dealer for service.
If you require spare parts, always give the model, serial number of your equipment and the spare part number for the part you need. The spare part list is at the back of this manual. Use only spare parts mentioned in the spare part list.
TECHNICAL SPECIFICATIONS
Length. 128cm
Width 57 cm
Height. 168cm
Weight. 49 kg
The Trend meets the requirements of the EU's EMC Directives on electromagnetic compatibility (89/336/EEC). This product therefore carries the CE label.
The Trend meets EN precision and safety standards (EN-957).
Due to our continuous policy of product development, Tunturi reserves the right to change specifications without notice.
NOTE! The instructions must be followed carefully in the assembly, use and maintenance of your equipment. The warranty does not cover damage due to negligence of the assembly, adjustment and maintenance instructions described herein. Changes or modifications not expressly approved
by Tunturi Oy Ltd will void the user's authority to operate the equipment!
We wish you many enjoyable trainings!
INHALT
GA ALS VOLGT TEWERK:
Paraacular:
Paraacular (1-16)
Poraderivative:
Poraderivative (1-16)
EJERCICIOS CON TUNTURI
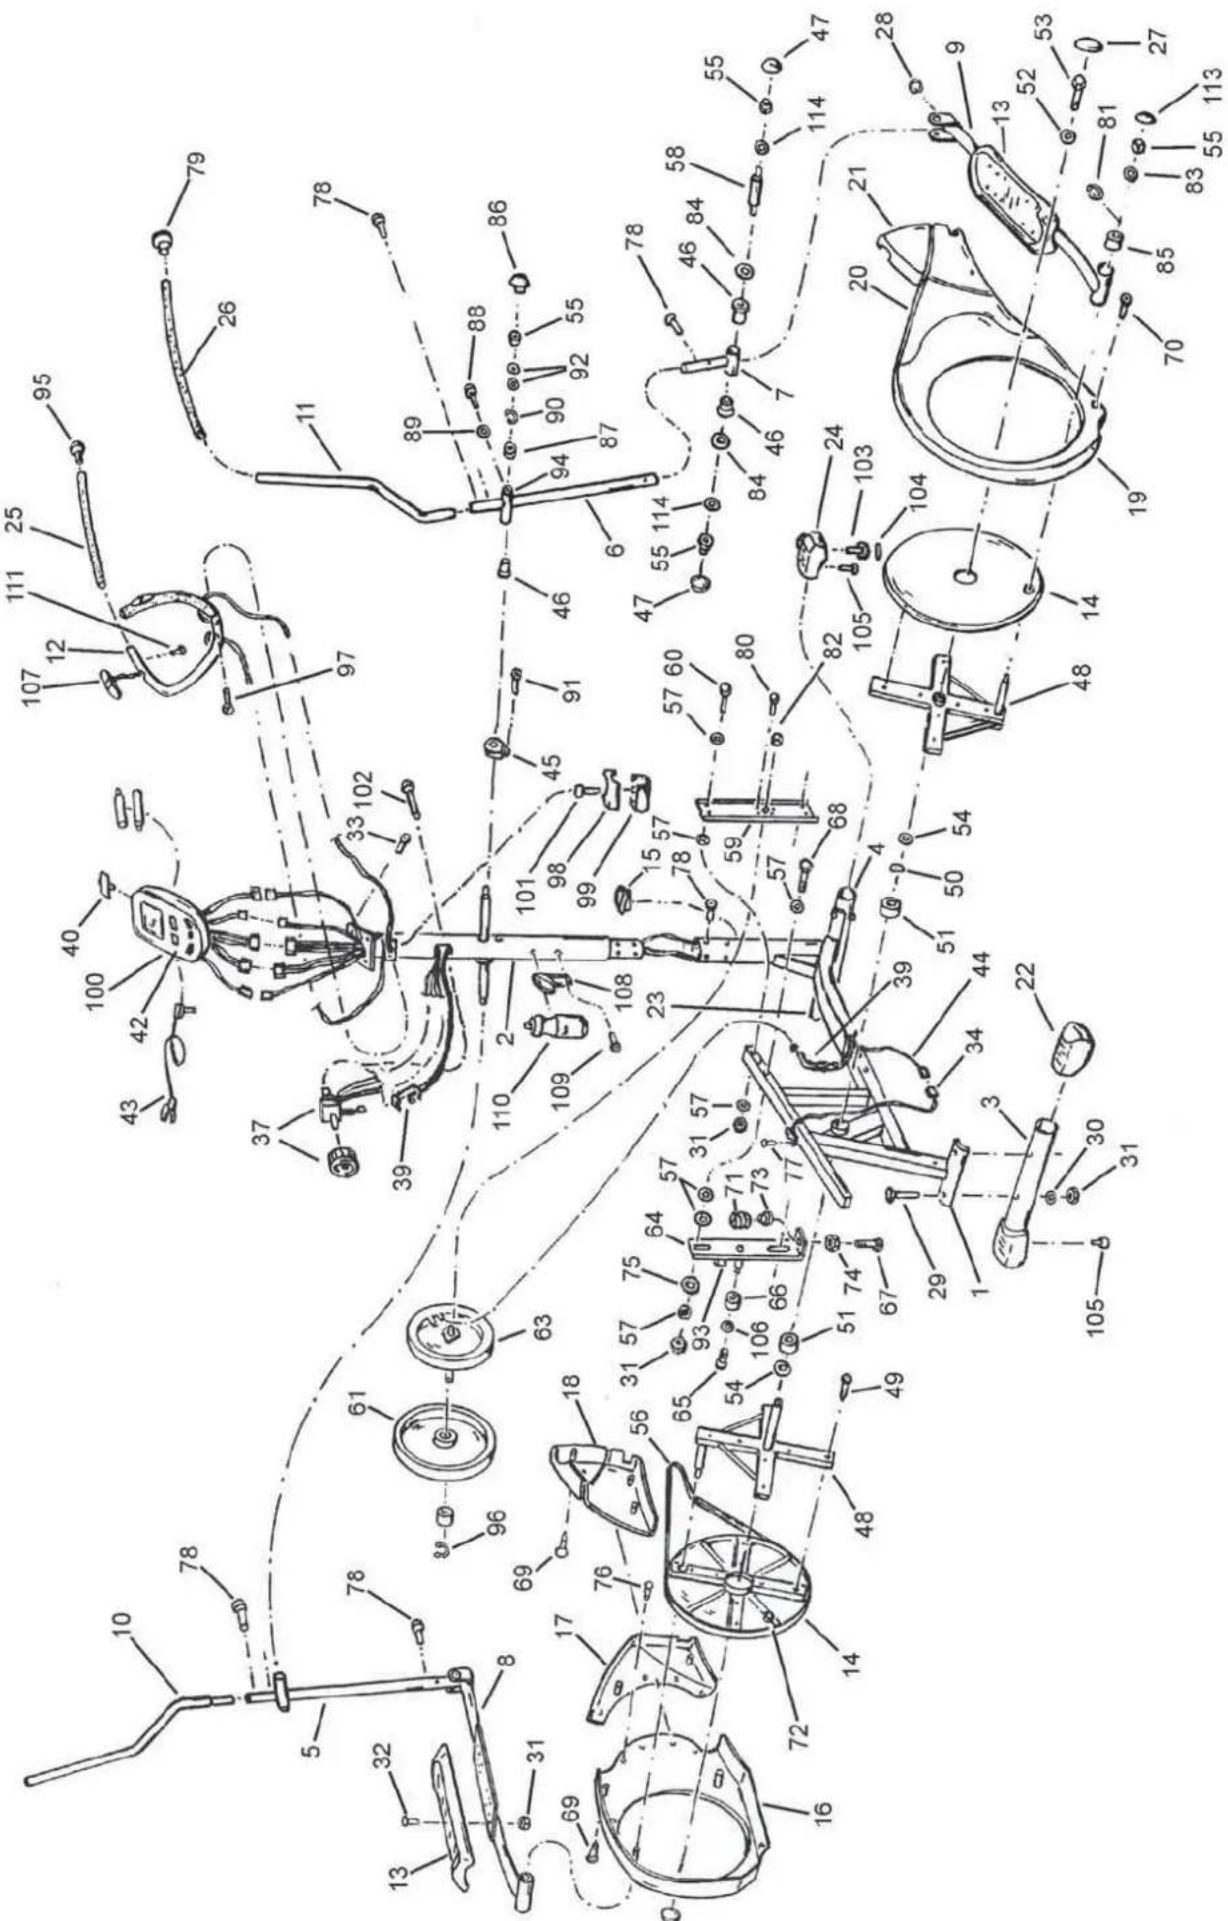
20 173 7044 20 Middle cover, RH
21 173 7049 20 Front cover, RH
22 533 7096 20 Rear foot cover 2
23 533 7097 20 Front foot cover, LH
24 533 7098 20 Front foot cover, RH 1
25 213 7018 20 Fixed handlebar grip
26 213 7017 20 Handle grip 2
27 533 7099 20 End cap 2
28 533 7100 20 End cap 2
*29 M8x75 DIN 603 Screw
30 M8 DIN 125 Washer (4 pcs) 5
31 M8 DIN 985 Nylock nut ( 12 pcs) 14
*32 M8x25 DIN 603 Screw
*33 M5x10 DIN 7985 Screw
34 403 7070 Speed sensor
37 223 7011 20 Tension control (incl. 35, 36, 38)
39 2237013 Tension connector 1
40 173 7052 20 Battery cover 1
42 233 7038 20 Membrane 1
43 403 7039 20 Ear clip sensor 1
44 403 7099 Meter cable 1
45 673 7005 20 Locking washer 2
46 5337101 Sleeve 6
47 533 7102 20 End cap
48 3537003 Pedal tube crank, pair
49 4,8x19 DIN 7981 Screw 16
50 6537049 Washer 2
51 523 1010 Bearing 2
52 6530082 Washer 1
53 653 7052 Locking screw
54 6537045 Spacer 2
*55 M10 DIN 985 Nylock nut 8
56 4437006 Belt
57 M8 DIN 9021 Washer 12
58 3437027 Pedal tube shaft 2
59 503 7034 Flywheel holder bracket 1
60 M8x65 DIN 931 Screw 4
61 303 7008 Flywheel (incl. 62, 96) 1
63 373 7008 Brake unit, compl. 1
64 513 7005 Belt tightener 1
65 M6x12 DIN 7985 Screw
66 2637009 Drive pulley
67 M8x30 DIN 933 Screw
68 M8x65 DIN 931 Screw 2
69 4,8x20 DIN 7981 Screw
70 M5x12 DIN 7985 Screw 12
71 6437007 Spring 1
72 4031142 Magnet
736937002 Spring qide
74 M8 DIN 934 Nut
75 653 7044 Slide washer
76 3,9x8 DIN 7981 Screw
77 3,5x13 DIN 7504-M Screw
*78 M8x16 ISO 7380 Allen head bolt 14
79 533 7103 20 Handlebar end cap 2
80 M6x12 DIN 7985 Screw
81 40 DIN 471 Retainer 2
82 6537047 Nut 1
*83 M10 DIN 125 Washer 2
84 6537046 Washer
85 5237020 Bearing 2
86533710420Endcap 2
87 523 111 87 Bearing 2
88 M5x6 DIN 7985 Locking screw 2
89 M5 DIN 125 Washer 2
90 17 DIN 471 Retainer 2
91 M5x12 DIN 7985 Screw 2
92 M10 DIN 433 Washer
93 6937003 Distance foam 2
94 653 5050 Sleeve 2
95 533 7105 20 Fixed handlebar end cap 2
96 12 DIN 471 Retainer 1
*97 M8x20 ISO 7380 Screw 2
98 173 7050 20 Upper cover
99 173 7051 20 Lower cover
100 233 7029 20 Meter (incl. 40, 42)
*101 M3x10 DIN 7985 Screw 1
+102M5x40 DIN 7985 Screw
103 533 7106 20 Adjustable foot (incl. 104) 2
104 683 7005 20 Foot pad 2
105 M5x12 DIN 7985 Screw
106 M6 DIN 125 Washer
107 403 7073 20 Hand pulse grip unit 2
108 593700120 Bottle track
*109 M5x12 DIN 7985 Screw
110 453700120 Bottle 1
111 3,9x19 DIN 7982 Screw 2
113 533 7111 20 End cap 2
114 6537061 Washer 4
115 423708920 Label
- 583702120 Owner's manual
BREMSHEY SPORT
Austria
DoWi GmbH
Ziehrerstrasse 80
8041 Graz
Tel. +43 316 71 64 12
Fax+43316716435
www.dowi.at
Benelux
Tunturi B.V.
Postbus 60001
1320 AA Almere
Nederland
Tel. +31 36 546 00 50
Fax +31 36 546 00 55
www.bremshey.nl
Finland
Tunturi Oy Ltd
PL750
20361 Turku
Tel. +358 2 513 31
Fax +358 2 513 3323
Germany
Tunturi GmbH
Heidenfelder Str. 5
97525 Schwebheim
Tel. +49 9723 9345 0
Fax +49 9723 9345 19
www.tunturi.de
Great Britain
Bolton Stirland International Ltd.
Boland House
Nottingham South
Industrial Lane
Wilford
Tel. +44 115 98 22844
Fax +44 115 98 17784
www.bsfitness.co.uk
USA/Canada
Accell Fitness North America Inc.
130 Hayward Ave, Suite 2
N2C 2E4
Kitchener, ON Canada
Tel. 1-888-388-6887
Fax: 1-519-576-2521
www.accelfi tness.com