— Game — Mode d'emploi PDF")
Mario Super Sluggers (Wii) - Game NINTENDO - Free user manual and instructions
Find the device manual for free Mario Super Sluggers (Wii) NINTENDO in PDF.

User questions about Mario Super Sluggers (Wii) NINTENDO
0 question about this device. Answer the ones you know or ask your own.
Ask a new question about this device
Download the instructions for your Game in PDF format for free! Find your manual Mario Super Sluggers (Wii) - NINTENDO and take your electronic device back in hand. On this page are published all the documents necessary for the use of your device. Mario Super Sluggers (Wii) by NINTENDO.
USER MANUAL Mario Super Sluggers (Wii) NINTENDO
NEED HELP WITH INSTALLATION, BESOIN D'AIDE POUR L'INSTALLATIO MAINTENANCE OR SERVICE? L'ENTRETIEN OU LA RÉPARATION?
Nintendo Customer Service
SUPPORT.NINTENDO.COM or call 1-800-255-3700
NEED HELP PLAYING A GAME? Recorded tips for many titles are available on Nintendo's Power Line at (425) 885-7529. This may be a long-distance call, so please ask permission from whoever pays the phone bill. If the information you need is not on the Power Line, you may want to try using your favorite Internet search engine to find tips for the game you are playing. Some helpful words to include the search, along with the game's title, are "va through," "FAO," "codess," and "tips."
The official seal is your assurance that this product is licensed or manufactured by Nintendo. Always look for this seal when buying video game systems, accessories, games and related products.
- Some people (about 1 in 4000) may have seizures or blackouts triggered by light flashes or patterns, and this may occur while they are watching TV or playing video games, even if they have never had a seizure before.
- Anyone who has had a seizure, loss of awareness, or other symptom linked to an epileptic condition should consult a doctor before playing a video game.
- Parents should watch their children play video games. Stop playing and consult a doctor if you or your child has any of the following symptoms:
Convulsions Eye or muscle twitching Altered vision Loss of awareness Involuntary movements Disorientation
To reduce the likelihood of a seizure when playing video games:
- Sit or stand as far from the screen as possible.
- Play video games on the smallest available television screen.
- Do not play if you are tired or need sleep.
- Play in a well-lit room.
- Take a 10 to 15 minute break every hour.
WARNING - Repetitive Motion Injuries and Eyestrain
Playing video games can make your muscles, joints, skin or eyes hurt. Follow these instructions to avoid problems such as tendinitis, carpal tunnel syndrome, skin irritation or eyestrain:
- Avoid excessive play. Parents should monitor their children for appropriate play.
Take a 10 to 15 minute break every hour, even if you don't think you need it. - If your hands, wrists, arms or eyes become tired or sore while playing, or if you feel symptoms such as tingling, numbness, burning or stiffness, stop and rest for several hours before playing again.
- If you continue to have any of the above symptoms or other discomfort during or after play, stop playing and see a doctor.
CAUTION - Motion Sickness
Playing video games can cause motion sickness in some players. If you or your child feel dizzy or nauseous when playing video games, stop playing and rest. Do not drive or engage in other demanding activity until you feel better.
IMPORTANT LEGAL INFORMATION
This Nintendo game is not designed for use with
any unauthorized device. Use of any such device will invalidate your Nintendo product warranty. Copying of any Nintendo game is illegal and is strictly prohibited by domestic and international intellectual property laws. "Back-up" or "archival" copies are not authorized and are not necessary to protect your software. Violators will be prosecuted.
REV-E
WARRANTY & SERVICE INFORMATION
REV-O
You may need only simple instructions to correct a problem with your product. Try our website at support.nintendo.com or call our Consumer Assistance Hotline at 1-800-255-3700, rather than going to your retailer. Hours of operation are 6 a.m. to 7 p.m., Pacific Time, Monday - Sunday (times subject to change). If the problem cannot be solved with the troubleshooting information available online or over the telephone, you will be offered express factory service through Nintendo. Please do not send any products to Nintendo without contacting us first.
HARDWARE WARRANTY
Nintendo of America Inc. ("Nintendo") warrants to the original purchaser that the hardware product shall be free from defects in material and workmanship for twelve (12) months from the date of purchase. If a defect covered by this warranty occurs during this warranty period, Nintendo will repair or replace the defective hardware product or component, free of charge. The original purchaser is entitled to this warranty only if the date of purchase is registered at point of sale or the consumer can demonstrate, to Nintendo's satisfaction, that the product was purchased within the last 12 months.
GAME & ACCESSORY WARRANTY
Nintendo warrants to the original purchaser that the product (games and accessories) shall be free from defects in material and workmanship for a period of three (3) months from the date of purchase. If a defect covered by this warranty occurs during this three (3) month warranty period, Nintendo will repair or replace the defective product, free of charge.*
SERVICE AFTER EXPIRATION OF WARRANTY
Please try our website at support.nintendo.com or call the Consumer Assistance Hotline at 1-800-255-3700 for troubleshooting information and repair or replacement options and pricing.*
*In some instances, it may be necessary for you to ship the complete product, FREIGHT PREPAID AND INSURED FOR LOSS OR DAMAGE, to Nintendo. Please do not send any products to Nintendo without contacting us first.
WARRANTY LIMITATIONS
THIS WARRANTY SHALL NOT APPLY IF THIS PRODUCT: (a) IS USED WITH PRODUCTS NOT SOLD OR LICENSED BY NINTENDO (INCLUDING, BUT NOT LIMITED TO, NON-Licensed GAME ENHANCEMENT AND COPIER DEVICES, ADAPTERS, AND POWER SUPPLIES); (b) IS USED FOR COMMERCIAL PURPOSES (INCLUDING RENTAL); (c) IS MODIFIED OR TAMPERED WITH; (d) IS DAMAGED BY NEGLIGENCE, ACCIDENT, UNREASONABLE USE, OR BY OTHER CAUSES UNRELATED TO DEFECTIVE MATERIALS OR WORKMANSHIP; OR (e) HAS HAD THE SERIAL NUMBER ALTERED, DEFACED OR REMOVED.
ANY APPLICABLE IMPLIED WARRANTYES, INCLUDING WARRANTYES OF MERCHANTABILITY AND FITNESS FOR A PARTICULAR PURPOSE, ARE HEREBY LIMITED IN DURATION TO THE WARRANTY PERIODS DESCRIBED ABOVE (12 MONTHS OR 3 MONTHS, AS APPLICABLE). IN NO EVENT SHALL NINTENDO BE LIABLE FOR CONSEQUENTIAL OR INCIDENTAL DAMAGES RESULTING FROM THE BREACH OF ANY IMPLIED OR EXPRESS WARRANTYES. SOME STATES DO NOT ALLOW LIMITATIONS ON HOW LONG AN IMPLIED WARRANTY LASTS OR EXCLUSION OF CONSEQUENTIAL OR INCIDENTAL DAMAGES, SO THE ABOVE LIMITATIONS MAY NOT APPLY TO YOU.
This warranty gives you specific legal rights. You may also have other rights which vary from state to state or province to province.
Nintendo's address is: Nintendo of America Inc., P.O. Box 957, Redmond, WA 98073-0957 U.S.A.
This warranty is only valid in the United States and Canada.
DOLBY PRO LOGIC II
Manufactured under license from Dolby Laboratories. Dolby, Pre Logic, and the double-D symbol are trademarks of Dolby Laboratories.
This game is presented in Dolby Pro Logic II surround sound. Connect your game console to a sound system with Dolby Pro Logic, Dolby Pro Logic II, or Dolby Pro Logic IIx decoding to experience the excitement of surround sound. You may need to enable Dolby Pro Logic II in the audio options menu of the game.
© 2008 Nintendo. © 2008 NAMCO BANDU Games Inc. TM, & and the Wii logo are trademarks of Nintendo. © 2008 Nintendo.
Content's Contents
Controls
Controls 4
In-Game Controls 7
Getting Started 11
Game Rules 13
Please Read!
About the Three Control Types
You can choose between three control types when playing Mario Super Sluggers: holding the Wii Remote upright, holding it sideways, or using the Nunchuk. You must hold the Wii Remote upright or use the Nunchuk to control nongame activities, such as scrolling through menus.
- This manual uses the upright and Nunchuk control types for its explanations. See p.6 for information on holding the Wii Remote sideways.
Switching Control Types
- To switch between upright or Nunchuk control, simply connect or disconnect a Nunchuk controller to the Wii Remote.
- To switch to sideways control, select Change Controls from the Pause menu, then click on the Control Type panel until you see a sideways Wii Remote icon. If you're using Nunchuk control, disconnect the Nunchuk first.
SYSTEM MENU UPDATE
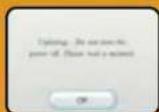
Please note that when first loading the Game Disc into the Wii console, the Wii will check if you have the latest system menu, and if necessary a Wii system update screen will appear. Press OK to proceed.
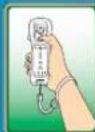
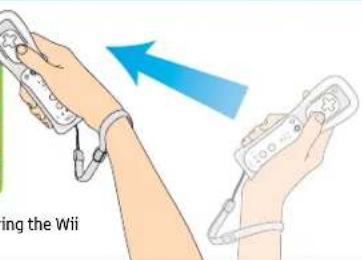
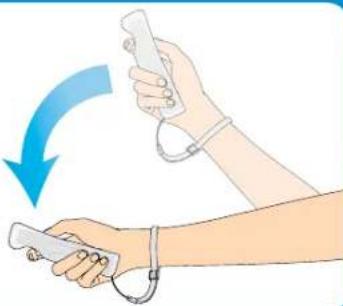
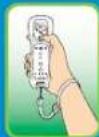
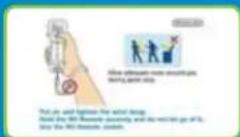
CAUTION: Wrist STRAP USE
Please use the wrist strap to help prevent injury to other people or damage to surrounding objects or the Wii Remote in case you accidentally let go of the Wii Remote during game play.
Also remember the following:
Make sure all players put on the wrist strap properly when it is their turn.
- Do not let go of the Wii Remote during game play.
- Dry your hands if they become moist.
- Allow adequate room around you during game play and make sure that all areas you might move into are clear of other people and objects.
Stau at least three feet from the television.
Use the Wij Remote Jacket

This game supports three control styles. You can switch between them midgame. Please see p.3 for information on switching control types.
- For multiplayer games, you will need one Wii Remote or one Wii Remote and Nunchuk per player—depending on the control type you're using.
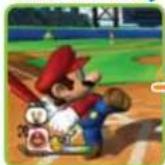
Holding the Wii Remote Upright
For this control type, most of the in-game actions require you to swing the Wii Remote
Offensive controls Defensive controls
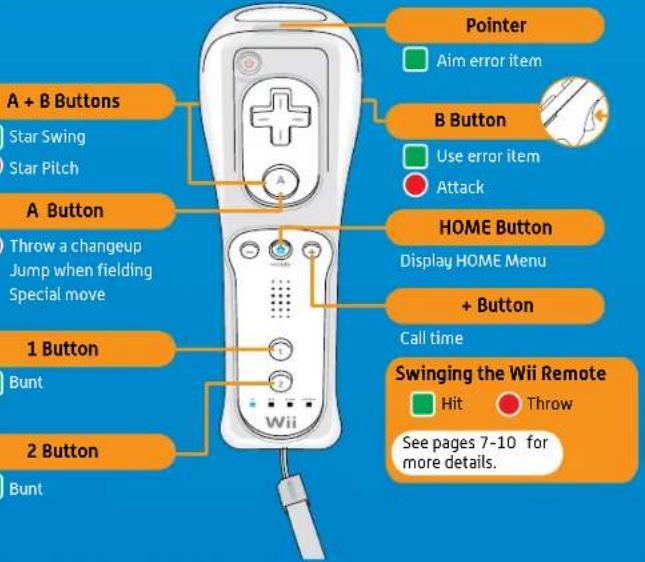
Menu Screen Controls
On menu screens, make selections by pointing with the Wii Remote or using +or Press A to confirm selections and B to cancel.

Controls

Using the Nunchak
You can connect a Nunchuk to the Wii Remote for more diverse controls.
Offensive controls Defensive controls
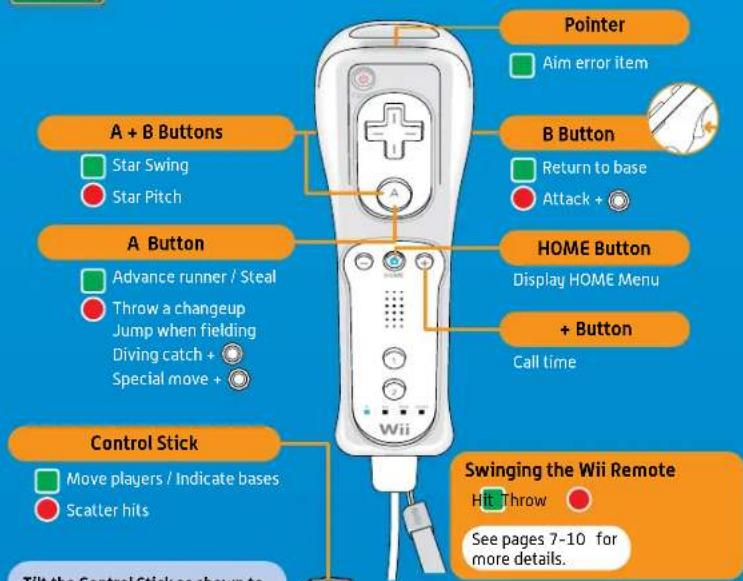
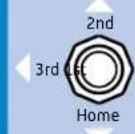
Tilt the Control Stick as shown to indicate individual bases
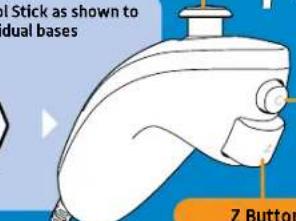
2 Button
Use error item / Bunt
Pickoff throw / Relay throw / Switch fielder
Swinging the Wii Remote
Hit Throw
See pages 7-10 for more details.
C Button
Reset batter / pitcher position
Use error item / Bunt
13/14
Pickoff throw / Relay throw / Switch fielder
5

Holding the Wii Remote Sidewaysu
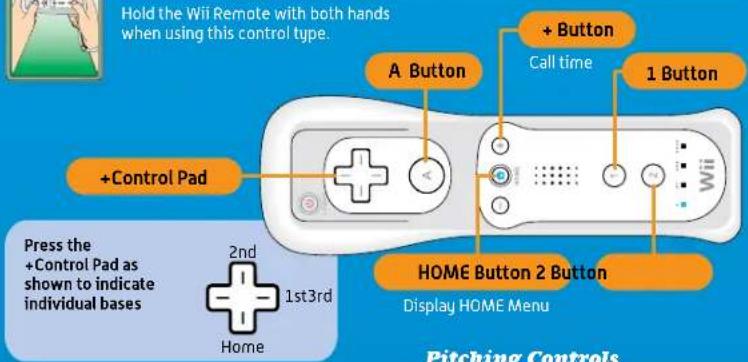
Batting Controls
| Move batter | Press left or right to move, down to reset |
| Normal swing | Press ② |
| Charge swing | Press and hold ②, then release |
| Scatter hits | Press when you hit |
| Star Swing | Press ① + ② |
| Bunt | Press and hold ① |
| Use error items | Aim with ①, press ① to fire |
Baserunning Controls
| Advance to next base | ① |
| Retreat to previous base | ② |
| Dash | Tap ① repeatedly while advancing. Tap ② repeatedly while retreating |
| Steal | Pick a base with + and press ① |
| Hait runner | Tap ② while advancing Tap ① while retreating |
| Select base | + |
Pitching Controls
| Move pitcher | Press left or right to move, down to reset |
| Normal pitch | Press ② |
| Charge pitch | Press and hold ② |
| Curve | Press left or right on during the pitch |
| Changeup | Press and hold up on while releasing the ball |
| Star Pitch | Press ① + ② |
| Pickoff throw | A |
Fielding Controls
| Fielding Controls | Move fielder |
| Dash | Tap ① repeatedly while moving |
| Throw | Pick a base with and press② |
| Relay throw | Press ② without pressing |
| Switch players | A |
| Jump actions | ② |
| Attack | Press ① + ② |
| Use special abilities | ② |
6
In-Game Controls
In-Game Controls

When playing with the Wii Remote held upright, or playing with the Nunchuk, the controls consist of Wii Remote movements and button presses. See p.6 for controls when playing with the Wii Remote held sideways.

Batting
Pull your bat back and wait for the ball. When it crosses the plate, swing away! When using a Nunchuk, use to move the batter and the cursor. You'll make better contact with the ball—and hit with more power—if you strike it with the center of the cursor. Press to reset the batter's position.
Cursor
The cursor will move with the batter.
How to Swing
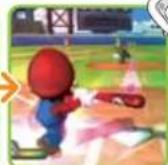
Pull the Wii Remote back to wind up, then swing the Wii Remote forward to complete your swing.
Specialized Batting Controls
| Normal swing | A quick swing done without a windup. They aren't especially powerful, but they create better contact. |
| Charge swing | A powerful swing done with a windup. Swing when the charge is at maximum to unleash a mighty blow. |
| Star Swing | Press and hold A and B while swinging to use a Star icon and let loose a Star Swing. These swings differ depending on the character at bat. |
| Bunt | While holding the Wii Remote upright, press and hold either 1 or 2 to assume the bunt stance. When using the Nunchuk, press and hold Z. |
Nunchuk Only
denotes controls that are only used when playing with a Nunchuk.

Baserunning
When playing with the Wii Remote only, baserunning is automatic—but you can use the Wii Remote to dash. When playing with a Nunchuk, you can control how players run the bases, including when and if they steal.

Dashing
Shake the Wii Remote while running to dash.

Advancing, Retreating, and Stopping
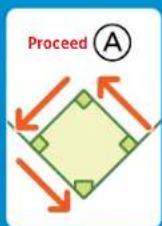
Press A to send all runners to the next base. Press B to send all runners back to the previous base. Halt all runners by tapping B when they're running forward or A when they're running back. To direct an individual runner, tilt in the direction of a base and press the appropriate button. You can also halt a single runner by tilting in the direction of a base and pressing the appropriate button.

Stealing
Select a base with and press A to send the runner to that base. If you do so before the pitcher throws the ball, the runner will start stealing when the pitcher releases the ball.
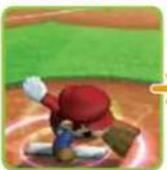
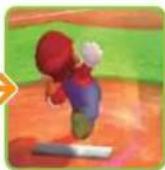
Close Plays
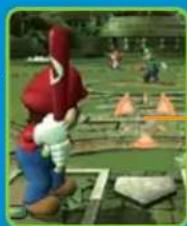
When a runner is approaching third or home along with the throw, the screen will switch to one like that shown to the right. When this happens, wait for a button icon to be displayed, then press it as quickly as you can. If the offensive player presses the button first, the runner will be safe. If the defensive player presses the button first, the runner will be out.

Nunchuk Only
In-Game Controls


Pitching Fielding
Move the pitcher on the mound by tilting left or right. Press to reset the pitcher's position. Once the pitcher is in position, swing the Wii Remote down to throw the ball.
How to Pitch
Swing the Wii Remote to wind up, then swing down to throw the ball.
Specialized Pitching Controls
| Normal pitch | A pitch thrown without a windup. They aren't super-fast, but they're easier to control. |
| Curve | When playing with the Wii Remote held upright, you can curve pitches to the left or right by twisting the Wii Remote in that direction after releasing the ball. If you're playing with a Nunchuk, you can throw curves by tilting after releasing the ball. |
| Changeup | Press and hold A to throw a floating pitch with good movement. |
| Charge pitch | Wind up to build a charge, then release the ball when the charge is at maximum to throw a super pitch. |
| Star Pitch | Press and hold A + B when throwing to use a Star icon and throw a Star Pitch. Star Pitches differ depending on the character throwing them. |
The Pickup
Nunchuk Only
Press 2 before pitching to switch to fielding mode. Tilt to select the base you want to throw to, then swing the Wii Remote to perform a pickoff throw.

· ( - ) = 0
Fielding
When playing with the Wii Remote in the upright position, fielders will automatically pursue the ball. When playing with the Nunchuk, you control the players' movements with . Shake the Wii Remote when moving to dash.
Throwing the Ball
When playing with the Wii Remote in the upright position, simply swing the Wii Remote to throw the ball—it will automatically go to the correct base. When playing with the Nunchuk, you can choose a base to throw to with . If you don't select a base, the ball will go to whatever base the fielder deems necessary. Press and hold 2 while throwing to hit the cutoff man (a player in between the fielder and the desired base).
Switching Players
Nunchuk Only
Press 2 before picking up the ball to take control of a different nearby player.
Jump Actions / Special Actions
Press A to make a fielder jump or attempt a diving catch. When playing with a Nunchuk, press A while moving to make a diving catch or use a special action.

Jump Diving Catch
Attacking
Press to attack balls or other items with a kick. Attacking a ball can toss it to a nearby player, while attacking an error item will destroy it.
Buddy Actions
Teammates who share chemistry can perform the following actions when close to each other.
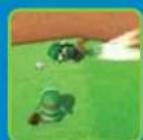
Buddy jump
Two players join forces to perform a high-flying buddy jump. Use this technique to grab balls that are on the way out of the park.
Buddy toss
Attack a ball to pull off a buddy toss. Balls so tossed will be thrown back to the infidl at a high speed.
Getting Started
Getting Started

Follow this procedure the first lime you start up a game.

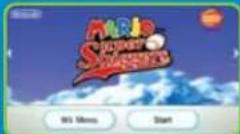
Insert the Mario Super Sluggers Came Disc in the Wii's disc slot. The Wii will turn on and display the screen shown to the right. Read the contents and press A to confirm.


When the Wii Menu appears, point the cursor at the Disc Channel and press A. Point the Wii Remote at the screen.
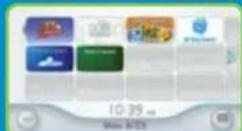

When the Channel Preview screen appears, point the cursor at Start and press A.

A screen will appear that shows you how to attach the wrist strap. When you are finished reading the instructions, press A to continue.

About Save Data
Game progress is saved in files, of which you can have a maximum of three. Game data is saved automatically when you return to the main menu after changing game settings. In Challenge mode, you can save by choosing on the Pause menu. You need at least 2 blocks of empty space in your Wii system memory.
- For information on how to delete save data in your Wii system memory or copy it to an SD Card, please read the Wii Operations Manual.
- Do not turn the power off or press RESET while saving.

File Select Screen
Press A and B on the title screen to display the file-select screen. When playing for the first time, you will need to select a file to which your game progress will be saved. Choose a file by pointing at it with the Wii Remote, and pressing A to confirm. If a save file exists, you can choose Continue to keep playing a previous game.
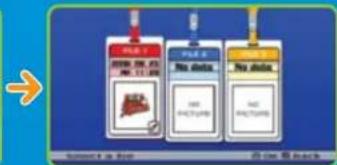
These options appear when a save file already exists:

Continue a saved game

Delete a game file

Copy a game file
Remember!
Deleted game data cannot be restored and is gone forever.

Main Menu
After choosing an existing save file or creating a new one, you will proceed to the main menu. Select the mode you want to play and press A to confirm.
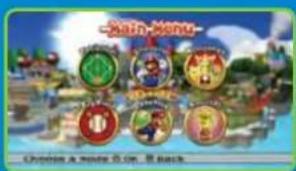
| Exhibition | A no-nonsense mode where you select a field and characters, then play against a friend or the computer. |
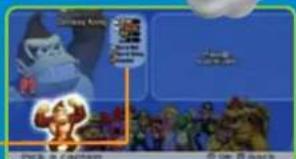
| Challenge | A single-player mode where you recruit baseball stars, form a team, and defeat the nasty Bowser! |
| Minigames | A minigame mode for quick-paced multiplayer fun. |
| Toy Field | A multiplayer game where you hit, field, and collect coins. |
| Training | A practice mode where you can sharpen your basic baseball skills. |
| Records | A mode where you can view game records. |

Game Rules
Game Rules

These pages contain common features and rules
you'll encounter when playing Exhibition and
Challenge modes.

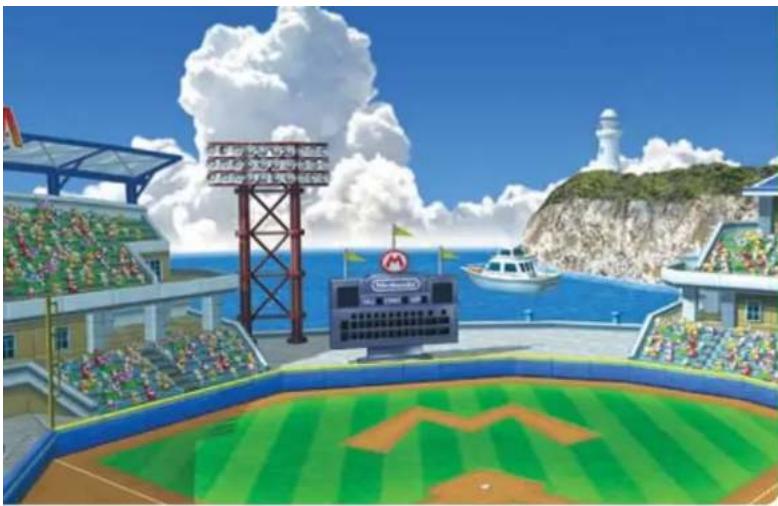
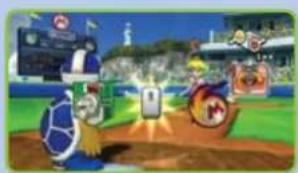
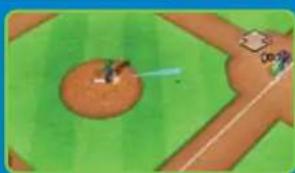
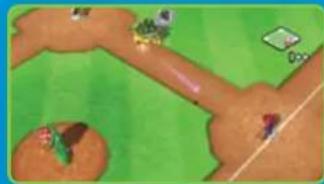
Viewing the Game Screen
This screen below is what you see when you're batting or fielding in a multiplayer game. If you're playing the computer, the camera will be behind the pitcher when you're in the field.
Next Batter
if the current an
nextbattershare
chemistry error items
will appear here
Chemistry
(if applicable)
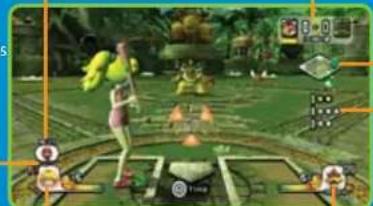
On-Base Indicator
Ball / Strike Count
S = Strikes
B=6alls
0 = OUTFs
Batter Info
The team's Star Gauge and Icon appear
next to the character portrait

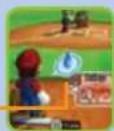
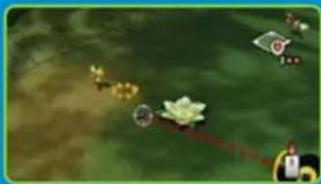
In-Play Screen
The camera will switch to this view when the ball is hit.

Control Display
This shows the character currently
being controlled.
Ball's Landing Area
Error Item Pointer
Pitcher Stamina
Pitchers have a certain amount of stamina that drops
as the game continues. Stamina drops more quickly
when the opposing team gets consecutive hits
When a pitcher is out of stamina, ball speed and
control drop dramatically.
Poor Stamina Icon

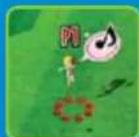
Chemistry
How well characters play together depends on their chemistry. Chemistry, both good and bad,
affects characters near each other in the field, as well as the batting order. When choosing your
roster, check for to see which characters play well together.
When chemistry is good.

or
y is bad
You can use error items when batting or
use buddy actions in the field.
throws sometimes fly off the mark!
Character Abilities
Each character has special abilities that can be used
in certain points in games. You can check these
abilities by pressing ① when selecting your captain
or your players.
Special Abilities
Special Ability Types

Pitches
Special techniques used on the mound.

Swings
Special techniques used at the plate.

Running
Special techniques used during close plays.

Fielding
Special techniques used in the field.

VEUILLEZ LIRE ATTENTIVEMENT L'INTEGRALITE DU MODE D'EMPLOI DE LA WITTM AVANT D'UTILISER VOITRE SYSTème, VOTRE DISQUE DE JEU, OU VOS ACCESSOIRS WII. CE MODE D'EMPLOI COMPRED D'IMPORTANTES INFORMATIONS SUR VOITRE SANTÉ ET VOITRE SECURITÉ.
INFORMATIONS IMPORTANTES CONCERNANT VOITRE SECURITE: VEVUILLEZ LIRE LES PRECAUTIONS SUIVANTES AVANT QUE VOUS OU VOITRE ENFANT NE JOUIEZ A VOS JOUX VIDEO.